112% Completion Walkthrough with Maps
Preface 1: Forward
Preface 1: Forward
With Silksong having finally arrived, the original Hollow Knight is likely to see a resurgence in new players coming to the game, as well as some old ones coming back to give it another go. This guide is written with the intention of helping the former make their way through a difficult but enjoyable game, and to help the latter to shake the dust off.
To the new players, welcome to Hallownest! My first play through I quickly got turned around and was confused as all heck even finding the first boss. Hopefully you've made it further than me, but if you're here you're probably looking for some tips and advice on where to go and how to get further. I'll admit, I was the same. I looked up a guide and followed it, but I'm a persistent filthy casual and the route that guide took led through some bosses in the middle that I struggled hard with without adequate upgrades that it wouldn't cross until much later, and I didn't have the knowledge of the game yet to go off and find what I needed on my own. Several years and a few more play throughs later and I have come up with this route as my preferred path. Unfortunately, coming at bosses underprepared in the mid-game is somewhat unavoidable to at least some degree, so your mileage may vary.
Old hands to the game may recognize many similarities to some Speed Run routes they may have seen in this guide. This is not a coincidence, as much of it is based on them. I did not entirely come up with this route by myself, but I have shuffled some things around to my own tastes, cut out some backtracking, and hopefully made it more accommodating to newer players as well.
This guide is not an "all achievements" guide, as there is at least one that will be completely bypassed and unmentioned. Conversely, it does point out many other divergences to meet with NPC's or encounter other optional secrets that can be taken or left as desired. It also directs players towards collecting and selling all of the Relics scattered throughout the world, which isn't strictly necessary, but is included for new players who may end up losing all of their Geo to accidental double-deaths, and if you manage to hold on to it all until the end of the game it will make certain optional purchases more attainable.
This guide will also not be giving a comprehensive explanation of what counts towards 112% and where such-and-such item is outside of the direction of the route it takes. I know, this is somewhat counter to my opening statement about my own not knowing where things were when I first started playing, but I have found that the best way to learn where something is and how to acquire it, is to find it in-game. Hallownest is a maze, and doesn't give up its secrets easily. Just be assured that by the time you reach the end, should you have followed this guide through its steps, you will have everything you need for a 112% completion run on conquering the final challenges of the game.
Prefaces: Gameplay and Recomendations.
Preface 2: Recommendations for Controller Users
Both Keyboard and controller users can remap their controls (at least if you're using an Xbox or Dualshock-4 Controller), but for controller users in particular I have some advice to offer that will be invaluable later on. The standard layout serves well enough for the basics, but the biggest bugaboo is that by default both your jump and attack buttons require using the same thumb to press at the same time. This combination of actions becomes necessary for some of the more advanced combat techniques later on if you want to truly master them. Remap your controls so that you can do so. If you have a controller with mappable back buttons that you can use, even better.
Preface 3: Exploration
 It should be noted again that this guide is only for a "mostly" optimized general route to take through the game. Different people are going to have different opinions on what optimized means. For some it means collecting every item they can reach that they feel will make the later challenges easier for them. For this guide, it means taking a route with minimal backtracking or crossing of previous areas explored. For better or worse this comes with a degree of forced mastery of the game's combat and mechanics before acquiring some of the tools that would make some things easier, but not impossible without. Neither method is wrong, and the guide tries to make allowances for people who want to explore beyond the route or know what they're looking for, so long as they make their way back to where they left the guide’s route eventually.
Additionally, though this guide shares many steps with a couple of older 112% Speed Run routes, as it takes many of its steps from them as a base, it is not intended as a speed-run guide, nor will it point out every nook and cranny of the world that there is to discover. There are multiple paths, hidden areas, unlockable shortcuts, and secrets to explore, and I only point out most of them. Feel free to backtrack if you need to, or saw something that hasn't been explained and check it out for yourself. Exploring all areas of a room that you can reach and experimenting is a good way to find these secrets, and many of the things in this guide can be reached earlier in the game either by stepping off the directed path, or with a bit of persistence, patience, and outside the box thinking.
 For new players, your best friend for this will be the Wayward Compass Charm. This guide provides its own maps, and I try to provide clear instructions on which exits to take, but it can still be confusing if you aren't familiar with the world already. My route doesn't direct you to purchase it until Chapter Three, but if you find yourself getting lost frequently feel free to backtrack to Dirtmouth to acquire it before then.
Also note that buying items and upgrades from the various shops need not necessarily be done at the times this guide suggests. Merely that the indicated purchases should be made no later than when directed, as holding off longer will mean either extra doubling back or making the coming steps more difficult than they need to be. The only exception to this rule-of-thumb is that it is strongly recommended that no "out-of-sequence" purchases be made until after the [Lumafly Lantern] is purchased at the beginning of Chapter 4. As it is the most expensive early purchase in this guide, any extra purchases before acquiring it may make doing so difficult, and you will soon have access to what will become your primary source of Geo in the City of Tears.
 Special note should be taken for locating Blugsacs. These yellow, pulsating creatures can be located by following the "heartbeat" noise they make and provide a rancid egg when killed, but doing so is a profound waste as they are entirely stationary, do no damage to the player, and can be struck repeatedly with the Dream Nail once it is obtained to fully restore your Soul at no risk to yourself from them. Be careful when approaching them while equipped with certain charms that do area damage or spawn companion creatures that fight for you, as they can quickly kill them and deprive you of this valuable resource.
Preface 4: Bosses
 This is mostly for the new players reading this guide. Generally speaking, I won't be going into very much detail on how to beat bosses. Beating most bosses is straight forward enough in that you will need to learn their patterns to effectively combat them and avoid damage yourself. There are a few exceptions, however, of some bosses with unintuitive behavior, frustrating conditions around them, or a particularly high difficulty spike when they are encountered, where I will leave additional notes explaining the bosses behaviors and the strategies (besides pure bull headed persistence) I use to beat them.
The best general advice I can give to new players is to try and not psych yourself out. If you take a bad hit, don't panic (I know, easier said than done) and just focus on dodging until you can reorient yourself to effectively retaliate again. If you attack and miss, stay calm and avoid the retaliation and use it to reset yourself into a better position. When you die, try not to get too frustrated and just collect your Shade and try again.
Every boss has openings to evade and retaliate. Every boss can (with difficulty) be beaten without taking any damage if you master exploiting these openings. If you find yourself caught in a loop of dying to a boss over and over again, and feel like you're right on the edge of beating them, but your heart's pounding in your ears and you're gripping your controls too tight, one of the better things you can do instead of pushing for "one more try", is to just put the game down for a night, or even a day or two, and let everything percolate in the back of your subconscious. Chances are when you come back after taking a break you'll beat them within just a few attempts.
You can do it.
Chapter 1 - The Journey Begins; Part 1
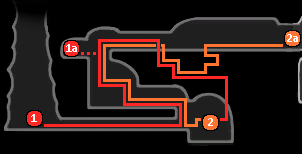 01-1
01-1 1 - Game Start. Head to the left instead of taking the directional queue to find a hidden area with the first [Geo Deposit] of the game. Hit it with your Nail until it breaks and collect them all, then continue on to the right, breaking the doors with your nail as you go. This first section is fairly linear, introducing some basic platforming, with only a couple side areas that you can explore if you wish. The glowing tablet half way up only explains how to use [Focus], your healing ability, as the ability is already unlocked from the start. Continue up and around until the floor collapses under you.
-o-o-o-o-o-
 (Extra Note: Geo) Geo deposits are found all over Hallownest. Geo is the accepted currency of the world, but use caution. Dying twice before recovering your Shade permanently loses you all of the Geo you had collected before that point.
This guide is not going to point out where the Geo deposits all are point by point, but they are going to be a large portion of your expected income throughout the early game before reaching the City of Tears, so make sure to explore and find as many as you can so you can afford the [Lumafly Lantern] when the time comes. However, exercise your own discretion when pursuing the ones you find, as many deposits are in areas surrounded by terrain hazards that can make them difficult to reach or escape from, and if the Geo knocked out of them falls into spikes or thorns it is all but lost unless you have a certain Charm equipped (though if it falls in an acid pool you're SoL). Also take note that Deposits have regional variants, such as looking like Chests in the City of Tears, and can sometimes be hard to spot among the other clutter as is the case in Deepnest where they are a shinier variant of the breakable shells found throughout the rest of the world.
-o-o-o-o-o-
1a - (Optional) At the top of the second jumping segment, break the Lifeblood Cocoon to the left and kill the Lifeseeds for some extra Blue Masks.
-o-o-o-o-o-
 (Extra Note: Blue Masks) Blue Masks are not added to your base heath, but on top of it, and cannot be healed or regenerated normally. Some Charms later in the game give additional Blue Masks or modify existing Masks in other ways.
-o-o-o-o-o-
2 - After the floor collapses keep making your way to the right. Jump carefully, as the floor below is made of spikes, and ahead the path diverges to an above and below route. You want to take the below route for now, and further along is an even wider area of spikes that can't be simply jumped over. By aiming down and swinging your nail while airborne you can "Pogo" over them. Make it to the far end and drop to the hidden area below and open the chest to acquire the Fury of the Fallen Charm (1/40).
-o-o-o-o-o-
 (Extra Notes: Nail Pogoing and Enemy Traversal) Environment hazards aren't the only thing that can be nail pogoed off of. All of the hostile creatures of Hallownest, and a couple friendly NPCs as well, have a hitbox that can be used to pogo off of. Many enemies have no adequate counter to attacks from vertical positions, so it's also a good way of avoiding taking damage. This is often handy for reaching high areas, bypassing other terrain hazards before unlocking the otherwise needed traversal tool, or avoiding prolonged fights with hostile creatures.
 (Extra Notes: Charms) Charms are trinkets that can be equipped to alter gameplay in a variety of ways. Their powers are many and varied and can often have surprising and less surprising synergies with each other, so it is best to read their descriptions and experiment to see if they suit your play style or not.
They can only be equipped while resting at a Bench, and what charms can be equipped are limited by the number of [Charm Notch]es you have. You start with 3, and there are 8 more that can be found or bought throughout the world for a total of 11. This limit can be somewhat exceeded by Over-Charming, which is achieved by trying to equip a charm with more notch requirements than current notches available 5 times, but carries the penalty of causing all damage taken to double for as long as you are over-charmed.
[Charm Notch]es do not count towards %Complete, but this guide counts them anyway, as there is very little reason not to collect all of them unless you know for a fact that you won't need them in the endgame.
-o-o-o-o-o-
2a - Make your way back around to where the floor fell out from under you, but take the upper route where the path splits this time and break down the big gate at the end of the path. Once through, drop all the way down and continue along into the town of Dirtmouth.
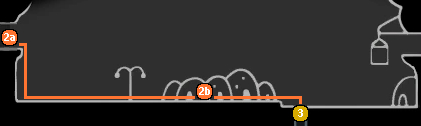 2b - (Optional) Meet Elderbug and/or rest at the Bench next to him. Despite never having gone into the ruins himself, Elderbug knows a fair amount of Hallownest from stories told to him by the few bugs who venture into them and return. He will often comment on the other residents, and offer unsolicited opinions on various locations around Hallownest that you have been to.
-o-o-o-o-o-
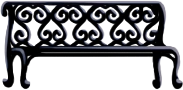 (Extra Notes: Benches) Benches are your save points throughout Hallownest. Resting at a Bench restores all of your Masks, but also respawns nearly all enemies killed since your last rest or reload, not including bosses and unique enemies. Benches are also where you can swap out your [Charm] build to experiment or if something isn't working how you thought it would.
This guide operates under the assumption that unless directed otherwise you are regularly exploring and resting at the Benches scattered throughout the world without it having to point all of them out. However, note that there will be several points throughout the guide where you will be directed to rest at a Bench or to ignore the ones along the path. Sometimes this will be to instruct you to equip a specific Charm, but mostly this is to take advantage of the game mechanic where when you quit the game and reload you are returned to the previous Bench rested at to more quickly return to a previous area. This mechanic is also useful for getting out of tight spots. Don't be afraid to quit and reload if you are about to die in an area where it would be difficult to retrieve your Shade without dying to try again.
-o-o-o-o-o-
3 - Continue past the edge of town and drop through the well to descend into the Forgotten Crossroads of Hallownest.
Chapter 1; Part 2
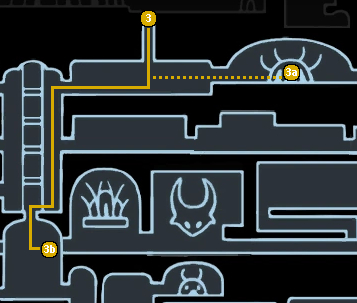 3a - (Optional) At the bottom of the well, go to the Right instead of Left and enter the large egg like structure to meet Quirrel. Quirrel is a friendly bug with a mysterious history and a fascination with the old places of Hallownest. He doesn't stick in any one place for very long, but when found he will often have advice for you, either on where to go to progress or how to find something to improve yourself for the challenges ahead.
3b - Go left from where you dropped down into The Forgotten Crossroads and drop to the bottom of the large shaft with many platforms. Drop to the next room down to meet Conifer the Cartographer and buy the Area Map from him (30 Geo), then head down and to the right to the next room. Entering the large open area with the flying enemy with the bulbous orange body (Aspid) will cause gates to close at the exits. Defeat all of the aspids that spawn to keep making your way right.
-o-o-o-o-o-
 (Extra Notes: Maps) Maps are not necessary for %Complete, but do offer the {Cartographer} Achievement for collecting all of them. They're also damn handy for finding your way around the labyrinthine tunnels of Hallownest, especially when combined with the Wayward Compass Charm. Experienced Players who already know their way around Hallownest can ignore buying the maps if they wish, but every Cornifer location is included in this guide for completeness, and you can find him in every area of the game except one.
Also keep in mind that even if you miss a Cornifer location, the maps will still be available for purchase in Dirtmouth from his wife Iselda after he leaves an area. They will, however, be more expensive than if you bought them directly from him, so if you are playing a run with maps it is best to buy them from him directly to conserve Geo.
-o-o-o-o-o-
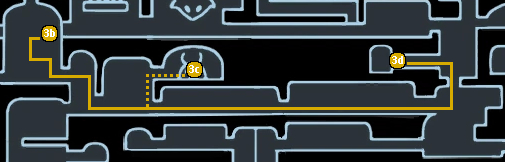 3c - (Optional) Take the upper right exit to the room to rest at the Bench in the Crossroads Hot Springs after defeating the Aspid Gauntlet. Resting in the water of the spring regenerates Masks more slowly than at the Bench, but also charges your Spirit if you've needed to [Focus] to heal before now.
3d - Make your way across the next couple of rooms past the creatures that pop in and out of the ground and walls (Goams) until you see a sign with an arrow on it pointing up and to the right. Follow it and enter the first door to the left to find the Forgotten Crossroads Stag Station. Activate the Stag Station (50 Geo) and rest at the Bench.
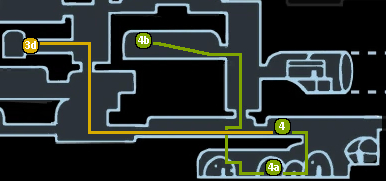 4 - Leave the Stag Station and make your way back down and to the right again until you see a large sleeping creature. Smack it to fight the (MINIBOSS) Gruz Mother and reclaim your 50 Geo, then make your way down into the village below and enter the only house with an open door.
4a - Rescue Sly from his dreams and exhaust his dialogue before leaving, then head up into the room above and enter the room to the left of it.
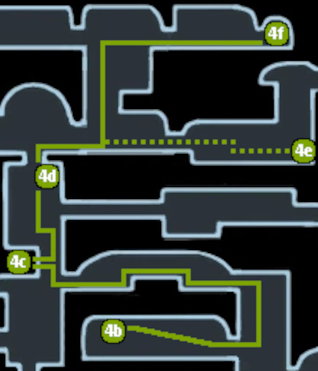 4b - Nail Pogo up and over the spiked platforms to free the Grub (1/46), then leave and keep going up. Make your way to the left past the warrior bugs and back into the room connected to the Stag Station.
4c - Break the wall immediately in front of you to the left and up a little to kill the two Aspids hiding behind it and free the Grub (2/46) behind them, then make your way up.
4d - Hit the lever on the underside of the platform to open a shortcut, then go through it and hang a right.
4e - (Optional) Keep going right instead of up to meet Myla, a cheerful Miner Bug.
4f - Go up, then hang a right and free the Grub (3/46) behind the Husk Guard, then backtrack to the room connected to the Stag Station and leave through the exit on the left above it.
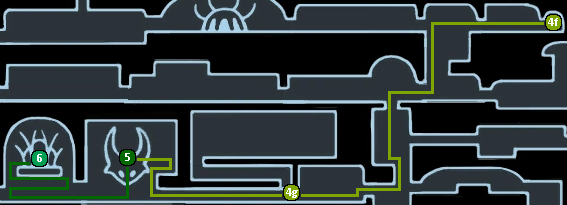 4g - Break the ceiling in the corner above the Husk Guard to reveal a hidden passage. You will return to this area later so keep making your way to the left.
5 - In the large room, make your way up along the right wall and over left again into a very large open area to fight (BOSS) the False Knight. Collect the [City Crest] once he is defeated, then open the chest behind the boss gate and up to the left for (200 Geo).
6 - Keep making your way to the left until you can go up and enter the Ancestral Mound. Speak to the Snail Shaman inside to acquire the [Vengeful Spirit] spell.
-o-o-o-o-o-
(Extra Notes: Spells) This is mostly for new players, but my advice to you is that you should work to integrate Spells into your combat rhythm early and often, especially for Bosses. Magic is the epitome of "a good defense is a better offense", and most bosses don't give the opportunity to heal more than one mask in any given opening anyway, especially without the use of certain Charms.
 A tendency of many new players is to hoard their Soul "just in case" they need to heal (I know I did on my first play through and I struggled Hard in the back half of the game until I started doing this myself). In the early game and even much of the later areas, a lot of the smaller enemies respawn on leaving a room and reentering it, and can be farmed for Soul if you're low. Certain Charms can also be equipped to speed up this process. After acquiring the Dream Nail restoring Soul becomes even easier, as all you need to do is hit enemies with it repeatedly. This works best on slower enemies with predictable patterns, especially ones where they patrol without chasing you.
There are 3 Spells in the game, each with their own upgraded forms: [Vengeful Spirit/Shade Soul] is a linear horizontal attack that goes a little past the edge of the screen in the direction it was fired, [Desolate Dive/Descending Dark] is a downward attack that does splash damage on impact with the ground and provides a few seconds of I-Frames after the fact that can be used to avoid taking damage and/or to reposition yourself, and [Howling Wraiths/Abyss Shriek] is an upward cone that blasts everything above you, usually for several hits. On a per-hit basis these spells almost always do more damage than your Nail unless you've upgraded it several times and/or are using a certain Charm, especially after acquiring their Upgraded forms, and unlike your Nail the upgraded spells are not constrained by walls or ceilings and have a much higher range on top of that. This makes them amazing for clearing enemies in inconvenient places.
Keep in mind that this is not me advocating a pure magic charm build. I prefer a hybrid magic/melee setup myself, but the utility of magic in combat in this game cannot be brushed off lightly.
-o-o-o-o-o-
Chapter 2 - Hallownest's Protector
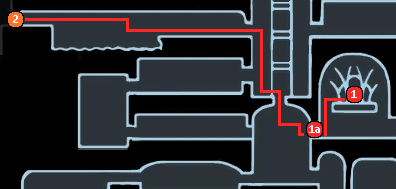 1 - Make your way through the Shaman's challenge when you can move again and acquire the Soul Catcher Charm (2/40) behind the Elder Baldur at the end. The Elder Baldur can only be injured when it is standing up, forcing you to keep your distance and use [Vengeful Spirit] to clear the path. (Optional) There is a lifeblood Cocoon in the upper left before the drop to the Elder Baldur that can be broken for extra Blue Masks.
1a - Exit the Ancestral Mound and make your way down and to the left. Hit the lever to open the passage to the main crossroads shaft and go through the exit to the left with foliage growing around it.
2 - Keep going left and kill the Elder Baldur blocking the end of the bridge to enter Greenpath.
02-2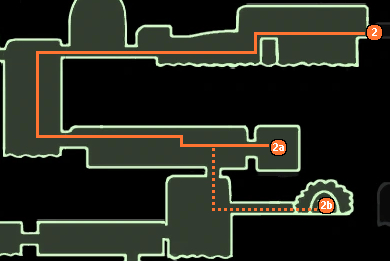 2a - Make your way down and to the right for now. Buy the Area Map from Cornifer (60 Geo) and free the Grub (4/46) above him, then backtrack to where you saw the red cloaked bug on a ledge above you.
2b - (Optional) Head down one room from Cornifer and go right through the door decorated with large dark grey teeth and talk to the creature at the end to Acquire the [Hunter's Journal]. Killing at least one of every enemy in the game gives the {Keen Hunter} Achievement, while completing the Journal and returning to the Hunter gives the {True Hunter} Achievement.
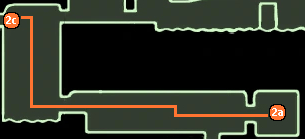 2c - When you reach the area where you saw the red cloaked bug again, you're going to try and get up to the ledge they were on. Your jump isn't enough to reach it normally for now but this is a pretty major skip for this early in the game and can use two methods. The first method is to jump towards the ledge and at the top of your jump TAP to face right and use [Vengeful Spirit] on the Quick-Cast input twice, then immediately turn left again and finish crossing the gap. This is tricky and may take some practice. There are two Maskflys on a ledge in the room to the right just above where you enter from this room that can be hit through the ledge with an upward jump attack before they can fly away to recharge Soul, and they respawn every time you exit and reenter the room. Equipping the Soul Catcher Charm can help speed up the process of regaining your Soul. The second method is easier but slower for those who can consistently perform the first. It is achieved by luring the Squit in the alcove below where you're jumping from up to the gap and nail pogoing off of it to cross. If you can't make either of these skips, you may have to take the long way around. Once past the gap, keep making your way leftward until you find another vertical shaft. Jump through the ceiling to the room above and hang a right.
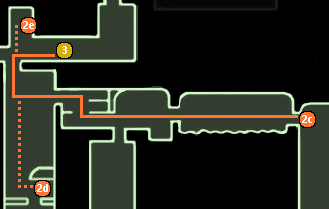 2d - (Optional) Open the toll gate (50 Geo) mid-way down the vertical shaft for a Bench and a passage to the lower area.
2e - (Optional) Instead of going right straight away, jump up and break a cracked wall so you can break a Lifeblood Cocoon for some extra Blue Masks.
3 - Defeat the (MINIBOSS) Moss Knight to open the gates and make your way to the right and up into the next room, then travel left until you hear signs of a struggle.
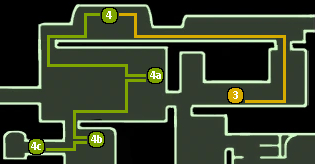 4 - Strike the (MINIBOSS) Vengefly King to initiate glorious combat and defeat it. Once finished, keep going right and then down into the next room. (Optional) Stick around and introduce yourself to Zote the Mighty once the Vengefly King is defeated.
-o-o-o-o-o-
 (Extra Notes: Zote) You can chose to walk under the Vengefly King instead of fighting it but this guide assumes that you don't, as the (DREAM BOSS) at the end of Zote's quest is needed for a substantial reward of (Dream Essence). Otherwise you will need to either farm enemies, the [Whispering Root]s scattered across the world, or engage in a much longer diversion to dreamnail the Soul Master's corpse and defeat the (DREAM BOSS) Soul Tyrant. If you want the {Neglect} Achievement, I advise starting a new game and following this guide while ignoring the Vengefly King, and return to this area after acquiring the [Mantis Claws] to hit the remains of Zote's shell with your Nail for the Achievement.
-o-o-o-o-o-
4a - Make your way to the right side of the large room to free the Grub (5/46) guarded by another Mosskin Knight. Once done, make your way to the bottom left of the room and follow the sign pointing down to the Greenpath Stagway.
4b - Collect a [Wanderer's Journal] behind the breakable wall to the right of the Stagway entrance (Watch out for the Fool Eater right under it), then enter the station.
4c - Activate the Stag Station (140 Geo) and rest at the Bench for the upcoming boss fight, then head back up to the large room and take the left path until you find another large room.
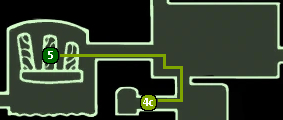 5 - Defeat (BOSS) Hornet Protector and collect the [Mothwing Cloak].
Chapter 3 - Into the Wastes
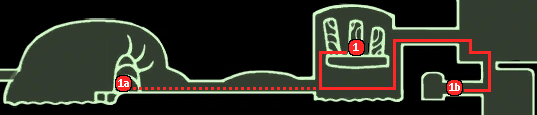 1 - Make your way back to the Stagway through the paths under the boss arena using your new traversal method.
1a - (Optional) Instead of returning to the Stag Station right away, head to the far left and enter the structure before the dock for a Quirrel encounter. Watch out for the Mosskin Knight standing on the end of the dock.
1b - Take the Stag to Dirtmouth.
03-2 2 - Buy the [Quill] (120 Geo) and Wayward Compass Charm (220 Geo)(3/40) from Iselda. Alternatively, if you are doing a no-maps run, buy the Gathering Swarm Charm (300 Geo)(3/40) from Sly instead, but not both for now.
2a - (Optional) Encounter Zote again at the edge of town.
2b - (Optional) Meet Tiso, a somewhat taciturn warrior bug by the well.
2c - Once finished with all tasks in Dirtmouth, return to the Forgotten Crossroads.
03-3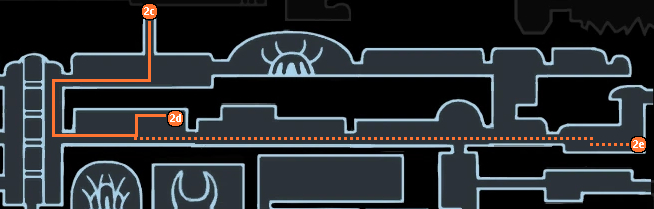
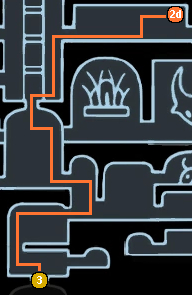 2d - Make your way to the Crossroads' main shaft and enter the first passage on the right below where you came in. Hop up the first couple platforms and dash onto the ledge above to free a Grub (6/46).
2e - (Optional) Head all the way to the other side of the crossroads for some new dialogue from Myla.
3 - Go back to the main shaft and head down to the room connected to the hot springs and through the door below where you came in. Dash over to the ledge across the gap and descend into the Fungal Wastes.
03-4
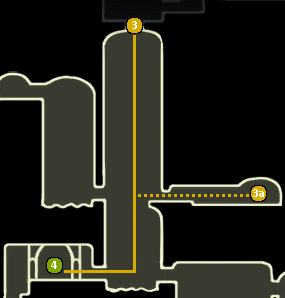 3a - (Optional) As you are making your way down the vertical shaft, locate an exit on the right. Rest at the Bench inside and meet Leg Eater if you wish, but don't pay him to see what he has to offer until instructed, as there is a method to attain a discount you don't have access to yet.
4 - Carefully make your way down through the vertical shaft, being mindful of the enemies and acid pools until you reach the bottom, then head left to fight the (MINIBOSS) Twin Shrumal Ogres. Collect the [Charm Notch] (1/8) once they're defeated.
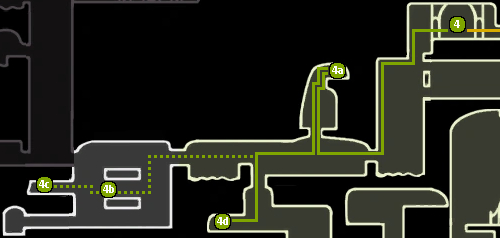 4a - Head down and continue left. Be mindful of the mushrooms that spit fizzing growths that home in on you, as being exploded by them deals 2 Masks of damage. Continue left until you find a gap in the ceiling and jump past the volatile fungus to reach the top and collect a [Hallownest Seal].
4b - (Optional) Keep heading left instead of taking the exit down to find the Queen's Station. On one of the ledges on the upper left side you will encounter Quirrel again. Note: This encounter must be done on your first visit to Queen's Station and before obtaining the [Mantis Claw]. Quirrel leaves when you do even if you haven't spoken to him yet, and if you have already acquired the [Mantis Claw] before discovering Queen's Station Quirrel will not be there at all.
4c - (Optional) enter the upper platform of Queen's Station on the left to meet Willoh.
4d - Head down into the exit to the right of the acid pools and buy the Area Map from Cornifer (75 Geo). Once you're done, backtrack all the way to the bottom of the vertical shaft where you first entered the Fungal Wastes as the way forward through this room is blocked by a gate for now.
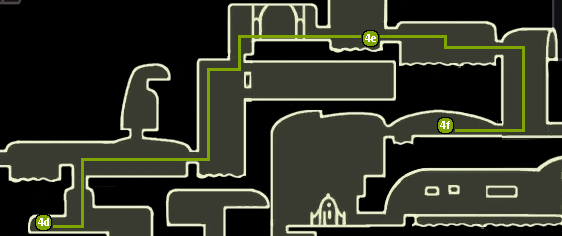 4e - Keep heading right until you see a gate that's been chained shut, drop down to the bottom of that room, and hang a left into a room where you will hear snoring.
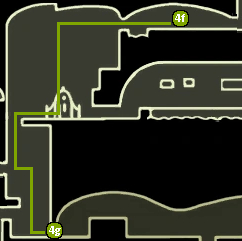 4f - (Optional) Wait around in the middle of the room for your first encounter with Cloth, a large, affable bug with an equally large club.
4g - Continue on and use the purple bouncy mushrooms in the next room to nail pogo your way across and reach the path down. When you see Hornet again head left instead of following her to the right, and make your way to the bottom of that room as well to enter the Mantis Village Outskirts on the right. Continue moving rightward and go down when you can to drop into a vertical shaft. Make your way about mid-way down and enter the Mantis Village on the left.
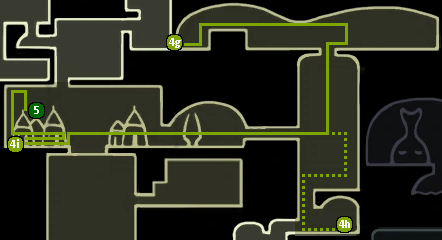 4h - (Optional) Drop into the room below the vertical shaft connected to the Mantis Village and rest at the Bench to the right for a quick reload point, just in case.
4i - Make your way across the bottom of the room to the far left side and hit the lever there to open access to the area above.
5 - Make your way back and across the upper path this time into the upper left area of the room to acquire the [Mantis Claw].
Chapter 4 - The City of Tears; Part 1
04-1
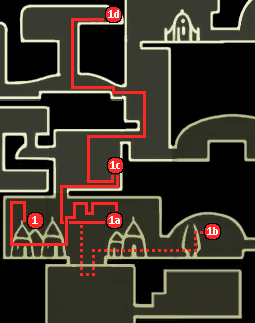 1a - Climb out and back to the main village area, then traverse through the area on the other half of the village that was previously inaccessible to find another lever. Hit it to open the passage down, but go up instead for now.
1b - (Optional) Duck into the chamber below and leave, then head right to find Quirrel. This must be done before entering Deepnest or The City of Tears if you wish to encounter Quirrel here.
1c - Climb up from the bottom right corner of the room to collect a [Wanderer's Journal], then up and around to the exit in the upper right.
1d - Make your way up the wall to the upper left exit, then climb/bounce up the shaft to rescue the Grub (7/46) to the right past a narrow horizontal tunnel lined with bouncy mushrooms and full of floaty enemies. A [Vengeful Spirit] or two should take care of them easily enough to clear the way.
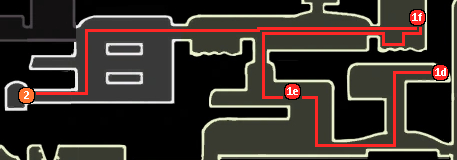 1e - Drop back down and continue to the left to hit a lever and open a shortcut to the left side of the region. Use the bouncy mushrooms to travel up and past where you met Cornifer earlier and head right.
1f - Enter the vertical shaft but don't climb to the top. In the middle of the bottom will be a wall you can now climb with some thorns above and to the right. Climb and dash to the right side of the shaft and climb again to hit a lever to open the exit and collect a [Wanderer's Journal].
2 - Backtrack and keep going left to enter Queen's Station. Drop to the bottom and enter the bottom left platform to unlock the Stag Station (120 Geo) and take it to Dirtmouth. Buy the [Lumafly Lantern] from Sly (1800 Geo), return to Queen's Station, and rest at the Bench.
-o-o-o-o-o-
 (Extra Note: Expense) If you're only a couple hundred Geo short of buying the lantern, take the Stag back to Greenpath and go into the large room above the station entrance. In the middle on the left side will be two Moss Knights that can be farmed with judicious application of [Vengeful Spirit] and a couple nail hits for a total of (80 Geo) per run, and behind them are a couple of large~ish Geo Deposits if you haven't collected them already. If you're finding you've fallen significantly short, however, I recommend returning through the path this guide has taken and exploring the rooms a bit more to see if you've missed any easily reachable deposits.
-o-o-o-o-o-
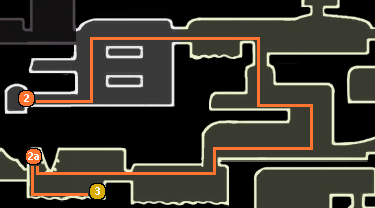 2a - Make your way back to where the shortcut to the mantis village is, but go left instead of right to a new area. Follow the path down and pogo through the next room to the left again. In the room with the thorn wedge on the ceiling, acid floor, and bouncy mushrooms, cross to the far side and bounce up to free the Grub (8/46) there.
3 - Drop down and hop skip and dash across the acid pools to collect the Spore Shroom Charm (4/40), then circle back to the left side of the room and break the wall under where the Grub was and leave through the newly opened exit.
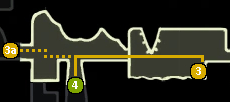 3a - (Optional) Cross to the left side of the room and enter the door to find the Moss Prophet and his followers. Kill the congregation as they attack you, and speak to the Moss Prophet for some lore.
4 - Cross to the left side of the room and backtrack to trigger the collapsing floor and hug the right wall as you fall into Deepnest.
-o-o-o-o-o-
 (Extra Note: Exploration Advisory) Deepnest is a dark, typically late-game area, but we're making a quick stop in it for a couple of things. In this one instance I am retracting my Preface advice of exploration. Straying from the path proscribed here is a good way to get lost and die, as many of the enemies here are much more aggressive and resilient than what has been encountered so far. If you follow this guide all the way through, you will be returning for a full sweep of the area much later when you are better prepared, and any off-route exploration can be done then if you wish.
-o-o-o-o-o-
04-2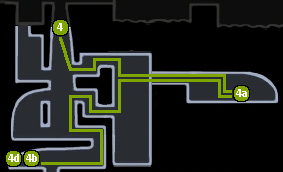 4a - Hug the right wall as you fall to slip into a side passage and cross into the exit ahead of you. If you fall all the way to the bottom you'll have to climb back up. In the next room keep going straight right to break a wall on a raised ledge to open a hidden door. Behind it, ignore the first two and last "Grubs" and free the third Grub (9/46). The others are all Mimics and can be killed if desired for their Hunter's Journal Entry progression, but be careful, they're highly aggressive, and can run faster than your base nail attack speed negating its knockback. The best way to kill them at this point is to either free them one at a time, lure them into an area of the room with a high ceiling and pogo off of them until they die, or if you have a full Soul, free them all at once starting with the one in the back, leave the room, and reenter to blast them all with [Vengeful Spirit] as they charge you.
4b - Return to the room you dropped down into and make your way to the bottom and cross to the left side to buy the Area Map from Cornifer (38 Geo).
4a - Hug the right wall as you fall to slip into a side passage and cross into the exit ahead of you. If you fall all the way to the bottom you'll have to climb back up. In the next room keep going straight right to break a wall on a raised ledge to open a hidden door. Behind it, ignore the first two and last "Grubs" and free the third Grub (9/46). The others are all Mimics and can be killed if desired for their Hunter's Journal Entry progression, but be careful, they're highly aggressive, and can run faster than your base nail attack speed negating its knockback. The best way to kill them at this point is to either free them one at a time, lure them into an area of the room with a high ceiling and pogo off of them until they die, or if you have a full Soul, free them all at once starting with the one in the back, leave the room, and reenter to blast them all with [Vengeful Spirit] as they charge you.
4b - Return to the room you dropped down into and make your way to the bottom and cross to the left side to buy the Area Map from Cornifer (38 Geo). 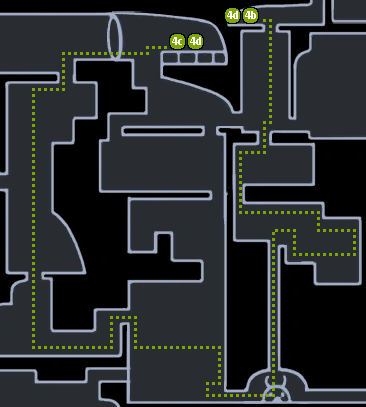 4c - (Optional: DO NOT REST AT EITHER OF THE BENCHES YOU ENCOUNTER!!!) Drop into the room below and make your way down through the maze like rooms until you drop into the Deepnest Hot Spring. Exit left and traverse up and over to the room to the left and start making your way all the way up to the Failed Tramway for your second encounter with Cloth. Extra exploration is Strongly advised against at this point in the game, as you will return to Deepnest later for a more thorough delve. The mapped route indicated was chosen because I find that it has both less enemies and somewhat more straight-forward traversal as opposed to the more mazelike layout of the column shown to the right. Going through those rooms will also delay or prevent an optional encounter with Zote in the City of Tears later on.
4d - Once all desired tasks are completed, quit and reload to return to the Queen's Station Bench.
04-3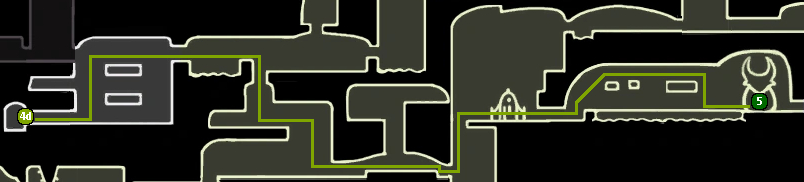 5 - Make your way rightward across the Fungal Wastes, taking the shortcut past where Cornifer was, until you return to where you saw Hornet earlier. Follow her path into the next room and climb through the thorns along the ceiling until you reach the other side of the acid lake, activating the bridge along the way to make returning easier if you make mistakes. Once on the far side, use the [City Crest] on the statue and enter the Gate to keep moving forward into the City of Tears.
Chapter 4; Part 2
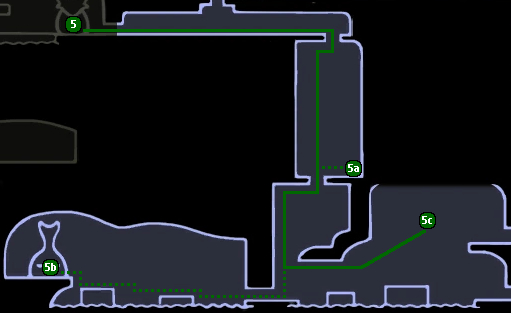 5 - (Continued) Make your way through the corridors and down the two elevators.
5a - (Optional) Along the path to the second elevator you will find a Bench where Quirrel has stopped to take in the ambiance.
5b - (Optional) At the bottom of the second elevator go left instead of right. On the far side of the room you will find the Nailsmith's hut. Speak to him to upgrade your Nail for the first time (Sharpened: 250 Geo) if you wish.
5c - You will either need to jump off of the elevator as it is coming down, ride it back up, or nail pogo off of the roof to reach the high wall and climb, but any way you chose, make for the elevated platforms in the center of the cavern. Ascend these platforms to collect a [Hallownest Seal] at the top.
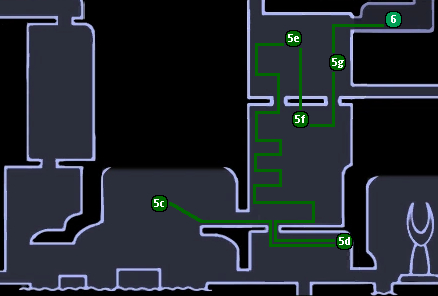 5d - Continue along the elevated platforms leading right to enter the upper area of the next building. Drop into the room below, open the gate and keep going right to meet Relic Seeker Lemm. Sell all of your Relics to him for Geo.
5e - Return to the corridor above Lemm and ride the elevator to the right up once, then follow the shaft on the left up until you find a lever. Hit it to open the door to the shaft leading back down.
5f - Hit the second lever at the bottom of the shaft to open the gates and follow the path to the right and up.
5g - Take the elevator up once and free the Grub (10/46) in the room to the right.
6 - Ride the elevator up again and take the right path into an open room. Make your way up to the exit in the ceiling to be attacked by a (MINIBOSS) Soul Twister before you can leave. Once it is defeated continue up into the Soul Sanctum.
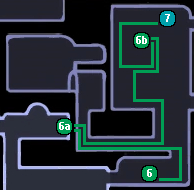 6a - Take the path to the left to find an elevator. Mid-way up it is a breakable wall that opens a shortcut to the Skyway Bench. Unlock it (150 Geo), then buy the Area Map from Cornifer (90 Geo).
6b - Return to the Soul Sanctum to make your way up the first elevator and climb through the middle of the room to a ledge overlooking the second elevator to the left with a lever on it. Hit it to open the door above.
7 - Make your way from the lever to the elevator shaft and climb it into the now accessible room to fight a (MINIBOSS) Soul Warrior.
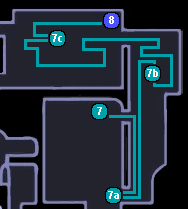 7a - Once the Soul Warrior is defeated take the door to the right and go down to the bottom of the new room and through the door on the left to open a shortcut back to the first elevator, then go back to the previous room.
7b - Climb up as high as you can and drop to the right to open another shortcut, then either take the elevator or climb the shaft to a higher ledge and make your way up and into the next room to the left.
7c - Make your way through the middle of the room and up into the hallway on the other side of the door that blocked your progress at the start and hit the lever to open it.
8 - From the lever go left, but before leaving the room jump into a darker area of the ceiling marked with some drapes to find a hidden area. Be mindful of the Mistakes and Follys that spawn behind you as you collect the Spell Twister Charm (5/40) on the far right side of the room. A few [Vengeful Spirit]s should help thin them out.
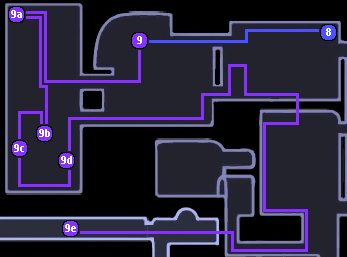 9 - Drop back down to the main hall and exit the door to the left to fight the (BOSS) Soul Master. Watch out for the second phase and collect the [Desolate Dive] spell once he's defeated.
9a - In the next room to the left, climb up and open the Geo Chest in the very top left of the tower.
9b - Break through the indicated areas and collect the [Hallownest Seal] along your path.
9c - Try to catch the edge of the next cracked floor so you don't break all the way to the bottom and free the Grub (11/46) below. Otherwise you'll need to move ahead to 9d and circle back around to do so.
9d - Make your way into the bottom of the room and climb up the other side to open a shortcut back to the rest of the tower. Be careful not to be swarmed by the Mistakes and Follys that spawn while you do so, then climb up and out to the right. Follow the path until you're back in the room below where you got the Spell Twister Charm and dive through the cracked glass into the room you fought the Soul Warrior in. Continue backtracking through the Soul Sanctum and leave via the elevator shortcut into the Skyway. Continue making your way to the left across the Skyway until you enter a room with a bunch of suspended platforms.
9e - (Optional) Mid-way across the Skyway you will encounter Zote. Speak to him if you wish or leave him be.
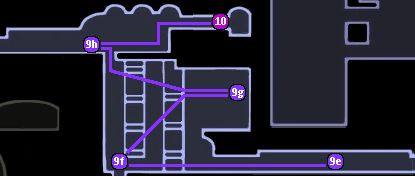 9f - On the other side of the bottom of the room hit the lever to open the passage to the City Gates.
9g - Climb the suspended platforms up and to the right while being mindful of the flying guards. Find the second ledge on the right wall and enter it, but watch out for the guard bug patrolling at the back to collect the [Simple Key] behind him.
9h - Make your way across the room to the top left and jump into the room above. Cross to the left and drop down into a small structure with some Husks in it to collect a [Wanderer's Journal].
10 - Make your way back to the right side of the room. Cut the chain to drop the large block and enter the City Storerooms Stag Station. Unlock it (200 Geo) and take it to the Forgotten Crossroads.
Chapter 5 - Heart of the Mountain
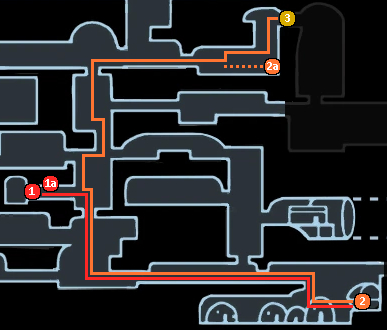 1 - From the Forgotten Crossroads Stag Station, make your way back down to where you fought the Gruz Mother and keep going right into the hut you hear laughter coming from.
1a - (Optional) Tiso will be resting on the Stag Station bench when you arrive if you wish to see what he has to say.
2 - Inside the hut meet Salubra and buy the first [Charm Notch] (120 Geo)(2/8) available from her. Exit the hut and make your way back to the vertical room by the Stag Station and go up through the gate in the ceiling you opened before, then continue to the right into the crystal mine entrance.
-o-o-o-o-o-
 (Extra Notes: Out of Sequence Purchases) Now may be a good time to get an extra Charm or two (or four if you can afford them all), and maybe even some extra Charm Notches if you wish. You can always return on your own, but this guide's path doesn't circle back to anywhere near Salubra again for quite some time. I recommend at minimum picking up either the Shaman Stone (220 Geo) or Longnail (300 Geo) Charm depending on your play style, but it's up to you, and you may even get both if you wish.
-o-o-o-o-o-
2a - (Optional) Drop down below the path to where Myla is for some new dialogue.
3 - Take the elevator above Myla up to the top and proceed into the next room. Use [Desolate Dive] on the shaking floor to enter Crystal Peak.
05-2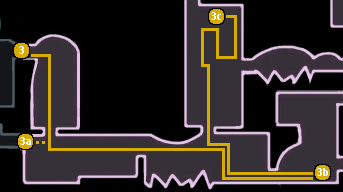
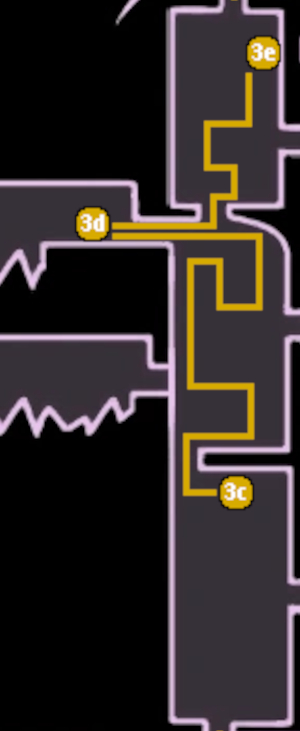
3a - (Optional) Just under where you enter the mines will be a door on the left wall. Go through it and pay the toll (50 Geo) to open the Dark Room Shortcut to the Forgotten Crossroads.
3b - Make your way across the conveyors to the bottom right corner of the large room and go through the door. Rest at the Bench on the right side of the room.
3c - Backtrack slightly and go up before the conveyors. Make your way up until you see two sets of vertical conveyors and take the one in the middle of the room. It is best to just dash before reaching the spikes without imputing a direction to make your way through the challenge and free the Grub (12/46) at the end. Hit the lever and jump up into the next room.
3d - The Crystal Crawlers in the passages above can only be damaged by spells, so carefully make your way through the gauntlet of Lazors they fire. When you see a miner bug chipping away at the left wall break that wall but keep climbing up for now as you can't reach the treasure on the other side of it yet. Traverse through another Lazor gauntlet and enter the room you hear Cornifer humming from to buy the Area Map from him (115 Geo).
3e - Leave Cornifer and keep making your way onward and upward. In the next room, climb around from the left side of the room while continuing to avoid the Lazors to reach the shaft on the right, then climb to the top and collect the [Shopkeeper's Key]. Make your way back to the left side of the room and keep climbing up into the hall above.
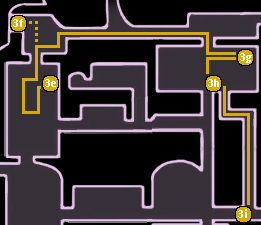 3f - (Optional) Go left instead of right to find Quirrel admiring the view of Dirtmouth from an observation deck.
3g - Take the right exit and drop down into the first opening on the right. Be mindful of the Lazors as you follow them around anticlockwise to reach a [Wanderer's Journal].
3h - Drop back into the vertical shaft and hit the lever at the bottom to open a shortcut, then drop down the shaft on the right.
3i - Hit the lever to the left to open the way forward for later then take the exit to the right.
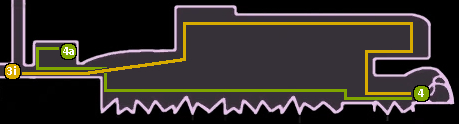
4 - Make your way up and around the cavern while timing your jumps and dashes to avoid the lazors and acquire the [Crystal Heart] from the broken automaton at the end.
4a - Use your newly acquired traversal method to return to the left side of the cavern. Jump onto the wall above the exit and climb up, then use the [Crystal Heart] while clinging to the wall to dash across the gap and free the Grub (13/46).
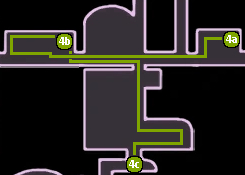 4b - Drop down and exit the room. Follow the corridor left into another room. Time your dashes carefully to dodge through the pistons and reach the Grub (14/46) at the top. Hit the lever behind it to stop the pistons and open the gate down to the rest of the room. If you're having difficulty timing your dodges, there is a Glimback in the previous room that continuously respawns on reentering it, and can be used to replenish your soul if you're careful.
4c - Backtrack to the previous room and take the exit in the floor. Make your way to the bottom of the new room and drop through the exit to find another Grub (15/46). Hit the lever to open the gate next to it.
 5 - Circle down and to the right to enter another darkened room. Carefully make your way across it and to the other side. Use the [Crystal Heart] to cross the gap again and enter the Crystalized Mound on the other side. Make your way through the platforming challenge up to the top right corner first to free a Grub (16/46), then drop back and go up and left to find a Snail Shaman trapped in a crystal. Shatter it to upgrade [Desolate Dive] into [Descending Dark] and go straight left to leave the Mound.
Chapter 6 - Descent into Dreams
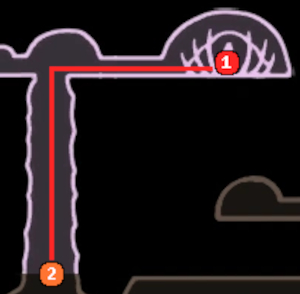 1 - From the Crystalized Mound backtrack to the gap.
2 - Jump into the gap to descend into the Resting Grounds.
06-2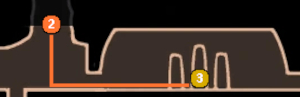
3 - Make your way to the right and interact with the tablet on the raised dais with three statues on it for a cutscene. When you can move again platform to the right to acquire the [Dream Nail]. When you wake up speak to the Moth Seer, then leave her Home.
-o-o-o-o-o-
 (Extra Notes: The Dream Nail) Up until now, most of the abilities you have collected have been fairly self-explanatory, but the Dream Nail has a few nuances to it that bear explaining, as it's very easy to forget that it's even there a lot of the time. This is somewhat counterintuitive, as the Dream Nail is a core part of your equipment, and especially for Spell builds its existence is invaluable.
The most basic use for the Dream Nail that you are told about is to enter and leave "Dreams". Most all NPCs, hostile creatures, a fair number of the deceased denizens of the realm, and even a few seemingly inanimate objects have at least some form of "dream dialogue" that can be viewed by hitting them with the Dream Nail, and in some cases you can even enter their Dream and interact with them in some way. Most often this interaction is in the form of Dream Bosses and Mini-bosses, but a few have other challenges to complete. These bosses and challenges will usually but not always be indicated by brightly glowing dreamcatchers coming off of the character or object you need to hit with your Dream Nail.
The second, and far more utilitarian, use for the Dream Nail is as a quick way to recharge your Soul. No joke, I didn't even realize this for my first several play throughs, so I'm telling you now. The only place it is explicitly mentioned in-game is in a particular Charm's description, and players usually obtain it fairly late in a run so new players usually have already forgotten about the Dream Nail other than for its first function. So I'm telling you now, excepting the use of the mentioned Charm which increases the Soul gained, one strike on any hostile creature will fill your base Soul pool by 1/3, or completely fill a completed Soul Vessel, and it even works on creatures like Goams and Garpedes that can't be damaged.
Keep a lookout for enemies that patrol on fixed routes and speeds without chasing you, or other predictable behaviors, to practice on, and use it frequently to get a feel for its timing.
Later on, you will unlock more abilities for the Dream Nail that allow you to fast travel to self-set points as well as enter some dreams you weren't able to before.
-o-o-o-o-o-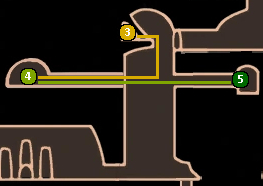 4 - Go down and enter the corridor under the Moth Seer's home to collect the Dreamshield Charm (6/40).
5 - Backtrack to the main vertical shaft and cross straight over to enter the Stag Station. Hit the lever to activate it and travel to Dirtmouth.
Chapter 7 - The Lost Shaman
 1 - Exit the Stag Station and go to Sly's Shop.
1a - Talk to Sly to give him the [Shopkeeper's Key] and buy the [Elegant Key] (800 Geo) from him. Once done head over to the map shop and buy the Resting Grounds Map from Iselda (75 Geo), as it is the one area of the game you will never meet Cornifer in.
1b - Return to the Stag Station and take it to the City Storerooms.
07-2
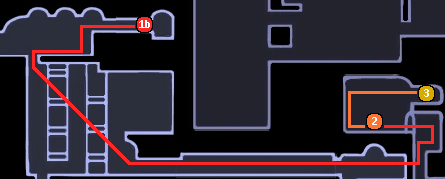
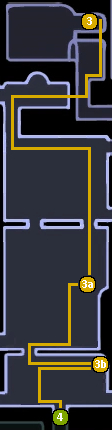 2 - Make your way back to the Skyway Bench and head through the broken wall to take the elevator or climb the shaft to the top. Use the [Elegant Key] to open the locked door above the elevator and fight another (MINIBOSS) Soul Warrior, this time assisted with spawning Follys.
3 - Once he is defeated make your way up to the room above and examine the Snail Shaman strapped to the table to upgrade [Vengeful Spirit] to [Shade Soul] and hit the lever to open the gate to descend.
3a - Make your way down through the tower and just drop instead of taking the second elevator after the room transition. Hit the lever at the bottom to open the gate and drop down again.
3b - Head right and sell your Relics to Lemm.
4 - Leave Lemm and keep making your way down to the main corridor at the bottom of the region. A little to the right of the elevator use a [Simple Key] to unlock the Royal Waterways and descend into them.
Chapter 8 - A Tale of Two Knights
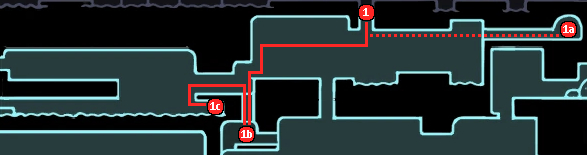 1 - Make your way to the left, drop down and follow the marking on the wall of a Bench pointing left.
1a - (Optional) Make your way right instead of left and break open a wall next to a Geo Deposit to meet Tuk, who will sell you Rancid Eggs for Geo.
1b - Drop down and use [Descending Dark] to break through the loose floor and rest at the Bench at the bottom.
1c - Go up from the Bench and cut left at the first turn. Below the entrance to the new open area free the Grub (17/46) behind the breakable wall.
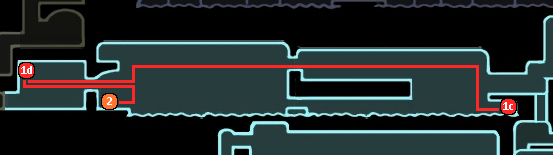 1d - Make your way back up and across this room and the next and fight a bunch of Hwurmps to open the gates in the third room. Once the gates are open, buy the Aera Map from Cornifer (75 Geo) in the top left corner and hit the lever to open the passage into the Fungal Wastes.
2 - Go back to the previous room and fall to the bottom and go left to collect the [Mask Shard] (1/16) under the exit, then quit and reload to return to the Bench.
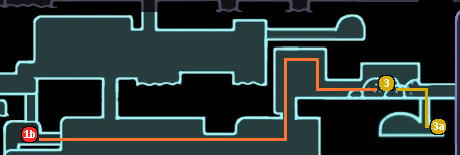 3 - Break the wall to the right of the Bench and continue on an almost straight path until the walls start to become... brown. Jump up into the next room and loop around to fight the (BOSS) Dung Defender. Collect the Defender's Crest Charm (7/40) once he's defeated.
3a - In the room to the right hit the leaver and break the wall, then [Descending Dark] through the floor to collect a [King's Idol] on the right. Backtrack to the previous area and make your way down and into the bottom right of the main tunnels. Drop down and follow the path continuing right until you see some crystals on the ground. Use the [Crystal Heart] to cross the gap and keep on rocketing through the narrow channel full of spikes and into the next room. Keep making your way right until you find a room with a bunch of Hwurmps and make your way above it.
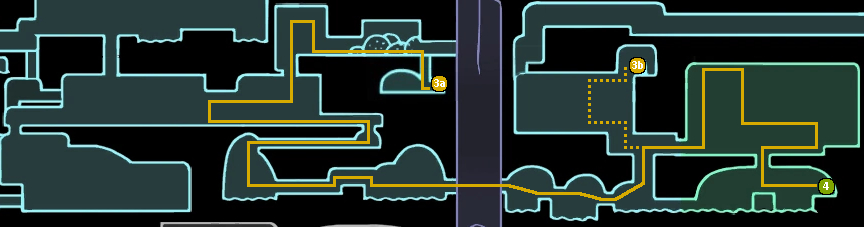 3b - (Optional) Take the left path above the Hwurmps and follow the shaft up and through a crack in the wall to meet Eternal Emiletia and open a shortcut back out into the City of Tears.
4 - . Continue on up and over and drop down when the path allows. Fight your way through three waves of guard bugs to open the gates and keep following the path downward and back into the acid cavern. Jump across the platforms to the right and collect [Isma's Tear].
Chapter 9 - The Lost Knight
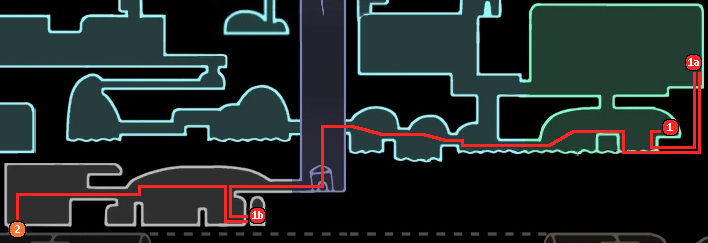 1 - Drop into the water and start swimming rightward.
1a - Climb up the wall to free a Grub (18/46), and then backtrack to where you used the [Crystal Heart] to pass through a narrow channel full of spikes, but this time drop through the middle instead of going all the way across.
1b - Exit the broken lift shaft to the left and jump onto the first pillar. Cling to the right side of it and slide down until you're almost at the bottom, then use the [Crystal Heart] to cross over the writhing bugs and collect a [Wanderer's Journal].
2 - Return to the pillar and climb back up, then continue on leftward as far as you can go to drop down and enter the Ancient Basin Tram Station.
09-2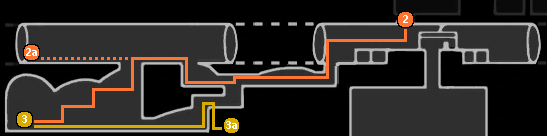 2 (Continued) - Head to the bottom left of the tram station and drop down. Climb up into a large open area and then make your down and left.
2a - (Optional: WARNING: Point of no return for an NPC Quest) Instead of dropping down again, go left across the gap and defeat all of the lesser mawleks and aspids there. Cloth will pop out of the ground and have some things to say on the matter.
-o-o-o-o-o-
(Extra Note: SPOILERS) This encounter locks you into the path of Cloth helping with the Traitor Lord boss and die at the End. Not meeting her here instead causes her to appear in Dirtmouth.
-o-o-o-o-o-
3 - Continue past the two lesser mawleks at the bottom of the drop to collect a [Pale Ore] (1/6).
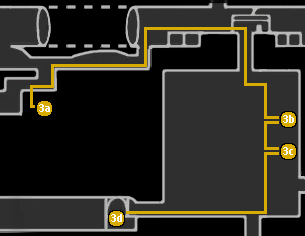 3a - Drop down again and make your way rightward, being mindful of the lesser mawlek and belflys. At the end of the path before jumping up to the hall where you came in, use [Descending Dark] on the loose floor to free a Grub (19/46) behind another lesser mawlek.
3b - Return to the Tramway platform and drop into the door in the middle. Make your way down the right side of the room and enter the first alcove to drop (3000 Geo) into the fountain to receive a [Vessel Fragment] (1/9).
-o-o-o-o-o-
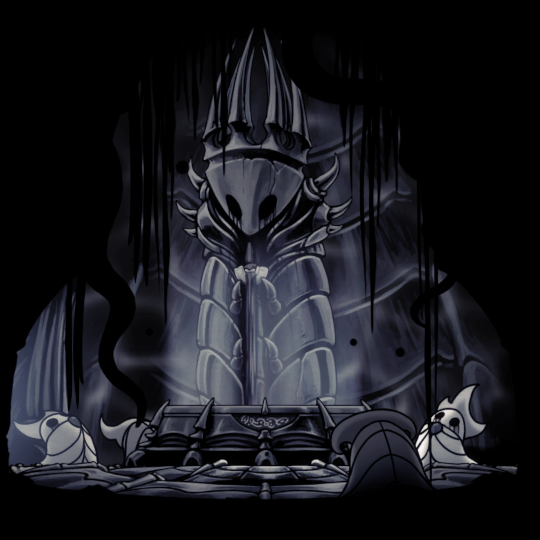 (Extra Note: Poor wording) The fountain takes Geo cumulatively and does not exceed a total of 3000 despite the wording of the inscription. If you don't have at least 3562 Geo when you reach this point, it is fine to ignore it for now as you will need your Geo for three more steps in this Chapter and you will be returning to the Ancient Basin later on.
If you really want it now, though, the Lesser Mawleks in the first area you visited can be farmed for 18 Geo each and can be killed quickly with Shade Soul.
-o-o-o-o-o-
3c - Drop down into the next alcove in the right wall to buy the Area Map from Cornifer (112 Geo).
3d - Drop down from Cornifer to the bottom of the room and make your way across to the left. In the next room unlock the Bench (150 Geo) and use the [Crystal Heart] to cross the spike filled chasm.
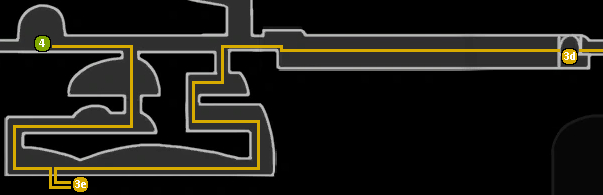 3e - Drop down into the first opening in the floor and carefully make your way around past the first three mawlurks and drop into the hole in the floor to pick up a [Simple Key] from the lost Royal Retainer to the right. Climb back up and continue making your way along the path until you return to the straight corridor and break open the wall leading back.
4 - Continue on leftward to fight the (BOSS)Broken Vessel.
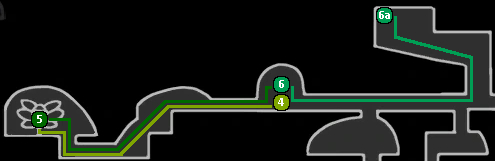 5 - Once the Broken Vessel is defeated, continue following the path left and down, then climb to acquire the [Monarch Wings] and backtrack to the boss room.
6 - Hit the now glowing body of the Broken Vessel with your Dream Nail to fight the (DREAM BOSS) Lost Kin, and speak to its ghost once it is defeated to collect (400 Dream Essence).
-o-o-o-o-o-
 (Extra Note: Dream Bosses) Dream Bosses are upgraded versions of the original with more powerful abilities and higher aggression. If you lose to the boss, you don't die however. You reappear back outside of their Dream with full masks and can try again immediately if you wish.
(Boss Tips: Lost Kin) Lost Kin is a bit of a milestone, and for new players it is likely to be the hardest boss you've encountered to this point by a significant degree. It is a poster example of what I mean in my preface when I said that coming at some bosses under-prepared in the mid-game is unfortunately unavoidable to one degree or other. Most other guides don't encounter them until much, much later when the player is better equipped. The reason I chose to fight Lost Kin now instead of later is two-fold.
First, the fact that they are a dream-boss means that dying to them over and over and over again has very little real in-game consequence. There is a great deal of frustration on the player's part due to the difficulty, to be sure, but losing to them doesn't result in having to retrieve your Shade and you can immediately jump back into the next attempt. There is also a bench relatively nearby and the path between it and Lost Kin is relatively sedate compared to other alternative "mid-game" bosses, so if you have to put the game down for a while to let the fight percolate in your subconscious, returning isn't that difficult. It usually takes me several play-sessions to beat them at this point on a save.
Secondly, the (400 Dream Essence) their defeat grants you is needed to unlock the Dreamgate in Chapter 11, and there aren't really any "easier" ways to get that much this soon that aren't also picked up along the way. While not strictly necessary this early on, it does greatly reduce the amount of backtracking that will have to be done in several stretches in the following chapters, and should be acquired no later than Chapter 19: Part 2 for reasons explained then.
The boss arena is accessible from both sides of the dream realm you enter, and can be reached faster by dropping down off of the first platforms to appear on your left and dashing into the opening on the side of the structure.
Lost Kin itself shares all of its attacks with the Broken Vessel, except that they come much faster, there are six infection blobs instead of four from the slam attack, the arena covering cascading infection attack is totally removed, and infected balloons spawn periodically throughout the fight.
If you're quick you can start the fight with a free double hit from Shade Soul before Lost Kin screams to announce itself. The Key to beating them this early in a run is to fight defensively and maintain your spacing from the boss, only go in for hits after they close on you, and don't forget to use your spells. [Descending Dark] in particular is useful because it can clear the Infected Balloons that spawn and provides I-Frames on impact. If you find yourself dying often, the Shadow Creepers behind you can be Dream Nailed to quickly recharge your Spirit for consecutive attempts.
-o-o-o-o-o-
6a - Once the Lost Kin is defeated and you've claimed its essence make your way to the right and double jump up into the area of the ceiling you couldn't reach before next to where you first dropped down into the Mawlurk den. Make your way to the top left corner of this new area to free the Grub (20/46) that is trapped there and return to the main corridor.
 6b - Make your way all the way to the right as far as you can go, double jumping into the previously inaccessible area at the bottom of the room under the tram. [Crystal Heart] is really useful for crossing the distances quickly as once past the two Shadow Creepers near the boss room there are no other enemies on this level. Break the wall when you can't go any further to access the Hidden Station.
6c - Enter the station and activate it (300 Geo) before taking it to Greenpath.
Chapter 10 - A Dark Ritual
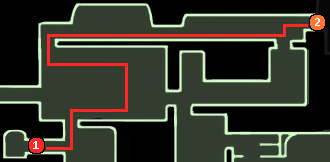 1 - Leave the station and make your way up to where you fought the Vengefly King earlier.
2 - Head to the left along the elevated path into the Howling Cliffs .
10-2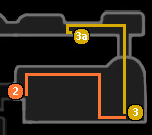 3 - Make your way along the upper path of the room and drop through the Fake chest to encounter the twin Elder Baldurs. Only the one on the right needs to be killed to access the passage containing the Baldur Shell Charm (8/40), and unlike the last time you encountered an Elder Baldur, Shade Soul will entirely bypass their defensive curl.
3a - Jump into the ceiling behind you and climb to the top. Break through the wall to the left and free the Grub (21/46) under the path.
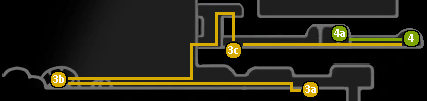 3b - Keep making your way left and into the open air until you see a white glow at the base of a large bug carcass to collect a [King's Idol].
3c - Climb up the cliff face and find a cracked wall you can break through. If you can hear Cornifer's humming you've gone too far for now. Drop down into the hidden area and collect the [Wanderer's Journal] there.
4 - Break through the wall to the right of the dead bug with the journal and keep going right. Dream Nail the large dead bug you find at the end of the passage.
4a - Return to the previous room and hit the torch with your nail until it ignites.
-o-o-o-o-o-
 (Extra Notes: The Grimm Troupe) The actions of 4 and 4a are the beginning of the Grimm Troupe storyline. I won't go into details, as those are more or less given to you straight by the characters involved if the story is what interests you, but do note that there is a binary choice at the very end that results in a different reward. In the {Ritual} route, you keep the companion charm you've been upgrading throughout its stages at its maximum power. In the {Banishment} ending, however, you trade that charm for a different one that gives a %-Chance to no-sell damage that increases whenever you take damage until it triggers and resets. Keep these things in mind when you get to the end stages of the quest.
-o-o-o-o-o-
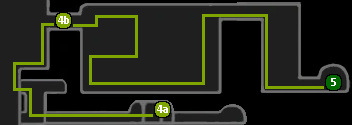 4b - Return to the main cliff face to continue climbing and follow the humming to buy the Area Map from Cornifer (75 Geo)
5 - Keep going right from Cornifer into a dark room. Carefully make your way around the room being mindful of the spikes and vengeflys that try to ambush you. Follow the blue butterfly flowers into the next room to the right and collect the Joni's Blessing Charm (9/40) from the bug left in repose and speak to her spirit if you wish. Return to the dark room and use [Descending Dark] on the loose ground to the left of the Soul Totem for a shortcut to the exit.
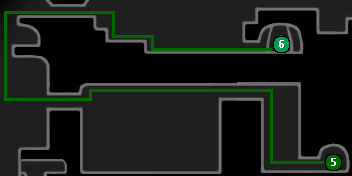 6 - Continue climbing the cliffs until you can climb no more and go to the right into the next area. Drop down and make your way over the spiked floor and into a narrow crevasse under the cliff above to find a door set into the wall. Enter and speak to the bug inside to learn [Cyclone Slash] from Nailmaster Mato.
-o-o-o-o-o-
 (Extra Note: Nail Arts) Nail Arts are one of the few things that can raise nail damage to be similar to Spells, but unlike spells which cost Soul to cast, Nail Arts require time to Charge by holding down the attack key or button after the initial swing. This is why having a control setup that allows you to seamlessly and independently press the inputs for jump and attack is so important, as there are several instances, mostly in boss fights but also in one particular endgame challenge, where you will want to have a nail art charged while also jumping and/or climbing up a wall.
For now all you have is the Cyclone Slash, a spinning attack that hits everything to either side of you several times and can also be useful for accelerating long falls. Later you will also acquire the Great Slash and Dash Slash, which are functionally similar in delivering a large arc of damage in one direction, with the difference being that Dash Slash is performed during a Dash and does slightly less damage than Great Slash.
-o-o-o-o-o-
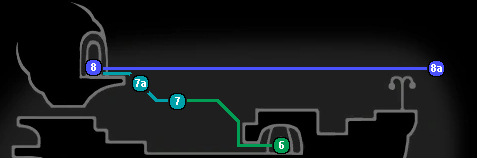 7 - Leave Nailmaster Mato's home and climb up and to the left to find a monument that a spirit will appear in front of as you approach it. Speak to them or hit them with your Dream Nail to fight (DREAM MINIBOSS) Gorb and do so again once they are defeated for (100 Dream Essence)
7a - To the left of Gorb's grave, lure a nearby Vengefly up and nail pogo off of it to reach the upper ledge with a double jump and dash to enter the Stag Nest. Keep in mind that If you miss and kill the Vengefly without reaching the ledge you can move back to the last area and return to respawn it. If you haven't upgraded your Nail at all yet, this may be slightly easier as you will be able to pogo off of the vengefly twice before it dies.
8 - Inside the Stag Nest, drop down to the bottom and acquire the [Vessel Fragment] (2/9) further along. Optionally, jump/[Crystal Heart] to the area across from where you entered and examine the broken egg there.
8a - Use the [Crystal Heart] to leave the Stag Nest and just continue on rocketing the whole way across until you fall into Dirtmouth.
Chapter 11 - The Ringmaster
11-1
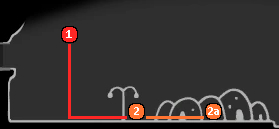 1 - Make your way towards the town to the right from where you land.
2 - Once back in Dirtmouth enter the larger of the two tents that have appeared and acquire the Grimmchild Charm (10/40) from Troupe Master Grimm.
2a - Leave the tent and rest at the Bench to equip the Grimmchild Charm, then take the Stag to the City Storerooms.
11-2
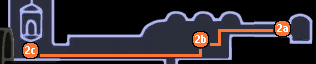
 2b - Leave the station platform and find the red burning torch. Kill the Grimmkin Novice it belongs to, to collect its flame.
-o-o-o-o-o-
(Extra Note: The Grimm Troupe) There are three kinds of Grimmkin you will encounter through the course of their ritual, and they only appear when you have the Grimmchild Charm equipped. Novices, Masters, and Nightmares. Each stage is an advancement on the previous with more health and attacks, but they all behave very similarly. Notably, they always maintain the same distance and relative position from you until they attack, regardless of terrain or other obstacles. The most straightforward method to deal with them is to avoid their attacks and wait for them to teleport parallel to you horizontally and blast them in the face with [Shade Soul] a few times.
-o-o-o-o-o-
2c - Move into the next room to the left and unlock the Elevator (150 Geo) to ride it up into the Infected Crossroads.
11-3
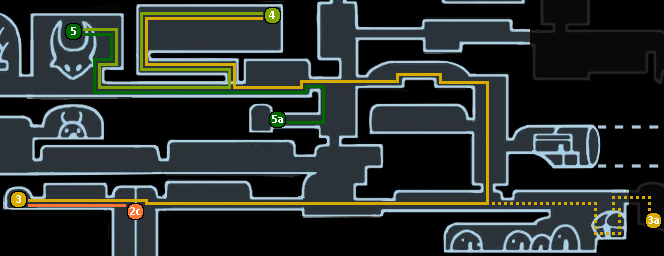 3 - Go left from the elevator. In the next room drop through the spike lined hole in the floor and continue left to collect a [Vessel Fragment] (3/9).
3a - (Optional) Go to Salubra's house and climb the wall, jump/dash left, double jump and cling to the overhang above to find a hidden passage. Take it to the right into Blue Lake and drop down to meet Tiso again.
4 - Take the long route back to the vertical shaft connected to the Stag Station, as the short route is now blocked by the infection. Return to the corridor connecting it to where you fought the False Knight and jump into the corner of the ceiling you broke open the first time you were here behind the now immobile and heavily infected Husk Guard. Rocket past the spikes with the [Crystal Heart] and enter the room above. Fight past the waves of Aspids on the right half of the room to collect the Glowing Womb Charm (11/40) from the top right corner.
5 - Continue on back to where you fought the False Knight and make your way above the boss arena. Break open the cracked wall but Do Not kill the maggots (yet) as they can be farmed for Soul using the Dreamnail if you find the Dream Boss here difficult. Dreamnail the dead Maggot to fight (DREAM BOSS) the Failed Champion. Once he's defeated talk to the maggot's spirit to collect (300 Dream Essence).
-o-o-o-o-o-
(Boss Tips: Failed Champion) This is another difficult boss for new players at the current progression of this guide, and may seem impossible as each direct attack and clipping the boss' body hitbox causes 2 Masks of damage. Given that unless you've explored outside of this guide quite a lot you should still be at the base 5 Masks, this might seem a bit daunting, but it is doable. As with Lost Kin, most other guides don't loop around to him until much later on, and again as with Lost Kin, the reason we are here this early is because Failed Champion is a Dream Boss that can be attempted over and over without having to collect a shade, and we need his Essence for the Dreamgate at the end of this chapter. Even with all of this, and the tips given below, if you feel you absolutely cannot beat him yet, I advise returning to collect his Dream Essence and the Dreamgate no later than the start of Chapter 19; Part 2 for reasons stated in additional notes there.
Failed Champion only has 3 attacks plus a phase-change only attack in addition to a backstep, and his patterns are simple, if frustrating. The first is a simple swing attack, the second is a swing that causes a ground shockwave that he will use 1-3 times that also causes rocks to fall from the ceiling that deal 1 Mask of damage if they hit you, and the third is a jump and swing, which will be preceded by him running towards you if you are too far away. If he attacks 2 or more times with the shockwave attack, it will always be followed by a jump attack. The phase-change attack is the same as the False Knight where he will jump to the middle of the arena and start swinging wildly to both sides and causing rocks to fall from the ceiling all over the arena for the duration.
The key to defeating him is to keep your spacing just out of reach of his swings while trying to also keep him in the middle of the arena, and don't get greedy with your nail. It's a marathon, not a sprint. Dash under him when he jumps at you, as you can't double jump over his swing attacks or jumps, and remember your spells. The shockwave attacks' damage area are deceptively lower than they appear and can be jumped over with a normal jump. His hitbox is large enough that if you are far enough away and use [Shade Soul] it can sometimes hit him twice, and his move-set cycles are slow enough to consistently catch him in the full direct hit and shockwave of [Descending Dark]. The phase-change attack is an excellent time to retreat to the edge of the arena and get some cheeky double [Shade Soul] hits in if you have enough Soul.
Finally, there is a cheese during his stun phase. As soon as the boss goes down and the maggot exposes himself a timer starts where at the end he will stand up again without taking any damage. However, a new, shorter timer starts as soon as he is "Hit", and it restarts every time you hit him again. This includes hitting him on his armor where he doesn't take any damage. Effectively you can just hit the armor and prolong the stun phase indefinitely, but that isn't the cheese, because you can also hit the armor with your Dream Nail and still recharge your Soul.
To execute the cheese, when he is stunned jump over him so you are on the Armor side of the boss and hit him with your nail, hit him with your dream nail, and repeat as desired. If you took damage during the attack phase, you can also use the cycle to heal by replacing the dream nail hit with [Focus] to heal a single mask instead. Just remember that every other action must be a nail attack to keep resetting the cycle. Once fully healed and topped up on Soul, jump to the other side and hit the Maggot until he stands up again.
-o-o-o-o-o-
5a - Once you have claimed the Dream Essence, you can now kill both maggots for their complete Hunter's Journal entry if you wish, but otherwise return to the Stag Station and take it to the Resting Grounds.
11-4
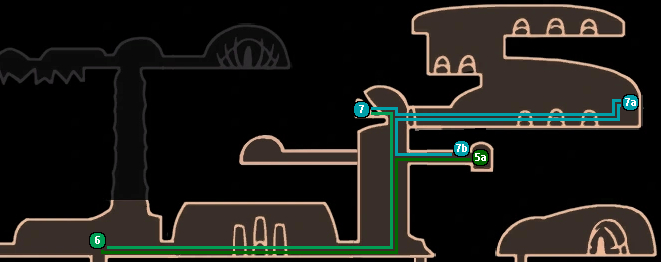 6 - Leave the station and drop down and go left past where you were first trapped in a dream and into where you first dropped into the Resting Grounds. On the raised platform, speak with the red spirit or hit them with your dream nail to fight (DREAM MINIBOSS) Xero. Once he is defeated, speak with or dreamnail him again for (100 Dream Essence).
7 - Return to the Moth Seer and talk to her for a [Hallownest Seal], [Pale Ore] (2/6), Dream Wielder Charm (12/40), [Vessel Fragment] (4/9) and unlock the [Dreamgate] ability for the Dream Nail. Note however, that if you skipped Lost Kin and/or Failed Champion you won't have enough Essence to recieve the [Vessel Fragment] or Dreamgate, possibly the Dream Wielder Charm, and the [Pale Ore] if you skipped both.
7a - Make your way right into the newly unlocked area. Heed the advice of the first spirit you encounter and make your way to the waterfall on the right wall. Climb to the top of it and enter the hidden area to collect a [King's Idol].
7b - Return to the Stag Station and take it to Dirtmouth.
Chapter 12 - Treasures of the Mountain
12-1
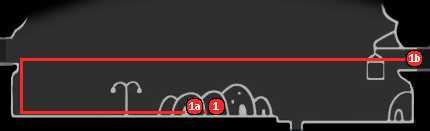 1 - Leave the Stag Station.
1a - Rest at the bench and Double Check that the Grimmchild Charm is equipped. Equip it if it is not.
1b - Make your way up the cliff on the left and use the [Crystal Heart] at the top to cross to the right. As soon as you see an elevator, double jump and climb up the side and over, hit the lever to unlock the shortcut and go right to return to the Crystal Peak.
12-2
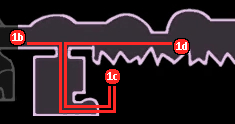 1c - Cross the first gap and drop through the floor. Drop to the bottom of the room and ignore the first "Grub", as it is a Mimic, or kill it for Hunter's Journal progress. The real one is behind a breakable wall behind it: Grub (22/46).
1d - Return to the corridor above and use the [Crystal Heart] to cross the next gap and kill the Grimmkin Novice you run into along the way to collect its flame.
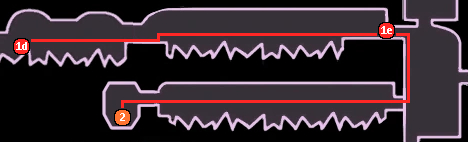 1e - Make your way through the rest of the room and across the next to place a Dreamgate Exit where Cornifer used to be and grab the [King's Idol] on the ledge above.
2 - Go right to the next room and make your way down to an exit on the left wall. If you didn't open it on the previous visit then break the cracked wall that hides it and go through. Time your use of the [Crystal Heart] to pass the Lazors and enter the geode on the far side to acquire the Deep Focus Charm (13/40) and Dreamgate out.
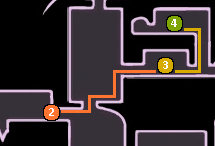 3 - Go right and jump into the next room, climb up the right shaft with the Shardmites and through the exit on the right. In the middle of the room will be the (BOSS) Crystal Guardian. Before he wakes up you can get some cheesy damage on him by using Descending Dark if you don't interact with him first.
4 - Jump up the right side of the room and fight the (BOSS) Enraged Guardian to collect the [Mask Shard] (2/16) behind him once defeated. If you need Soul on consecutive attempts, the upper shardmite in the previous room can be stalled with its spikes out within reach of a platform for some cheeky Dream Nail hits.
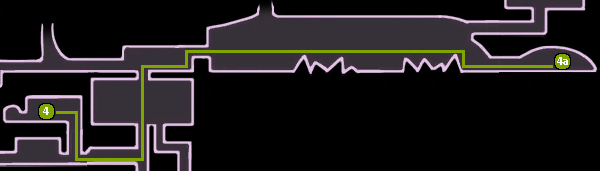 4a - Leave the Bench Room heading rightward, make your way to the top of the room and double jump to the high ledge and continue going right. Make your way across the bottom of the room into the next. It is best to use [Shade Soul] to clear the enemies in this narrow room to avoid damage, then free the Grub (23/46) on the far side.
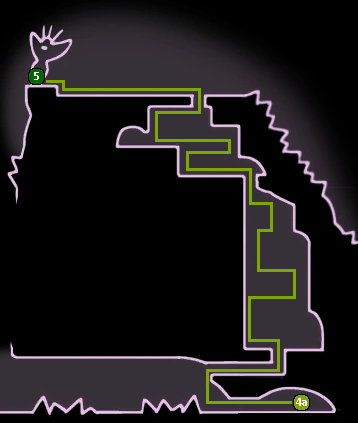 5 - Return to the previous large cavern and make your way to the top right exit. It is possible to execute a combination of double jumps and nail-pogos off of the Crystal Hunter just outside to reach the high ledges instead of backtracking to the left side of the room to make your way up normally. Continue along the crevasses upwards to the very top. If you find yourself taking a lot of damage navigating the crystals, keep in mind that Shardmites stop before they actually reach you and make nearly perfect Dream Nail batteries because of this. Once you reach Hallownest's Crown, go left and collect the [Pale Ore] (3/6) at the base of a moth statue, then use Dreamgate to return to the Dirtmouth Shortcut entrance.
 5a - Make your way back leftward across the crystal lined rooms to return to Dirtmouth.
Chapter 13 - Secrets of Greenpath
13-1
 1 - Take the lift down or jump off the cliff to return to Dirtmouth and go to Sly's Shop.
1a - (Optional) Meet the Grave keeper's Ghost halfway between the locked door on the right cliff face and the well.
2 - Buy the first [Mask Shard] (150 Geo)(3/16) from Sly.
2a - Leave the store and take the Stag to Greenpath.
13-2
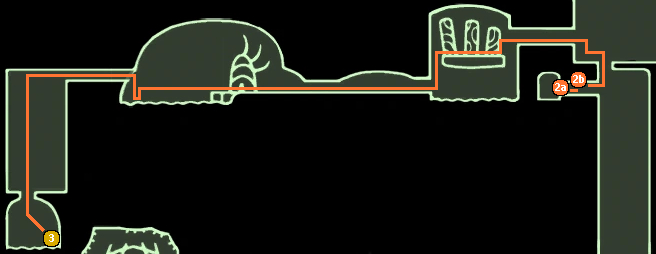 2b - Rest at the Bench to set your reload point when you arrive.
3 - Leave the station and make your way back to where you fought Hornet. Drop down below the arena and go left. Cross the acid lake and swim under the cliff to reach a hidden path. Make your way through the next room to the bottom to collect the Shape of Unn Charm (14/40). Quit and reload to return to the Stag Station Bench and double check that the Grimmchild Charm is equipped and equip it if it is not.
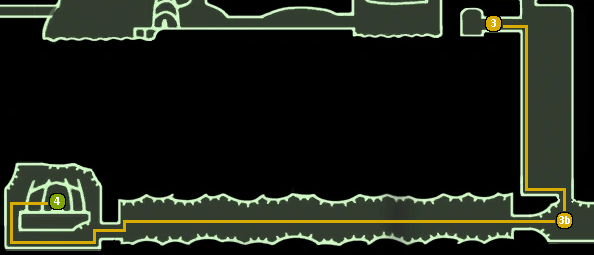 3b - Leave the station again and make your way to the bottom of the vertical shaft. Drop through the floor and place a Dreamgate Exit on the stone arch ledge below where you enter.
4 - Head left into a long cavern full of Duranda. Double jump, dash and nail pogo across them and through the thorns as necessary and into the next room. Circle around to the upper ledge and enter the house to learn [Great Slash] from Nailmaster Sheo, then use the Dreamgate to return to the previous area.
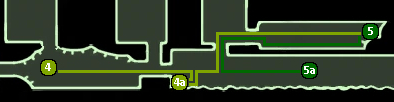 4a - Go rightward into the next room and collect a [Hallownest Seal] from the dead bug under the entrance.
5 - Continue right a short ways and up into the ceiling, make your way to the lowest exit on the right wall and dash through the Lumaflys and thorns to collect the Thorns of Agony Charm (15/40).
5a - Return to the long corridor and continue rightward to kill a Grimmkin Novice to collect its flame.
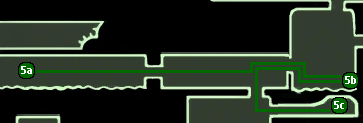 5b - Continue heading rightward through another long room with a bunch of Obbles floating around and into the next to free the Grub (24/46) in the bottom right corner.
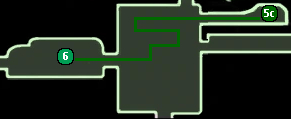 5c - Return to the previous room and drop through the floor, then go right and rest at the Bench to set your reload point.
6 - Make your way through the room left of the Bench and exit to the Left to fight the (MINIBOSS) Great Moss Charger.
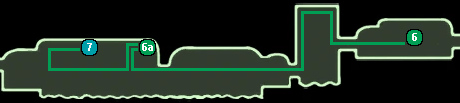 6a - Keep moving left and around the next room to enter another long corridor. Cross it about half way and free the Grub (25/46) about half way through.
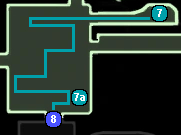 7 - Continue to the left side of the room and jump into the ceiling and head right to collect a [Vessel Fragment] (5/9), then quit and reload to return to the Bench.
7a - Go left and make your way down the room. Past the Duranda where you start to see bubbles along the walls and floor, climb up the right wall into a hidden area and collect a [Wanderer's Journal].
8 - Drop down and Descend into Fog Canyon.
13-3
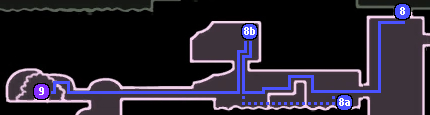 8a - Drop down and find the exit to the left. In the next room it is possible to swim and skip the platforming in this room and pass under the main block, but it is slower. Alternatively, the [Crystal Heart] can be used on the side of the first low platform to do the same but takes practice.
8b - Past the block in the middle of this room, head up into the ceiling to collect a [Hallownest Seal] and (Optional) break the Lifeblood Cocoon to the left for some extra Blue Masks.
9 - Return to the room below and exit to the left and jump up and around to enter the Overgrown Mound. Make your way to the right and fight through a couple waves of Squits to reach the dead Snail Shaman at the end and acquire [Howling Wraiths], then quit and reload to return to the Bench.
13-4
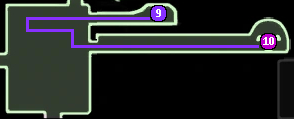 10 - Make your way through the room to the left again and exit to the right. Pass through the dark corridor and enter the Stone Sanctuary. Talk to the Ghost or hit her with your Dream Nail to fight (DREAM MINIBOSS) No Eyes and talk to or hit her with the Dream Nail again to collect (200 Dream Essence), then collect the [Mask Shard] (4/16) at
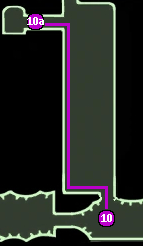 the end of the passages to the right of the boss room. Once finished, use the Dreamgate to leave.
10a - Backtrack to the Stag Station and take it to Dirtmouth.
Chapter 14 - The Resting Grounds' Depths
14-1
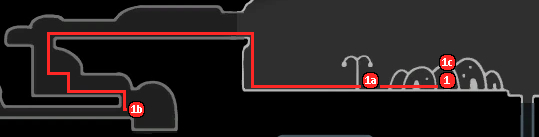 1 - Exit the Stag Station and double check that the Grimmchild Charm is equipped at the Bench and equip it if it is not.
1a - Enter the Big Top and talk to Troupe Master Grimm to upgrade the Grimmchild Charm. Keep it equipped afterwards.
1b - Climb the left cliff and return to King's pass to make your way to the first large room to the right of where the game started. Kill the Grimmkin Master and collect its flame, then quit and reload. Don't unequip the Grimmchild just yet when you reload on the Bench.
1c - Enter the Stag Station and take it to the Resting Grounds
14-2
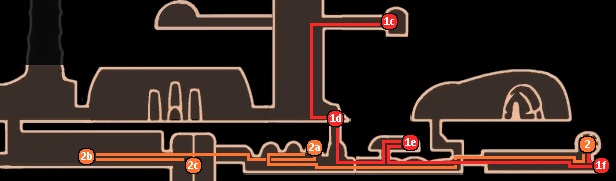 1d - Exit the station and drop to the bottom of the shaft. [Descending Dark] through the cracked sarcophagus on the right to access the area below.
1e - Break through the wall to the right of where you drop in, then break the ceiling just a little further along the path to find a hidden area with a Grub (26/46) to be freed.
1f - Keep going right and break through the wall behind the chest and be mindful of the trapped floors after the drop behind it. After the second drop watch out for one last trapped floor and the Entombed Husk ahead. Collect a [Wanderer's Journal] from the small hidden area it was hiding in.
2 - Jump up from the hidden area's entrance and break the ceiling to collect the Soul Eater Charm (16/40).
2a - Backtrack to where you dropped into the area and keep going left until you see a cracked ceiling. Break through it and watch out for the belflys and collapsing floors as you break through the cracked walls leading back right to collect a [Hallownest Seal].
2b - Head back left and break through the wall. Pass through the lift room into the next and Kill the Grimmkin Master to collect its flame. (Optional) Hit the lever to the upper left to open a passage leading to under Xero's grave.
2c - Backtrack to the lift room and use it to descend into the City of Tears.
Chapter 15 - At the Edge of the World
15-1
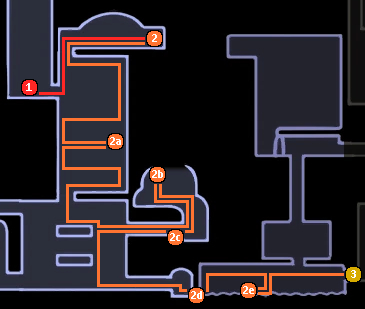 1 - Exit the elevator room to the right.
2 - Make your way to the exit in the ceiling above you and fight through the guard-bug gauntlet you encounter there to collect the [Vessel Fragment] (6/9) at the far end.
2a - Drop down into the tower below and make your way down the first elevator shaft. When you reach the second elevator shaft, duck into the only floor that doesn't have a call lever and collect the [Wanderer's Journal] behind the Sentry Husks guarding it.
2b - Make your way the rest of the way down and Enter King's Station through the floor. Enter the upper station platform and collect the [Hallownest Seal] above it using double jumps and nail pogoing over the spikes on the roof. It's a bit tricky to get above, as there is only a very small area on the side of the roof below the spikes that can be grabbed on to with a wall cling.
2c - Return to the platform below and activate the Stag Station (300 Geo), place a Dreamgate Exit, and double check that the Grimmchild Charm is still equipped.
2d - Return to the station hub to the left and drop down to the bottom. Exit to the right to find a broken station. Swim under the wall at the far right side.
2e - Continue along the path and free the Grub (27/46) below while watching out for belflys.
3 - Keep moving right to enter the Kingdom's Edge.
15-2
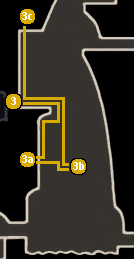 3a - Drop off the ledge to the right and follow the wall down to a pipe you hear a by now familiar humming coming from. Enter it and buy the Area Map from Cornifer (112 Geo).
3b - Exit the pipe and find a red flame torch on one of the platforms outside. Kill the Grimmkin Master it belongs to and collect its flame.
3c - Return to where you entered the area and climb the wall above all the way up to collect a [Wanderer's Journal]. Drop back down and use the [Crystal Heart] when the room opens up to reach the other side and continue moving rightward.
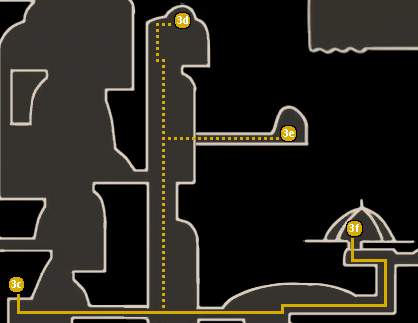 3d - (Optional) Climb to the top of the first room to the right to meet Bardoon.
3e - (Optional) Find a ledge marked with the telltale blue butterfly flowers to find a hidden room with a Lifeblood Cocoon and break it for some extra Blue Masks.
3f - Continue along rightward and take the upper path. Above a series of double jumps there will be a bent Bench sign. Break the ceiling above and to the left of it to access a Bench and collect a [Wanderer's Journal].
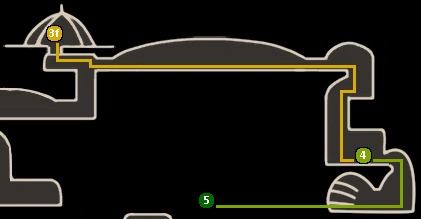 4 - Drop back down and keep going right. Follow Hornet at the end of the hall and drop down through the next room to fight (BOSS) Hornet Sentinel.
5 - Once Hornet is defeated again, talk to her, then make your way right and down and all the way to the end to the left and enter the Cast Off Shell. [Crystal Heart] can safely be used to quickly cross the frankly absurd distance, and once at the end claim the [King's Brand]. Use the Dreamgate to leave the area once you can move again, and take the Stag to the Hidden Station in the Ancient Basin.
Chapter 16 - The Abyss
16-1
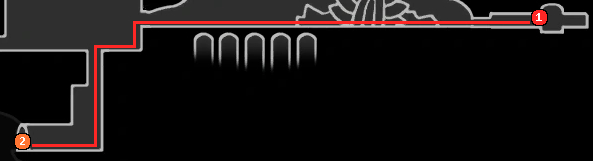 1 - Exit the station using the [Crystal Heart] to cross the distance to the basin's main hub room, then drop into the floor.
2 - Make your way down and to the left in this new room to open the gate with the [King's Brand] and Enter The Abyss.
16-2
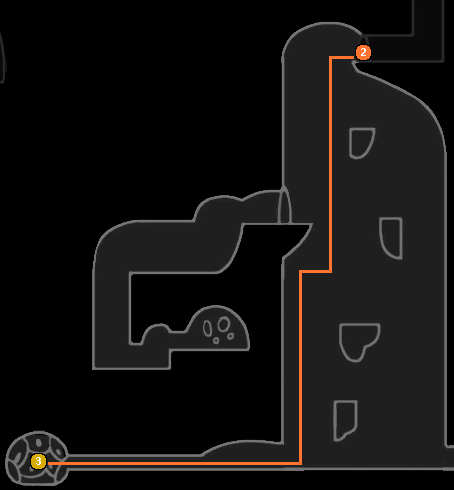 3 - Drop all the way to the bottom and exit to the left. Make your way to the end of the hall and use [Howling Wraiths] in the middle of the room full of faces to evolve it into [Abyss Shriek].
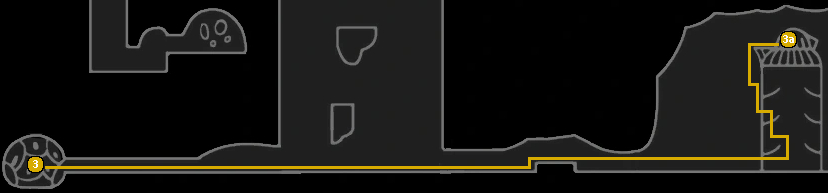 3a - Return to the main vertical room and keep following the bottom rightward. Two rooms over climb to the top of the platforms and enter the structure. Hit the lever inside to light the lantern to calm the Abyss.
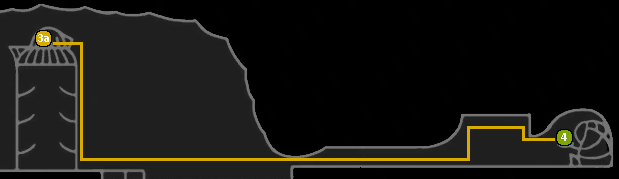 4 - Use the [Crystal Heart] to cross the lake of void substance and cross into the next area. At the far end bathe in the bowl overflowing with darkness and evolve the [Mothwing Cloak] into the [Shade Cloak].
4a - Take the lower path from the bowl overflowing with darkness to collect an [Arcane Egg].
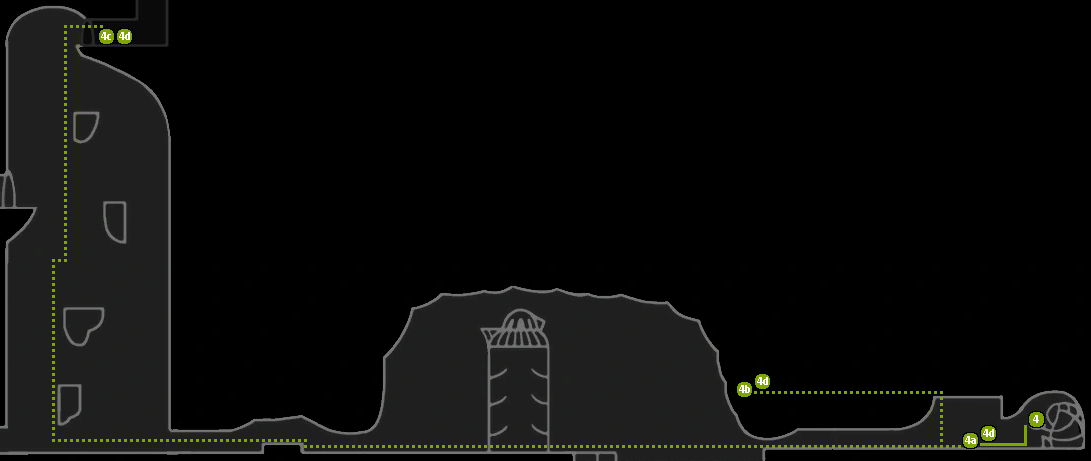 4b - (Optional) Backtrack a little ways and climb into the ceiling to find a hidden corridor. Pass through the Shadow Gate and collect the Void Tendrils Journal Entry from the tablet in the observation room at the far end.
4c - (Optional) Backtrack all the way back to the entrance to The Abyss to meet Hornet for some extra dialogue.
4d - Use the Dreamgate to leave the area once all desired tasks are completed.
Chapter 17 - The Mantis Lords
17-1
 1 - Call the Stag and take it to Dirtmouth.
2 - Leave the station and make sure the Grimmchild Charm is equipped at the Bench, then enter the Big Top to fight (BOSS) Troupe Master Grimm to upgrade the Grimmchild Charm and collect a [Charm Notch] (3/8).
2a - Return to the Stag Station and take it back to King's Station.
17-2
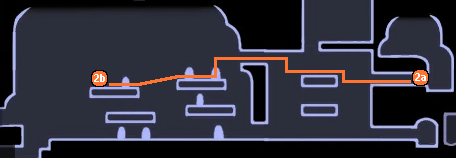 2b - Leave the King's Station hub through the upper left exit and enter the curtained door one level of platforms down. Clear the husks before hopping into the hidden passage at the back of the room to find the Gorgeous Husk. Kill it and collect its spoils.
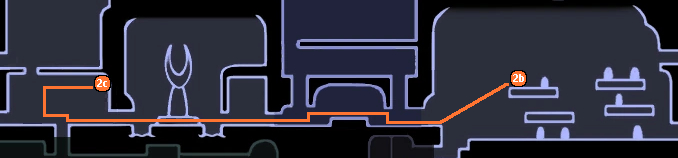 2c - Make your way across the main city boulevard and up into Lemm's office to sell all of your Relics.
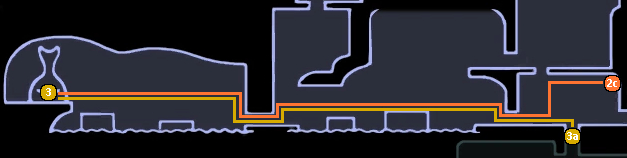 3 - Keep moving along the boulevard leftward. In the room past the elevator down from the city gates climb up the wall as high as you can and use the [Crystal Heart] to avoid all the enemies below. Enter the Nailsmith's hut and upgrade your nail to Coiled. Note that if you skipped fighting both Lost Kin and Failed Champion for their Dream Essence, you won't have had enough Essence for the Moth Seer's [Pale Ore] when you last spoke to her, but you will have enough now. If you don't have the required [Pale Ore], for the third upgrade, go and acquire it from the Resting Grounds now. (Sharpened - 250 Geo)(Channeled - 800 Geo + 1 [Pale Ore]) (Coiled - 2000 Geo + 2 [Pale Ore])
3a - Backtrack to the hall below Lemm's office and return to the Royal Waterways.
17-3
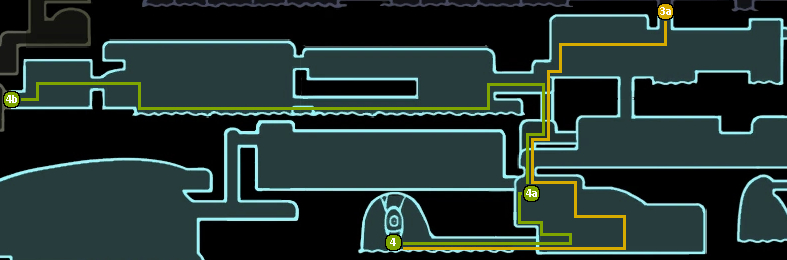 4 - Make your way down to the Bench and in the corridor directly below it use [Descending Dark] on the loose floor. Circle around the new area all the way as far down as you can go. Start making your way left and when the path starts to go up instead keep going straight into a hidden area to find (BOSS) Flukemarm. Defeat her and collect the Flukenest Charm (17/40).
4a - Return to where the hidden path started and climb up, being mindful of the Belfly at the top. Open the shortcut to the right and break the cracked wall in the corner above you to the left, but return to the Bench for now.
4b - Go up and to the left, making your way back to where Cornifer was to pass into the Fungal Wastes.
17-3
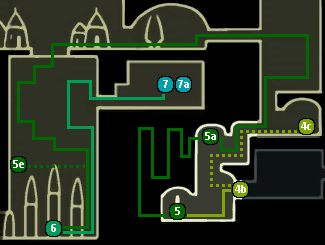 4c - (Optional) Make your way up into the next room and rest at the Bench before attempting the spike challenge to rescue Bretta.
5 - Go left and drop down to acquire the Dashmaster Charm (18/40) from the base of the statue.
5a - Go left from the statue into a hidden area and climb through the narrow spike filled channels to rescue Bretta. Then make your way to the Mantis Village. Drop through the big hole in the middle of the floor you opened before and make your way around the left side of the room, hitting the levers to open the doors along the way.
5b - (Optional) At the top of the boss arena, use the [Crystal Heart][ to cross to the other side of the room and break open a wall to find a Lifeblood Cocoon for some extra Blue Masks.
6 - Drop to the bottom of the big room and challenge the (BOSS) Mantis Lords.
7 - Once the Mantis Lords are defeated, head back up and circle around to the exit on the right, continuing to hit the levers and open the gates as you go. Collect all the treasures in the new room, including a Geo Chest, a Chest with a [Hallownest Seal], and the Mark of Pride Charm (19/40).
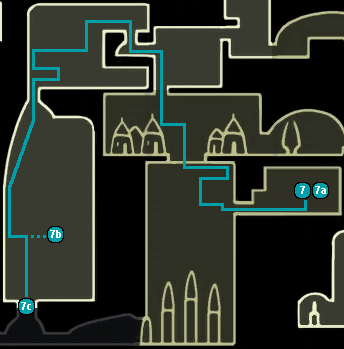 7a - {RITUAL} If you are going for the Ritual ending to the Grimm Troupe Quest, rest at the bench in the bottom right corner of the room and make sure the Grimmchild Charm is equipped.
7b - Leave the Mantis Village through the ceiling and make for the left exit of the room above and double jump up to enter the Fungal Core and just keep going down from there. {RITUAL} Once you are near the bottom of the Fungal Core, search for the red flame torch and Kill the Grimmkin Nightmare to collect his flame.
7c - Once you reach the bottom of the Fungal Core, fall into Deepnest.
17-4
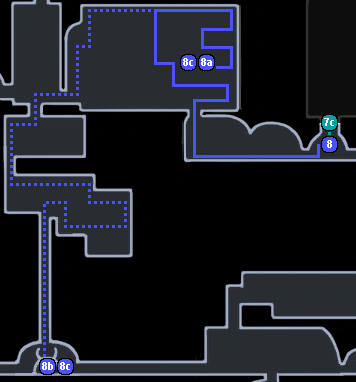 8 - Collect the [Mask Shard] (5/16) at the bottom of the fall.
8a - Fall through the collapsing floor and make your way left and up into a maze like room. Make your way through it to the top, and in the corner where a tall vertical shaft meets the very top of the room and goes left, go right instead into a hidden area. Drop down through the area below to collect a [Hallownest Seal] at the end.
8b - (Optional) Make your way to the left through the mazelike rooms until you drop into the Deepnest Hot Spring for a Quirrel Encounter. If he is not there, then you will have to make your way up to the Failed Tramway where you may have met Cloth at the beginning of Chapter 4, and then return to the Hot Spring. It may be best to rest at the bench there and quit and reload to make the return trip easier.
8c - Once all desired tasks have been completed use the Dreamgate to return to King's Station and Immediately take the Stag to Dirtmouth.
Chapter 18 - The Forgotten Ones
18-1
 1 - Leave the Stag Station
1a - Descend into the Infected Crossroads
18-2
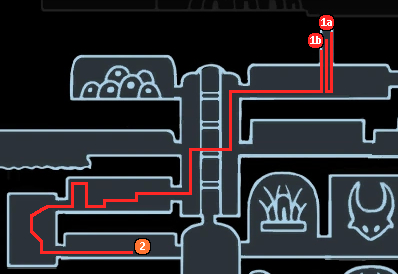 1b - Jump up into the well and climb the wall half way and collect a [Hallownest Seal] on the left.
2 - Head to the main shaft in the crossroads and break through the cracked door under the Greenpath exit. Climb and fall through the spike filled corridors to fight the (BOSS) Brooding Mawlek. Defeat it and collect the [Mask Shard] (6/16) that forms on its defeat. Once you have it, make your way back to the halls with the Goams.
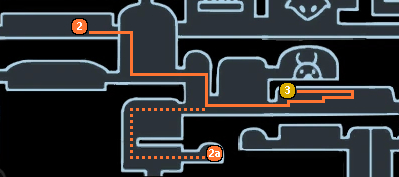 2a - (Optional) Go back to the entrance to the Fungal Wastes but go right instead of down and use [Descending Dark] on the loose floor to access the [Hunter's Journal] entry for Goams.
3 - In the first room with Goams, navigate through the ceiling and collect the [Mask Shard] (7/16) at the end.
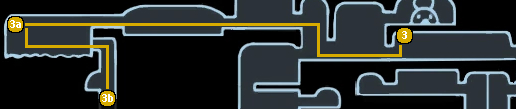 3a - Go back to the room where you first met Cornifer and take the lower left exit. Cross the acid pool at the end to free a Grub (28/46).
3b - Go back to the right side of the room and swim under the wall to descend into Fog Canyon
18-3
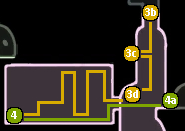 3c - Go left into a hidden area at the top of the room and down through the thorn filled nook to collect a [Hallownest Seal].
3d - Go back up and into the main shaft, then descend until you see the first exit on the left. Place a Dreamgate Exit before entering it.
4 - Navigate through the exploding bubbles to acquire the [Charm Notch] (4/8).
-o-o-o-o-o-
(Extra Note) Spells can be used to clear the way, and [Descending Dark] provides I-Frames for clearing the drops without taking damage. In the top right corner of the room there are also a trio of Uoma, one of which is easily reached with the Dream Nail to recharge Soul.
-o-o-o-o-o-
4a - Return to the previous vertical room and exit straight across to the right into the Fungal Wastes.
18-4
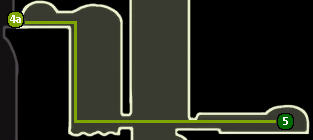 5 - Drop through the next room and exit to the right, then go straight across. Equip the Defender's Crest on the Bench and pay Leg Eater to see his charms (86 Geo), then buy the Fragile Heart (280 Geo)(20/40), Greed (200 Geo)(21/40), and Strength (480 Geo)(22/40) charms from him. The Defender's Crest can be unequipped once finished.
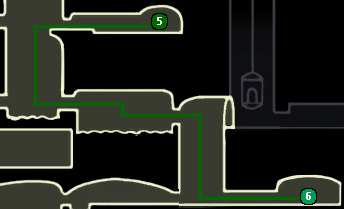 6 - Leave Leg Eater's room and make your way down to exit right. Keep going right and at the bottom of the next vertical room exit right again. Talk to the spirit or hit them with your Dream Nail to fight (DREAM MINIBOSS) Master Hu, then talk to or Dream Nail him again to collect (100 Dream Essence). Once done use the Dreamgate to return to Fog Canyon.
18-5
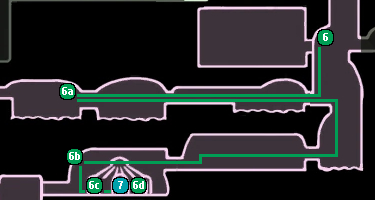 6a - Drop down to the next exit to the left and take it. Cross the room and into the next and make your way above the shadow gate to buy the Area Map from Cornifer (150 Geo).
6b - Return to the vertical room and take the left exit all the way at the bottom. Cross through this room and use the [Crystal Heart] when you enter the next to find a hidden area and free the Grub (29/46) inside.
6c - Drop down and go to the middle of the room to place a Dreamgate Exit.
6d - (Optional) Speak to Quirrel.
7 - Enter the Teacher's Archives and rest on the Bench at the top of the first room if you wish. Make your way down through the structure to fight (BOSS) Uumuu.
-o-o-o-o-o-
(Boss Notes: Uumuu) the Dream Nail combined with the Dream Wielder Charm can be used to keep Uumuu at a distance as it is immune to physical attacks until Quirrel breaks its outer membrane. Once vulnerable, it can be quickly killed with Magic.
-o-o-o-o-o-
Make your way into the next room and meet Quirrel next to the tank in the middle. Once Quirrel has done what he must, hit the tank with the Dream Nail (DREAMER) to enter Monomon's Dream to end it (1/3). (Optional) Collect the Charged Lumafly Journal Entry on the left side of the room. Once finished, use the Dreamgate to Exit.
Chapter 19 - The Queen's Gardens; Part 1
19-1
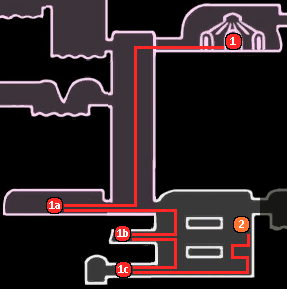 1 - Go left and drop to the bottom of the next room and enter the room to the left.
1a - Meet Millibelle the Banker in the middle of the room. Pay her (100 Geo) to open an account, then deposit (4500 Geo) with her, then return to the previous vertical room and exit across to the right to enter Queen's Station.
-o-o-o-o-o-
 (Extra Note: Millibelle) If you do not have the total 4500 Geo to deposit at this time, do not deposit 2550 Geo or more with her, as you will not get the maximum return on it later. Once the 2550 threshold is crossed, Millibelle moves on to the next step of her quest where you can extract a return on your deposit with interest from her, but the total return is dependent on how much you have given her before then.
As long as you fully complete steps 19-1:1a and 19-1:2a before Chapter 23-1:2c you will be fine, and Millibelle's proximity to Queen's Station makes returning convenient if you progress through the guide and find you have the needed Geo to spare when close to another Stag Station.
-o-o-o-o-o-
1b - Enter the upper left platform and jump into the area above Willoh to find a [Hallownest Seal]. (Optional) Dream nail her and the corpse the Seal was next to for some grimdark.
1c - Go down to the active station platform to sit on the Bench, then return to the station hub.
2 - Collect the [Mask Shard] (8/16) on the right side of the station hub above the thorns.
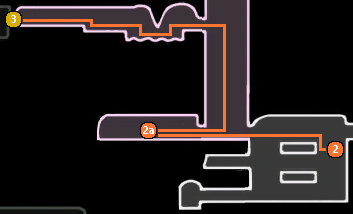 2a - Return to Fog Canyon through the top left exit and cross into the next room over to where Millibelle was to now find her gone. Knock over the bank façade by hitting it with your nail, then leave.
3 - Go back to the vertical room and climb until you find the next exit left. Take it and swim under the large thorn spike to enter the Queen's Gardens.
19-2
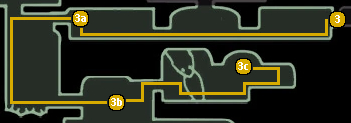 3a - (Optional) If you rescued Cloth in the Ancient Basin you will meet her directly along the path before the gates into the Gardens.
3b - Make your way down the first vertical room and exit right and fight through the Mantis Petra gauntlet.
3c - Keep moving right and follow the sign and circle around the room to buy the Area Map from Cornifer (150 Geo) for the (Cartographer} Achievement. (Optional) Meet the spirits of Caelif & Fera to the right of Cornifer.
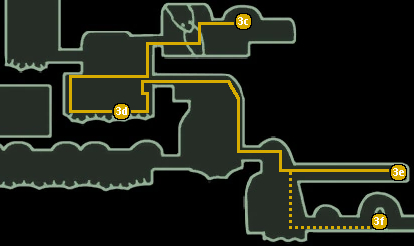 3d - Return to the previous room and circle around the lower half of it to activate a Lever to open the path forward.
3e - Cross over the next room and drop down to exit in the lower right. Enter an alcove on the right side of the next vertical room and fight past two Mantis Traitors to acquire the [Love Key]. Be careful as a third will spawn behind you as soon as you enter the room with the giant dead Husk Dandy.
3f - (Optional) Go to the bottom of the room to open the shortcut back to the Fungal Wastes and enter the Moss Prophet's chapel to find him and his followers dead. They can be Dream Nailed for extra dialogue and inspecting the Vagabonds will give their [Hunter's Journal] entry if it was not obtained earlier.
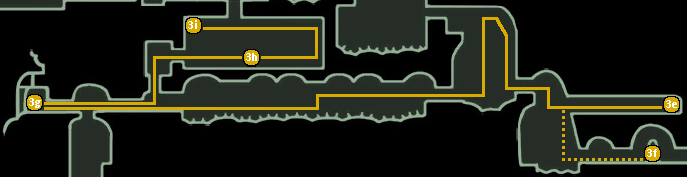 3g - Backtrack to the previous room and make your way to the lower right exit. Continue across until you can't go right anymore and unlock the Bench (150 Geo).
3h - Go left two rooms and up into the next to fight through the Mantis Gauntlet.
3i - Continue on to the upper half of the room and free the Grub (30/46) in the hidden area behind the Geo Node.
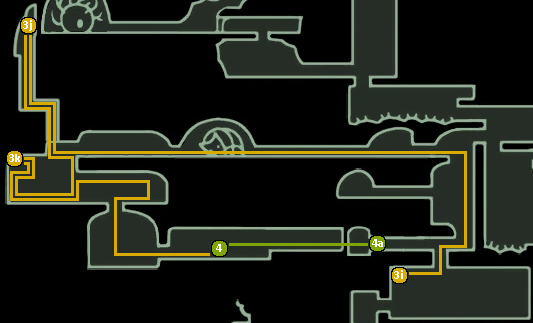 3j - Go up into the next room, climb to the top and take the left path. Keep going past the corpse of a giant bug and when the path narrows climb up instead of down into a hidden area to free a Grub (31/46) at the top.
3k - Go back down and circle left through the narrow passages to collect a [Hallownest Seal].
4 Circle around the right half of the room and drop down into the next. Keep following the path right to find another Warrior's Grave. Talk to the Spirit or hit them with your Dream Nail to fight (DREAM MINIBOSS) Marmu. Once they're defeated talk to or dreamnail them again to collect (150 Dream Essence).
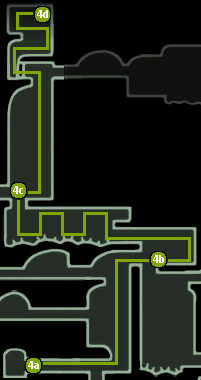 4a - Continue on to the right and unlock the Queen's Gardens Stag Station (200 Geo), hit the lever to open up a Shortcut, and rest at the Bench.
4b - Leave the station through the right exit. Climb to the top of the room again but take the right path this time and unlock the shortcut down, but continue on circling up.
4c - Navigate through the trick platforms and thorns in the next room and place a Dreamgate Exit as soon as you jump into the room after.
4d - Make your way to the top of the vertical room and break the glass, then climb through the next bit to free a Grub (32/46) at the top. Use the Dreamgate to return to the bottom.
Chapter 19; Part 2
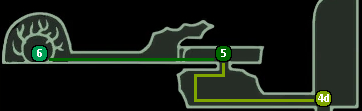 5 - Take the door to the left and make your way through the trick platforms and thorns to face the (BOSS) Traitor Lord.
-o-o-o-o-o-
(Extra Note) If you met Cloth in the Ancient Basin, this will be your final encounter with her, as she helps you defeat the Traitor Lord, but dies delivering the final blow. Returning to the room after defeating him allows you to speak with her spirit for one final time.
 (Boss Notes: Traitor Lord) Traitor Lord is easily one of the most frustrating bosses in the game for new players. Not because he is the first many new players will encounter to do 2 Masks of damage unless they're using a guide like this one. Not because of the tight timing on his patterns that makes healing all but impossible, or his all-arena covering attacks that require the shade cloak to pass through rendering many of the dodging strategies players develop in the early game all but useless. But because the nearest bench to the boss is the one in the Queen's Garden Stag Station and the obnoxiously long walk back through two separate medium-difficulty platforming challenges from it when, not if, they die, on top of the fight starting with battling several Mantis Traitors at once in a fairly enclosed space.
It is entirely likely for players to arrive in the boss arena already injured and low on Soul to heal, only to be quickly killed by the preamble before the actual boss fight even begins. If you're badly injured or become so before the Traitor Lord even appears, just quit and reload and save yourself the aggravation of having to collect your Shade from directly under the arena. (Yes, it appears above all of the trick platforms and thorns and they have to be navigated through to reach it)
One tactic more experienced players use to mitigate the frustration is to place a Dreamgate on the platform under the entrance to the arena. Be careful if you do this, however, as it is not uncommon for unfamiliar players to take multiple dozens of attempts before they beat the Traitor Lord, no matter how prepared or "over" prepared they may be. This guide provides very narrow margins for the required Dream Essence to unlock the final %Completion from the Moth Seer, and if too much Dream Essence is used returning to the boss, and not enough regained through slaying standard enemies while traveling, you will be required to either backtrack to visit the [Whispering Roots] that this guide has been largely ignoring, or trekking up to the one Dream Boss not covered if you fall short. If you had to skip Lost Kin and/or Failed Champion earlier on and didn't collect their Dream Essence to acquire the Dreamgate, go back and do so for at least one of them and collect the Dreamgate before attempting to fight Traitor Lord. You'll thank yourself after you beat him. It also isn't a bad idea to use your Dreamnail on the Mossflys in the vertical room right of the Stag Station to charge your Soul before dreamgating to the boss and collecting your Shade.
To start the fight are 3 waves of Traitor Mantises; 2 of 1 and 1 of 2. If you have Cloth helping you, she will kill the second mantis before it can attack and help you with the third wave. You can still take damage from moving into its body hitbox, but its actions are all scripted and this is an excellent opportunity to heal if you need to. If you do not have Cloth helping you it will behave normally. Once all waves are defeated you will hear a Roar from above and see dust falling from the middle of the arena. This is an excellent opportunity to get some cheeky preemptive damage on the boss as it can be hit with [Abyss Shriek], followed by a hit from your Nail or [Descending Dark] when he drops down before you're frozen in the boss declaration cutscene.
Traitor Lord has 4 attacks. A straight lunge, a Jump Lunge, a double-disc that travels the entire arena horizontally in a wave pattern, and a shockwave slam that hits the entire arena horizontally And vertically. The key to beating him is to stay close to him, try to maintain pogo melee attack chains instead of staying grounded as double jumps can be used to avoid the standard lunge, don't be wasteful with your shade cloak and standard dashes to avoid damage by dashing through him instead of away when he jumps, and liberally using [Descending Dark] to both punish the boss' aggressive behavior and avoid damage yourself. The Mantis Lord only uses the double-disc attack when you are far away from him, so keeping close avoids him using it entirely. Further, if you're at a distance and he uses his shockwave attack, the least wasteful way to avoid damage is Shade Cloak which could be on cooldown if you used it to dodge a previous attack, but if you're close [Descending Dark] lets you both avoid damage and punish him for the long stationary animation.
Other than that, my only advice is don't be afraid to put the game down for a day if it feels like you know his patterns but you've still hit a wall with him. Taking a break allows you to calm down while your subconscious churns through everything you've learned.
-o-o-o-o-o-
6 - Once the Traitor Lord is defeated continue left to enter The Queen's Sanctum and retrieve the first half of the Kingsoul Charm from her. Quit the game and reload to return to the Queen's Gardens Stag Station.
Chapter 20 - Into the Depths
20-1
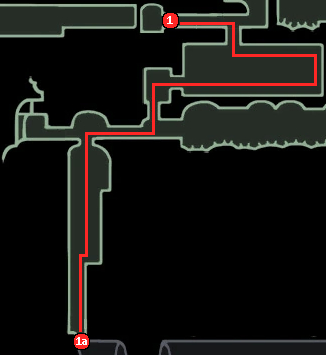 1 - Make sure the Grimmchild Charm is equipped before leaving the Stag Station
1a - Make your way back to the Bench in the lower left of the region and drop through the floor in the room to the right of it. Navigate through the thorns in the darkened room and drop down again to return to Deepnest.
20-2
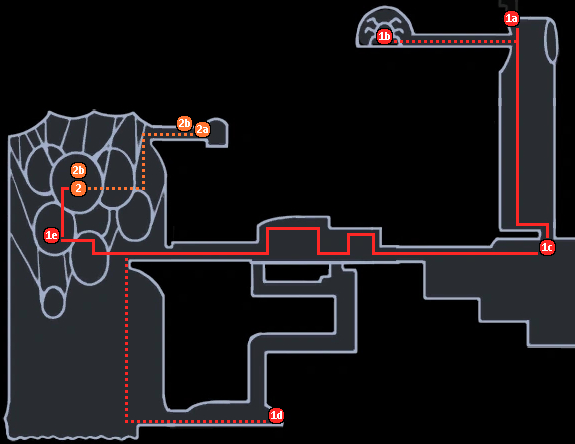 1b - (Optional) To the left of where you enter Deepnest, enter a narrow hall to meet the Mask Maker. His mask can be broken by using [Descending Dark] next to him for some additional dialogue.
1c - Navigate to the bottom of the vertical shaft you enter Deepnest into and after you drop through into a new room place a Dreamgate Exit before continuing along the path leftward to a large open cavern.
1d - (Optional) Drop down to the bottom of the cavern and exit right. Keep walking until you see a bug come out of the wall ahead of you to meet the Midwife. Careful! She bites at the end of her dialogue, but can be evaded by running away. To return to where you need to be to continue, take the upward shaft and break through the supported walls and floors to open the way.
1e - Cross the platforms to the left and enter the small hut to meet with Brumm, who discusses his concerns with the ritual before giving you his flame.
2 - From the hut Brumm was in, go up and right to enter the Beast's Den and "rest" on the Bench, then break free by mashing attack once you are able to. Drop down and find a collapsing floor a little to the right to collect the [Hallownest Seal] in the alcove below it, then navigate up to the top of the nest, freeing a Grub (33/46) along the way before you find where Herrah rests. Enter her Dream and end it (2/3). Speak to Hornet once you wake if you wish, then make your way down along the left paths. The Grimmchild can be unequipped if desired at a Bench to the lower left, above the large room you first enter in. Once finished, leave the Beast's Den.
2a - (Optional) Take the platforms up and to the right to enter the Distant Village Stag Station and unlock it (250 Geo), then take the Stag to the Stag Nest, examine the egg in the upper area by the exit, and return to the Stag for the {Hope} Achievement.
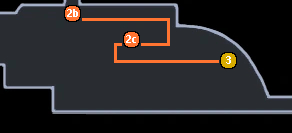 2b - Use the Dreamgate to return to 1c once finished.
2c - From your Dreamgate head right past a Stalking Devout and down through a collapsing floor to free a Grub (34/46), then drop down behind it and dash to the right to reach another corridor.
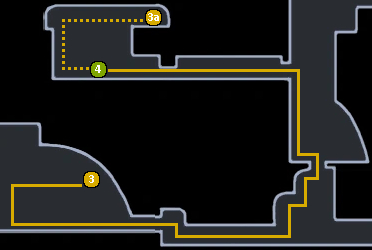 3 - At the back of the corridor is another Stalking Devout. Make it behind them and break the wall behind it to enter the Weaver's Den and collect the Weaversong Charm (23/40) by taking the upper path and crossing a spike floor. Once you have it, leave the Weaver's den and make your way down to exit this room on the bottom right. In the next room find the upward path and take it to another exit, then in the vertical room locate the exit marked with glowing white mushrooms along the left wall and enter it.
3a - (Optional) Take the path past the fallen warrior to loop up and around above it to find a Lifeblood Cocoon that can be broken for some extra Blue Masks.
4 - Talk to the warrior's ghost or strike them with your Dream Nail to fight (DREAM MINIBOSS) Galien. Once they are defeated do so again to collect (200 Dream Essence).
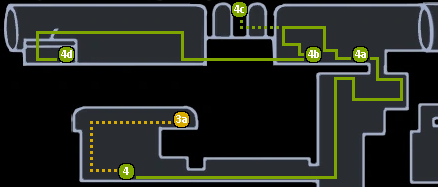 4a - Return to the vertical room and navigate to the top and through the ceiling to enter the Failed Tramway. Place a Dreamgate Exit on the ledge above where you come in.
4b - Make your way left and into the broken station and down into the tram car buried under it. Hit the lever on the right to open the way leftward.
4c - (Optional) Jump above the broken station to find a Lifeblood Cocoon that can be broken for some extra Blue Masks.
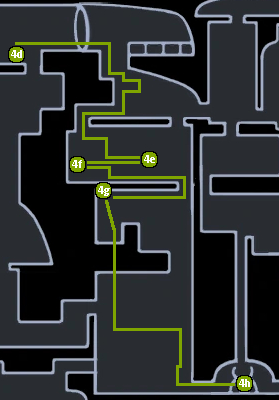 4d - Continue making your way left and enter the crashed tram car at the end through its ceiling to collect the [Tram Pass], then use the Dreamgate to return to the beginning of the Failed Tramway.
4e - Exit through the large door to the right and make your way down through the left exit in the floor. Fight through the Corpse Creeper gauntlet then go right to rescue Zote from the spider webs below.
4f - From Zote go straight left to collect a [King's Idol].
4g - Drop into the next room and free the Grub (35/46) directly to the left, then fall through the small passage on the right side of the spike floor below.
4h - Make your way to the bottom of the room and through the exit on the right to enter the Deepnest Hot Spring. Rest on the Bench and return to the room to the left.
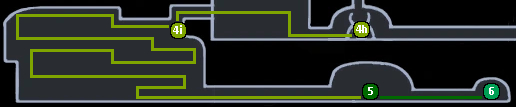 4i - Use the [Crystal Heart] from the ledge above where you come in to find a cracked wall on the other side of the room. Break through it and drop down to free the Grub (36/46), then break the wall above it to the left to find another hidden area.
5 - Follow the familiar figure through the winding tunnels and past another breakable wall to find (BOSS) Nosk.
-o-o-o-o-o-
 (Boss Notes: Nosk)
Nosk isn't terribly difficult for this guide's current status, but it can be annoyingly aggravating to new players due to how skittery it is. First note that in the tunnels leading up to it is a wall that can be broken from one side that comes out next to where the Grub was for a shortcut back to the Bench. Second is that Nosk is fast enough on its feet where it can be double or even triple hit with [Shade Soul] when it is running away from you. Thirdly, when Nosk jumps up into the ceiling to rain down infection on you, it is highly vulnerable to [Abyss Shriek] and should be punished accordingly for a quick and dirty kill.
-o-o-o-o-o-
6 - Once Nosk is defeated go to the right of where it was and collect the [Pale Ore] (4/6), then quit and reload to return to the Deepnest Hot Spring.
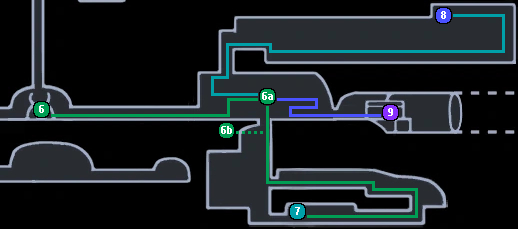 6a - Leave the Hot Spring to the right into a room full of Garpedes. Place a Dreamgate Exit roughly as close to the center as you can figure, then drop into the room below.
6b - (Optional) After dropping down, go left into a hidden area to collect the Garpede Journal Entry.
7 - Make your way through the shadow gate and around the room, shade-cloaking through the enemies, to collect the Sharp Shadow Charm (24/40), then use the Dreamgate to return to the previous room. Remember, if you take some damage you can heal and use your Dream Nail on the Goams to restore your Soul.
8 - Make your way up into the room above and nail-pogo, dash, and double jump across the Garpedes and spike walls, then nail-pogo up the vertically traveling Garpede's face to collect the [Vessel Fragment] (7/9) in the hall above and to the left. Use the Dreamgate to return to 6a again.
9 - Make your way to the right side of the room and find the exit out to the lower right. Unlock the Tram Car in the next room, enter, and activate the right control twice to travel to The Hive.
Chapter 21 - The Hive
21-1
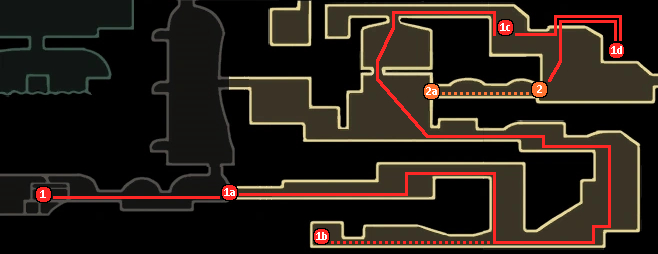 1 - Rest on the Tram Bench and leave the car.
1a - Make your way straight across to the right and break the cracked wall over the writhing insects at the far end of the tunnel to open the lower entrance into the hive and place a Dreamgate Exit just behind where it was.
1b - (Optional) Make your way around the next two rooms and cut left at the bottom of the first vertical room to find a Bench trapped in amber hanging from the ceiling. Break it free to rest at the Bench if you wish.
1c - Make your way rightward and drop down the first vertical room, continue to the right and climb the next vertical room to take the exit to the upper left. Travel through the hall until you reach a large open room and make your way to the top left of it to jump into the ceiling, then climb to the top middle of this large open room and keep following the path right again. In the next room, drop to the second ledge down from the entrance. Cling to the wall to your left and from roughly the center of it use the [Crystal Heart] to find a hole in the ceiling. Cancel your super dash just before you reach it and double jump into it.
1d - Follow the hall in the ceiling to free the Grub (37/46) at the end, then return to the cavern below.
2 - In the bottom left corner of the cavern, lure one of the large charging bees into smashing the cracked wall and collect the [Mask Shard] (9/16) behind it.
2a - (Optional) To the left of the mask shard, break the wall to open a shortcut to the other side of The Hive.
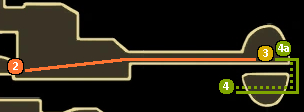 3 - Continue rightward to the far end of the room and break through all the cracked barriers to face the (BOSS) Hive Knight.
4 - Once the Hive Knight is defeated, make your way to the right and then under the arena to collect the Hiveblood Charm (25/40), then use the Dreamgate to return to where you entered The Hive.
4a - (Optional) Return to the room above once you have the Hiveblood Charm to meet the spirit of Queen Vespa.
Chapter 22 - Secrets of the Kingdom's Edge
22-1
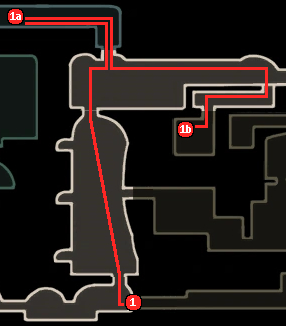 1 - Make your way up and to the top of the vertical room above. Continue up to an exit in the ceiling of the next hall above where you came in to enter the Royal Waterways.
1a - Make your way to the right and double jump up as soon as the ceiling opens up to free a Grub (38/46) above and to the left.
1b - Return to the previous hall and continue rightward to the end. Use [Descending Dark] on the loose floor to open a secret area under the floor. Navigate the narrow passage to drop into a cut off section of The Hive and free the Grub (39/46) inside.
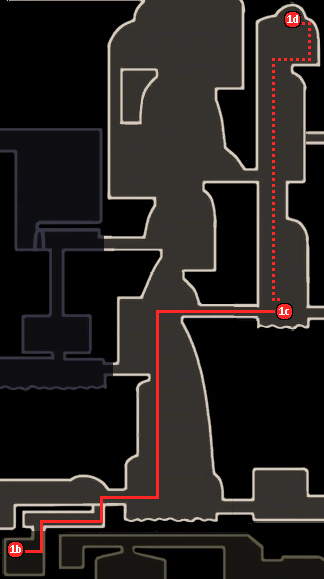 1c - Return to the previous room and break open the wall next to where the loose floor was and continue on. Climb to the top of the vertical room and take the upper right exit into another vertical room. Place a Dreamgate Exit on the floating platform above the acid pool at the bottom of the room.
1d - (Optional) Climb up to the top of the room for some new commentary from Bardoon.
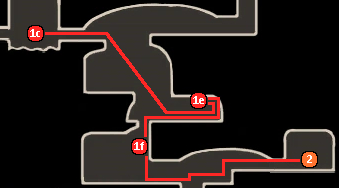 1e - Keep making your way to the right and take the lower path in this room this time around. When you reach the bottom, find the cracked wall to the right and break it open to free the Grub (40/46) behind and above it.
1f - Drop through the exit in the floor and find the loose ground to your right. Use [Descending Dark] to break through it and climb back up half way into a narrow passage. Be mindful of the multiple stalactites that will fall from the ceiling above the corpse at the end before you collect the [Wanderer's Journal] it is holding.
2 - Continue rightward along the bottom of the room and pass through the Shadow Gate to find a fallen warrior. Speak to their ghost or hit them with the Dream Nail to fight (DREAM MINIBOSS) Markoth, and speak to or dreamnail them again once they are defeated to collect (200 Dream Essence).
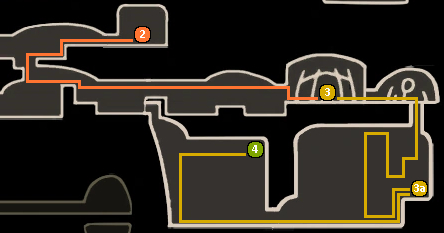 3 - Return to the previous room and drop through the floor. Make your way to the right past the three Great Hoppers and enter the hut to learn the [Dash Slash] Nail Art (800 Geo) from Nailmaster Oro.
3a - Return outside and go right to find a patch of loose ground. If you don't have enough soul to use [Descending Dark] to break through it there is a Soul Totem in a semi hidden area to the right. Break through two more loose floors in the room below and at the bottom make your way right to free the Grub (41/46) past the hoppers and spikes.
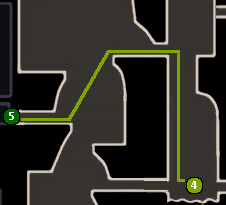 4 - Continue along the path leftward past a couple more Great Hoppers and in the next room climb up and enter the structure on the right wall to acquire the Quick Slash Charm (26/40), then use the Dreamgate to return to the beginning of the area.
5 - Climb up to the upper left exit of the room, then make your way across to the other side of the next room and down to the lower left exit to enter the Tower of Love.
Chapter 23 - The Watcher
23-1
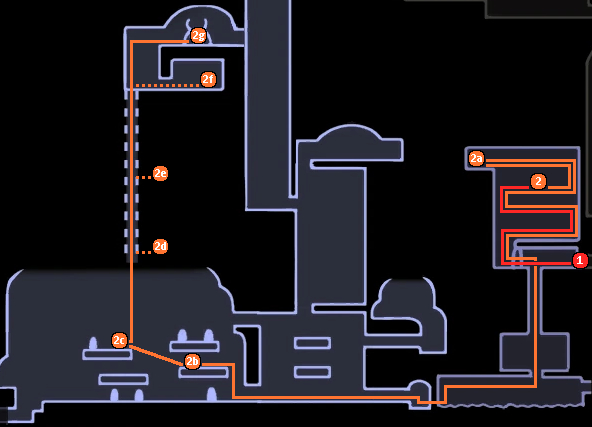 1 - Unlock the door to the left with the [Love Key] and head up.
2 - Make your way to the top of the tower to fight (BOSS) The Collector.
-o-o-o-o-o-
 (Boss Notes: The Collector) For a boss that only has two moves itself and spends most of the fight jumping around like an idiot, this fight is surprisingly difficult unless you know how to beat it already, and it may even be advisable to skip ahead a little to King's Station simply to have a closer Bench if you find yourself caught in a death loop.
Rule #1: Do. Not. Jump. to avoid The Collector. It is always jumping around, the ceiling is low enough where double jumps can't get over it, and you're more likely to jump into it than away from them. It is perfectly possible to simply walk under them as they jump towards you without taking any damage while taking cheeky swipes at them with your nail. The only circumstance where you should jump would be when The Collector is on the other side of the arena from you and you need to line yourself up with the flying adds to shoot a [Shade Soul] to clear them.
Rule #2: Clear the adds as quickly as possible. [Shade Soul] is this fight's MVP for clearing enemies at a distance as their jars break, but keep in mind that these adds are also the only source of restoring your Soul, as The Collector itself has none.
-o-o-o-o-o-
2a - Make your way above the boss arena to free the three Grubs (42/46)(43/46)(44/46) and acquire the Collector's Map at the far left. (Optional) Jump into the ceiling to find a hidden area containing the Vitruvian Grub tablet.
2b - Leave the tower and go leftward, through King's Station and out the lower exit across from the Kingdom's Edge path. Enter the door on the platform directly above the lower exit to King's Station and free the Grub (45/46) behind the Great Husk Sentry inside.
2c - Leave the building and cross to the platform up and to the right. Use a [Simple Key] on the door next to the sign with the Hot Spring symbol to open the Pleasure House and enter.
2d - Activate the Elevator to send it up, but step off at the first opportunity. Go right and drop down to collect the [Wanderer's Journal] there.
2e - (Optional) Break open the wall next to the relic and call the elevator back down and wait for it to reach the bottom, but don't ride it up. Climb up the elevator shaft instead to find a room on the right of one of the floors with a rather grim dinner scene and meet the Spirit of Poggy Thorax in the kitchen to the right of it.
2f - At the top of the elevator enter the door on the left. (Optional) go right for Beauty.
2g - Climb up to the hot spring in the pleasure house to find where Millibelle the Thief absconded off to all this time. Smack her with your Nail until all the Geo falls out of her.
-o-o-o-o-o-
(Extra Notes: Millibelle the Thief) If Millibelle is not in the Pleasure House, then you haven't given her enough Geo yet. Go back to Chapter 19 to refresh your memory on what you need to do and deposit the rest of the Geo required and rest at a bench before returning to check the bank and find her missing. These steps must be completed in this order.
The maximum return you can extract from her is (6834 Geo) and Nail Pogoing on her from above is the most efficient way to extract it so you aren't chasing her shell all over the room. Be advised, however. There is a cap on how much Geo Millibelle will drop on the ground at one time. Make sure to collect it regularly and continue smacking her like a piñata to claim it all. Having the Gathering Swarm Charm equipped can help greatly with this. It can be purchased from Sly if you haven't bought it already, but isn't necessary.)
-o-o-o-o-o-
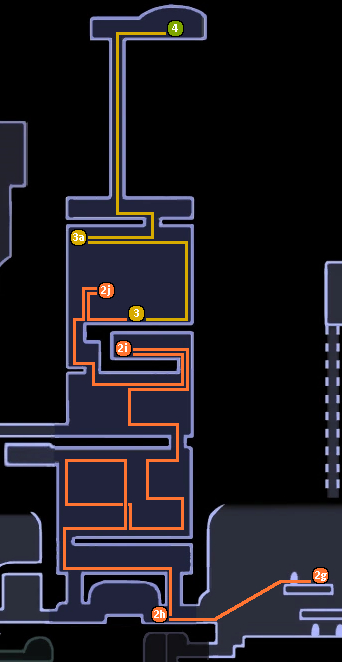 2h - Leave the pleasure house the way you came in and continue traveling left and into the first tower. Place a Dreamgate Exit next to the bottom of the first elevator, ride it up and then go left and up through the exit in the ceiling
2i -Make your way around the next room, striking the levers to open the doors along the way and leave through the exit in the upper right. Make your way up through the next room as well and take the exit in the ceiling on the right to free the Final Grub (46/46) in the room above.
2j - Return to the previous room and take the left exit in the ceiling this time. Ride the elevator or climb up to the next level of this room, then before entering the gate ahead climb into the ceiling and go right to break a chain to make the upcoming boss fight easier.
3 - Drop back down and continue through the gate to the right and to the end so the second gate closes to fight the (BOSS) Watcher Knights.
3a - Once the Watcher Knights are defeated, go up and to the end for a chest full of Geo, then pick up the [Hallownest Seal] on the ledge above it.
4 - Take the exit in the middle of the ceiling and make your way to the top of the very tall tower to Enter the Dream of Lurien the Watcher and end it (3/3).
Chapter 24 - A Foolish Endeavor
24-1
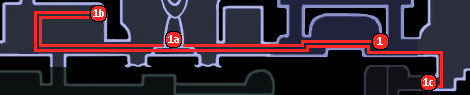 1 - Once you wake up use the Dreamgate to return to the bottom of the tower.
1a - Head left to the statue of The Hollow Knight and talk to Relic Seeker Lemm to get him to return to his office.
1b - Head onward to Lemm's office to find that he somehow beat you there and sell all your Relics to him, then use the Dreamgate to return to the other side of the city.
1c - Exit right and drop down to enter the Royal Waterways.
24-2
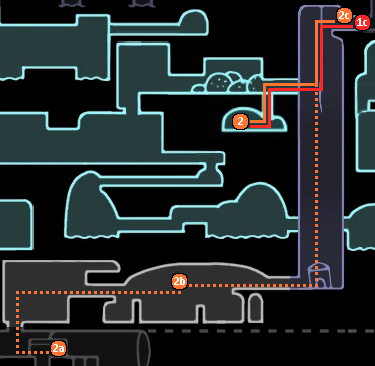 2 - Make your way down the left wall of the broken lift and into the opening to the Dung Defender's area. Drop down into the hole and enter Ogrim's dream to fight the (DREAM BOSS) White Defender for (300 Dream Essence).
 -o-o-o-o-o-
(Extra Note: White Defender) Only the first time rewards Dream Essence, but he can be defeated five times for some extra dialogue. Keep in mind, however, that for each defeat White Defender will deal +1 more masks of damage, up to a total of 5. On the Fifth defeat Ogrim wakes up and speaks with you. On leaving and returning to the area Ogrim has left and a dung statue of The Knight is added to the chamber to the right.
-o-o-o-o-o-
2a - {RITUAL} If you're going for the Ritual ending to the Grimm Troupe Quest and don't already have the Grimmchild Charm equipped, head down to the Ancient Basin Tramway and call the Tram to use its Bench.
2b - {RITUAL} In the hall between the crashed elevator and tram station, kill the Grimmkin Nightmare and collect its flame. It may be advised to trigger the fight and then move to the passages on the left side of the room instead of fighting him on the pillars.
2c - Climb back up to the top of the crashed lift and return to the City of Tears.
24-3
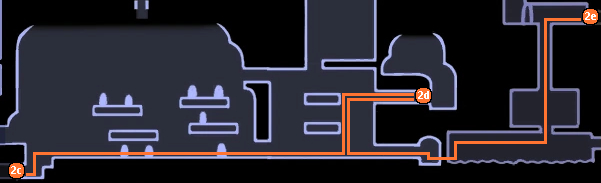 2d - Make your way back to King's Station to call the Stag and place a Dreamgate Exit next to the bell.
2e - Return to the Tower of Love and take the exit out to the Kingdom's Edge.
24-4
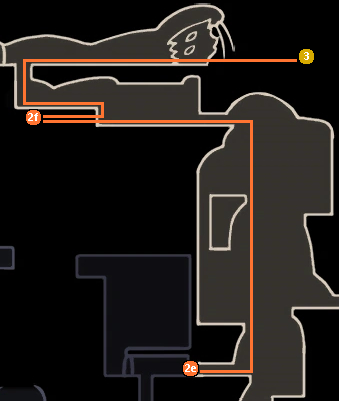 2f - Climb up the left wall to the top and take the exit from the vertical room. Straight ahead break the cracked wall and watch out for the spiked floor and patrolling Great Hopper behind it to collect a [King's Idol], then continue up and right past the Belflys into the giant shell.
3 - Speak to the bug hanging from the ceiling by chains to compete in the Colosseum of Fools. Each Trial must be unlocked and beaten in sequence a minimum of once. Geo rewards repeat, but the items given at the end of the first and second trials are only received on their first completion: (Trial of the Warrior - 100 Geo to unlock, ~1000 Geo and [Charm Notch] (5/8) Payout)(Trial of the Conqueror - 450 Geo to unlock, ~2000 Geo and [Pale Ore] (5/6) Payout)(Trial of the Fool - 800 Geo to unlock, ~3000 Geo Payout). There is a gladiator's pit below the hall where Little Fool is hanging out where you can use the Bench to set your reload and reassign your Charms, and if you die in the trials the darkened room on the left is where your Shade will be waiting. Before completing the Trial of the Warrior you can also meet Tiso and Zote.
-o-o-o-o-o-
 (Extra Note: The Trial of the Fool) The Trial of the Fool is an extreme Endgame challenge, and takes a fair amount of skill and persistence to beat for new players. Sitting somewhere between the boss-rush of the Pantheons in Godhome and the White Palace's pure platforming insanity, The Trial of the Fool is probably one of the most difficult challenges in the entire game, testing players' Mastery of the game's combat and platforming together.
The big thing to remember is that unless you are speedrunning the game, The Trial of the Fool is a marathon, not a race. Take advantage of lulls to heal and remember your Dream Nail for restoring your Soul, as there are several enemies that have predictable patterns that can be exploited to your advantage if they can be isolated. In particular, you want to watch out for stages with Sharp Baldurs, Shielded Fools, and one stage with Mistakes in the middle of the Trial. If these enemies can be isolated at the end of their stages they can be farmed for Soul using the Dream Nail at the right timing and spacing, and lured to the sides of the arena to give opportunities to heal and continue the cycle indefinitely. Sacrificing a few runs to learn this timing may be worth it.
Also know that when you reach the end of the trial and face the God Tamer (Signified by the crowd going quiet before you hear a loud stomping as a greatnail wielding bug and her giant mount emerge from the right side of the arena), only her mount needs to actually be killed to end the fight, and it will continue to fight if she is killed first, so focus all your efforts and spells on it while only paying enough attention to the God Tamer herself to avoid her attacks.
Finally, other than the 1% it contributes towards 112% Completion, the only reward for finishing it is Geo, and thanks to all the relic hunting you've been doing and an upcoming visit to all the Grubs you've freed, you should have more than enough to be getting along for the time being. As completing it is required for 112%, you do need to beat it before reaching the final Chapter of this guide, and it is recommended you do so before Chapter 29 as after that point there will be nothing significant left to spend Geo on, but you can safely leave it for now to finish out collecting the remaining upgrades, Charms and Notches before returning if you wish.
-o-o-o-o-o-
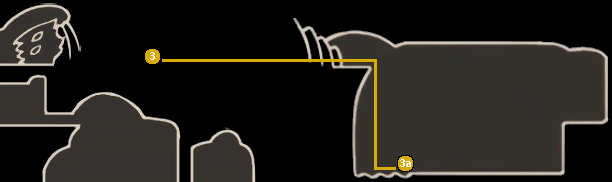 4a - Take the right path up and out of the gladiator pit to access the area behind the arena and break the wall to the right to find the Pale Lurker's lair. Defeat her for a [Simple Key], and swim under the wall below the arena gate to collect a [King's Idol]. Once all of that is finished use the Dreamgate to return to King's Station and take the Stag to Dirtmouth.
Chapter 25 - Awakening
25-1
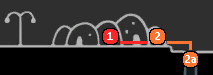 1 - Exit the station and rest at the Bench.
2 - Enter Bretta's house to collect a [Mask Shard] (10/16), then head down into the basement and dreamnail the statue of Zote (DREAM BOSS) and defeat Grey Prince Zote (300 Dream Essence). (Optional) Speak to Zote and Bretta outside for additional dialogue.
-o-o-o-o-o-
 (Boss Notes: Grey Prince Zote) Grey Prince Zote is difficult for new players because a lot of his behaviors seem random and chaotic, defying much of the muscle memory and subconscious tactics they've developed up to this point , but there are patterns to exploit. Unlike his waking-world counterpart, Grey Prince Zote is anything but a joke despite the flailing and other nonsense.
His flail attack where he just runs across the arena swinging his nail willy-nilly for a few seconds ends with him falling on his face and sending out two small shockwaves to either side of him, with him sometimes skipping the flailing entirely and just falling on his face and causing shockwaves. His Leap attack has him jumping randomly around the arena and sends out shockwaves on impact as well. His Nail Slam attack has him leap into the air, targeting the player, sometimes even reorienting himself and changing direction midair, and causing two shockwaves on impact, with a larger shockwave going in the direction he is facing when he lands. His Shadow Slam attack has him "fall" through the floor of the arena, only to then come down from the sky onto where the player is standing when you start to hear his Doppler, and, you guessed it, causes shockwaves on impact. And finally, he summons Zotelings to harass the player, with different variants being added after successively beating him. There are two variants of the summon. One where GPZ stands still and breathes in deep before spitting the Zoteling(s) out one by one, and in higher difficulties and the Pantheons he will stand still and cry out, summoning ones that explode.
Needless to say, you're going to spend a lot of this fight airborne and shade-cloaking to avoid damage. When GPZ does his shadow slam, you can time a [Descending Dark] to his Doppler to hit at the same moment he does and avoid damage entirely while punishing him in turn, and the flail attack can be nail pogo'd through and finished with either a double jump or [Descending Dark] if you can time it to the moment before he falls down to again avoid damage or/and punish him. When he goes to summon Zotelings is an amazing opportunity to punish him with nail attacks and/or spells, and on the lowest difficulty the flying Zotelings are easy enough to clear with your Nail and [Shade Soul], and can often also be cleared by catching them in the shockwave of a [Descending Dark] cast to punish GPZ for the long stall at the end of most of his attacks.
(Extra Notes) Only defeating the boss once is necessary, but he can be fought again. Defeating him multiple times lights additional candles in the Zote Shrine, but becomes successively more difficult with each defeat. Defeating him 1-4 times lights an additional candle in the shrine. the fourth time also causes Bretta to leave Dirtmouth permanently with one last update to her diary, and defeating him 10 times causes the statue to become golden.
-o-o-o-o-o-
2a - Once Grey Prince Zote is defeated, leave Bretta's house and head down into the Infected Crossroads.
25-2
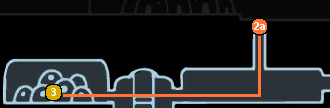 3 - Cross left and straight across the top of the crossroad's main vertical shaft and enter the Grubhome to receive (Geo +6750), a [Mask Shard] (11/16), the Grubsong Charm (27/40), a Rancid Egg, a [Hallownest Seal], The Final [Pale Ore] (6/6), a [King's Idol], and the Grubberfly's Elegy Charm (28/40). Having the Gathering Swarm Charm equipped can help greatly with collecting all the Geo, as the Grubfather just tosses it all on the ground, but it isn't necessary. It can be purchased from Sly if you haven't bought it already. Once all rewards have been collected, quit and reload to return to the Bench in Dirtmouth.
25-3
 4 - Enter Sly's shop and drop down into the basement to receive the Nailmaster's Glory Charm (29/40) from him. Then exit and reenter the building to buy out his inventory of Charms, [Mask Shard]s and the Final Two [Vessel Fragment]s if you haven't already:
 • 4 Charms (30/40)(31/40)(32/40)(33/40)(1250 Geo Total);
• 3 [Mask Shard]s (12/16)(13/16)(14/16)(2800 Geo Total);
• 2 [Vessel Fragment]s (8/9)(9/9)(1450 Geo Total).
4a - If you bought the Gathering Swarm Charm instead of the Wayward Compass back in Chapter 3, head over to Iselda's shop and buy it (33/40)(220 Geo), (Optional) then buy out any additional map markers as desired.
4b - If you had to skip fighting Lost Kin and/or Failed Champion when they were encountered earlier due to their difficulty, go and beat them now, otherwise you're likely going to fall substantially short of the 2400 Dream Essence required for the next step. If you have forgotten where to find them, reference Chapters 9 and 11 for their locations. Otherwise, take the Stag to the Resting Grounds.
25-4
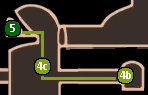 4c - Exit the station, and if you have less than 2400 Dream Essence (and haven't skipped any of the mentioned Dream Bosses to this point) hit the [Whispering Root] with your Dream Nail and collect Dream Essence until you do. If for some reason you've had to use the Dreamgate a lot and this one isn't enough by itself, there is a second [Whispering Root] in the top right corner of the Spirit's Glade to the upper right that can also be collected.
5 - Enter the Moth Seer's home and speak with her to receive an [Arcane Egg], [Mask Shard] (15/16), and the Awoken Dream Nail, and then exhaust her dialogue until she disappears into dream essence.
Chapter 26 - The Lamenter's Plea
26-1
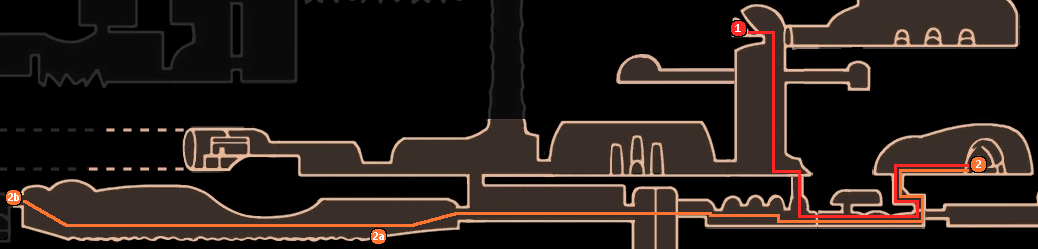 1 - Leave the Seer's home.
2 - Drop into the tunnels below the broken sarcophagus and find the chest to the right that had a cracked wall next to it on your first visit. Break the ceiling above it and go up. Enter the home there to talk to the Grey Mourner Ze'mer and accept her request. Then make your way across to the Blue Lake.
-o-o-o-o-o-
 (Extra Notes: The Delicate Flower Quest) Warning! This begins the [Delicate Flower] Quest. Your reload point is automatically set to the bench outside on accepting and from this point until its successful delivery any damage taken resets the quest. If this happens You will have to talk to the Grey Mourner to receive another [Delicate Flower]. In this event it is better to backtrack on foot and clear any enemies skipped instead of quitting and reloading to return to the Bench in front of her house to make future attempts easier.
If you find yourself struggling particularly, it may not be a bad idea to also pre-clear the enemies that don't respawn on changing rooms along the proscribed route and make your way back to Ze'mer on foot
-o-o-o-o-o-
2a - (Optional) On the right shore of Blue Lake meet Quirrel one final time for the {Witness} Achievement.
2b - Cross to the other side of Blue Lake using the [Crystal Heart] and climb up to cross into the Infected Crossroads.
26-2
 3 - (DO NOT REST AT THE BENCH!) Drop down and enter Salubra's shop to buy all of her available Charms (34/40)(35/40)(36/40)(37/40)(38/40)(1690 Geo) and [Charm Notch]es (6/8)(7/8)(8/8)(2800 Geo) if you haven't already.
3a - Make your way all the way across the Forgotten Crossroads, past the room where you first met Cornifer and into the room with the acid pool to swim under the wall below the entrance and descend into Fog Canyon.
26-3
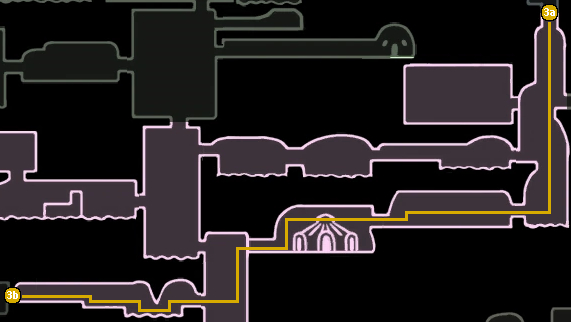 3b - Navigate to the bottom of the first vertical room and left past the Teachers Archives. In the second vertical room drop to the second exit to the left and swim under the thorn wedge again to enter the Queen's Garden.
26-4
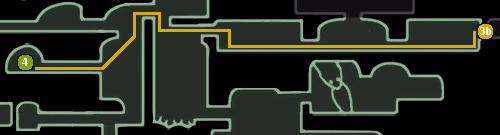 4 - Cross the room and go up through the previously blocked ceiling, then left into the vertical room connected to the Stag Station. Drop down to roughly the middle of the shaft and then go left through the exit surrounded by thorns. Carefully hop and dash through the thorn filled passage to plant the [Delicate Flower] on the Grave, quit, and reload outside the Grey Mourner's house. Enter to finish the quest, and receive The Final [Mask Shard] (16/16). Once finished, use the Dreamgate to return to King's Station and take the Stag to the Hidden Station.
Chapter 27 - The White Palace; Part 1
27-1
 1 - Leave the Station and make your way to the middle of the large open room.
2 - Dreamnail the dead Kingsmould, then go right through the dreamscape and kill his living counterpart to open the door and enter The White Palace.
-o-o-o-o-o-
 (Extra Notes: The White Palace) The White Palace is a very long platforming hellscape. There are only four actively hostile enemies in the entirety of the area (As opposed to "enemies" who just serve as barriers/places to pogo from), one of which you just killed and two of which are at the end of an entirely optional segment. Instead, the map itself is your enemy. There are only a couple of Benches scattered through the map, and if you find yourself down to one mask and no soul, it is Highly advised to just quit and reload rather than die and have to retrieve your Shade.
For the sake of this guide, I leave it up to you if you wish to follow it exactly or find your own routes through by trial and error. I take several skips and shortcuts through the map of varying difficulty to properly follow, and it is highly recommended to first read the step you are on the whole way through before attempting it, and second to at least skim the next two or three steps ahead to have an idea of what is coming up.
Charms: To mitigate the frustration, the Hiveblood Charm can be invaluable if you have the patience, as it offers health regeneration for the last mask lost, and coupled with Grubsong means you effectively have infinite Soul to heal yourself if you get caught twice by just taking damage and letting the one mask regenerate over and over again. Combining both with the Deep Focus Charm doubles your healing potential even further. The Longnail/Mark of Pride are also good options as they extend your Nail's reach and make it easier to pogo off of things from further away, while the Quick Slash Charm allows you to spam pogos without worrying about getting the timing right as much.
-o-o-o-o-o-
27-2
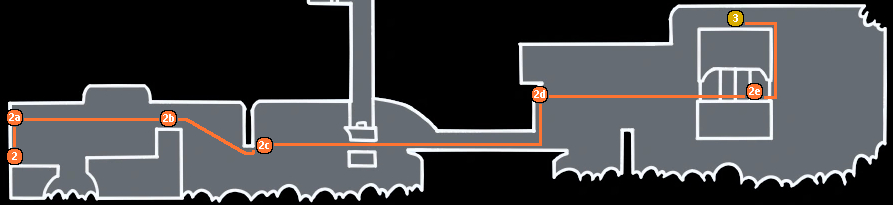 2a - Once you enter the gate, much of the first area after can be skipped entirely by climbing the wall and using the [Crystal Heart] near the top while positioned over the shell engraving. Cancel it when a pillar from the ceiling blocks your path and platform to the other side of it.
2b - (Optional) You passed a Bench during the Super Dash. If you really want you can backtrack to rest at it.
2c - The next area can largely be skipped by using the [Crystal Heart] at the very bottom of the barrier here again to cross into a different room.
2d - Cancel your super dash before the ground disappears from under you and climb the wall to just under the ledge with the Soul Totem on it for another [Crystal Heart] skip.
2e - At the end of your Super Dash, kill the Kingsmould to open the gate behind it.
3 - Instead of taking the platforms ahead, climb the wall above the outside of the gate that the Kingsmould was guarding and jump over the lip to go left and hit the lever to light the lantern.
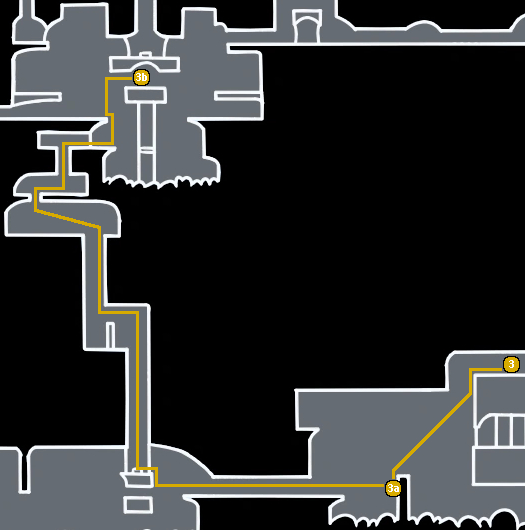 3a - Continue left and fall through the floor and make your way back down to [Crystal Heart] back into the previous room from a pillar coming up from the floor, then take the elevator that was previously gated off up into the next section. Jump past the spike filled room and enter a large open space full of Royal Retainers that can be dreamnailed for infinite Soul.
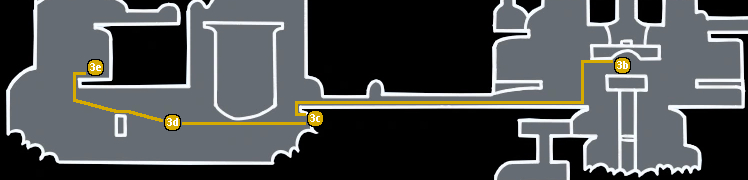 3b - Rest at the Bench in the middle of the room to set your spawn, then make for the exit to the left that you didn't come in through. Make your way past the spinning blades on the floor, wait for the moving one to approach you and jump over the stationary one as the mobile one stops, then chase it with dashes. Jump into the alcove in the ceiling to avoid its return and make like the wind and dash away with its second rebound hot on your heels.
3c - Once past the first set of blades, drop to the wall below the ledge you come out on and use the [Crystal Heart] while over the shell engraving in the middle of the wall for another huge skip. Cancel your super dash when you get within double jump range of a the first platform you reach.
3d - Pogo over the blades ahead to reach another platform. From there, jump-dash-double-jump through the two spinning blades ahead to reach the next platform, and jump and dash under the one after that to double jump back again and reach it and the ledge above.
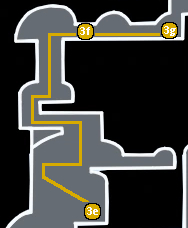 3e - Jump up the three platforms ascending leftward while timing your jumps and dashes to avoid the mobile blades, and once above the third dash and double jump back to the right to reach the next safe ledge. There is a Soul Totem at the end of the hall ahead if you need some, then just continue jumping, pogoing and dashing to reach the exit above to the next room.
3f - Ascend the platforms through the mobile blades to reach the ledge above, then Walk through the spaces between the vertically moving mobile blades ahead. At the fourth blade, wait for it to go into the ground and jump above the one set into the floor and nail pogo off of it until the next mobile blade starts to descend into the floor. Follow it down to the narrow gap between it and the next blade. Walk past this one again, and dash past the three continuous mobile blades ahead to reach the next damage checkpoint.
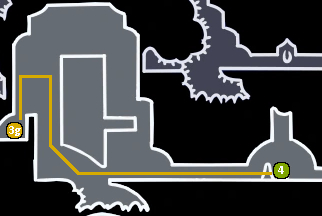 3g - Climb the wall above you and dash under the mobile blade when it rises, pogo past the one immediately after it, and fall. Try and reach the wall to the left with a dash and double jump if you can to cling to it and control your descent because there is a spike covered roof below that you will have to nail pogo across to the right, then just cross the platforms to reach another safe hallway.
4 - Hit the Lever to Light the Lantern in the safe hall and continue and hit the next lever to open the way back into the large room with the Bench.
Chapter 27; Part 2
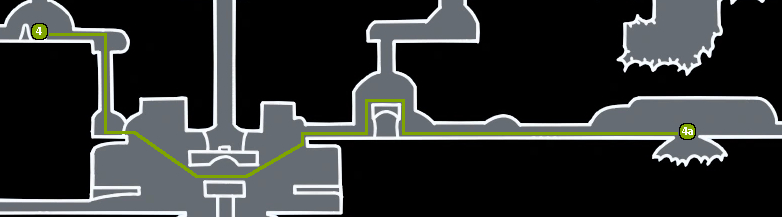 4a - Go through the right exit this time and make your way over the cage with the lantern and lever in it for now. In the next room, wait for the floor level mobile blade to start moving away from you. Chase it with dashes and jump over it on its rebound to dash between the three stationary blades at the end. Jump past them and move onto the next room.
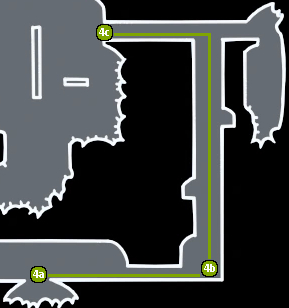 4b - Wait for the vertically moving blade to the right to start rising and chase it up. Dash out of its way when it starts to come back down and double jump back to the right wall, then move to the left and into an alcove when that one reaches the top of its movement as well. From the alcove, wait for the blade above and on the right side to move under your position and keep climbing the right wall, double jump between the left side moving blade and the stationary blade above and nail-pogo off of it to reach another alcove on the right this time. From there climb the wall again and jump between the two blades on the left and right moving parallel to each other and nail pogo-double jump off of them to quickly climb the wall the rest of the way up as they chase you to reach the hall leading into the next room to the left.
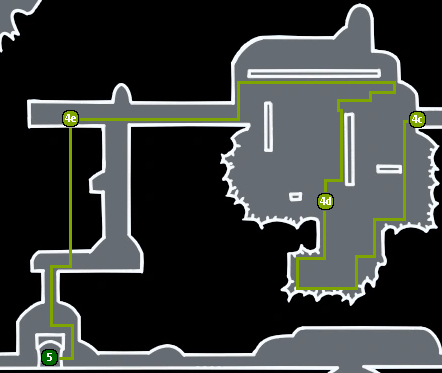 4c - Drop to the platform ahead and continue dropping down while avoiding the blades and into a narrow gap lined with thorns. Make your way through the narrow passages and back up to the room above.
4d - Jump up to the platform with spikes on the right side, but instead of taking the "obvious" path to the left with the two moving blades, jump right instead to pogo and double jump up the blades there instead, but be careful of the moving blade above you that guards the path to the platform there. Time when the blade to your immediate right starts to go down and Vertically double jump-dash past it and its opposed counterpart to reach the next platform, then repeat the process again to reach the platform after that. From there, finishing the room is as simple as jumping on to the wall to the right and using the [Crystal Heart] below the track to reach the other side of the room and the hall into the next.
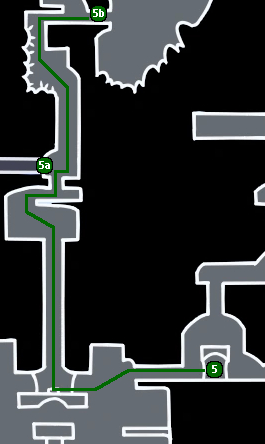 4e - The next room is entirely skippable. Just look for a bit of cracked floor to the left of the spikey spinny death hole and use [Descending Dark] to bypass it and hit the lever at the bottom, then drop down again into where you entered this section of the palace and hit the now accessible lever to Light the Lantern.
5 - Go back to the main hub room and take the now accessible elevator up. Jump through the space at the top and into the next. Instead of trying to dash past the wingmoulds above you, as would be the instinct, double jump either over or under them and pogo off of them or the stationary blades as necessary. Dash and pogo or [Crystal Heart] past the spikes in the narrow passage to the left at the top, and pogo off of the two wingmoulds on the other side of them to reach the wall above and climb it to find a Bench.
5a - (Optional) Instead of jumping past the wingmoulds, to the right of the entrance there is a hidden cracked wall in the upper corner. Break it and take on the challenge within if you're into Masochism.
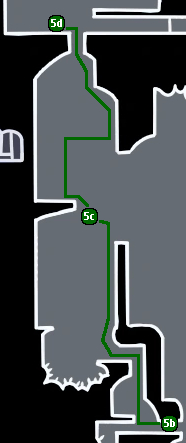 5b - Go up into the next room and grab on to the left wall under the two blades. Wait for the mobile one to start moving away from you to hop up and jump-dash over it on the rebound. Immediately double jump up to the spinning blades above and nail pogo off the top one to double jump onto the left wall of the vertical passage to the right instead of the larger room to the left. Be careful of the mobile blade in this passage as you make your way to a narrow horizontal corridor with retracting spears on the left for a damage checkpoint. Instead of trying to pass through the spears, when the mobile blade passes you going up, continue climbing the left wall of the right passage to reach an alcove. When the blade passes you again as it is going down continue up the left wall again to reach the top.
5c - Jump to the next level to the left and jump above the left lamp to nail pogo off of it and double jump to skip to the ledge above. From there, jump up and right, then nail pogo off of the spikes on the wall And the spears as they are coming out to double jump and dash to reach the right wall. From there just climb to the next safe floor and continue ascending the platforms to reach the next room..
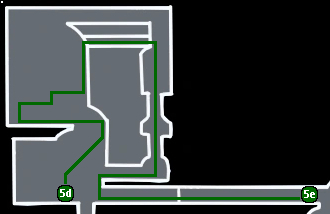 5d - Position yourself between the two middle blades above and Vertically double jump and nail-pogo between them to reach the platform there. From there make your way to the right side wall and climb it to the top, align yourself with the shell engraving to charge the [Crystal Heart], and wait for the mobile blade to go down to blast off, pass through the blade lined passage and cancel it the moment you enter the gap ahead. Jump up and pogo over the spikes to reach a platform. Wait for the blade to go up to reach the wall and when you're roughly 3/4 up it use [Abyss Shriek] to open a passage to bypass the next bit. At the end of the passage break open the way forward and jump into the vertical passage the moment before the two sets of spears on the walls retract, and once past them double jump to time a [Descending Dark] for the moment the spears below retract to pass through it all in one go. Hit the lever at the bottom and take the now accessible hallway below into the next room.
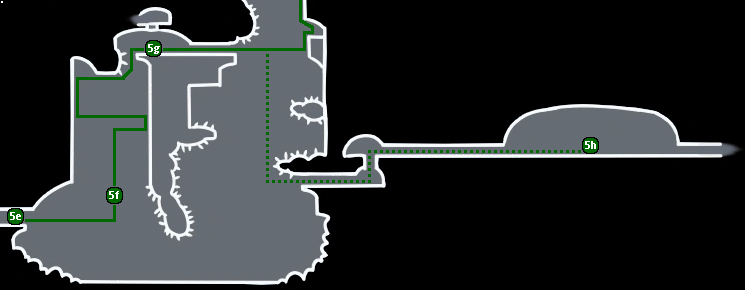 5e - Use the [Crystal Heart] at the start of the room and cancel it before you slam into the thorn covered wall to reach some platforms. Pogo and dash to the wall of blades to the right and pogo up the narrow gap between them and the wall, being mindful of the mobile blade above. Once past them jump to the platform on the right for a damage reload point.
5f - Continue by pogo-double jumping off of the mobile blade to the left several times, and when you reach the top dash and double jump over to the wall to the right. Climb to the top and align yourself with the shell engraving there to use the [Crystal Heart] to reach the left wall. Climb up it and time your passage through the multiple sets of spears to reach the next safe point. Congratulations, you've effectively beaten the White Palace, as there are no more significant hazards in your path to the peak.
5g - Use the [Crystal Heart] to reach the next ledge and from there climb to the top and use the [Crystal Heart] again to pass through the next two rooms.
5h - (Optional) After the first Super Dash from 5g, drop down and fall to the left past the thorn wedges and double-jump-dash and pogo off the wingmould if you have to, to a small out of the way hallway. Jumping up and making your way to the room at its end, you will find a lab with a lore tablet, and a mould of a figure with four arms that can be dreamnailed. To leave this area just keep going right to find yourself above 5g.
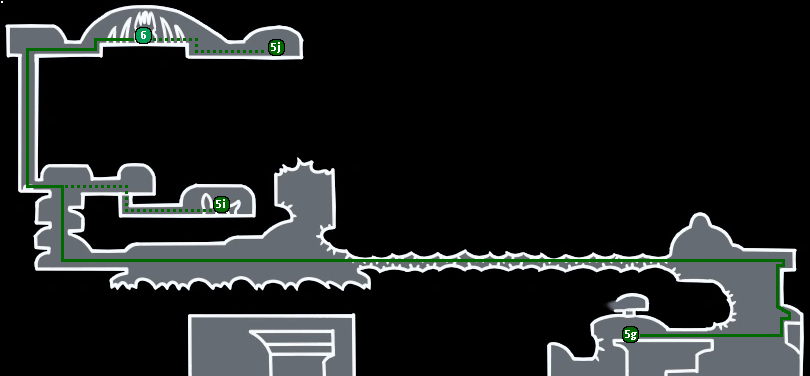 5i - (Optional) Next to the last Soul Totem to the right after a series of double jumps following the second Super Dash is a bit of cracked floor that can be broken with [Descending Dark] to find a nursery.
5j - (Optional) When you reach the throne room at the peak, go past the Pale King's body and break the far wall to find another lore tablet.
6 - Smack the Pale King with your nail until his body falls over to collect the Second half of the Kingsoul Charm (39/40) and be ejected from the White Palace.
Chapter 28 - Birthplace
28-1
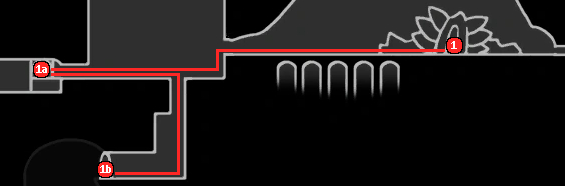 1 - Wake up back in the Ancient Basin and make your way left to the Bench on the other side of the main hub room.
1a - Rest on the Bench and equip the Fragile Heart, Joni's Blessing and Kingsoul Charms.
1b - Return to The Abyss
28-2
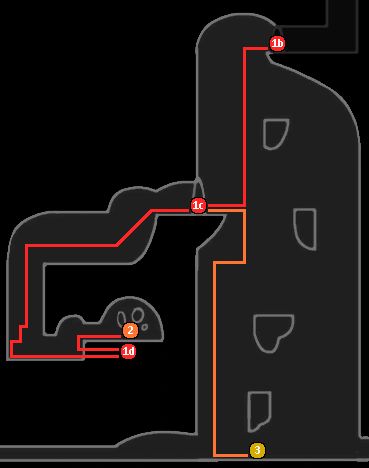 1c - Follow the left wall down and enter Proximity to the sealed door covered in vines to start its countdown and enter once it's open.
1d - (WARNING: MISSABLE! Once the Lifeblood Core Charm is collected this area will no longer be accessible.) If you find you are taking too much damage through this next bit, don't be afraid to quit and reload to return and try again instead of risking dying and having to go all the way to Leg Eater to repair the Fragile Heart. Make your way through the spike lined corridor until you drop through a narrow passage. At the bottom of the section below it the path splits. Take the left path and use the [Crystal Heart] when there is no more floor and navigate the platforms on the other side to collect an [Arcane Egg].
2 - Jump up to the left of where the Arcane Egg was to break open a wall, then make your way up to the hall above and collect the Lifeblood Core Charm (40/40) from the pedestal it rests on to complete your collection. You will be transported back outside the sealed door automatically on its acquisition.
 -o-o-o-o-o-
(Extra Note: The Hollow Knight) If you want the {The Hollow Knight} Ending Achievement, this is the final opportunity to do so. Instead of progressing forward, backtrack to the Stag Station and take it to Dirtmouth, go down into the Infected Crossroads and to the right to enter the Temple of the Black Egg and defeat (BOSS) The Hollow Knight.
It is also recommended, but not necessary for 112%, that you visit Salubra and buy [Salubra's Blessing] from her, as this is the first opportunity to do so. This does not count towards %Complete, but it does give the {Blessed} Achievement if you don't have it yet.
-o-o-o-o-o-
3 - When you wake up, drop the rest of the way to the bottom of The Abyss. Stand on the shaking ground until it gives way beneath you, then navigate the Hidden area below to locate another [Arcane Egg] almost straight down from the entrance. Make your way to the right, past the Siblings to find a large black egg. Hit it with your Dream Nail and once able to move again climb to the top of The Abyss for a cutscene. Once able to move after the cutscene, use the Dreamgate to return to King's Station.
 -o-o-o-o-o-
(Extra Notes: NPC Updates) Bardoon will now have new dialogue, and Hornet can now be found outside the Temple of the Black Egg. Entering the Temple and defeating (BOSS) The Hollow Knight now gives the {Sealed Siblings} Ending Achievement, while hitting The Hollow Knight with the Dreamnail when Hornet intervenes allows you to challenge (BOSS) The Radiance for the {Dream No More} Achievement.
-o-o-o-o-o-
Chapter 29 - Nightmare's End
29-1
 1 - Rest at the Bench and leave King's Station
1a - Make your way to the hallway below Lemm's office and place a Dreamgate Exit next to the Waterways Entrance.
1b - Go up and sell all your Relics to Lemm one final time.
 2 - Make your way to the Nailsmith and upgrade your Nail one final time: Pure Nail (4000 Geo + 3 [Pale Ore]).
2a - (Optional) Listen to the Nailsmith's request and either kill him or spare him. Killing him grants the {Purity} Achievement, and his body can be found and dreamnailed in The Junk Pit near the Godseeker. If spared, he will move to Nailmaster Sheo's house in Greenpath. Talking to them there will give the {Happy Couple} Achievement.
2b - Once finished with the Nailsmith, quit and reload to return to King's Station and take the Stag to Dirtmouth.
29-2
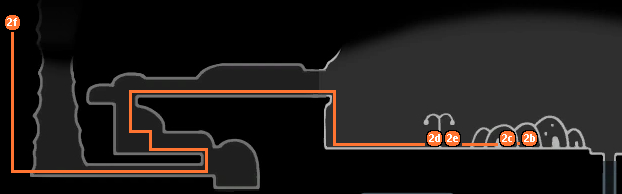 2c - Exit the Station and rest at the Bench to set your reload point.
2d - (Optional: WARNING: MISSABLE!) Equip one of the Fragile Charms and enter the tent on the left to meet Divine. Give her the charm and keep talking to her until she requests payment, whereupon she will return the Unbreakable variant of the Charm. Repeat the process as desired with the other two charms: Fragile->Unbreakable; Greed (9000 Geo), Heart (12000 Geo), Strength (15000 Geo).
-o-o-o-o-o-
 (Extra Notes: Fragile and Unbreakable Charms) Upgrading the Fragile Charms is Missable. Divine disappears with the rest of the Grimm Troupe on completion of the {BANISHMENT} Route. If she has any of your charms at the time it will reappear, still in its Fragile form, where her tent was in Dirtmouth. On the {RITUAL} Route, Divine will stick around after defeating Nightmare King Grimm until all three Fragile Charms have been made Unbreakable and the player has visited Leg Eater in the Fungal Wastes with one of them equipped. After this, the player can visit Divine one last time before she disappears as well.
If you find yourself short on the Geo needed for upgrading the Charms, the fastest methods of farming Geo at this point of the game are to either go back to the Colosseum of Fools and run the Trial of the Champion until you have enough, or farm the Great Husk Sentry's outside of King's Station with the Fragile/Unbreakable Greed Charm equipped.
-o-o-o-o-o-
2e - {RITUAL} If you're going for the Ritual ending to the Grimm Troupe Quest, Equip the Grimmchild Charm and head into the main tent. Find Troupe Master Grimm hanging out in the back and hit him with the Dreamnail to start the fight with (BOSS) Nightmare King Grimm. Defeat him to evolve the Grimmchild Charm to its final form and earn the {Ritual} Achievement, then use the Dreamgate to return to the City of Tears and immediately drop into the Royal Waterways. - Continues on Chapter 30.
2f - {BANISHMENT} If you're going for the Banishment ending to the Grimm Troupe Quest, ignore the big-top and head back into King's Pass instead. Go into the hidden passage at the back of where you started the game where the first Geo Deposit was. Climb up into an extension of the hidden area that takes you to the Howling Cliffs.
29-3
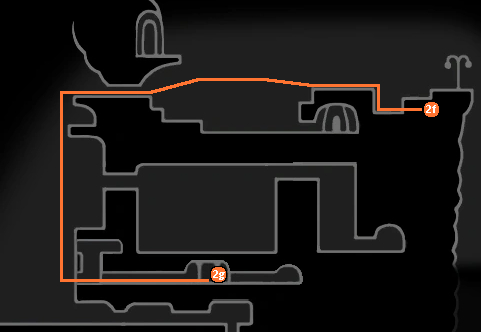 2g - {BANISHMENT} Break through the wall ahead of you and make your way around to the cliff face and down to where you lit the Nightmare Torch and began the Ritual. Speak with Brumm and destroy the Nightmare Lantern for the {Banishment} Achievement, then quit and reload to return to Dirtmouth. Talk to Nymm, the Accordion Player who has appeared outside the Stag Station, to receive the Carefree Melody Charm to replace Grimmchild. Once you have it use the Dreamgate to return to the City of Tears and immediately drop into the Royal Waterways.
Chapter 30 - Godhome
30-1
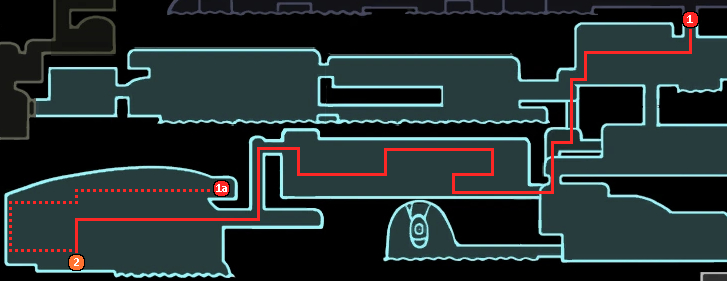 1 - Make your way down past the Bench and hang a left into the passage you broke open above Flukemarm's den. Watch out for the Flukemungas as you make your way to the other side of the room, as they deal two masks of damage per hit, and enter the Junk Pit.
1a - (Optional) Make your way to the far side of the Junk Pit and cross the platforms back to a ledge above where you came in. Enter the crack in the wall and climb up to the high pool to swim under the wall to the right and break open the grate behind it to meet the Fluke Hermit. She has some different dialogue if you have the Flukenest Charm equipped, and will temporarily leave her den to look down on the Godseeker after you beat two pantheons.
2 - Unlock the Sarcophagus at the far side of the Junk Pit with a [Simple Key], collect the God Tuner that the large bug drops, and then dreamnail them to enter Godhome. Make your way to the right and later up as you fight your way through all five Pantheons to gain the {Embrace the Void} and {Pure Completion} Ending Achievements.
-o-o-o-o-o-
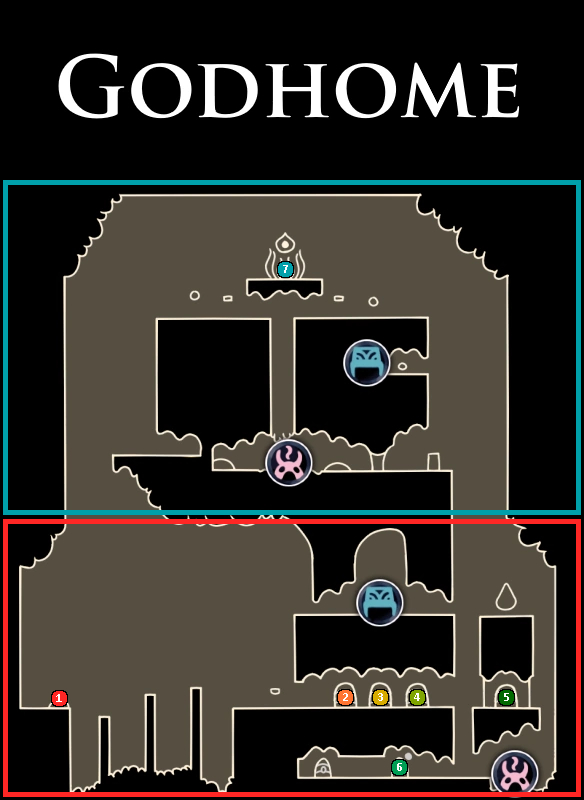 (Extra Notes: Godhome) Godhome is another navigable Dream Realm like the White Palace, but without the platforming hazards. It is roughly arranged as a big rectangle, and other than the Pantheons, Hall of Gods, and a certain secret area, is actually fairly peaceful.
The first area accessible can be roughly divided into three floors and you can exit the realm from where you first enter (1). The only point of interest on the Top Floor to start with is a Bench to set your reload point. The Middle Floor has the doors for entering the Pantheons of the Master (2), Artist (3), and Sage (4) from left to right, to start with. On Completion of the first three, the Pantheon of the Knight (5) opens to the right of them, and on completing that the upper area of Godhome becomes accessible after interacting with the vessel above its entrance on the top floor. The bottom floor contains the door to the Hall of Gods (6), where every boss you have previously faced can be challenged individually at variable difficulty, a locked door that glows blue that requires beating some of the extra challenges to open, and a sea of water that functions as a Hot Spring in restoring your Soul and Masks. Keep in mind, though, that Soul doesn't carry with you when starting any of the Pantheons or boss fights in the Hall of Gods.
Once the Pantheon of the Knight is beaten the upper area becomes accessible. This area contains a hot spring in the middle, another Bench on the right side up the outer wall, and the Pantheon of Hallownest (7), which can only be entered if you have the Void Heart. There are several other secrets scattered throughout the area, but I'll leave you to find or look them up for yourself. ;-)
Beating the Pantheons is the primary feature for this entire realm. They're grueling boss-rushes that will test you against every main boss through the entire game, plus a few bonus ones. The only exceptions are The Hollow Knight and Radiance that you can fight in the Black Egg Temple being replaced entirely with their "true" forms when you come to face them.
The only advice I have besides just being persistent in making your way through the Pantheons and mastering your chosen combat charm build as you go, would be that if you find yourself struggling with any particular boss, to make liberal use of the Hall of Gods to practice against them until you can beat them on the Ascended difficulty. Some people say beating them on Attuned should be sufficient, as even in the Pantheon of Hallownest this is what they are set to, but keep in mind that at Ascended difficulty, bosses deal double damage and have roughly 50% more health. This means that if you can beat a boss at Ascended difficulty, when you face them in a Pantheon, you will already have trained yourself to avoid and deal damage against them at a level where you can more consistently get through the comparatively easier fights and go into the next ones with more health and sometimes soul. This is especially important for beating the second to last, and last bosses in a respective Pantheon. There have been many times where I have reached a pantheon's peak with only one mask and no soul to heal with and been killed in the first couple seconds because of unfamiliarity with the new boss' behavior,
Note that the bosses and their Dream variants encountered throughout the rest of the world only appear in the Hall of Gods after you've beaten them, but the ones encountered at their respective Pantheon's Peak become available after the first time you reach them regardless of if you beat them or not.
Good luck.
Beat Hollow Knight's completion?
Flex it — let your friends know you pulled it off.
- 112% Completion Guide & Route★ 5 (3.9k)131k views9.2k ♥64 minUpdated Jan 30, 2022
- Hollow Knight - 5 Hour Speedrun Achievement Guide by a Speedrunner★ 5 (6.9k)122k views12k ♥10 minUpdated May 18, 2021
- 100% achievement guide [Godmaster update]★ 5 (1.5k)67k views3.6k ♥18 minUpdated Jan 3, 2022
- Карта Hollow Knight. Все по полочкам★ 5 (589)63k views1.5k ♥21 minRussianUpdated Feb 5, 2024
- Прохождение hollow knight на 112% (+DLC) (с картинками)★ 5 (1.2k)59k views3.2k ♥23 minRussianUpdated Dec 19, 2024
- Easy Speed Completion★ 5 (928)40k views2.4k ♥17 minUpdated Apr 2, 2021



- Upgrading to PremiumTeam Fortress 2★ 5 (20k)1441k views11k ♥6 minUpdated May 11, 2022
- No More Room in Hell Official ManualNo More Room in Hell★ 5 (2.8k)569k views2.1k ♥29 minUpdated Apr 22, 2019
- NMRiH Community Hosting GuidesNo More Room in Hell★ 5 (526)351k views653 ♥1 minUpdated Aug 10, 2022
- ULTIMATE GUIDE FOR GAME DEV TYCOONGame Dev Tycoon★ 5 (5.8k)326k views10k ♥4 minUpdated 23 Jan, 2014
- How to 'Git Gud' Soon™MORDHAU★ 5 (2k)318k views3k ♥68 minUpdated Nov 16, 2024
- Лучшие кооперативные игры SteamPAYDAY 2★ 5 (1.5k)315k views2.1k ♥56 minRussianUpdated Apr 27, 2025






This guide was created by its original author on the Steam Community. Are you the author and want it removed? Request removal.