Advanced AI Squad Commanding
Selecting Squadmates
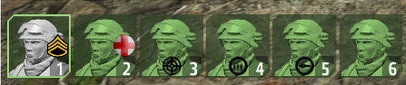
Each pane represents an individual squad member.
Quick Commands
- Terrain - You have the option to move your units to this location.
- Empty/Friendly Vehicle - You can give the order for the units to board that vehicle. The units will take the first availible slots, starting with Driver>Commander>Gunner>Passenger.
- Inside a Friendly Vehicle - You can give the order for the units to mount the vehicle you're in.
- Enemy Unit - Gives the order to engage that enemy.
- Squad Member - Allows you to select that unit only, Tell that unit to stop, or tell that unit to hold fire.
- Cover - A line should appear tethered to that cover. This indicates a hardpoint that the AI will try to stand on for optimal cover should you move the AI to that location.
- Sky - AI will move to the next mission waypoint, or your custom waypoint if you have set one.
- Friendly Vehicle with your own units - Allows you to give the order for those units to dismount that vehicle.
- Freelooking (using alt) - Gives the order to watch that position or give supressive fire at that location.
In addition, you can give the order for a unit to stop moving or hold fire from this menu. If the unit is currently away, you can give the order to regroup. You can also accsess the team menu from here, as well as Support and Communication commands, if there are any availible.
1 - Movement
- 1 - Return to Formation
Orders the selected units to return to your side in formation, depending on your currently selected formation. Units who previously had an Advance, Stay Back, or Flanking order will ignore that order and return to the default locations in formation.
------------------------------------------------- - 2 - Advance
Units will try to shift their positions in formation about 30-50 meters in front of you. This can be helpful if you want your AI to take an ambush before you do, or if you want to push your assault troops forward while you command from the back. - 3 - Stay Back
Units selected will shift their positions in formation to trail around 30-50 meters behind you. This will help keep your valuable bullet-magnet units (the ever important medics/corpsmen, or units with expensive equipment like AA specialists and Javelin specialists) out of a firefight. - 4 - Flank Left
Units will shift formation left and forward to try and get around the right side of the enemy. - 5 - Flank Right
Units will shift formation right and forward to try and get around the left side of the enemy.
------------------------------------------------- - 6 - Stop
Units will immediately hold their positions and cancel any action they were doing. Units that are stopped can still engage enemy units from that position if told to do so, which is useful if you want your unit to enter a sentry like mode where they engage anything they can see from that position. - 7 - Wait for me
Units will immediately hold their positions and cancel any action they were doing. Once you return within a reasonable distance of them, they will return to formation. - 8 - Find Cover
Using this command will issue all units a "Danger" state of combat. Units will bound for the nearest cover and cover each other in an attempt to hide from danger, attempting to disengage.
------------------------------------------------- - 9 - Next Waypoint
Orders your units to move to your Map-placed waypoint. (You can place a waypoint on the map by using Shift+LMB.)
2 - Targets
- 1 - No Target
Unit will belay any previous target orders and target units on their own discrescion, unless they are set to a "disengage" state of combat, in which case they'll avoid firing on anything. - 2-9 - First avalible Unknown or confirmed-hostile targets.
Any targets that are not confirmed friendly will appear here. If they take up more than 8 spaces, they continue on the next page. An unknown target can sometimes be confirmed enemy automatically from a distance, usually in the case of spotting enemy units from a long range via binoculars or through aircraft/tank radar IFF signatures. A target showing up here does not mean that you should shoot it all the time, sometimes friendly units are spotted from a distance and labeled as "unknown", in which case telling your units to shoot them will cause teamkills. - 0 - More
Cycles to the next page. Other pages contain static objects, animals, and friendly units that you are free to target.
The best part is that the kill feed will rarely show you as the one who commited fracticide.
3 - Combat State
- 1 - Open Fire (default)
If the unit has a target and is within range, the unit will attempt to attack the target. - 2 - Hold Fire
The unit will not fire on any targets, unless the target is deemed an immediate threat by being too close or firing in the general direction of your squad. - 3 - Fire
Generally used for commanders of tanks, but can also be used if a target is being held with a hold fire order. This will usually give a one-shot order, at which point the AI will return to whatever state they were in before. It is mainly used for targeting non-hostile structures or vehicles and attacking them. Using 2, you can target certain structures and vehicles without them needing to be enemy.
------------------------------------------------- - 4 - Engage
Any selected units with a target will break formation and engage said targets. This belays any hold fire orders. If the unit does not have a selected target, they will fire at enemies whilst maintaining formation. - 5 - Engage at will
Any units with this mode will automatically break formation and engage any targets deemed hostile until they are eliminated. This essentially makes the AI combat on its own, however it can be easy for your forces in this state to become disjointed and spread out too far to be effective. Usually, it's safer to manually assign a target to two or more squadmembers at once so they can work together to cover one another and provide supression fire for one another on the target. - 6 - Disengage (default)
Units will hold formation and attack enemy units assigned to them as targets from formation. Units will avoid assigning targets to themselves and move with you as a priority.
------------------------------------------------- - 7 - Scan Horizon
Units will constantly look 360 degrees at any available horizon to spot incoming units. Good for scouts and lookouts. If the unit has Binoculars or a weapon with a high-powered scope, they will use it to observe areas that are at greater distances. - 8 - Watch Direction
Units will look at a specific area in one of the 8 Cardinal or Orthaginal directions, (N, NE, E, SE, S, SW, W, NW) chosen by you. If the unit has Binoculars or a weapon with a high-powered scope, they will use it to observe areas that are at great distances. Alternatively, you can select a unit and use freelook (alt) to tell them to watch a particular location from the quick-command menu.
------------------------------------------------- - 9 - Supressive Fire
If units have a target, they will fire in the general direction of that target in an attempt to force the enemy to take cover. Units will use more ammo and fire more often, even if they don't have a clear shot.
4 - Vehicles
- 1 - Anywhere
The unit will board the first availible seat. If multiple units are selected, they will fill the vehicle, taking priority seats first. Seat priority is Driver>Commander>Gunner>Gunner 2>Passengers. - 2 - Driver
The unit selected will board the driver's seat. If multiple units are selected, the first unit will board the driver's seat and the rest will fill the seats as per "anywhere" seating. - 3 - Commander
The unit selected will board into the commander's seat of the vehicle. The commander will process orders and feed tactical information to the rest of the crew, telling the driver where to move and the gunner what to shoot, as well as spotting targets from his command seat. - 4 - Gunner
The unit selected will board in the first availible gunner's seat. If multiple are selected, the first one will board the gunner's seat while the rest will board anywhere availible. - 5 - Ride in Back
The unit or units selected will ignore all functioning seats and ride as passengers in the vehicle.
5 - Personal Messages
- 1 - Call Support
So far i've only seen this usable in warfare. Sends a vocal message to all other squad leaders on the command channel to send the support of your choosing to your current grid coordinates, as well as a "Done" option for some reason. Usually your support request will be immediately met by an AI saying "NEGATIVE". - 2 - Fuel Low
Calls out a warning that you have low fuel to your squad. - 3 - Ammo Low
Calls out a warning that you have low ammunition to your squad. - 4 - Injured
Calls out a warning that you have low health to your squad. Automatically is called out if you suffer a gunshot wound or your health falls below a certain percentage (usually around 75%). - 5 - Report Status/Report Position
If you have no subordinates or are a subordinate yourself, this will ask your squad leader or other squad leaders for their grid positions. An AI squad leader will always respond with their gridref. If you have units selected, it will ask them to report their status. This reset all portaits to green while the unit gives a SITREP. The units will first call out low ammo, health, or fuel, then call out grid positions in ascending order. Groups of units in the same grid will let the lowest number in that grid call out their gridref and will stay silent. Units who fail to answer the SITREP (unless they're in the same grid as another unit who reported) will be reported dead after a short timeout and removed from your hotbar. - 6 - I'm under fire
Warns other units of enemy fire. Sets a "Danger" combat mode for the unit under fire and other units if they also notice the fire. - 7 - One Less
Reports to squad that you've eliminated an enemy, reguardless if you have or not. Is sometimes automatically called out in combat if you spot the body of a target you were assigned. - 8 - ...is down
If a unit is suspected dead, you can manually report them down by selecting them on the hotbar and selecting this option. If the unit is not actually dead, they will report their position and then be re-added to the hotbar.
6 - Action Menu
This tab deals with context-sensitive actions, which can include Opening Doors, looking at a squadmember's gear, assembling and disassembling mounted weapons, picking up/dropping bags, reloading special magazines, saluting, and sitting down.
When opening a squadmember's gear, they'll often try to exchange gear at the nearest object that can hold it, be it a vehicle or a corpse. Once they get there, you can move their gear around as if it were your own. Unfortunately, AI loves to pick very far away locations to access gear, even if there are bodies right next to them they could do it at. Try to ensure the only access point for gear is the only one nearby or else your units might run over the countryside to go grab some magazines.
To make an AI assemble a weapon, you must have a Tripod Bag and a Weapon bag. Tell one AI to drop one of the bags and the other AI to assemble it. It will be assembled at the location of the dropped bag.
Multiple infantry units can be told to sit or salute at the same time. Having all of your units in a file and facing the right direction, saluting, is a good way to confuse other players.
If you have assistant AT or AA specialists in your squad, they have to drop their bags in order for another squadmember to rearm at that bag. Make sure when that squad member is done rearming that the member who dropped the bag picks it back up since they'll attempt to rearm at the bag even if it only contains a smoke grenade.
7 - Stances and Behavior
- 1 - Stealth
Units will move slowly and attempt to conceal themselves in any cover they can find, often crouching or going prone in bushes for visual cover. They will move from cover to cover in a bounding fashion. One group will stay behind to cover other members as they advance. Units will always remain crouched when moving and will switch to prone when idle. All radio communication between stealthed units will be hushed if such voice clips are available. Units in this mode actively search for enemy units and keep weapons raised but will avoid engaging enemy units unless told to do so. - 2 - Danger
Similar to Stealth, however chatter is generally distressed, units will advise each other when they are covering, and units will bound from solid cover to solid cover at top possible speed. Units crossing an open or exposed area with no cover will assign a small detatchment to stay a few meters back to cover, then swap roles when the covering squad moves forward, repeating until they make it to solid cover. This slows movement through open areas which may be detrimental, so try to issue orders to make them move as fast as possible. Units using this mode will also cover other units that are advacing through an urban area, keeping units behind cover to watch the advancing unit's 6 o'clock while the advancing unit peeks around the corner. Units in this mode actively search for enemy units and keep weapons raised. This combat mode is automatically issued if a unit is under fire, then automatically returned to whichever state they were in previously after they haven't been under fire for a few minutes. - 3 - Aware (default)
Units lower their weapons and loosely stick to cover, watching for enemy units. Units in this state opt to attempt to stay in formation and try to take the fastest path to their destination. - 4 - Safe
Units lower their weapons and opt to take open paths and roads to get to their location. They will not use cover and will either move quickly to their position if it is a long way away, or walk to their position if it is close by. Units in this mode do not look for enemy units, however they will still notice them if they are directly within their line of sight.
------------------------------------------------- - 6 - Stand Up
Units will always attempt to stand upright. If given a stealth, danger, or take cover order, they will use their prefered stance until this order is issued again. - 7 - Stay Crouched
Identical to stand up, however the units will remain at a crouch. Useful if you wish to retain a certain degree of concealment but high movement speed. - 8 - Go Prone
Units will immediately lay down and crawl. Useful for stealth and prepping units for an ambush, as well as ensuring units like Marksmen and Machinegunners are getting accurate shots on the enemy. - 9 - Copy my stance
Units attempt to maintain the same stance as you. Once they're close by and in formation, they'll drop to the stance that you are using, but will usually stand up and run or make a crouched run to your position if you start moving at a fast pace. Not as reliable as manually issuing them a stance order but it can fit the bill of you can't be arsed or aren't able to manage your squad that effectively.
8 - Formations
- 1 - Column
Units will form a line behind the squadlead, spaced approximately 2 meters apart from each other, in ascending numerical order. Lengthy formation. - 2 - Staggered Column
Units will form two columns behind the squadlead, spaced two meters in either direction, with even numbers on your right side and odd numbers on your left. - 3 - Wedge (default)
Units form a V, with the squadlead at the apex and the units trailing on either side. Even numbered units are on the right whilst odd numbered units are on the left. Well-rounded and the most balanced formation. - 4 - Echelon Left
Units will form the left side of the wedge in ascending numerical order. - 5 - Echelon Right
Units will form the right side of the wedge in ascending numerical order. - 6 - Vee
Forms an inverted wedge, with the squadlead at the apex and the units in front of the squadlead. Even numbers are on the right whilst odd numbers are on the left. - 7 - Line
Units form a horizontal line with the squadlead in the center, spaced about 1.5 meters apart. Even numbers are on the right whilst odd numbers are on the left. Broad formation. - 8 - Column (Compact) [File]
Units form a tight column behind the player, spaced approximately a meter apart in ascending numerical order. - 9 - Delta [Diamond]
Units will form 3 seperate lines behind the player. These take the form of a staggered column formation and a column formation spaced such that the column formation is halfway between each member of the staggered column formation. Most Compact formation.
9 - Teams
Allows you to assign specific units to a team. Whenever this group of units is selected, either with or without using the tools provided, it will be refered to as Team Color, Perform this action. This can help in large groups of units where naming each individual soldier by number can create a delay on your orders, or can help to group your soldiers by class or function.
Remember, you can quick select group Red by pressing Shift+F1, Green with Shift+F2, Blue with Shift+F3, Yellow with Shift+F4, and White with Shift+F5. All units are, by default, a member of team White.
You can also select a team by pressing 9 to open the team window, then 9 again to open the team selection window. Then press 1-5 to select the corresponding team, and then press the key of the type of action you want to do.
Selecting multiple teams will call out each individual member selected, instead of "Team [X] and Team [Y], perform this action.", so it may be faster to just issue the same order to each team seperately in the interest of berevity.
0 - Personal Replies
- 1 - Done
Indicates you are completed with a given order. Sometimes when you die and respawn, your portrait may have a "stop" order issued above it. When this happens your units assume that you're too busy to squadlead and will assign the lowest numbered subordinate to handle orders given to the squad by you, often botching them terribly. Using this command will return the squad to your personal command. - 2 - Fail
Indicates you cannot comply with orders. - 3 - Ready to Fire
Indicates that you have a target within your sights and are ready to shoot him. - 4 - Cannot Fire
Indicates you cannot shoot due to lack of ammo or if you are currently under supression fire. - 6 - Repeat
Asks your squad leader or commander to repeat the last issued command. - 7 - Copy
Signifies understanding of orders or information.
------------------------------------------------- - 8 - Communication
Mission-Specific Player-to-Player options. - 9 - Custom
Mission-Specific Actions.
Vehicle Command
A vehicle crewed by your subordinates will allow you to command the crew in that vehicle even if you aren't in the commander's seat. This will allow you to "drive" an armored vehicle while gunning (with a slight delay to account for communication between the gunner/driver) or allow an AI gunner to target enemy units while you drive and keep in cover.
Q and E can be used to tell a unit to drive slow or fast respectively, but using the forward command twice also results in fast movement. A and D can be used while moving to issue left and right turn commands.
Using Ctrl+F will force your gunner to change weapons (using F can do this too unless you are in a seat that also has multiple weapons, like an AH-64). Using Ctrl+Primary Mouse will order the vehicle to hold or cease fire if the weapon is an automatic (like a minigun, 20mm cannon, machinegun, or mounted grenade launcher) or issue a fire order if the weapon is a high-powered single shot (like an M256 main tank gun, TOW launcher, or attack helicopter/aircraft guided missiles). Using the primary mouse button by itself also works, but only if you do not have a weapon yourself to fire.
Some vehicles like tanks and IFVs can change between armor-piercing and high-explosive ammunition. To do this, you must select the main weapon and then use the context menu to select the munition to be loaded. Armor piercing ammunition is for destroying fortified objects and vehicles like bunkers, tanks, and armored cars. High explosive ammunition has a very large blast radius and does extreme damage to lightly armored targets like infantry and light vehicles, capable of taking out entire squads with well placed shots. For tanks, switching between SABOT and HE rounds takes a little more time than it does to load the gun normally. For IFVs, switching between APFSDT-S rounds and HEI-T rounds takes less than half a second.
Interpreting Squad Communications
- Negative, No can do, I can't.
The unit has failed whatever order you have given them. Usually this can happen when you tell them to board a moving vehicle, or board a vehicle that is locked or unplayable by your team. They will automatically attempt to board a moving vehicle until they loose sight of it.
This can also happen if you tell the unit to move to a location they can't get to. This usually means the area is blocked by something. - I'm at grid XXXXXX.
The unit is reporting their position in grid coordinates. Grid coordinates are divided into two sets of three numbers. The first three is the horizontal position whilst numbers 4, 5, and 6 indicate vertical position. To put it simply, read coordinates from the top of the map first, then from the side. - Enemy at 3 O'Clock, 200 Meters, Enemy, Front, 100 Meters. ect
- This unit has spotted an enemy unit or a unit with an unknown dispositon to your squad. If the squad member gives the direction in "O'Clock", imagine yourself in the center of a clock. Direclty infront of you is 12 O'Clock, whilst directly behind you is 6 O'Clock. Directly to your left is 9 O'Clock and directly to your right is 3 O'clock. Simply point yourself in the direction of the number the unit calls out as if you were standing on a clock. They also handily estimate the distance.
- The unit will only call out "Front", "Left", "Right", and "Back" if the squad has been or currently is moving in a single defined direction. When using this notation, squad members will coarsely estimate distances using prepositional terms, such as "Just", "Far", "Way", "Close", "Medium" ect. An example is "Enemy Man, Just Right, Close". This would indicate that the enemy is about to your 1 O'Clock and is usually within 100 meters of your squad.
- If a unit states that an enemy is "One Klick" or "Half a Klick", refrence that a "Klick" is a millitary term for a Kilometer, which is 1,000 meters. Thus, half of a Klick equals 500 meters.
- This unit has spotted an enemy unit or a unit with an unknown dispositon to your squad. If the squad member gives the direction in "O'Clock", imagine yourself in the center of a clock. Direclty infront of you is 12 O'Clock, whilst directly behind you is 6 O'Clock. Directly to your left is 9 O'Clock and directly to your right is 3 O'clock. Simply point yourself in the direction of the number the unit calls out as if you were standing on a clock. They also handily estimate the distance.
- I've Got him!, One Down!, Target Eliminated.
The unit has confirmed that they killed an enemy. This will always play if you have ordred them to target a specific enemy. - Copy, I'm on him. Engaging!
The unit is breaking formation to engage an enemy target. - Status Red!
This unit is in a vehicle and the vehicle has suffered debilitating damage. - Where are you? Report Position!
This unit has strayed a considerable distance from you. Give them a manual move order to get them back to formation faster. - Go! Covering!
When units are in a "Danger" or "Stealth" state, they will call out to each other. If a unit transmits this, it means they are staying behind to cover other units moving forwards. - Under Fire!
Units in an aware, safe, or stealth state will report if they have any form of ordinance land near them. If in a safe or aware state, they'll swap to a danger state. - Clear.
After a unit that has been under fire doesn't receive any fire for a few minutes, and spots no enemy units around them, they'll automatically report the area clear and swap back to aware or safe, depending on which state they were in when they came under fire. Units manually told to enter a danger state will never swap out of danger on their own.
Setting up an Assassination
- Enough AI units to quickly dispose of the force you're engaging, ideally a 1:1 ratio.
- AI with proper ranged capability. MP5's don't tend to perform as well as an M24.
- A good, unobstructed view of the enemy force.
You want to set your AI up in a treeline or on the edge of a hill. Once you approach the edge of the treeline, tell your AI to go prone. Get to a proper position and either have you AI move up in formation (Ideally a line, however you can change it based on the shape of the treeline), or you can tell the AI individually to move to different locations. Asking them to move to different locations is preferable as you can surround and the enemy. If you or the AI misses, the enemy won't have many places to run because of your wide coverrage.
Once all units are in their proper places, do ~16 to tell them to all stop, and ~78 to tell them to go prone.
You and your AI will automatically call out the soldiers to your squad once they confirm they are hostile. Select 1-2 of your units at a time and assign them a target using 2. Assign each soldier or group of soldiers a different target to maximize the spread of your damage. If your units have a clear veiw, they will report that they are "Ready to Fire."
Commanding from the Map
You can still select and give orders via the Map, however you will usually be limited to move orders if the game mode is not on Easy or a variaton thereof.
If the game mode is on easy, last-known positions of enemy and friendly soldiers will be displayed. This will allow you to select units and target enemy units from the map alone by simply selecting the units you want to attack the enemy, mousing over the enemy units, and selecting "Attack".
The map is also useful to give long-distance move orders or observing friendly forces on the map. Hovering over any map object with a unit selected will give you a corresponding quick menu command to execute.
Tips and Tricks
- If you have a large number of units in a vehicle, while moving at a slow speed you can do ~62 to tell them all to eject at once. This will make them all exit the vehicle at the same time, making unloading a truck much faster than using Disembark, as that command unloads them one by one. Be wary that in helicopters or cramped quaters, the AI can take damage from collisions with the ground, objects, or each other.
- Remember to tell your units to get back up after you order them to prone. If a unit is unresponsive, tell them to return to formation, give them a new order, or make sure they are standing and not prone.
- It's ideal to organize mixed squads into teams so you can manage things like an AT squad. This way you can easily tell your AT squad to engage a tank intead of having to select them individually or giving infantry the task of blowing up a tank with a peashooter. You may also want to assign four units (usually a medic, a machinegunner, and the remainder being riflemen/AT riflemen) into a team so you can easily access several balanced teams to send to an objective or location.
- Multiple units assigned to the same task (such as three or four units assigned to engage an enemy, move to a position, or perform an action) will act as a squad in themselves, with the lowest numbered unit taking point and the remaining units covering and watching different arcs. It can be benificial to send small groups of three to four squad members at a single enemy or objective instead of thinning out your squad by assigning each individual member a different target. This way, your groups of members will stick together and increase each other's longlivety instead of spreading out too far and getting flanked.
- You can use the Action Menu (6) to tell units to resupply, repair, and refuel at the respective trucks or service points. You can also use this menu to tell Medics to heal soldiers and engineers to repair vehicles or disarm/place explosives. The action menu will also annoyingly contain every door within a hundered or so meters that the AI is capable of opening or closing with little distiction between each.
- Units ejecting from air vehicles that have considerable altitude will automatically deploy a parachute. If your aircraft gets hit by enemy fire and is in the process of crash landing, using ~62 will likely save most of your units from a firey death in the event you don't successfully crash land or eject yourself.
- Units can be told to change seats while in some vehicles through the action menu (6).
- Units that are inside a vehicle with gear can be told to pick up a weapon from inside the vehicle while they are in a seat that would normally be able to access gear.
- Units will report low ammunition when they have 1-2 magazines left with anything that's not a light machine gun. Units will report that they can't shoot, out of ammo when they have only one magazine left.
- Units can be told to rearm, resupply, and take weapons from the action menu (6).
Limitations
Arma AI doesn't come without its downfall of being clunky and having obscure limits on how they're able to perform. Many players get frustrated that AI won't do what they tell them to when the player is perfectly capable of doing it. Keep these limitations in mind:
Maximum engagement distance also depends on what weapon the soldier is carrying, as well as wether or not that soldier can actually see the enemy you're indicating. You can tell if a soldier can't see the enemy if you assign them that enemy as a target and they then begin to scan the area for the target you indicated without actually aiming at them. If you need to direct them to a target, you can select them, hold Alt, and use the "watch position" command to focus their attention on a target or location.
Maximum engagement distance is only 200-250 meters for most submachine guns, 400-500 meters for most assault rifles and light machineguns, and pushing 600 for most sniper rifles. Anti-Tank weapons are all different, but RPGs and M136s usually have a few hundered meter's range, while SMAWs, NLAWs, MAWWS, and other unguided high-tier launchers have a bit extra range. Javelins have about a kilometer and a half of range, while stingers have about two or three kilometers range, though maximum range that a player can use all weapons is much higher.
In vehicles, maximum engagement distance is often much higher, usually around 800 meters for anything that even has a mounted MG on it. In armored vehicles, maximum distance can border on two kilometers. Remember that AI is almost dead-accurate if they can find and fire at a target, so it's almost garunteed death if you can get them to look at an enemy the right way.
AI also has particulars about pathing through towns, most notably using different points as cover around prefab buildings and fences and being able to navigate through urban enviornments while covering one another. They'll also cover one another as they move through the open, slowly in a bounding fashion.
Vehicles will opt to take roads to their destinations, even if they're tracked and wouldn't benefit from the smoother terrain of a road, unless they're directly told to take a path that isn't road-based.
Helicopter pilots, when told to disembark, will slow down and attempt to land nearby wherever they were told to disembark.
AI will only use stingers or AT launchers if told to target a vehicle or structure (and will only use stingers on aircraft). They'll also handily hammer it with as many rockets as it takes to blow it up, sometimes wasting their entire inventory in the process.
Closing
- Снайперское искусство.★ 5 (627)22k views722 ♥2 minCzechUpdated May 14, 2015
- Гайд для новичка DayZ. С чего начать?★ 5 (363)19k views305 ♥8 minRussian
- How to Read PGO-7 Optical Sights★ 4 (115)14k views150 ♥4 minUpdated Aug 3, 2014
- Фракции Arma 2.★ 5 (352)12k views224 ♥6 minRussianUpdated Apr 3, 2015
- Святое писание Армы.★ 5 (432)10k views184 ♥1 minRussianUpdated Jul 7, 2015
- Arma 2 and OA Weapon Class Names★ 4 (119)9k views162 ♥8 minUpdated Feb 28, 2015


- Upgrading to PremiumTeam Fortress 2★ 5 (20k)1441k views11k ♥6 minUpdated May 11, 2022
- No More Room in Hell Official ManualNo More Room in Hell★ 5 (2.8k)569k views2.1k ♥29 minUpdated Apr 22, 2019
- NMRiH Community Hosting GuidesNo More Room in Hell★ 5 (526)351k views653 ♥1 minUpdated Aug 10, 2022
- ULTIMATE GUIDE FOR GAME DEV TYCOONGame Dev Tycoon★ 5 (5.8k)326k views10k ♥4 minUpdated 23 Jan, 2014
- How to 'Git Gud' Soon™MORDHAU★ 5 (2k)318k views3k ♥68 minUpdated Nov 16, 2024
- Лучшие кооперативные игры SteamPAYDAY 2★ 5 (1.5k)315k views2.1k ♥56 minRussianUpdated Apr 27, 2025






This guide was created by its original author on the Steam Community. Are you the author and want it removed? Request removal.