Basics for the A10c II
IMPORTANT NOTE
Some parts in the controls got censored by Steam because its a 1870s insult for unskilled asian workers. ♥♥♥♥♥♥ means C- o- o- l- i- e (as in ♥♥♥♥♥♥-switch). I tried talking to steam support but they said they werent gonna do anything about it.
When talking about controls, the addition "long" means, that said controll needs to be held down. On the other side "short" means you just need to press it.
Pictures not loading can usually be fixed by refreshing the page.
If you want to zoom into the picture and get a "invalid url" error, try using middle mouse.
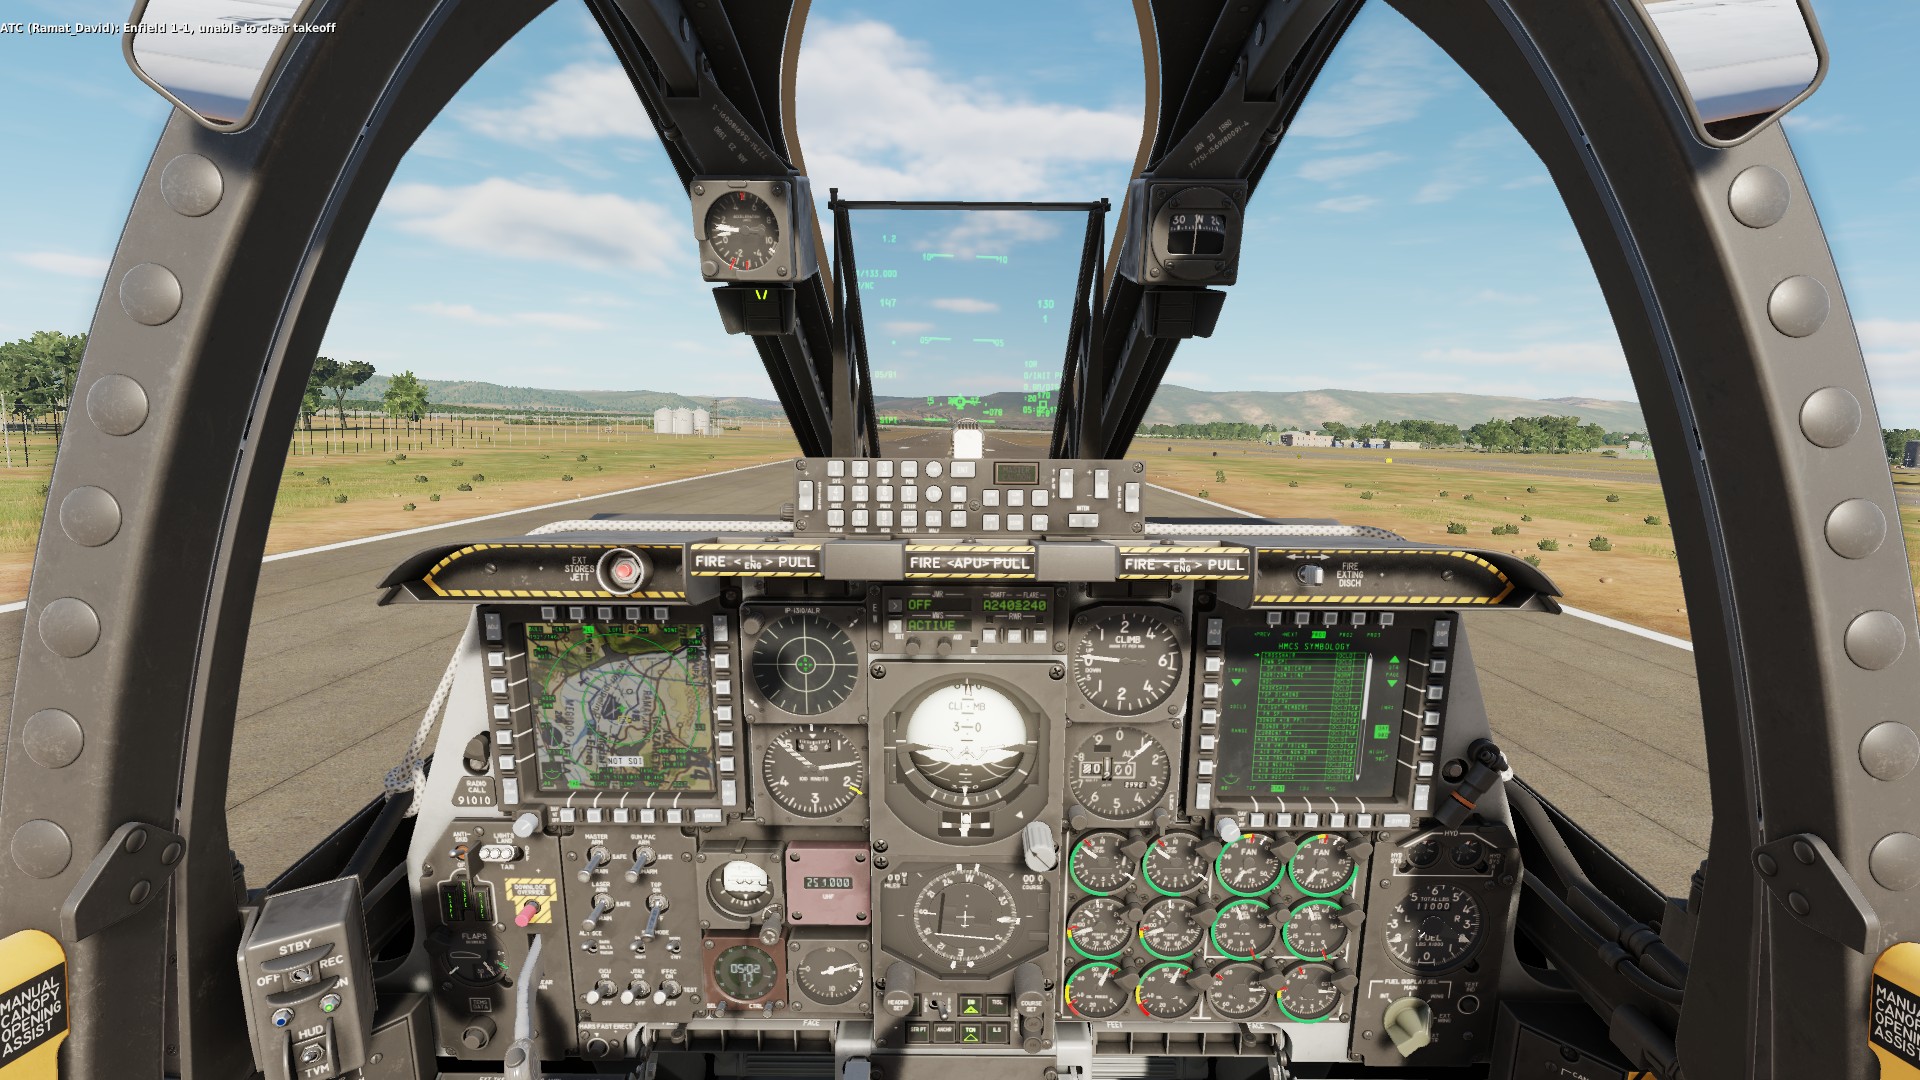
Cockpit overview
Center Console
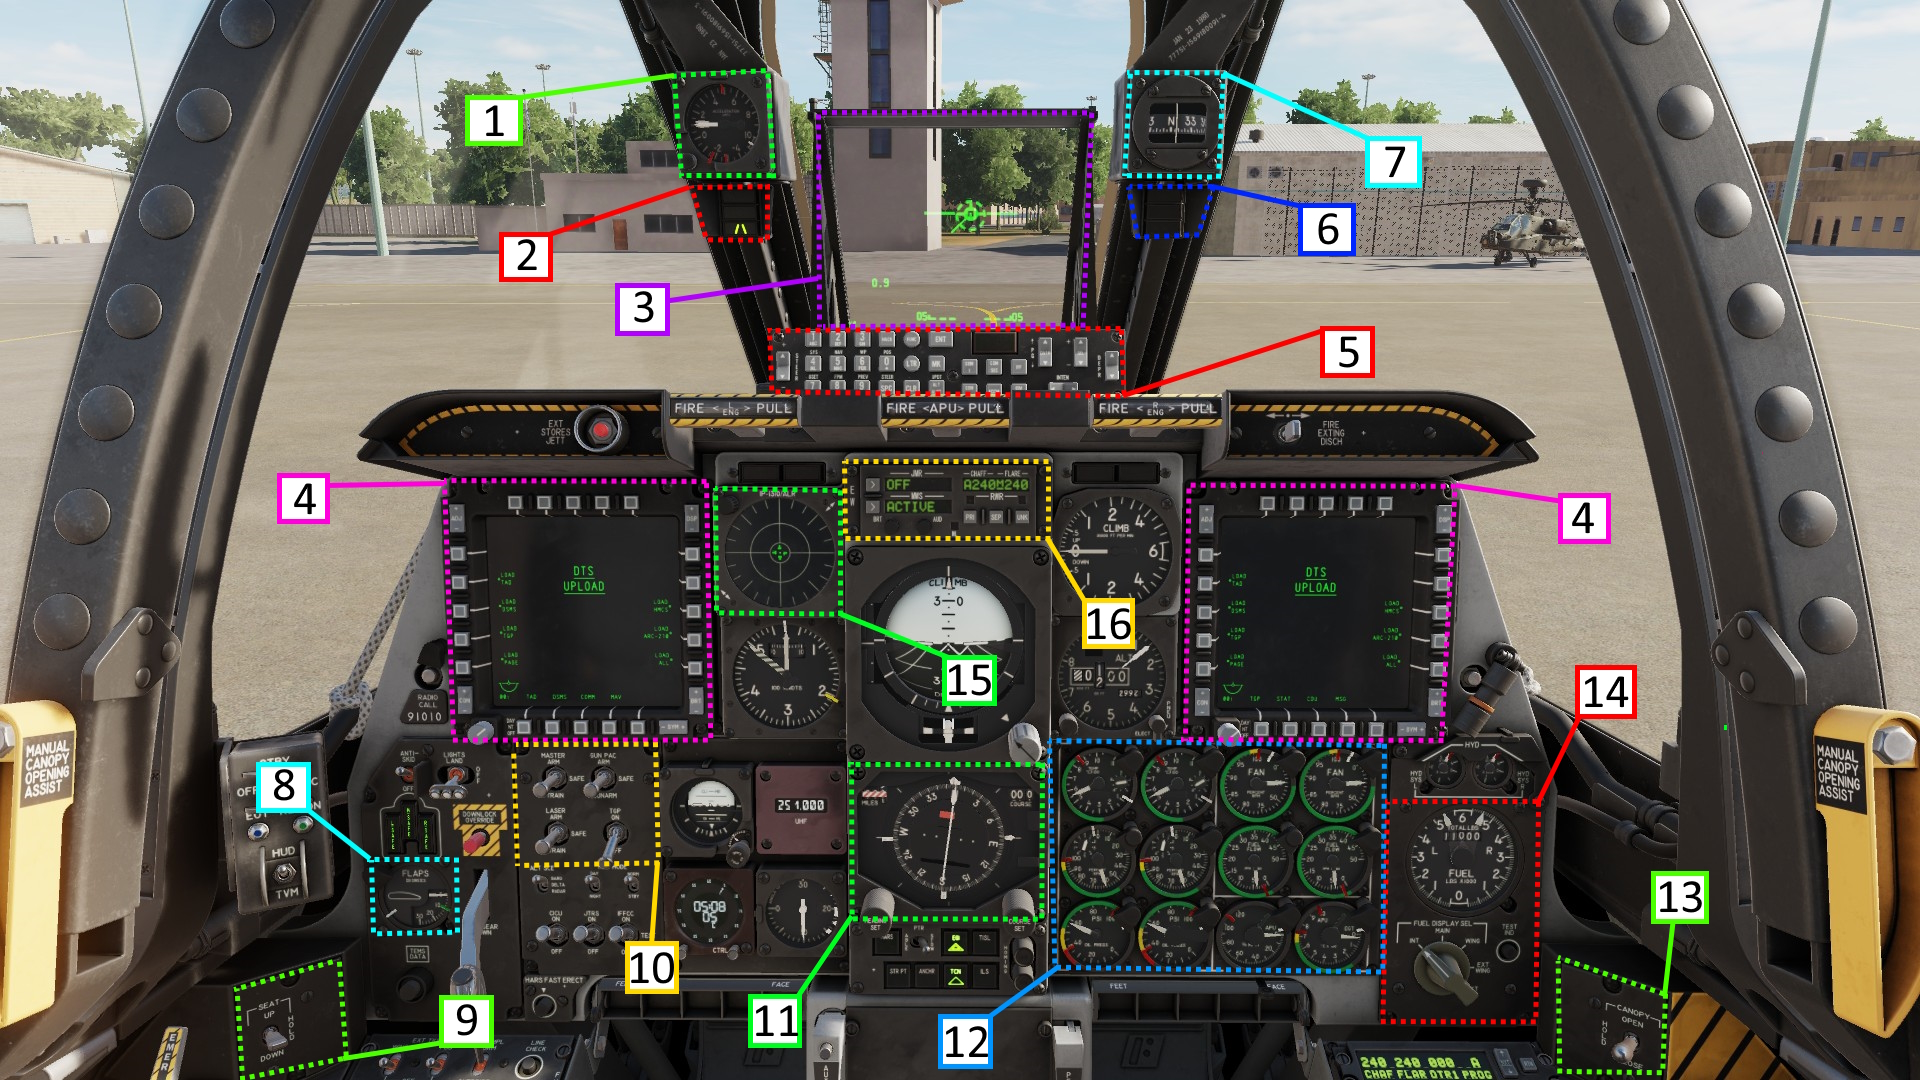
- G Force Gauge - shows current, highest and lowest G force
- Angle of Attack - Shows if your AoA is acceptable, too low or too high if your landing gear is deployed
- HUD - Displays information depending on the current mode, for more see HUD chapter
- Left and Right MFD - Multi function Displays that show various pages. For more detail see MFD chapter
- UFC - Sometimes called the scratchpad, the UFC is used to manipulate settings in the planes systems, mostly by typing numbers or letters
- Aerial refueling status light - Shows the current state of your aerial refueling process
- Backup compass - Shows the magnetic heading of the aircraft
- Flaps indicator - Shows how much the flaps are extended
- Seat adjustment - Moves your seat up and down. Usefull for seeing the top or bottom
edge of your hud if you dont have head tracking
- Master Arm panel - All arming switches are located here
- HSI - Most useful if youre working with TACAN
- Engine Gauges - Shows status of your engines and other related components
- Canopy open/close switch - Just close it
- Fuel indicator - Shows how much fuel you have in the aircrafts tanks
- RWR - The Radar warning reciever warns you if your get hit radar waves of other planes or ground stations, as well as incoming missiles.
Left and right console
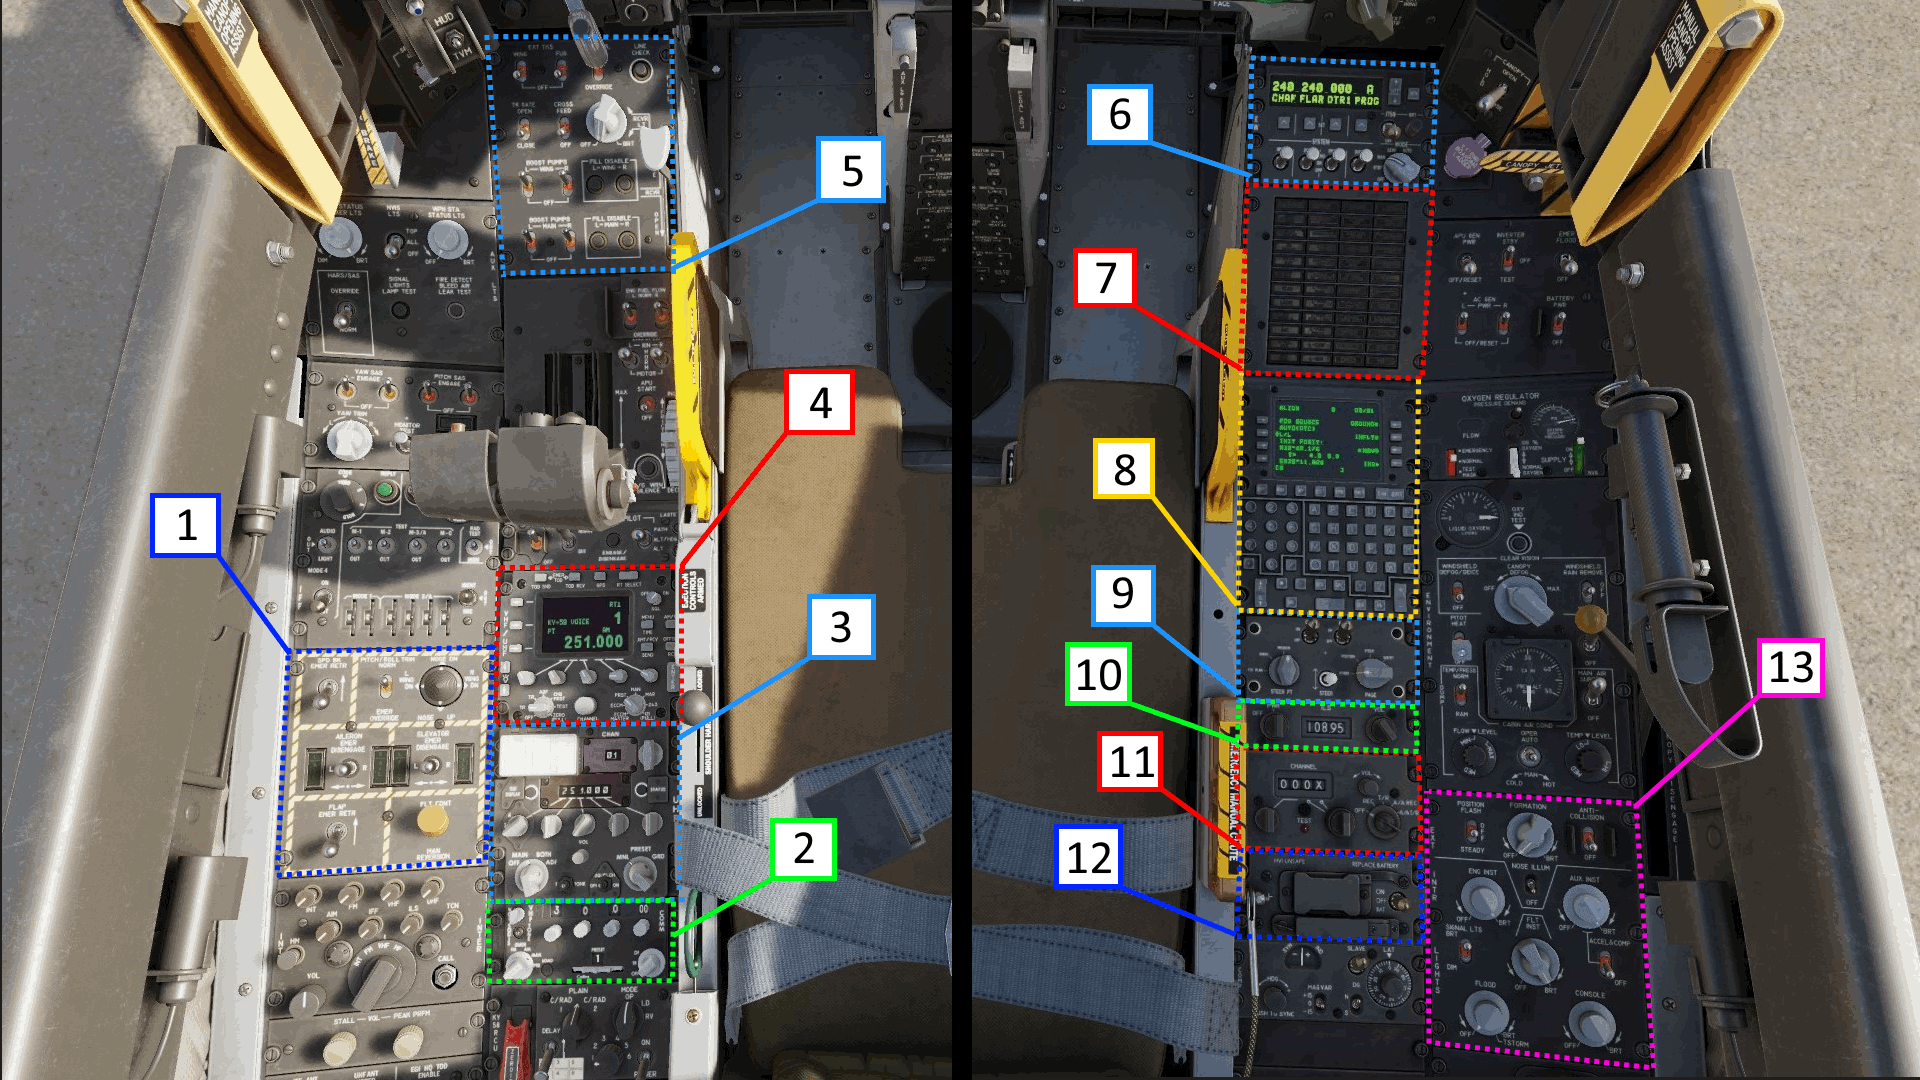
- Emergency control panel - Holds various options for emergency procedures
- AN/ARC-186(V) VHF radio - Controlls a radio in the VHF frequency range. More in the radio chapter
- AN/ARC-164 UHF radio - Controlls a radio in the UHF frequency range. More in the radio chapter
- AN/ARC-210 radio - Controlls a radio able of sending and recieving in the UHF and VHF frequency range. More in the radio chapter
- Fuel control panel - For controlling different aspects of your fuel systems.
- CMSP panel - Used to set your countermeasures and their profiles
- Master caution panel - Displays warning if there are problems with the planes systems
- CDU - The main part of your navigation system
- Auxiliary Avionics Panel - Used to decide what point you want to focus on. More in navigation
- ILS panel - Used to input a frequency for ILS approach. See landing
- TACAN panel - Used to set a TACAN frequency. See navigation
- HMCS panel - Turns on your HMCS. See HMCS chapter
- Lighting panel - Controls all internal and external lighting
Coldstart
In the following chapter i will explain how to start the plane from its "cold and dark" state until it is flyable. After that i will add settings that i would recommend you configure before heading out for a mission.
Coldstart until flyable
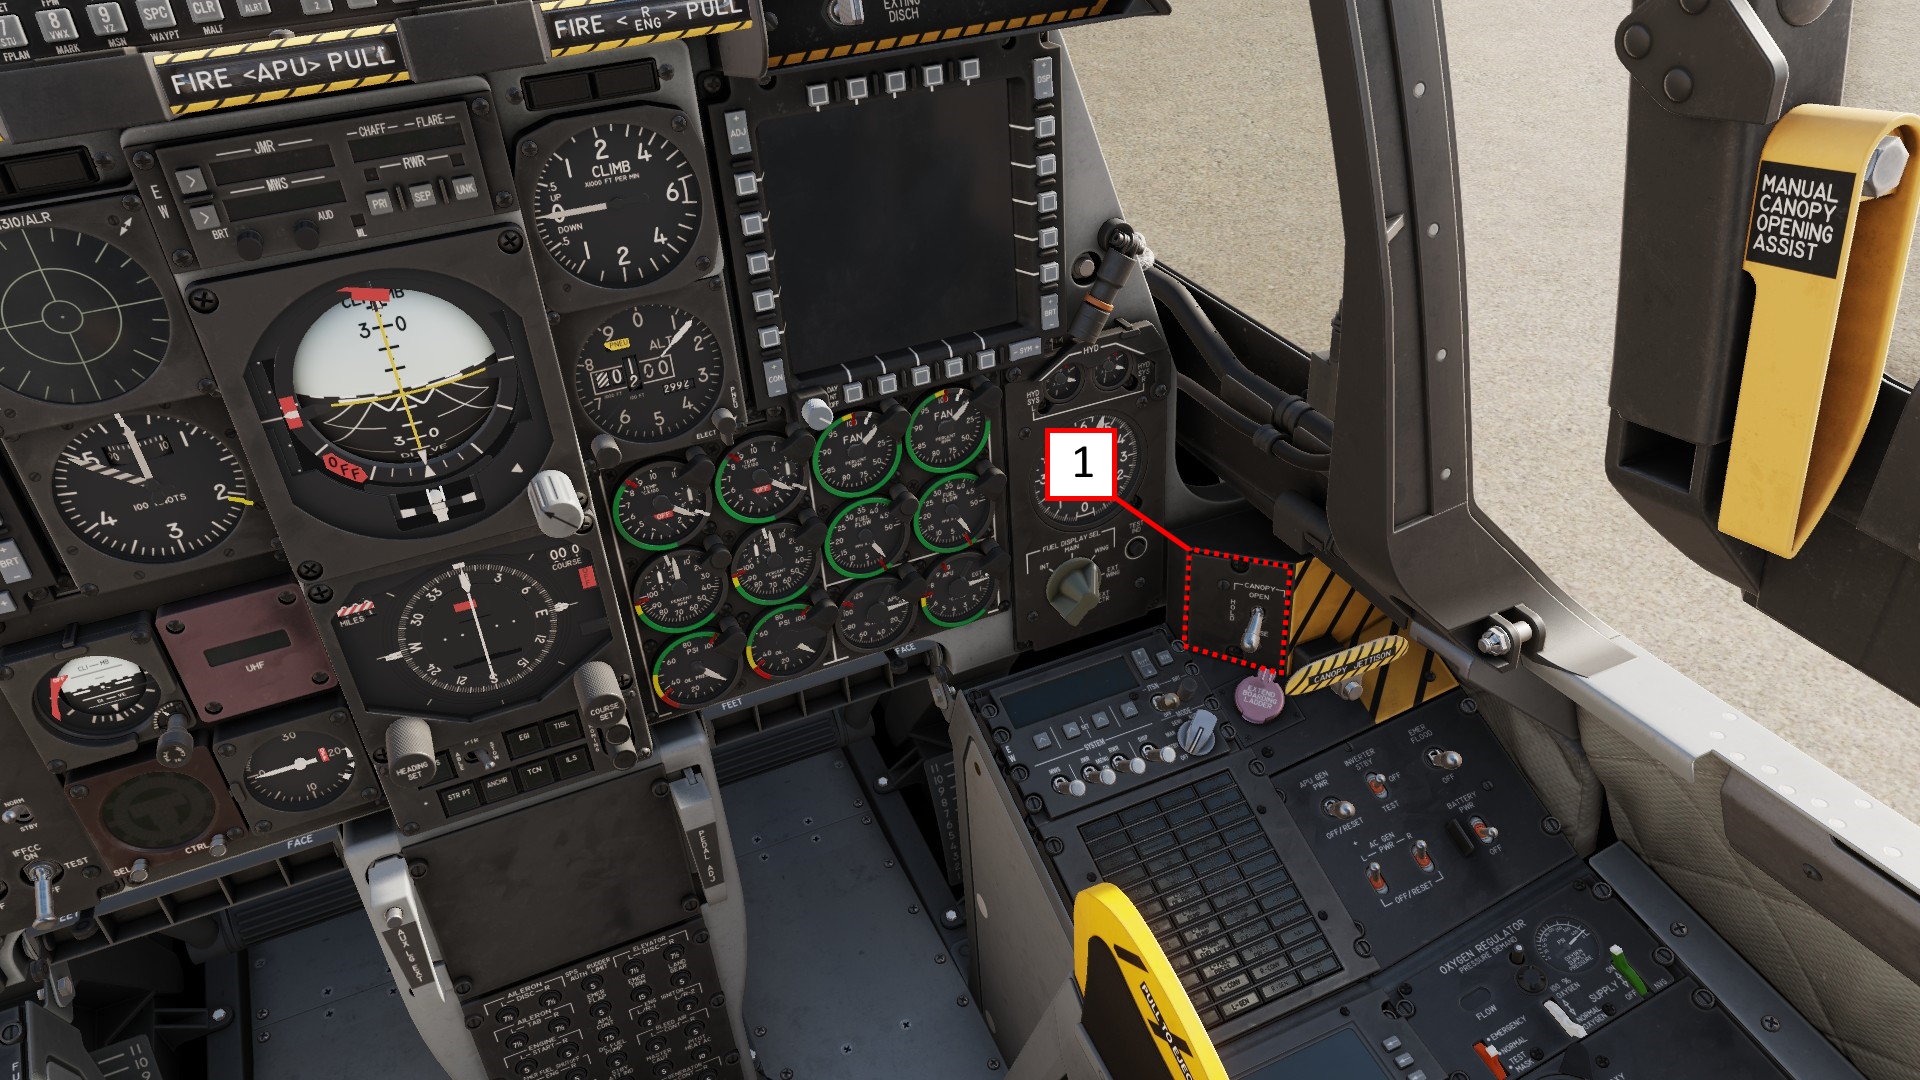
- Close the canopy
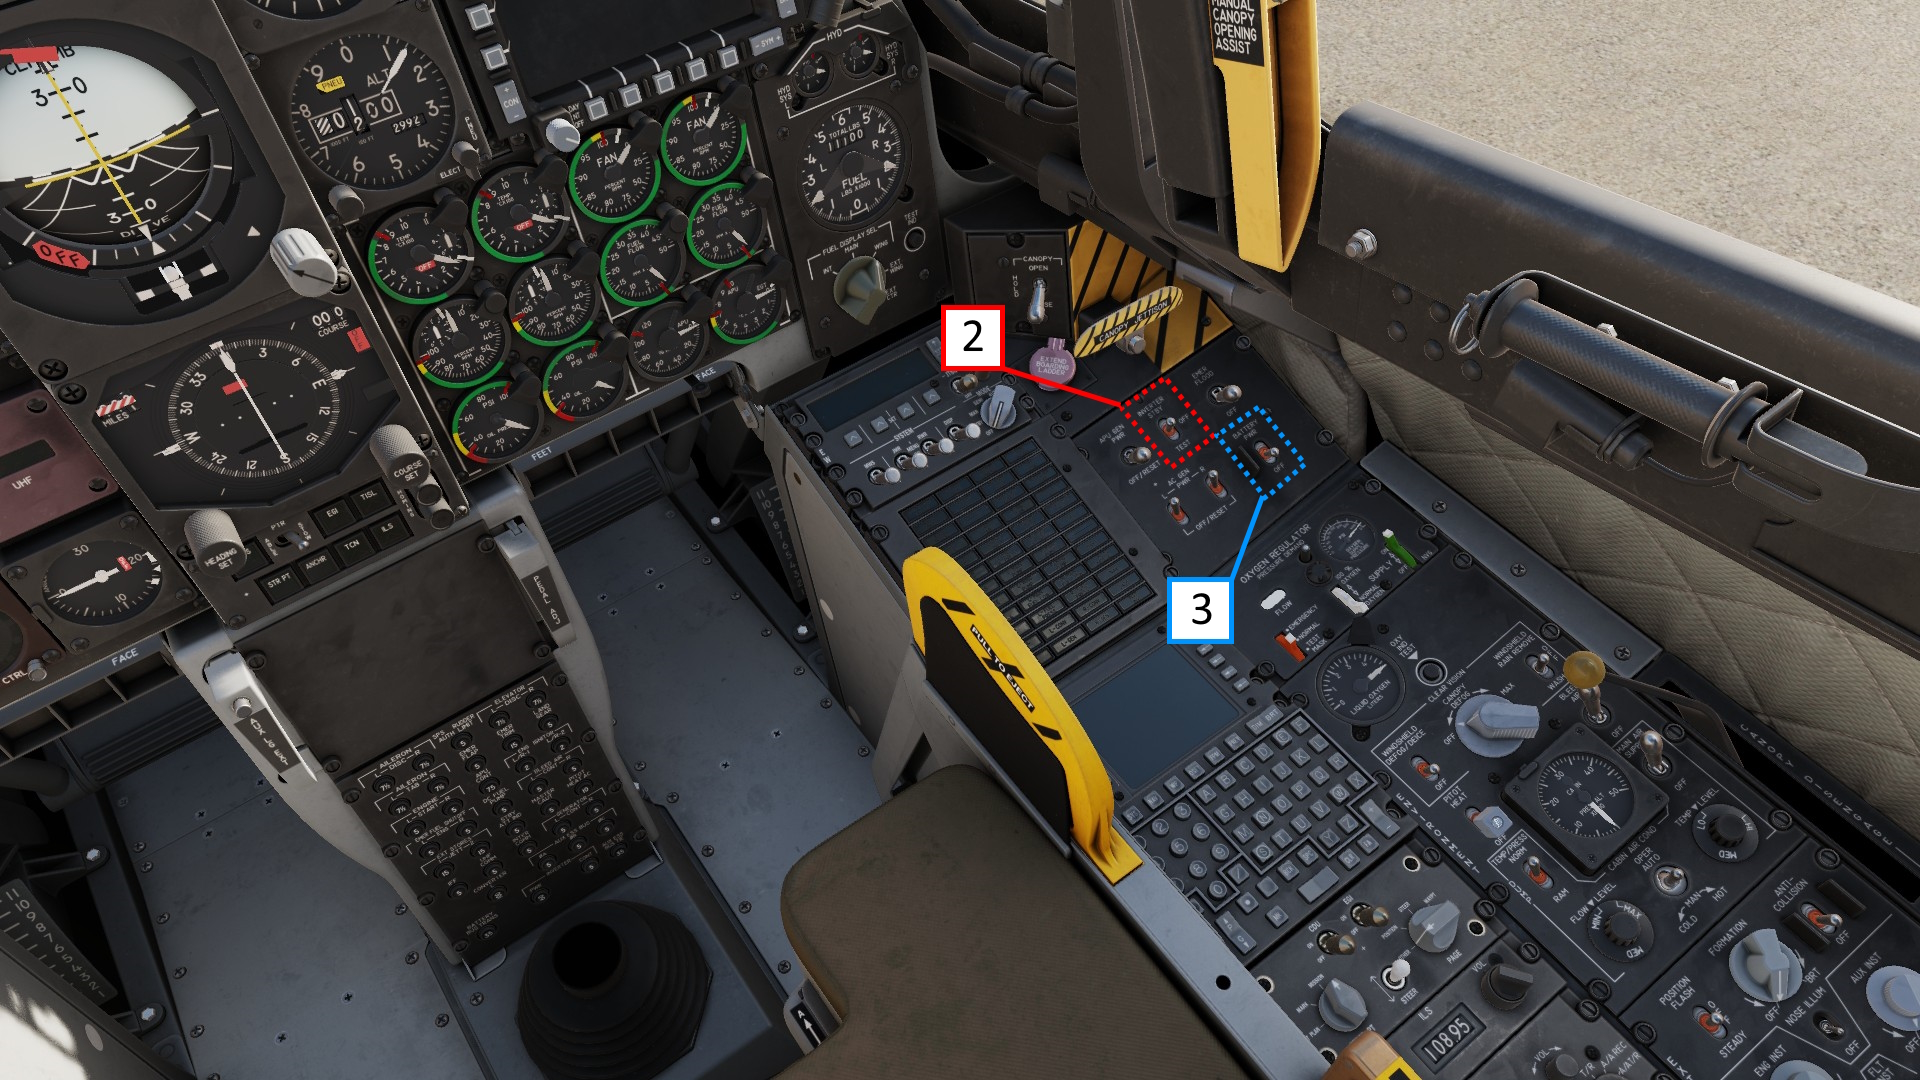
- Set the inverter to standby
- Set the battery to power
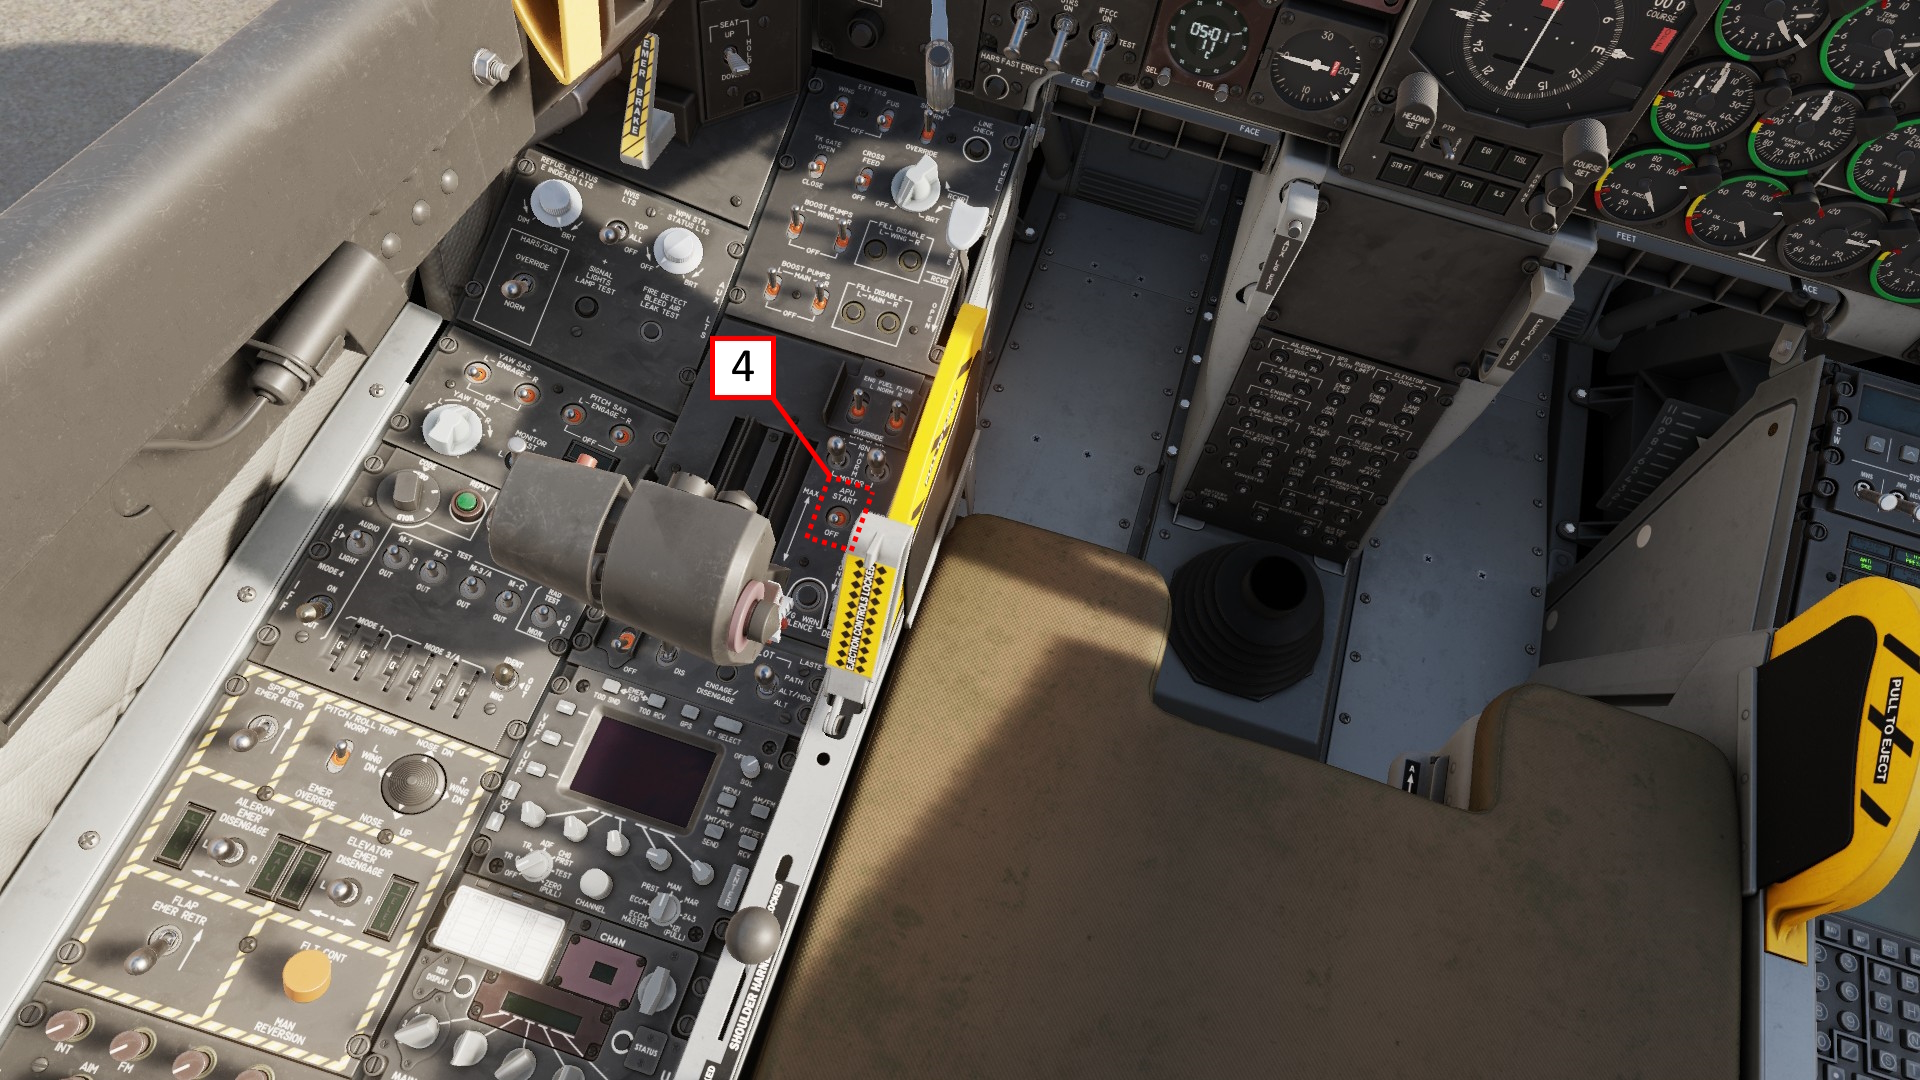
- Turn the APU on
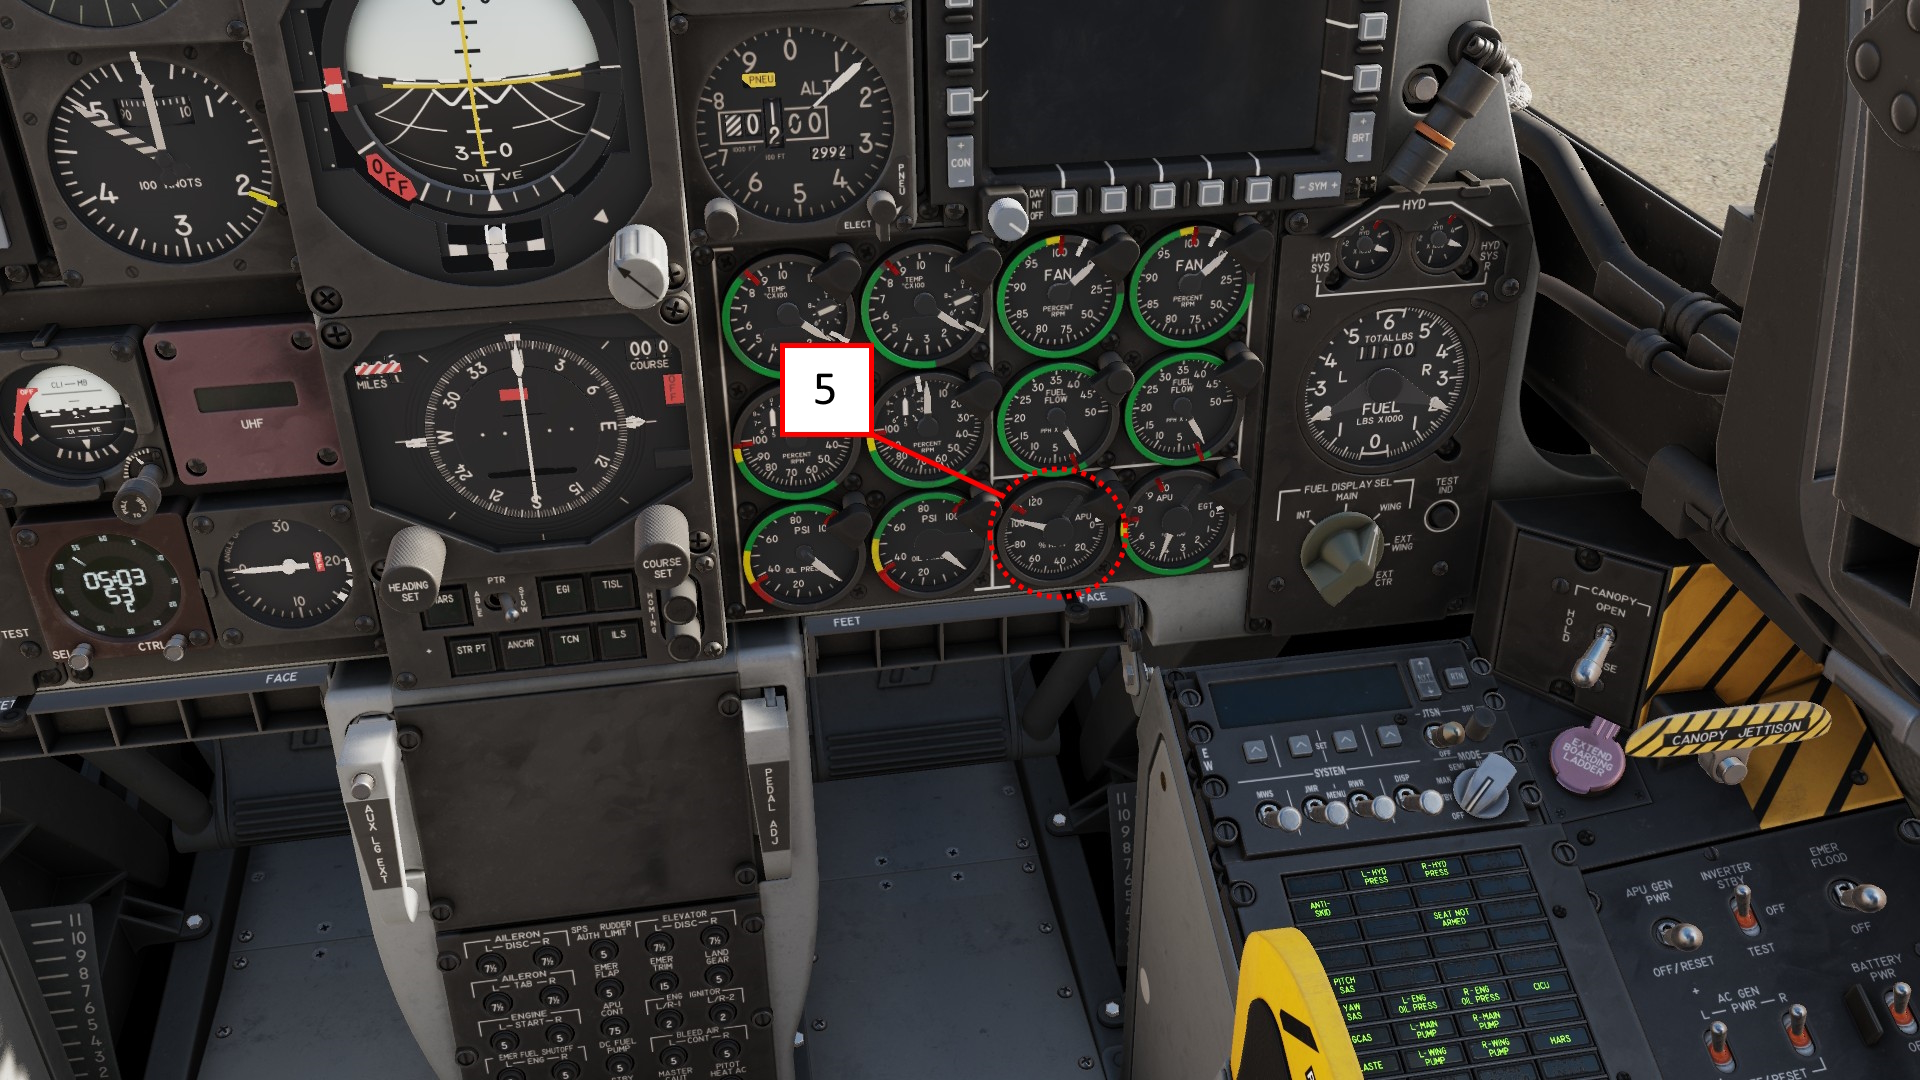
- Wait for the APU Gauge to reach 100%
While were waiting for this, we can already turn on the following switches.
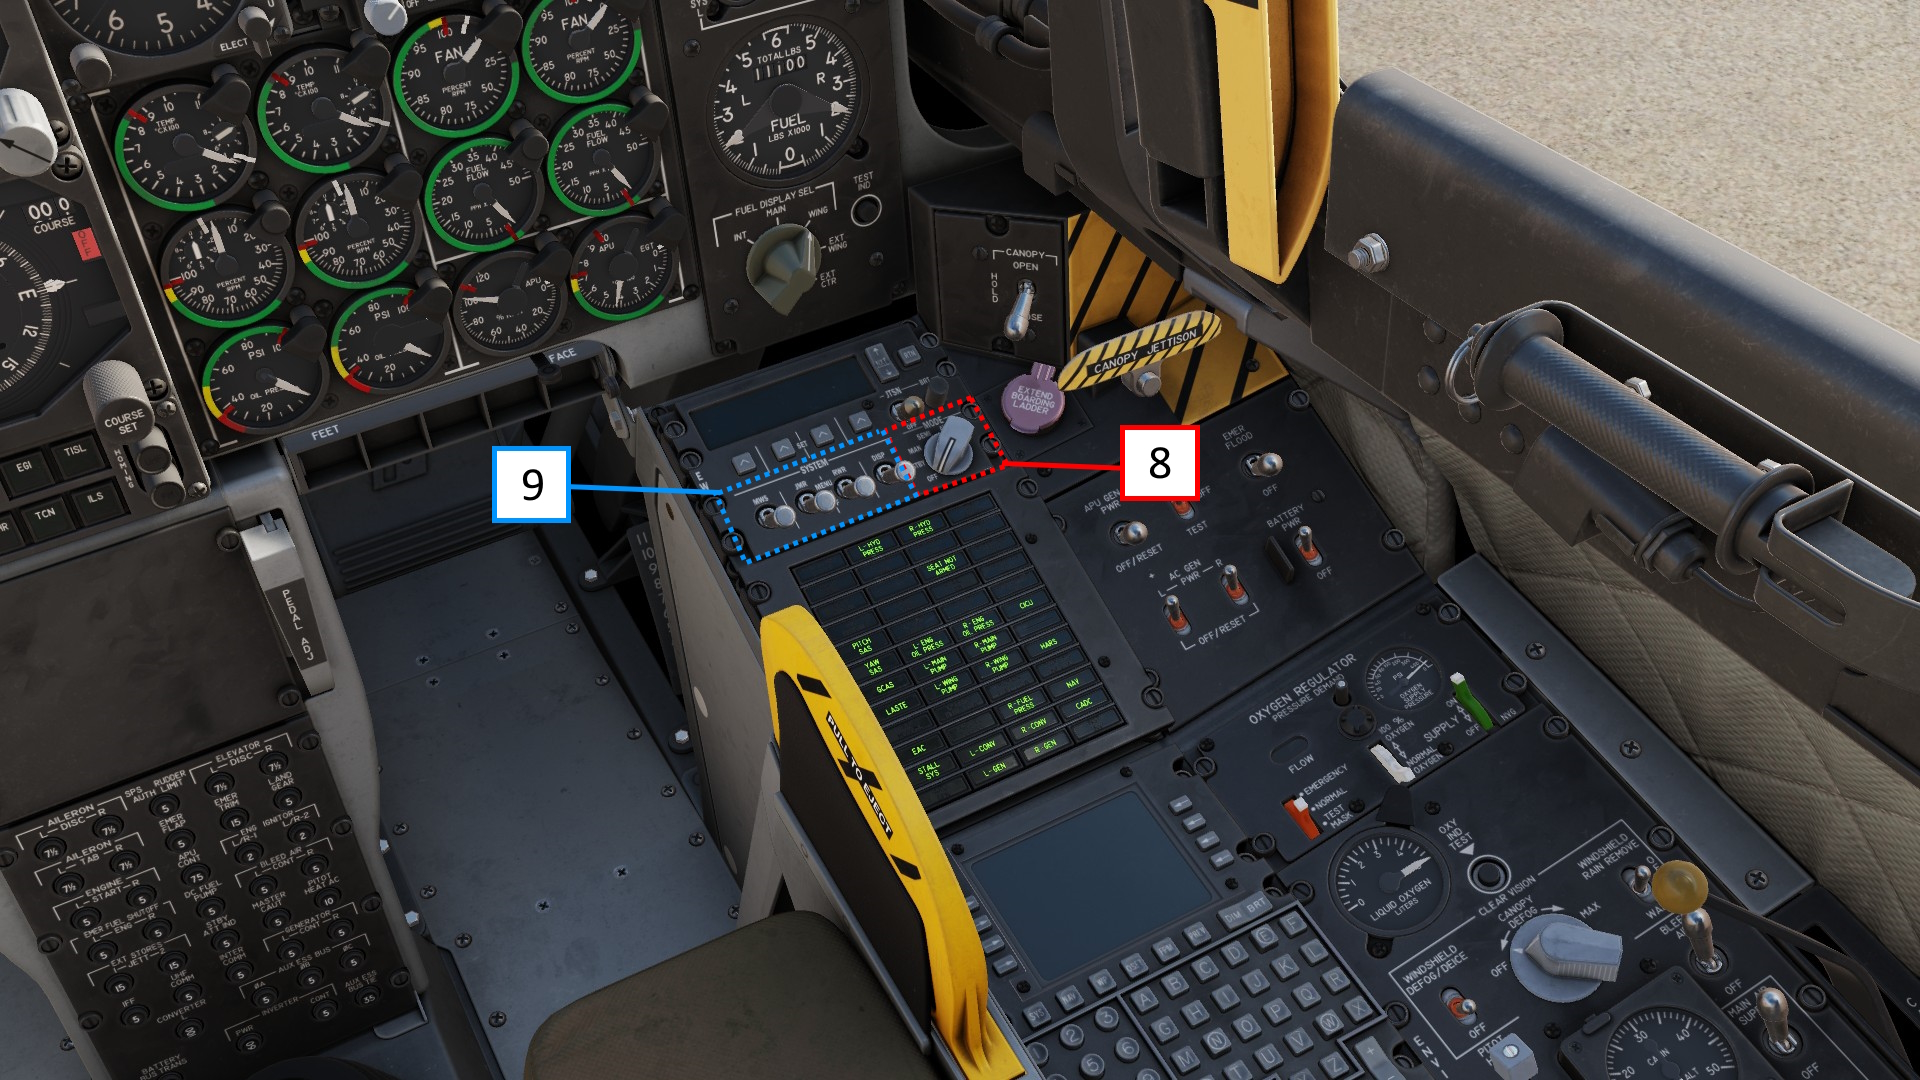
- Turn on EGI and CDU switches
- Turn on pitot heat
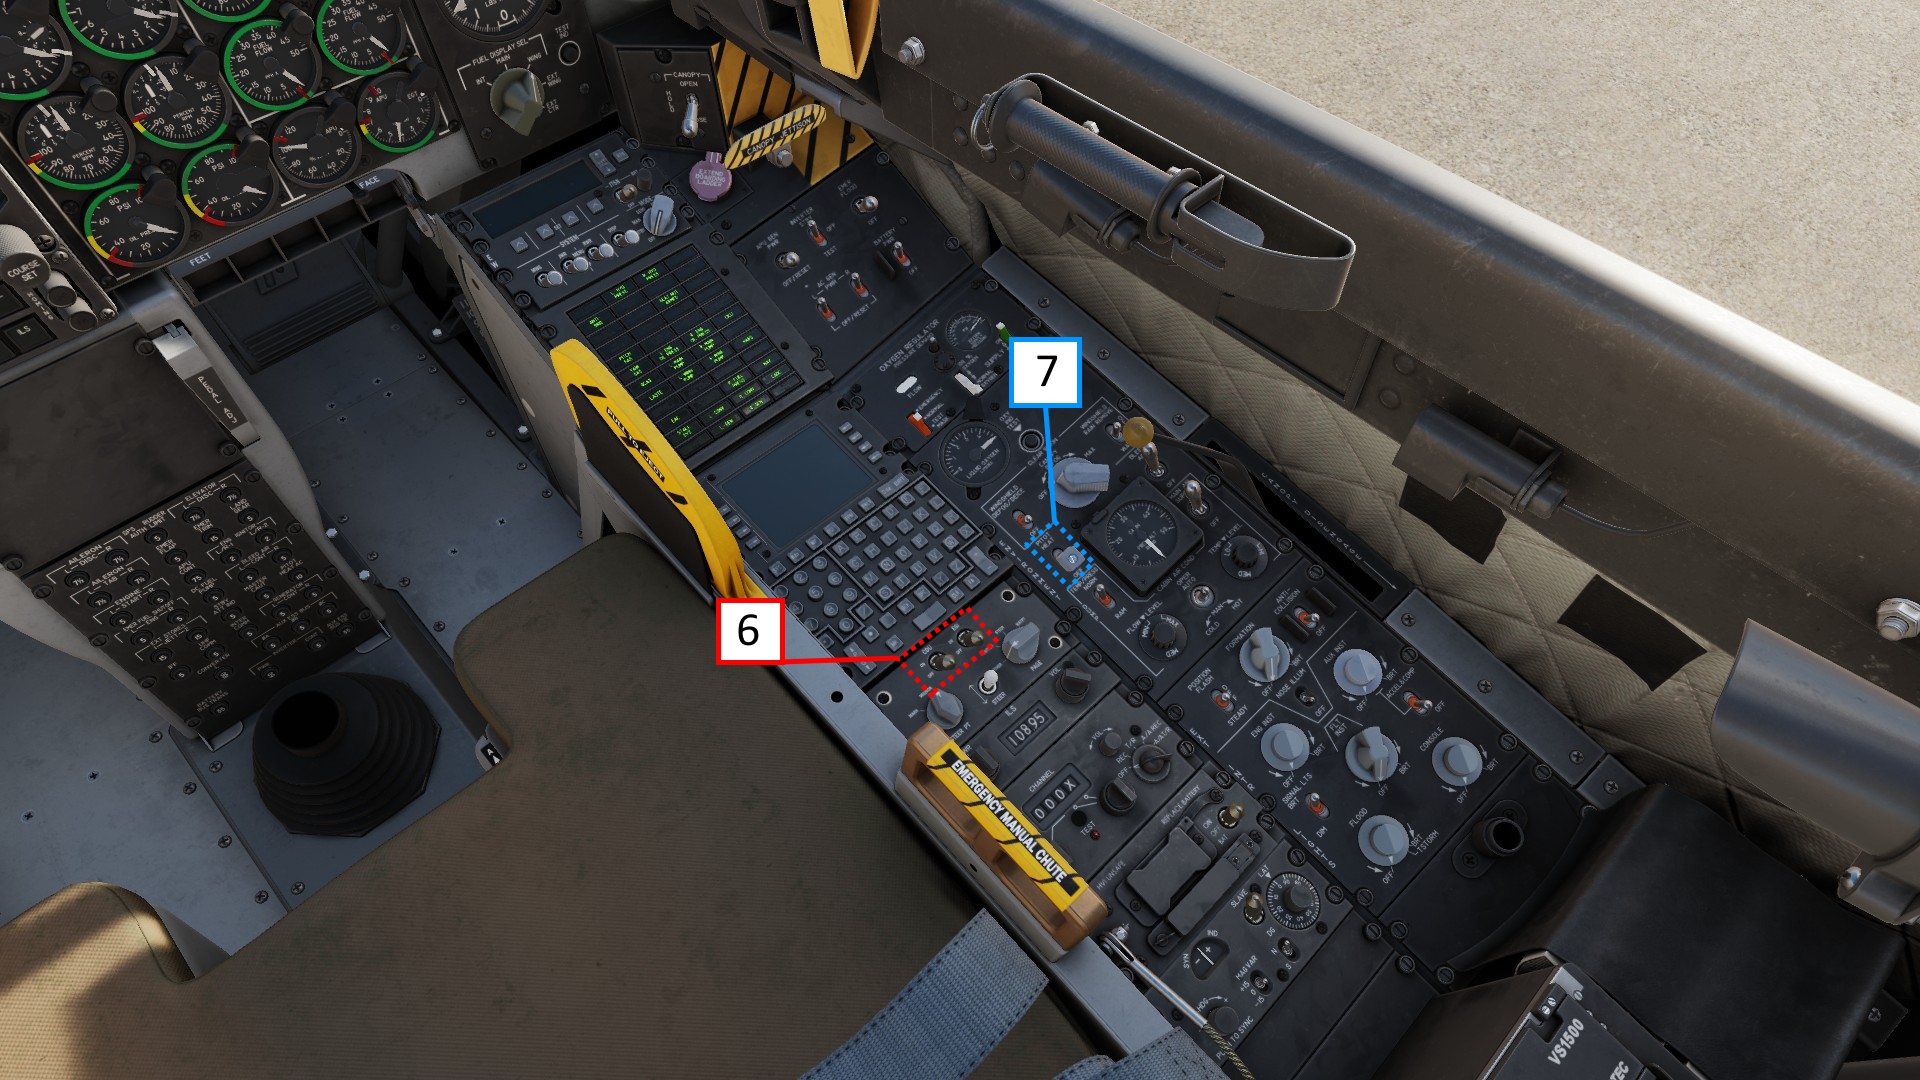
- Set countermeasures to desired mode. See countermeasures
- Turn on all switches in the blue box
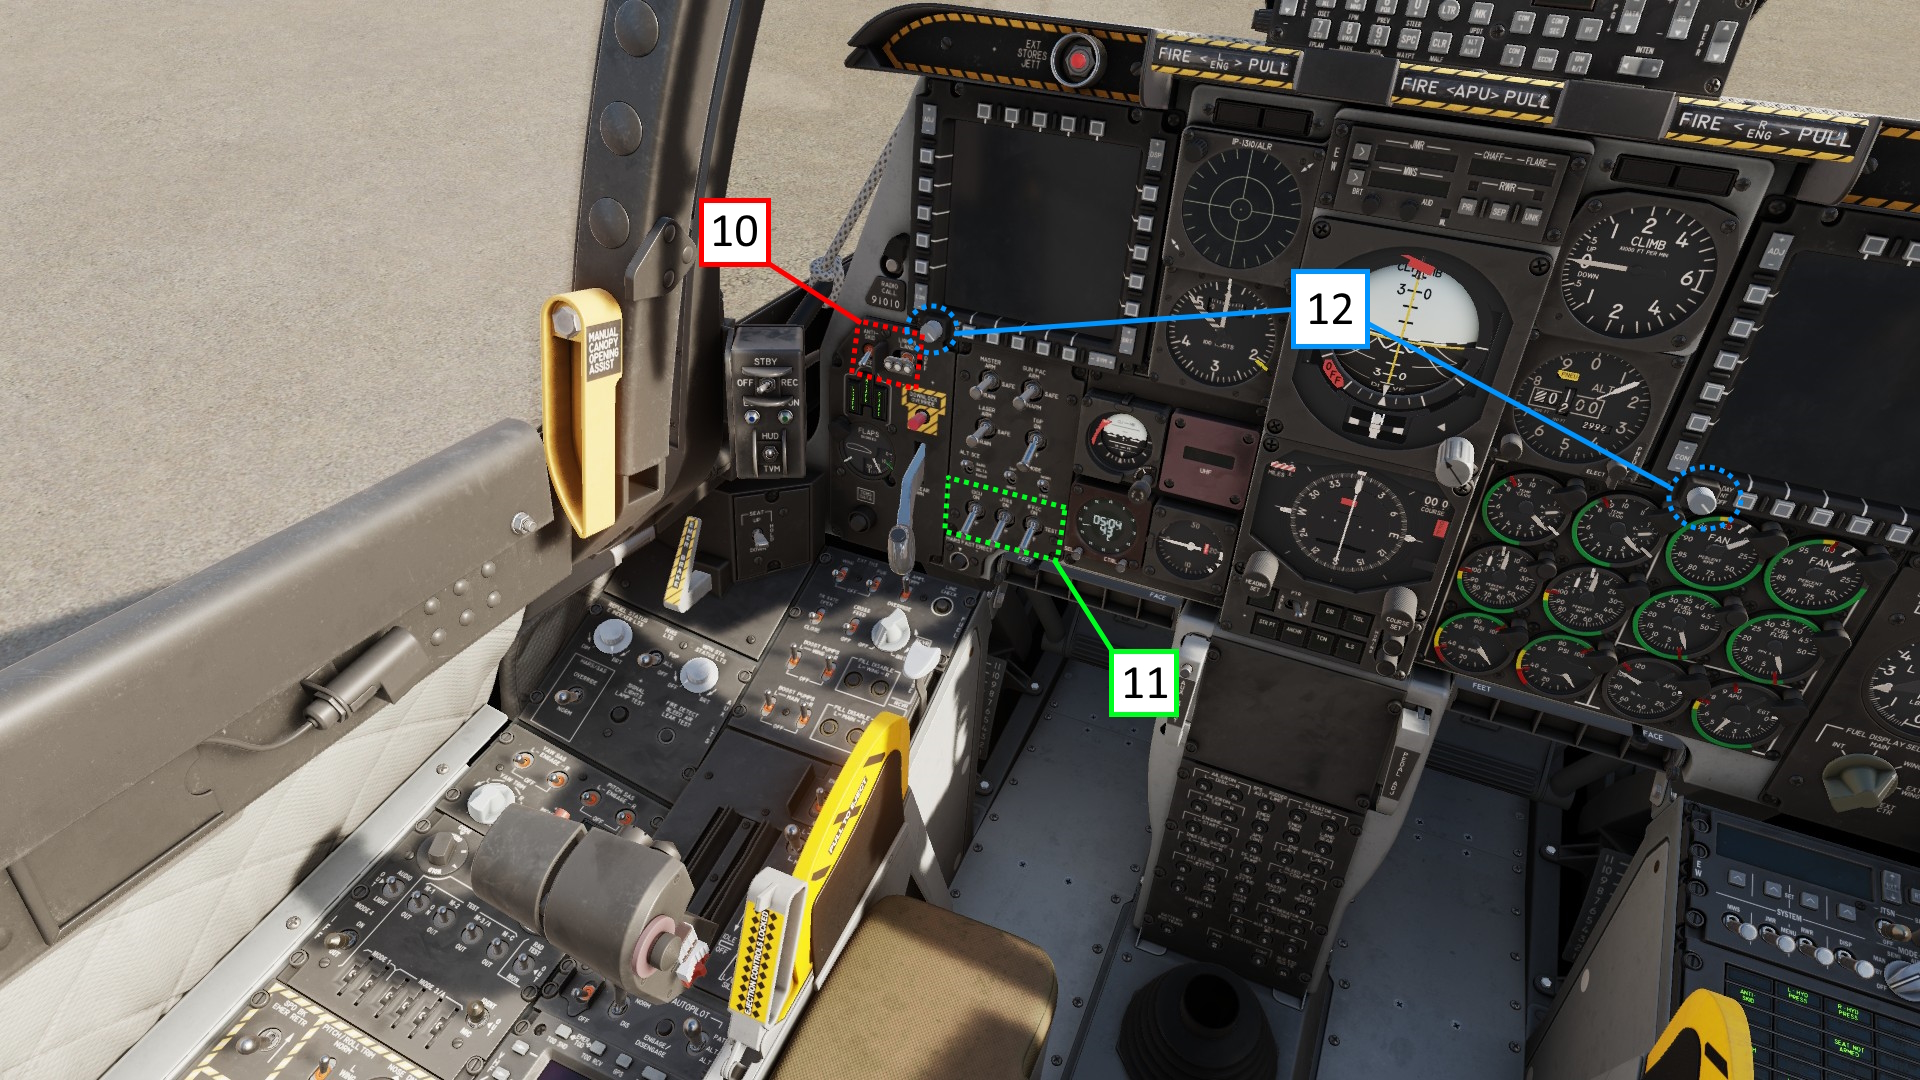
- Turn the antiskid on and front light to either landing or taxi
- Turn on all shown switches
- Set MFD knobs to night or day
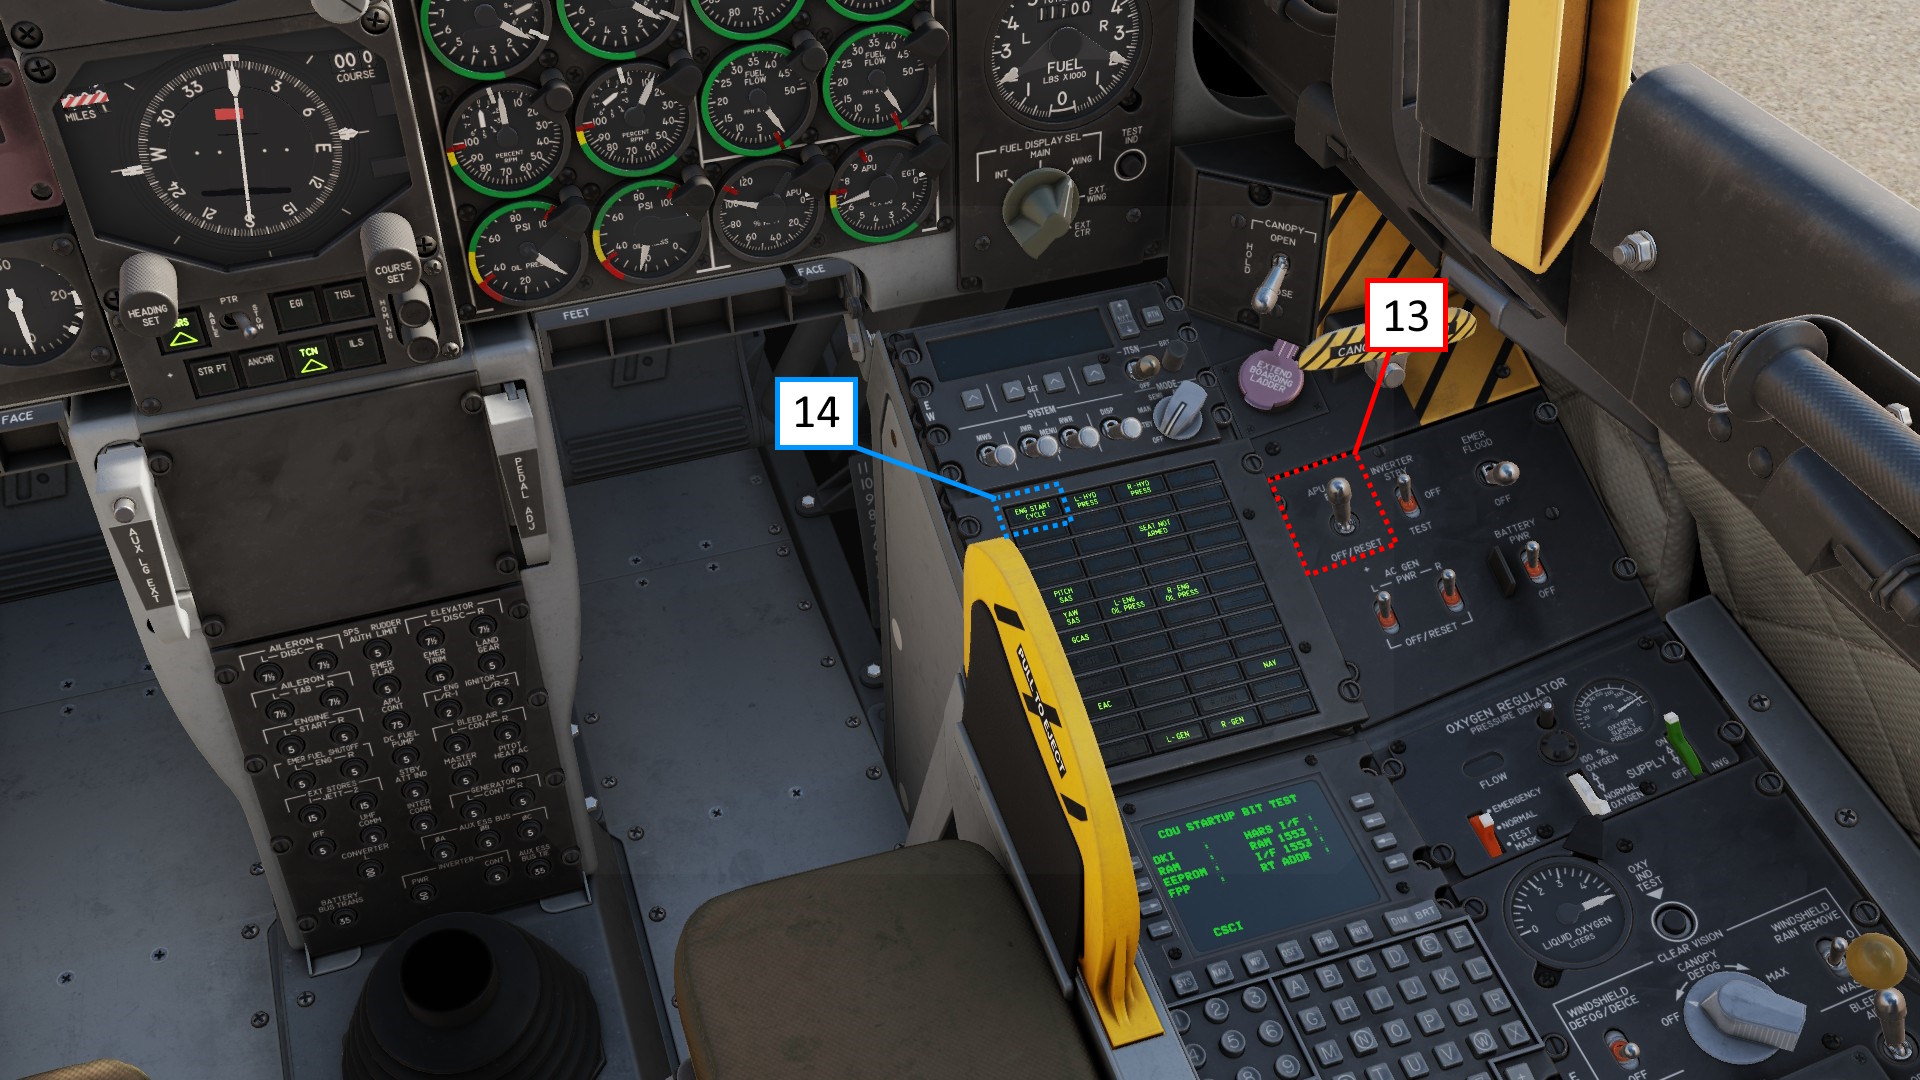
- Turn APU GEN on
- Start right engine with RCtrl + HOME. A engine start cycle warning will appear on the master caution panel. Once the warning disappears, start the left engine with RAlt + Home.
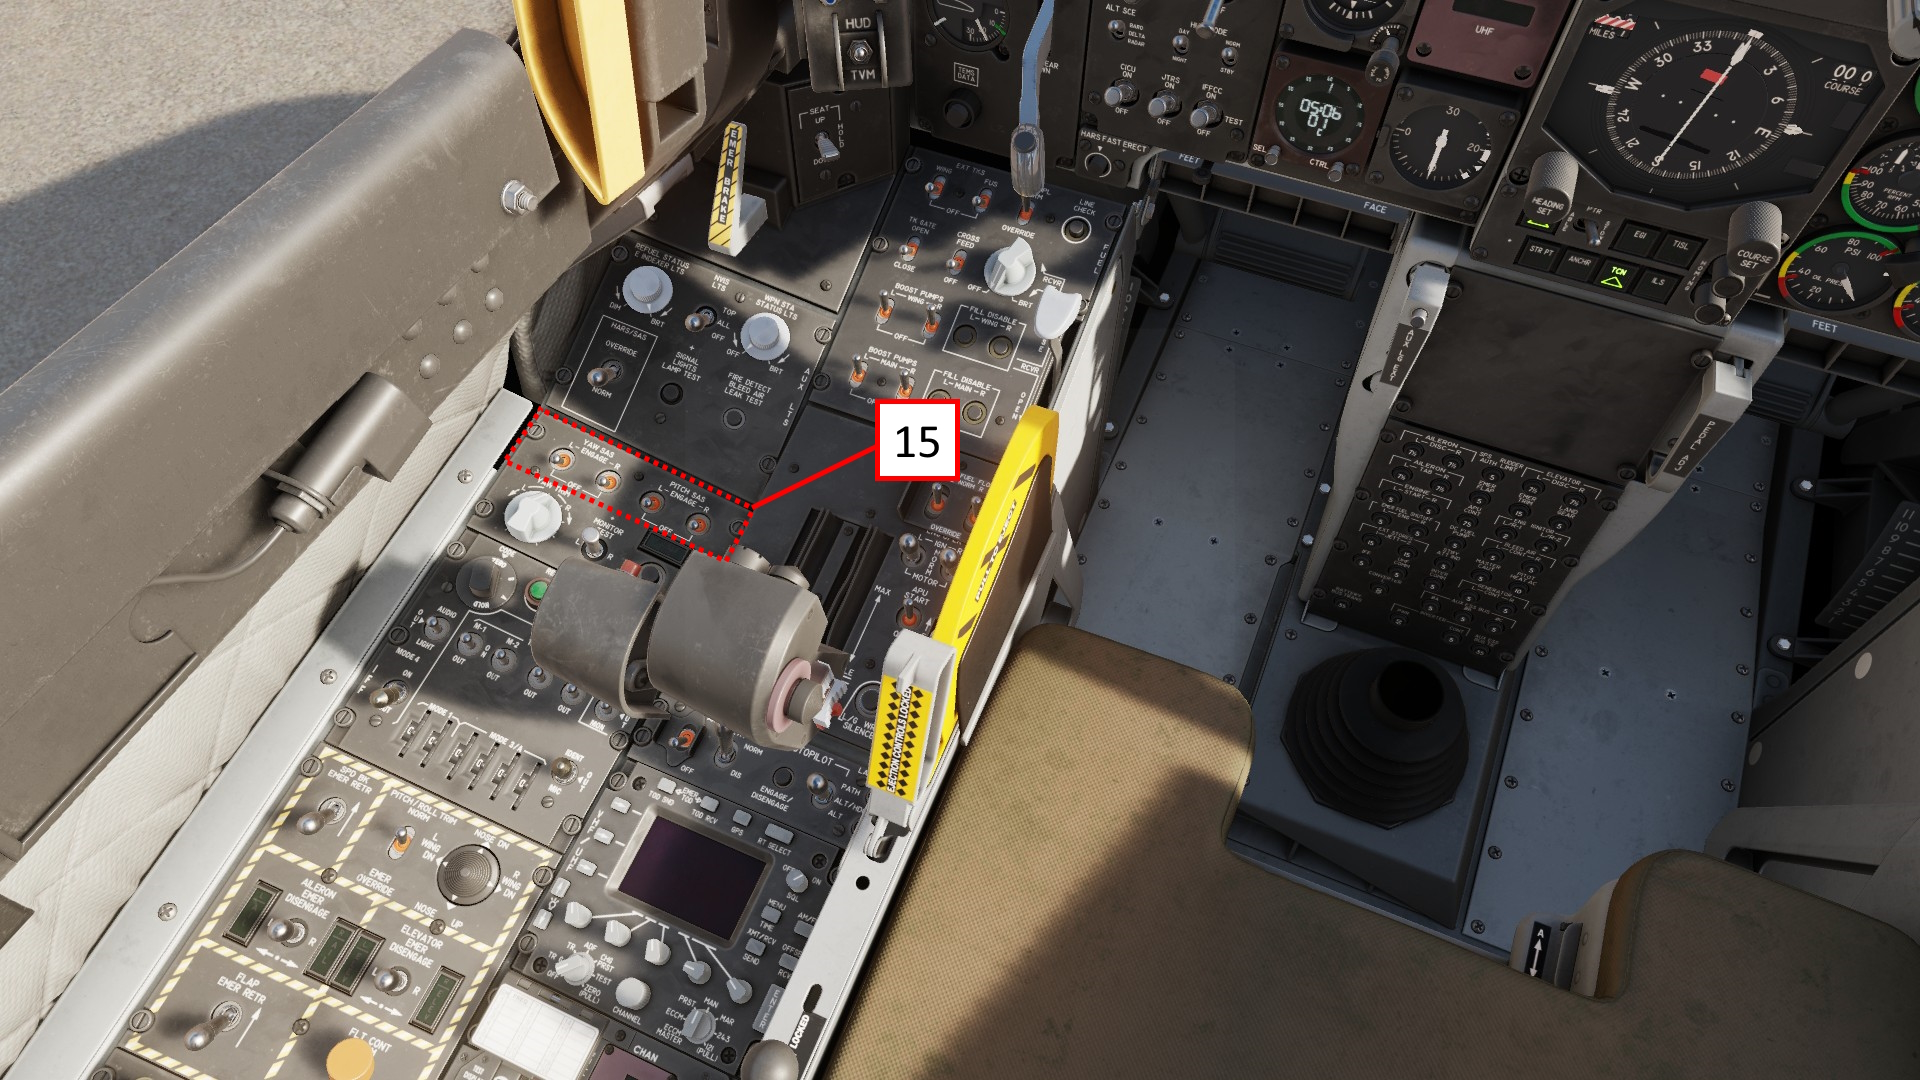
- Turn on YAW and PITCH SAS
- Wait until your CDU shows T = 4.0 0.8 in the shown line
- If it does, press the NAV button
- Press the EGI button
- Turn APU GEN off
- Turn off your APU
- Turn EAC on
- Arm your ejection seat
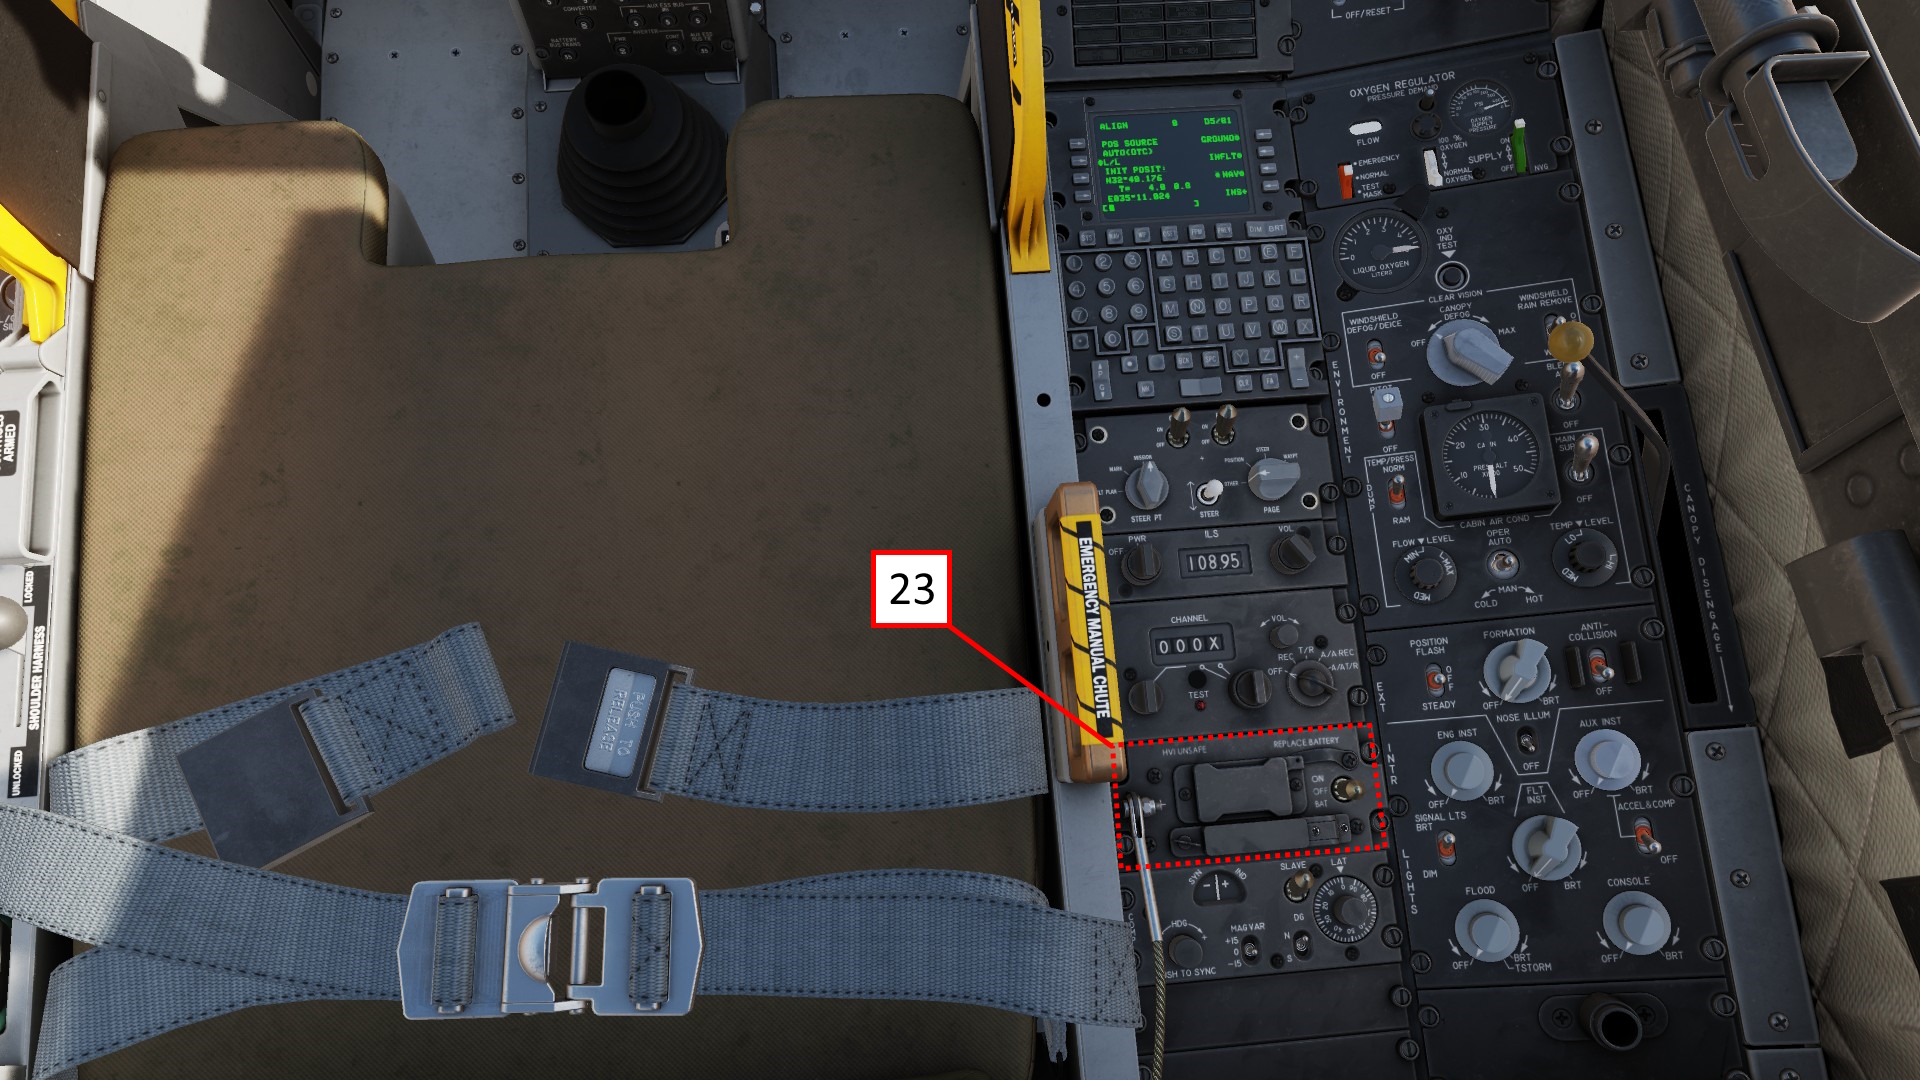
- Turn your HMCS on
Additional settings
From here on you can take off and fly, what comes now are settings that you can change, but dont have to.
I will not explain how to perform them, but rather link the chapter where i do.
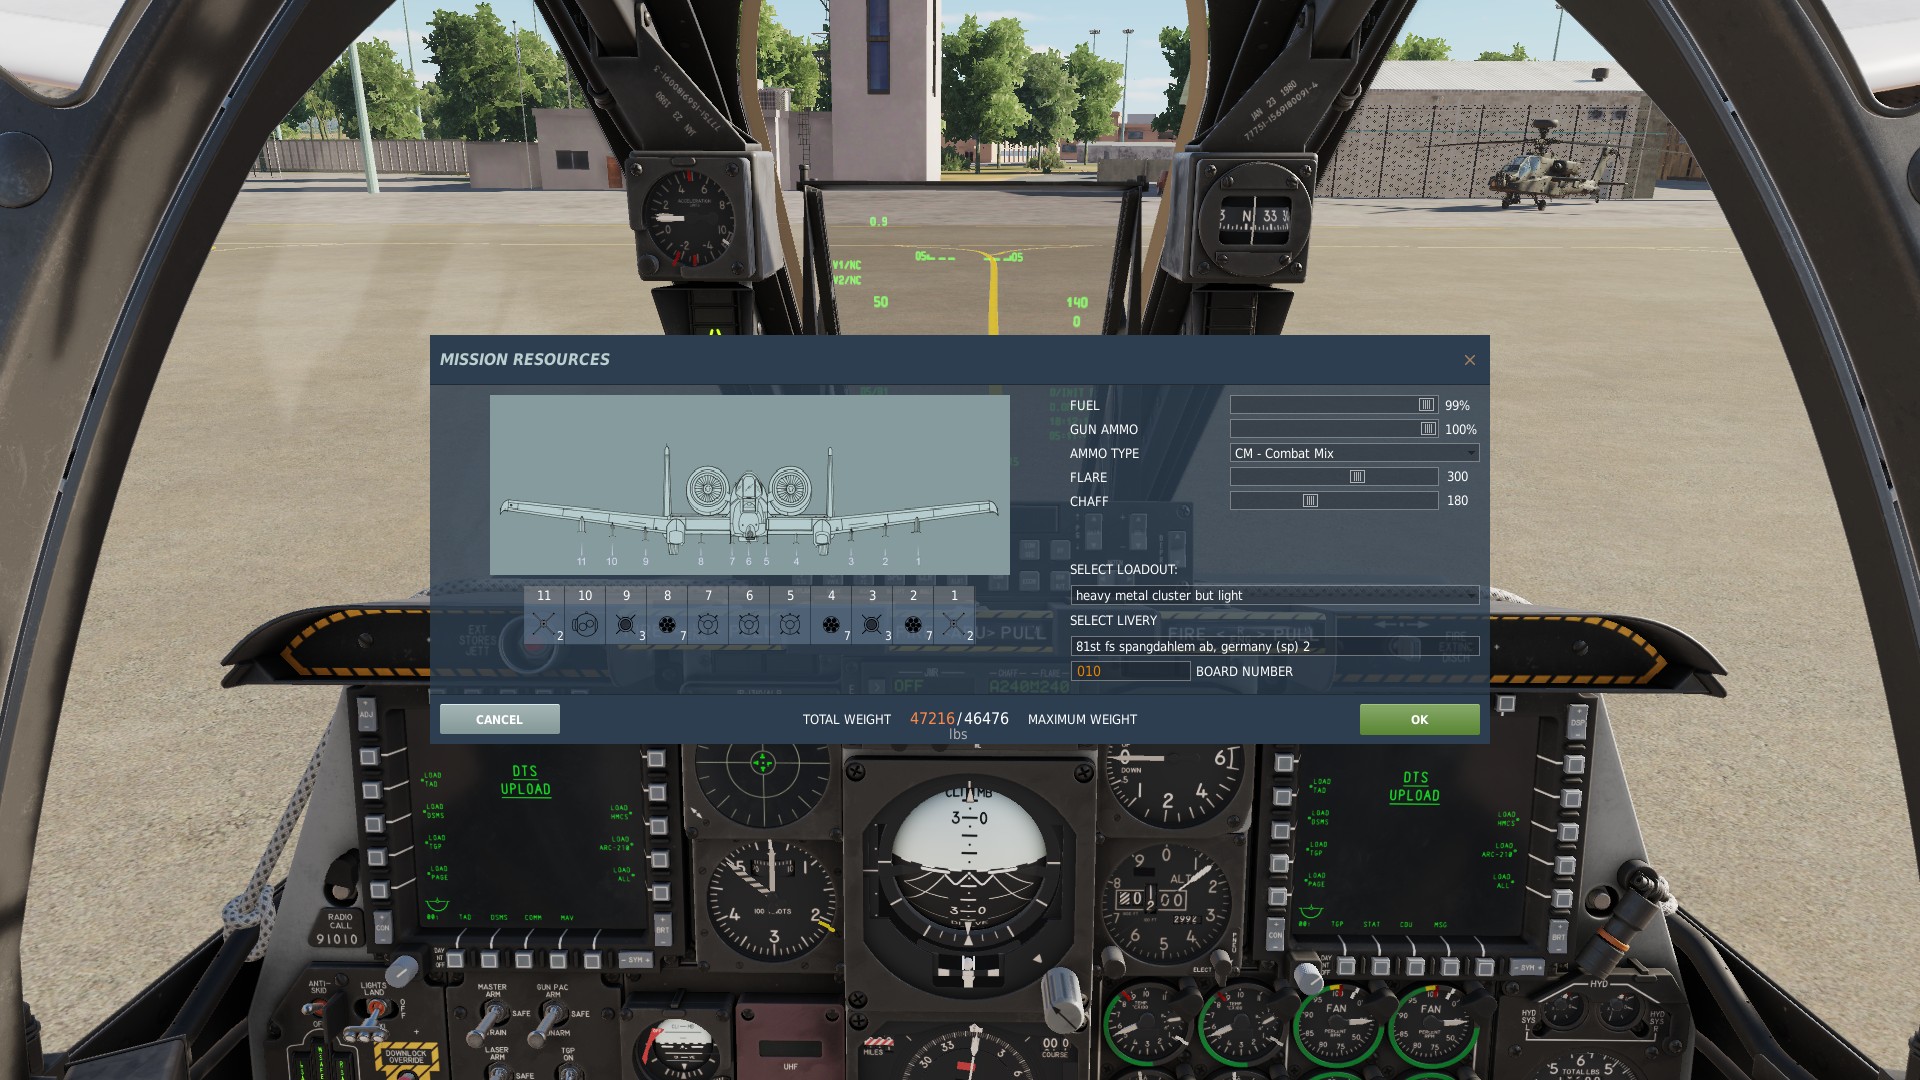
Load weapons, set profiles and configure your targeting pod.
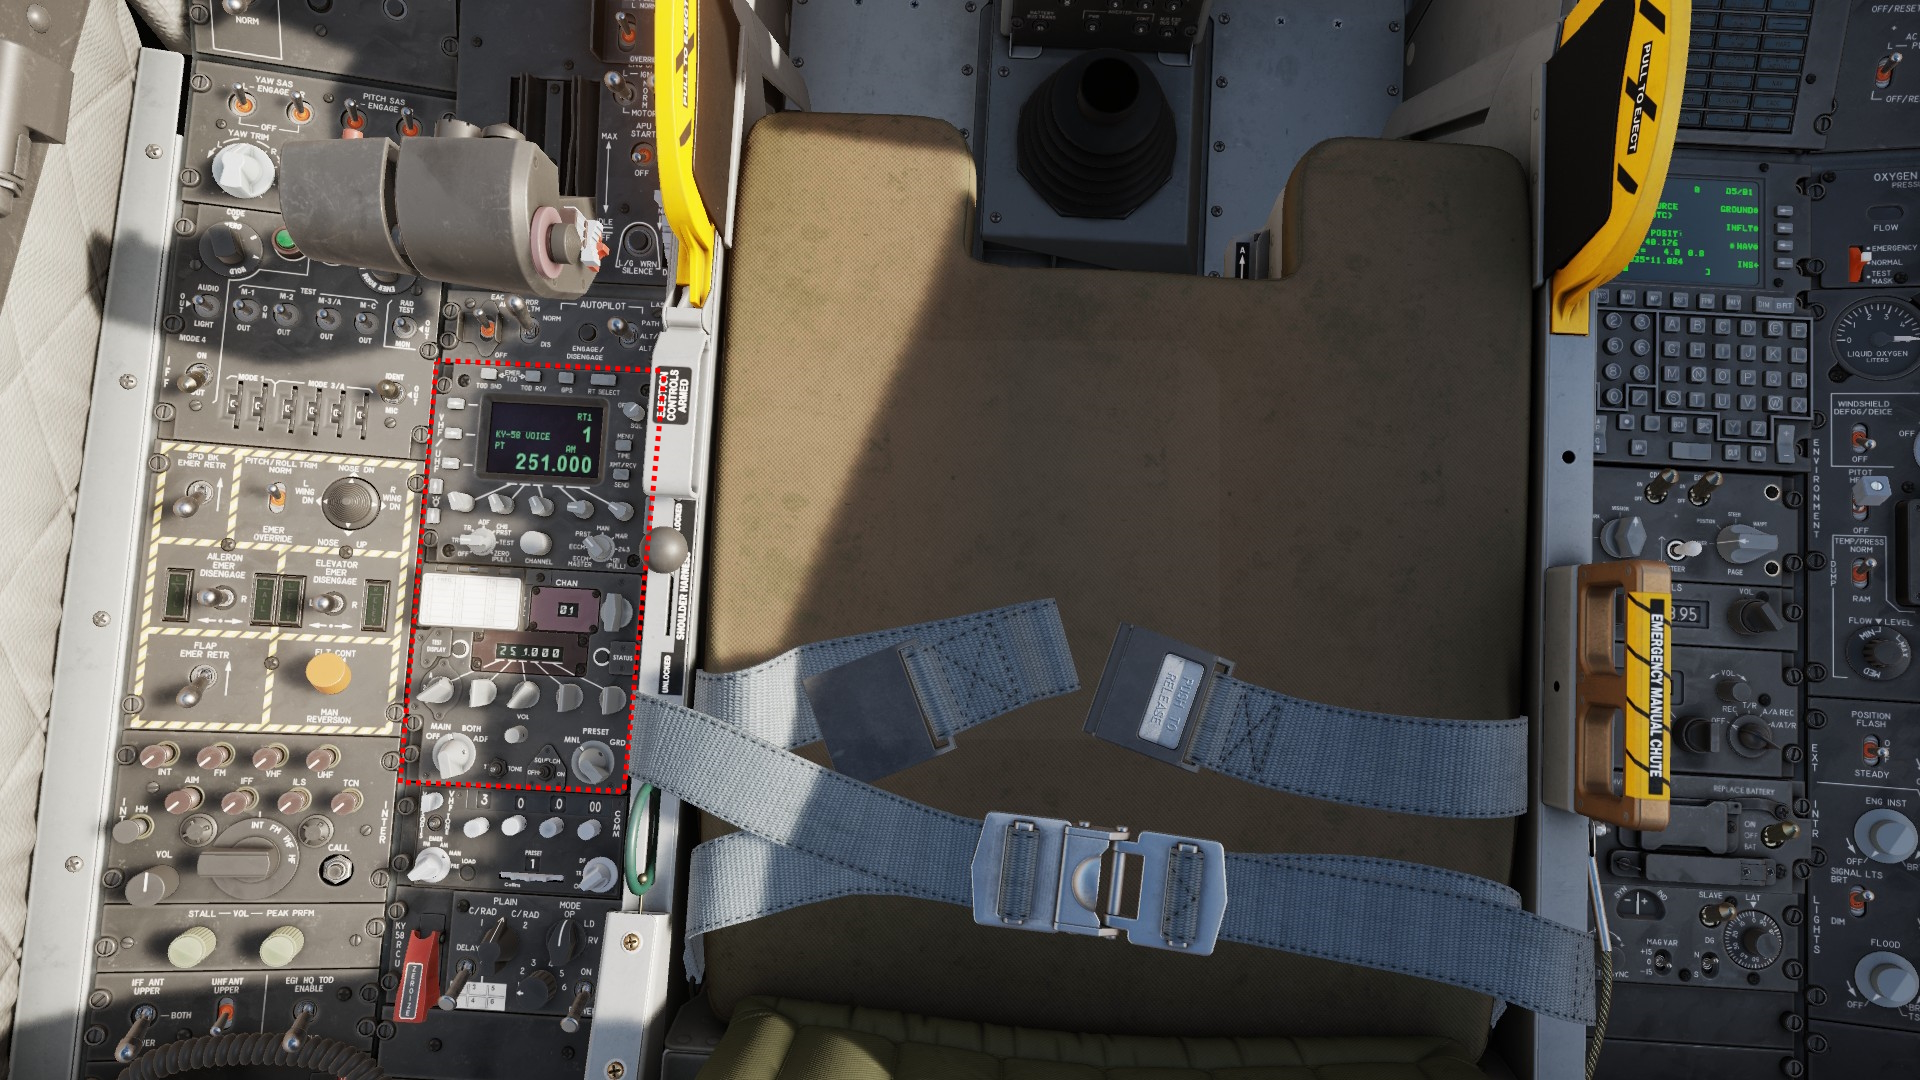
Turn on your radio systems and set frequencies.
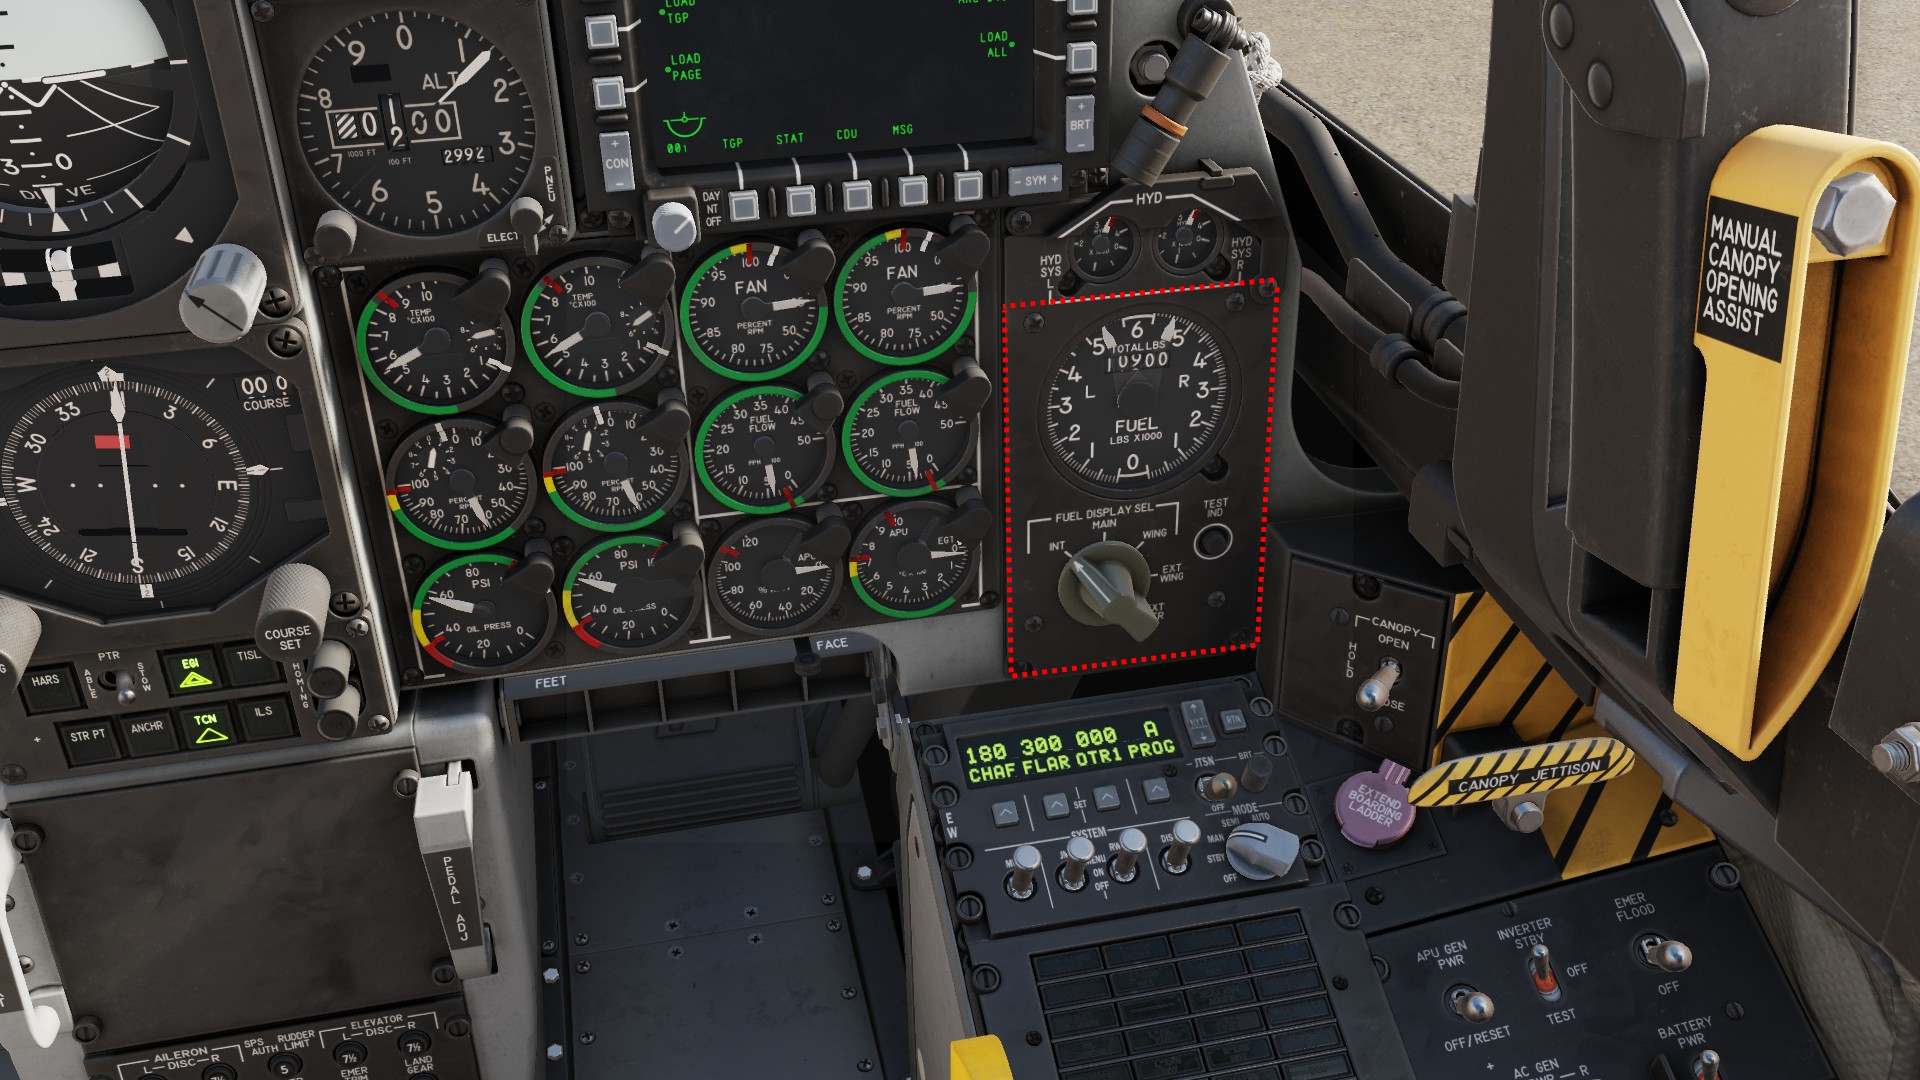
Set the fuel display to INT for internal
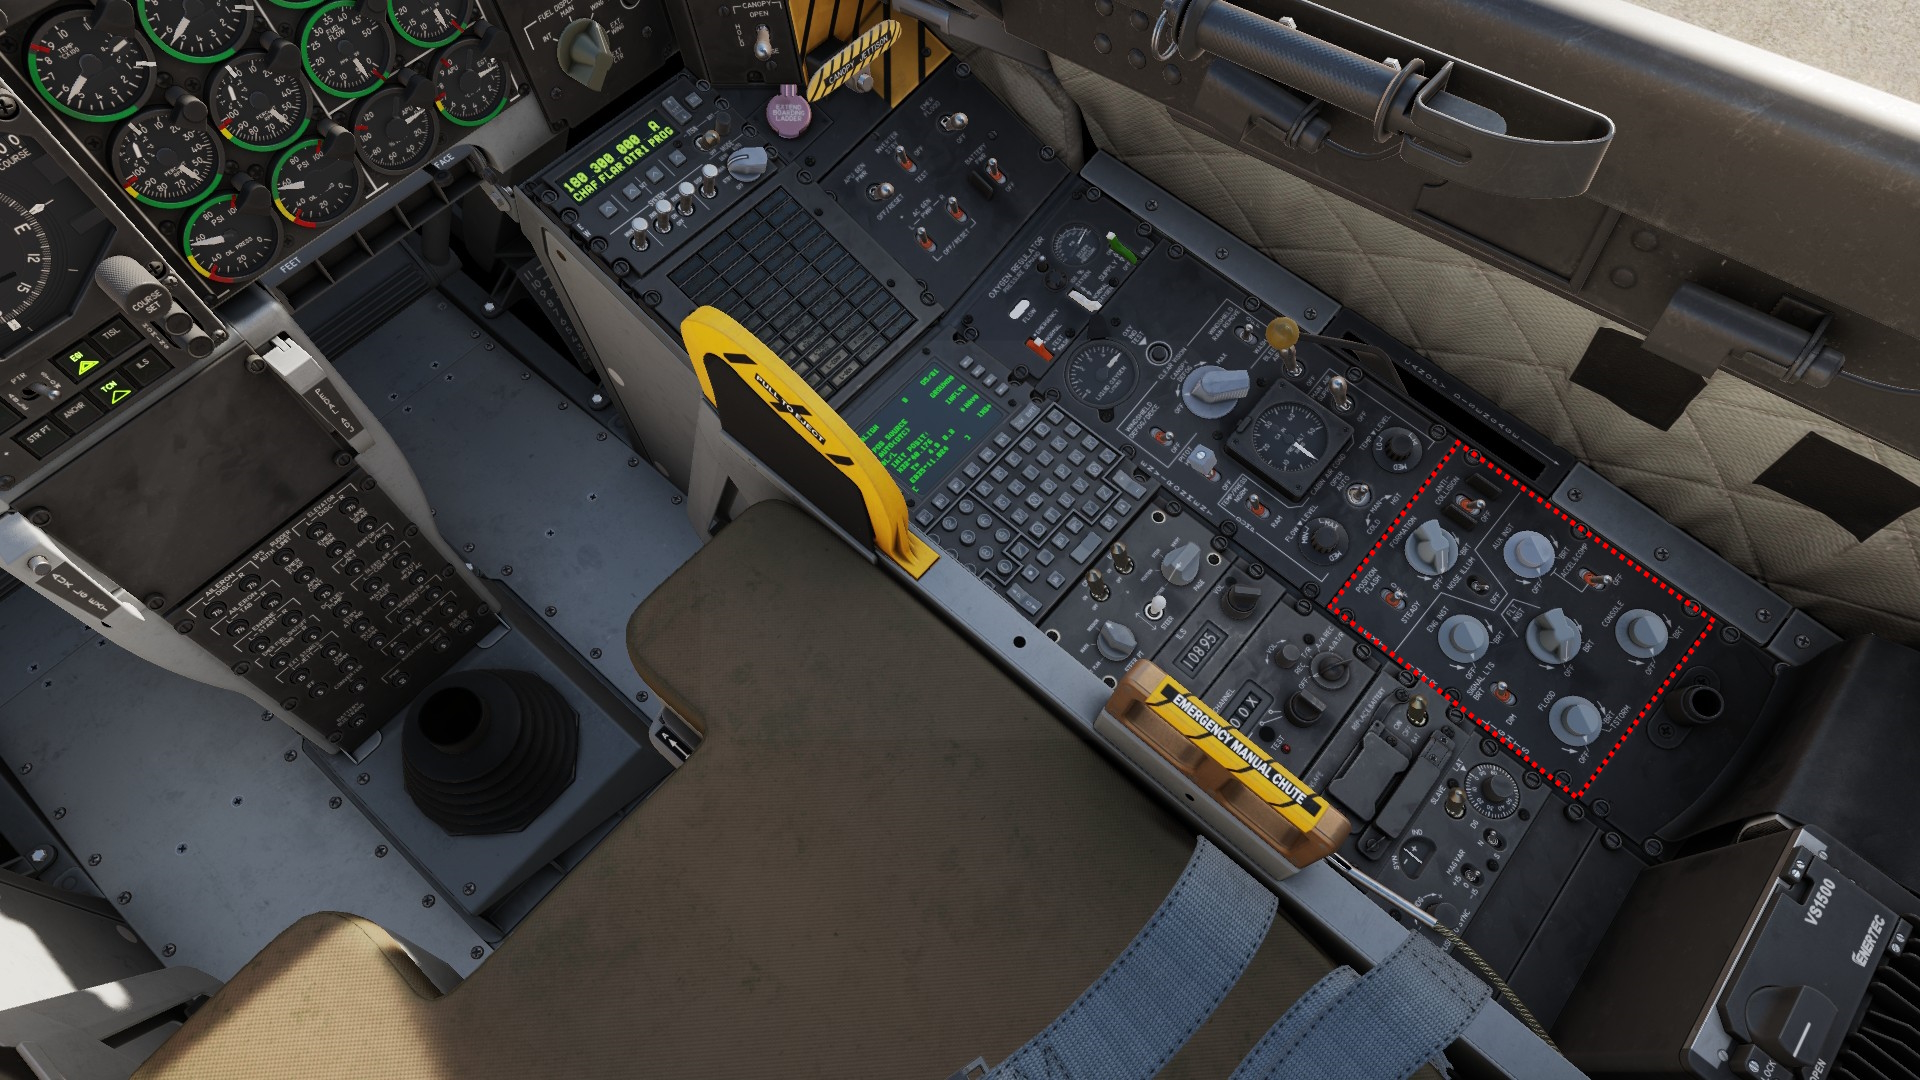
Set internal light volumes
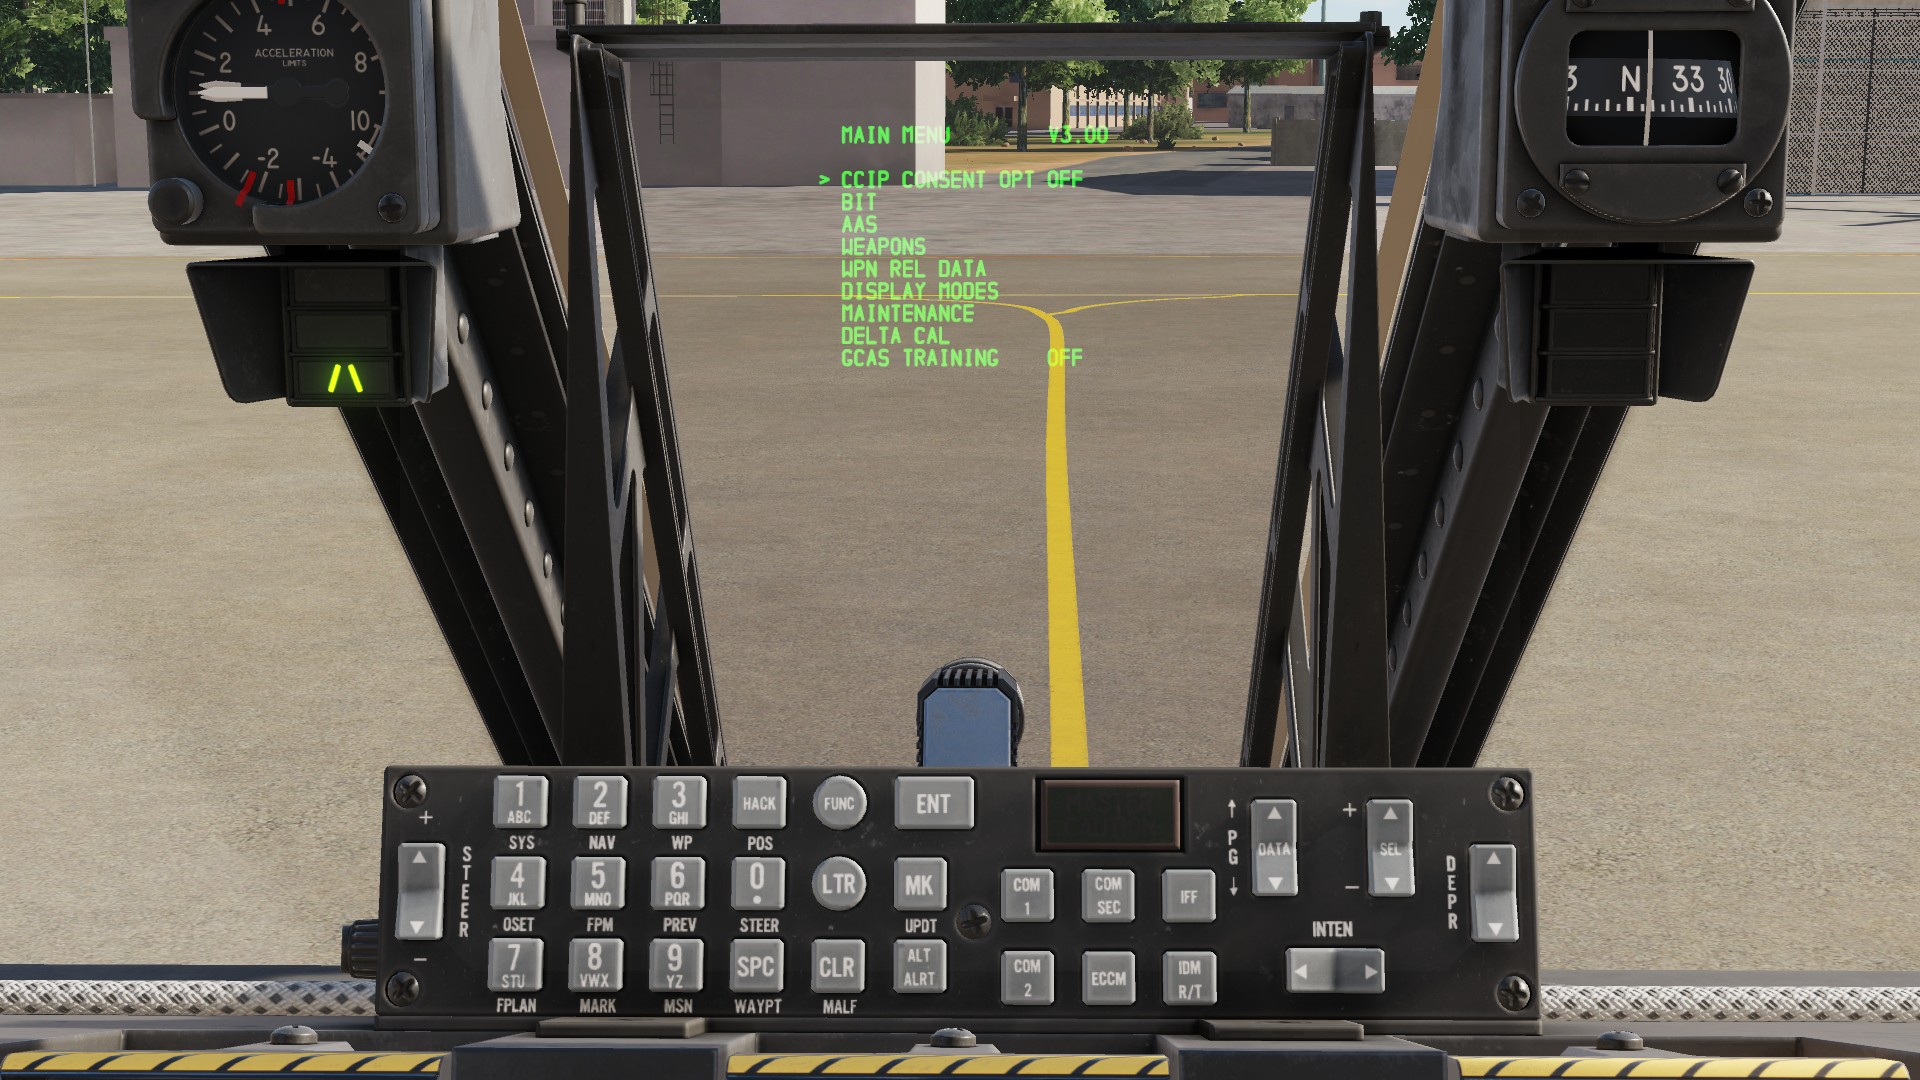
Set IFFCC settings as desired.
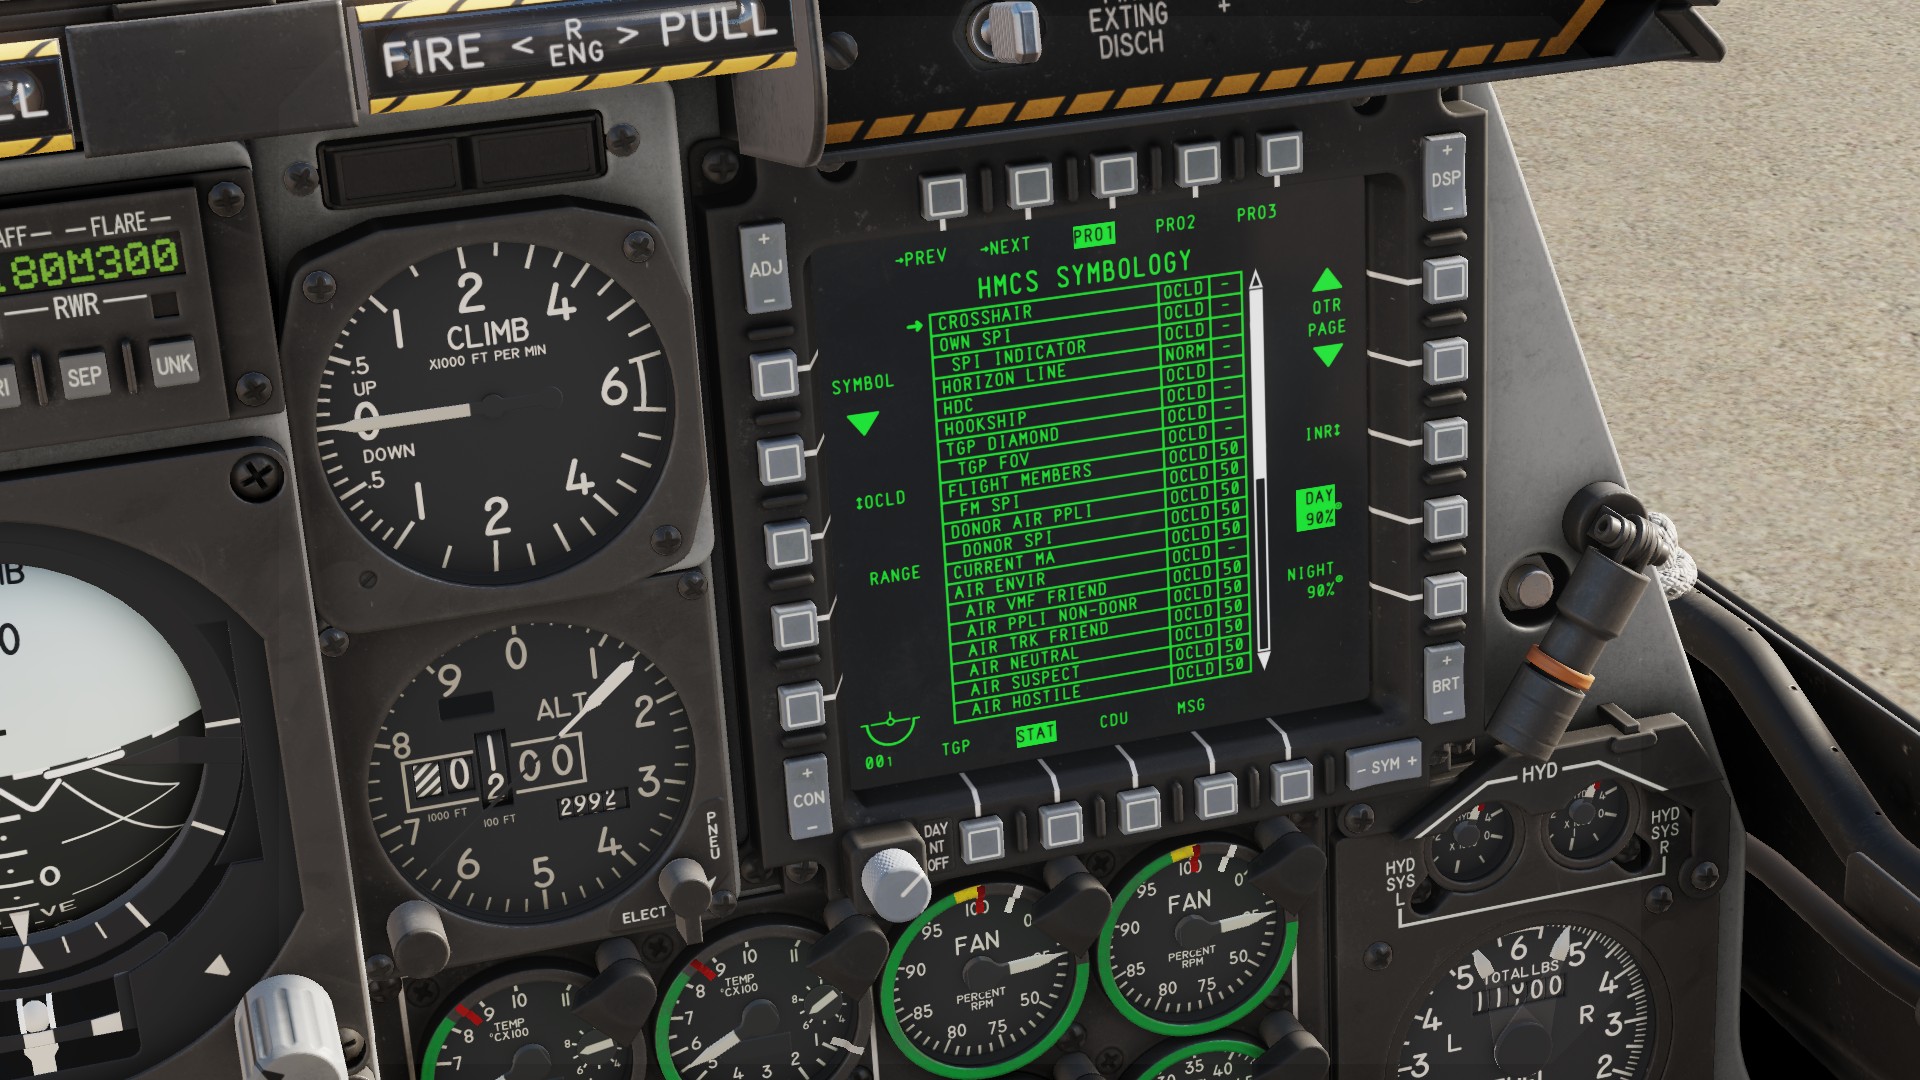
Adjust HMCS settings via the stat page.
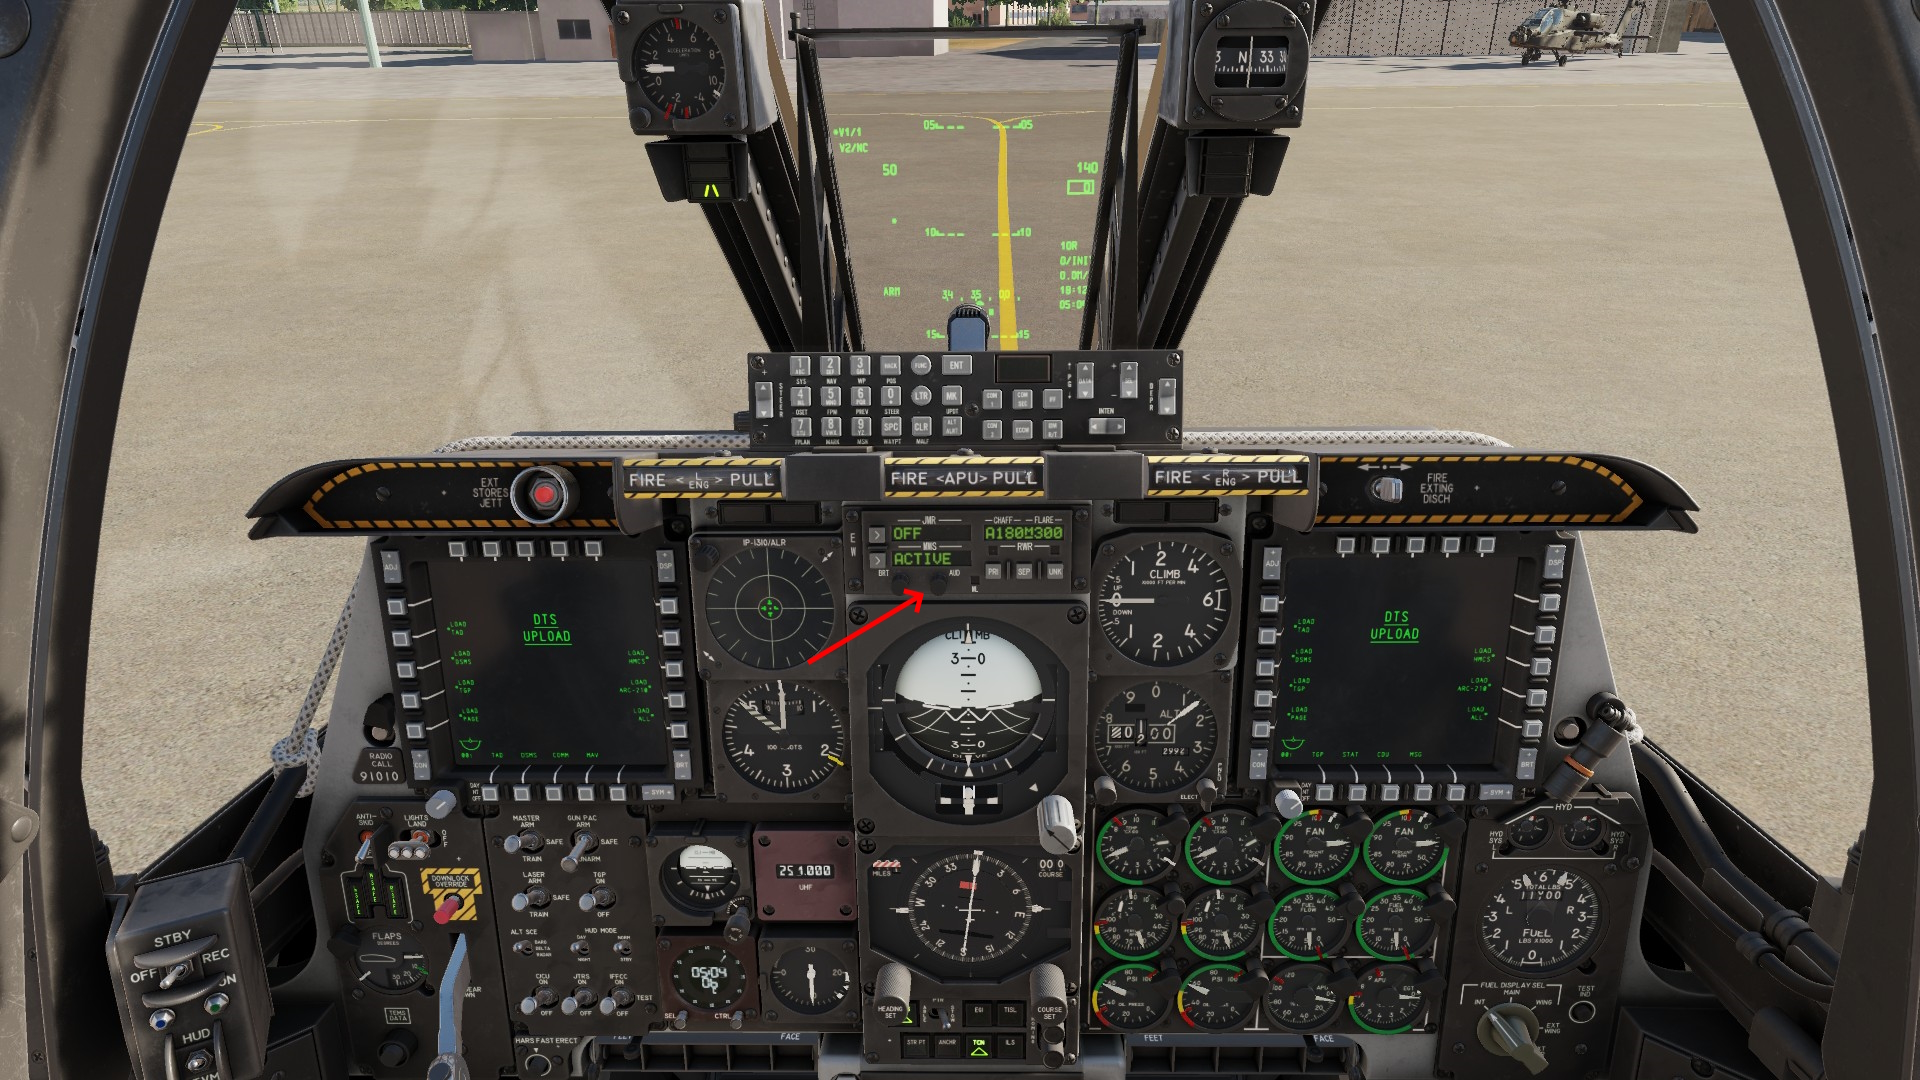
Turn RWR audio up to max.
Taxi and Takeoff
After starting your plane, you can start taxiing towards the runway.
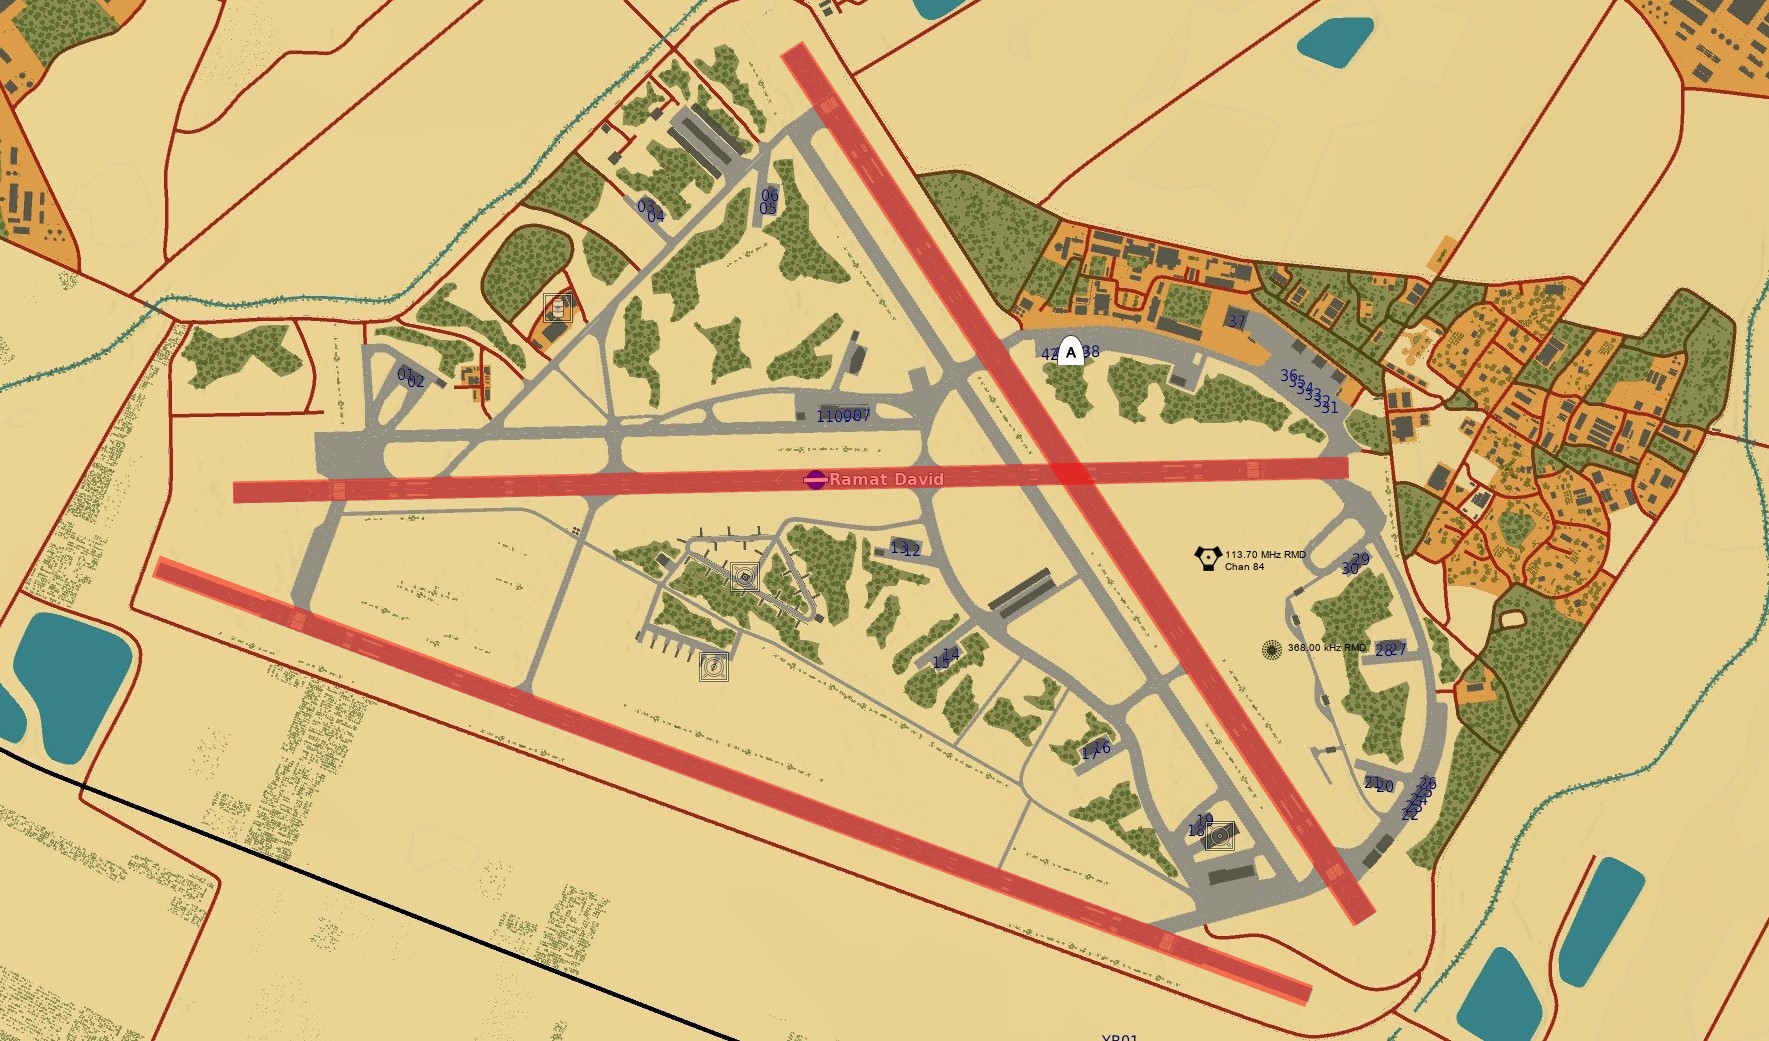
All airports will have at least one runway and a taxiway.
On the airport above, i have marked the runways red. Everything else is either a taxiway or a parking area.
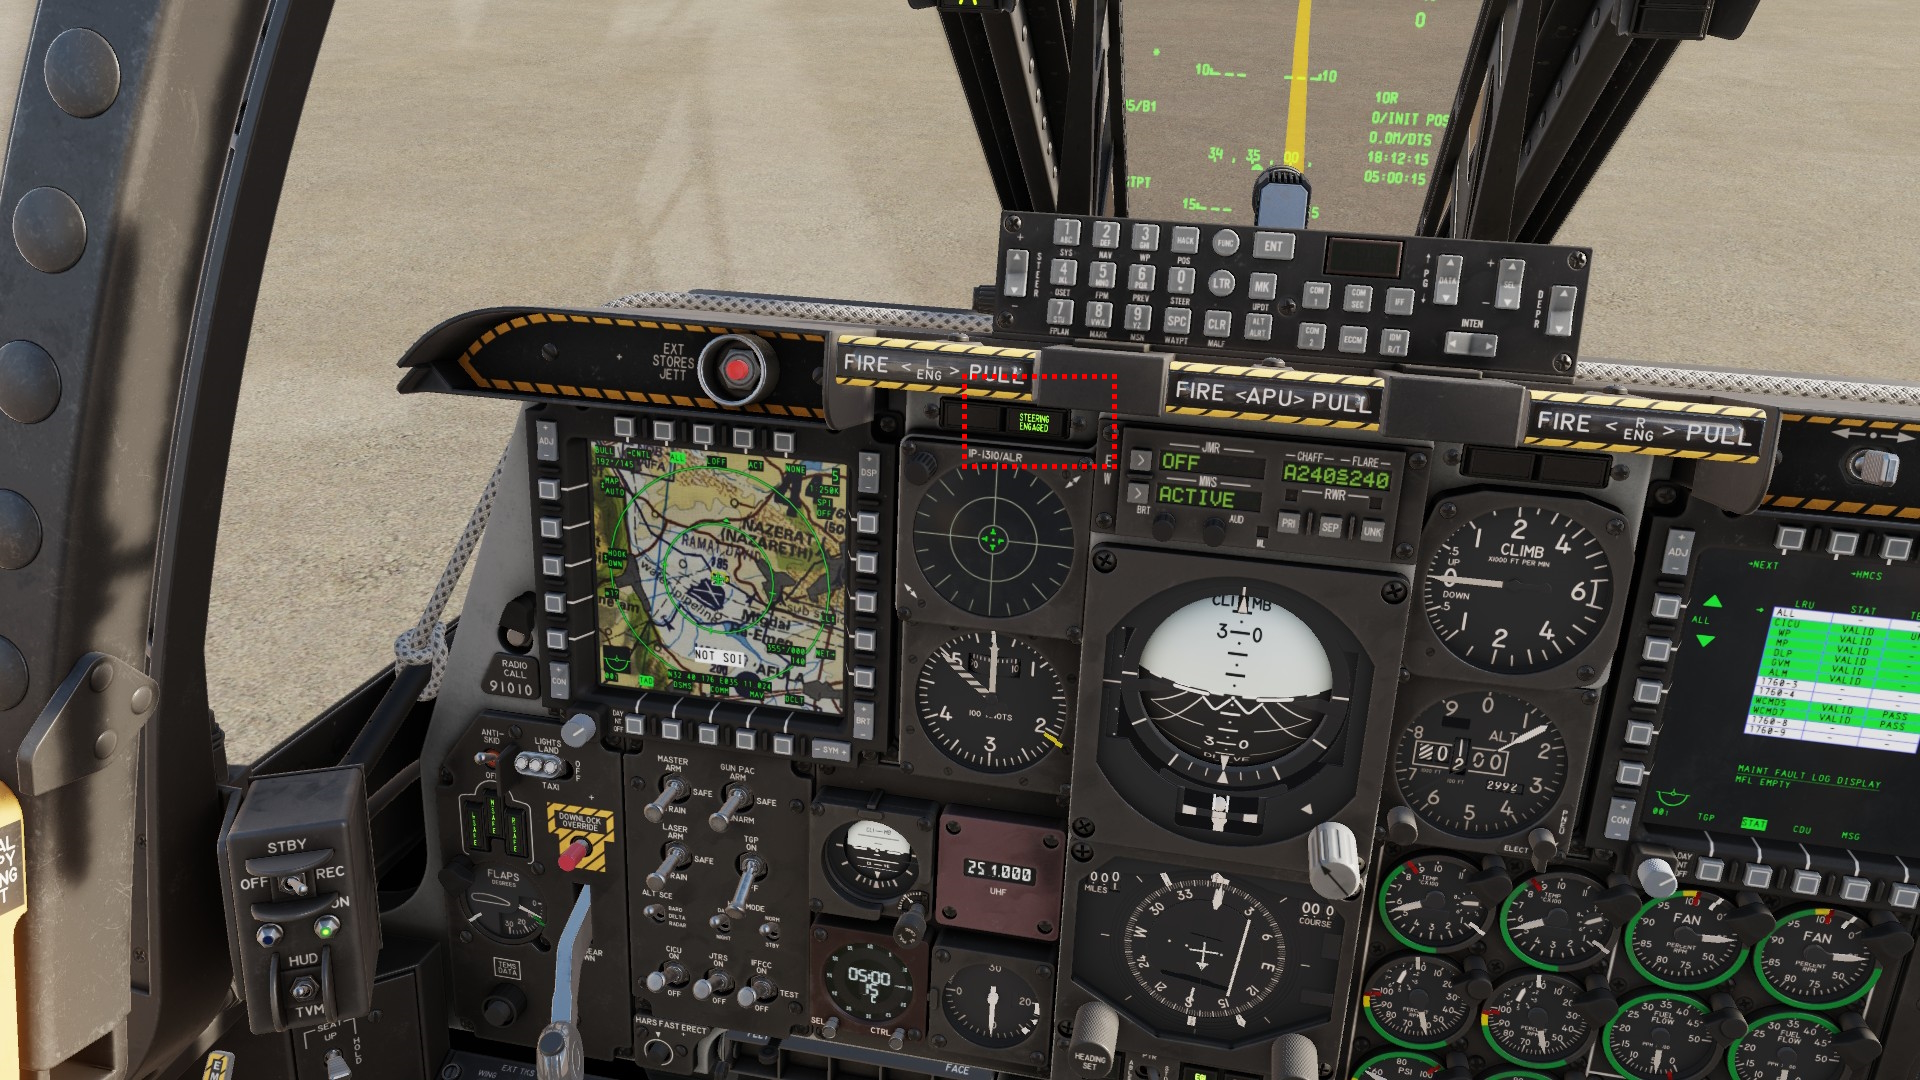
Make sure you have nose wheel steering engaged so you can can take turns around corners. If the light isnt on, press HOTAS Nosewheel steering button.
Before you drive onto the runway, check your map if another aircraft is taking off or coming in for a landing. Landing aircraft should always take priority.
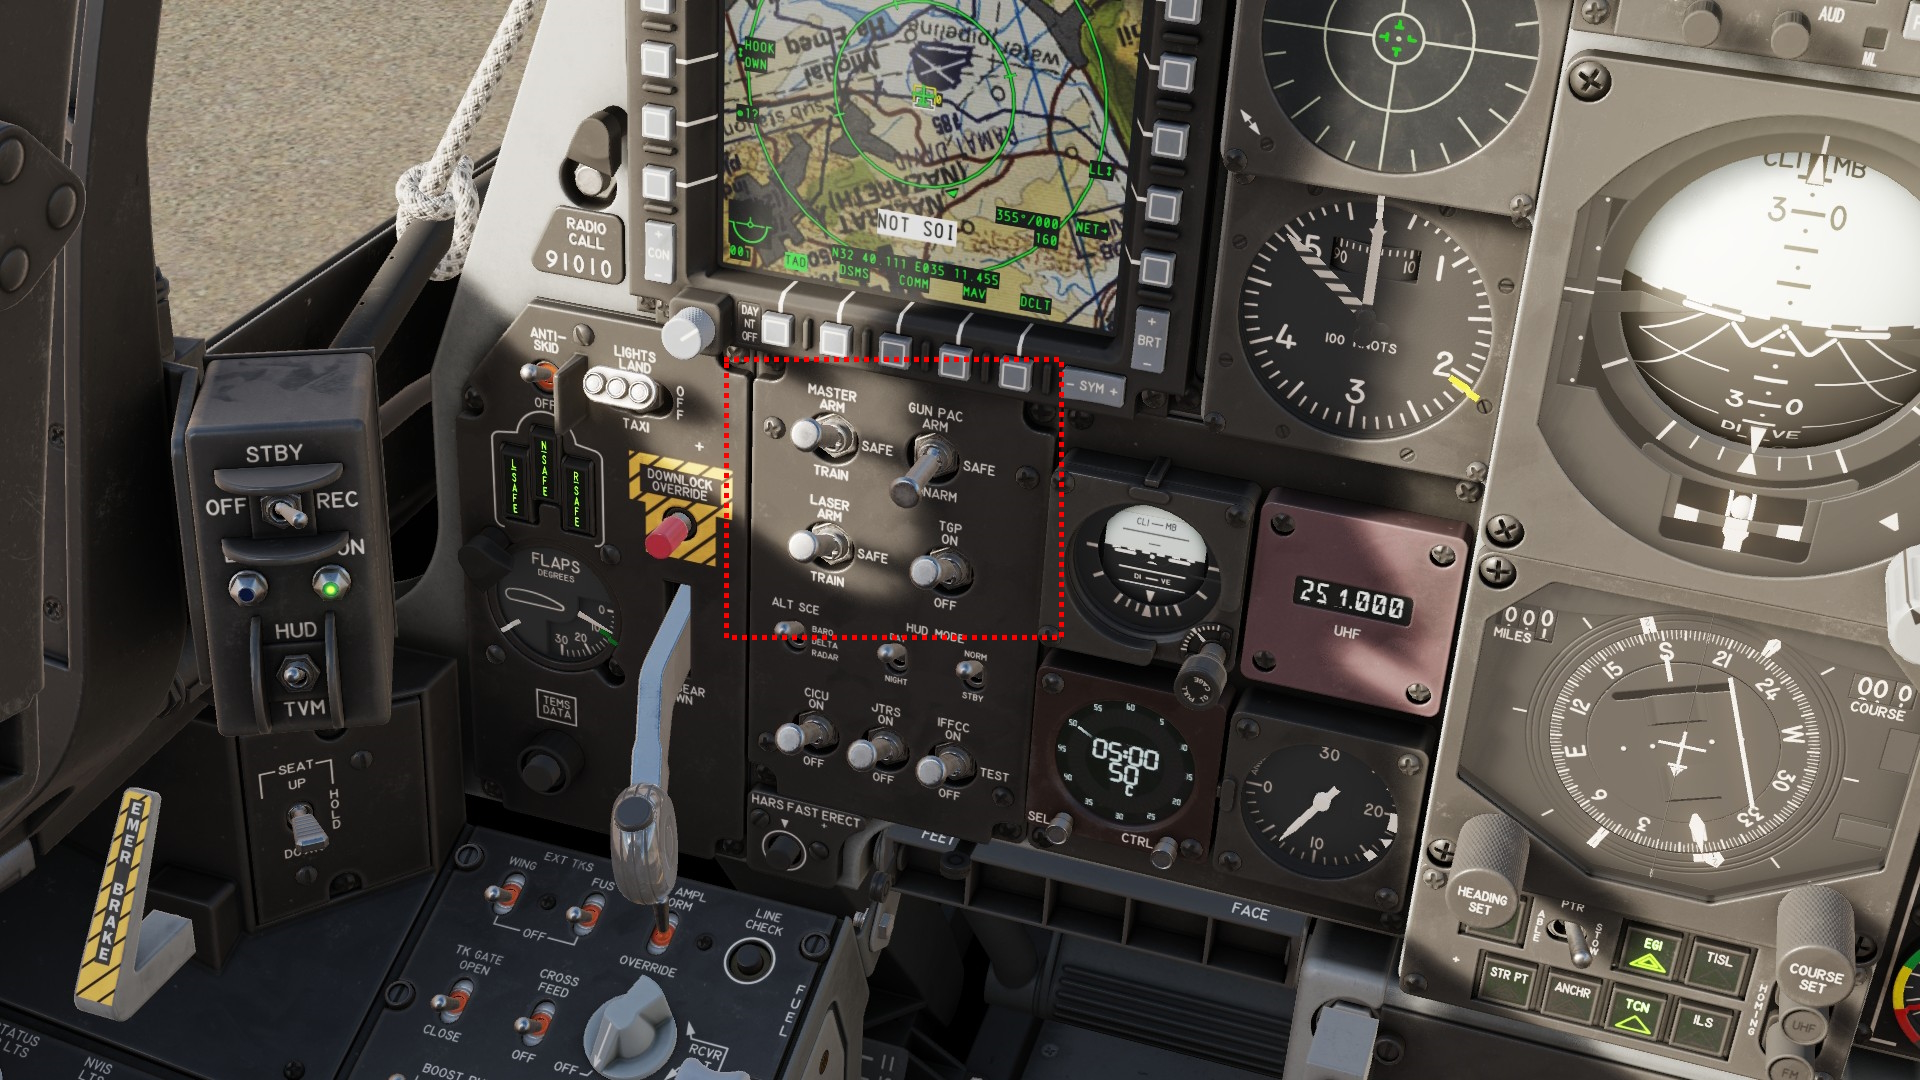
Also, while youre standing, arm masterarm and laserarm. Do not arm your cannon unless you need it. All other arming switches can be turned on since you still need to do a lot of things before you can actually drop weapons.
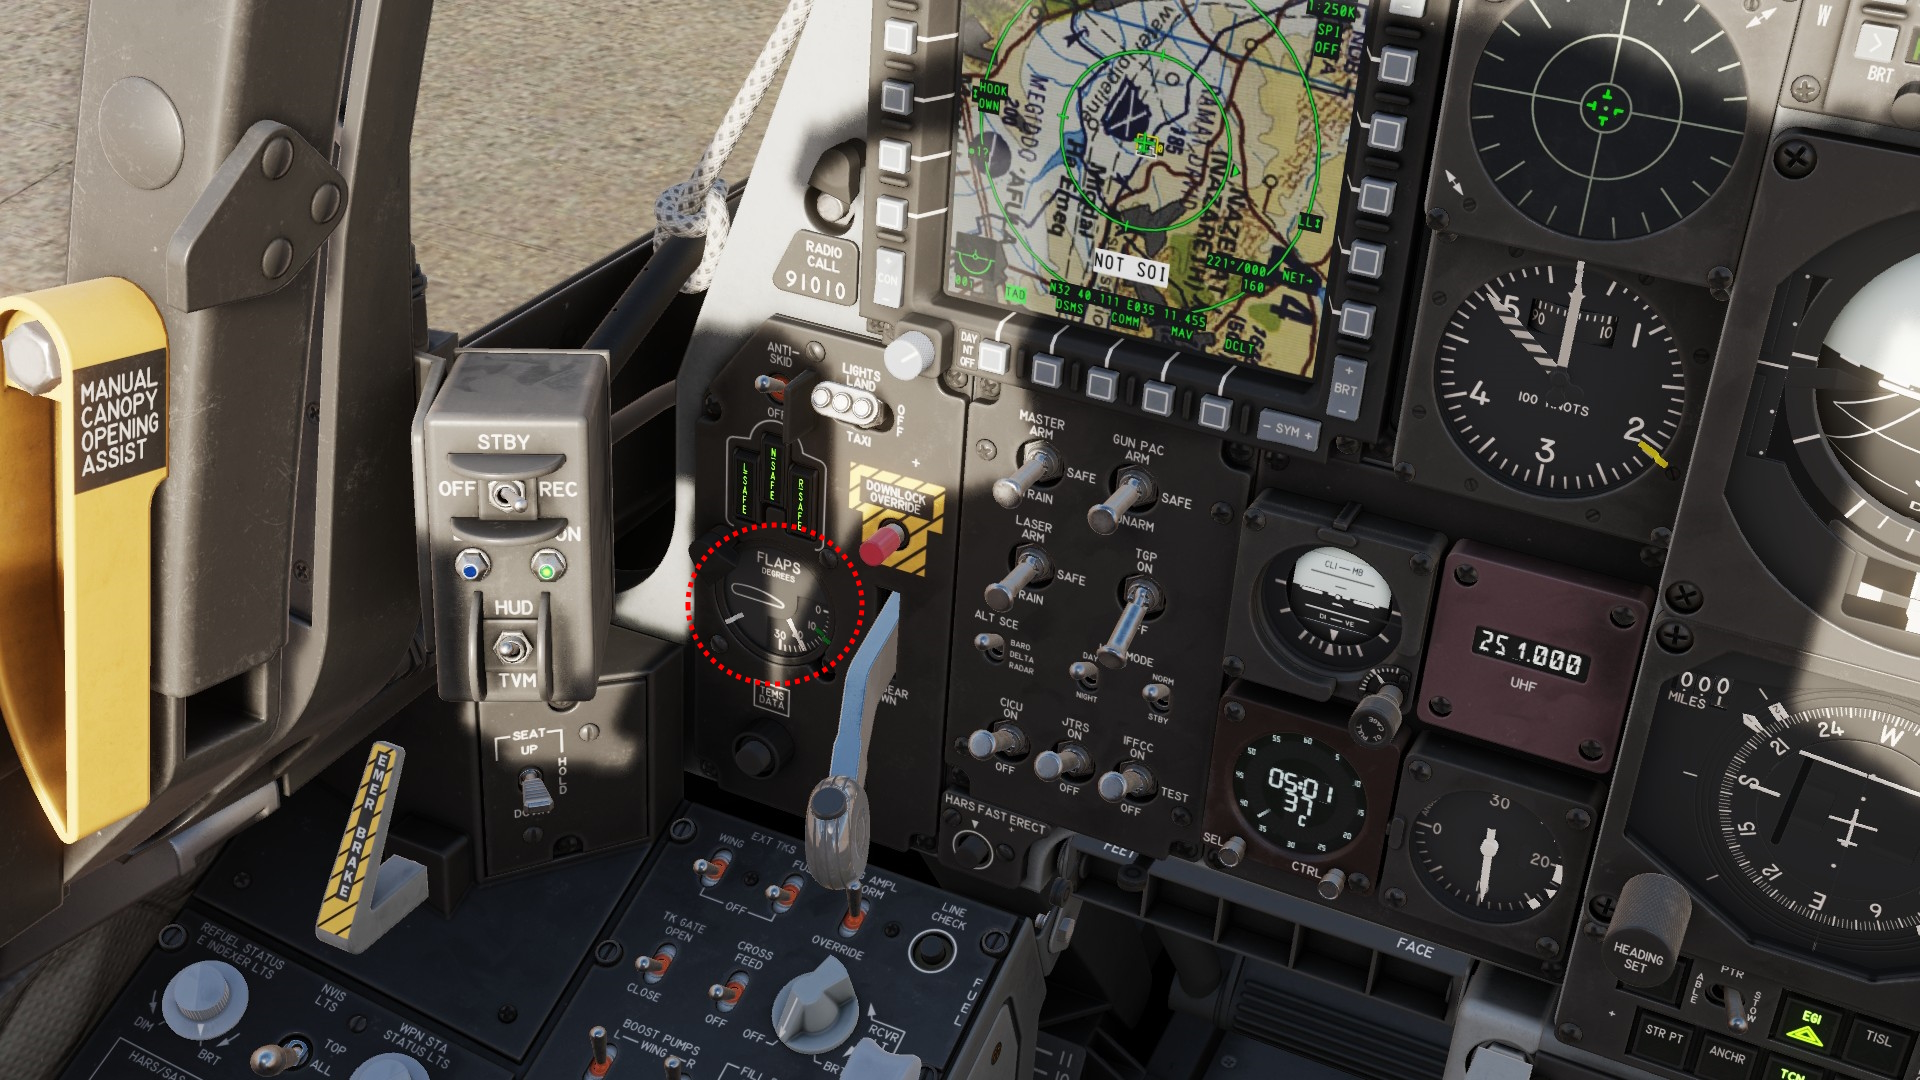
You can also lower your flaps to either the full or half position. This will generate more lift at the cost of slightly slower acceleration.
Once youre satisfied, drive onto the runway and accelerate.
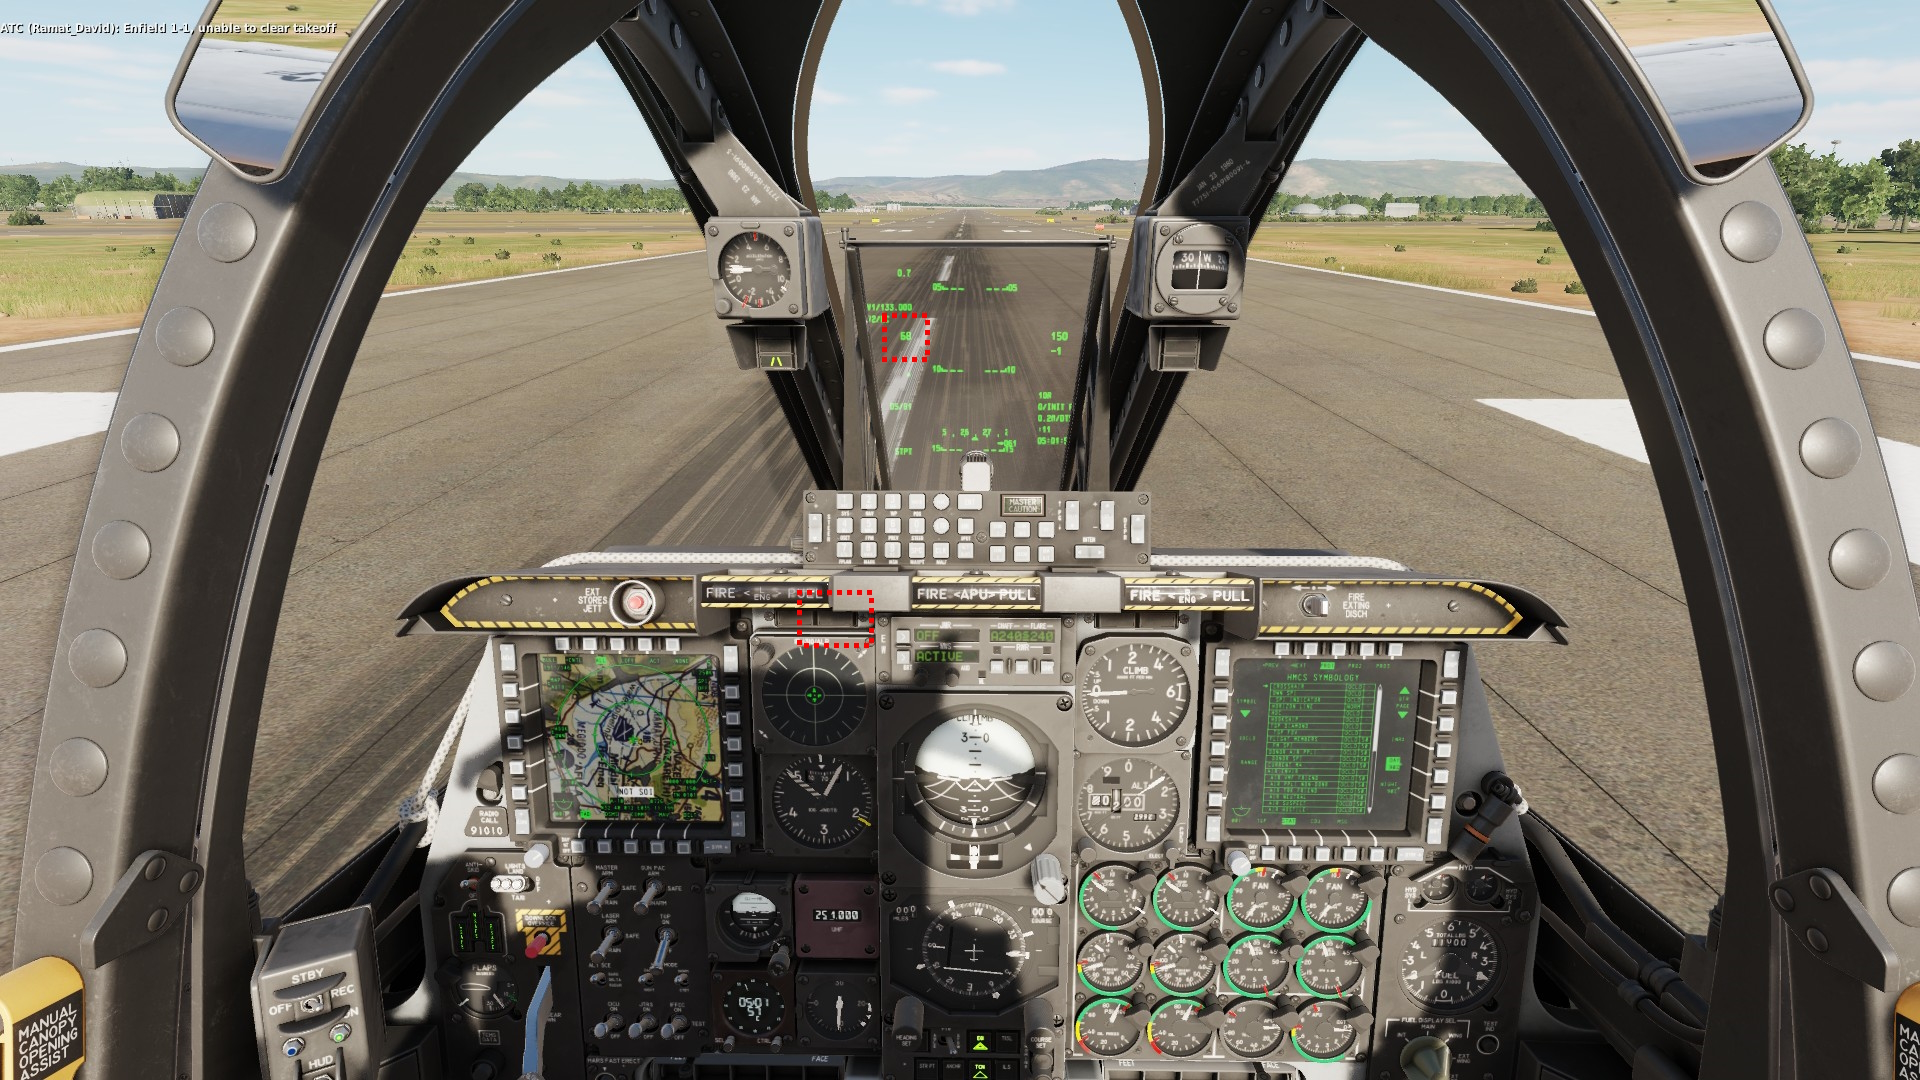
Once you pass the 60mph mark, disable nose wheel steering with the HOTAS Nosewheel steering button.
Depending on how heavy you are, you can take off at around 140 mph (this value is for heavy loadouts and full flaps). Gently (!) pull back on your stick and go on a 5° climb. Raise your gear.
Once you are at a reasonable alitiude - i usually go for 1000 to 1500 feet above ground - raise your flaps completely.
Weapons, Pods and loadouts Pt.I
In the A10c II you have a wide variety of different weapons to choose from. In this chapter i will give you an overview on what weapons you might want to carry. Their use will be explained in their own chapter.
All lists will exclude inert and captive carry training weapons.
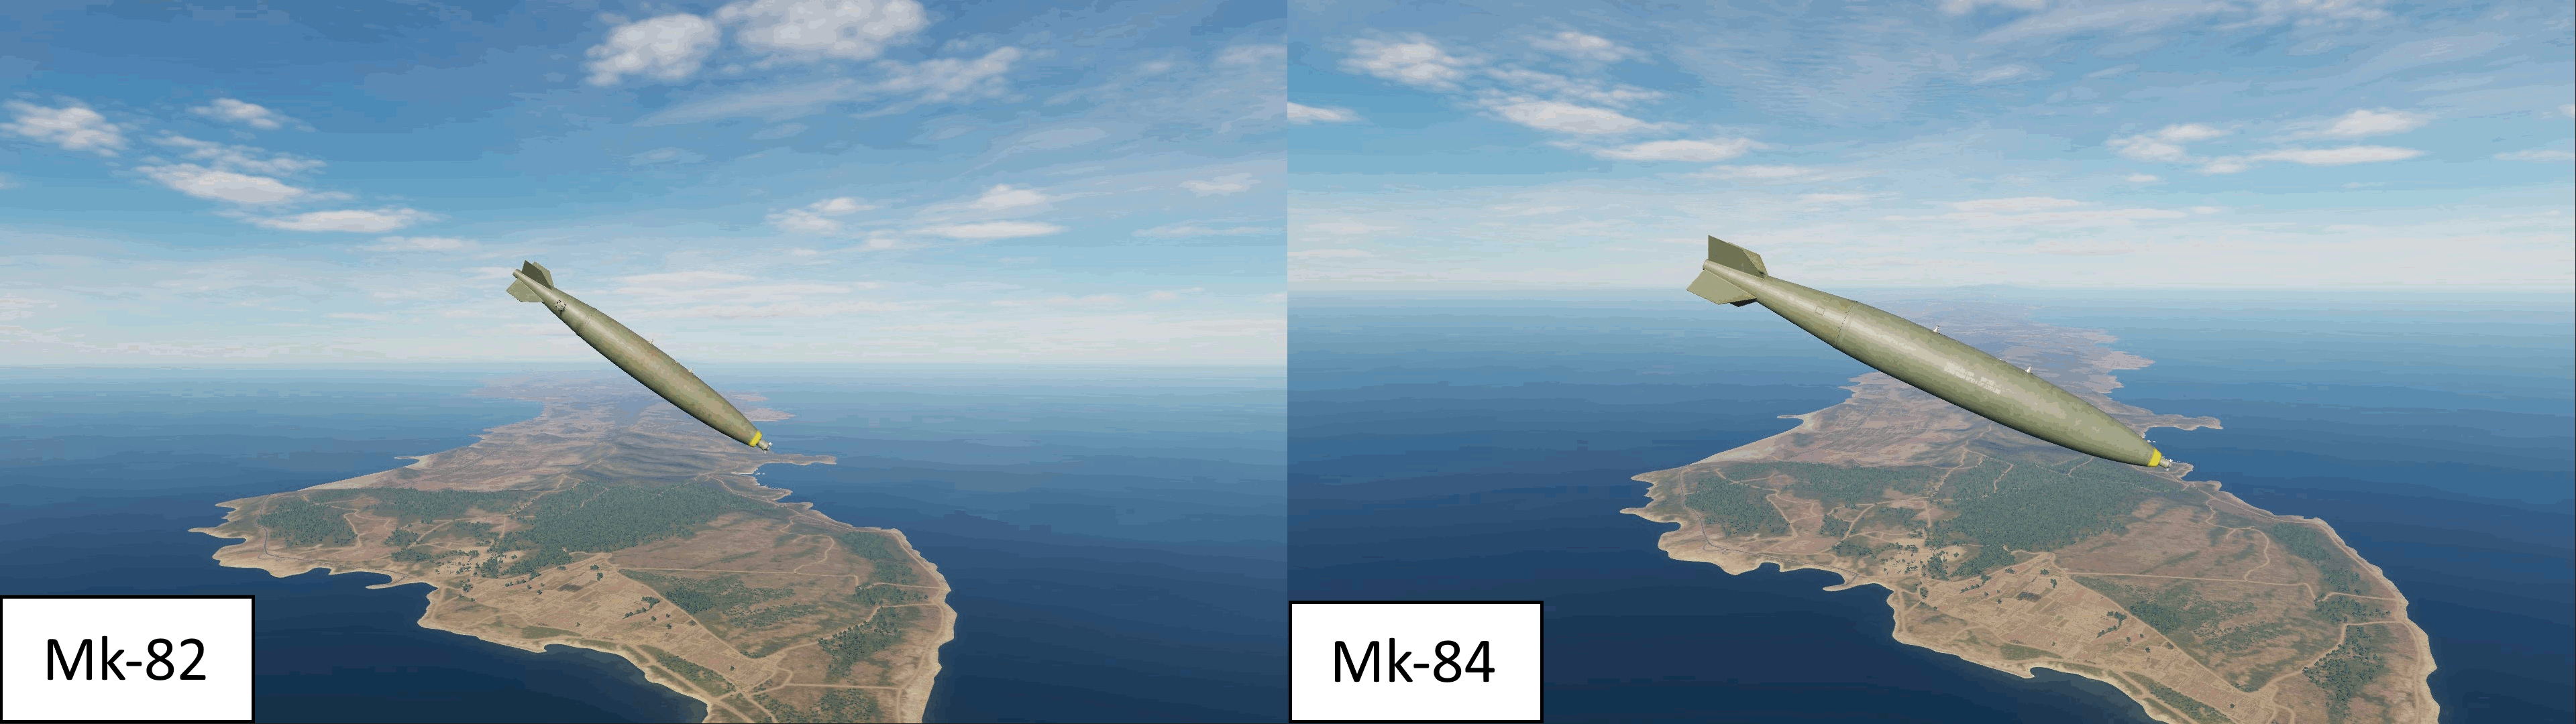
All weapons can generally be grouped togehter into the following classes:
- Mk-82 - 500lb unitary low drag bomb
- single weapon or triple ejector rack
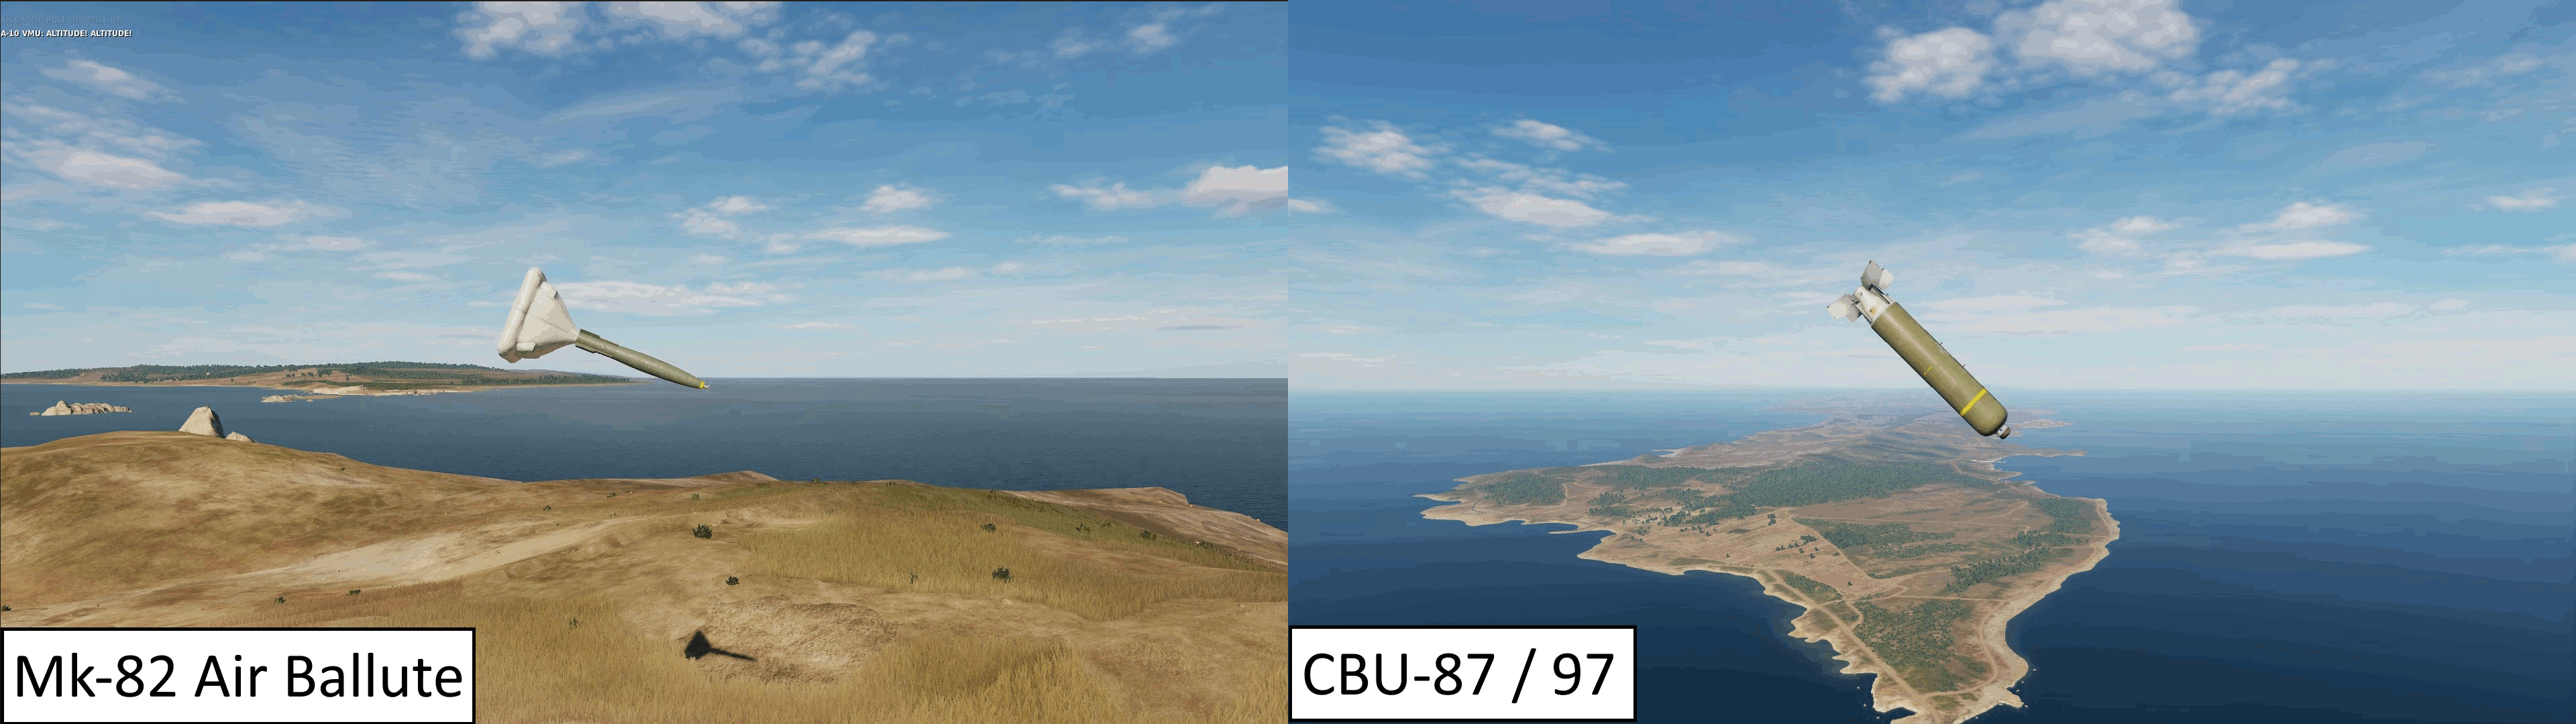
- Mk-82 AIR Ballute - 500lb unitary high drag bomb
- single weapon or triple ejector rack
- high drag bomb with ballute for use at low altitude
- single weapon or triple ejector rack
- Mk-84 - 2000lb low drag bomb
- single weapon per station
- CBU-87 - clusterbomb
- single weapon per station
- only effective against soft targets like infantry or unarmoured vehicles
- single weapon per station
- CBU-97 - clusterbomb
- single weapon per station
- submunitions are affected by wind
- effective against both soft and hard targets like tanks and armoured vehicles
- single weapon per station
 Guided bombs
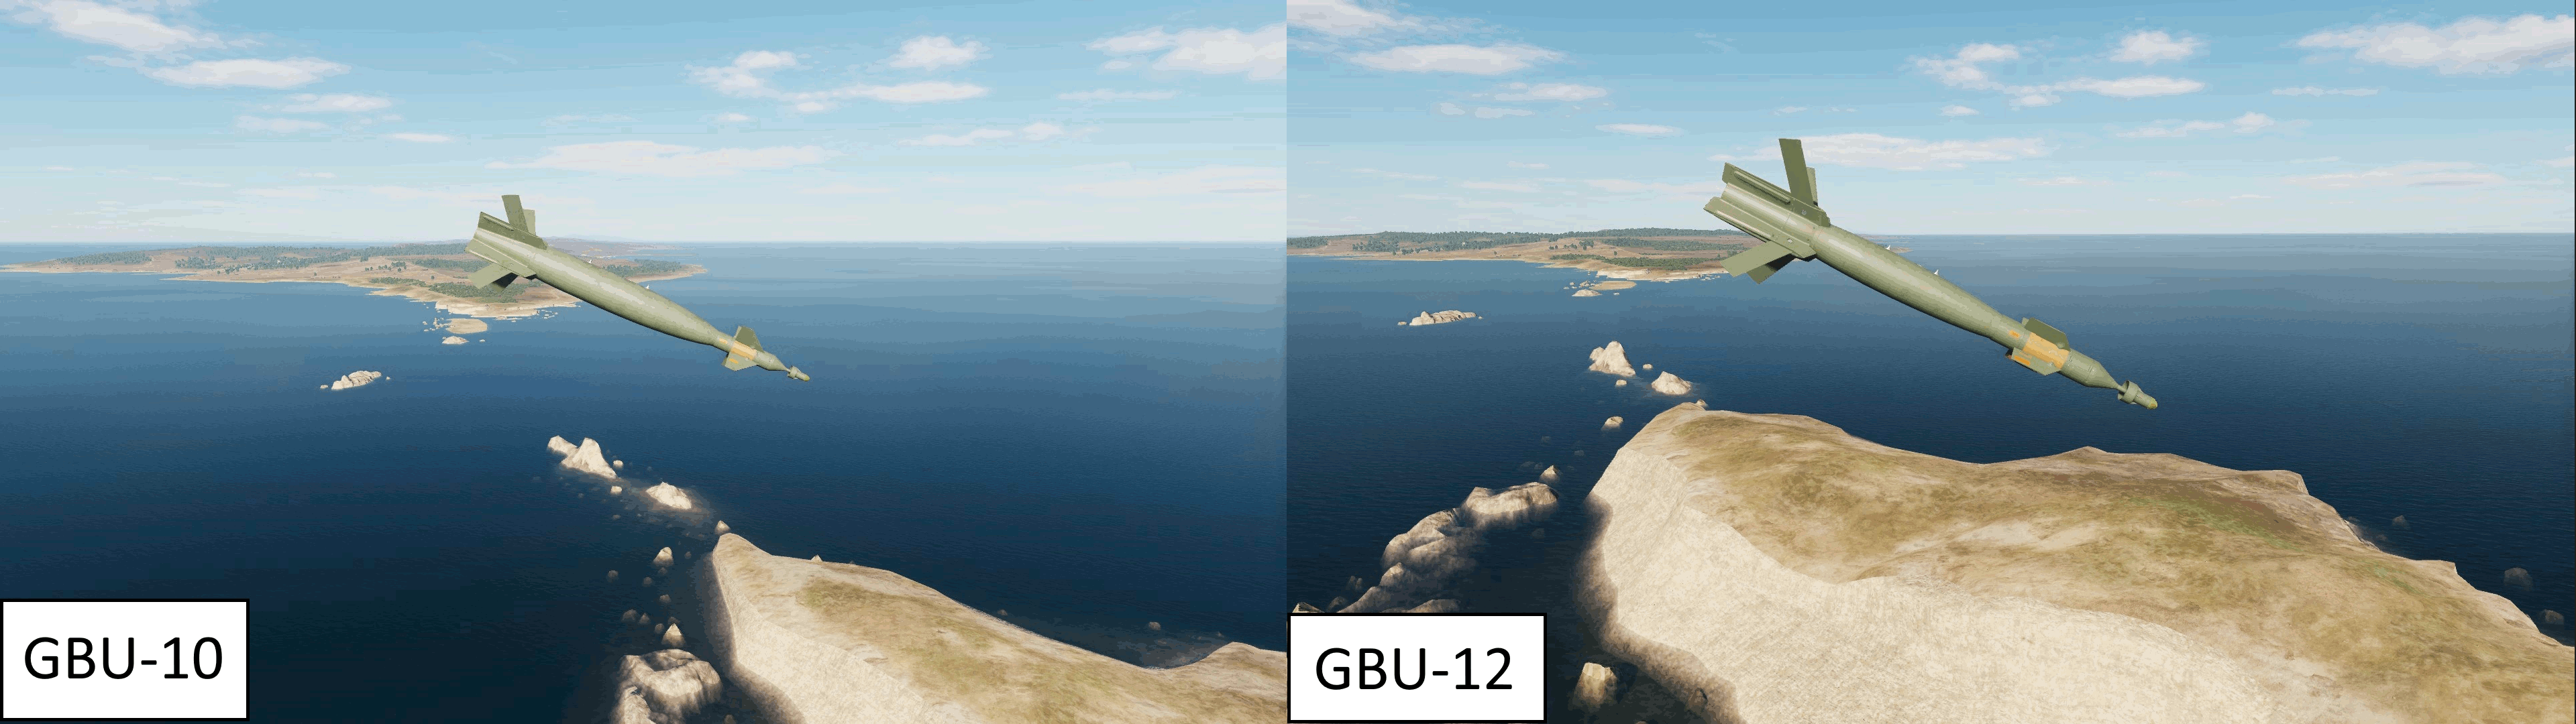
- GBU-12 - 500lb laser guided bomb
- single weapon or triple ejector rack
- depending on release altitude effective against moving targets
- requires laser designation during fall
- single weapon or triple ejector rack
- GBU-10 - 2000lb laser guided bomb
- single weapon per station
- depending on release altitude effective against moving targets
- requires laser designation during fall
- single weapon per station
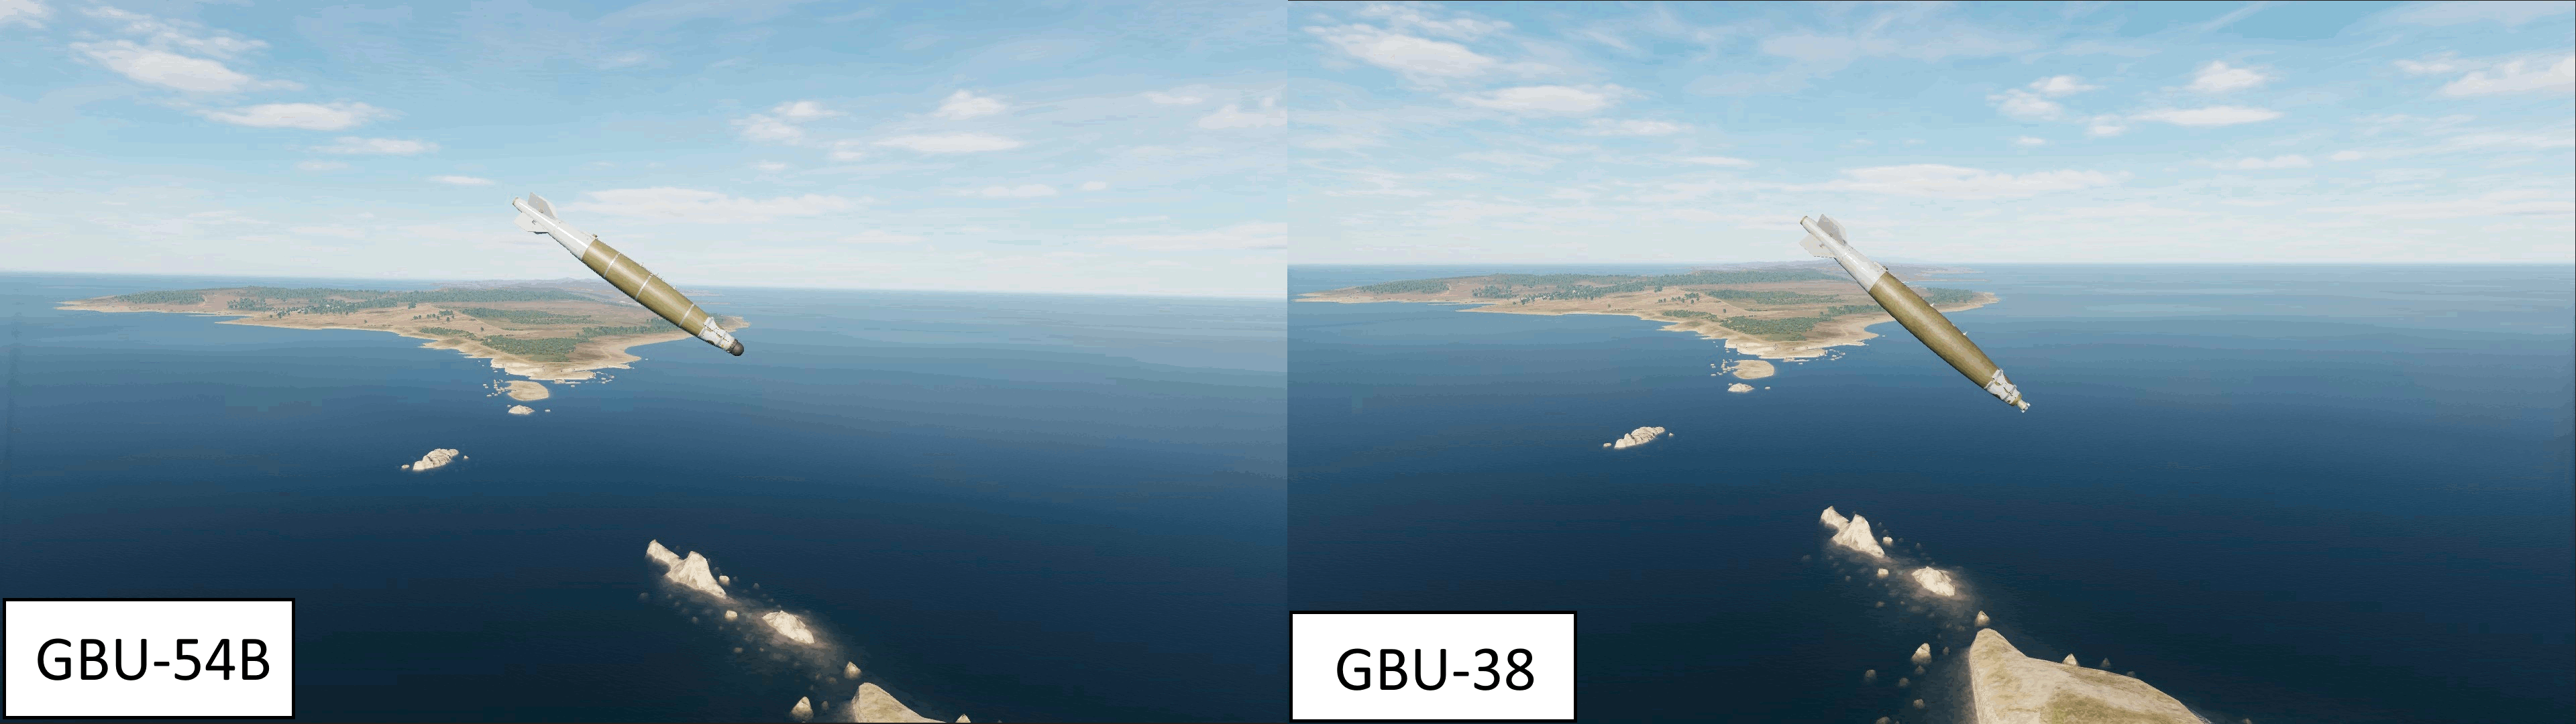
- GBU-38 - 500lb GPS/INS guided bomb
- single weapon per station; only available on 1760 smart stations
- only usable on stationary targets
- doesnt require further pilot input after release
- single weapon per station; only available on 1760 smart stations
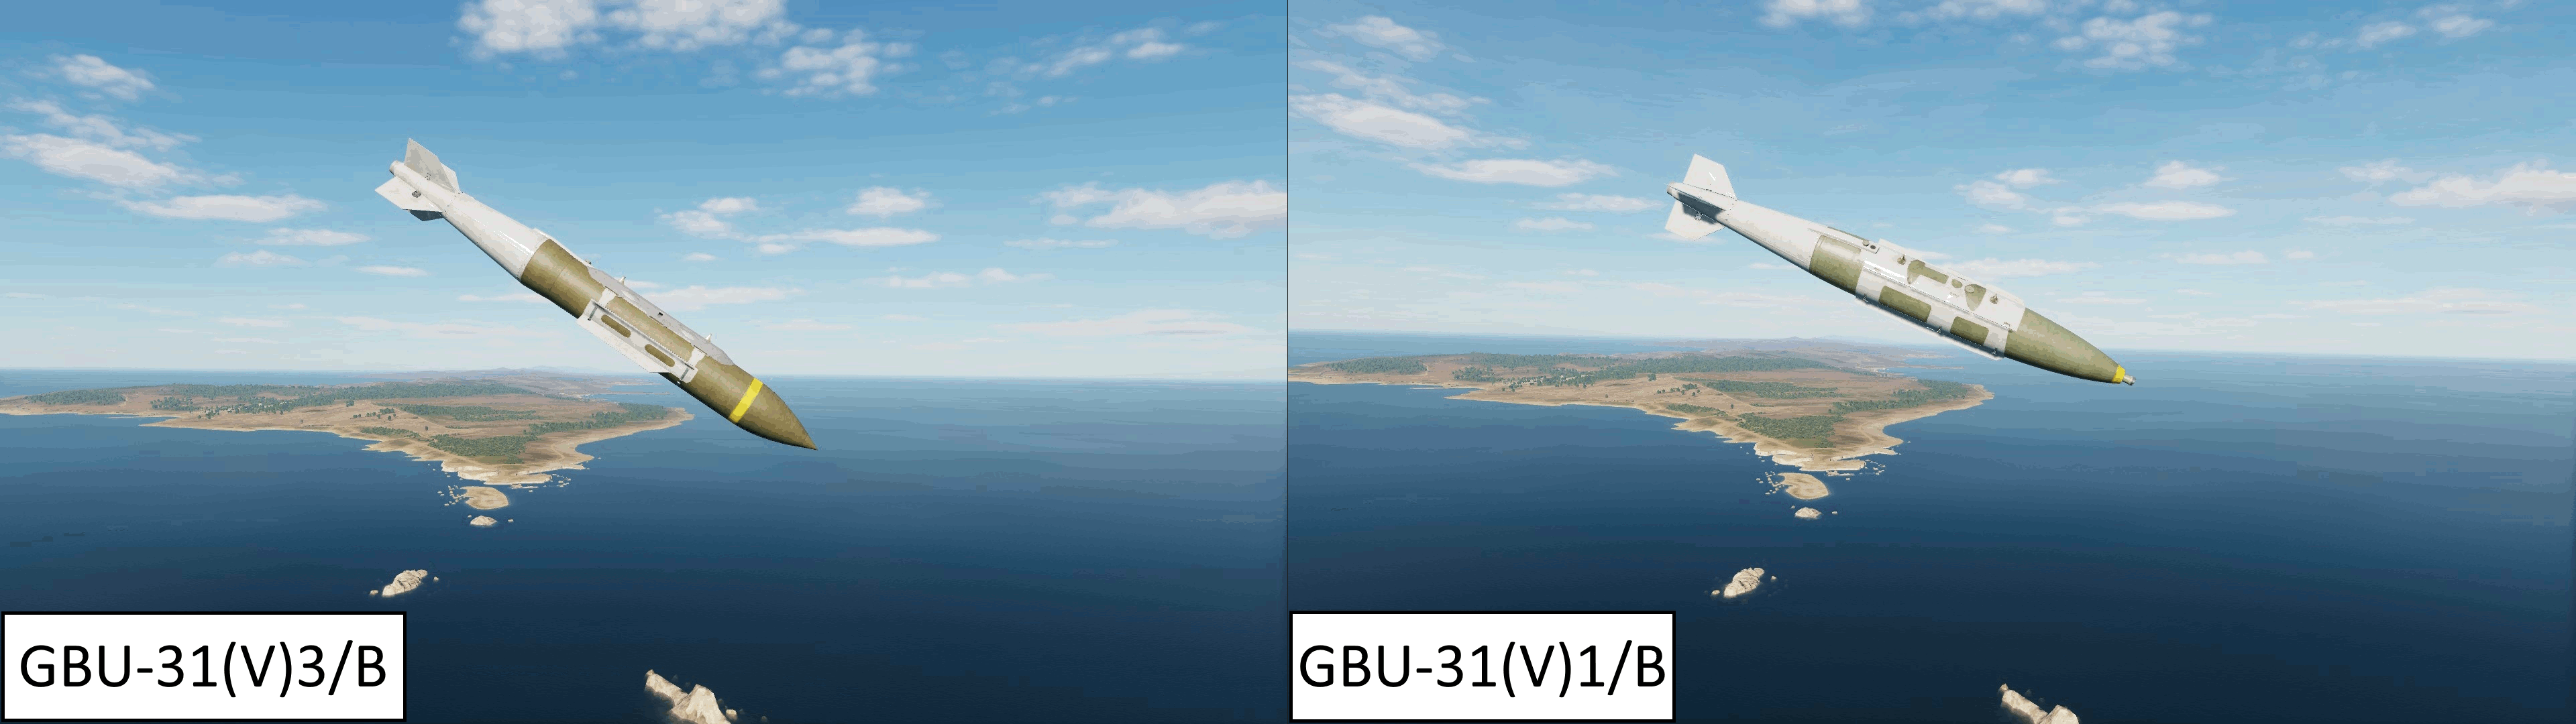
- GBU-31(V)1/B - 2000lb GPS/INS guided bomb
- single weapon per station; only available on 1760 smart stations
- only usable on stationary targets
- doesnt require further pilot input after release
- single weapon per station; only available on 1760 smart stations
- GBU-31(V)3/B - 2000lb GPS/INS guided penetrator bomb
- single weapon per station; only available on 1760 smart stations
- only usable on stationary targets
- doesnt require further pilot input after release
- single weapon per station; only available on 1760 smart stations
- GBU-54B - 500lb GPS/INS and/or laser guided bomb
- single weapon per station; only available on 1760 smart stations
- depending on release altitude and choosen guidance effective against moving targets
- depending on choosen guidance the bomb is either fire and forget or requires laser designation
- single weapon per station; only available on 1760 smart stations
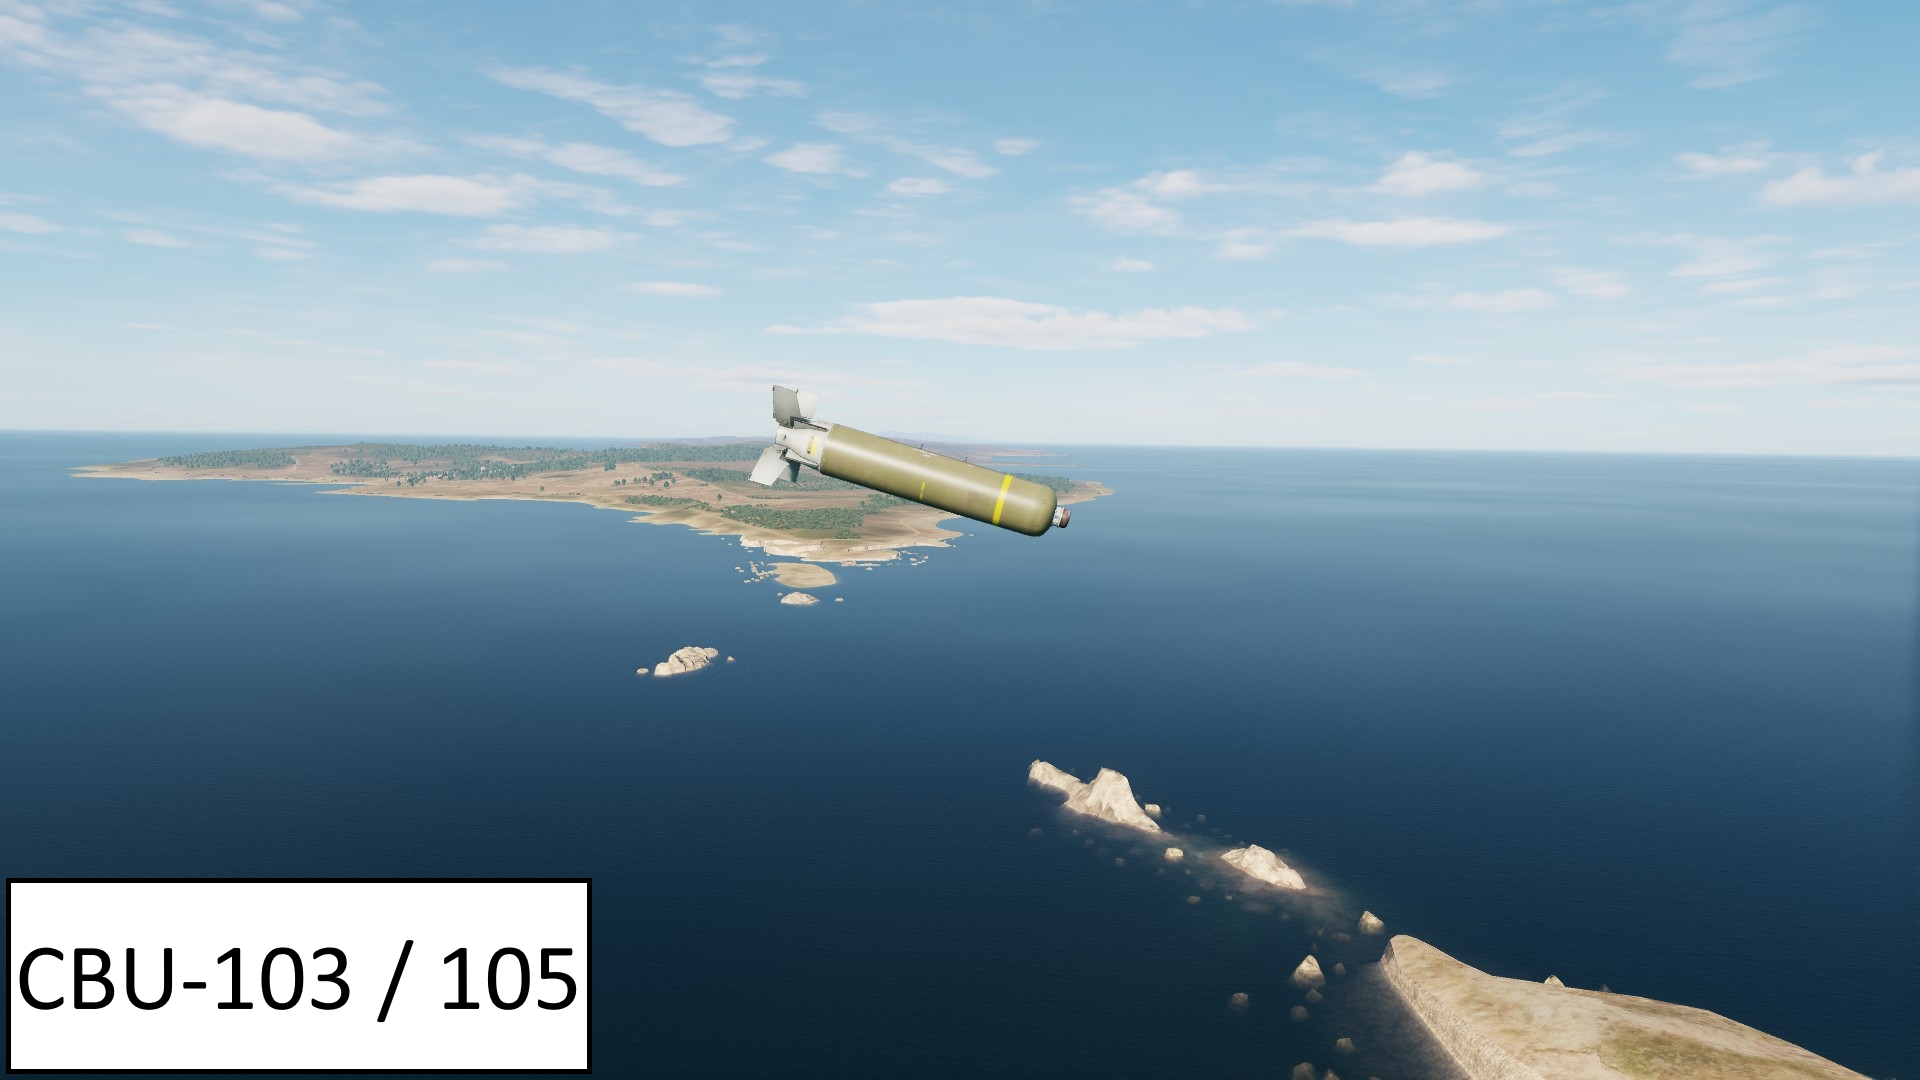
- CBU-103 - GPS/INS guided clusterbomb
- single weapon per station; only available on 1760 smart stations
- only effective against soft targets like infantry or unarmoured vehicles
- single weapon per station; only available on 1760 smart stations
- CBU-105 - GPS/INS guided clusterbomb
- single weapon per station; only available on 1760 smart stations
- submunitions are affected by wind
- effective against both soft and hard targets like tanks and armoured vehicles
- single weapon per station; only available on 1760 smart stations
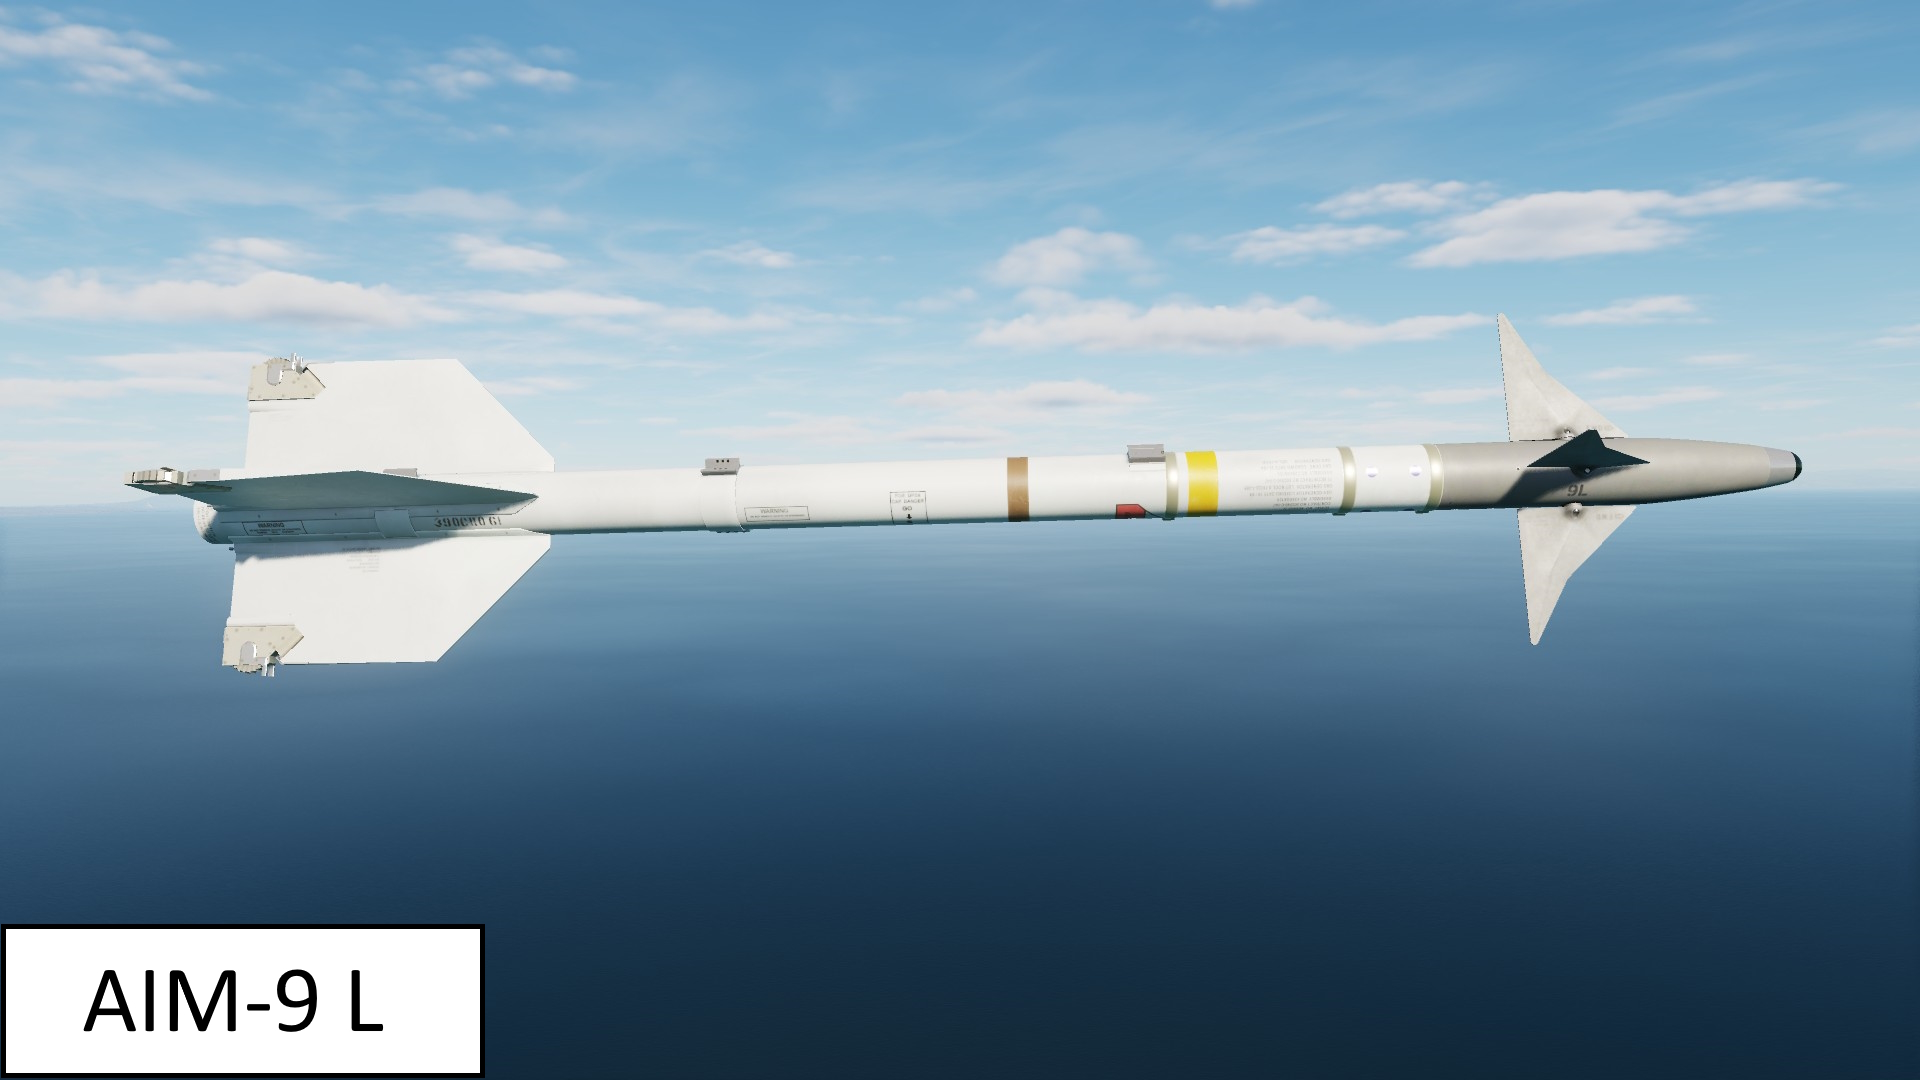
- AIM-9 L - IR guided short range air to air missile
- on single or dual launchers
- only on station 1 and 11
- due to their short range and limited quantity only for self defense
- on single or dual launchers
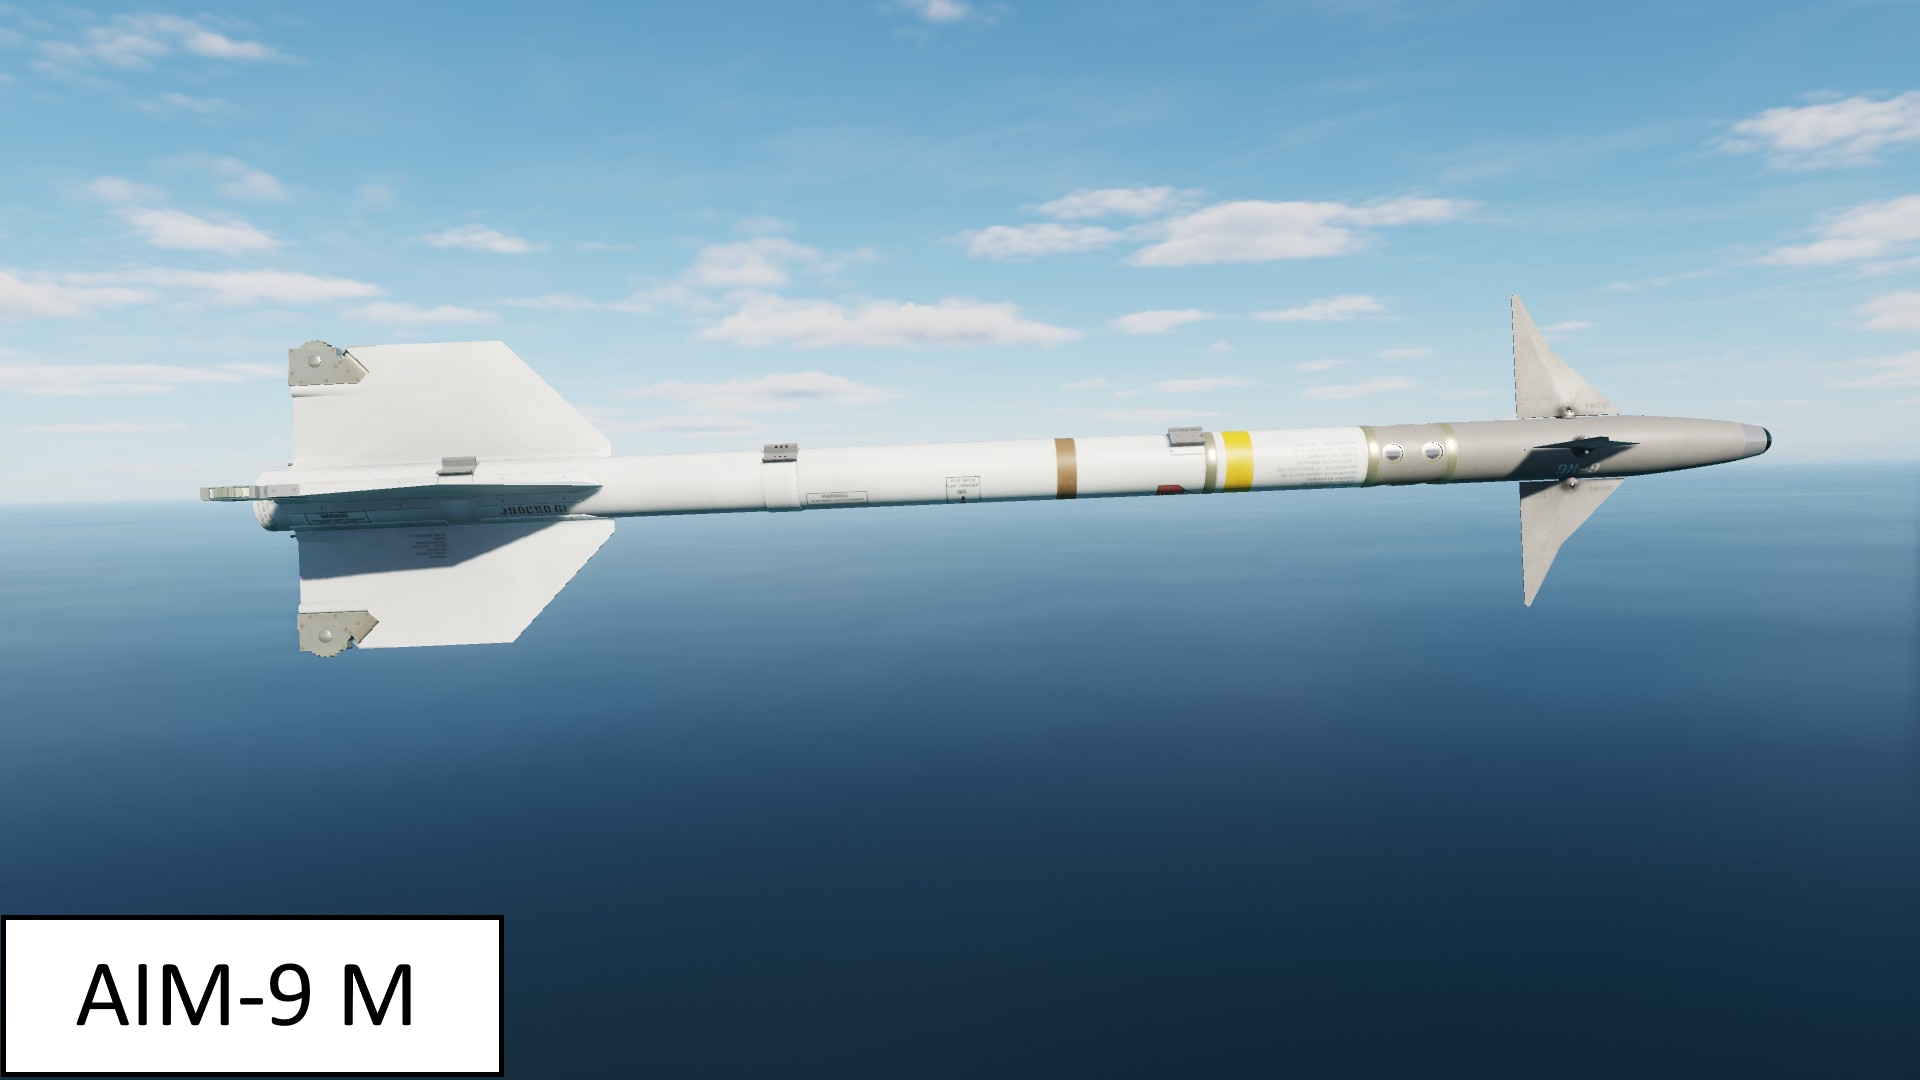
- AIM-9 M - IR guided short range air to air missile
- on single or dual launchers
- only on station 1 and 11
- due to their short range and limited quantity only for self defense
- more modern version of the L
- on single or dual launchers
 Air to Ground Missiles
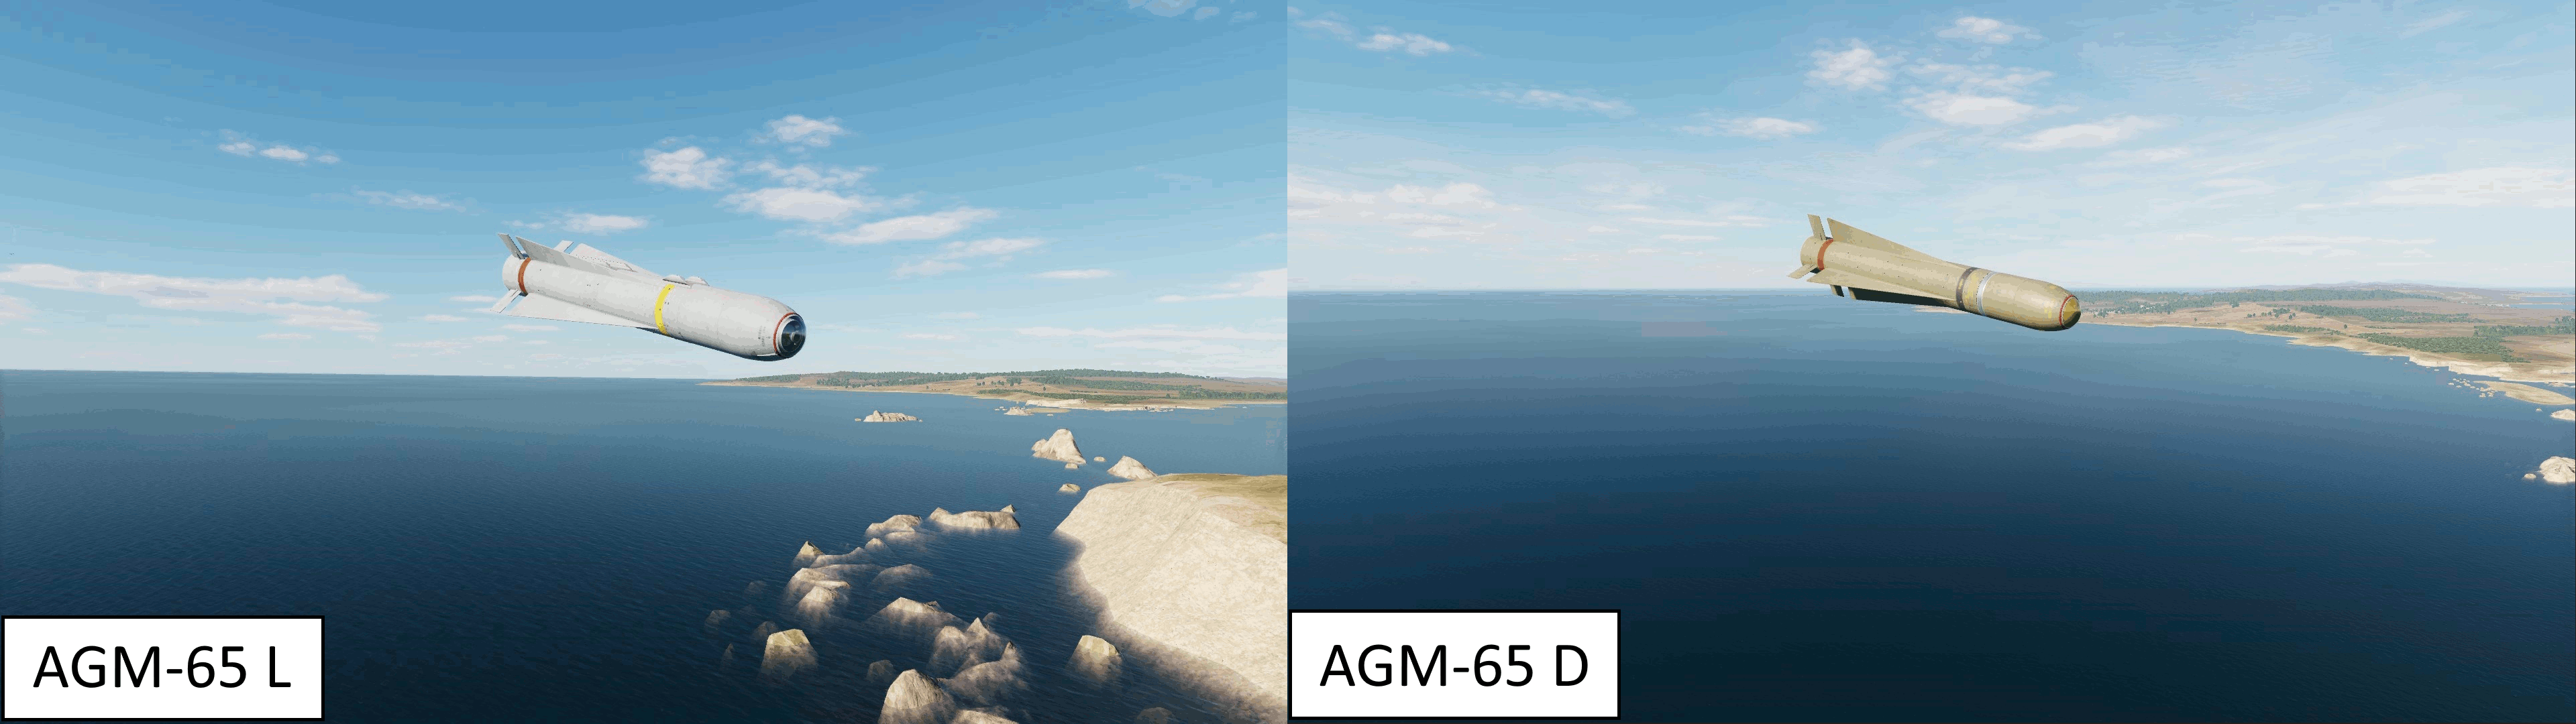
- AGM-65 D Maverick - anti tank air to ground missile with contrast seeker
- single, double or tripple launcher
- infrared imaging contrast seeker
- fire and forget after launch
- only available on station 3 and 9
- single, double or tripple launcher
- AGM-65 G Maverick - anti tank air to ground missile with contrast seeker
- single weapon per station since theyre larger then D Maverick
- infrared imaging contrast seeker or force correlation mode
- fire and forget after launch
- only available on station 3 and 9
- single weapon per station since theyre larger then D Maverick
- AGM-65 H Maverick - anti tank air to ground missile with contrast seeker
- single, double or tripple launcher
- electro optical contrast seeker or force correlation mode
- fire and forget after launch
- only available on station 3 and 9
- single, double or tripple launcher
- AGM-65 K Maverick - anti tank air to ground missile with contrast seeker
- single weapon per station since theyre larger then H Maverick
- electro optical contrast seeker or force correlation mode
- fire and forget after launch
- only available on station 3 and 9
- single weapon per station since theyre larger then H Maverick
- AGM-65 L Maverick - anti tank guided missile with laser seeker
- single weapon per station
- laser seeker
- requires laser designation during flight
- only available on station 3 and 9
- single weapon per station
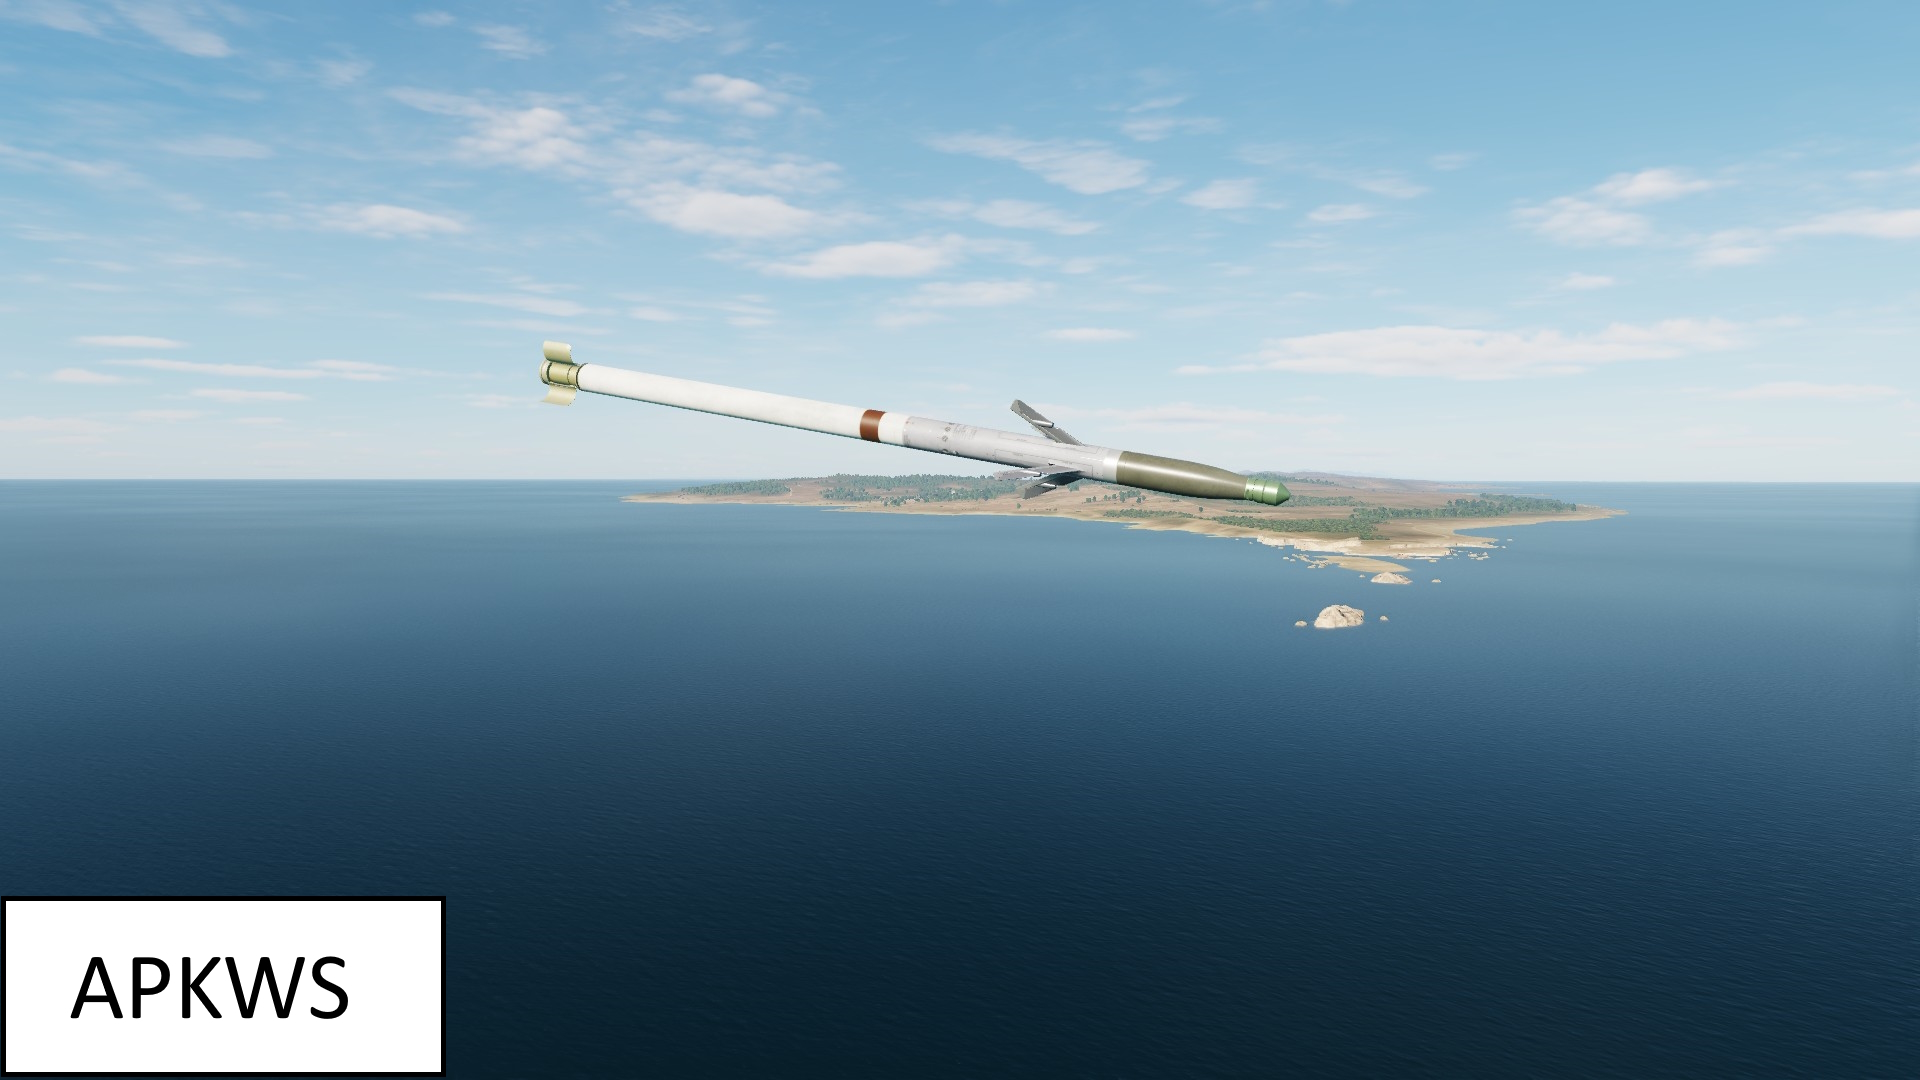
- Hydra APKWS HE - laser guided missile
- in tubes of 7 or on some stations on triple ejector racks with 3 tubes of 7 missiles for a maximum 21 per station total
- HE warhead against infantry and light vehicles
- in tubes of 7 or on some stations on triple ejector racks with 3 tubes of 7 missiles for a maximum 21 per station total
- Hydra APKWS MPP - laser guided missile
- in tubes of 7 or on some stations on triple ejector racks with 3 tubes of 7 missiles for a maximum 21 per station total
- multi purpose penetrator warhead against medium armour like BTRs
- in tubes of 7 or on some stations on triple ejector racks with 3 tubes of 7 missiles for a maximum 21 per station total
I will not include pictures of all AGM-65s, since they all have the same model. The only difference is the colour.
Weapons, Pods and loadouts Pt.II
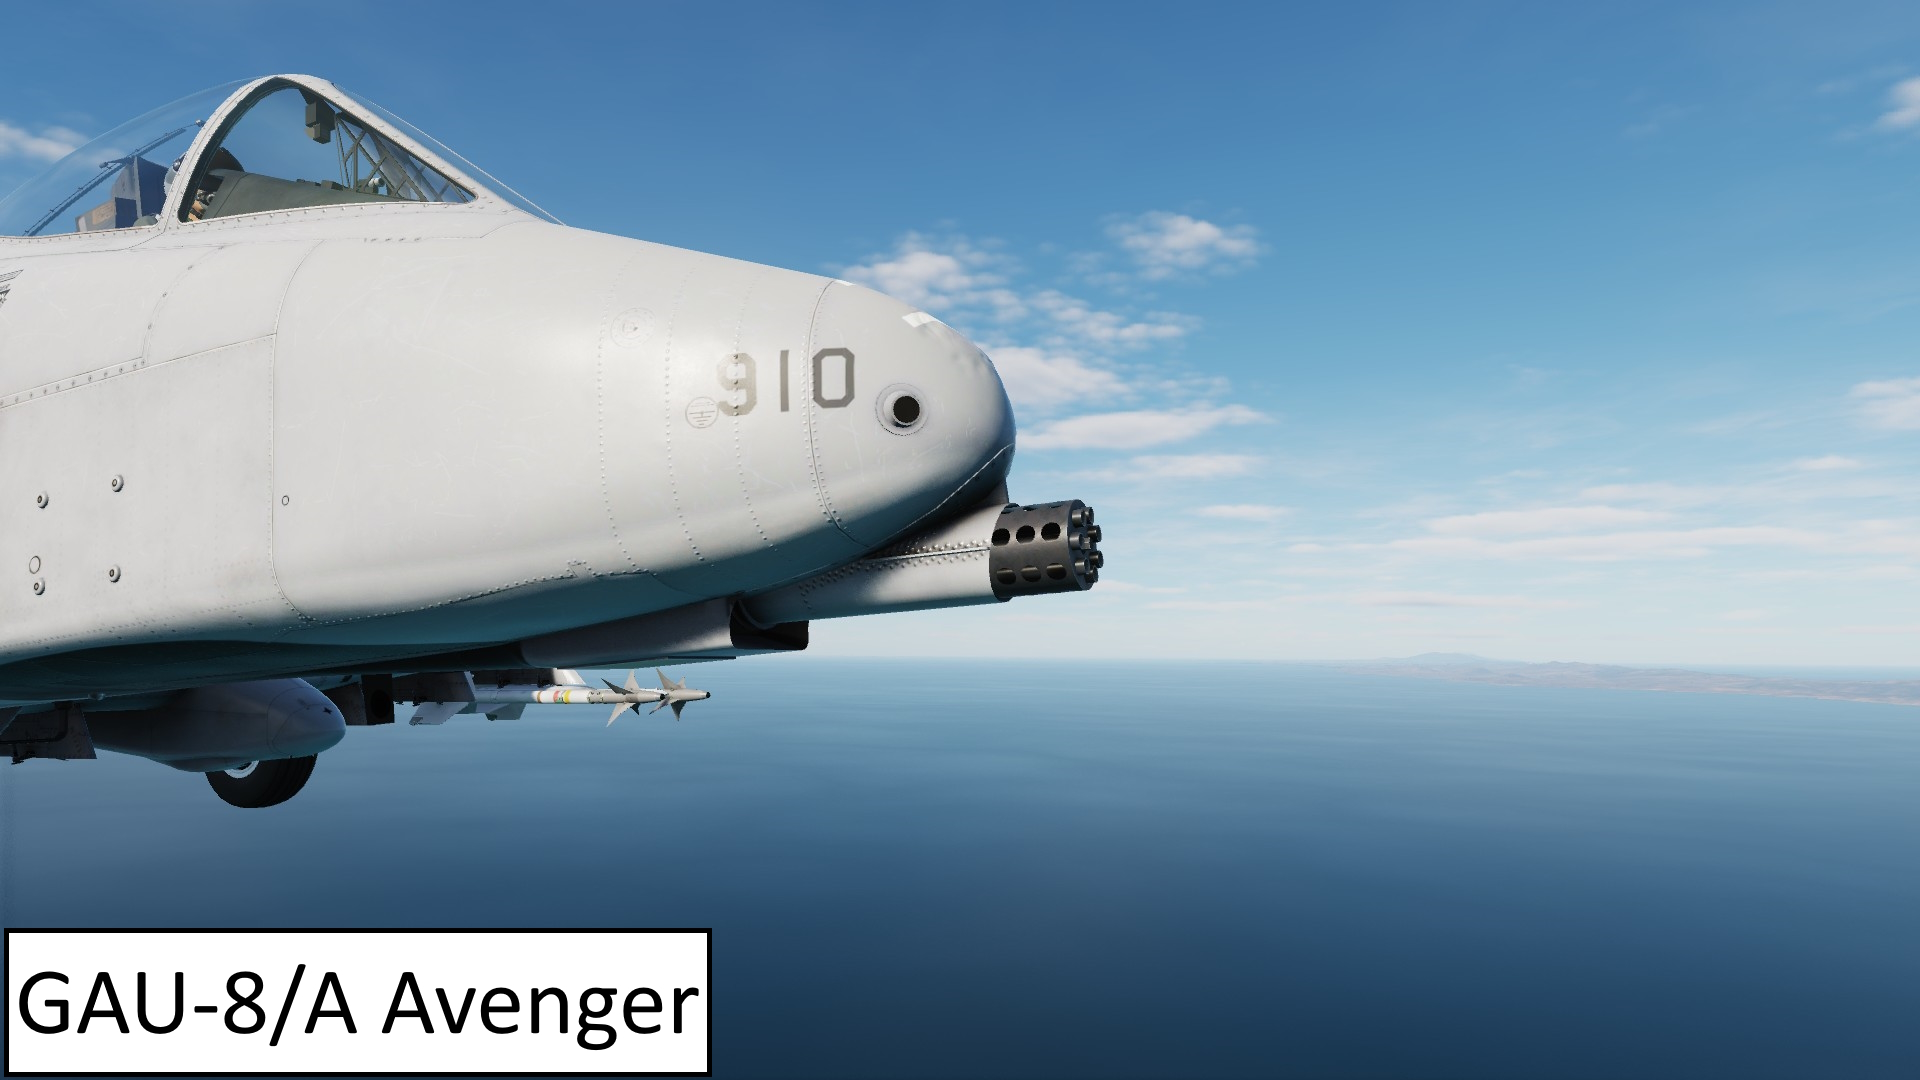
- GAU-8/A - 30mm rotary cannon
- doesnt take up a hardpoint since it is build into the airframe
- HEI - high explosive incendiary for use against infantry and unarmored targets
- Combat Mix - a mix of HEI and AP rounds; effective against up to medium armour - struggles against modern tanks
- doesnt take up a hardpoint since it is build into the airframe
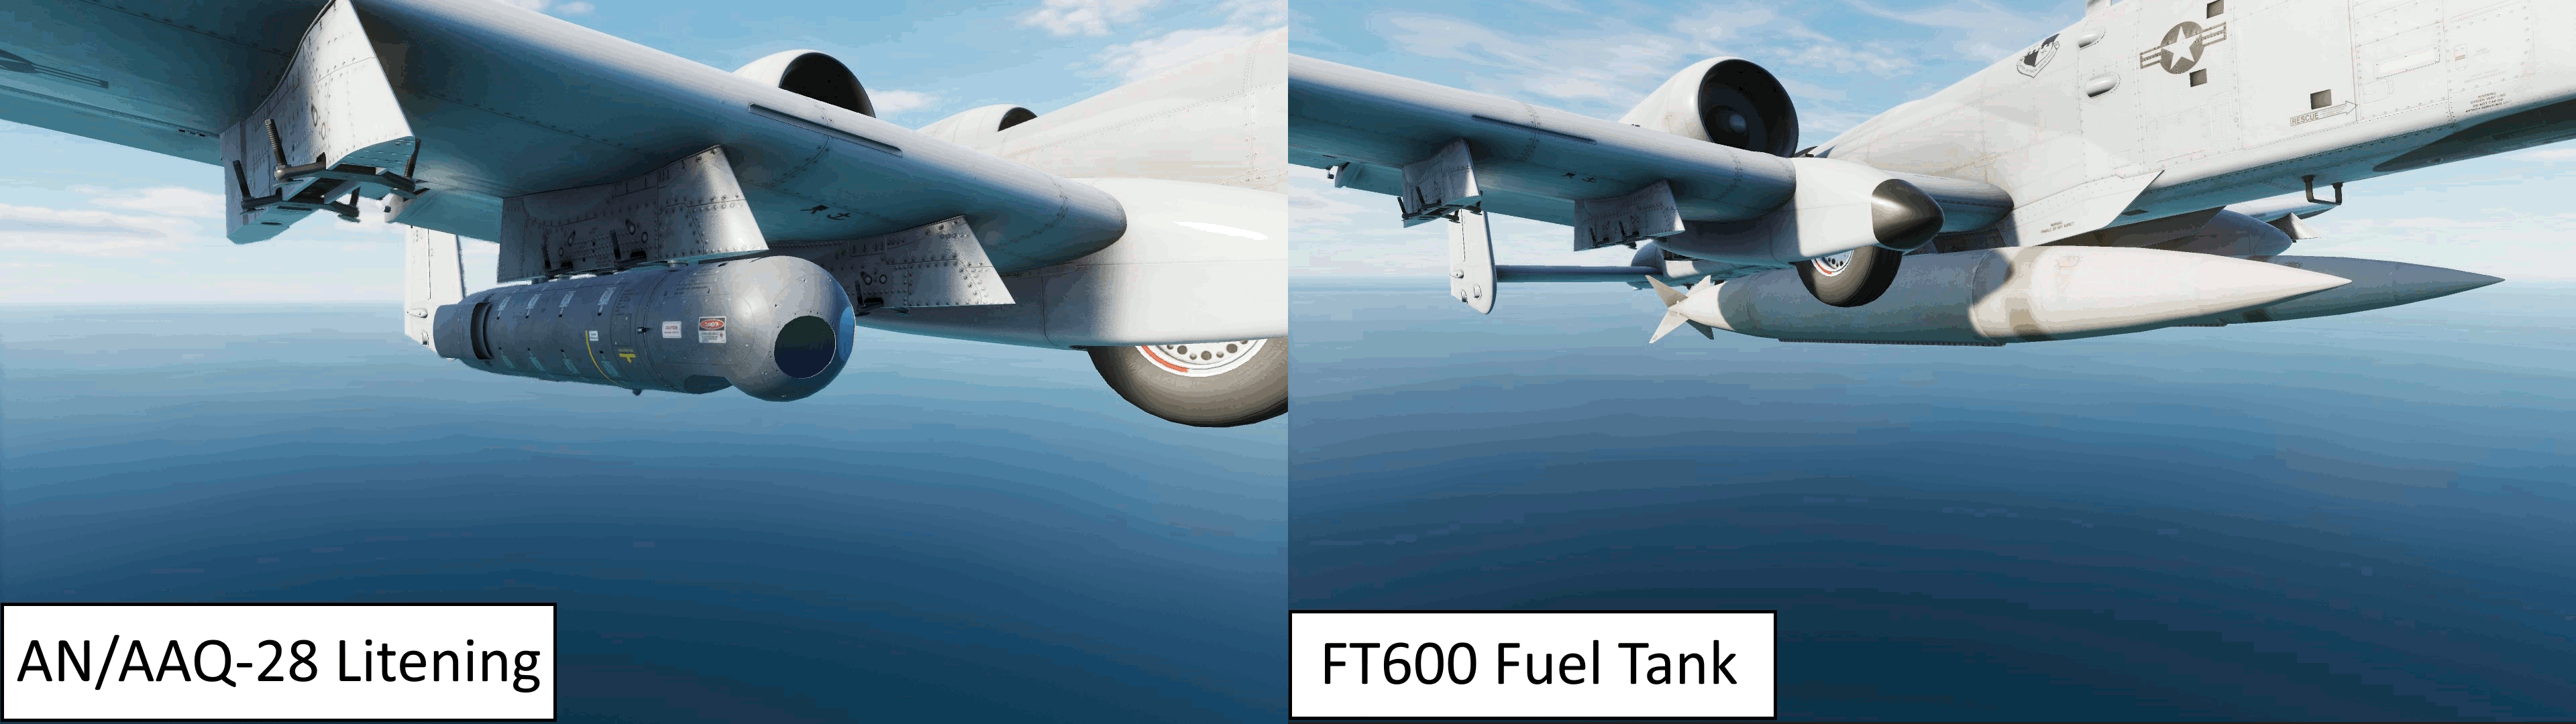
- AN/AAQ-28 Litening Targeting Pod
- must-have for all loadouts
- only available for station 2 and 10 (you only need one)
- has a lot to talk about, see its own chapter
- must-have for all loadouts
- FT600 Fueltank
- holds 600 gallons of aviation fuel
- maximum of three
- has no self sealing capabilities and is therefore useless for combat
- you already have a huge loitering time, why do you need a fuel tank
- learn midair refueling and all your problems will be gone
- holds 600 gallons of aviation fuel
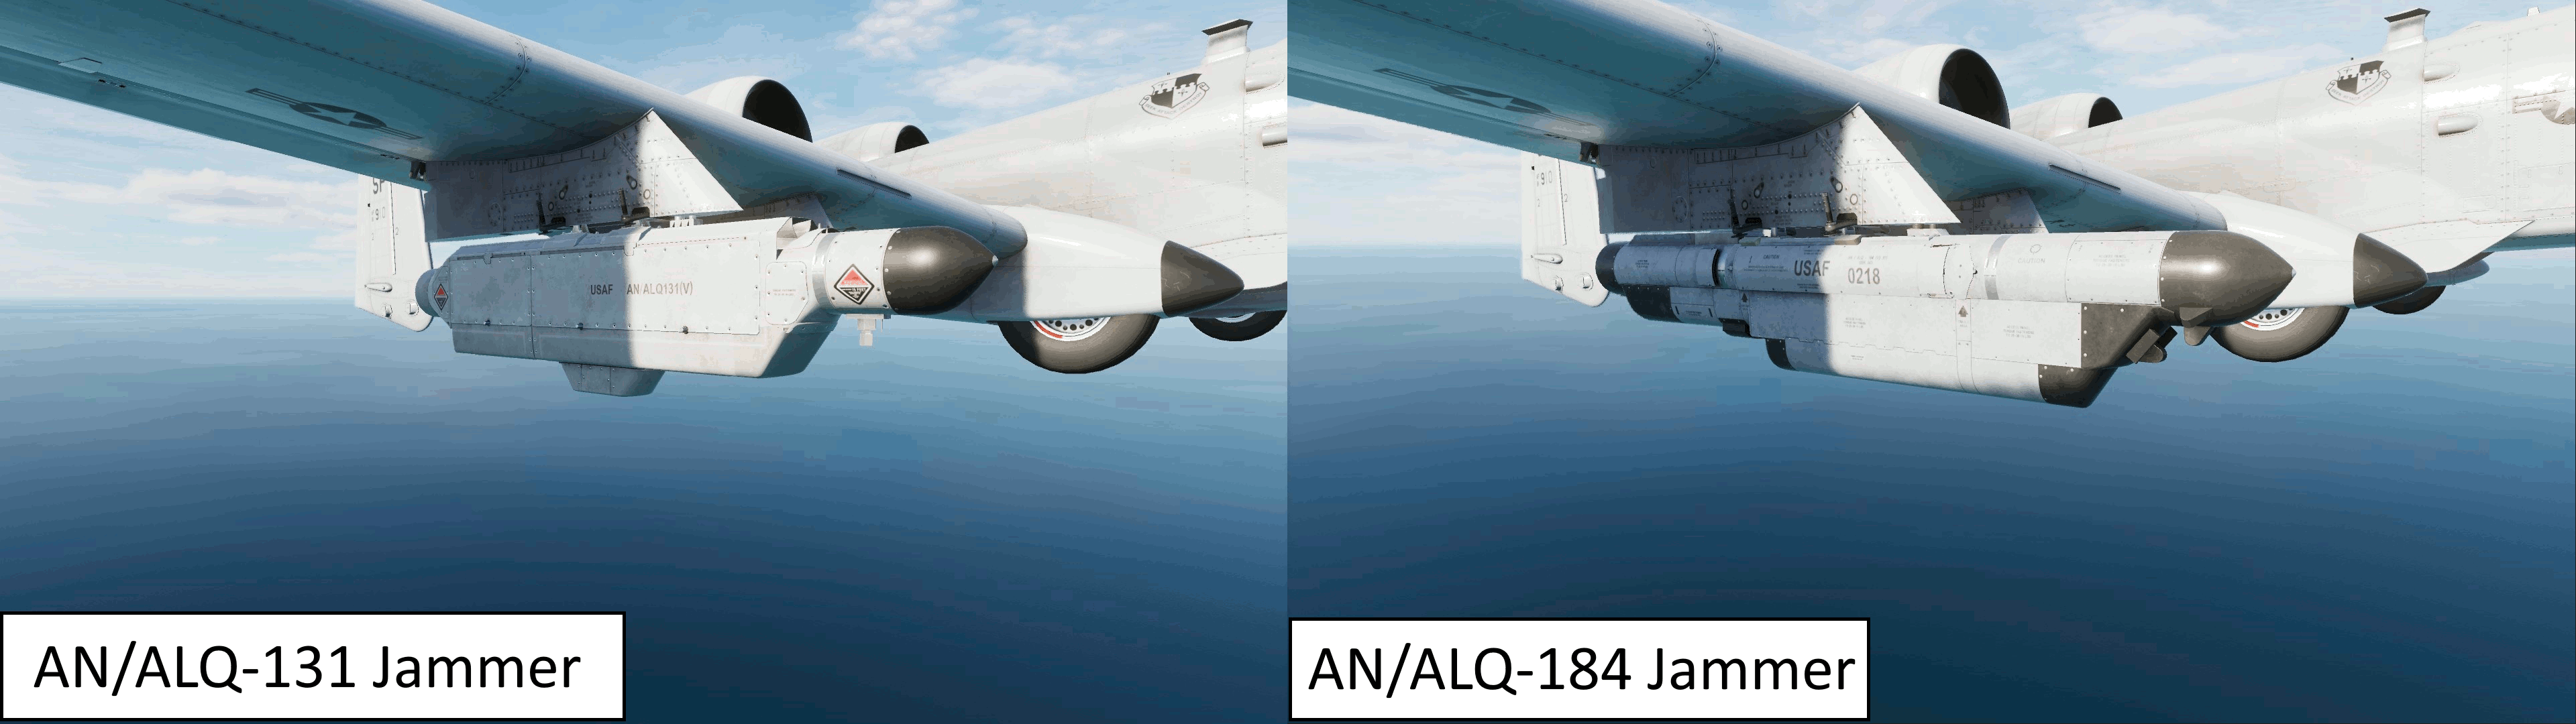
- AN/ALQ-131 Jammer
- radar jammer to help counter tracking radars
- close to useless as seen in ralfis video
- radar jammer to help counter tracking radars
- AN/ALQ-184 Jammer
- radar jammer to help counter tracking radars
- same as AN/ALQ-131, just in an aerodynamic case
- close to useless as seen in ralfis video
- radar jammer to help counter tracking radars
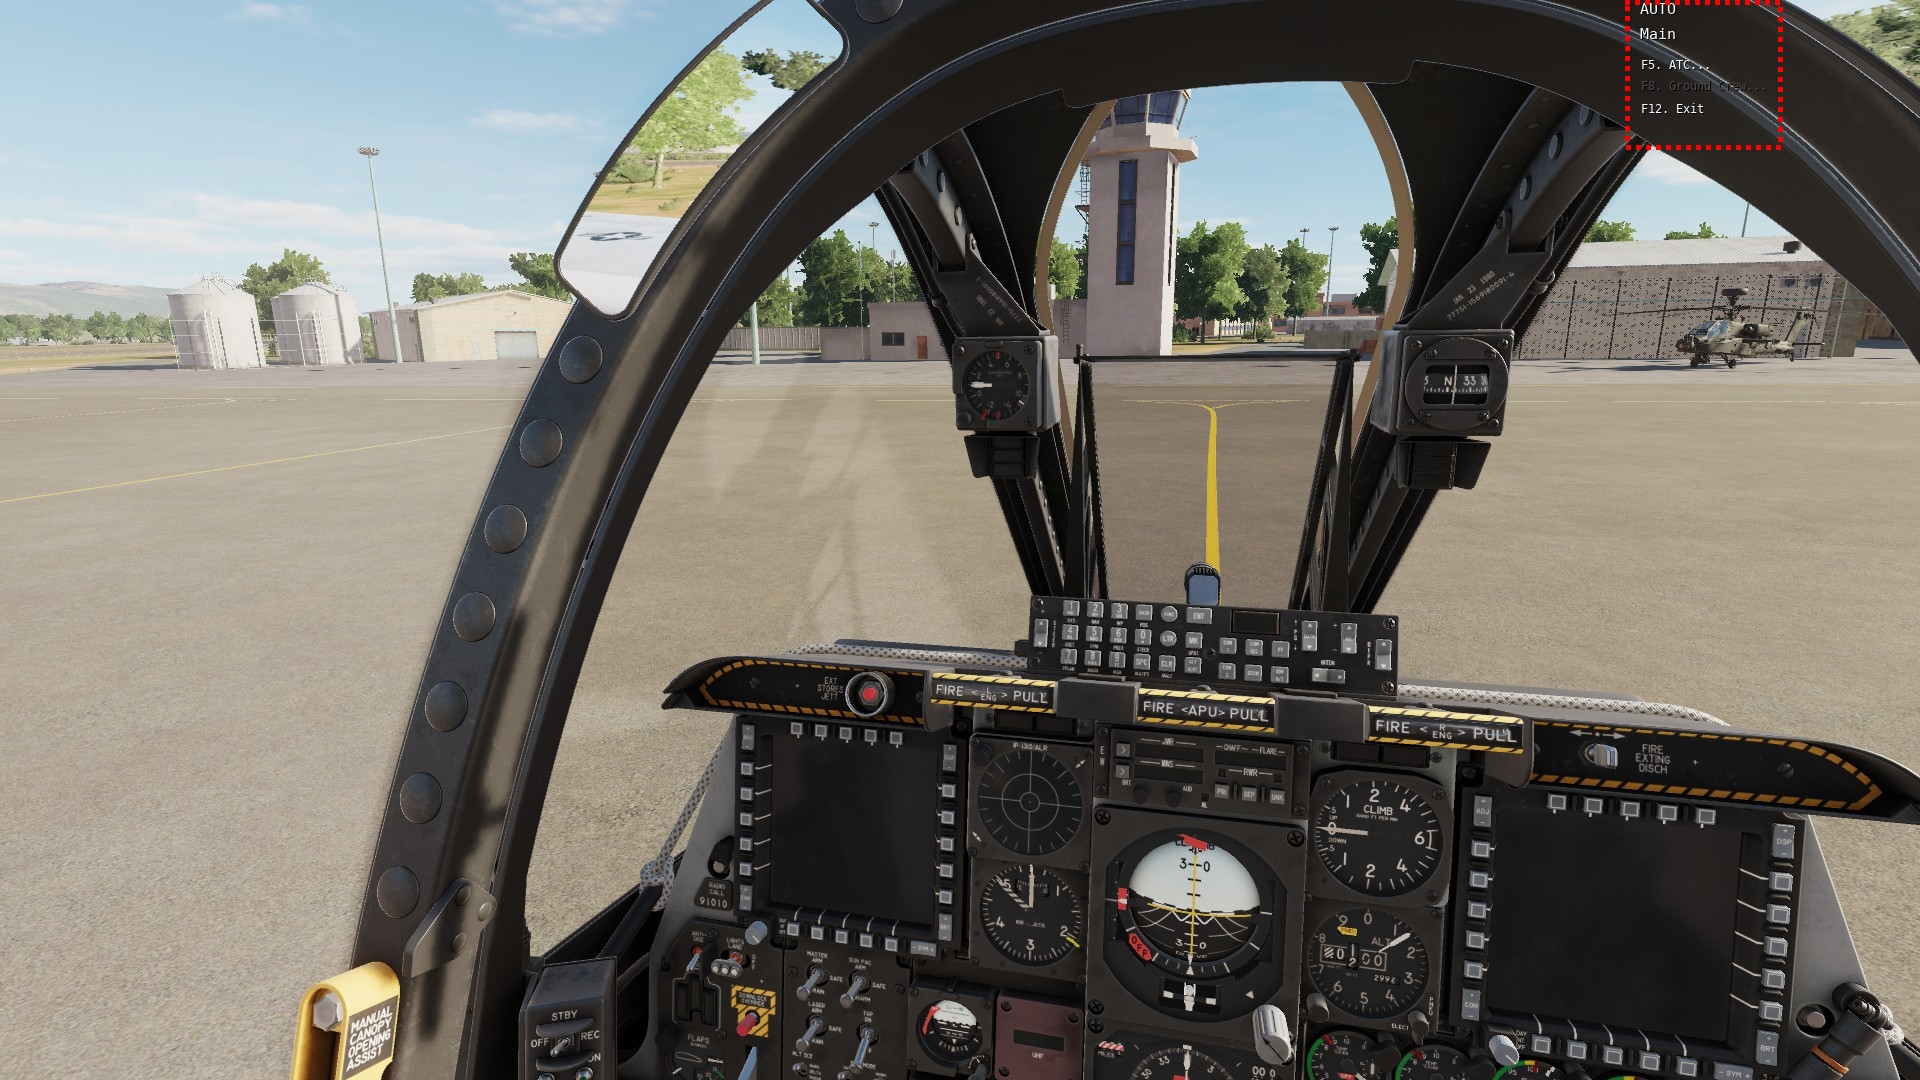
To get to the rearming screen, press #. This will open the communication menu in the top right corner.
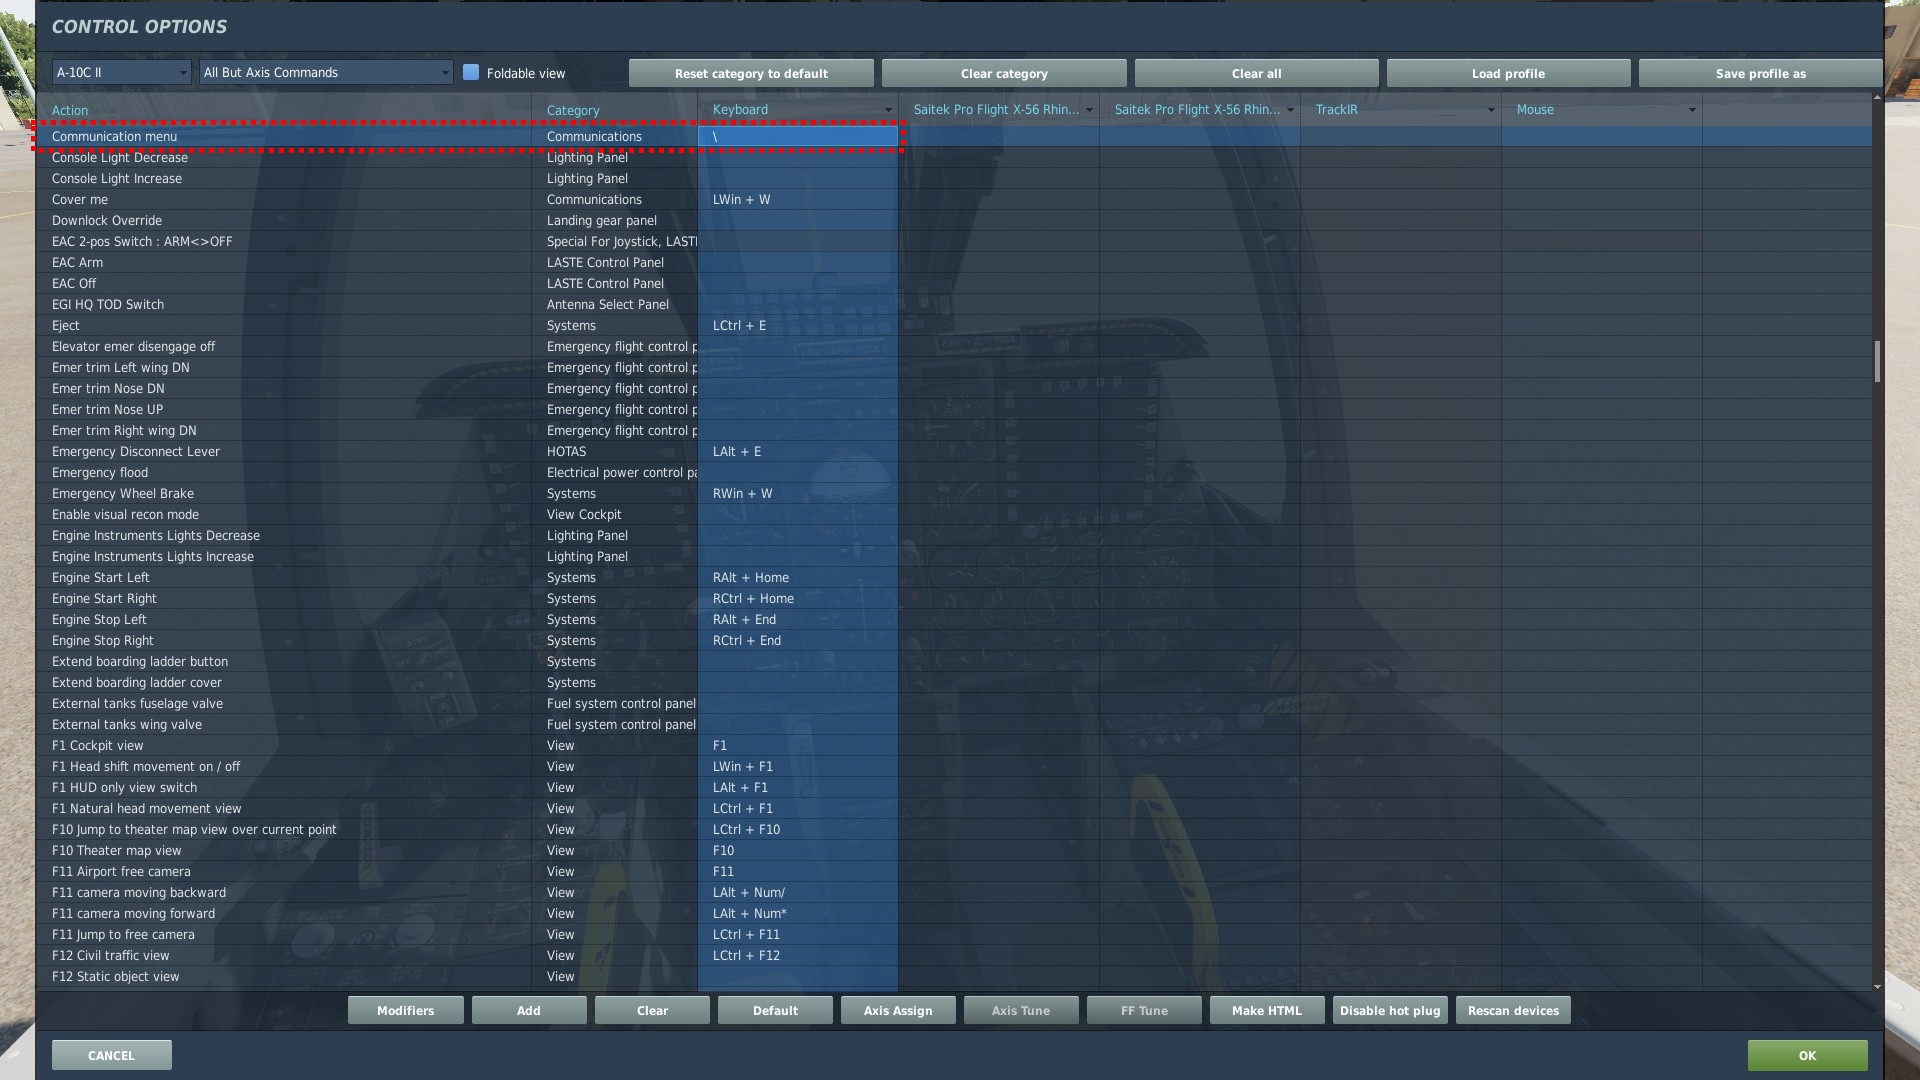
If the # key doesnt open the comms menu, check what keybind you have set for Communications menu".
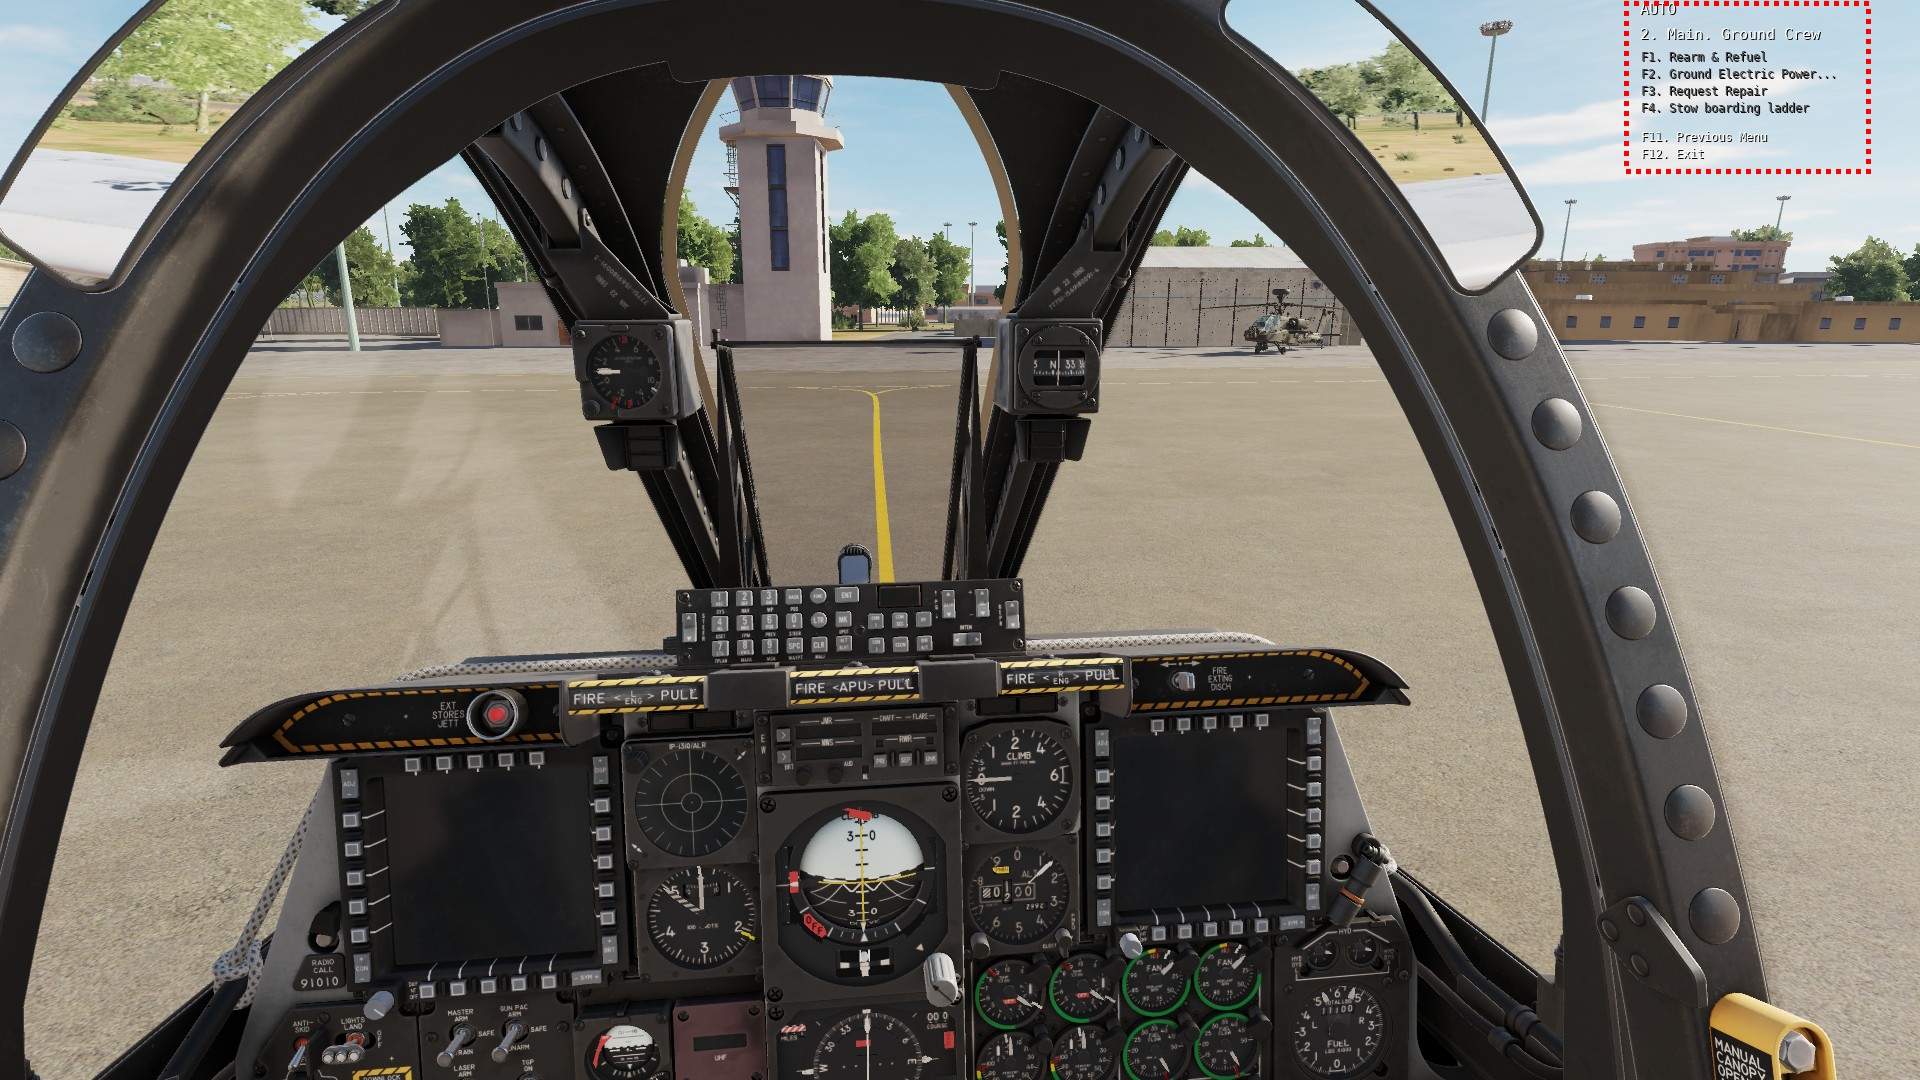
Now navigate to "Ground Crew" and then to "rearm and refuel".
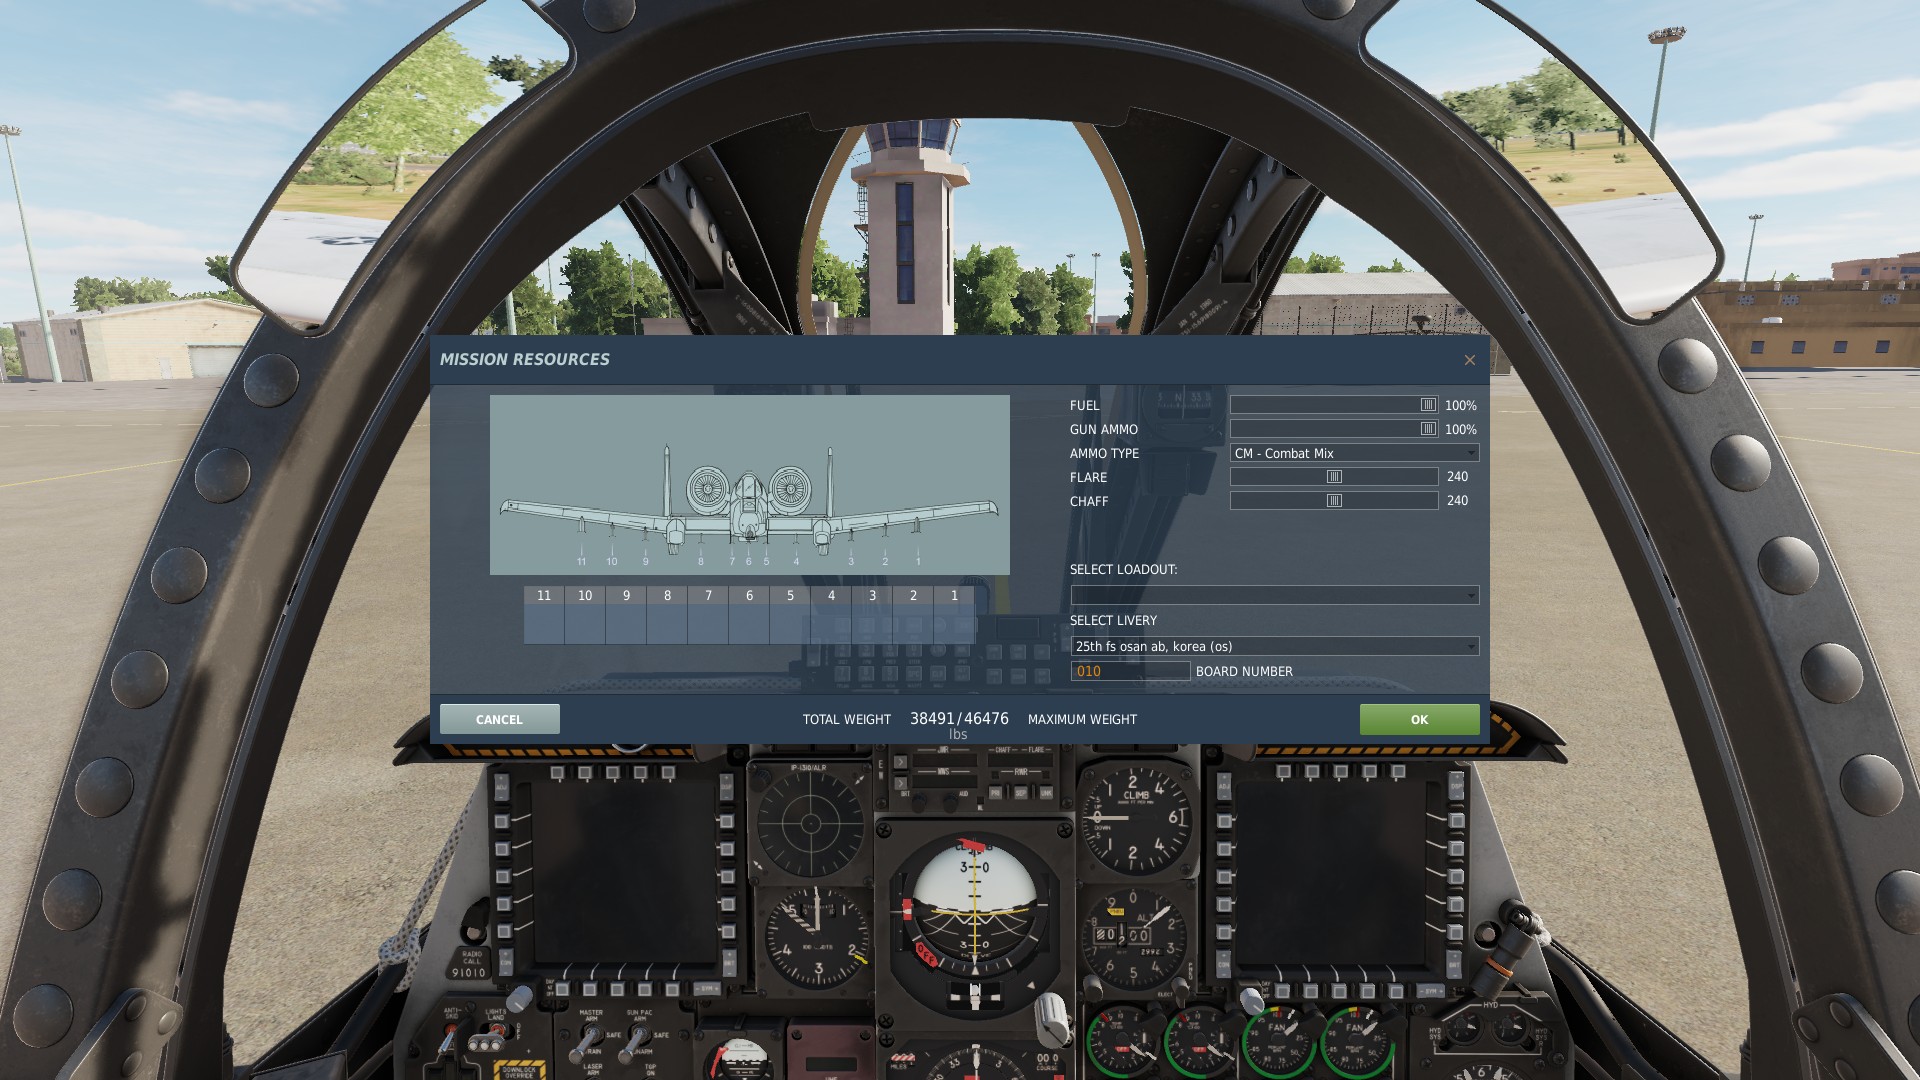
You will be presented with the following screen, allowing you to change livery, fuel, gun ammo, countermeasures and most importantly, load weapons.
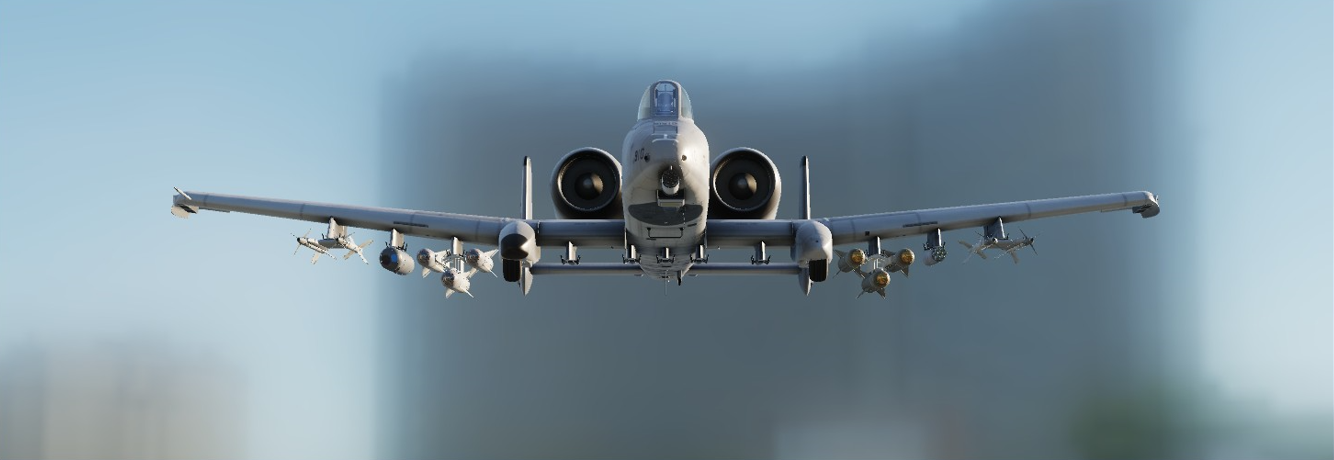
As a basic loadout, i would consider 4 AIM-9 M for selfdefence and because the jammers are close to useless. For air to ground work you definately need a TGP. Then i would also recommend to take 6 AGM-65s to deal with surface to air missiles or AAA.
To counteract the TGPs weight, i usually carry one pod of MPP APKWS to deal with AAA emplacements, but you can easily replace it with anything youd like to.
All other stations should be filled according to your missions needs.
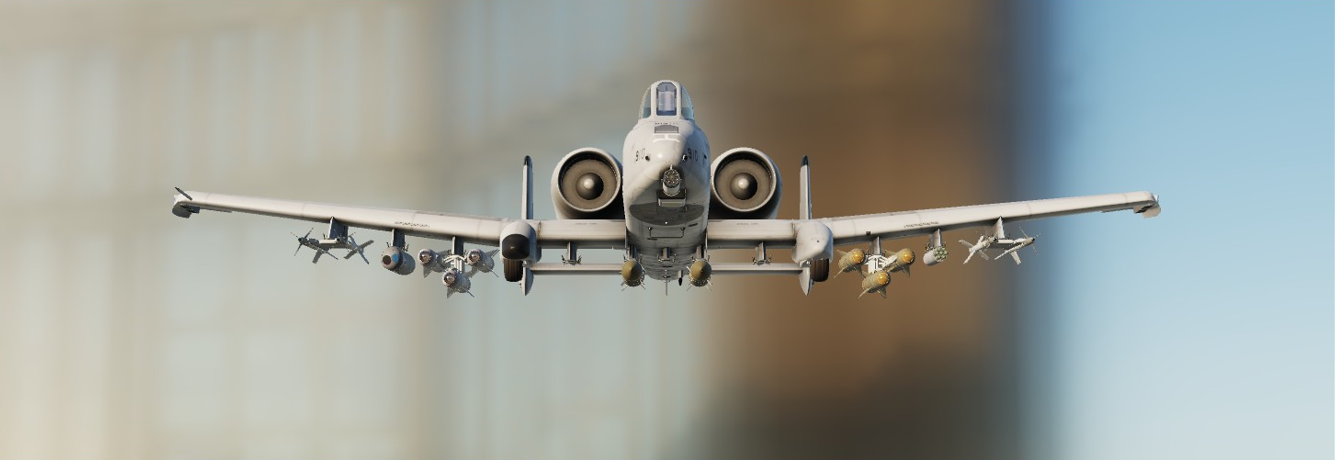
If you are going to strike a location that has bunkers or hardened structures, you will probably want to carry GBU-31(V)3/B penetrator bombs.
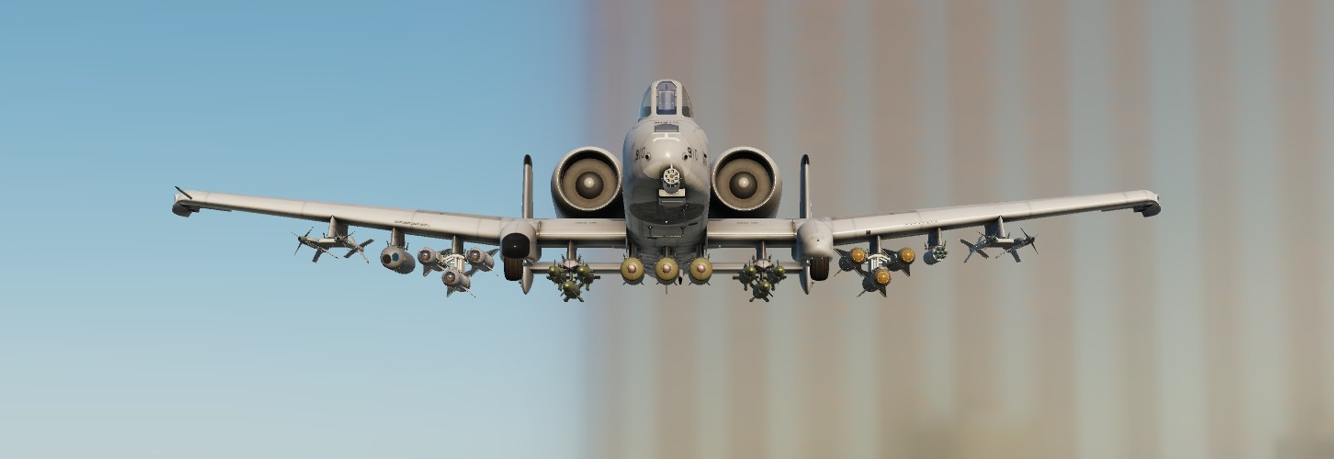
If youre destroying a larger number of enemy vehicles, id recommend to use CBU-105 and 97 clusterbombs for grouped enemies and GBU-12s for tanks that are standing alone.
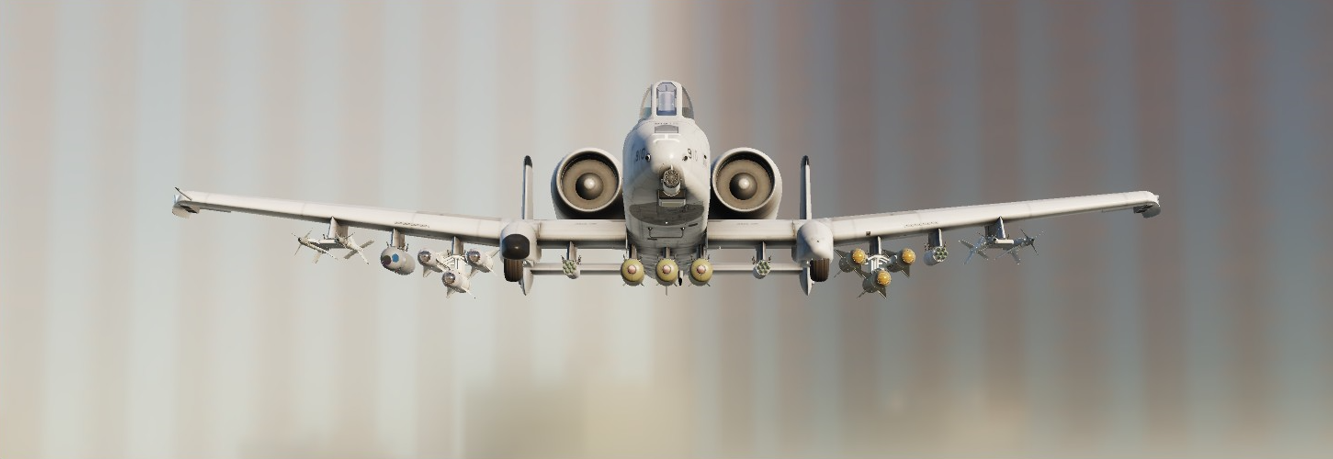
If i dont know what i am going up against, i usually just go with 105 and 97 clusterbombs and MPP APKWS.
IMPORTANT NOTE 1:
For nighttime missions, AGM-65 H and K will give you some trouble locking because they use a electro optical contrast seeker which is basically just a TV camera.
Use D or G Mavericks instead since they have a IR contrast seeker.
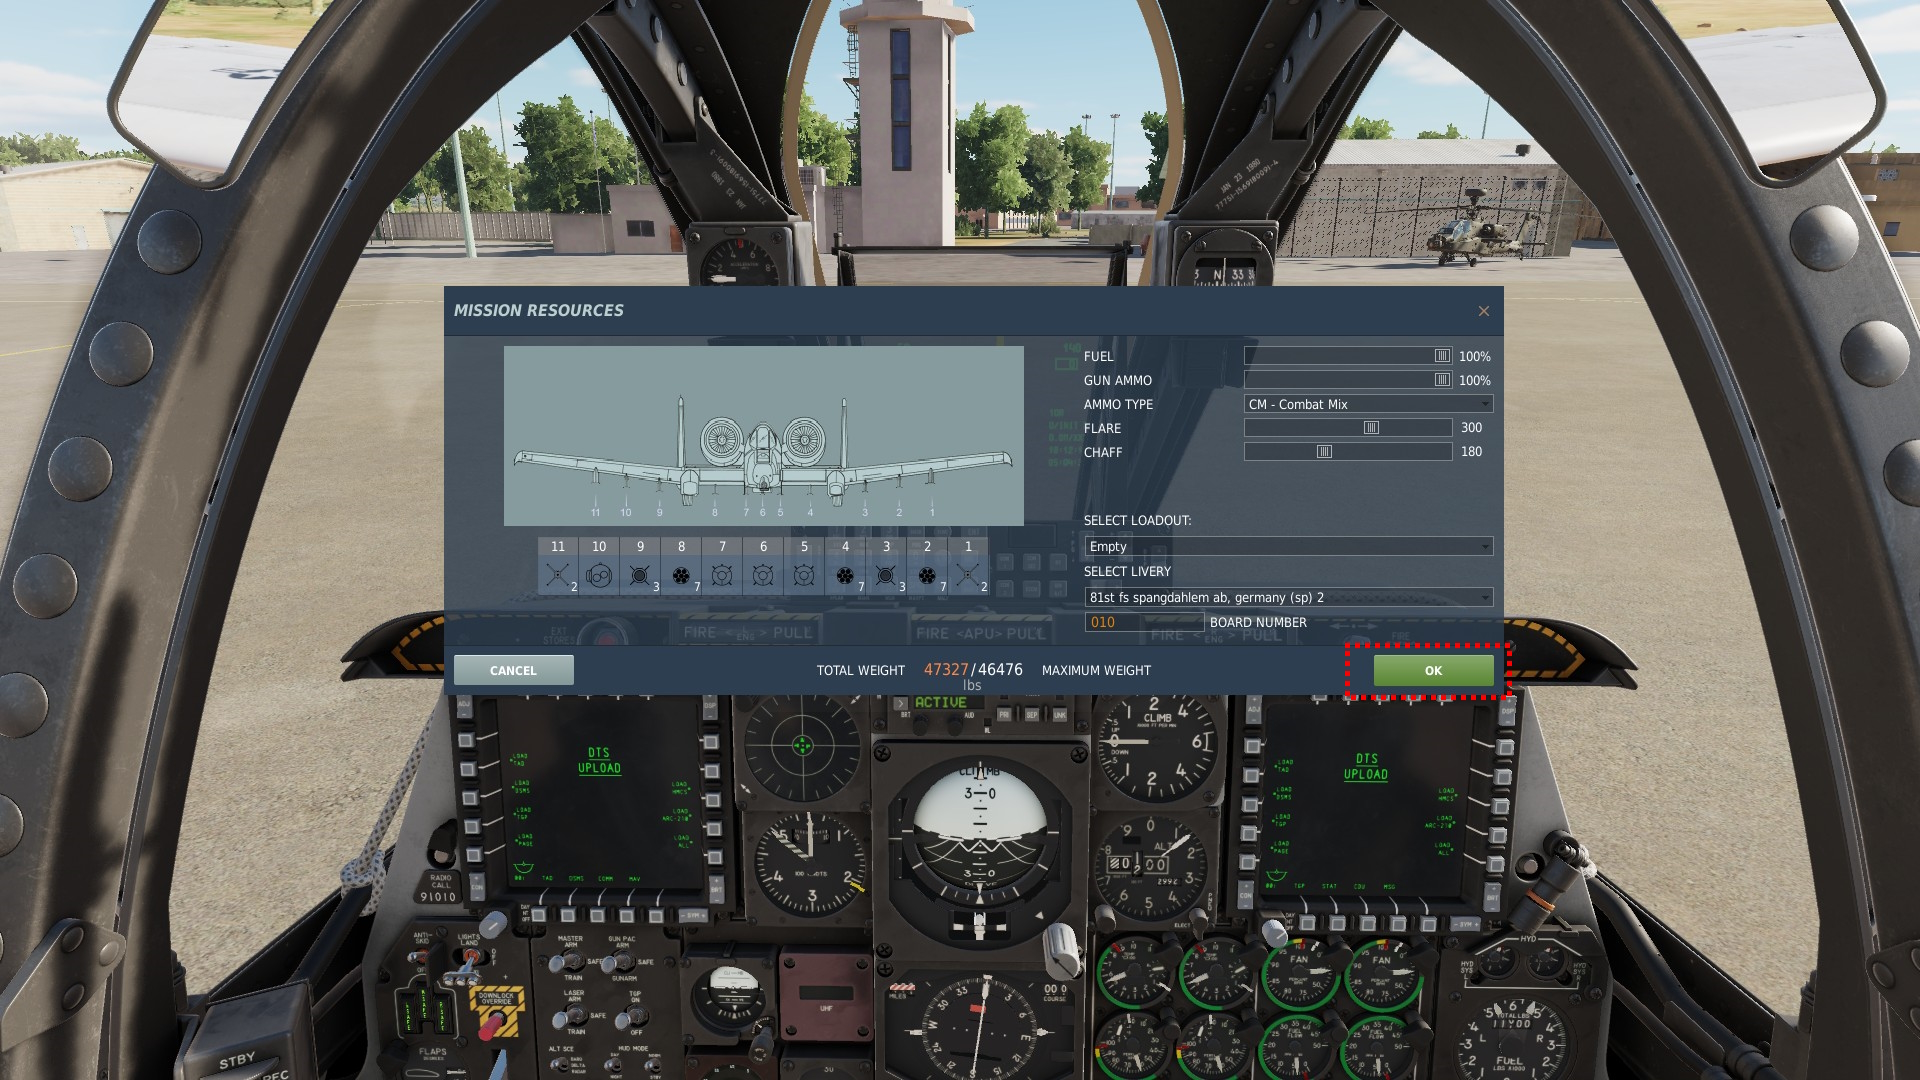
Once youre happy with your load, hit the OK button.
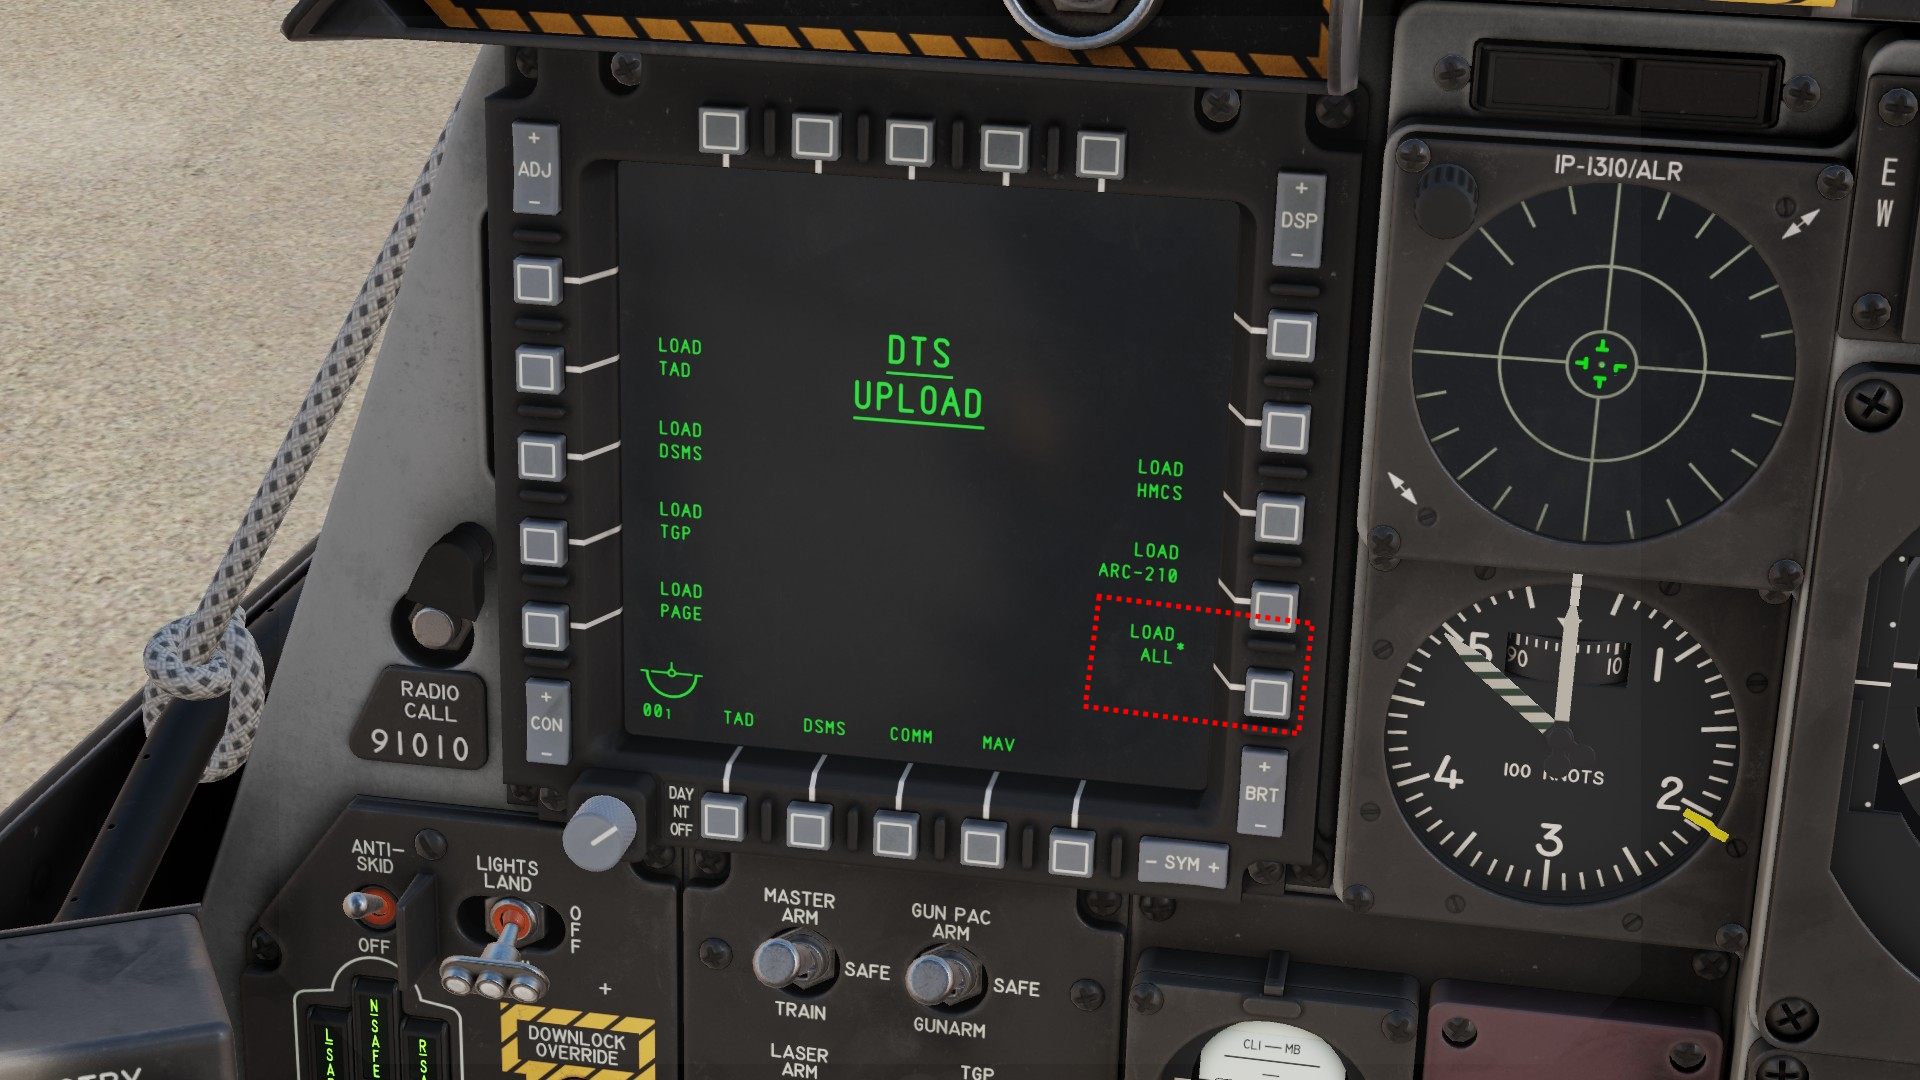
Once the ground crew says that theyre done with rearming, go to your left MFD and hit the LOAD ALL function key. Upon pressing them, most ✱ symbols next to other function keys will disappear.
Wait for them to reappear. This means that all weapon data has been loaded onto the aircraft and your DSMS page is populated.
IMPORTANT NOTE 2:
When rearming your plane after a mission, you will find that the LOAD menu has been replaced with the MAV menu.
To load new weapons stores into the DSMS, do the following (you do this after receiving new weapons from the ground crew).
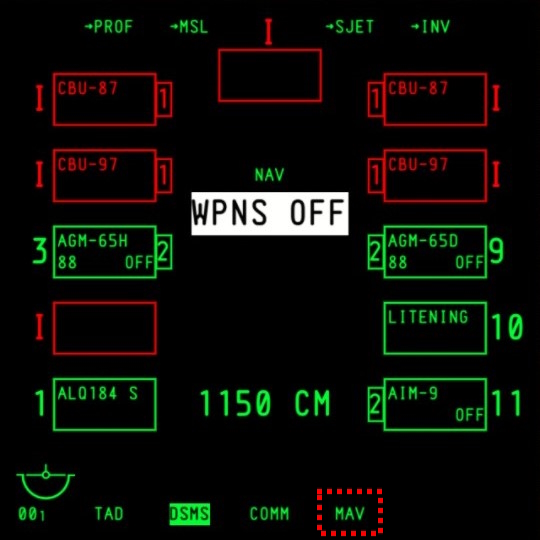 Press and hold any of the buttons at the bottom of your MFD. In our case i will press and hold the MAV key.
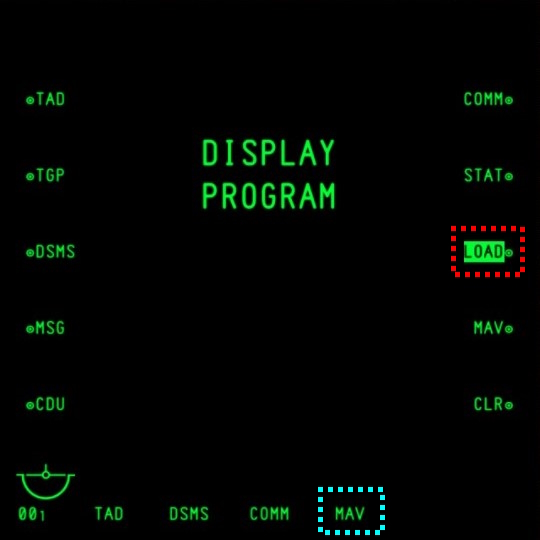 Now, press the LOAD key on the right side of the screen. After that, choose a menu to replace with the LOAD menu and press the function key under it.
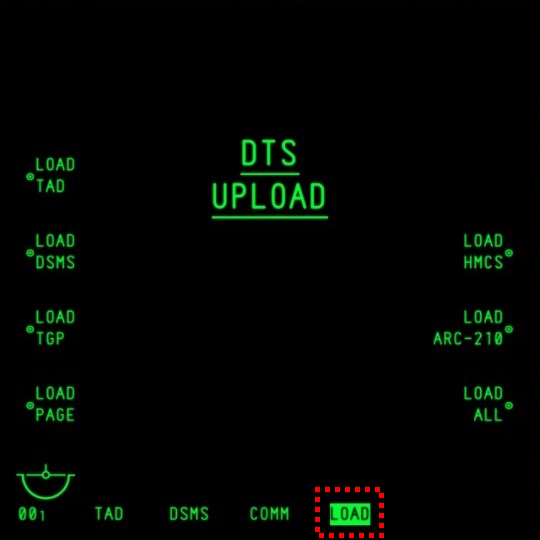 This way, you now have the LOAD menu back and can reload your DSMS. Of course, you can choose any other function to replace any of the preset ones (for example TGP on your left screen, TAD and DSMS on your right screen, etc.).
Weapon release modes - CCIP
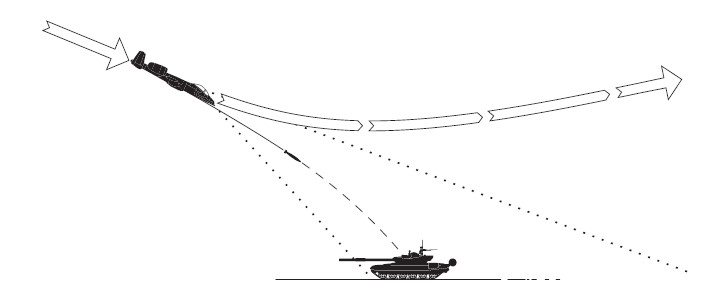
CCIP, abbreviated for computer-calculated impact point, is a release mode that works by projecting the expected impact point of the selected weapon on your HUD. It is then up to the pilot to maneuver the impact cue over the desired target during a divebombing-like maneuver.
Bomb CCIP
Bomb CCIP HUD Symbology
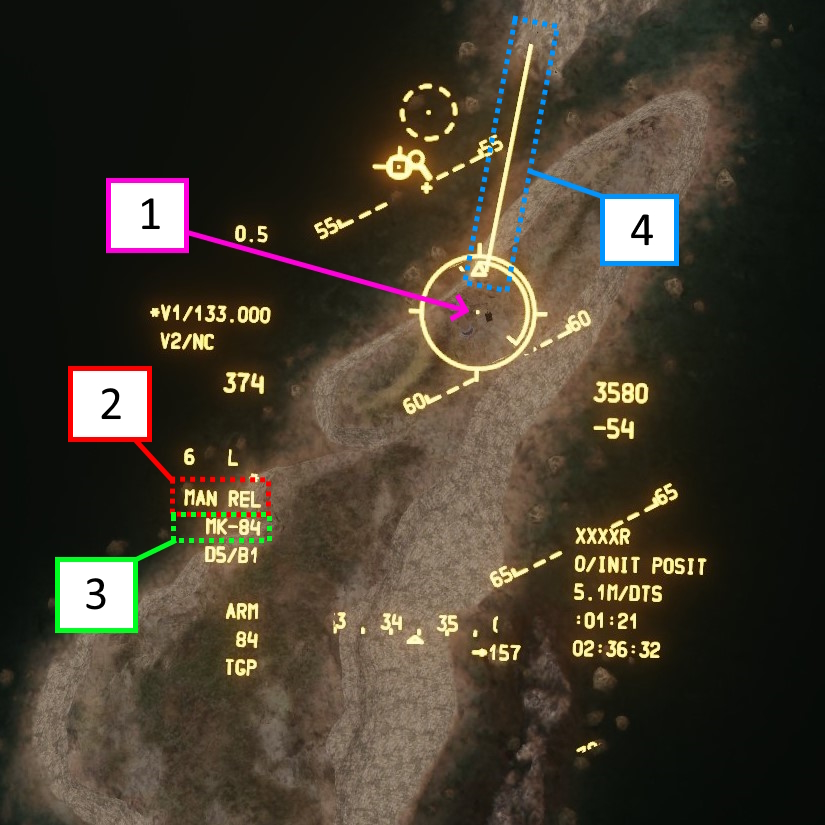
- Computer calculated impact point
- Release consent setting
- Selected weapon
- Projected weapon fall line
Using CCIP is quite simple.
When choosing a weapon, cycle to the CCIP HUD mode if you didnt already set the desired default release mode in the weapons profile.
At this point, the release consent setting will default to MAN REL or manual release. This means that whenever you press the button, the weapon will drop.
Enter a dive and place the computer calculated impact point over your target. If the impact point is ontop of your target, press weapon release and exit the dive by pulling up.
Rocket CCIP
Rocket CCIP HUD Symbology
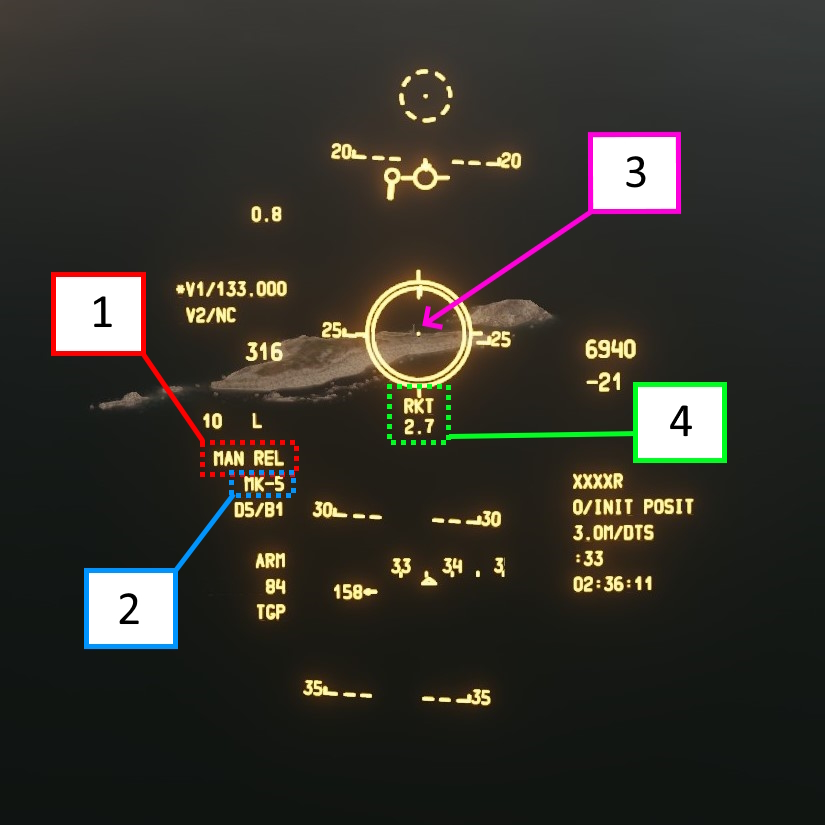
- Release consent setting
- Selected weapon
- Computer calculated impact point
- RKT indicator together with a range cue towards the impact point
Rocket CCIP is in its function identical to the regular bomb CCIP. Just move the impact point over the target and fire the rockets.
Note that the further you are away from your target, the less precise your rockets will be.
Weapon release modes - CCRP
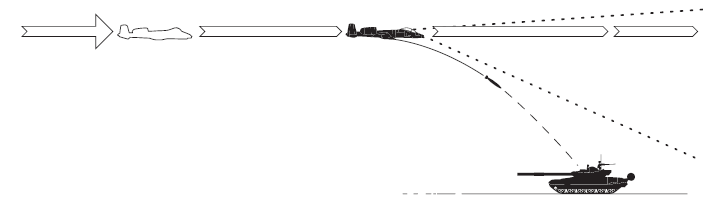
CCRP, computer-calculated release point, is your second release method. It doesnt involve a steep dive onto your target and allows you to stay at the same altitude while releasing your weapons.
While CCRP does require a somewhat deeper understanding of the aircrafts systems, it should be your go-to release method for all freefalling weapons.
CCRP for unguided and laser guided bombs
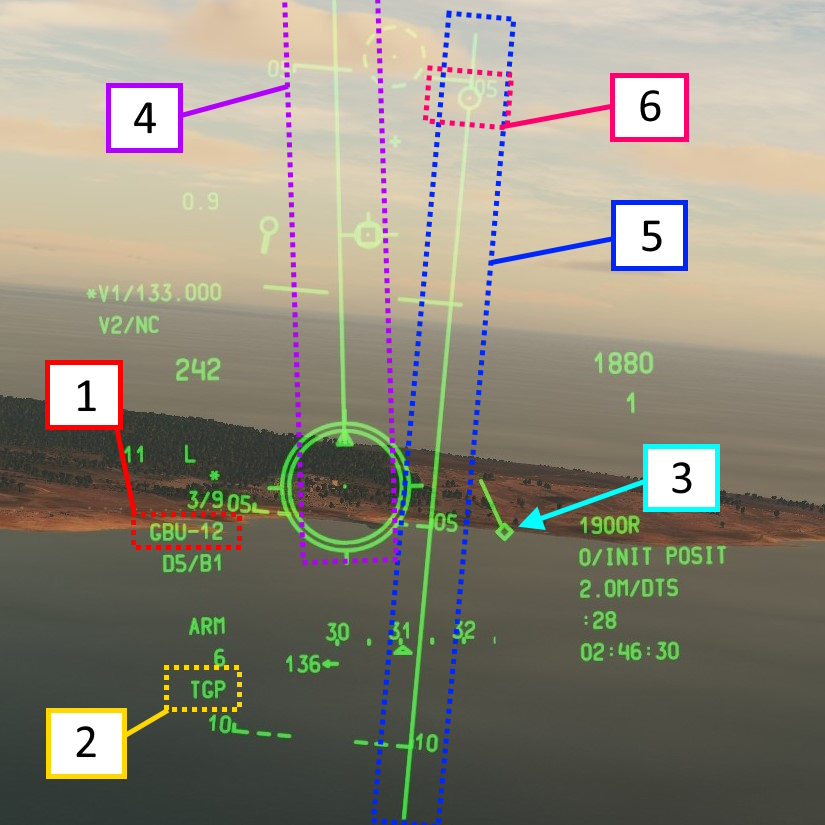
- Selected weapon
- SPI Source
- SPI
- Weapon fall line
- Azimuth steering line
- Solution que
After selecting a weapon in CCRP mode, you will see the symbology abover on your HUD. Take special not and ensure that you have selected your desired weapon and that the SPI is coming from the correct source. Note that the SPI may be outside your HUDs field of view.
Your goal will be to align both the weapon fall line and the azimith steering line as close as possible.
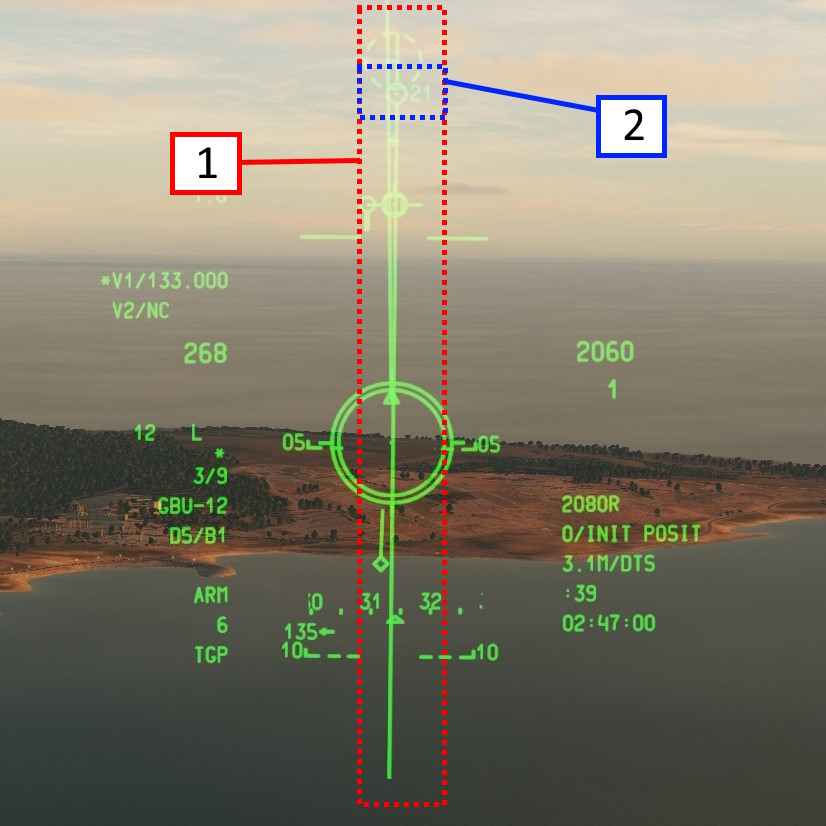
- Aligned azimuth steering line and weapon fall line
- Solution cue with timer
Once you have aligned the two lines as seen above, you will be flying towards your target. At a certain distance towards it, you will see a timer counting down from 21 appear next to the solution que.
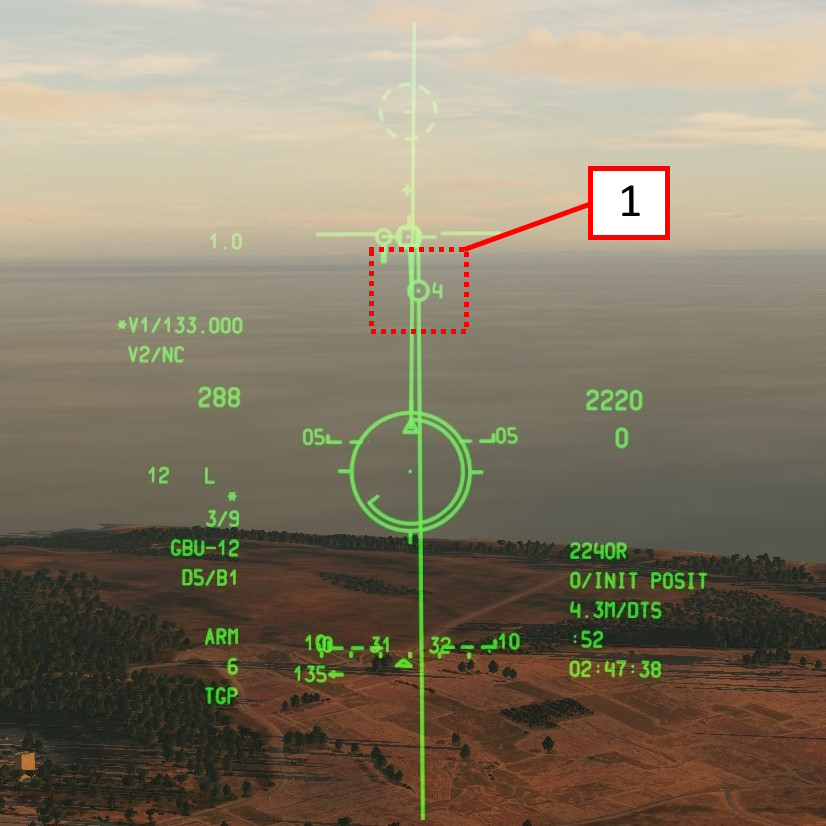
- Falling solution que
Once the timer hits 10, you want to press and hold your weapon release button until the weapon has dropped.
CCRP for GPS/INS bombs
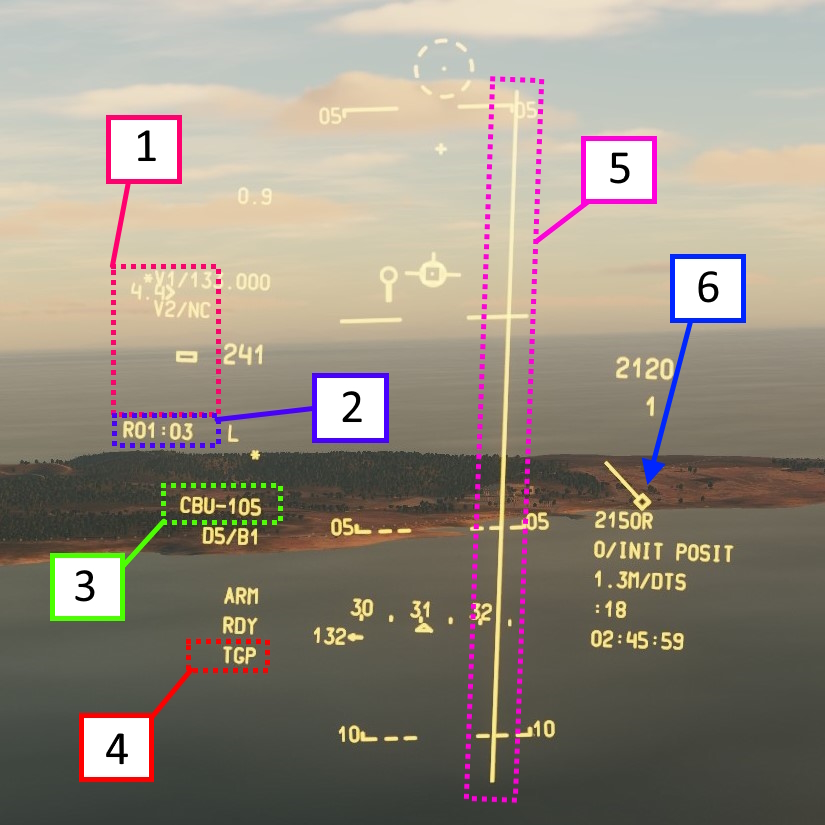
- Dynamic launch zone (will only appear at a certain distance to the target)
- Time to max range / Time to target
- Selected weapon
- SPI source
- Azimuth steering line
- SPI
After selecting a GPS/INS guided weapon CCRP will be your default release mode.
Ensure that the SPI source and location are correct and you have selected your desired weapon.
Similar to regular CCRP, you will be presented with a azimuth steering line once flying towards your SPI.
Once again, your goal will be to fly towards the azimuth steering line. A timer on the left side of your HUD will show you the estimated time to max release range.
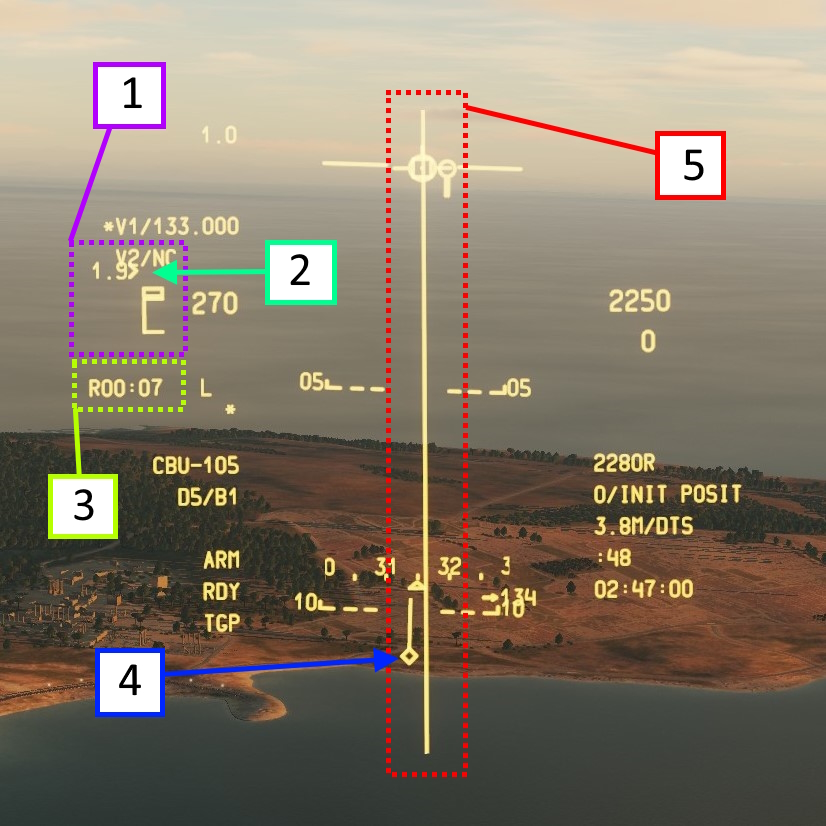
- Dynamic launch zone
- Current range indicator (in nautical miles)
- Time to max release range
- SPI
- Azimuth steering line
On the left side of your HUD, a dynamic launch zone will appear. The top end of the zone shows the maximum release range, the bottom end the minimum release range. The current range indicator shows your position within the launch zone and the distance to target.
Below the DLZ, a timer will show you the time until you reach the maximum launch zone. Once you are within it, the timer will show the time to target.
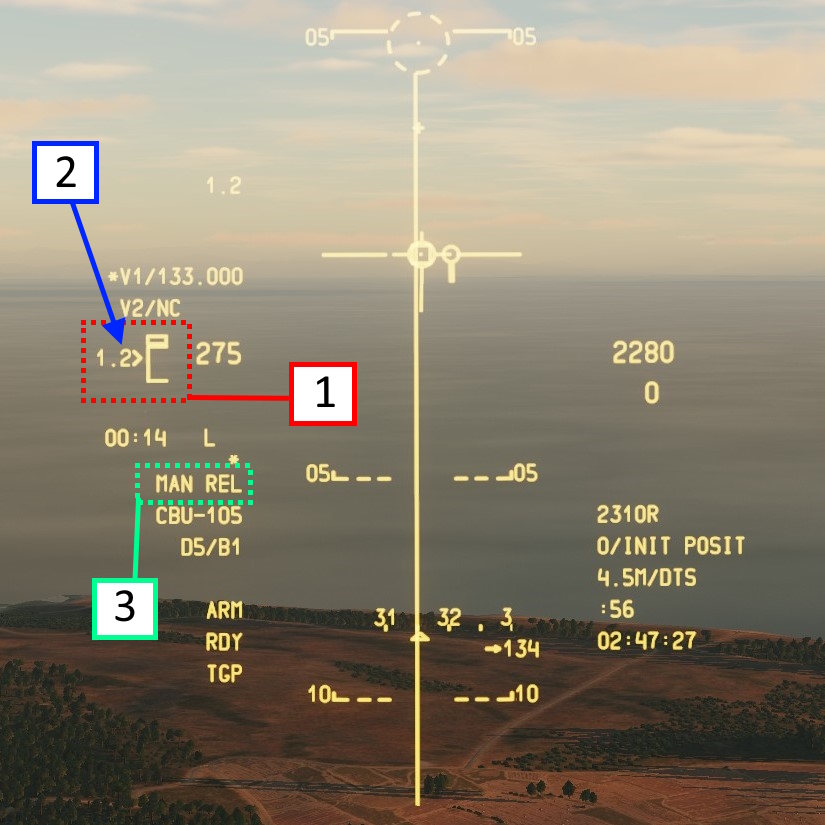
- Dynamic launch zone
- Range indicator withing DLZ
- MAN REL cue
Once youre withing release range, a MAN REL cue will appear. At this point you can press and hold weapon release until the weapon dropped
CCRP for unguided rockets
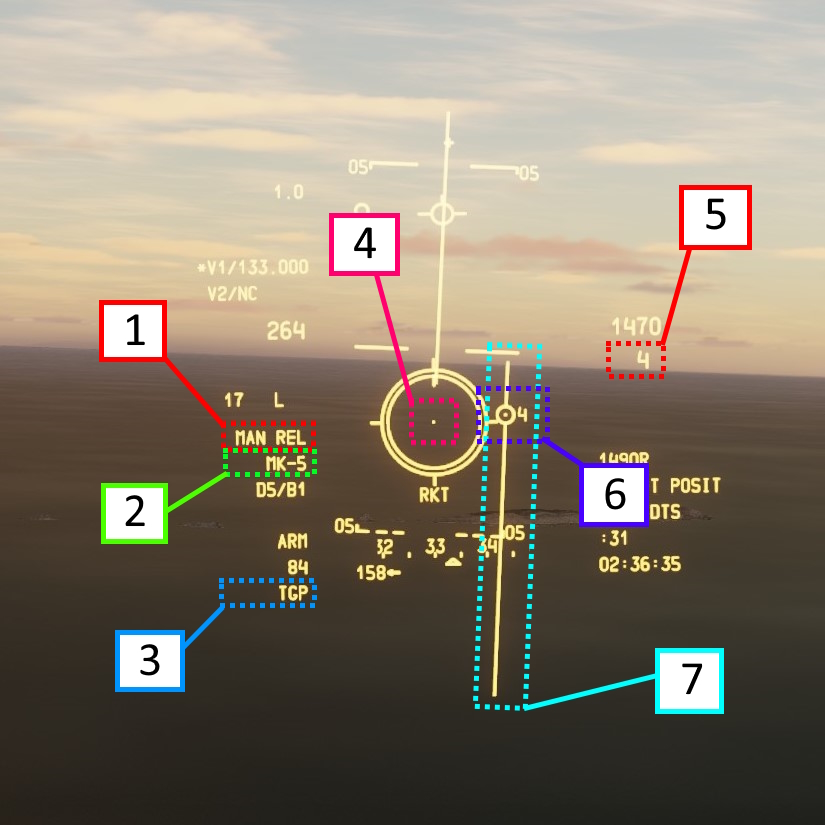
- Release consent setting
- Selected weapon
- SPI source
- Rocket pipper center
- Flight Path Angle indicator
- Solution cue with optimal release angle
- Azimuth steering line
Rocket CCRP will shoot rockets at your selected SPI.
Select your rockets and set your weapons release mode to CCRP with the Hotas Master Mode Button.
Fly towards your azimuth steering line.
The solution cue will show the desired release angle next to it. Pull your aircrafts nose up until your flight path angle indicator and the number next to the solution cue are identical.
Move the center of your rocket pipper over the solution cue.
If you followed these steps, the symbology should be similar to the one below.
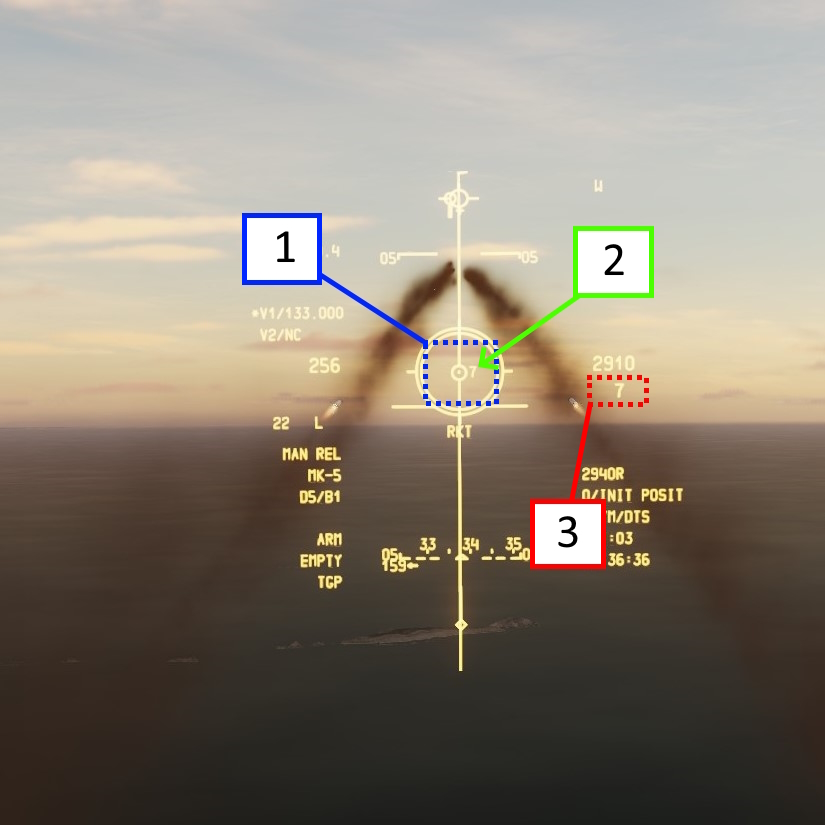
Note, that the rocket pippers center is over the solution cue (1) and the optimual release angle (2) is the same as your flight path angle (3).
You can ripple (release multiple weapons in one pass) multiple GPS/INS guided weapons to multiple targets by using markpoints. The only constraint youre facing is that all targets need to be reasonably close to each other.
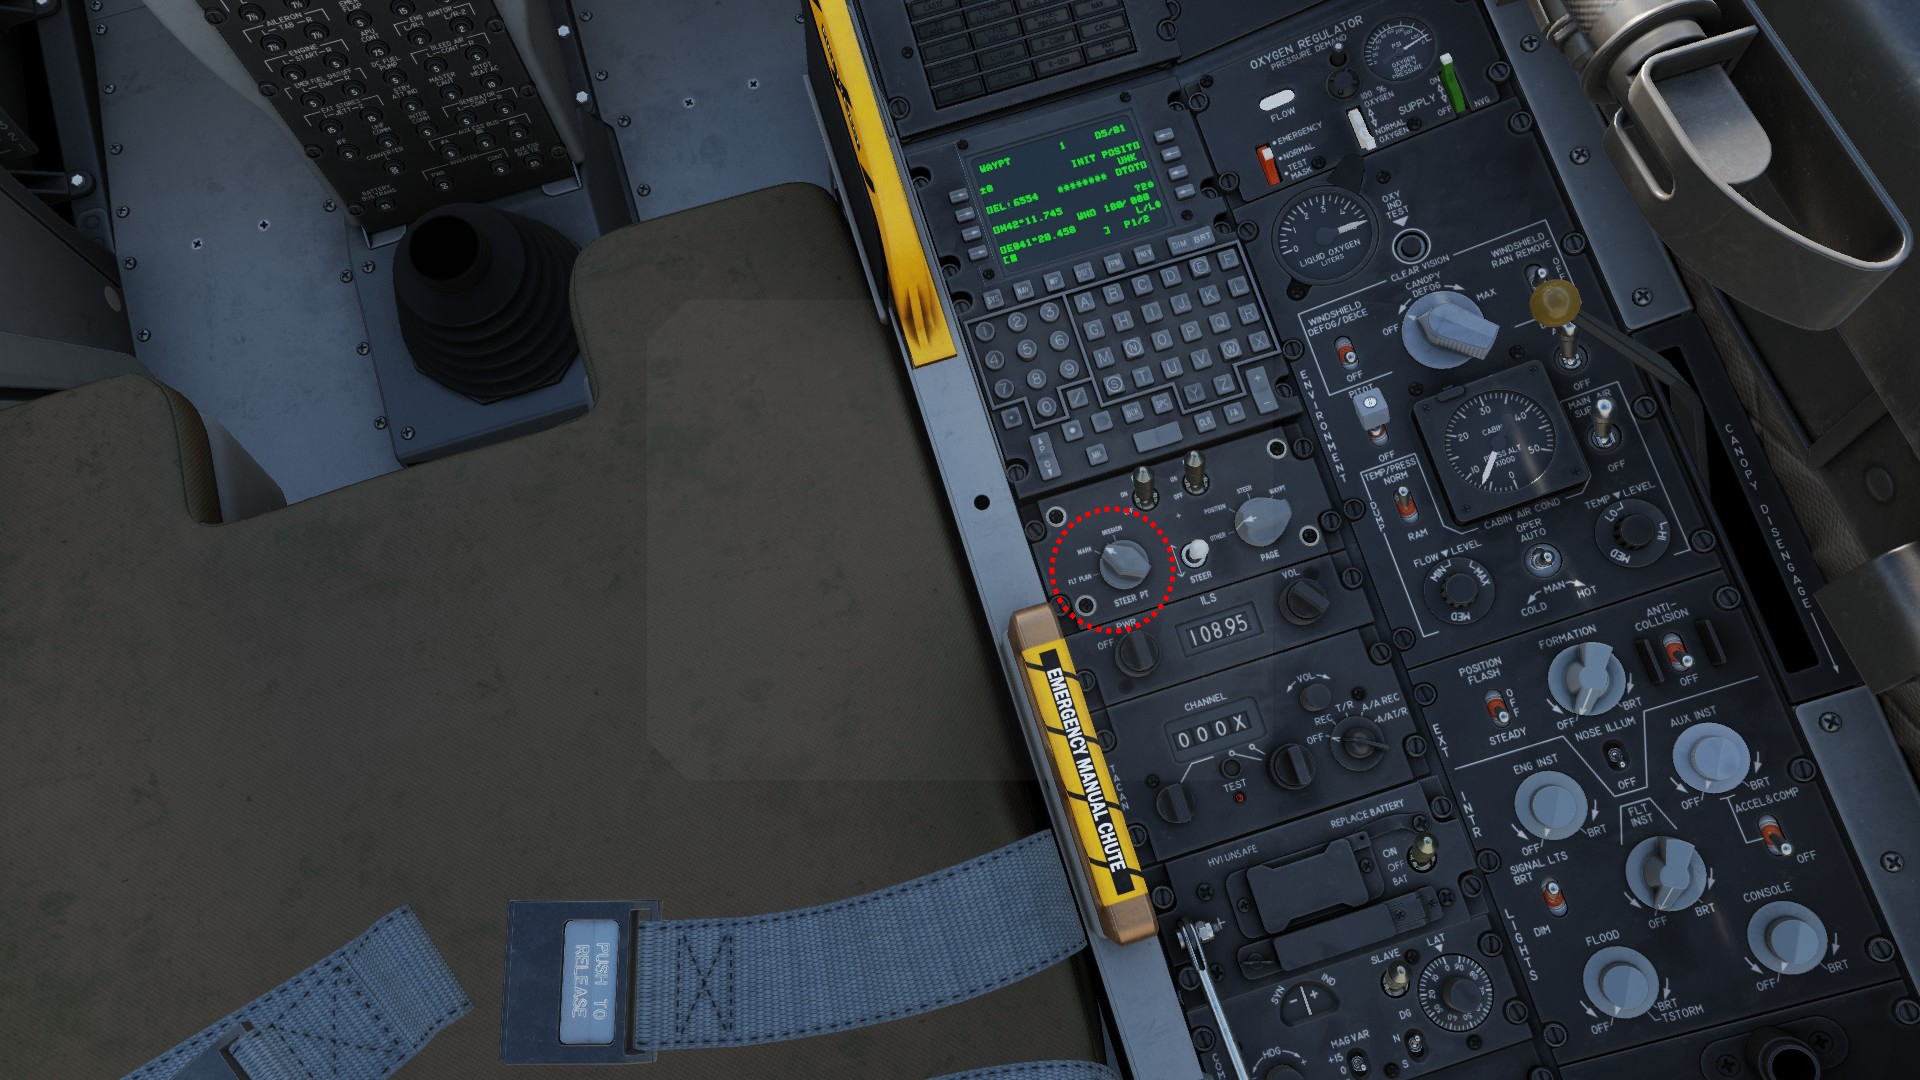
First, set you Steer Point Knob to MARK.
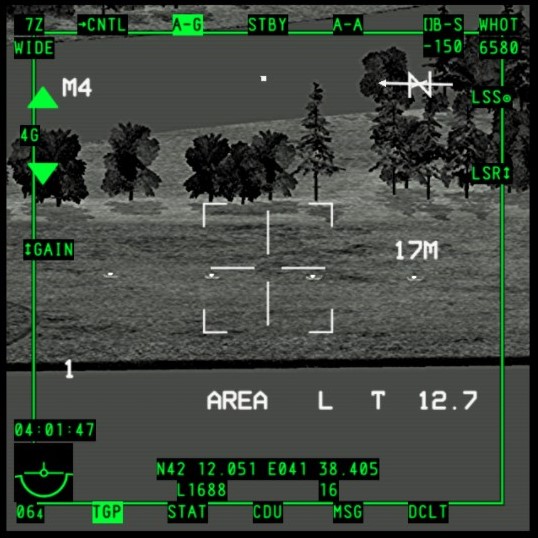 Next find your targets. Make sure that the targets are close to each other so you can reach them with your weapons without changing course.
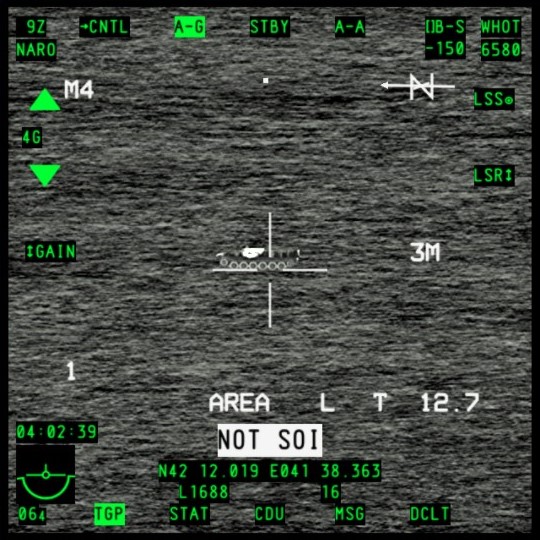 Set Markpoints. I will go in further detail on Markpoints in their own chapter, but for now all you need to know is that you move your TGP over your target and press HOTAS TMS right short while having your TGP SOI.
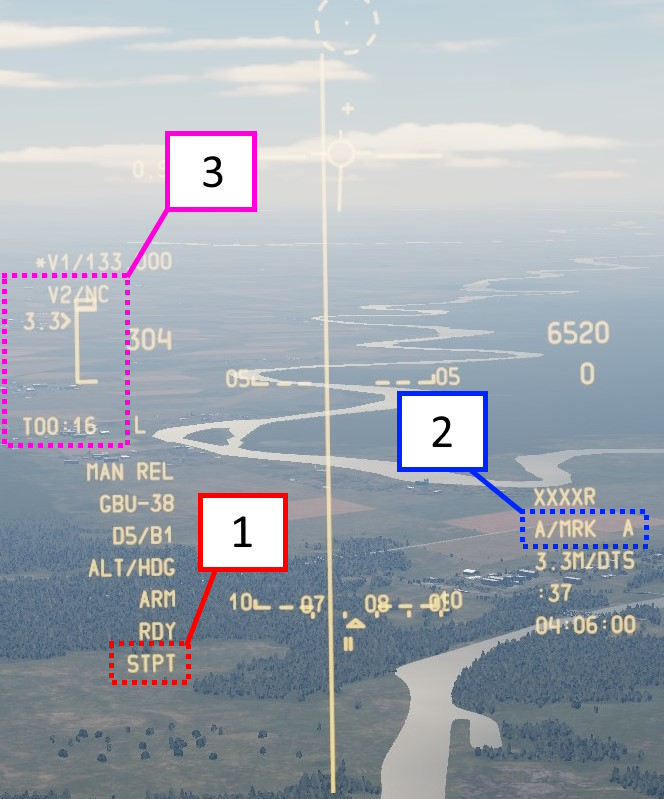
- Steerpoint Indicator
- Selected Steerpoint
- Dynamic launch zone
Next, make sure that your SPI is coming from your Steerpoint, which we have earlier set to be a markpoint.
Make sure that your selected Steerpoint is the Markpoint of your first target.
Fly withing the dynamic launch zone.
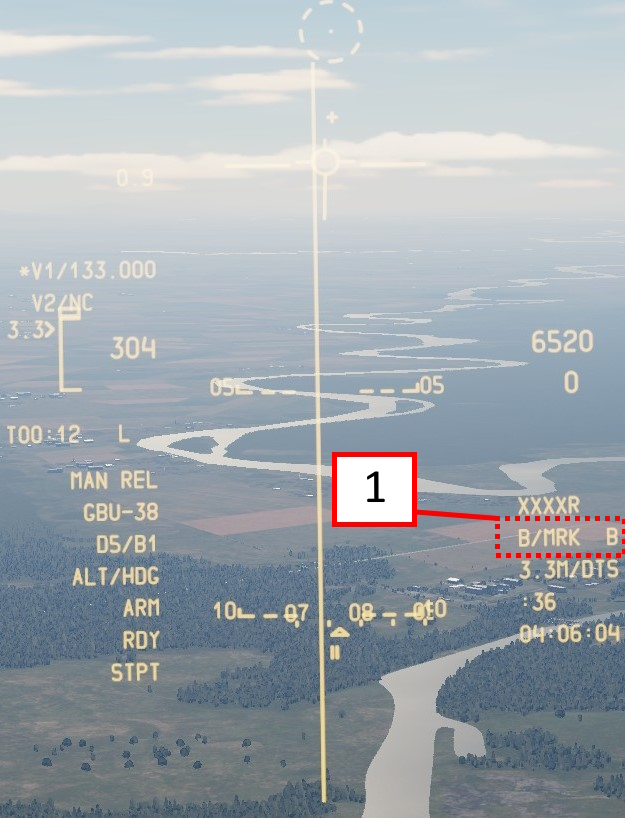
- Steerpoint Indicator
Once withing DLZ, release your first weapon and press AAP STEER Switch UP (or down) to get to your next targets markpoint. Alternatively to AAP STEER Switch UP you can also use the UFC STEER UP/DOWN Rocker Switch.
Release your next weapon and repeat this step until you are either out of weapons, out of targets or leftthe DLZ.
HUD
Your HUD or Heads Up Display is your main source of information. Is sends all of the important information straight to your field of view.
Navigation
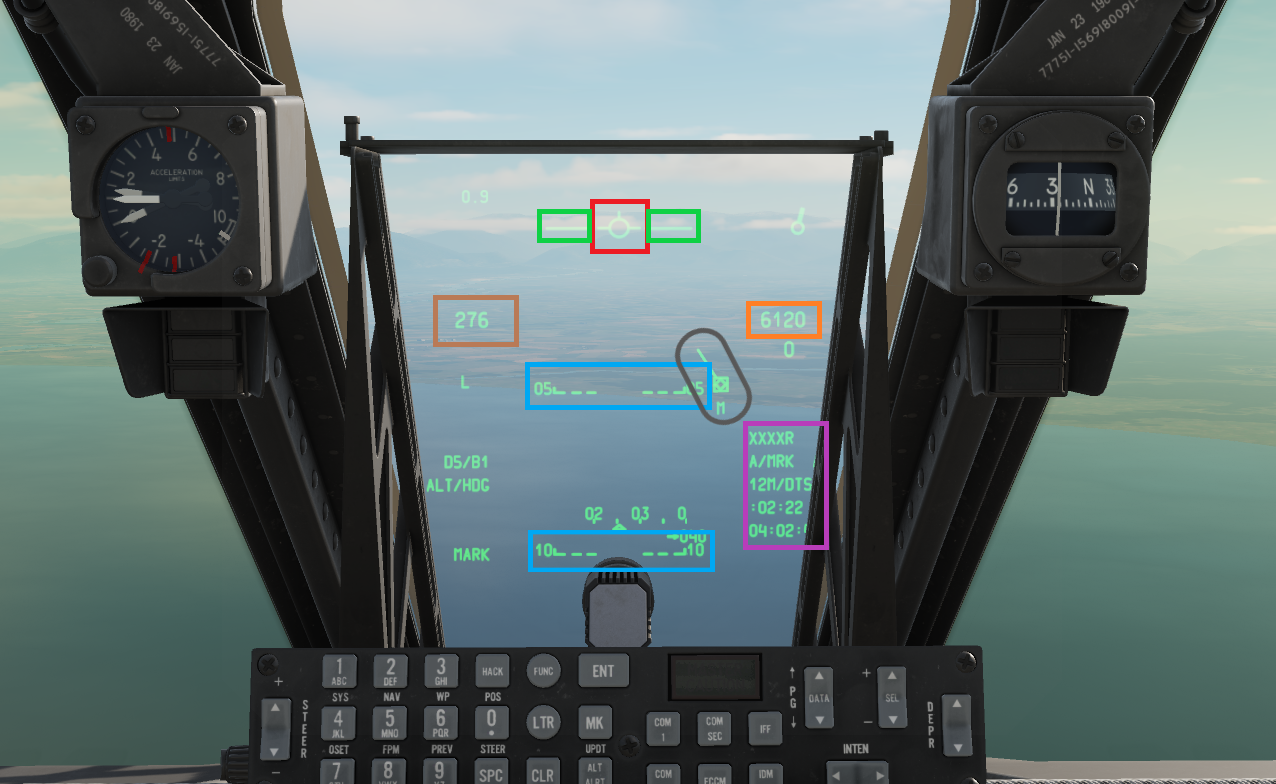
Green: Horizon indicator - Shows where the horizon is. The horizon has a 0 degree ascend and descend rate.
Red: Velocity vector - Shows where youre aircraft is currently moving towards
Orange: Altitude in feet
Brown: Airspeed in knots
Blue: Flight Path Ladder - Shows you the ascend (full line) or descent rate (dotted line) of your aircraft. A numeric representation of the rate is given on the sides.
Purple: Steerpoint information - Most important is the second line showing the selected Steerpoint (here Markpoint A) and the first half of the third line showing the distance to said Steerpoint (here 12 miles)
Black: Steerpoint - Representation of the Steerpoint (here with TGP inside)
Weapons
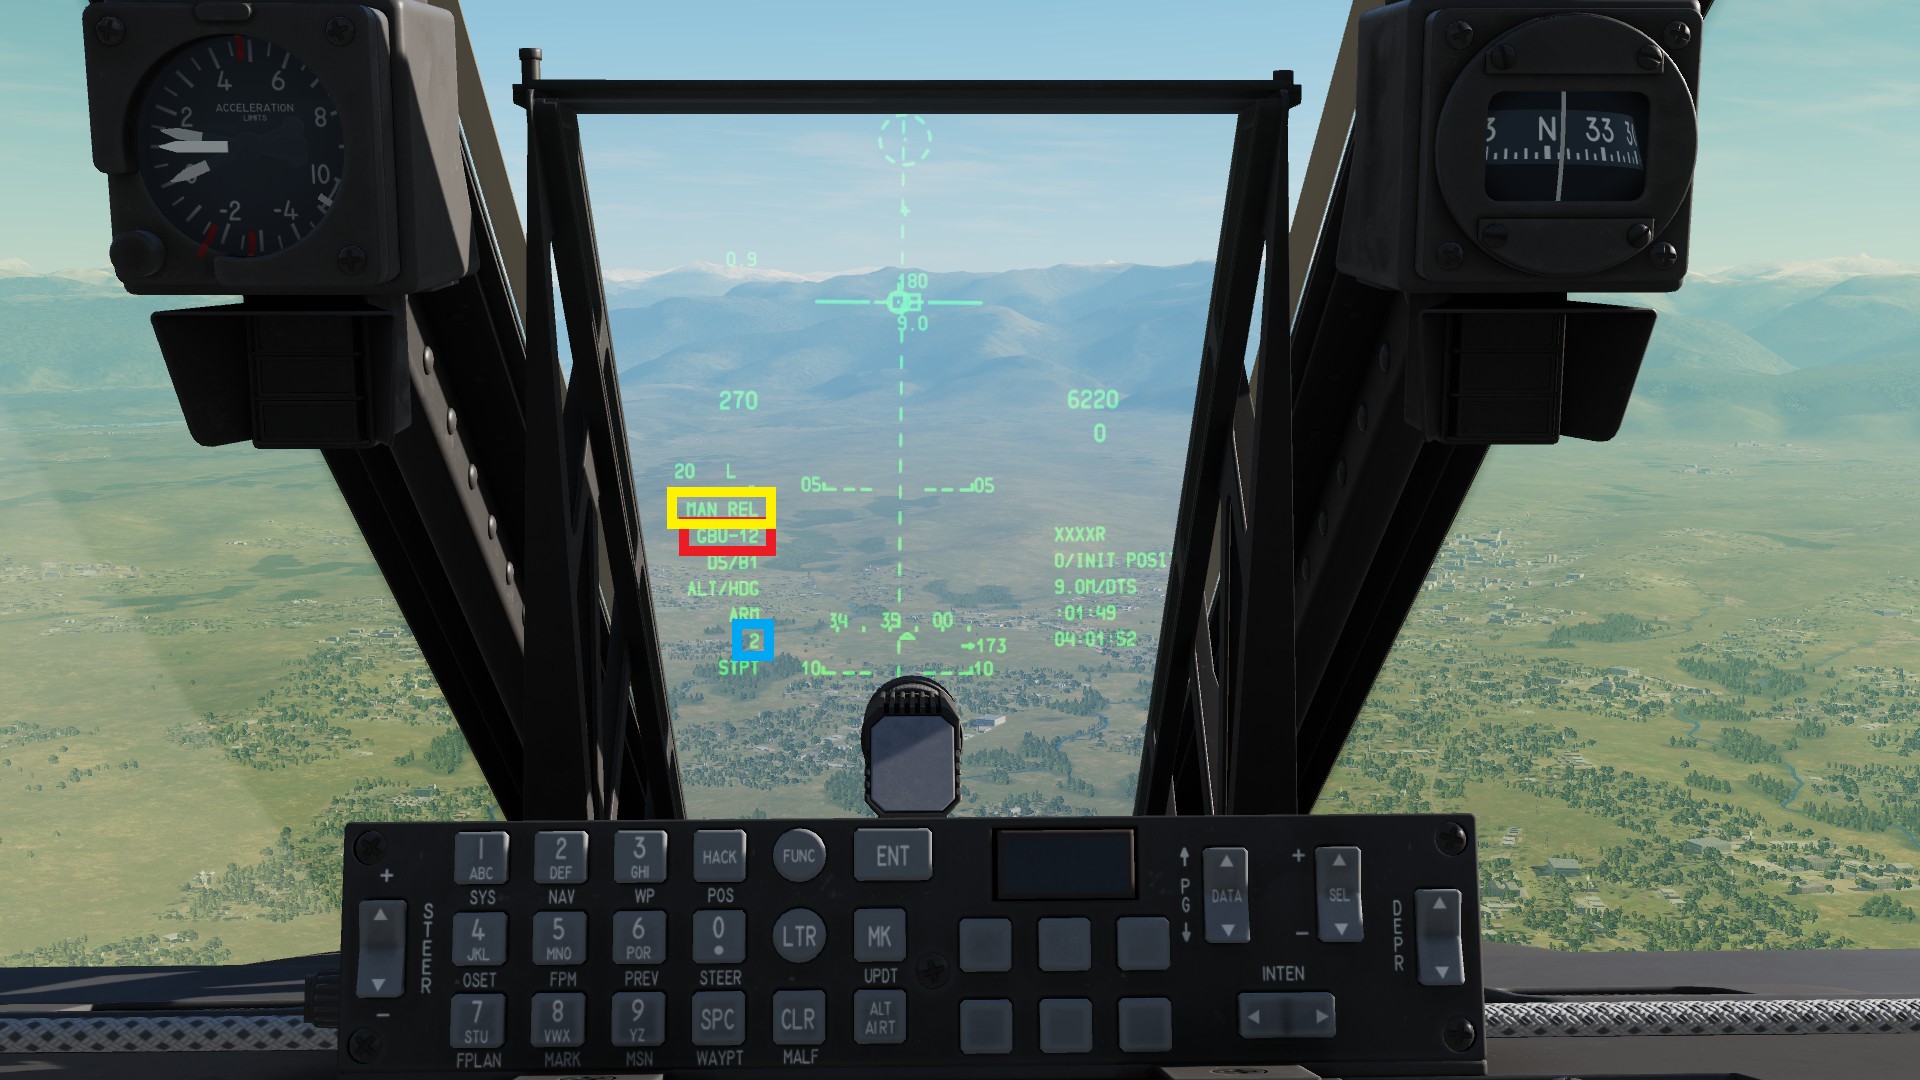
Yellow: Indicates the release mode
Red: Indicates the selected weapon profile
Blue: Indicates the station that will fire
Weapon specific information will be discussed in the corresponding chapter
DSMS
The digital storage management system or DSMS has the primary function of showing you what and how many weapons you have, as well as indicating their status. In addition to that, you can change the weapons settings and jettison (drop them withouth the intent of engaging enemies) selected weapons.
Needed controlsLoading your DSMS
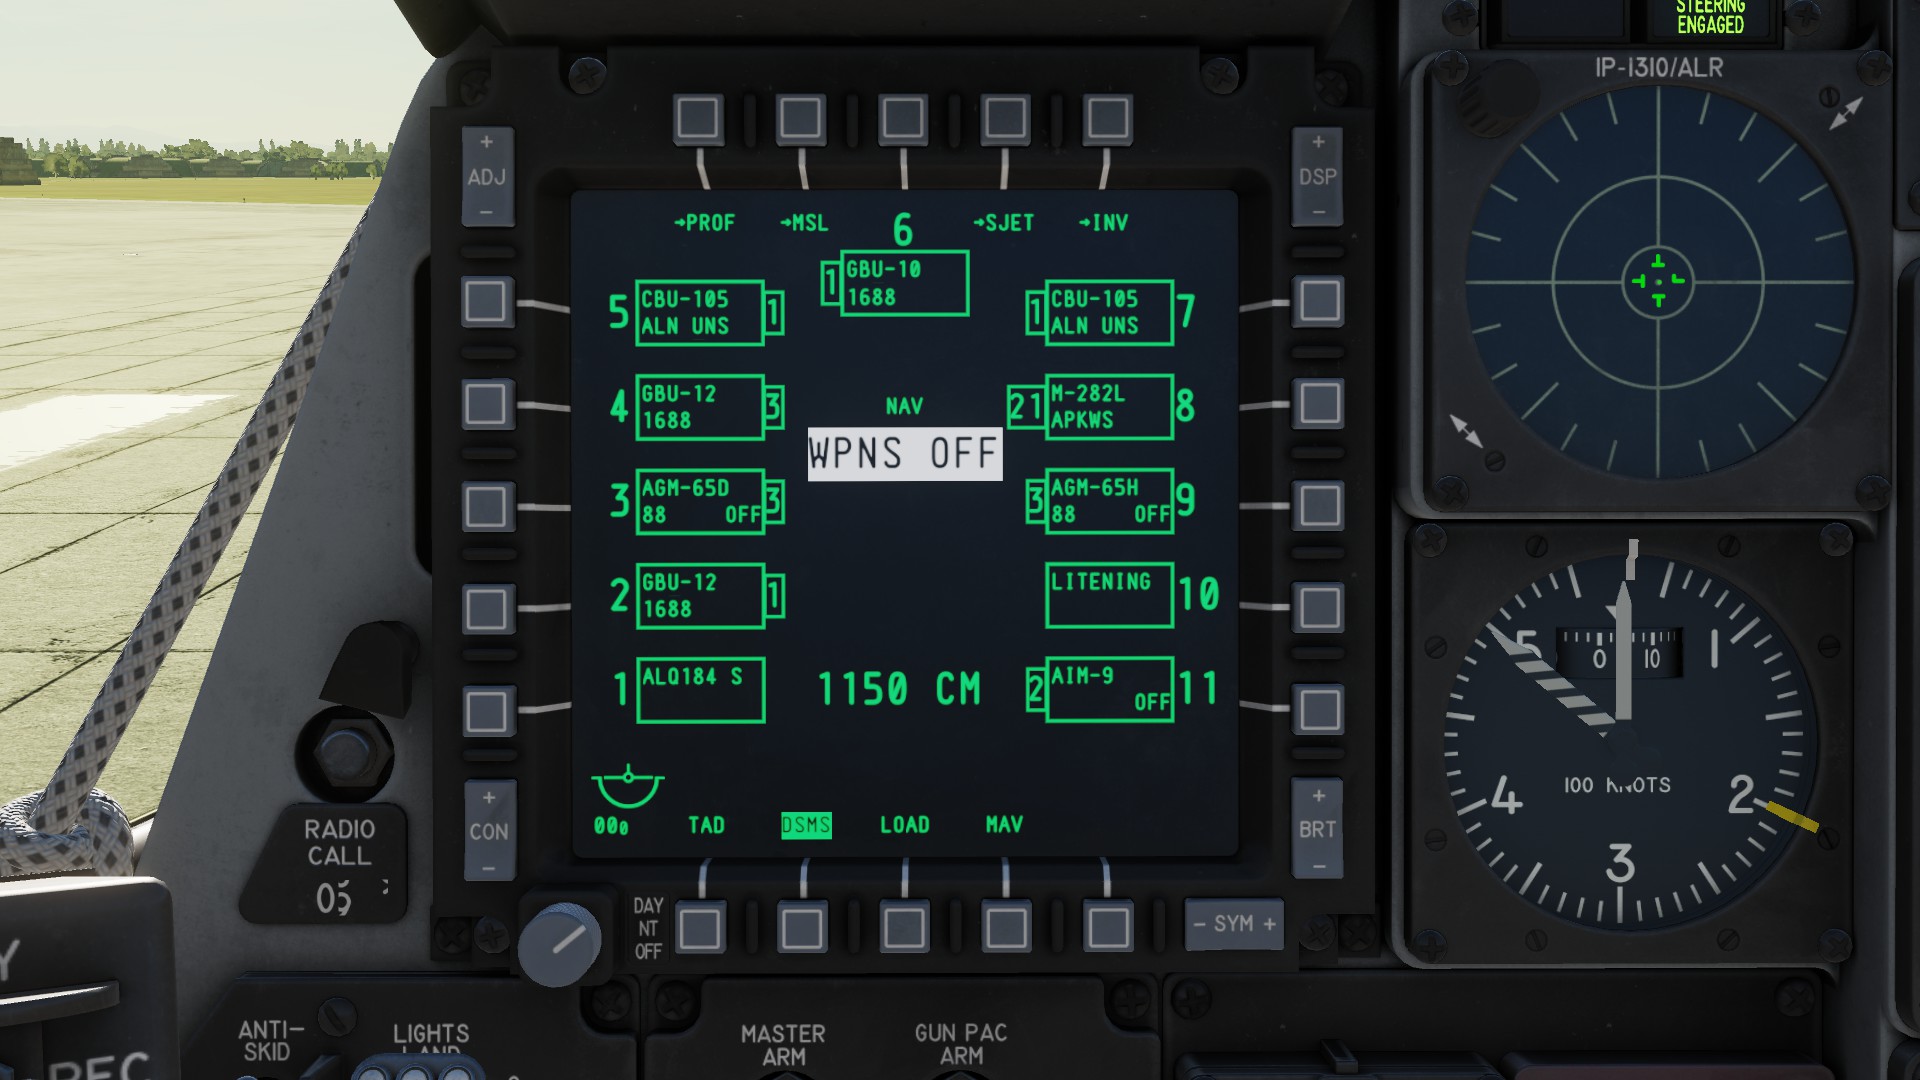
After you loaded weapons, your DSMS needs to be reloaded. If you dont, it will look like below.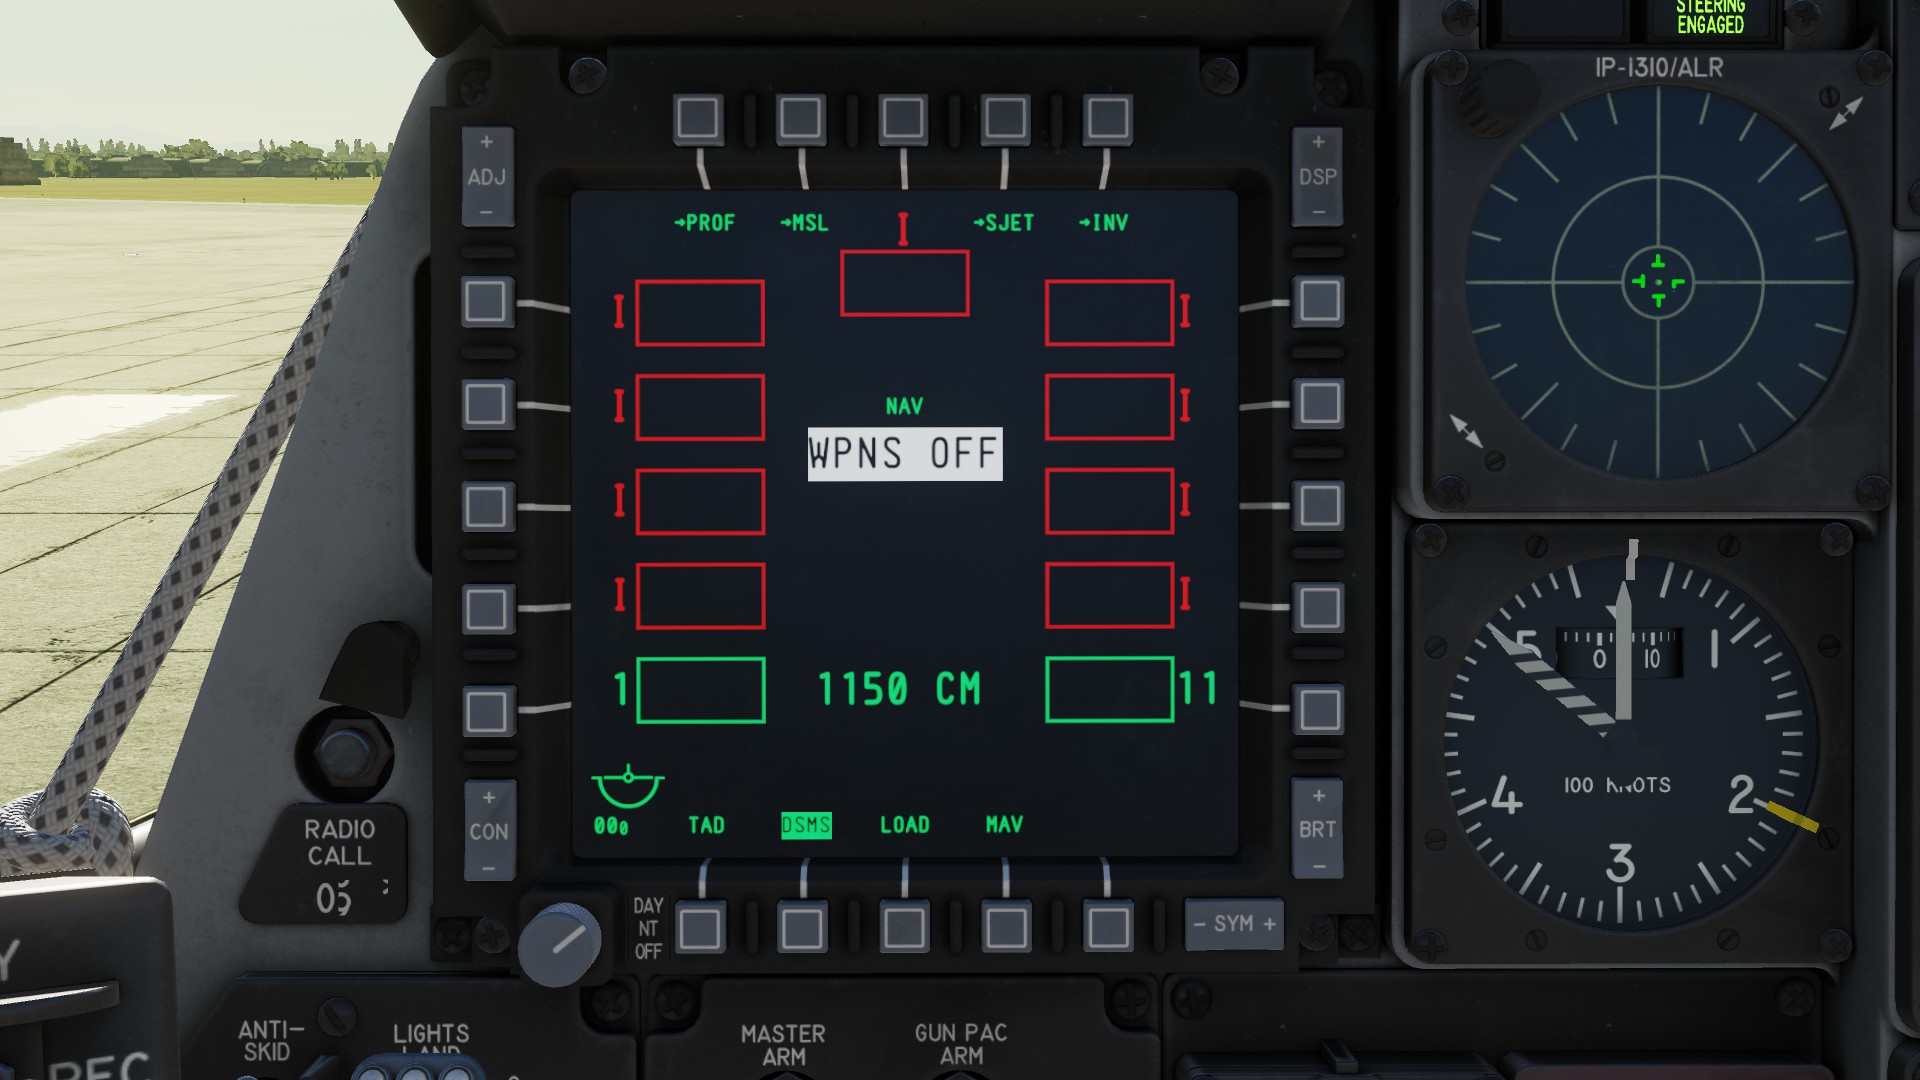 To avoid this, press the LOAD button in the bottom row (red). Now press LOAD ALL (blue) on the right.
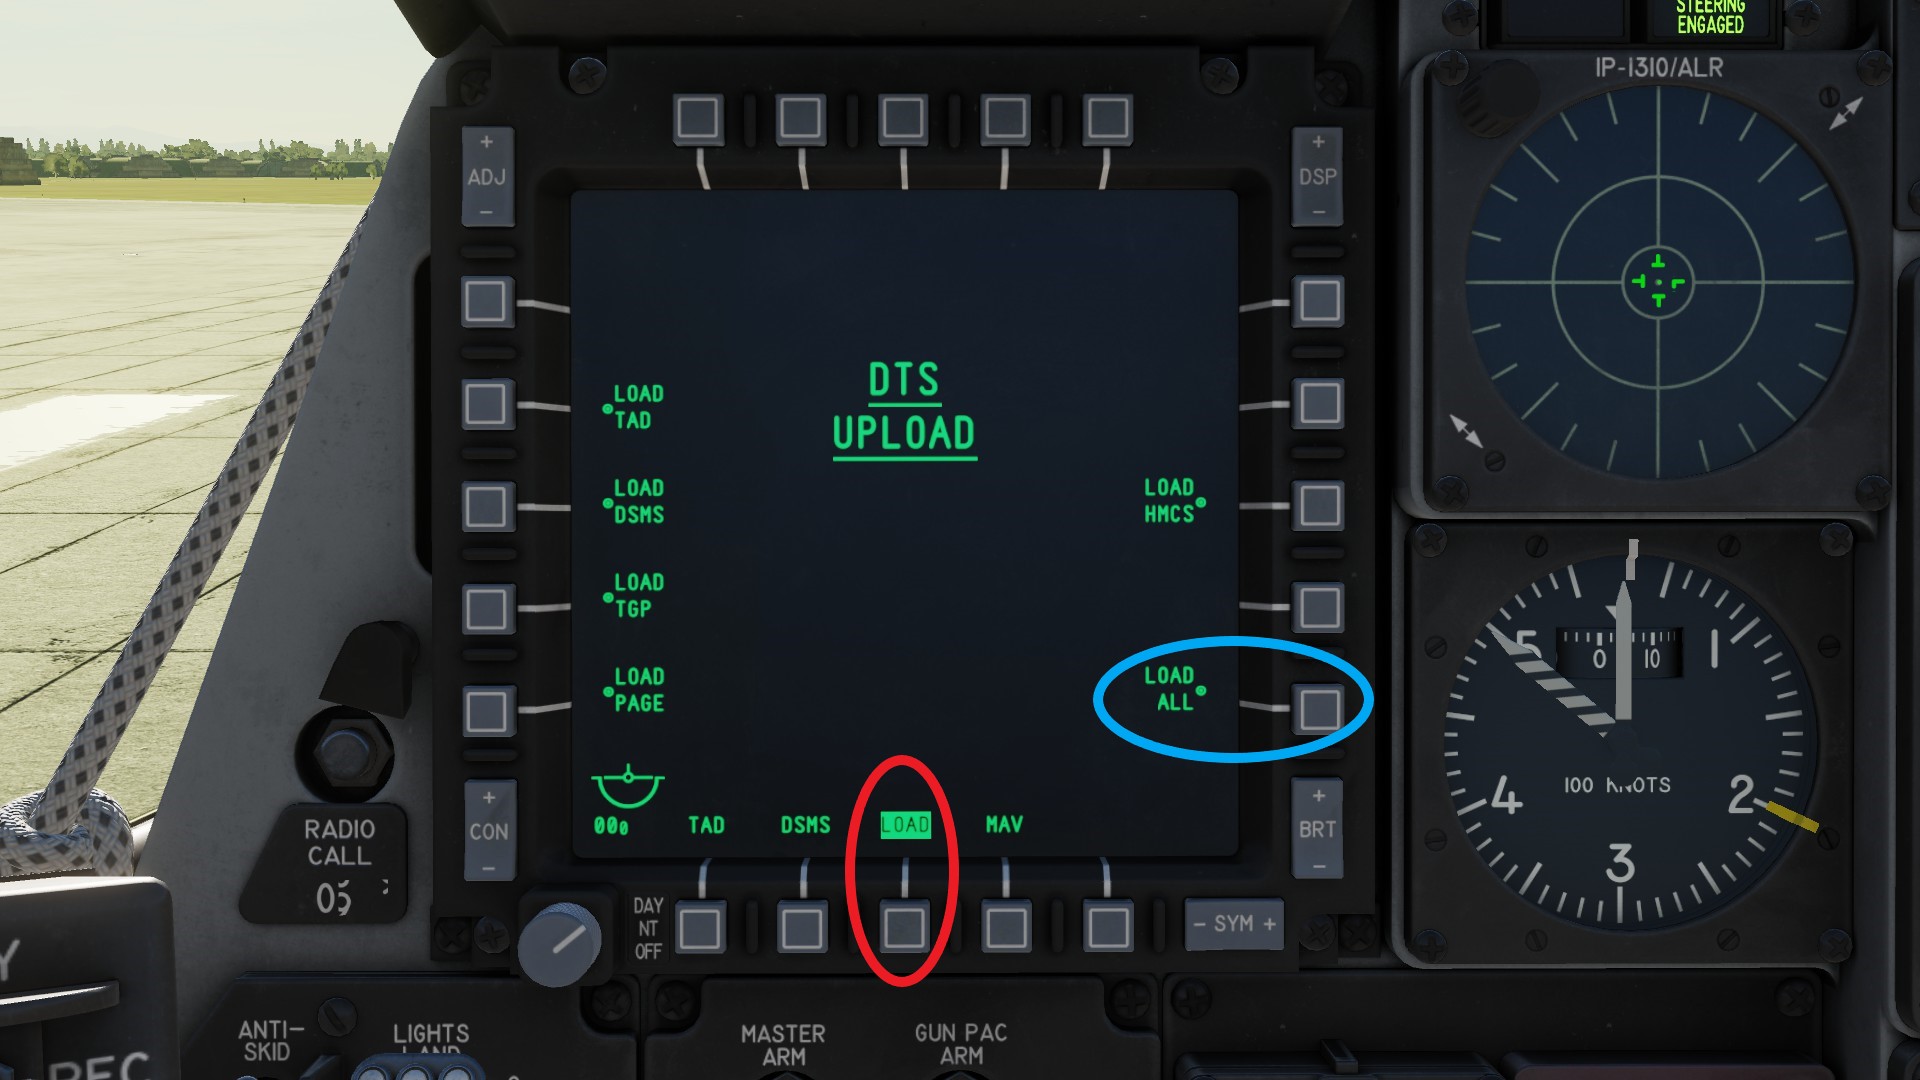 The dots on the left side (between the function and the button) will disappear for a short while. Dont press any buttons on the MFCD until the dots (red) reappeared.
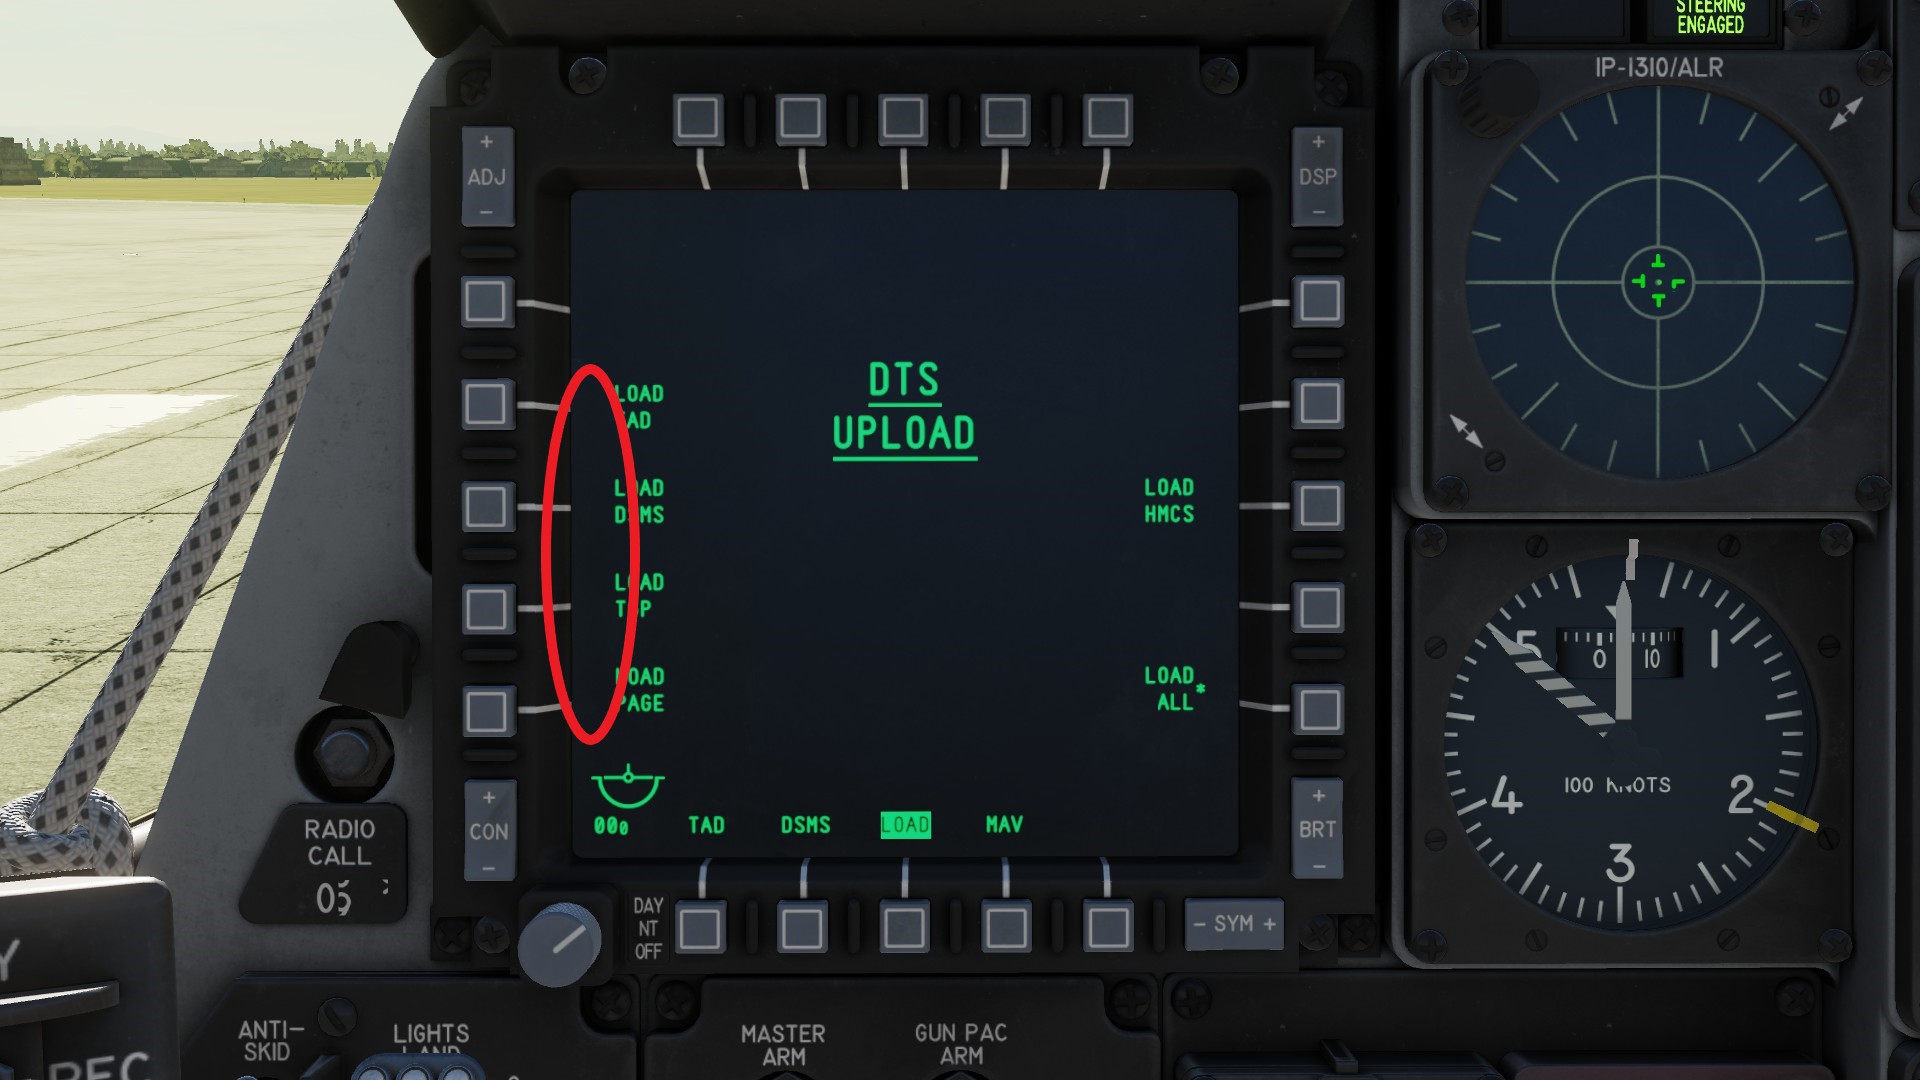 If you now go back to your DSMS page, you can see what weapons and how many of them you have loaded. You can quickly change the page of the MFCD with HOTAS ♥♥♥♥♥♥ Switch Left / Right short.
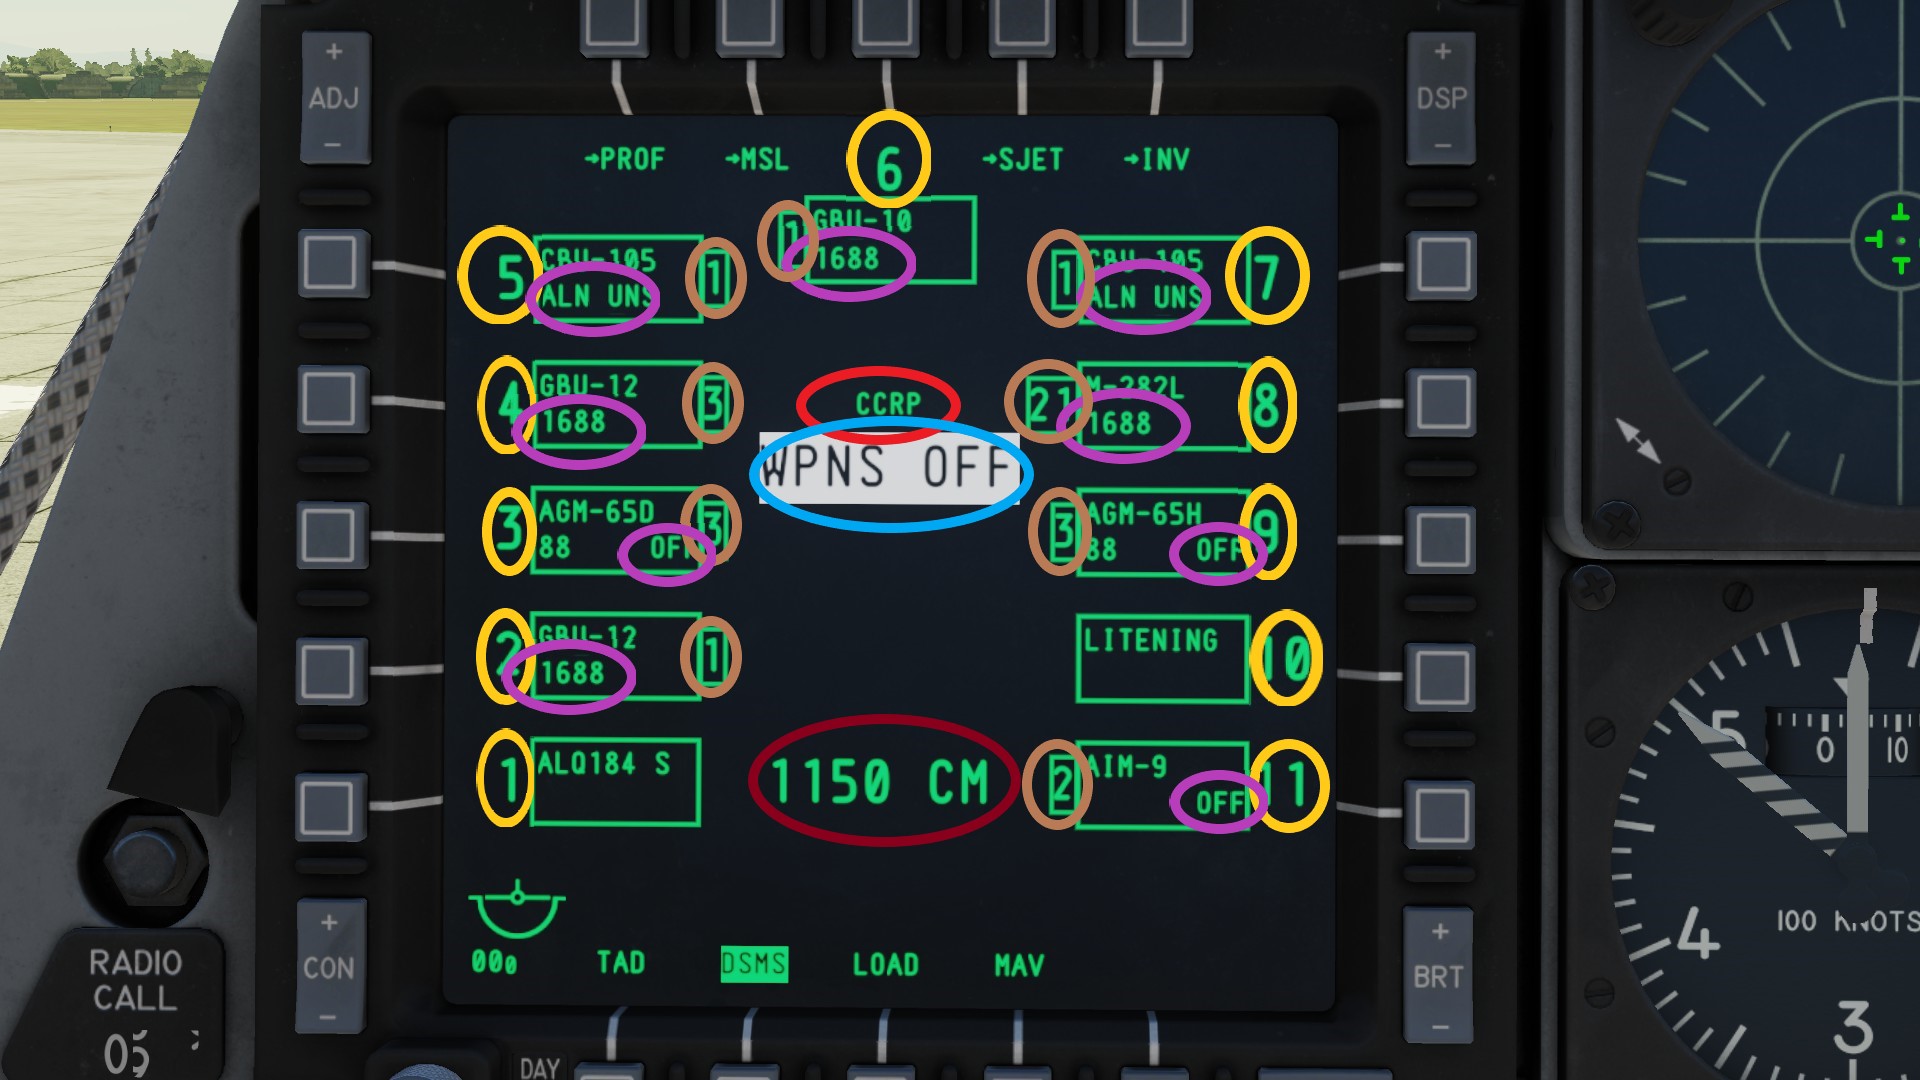
 You will see the currently selected release mode (red) and the weapon profile selected (blue). Each box on the sides is representing one pylon. The stations number is shown on the sides (yellow). The DSMS will provide the name of the weapon in these boxes. Furthermore the weapons alignment status or the laser code is shown (if the weapons has laser or GPS/INS guidance) (purple). The amount of weapons on the pylon are shown in a smaller box next to the pylon (brown). Also, the amount and type of GAU ammunition is shown in the bottom center of the display (dark red).
 If you were to select a weapon profile, the box of the station, that will fire will become white.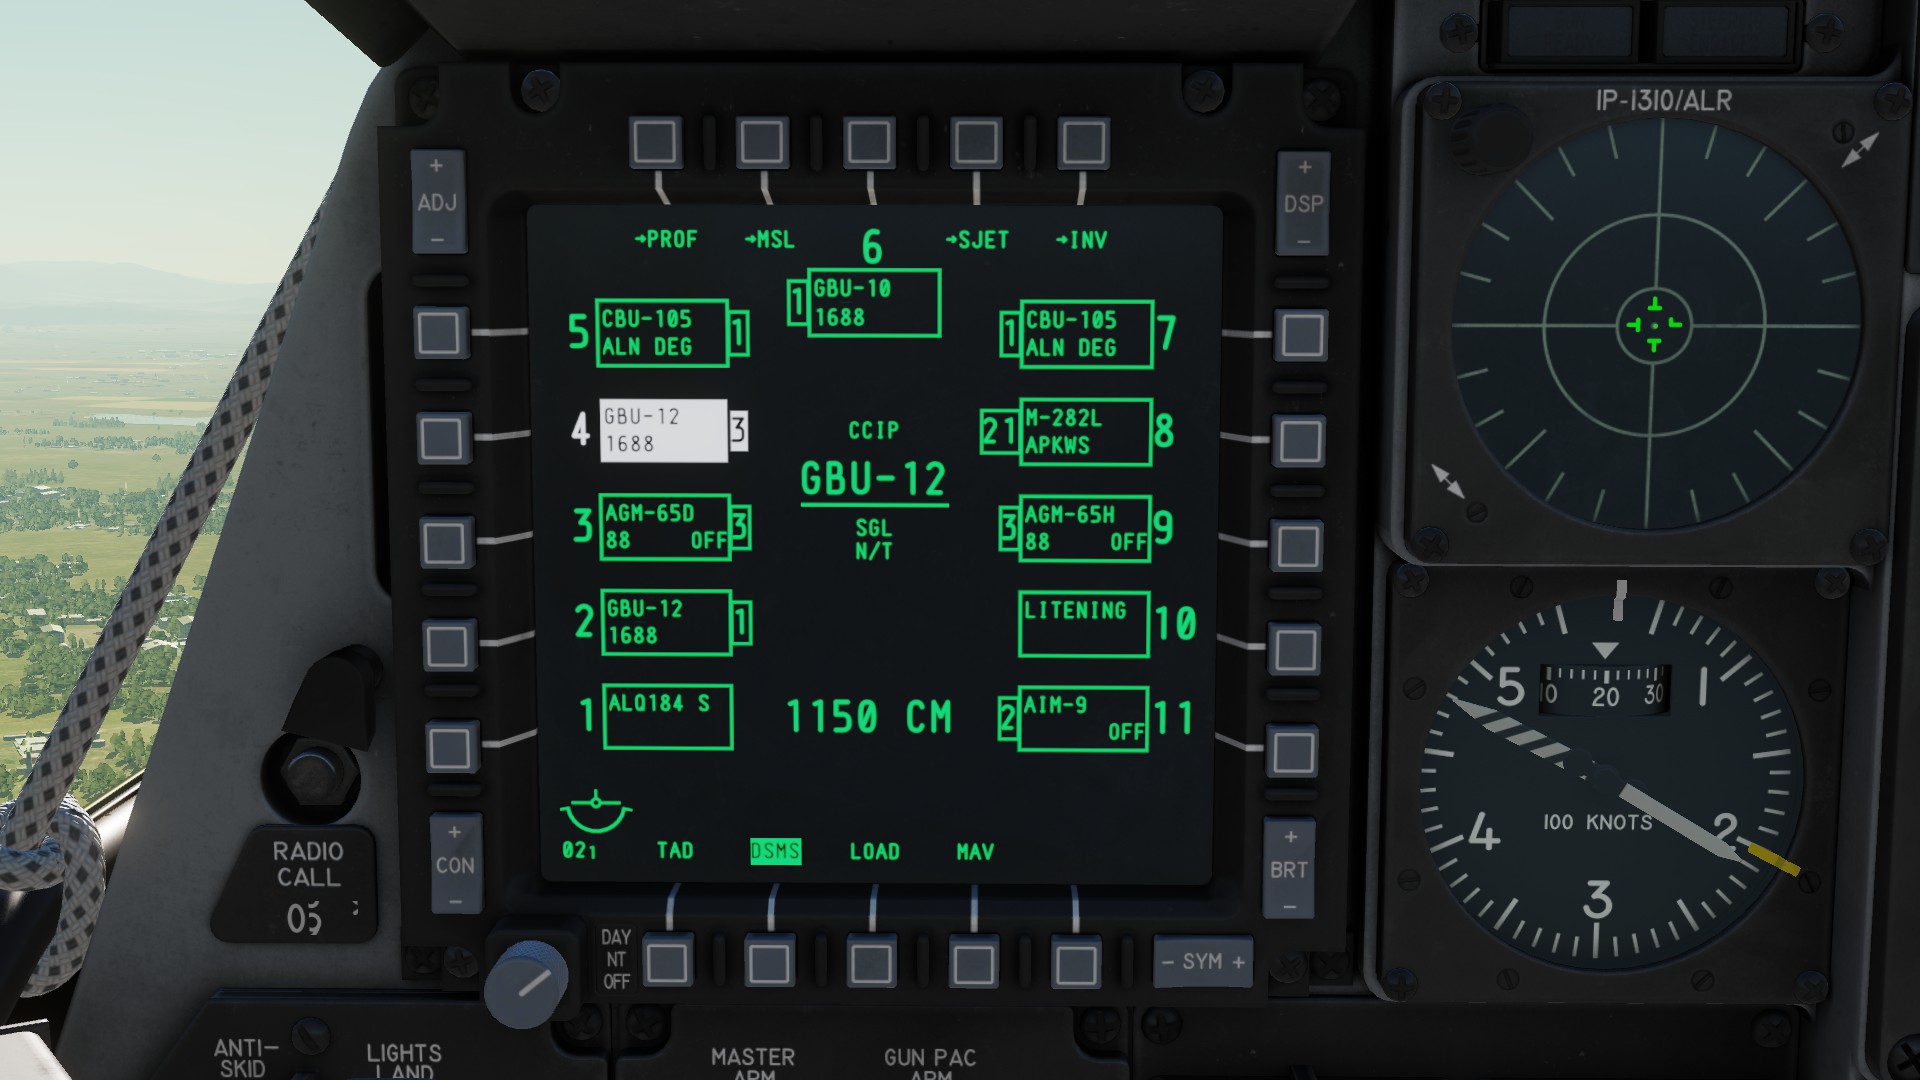
Changing laser codes
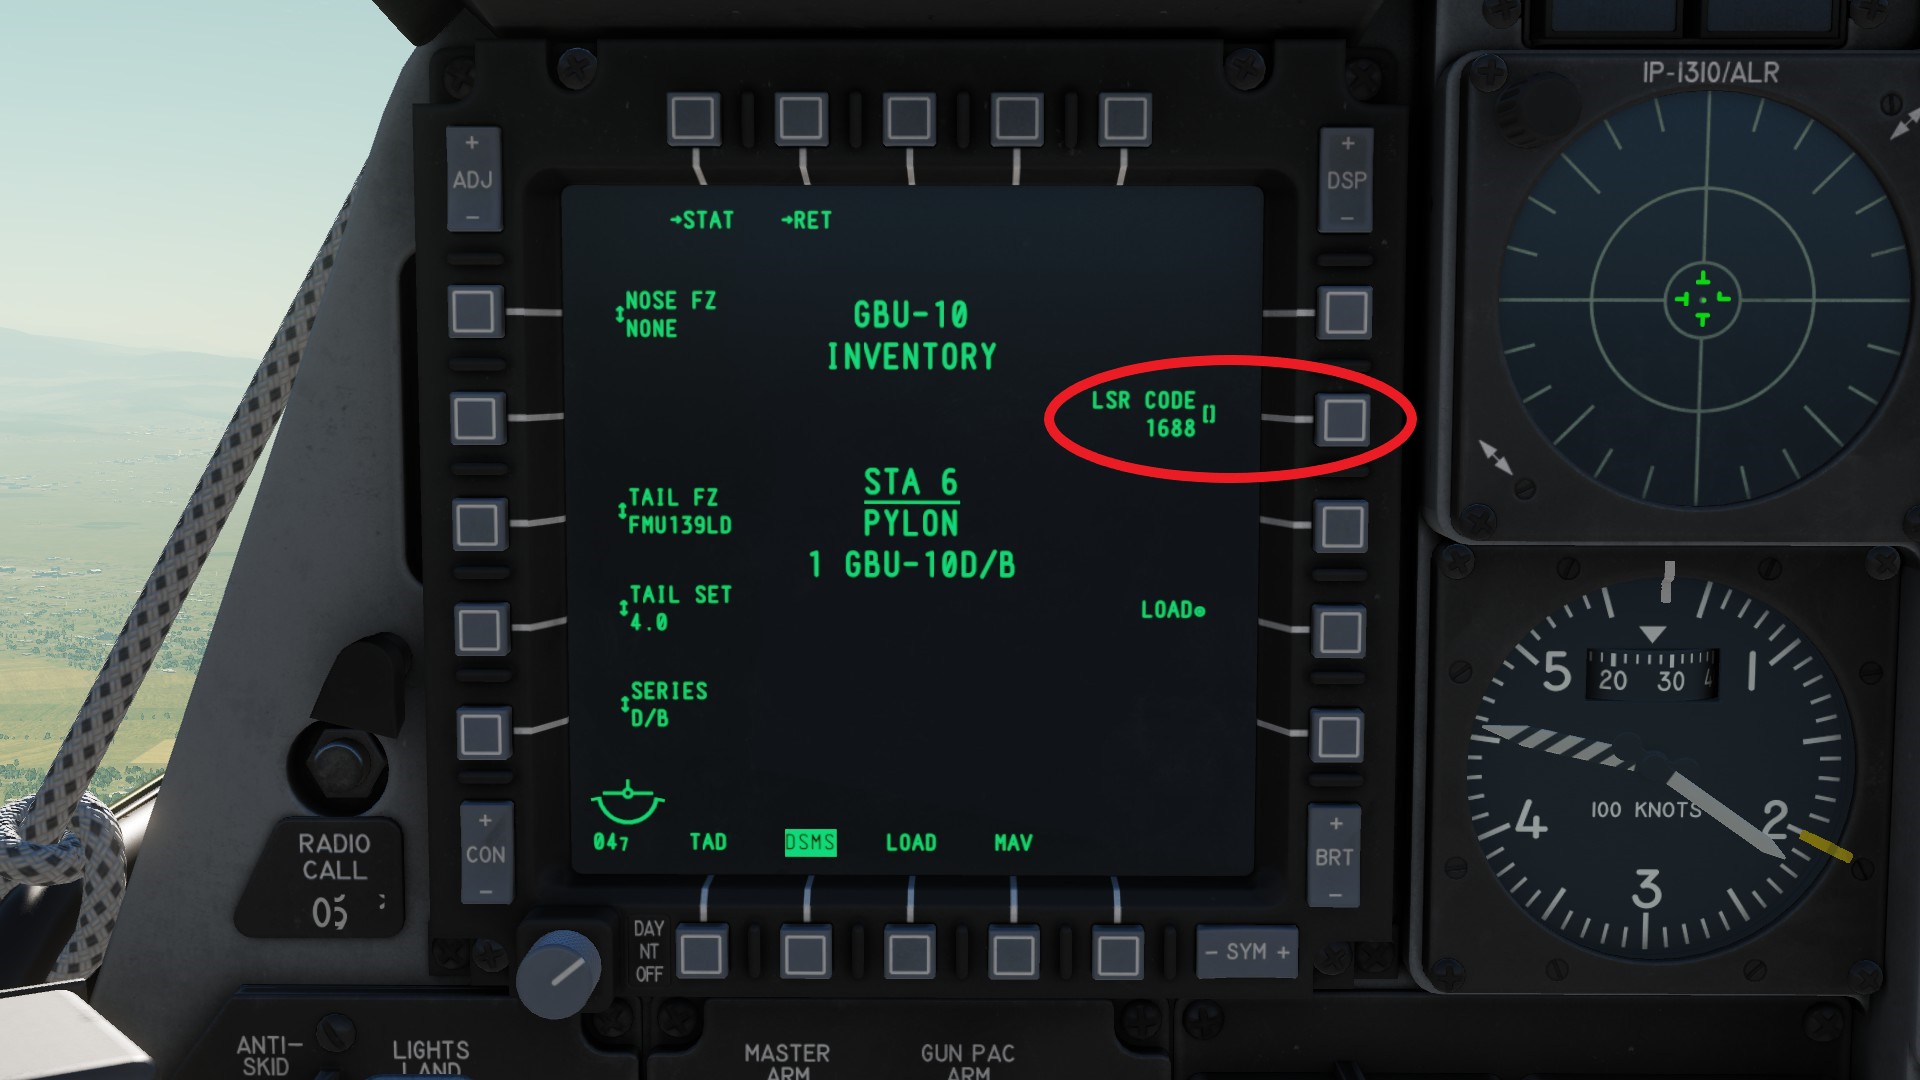
To prevent confusion you should always change the weapons laser code. If not, it may be that someone else also forgot and you both use the default 1688. This can cause confusion for the weapons laser seeker and it may track the wrong laser.
You can choose any laser code from 1111 to 1788.
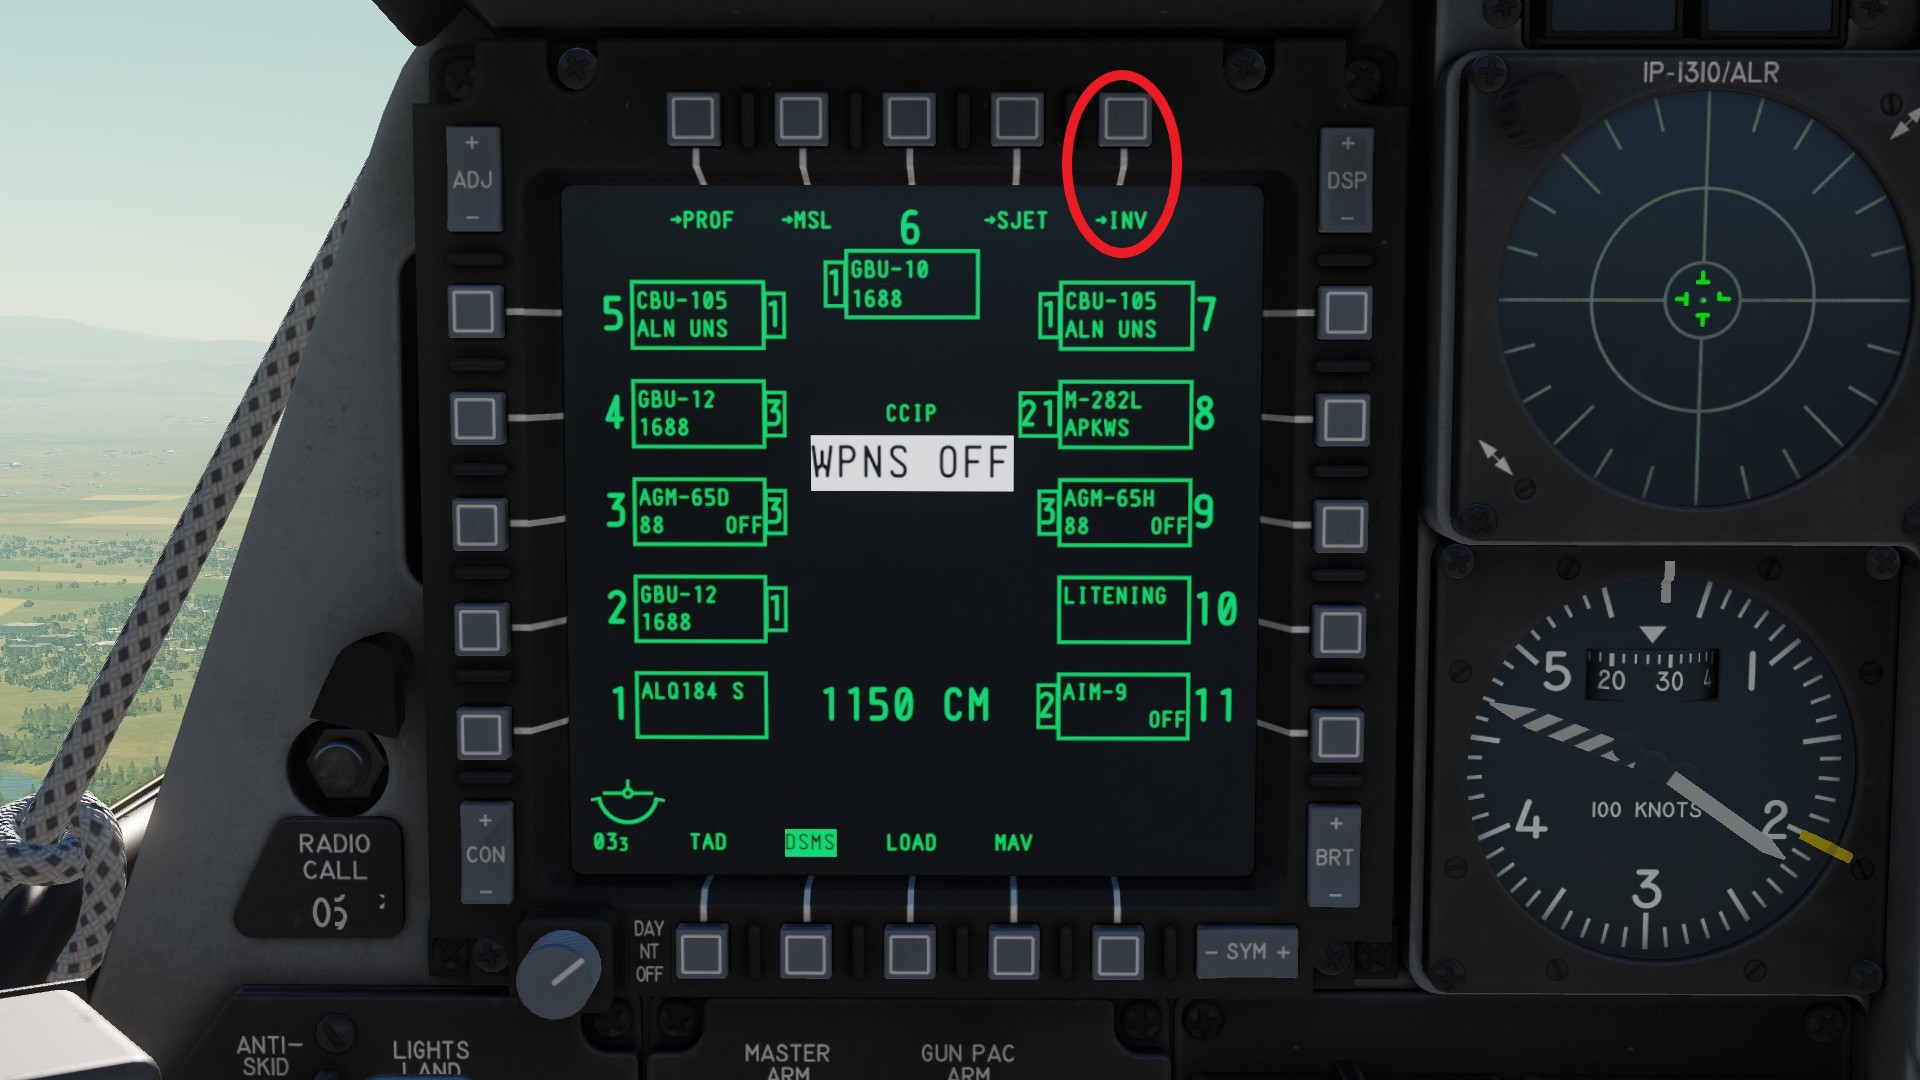 Now select the station of which you want to change the laser code. In my case the GBU-10 (red).
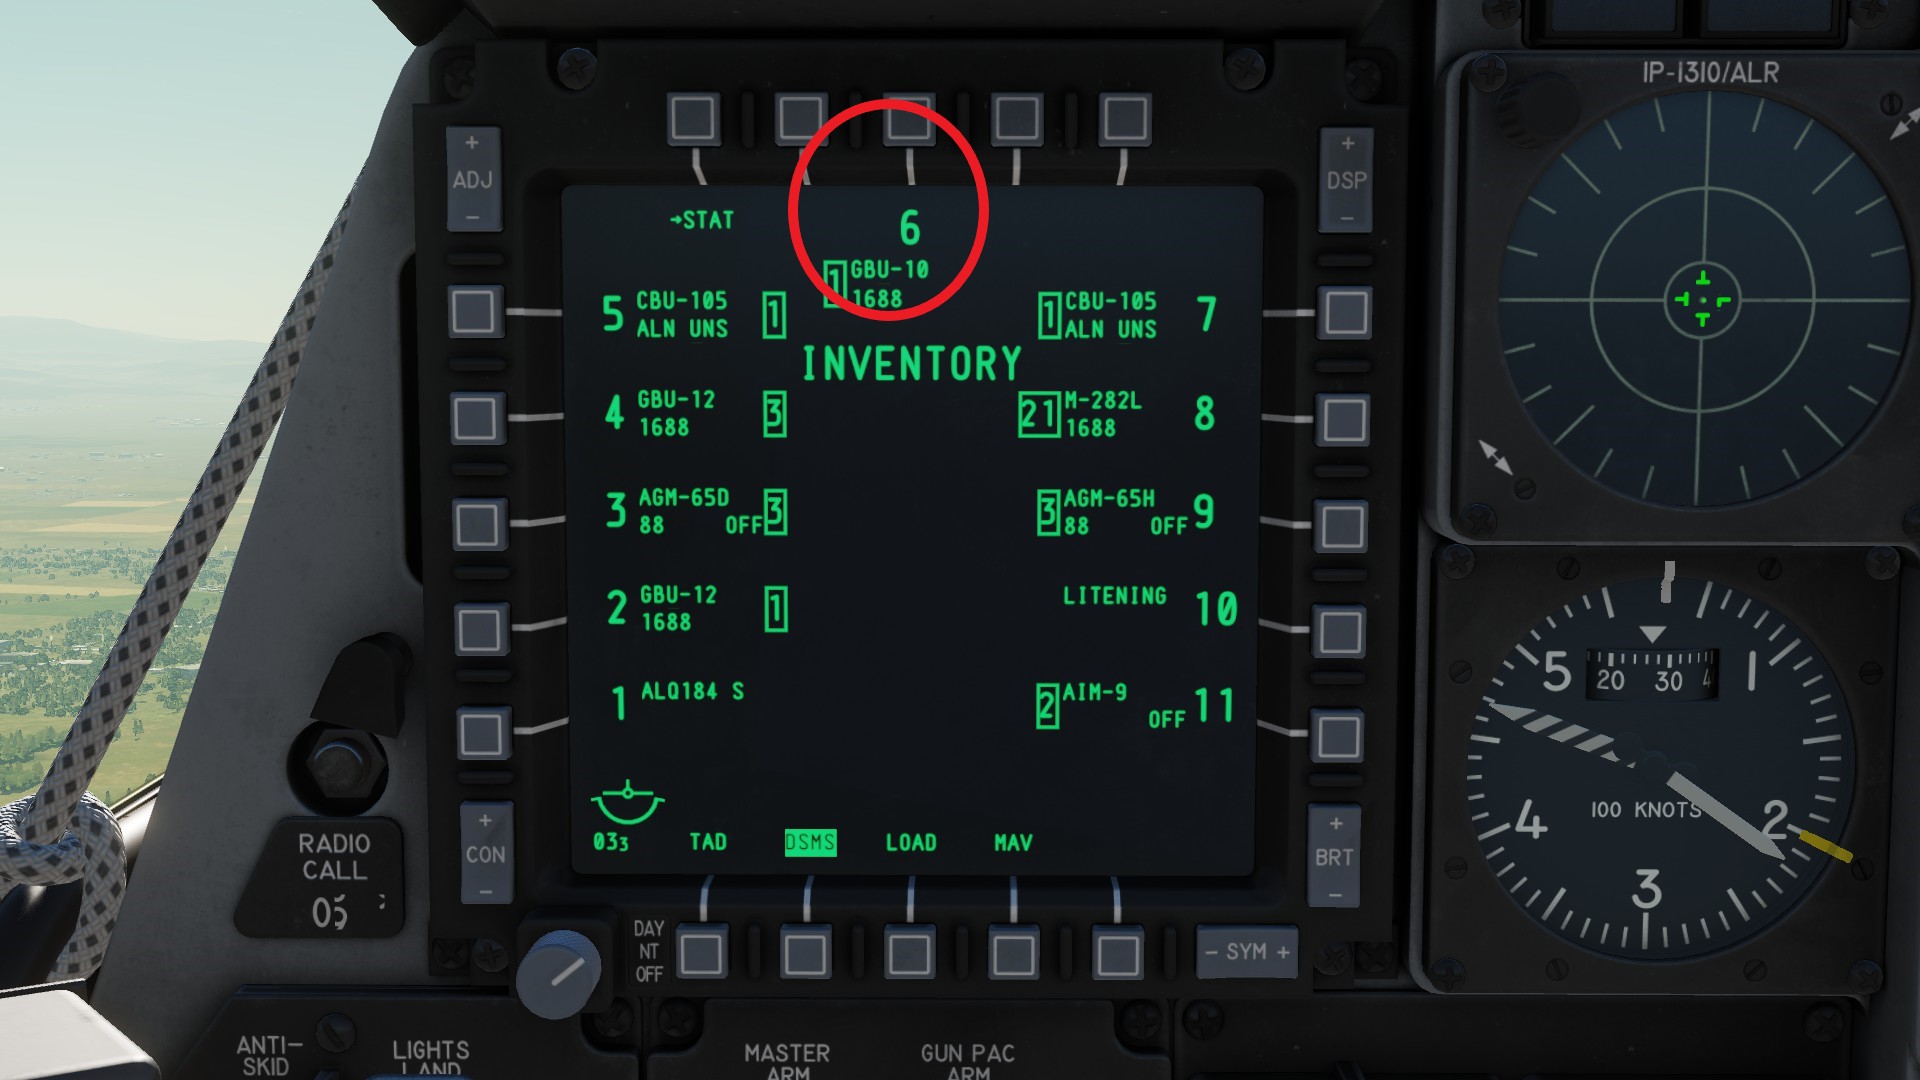 The DSMS will tell you what weapon is loaded (red). However you still need to confirm this by navigating to the right weapon. I will have to select GBU (green).
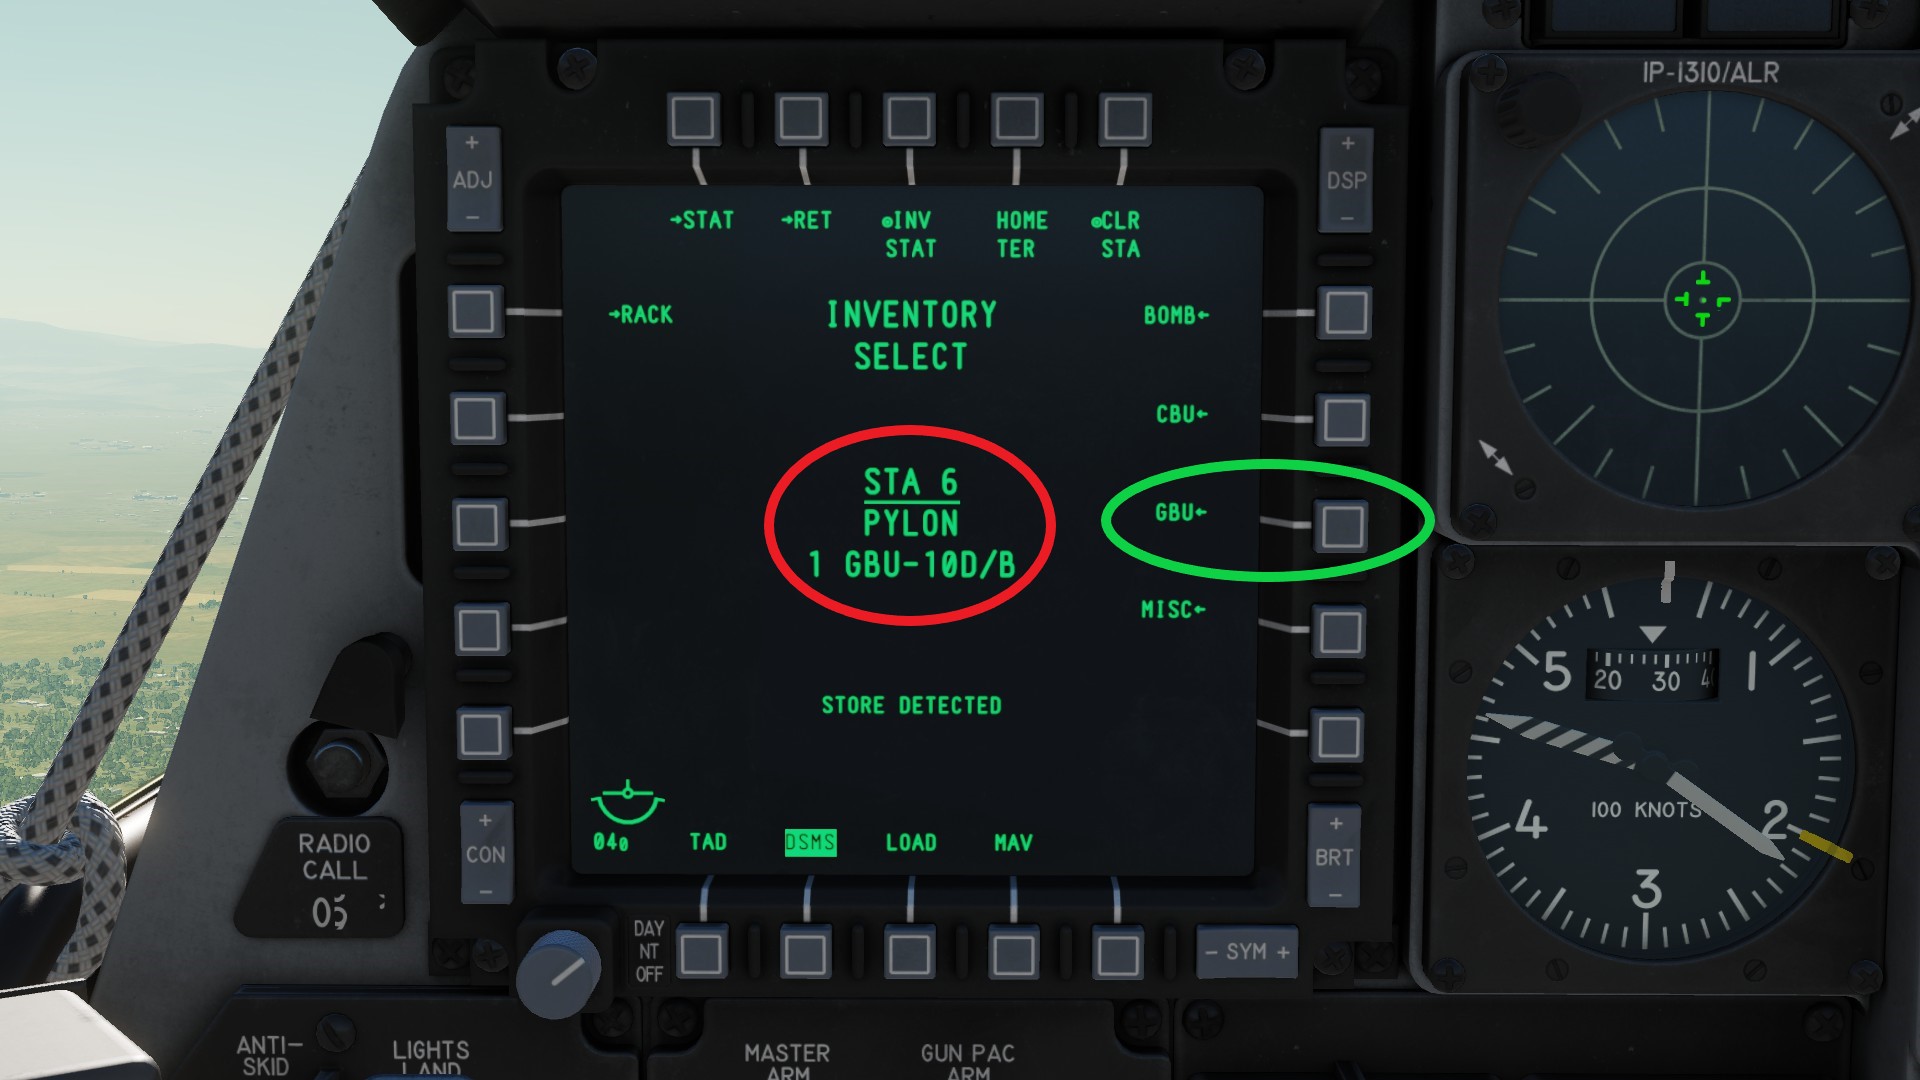 And then pick the model, here the GBU-10 (red).
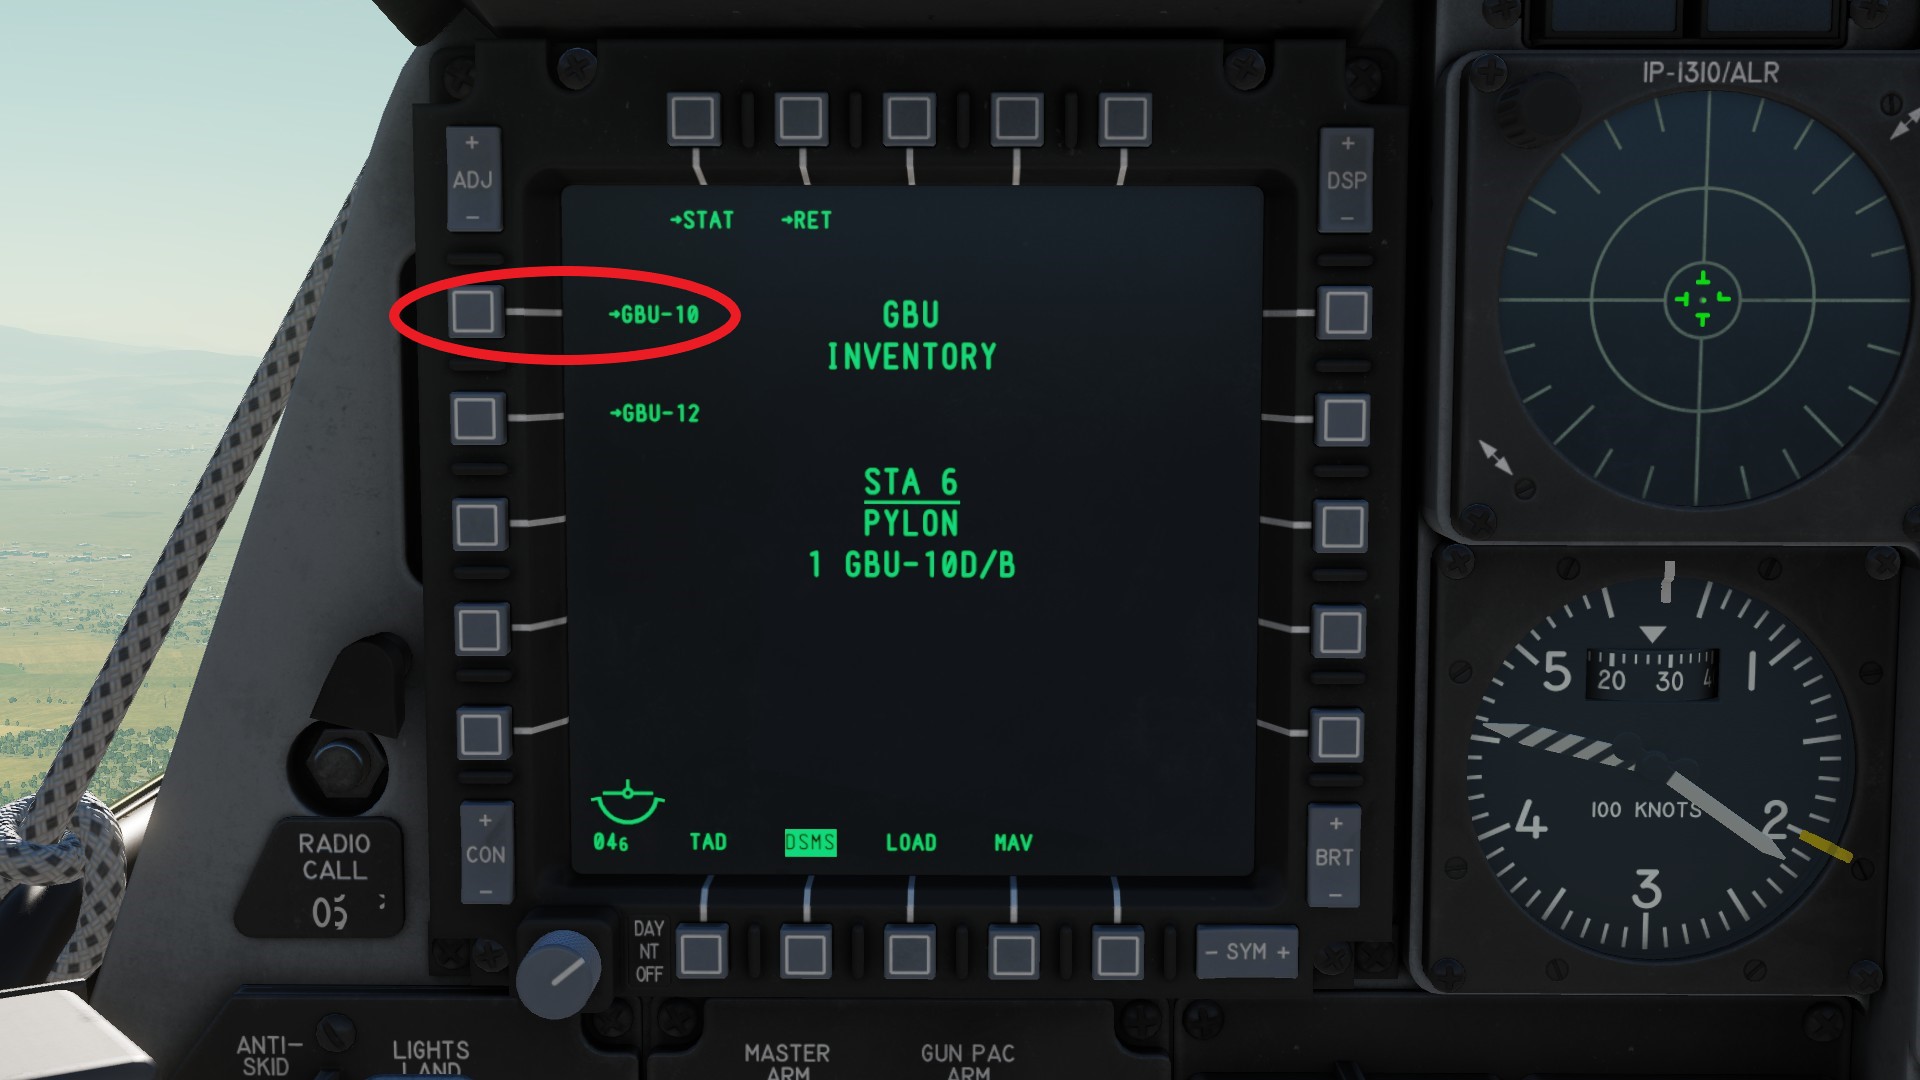 You can see the laser code currently used by the weapon on the right (red).
 Go to your UFC and type in a four number long code between 1111 and 1788. For this you can use the number buttons (red). The input symbols will be repeated on the HUD (black). If you want to delete a character, use the CLR button (blue).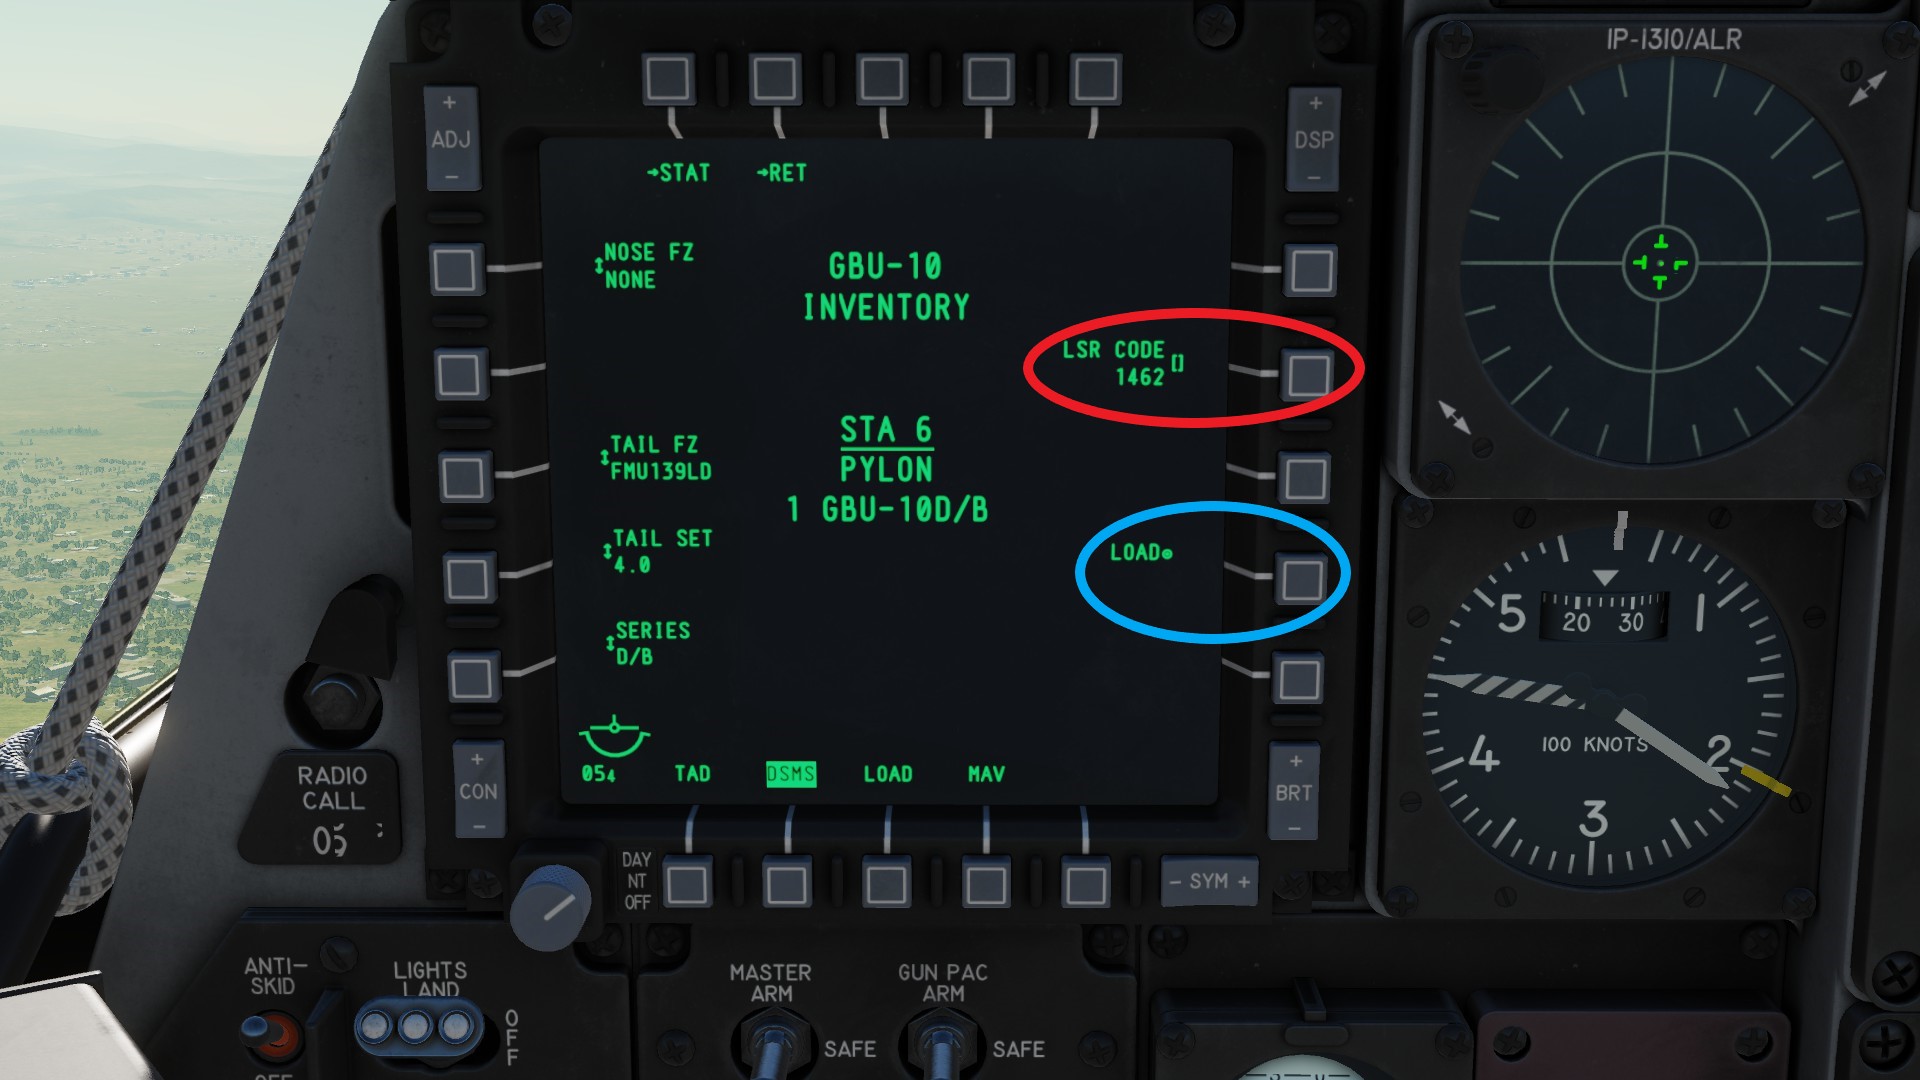
Here are the paths to find the laser codes for other laser guided weapons:
APKWS: Inventory - Pylon - Rocket - laser code is on the left
AGM-65L Maverick: Inventory - Pylon - Missile - laser code is on the top in the middle
GBU-54: Inventory - Pylon - GBU - GBU-54 - laser on the top right
Selective jettison
Sometimes, you need to get rid of stores without actually dropping them on enemies. For this purpose, the jettison function is implemented in your DSMS. To acces it, press the SJET button (red) on the top of your DSMS.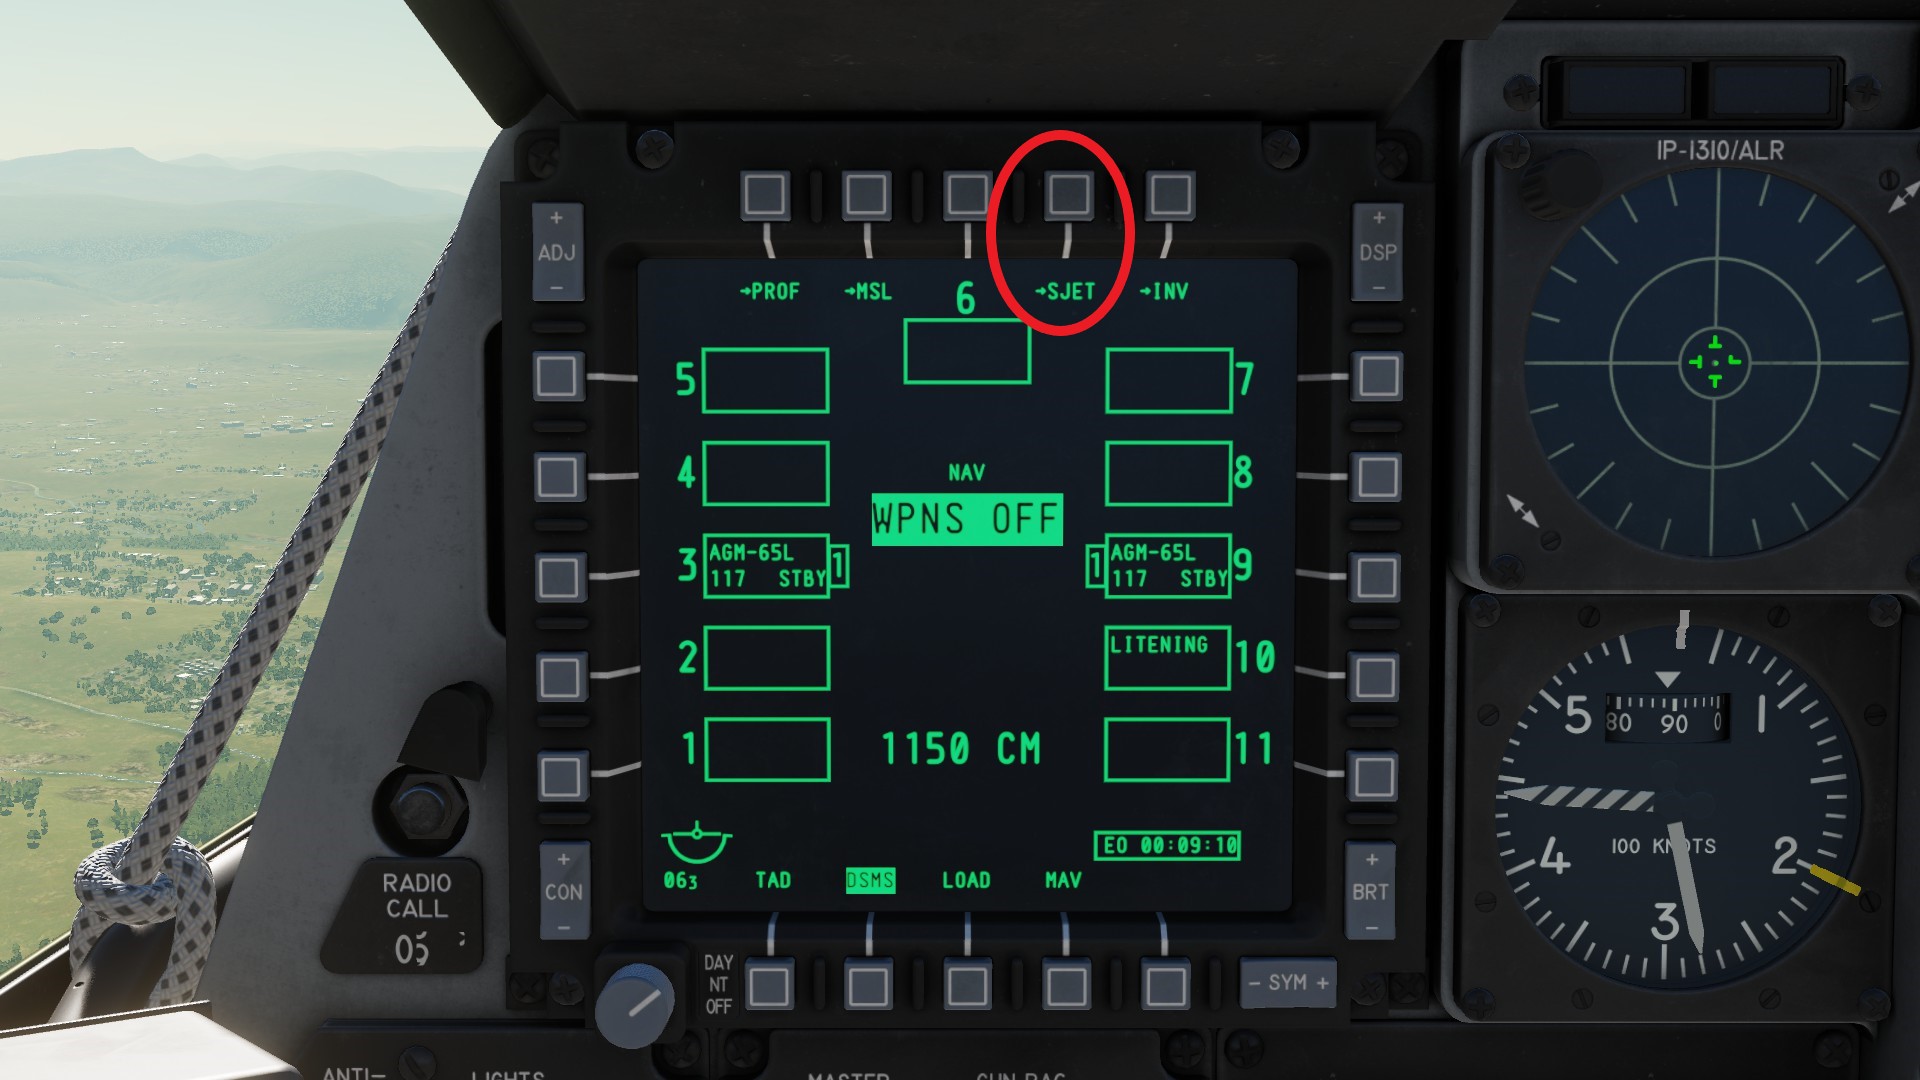 Now select the stores you want to jettison. In this example the L mavericks (red). Note that TGP and jammers can not be jettisoned.
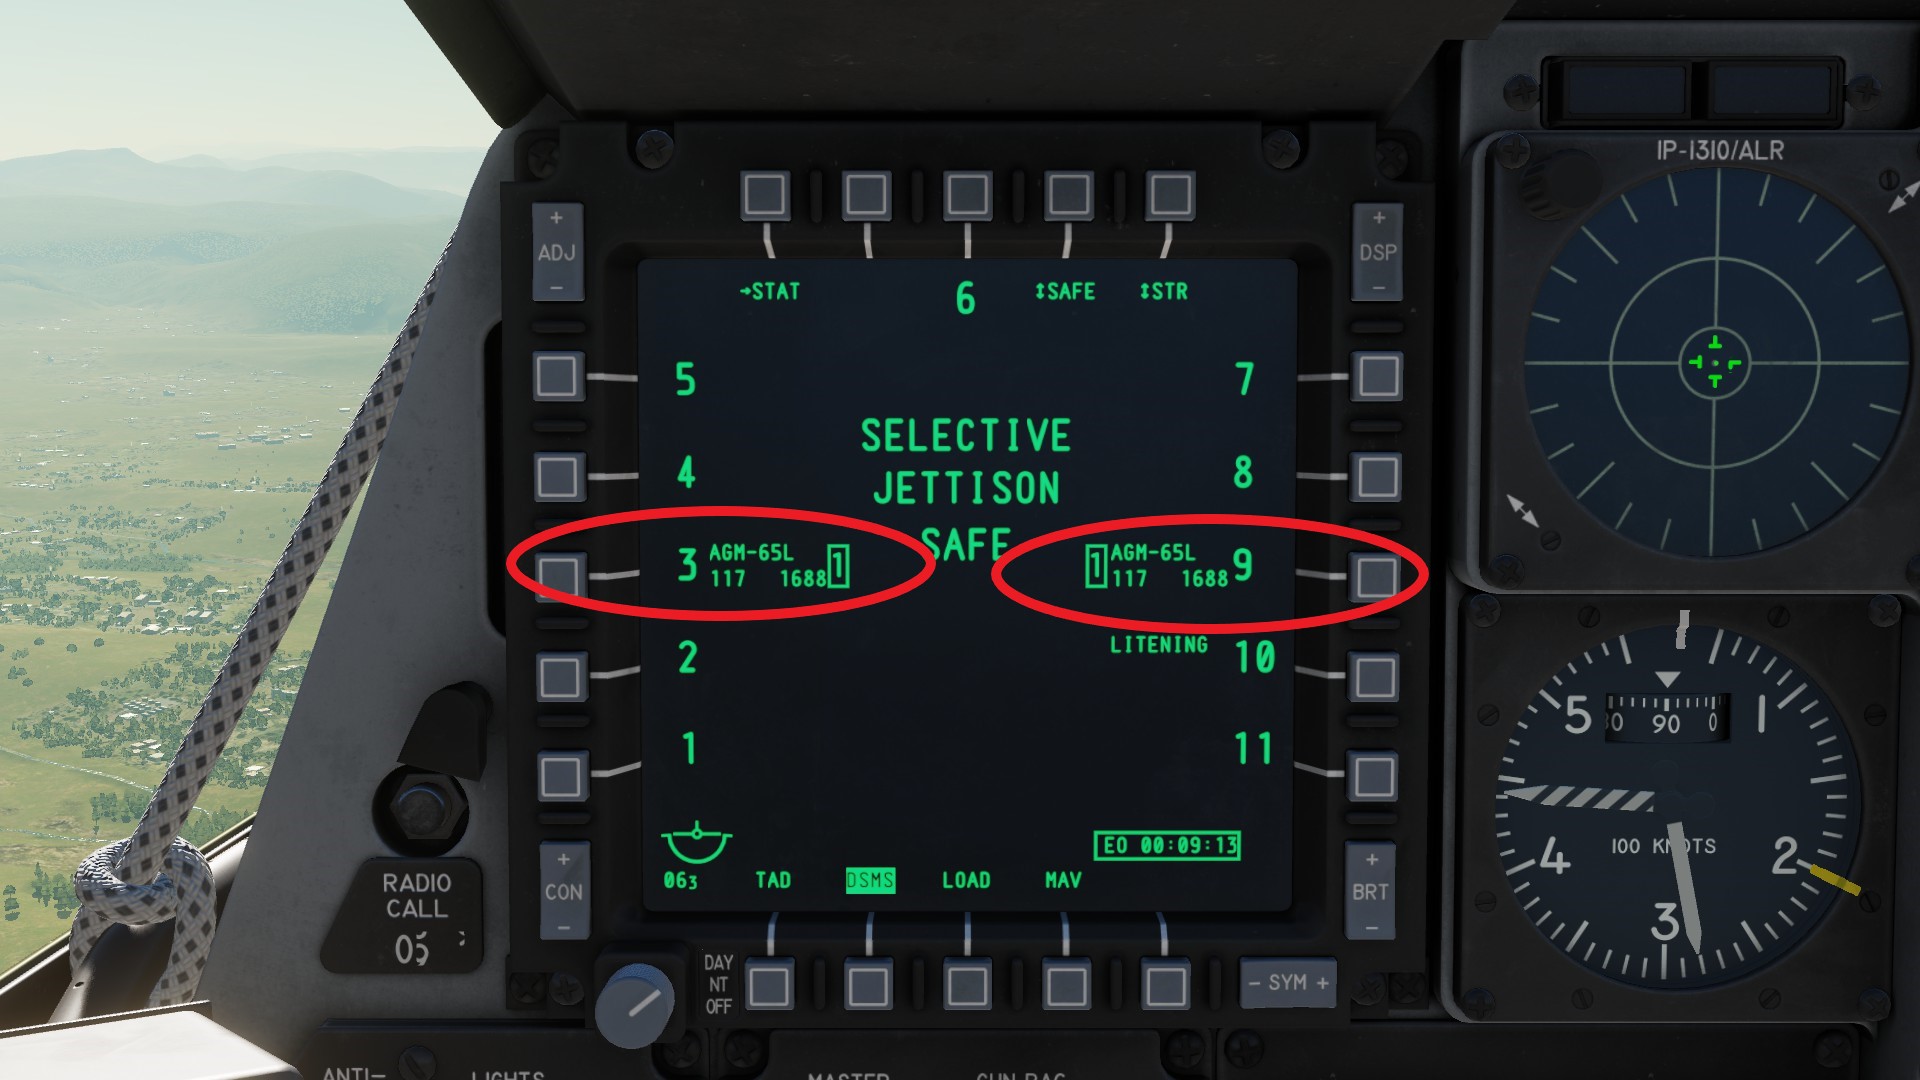 You can also choose to jettison the weapons as entire rack or just one missile by pressing the button in the blue circle. In addition to that, you can choose to eject the ordinance safe or armed on nose, tail or both by using the button i the red circle.
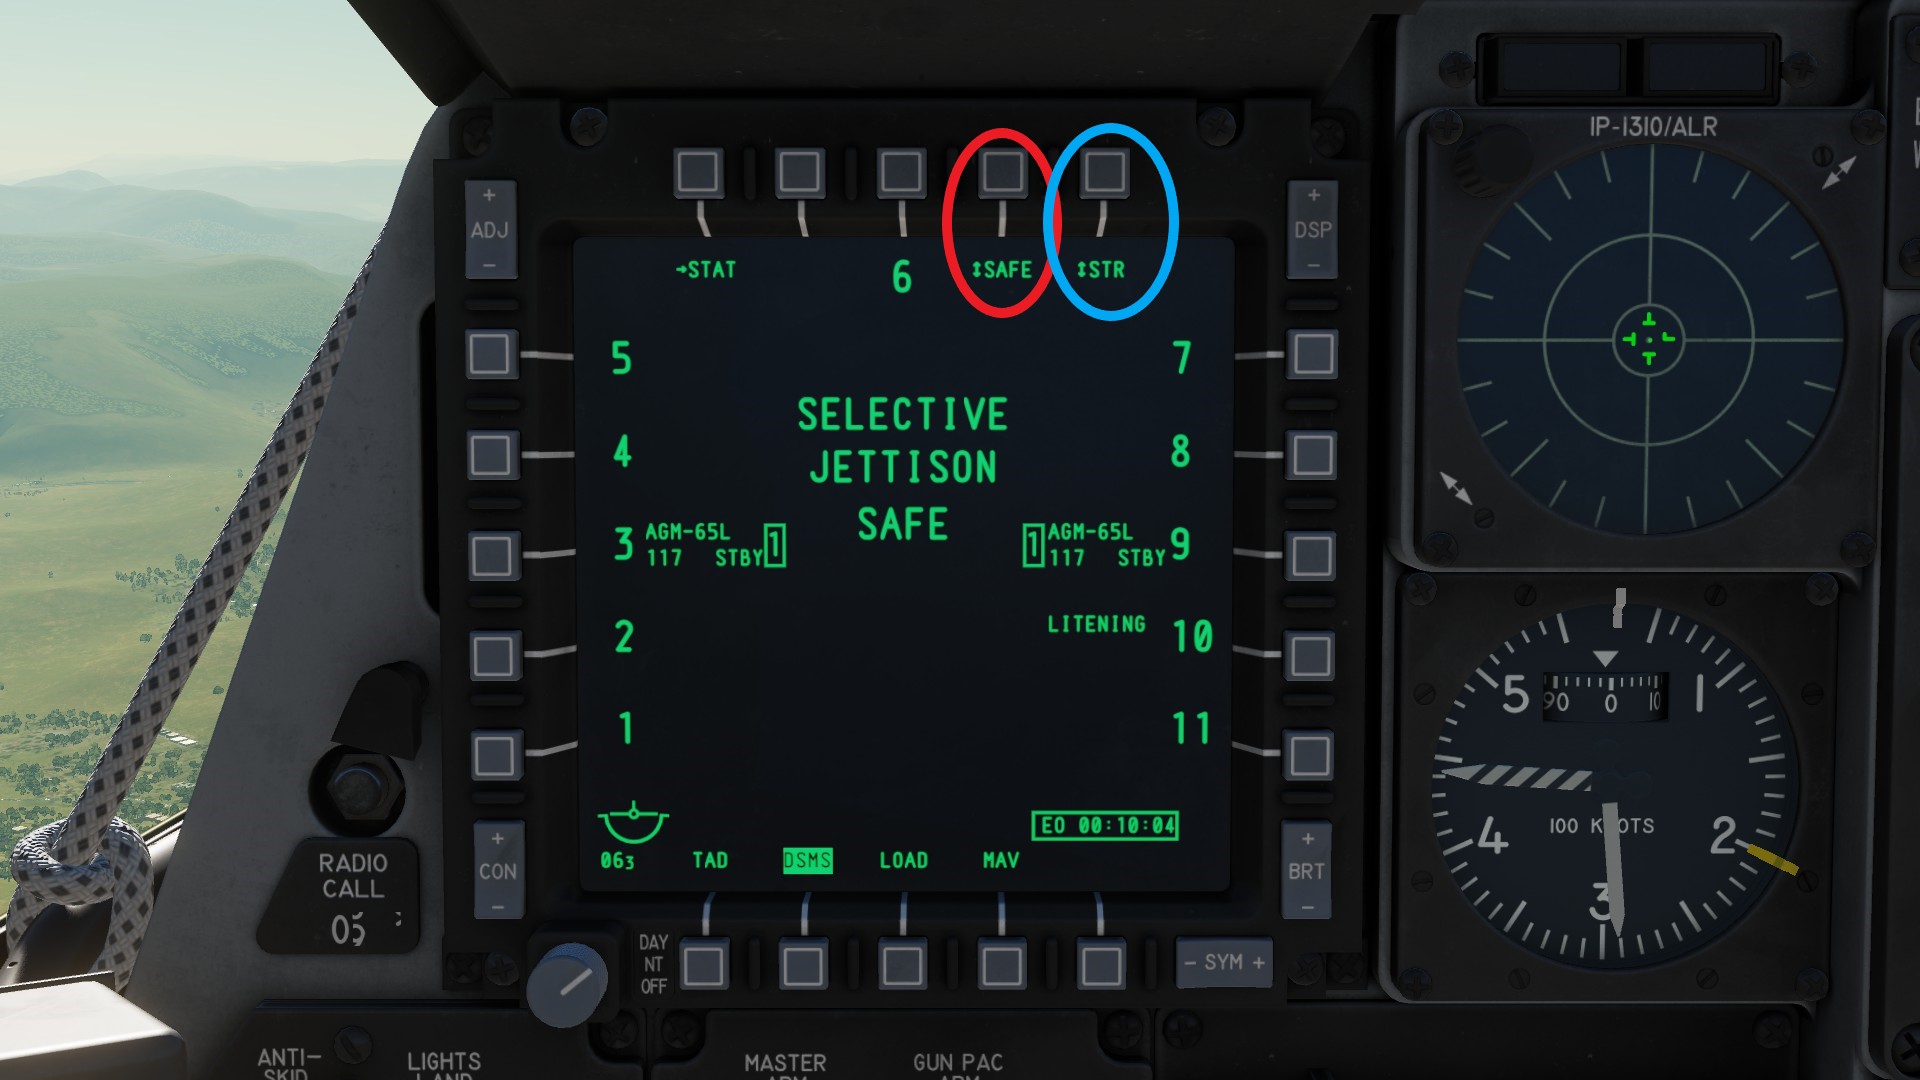 After you made your decision, press the weapon release button a few times. All selected ordinance will drop.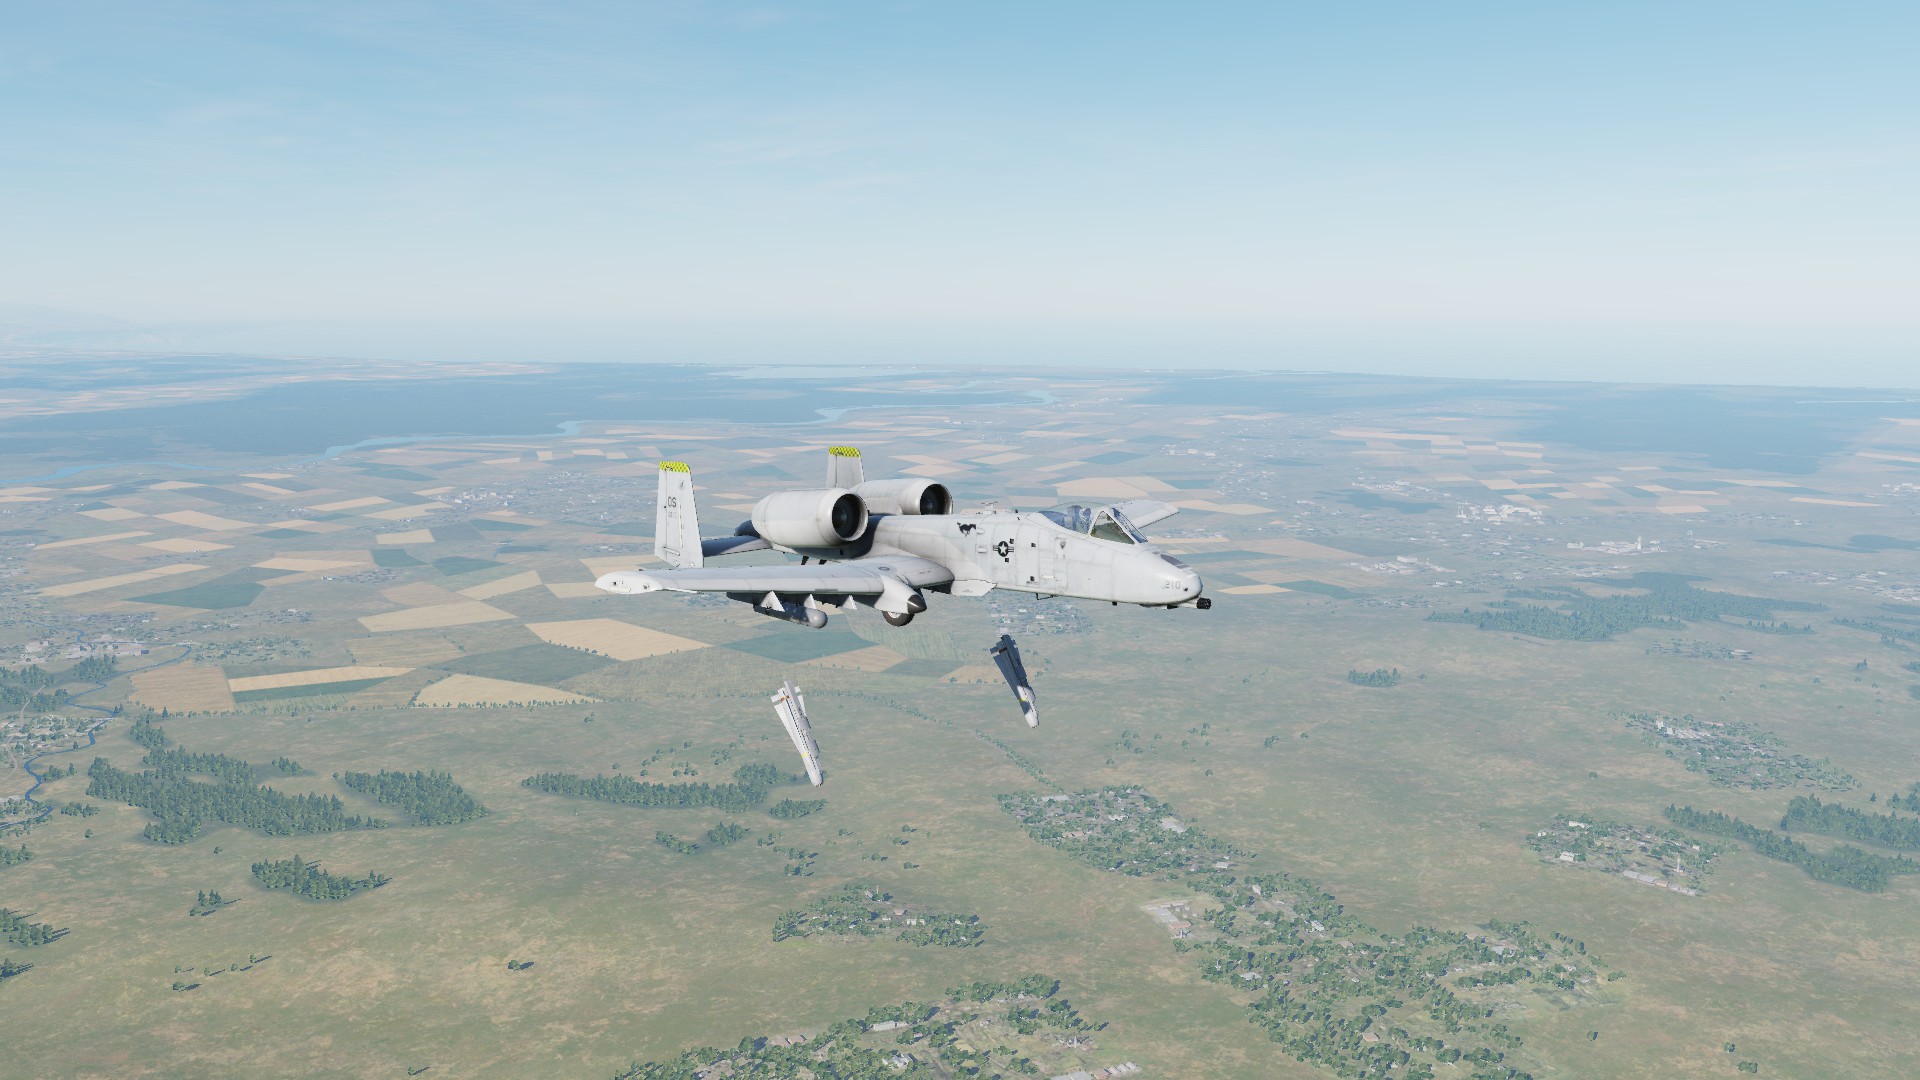
Editing weapon profiles
To alter the behaviour of weapons, you can edit their profiles. To can acces the profiles by pressing the PROF button (red).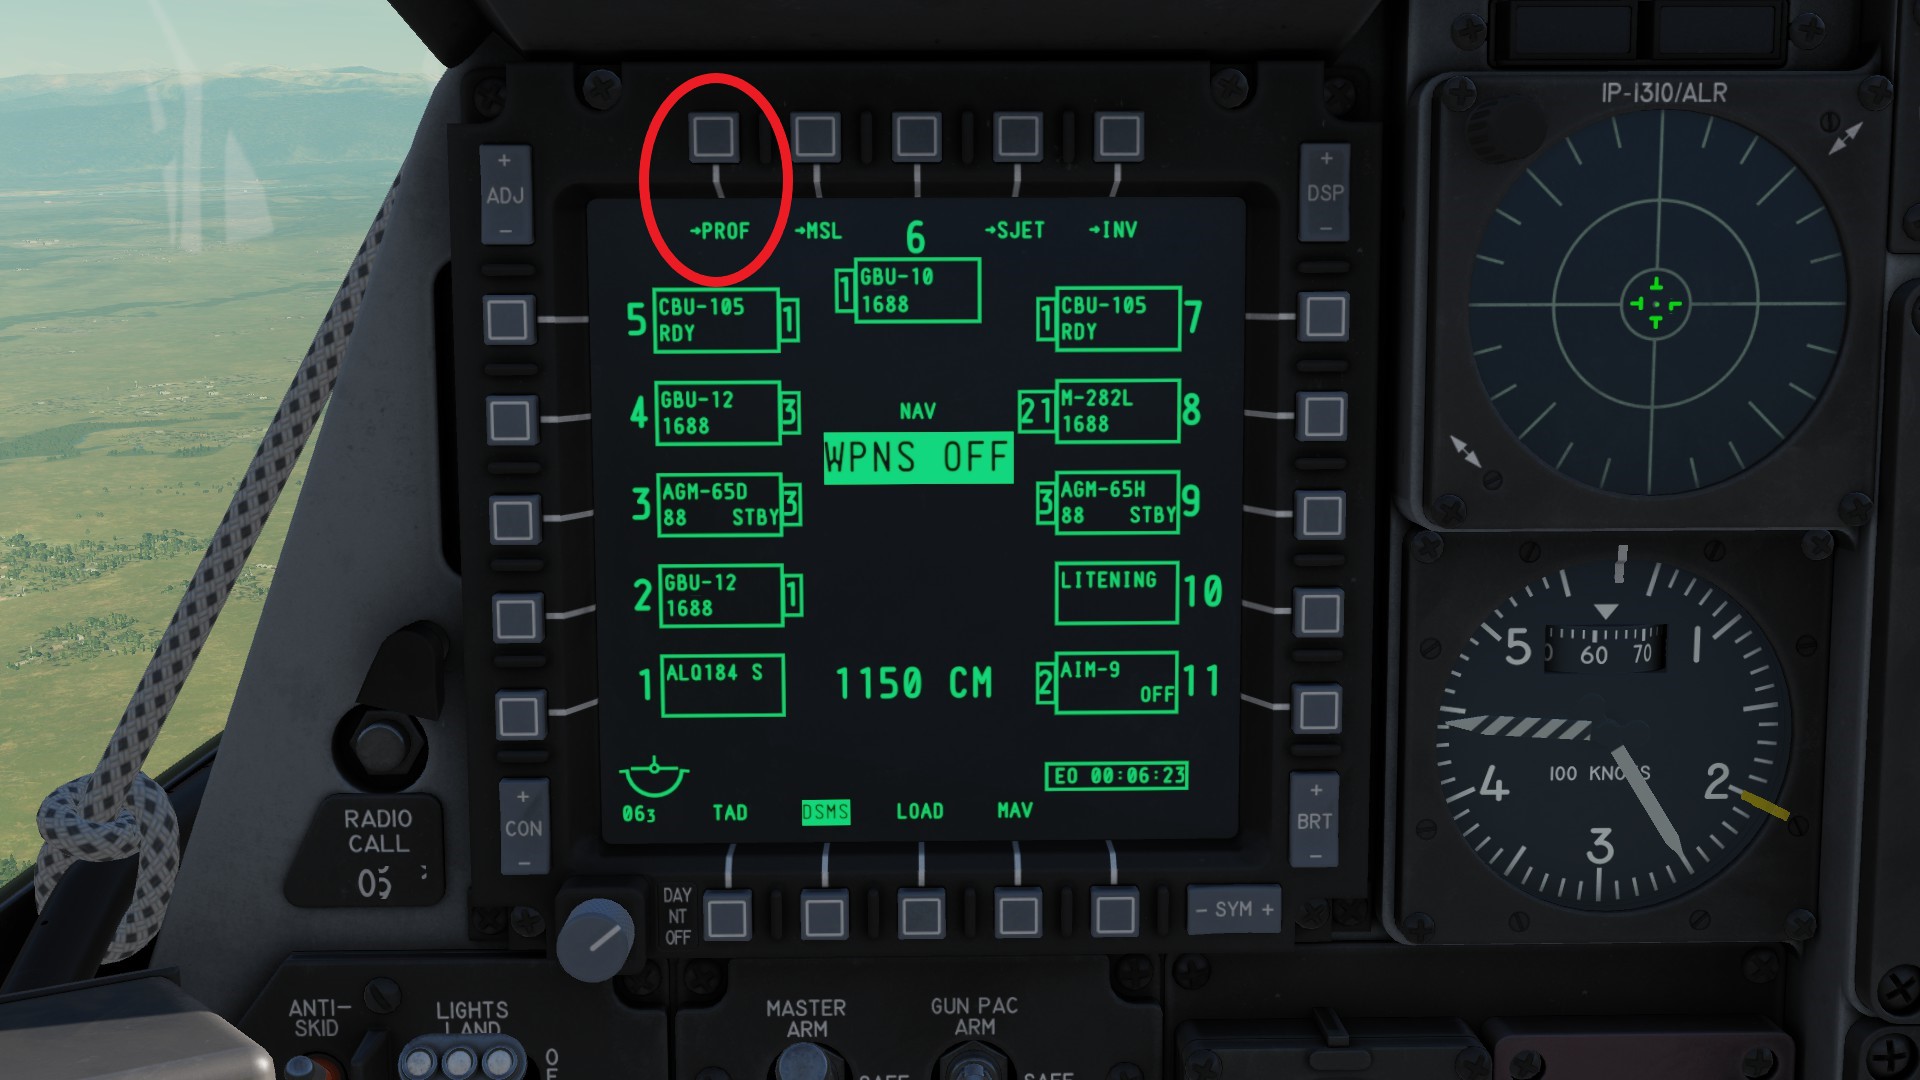 You can now see the profiles for all weapons on board and navigate between them by pressing the buttons on the right (red). You will also see a profile called WPNS OFF meaning, that not profile is selected - sort of an additional safety switch.
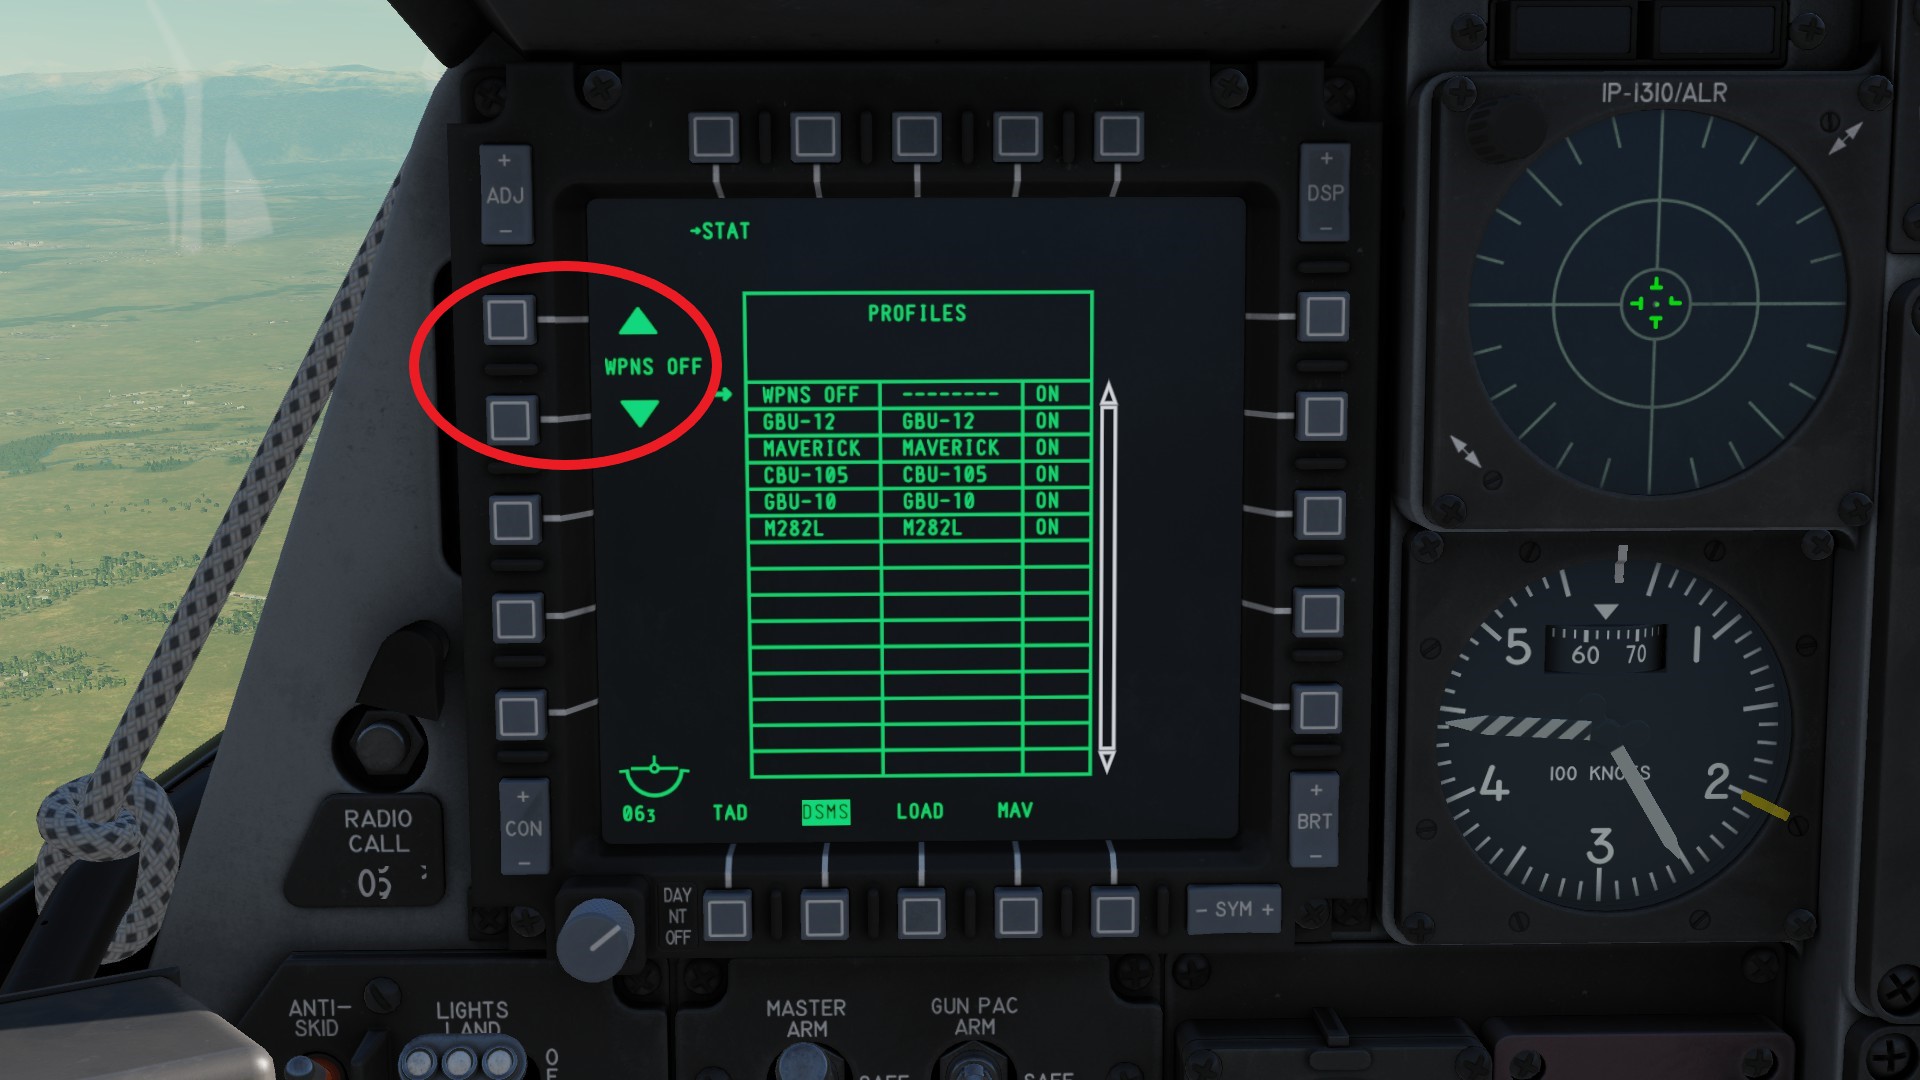 When you found the profile you want to see, you can press VIEW PRO (red) to view the setting of the profile or ACT PRO (blue) to activate the profile. As an alternative to activating the profiles here, you can make your HUD SOI by pressing HOTAS ♥♥♥♥♥♥ Switch Up short and then pressing HOTAS DMS Left / Right short to cycle between them.
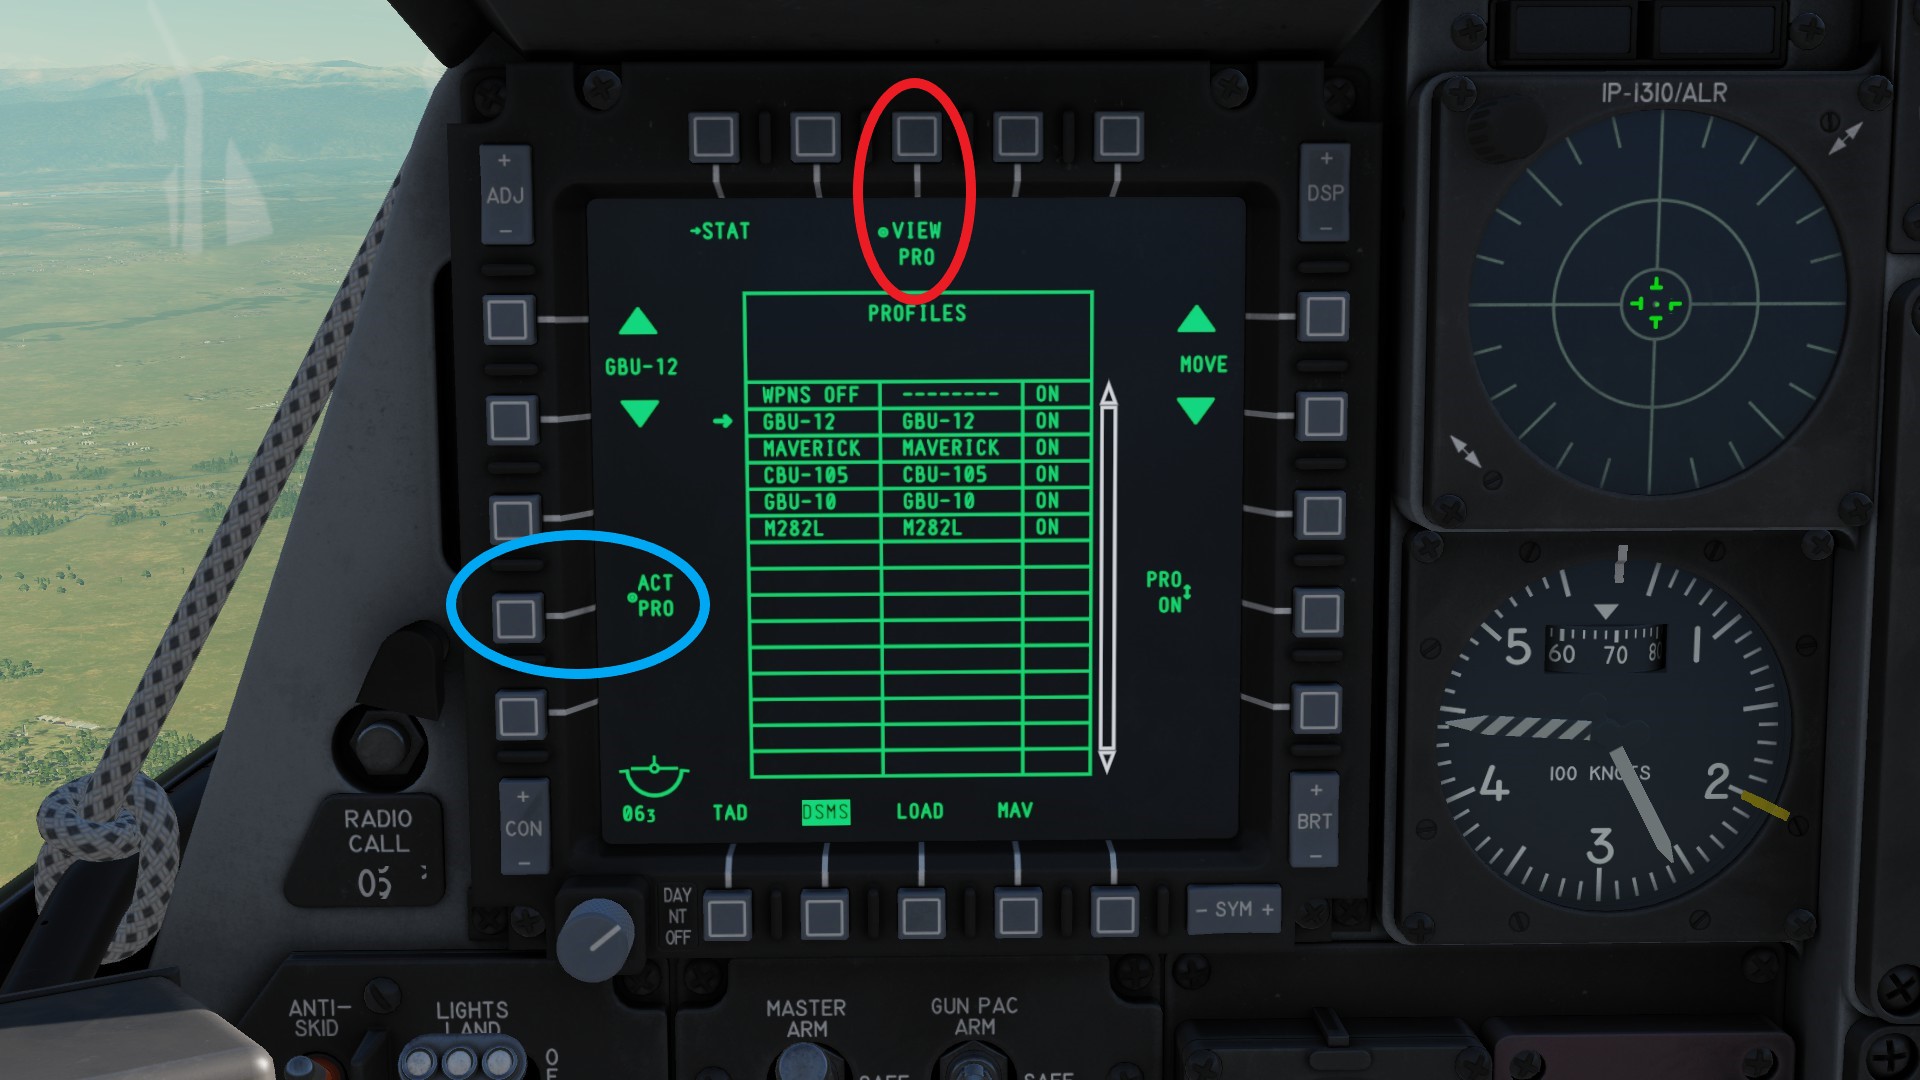 When you view a weapons profile, you will see information regarting delivery method, fuze and more. Since every weapon needs a different setup and has different settings you can change, i will go over them in the weapons chapter. One thing all have in common is the indicator at the bottom showing where the weapon of the profile you view is loaded (red).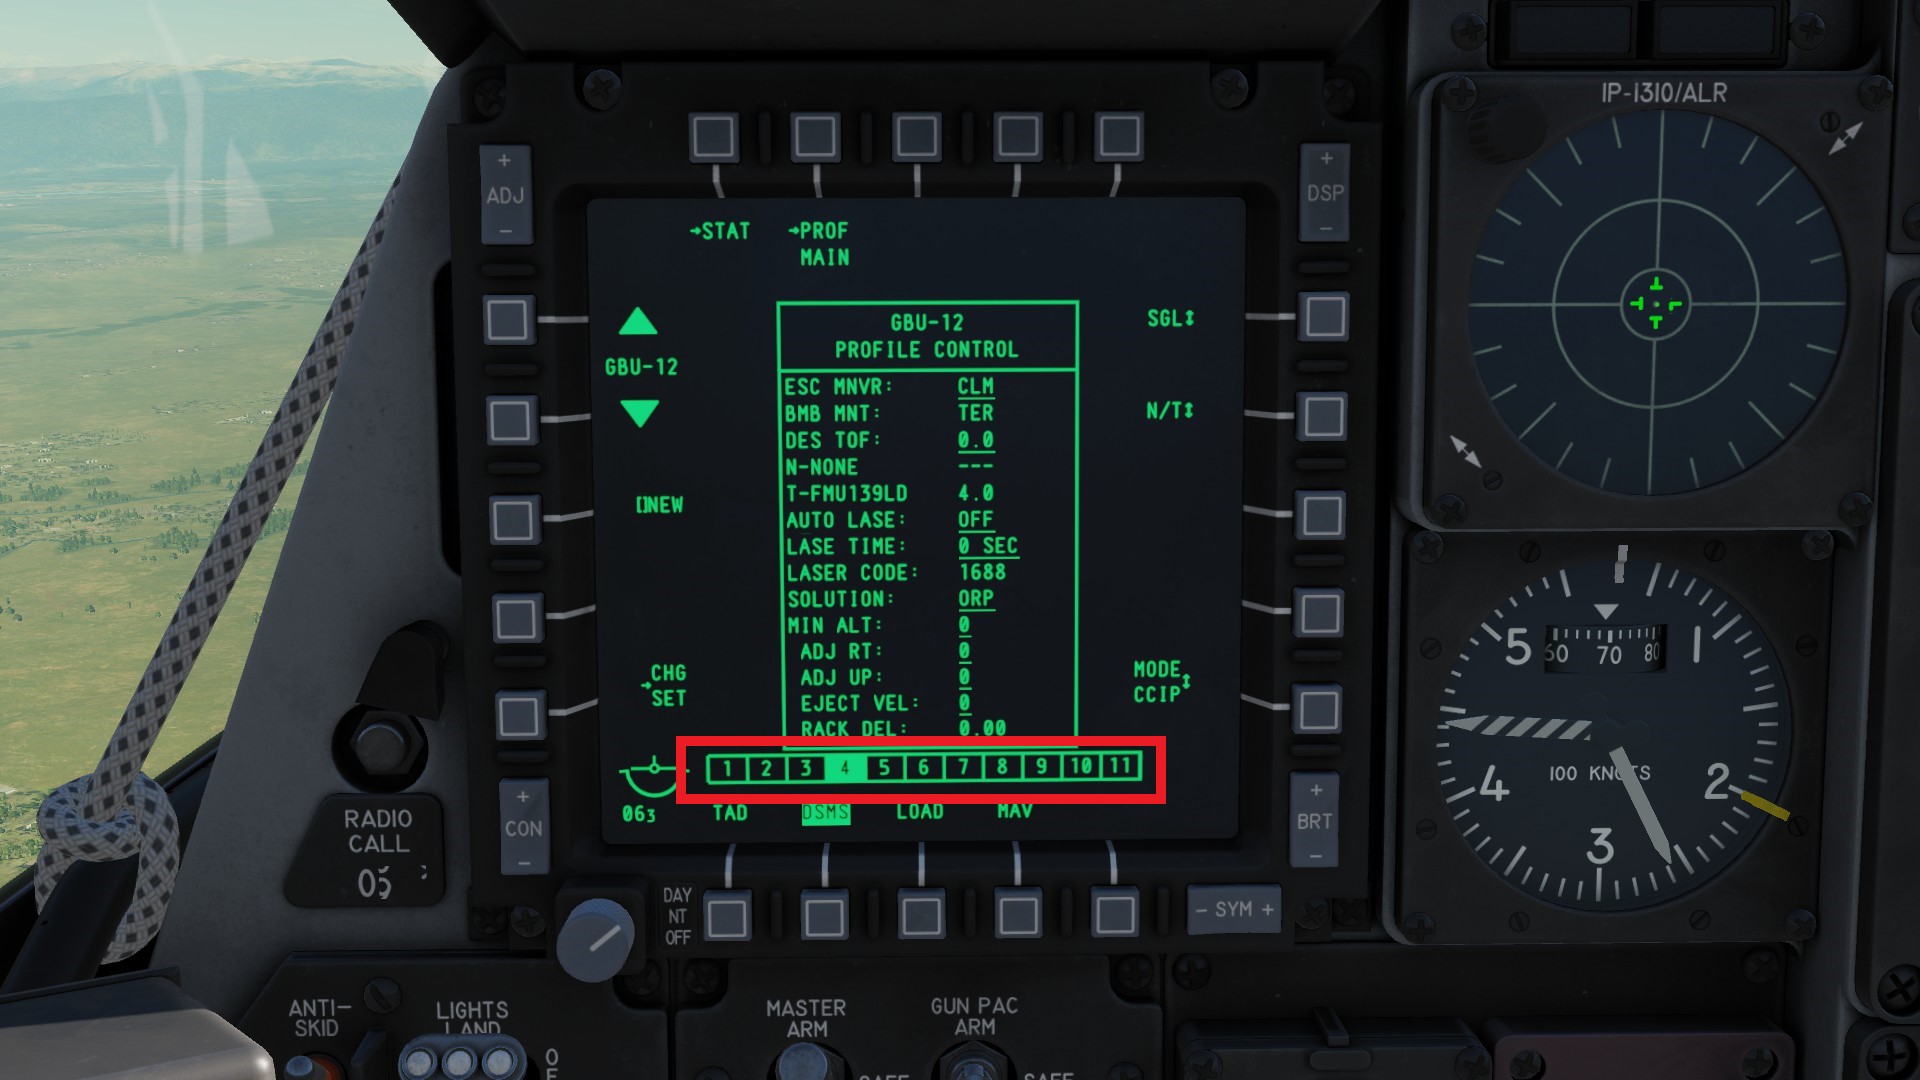
Countermeasures and RWR
Your countermeasures are your planes lifeline. No matter how good of a pilot you are, sooner or later you will find that missiles coming your way. The following onion shows what steps you can take in order to avoid being shot down.
Wait for air defense to be destroyed
This is by far the easiest way to not get killed - if there are no air defenses left, there is no way to get hit by them. The most practical way for us is asking allied flights, especially F/A-18 and F-16 if they can support us with AGM-88 HARM missiles. These will home in on the radiation from radars and are an effective way to get rid of radar guided SAM systems.
Dont get within range
This is also a easy way to evade enemy engagements. Many systems, especially AAA and IR guided SAMs are outranged by AGM-65 Mavericks and APKWS missiles.
Dont get detected
If you cannot outrange your opponent, it is best to not be detected in the first place. The easiest way to do this is terrain masking, i.e. having objects like mountains and hills between your aircraft and the radar.
Dont get locked
Eventually, you will have to expose yourself to deliver your weapon. However, if you are lucky and the radar prioritizes another target at the time, you can engage without being locked yourself.
Dont get launched against
If you are being locked, there is still a chance that the air defence will not fire until youre closer to it or present a different aspect of your aircraft, like your engines for IR guided SAMs.
You may be able to use this time to launch your weapon and mask your airfcraft again.
Dont get hit
If you are being fired at, you will have to use evasive maneuvering to evade the incoming fire. In addition, you can use chaff and flares to mess with the guidance systems of radar and IR guided SAMs respectively.
Dont get killed
If you fail to evade incoming fire, depending on what shot at you there may still be a chance that you get away damaged. Effects can range from scratches in your paint to loosing engines, systems and anything inbetween.
Before you start flying, you will want to set up your countermeasures.
The countermeasure control panel is next to your right thigh, above the master caution panel.
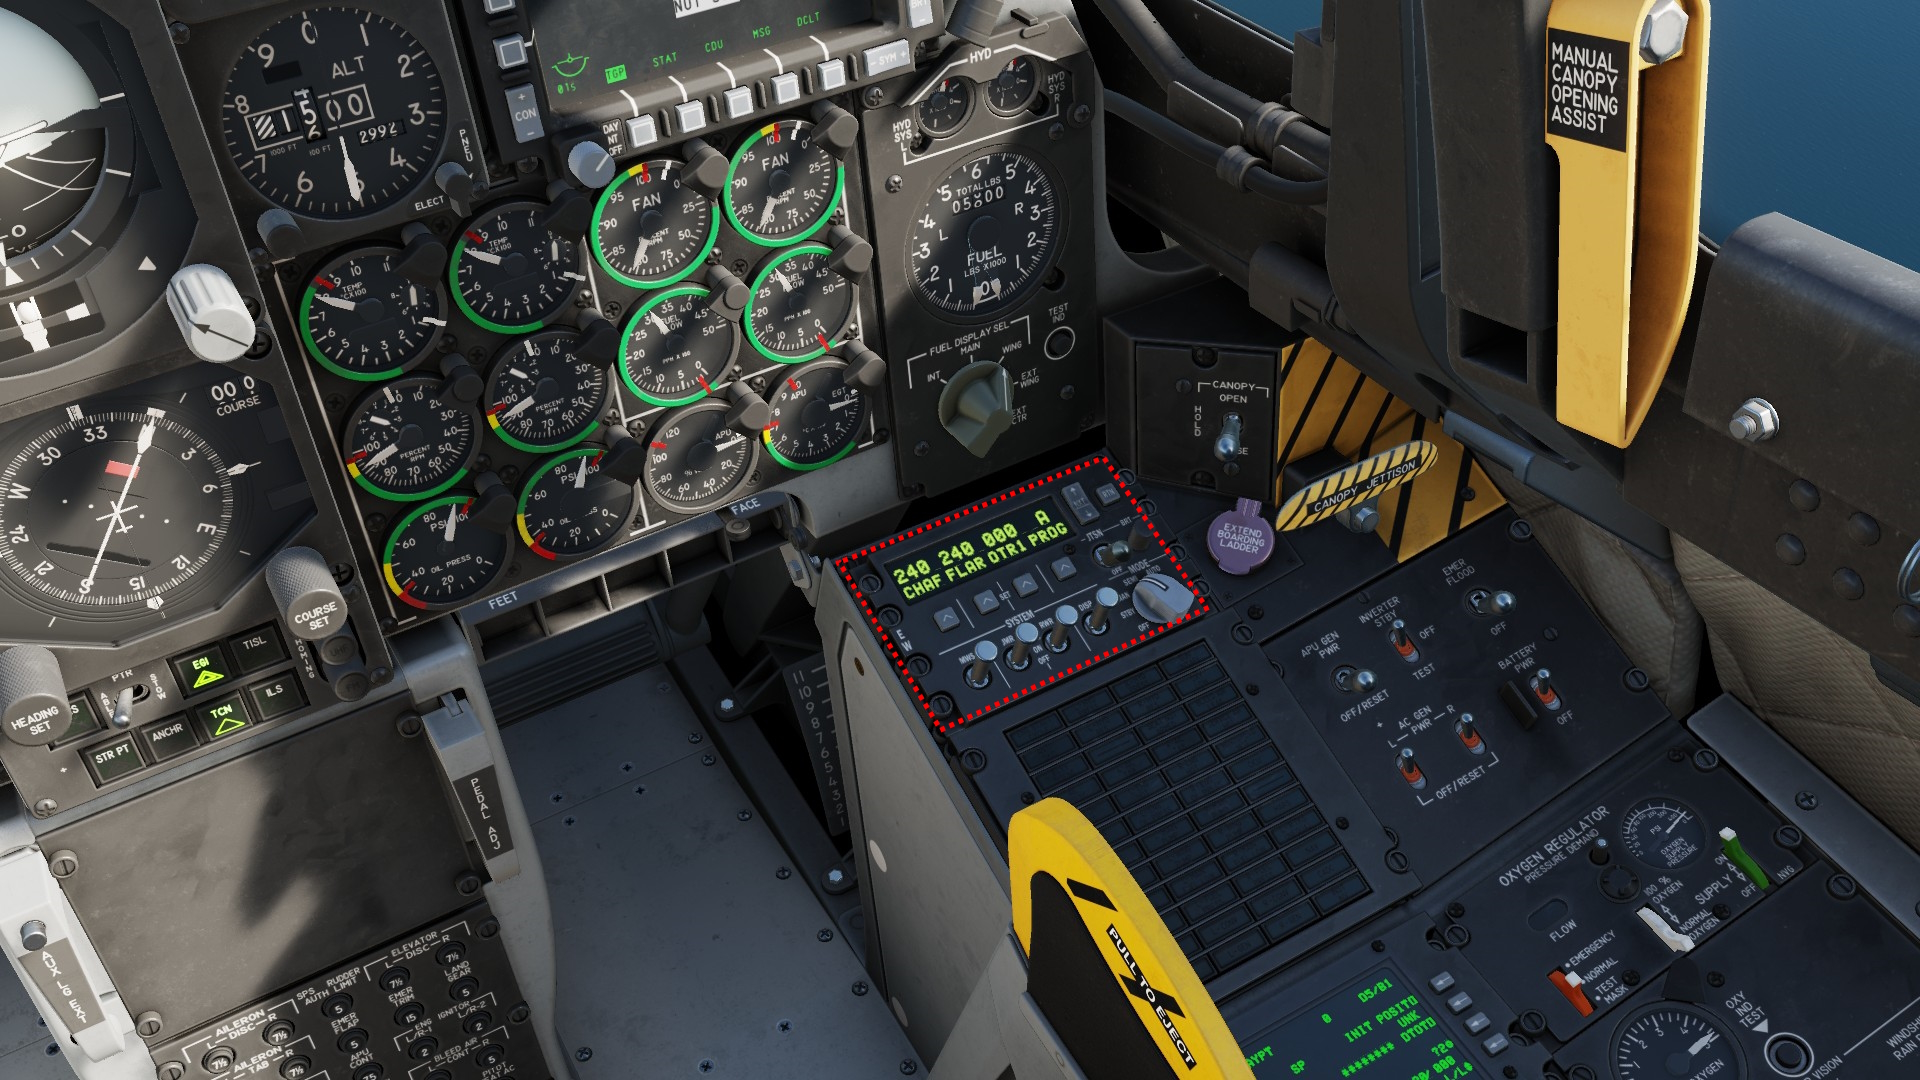
The panel consists of the following parts:
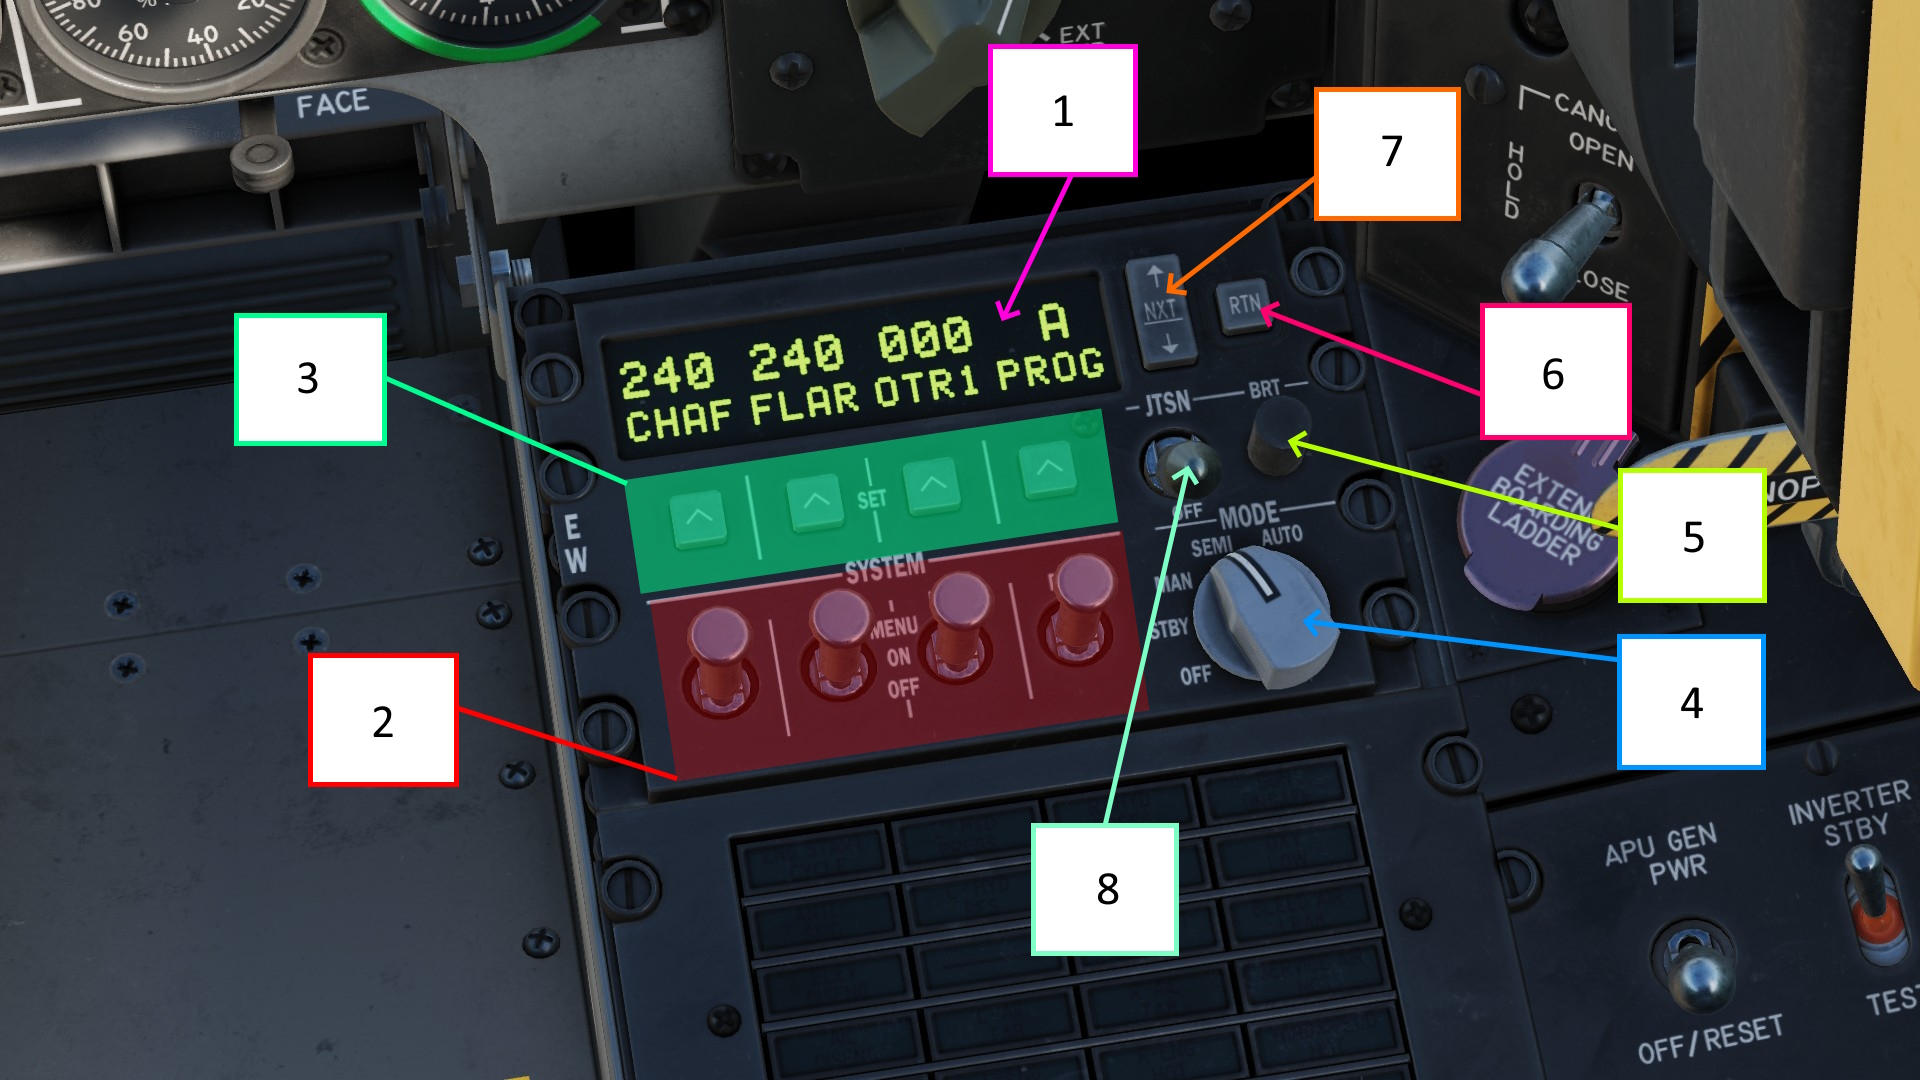
- A display showing relevant information
- The system power switches to turn various subsystems on or off
- "Edit program value" keys - more on these later
- The CMS master mode knob to select the systems operating mode
- A brightness knob for the the display
- A return and save key - more in that later
- A rocker switch to change the current program
- The jettison switch so you dont need to perform a emergency landing with magnesium rods under your seat.
Countermeasures in semi auto mode
Semi auto is the easiest mode for your countermeasures. With this mode, the plane will automatically choose the program it deems best for the current threat. Then all the pilot needs to do is dispensing it with HOTAS CMS Z axis (it says axis but its actually a button).
The setup is as follows.
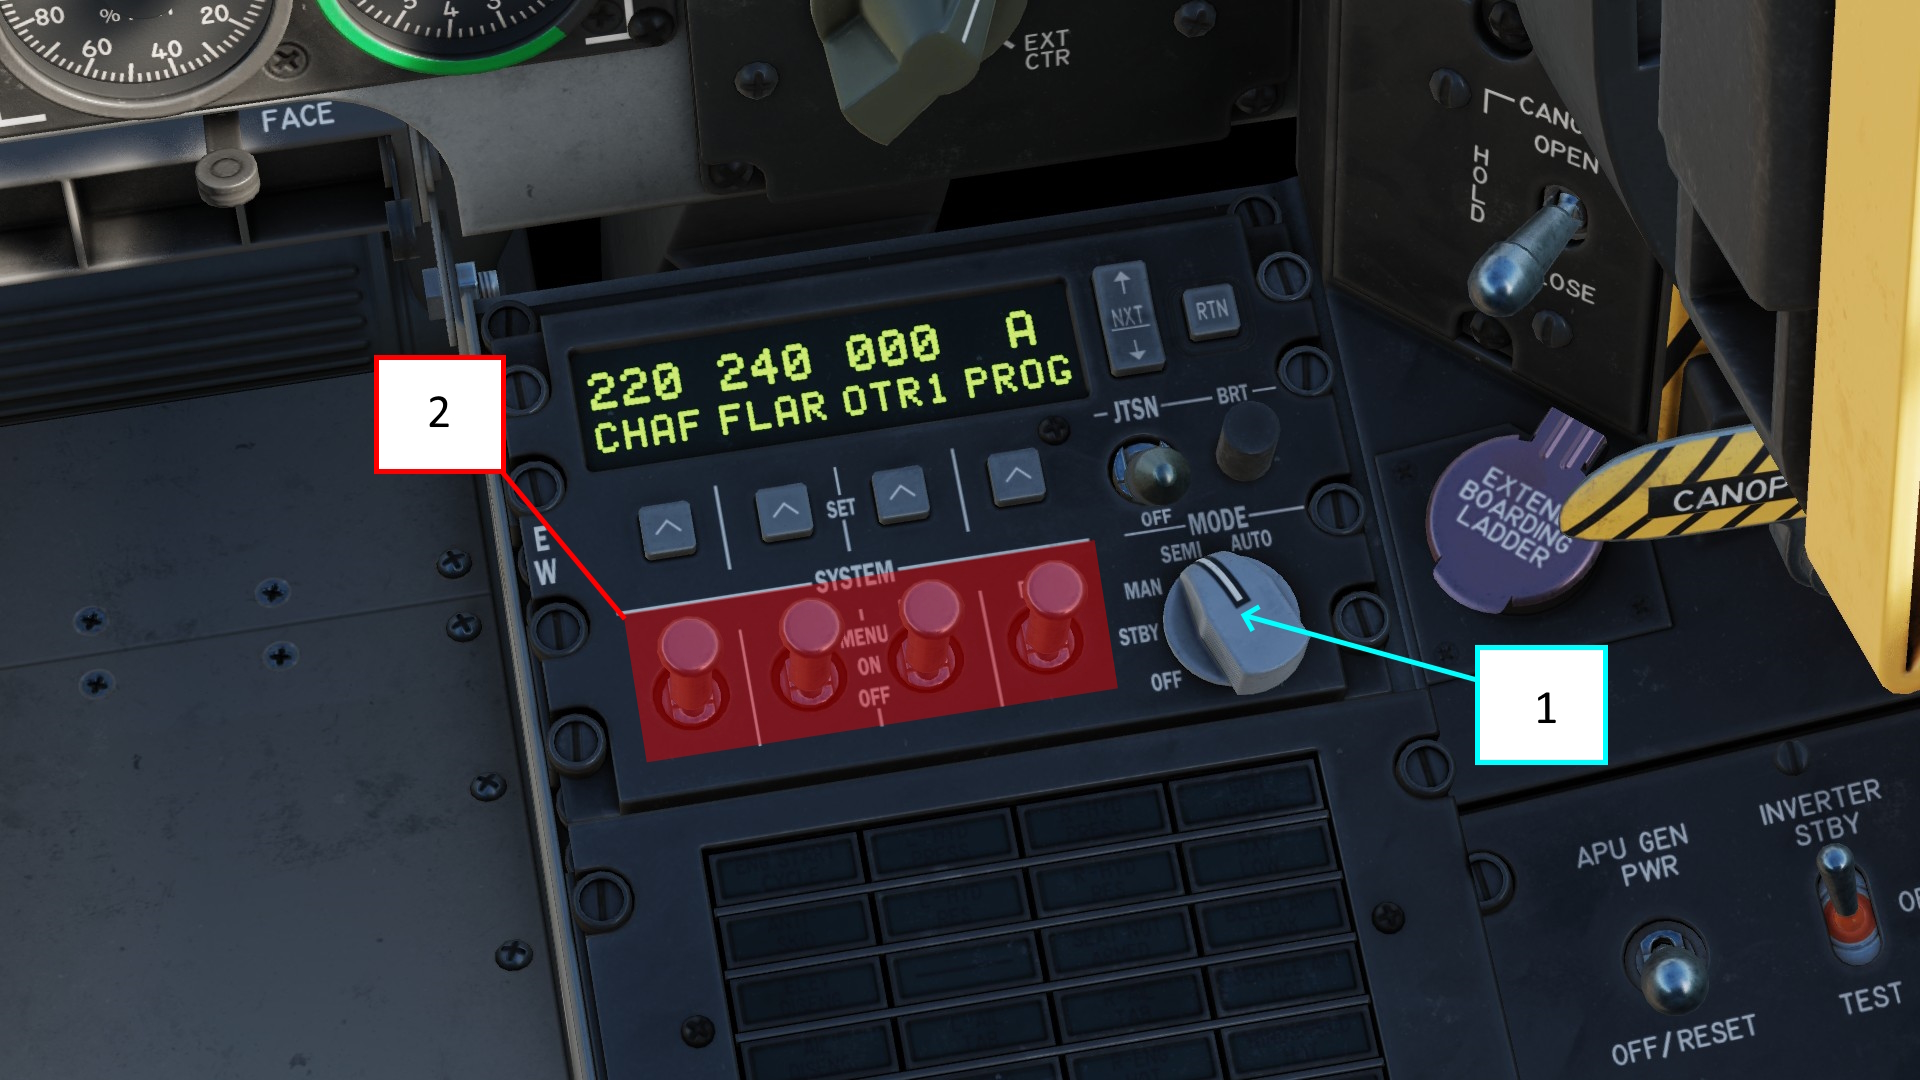
First turn the CMS Mode selection knob to the SEMI position.
Then, turn on all the subsystems.
Done. Your aircraft will choose a countermeasure program for you. Dispense it with HOTAS CMS Z axis.
Countermeasures in manual mode
If you dont trust the semi auto mode or you want to have more control over your aircrafts cm programs, you can just the manual mode.
Here the pilot will have to choose the best countermeasure profile by himself and dispense it. He can also edit the profile to fit his needs.
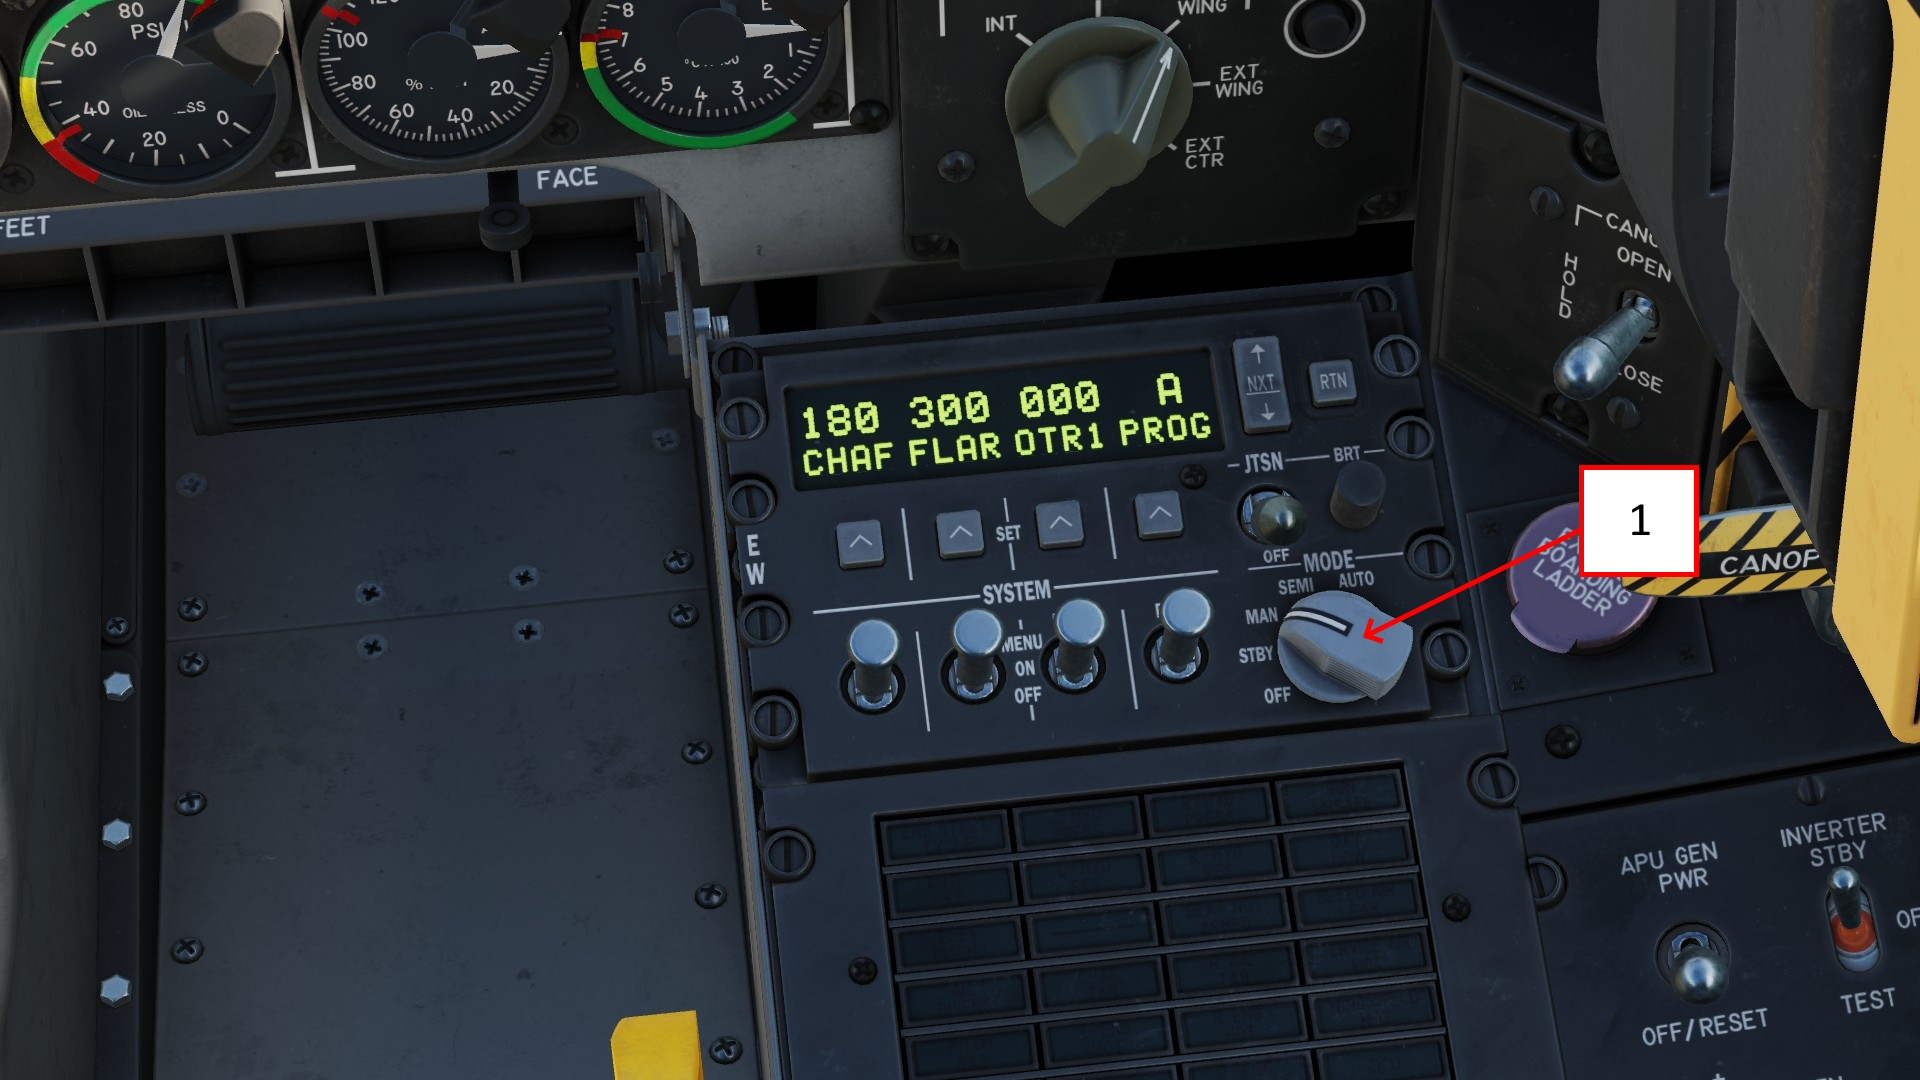
First, set the mode knob to manual.
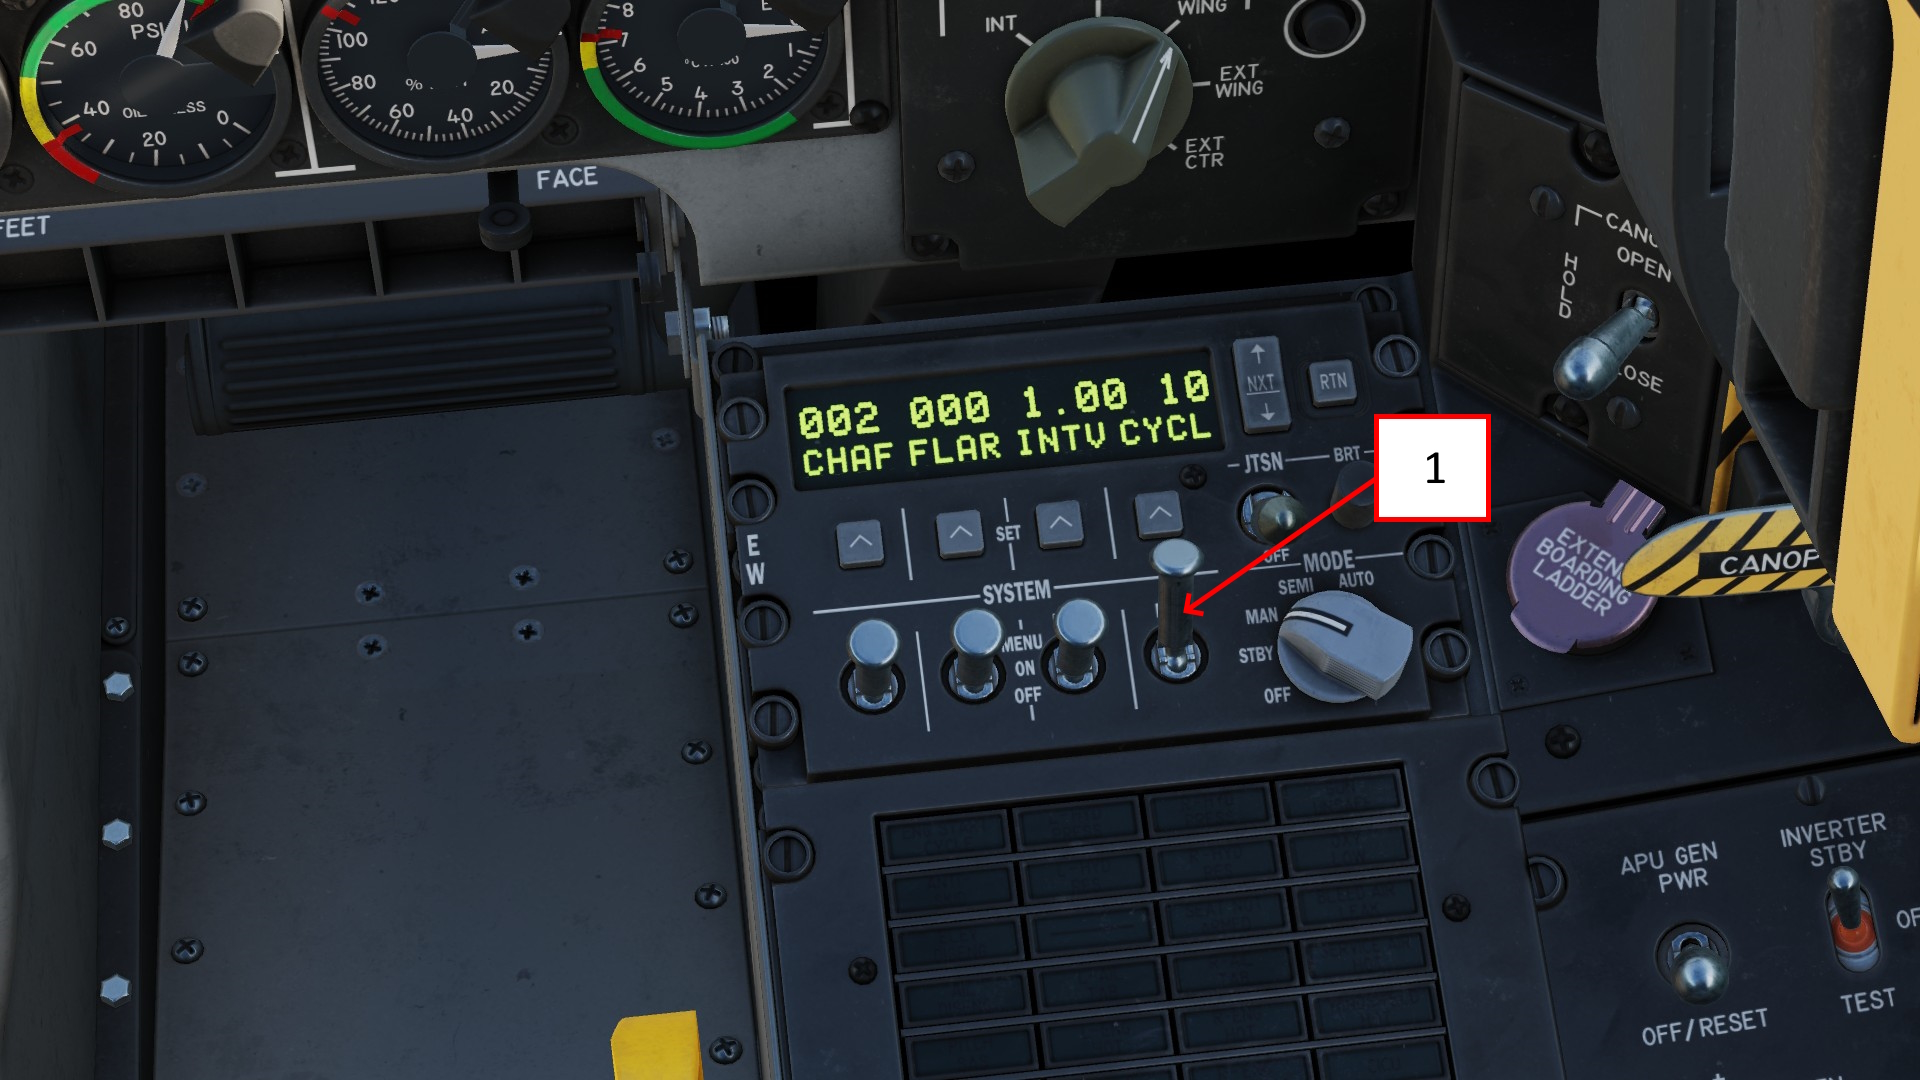
From here, you can edit the currently selected profile by right-clicking the right most power switch.
This will open the profiles settings.
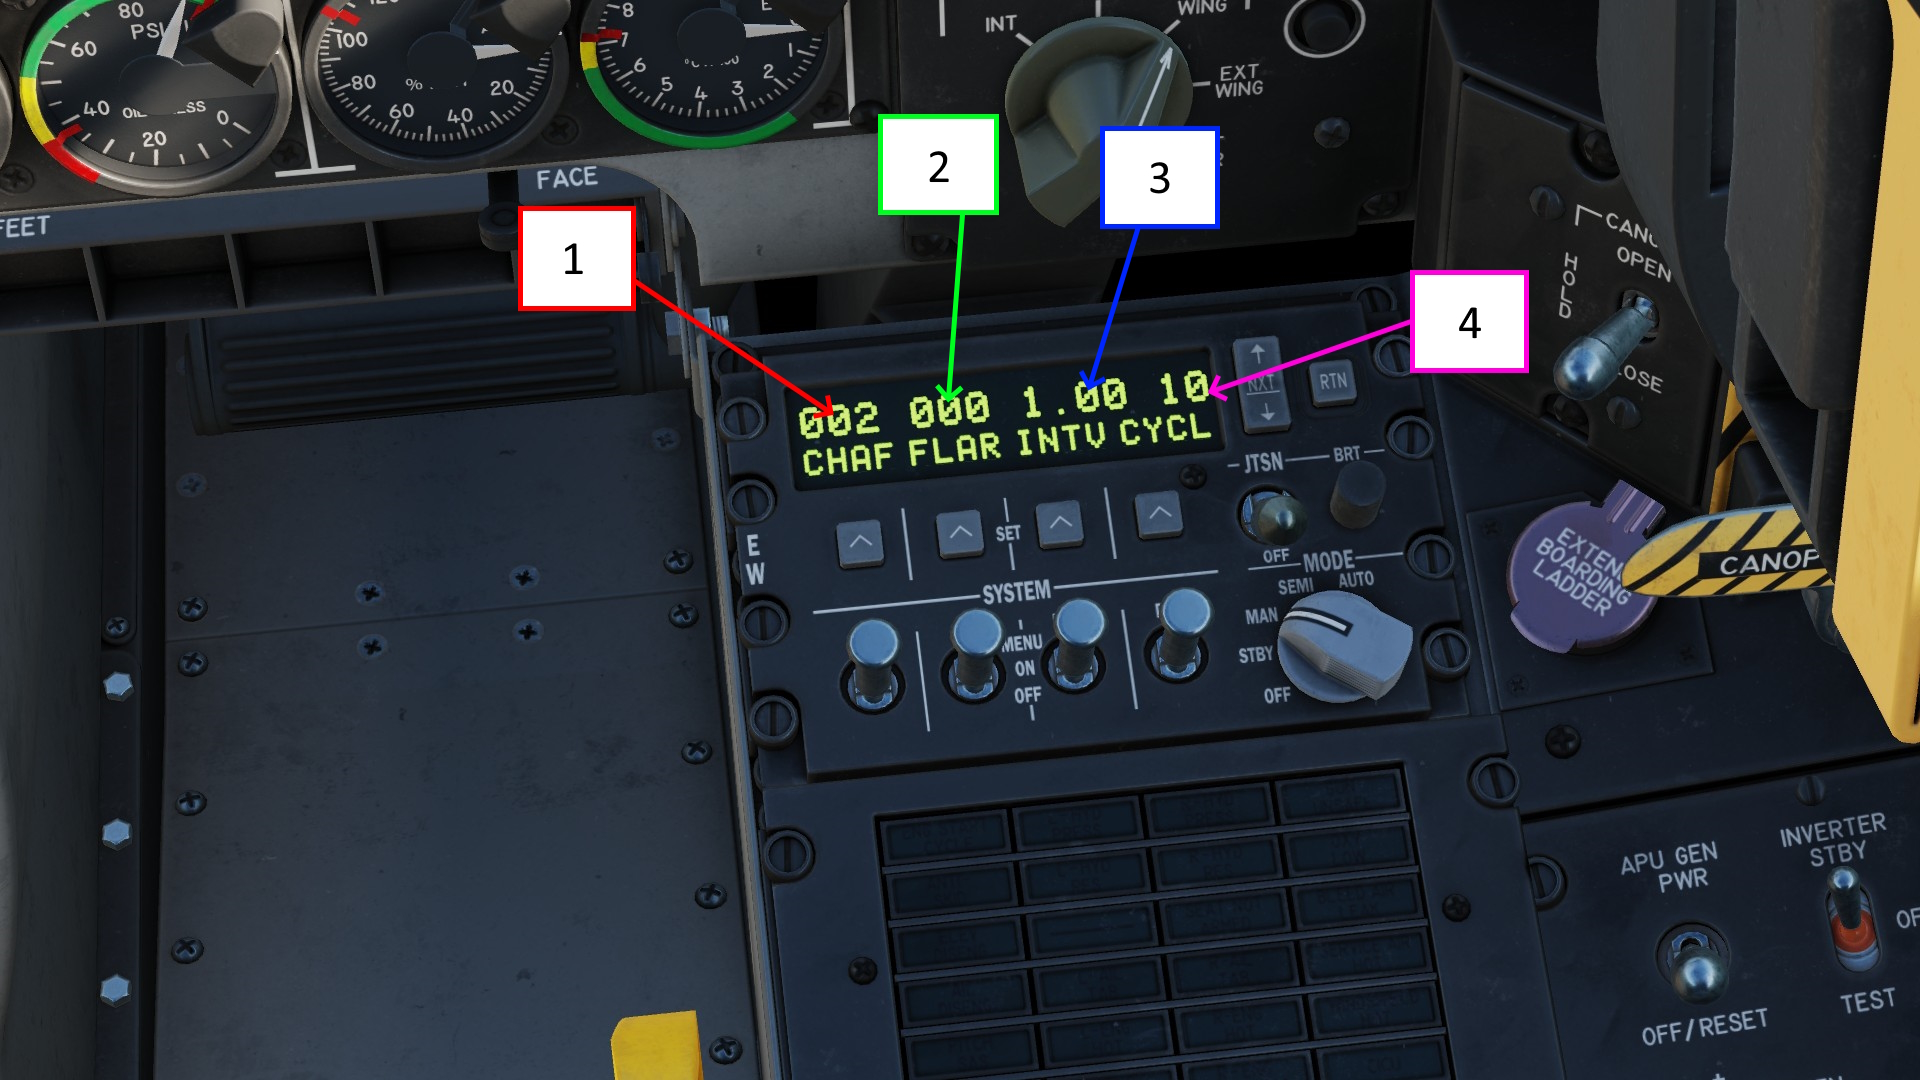
The settings are as follows:
- The amount of chaff dispensed per cycle
- The amount of flares dispensed per cycle
- The interval between each cycle in seconds
- The amount of cycles
The shown profile for example dispenses 2 chaff every second and repeats this 10 times.
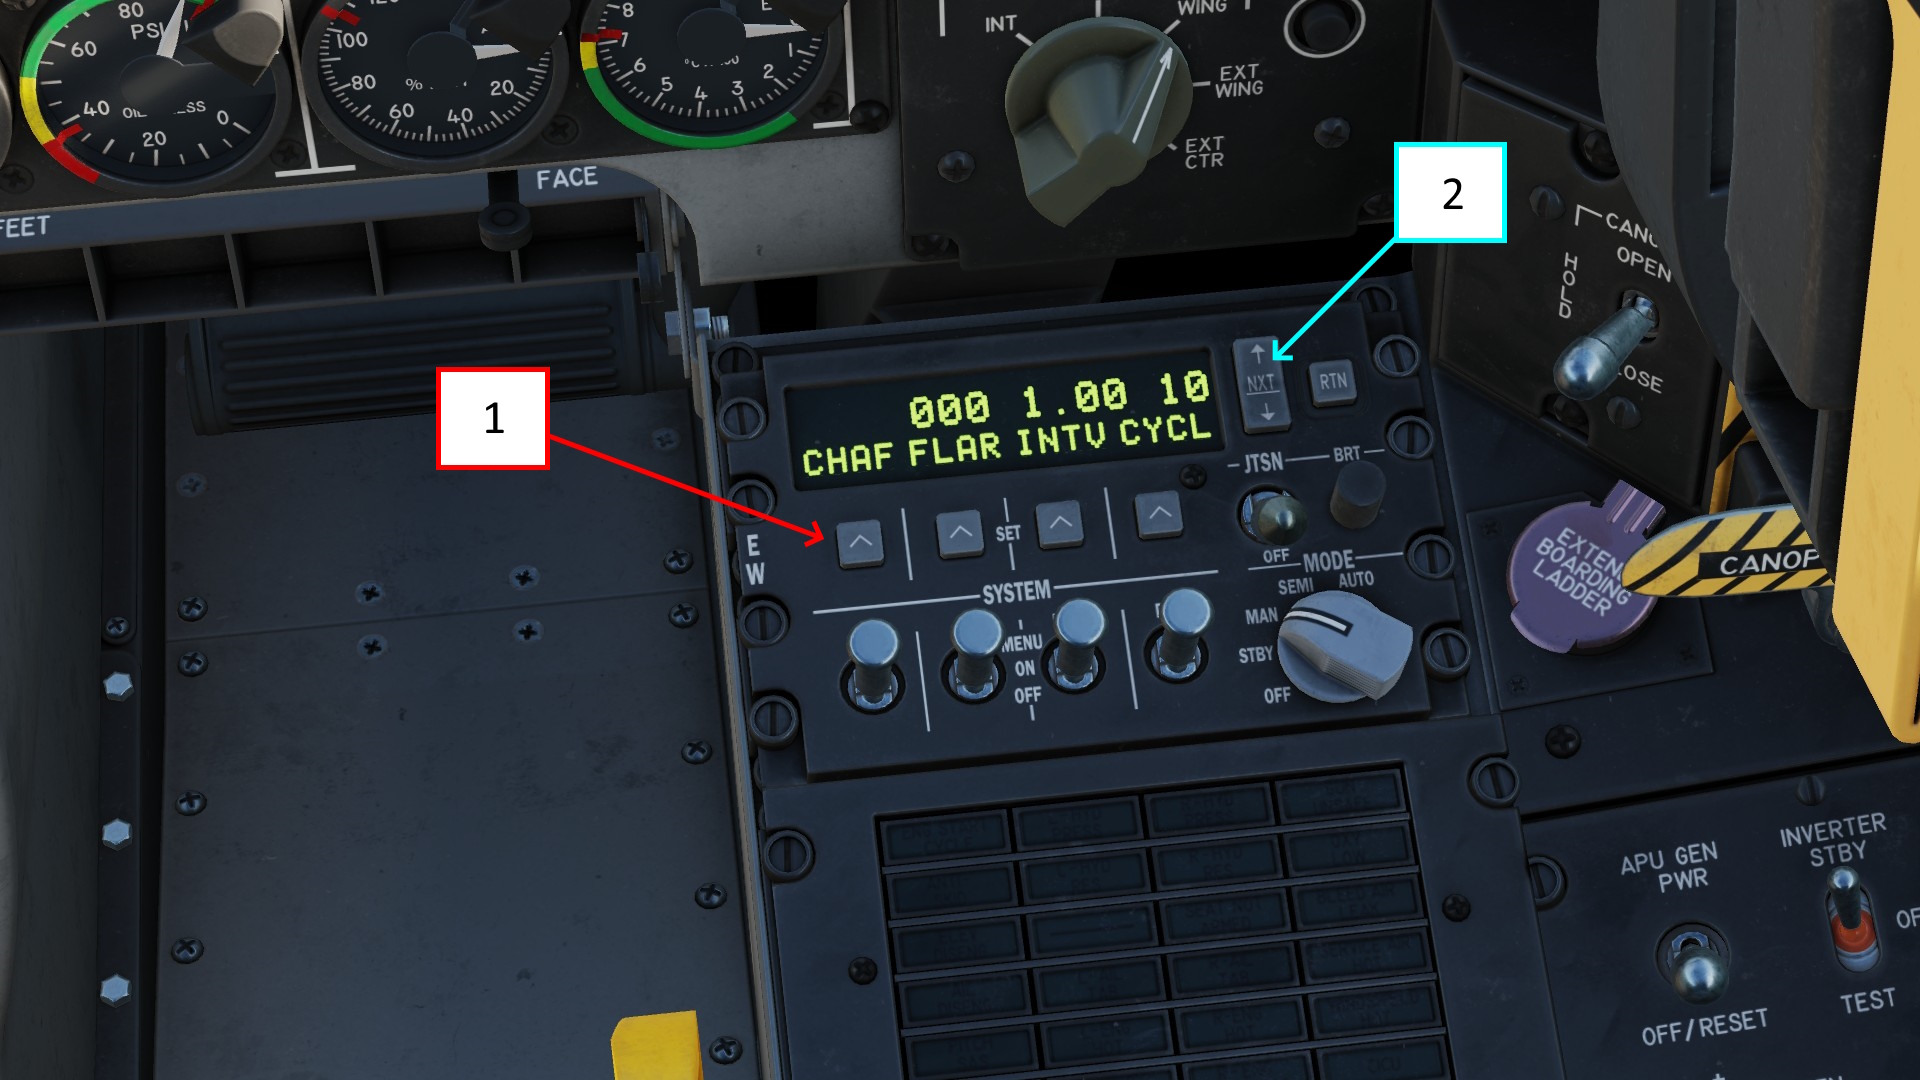
To edit the value, press the "edit program value". This will make the value above it start flashing.
Now, increase or decrease the value with the cycle rocker up or down.
Once youre done with one value, you can simply press another "edit program value" button and repeat the process.
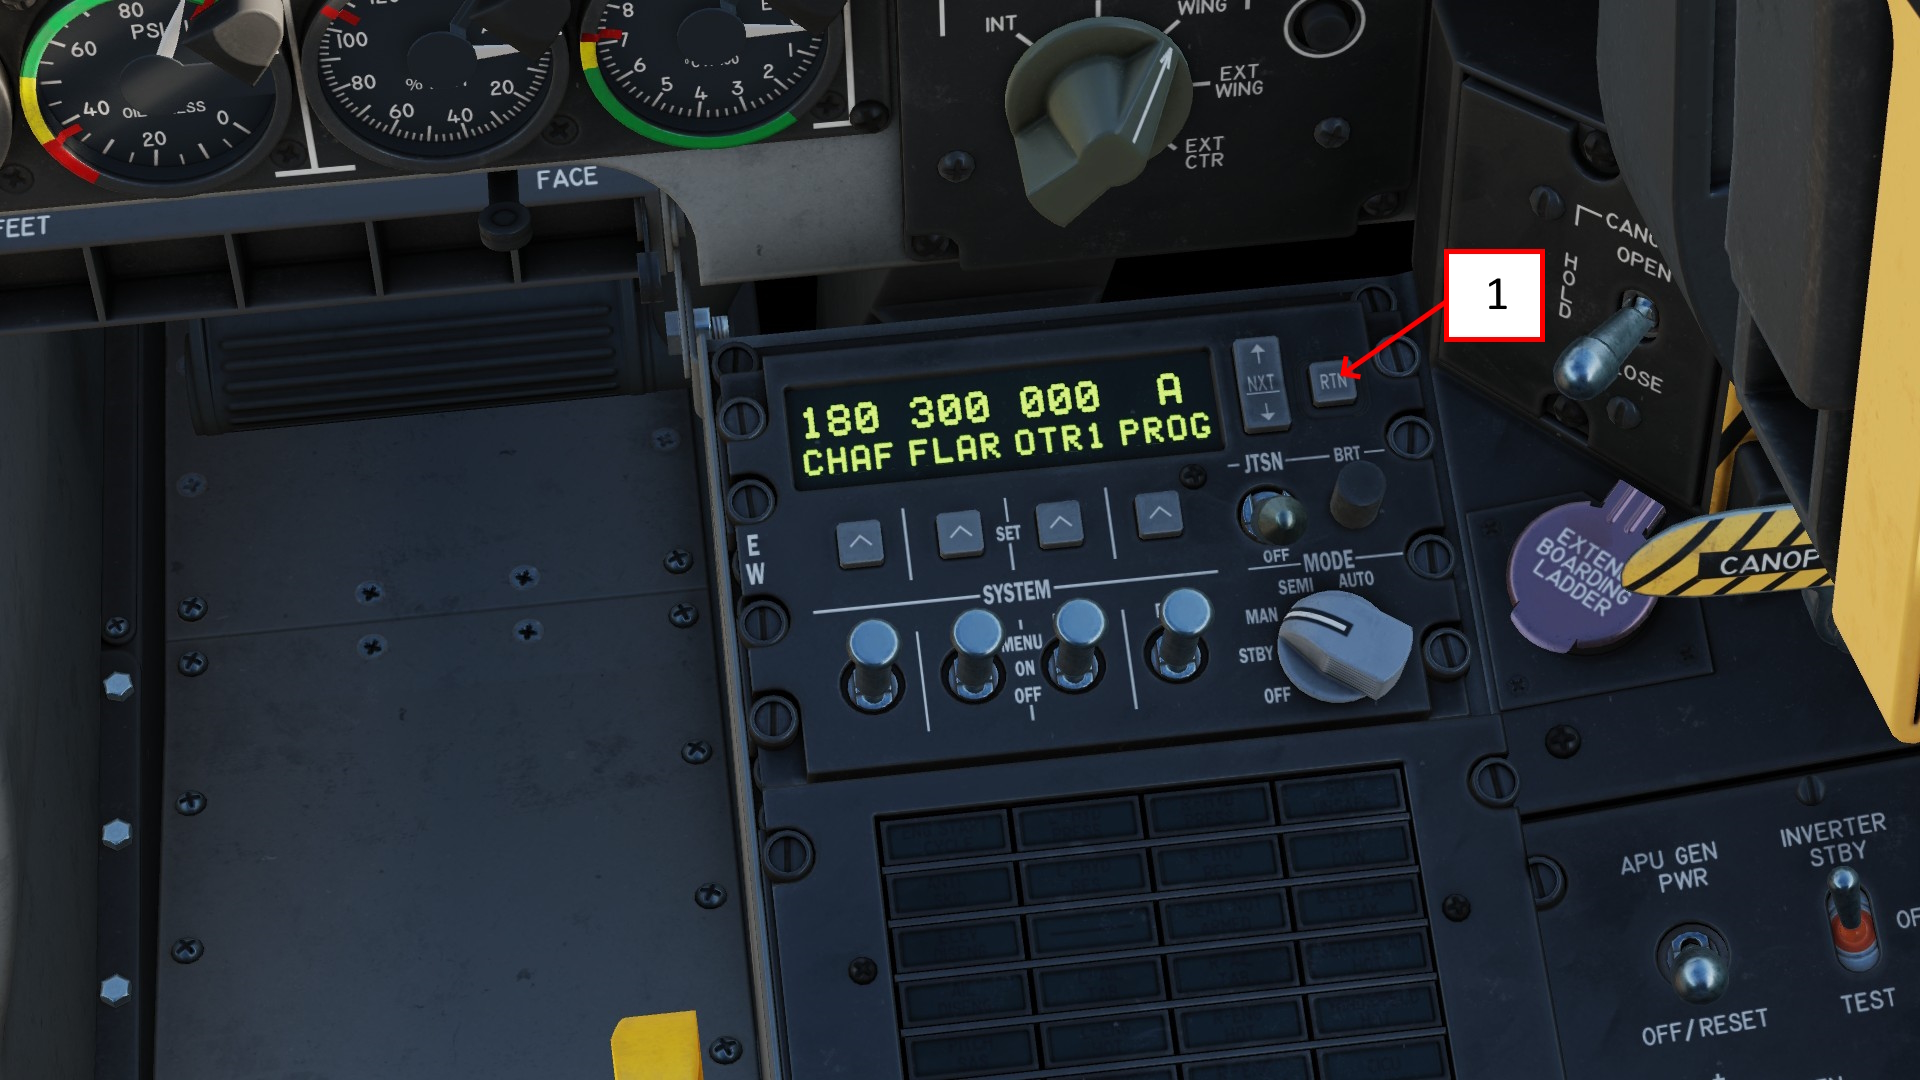
Once youre done editing the profile, press the return key until youre back in the default display.
You can use the same cyclic rocker switch to cycle to a new program and edit this one as well.
Personally i use the following programs:
Against IR guided SAMs
0 CHAFF | 2 FLARE | 0.25 INTV | 10 CYCL | sharp change in direction and dive
This profile will rapidly dispense 20 flares over a 2.5 second timeframe.
Against radar guided SAMs
5 CHAFF | 0 FLARE | 3 INTV | 2 CYCL | sharp dive and terrain masking
This profile will dispense two blops of chaff over a 3 second interval.
Always fly with your flare profile ready. Change to your chaff profile once you are being locked by a system.
IR SAMs will no give you any warning other then the missiles warning reciever detectiong the launch, hence you have a shorter window of opportunity to defeat the missile.
NOTE REGARDING JAMMERS
Youtuber ralfidude made a video in which he shows the usefullness of jammers in DCS. Long story short, theyre not worth taking, hence i will not go over its jamming modes.
The radar warning receiver or RWR is the small dart board looking display next to your left MFD.
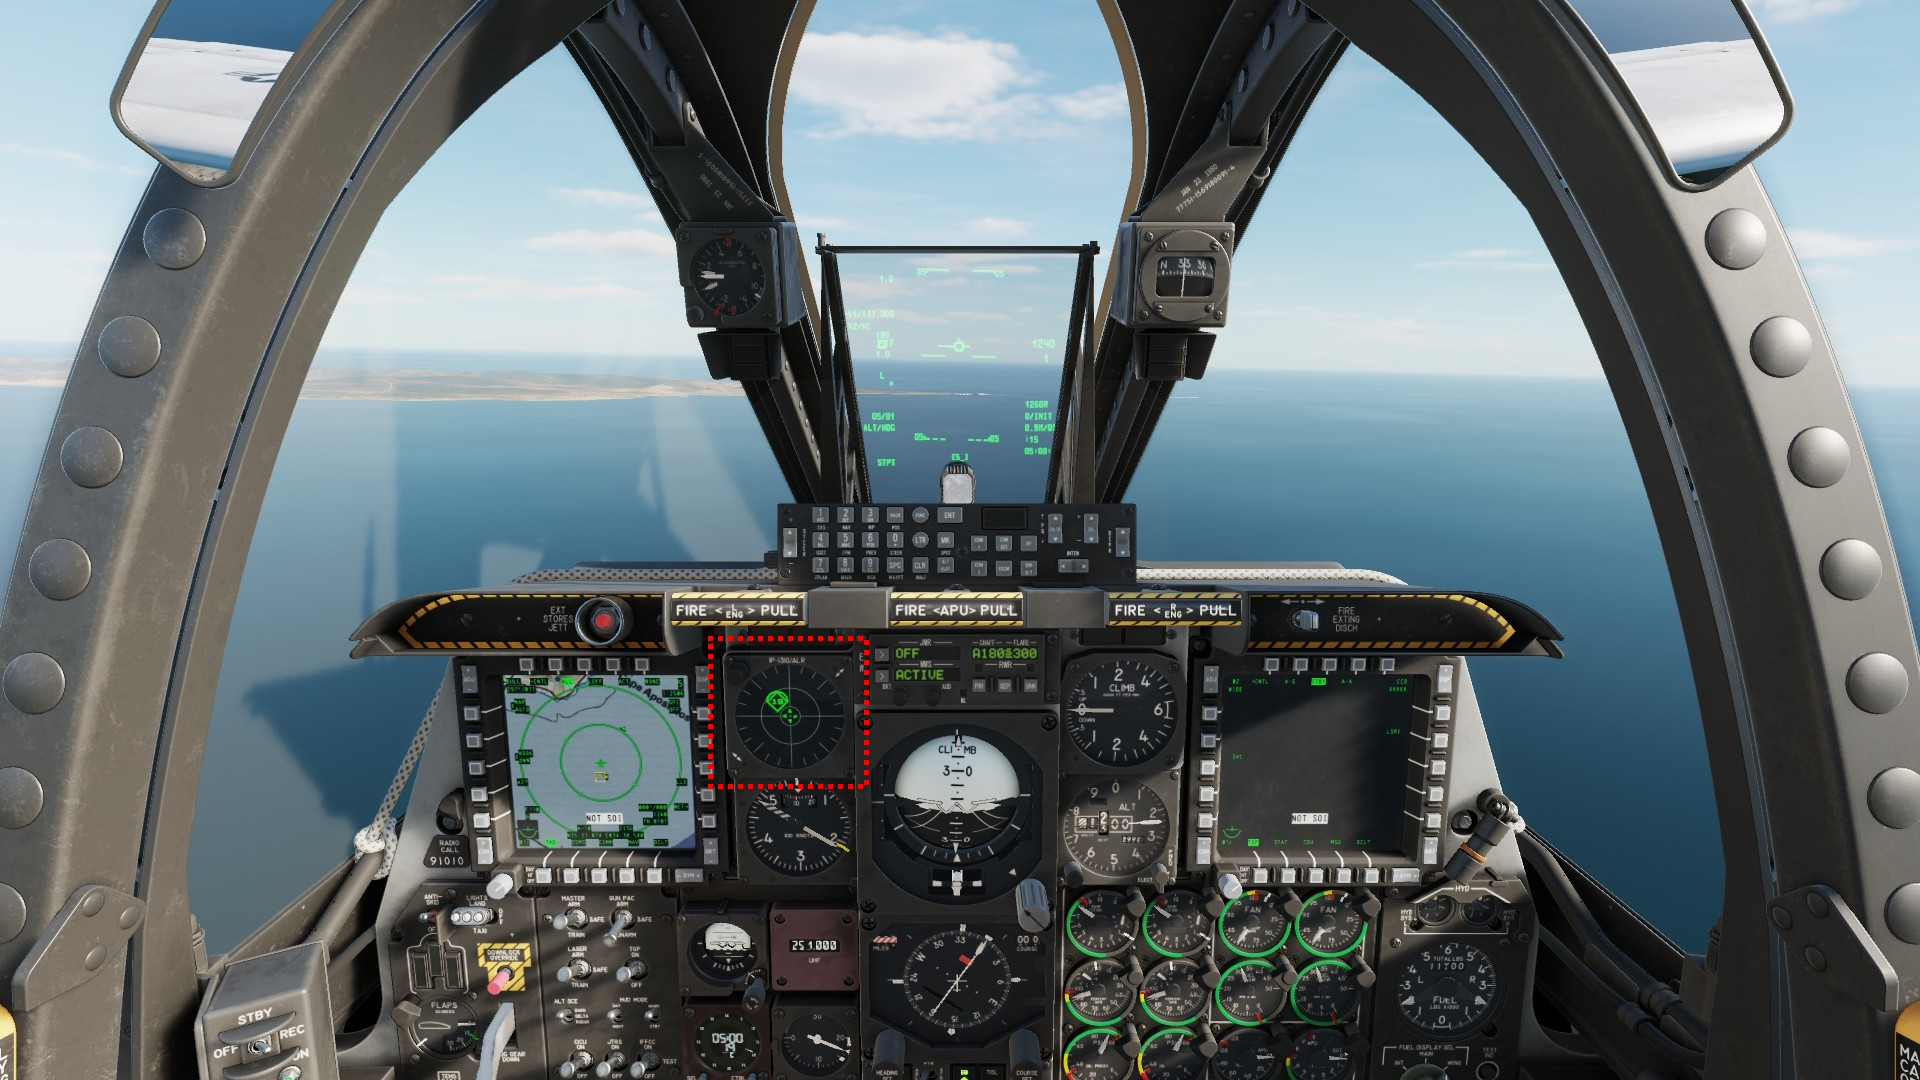
This handy device will let you know about all radars, lasers illuminating your aircraft and missiles being launched near you.
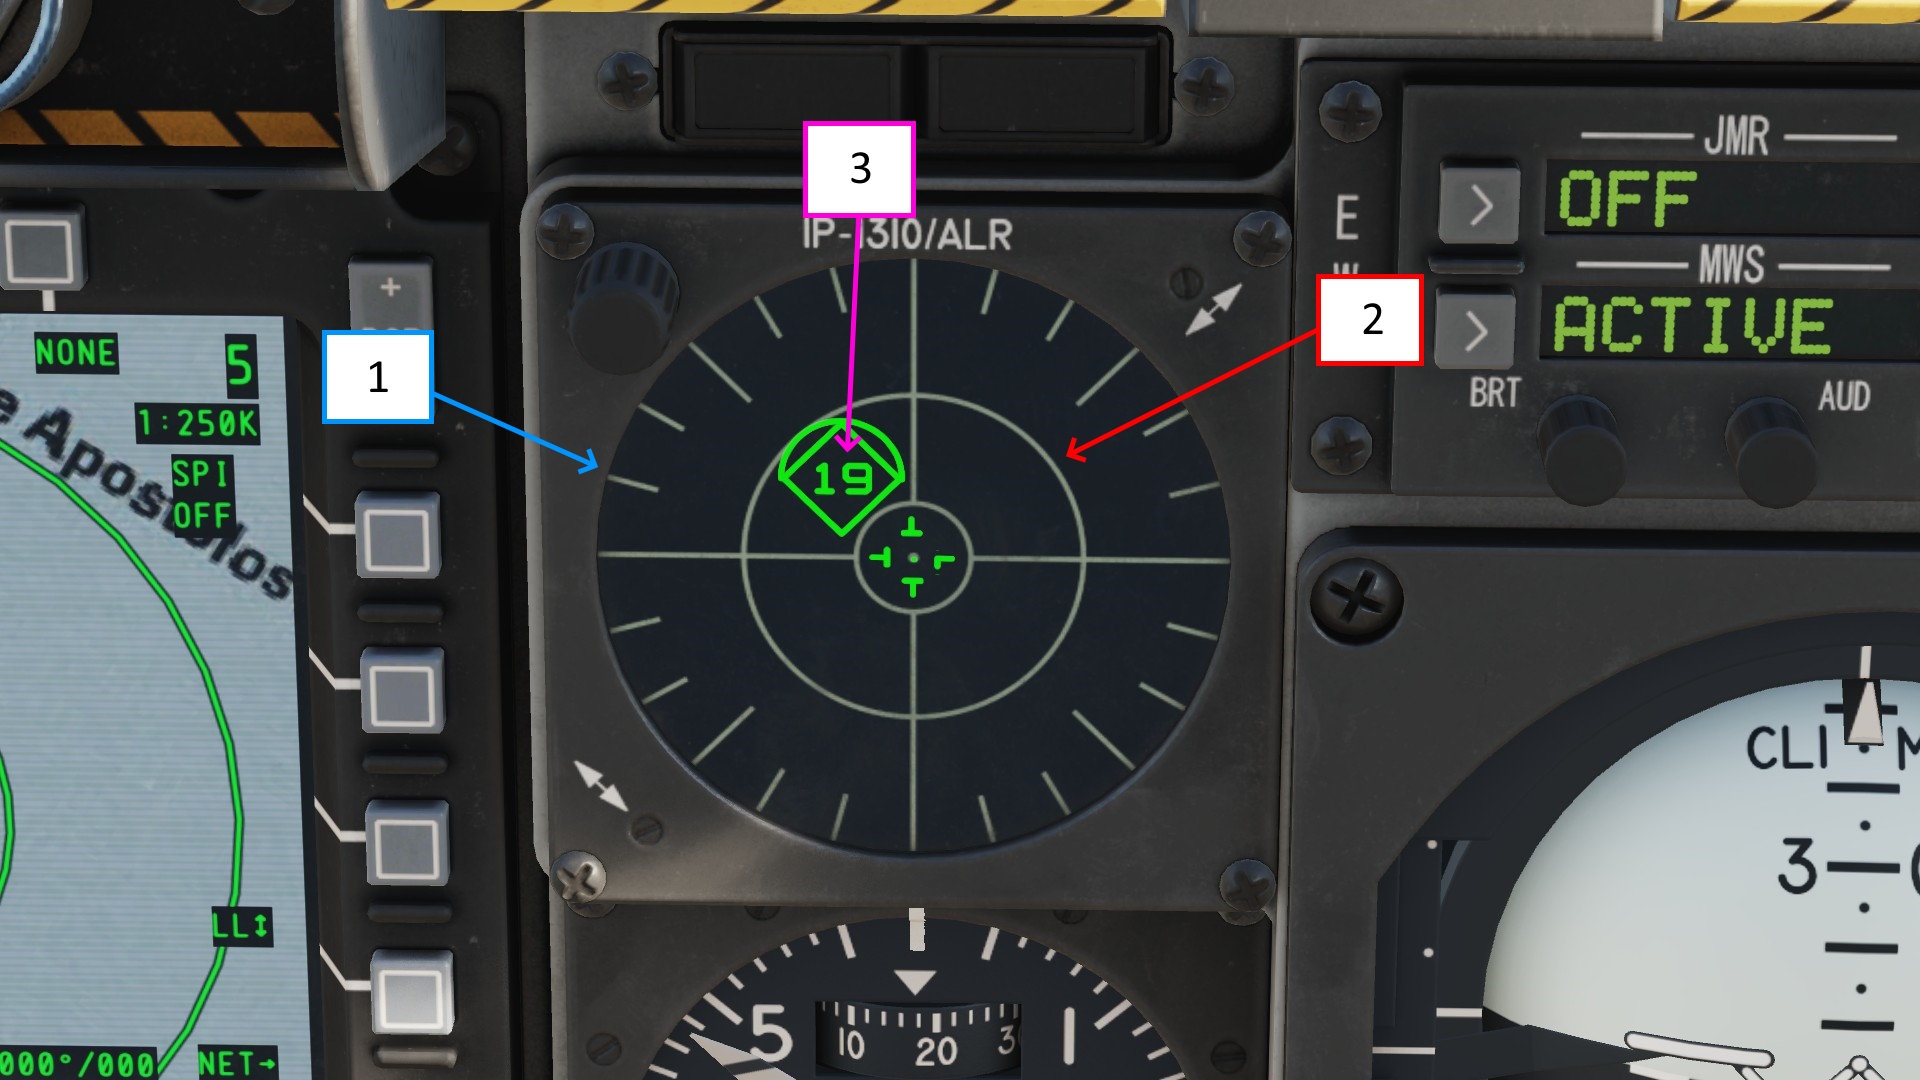
- Outer circle
- Inner circle
- Signal
The display is basically split into a outer circle and an inner circle. These do not necessarily correlate to how close you are to the actual emitter, but rather how strong the signal is.
For example, a longrange early warning radar could be in the inner circle while a short range SA-19 is in the outer one.
The position on the display however (left, right, infront or behind the center [your aircrafts relative position]) however is accurate.
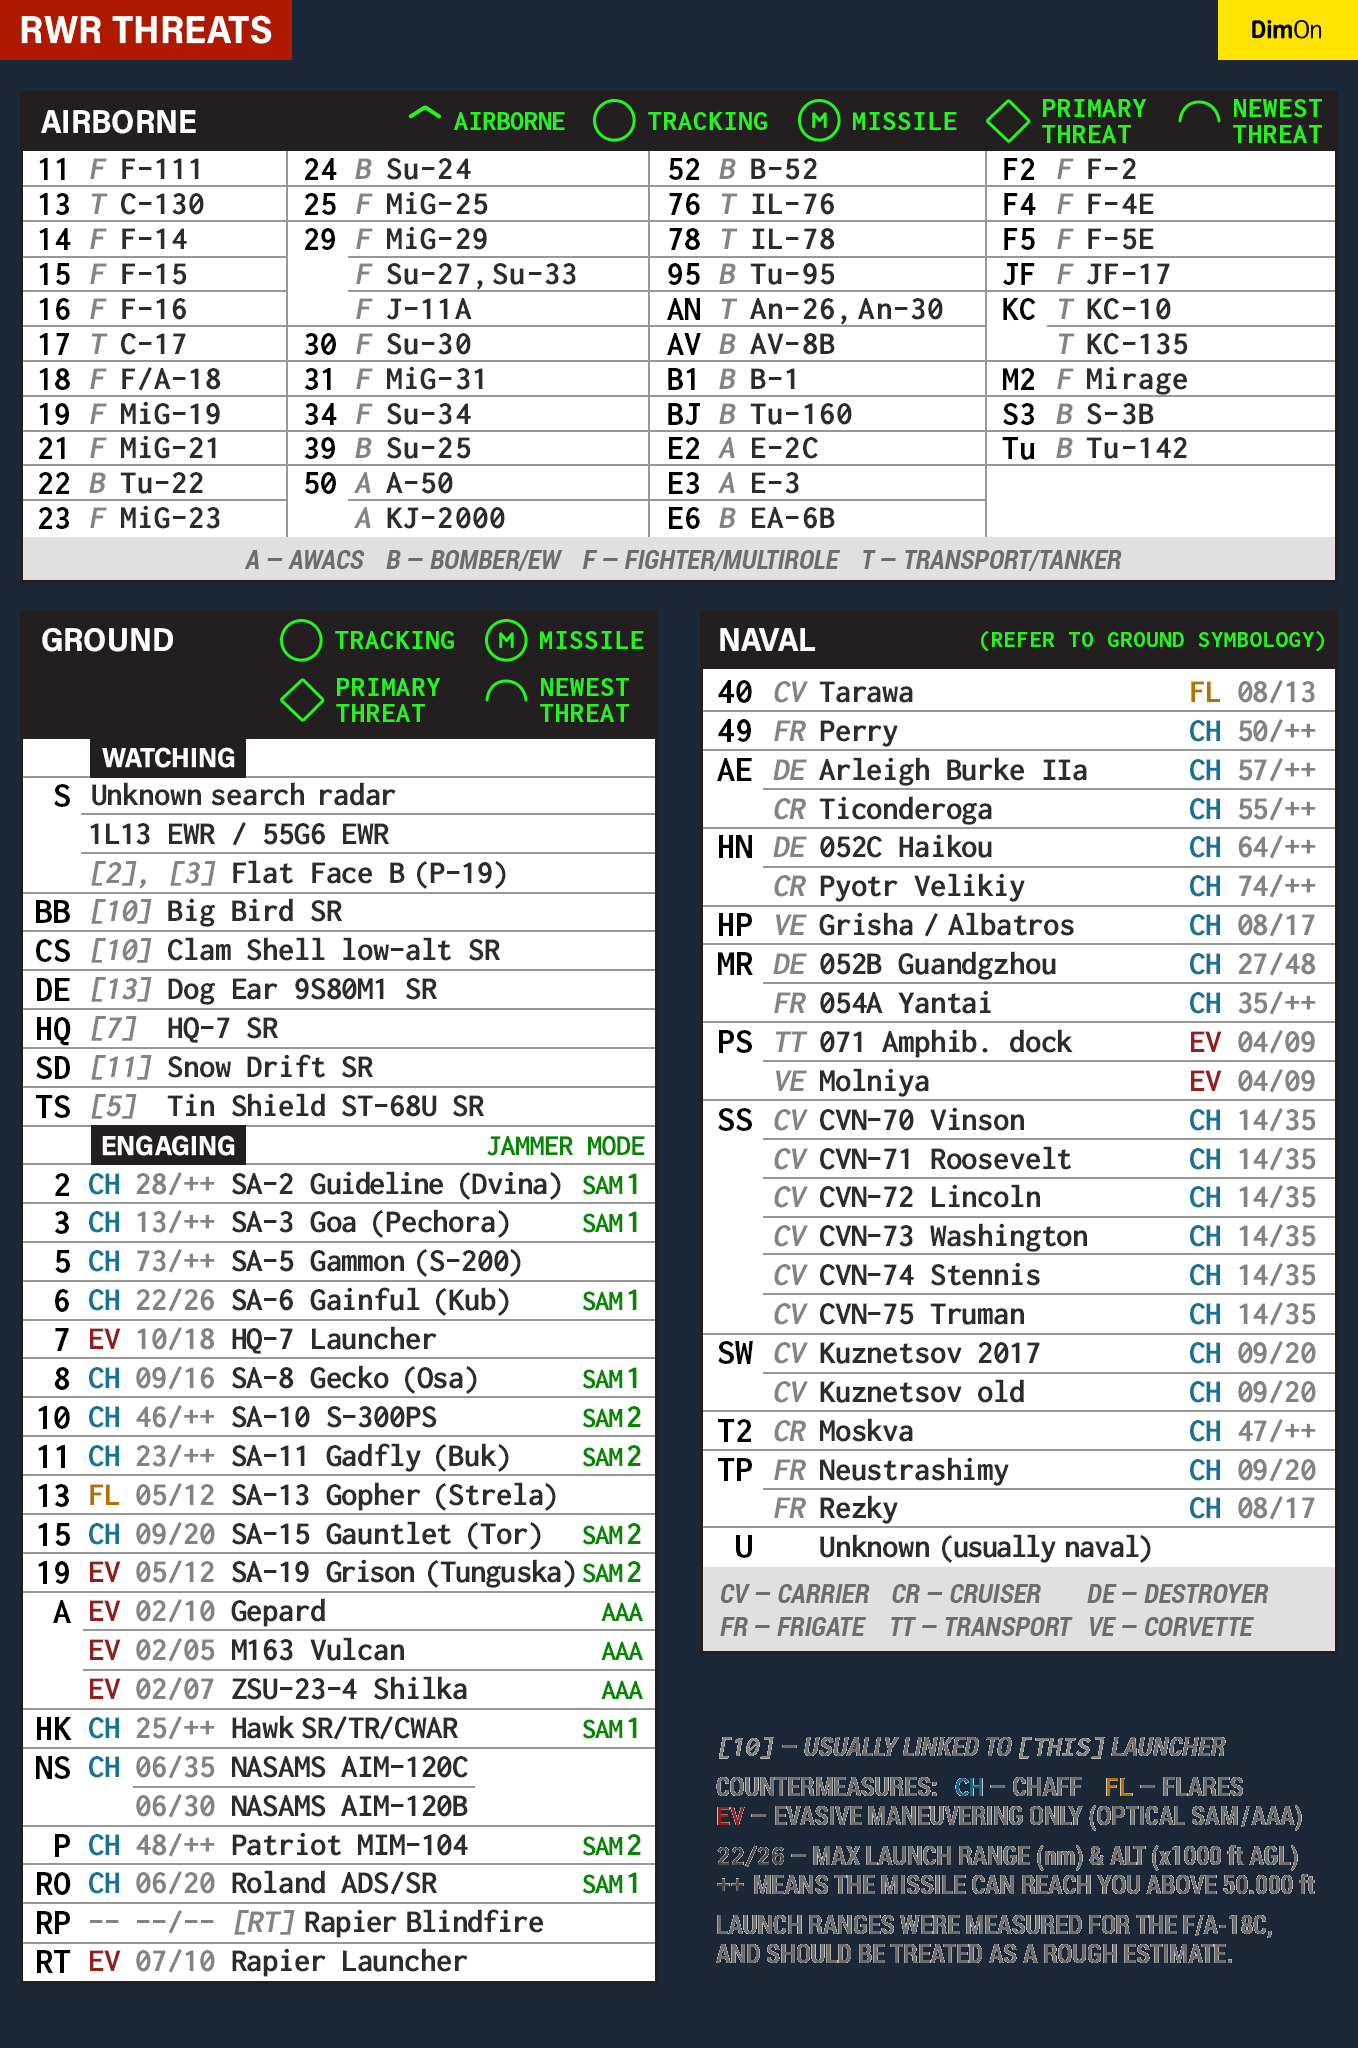
In the example above, the SA-19 is both the newest and the primary threat to my aircraft. Its roughtly to my 10 oclock position and has a strong signal.
The entire symbology is hard to explain, so i will leave this table here instead - please note that its not my own work, but i cannot find the source again.
TAD
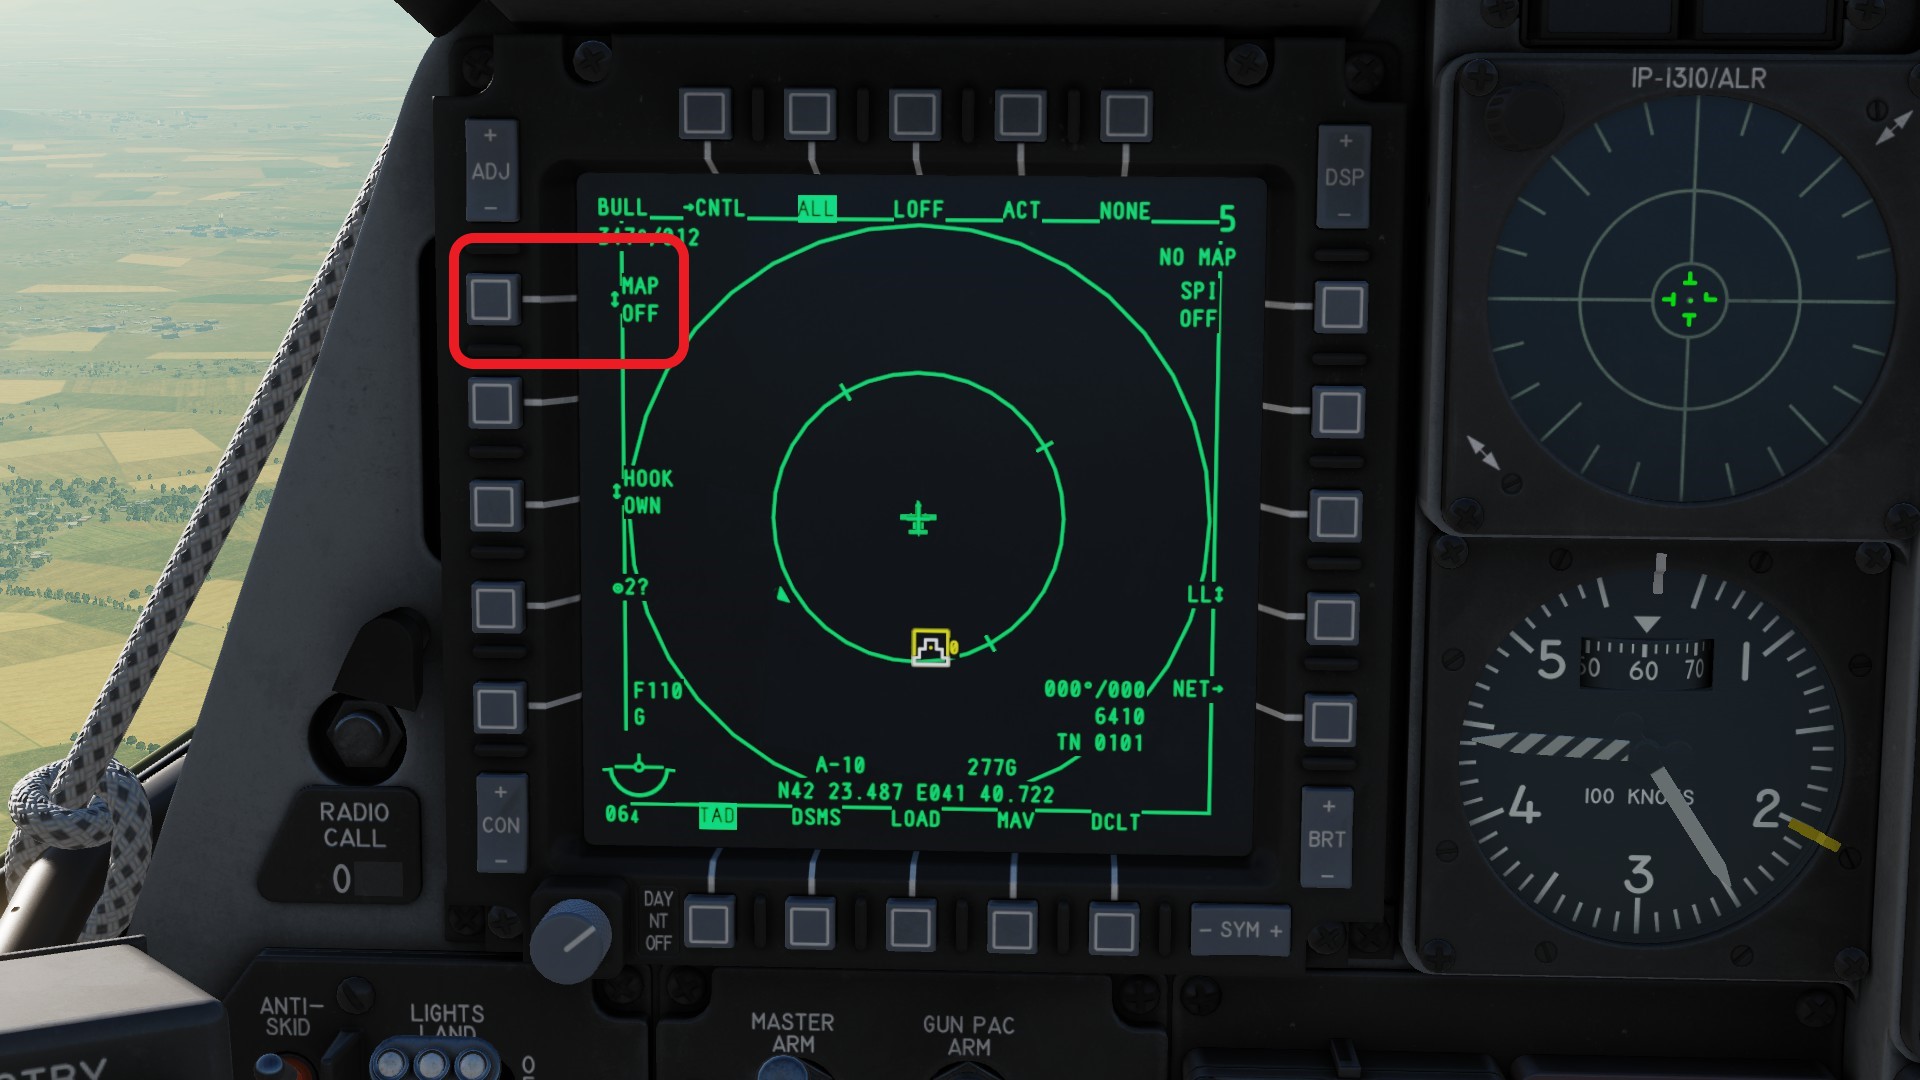
Your TAD or tactical awareness display acts as both a map and a easy way to share information between flight members.
Needed controls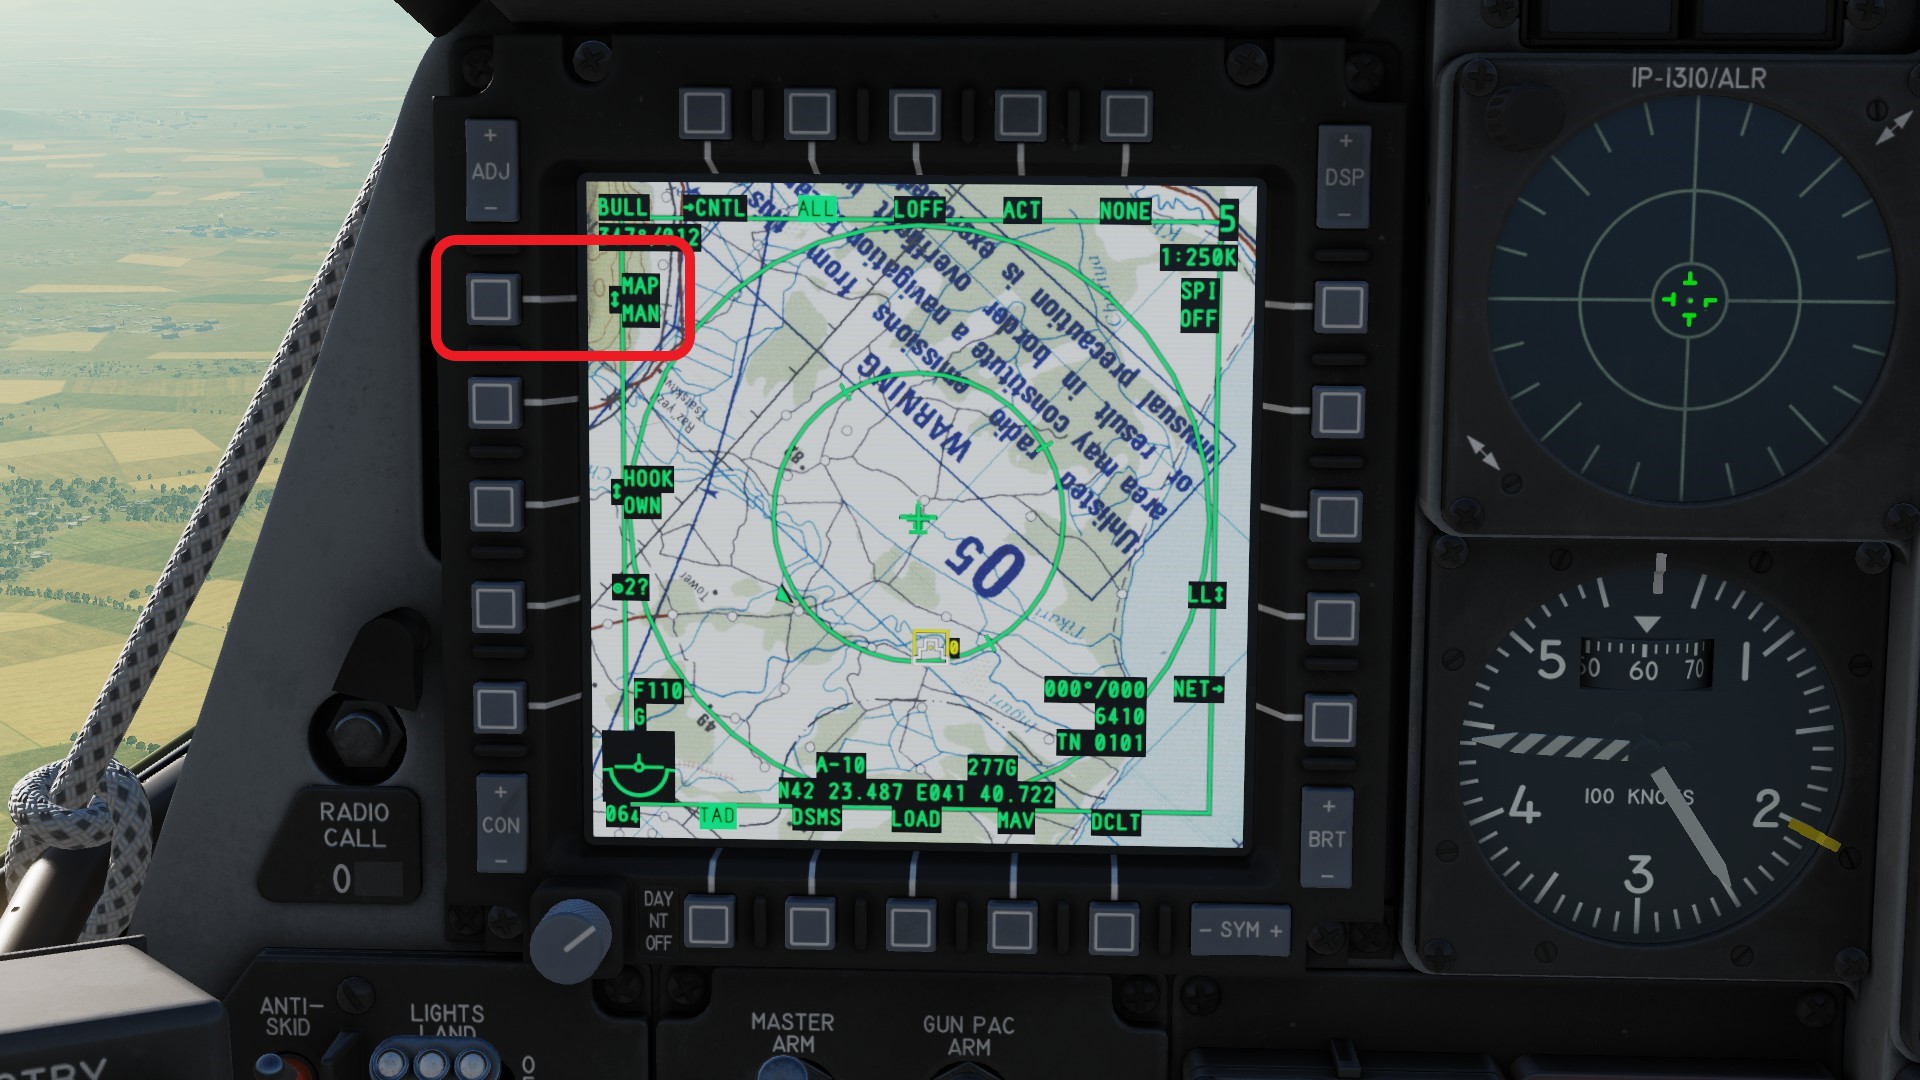
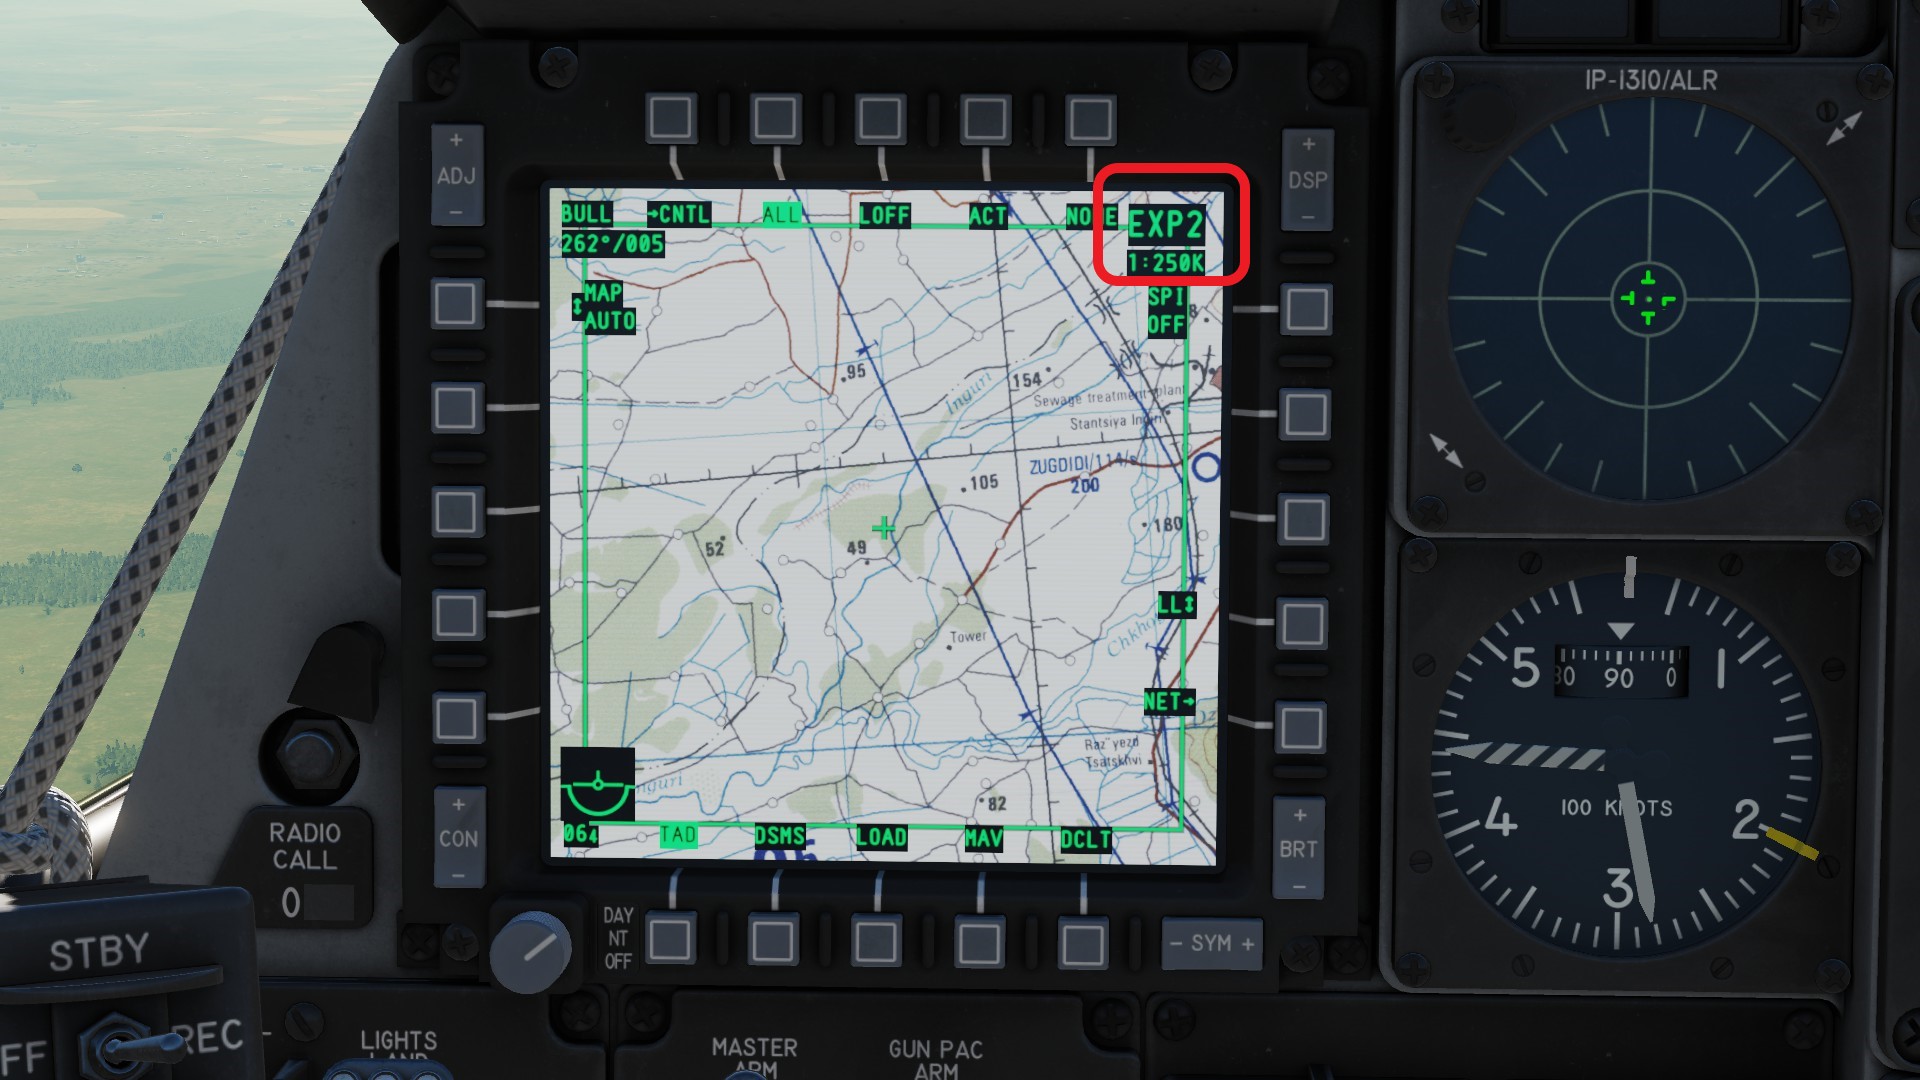
 You can cycle between the default view (if someone knows the name please let me know), EXP1 and EXP2 with HOTAS China Hat Forward short. In the default view, your slew commands will control a cross that you can recage with HOTAS China Hat Aft short. EXP1 and 2 will allow you to move the map, while having a cross in the center. In the EXP modes, the map will face north. EXP2 is more zoomed in than EXP1. You can see in what EXP mode you are in the top right corner (red).
 You can set markpoint with HOTAS TMS Right short. Afterwards, you can hook them with HOTAS TMS Forward short and then press HOTAS TMS Forward long to make them your SPI (red). You can also see, what magnetic heading you need to fly towards and how far the point is away from your aircraft (orange). For this however, make sure the mode is set to "OWN HOOK" (blue).
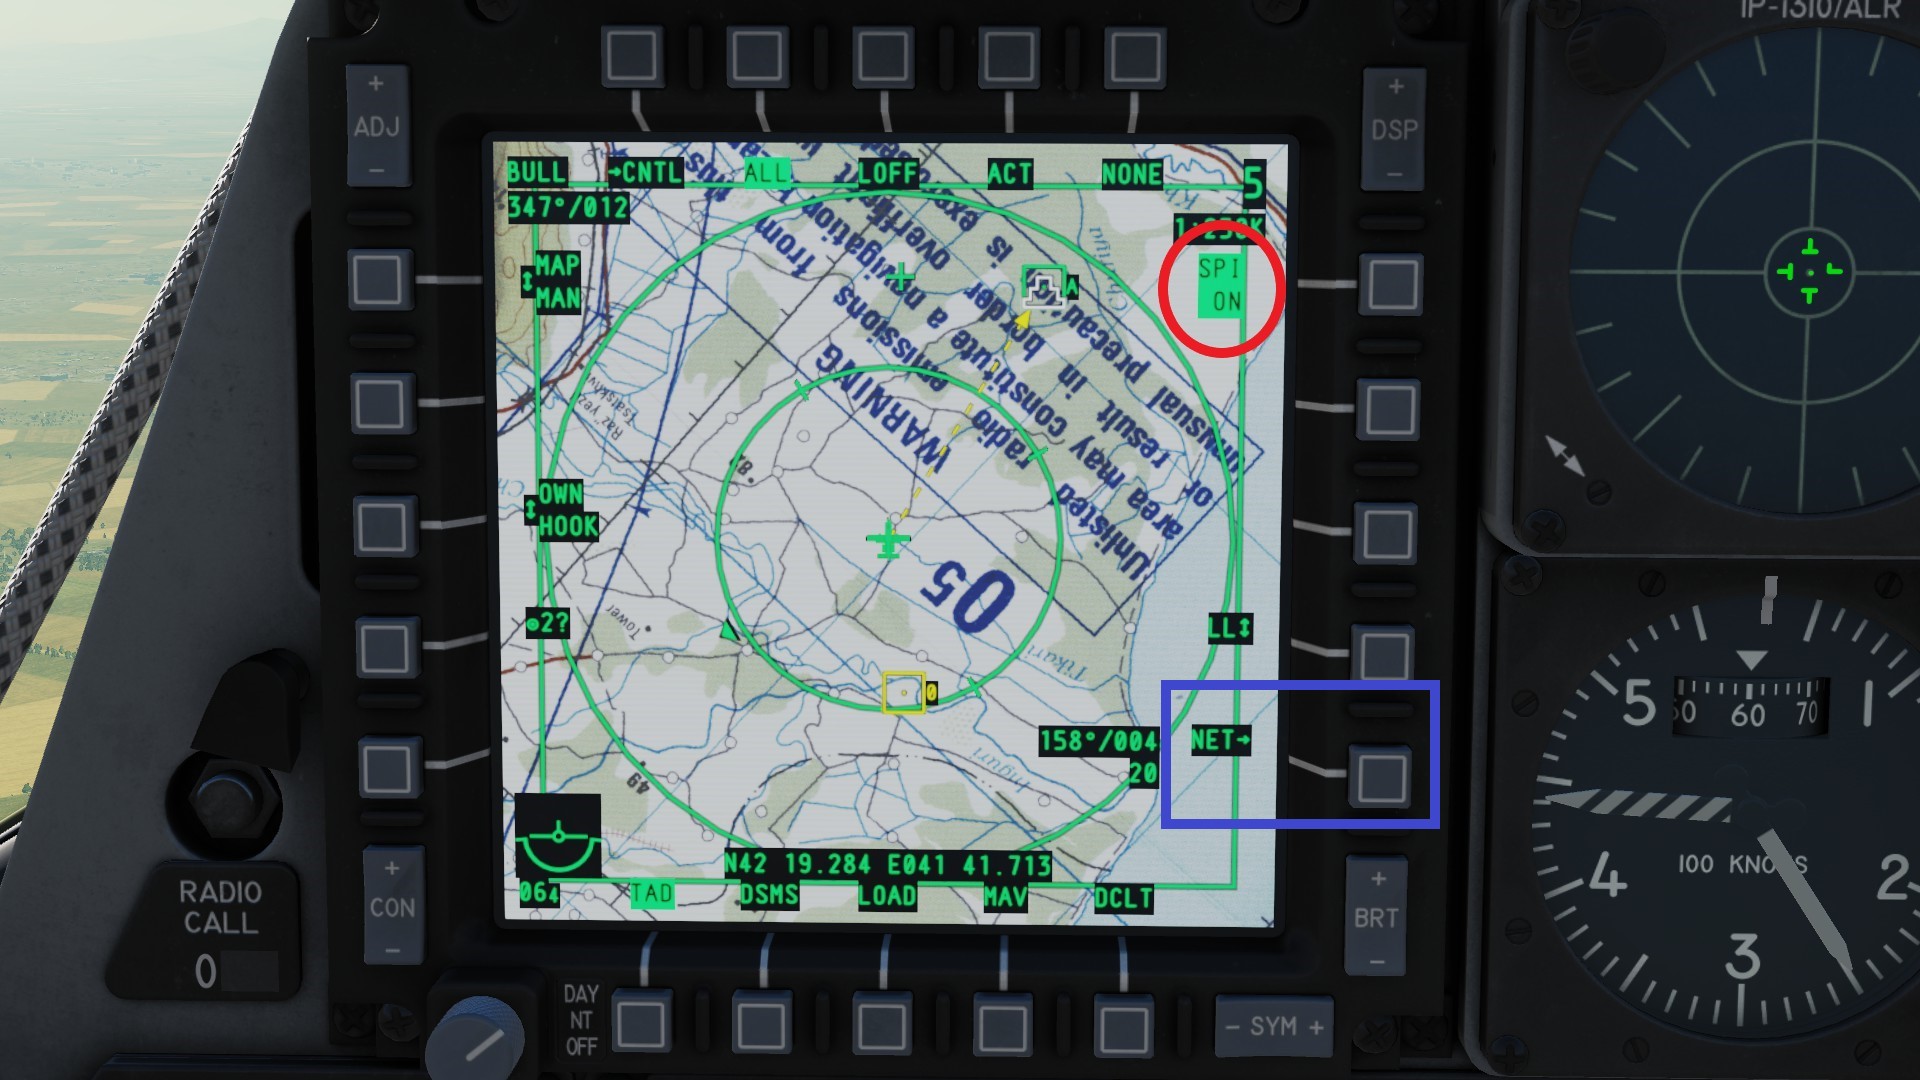 Now select a GRP ID (group id [blue]). All members of one flight have to use the same ID in this slot. After that, every plane needs a OWN ID (red). This needs to be individual per pilot. The SPIs of flightmembers will be shown as a small wedding cake.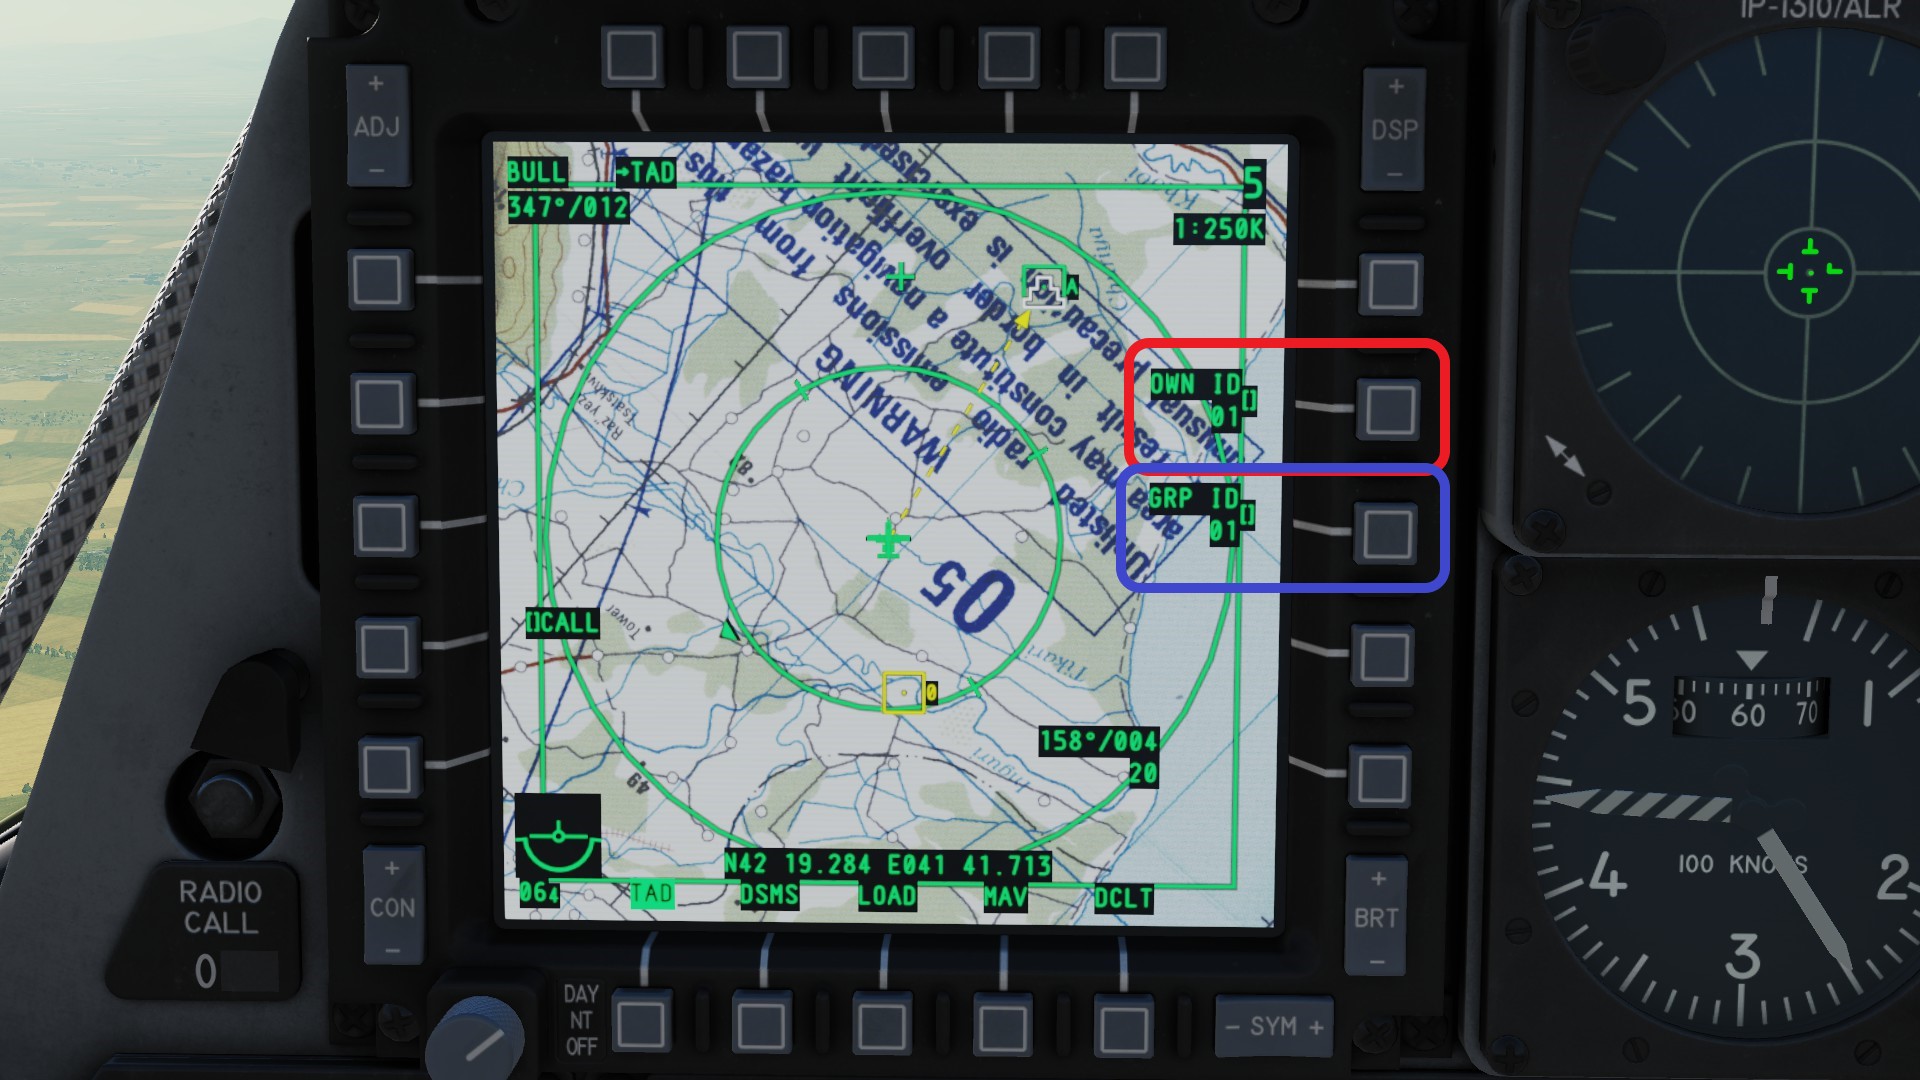
HMCS
Your Head mounted cuing system is your best friend for situational awareness and getting a overview of raidly changing situations. If your HMCS panel is powered, you can turn the HMCS on and off with HOTAS DMS Left long.
Needed controlsBasic symbology and usage
The HMCS will show you friendly ground units as a green X (black). And friendly aircraft as a green circle (red). The number under the circle indicates the distance between your aircraft and the other one in nmi. Also some of your HUDs symbology like the altitude (yellow) and the airspeed (blue) will be repeated (i will not name all repeated HUD aspects here, i think they are self explaining).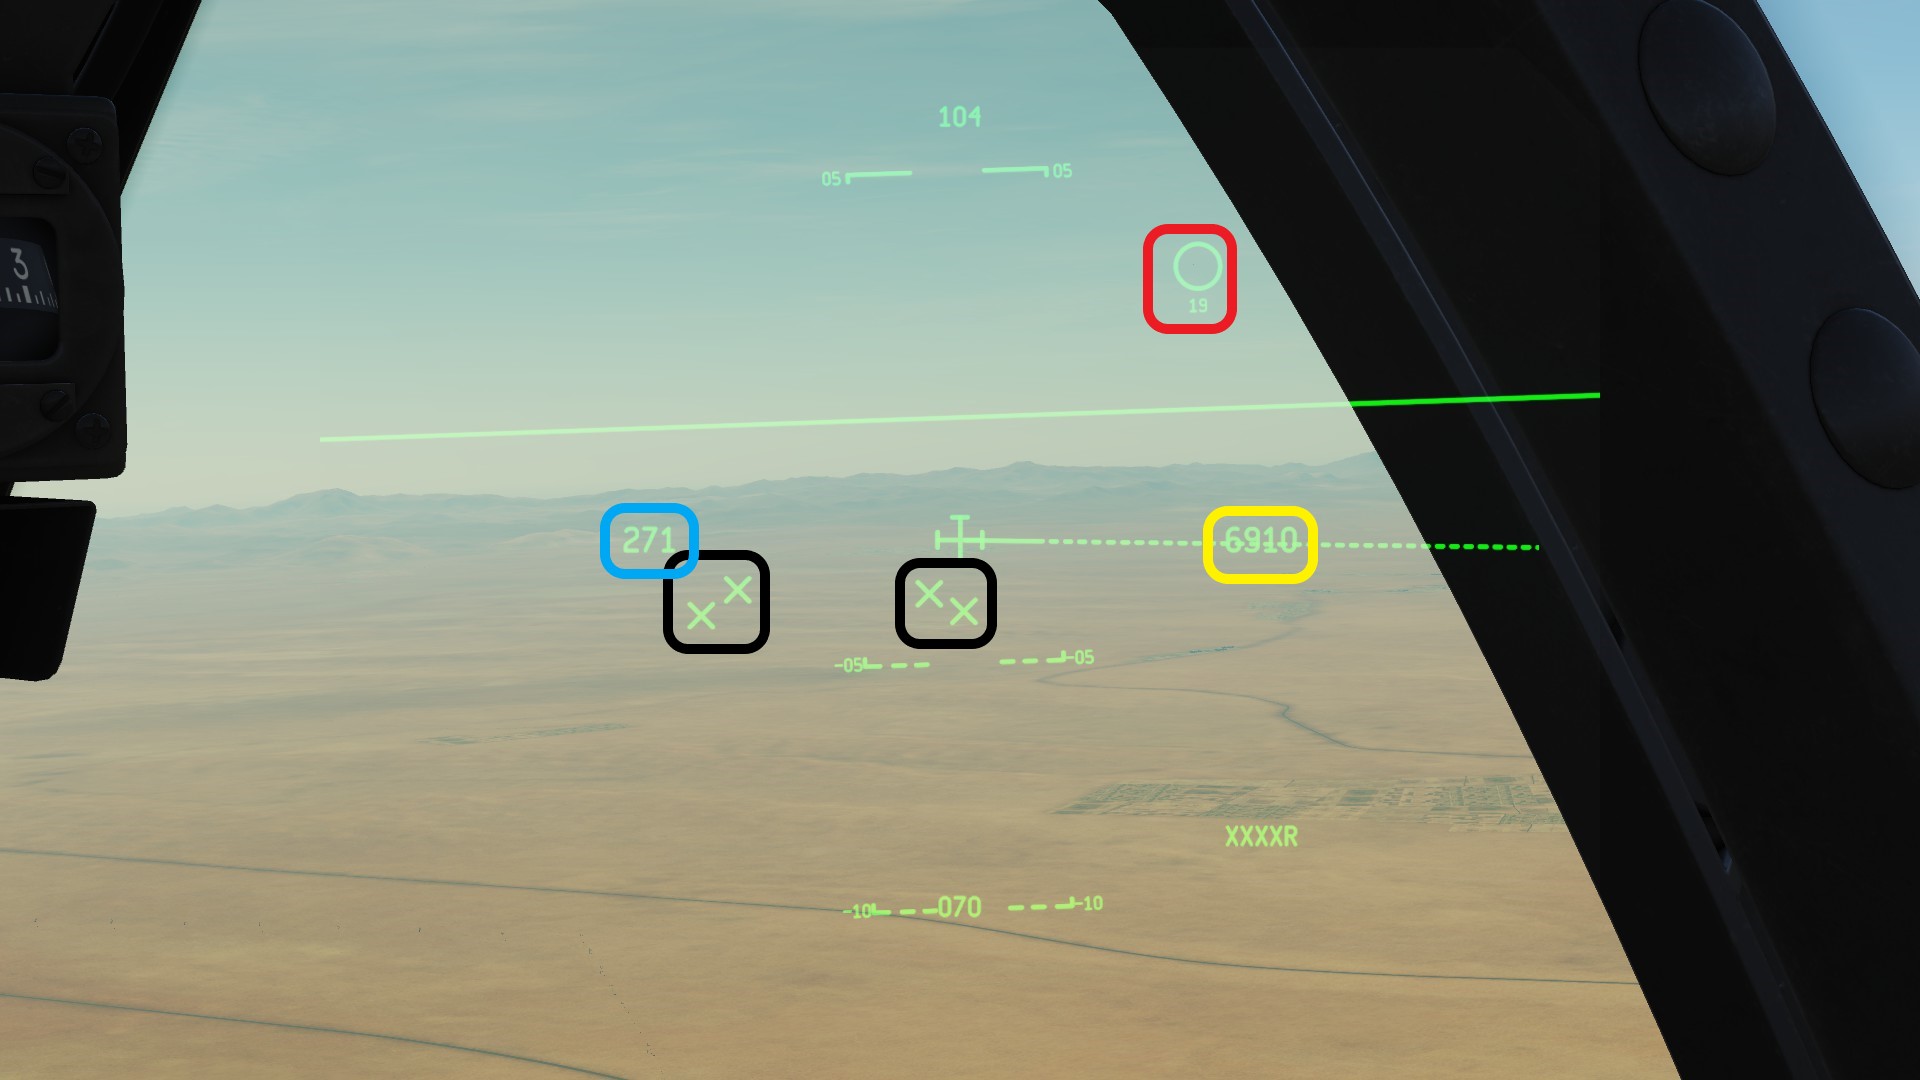 SPIs will be represented as a wedding cake (red) while Markpoints will be a green box with a dot i the middle (blue). Under the box will be the name of the markpoint.
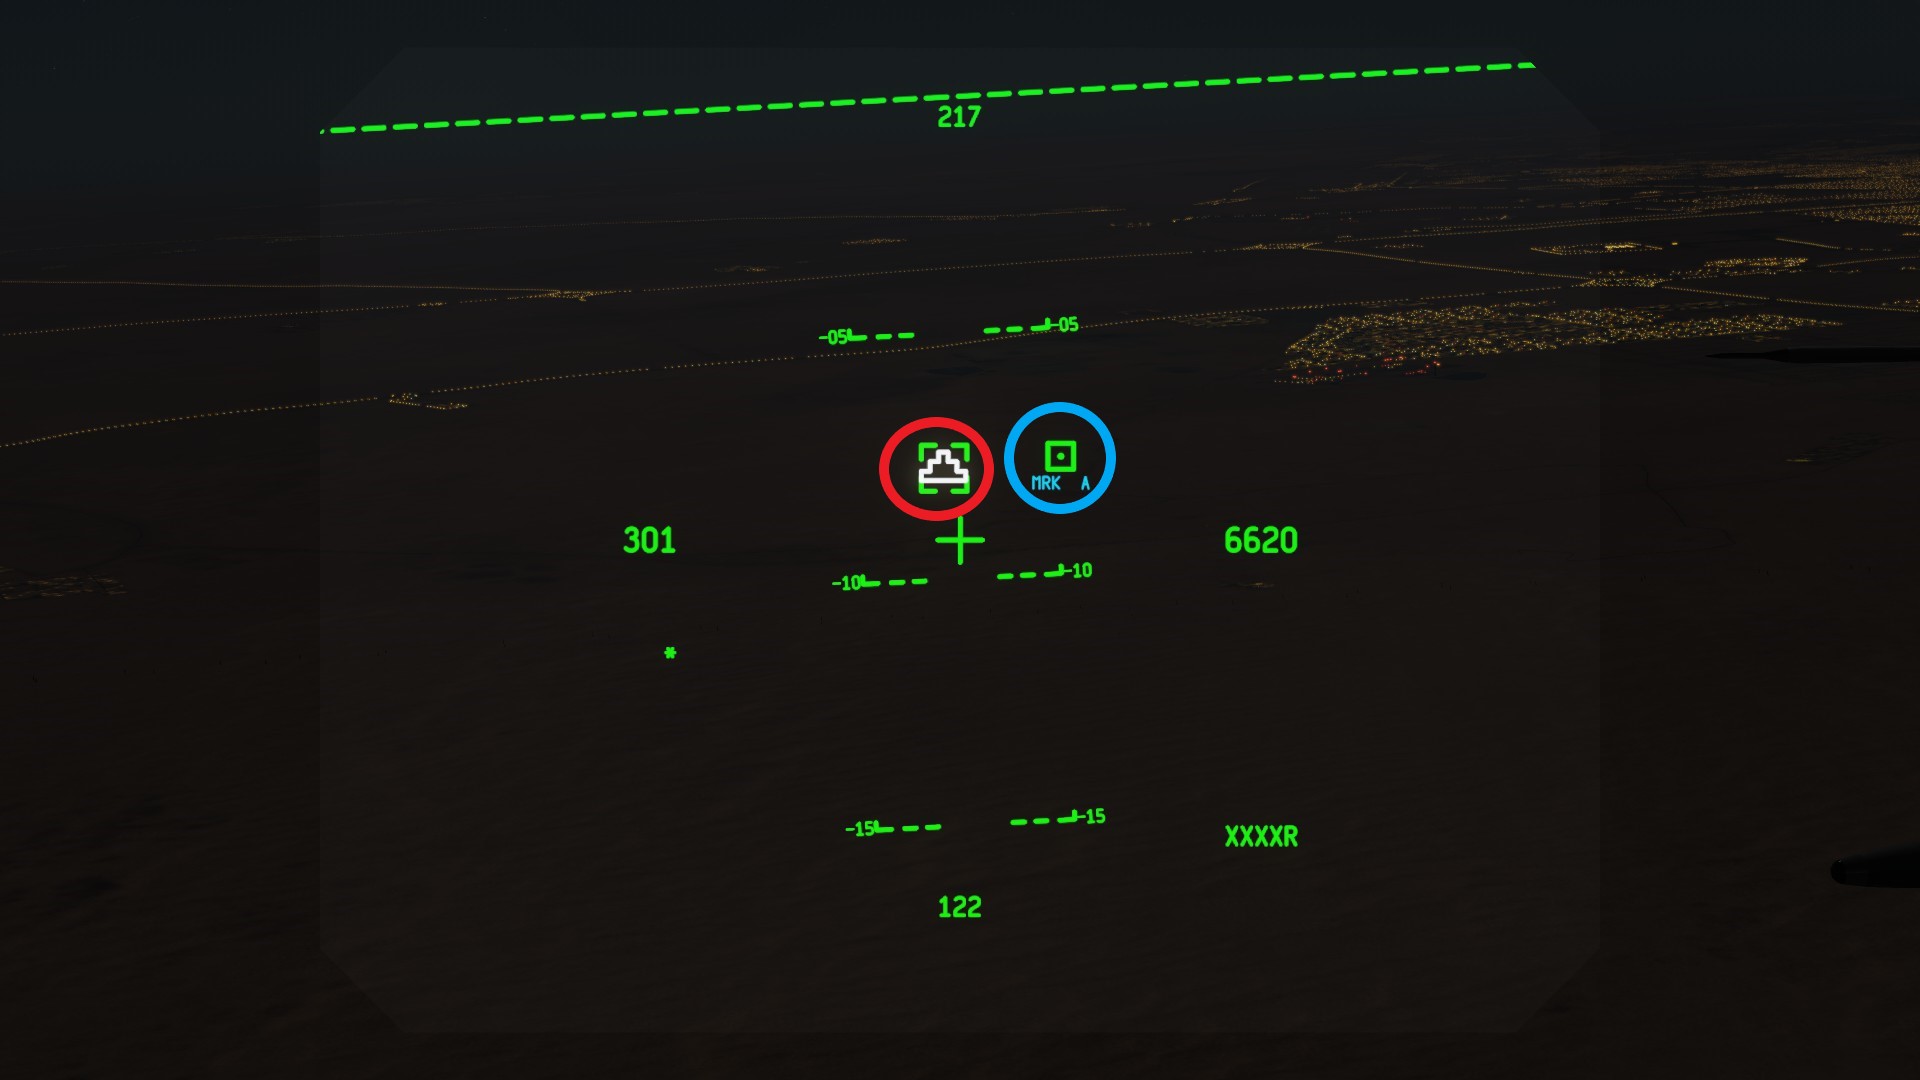 When moving the cross over a point, you will get information regarding the magnetic heading and distance in nmi to it (red). Also. the elevation of said the point will be shown (blue). The dashed green line (yellow) will point towards your SPI. it will become longer the further you look away from the SPI.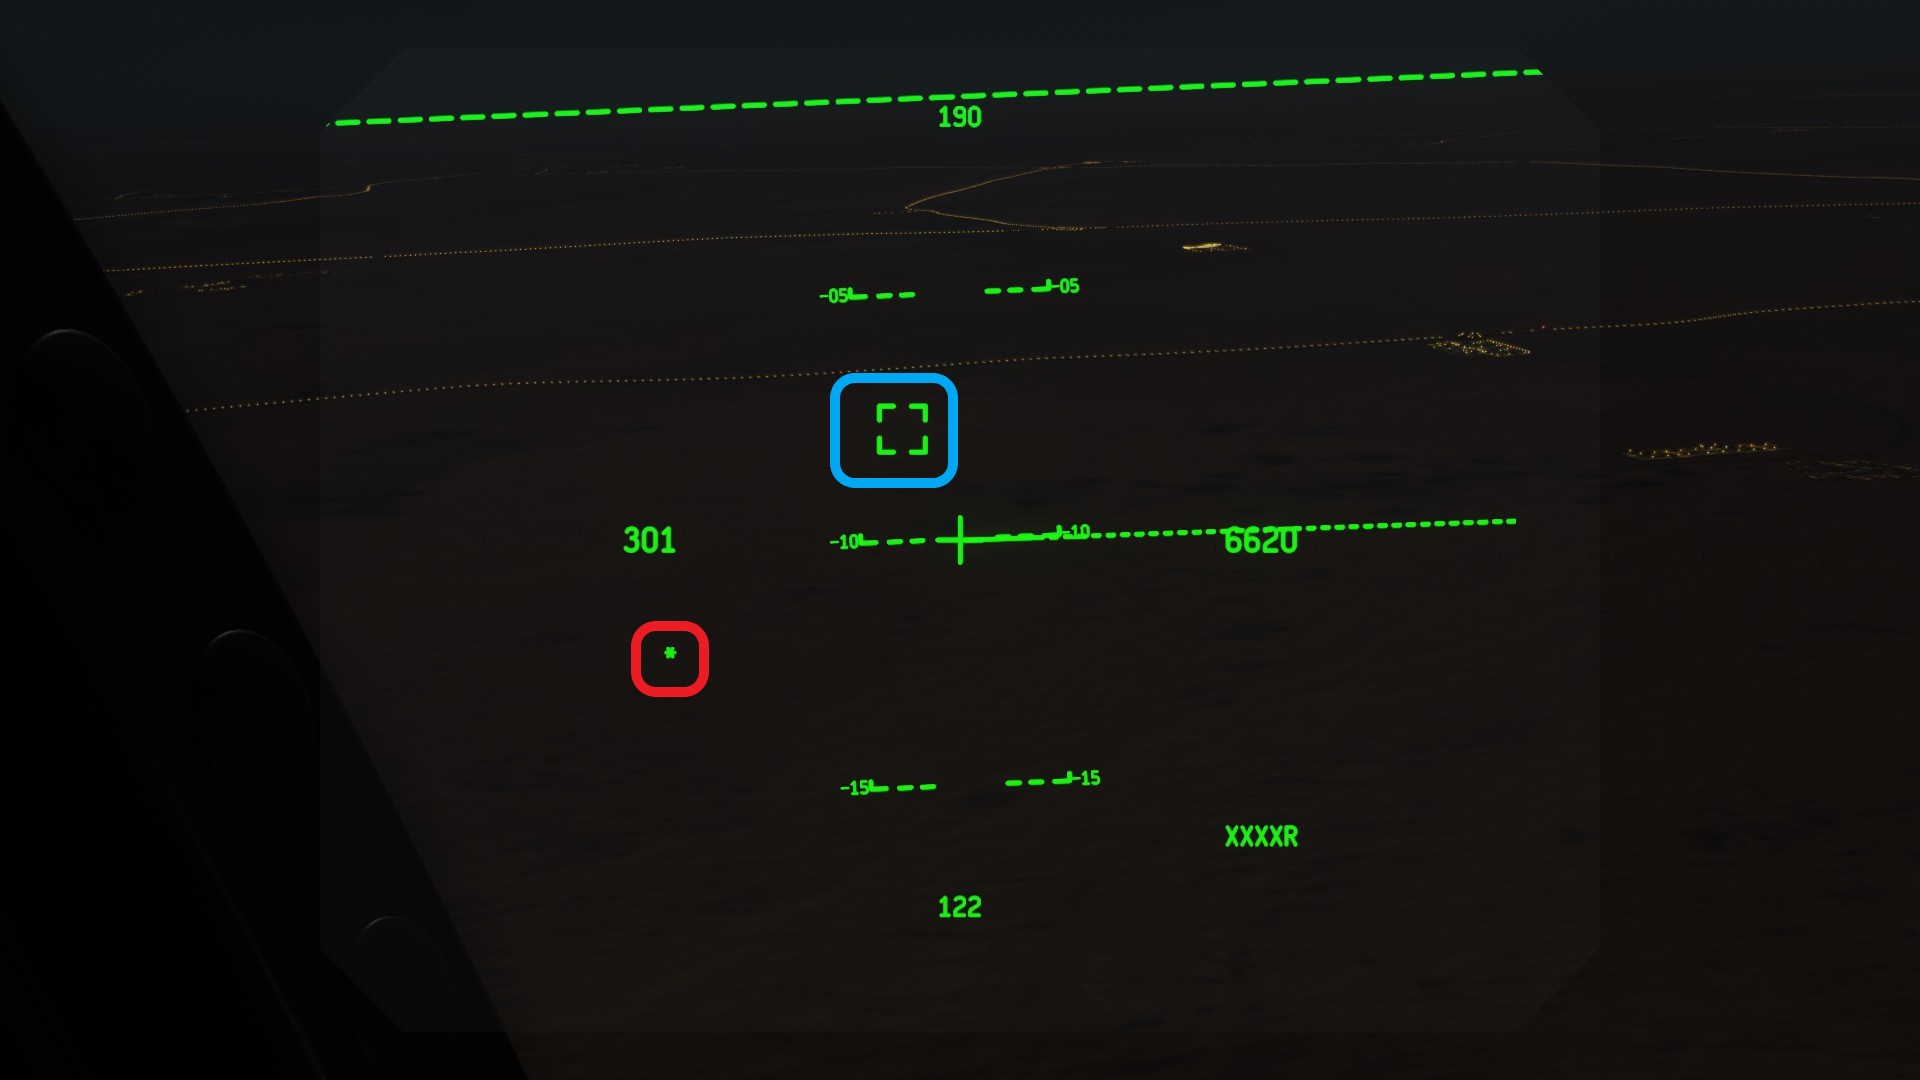
Integration with the TGP
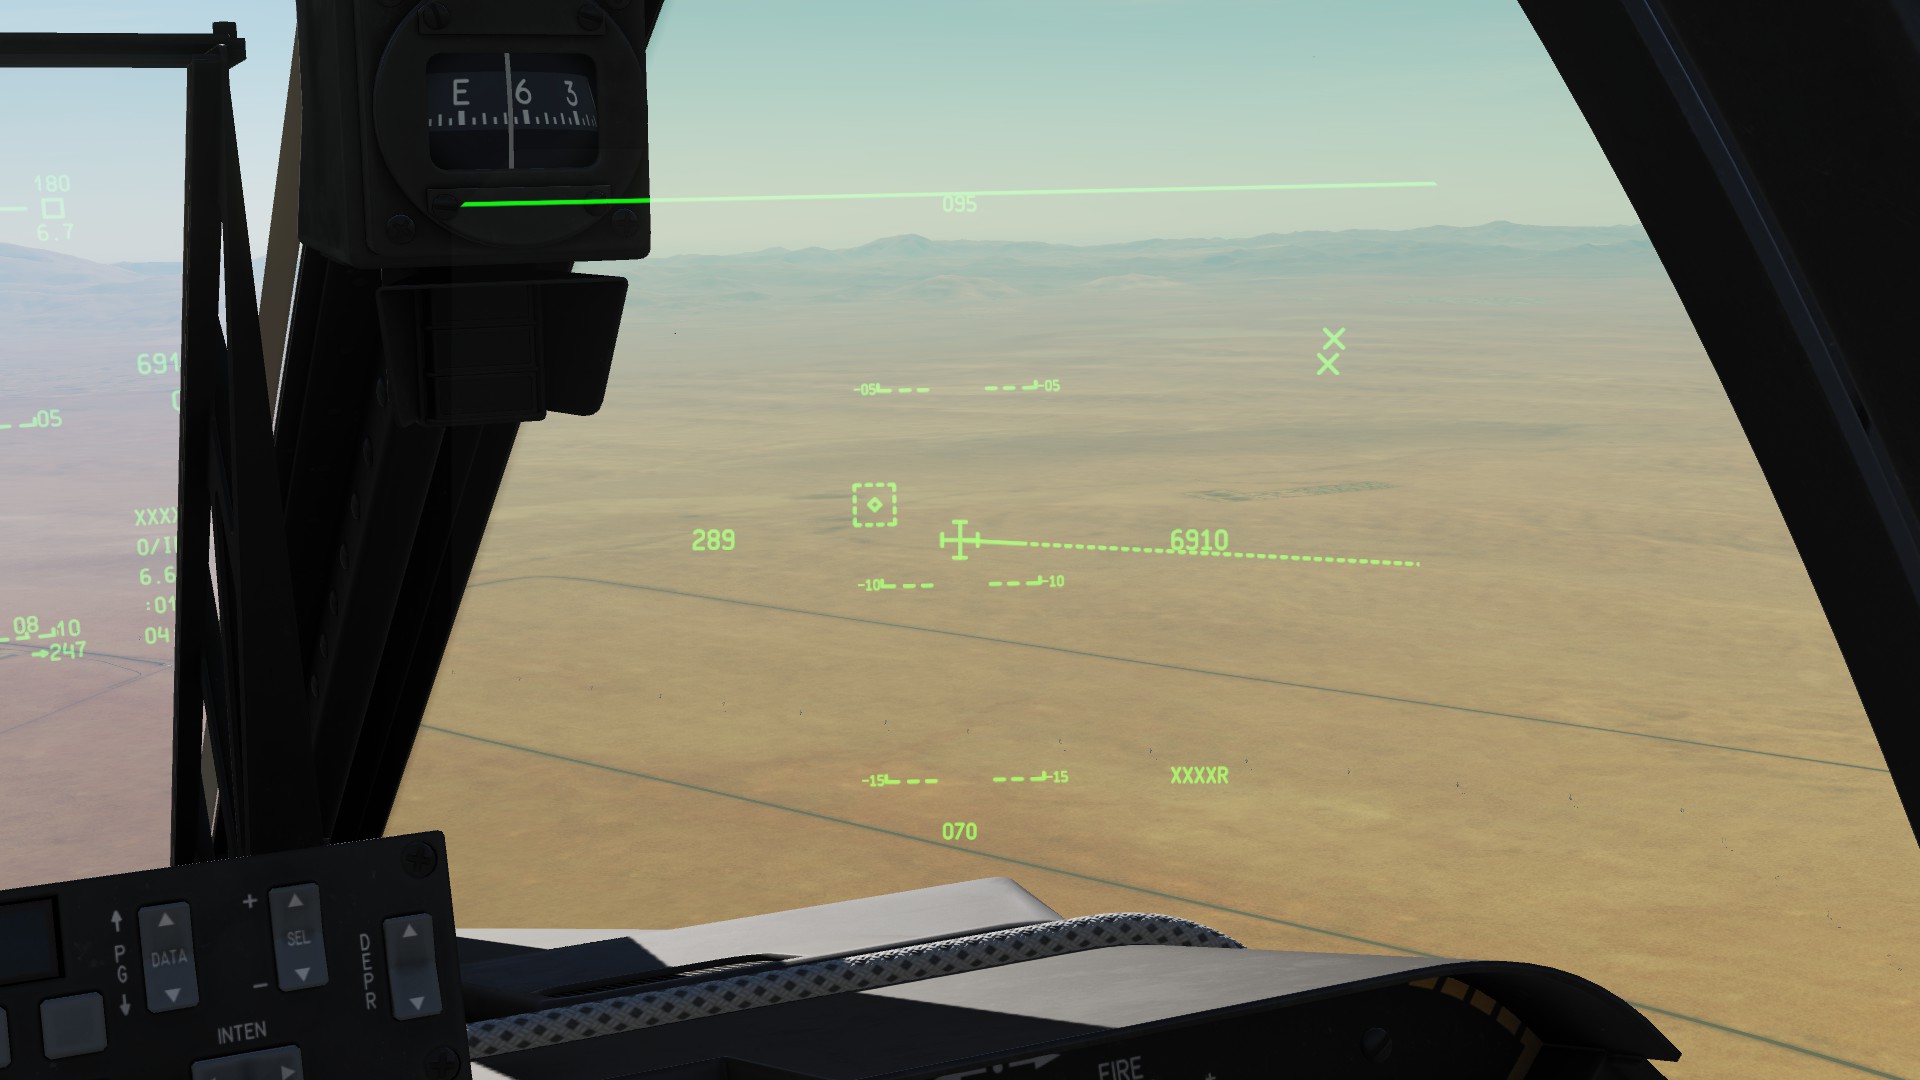
Since the purpose of the A10 is ground support, which will almost always include the usage of a targeting device, the TGP is integrated into the HMCS. You will see the FOV of the Tpod represented by a dashed box. It will change size depending on the zoom factor of the camera. Left a TGP will widest FOV settings, right a TGP with FOV set to narrow.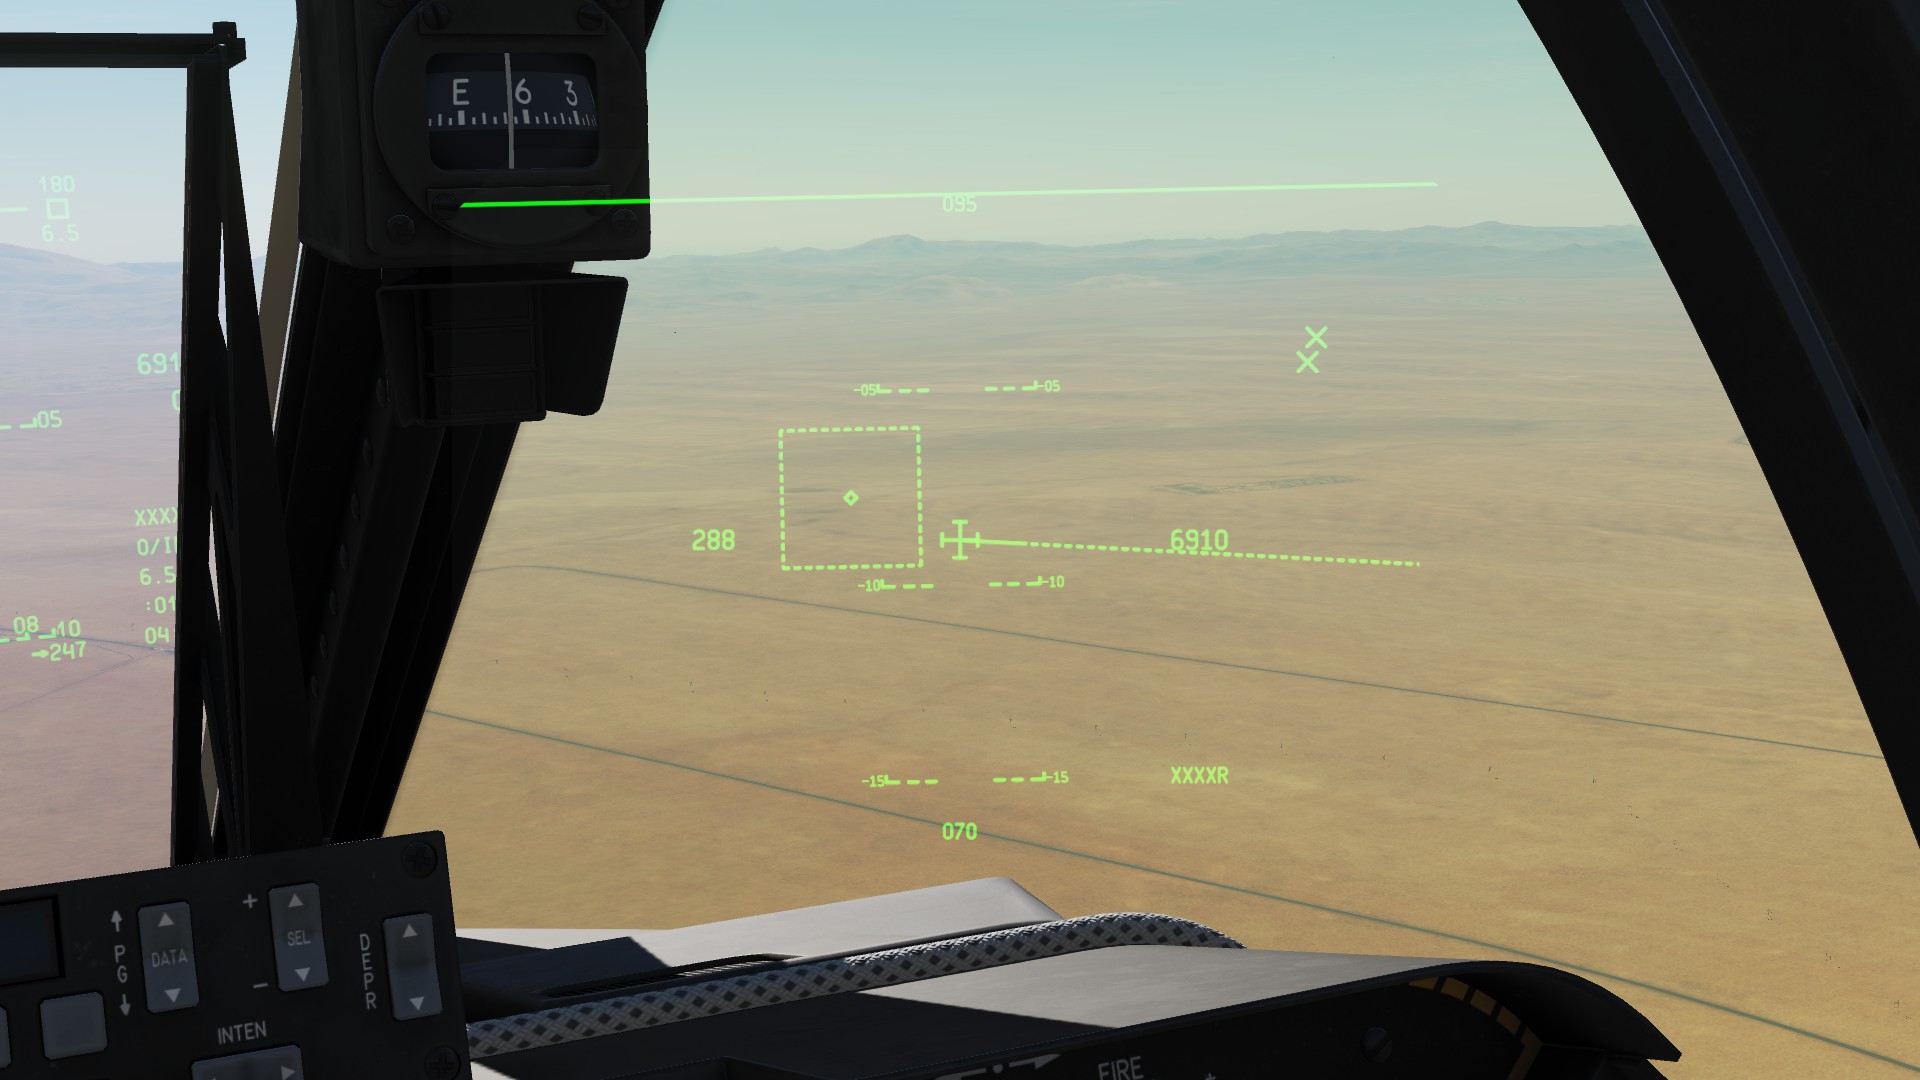
 After you press HOTAS DMS Left short your HUD will show the TGP view in green and black. Very usefull when you need to check something but dont want to leave the tagets unattended.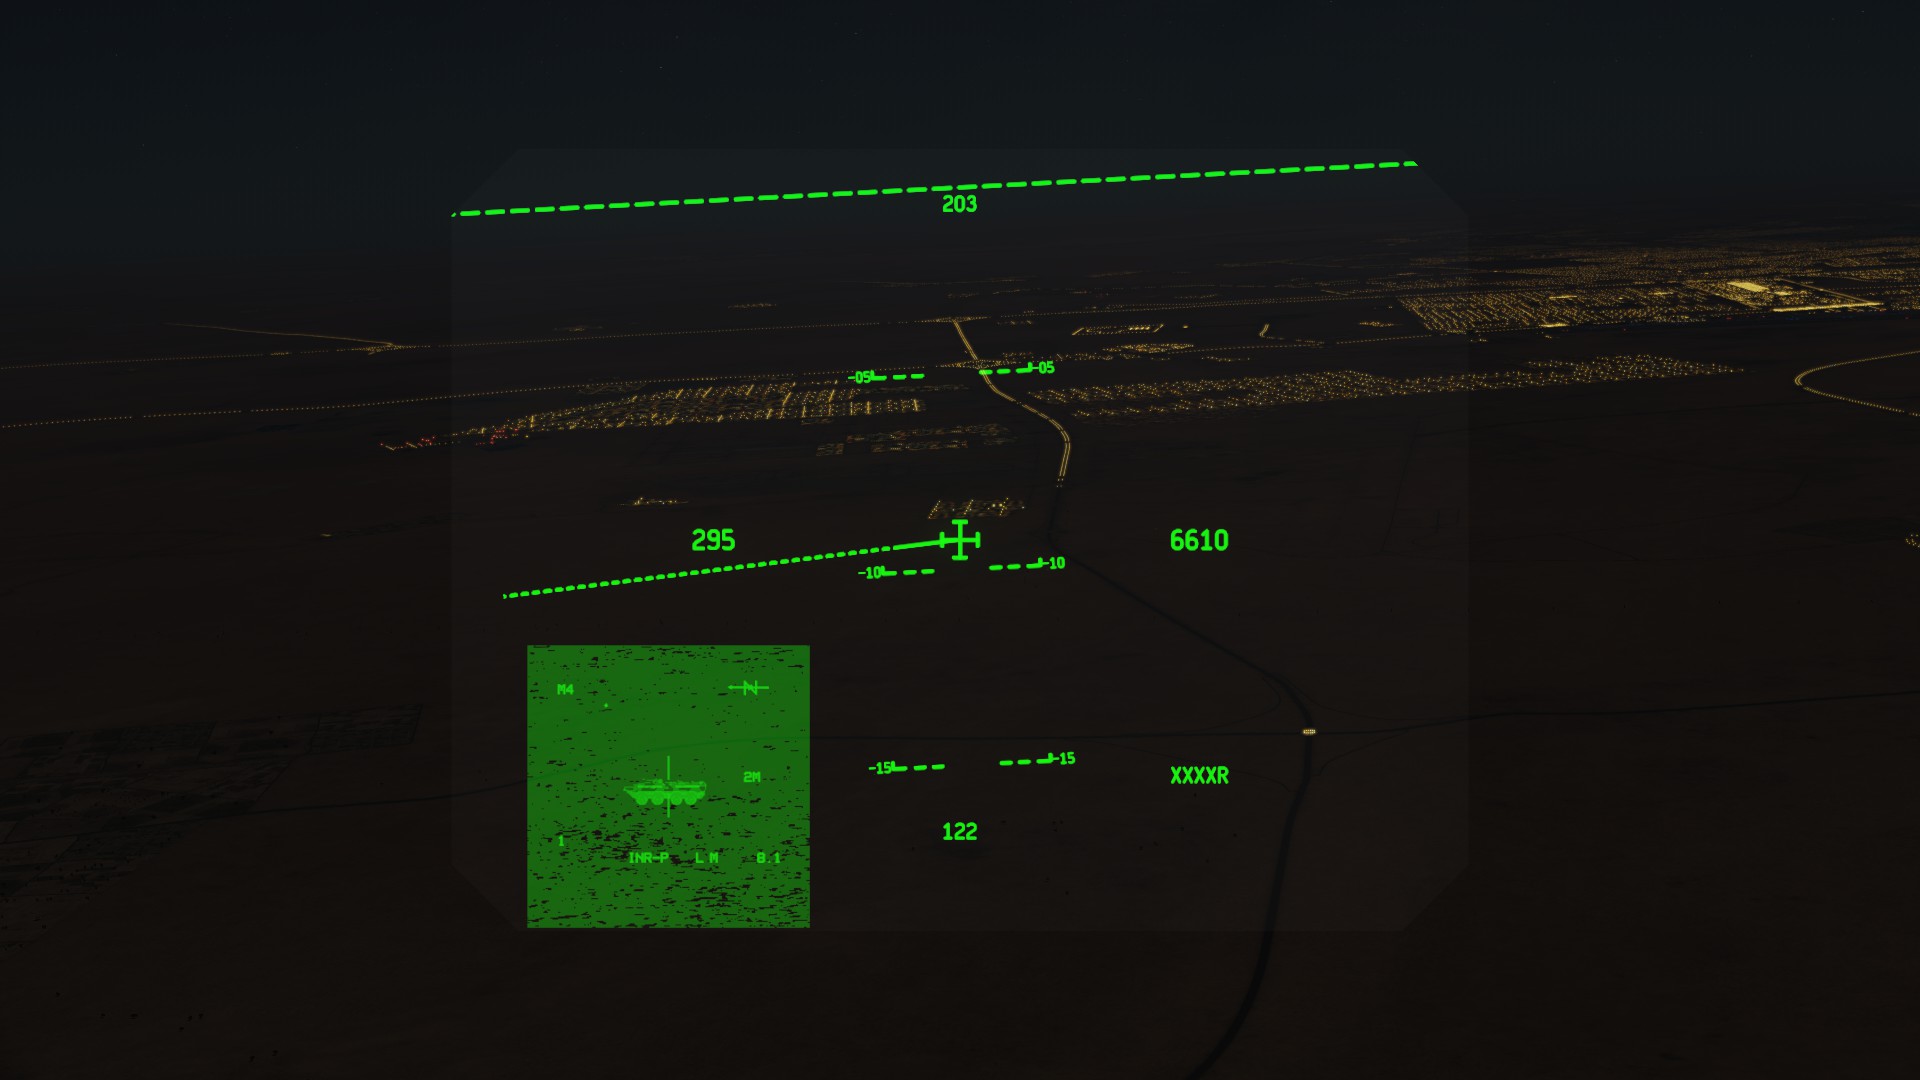
HMCS STAT Page
The stat page allows you to change what information will be shown on the HMCS and if it should be deactivated when looking at your plane or through your HUD.
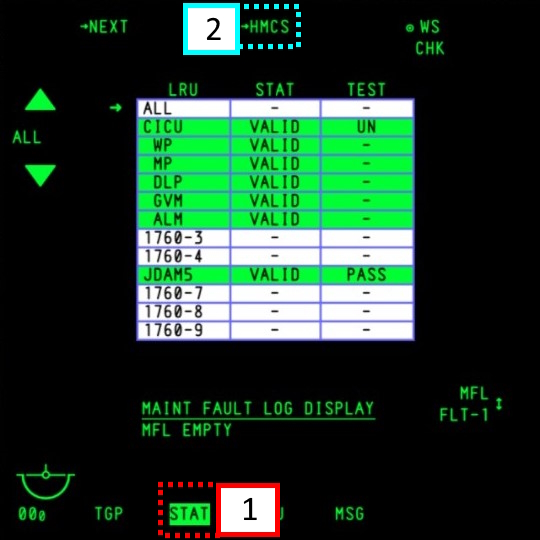 First go to the STAT page and from here to the HMCS submenu.
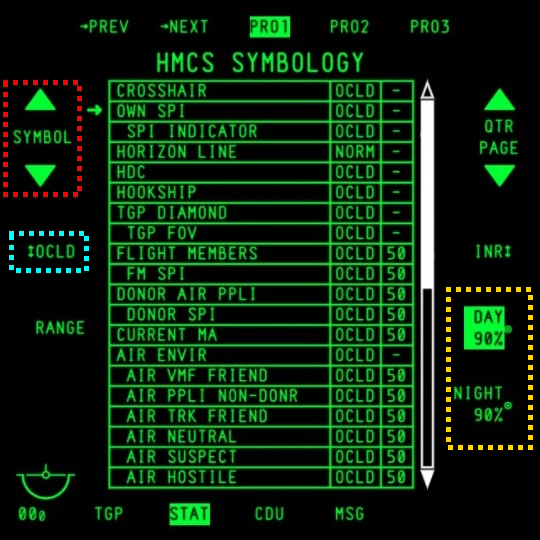 Here you can use the Symbol keys to move the arrow next to the function you want to change. You can change it between OCLD, ON and OFF.
You also have the option to change the HMCS brightness.
I recommend to change at the very least
FLIGHT MEMBERS
FM SPI
AIR ENVIR
to ON.
Navigation
For navigation, you will use the CDU next to your right thigh.
The following parts of the CDU are interesting for our purposes (note that mission creators might already have waypoints loaded for you; airfield coordiantes are preloaded on all maps):
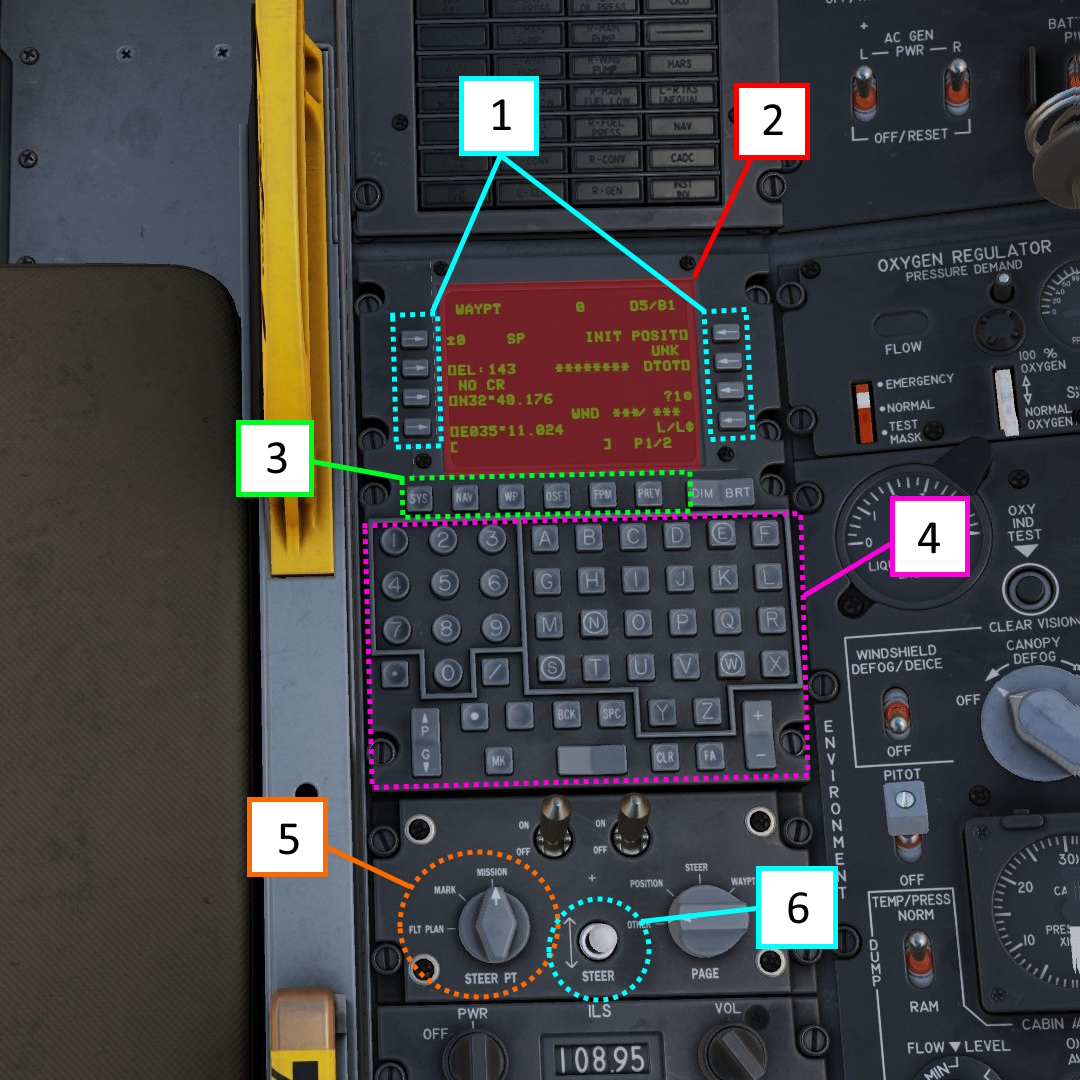
- Function keys
- Display
- Subsystem keys
- Keyboard
- Steerpoint selection knob (selects what type of point your steerpoint will be)
- Steerpoint selection switch (selects the individual steerpoint)
Setting Waypoints
Setting a waypoint allows you to steer towards and attack precise coordinates via gps.
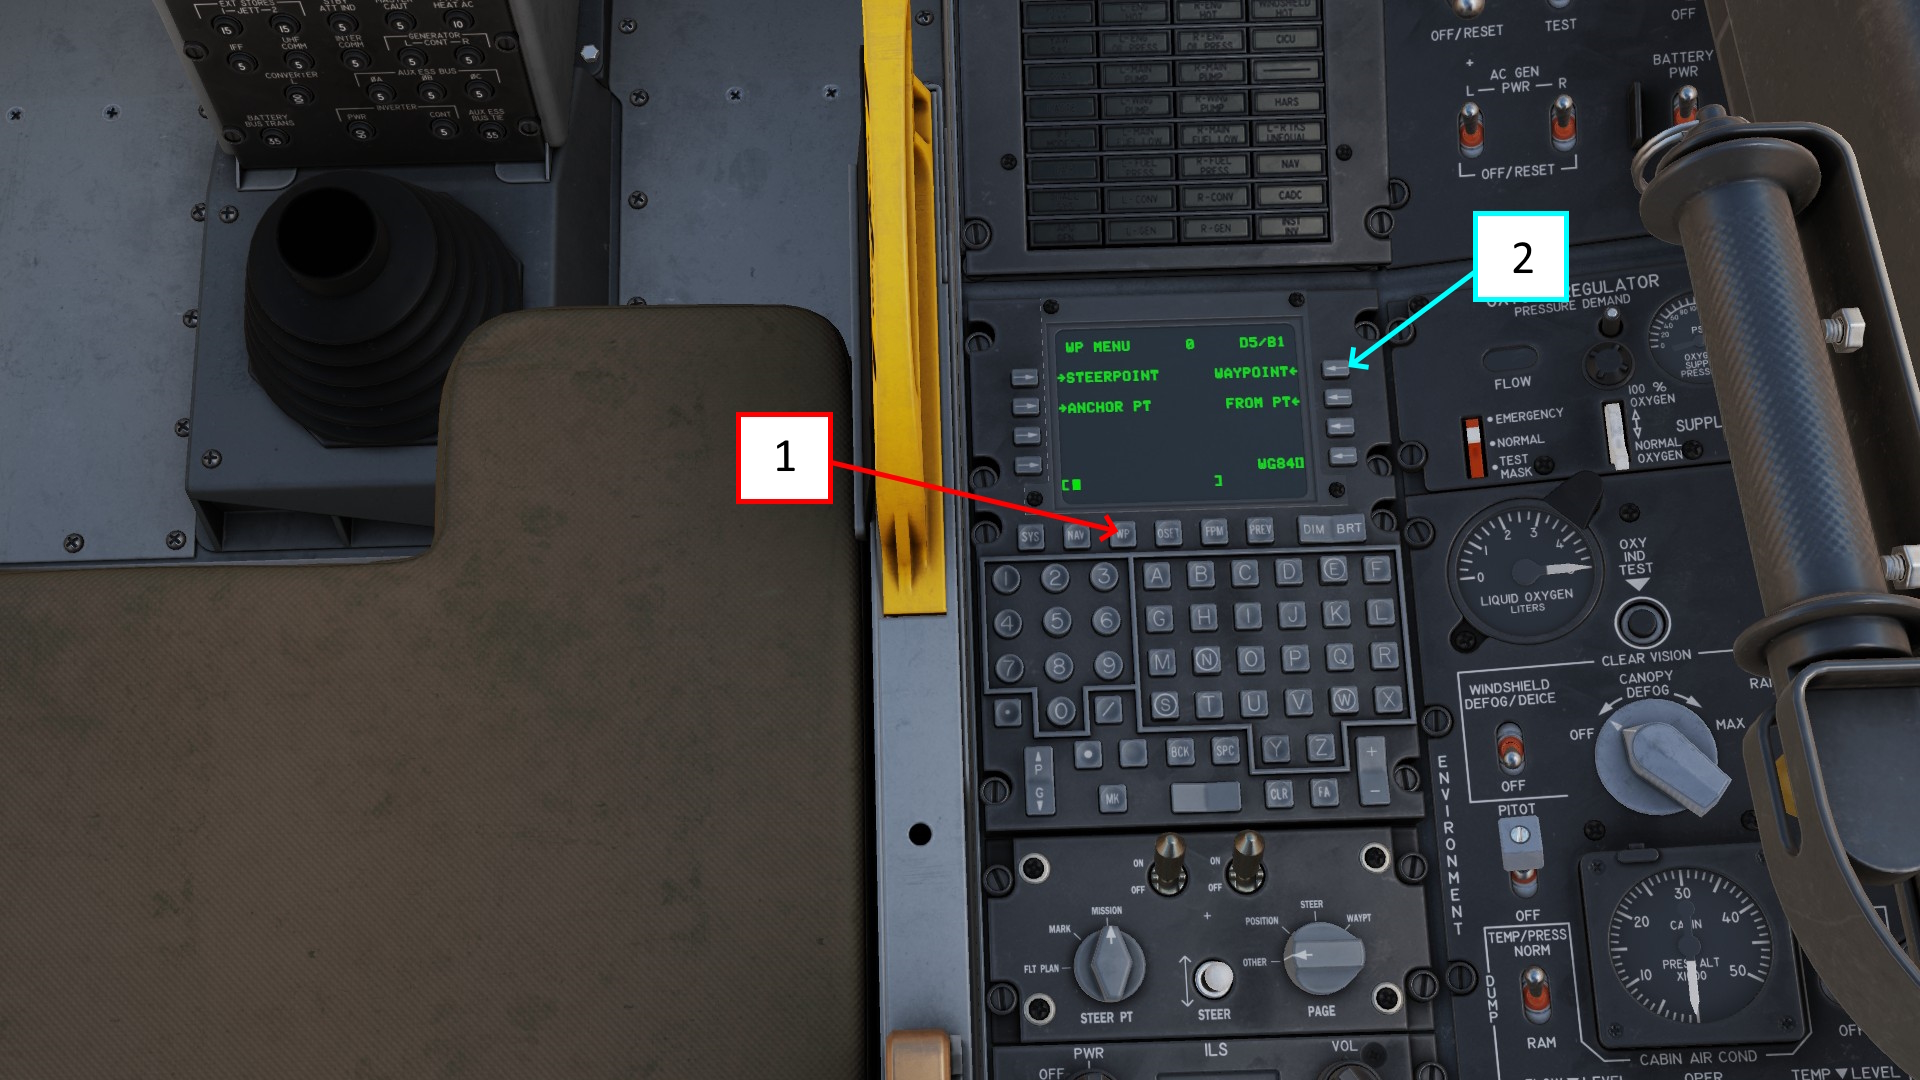
- Waypoint submenu
- Waypoint page
To set a new waypoint, you need to first head to the WP submenu and then to the WAYPOINT page.
You will be presented with the following symbology.
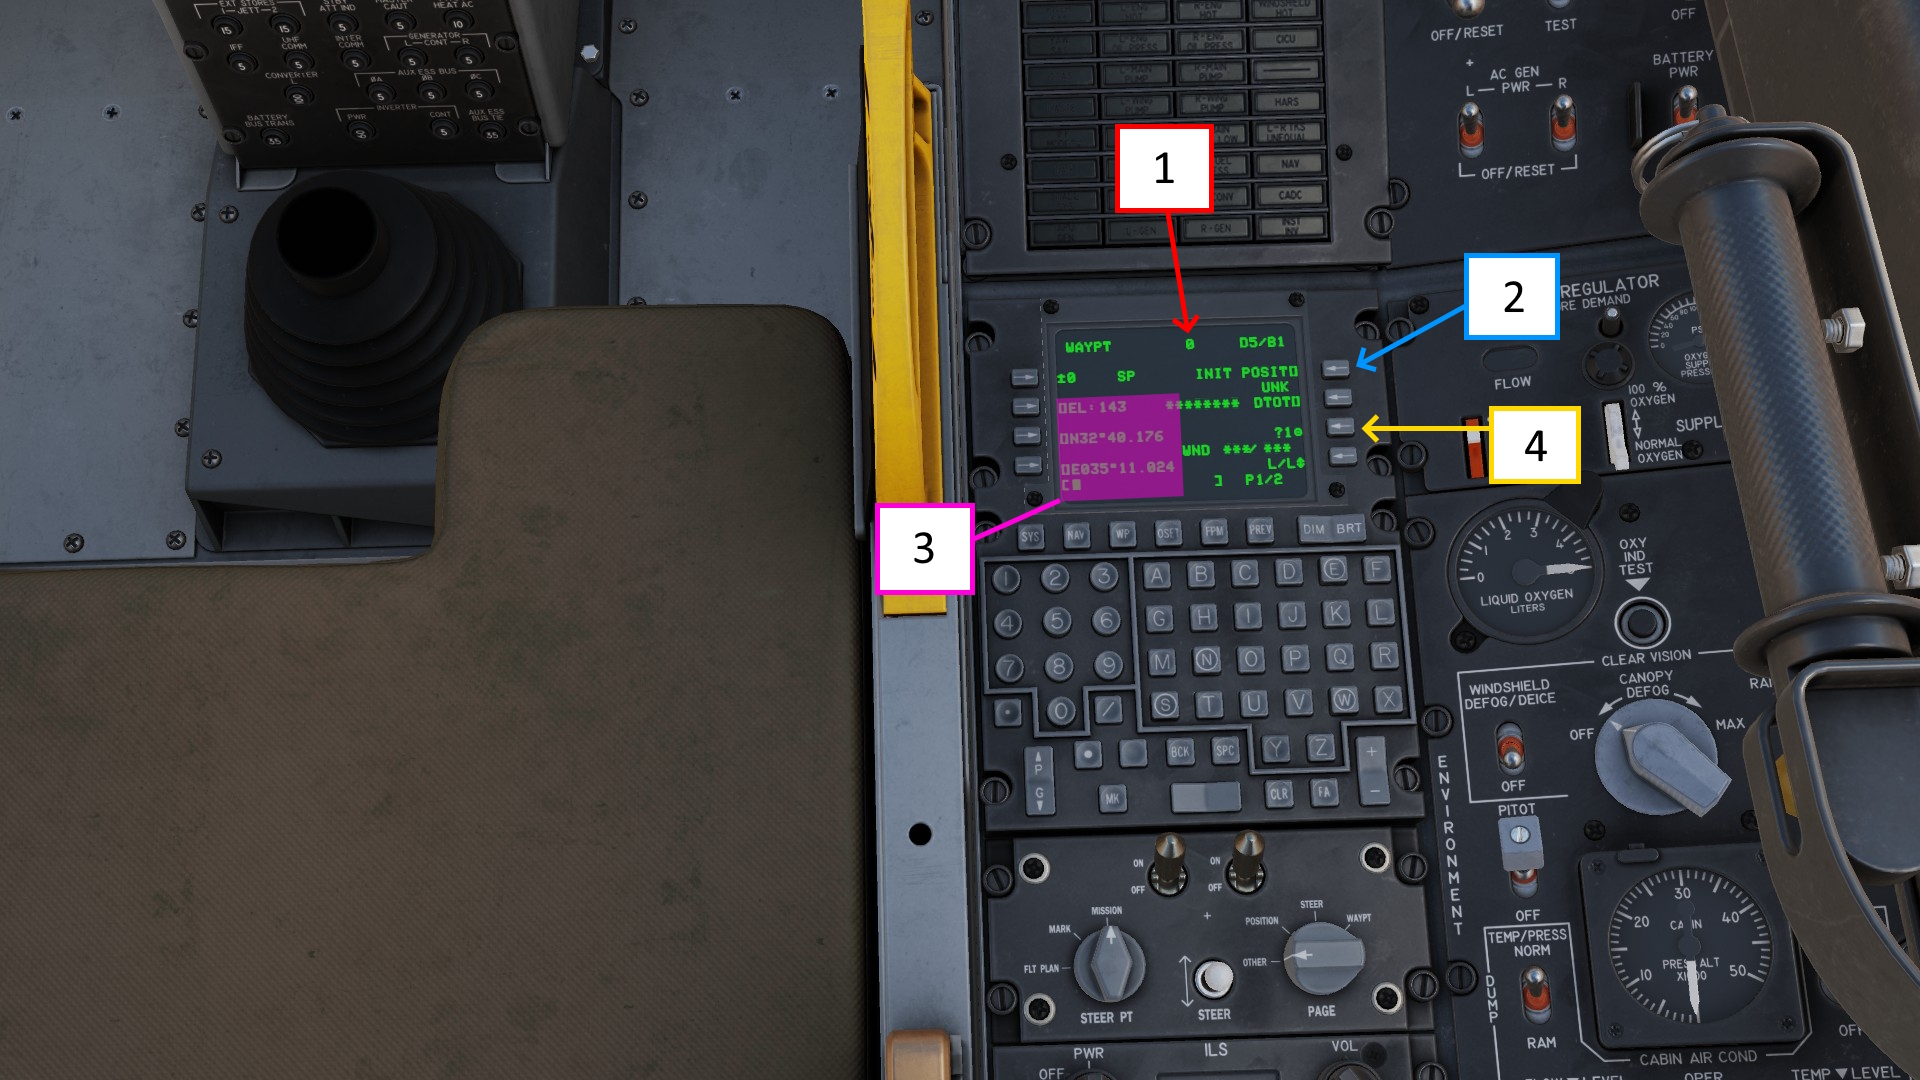
- Current waypoint
- Name of current waypoint
- Coordinates of current waypoint
- Create new waypoint? (create waypoint 1 in this case)
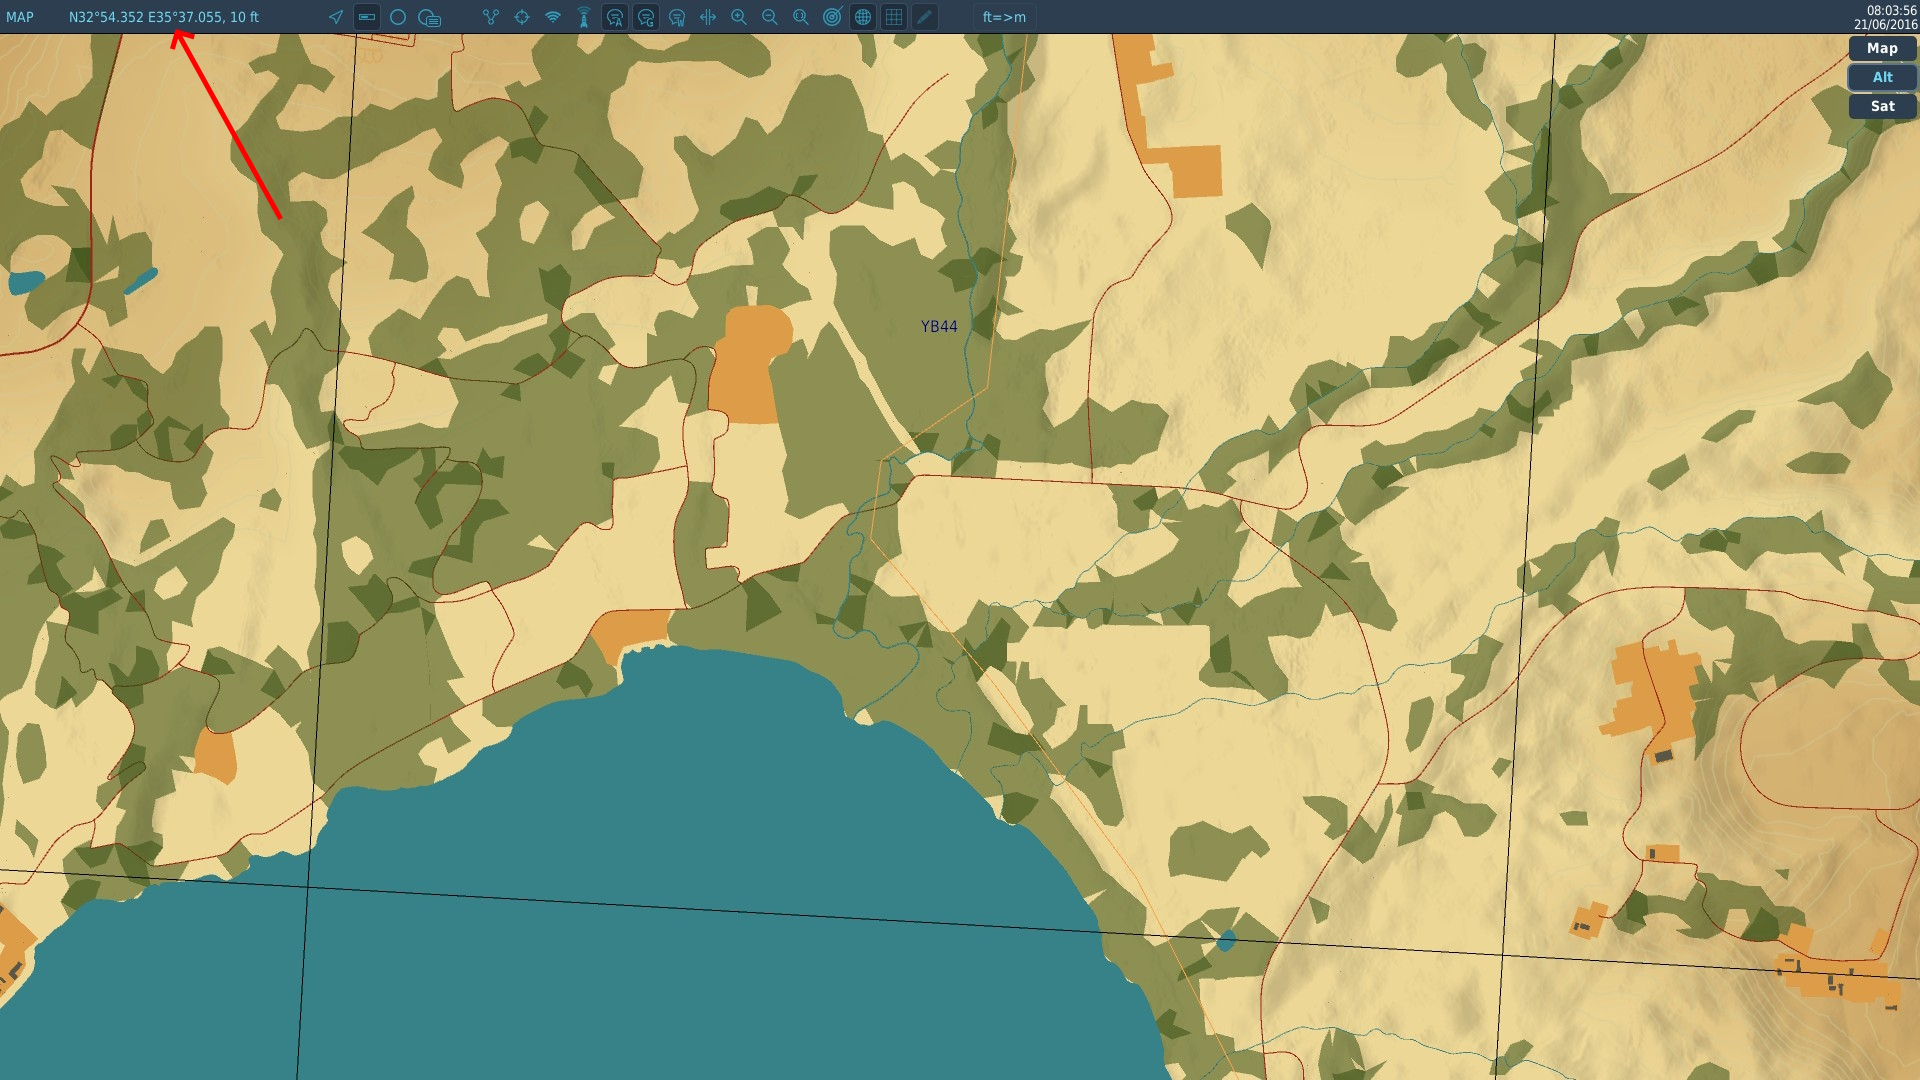
For your next step, you will need your actual coordinates. In this case i will get them from the map.
7 digit coordinates are precise enough to use in conjunction with gps/ins guided munitions and enable you to strike predesignated locations without further target identification.
In my case, the coordinates are
N 32 54 352
E 35 37 055
at 10 ft altitude
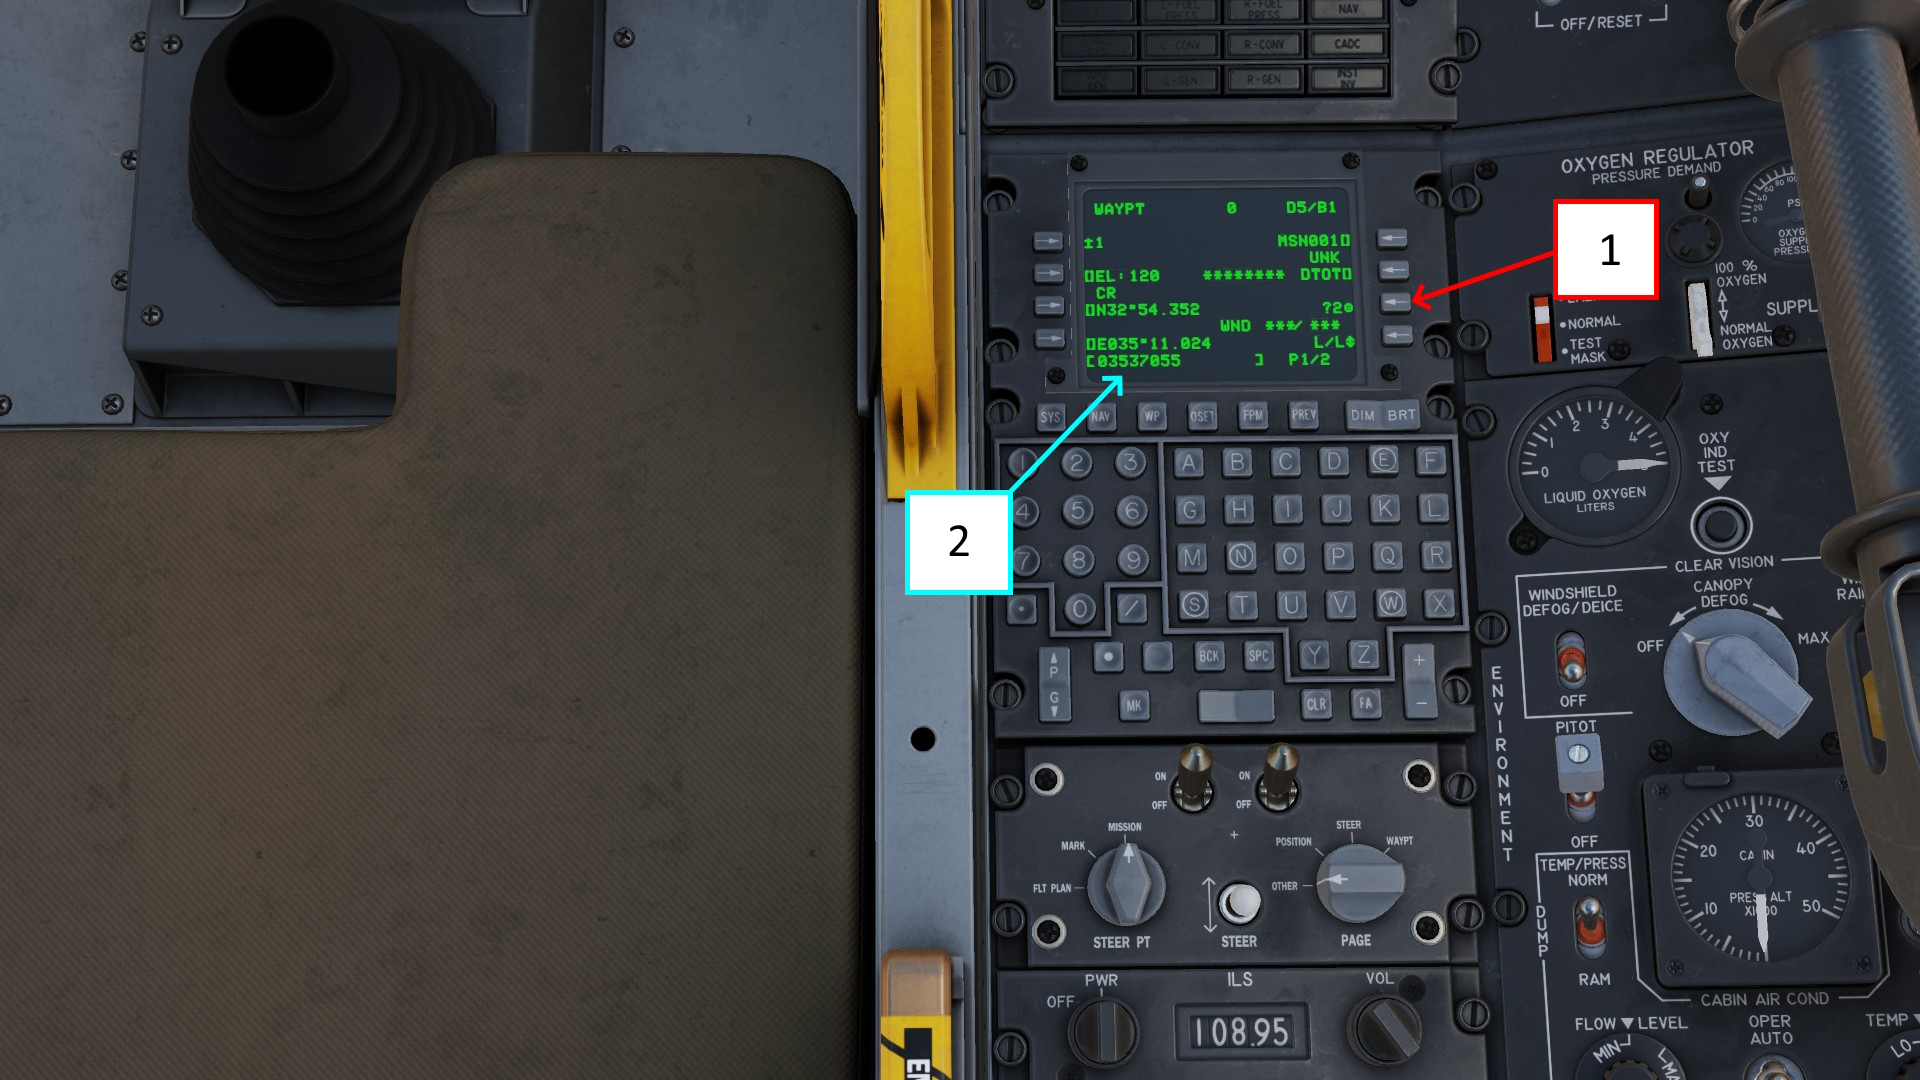
- "New waypoint" function key
- "Coordinate window"
First off, create a new waypoint. After that, you can start typing in your coordinates.
Note that for your east coordinate, you will need to put a 0 (zero) infront of it.
E 35 37 055 will therefore be 03537055.
After you typed your coordinate, it will be visible on the last line of towards the bottom.
Press the function key next to N or E depending on what coordinate you typed in. The ground elevation will automtically update or you can change it to a different one manually.
Repeat this step so you have set both your north and east coordinate in your new waypoint.
Lastly, we can change the name of your waypoint.
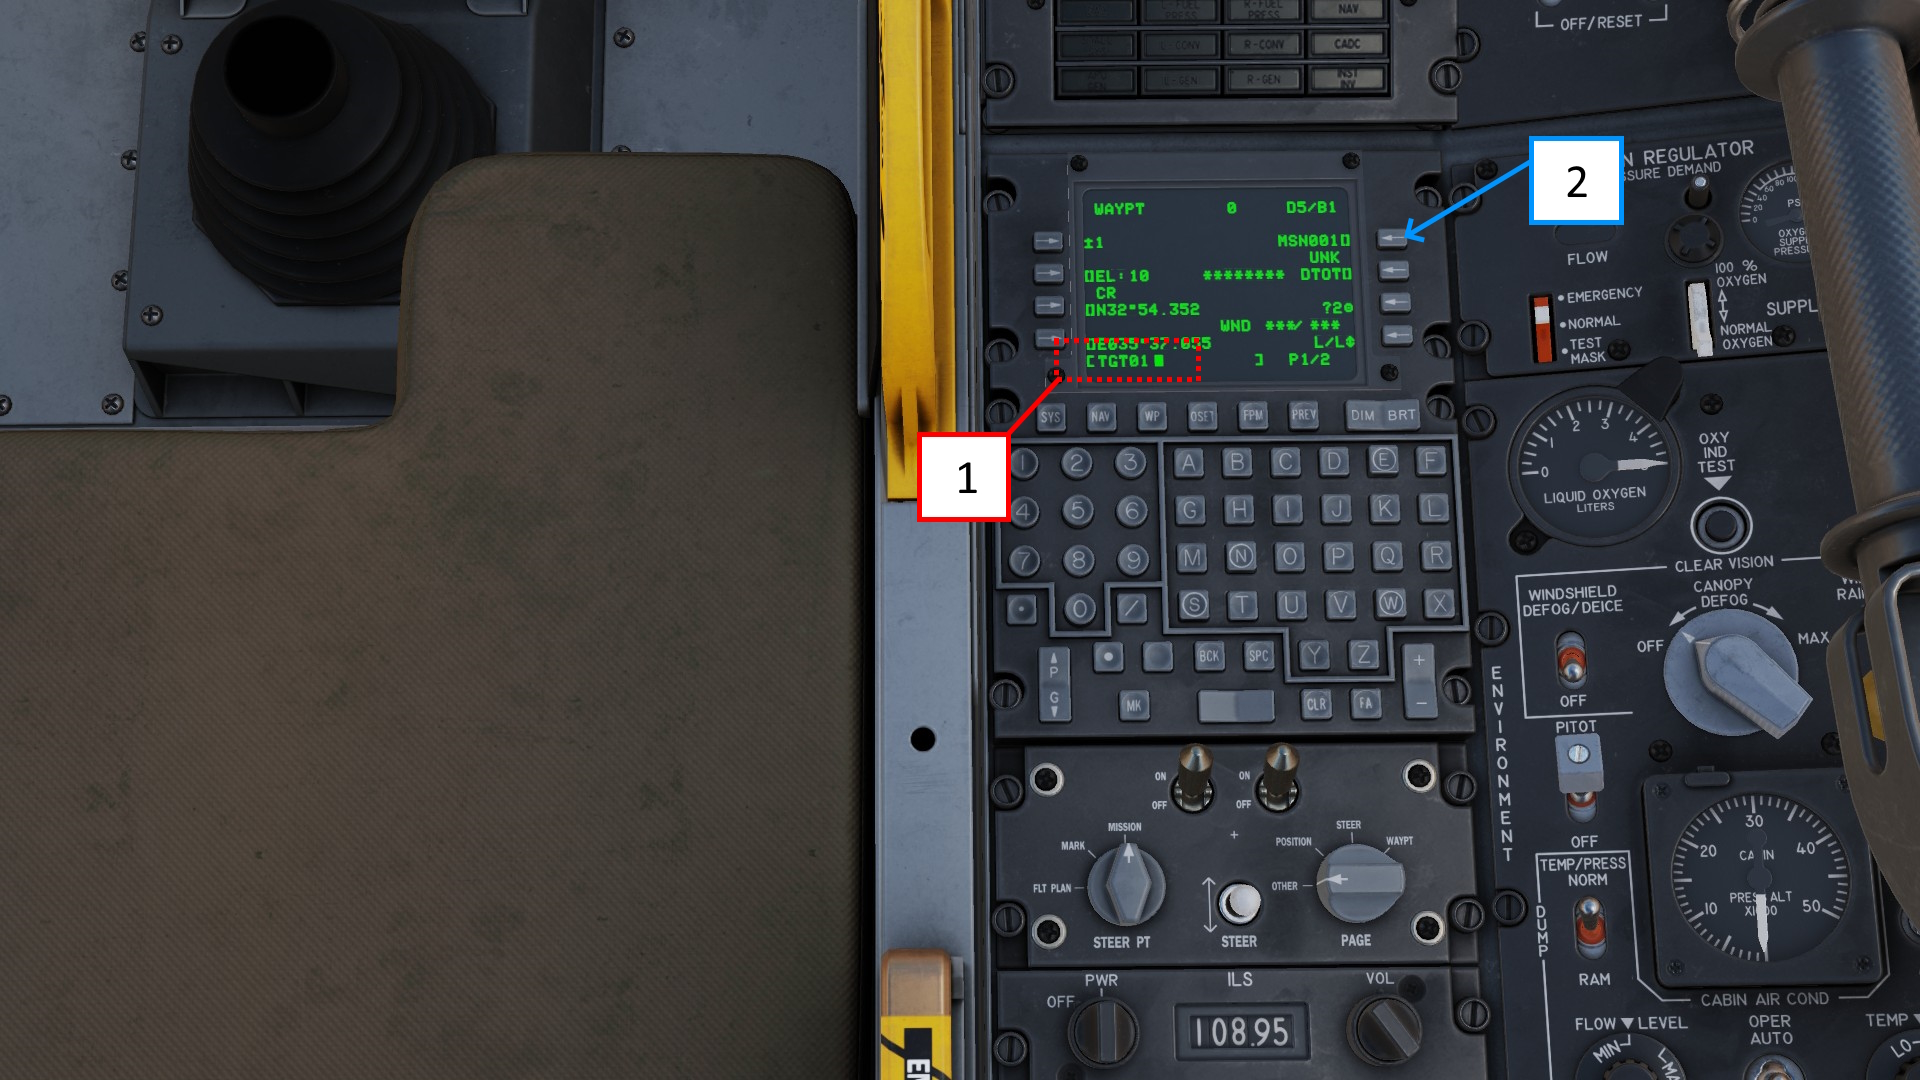
For this, simply write your desired name via the CDU keyboard and press the function key next to the waypoints placeholder name.
All settings will save automatically.
You can cycle between waypoints with your Steerpoint selection switch, either under your CDU or on your UFC.
TACAN
AN/AAQ-28 Litening Targeting pod
The Litening Tpod is probally the most essential pice of equipment. It allows you to find and designate targets. In addition to this, the TGP it used for transfer information to the computer to give you accurate information of when to release the selected weapon.
Needed controlsGeneral controls of the TGP
To power the TGP, you will need to flip the switch on the master arm panel to on.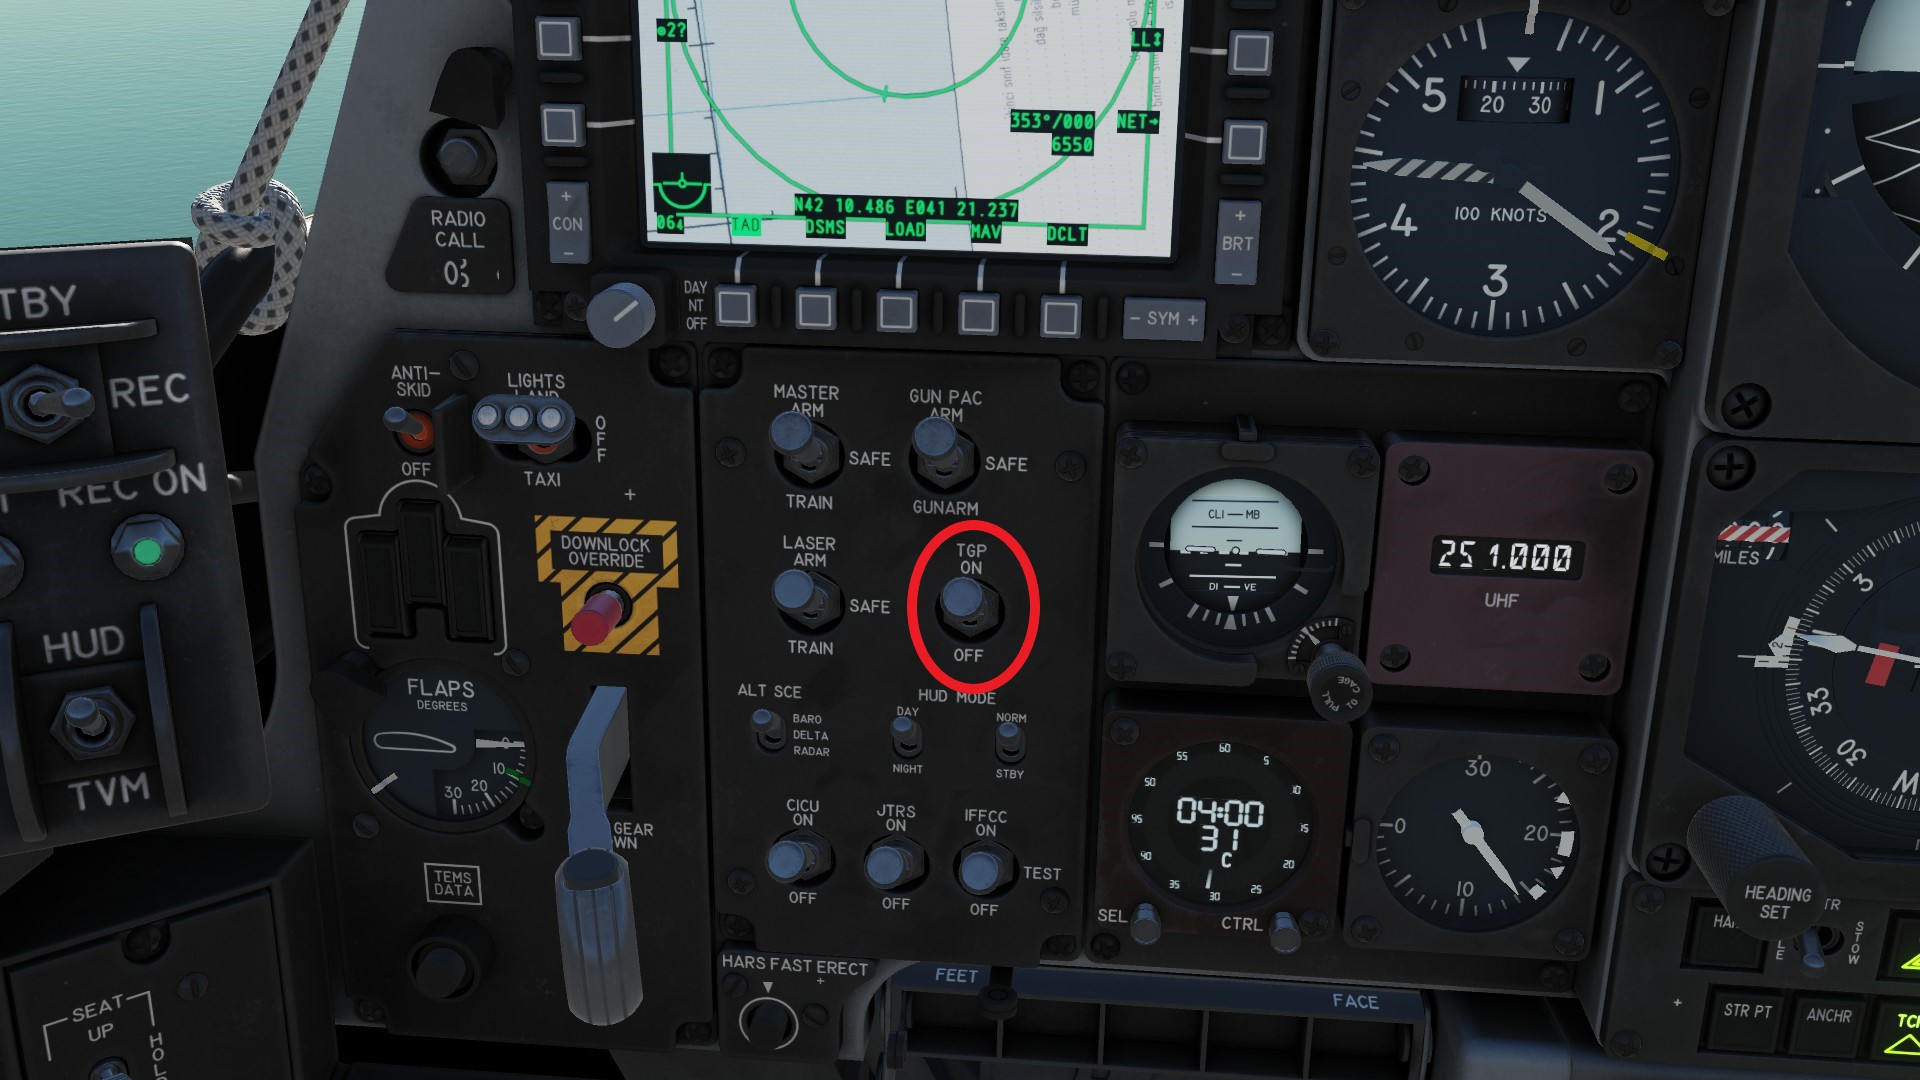 After this, a two minute warmup phase begins. Once its complete, you will get the symbology below. NOT SOI (red) means, that the display is not your sensor of interest, or to put is simple - any controls you might press will have no effect on the MFCD. In the top row you see three avaiable operation modes (blue). A-G means air to ground. This is the mode you will spen the most time in. STBY meany standby. The pod is warmed up and operational, but the lens is stored to prevent it from catching dirt. The last mode it A-A, standing for air to air. You will probally only use it when you try to shoot down a helicopter with mavericks or APKWS. The selected mode will have a green box around it.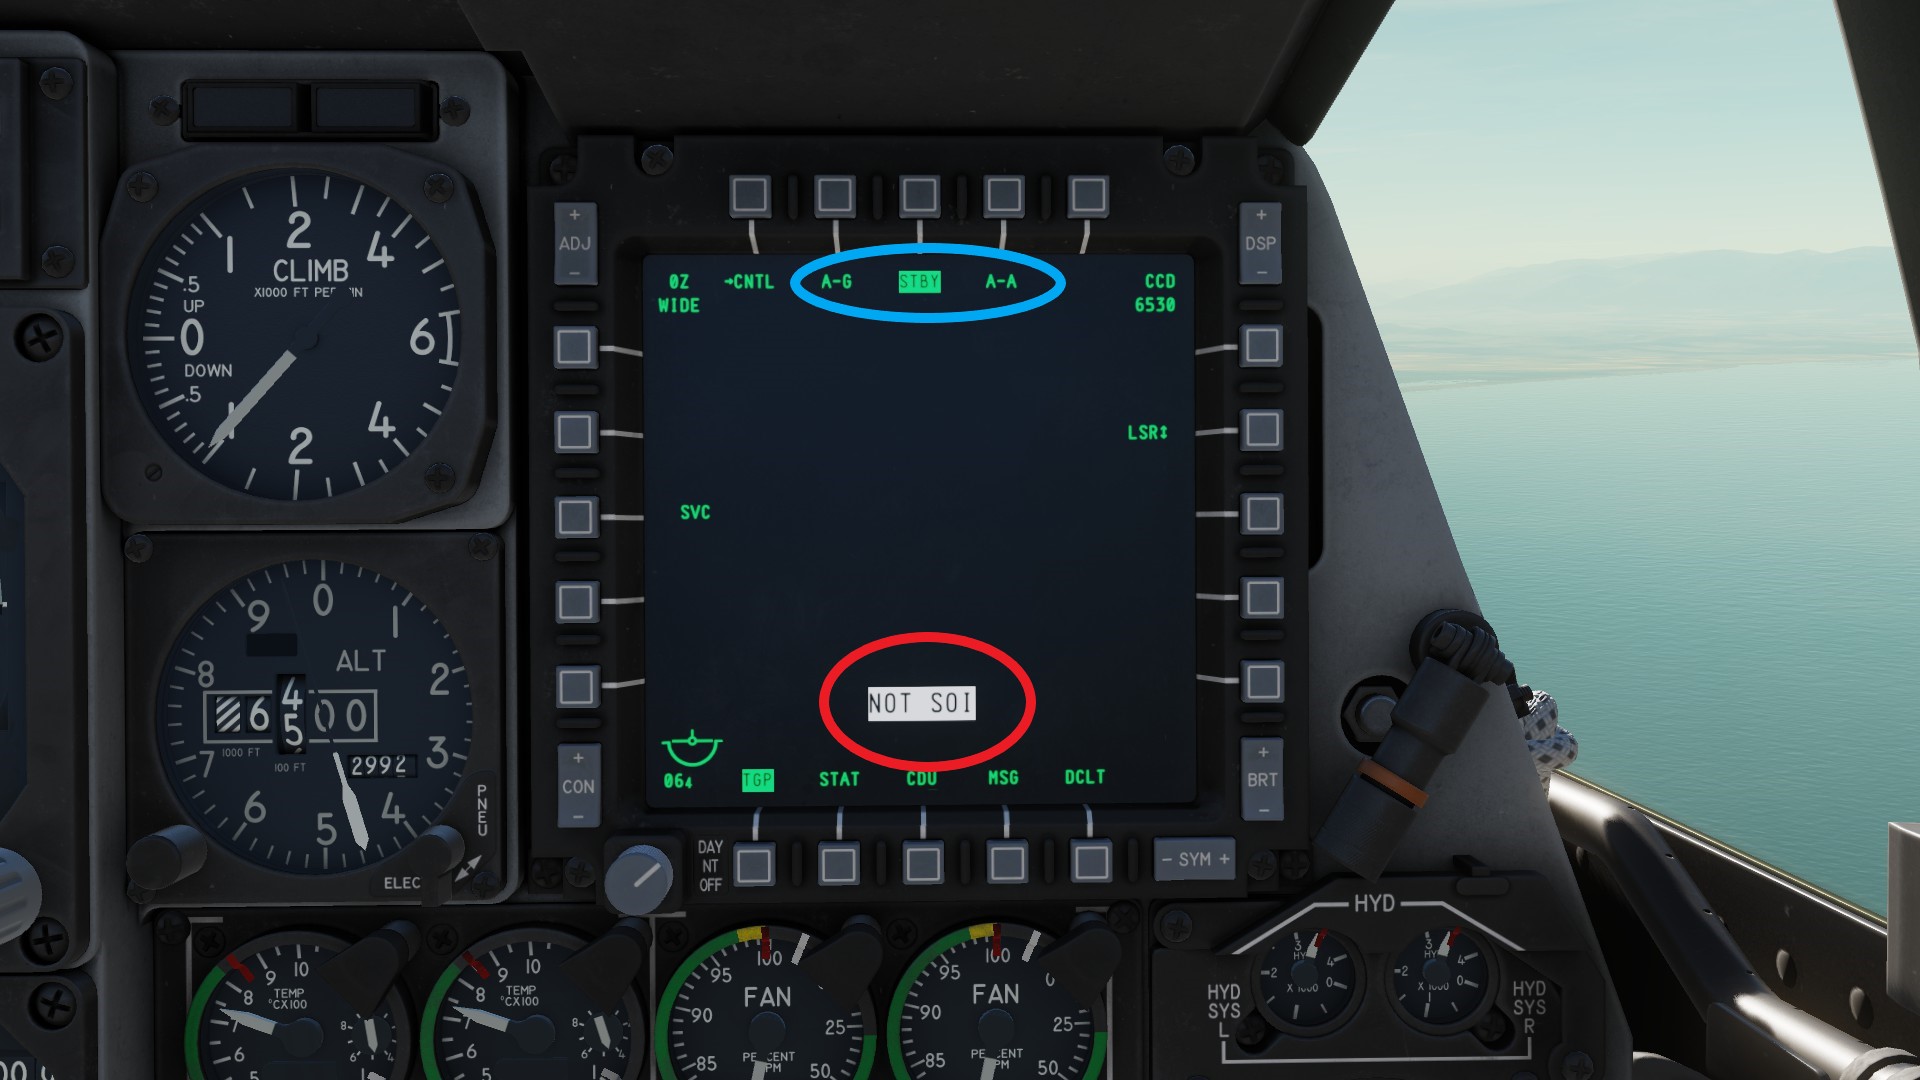
When you select one of the two operatianal modes, you will see the following.
Yellow: The FOV (field of view) setting and zoom factor of the TGP.
Blue: North in relation to the point the TGP is locking at.
Dark Blue: The direction where the TGP is locking at in relation to your plane.
Purple: The mode in which the camera is operating (TV or BHOT / WHOT thermal).
Black: The distance covered by the horizontal cross lines.
Brown: The FOV when the setting is changed to narrow.
Red: Your bank level.
Orange: The coordinates of the point youre locking at.
Green: The distance to the point youre locking at.
The Button in white resets your TGP back to boresight (it makes the camera look infront of you again).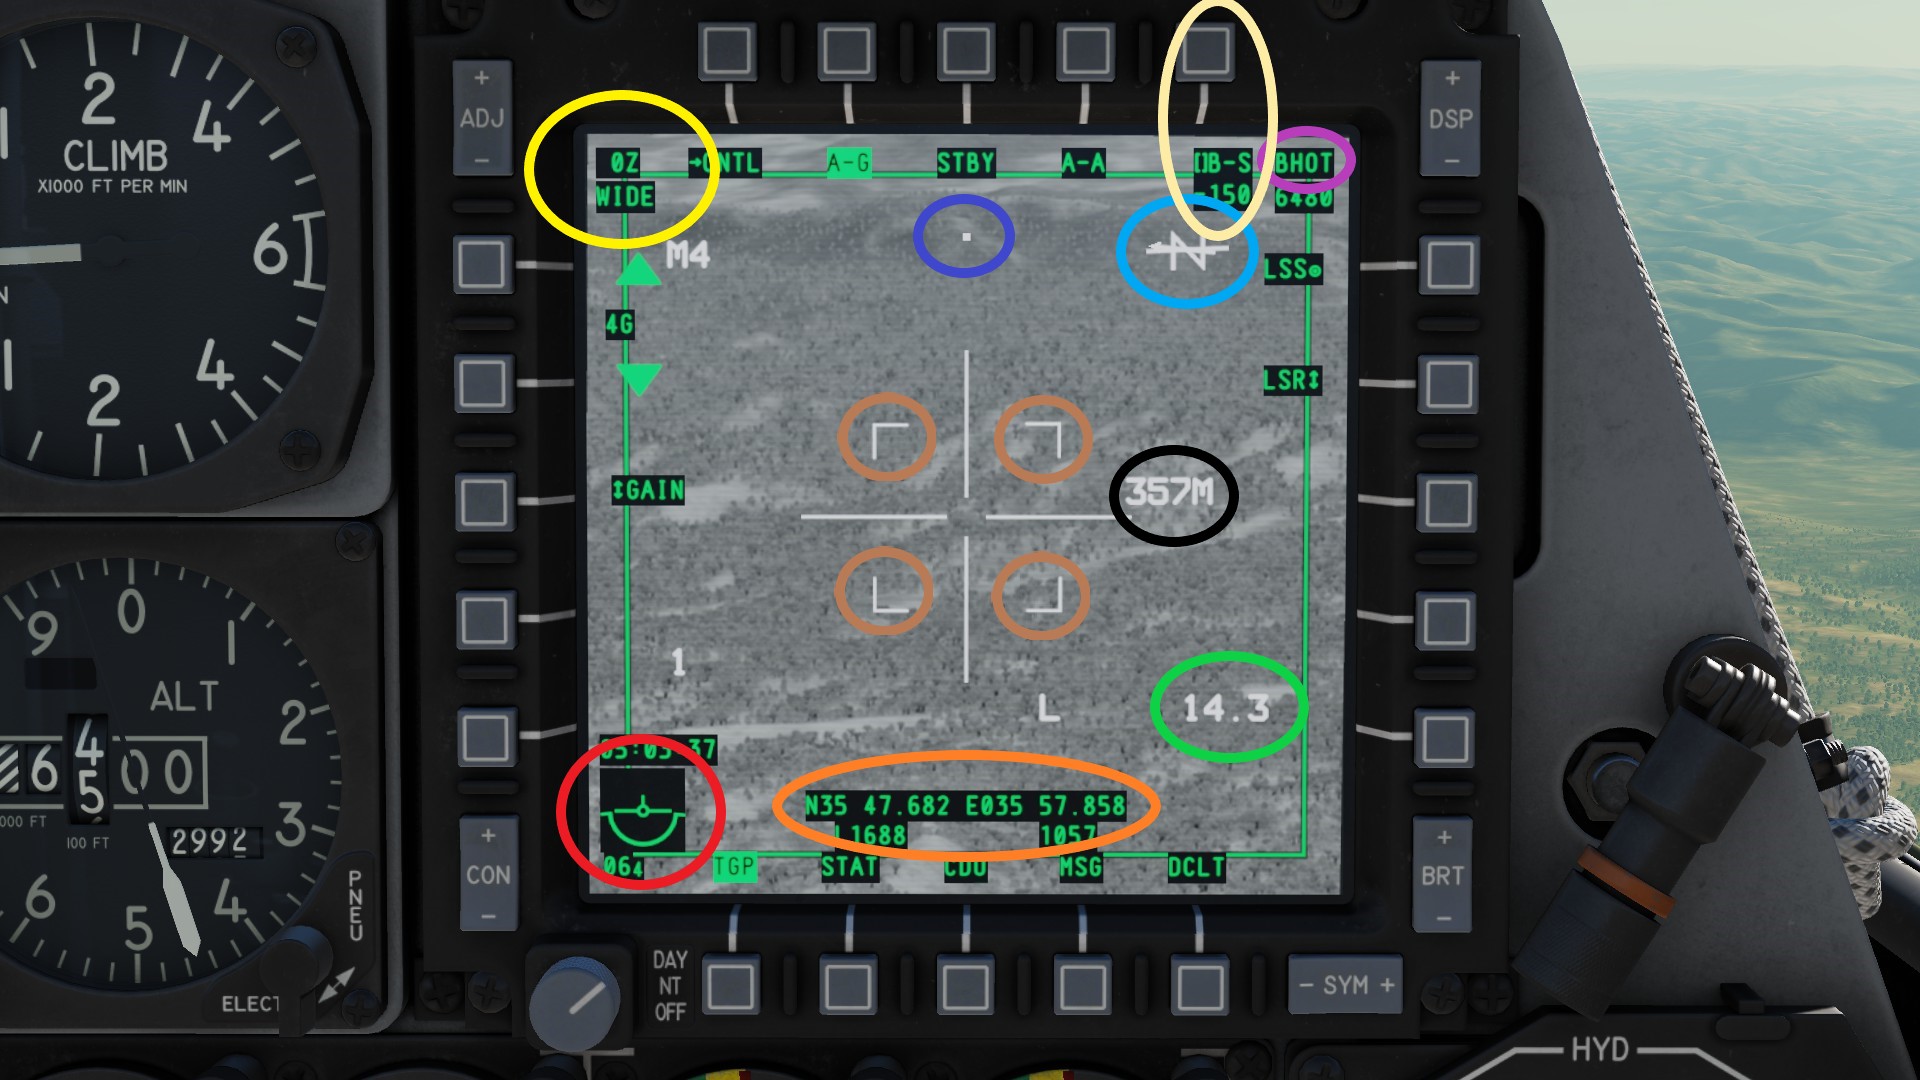
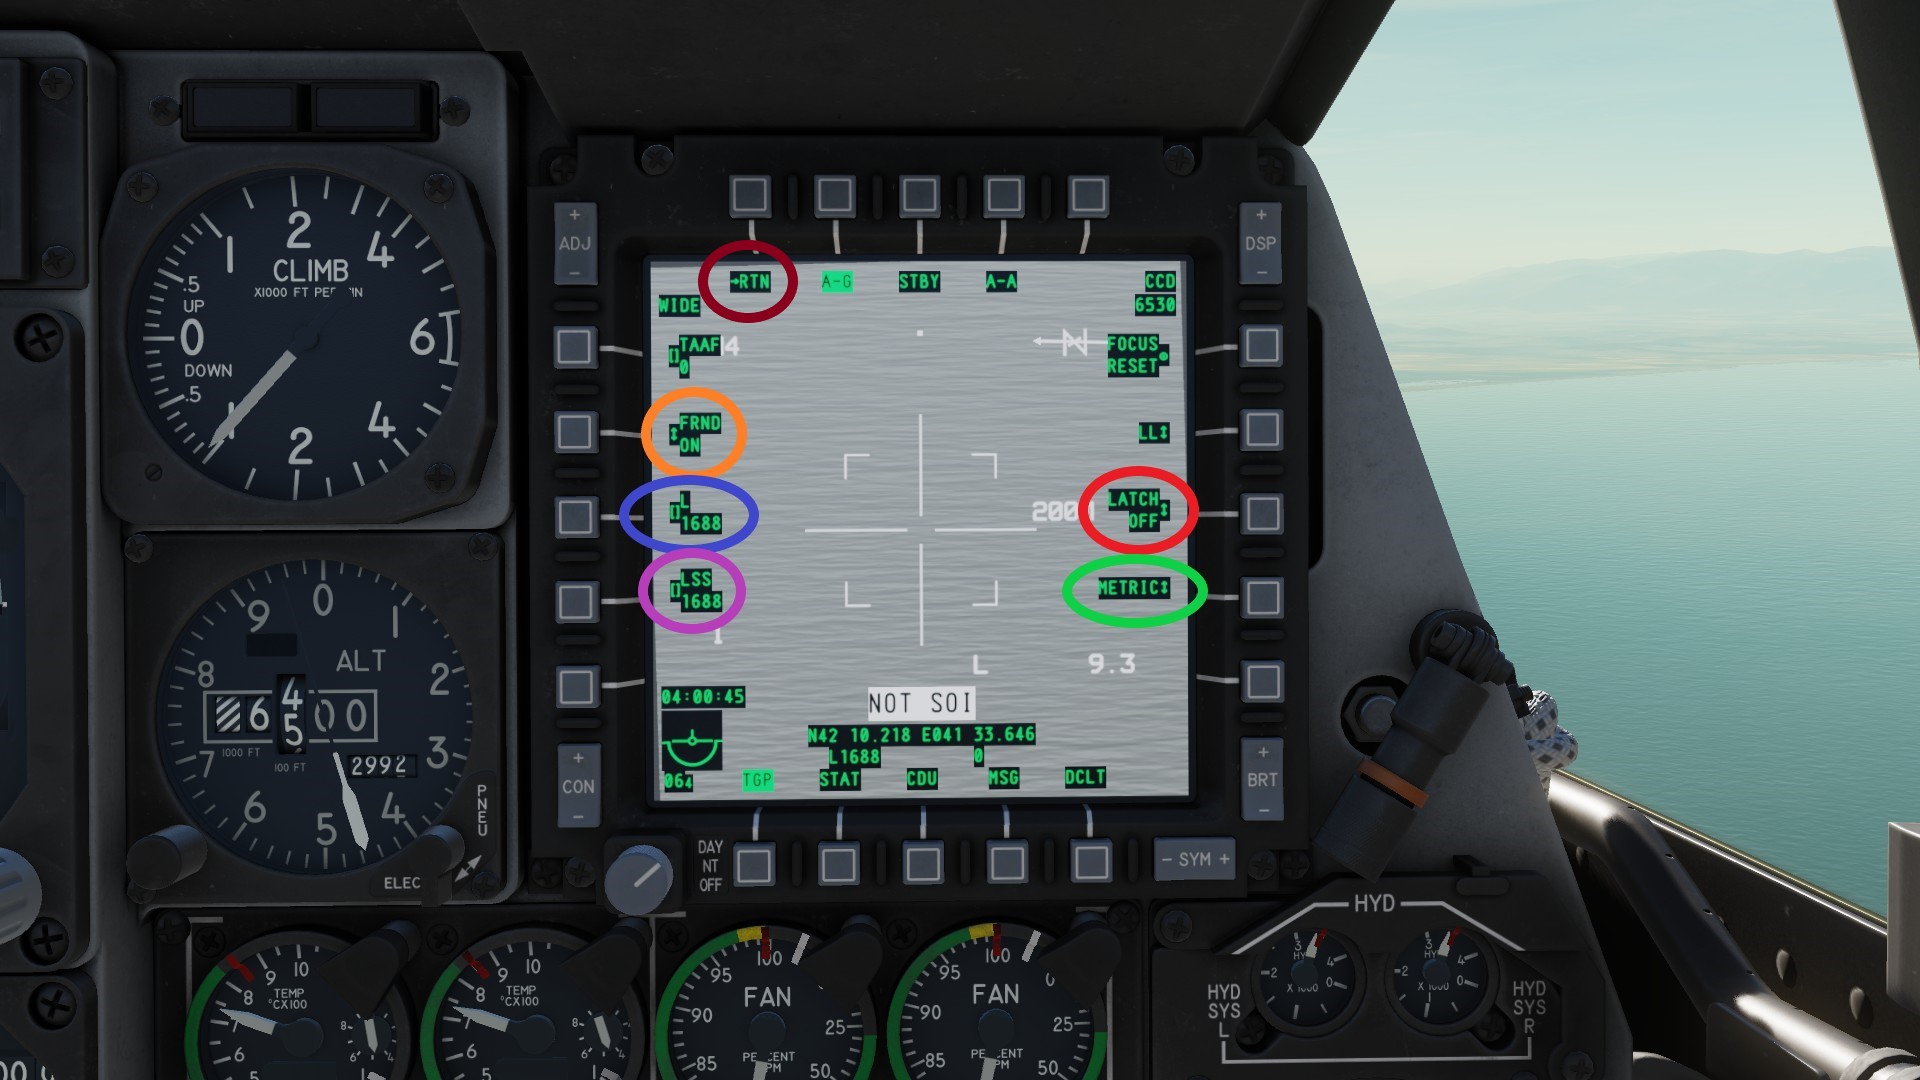
When you click on CNTL in the top left corner (dark red), you will see the control menu of the Tpod.
Orange: Allows you to see friendly units on your TGP image marked with a green X.
Dark Blue: Your laser code. Has to be the same code that is set to laser guided munitions.
Purple: LSS code. Laser spot search allows you to search for other players lasers with the code you set.
Green: Allows you to change the displayed information from metric to weird american units.
Red: LATCH allows you to just press the nose wheel steering button to fire a laser, instead of having to hold the button.
 You can make the display SOI with HOTAS ♥♥♥♥♥♥ Switch Left or Right long and move the camera with the HOTAS Slew controlls. The green box around the edge of the screen will indicate that the display is SOI.
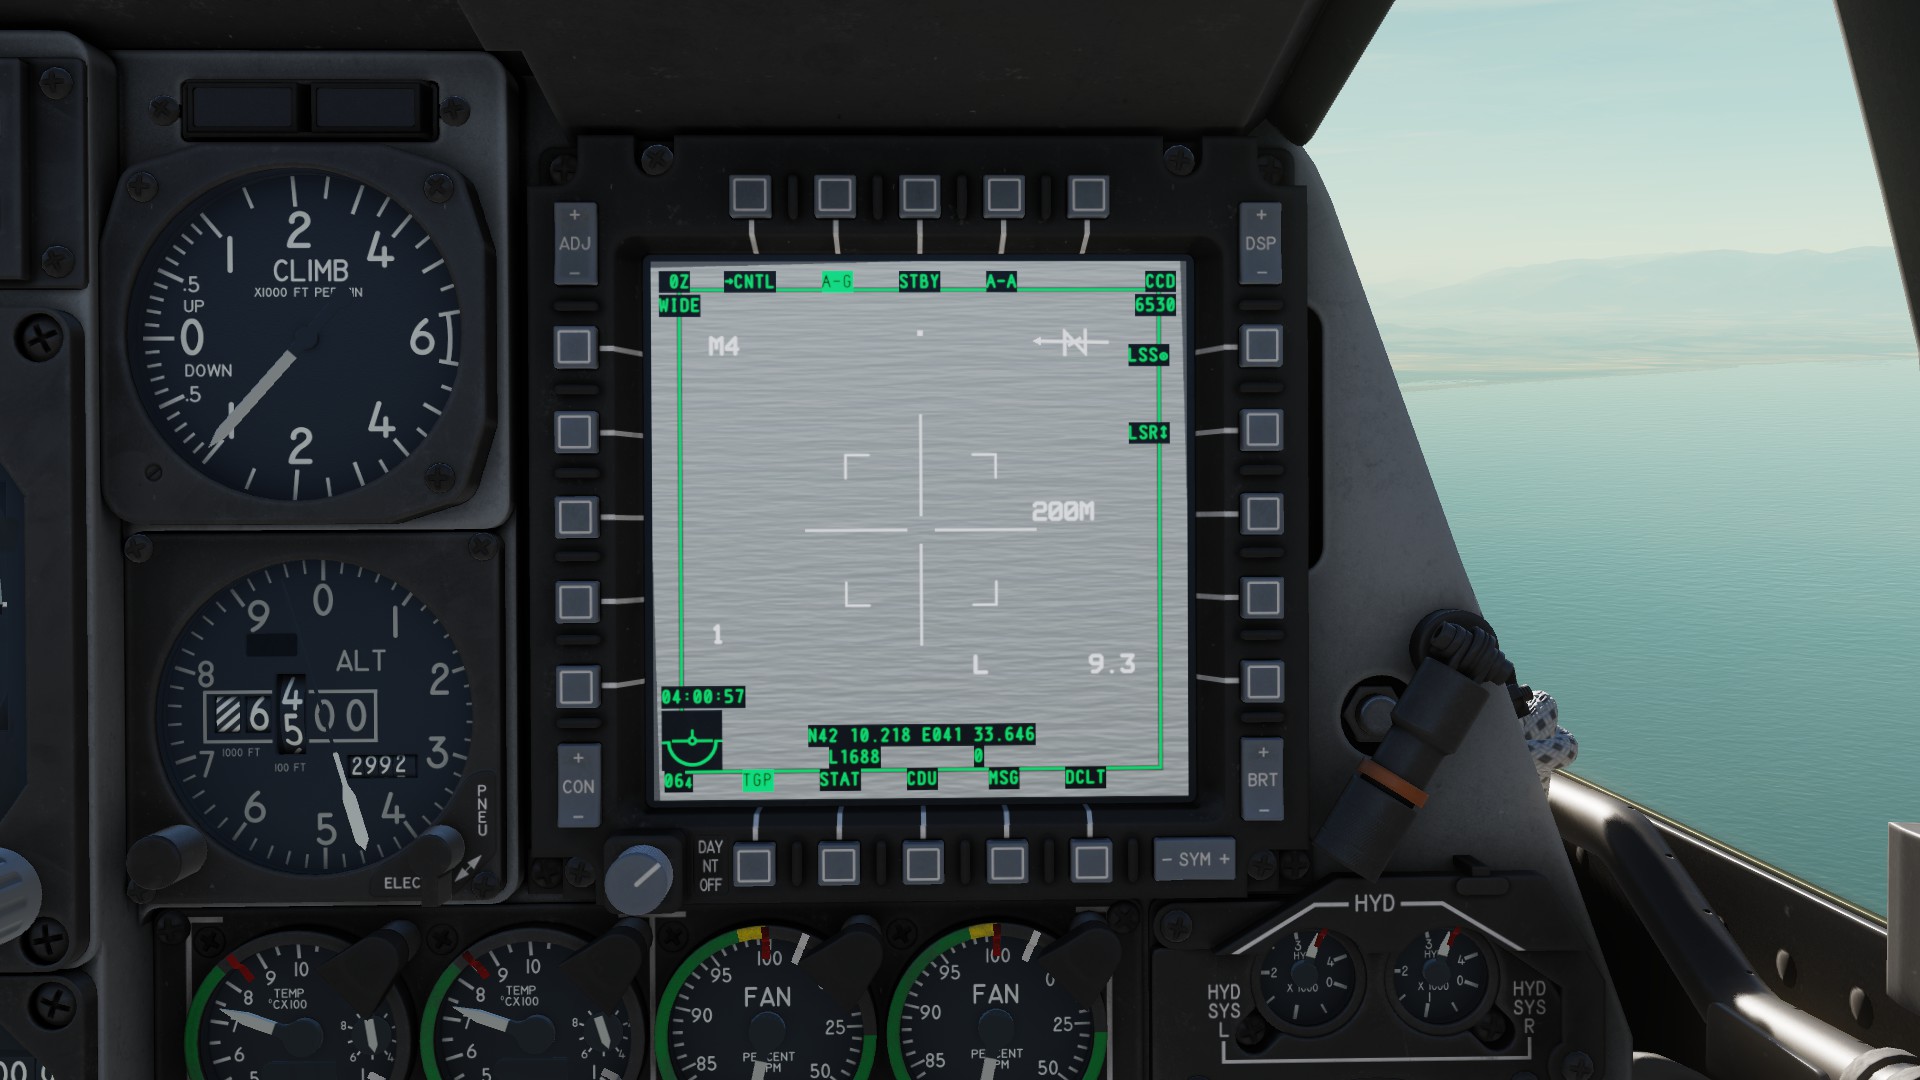 Here you can see the same image - a BTR - in the three avaiable camera modes.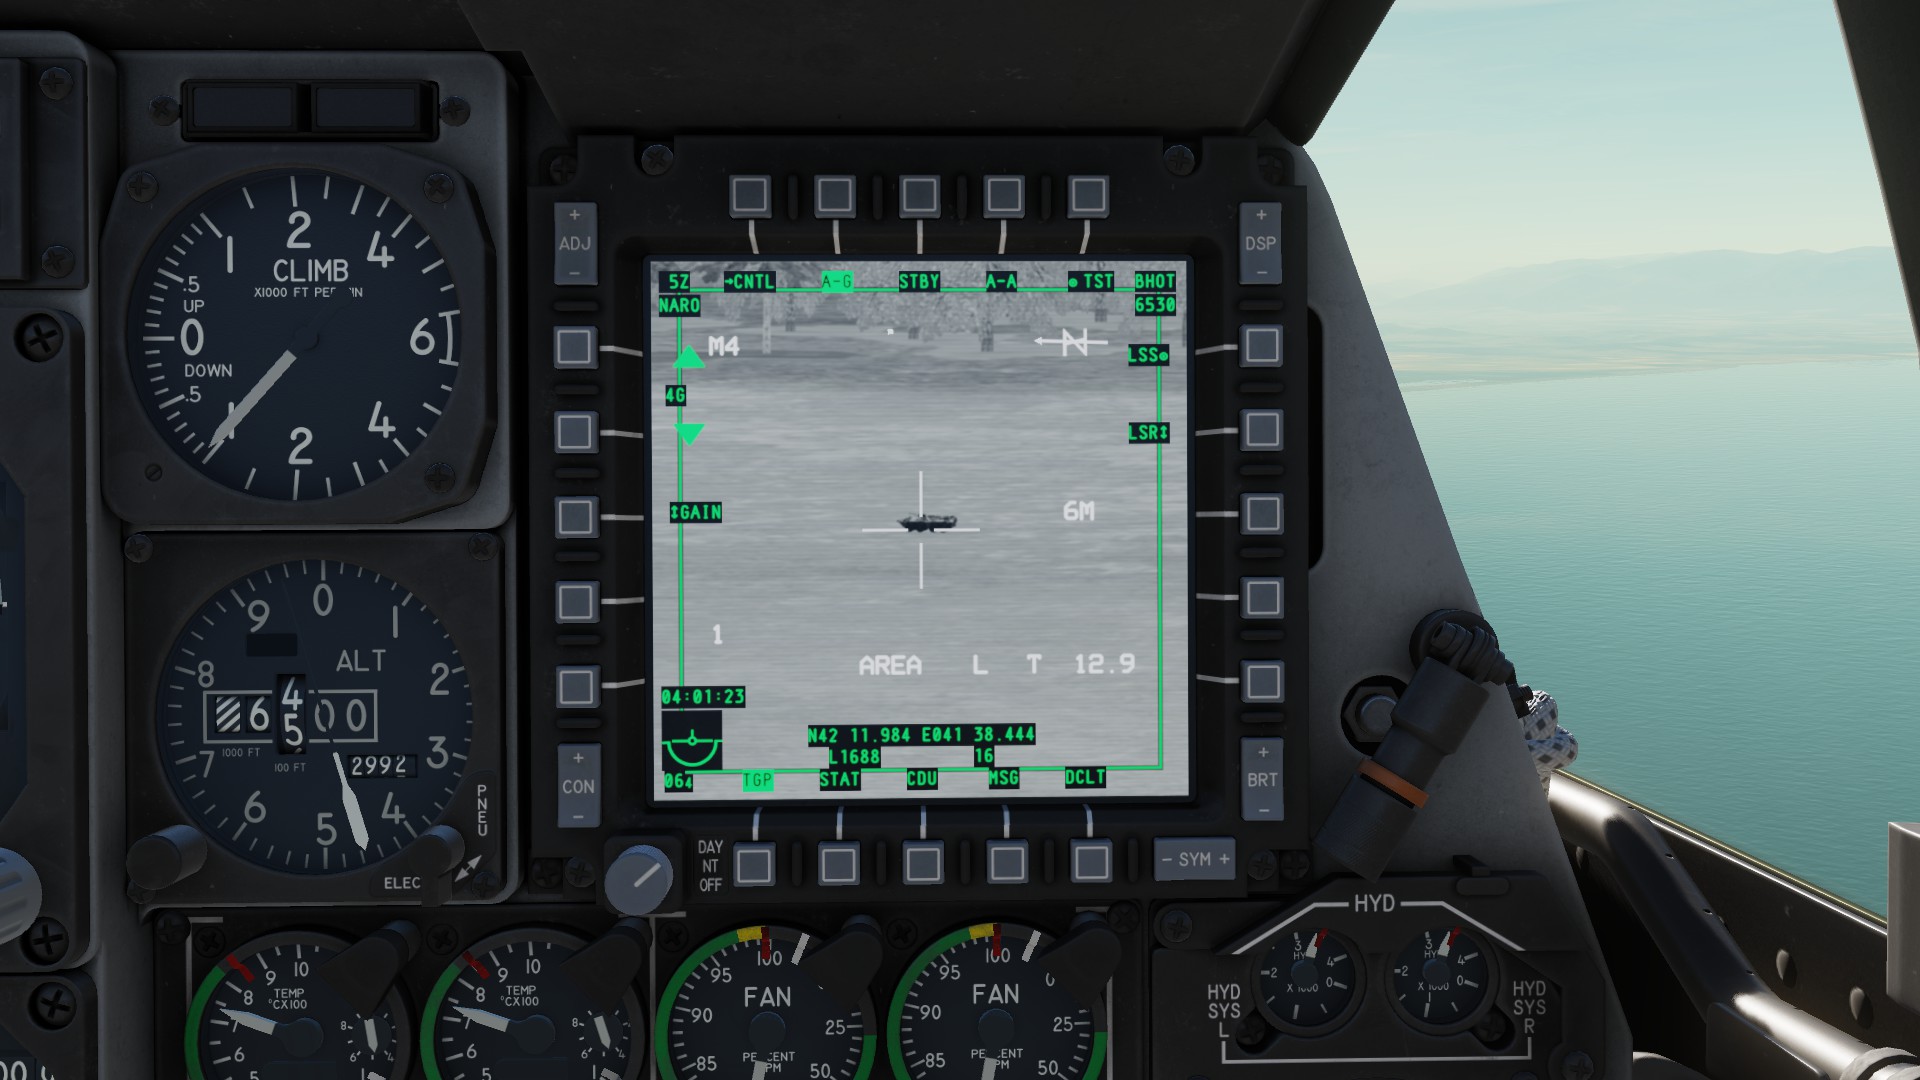
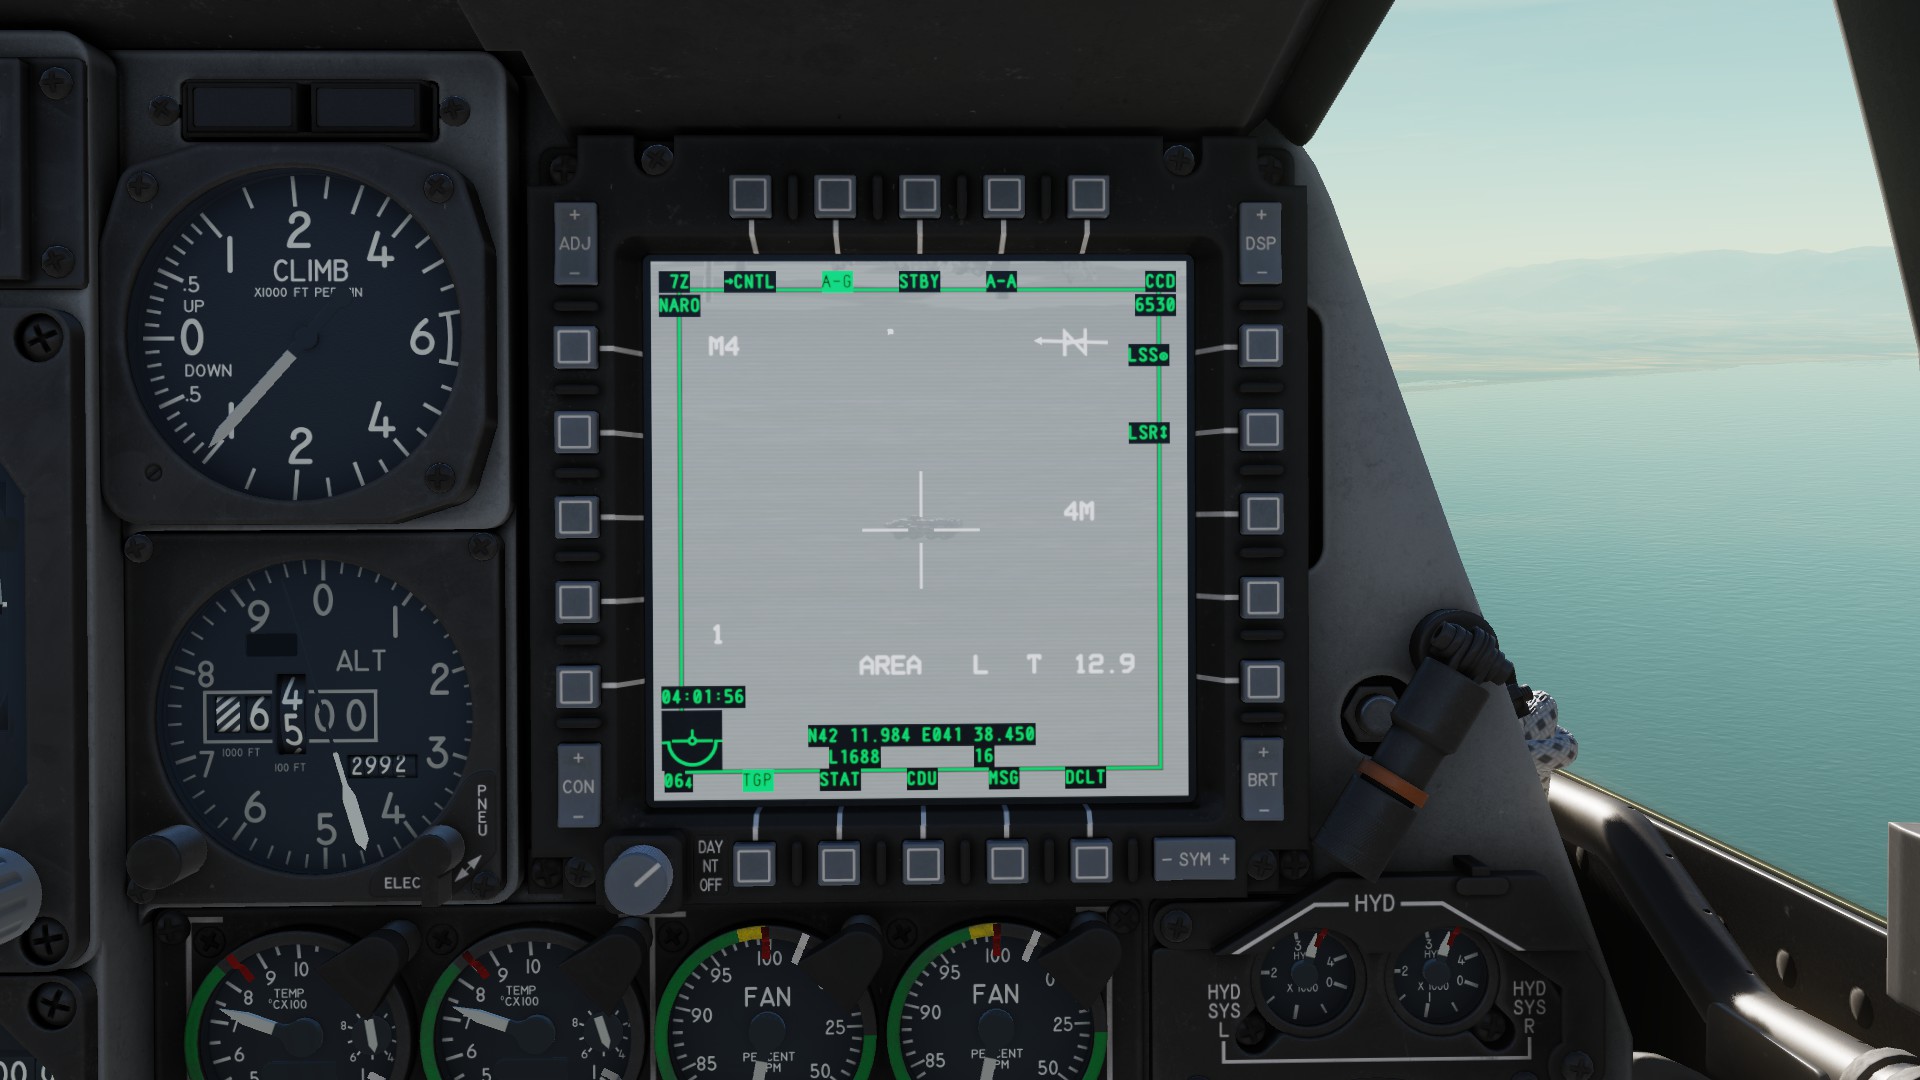
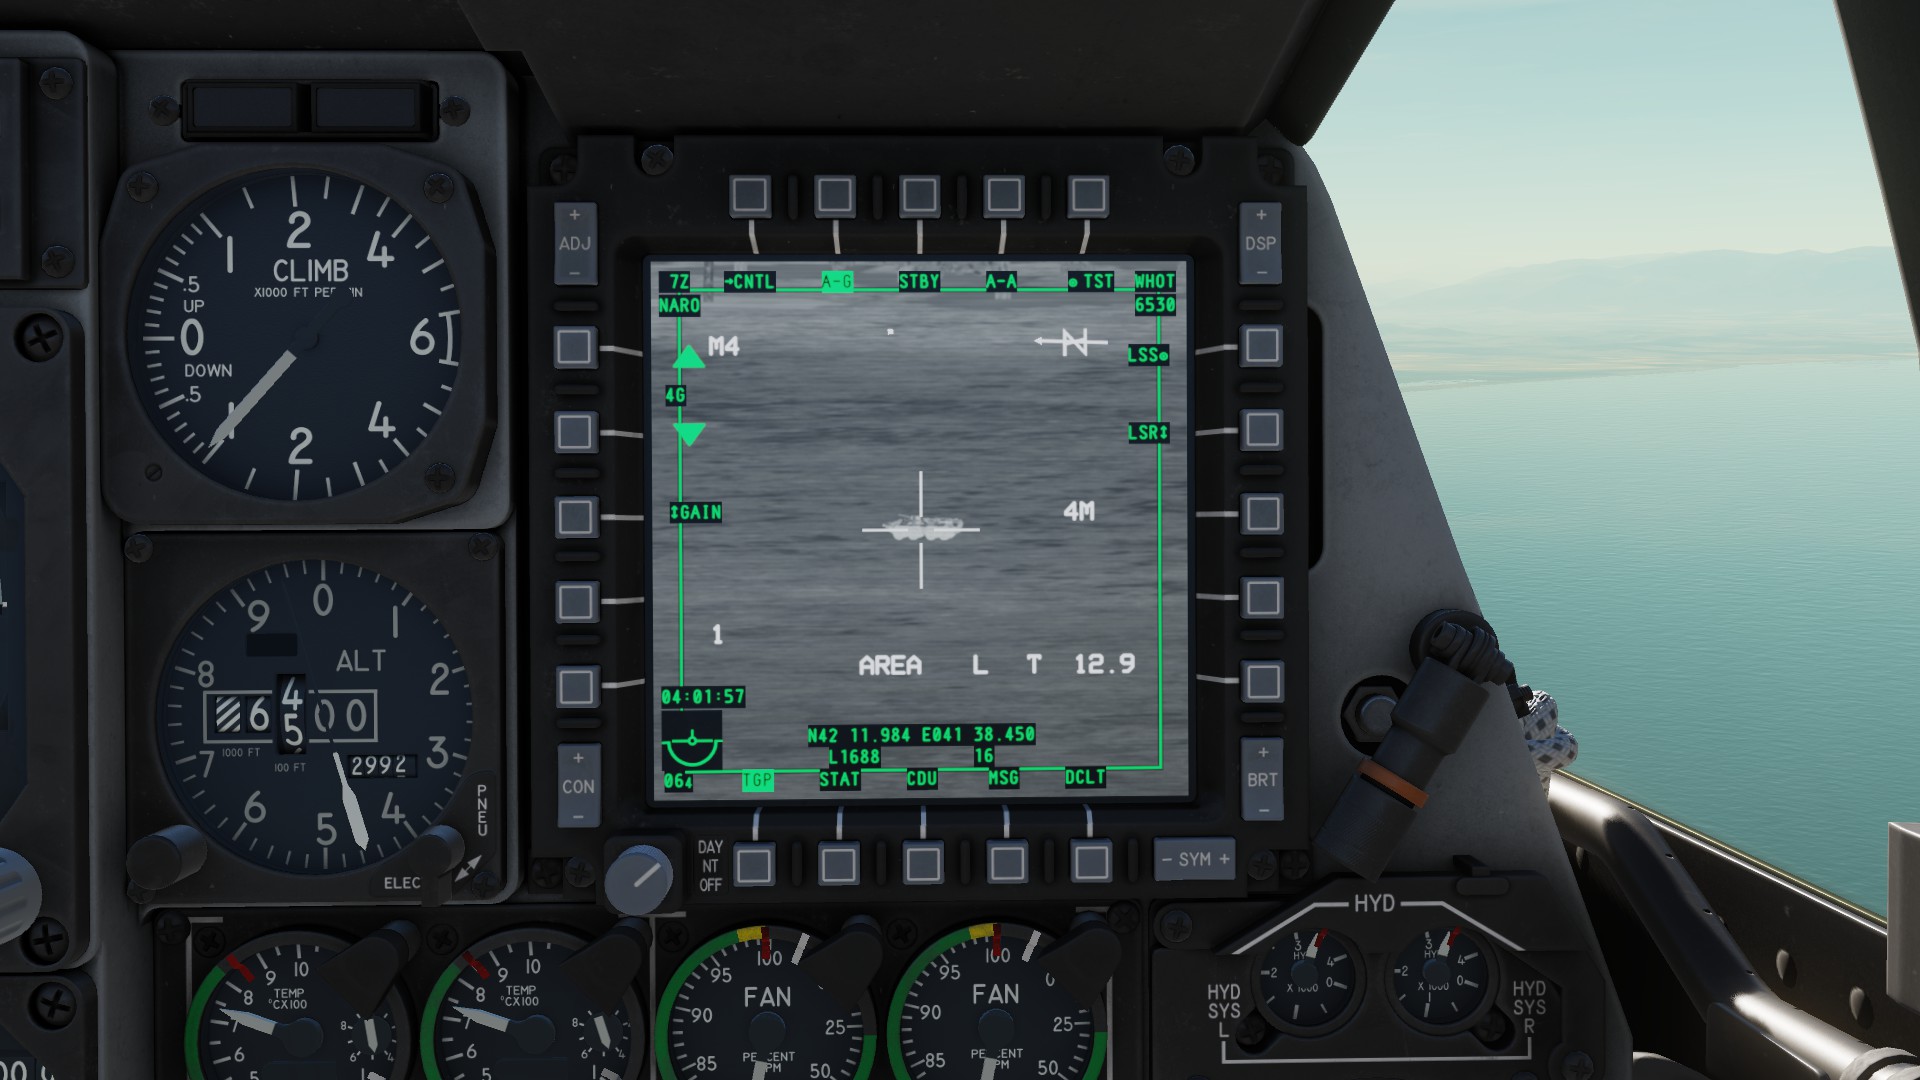
Top left: Black hot thermal
Top right: CCD or TV view
Bottom left: White hot thermal
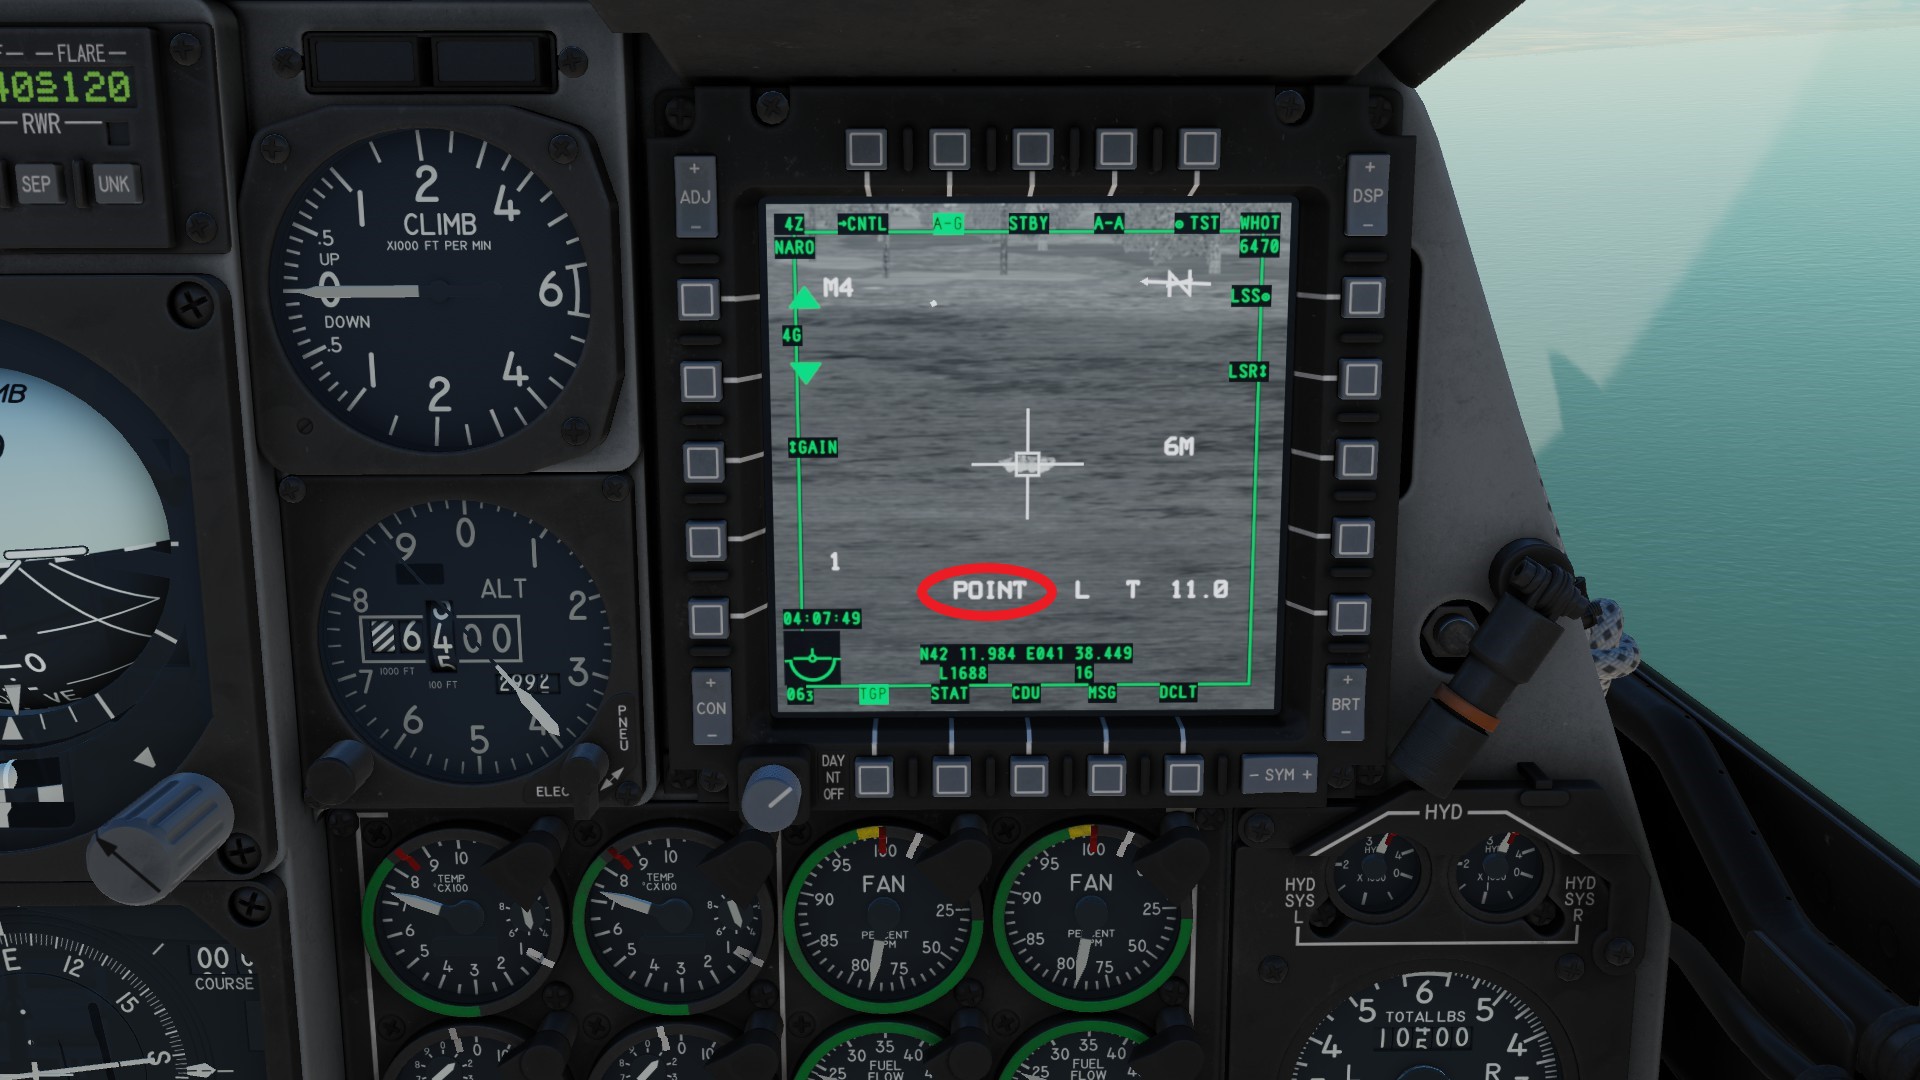
You have two different types of tracking avaiable. Areatrack (left) will lock the camera to the ground, while Pointtrack (right) will lock it to the point it is moved to. This can also be a moving point like a tank. The tracking mode is shown in the bottom of the screen (red). You can change the tracking mode with HOTAS TMS forward short.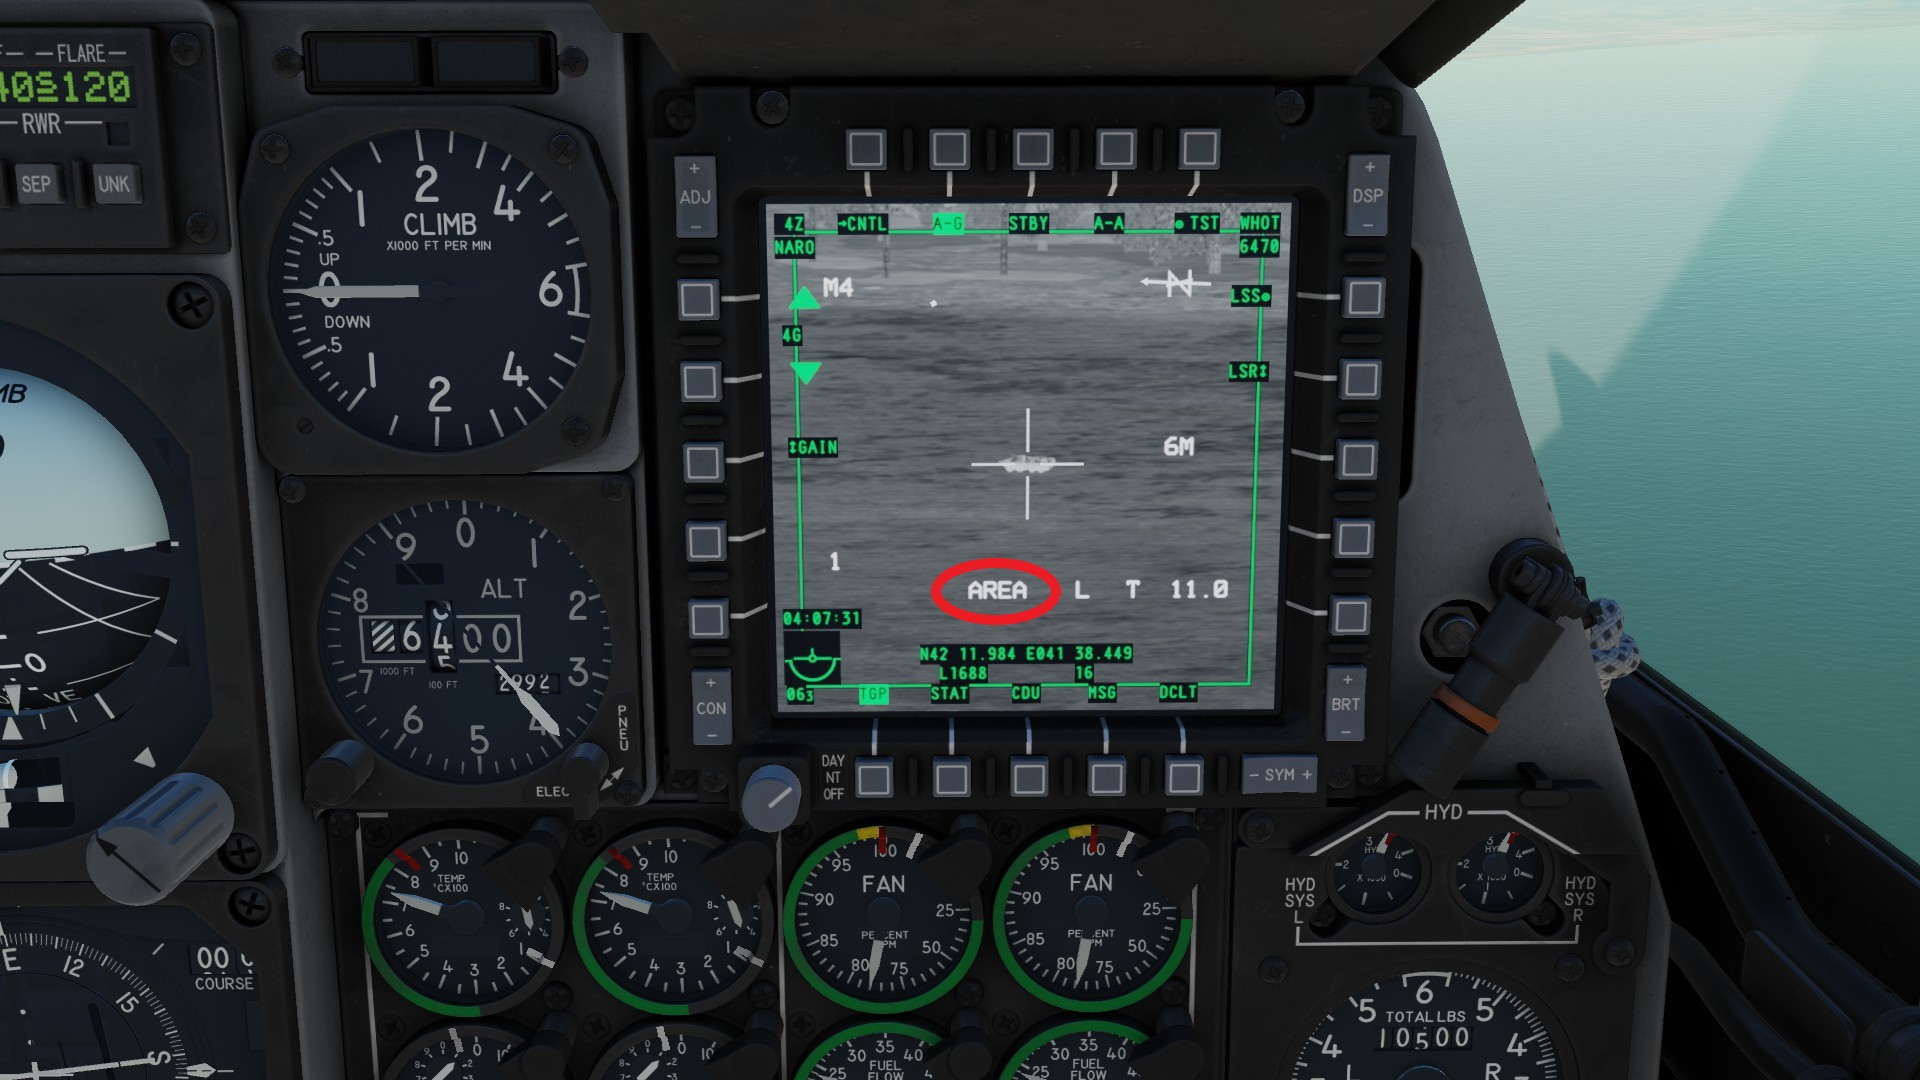
 When you see a M (red) like in the example below, it means that you are approaching a masking area. To simplify things, this means, that the TGP will soon look at your plane or external stores, which will cause it to breack line of sight with the target. This is espacially important when firing laser guided weapons. Try to change course more towards the target (if this is not too dangerous).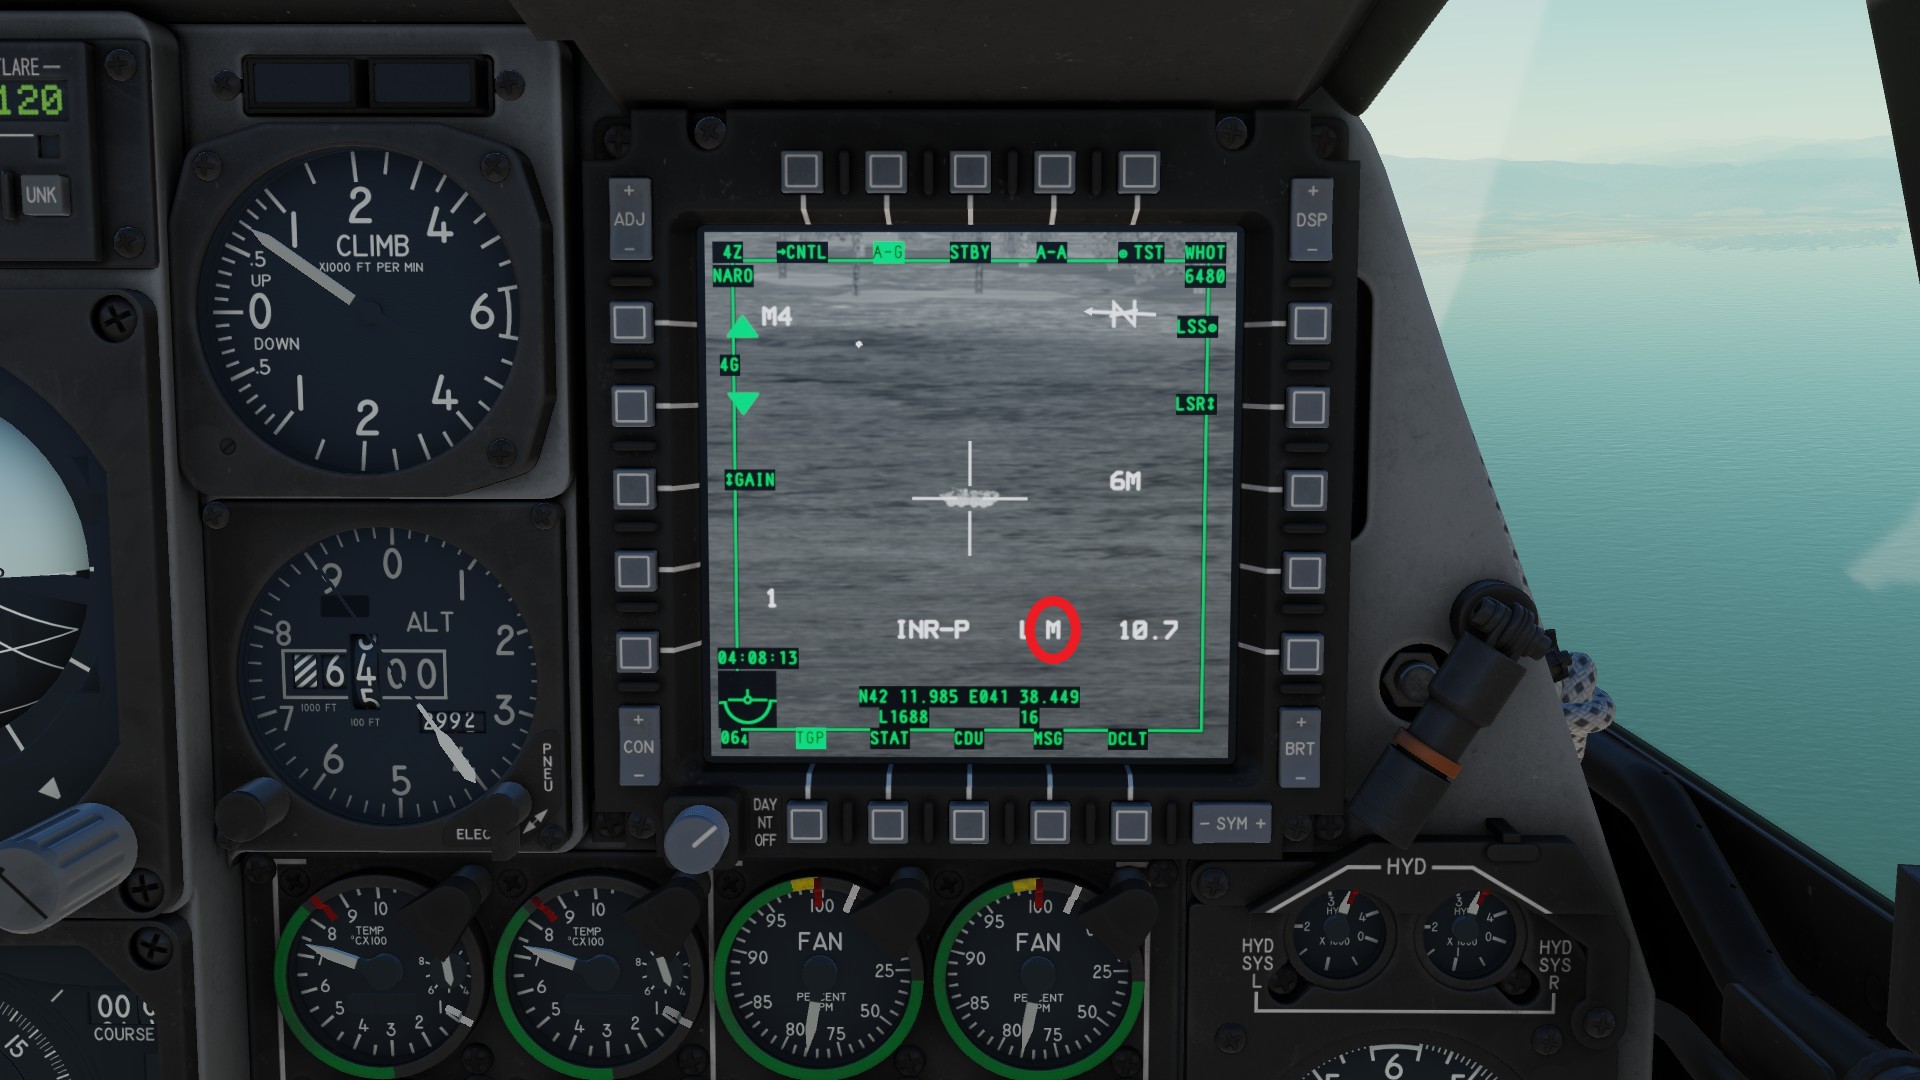
Setting points
With the TGP will mainly set two types of points for later use. The SPI (sensor point of interest) and the Markpoint.
Markpoint are mainly used to save coordinated for example to fly towards them later on or to release multiple JDAMs in one run (more on this later).To set a Markpoint, have your TGP SOI and press HOTAS TMS right short. The point will be names with letters from A to Y until they are being overwritten. On the left you can see a markpoint on the HMCS and on the right on the TAD.
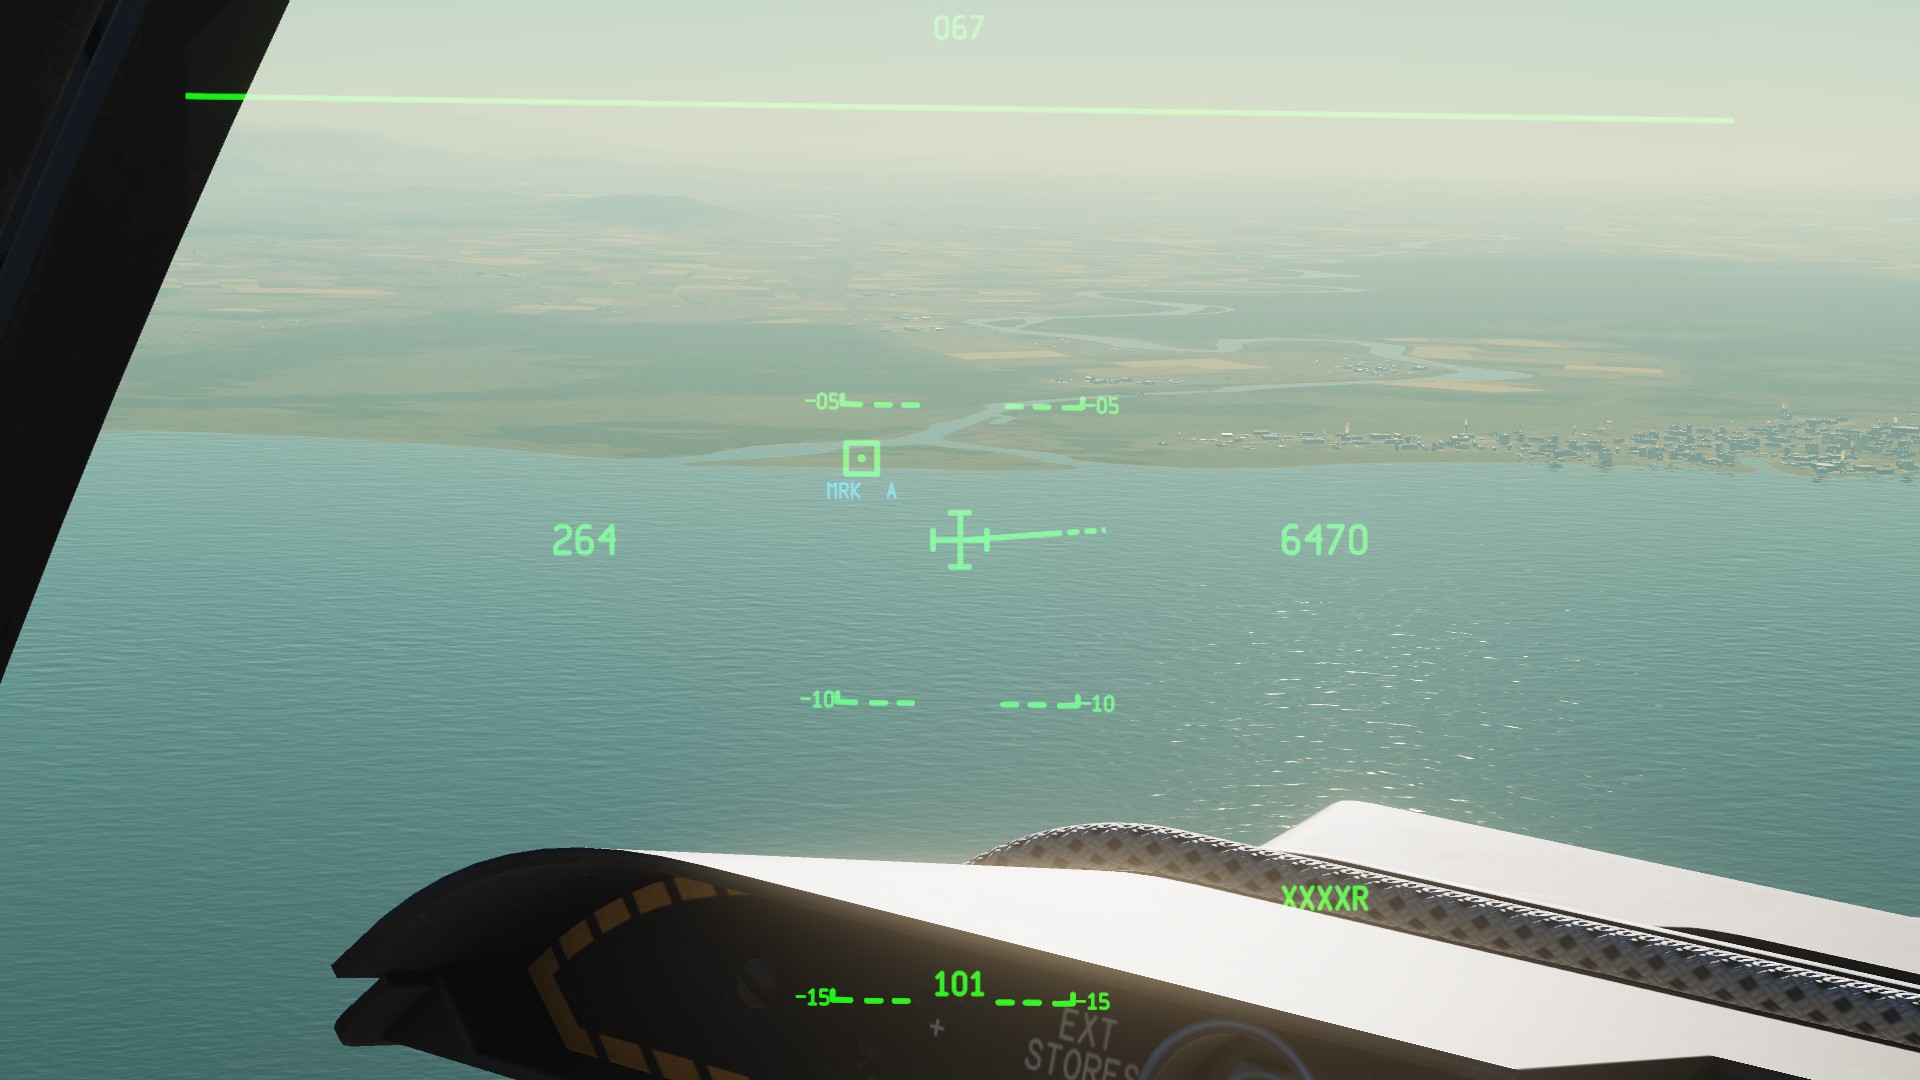
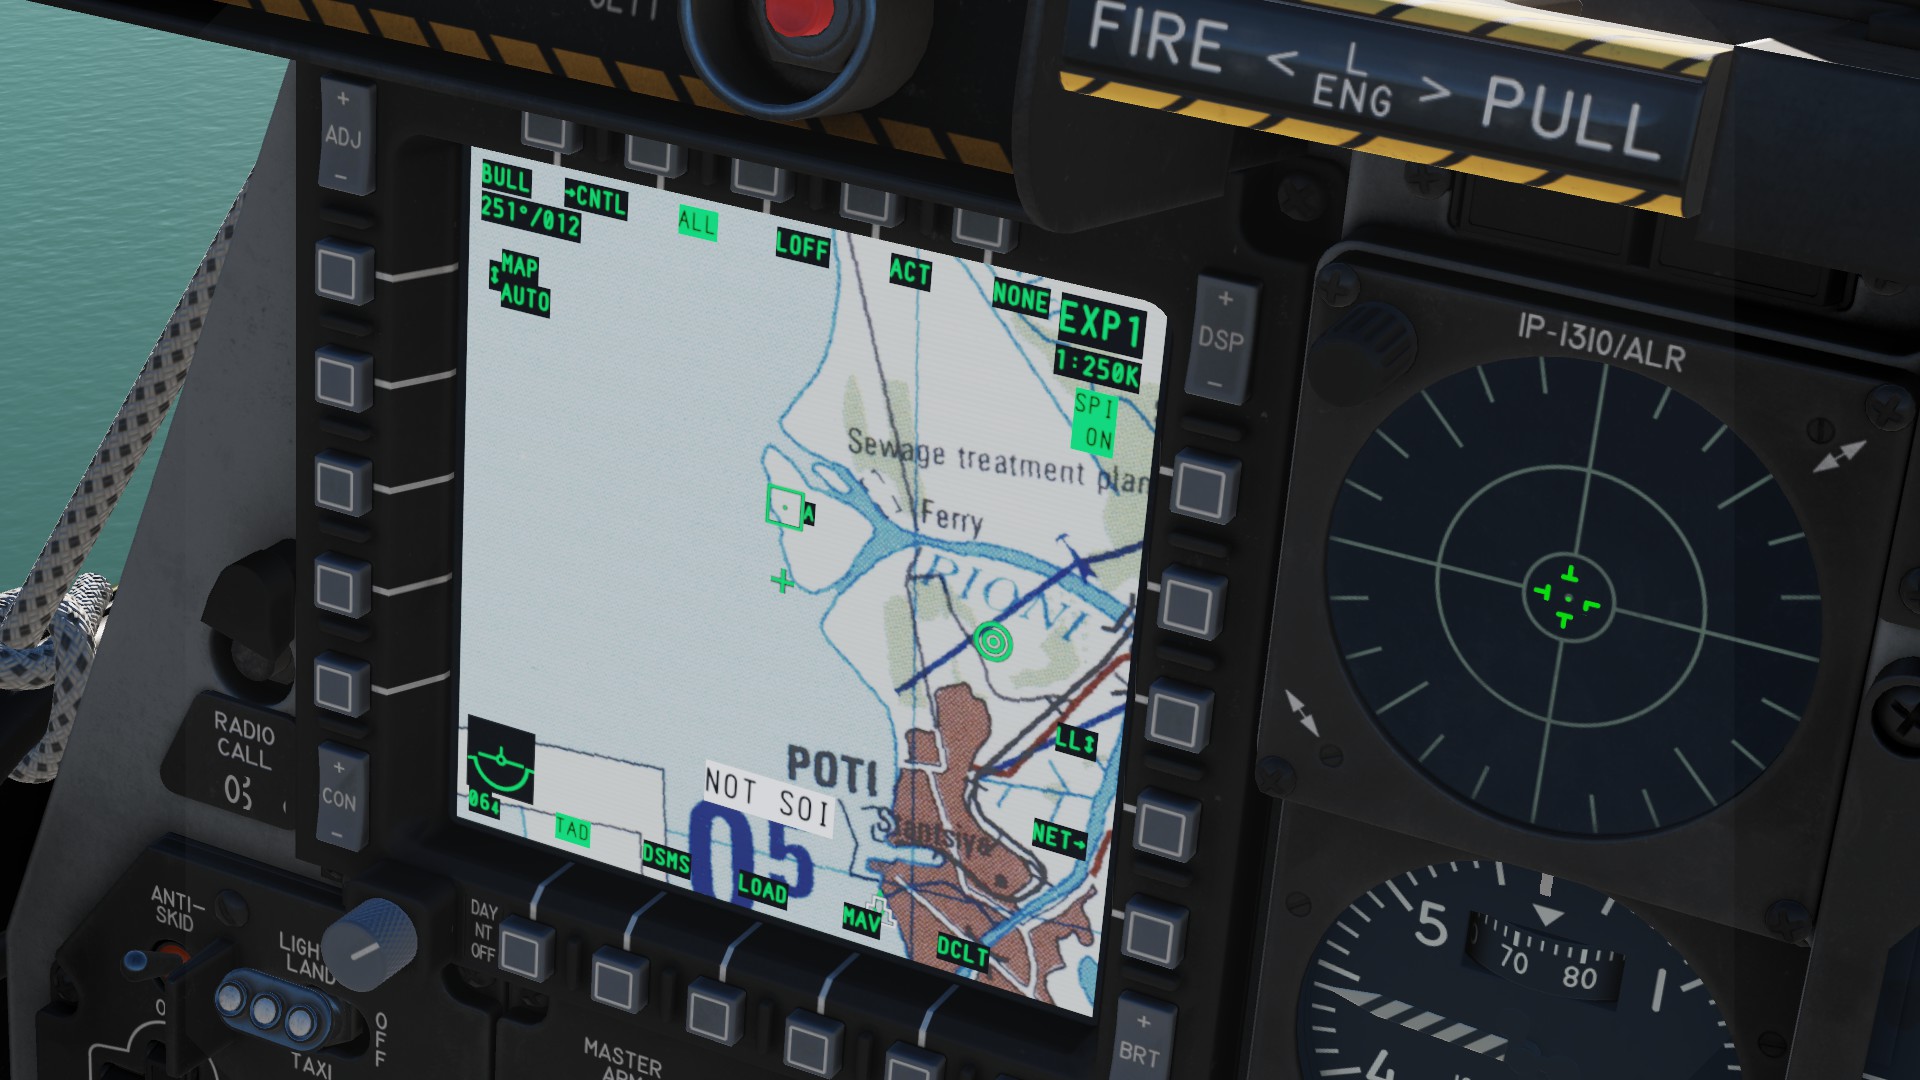 SPIs on the other hand are used to slave other sensors to it. These "other sensors" are mostly AGM-65s. Also, incase you end up in a masking zone, you can slave your TGP back to the SPI. A SPI is created with HOTAS TMS forward long while locking at the target. You can see a SPI in the HMCS on the left and on the TAD on the right. Many peole refer to the symbol as a "wedding cake".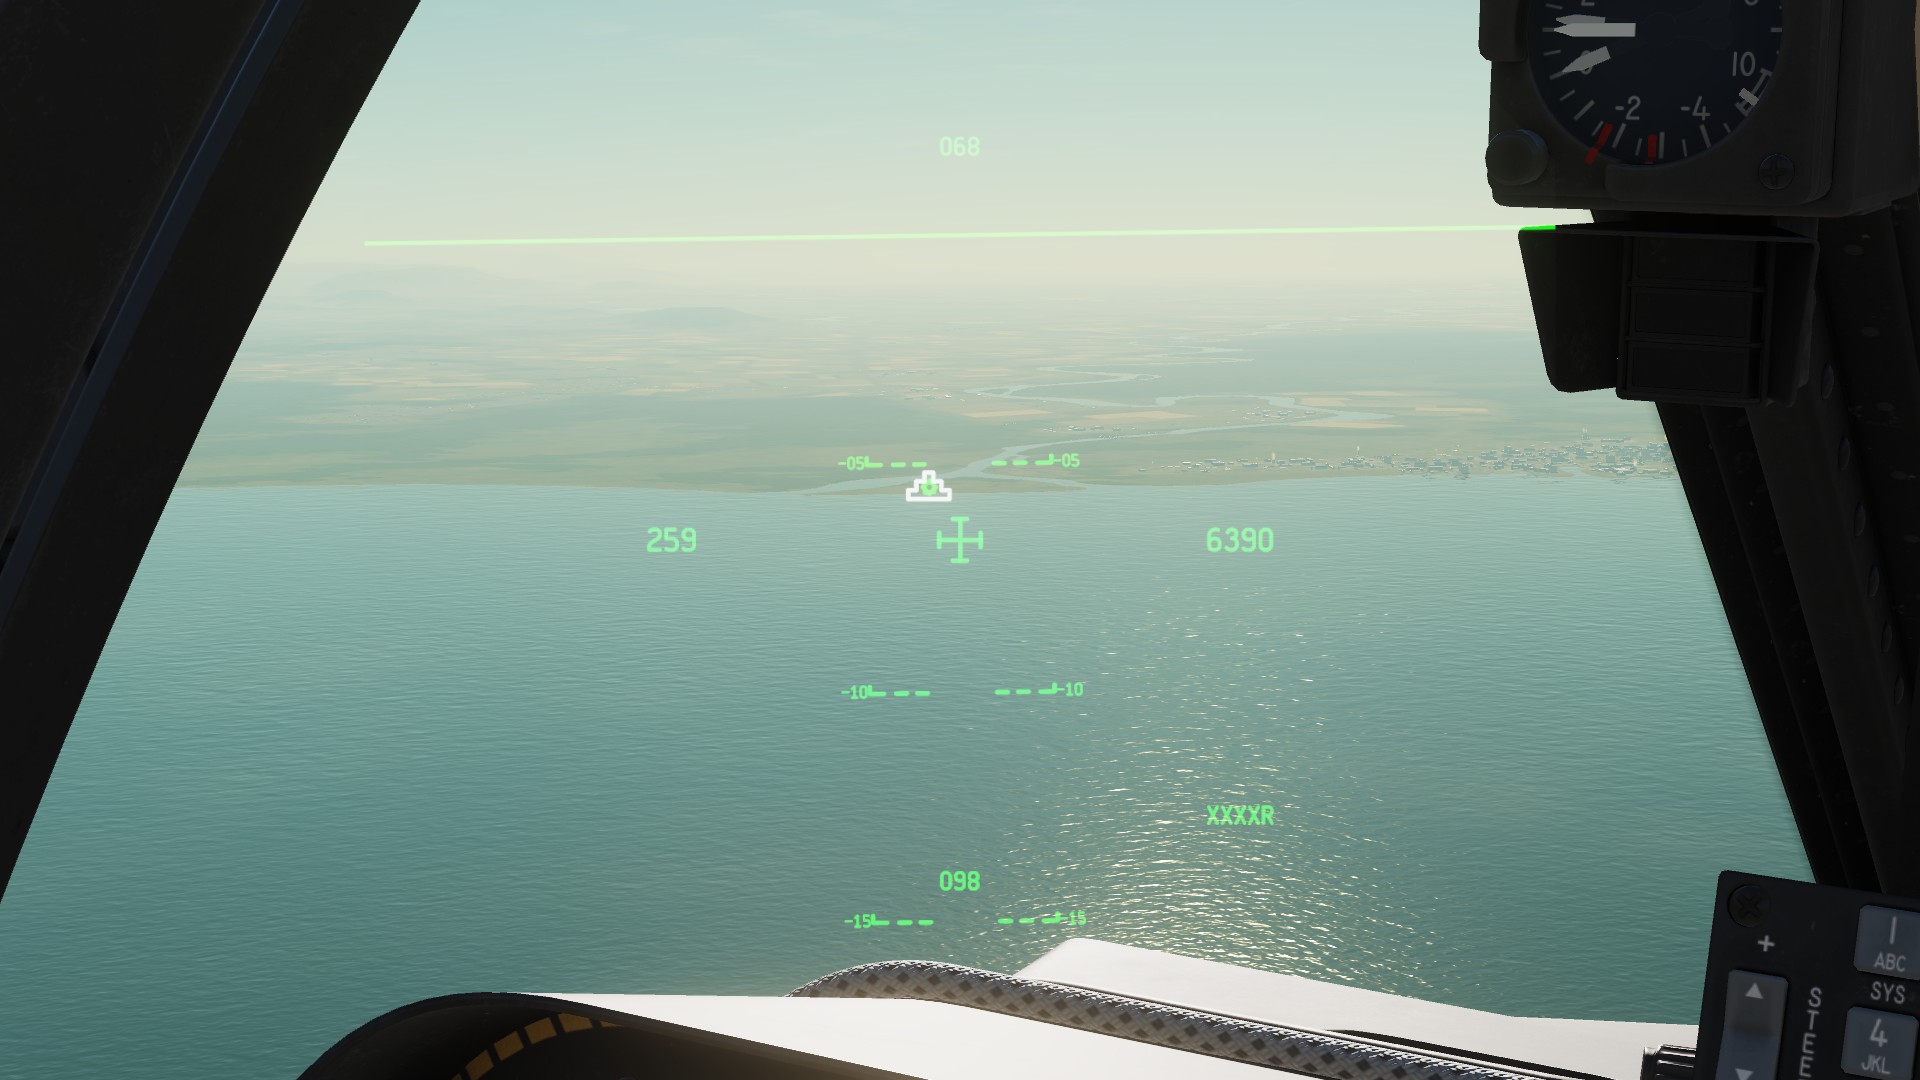
GAU-8 Avenger
With a rate of fire of 3900 rounds per minute, the GAU gives you the power to destroy all types of armored vehicles with relative ease. The gun has two main types of munition to choose from.
HEI - High Explosive Incendiary. High explsive rounds without any significant penetrating abilities. Most useful against infantry and unarmored targets.
CM - Combat Mix. A 4:1 mixture of API armor-piercing incendiary and HEI rounds. This will be your most usefull type of ammunition for tanks and other medium to heavy armored units.
You can carry up to 1150 rounds in the drum.
Needed controls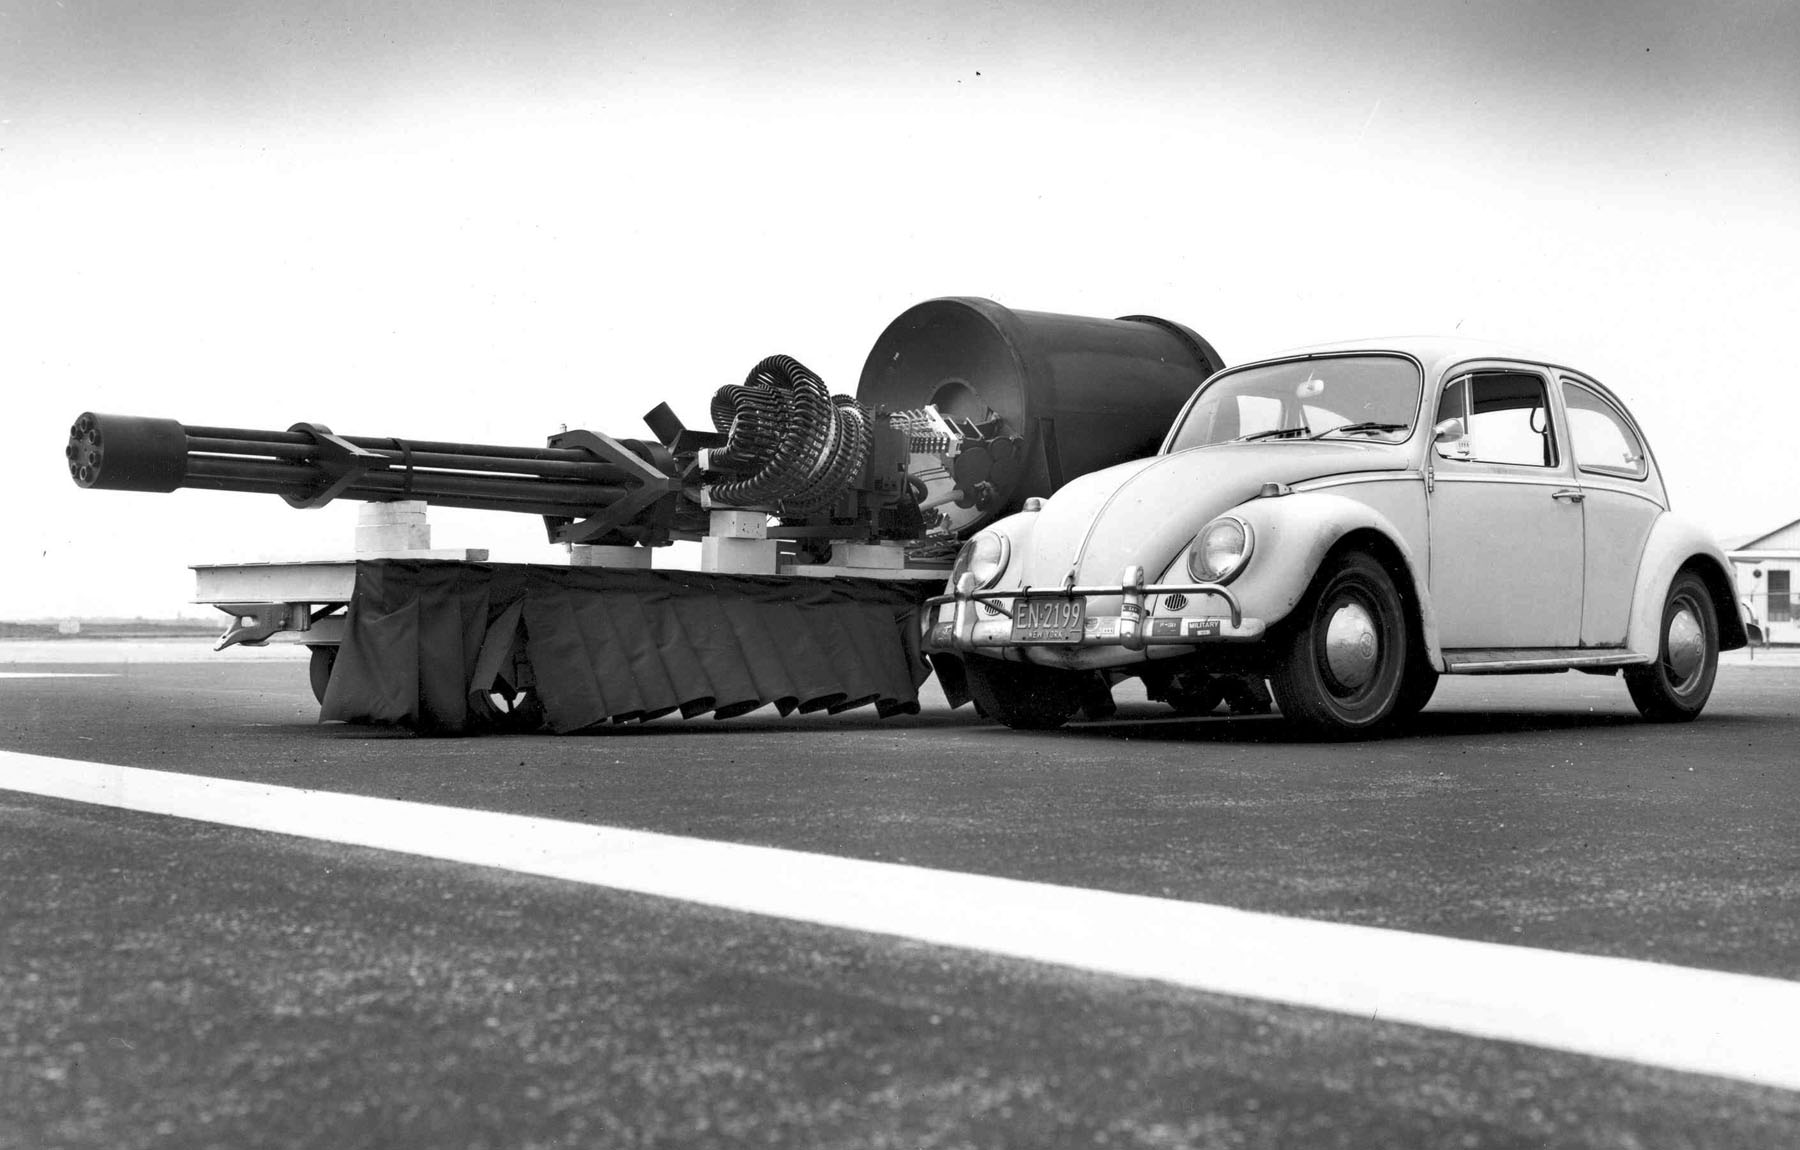 A picture by the US Airforce. The GAU-8 with the ammo drum is bigger than a VW.
To use the GAU, you will first need to set the gun safety switch (red) to GUN PAC ARM. This will allow both the gun and the PAC to work. The PAC can be imagined as a autopilot, that willlock onto the ground where the rounds will impact and balance out the extreme recoil the the gatling cannon.
A picture by the US Airforce. The GAU-8 with the ammo drum is bigger than a VW.
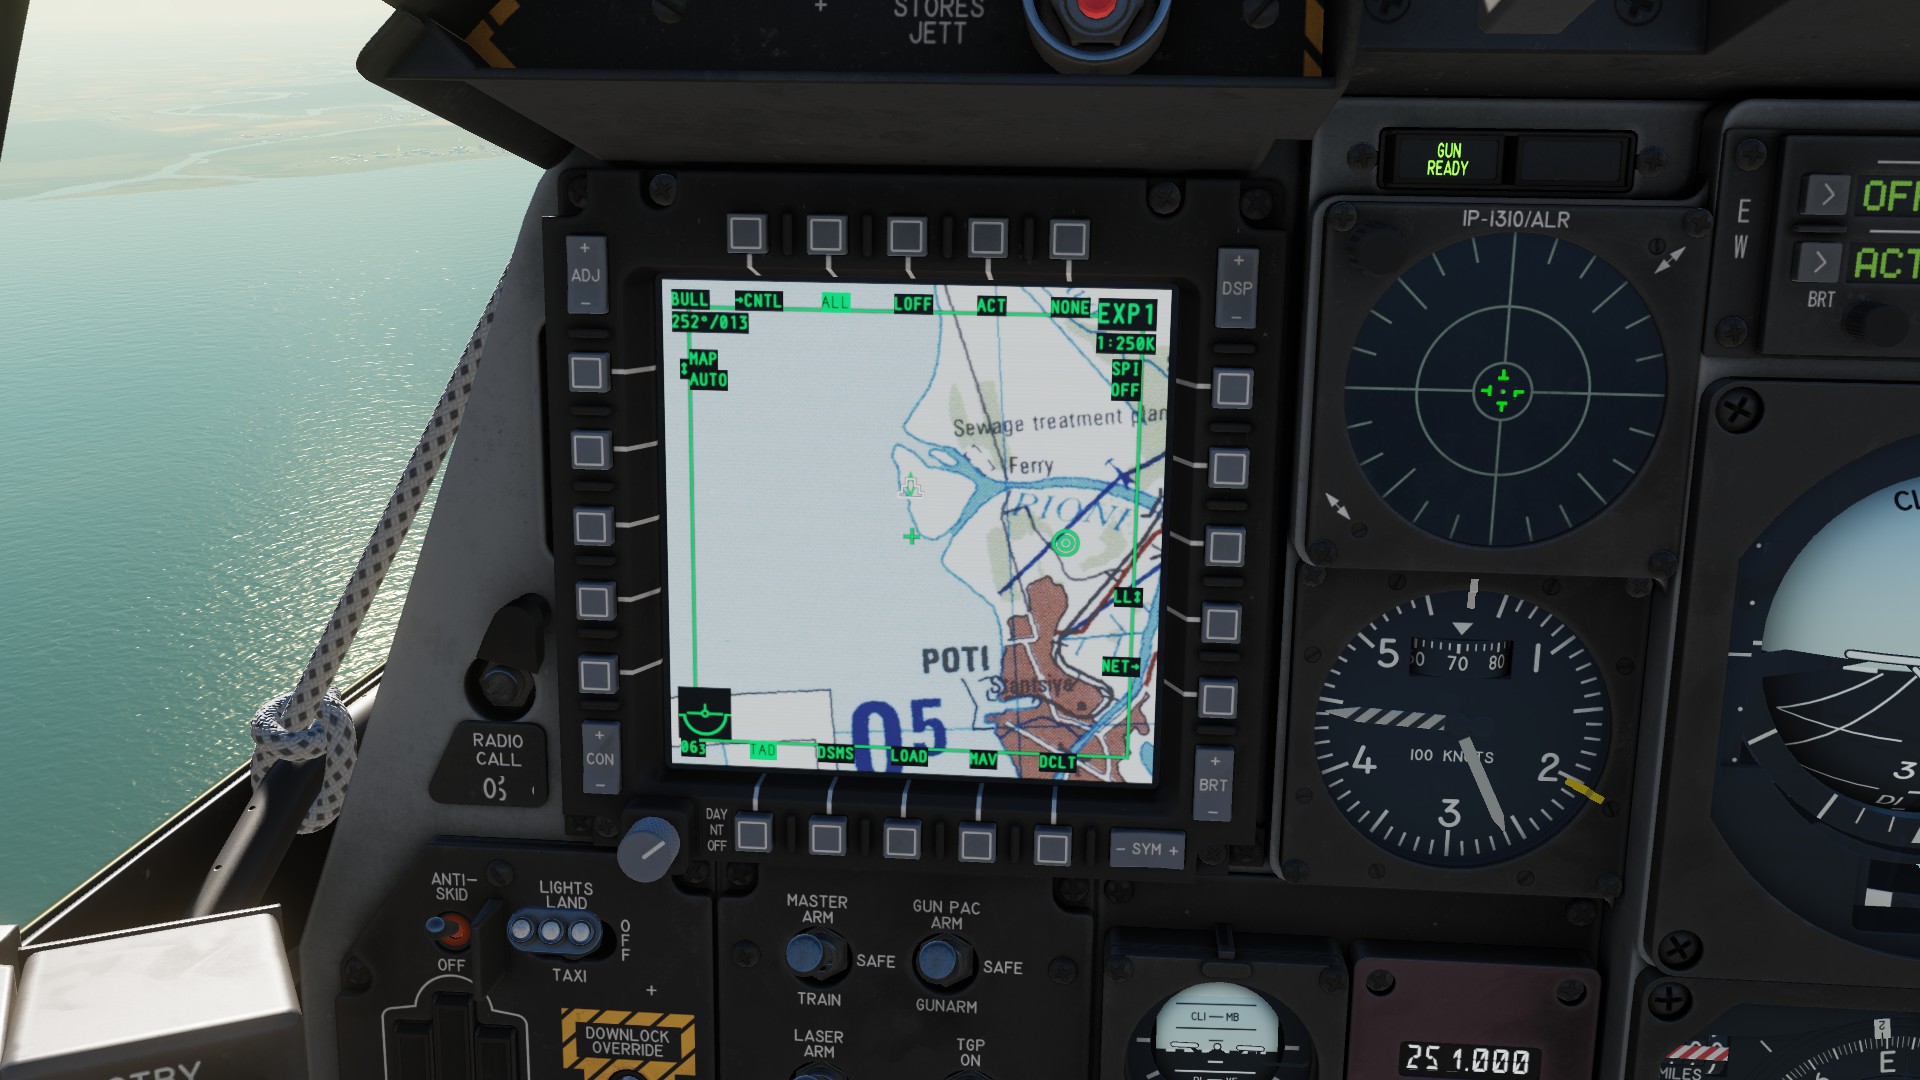
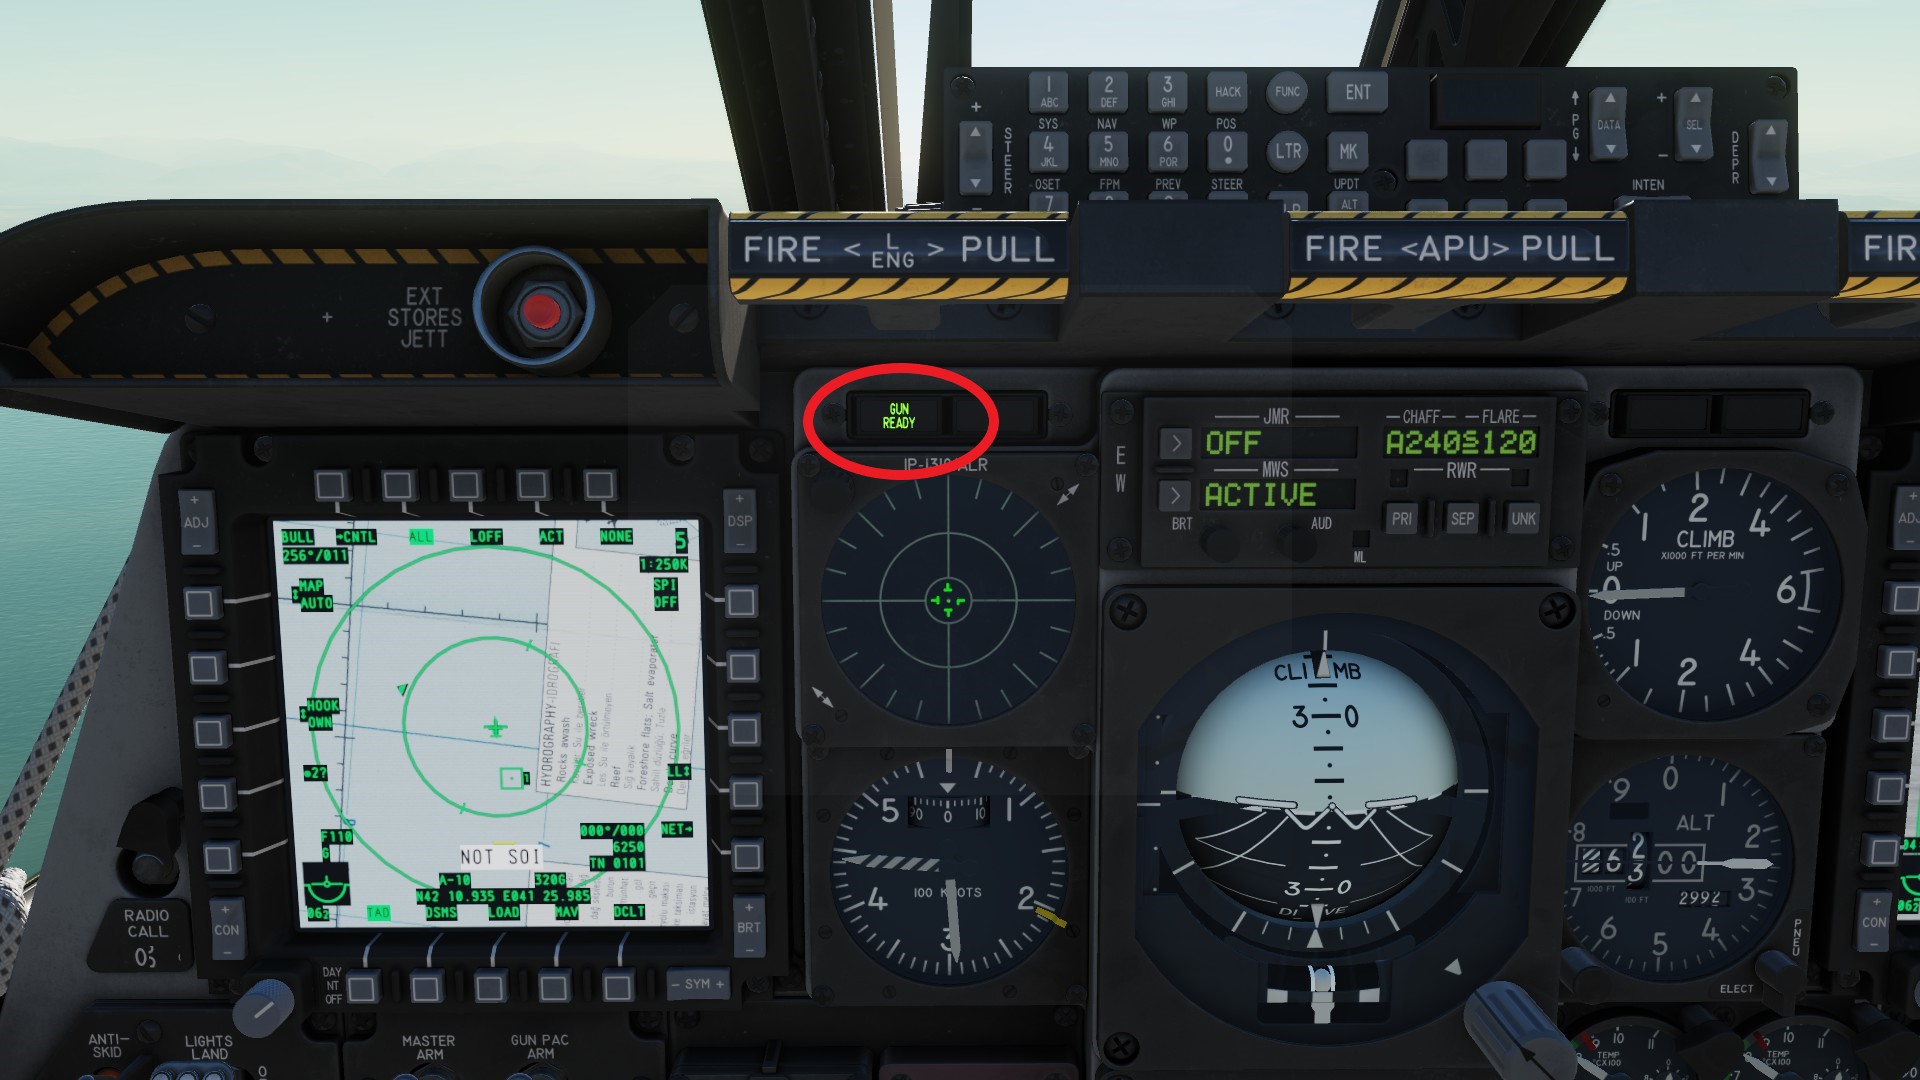
To use the GAU, you will first need to set the gun safety switch (red) to GUN PAC ARM. This will allow both the gun and the PAC to work. The PAC can be imagined as a autopilot, that willlock onto the ground where the rounds will impact and balance out the extreme recoil the the gatling cannon.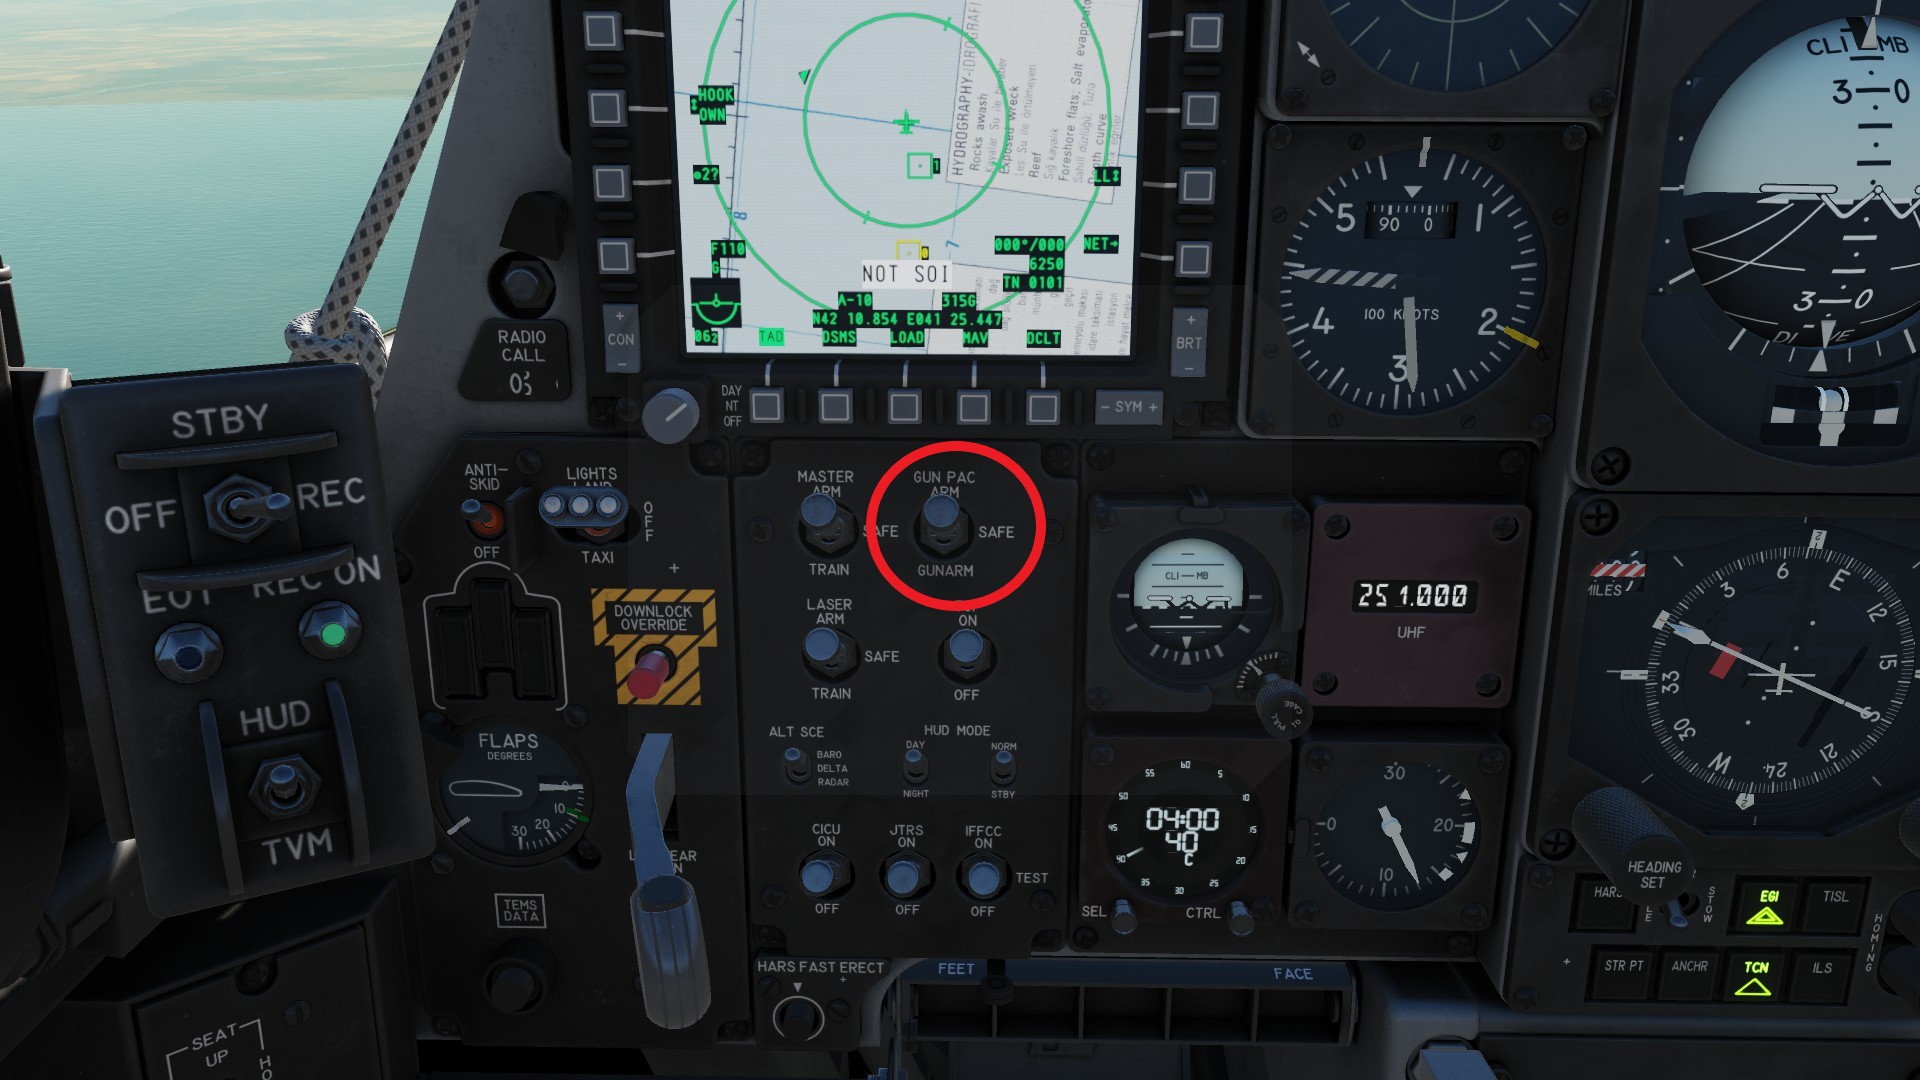 After that, a the GUN READY light will light up above the RWR, indicating the status of the weapon.
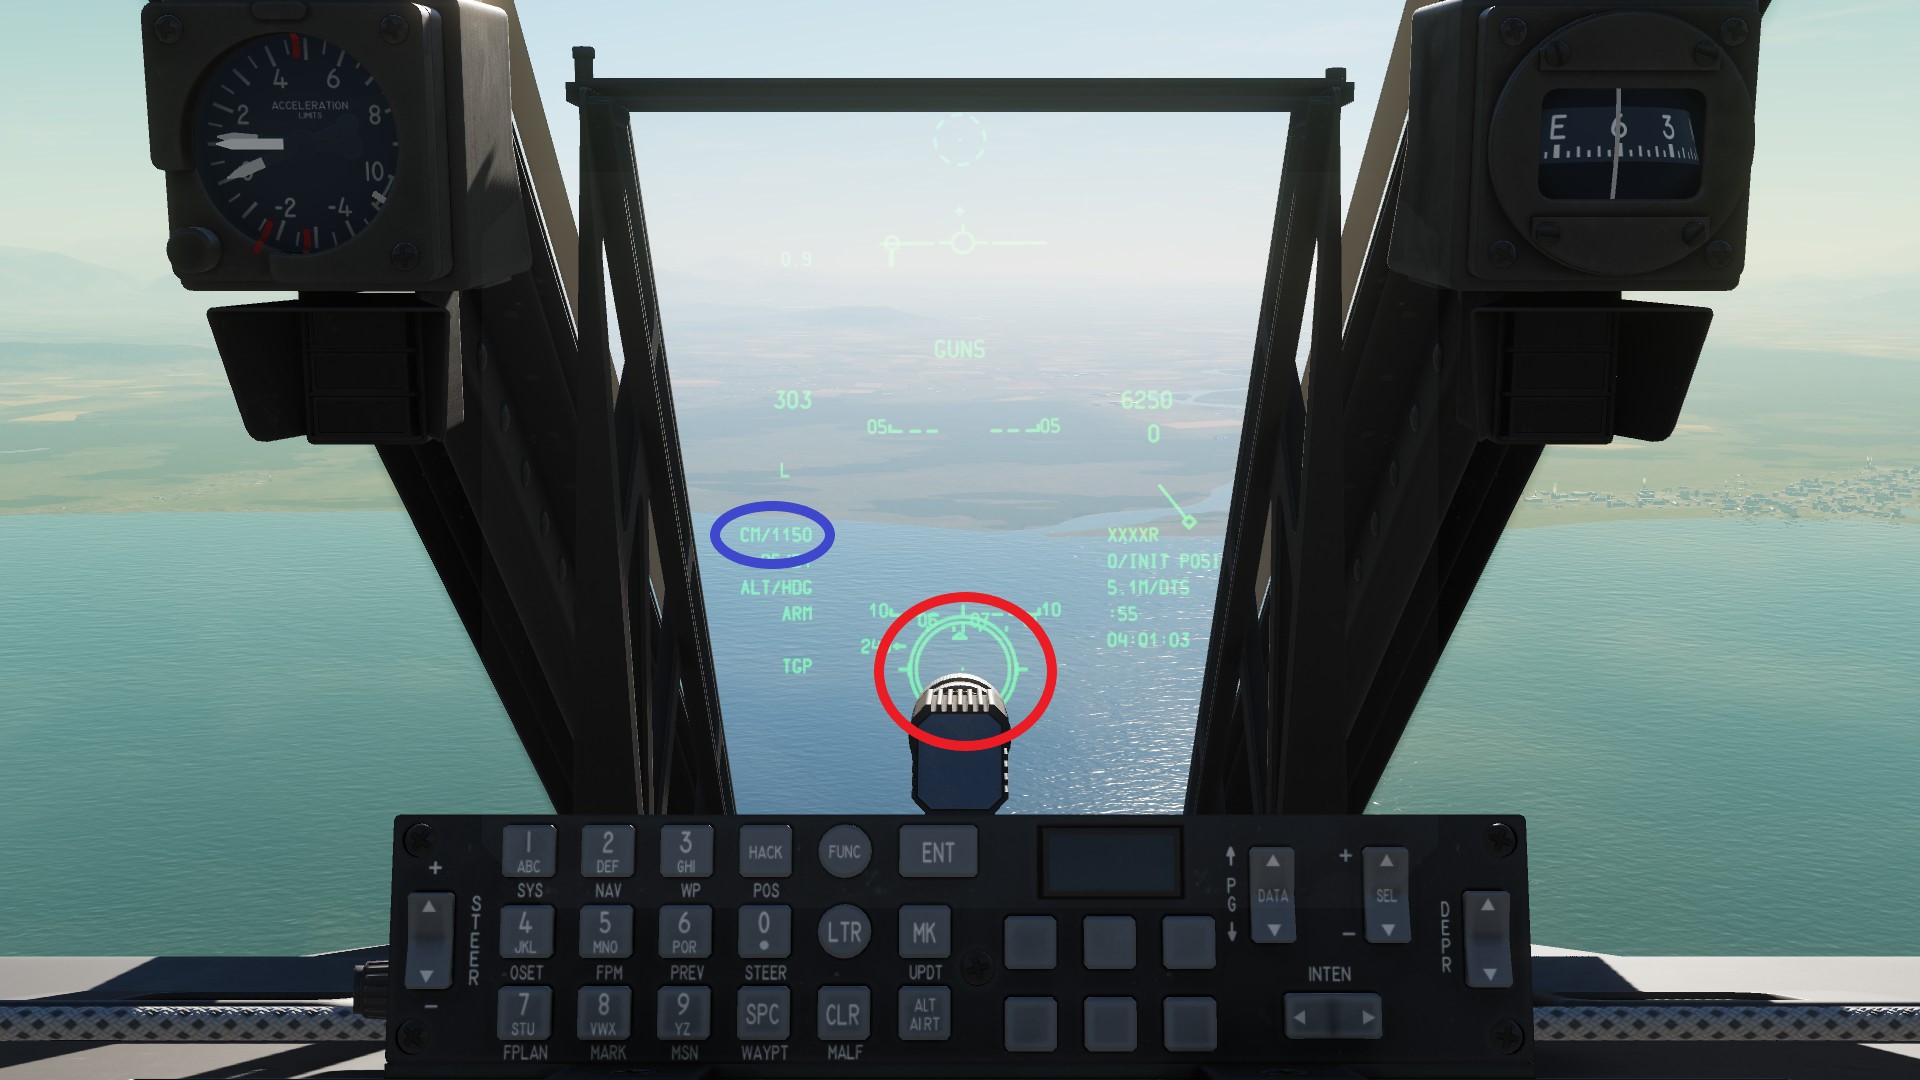
 Change the HUD to GUNS with the Master mode button. The HUD will now show a CCIP (continously calculated inpact point) redicle (red) as well as the type and amount of ammo loaded (blue).
 When you found a target, place the upper dot of the redicle on it and hold the first stage gun trigger. A small note will appear on the side of your HUD, indicating that the PAC-2 system is currently operating (blue). This will lock onto the ground and balance the coming recoil. The upper dot indicates the impact point of the API rounds and the lower the inpact point of the HEI rounds. When you are within 1 mile of the target, start firing. If you engage lightly or unarmored targets, you can fire form up to 2 miles and get acceptable results. The distance between your plane and the target will be shown under the reticle (orange). Make sure to pull up when you the the pull up warning (red). The higher your angle of attack is (so the higher your descend rate is), the more penetration you will achieve.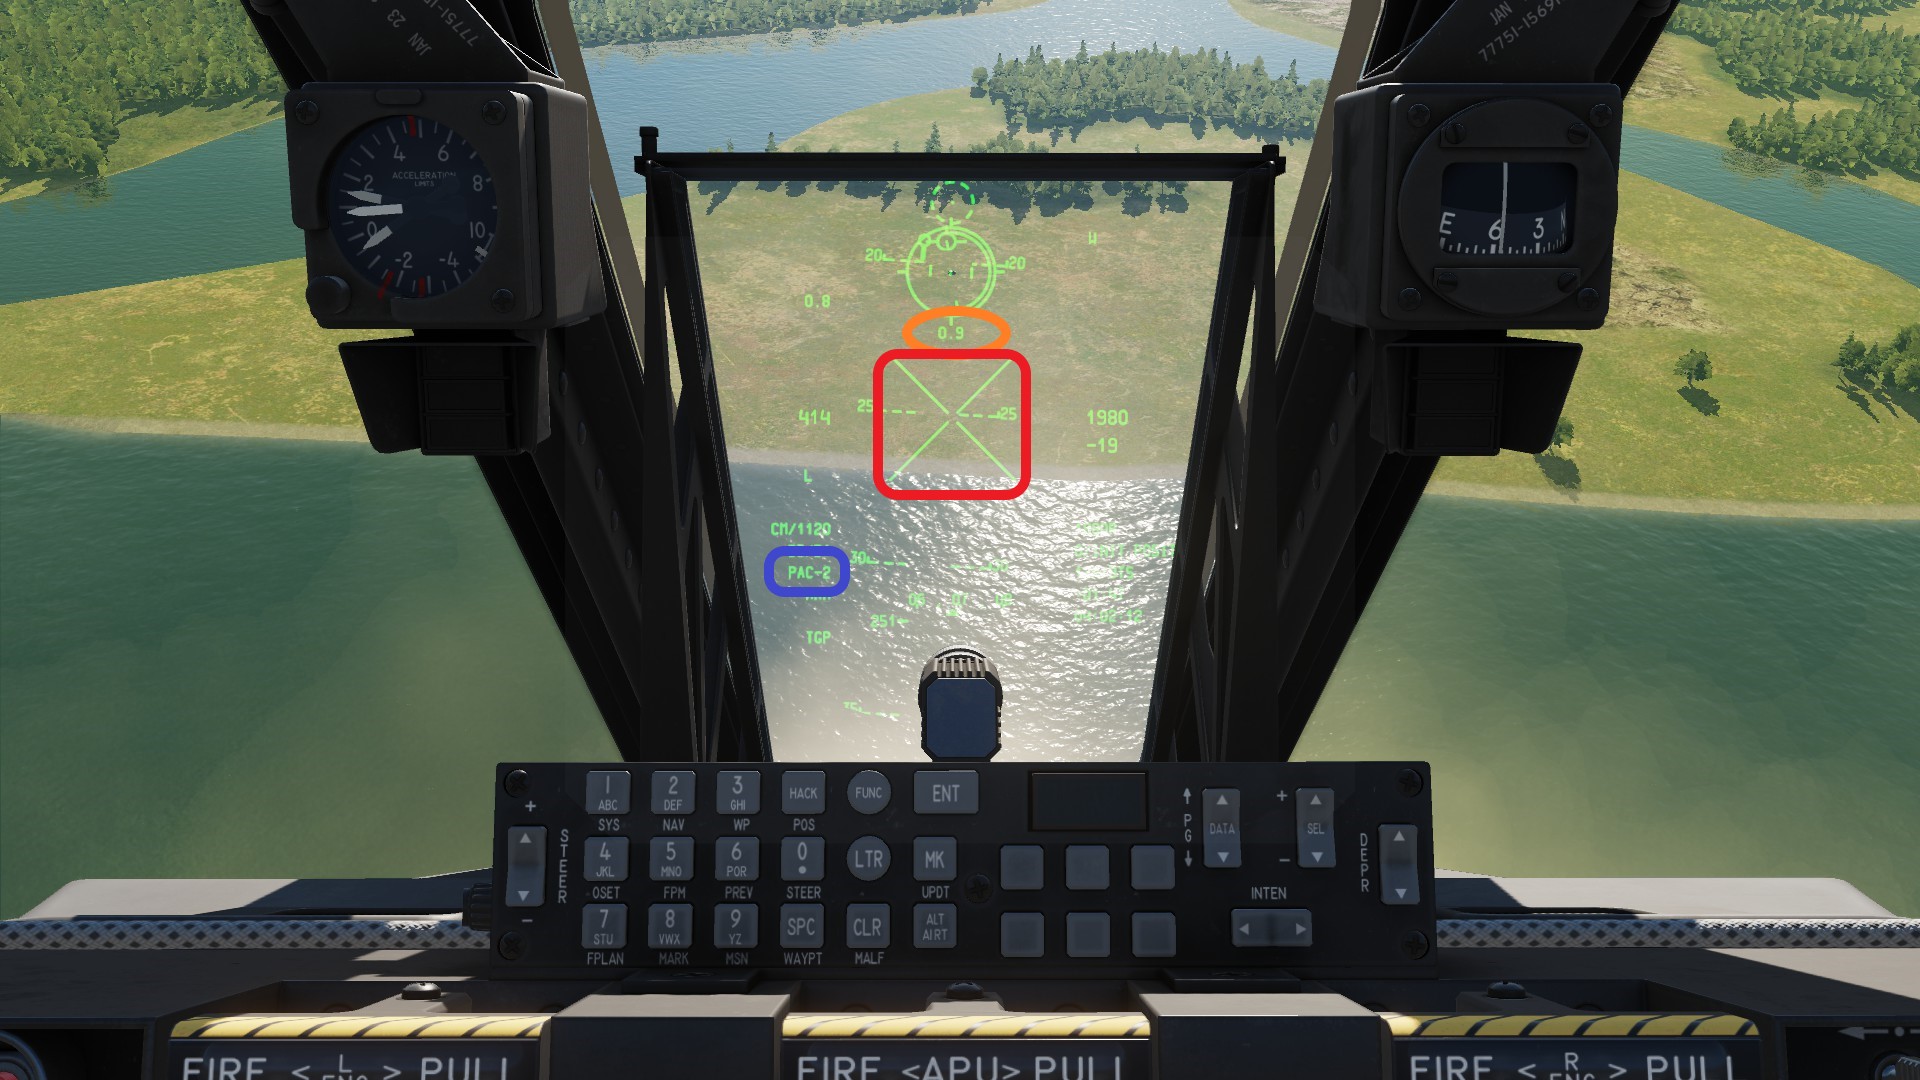
Dont forget to disengage the PAC before trying to pull up.
GBU-10/12
The guided bomb unit 10 and 12 are laser guided bombs which first entered service in 1976. The bombs consist of a seeker in the nose, the main body containing fuze and explosives and the tail fins used to guide and stabalize the bomb.
Needed controls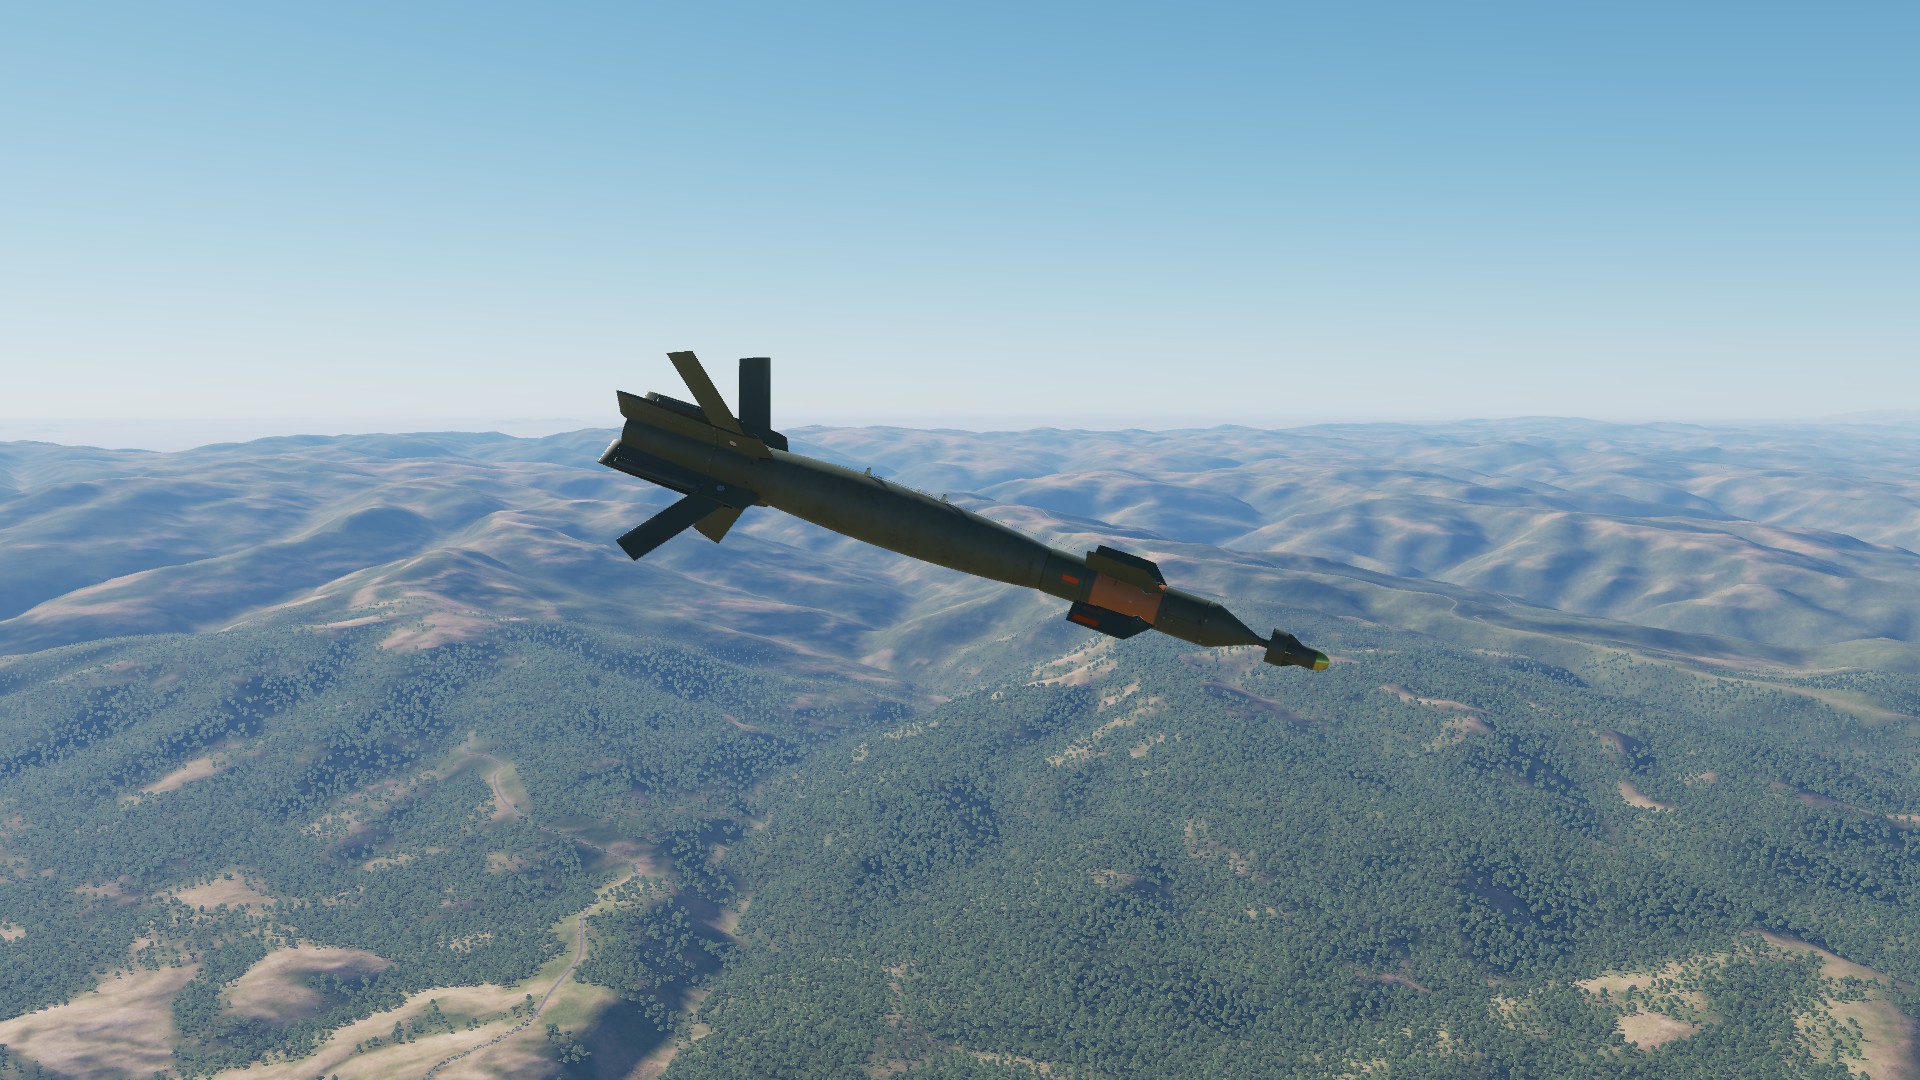
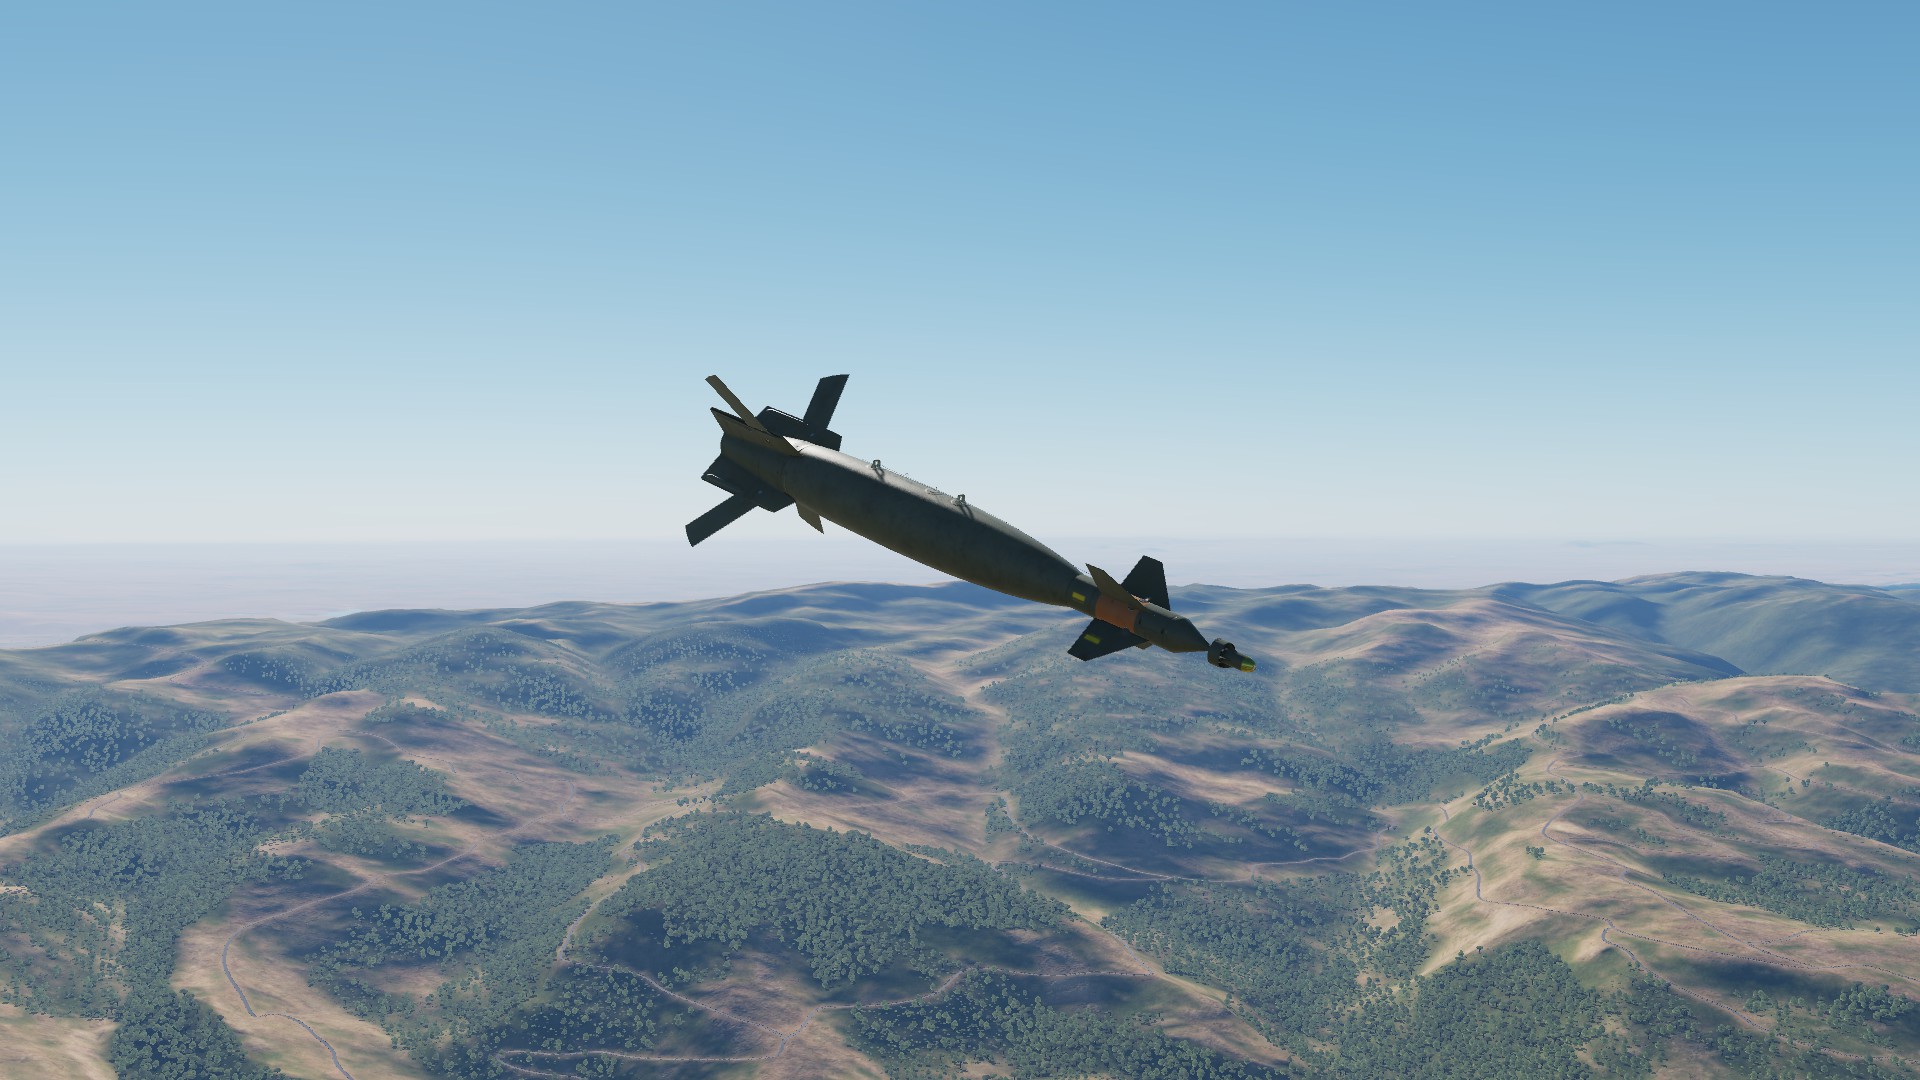
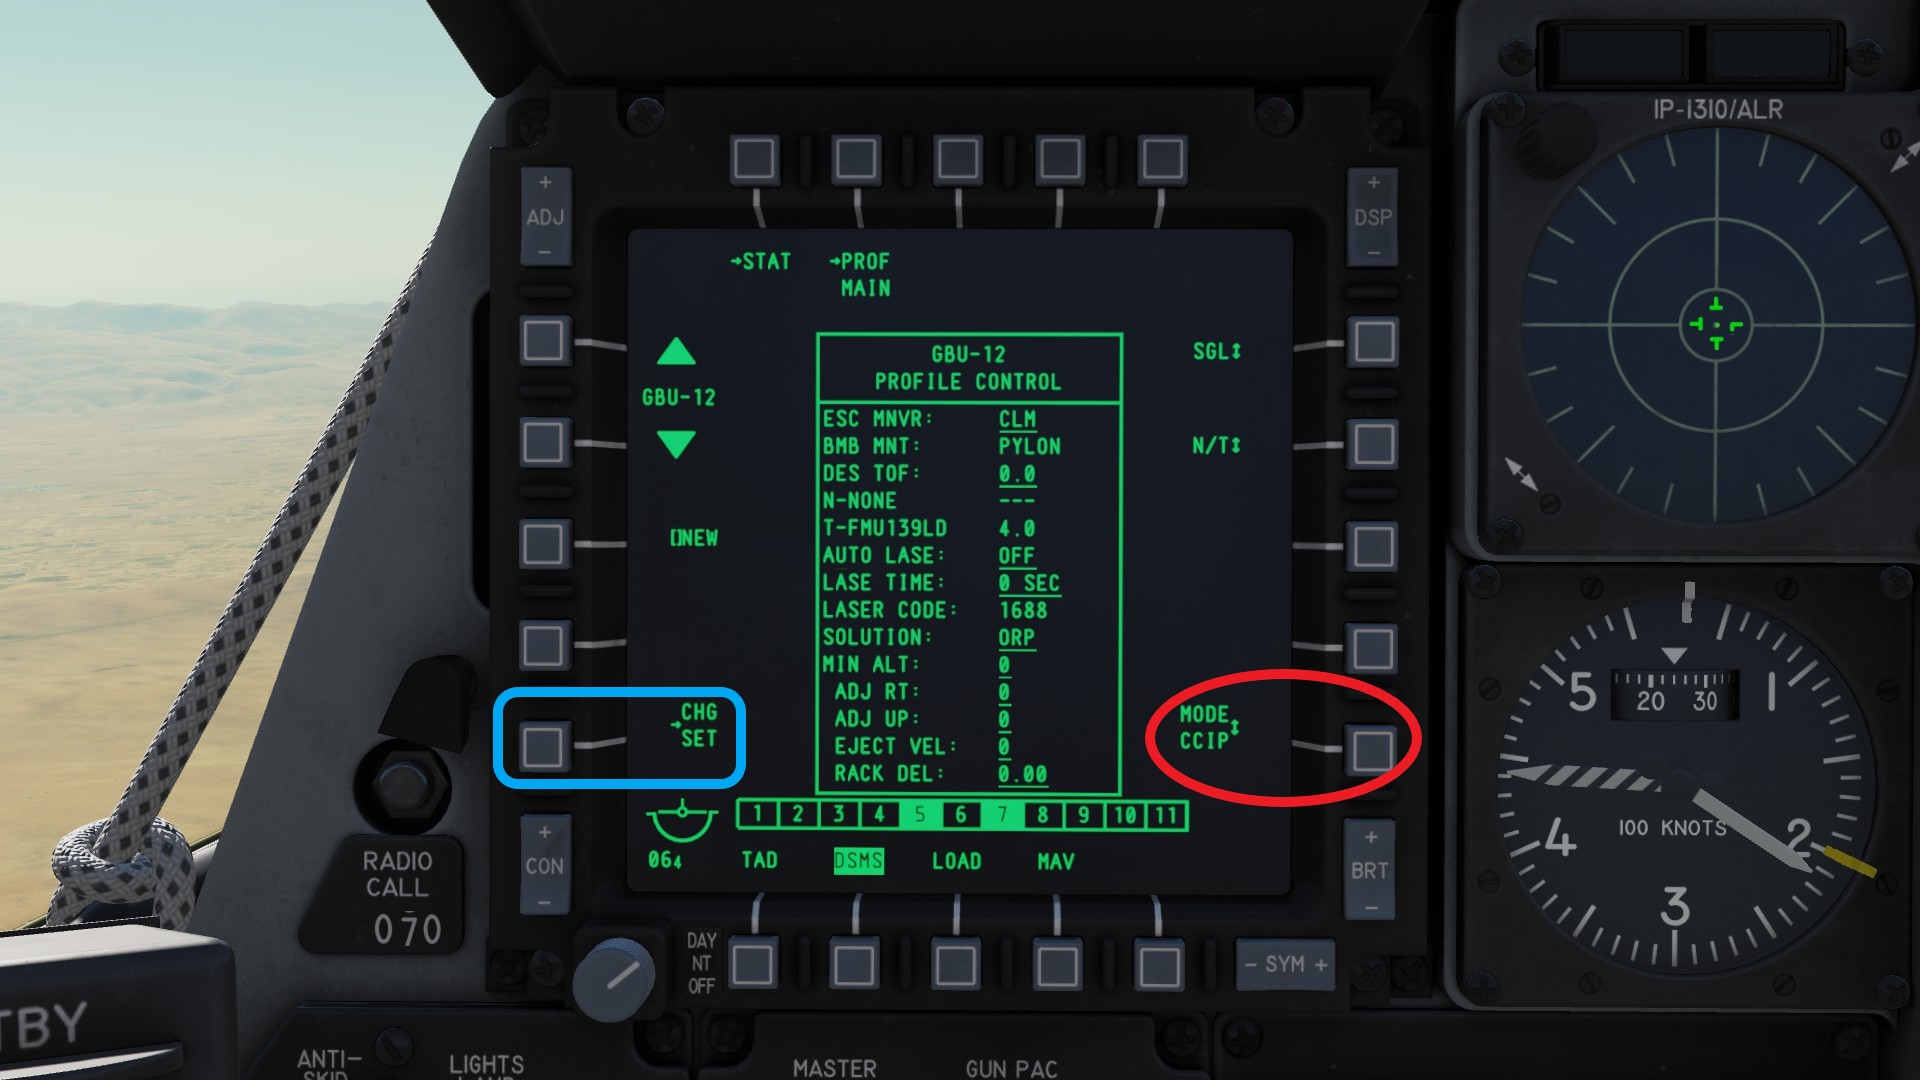
GBU-12 (500lb class) on the left and GBU-10 (2000lb class) on the right while falling towards their target. For this type of bomb, the profile is very important (if youre lazy like me). Take a look at the GBU-10 and / or 12 profile. You will need to change the delivery mode to CCRP (red). After that click CHG SET (blue). Also, set your laser code.
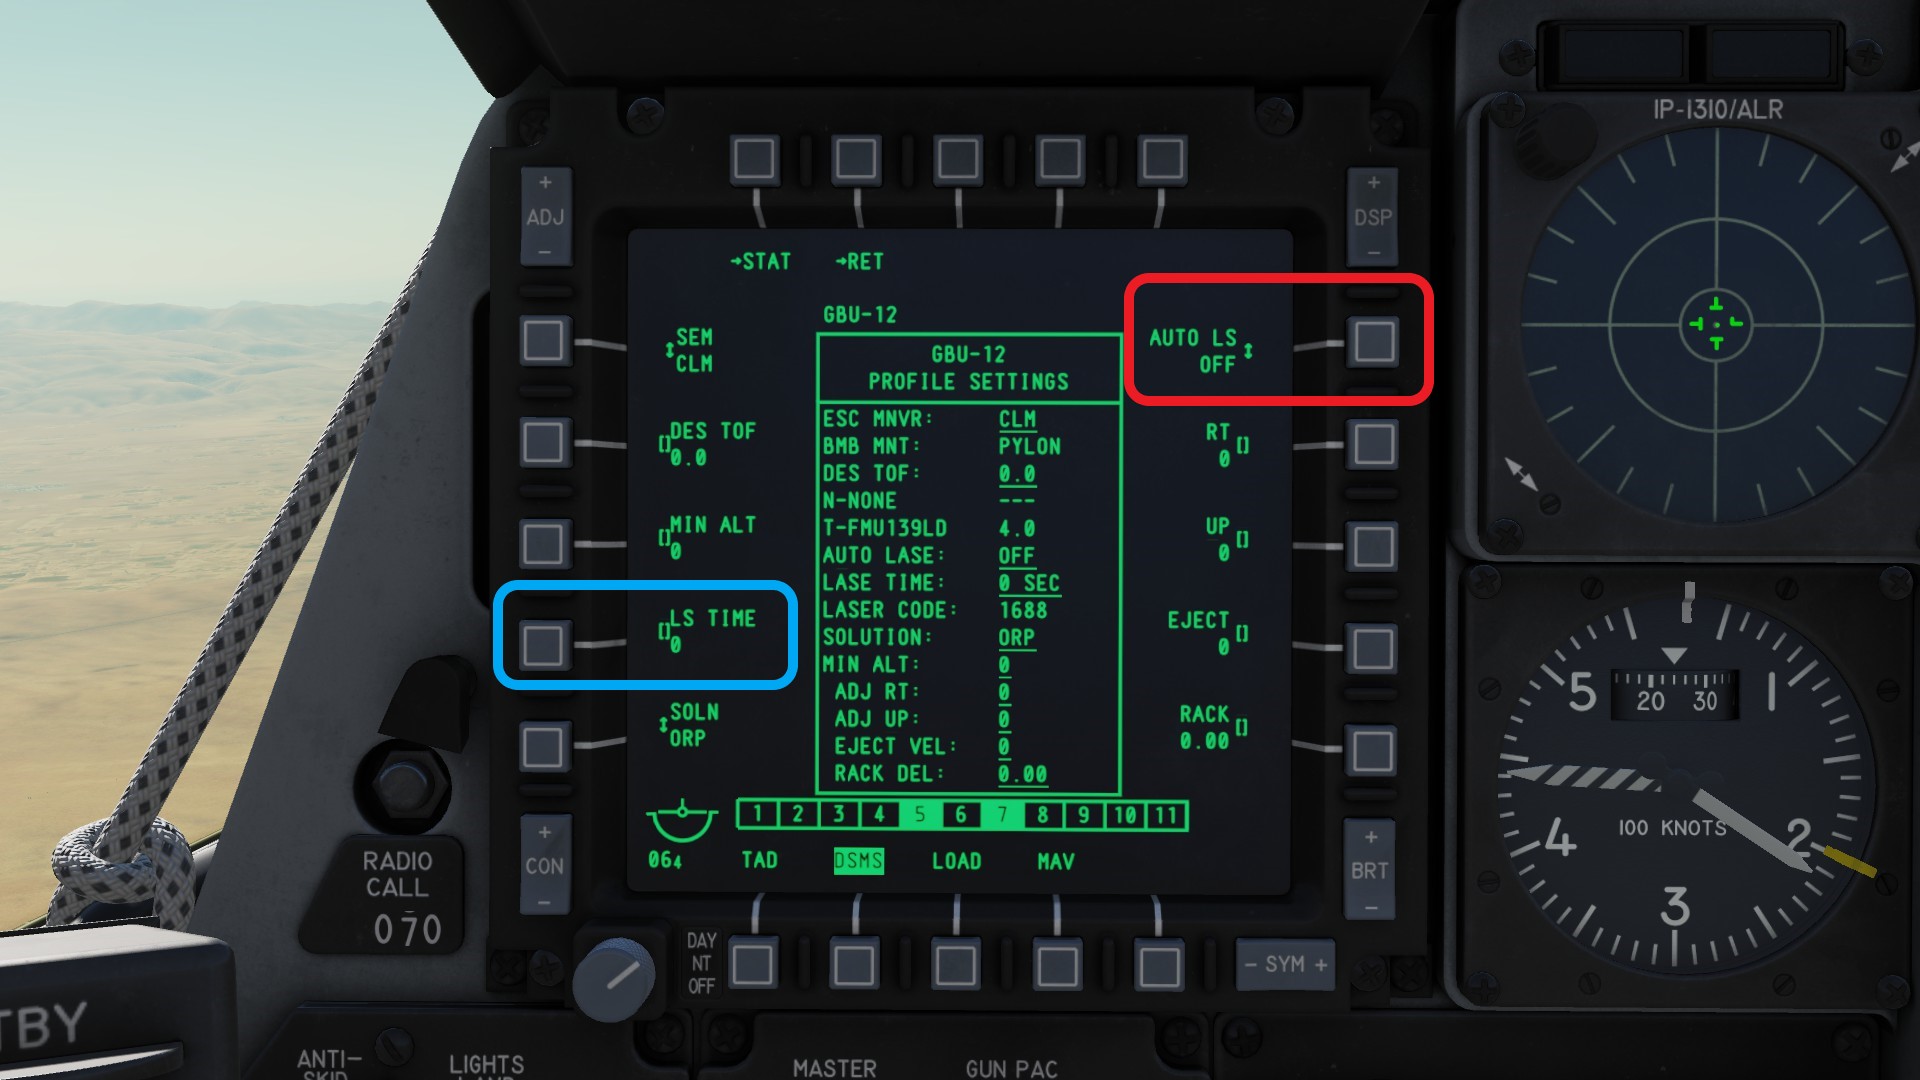
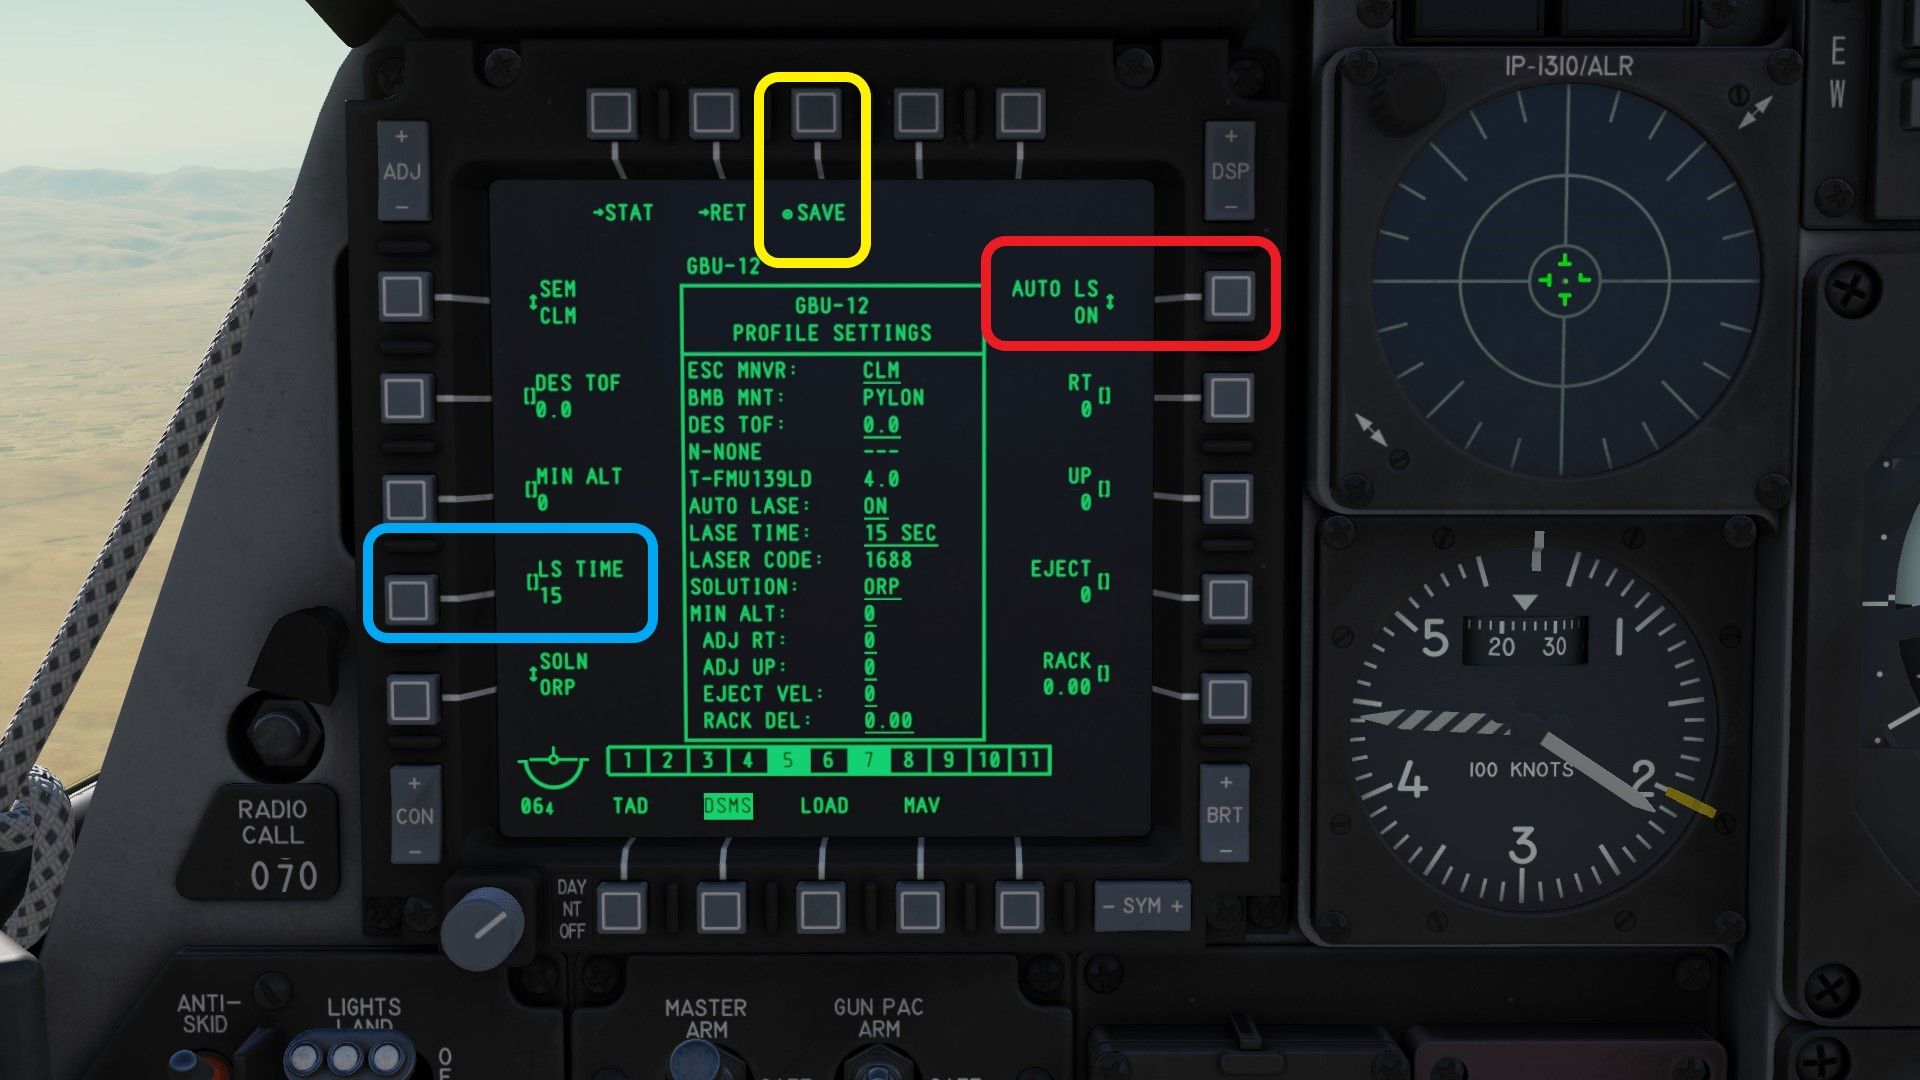
 The setting page will look like this. Were interested in the AUTO LS function (red) and the LS TIME (blue). Auto lase means, that the Tpod will lase by it self when a bomb of this type is released. The LS TIME dictates how many seconds before impact the laser is turned on. Common times are 15 and 20 seconds.
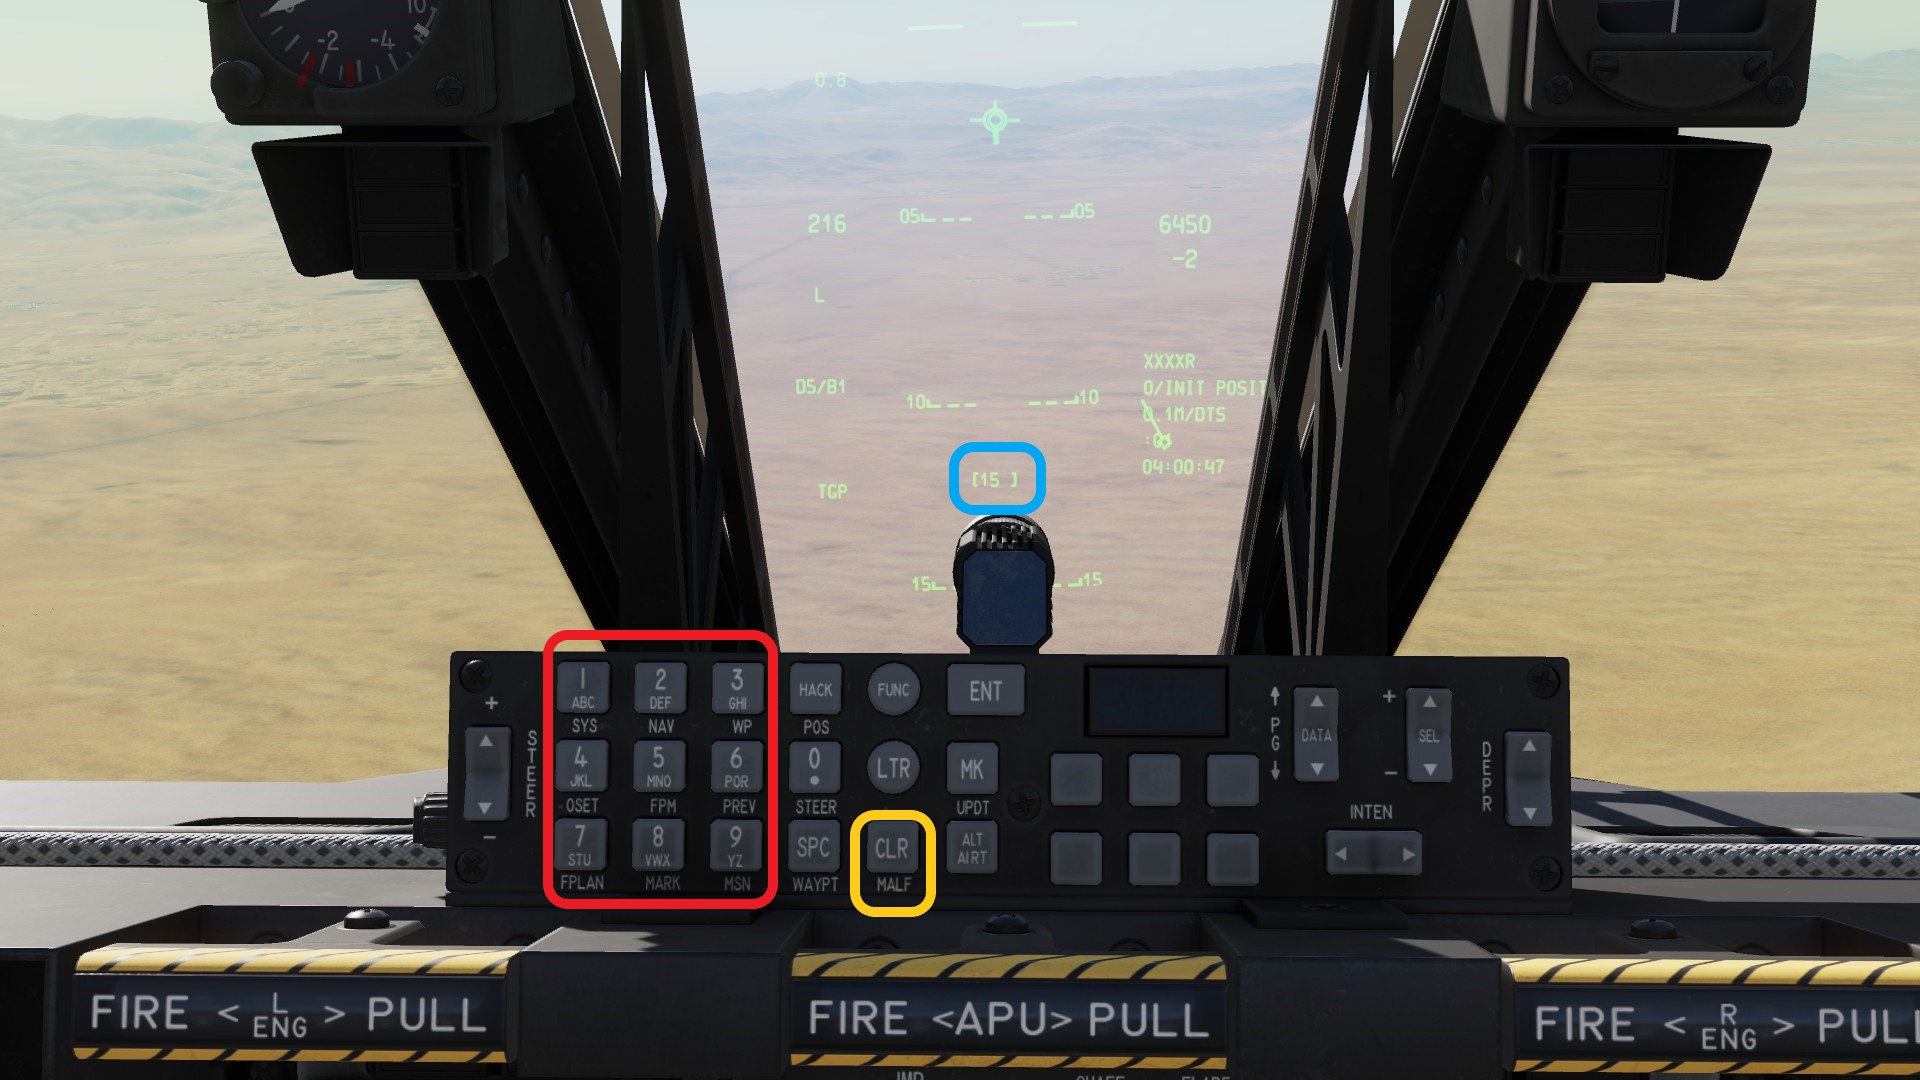
 Go to the UFC and type in the lase time you want with the number buttons (red) the input will be repeated on the HUD (blue). If you misclicked, use the CLR button (yellow).
 Go back to the MFCD and press the button next to AUTO LS so it is set to on (red). Now press the button next to LS TIME. This will replace the 0 with the time you have choosen. Press SAVE (yellow).
 Find your target and designate it with HOTAS TMS Forward long. It follows a standart CCRP release.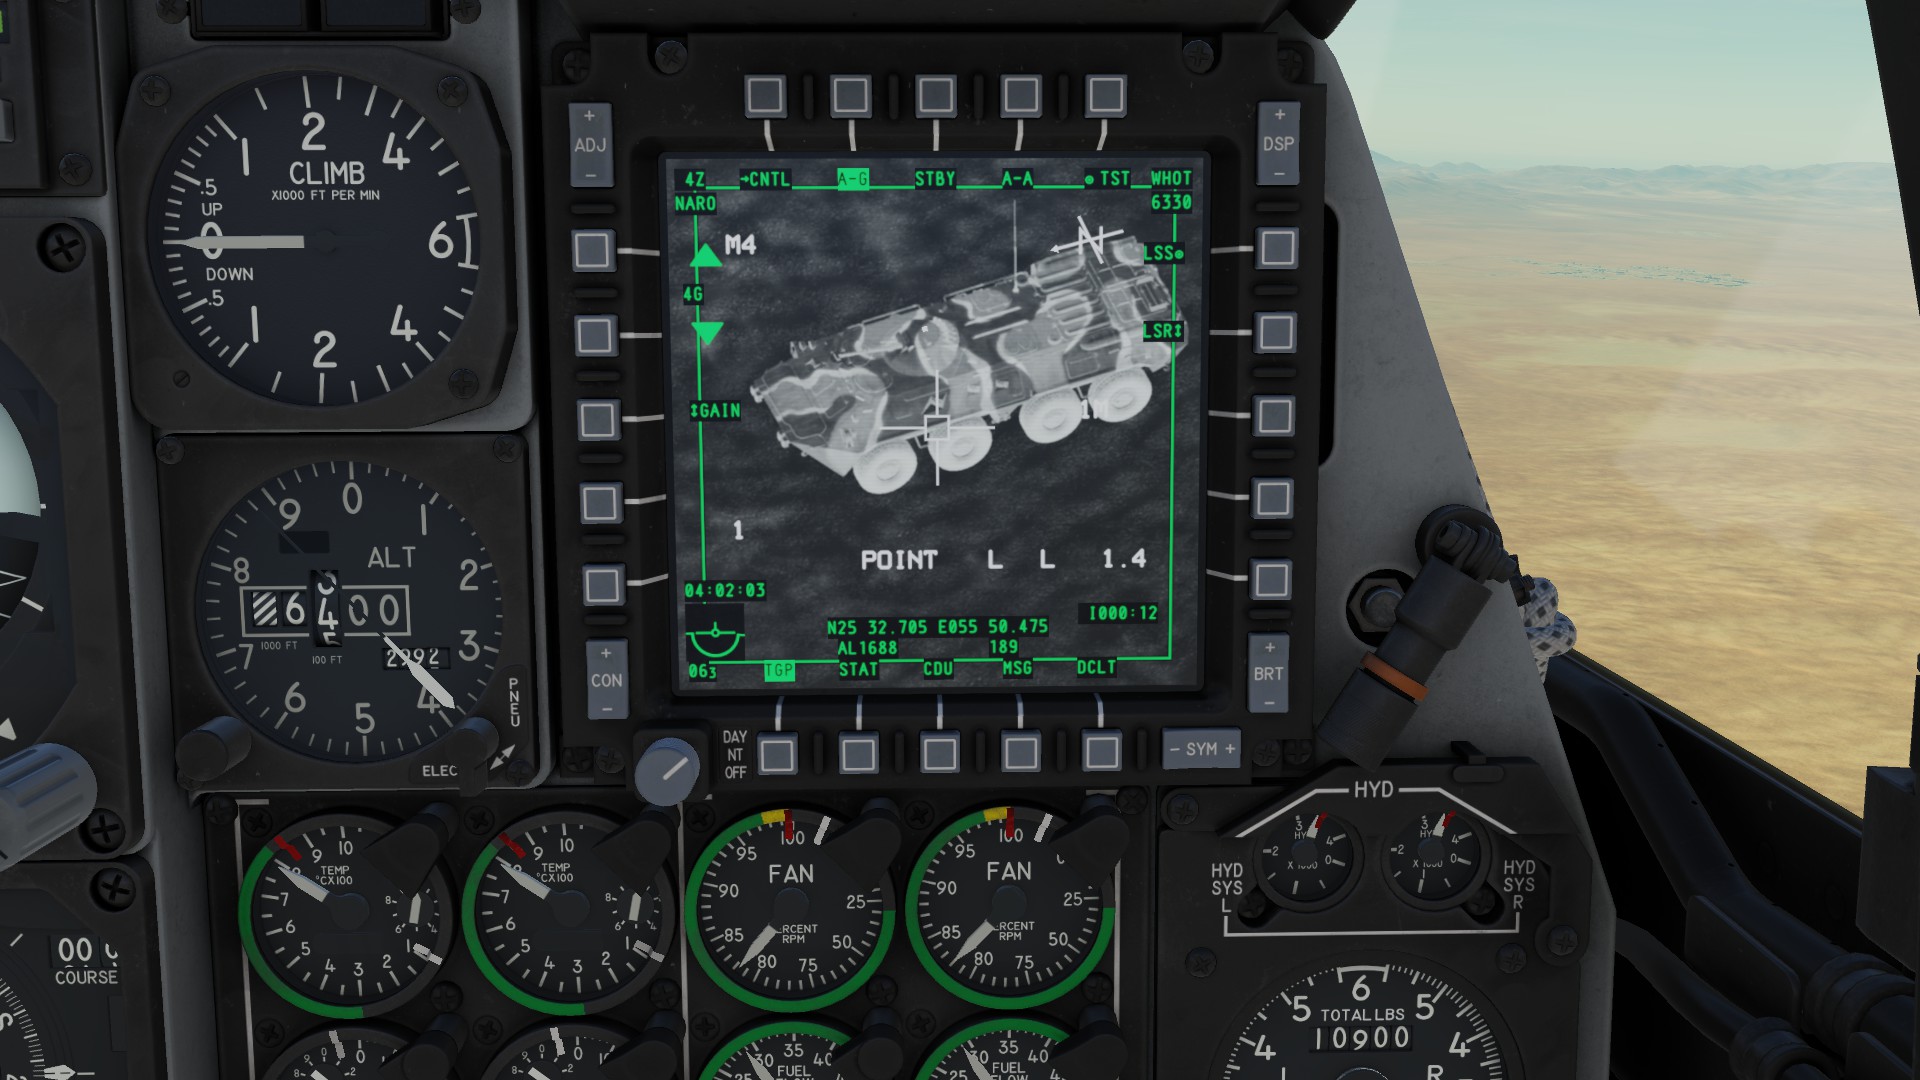
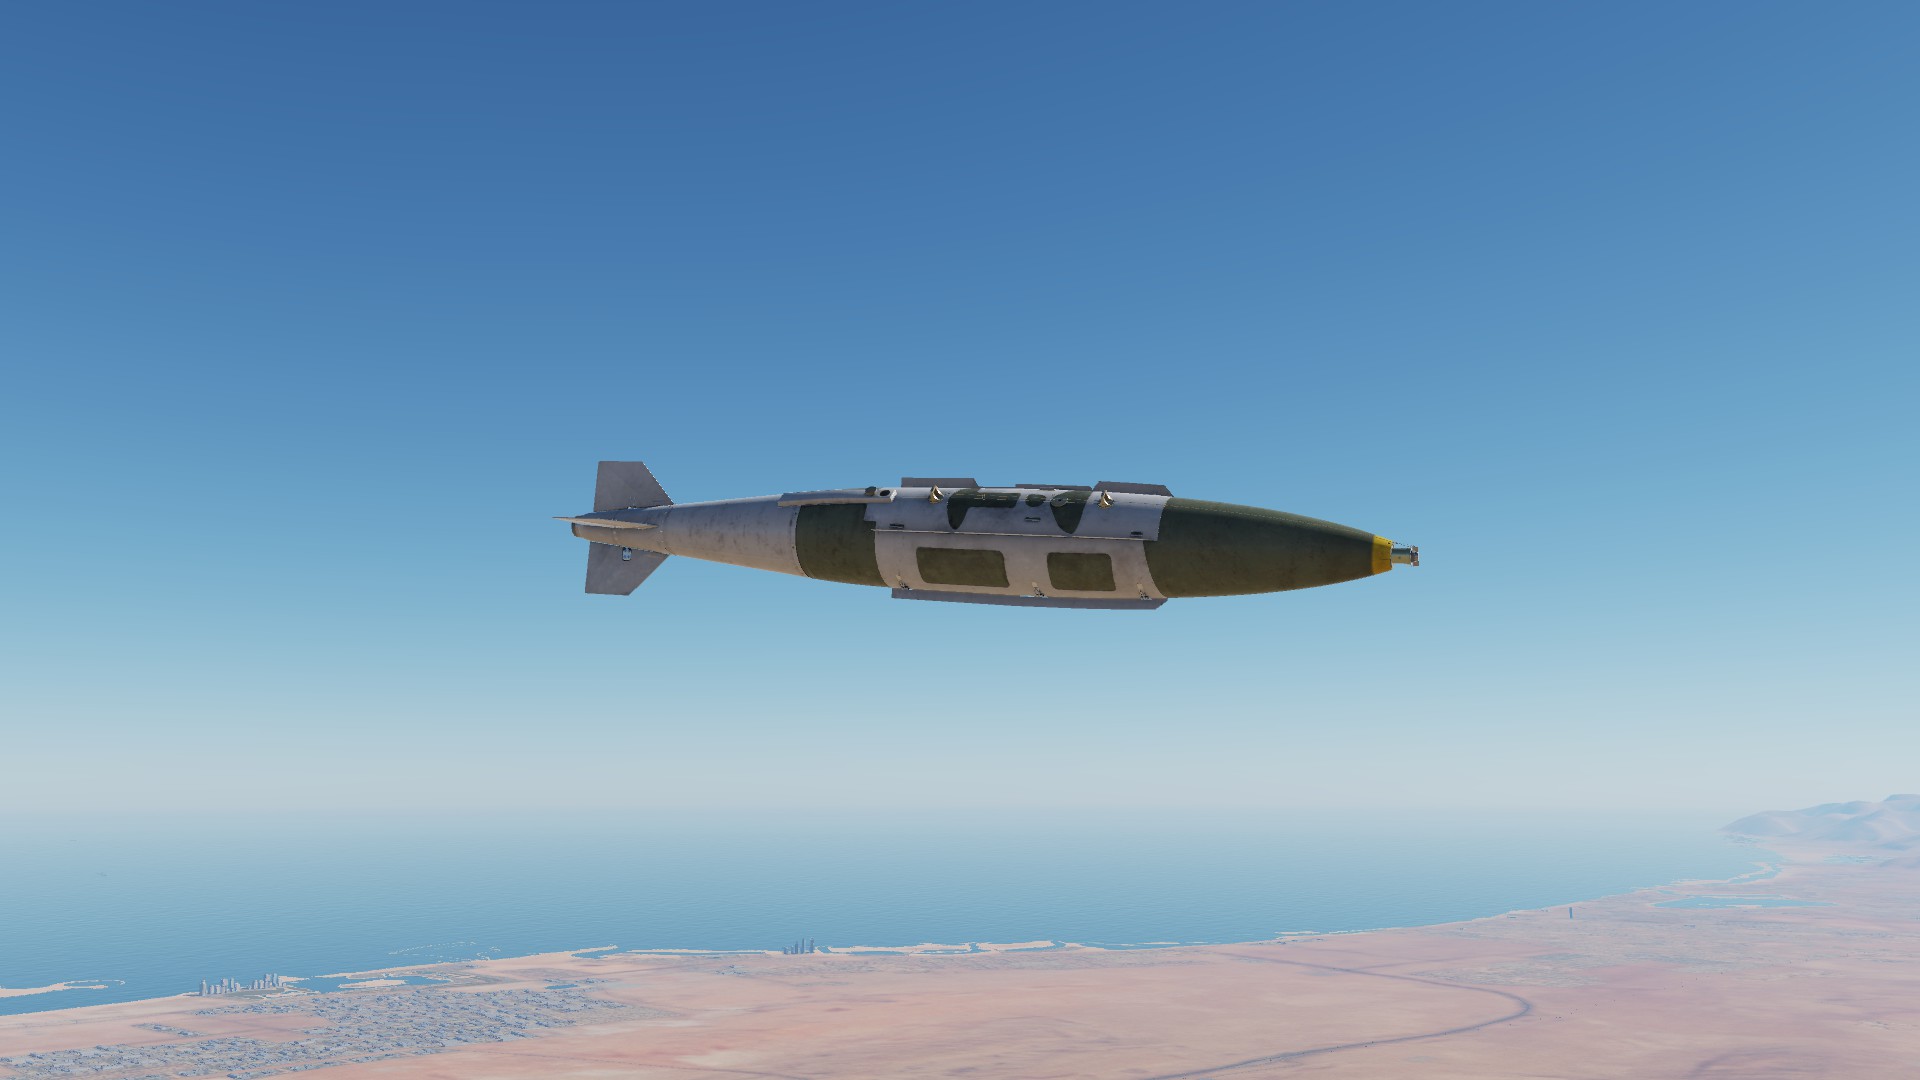
GBU-38/31
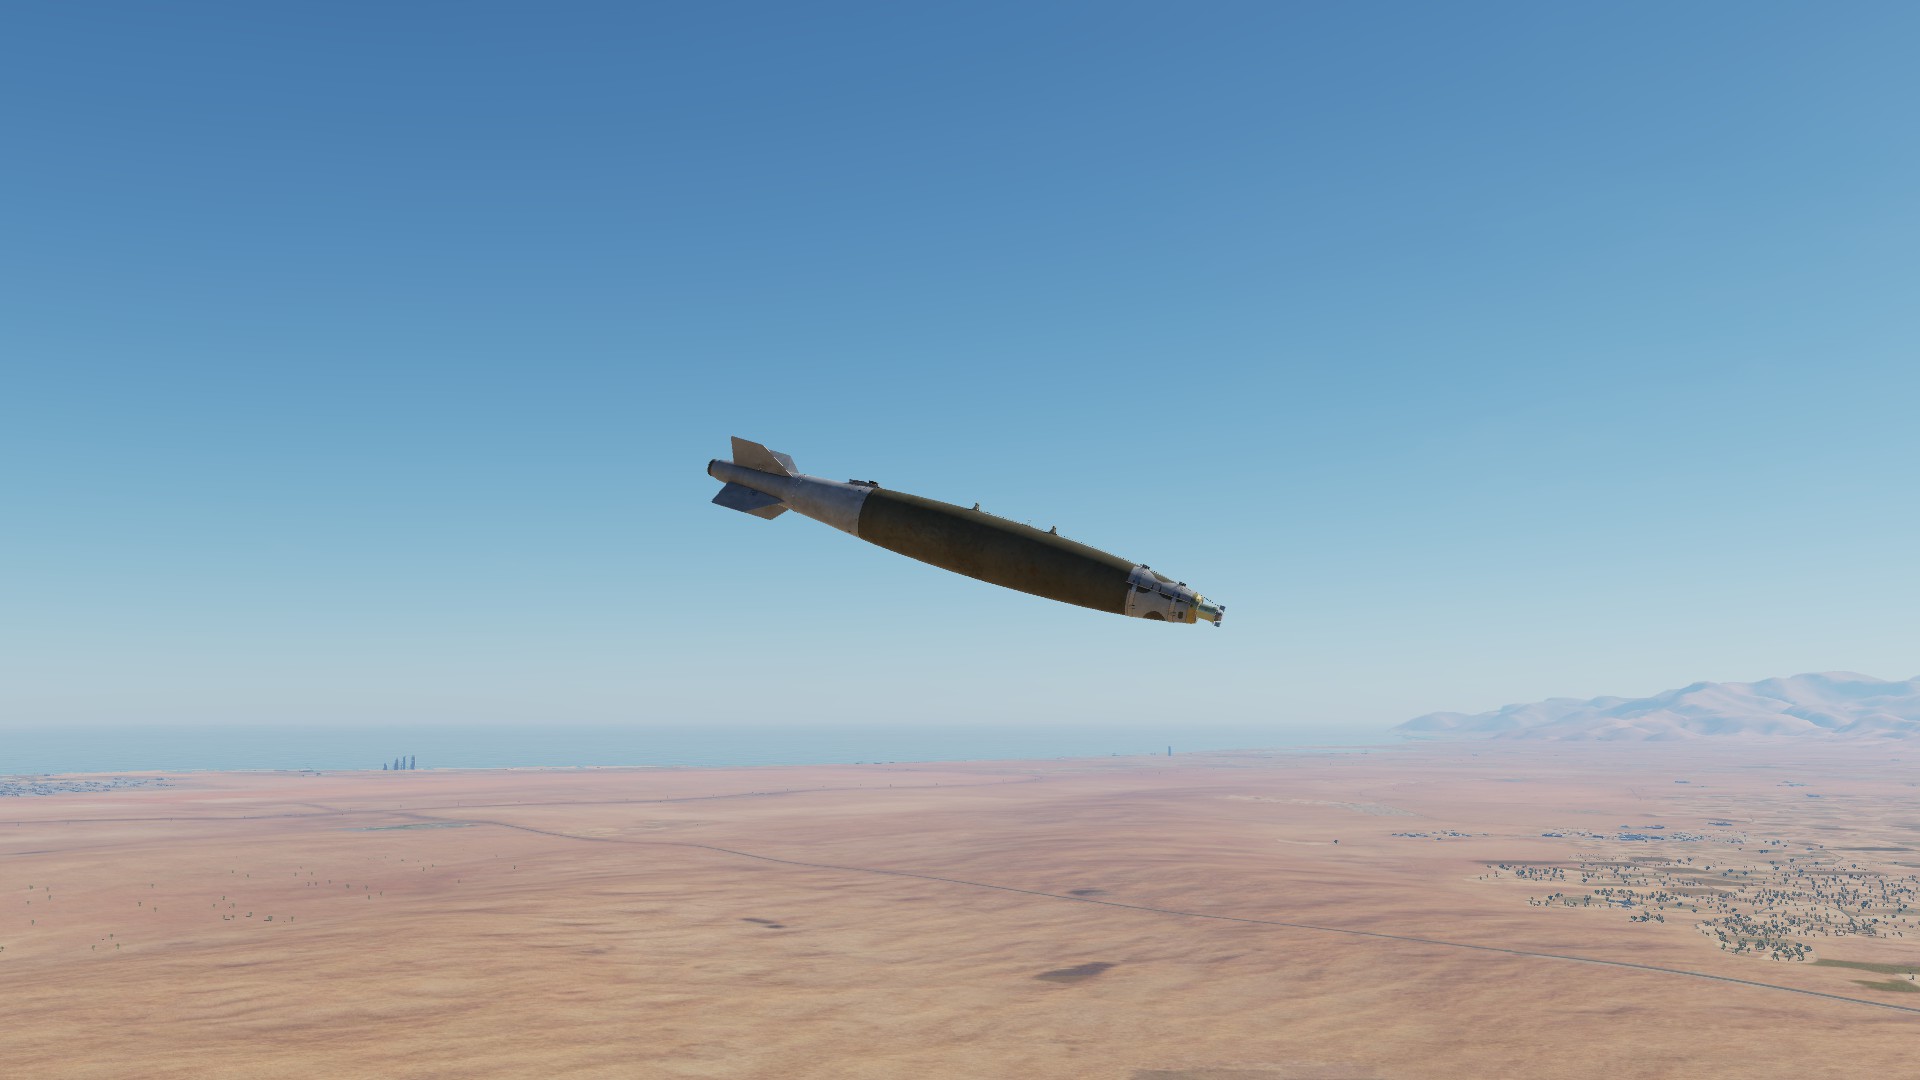
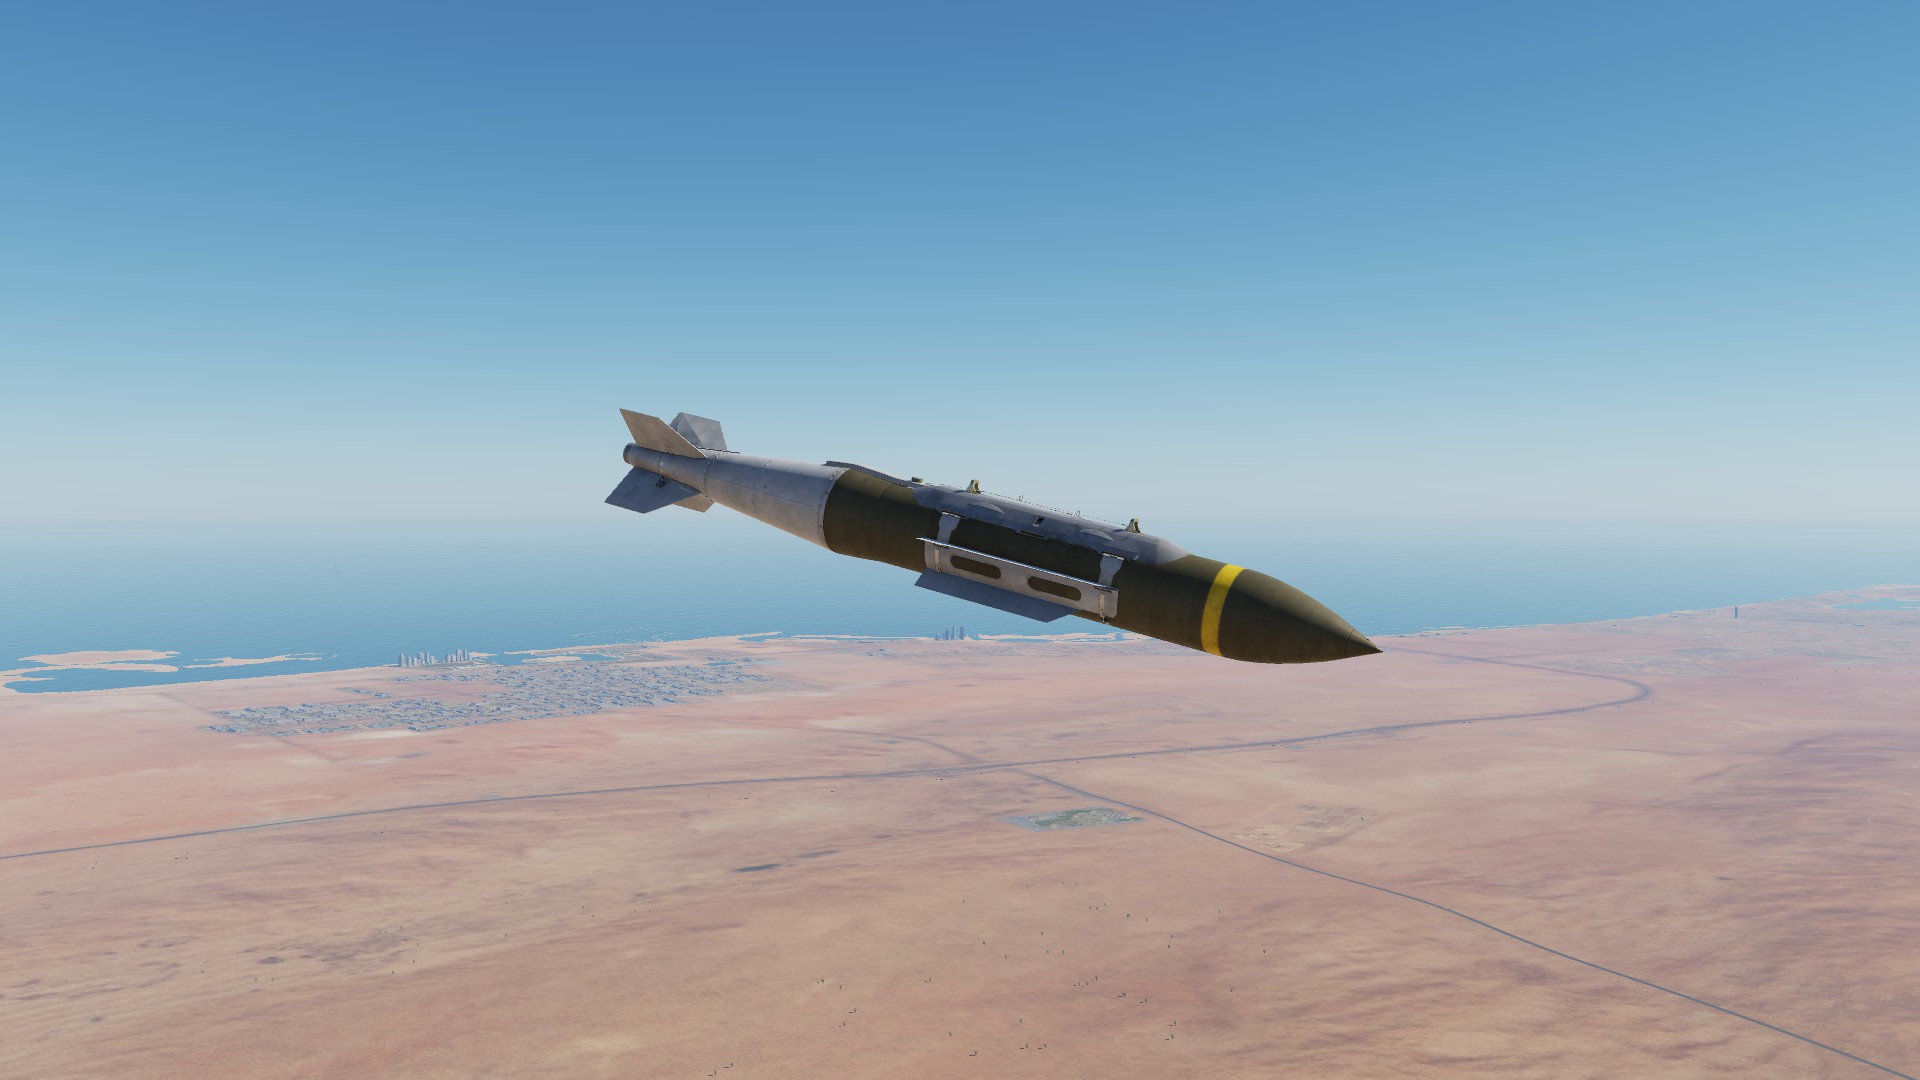 Needed controls
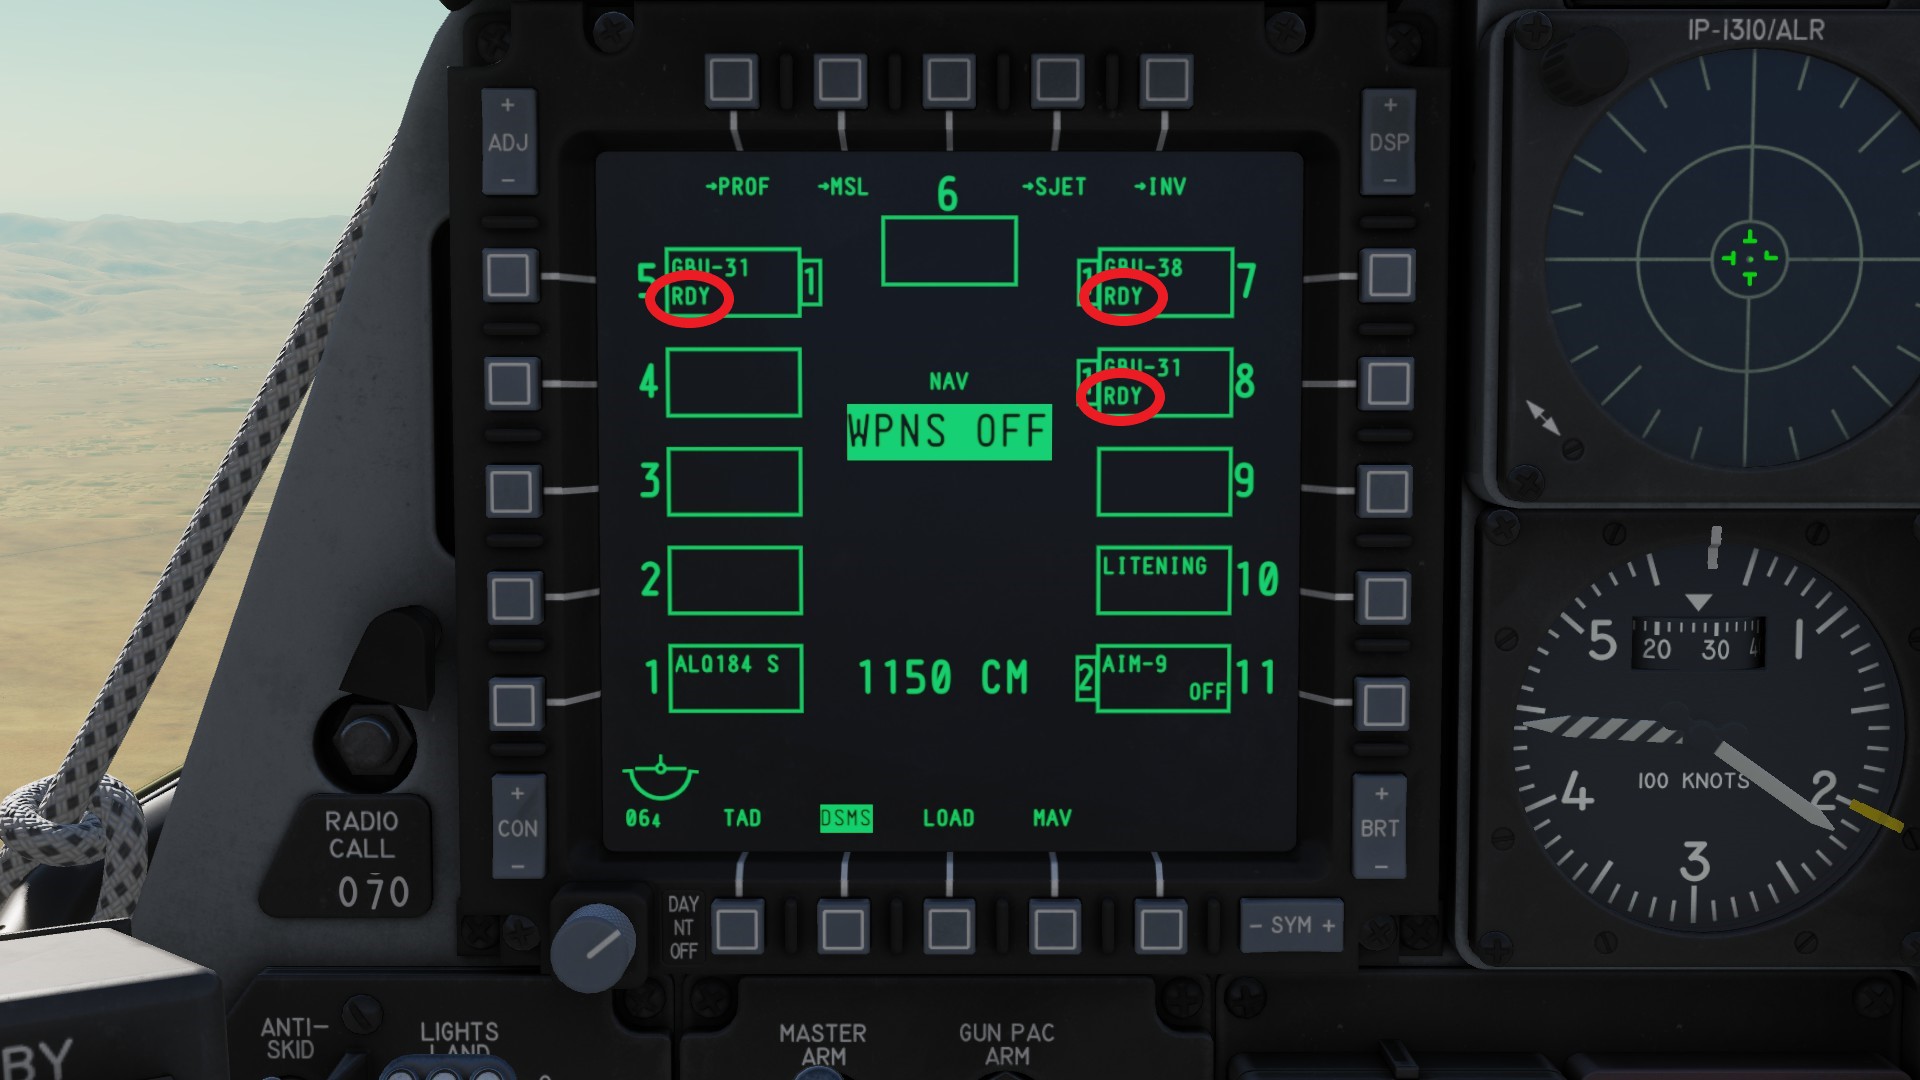
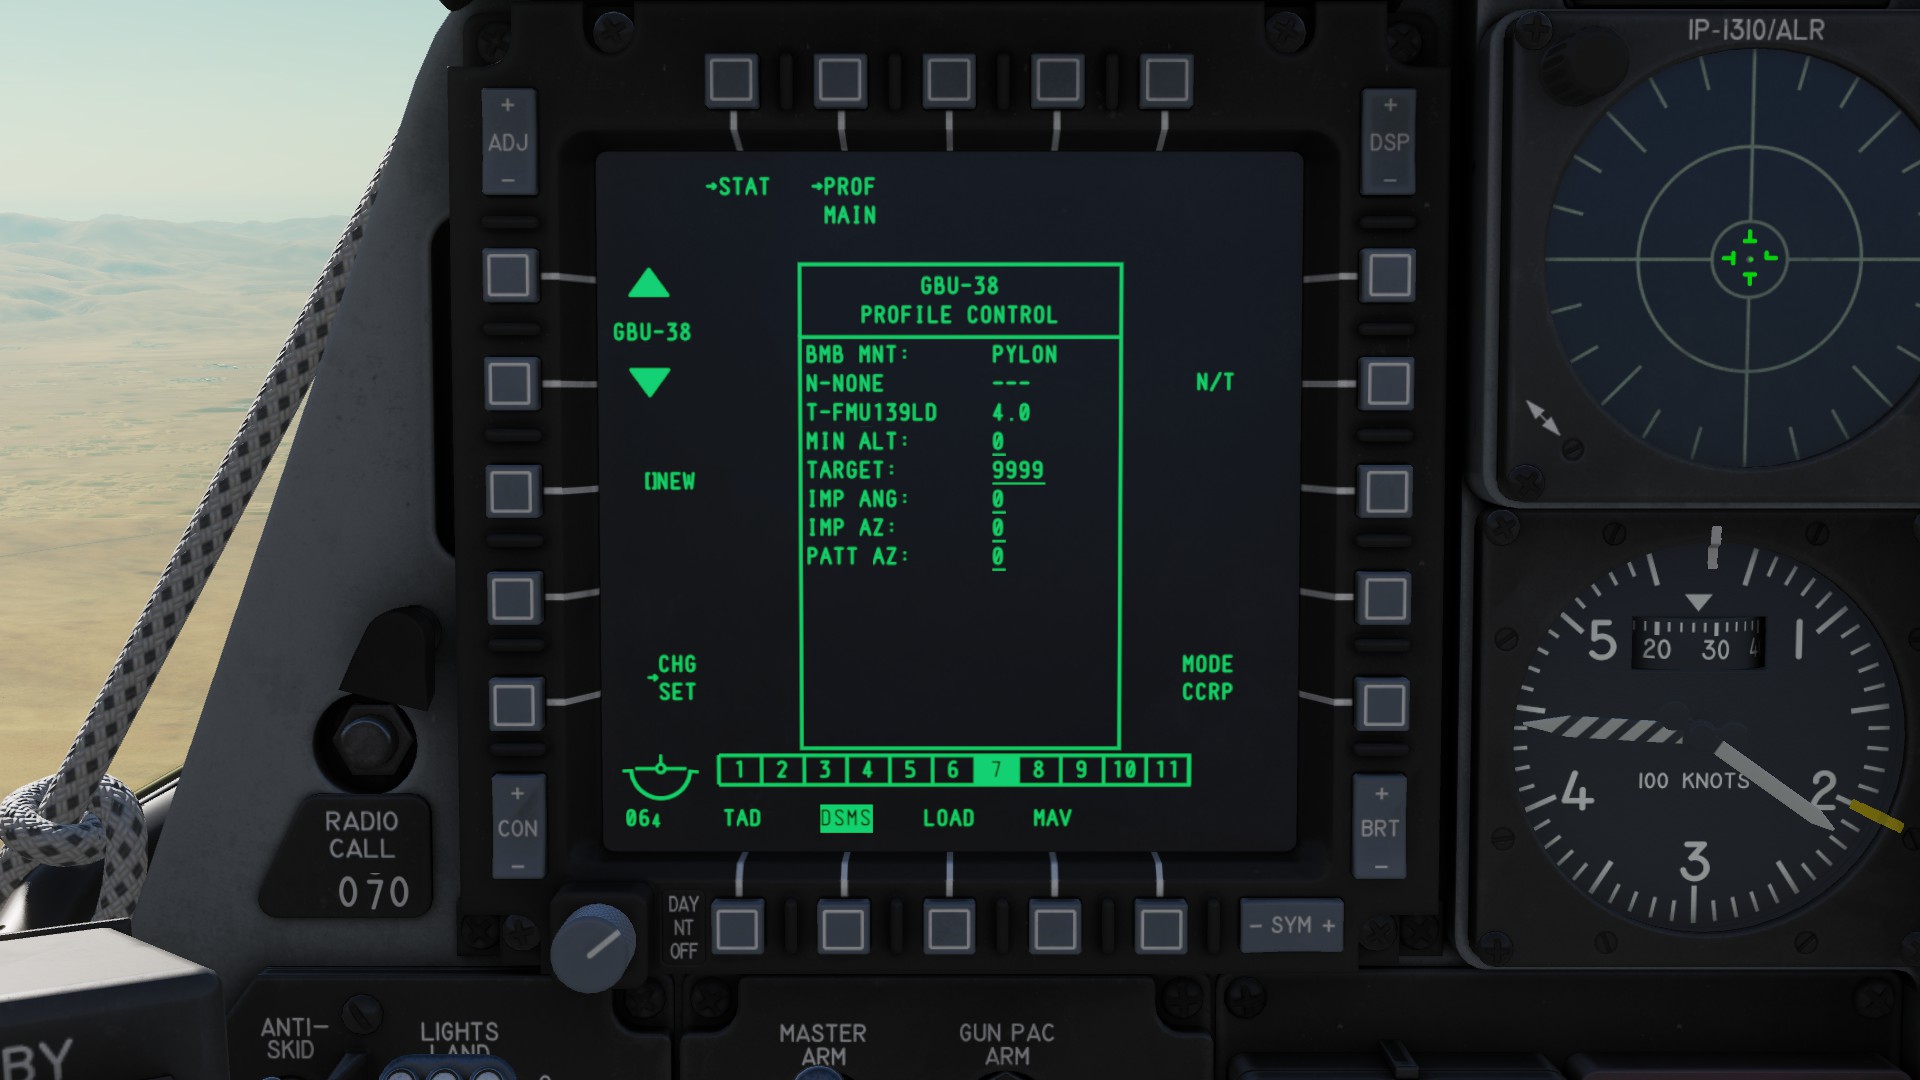 The only thing to note is that the bomb will only work after the alignment phase, which will start automatically after the DSMS has been loaded. Ordinance ready for employment is marked with RDY on the DSMS (red).
 After designating a target with HOTAS TMS Forward long you will see the following symbology.
The dynamic launch zone (red) shows the distance from the target, where the weapon can be deployed with sucess. The steering line (black) shows in what direction you have to fly. Try to keep it over your velocity vector.
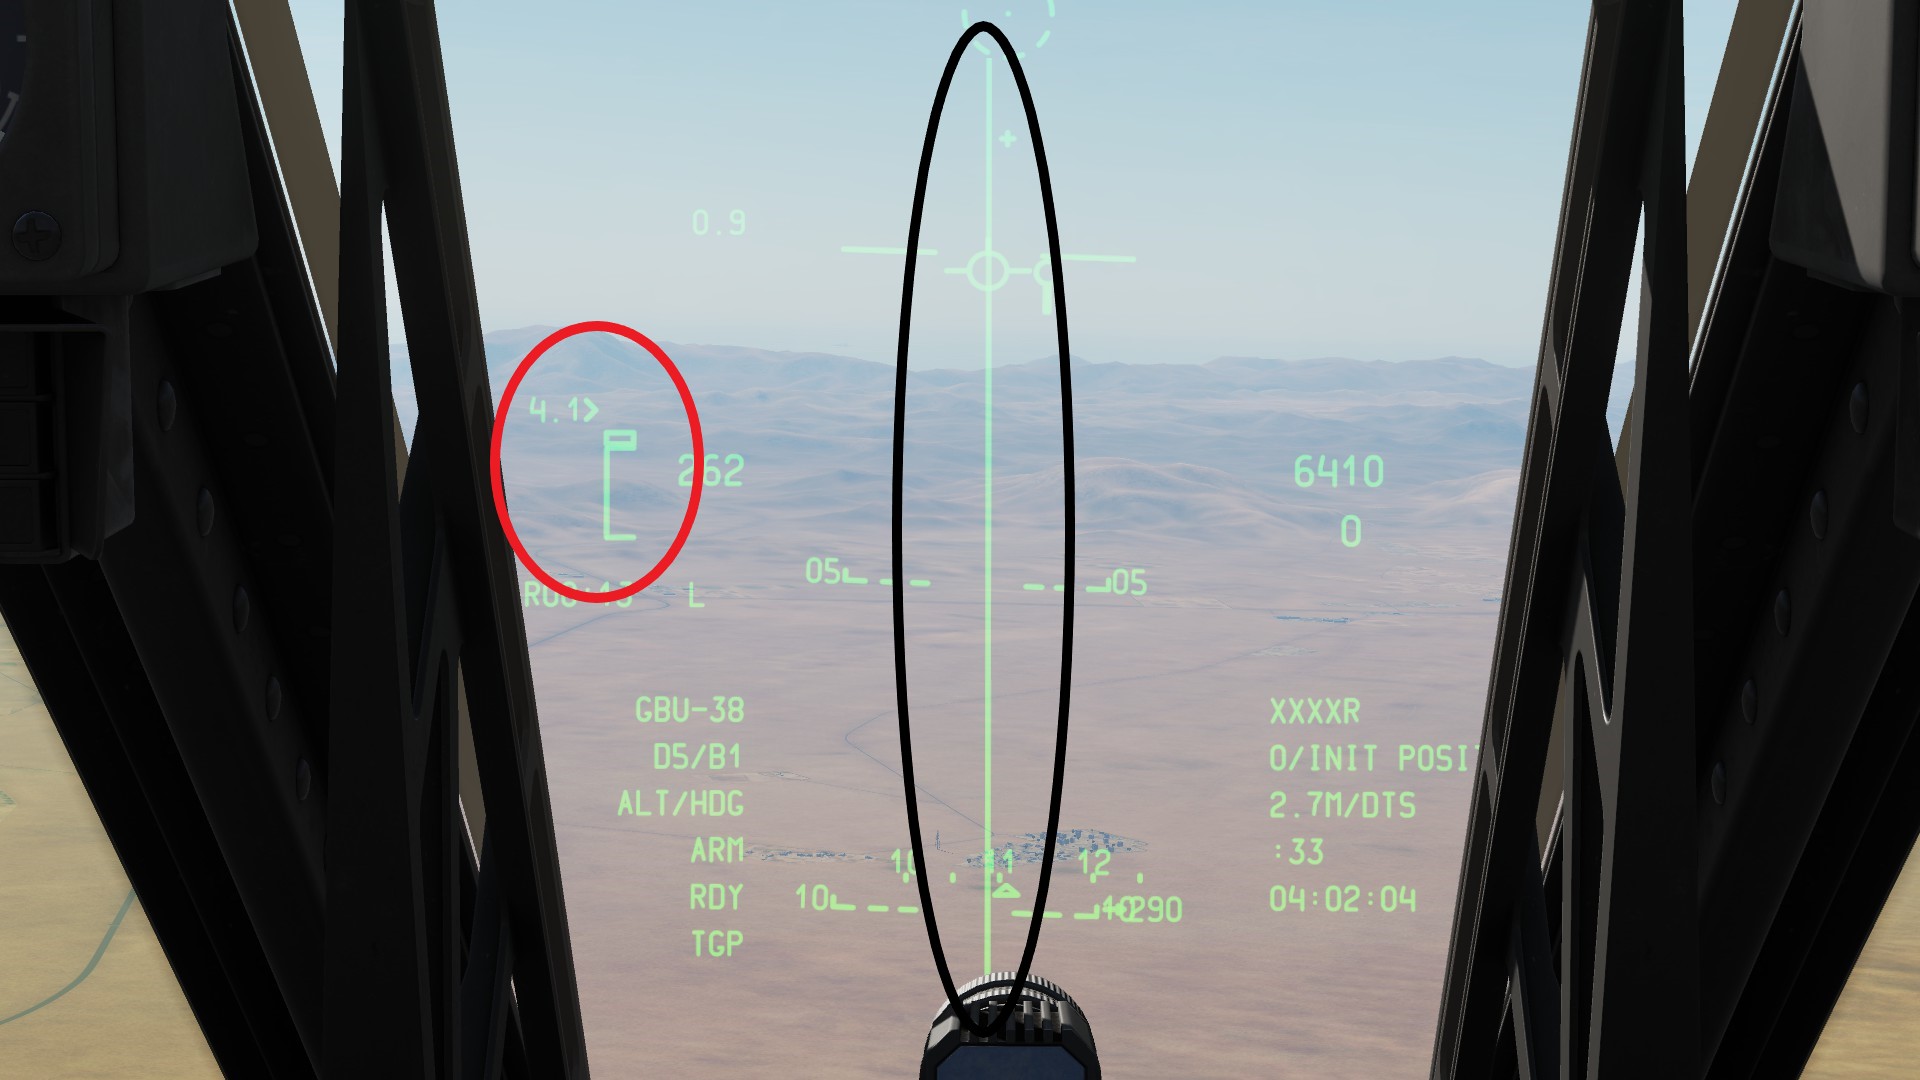 You can release the weapon when the arrow on the right of the dynamic launch zone is in the bracket (red). You will also get a notification that you can manually release the weapon on your HUD (blue).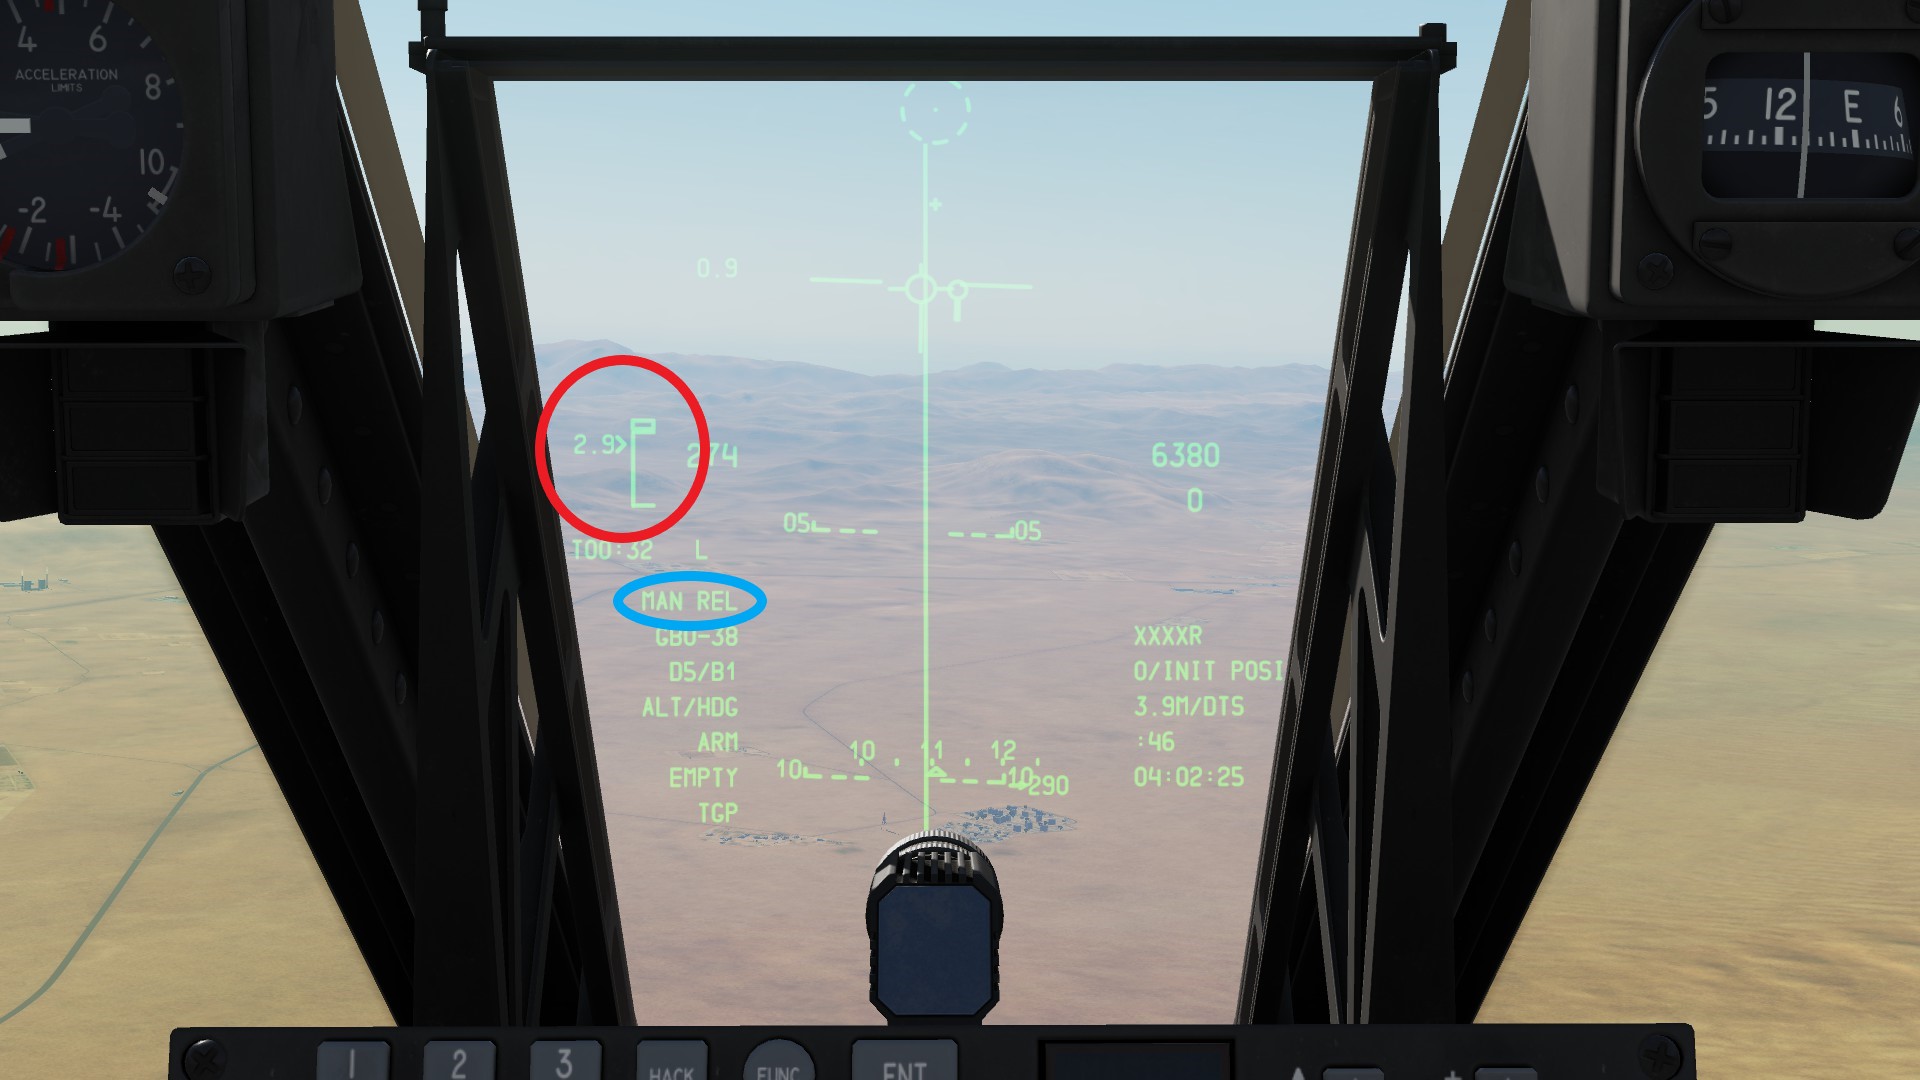
Dropping multiple JDAMs in one run
You can use a little trick to drop multiple JDAMs on different targets while performing only one attack run.
First you need to set you steerpoint knob to MARK.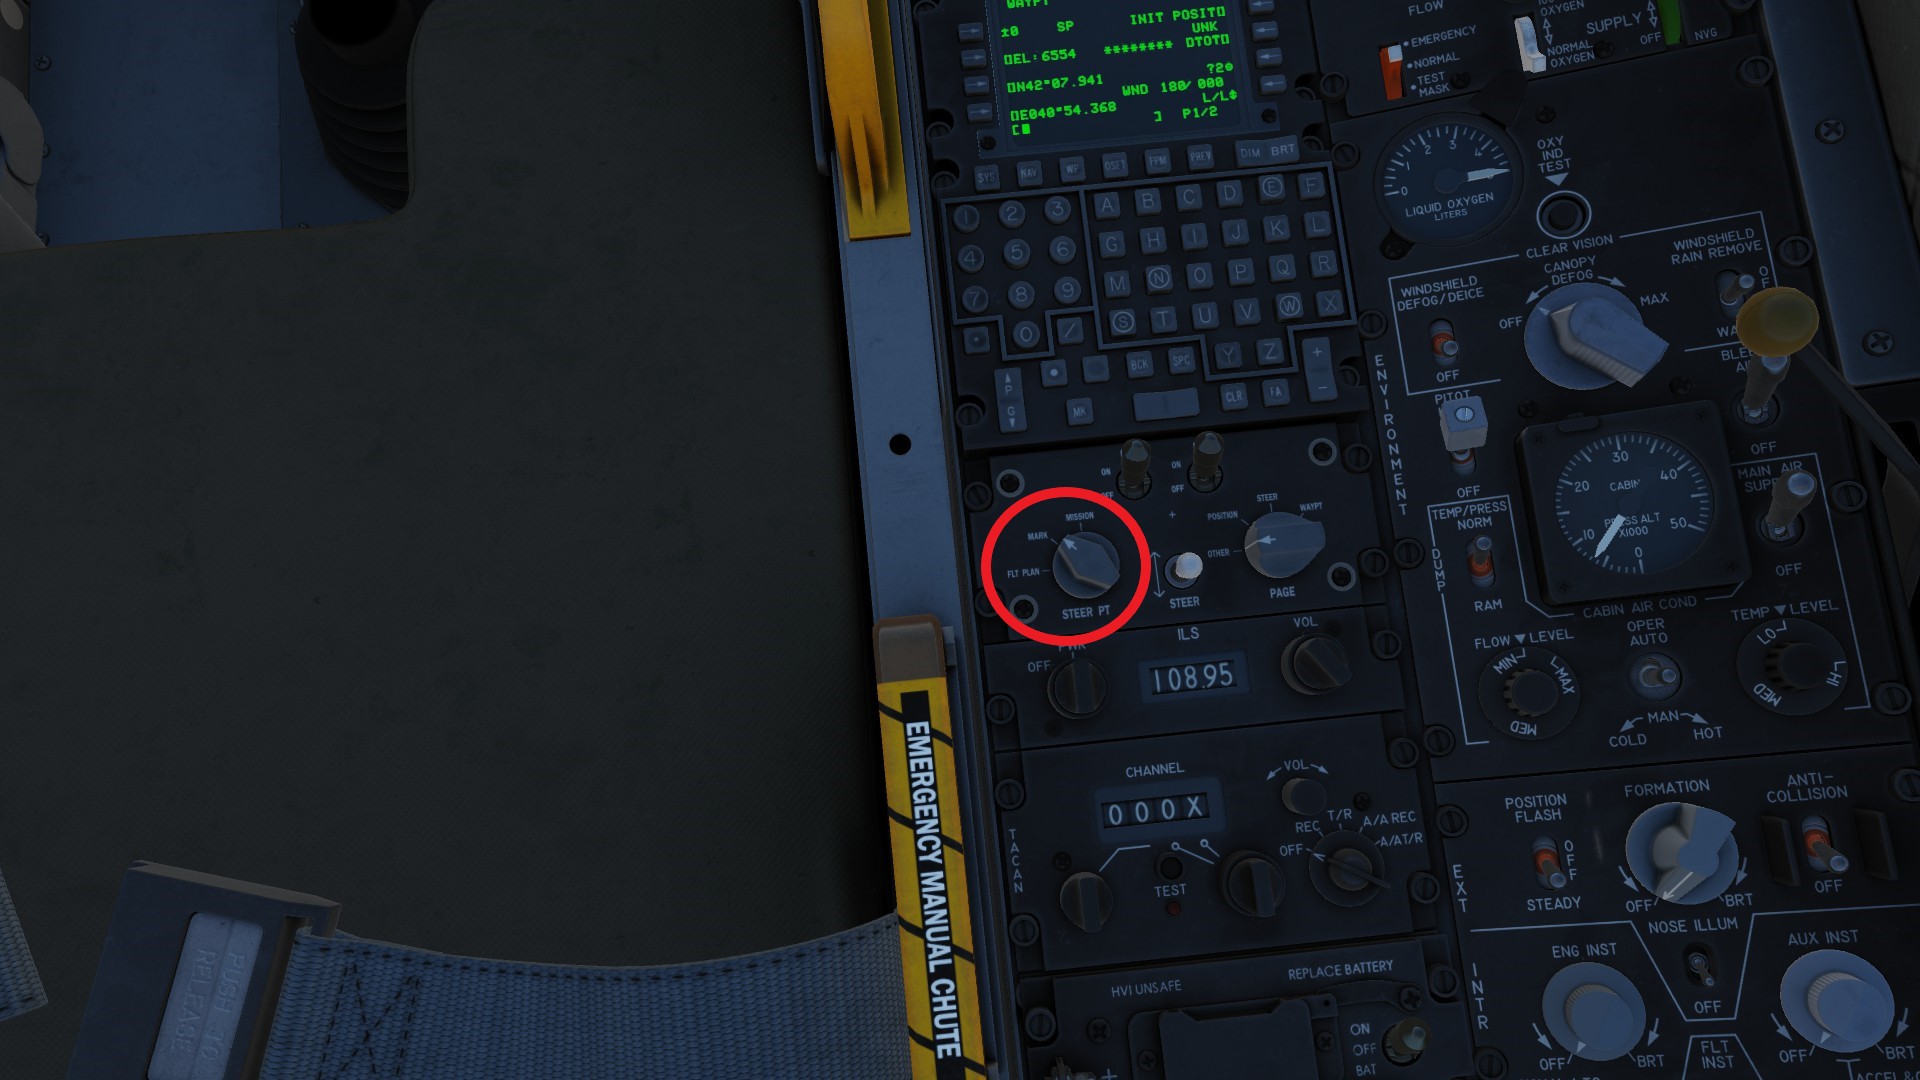 Now find your targets and set a markpoint on them with HOTAS TMS Right short. On your TAD is will look something like this.
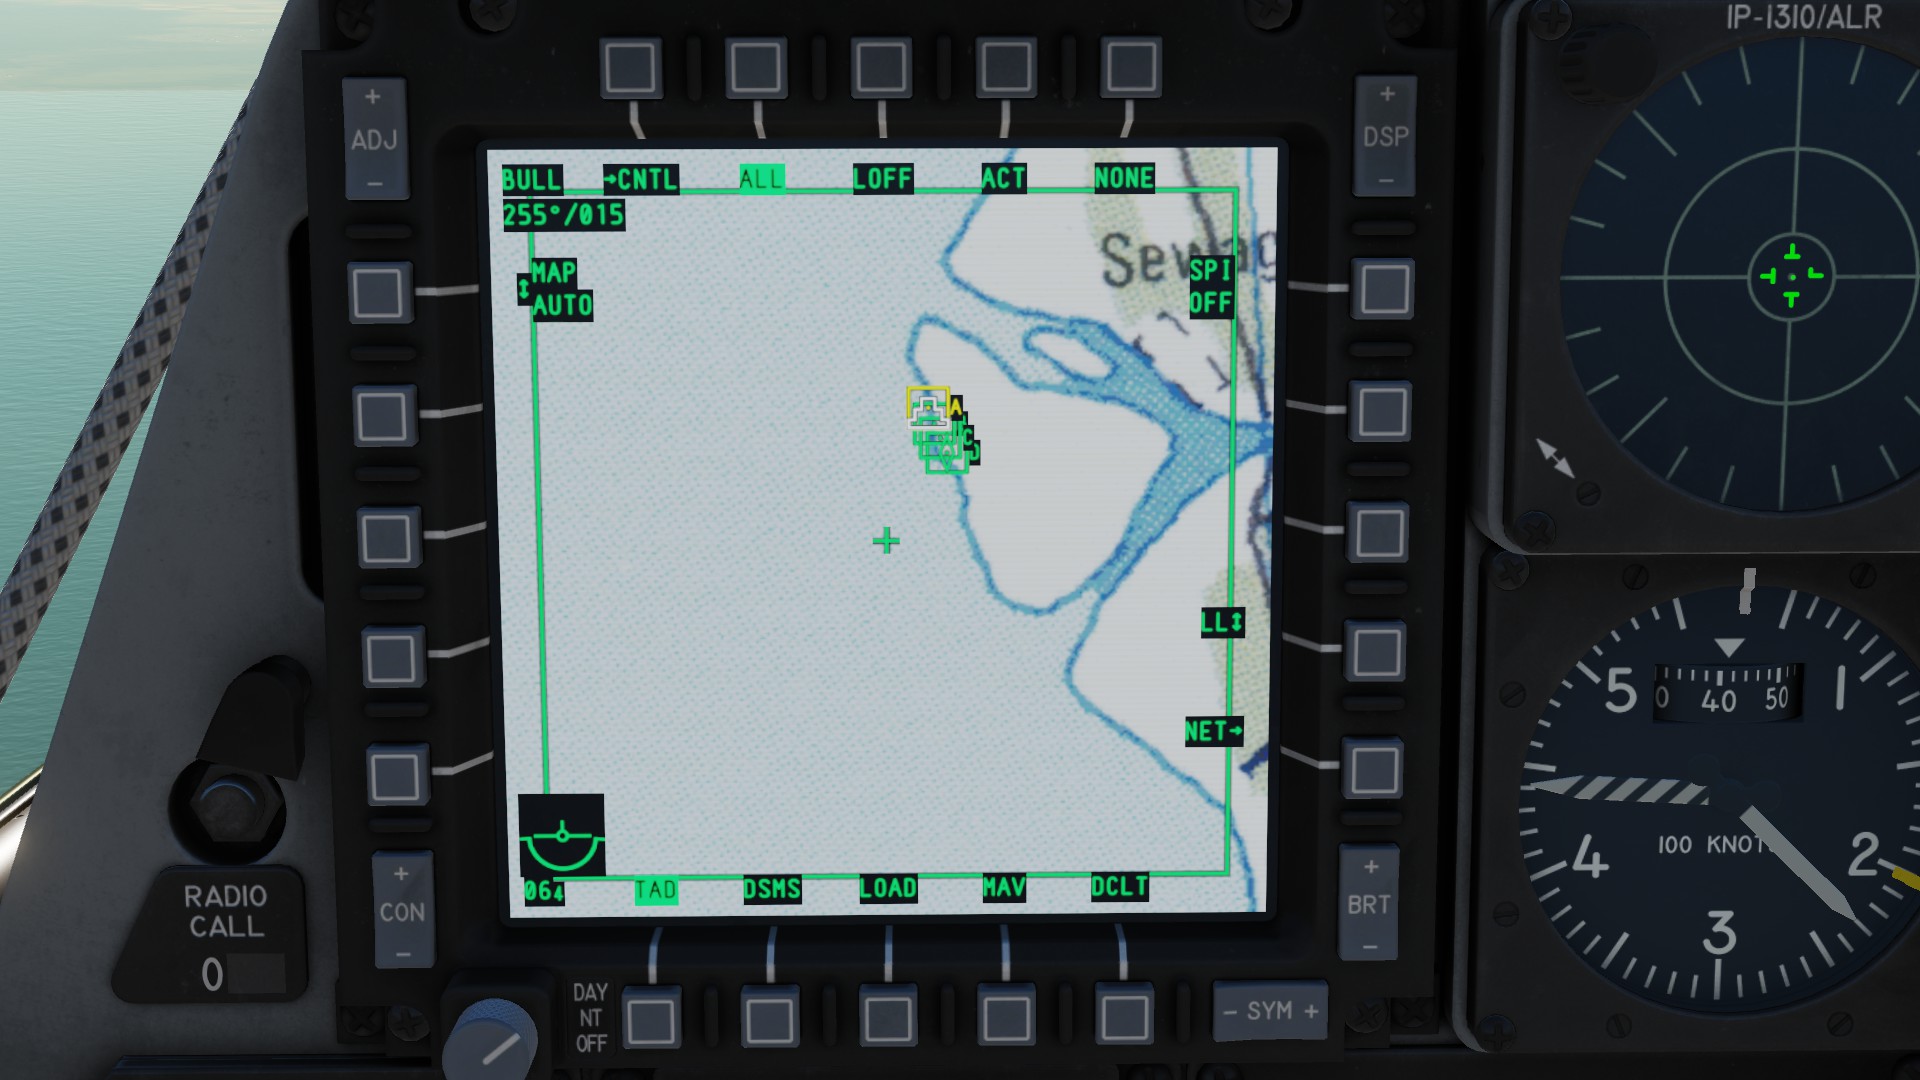 Make sure that your currently selected waypoint is your first target (for me A).
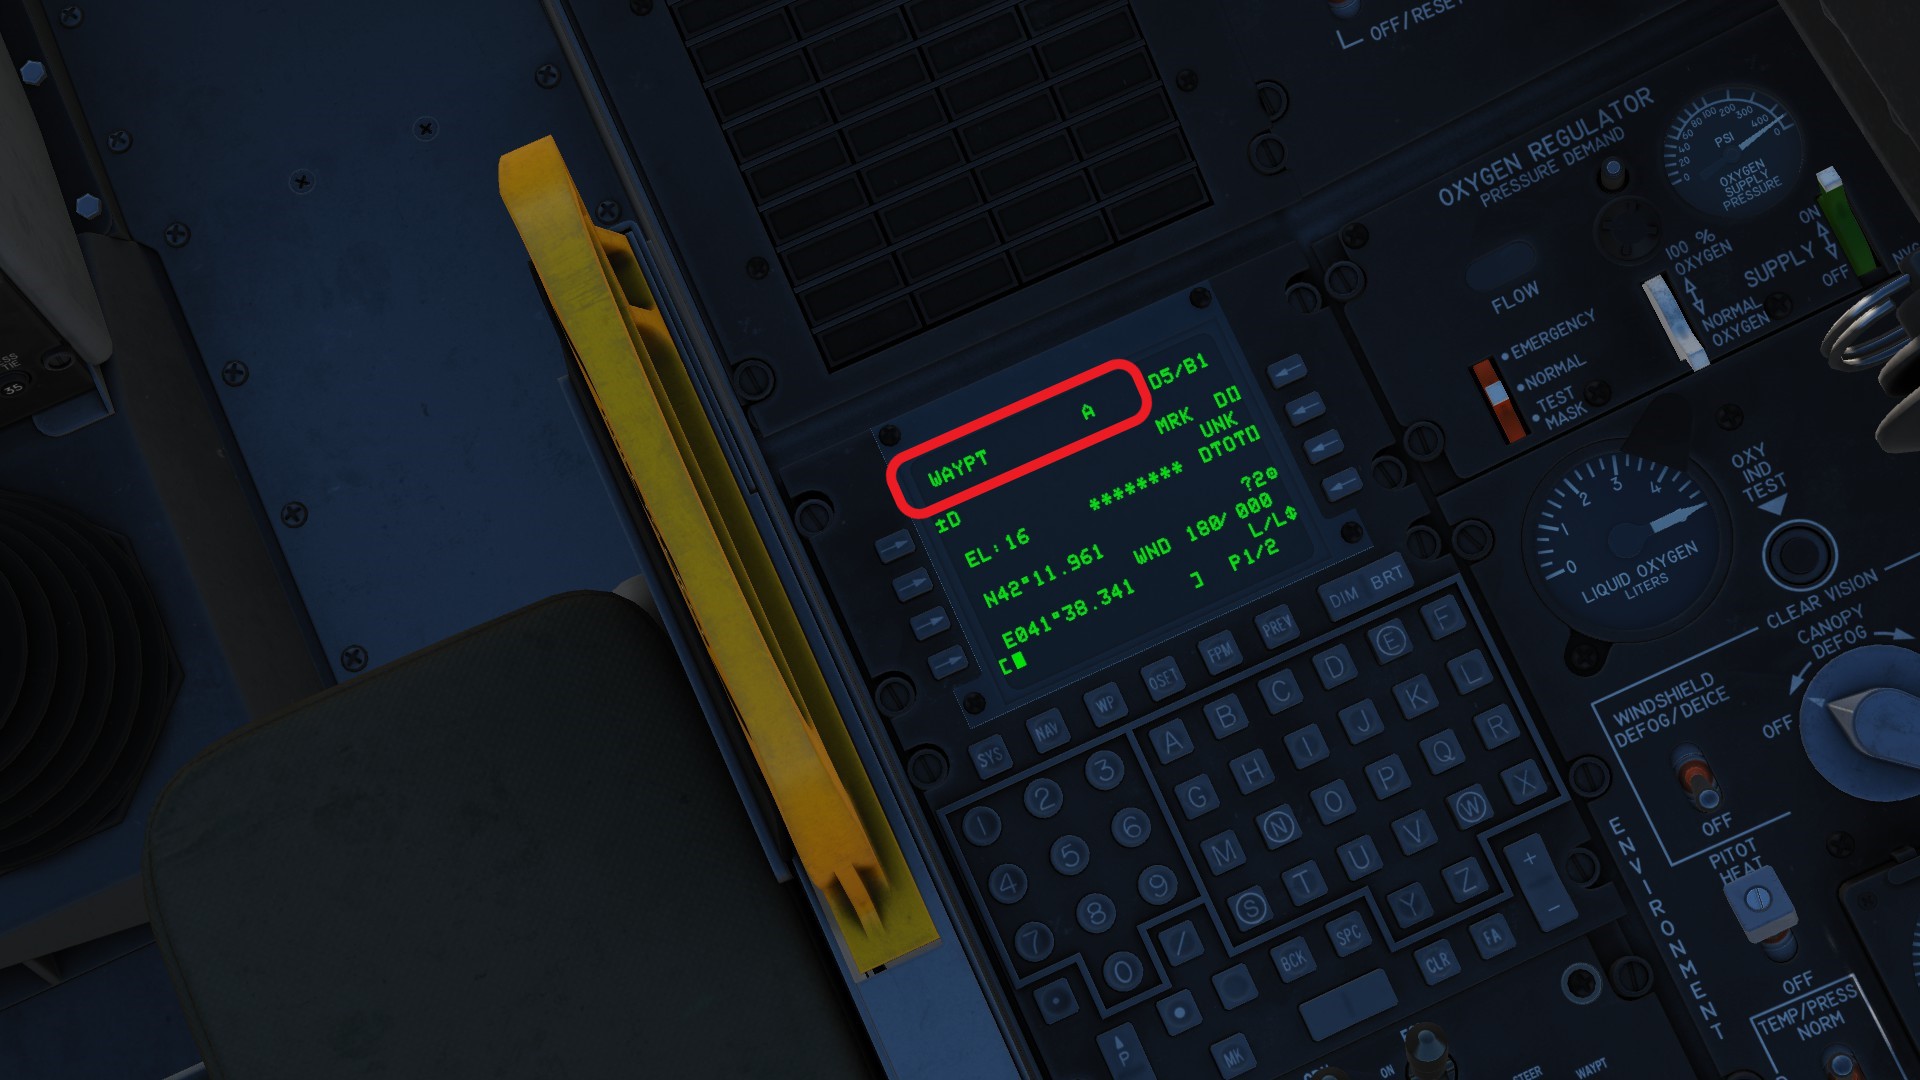 Drop your bomb and select the next markpoint with the switch (red). Repeat until you have dropped all your bombs or are out of range again.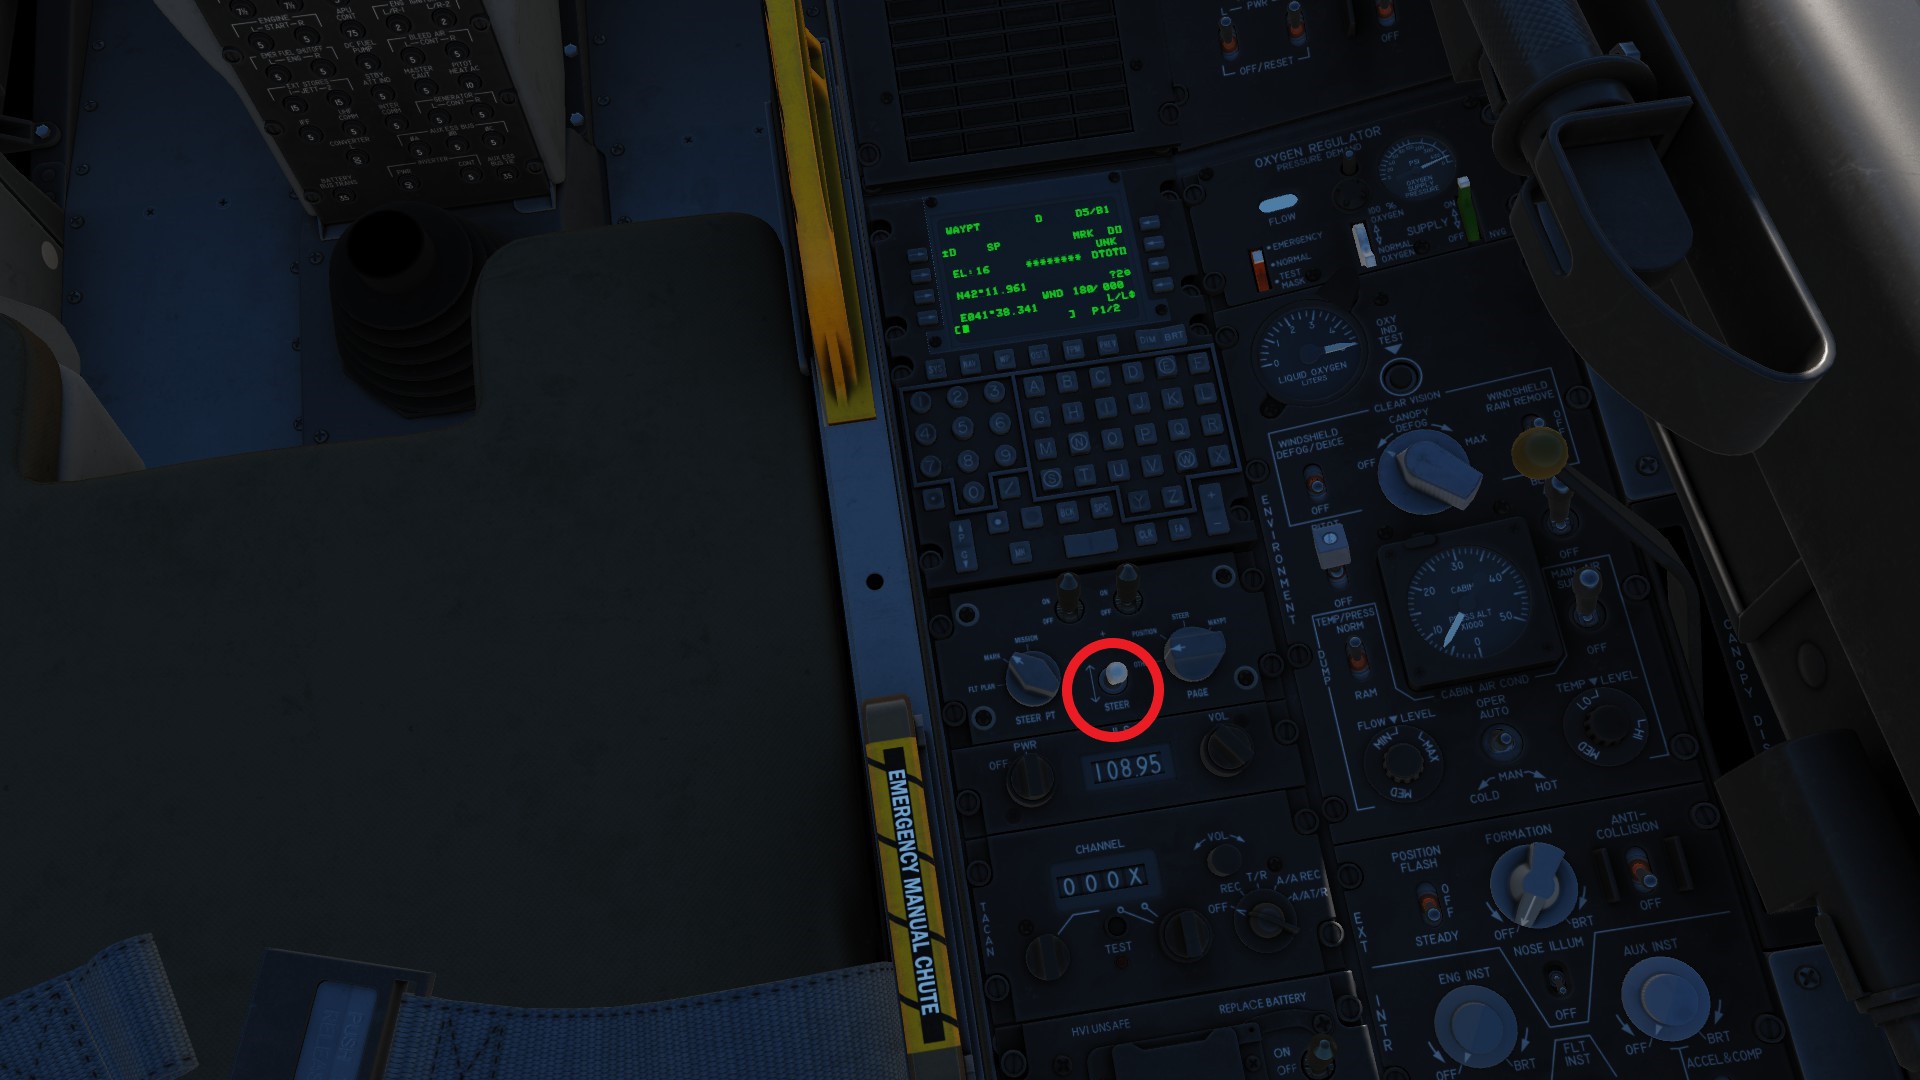
GBU-54
The GBU-54 can be imagined as a combination of a laser guided bomb and a JDAM. In fact, it is just a JDAM with a laser seeker attached to it. If no laser is provided, the bomb will guide with GPS/INS navigation. If a laser is involved, it will follow the laser. When using a laser, you can engage moving targets.
Needed controls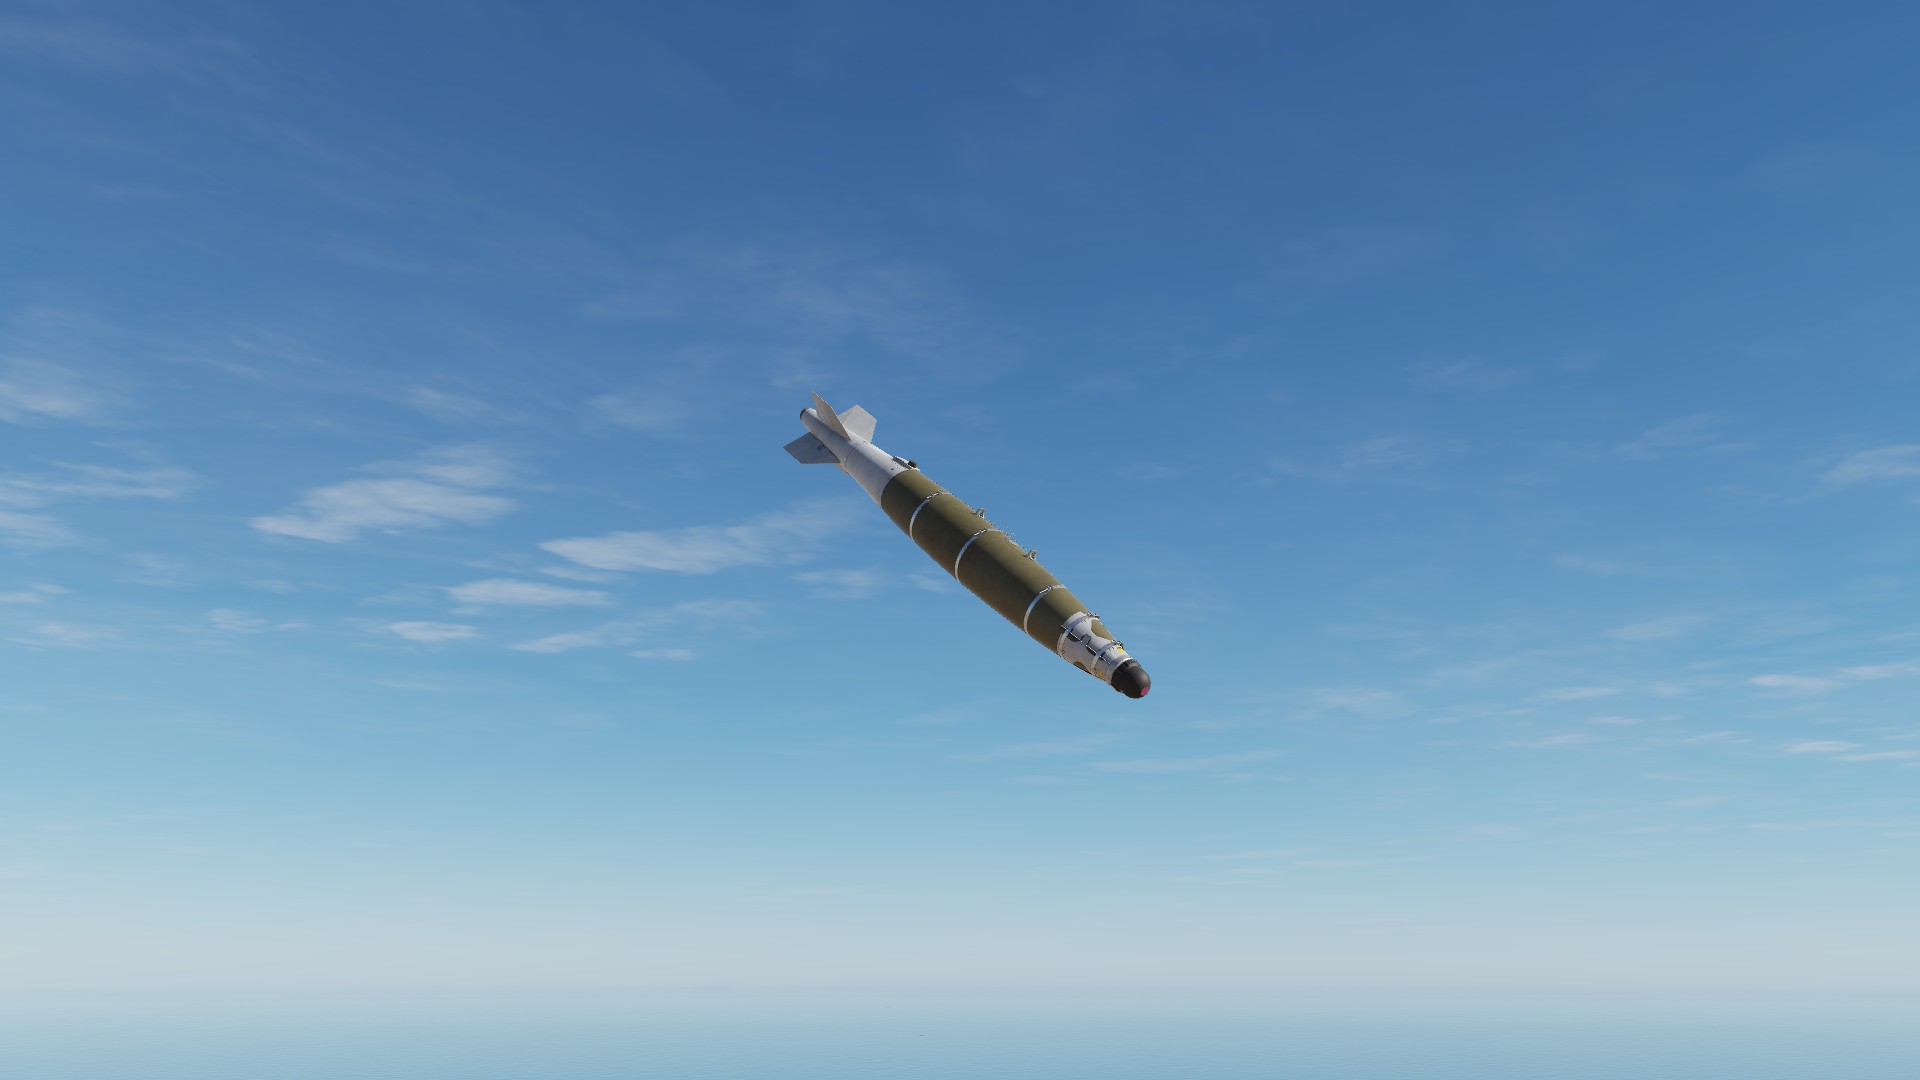 The profile is not important to us. Since the GBU-54 is a very versatile weapon, i would not recommend using autolase. If you want to do so anyways, please go back to the GBU-10/12 where i explain how to use it. Dont forget to set a laser code for the weapon and check on the alignment status.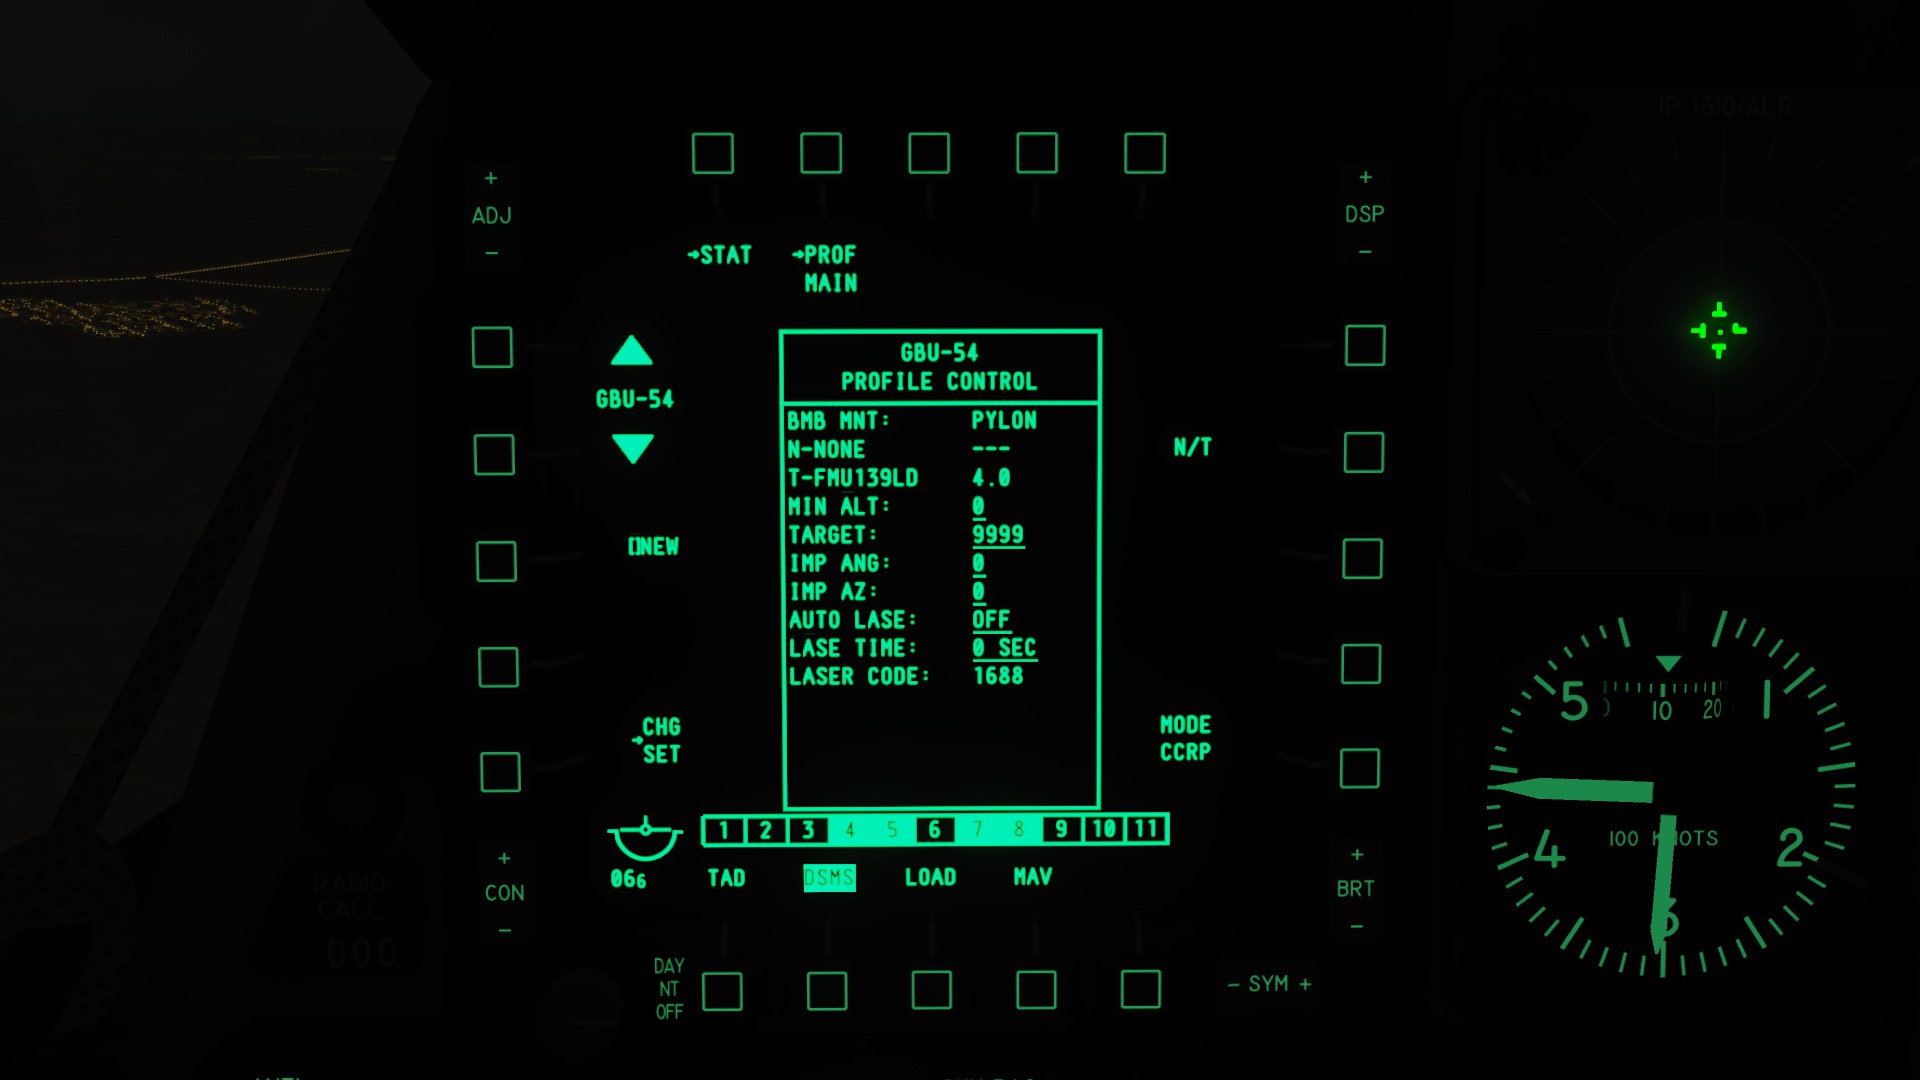
GPS/INS
When using only GPS/INS guidance, you can just designate your target with the TGP (Hotas TMS Forward long). After that you will get new symbology on your HUD. Your steering line (red) idicates where you should fly towards to get the best launch angle. Try to keep it in the center of the velocity vector. On the left (blue) you will see your dynamic launch zone. This is the area form the target where you can drop the bomb with enough energy, so it gets to the enemie. The number with the arrow next to it (green) shows the current distance to the target in relation to the dynamic launch zone. You will also get a expected time until youre in launch range in seconds (white).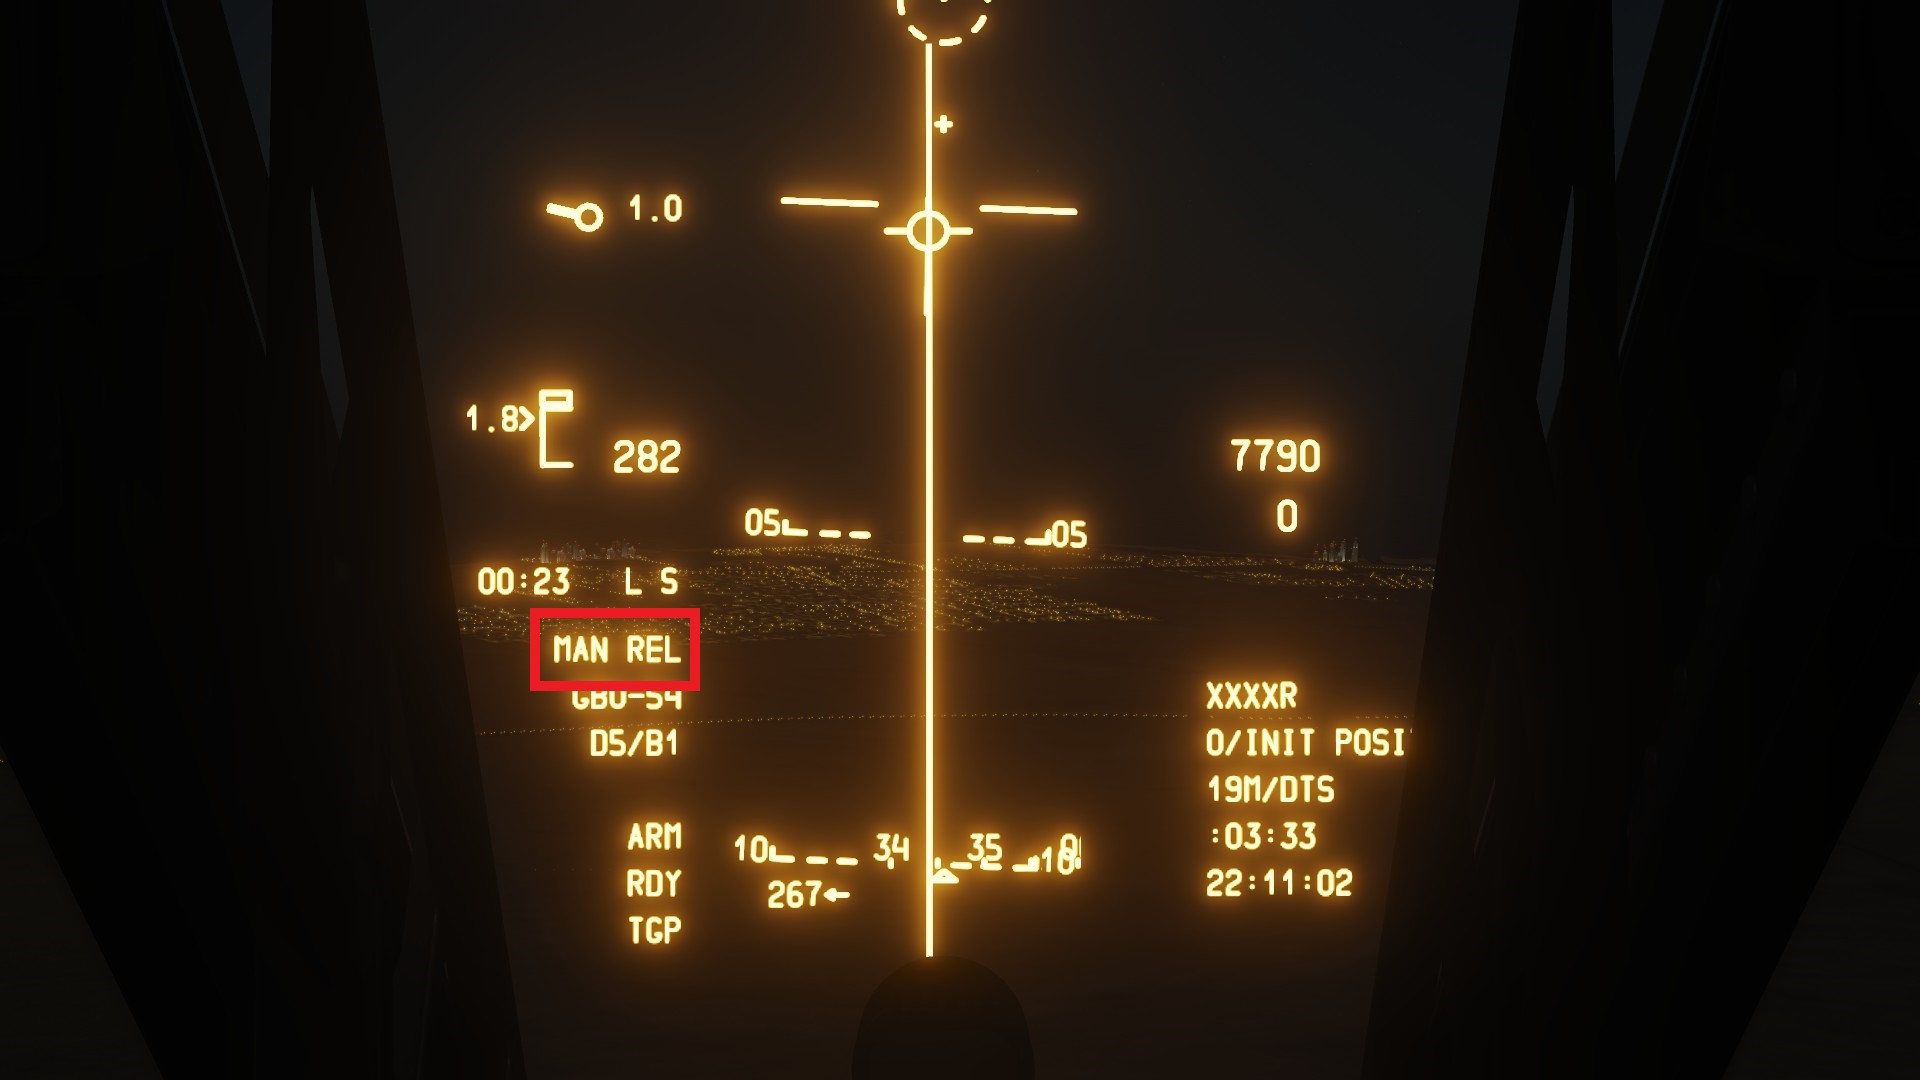
Laser guidance
For using a laser, you will get the same symbology. The only difference is, that you now lase the bomb into the target with the HOTAS Nosewheel Steering Button (i recommend latch). Lasing will be indicated by a flashing L on the TGP (red).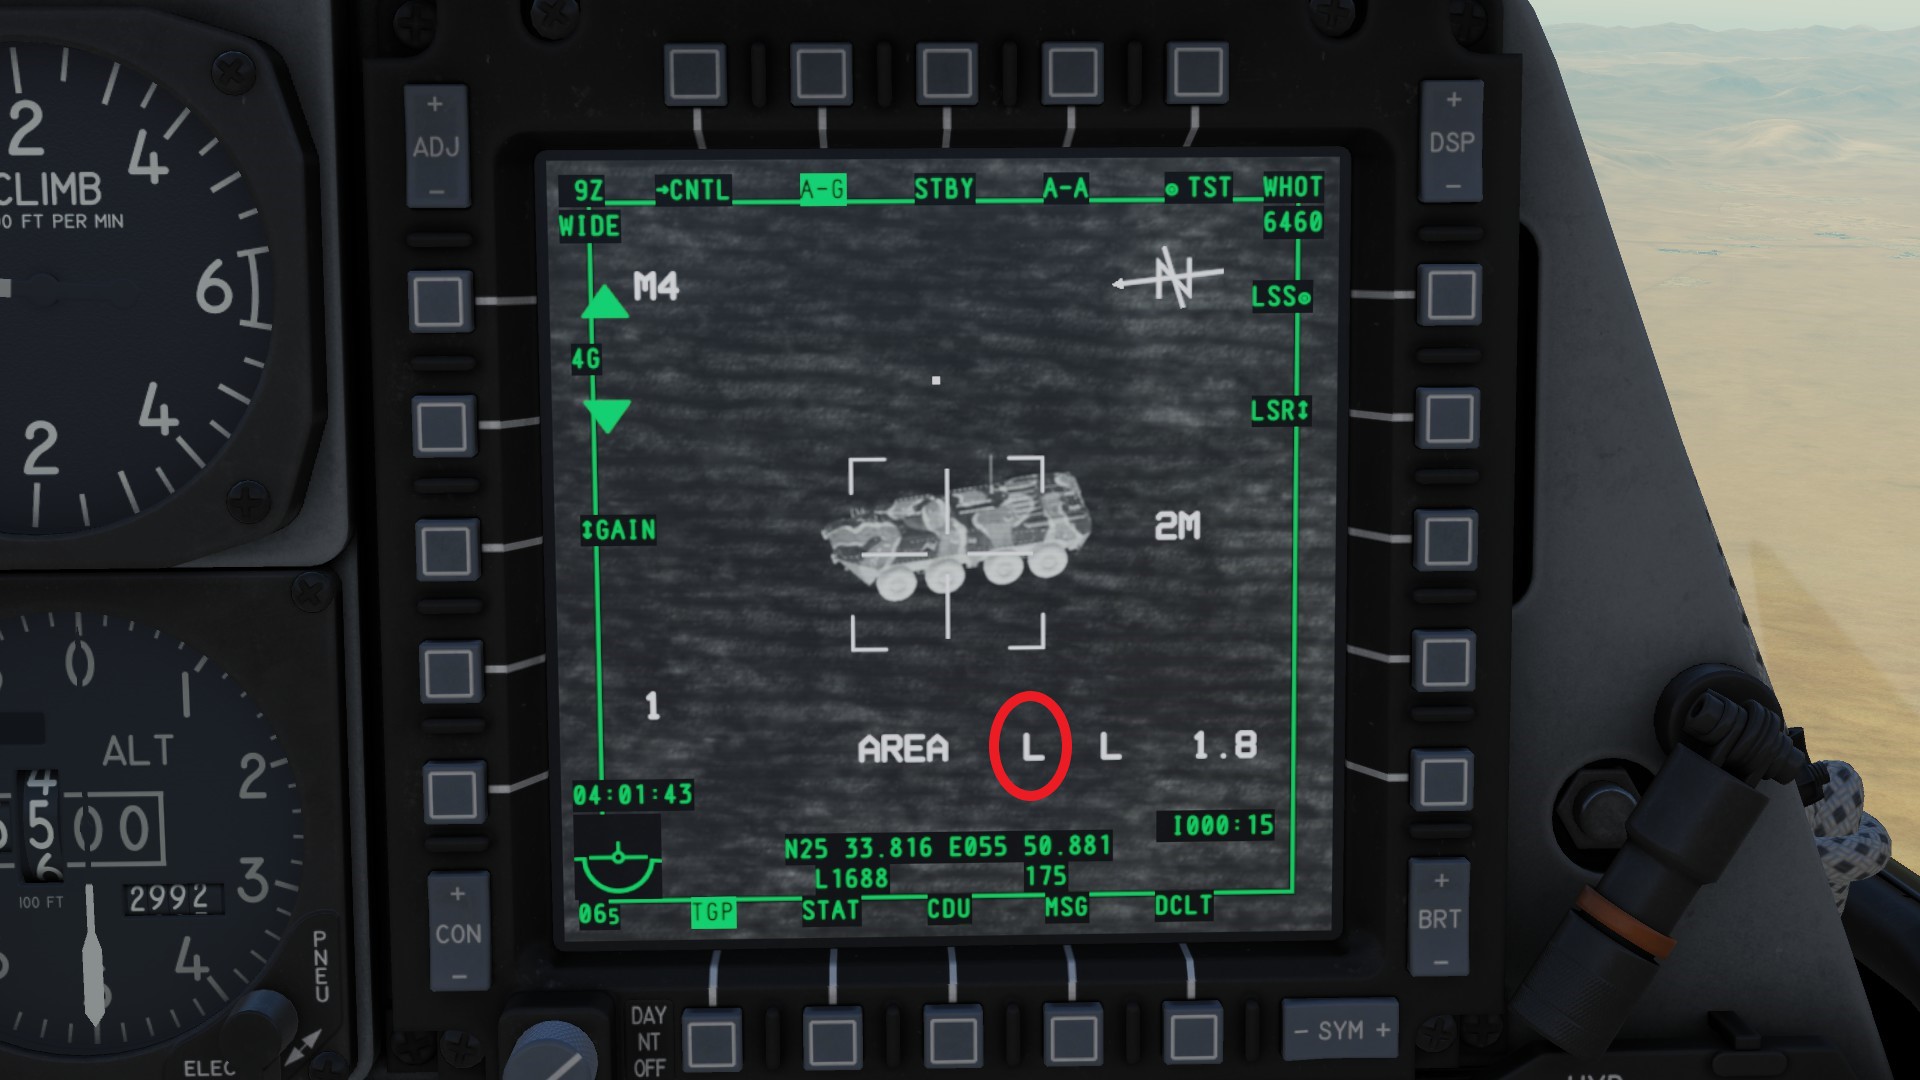
CBU-103/105
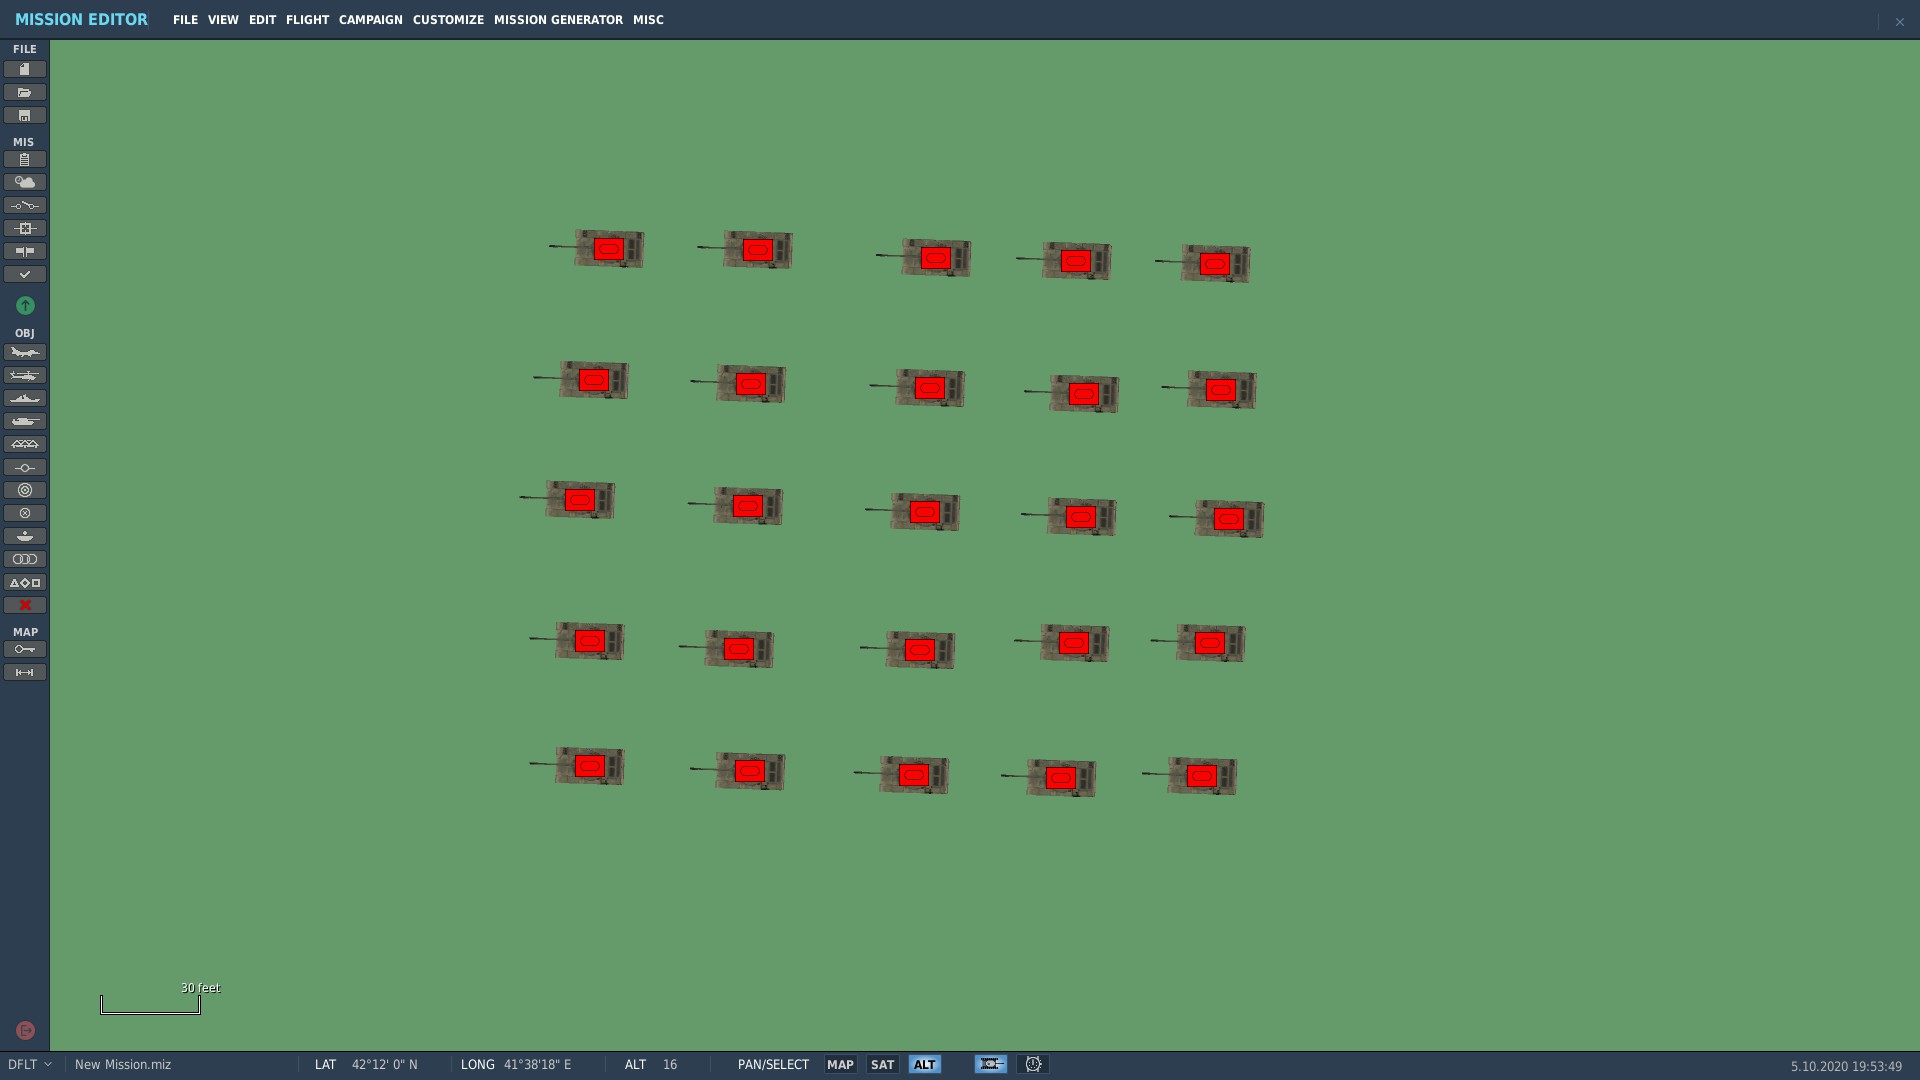
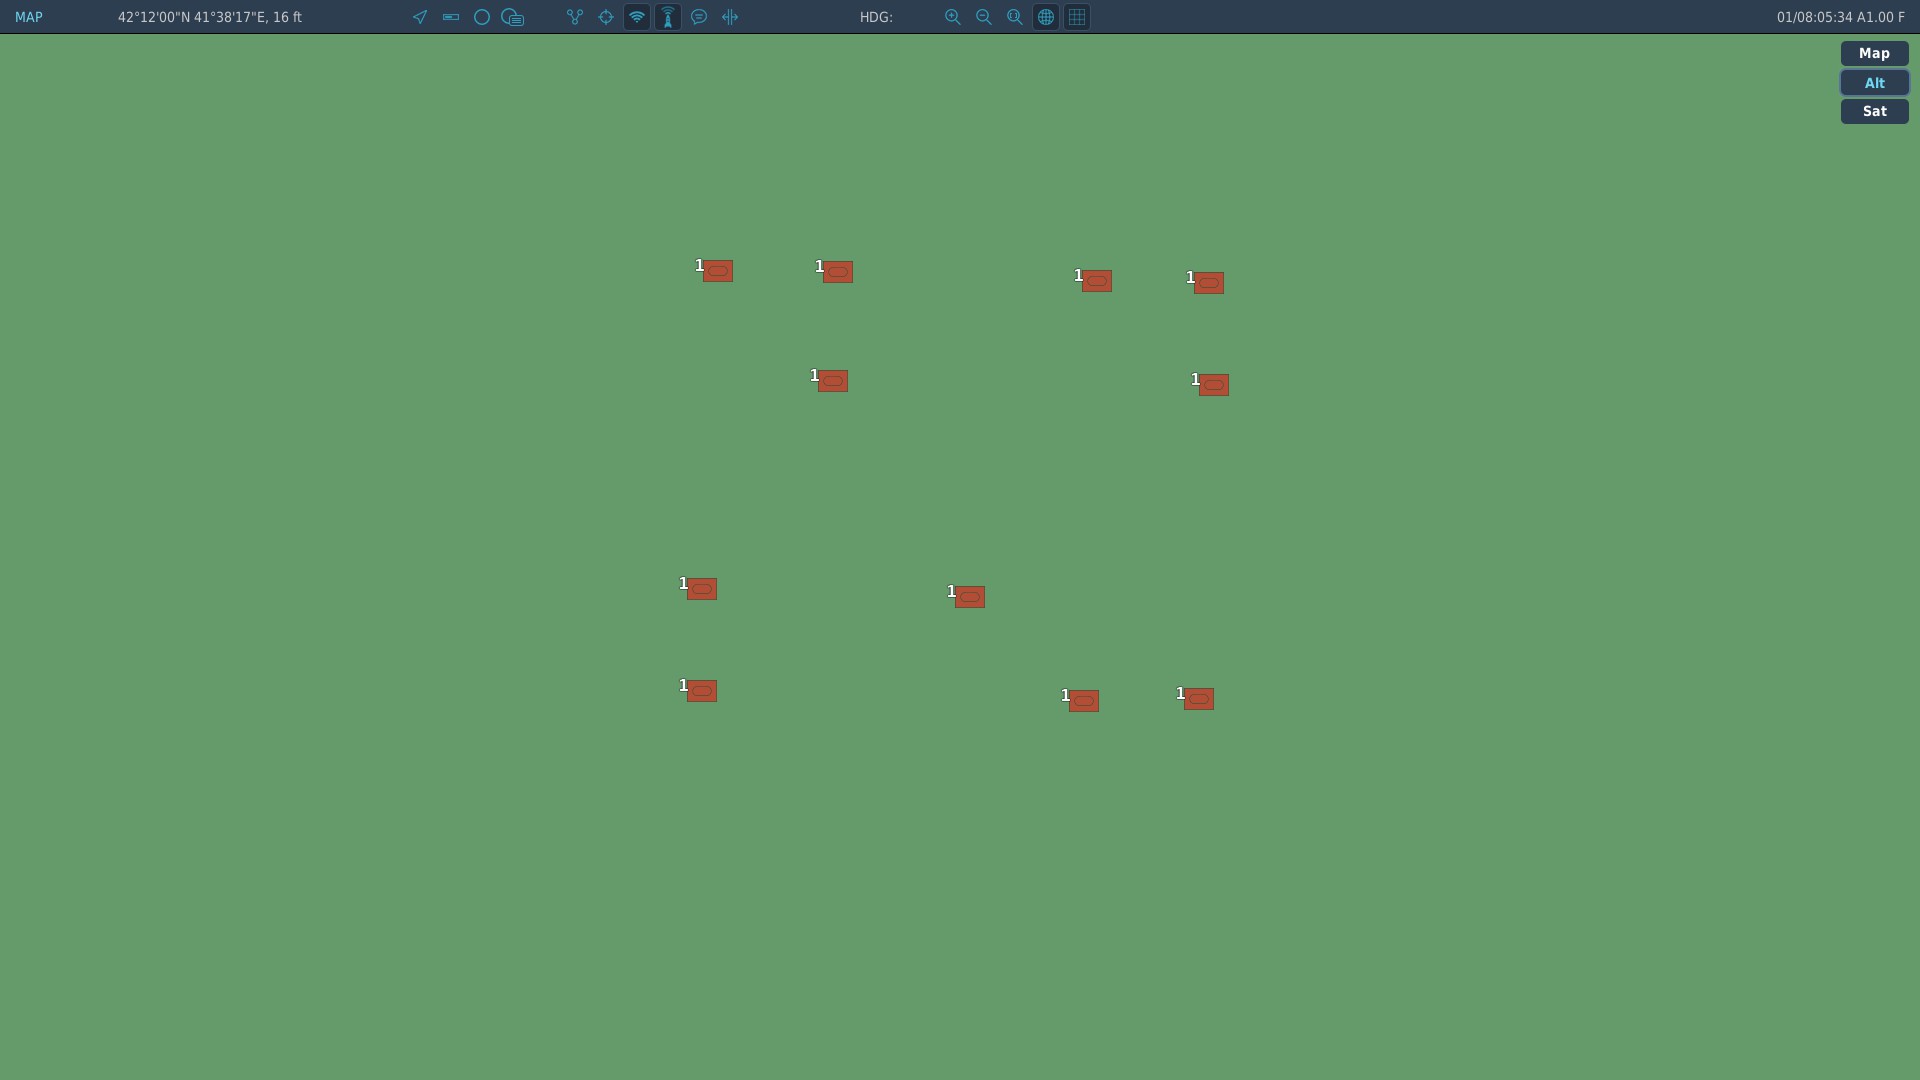 Needed controls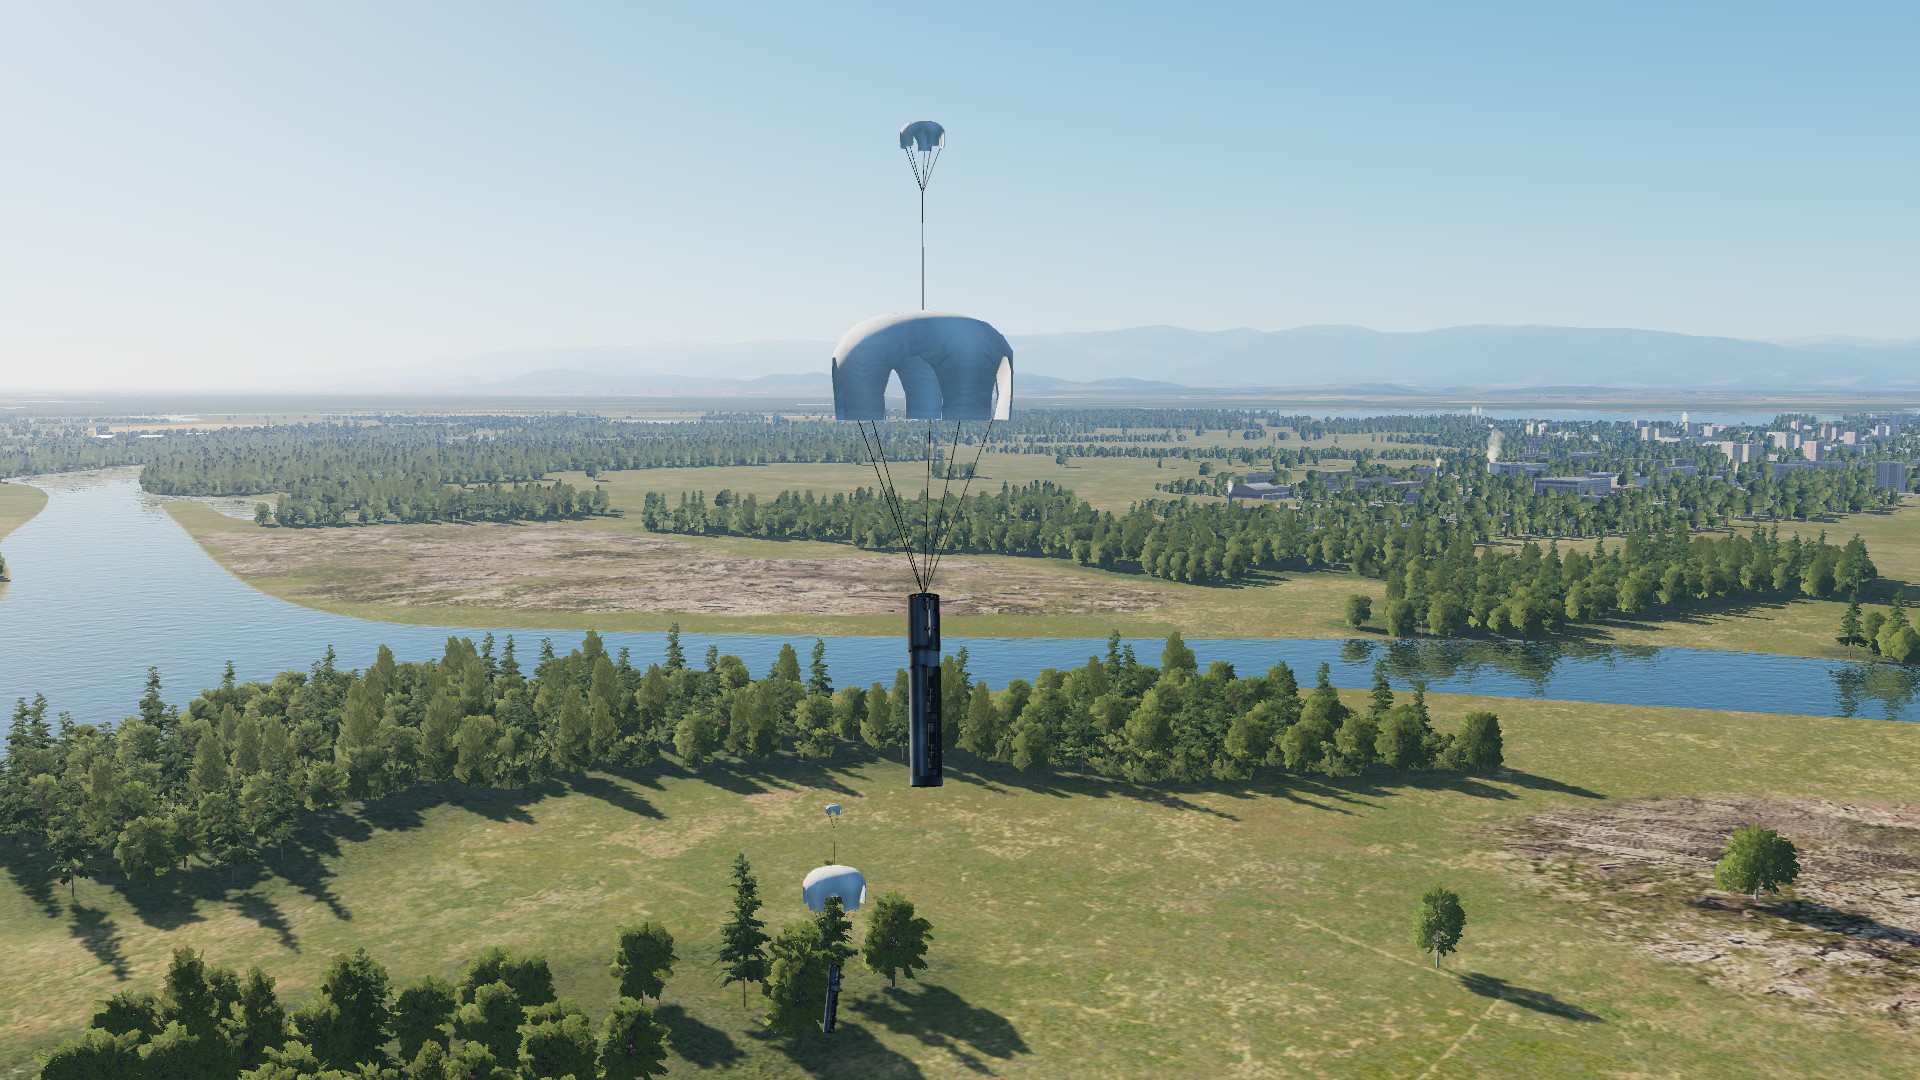
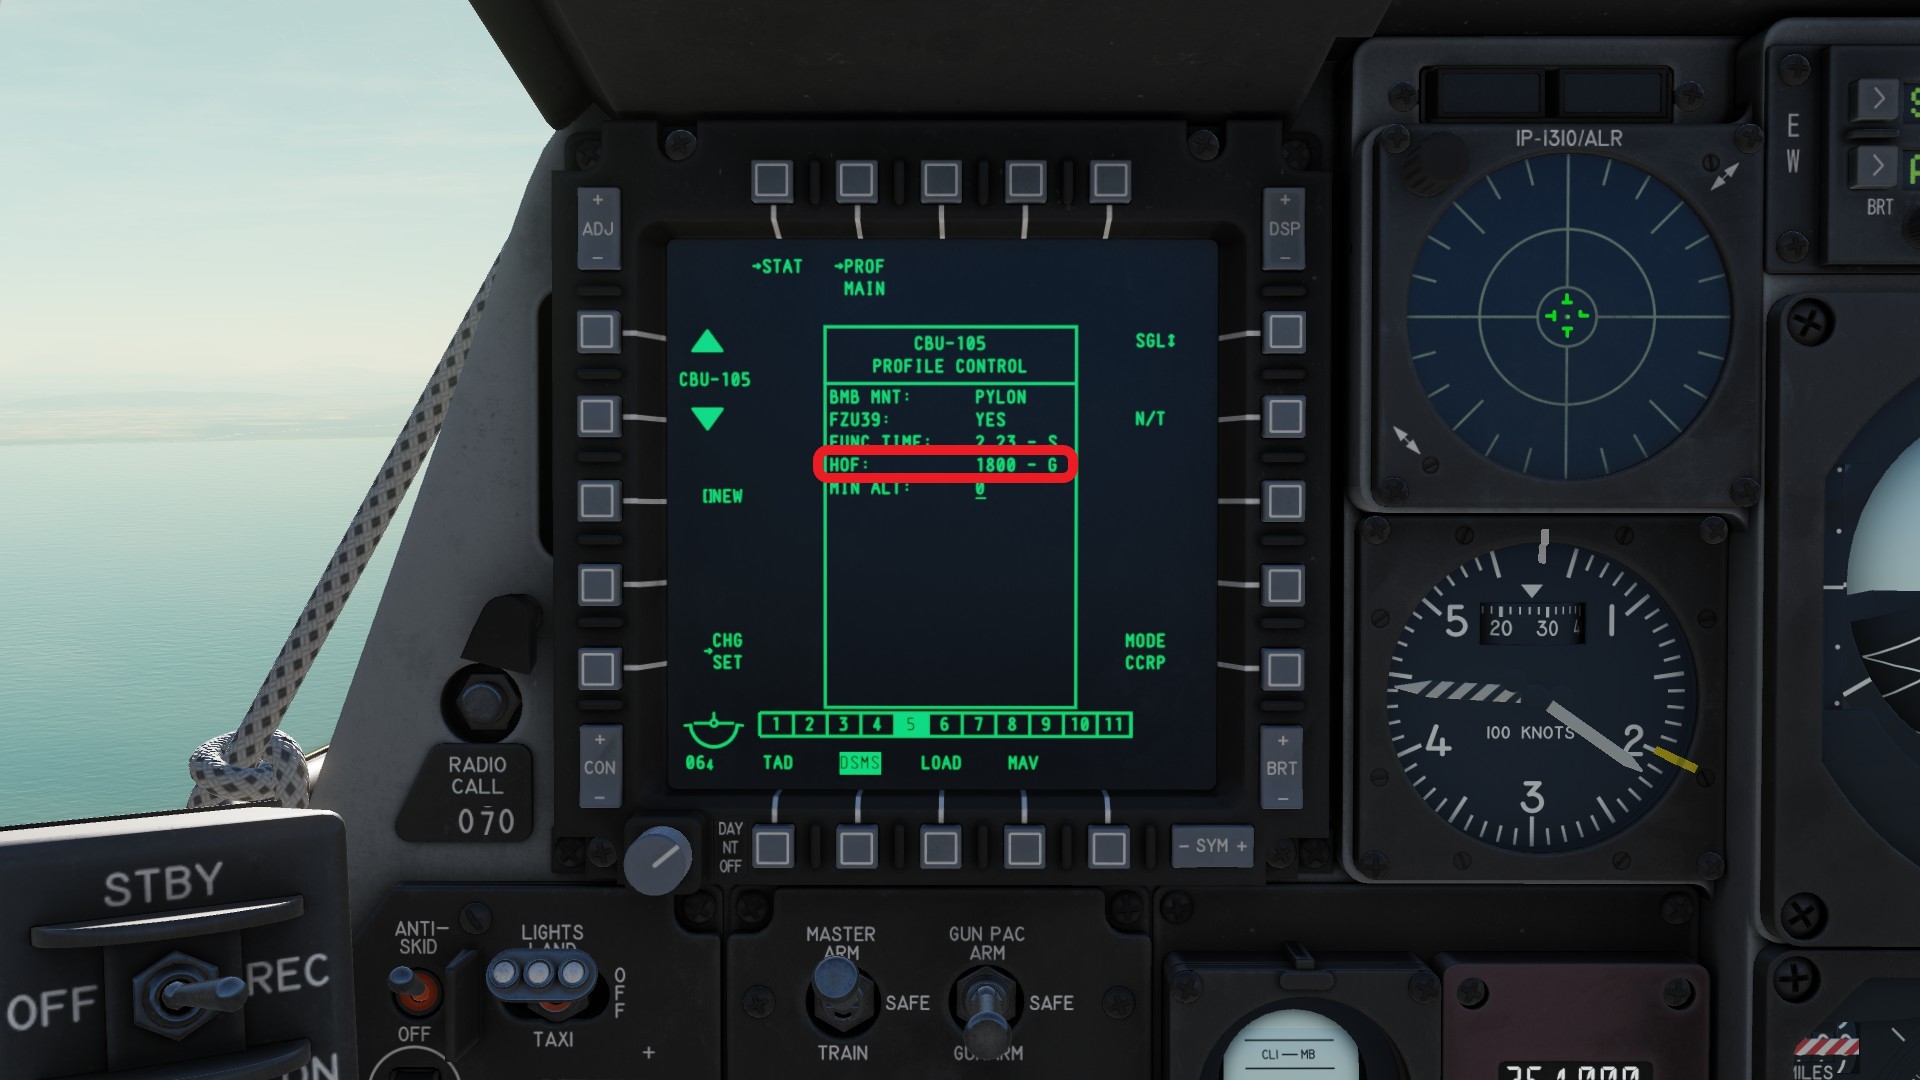
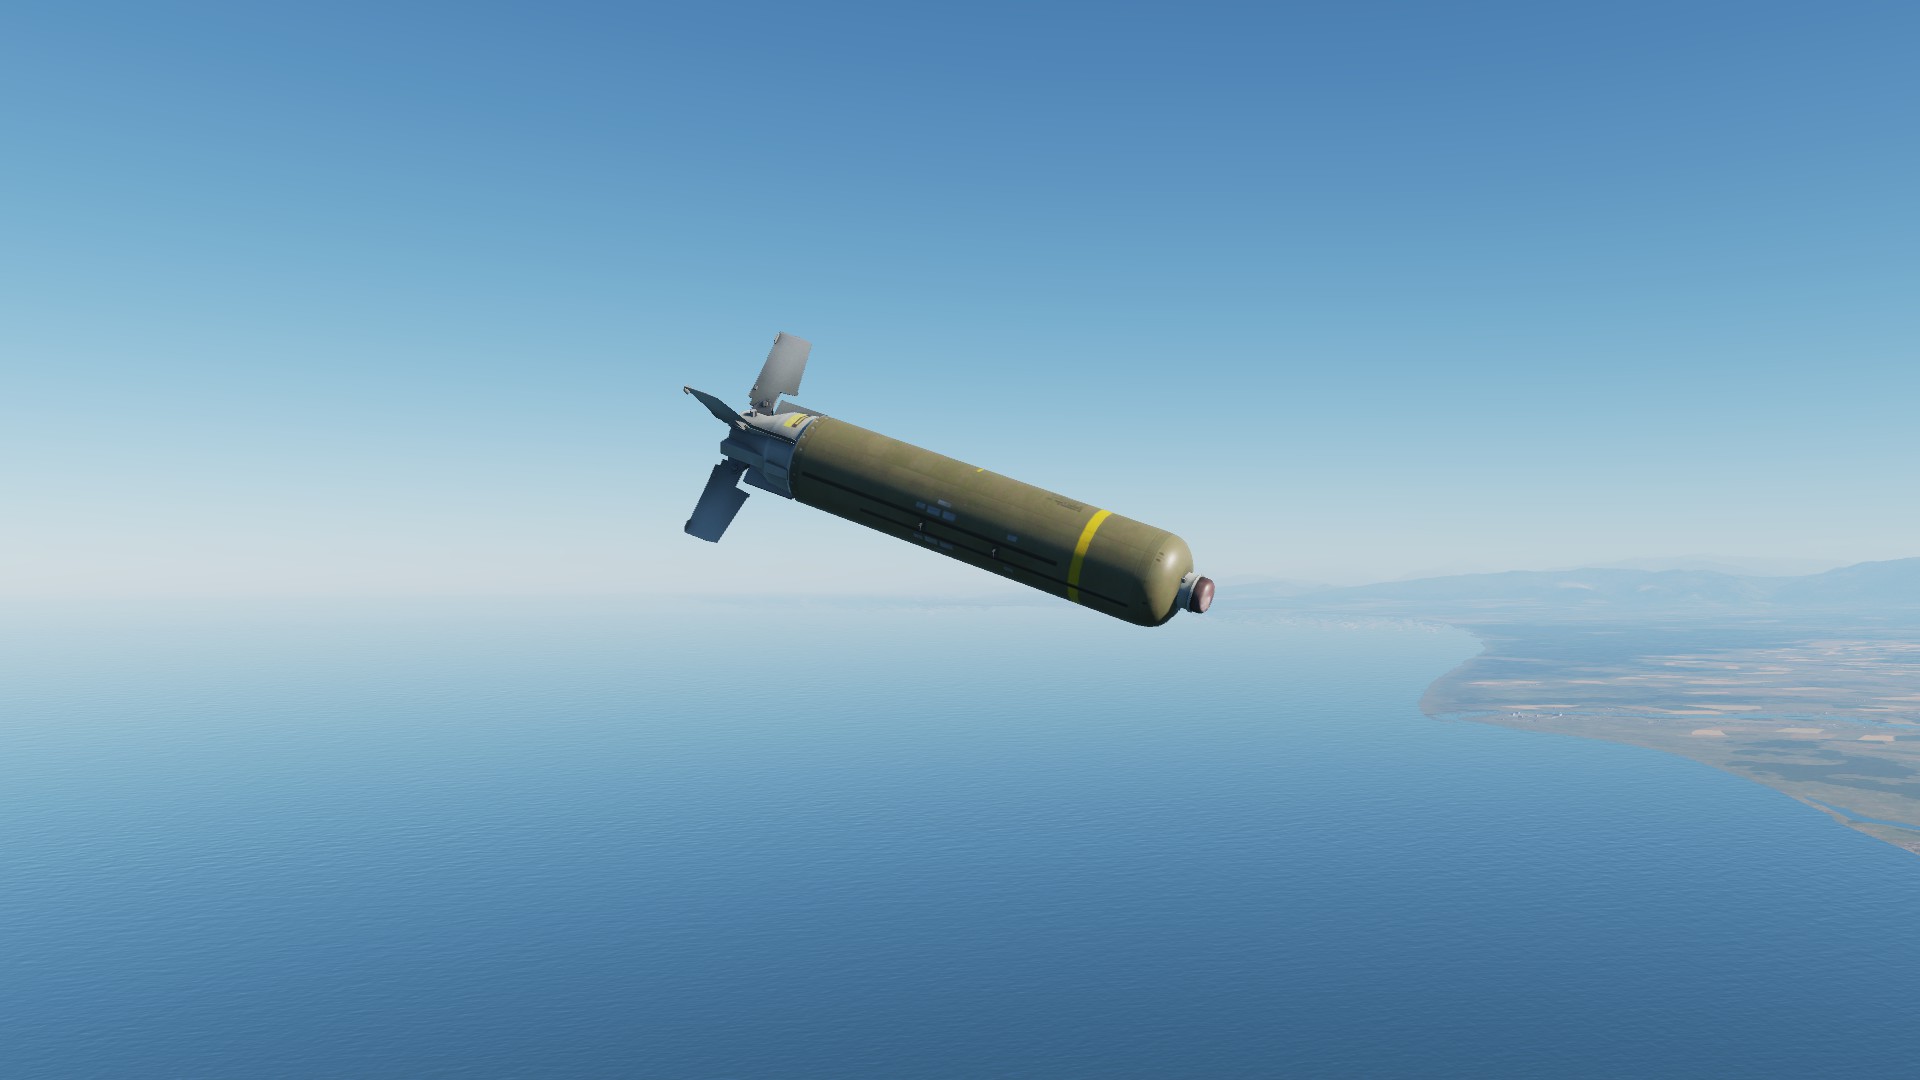 The clusterbomb can be deployed without any changes to the profile. One interesting thing however is the HOF - the hight of effect. This is the altitude where the bomb will release its submunitions. You can see it in the profile, however you have to change it via the inventory menu.
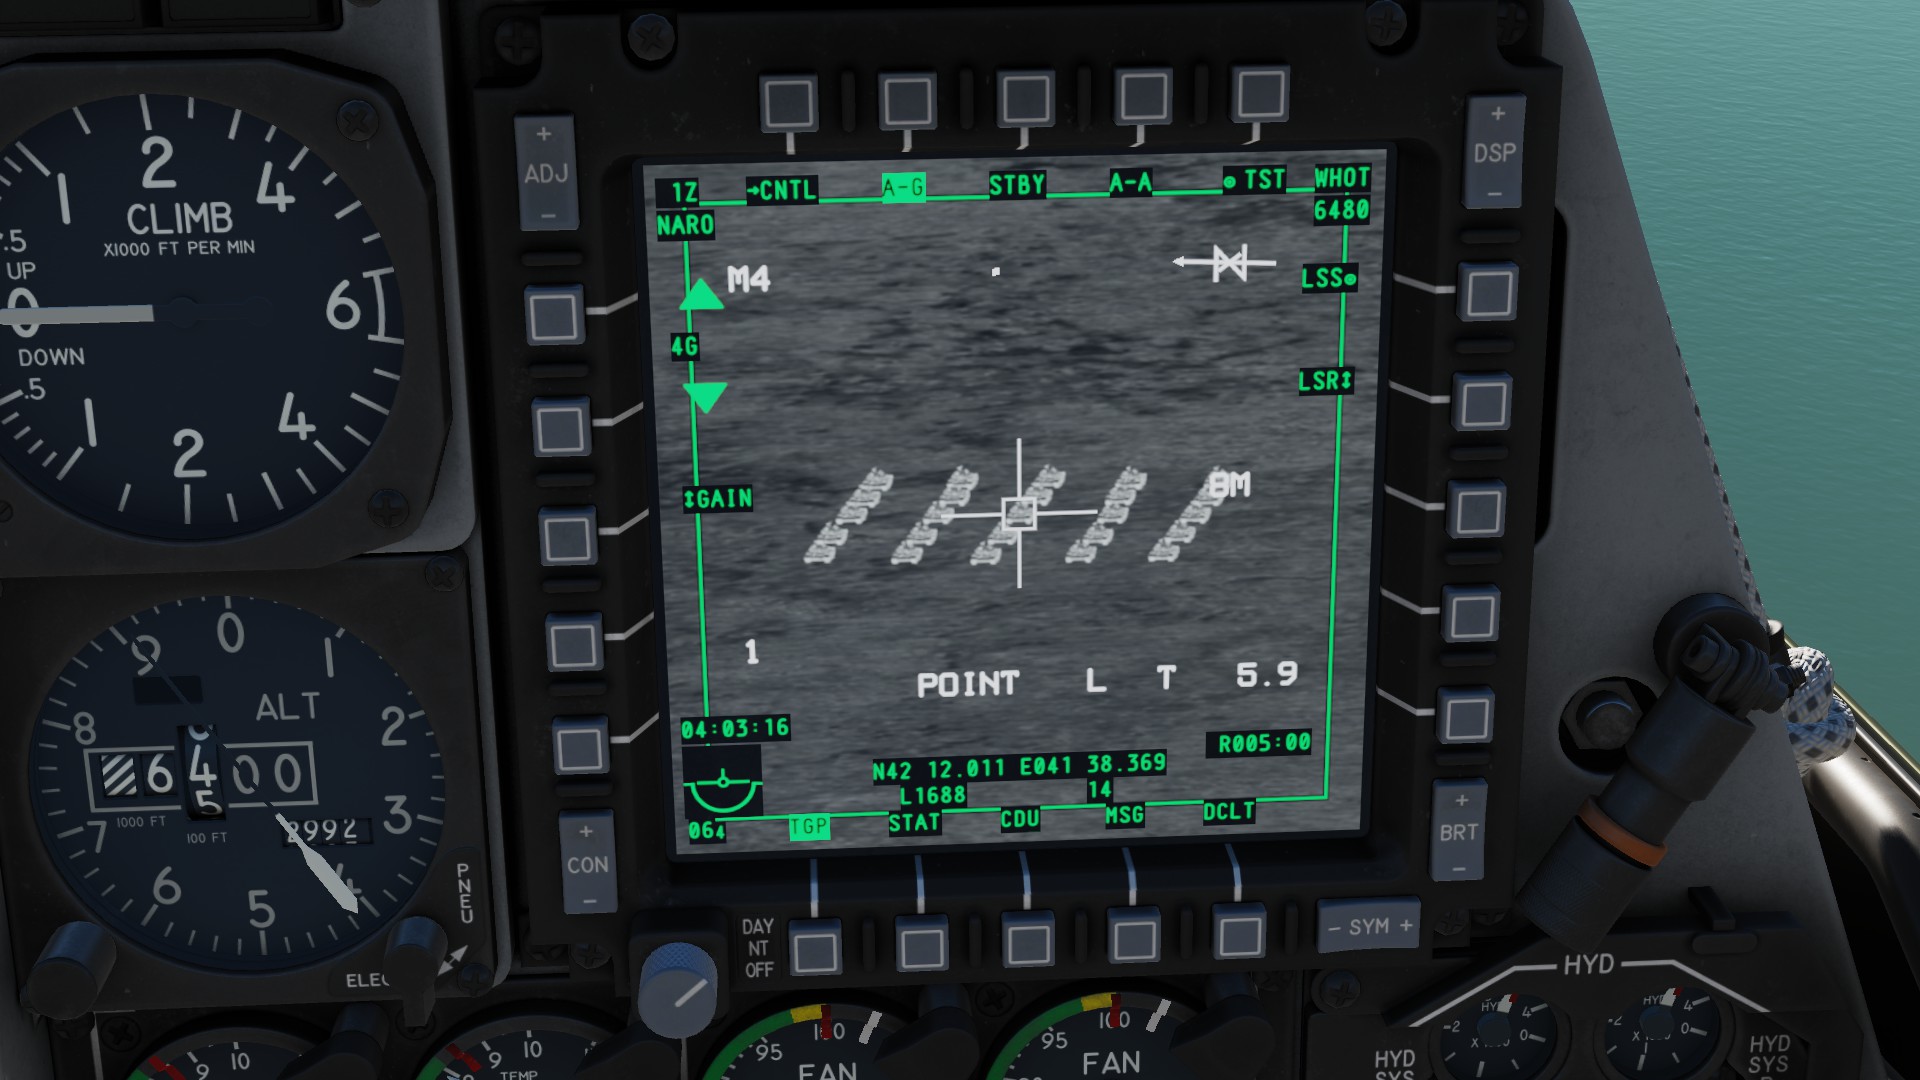
 Designate a target group with your TGP and create a SPI. If your group is big, target the center vehicle.
 Your HUD will show your standart symbology like it did with other GPS/INS weapons. Steering line (black) and dynamic launch zone (red).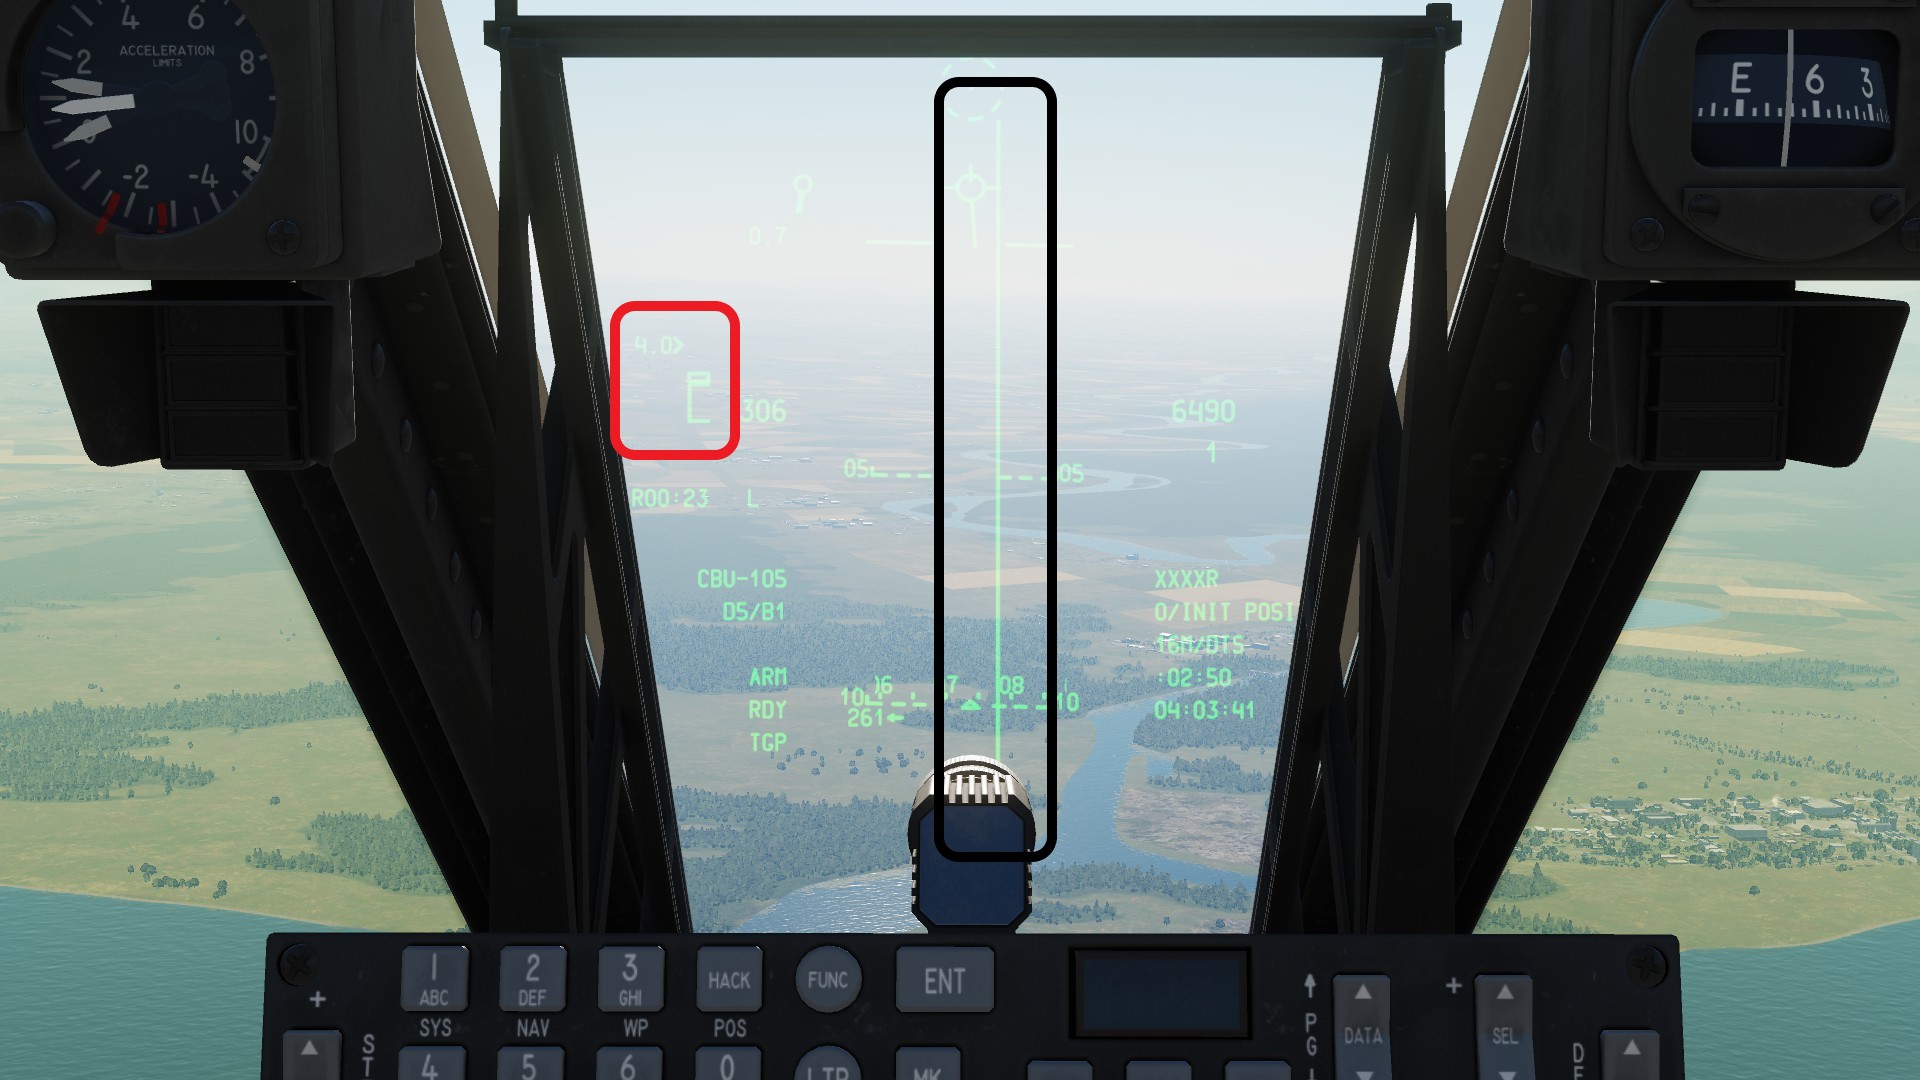
AGM-65 Maverick
The AGM-65 is a larger air to ground missile (AGM) capable of destroying any land based vehicle in a single hit. The missile has (in theory) a range of around 12nmi. However this is mostly limited, since you cannot fire the weapon without a good lock, which will usually be achieved around 6-9 nautical miles from the target (depending on the version). All Mavericks exept the L model are "fire and forget" weapons. Once theyre launched, they are destroying the target without relying on external help, making them probally the best choice against dangerous targets such as SAMs. In addition, the G, H and K versions can use a "Force correlation track", meaning that they can be fired at targets that are not considered a valid target by the missile such as buildings, roads, bridges or even just the ground. The L Maverick - of course - just goes where the laser guides it to. The Maverick can track moving targets.
Here is a small overview of the different AGM-65 models avaiable to the A10c II.
Bossfight against Jamsheed the RPG god.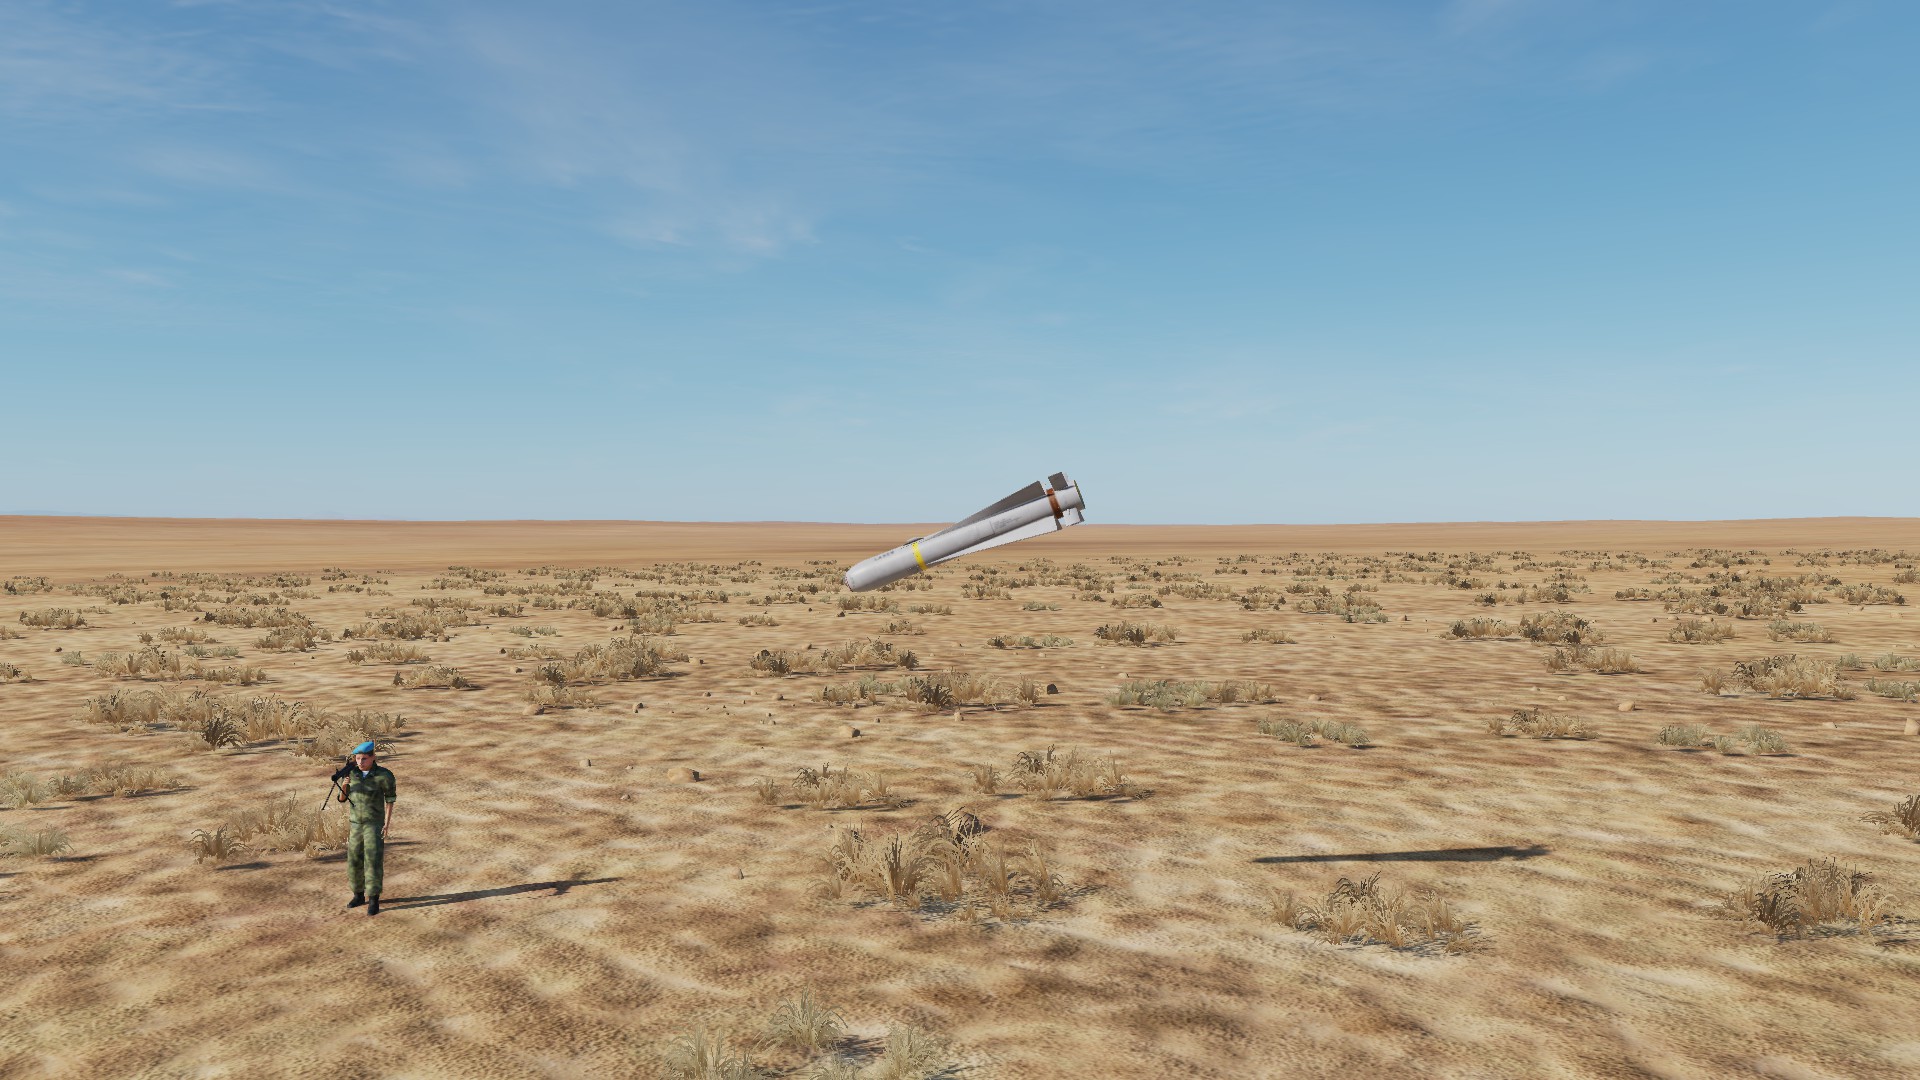 Needed controls
The AGM-65s have no important profile settings. The L however needs a laser code.
H/K/G/D models
These models are operated the same, since they all rely on a camera to lock their target.
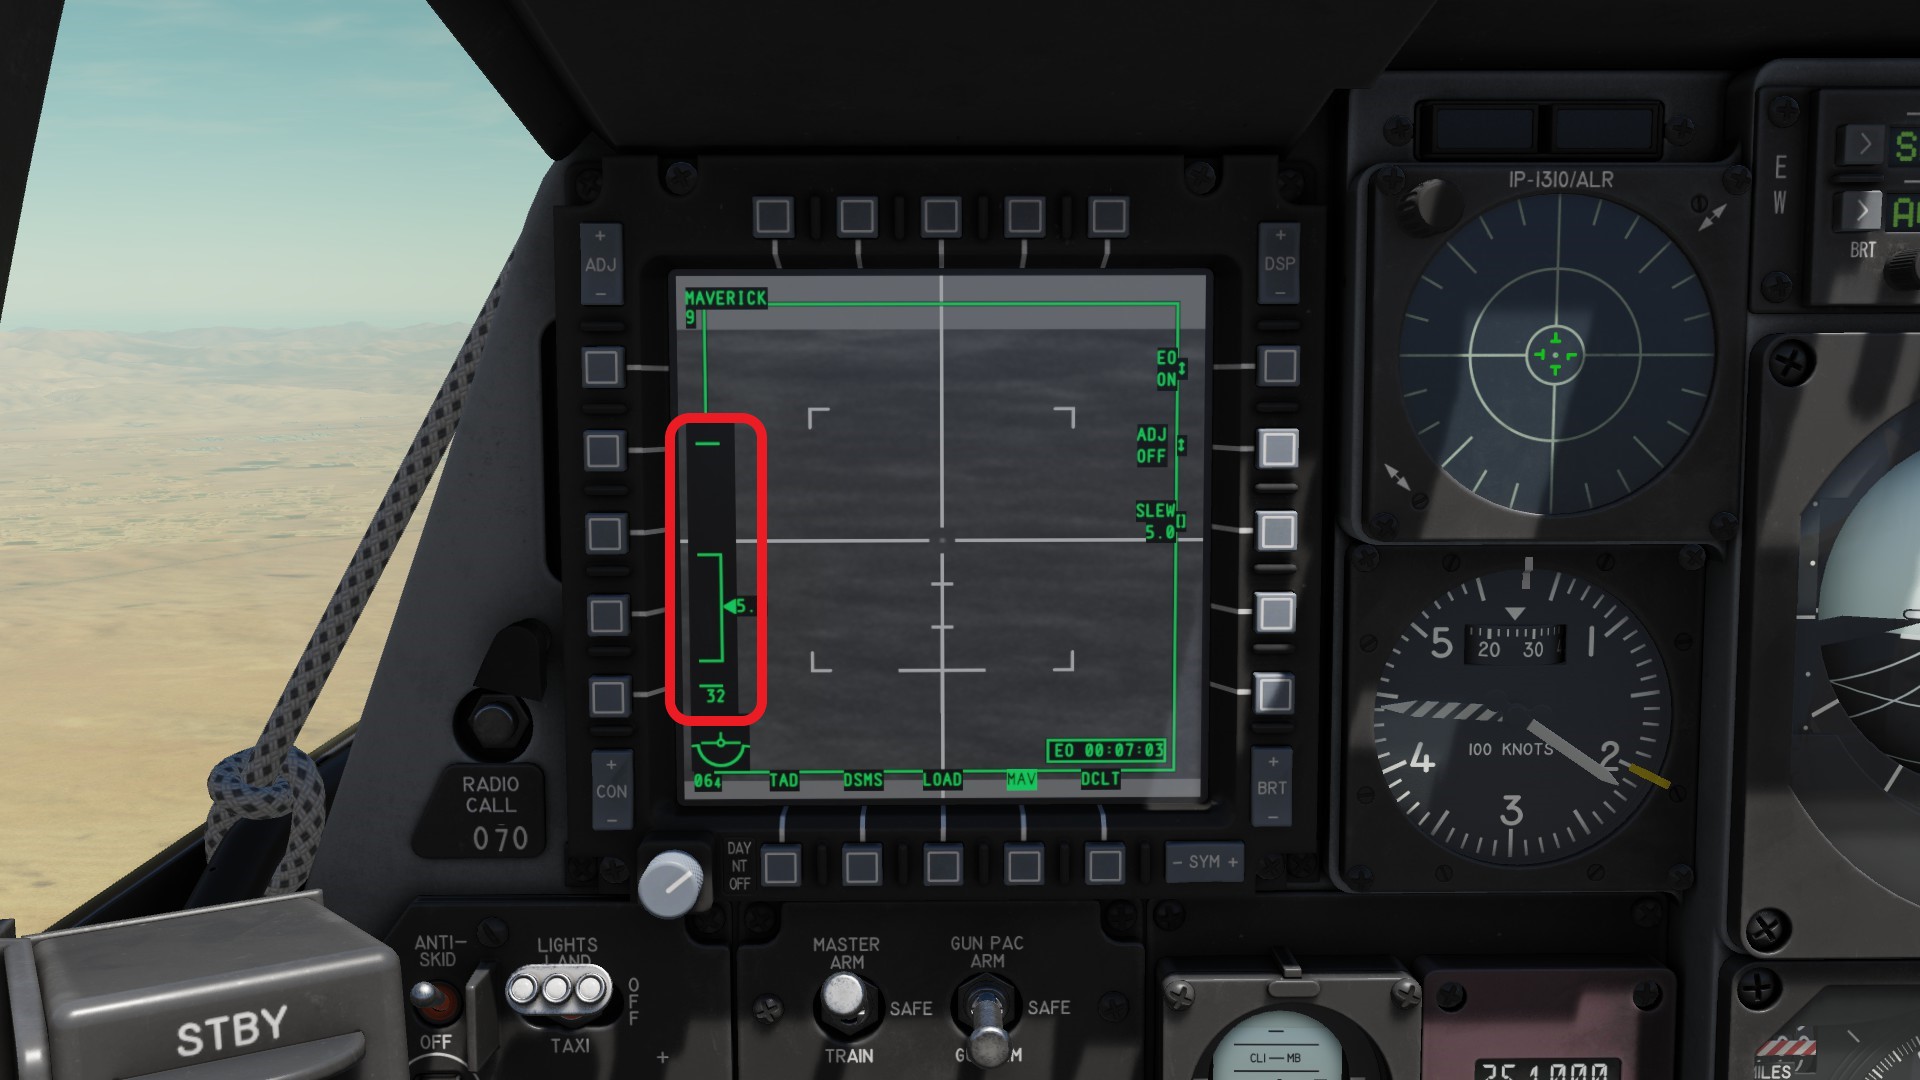
First you need to warm up your mavericks by going on the MAV page on your left MFCD (blue) and press the EO ON (red).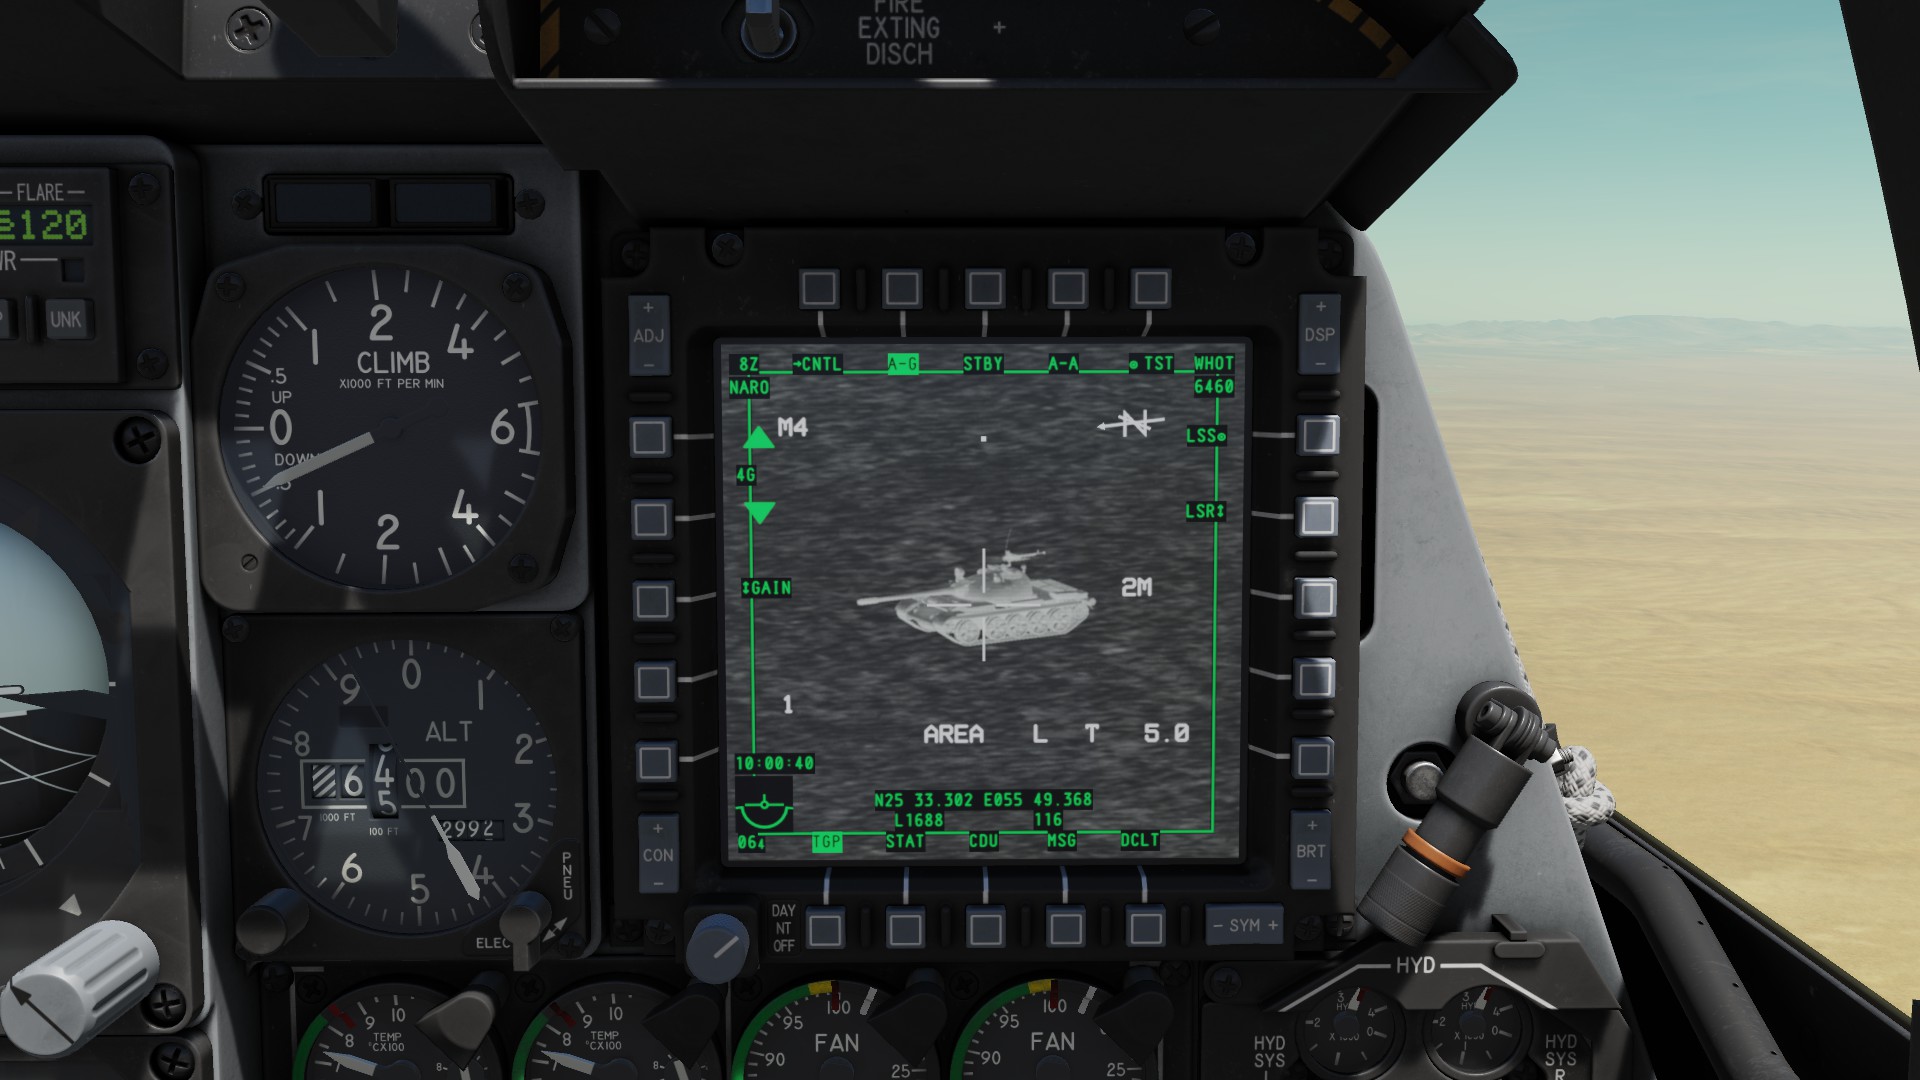 Select the maverick model you wish to fire and go to the MAV page (red).
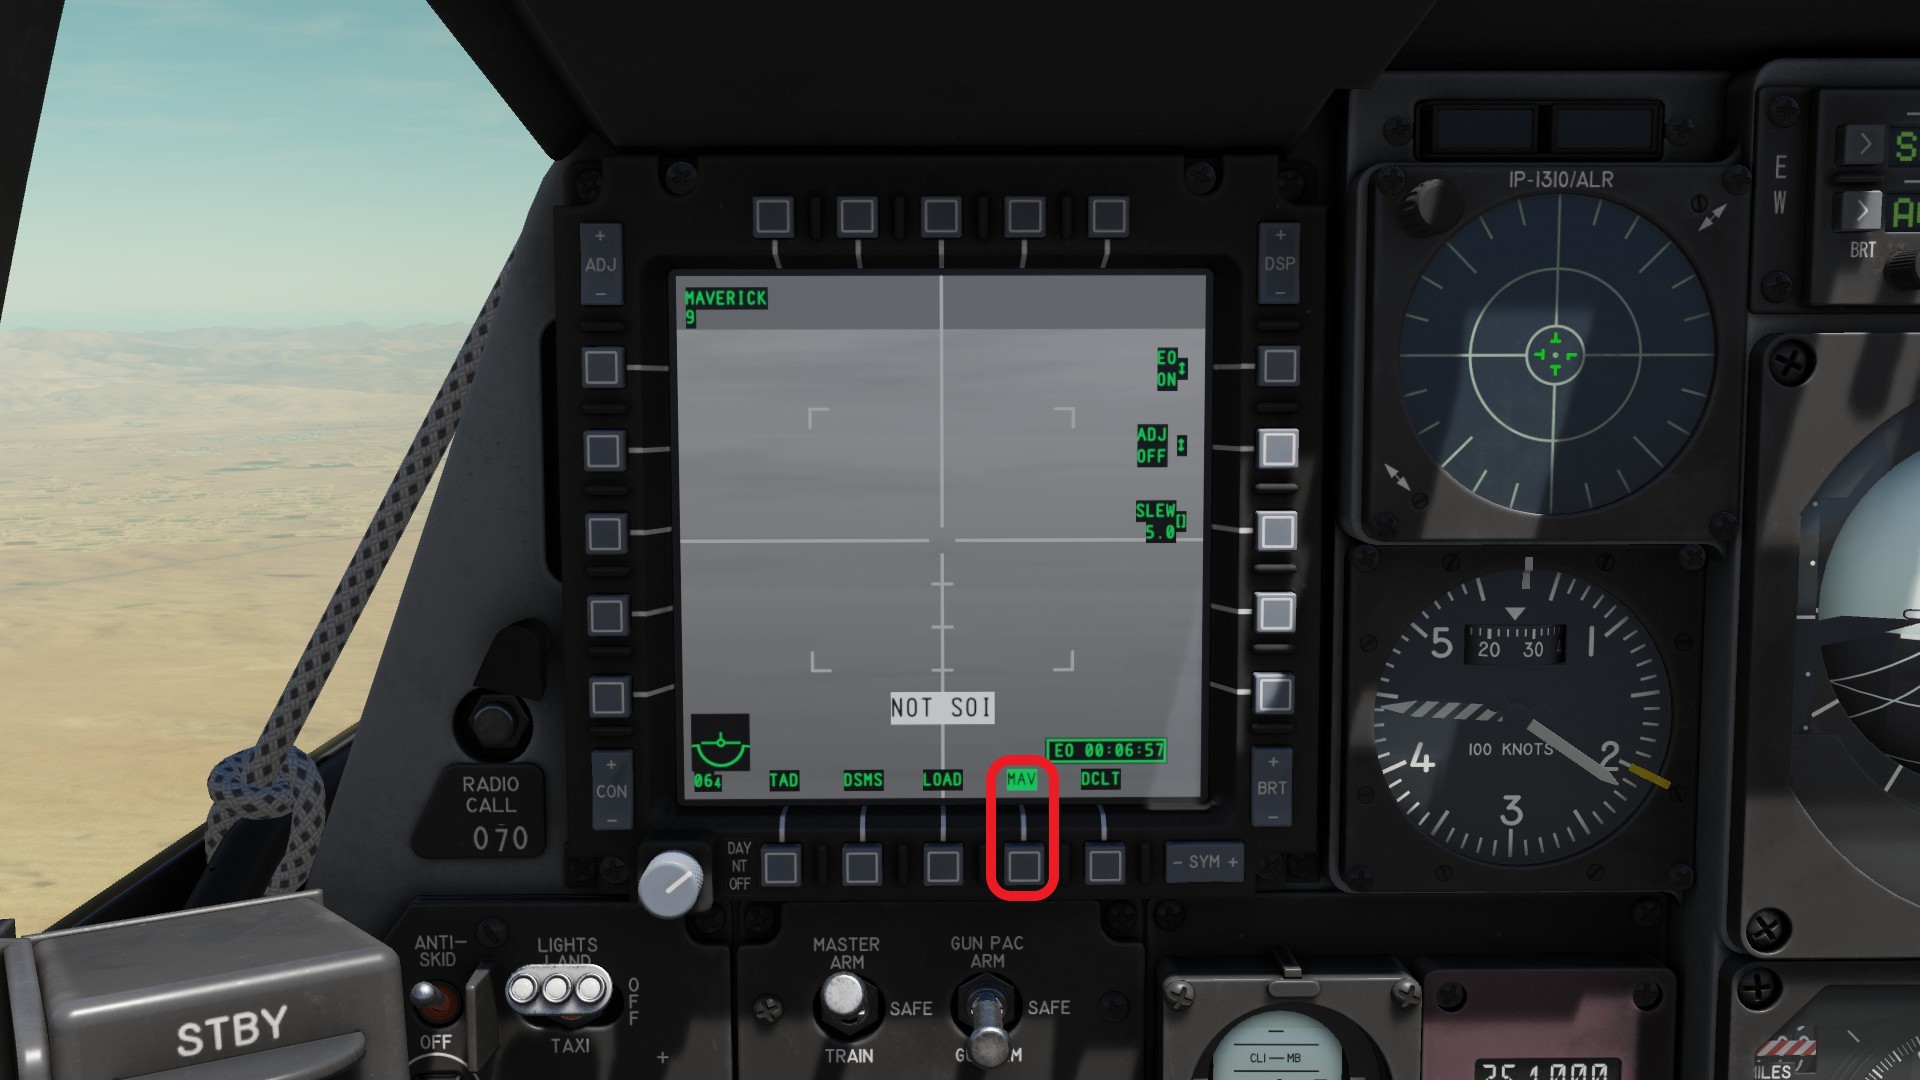 Make it SOI (HOTAS ♥♥♥♥♥♥ Switch Left / Right long) and press HOTAS China Hat Forward long to slave the mavericks camera to the SPI you just created. You can change the FOV of the Mav with HOTAS China Hat Forward short. On the left you will see the dynamic launch zone (red) indicating if you are in range.
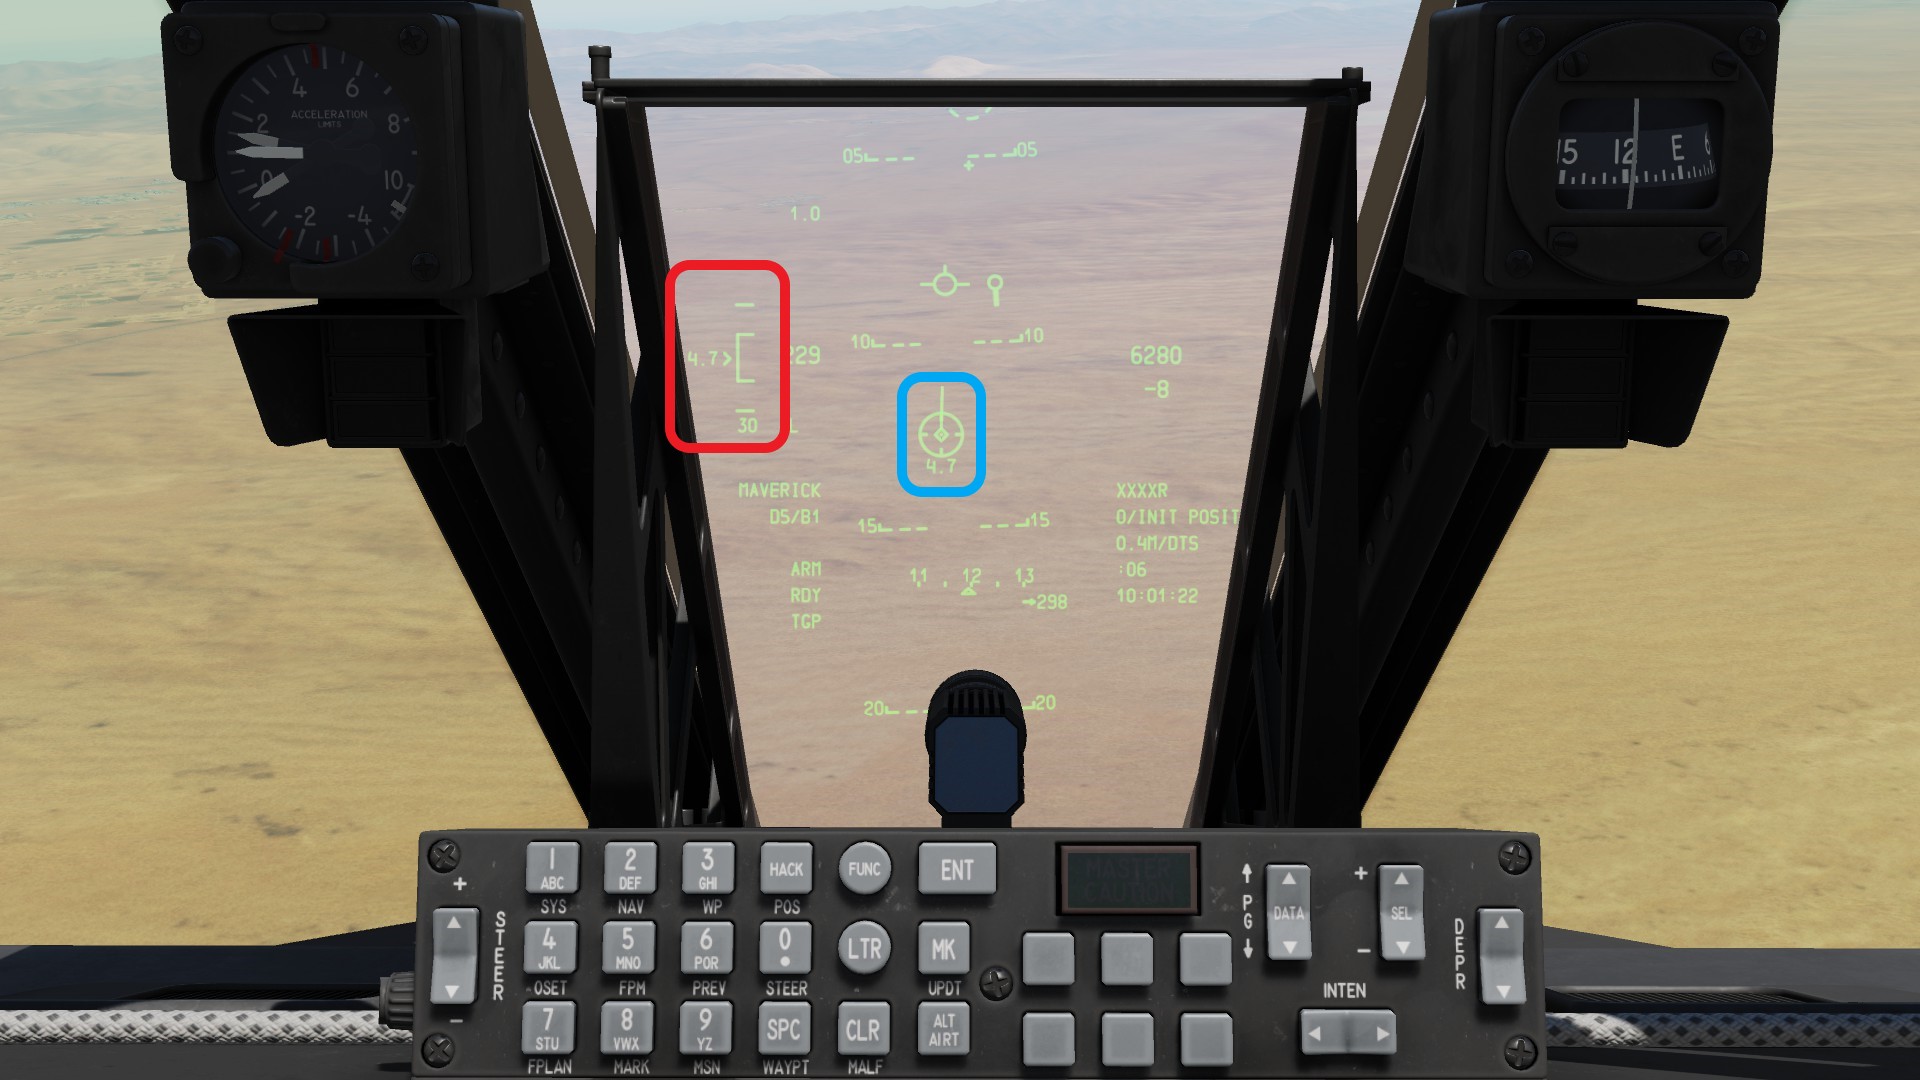
 Your HUD will also show different symbology. On the left, the dynamic launch zone will be repeated (red). The wagon wheel (blue) shows where the mavericks seeker is looking at. Under the wagon wheel you see the distance between you and the target.
 If you press HOTAS TMS Forward short with the MAV page SOI, you will get a lock - if the seeker detects the target of course. If the target is locked, the tracking gate will collapse (red). You can fire with weapon release.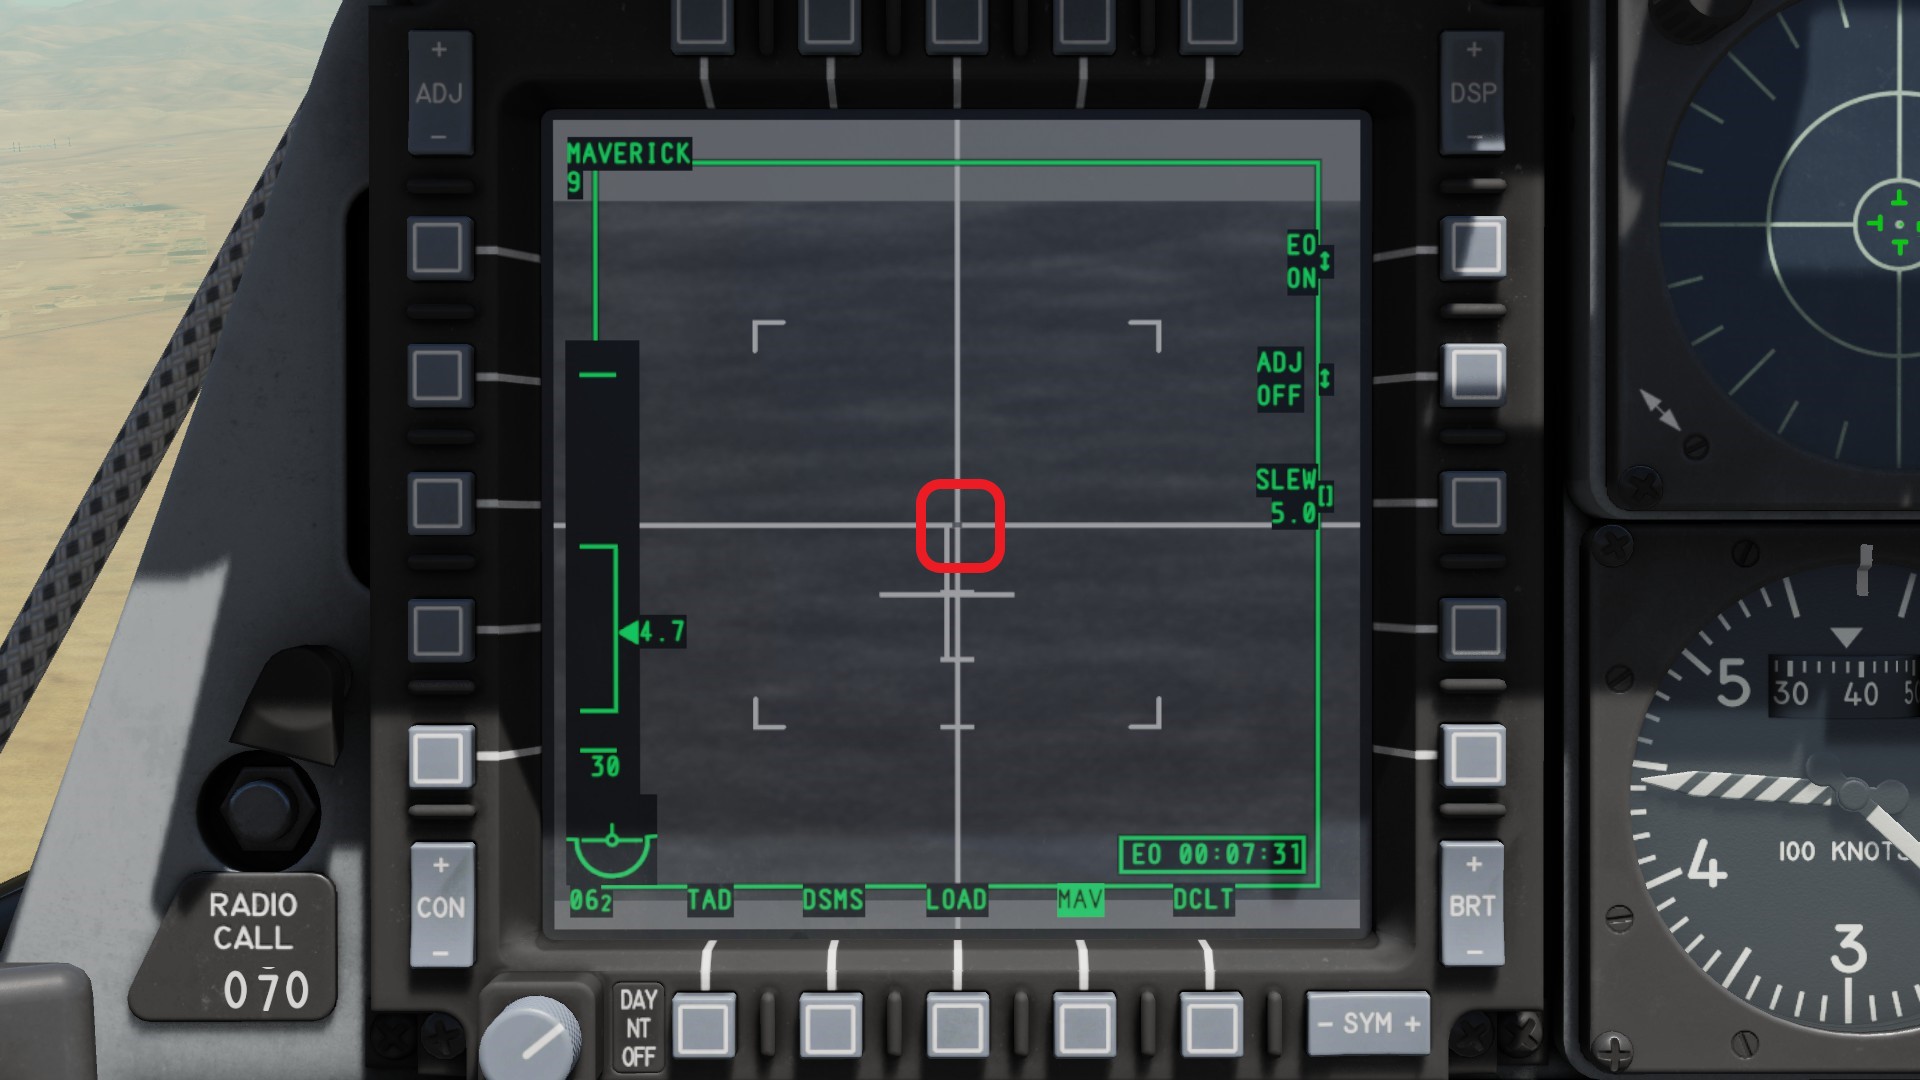
Note: Sometimes - if too many targets are close to each other - the seeker will lock to a different target than you want it to. You can sometimes work around that by setting your Mavericks FOV to narrow.
Force correlation
Force correlation allows the AGM-65 G / H / K to lock to things that are not considered a valid target, for example a bridge.
First find a target (here illegal campers in the desert) and set a SPI.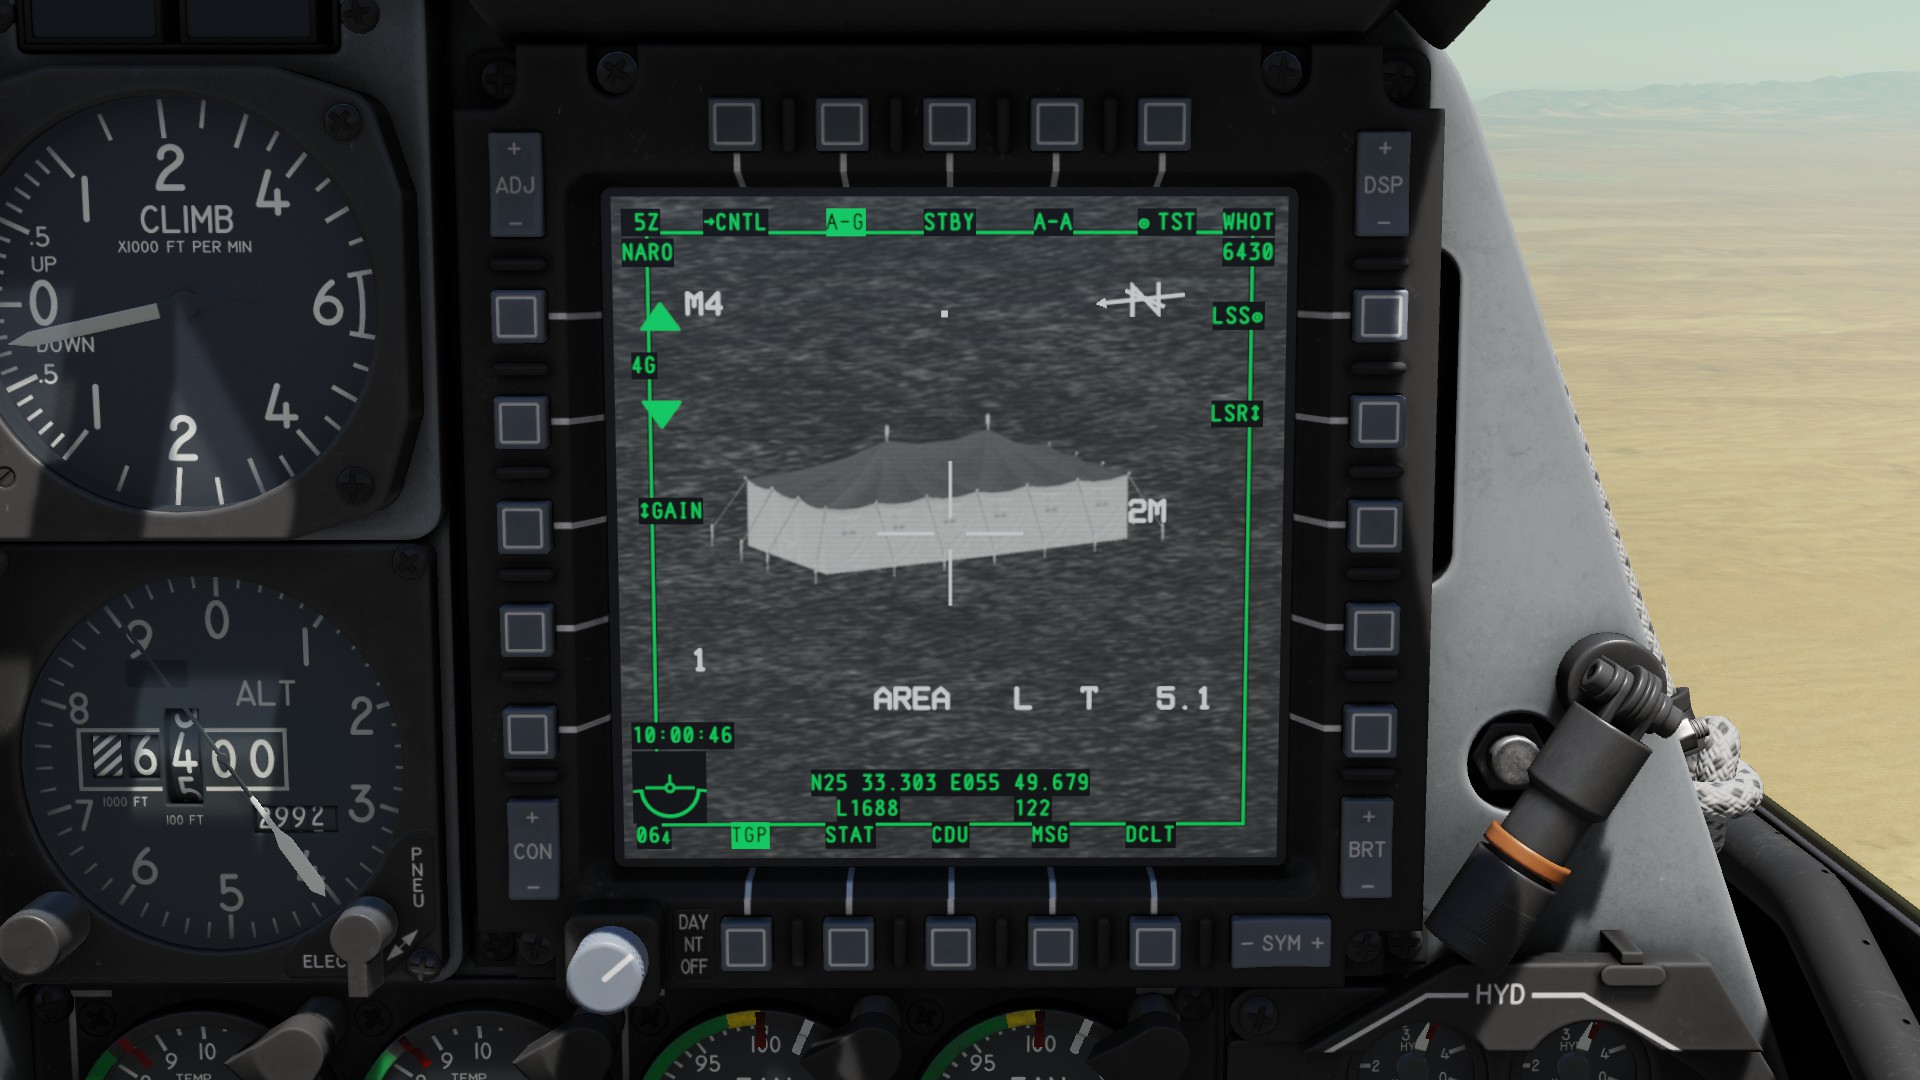 Slave you Mav to the SPI. Now press HOTAS Boat Switch Center short to set the Mav to force correlation.
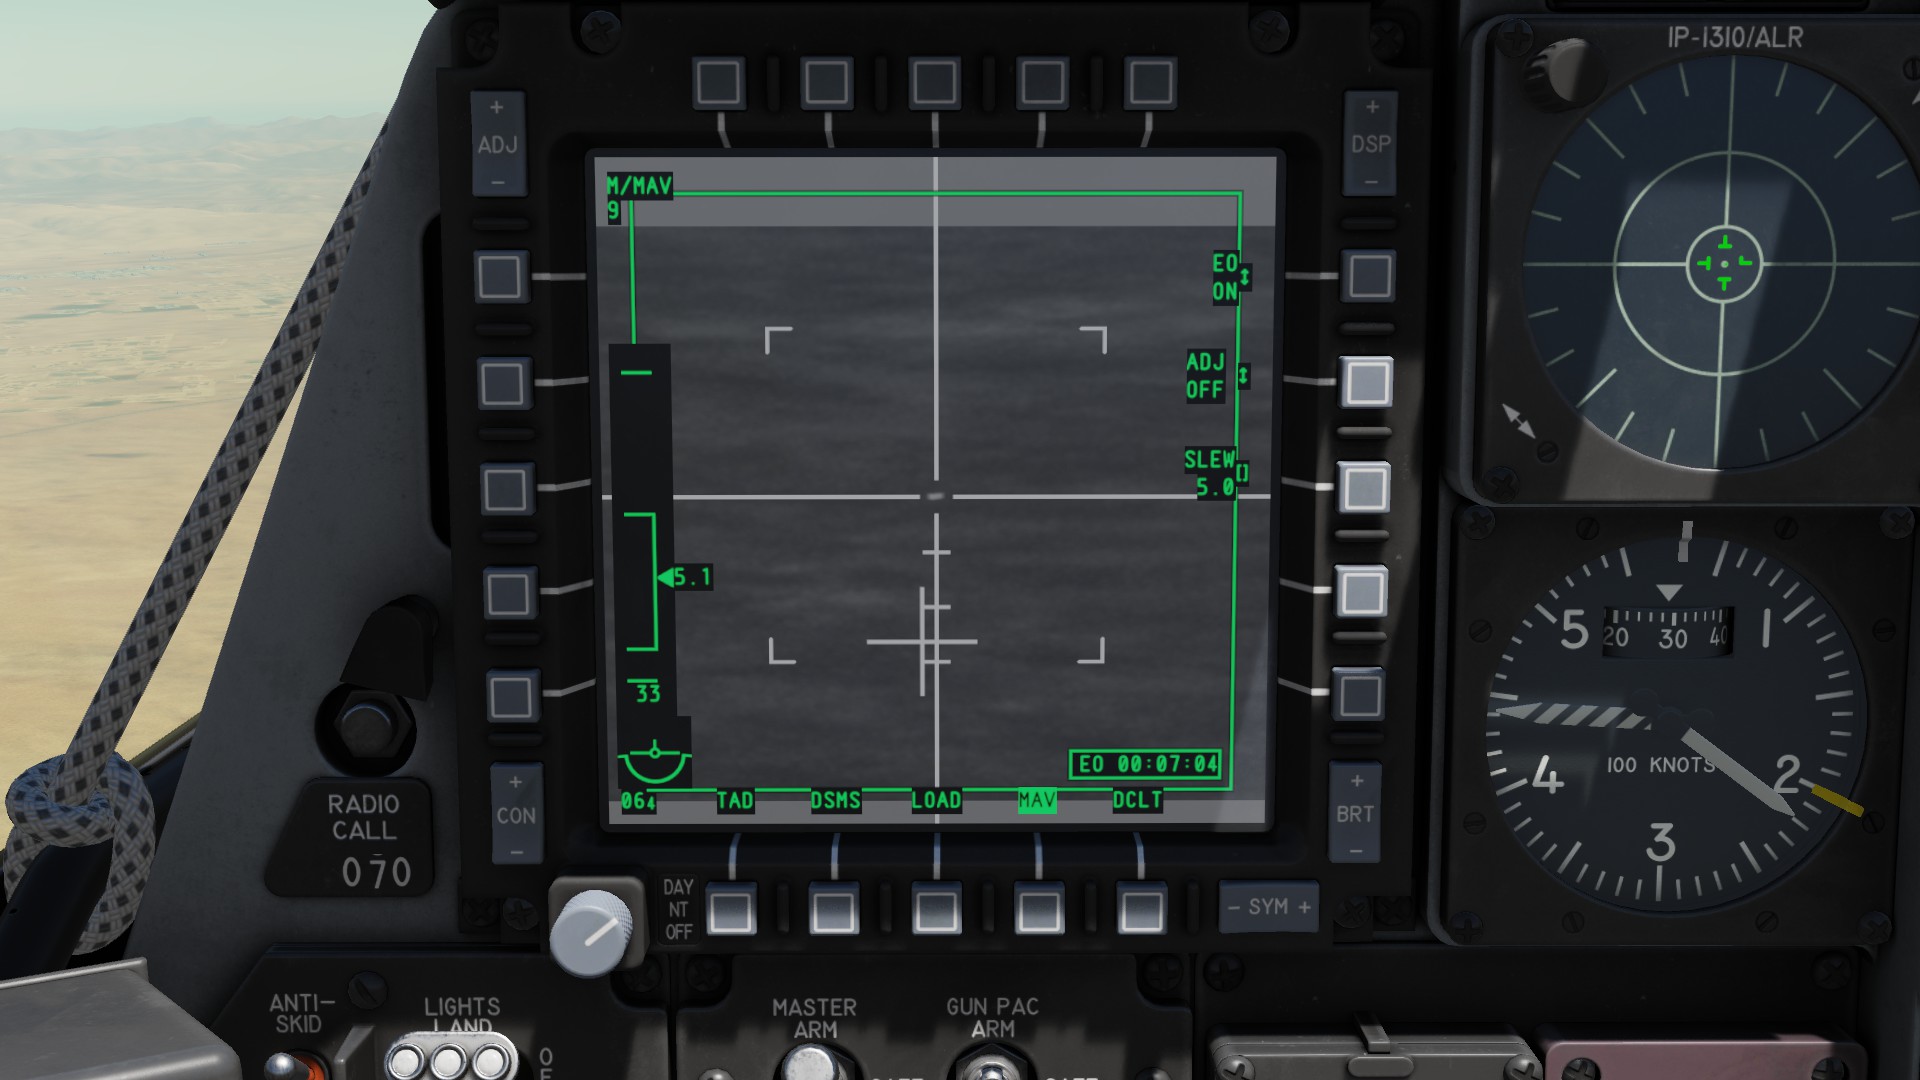 "Wiggle" the camera around with the HOTAS Slew controls. You will see that the tracking gate will now collapse even if youre not locking a valid target.
 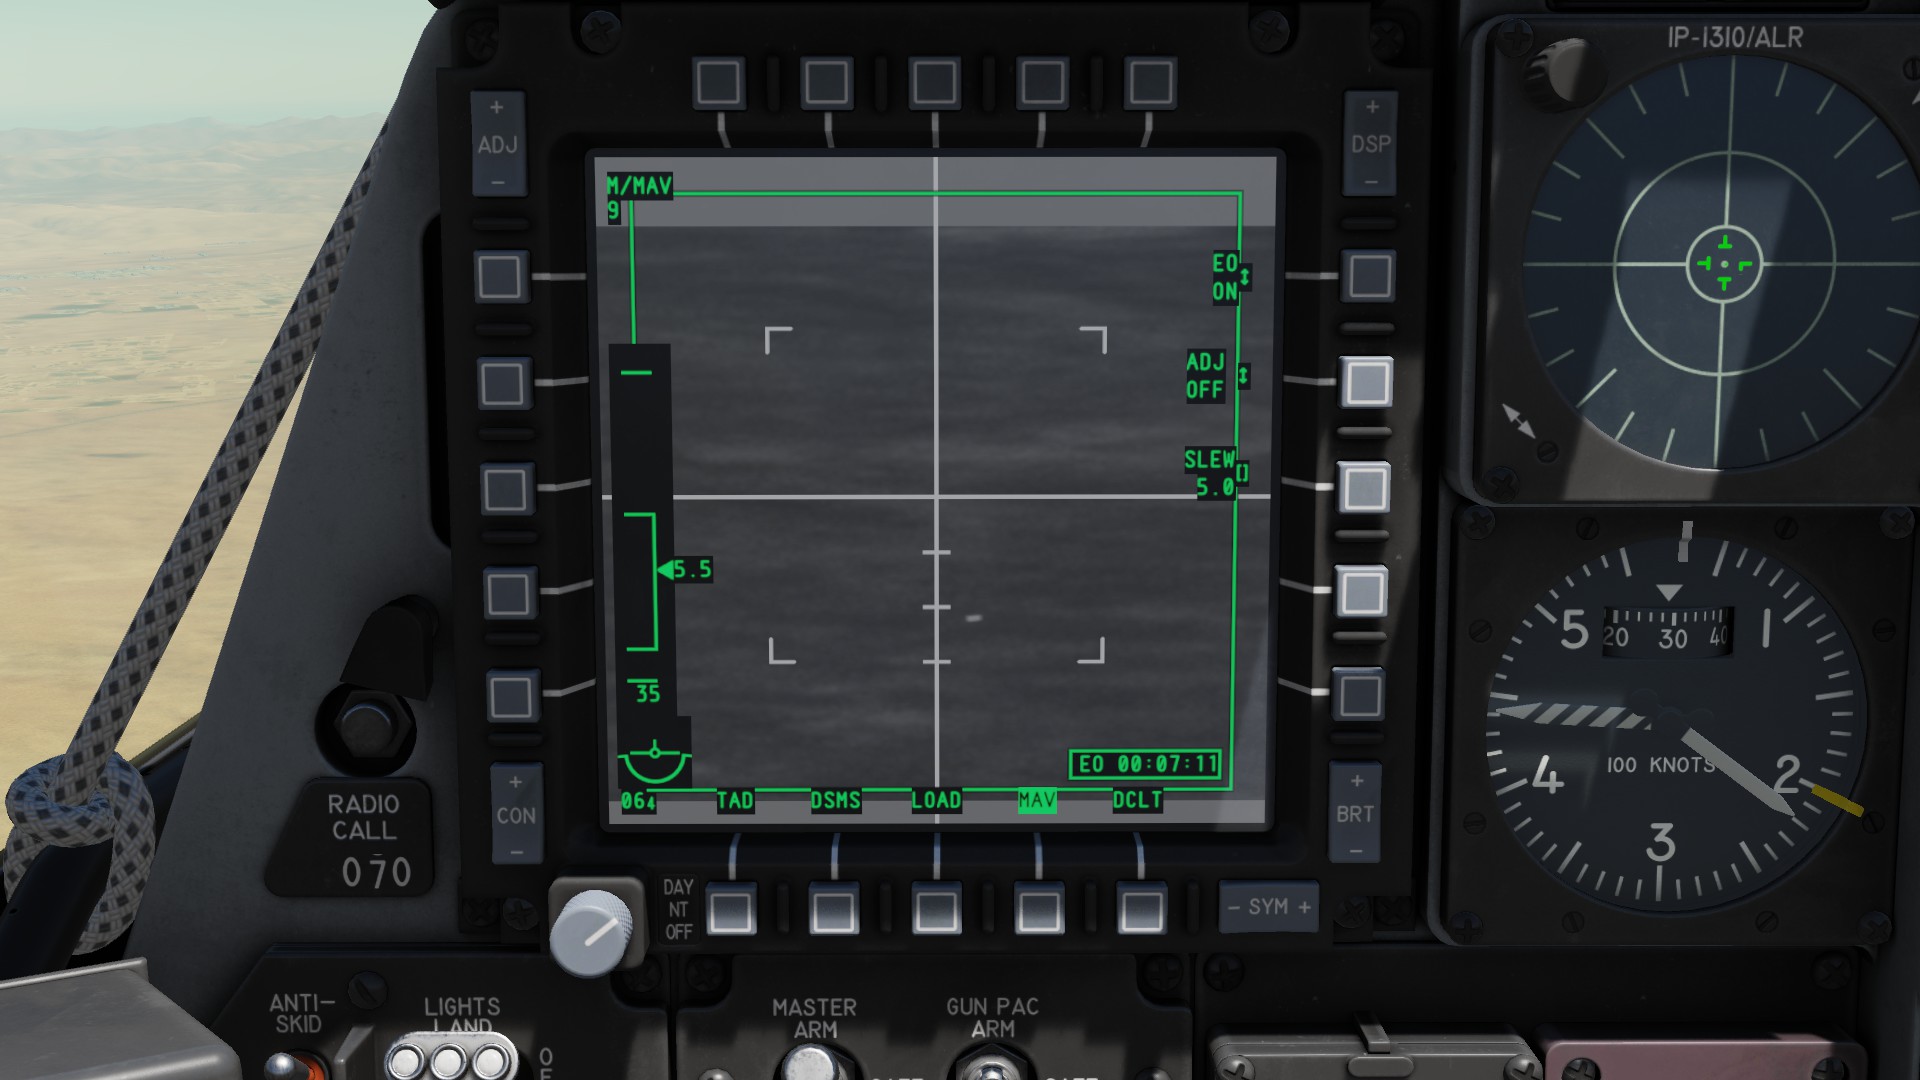 Slave the maverick back to the SPI and press HOTAS TMS Forward short to lock. Now fire. This mode will not track moving targets.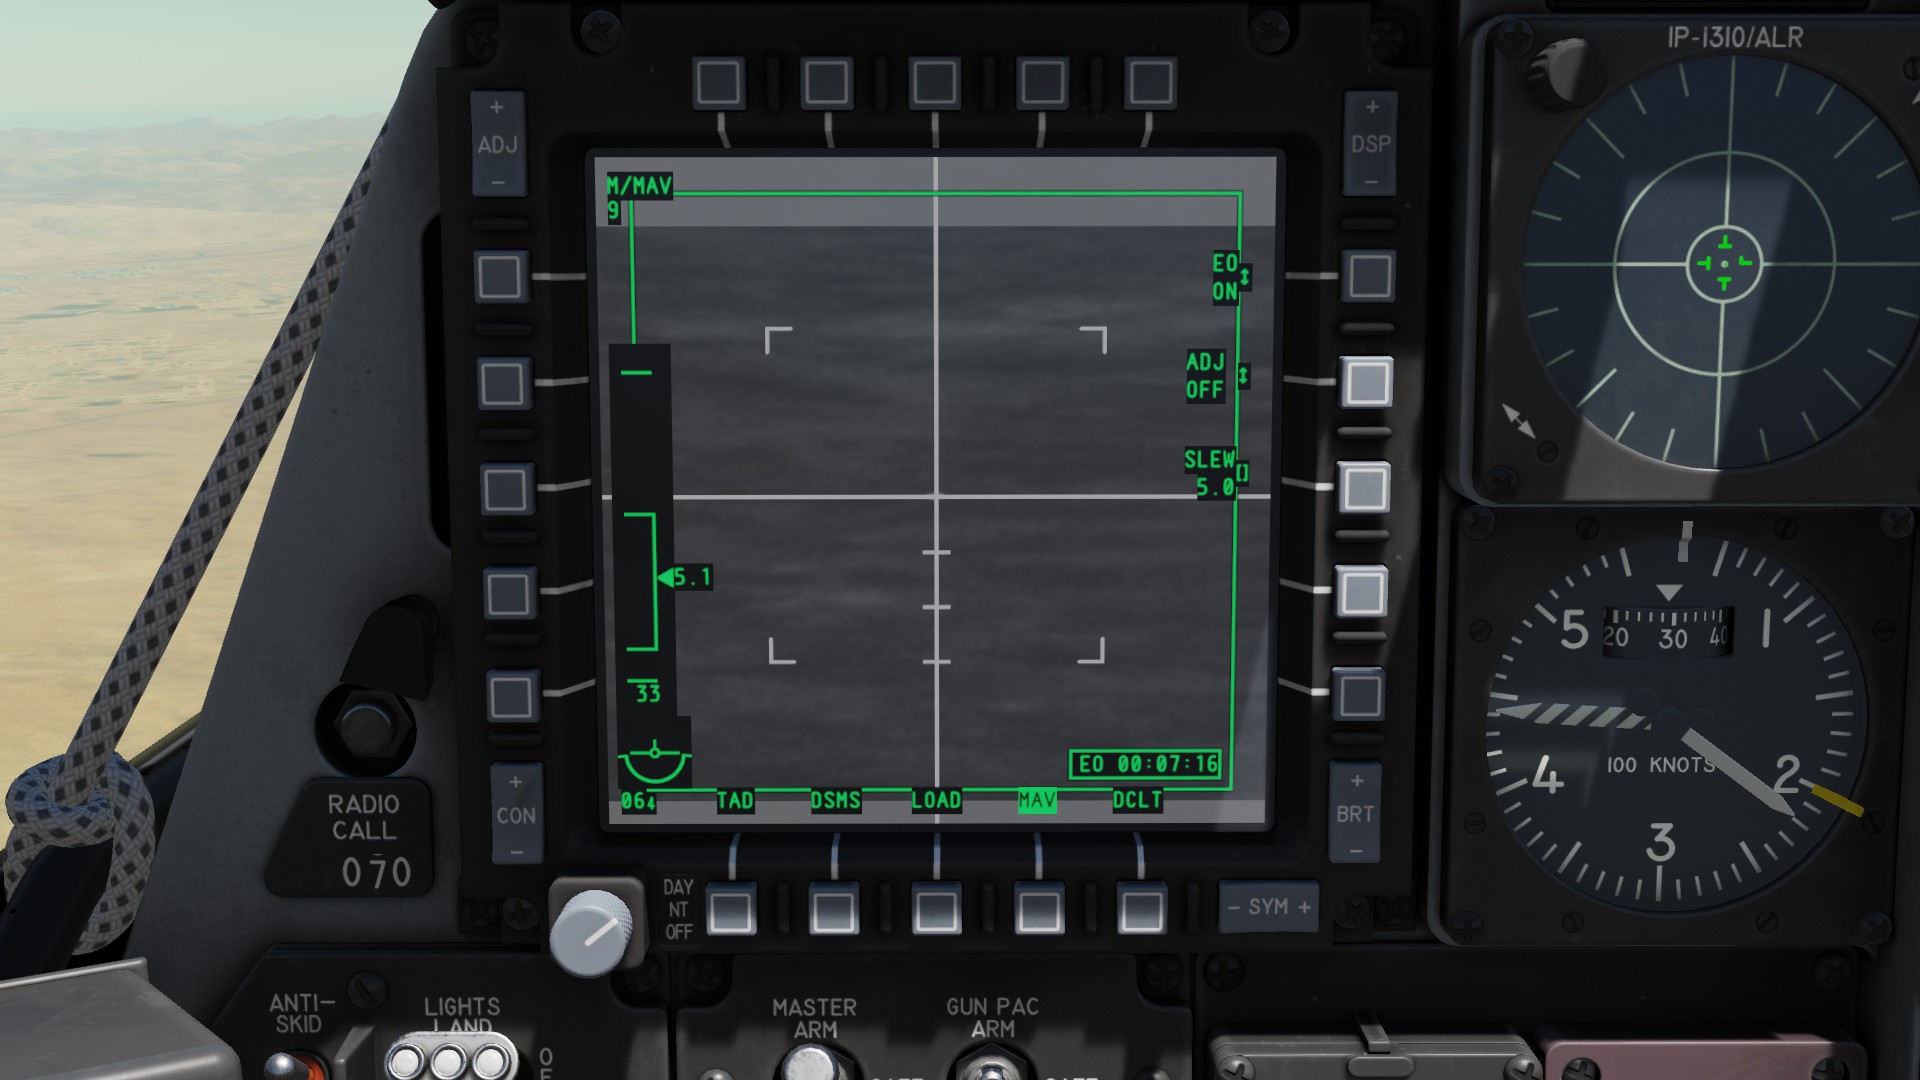
AGM-65L Laser guided Maverick
As you might have guessed, the L maverick needs a laser. So find a target, set the TGP laser to latch and start lasing.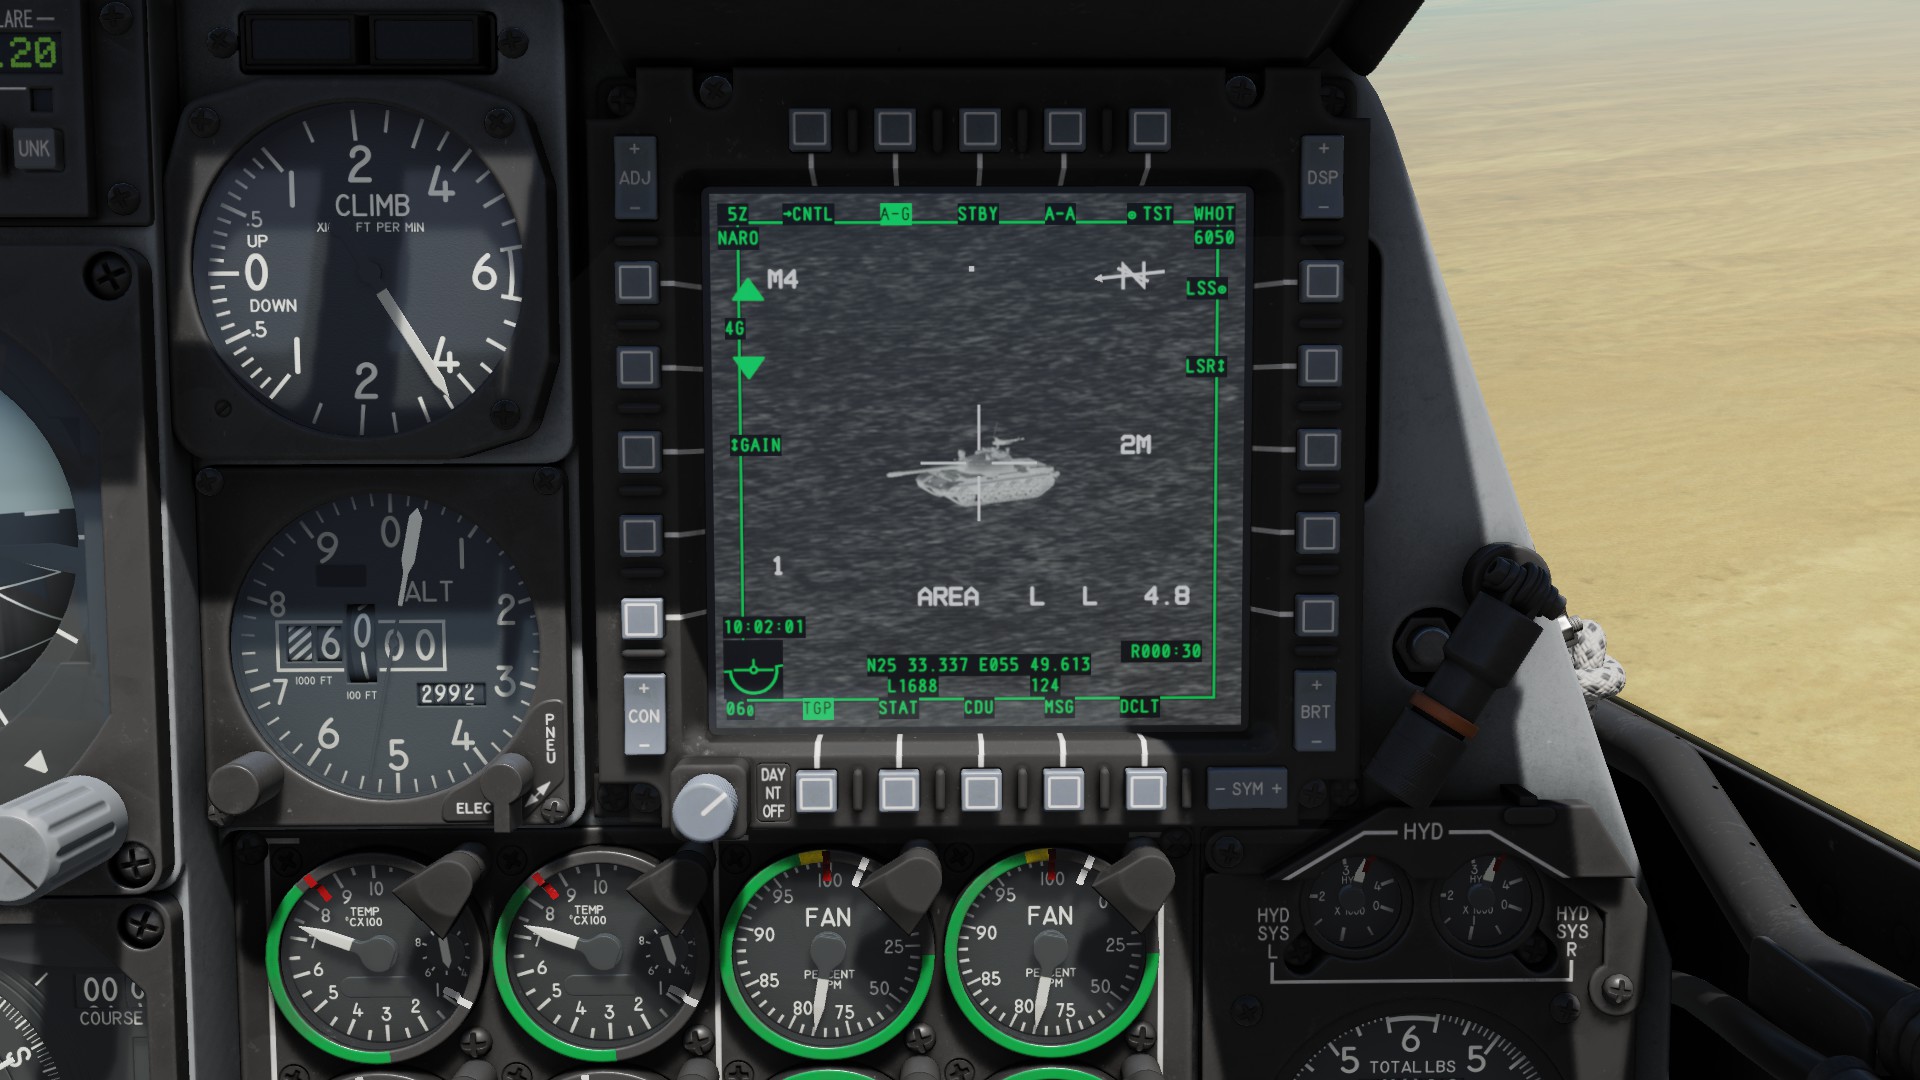 Your MAV page for the L looks different than those of the other models. The laser code is in the top part of the display (red). Make the screen SOI and press HOTAS TMS Forward short to uncage the seeker. It will now move from left to right, trying to find the right laser. You might need to pitch down so the seeker can find the laser. If the laser is locked, the X will turn into a solid box (yellow) and a dynamic launch zone will be shown (blue).
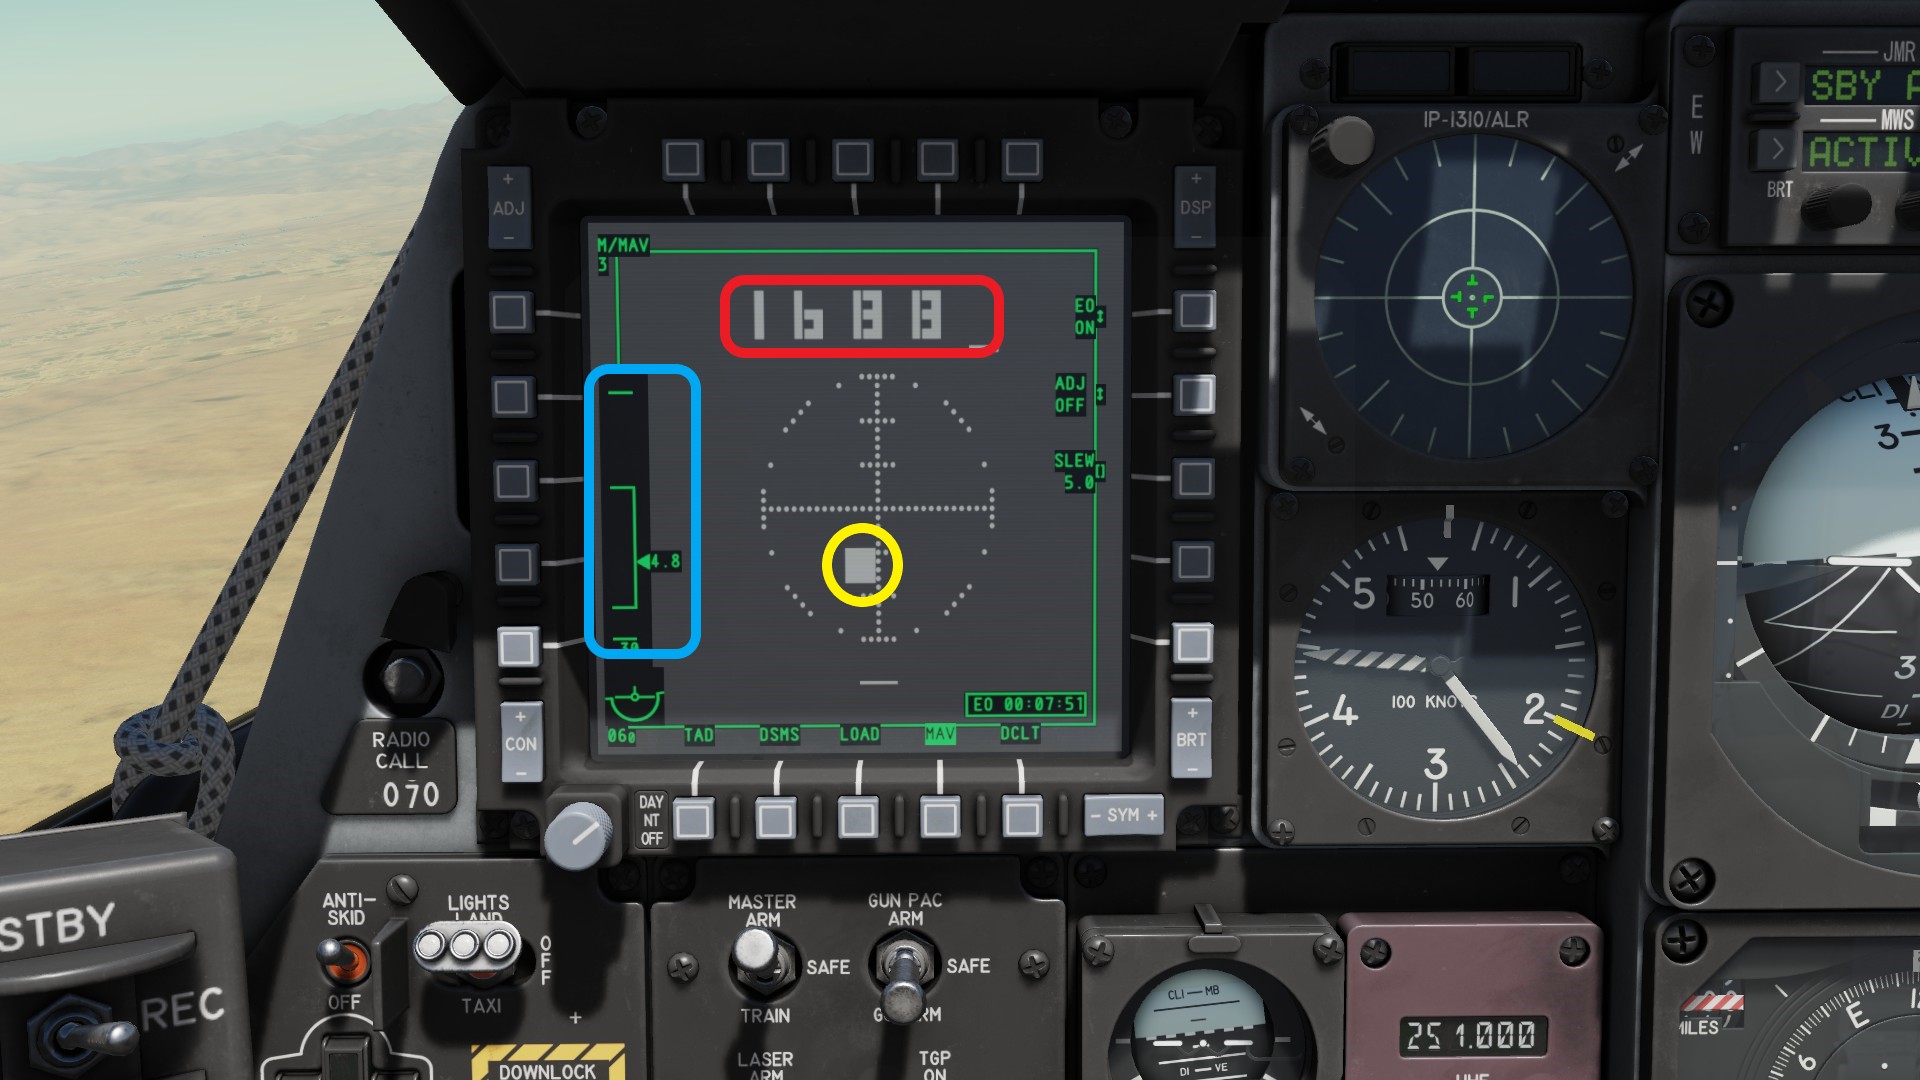 Fire with weapon release.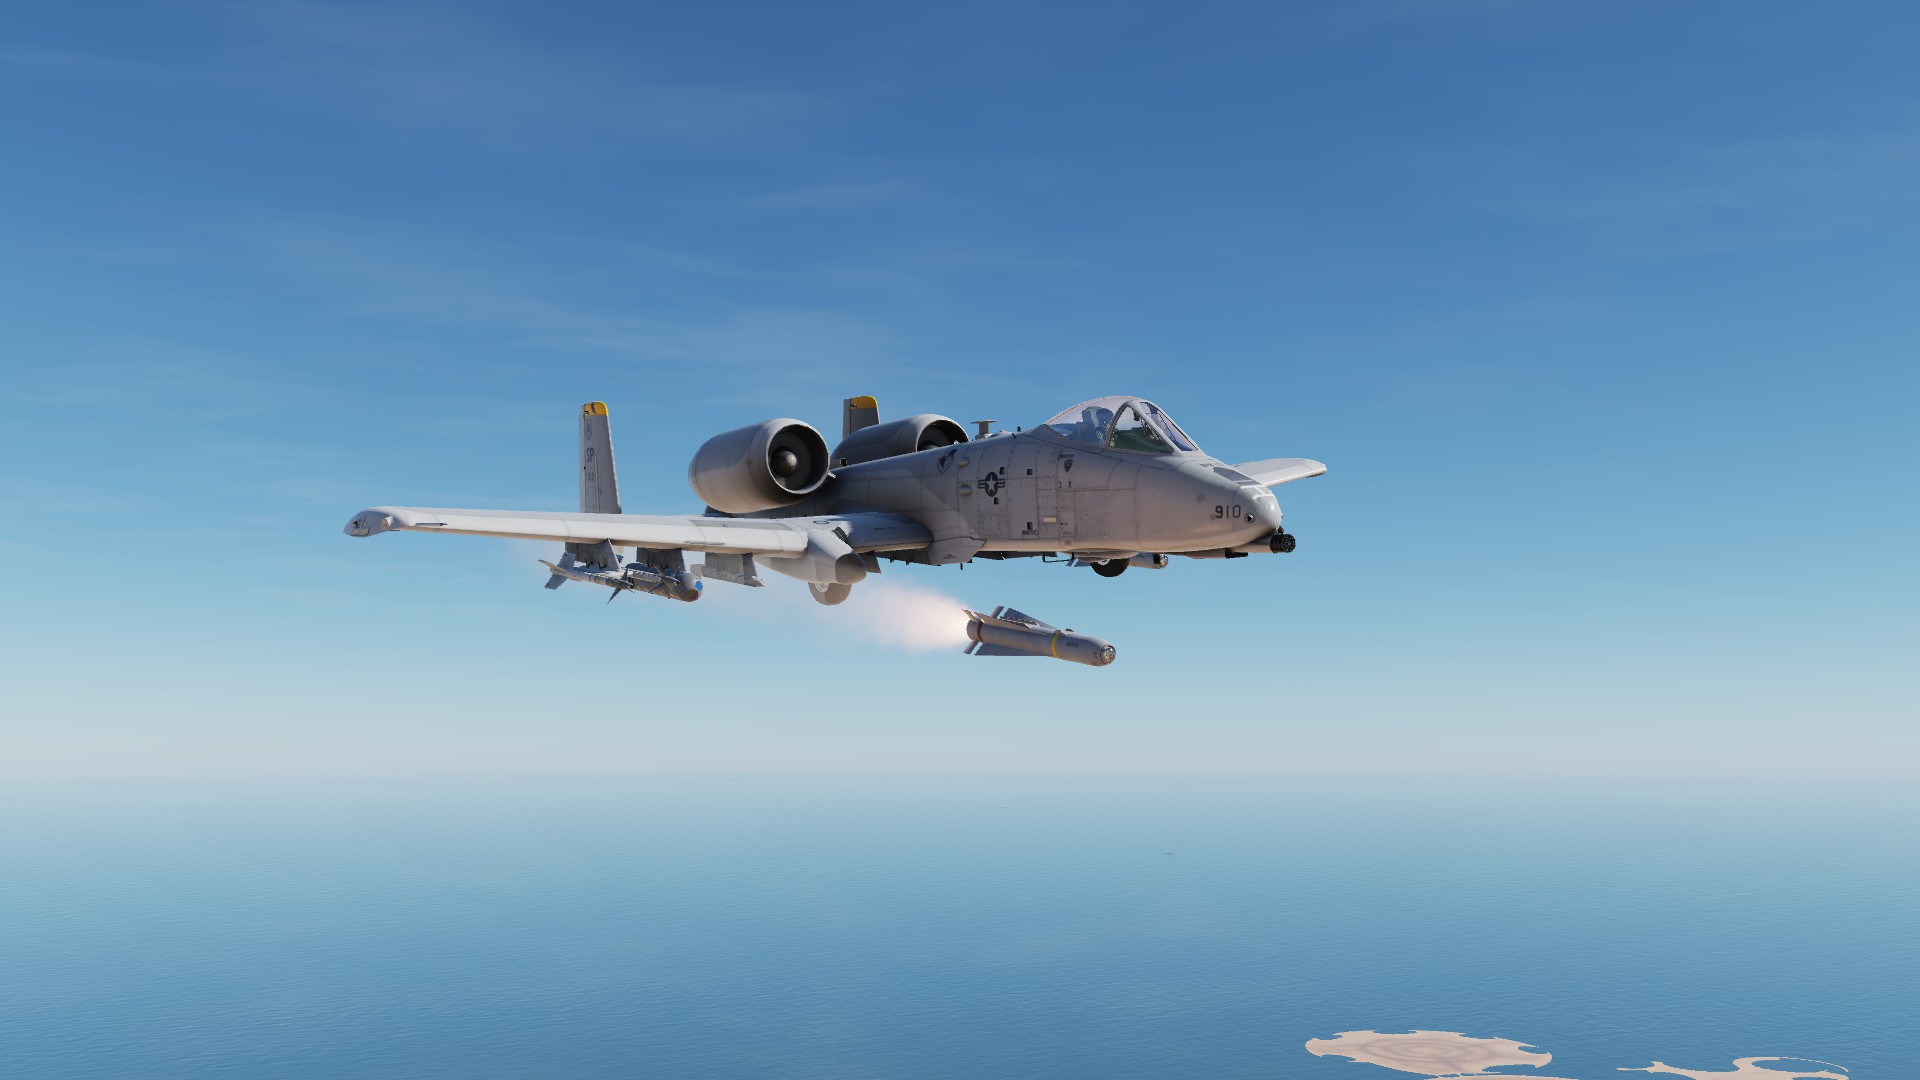
APKWS
The Advanced precision weapon kill system or APKWS for short was designed to close the gap between the AGM-114 Hellfire and the unguided 70mm Hydra rocket. The goal was to create a cheap way to destroy lightly armored targets like cars and create less colleteral damage than the 100lb Hellfire . The APKWS consists of a Hydra rocket and a mid-body guidance kit, which will follow a laser of the right code. The seekers are deploying after the rocket has been fired.
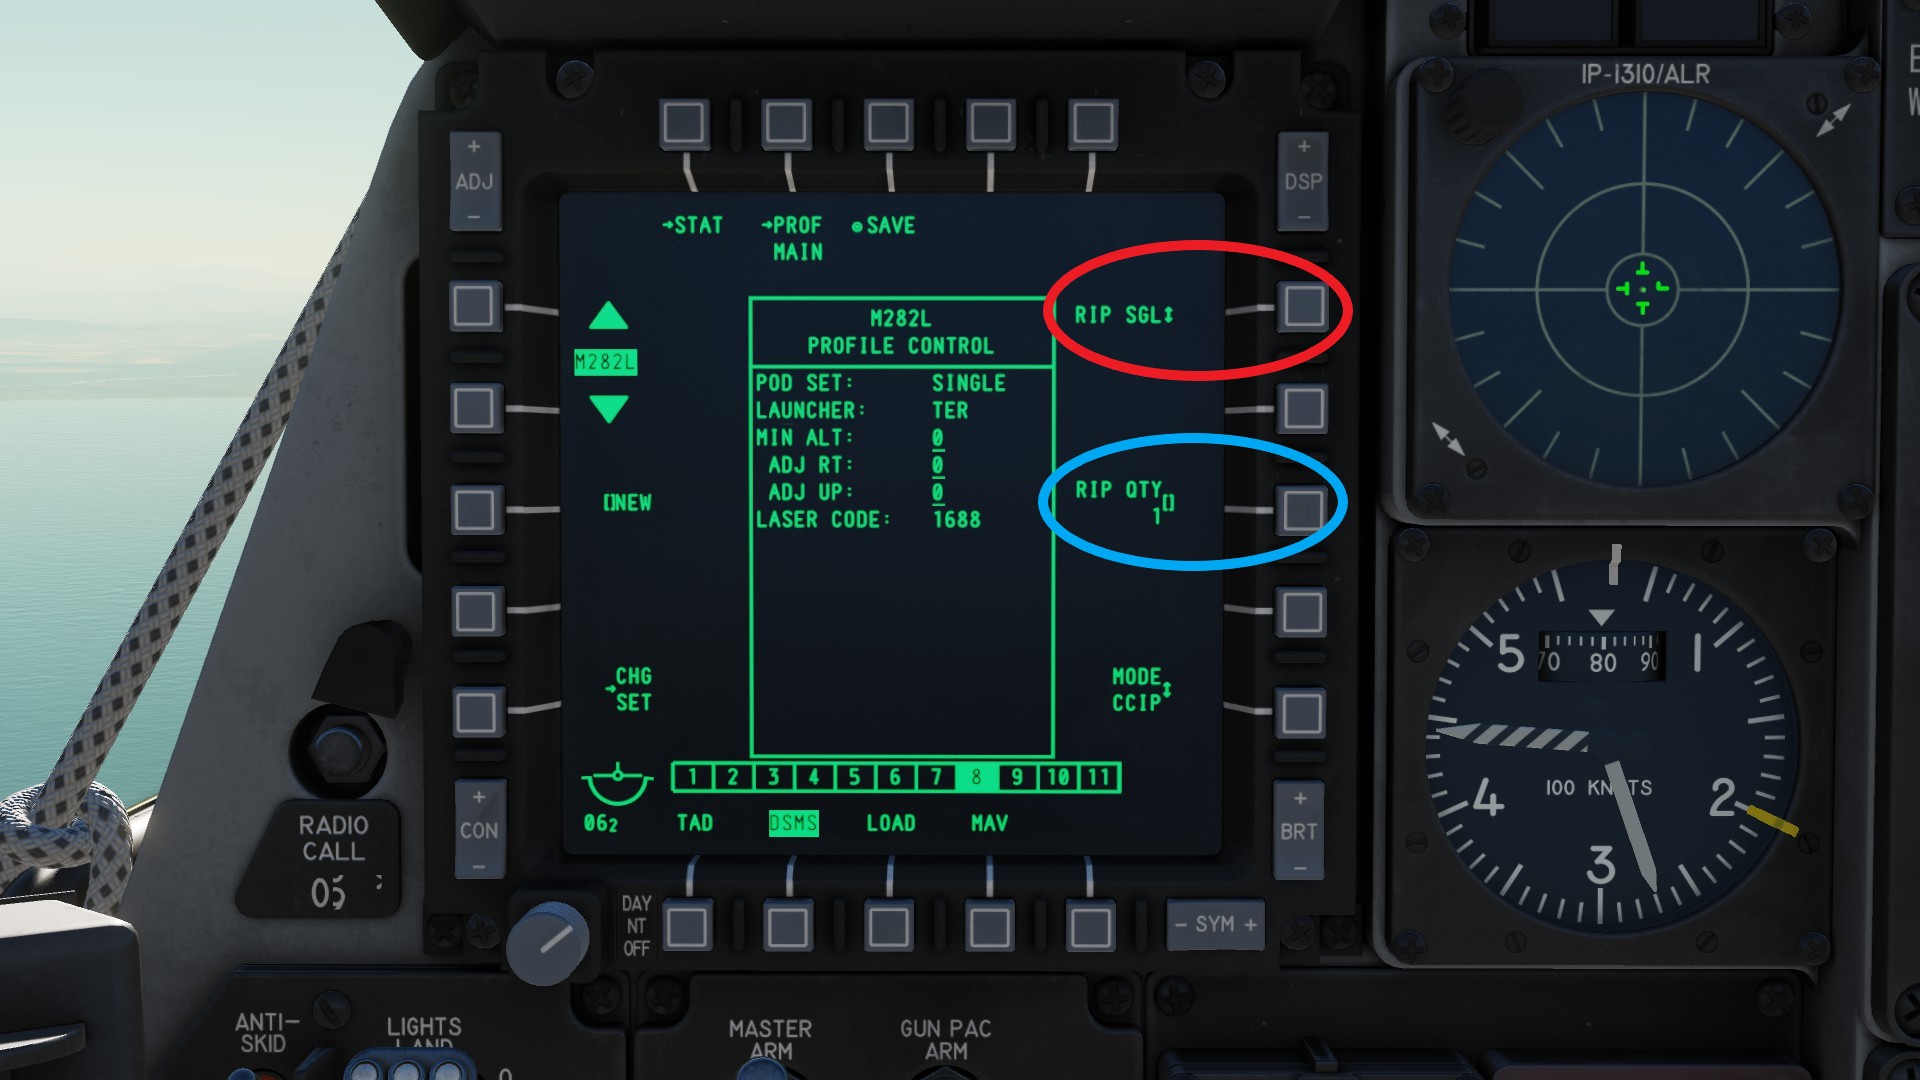
Needed controls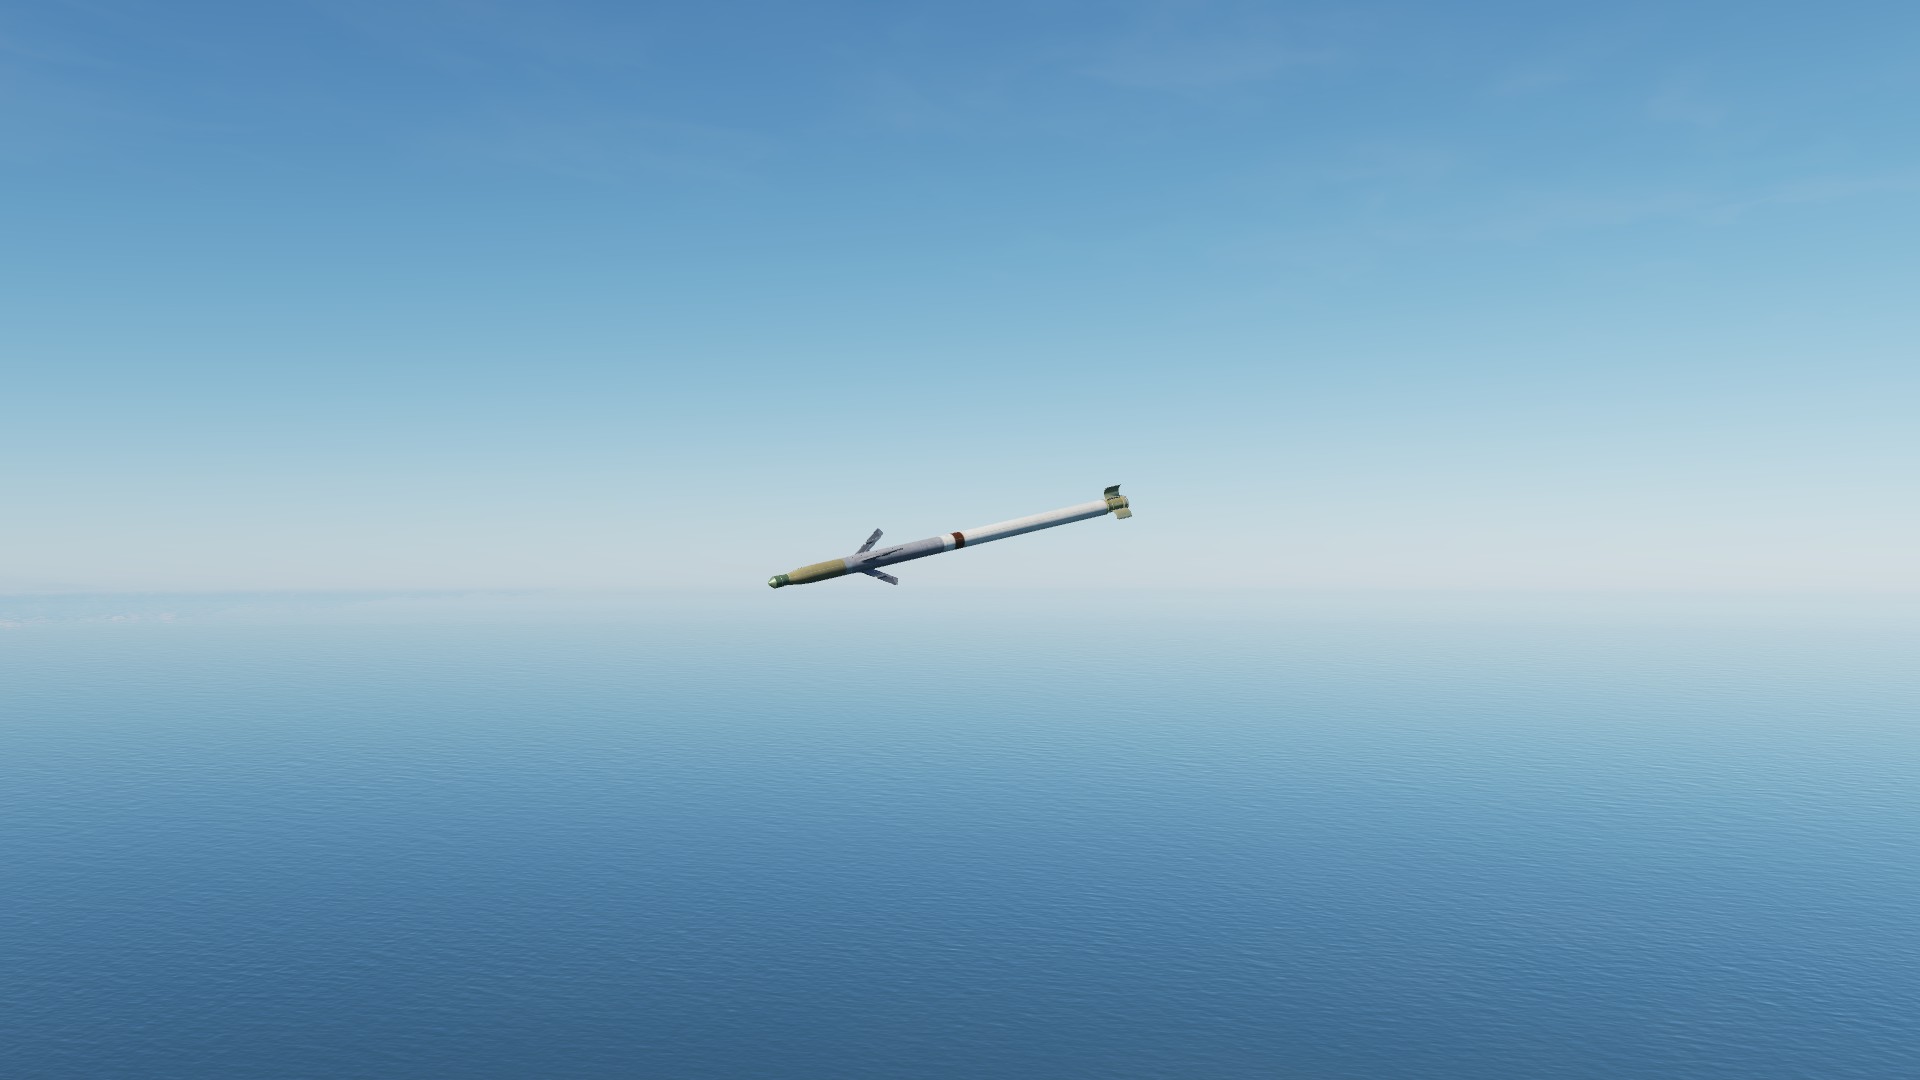 The weapons profile isnt very important to us. The only interesting thing is the ripple function (red). Ripple means, that you can hold down the weapon release button and the plane will fire the amount of rockets you set as quantity (blue). Other options are the pair function which shoots two rockets at a time, single (set by default) which will shoot a single missile and ripple pairs, meaning that amount X will be shot in pairs of two. Dont forget that you will need to set a laser code for this weapon.
 To use the weapon you need to find a target with the TGP.
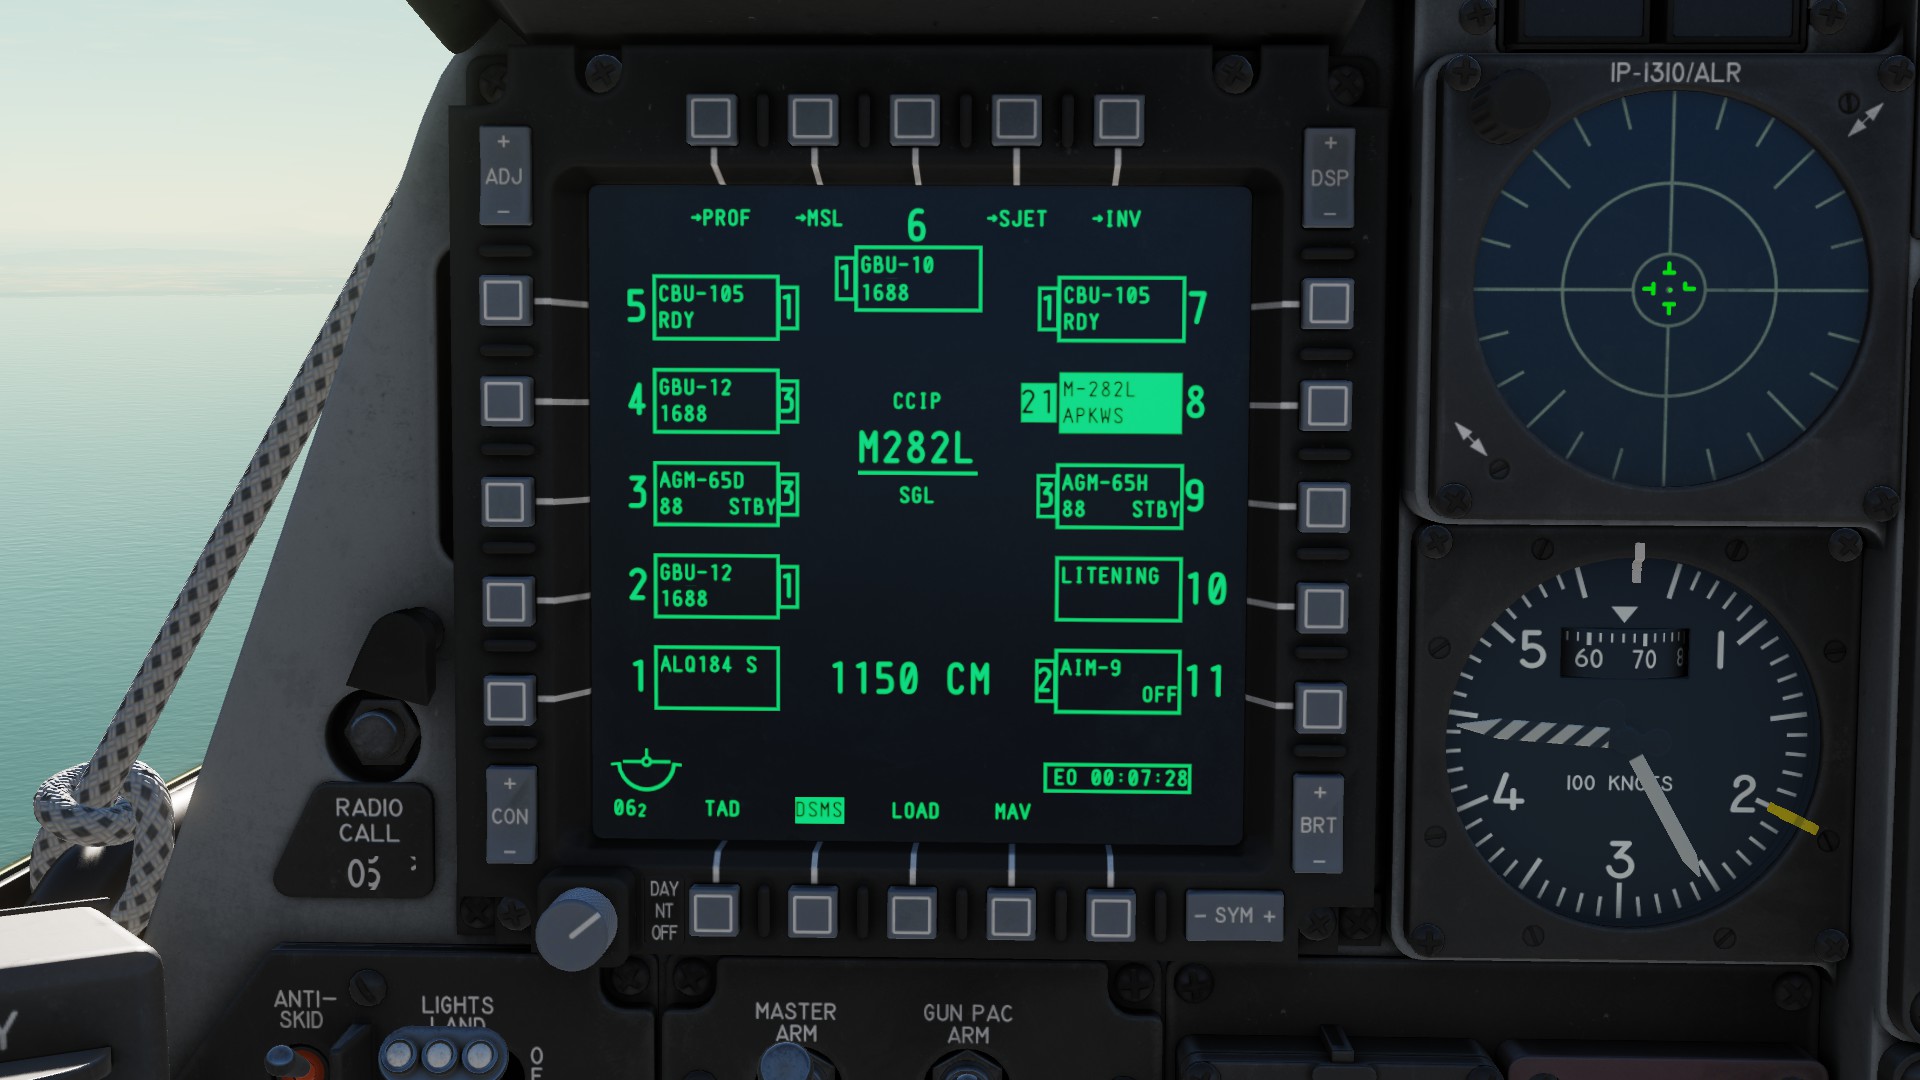
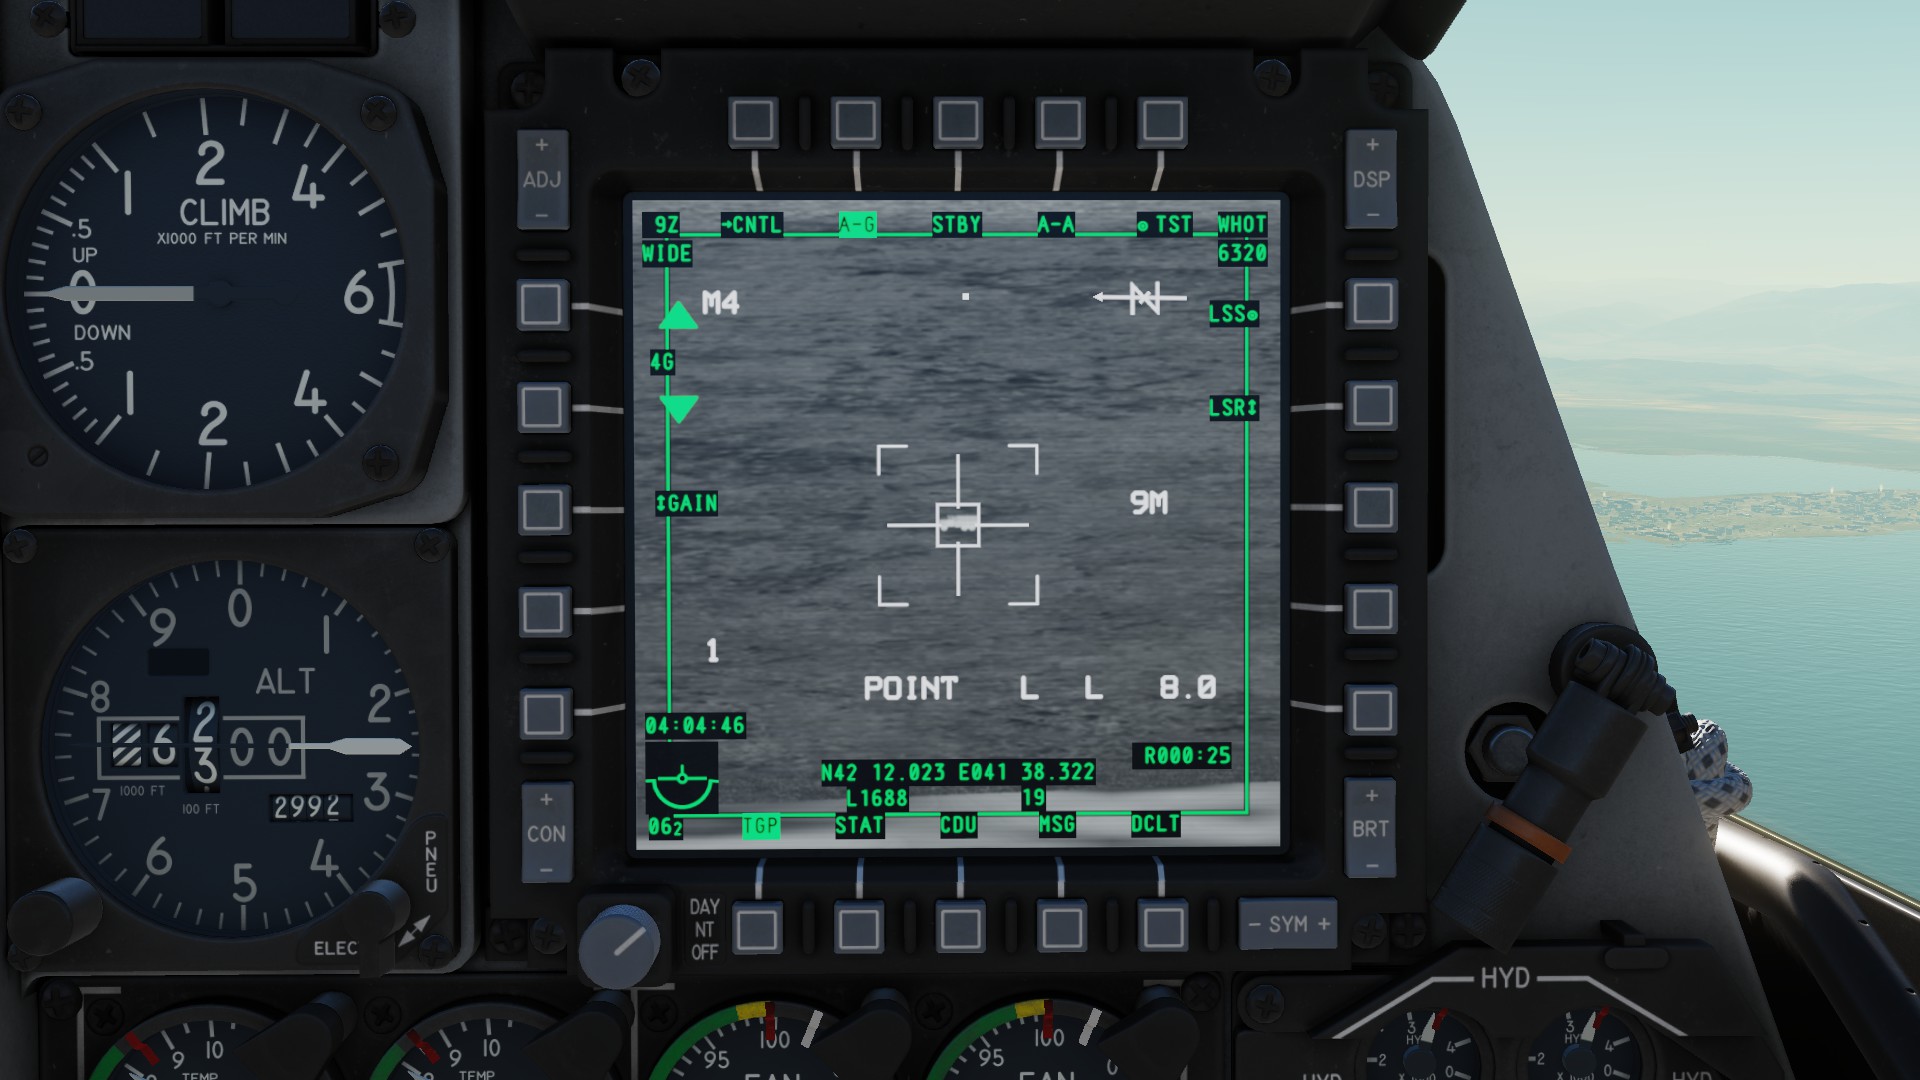 Select your APKWS as your weapon.
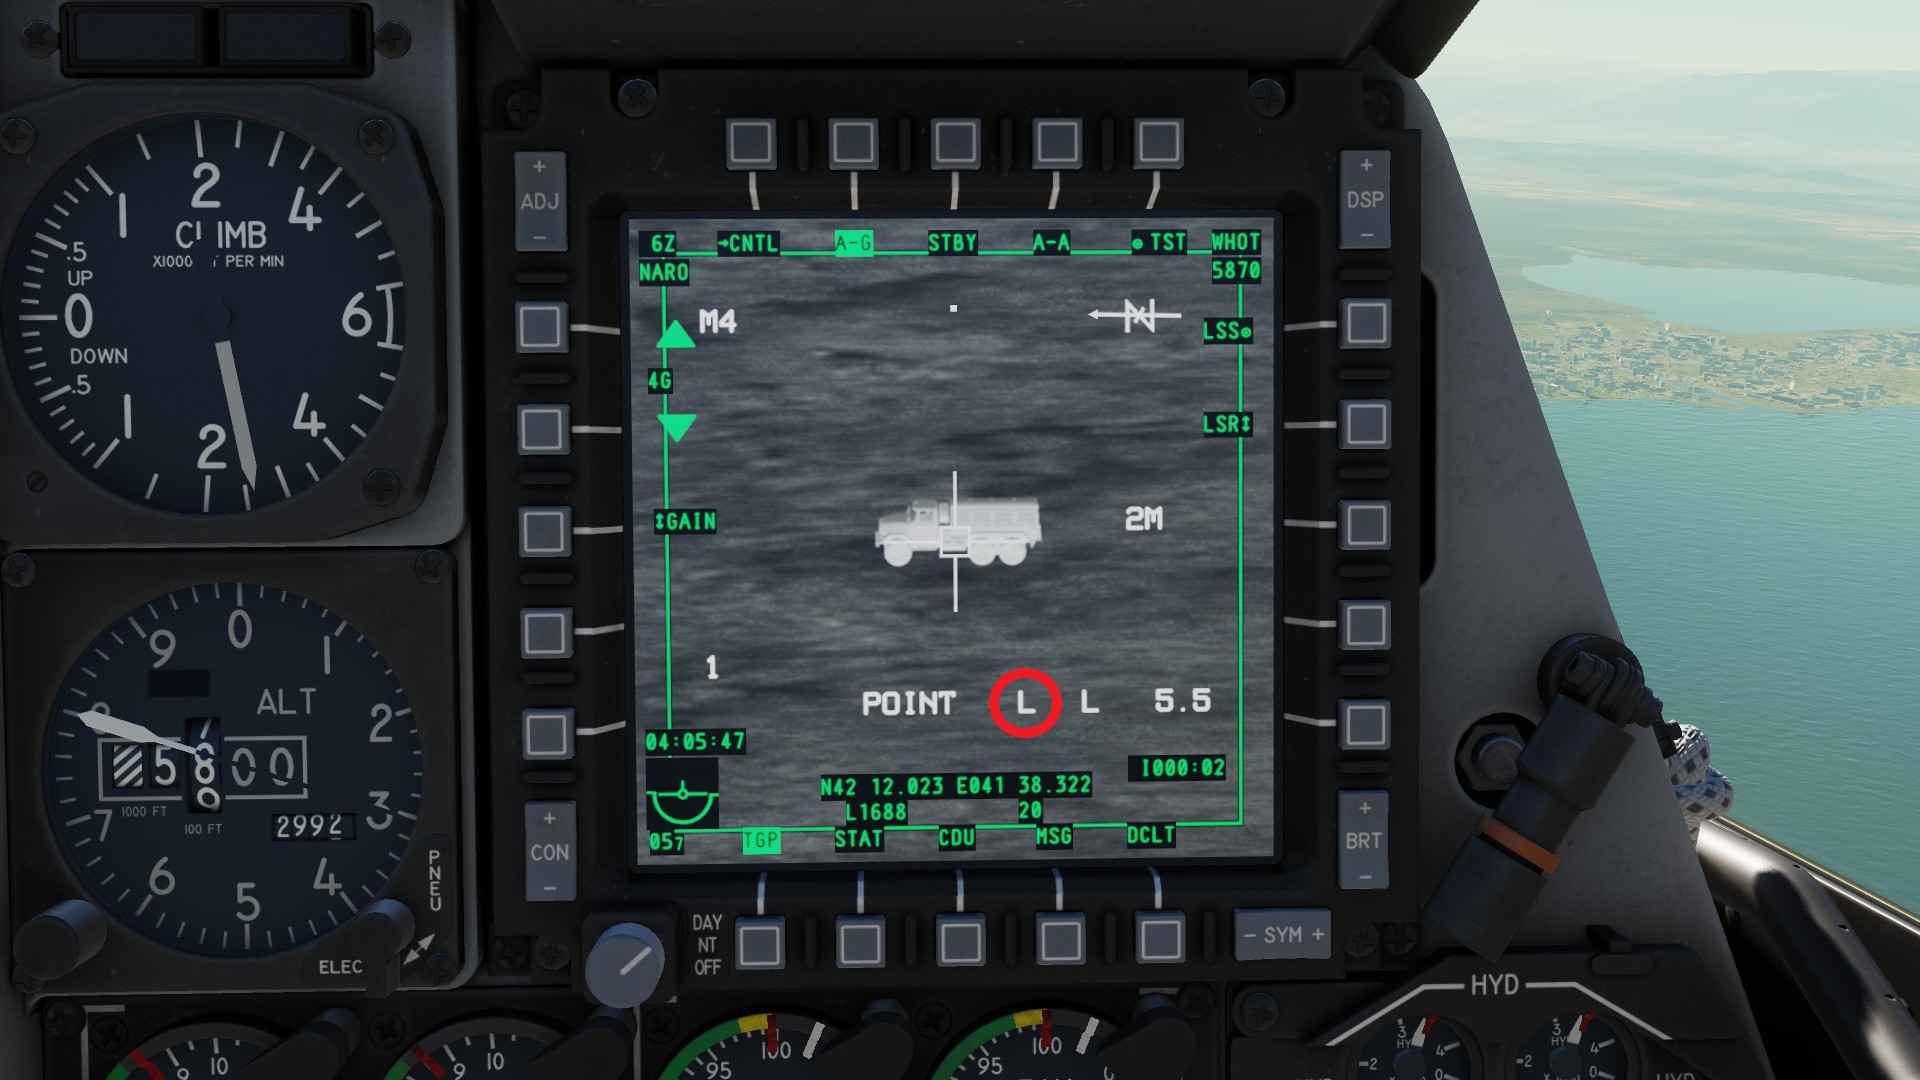
 When youre within 5.5nmi, turn on your laser with nose wheel steering (i recommend to set latch to on in the TGP). A firing laser will be indicated by a flashing L on your TGP (red).
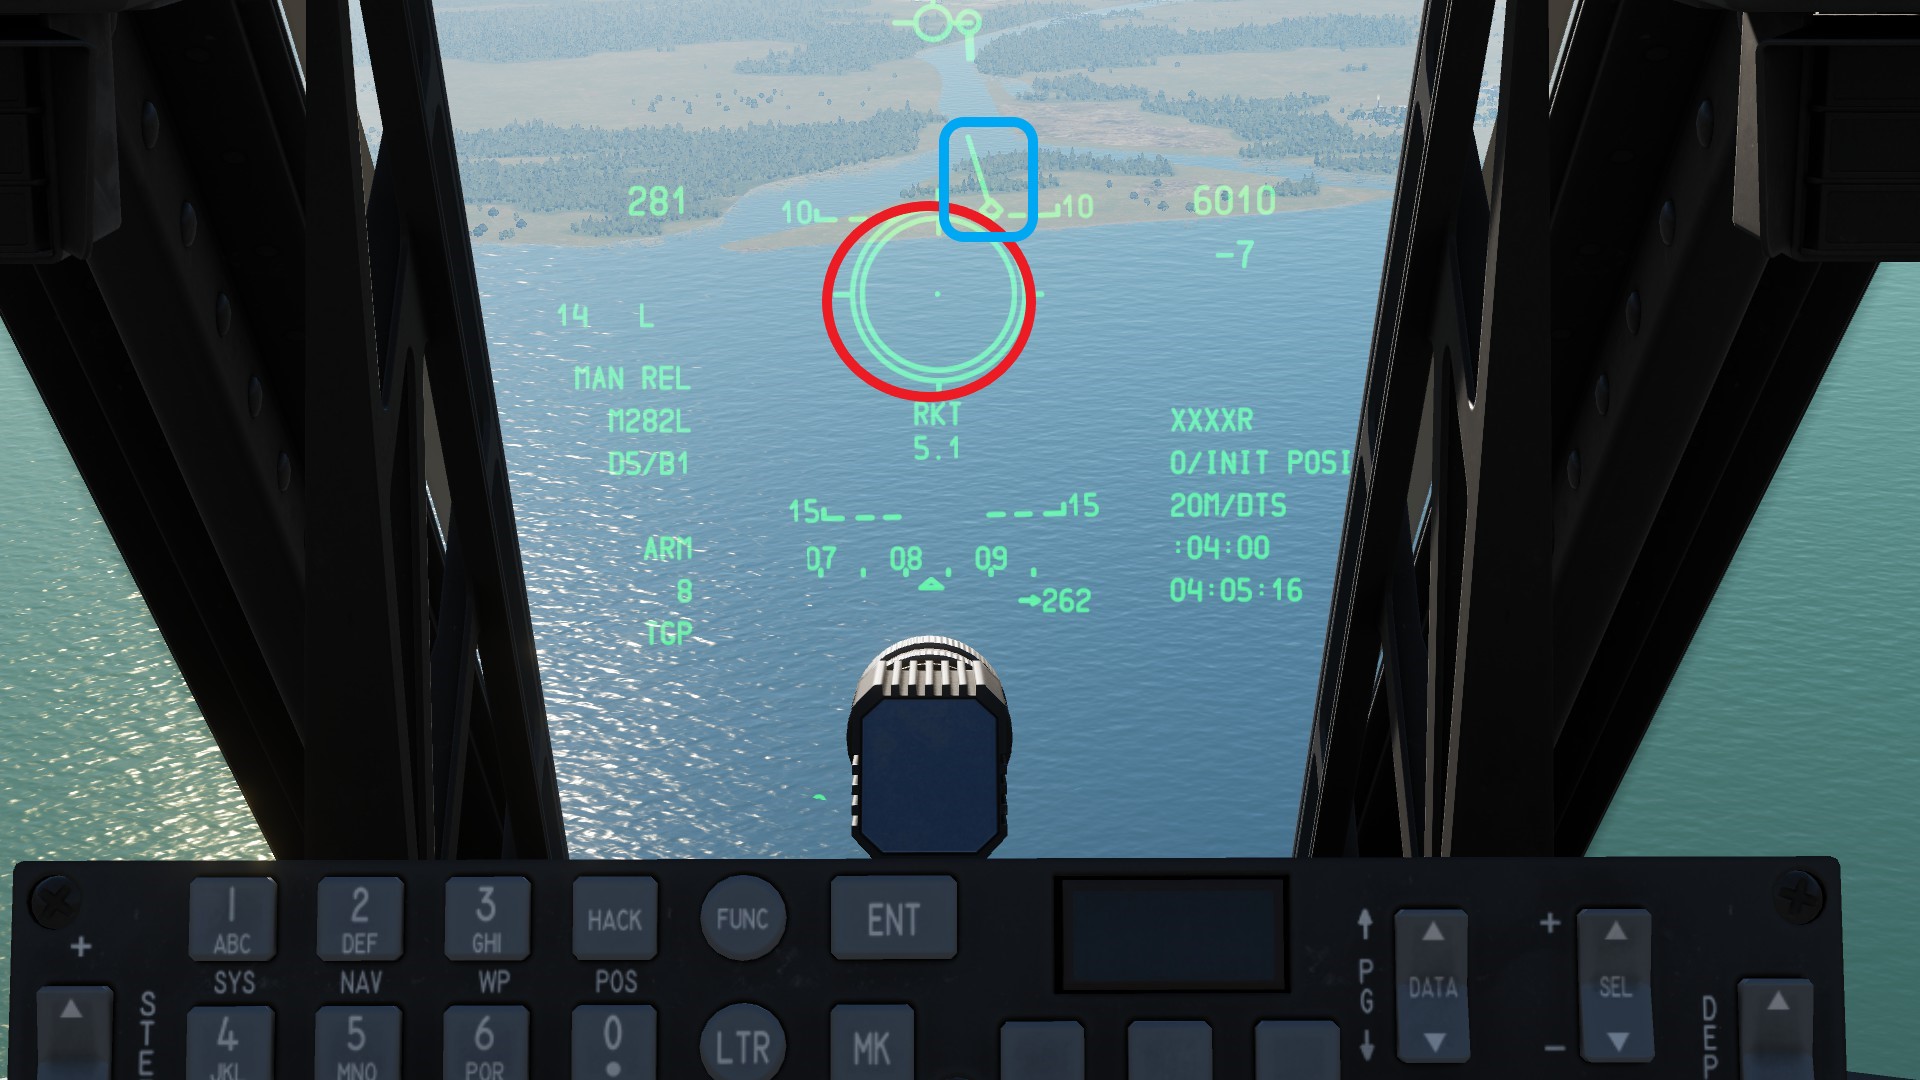
 Now move the rocket redicle (red) over the targeting pods FOV (blue).
 Wait for the impact and watch out not to bring the TGP into a masking zone.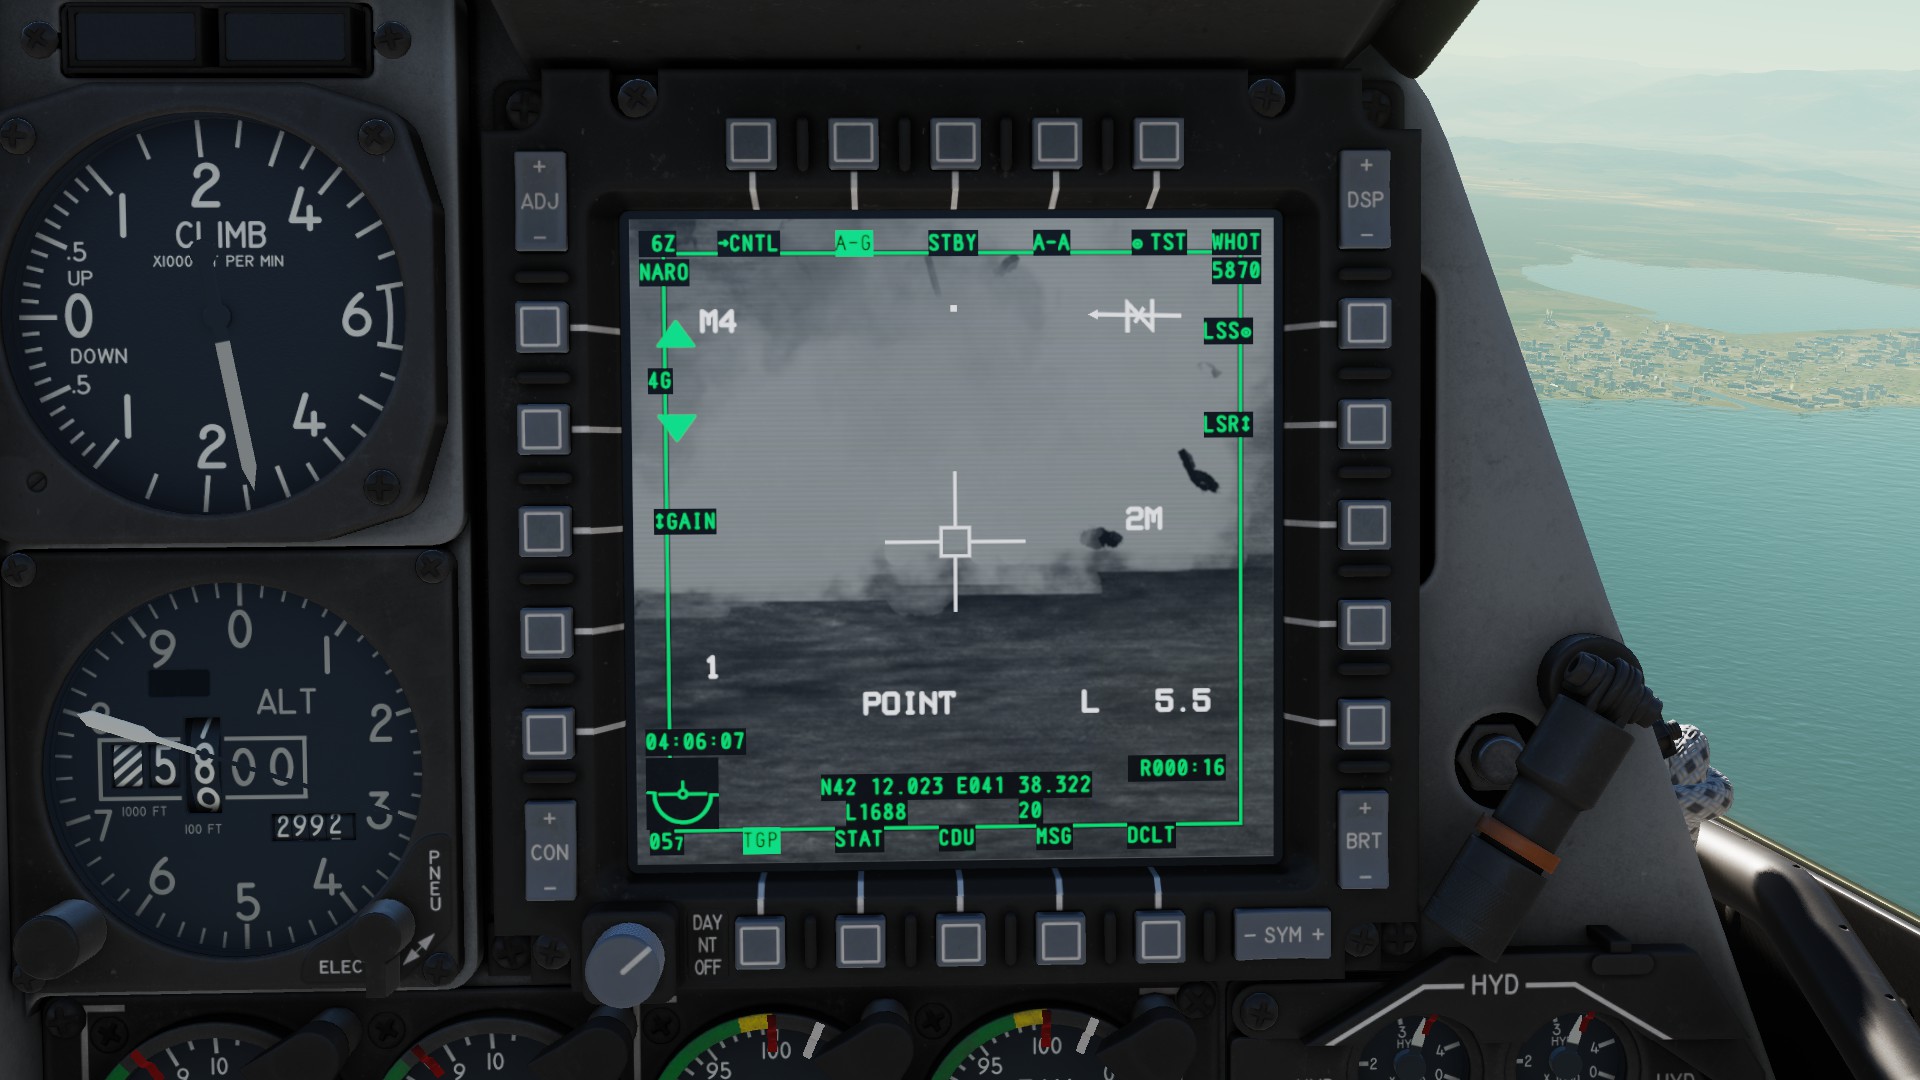
AIM-9 Sidewinder
The AIM-9 is your only way to effectively engage planes. Therefore i would not recomment using them against helicopters, use your gun or APKWS instead. You have two AIM-9s too choose from. The L and M. The M is the more modern one and should be used whenever you can.
Needed controls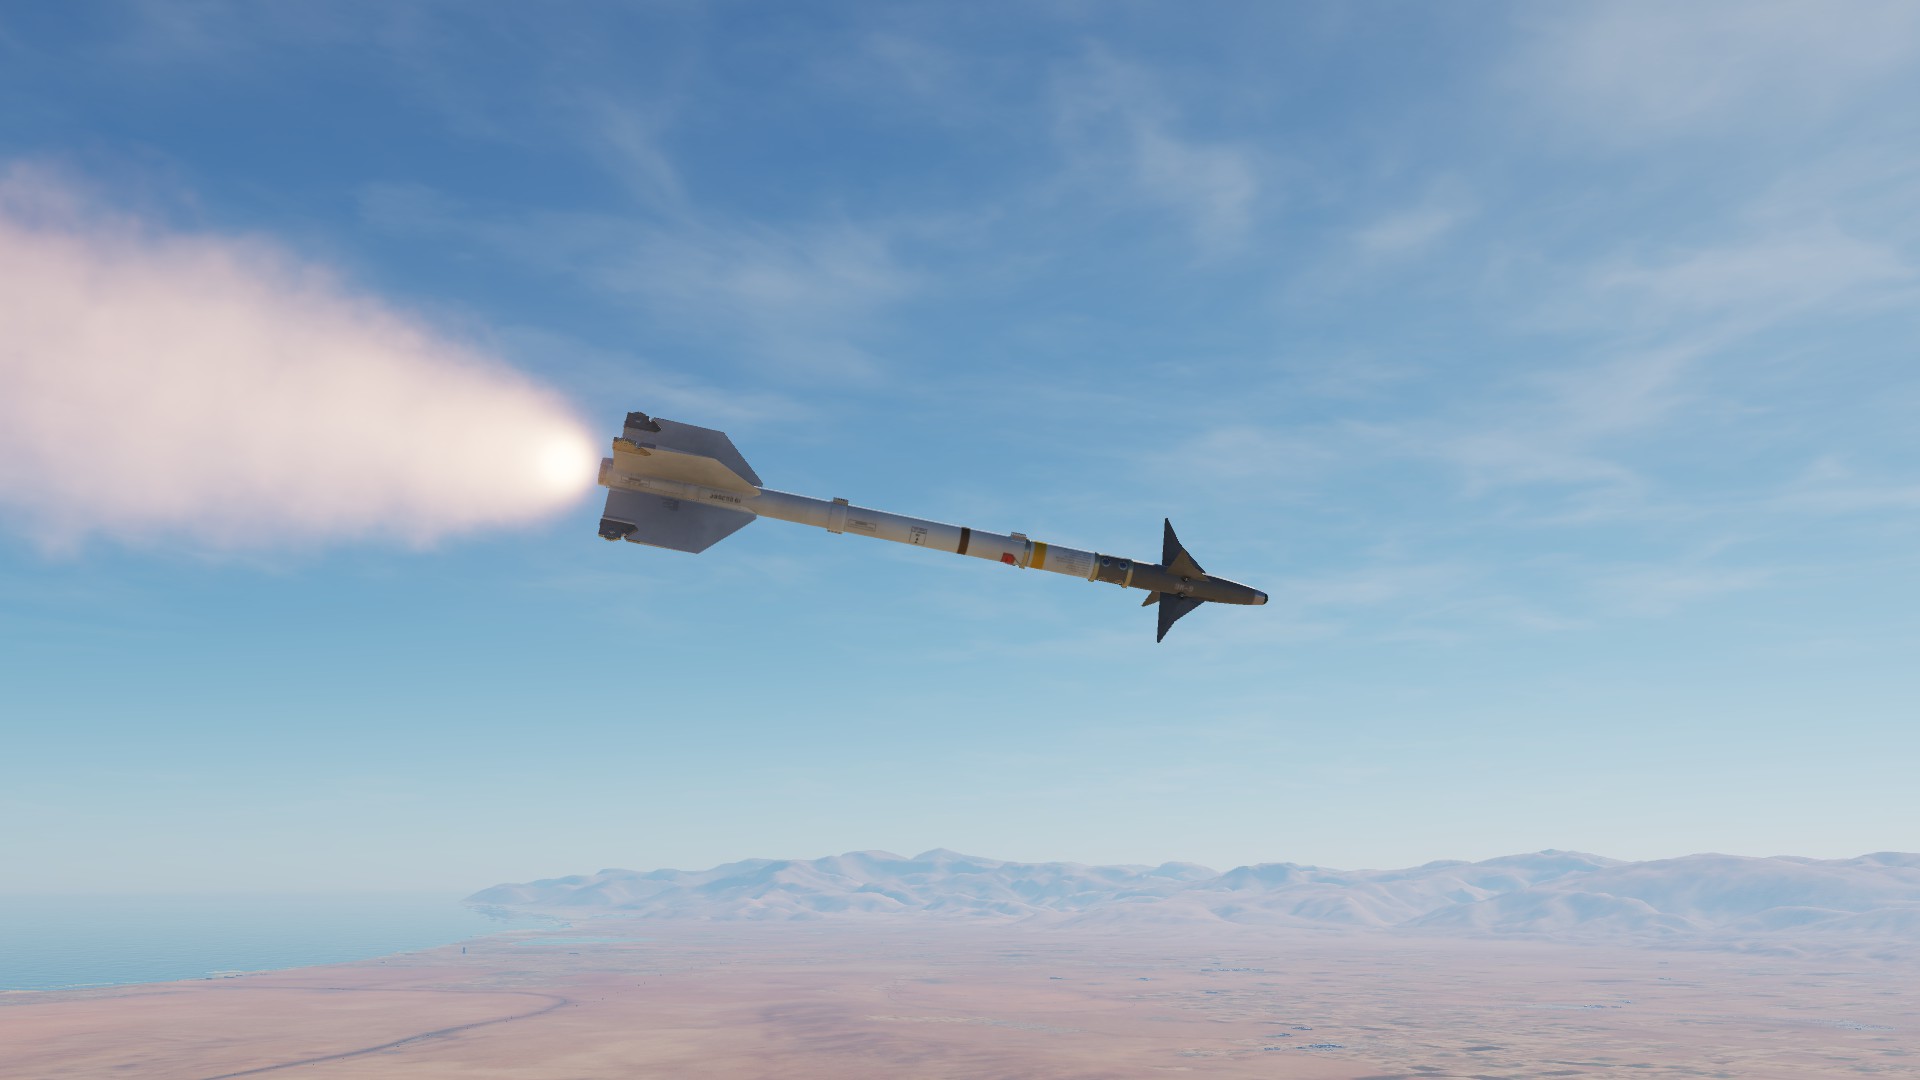 First you have to make put your HUD into air to air mode (left). To do this, press and hold your HOTAS Master Mode Controll Button. This will also select your Sidewinder missiles (right)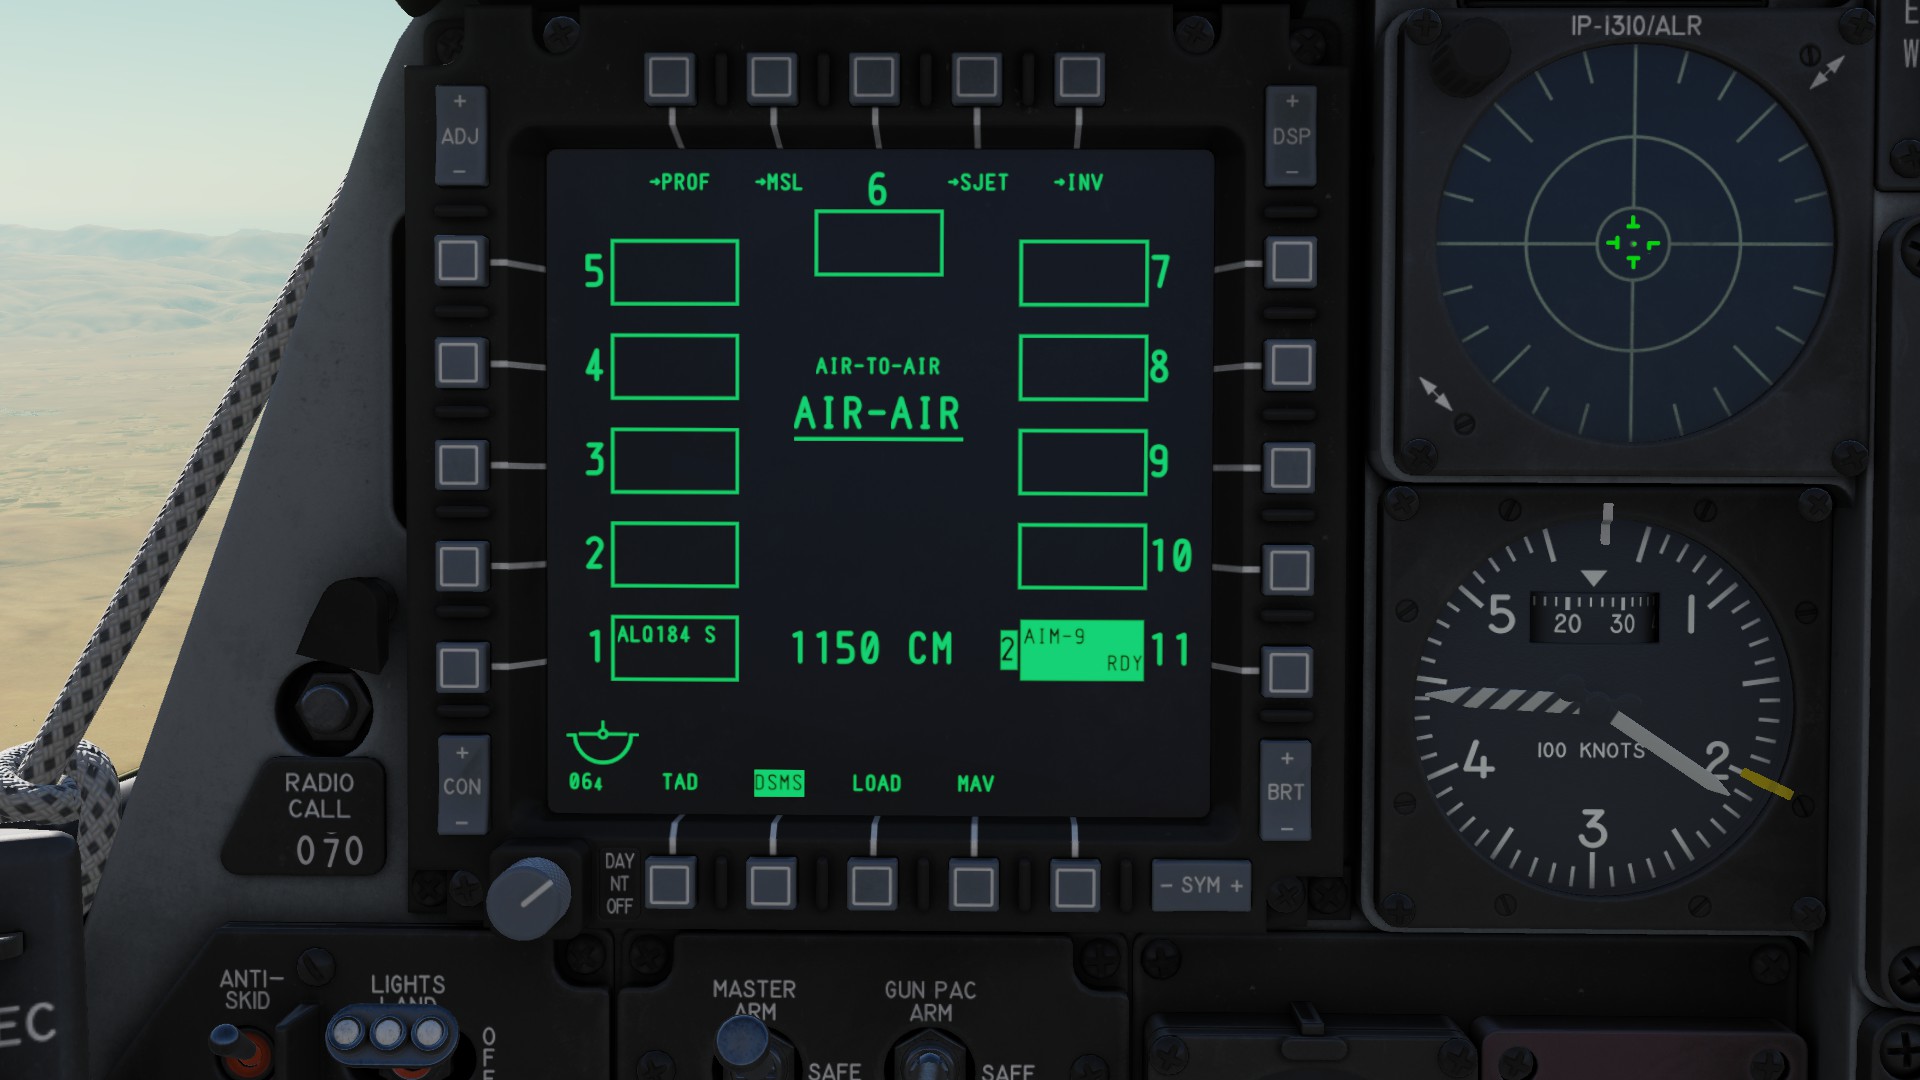
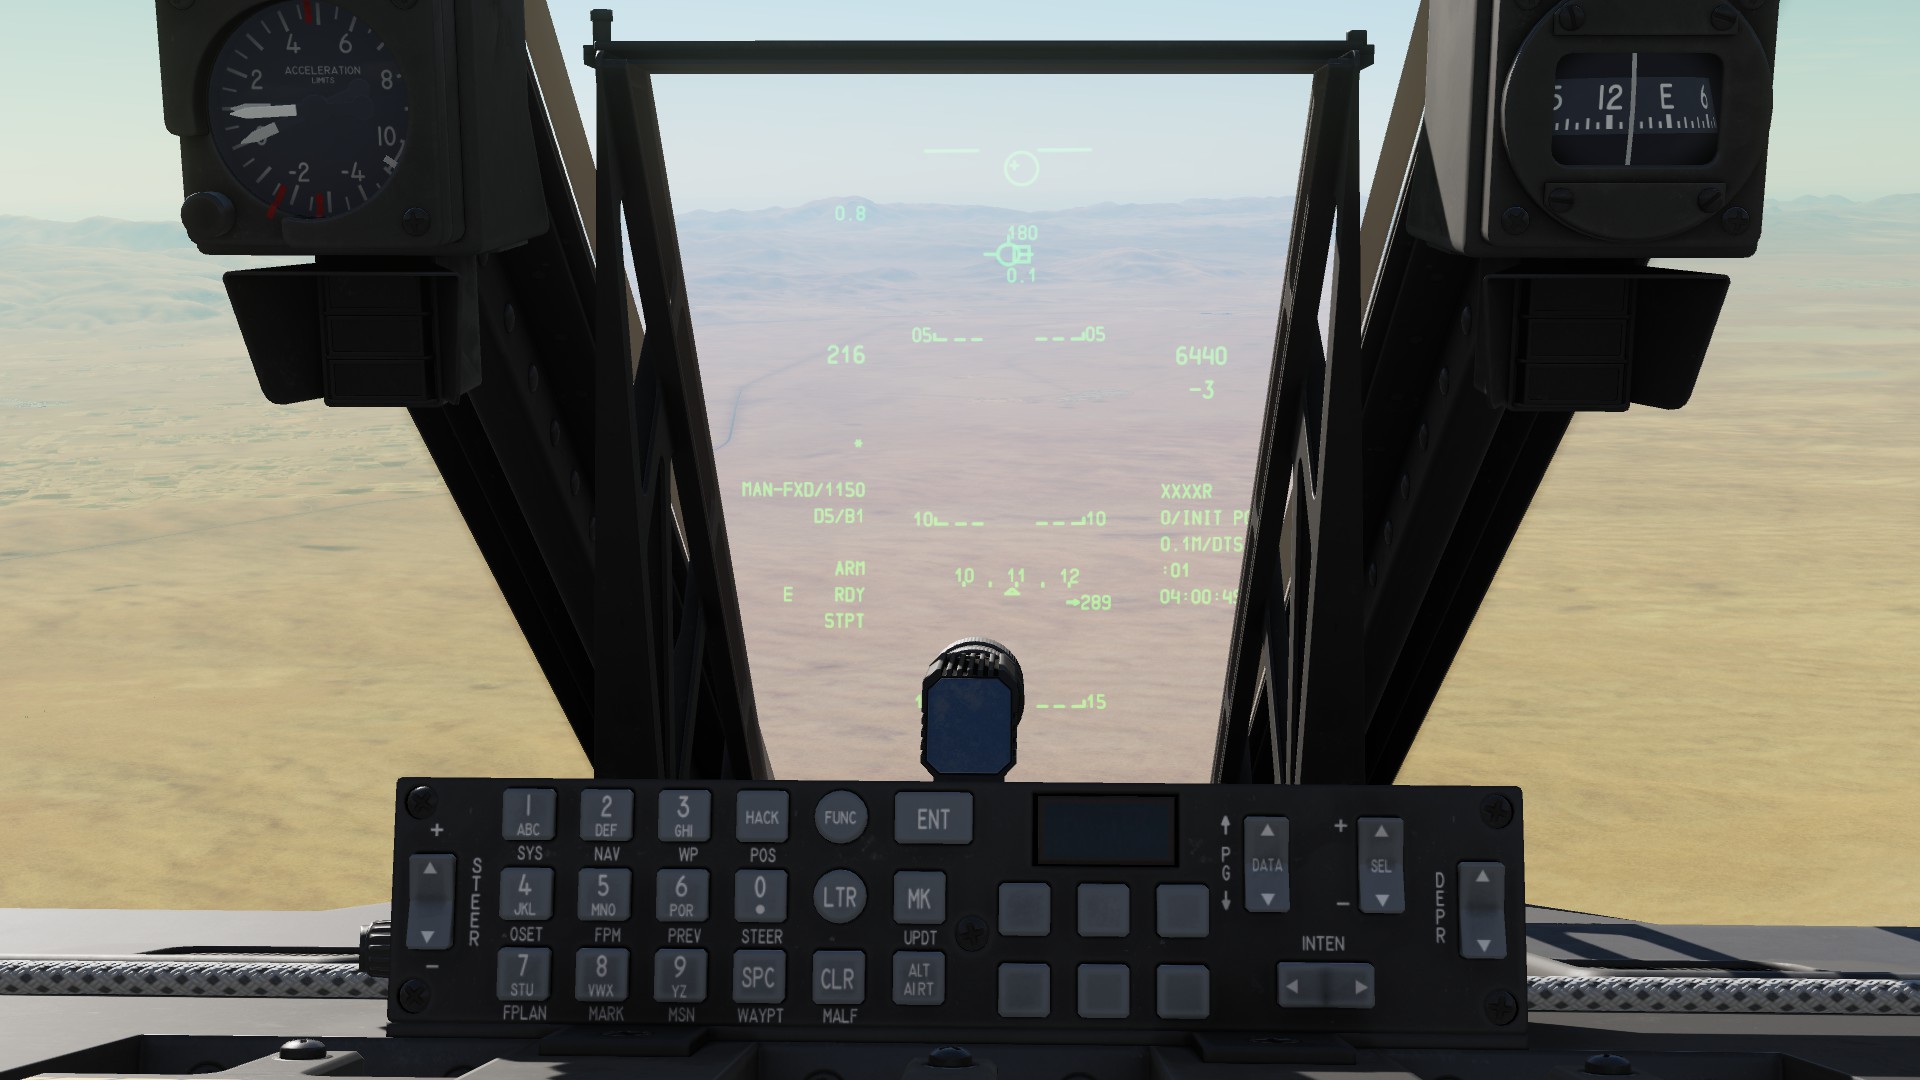 .
Now make your HUD SOI with HOTAS ♥♥♥♥♥♥ Switch Up short. A star (red) will appear if you did. After that, press HOTAS TMS Forward short. This will uncage the missiles IR seeker. The FOV of the seeker is shown as a small circle (blue). It will start rotating around a point on your HUD.
.
Now make your HUD SOI with HOTAS ♥♥♥♥♥♥ Switch Up short. A star (red) will appear if you did. After that, press HOTAS TMS Forward short. This will uncage the missiles IR seeker. The FOV of the seeker is shown as a small circle (blue). It will start rotating around a point on your HUD.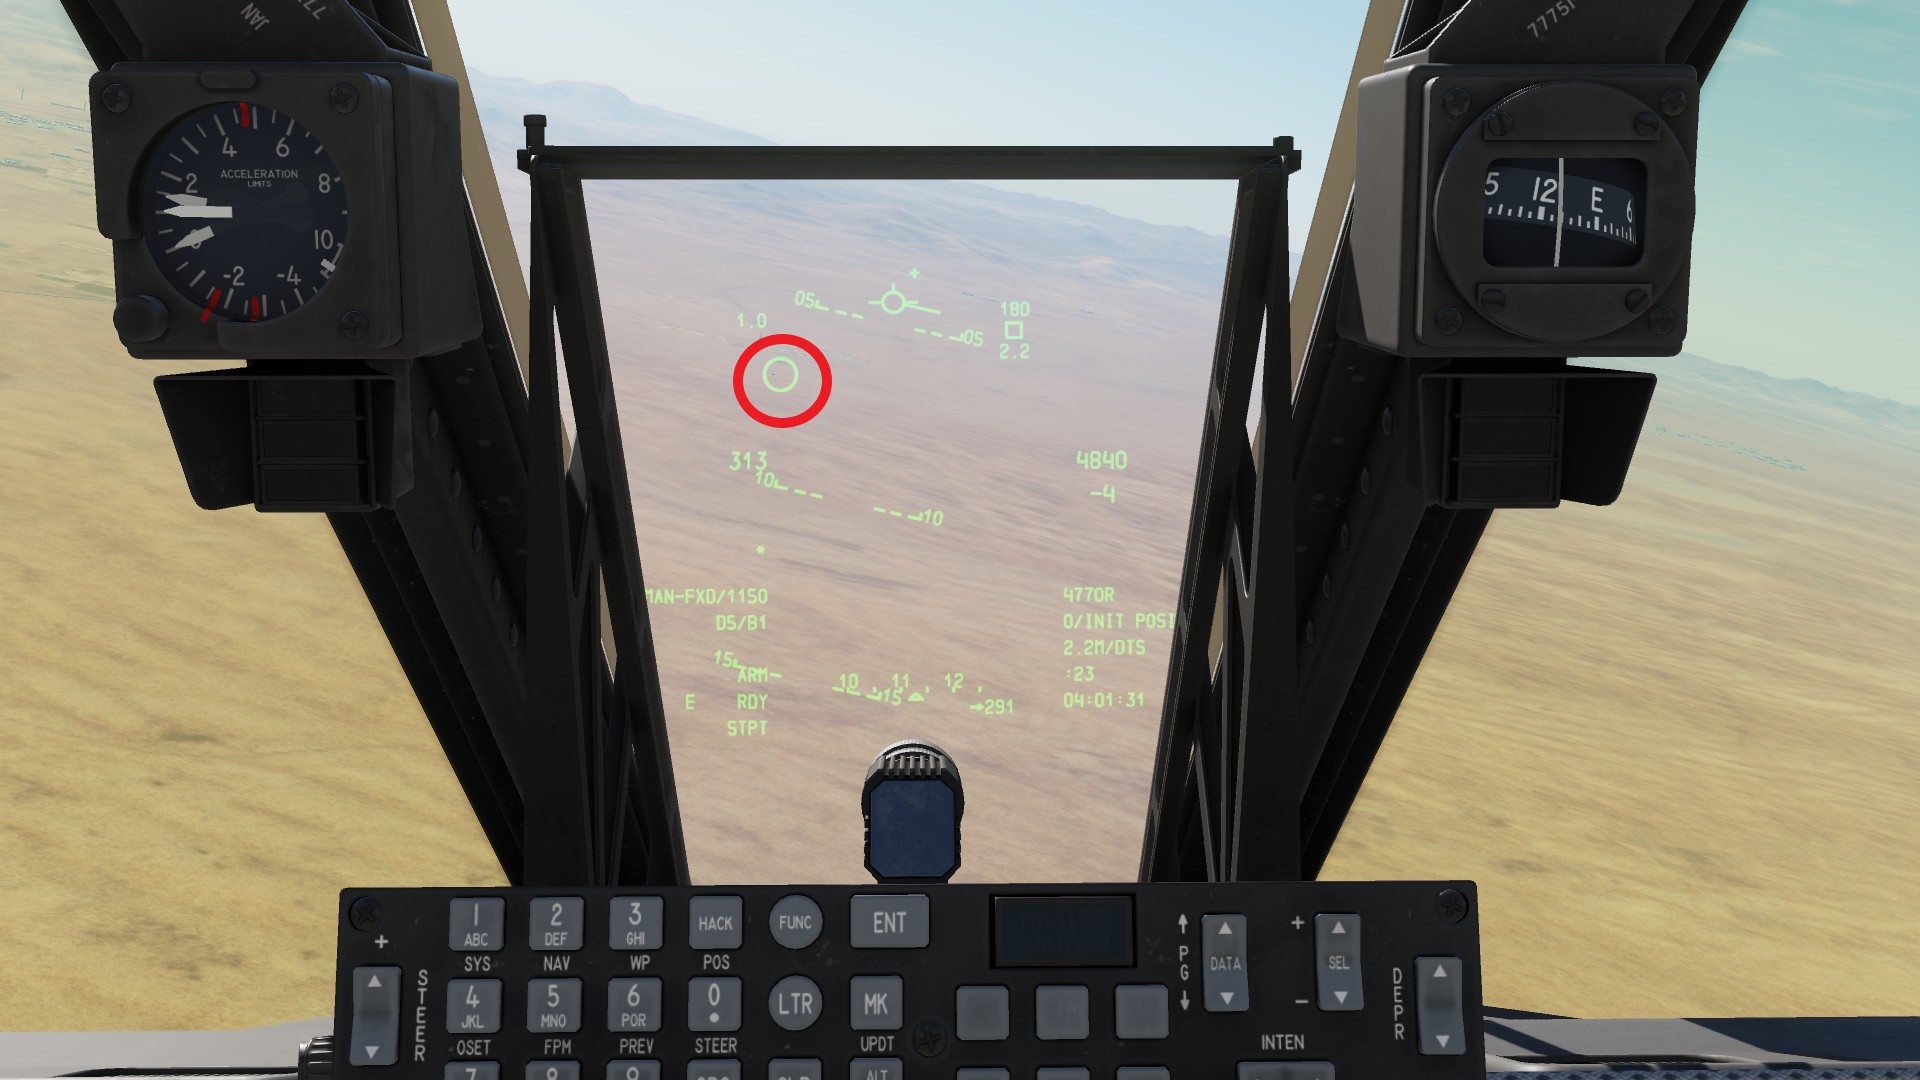 The missile is fire and forget.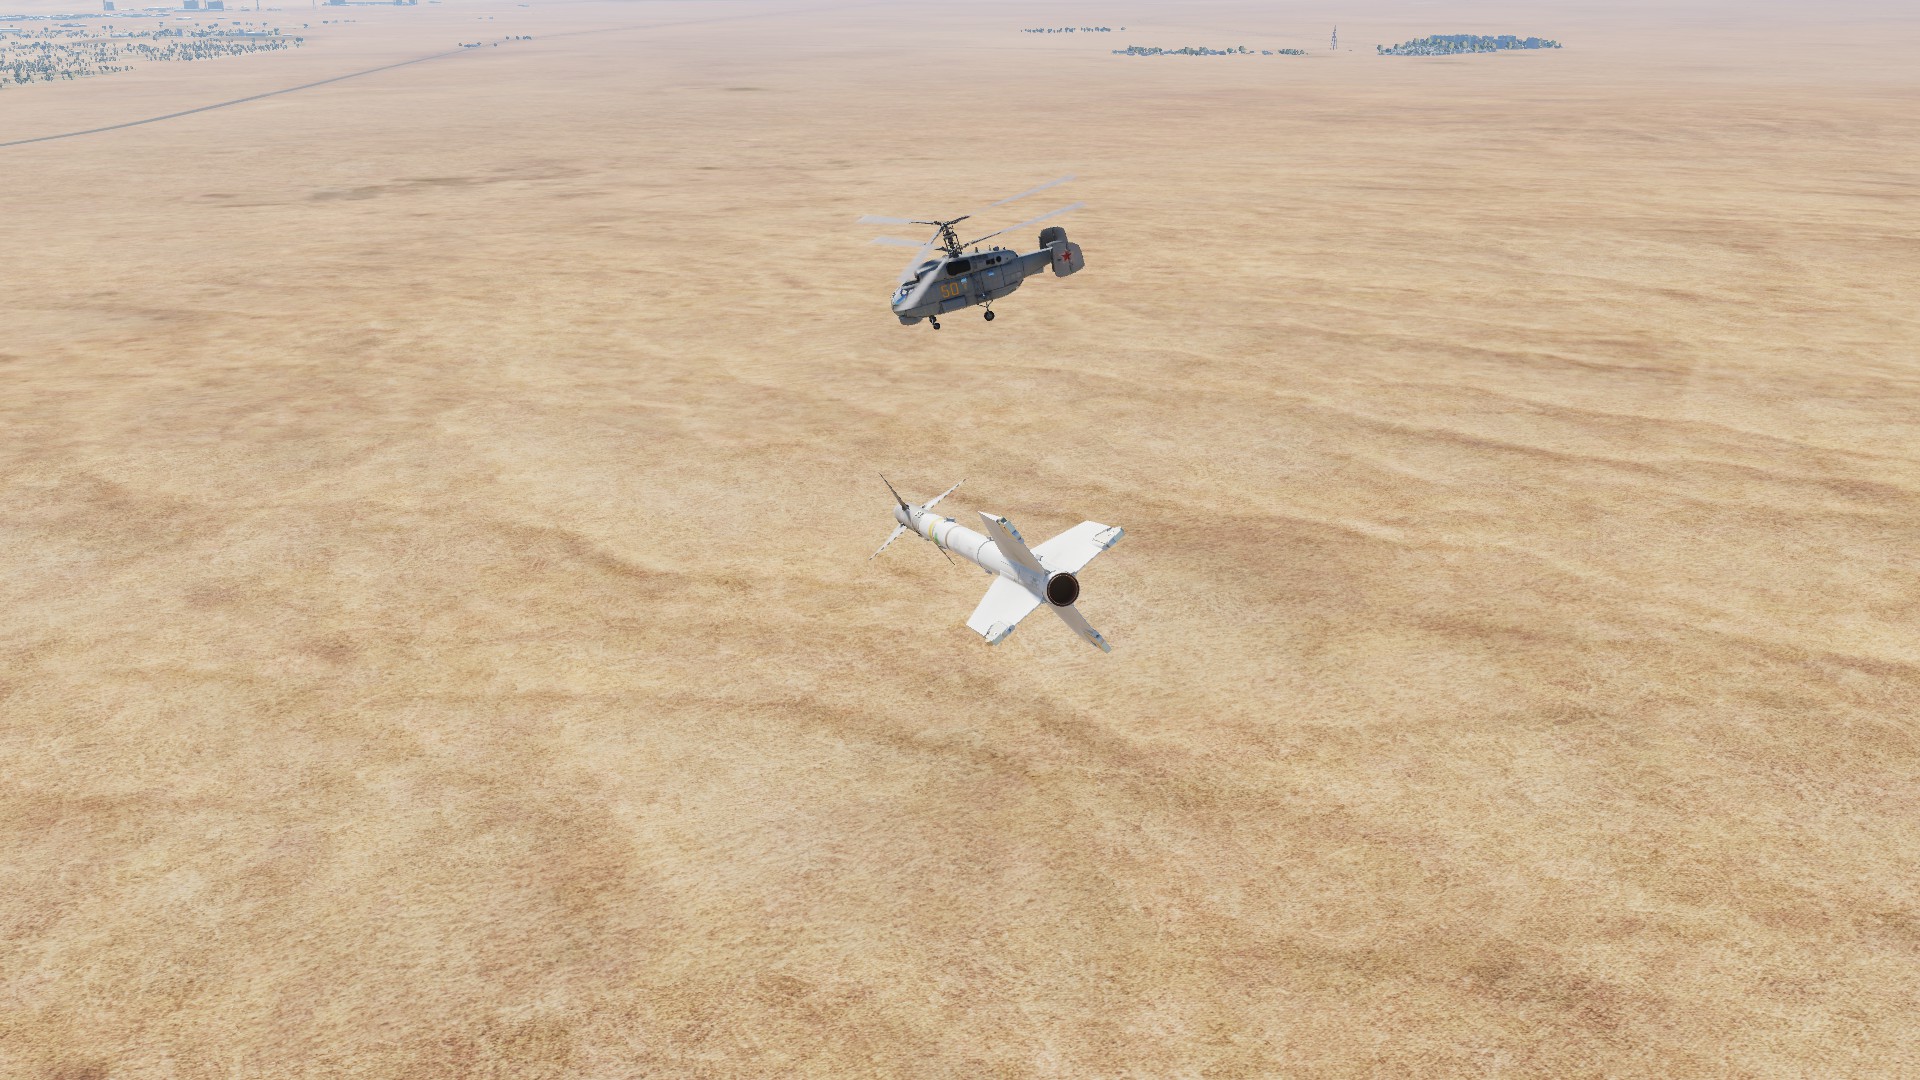
Radio communications
In the A10CII you have three radios at your disposal.
However i will only teach you about two of them, since i never used the third and dont want to pretend to know stuff about a system i never used.
That being said, for this chapter want to put out a big "thats how i do it" disclaimer. Especially for the AN/ARC-210 radio, there are a lot of options that ive never touched.
The two radios i will teach you are the AN/ARC-210 radio and the AN/ARC-164 UHF radio. Both are located under the throttle.
All frequencies are usually somewhere in the servers briefing which you can access by pressing ESC and then going to BRIEFING.
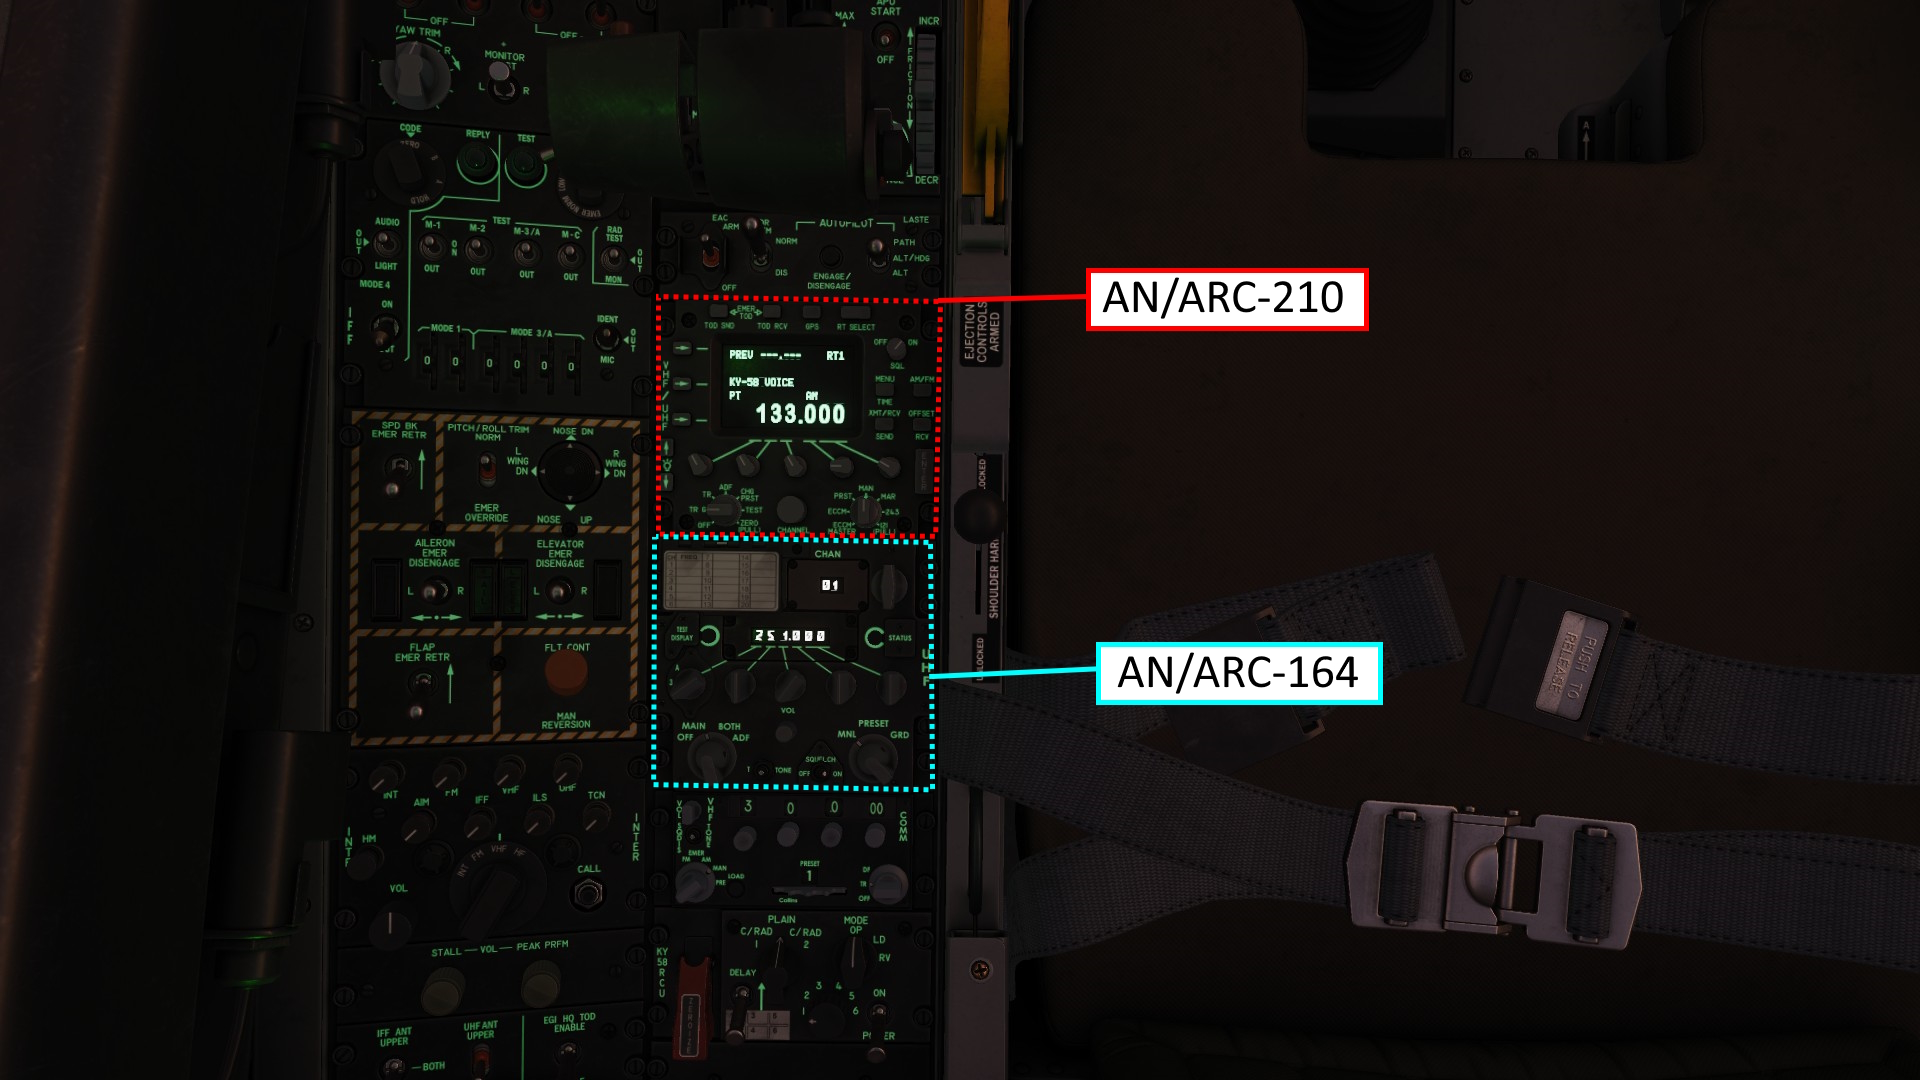
I personally use the 164 for more "permanent comms" like awacs or flightmembers while i use the presets on the 210 for "flexible comms" like tankers, JTACs, ATCs and therelike.
- Function dial
- Frequency mode dial
- Frequency selector dials
- Volume knob
The AN/ARC-164 is pretty straight forwards to use.
Simply set the function dial to MAIN, the frequency mode dial to MNL for manual and use the frequency selectors to set your desired frequency. You may adjust the volume via the volume knob.
The AN/ARC-210 is the more complex of the two radios. It has more options but like i said i will only focus on the way i use it.
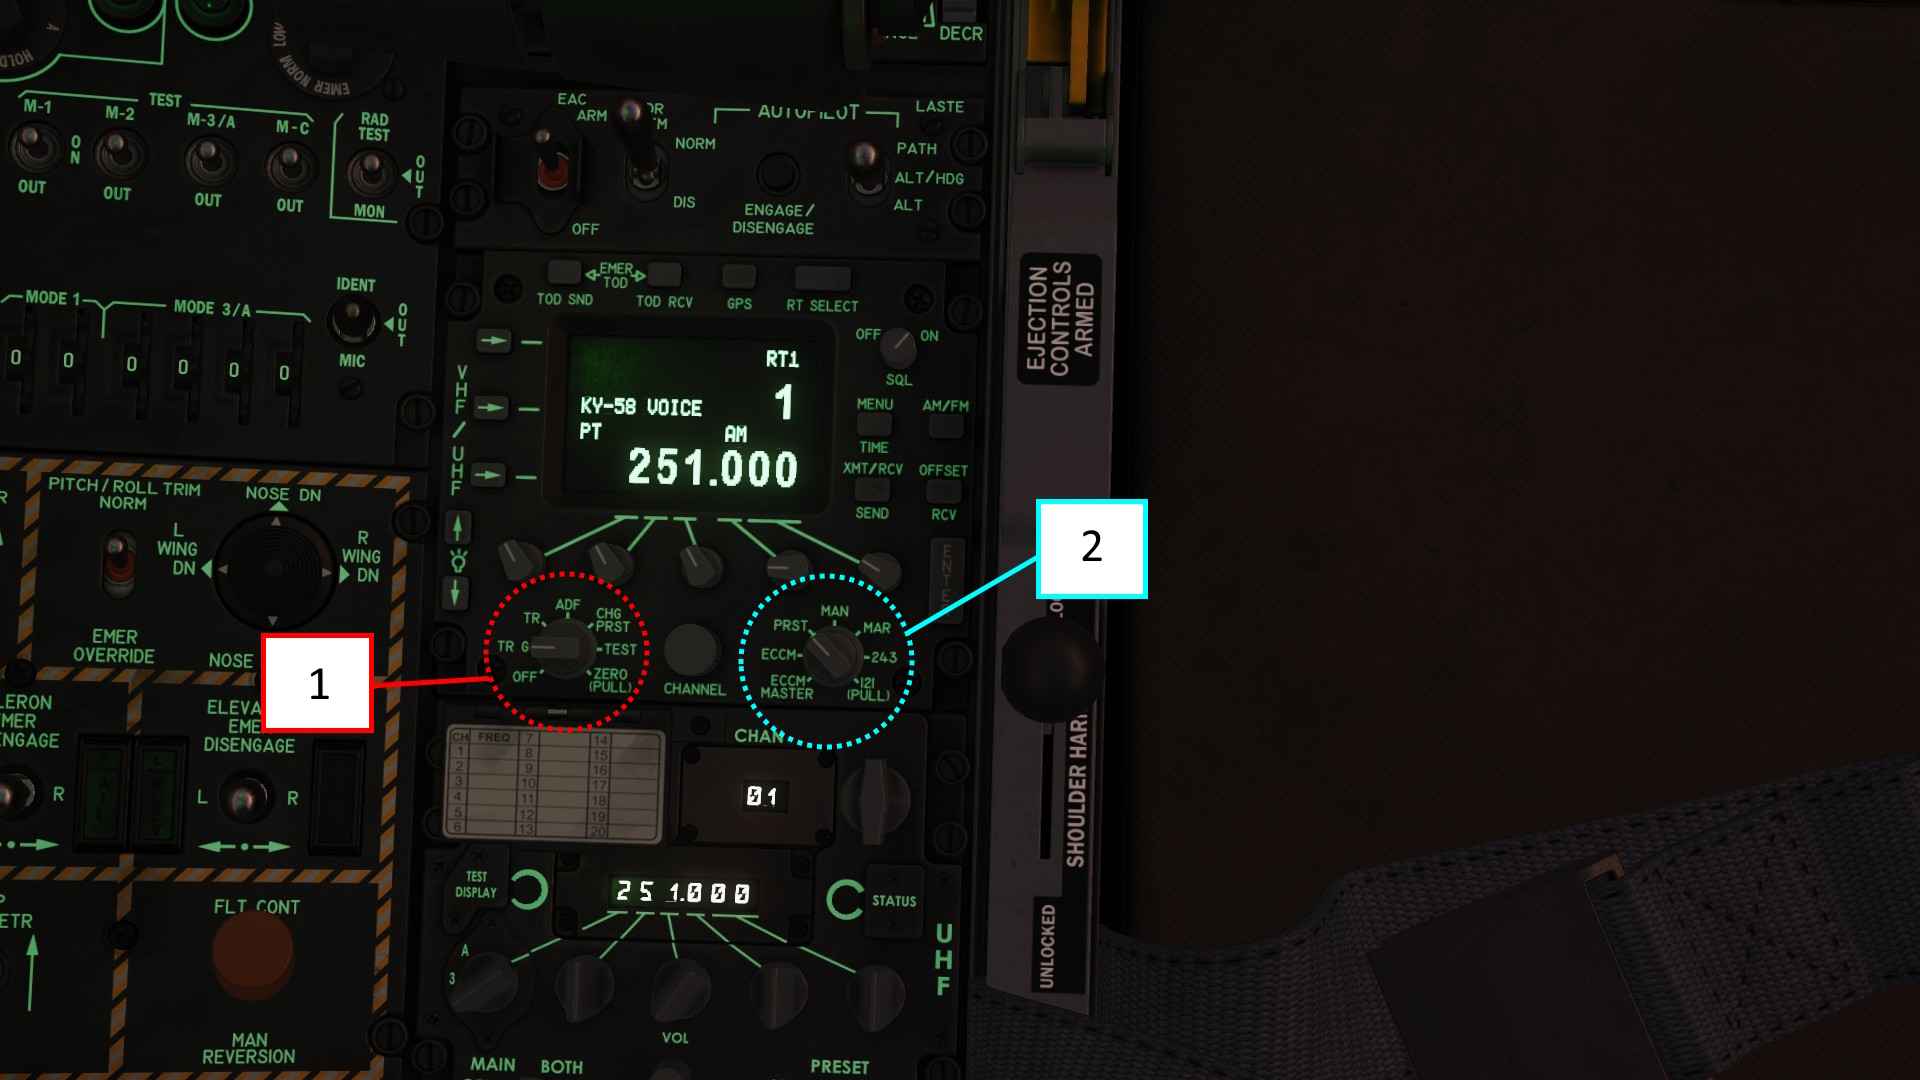
- ARC-210 master switch
- ARC-210 secondary switch
First off, set the ARC-210 master switch to TR G (transmit recieve + monitoring guard channel) and the secondary switch to PRST for preset.
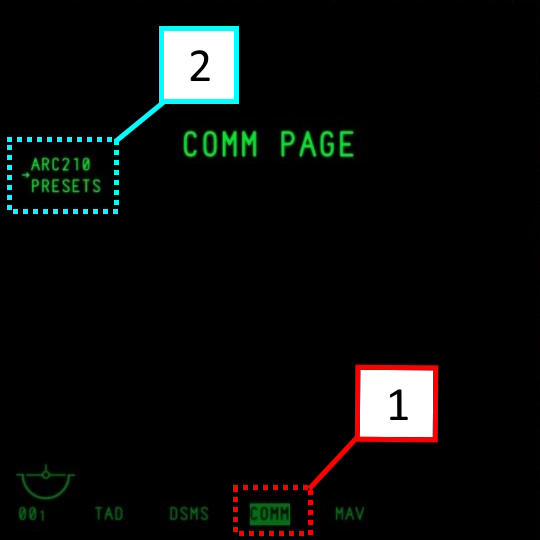 1. COMMS page function
- ARC-210 PRESET function
To edit the radios presets, nagivate to the preset page by pressing the function button under the COMMS function (default on your left MFD) and then the function button next to the ARC-210 PRESET function.
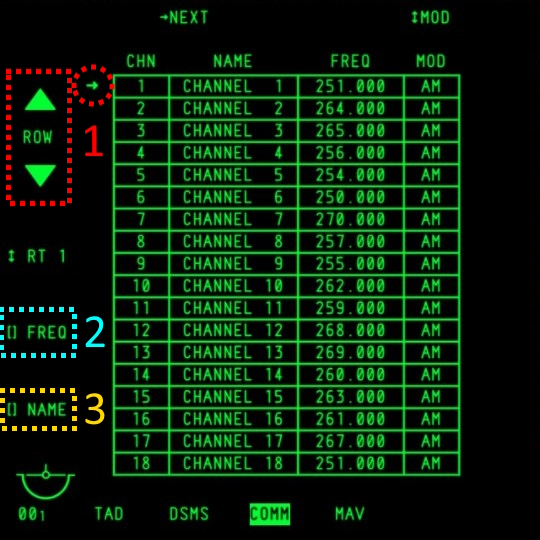 1. Row selector functions up and down & row indicator
- Frequency function
- Name function
Using the buttons next to the Row selector functions, you can choose what preset you want to change.
All changes by both the frequency and name function will only affect the preset you have selected via the row selector. You select a preset by moving the row indicator next to the preset of your choosing.
Using the UFC (more on that in a moment), you can enter your desired frequency or name and press the button next to the function to change it.
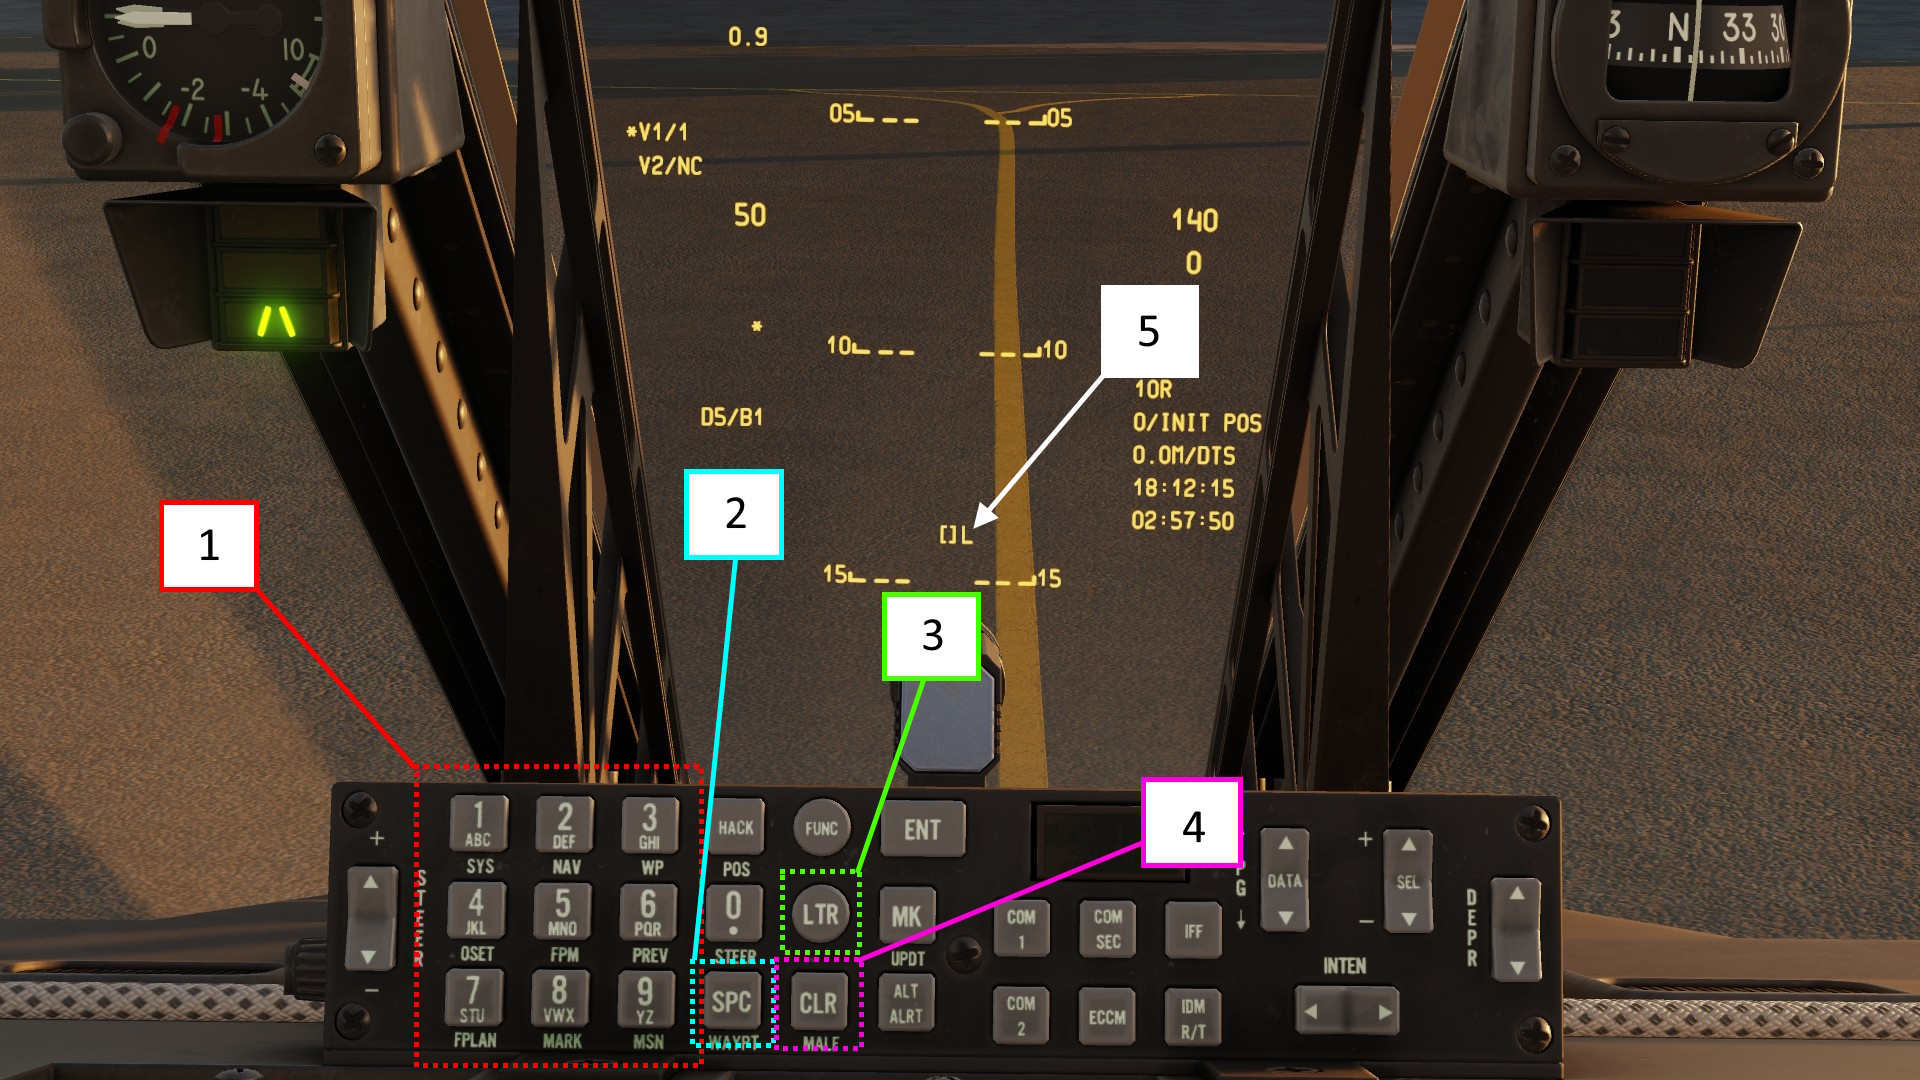
- Number / Letter buttons
- Space button
- Letter Function key
- Clear key
- Letter function indicator
Using the UFC, you can write your frequencies and preset names to then paste into the preset via UFC.
To write numbers, use the number buttons. If you want to write letters, press the LTR function key. If you press the key once, a L will appear as letter function indicator and the next button you press will be a letter instead of a number. If you press the LTR key twice, a Ḻ will appear as letter function indicator. This means that all following button inputs will be a letter until you disable the LTR function by pressing the key a third time.
The SPC key will act like your keyboards space key and leaves a blank character.
The CLR key will clear the last character.
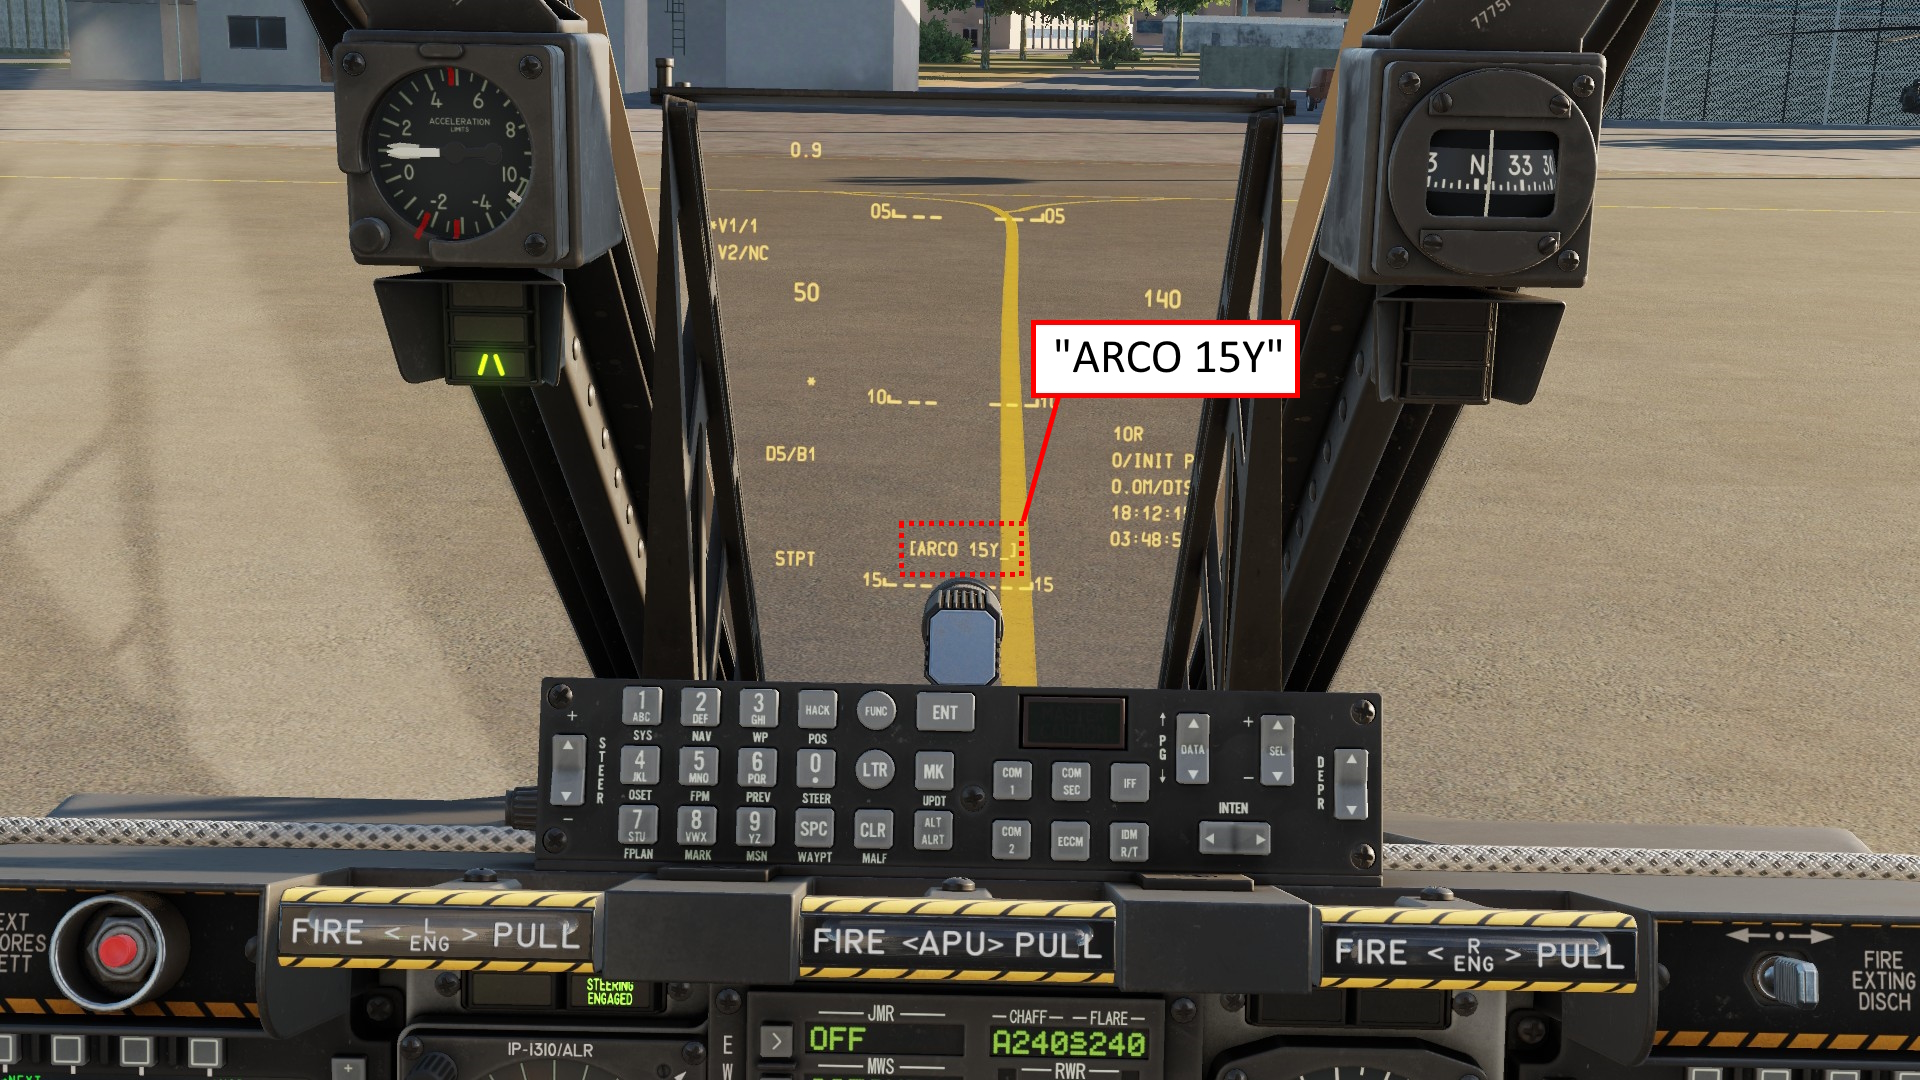
In the following example, i have edit preset 6 to be my tankers frequency. I will call it "ARCO 15Y", the name of the frequencies tanker and its TACAN frequency and set the frequency to 315.000 AM.
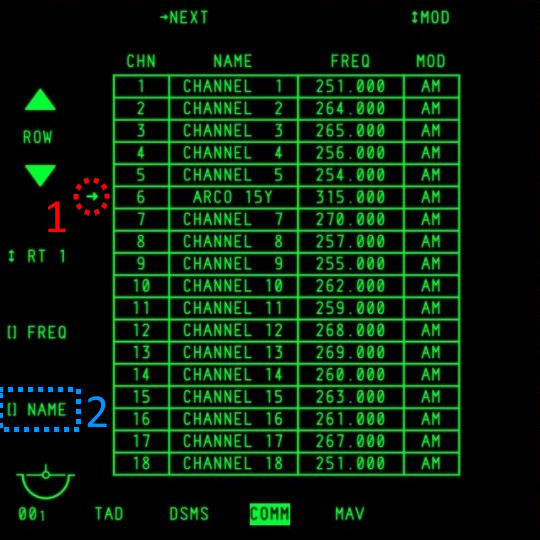 1. Preset selector
- Name function
With the Preset selector next to preset channel 6 and "ARCO 15Y" on my HUD, i press the function key next to the NAME function.
I then repeat the process but instead of "ARCO 15Y", i type "315" (the tankers frequency) into the UFC and press the button next to FREQ.
With this set, the preset is functioning.
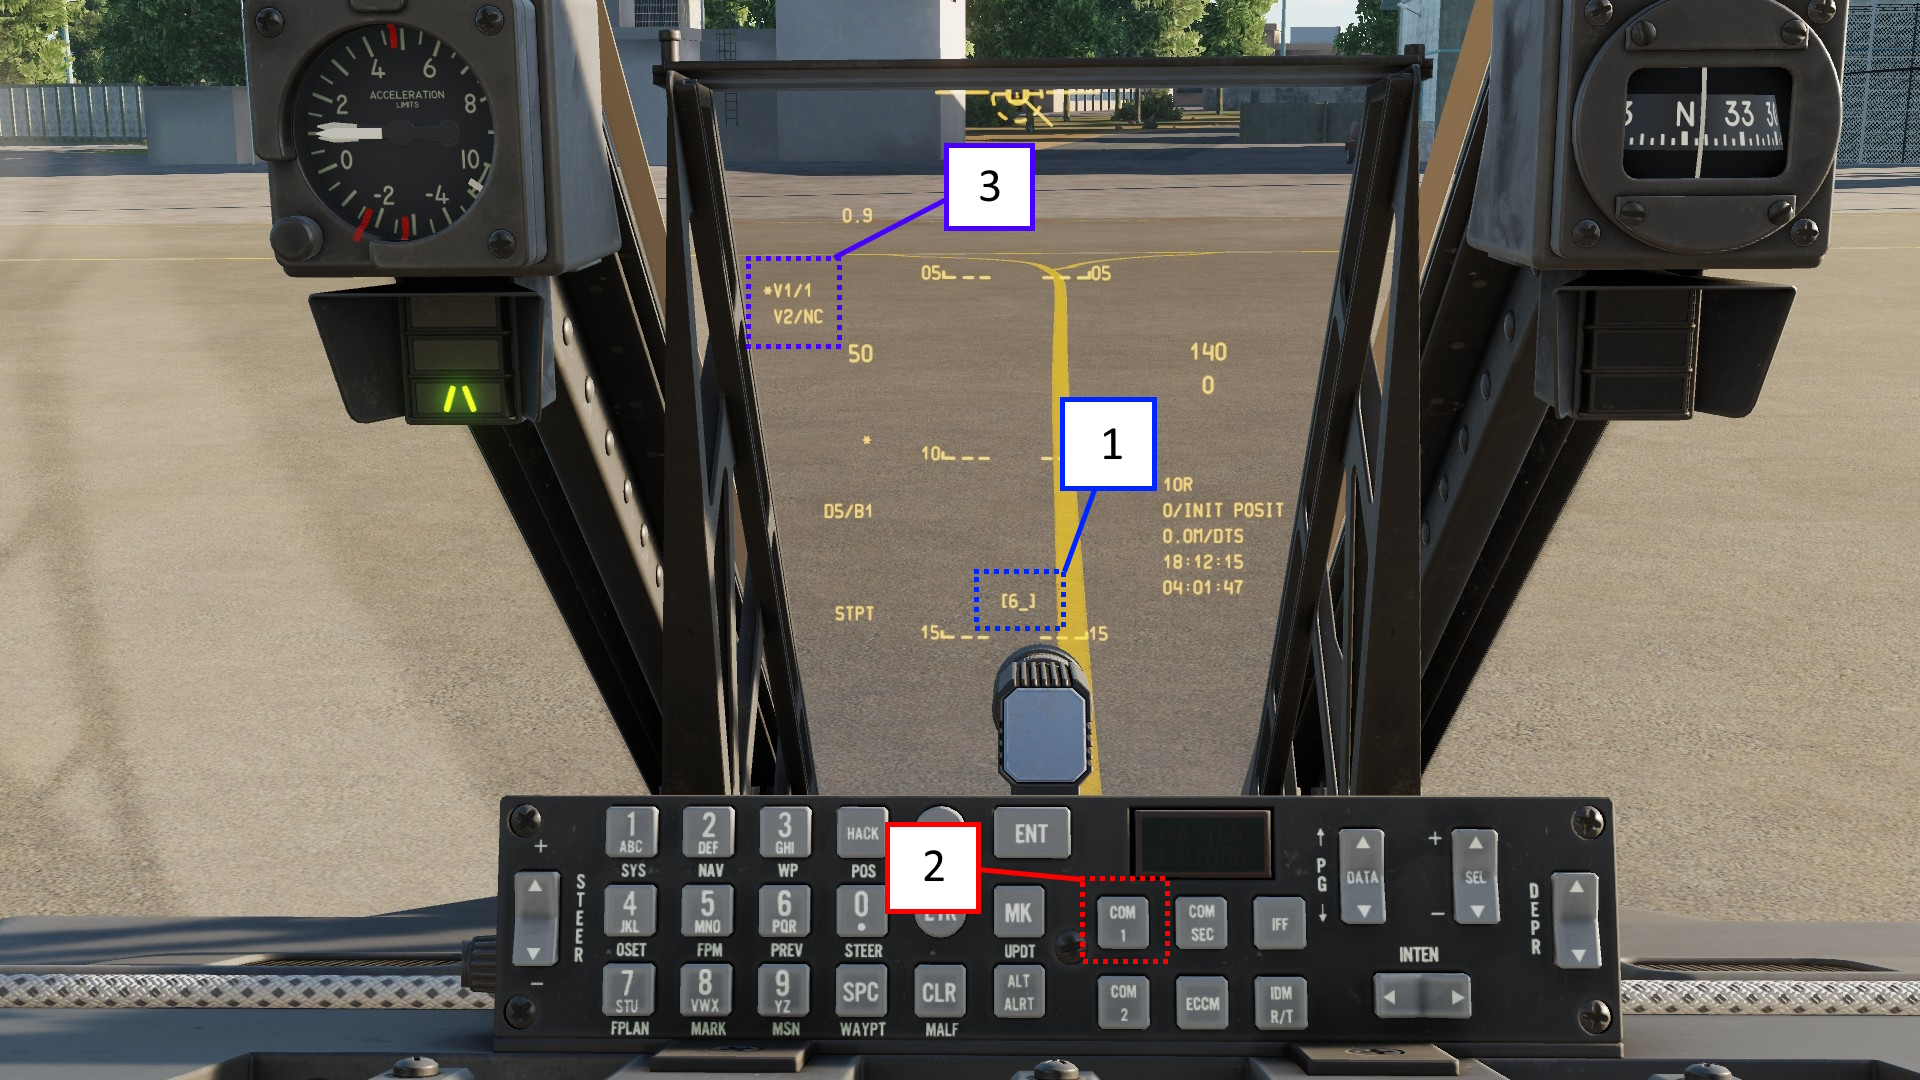
- Desired preset channel selected via UFC
- COMM 1 function key
- AN/ARC-210 HUD repeater
To select a given preset channel, simply use the UFC to type the channel onto your HUD and press the COMM 1 function key. Your AN/ARC-210 HUD repeater will update to V1/your preset channel. In our case V1/6.
Note that if you want to disable the HUD repeater, you can press and hold the COMM 1 and / or COMM 2 function key. This will disable either the V1 or V2 repeater.
Also note that the V2 repeater serves no function as the A10CII only has one AN/ARC-210.
All further communications are set up by the server or in the mission. You can access the communications menu via the # key.
Alternatively you can look up the key you have set for "Communications menu" in the A10CII keybindings.
Landing
Since every sortie has to come to and end, you need to get back to the ground at some point.
To land, you will first need to find the airfield of your choice and distinguish between runway and taxistrip. Keep in mind that some airfields may have more that one runway.
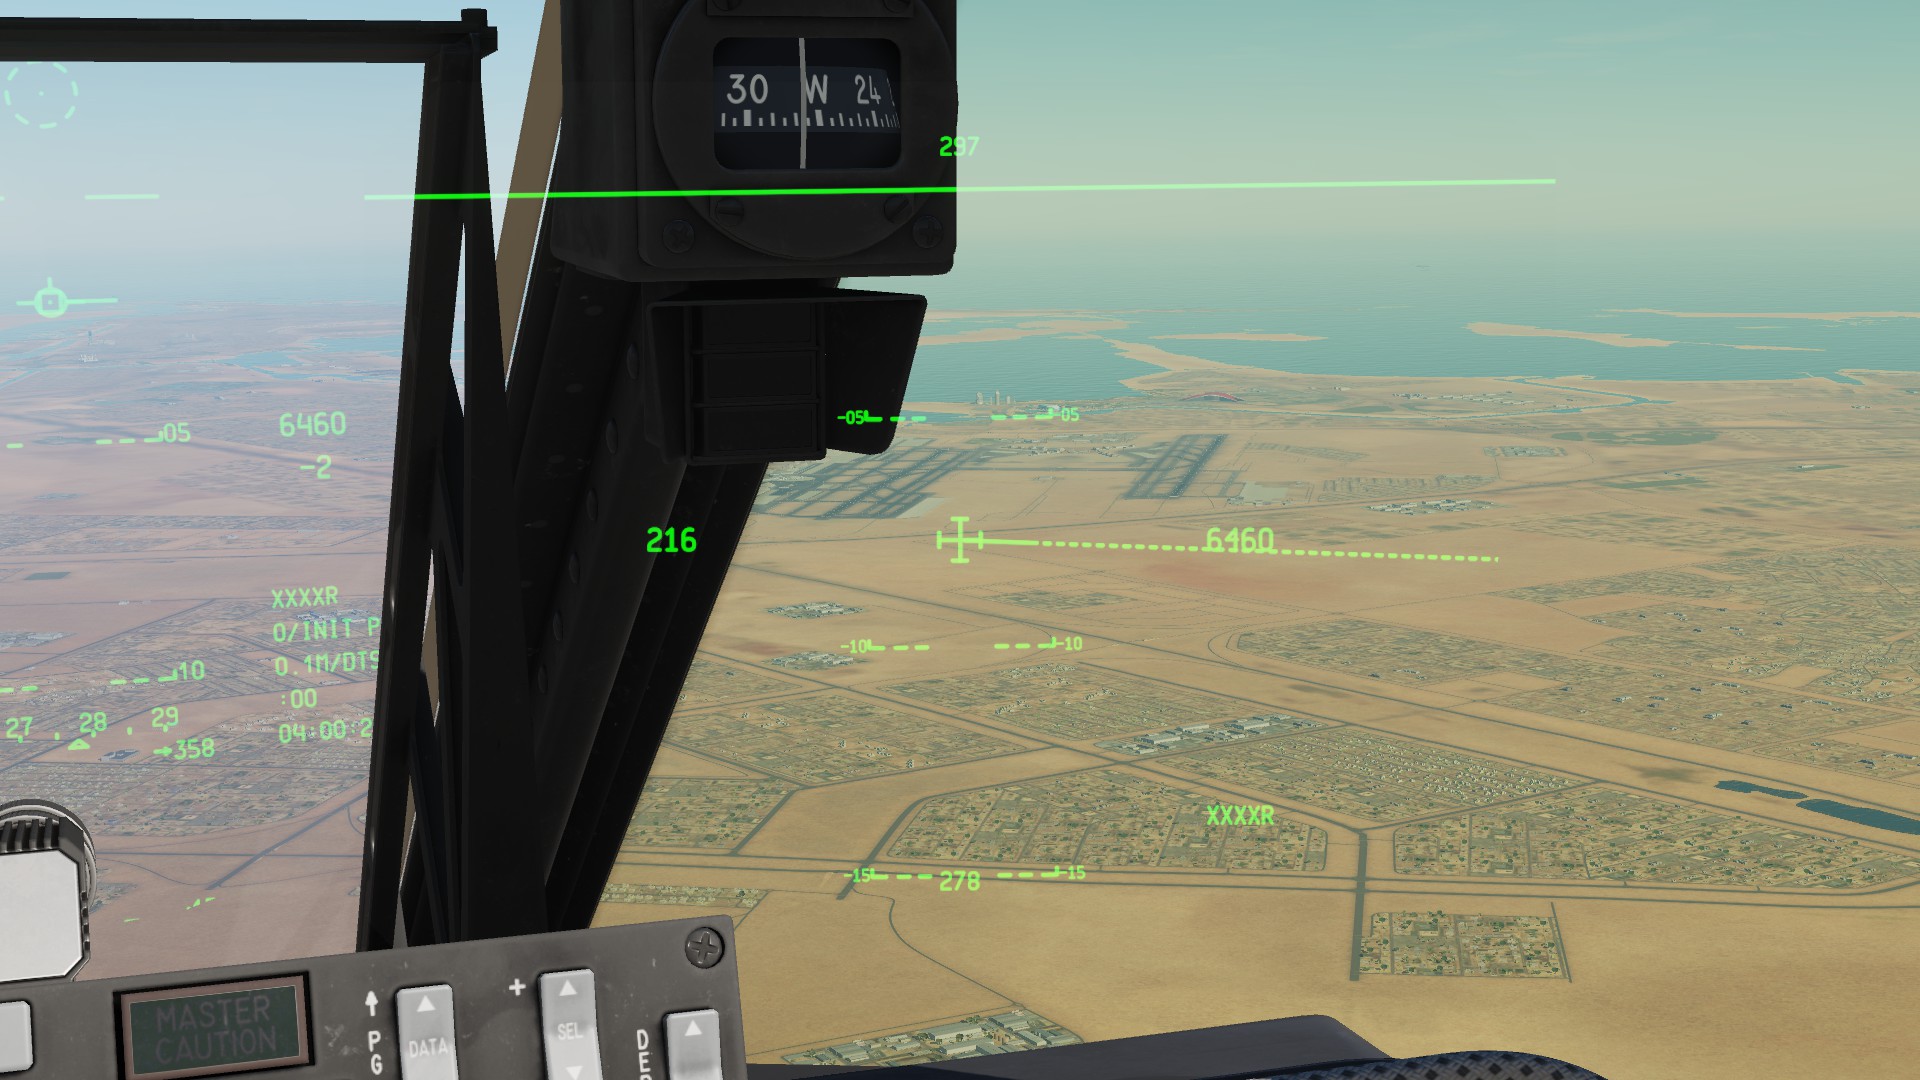
The easiest way to find a airfield is to select waypoint 0, which will be your initial position - basically where you started from. Follow it and you are guaranteed to get back to your homebase.
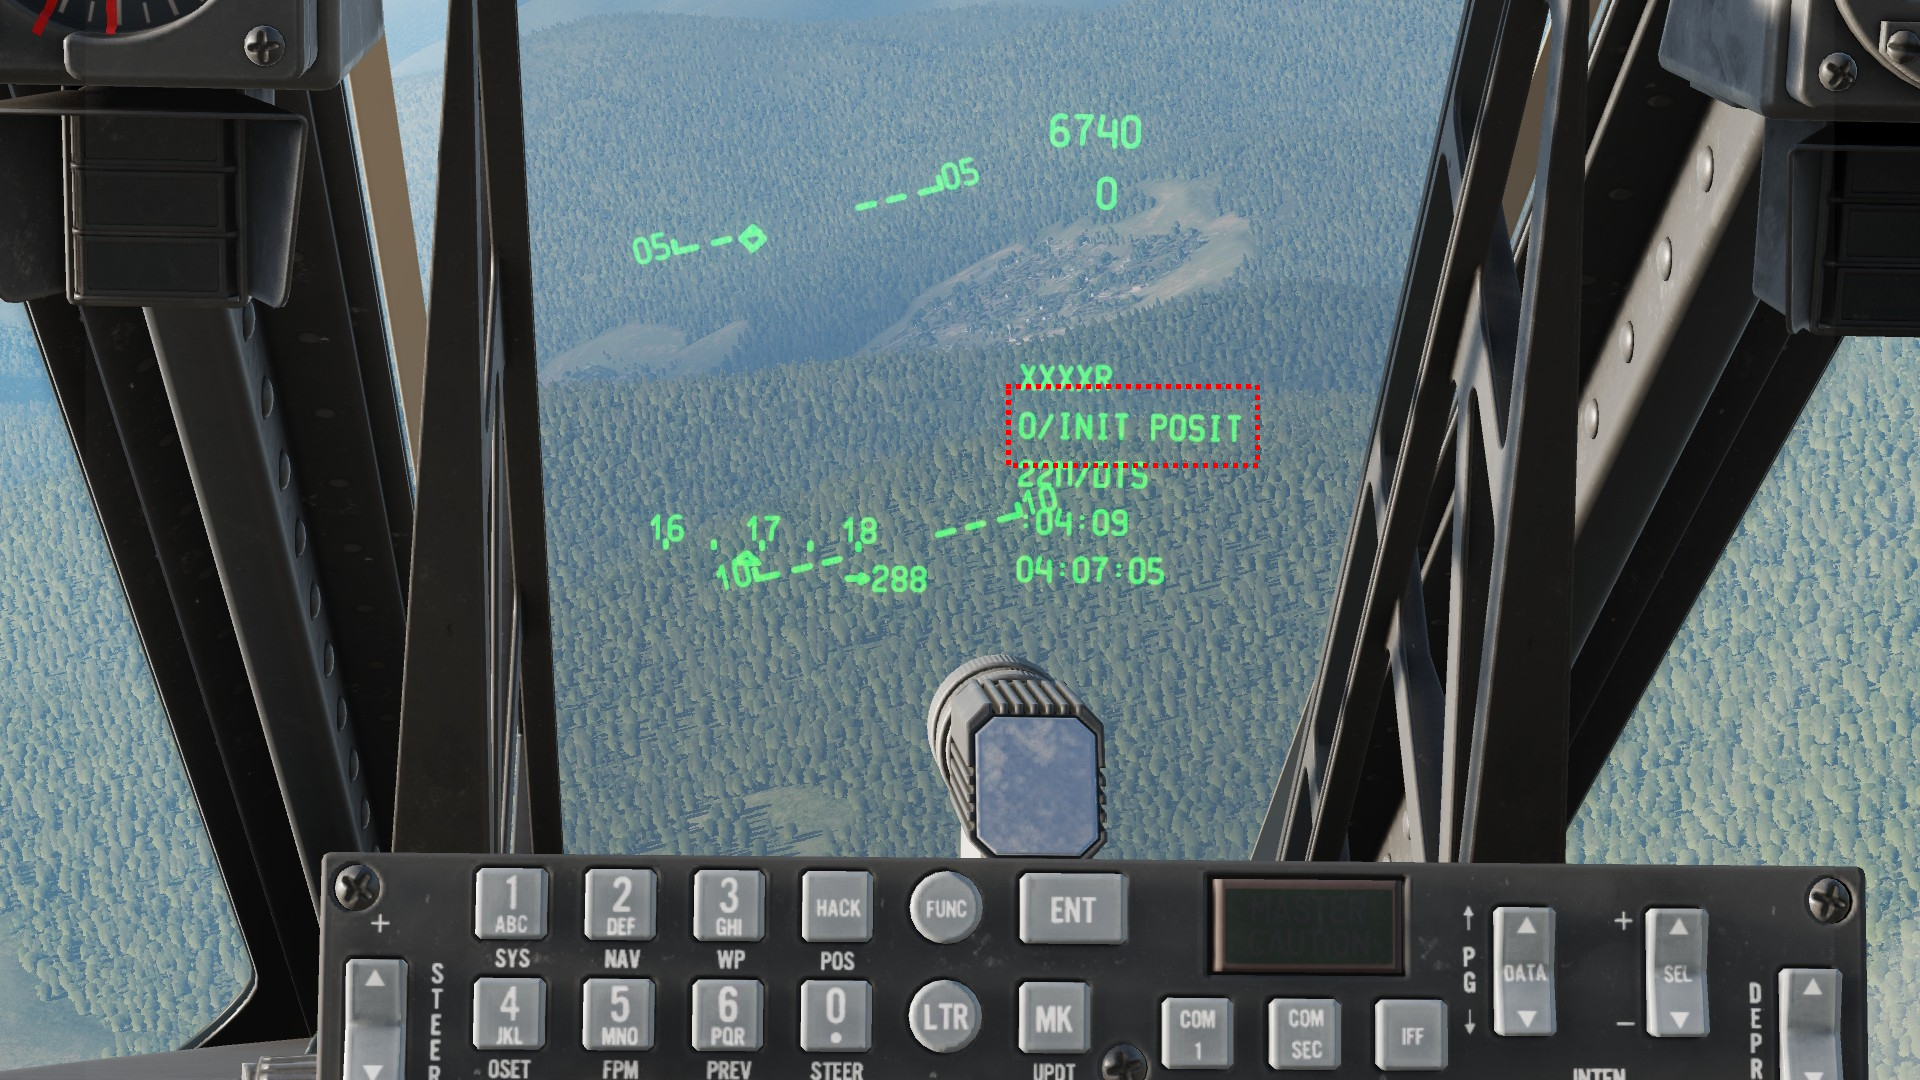
Now you need to line up with the runway you want to land on. It doesnt have to be perfect, but the better youre aligned, the less you have to worry about later.
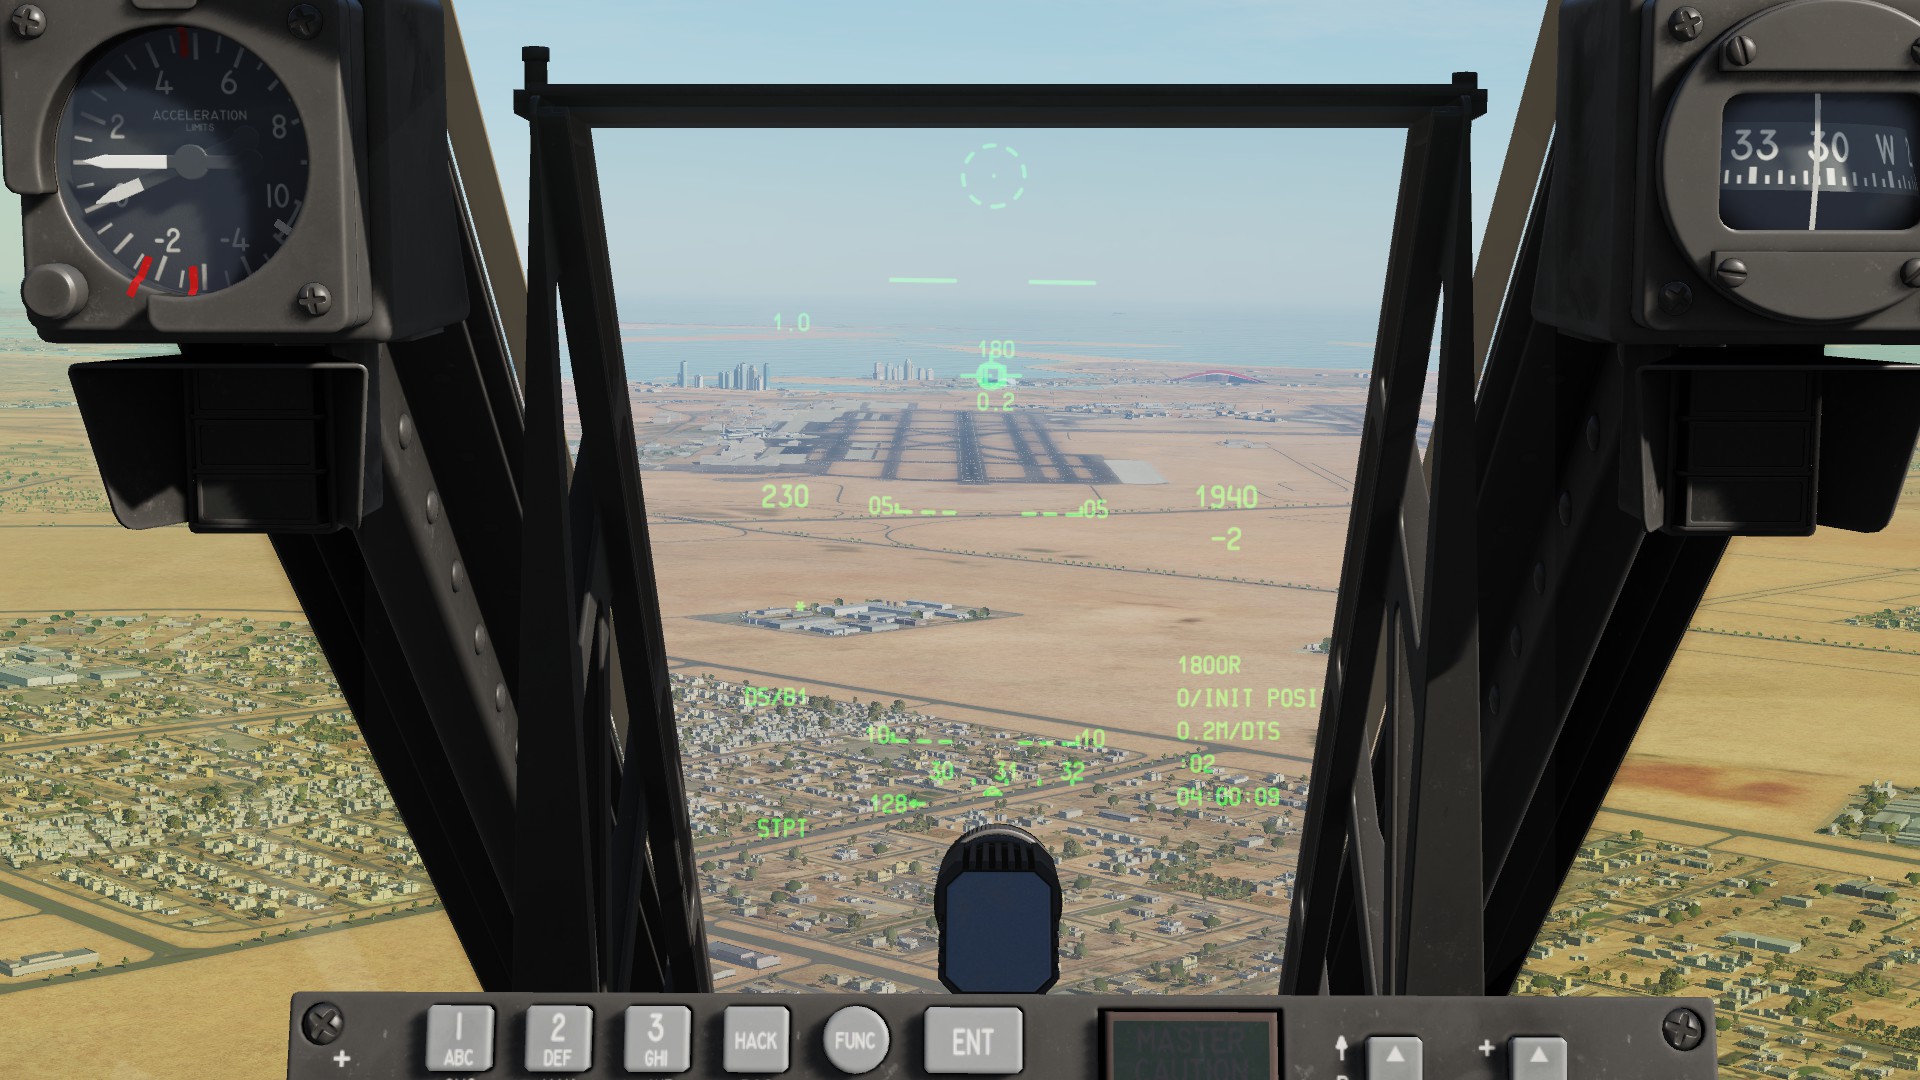
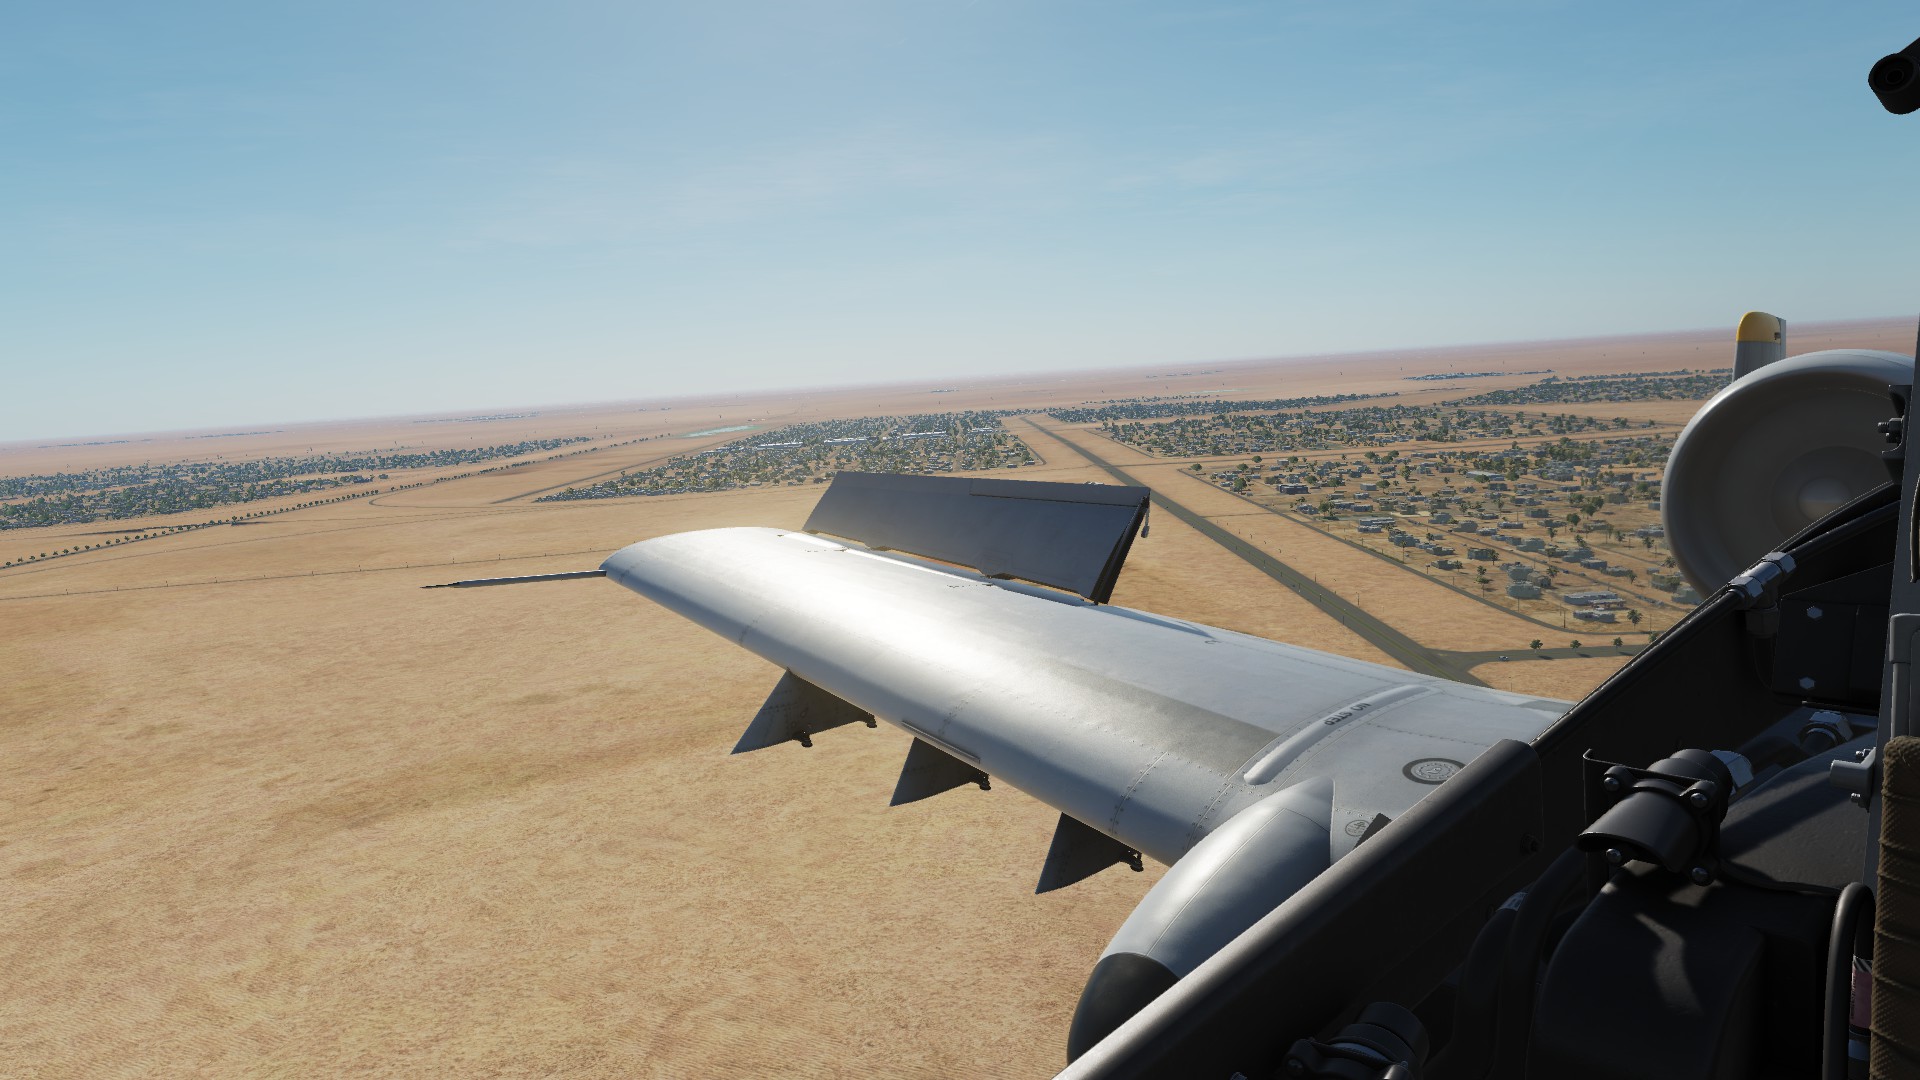
Deploy your speedbrakes to slow down. You landing speed should never be over 160 knots.
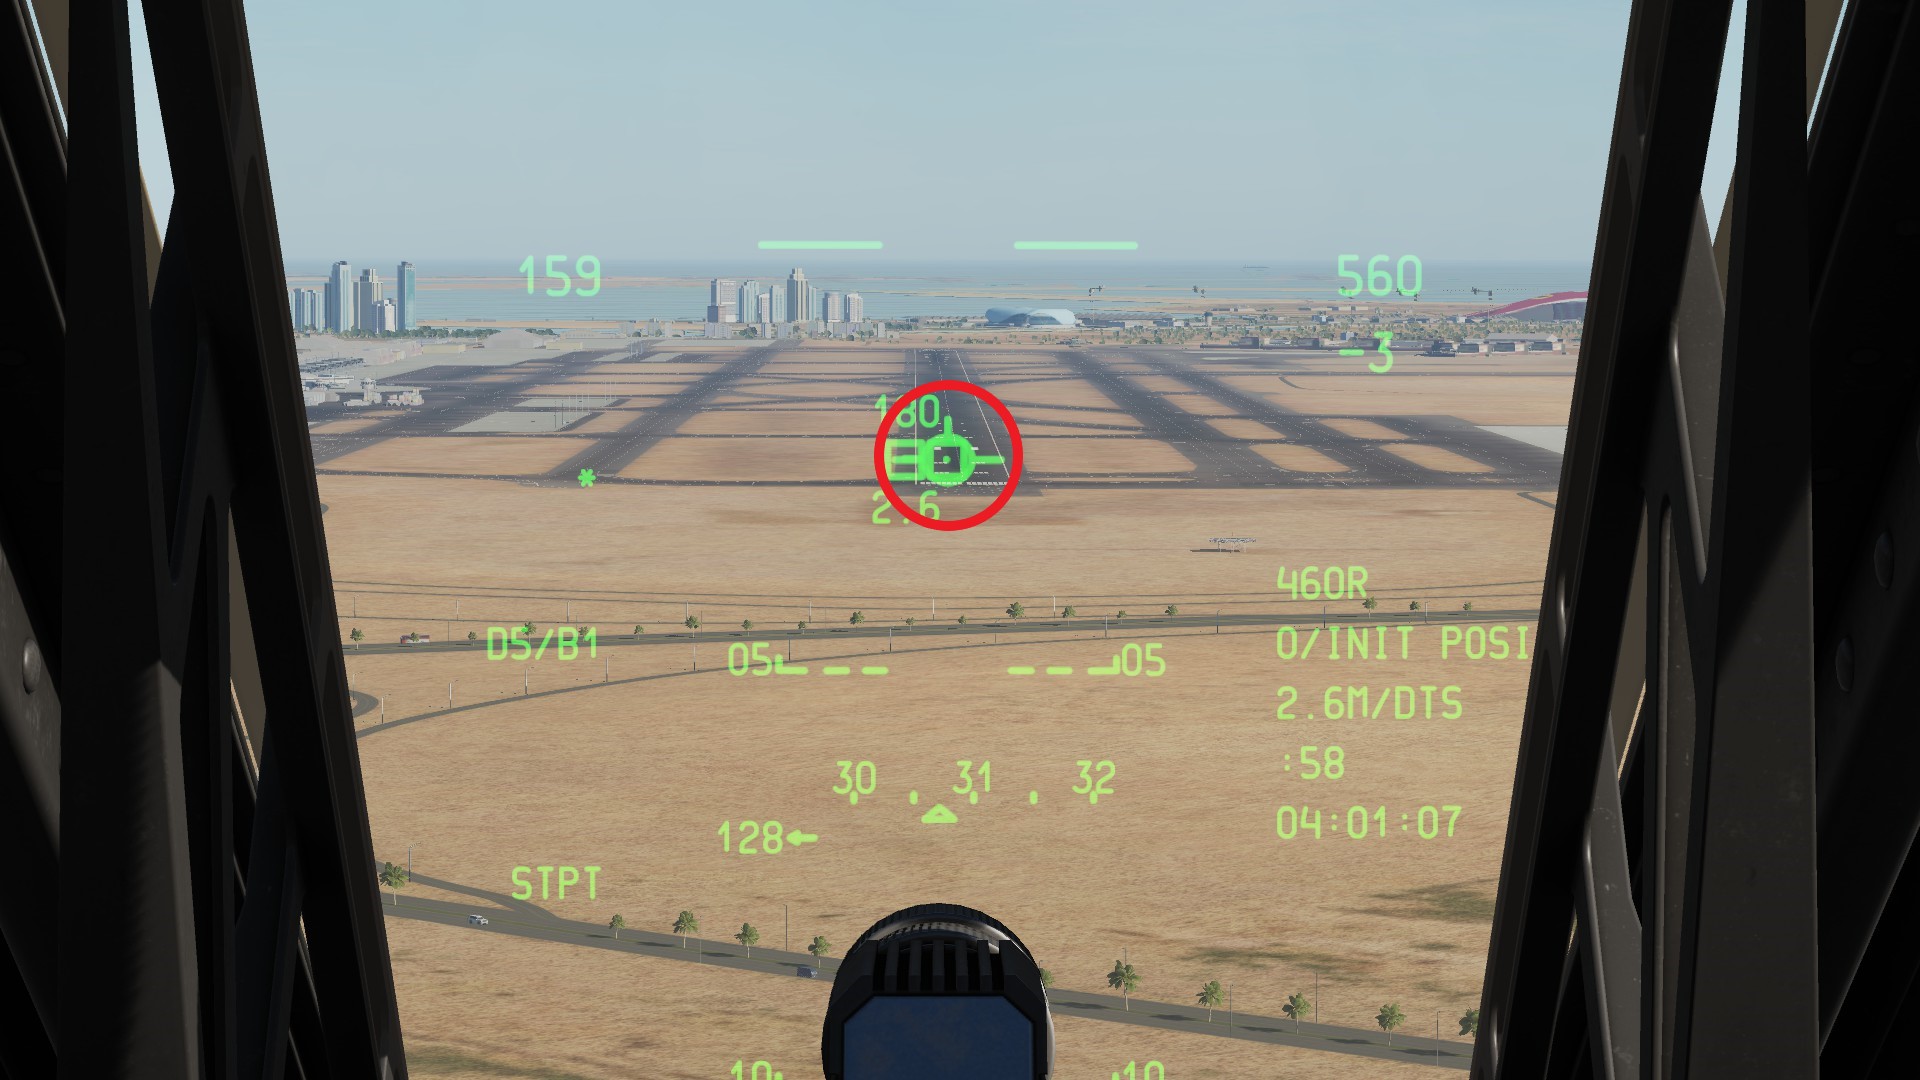
Move your velocity vector (red) over the start of the runway and keep it there. To do this, add or reduce throttle power. However, you have to make sure, that your speed is over 130 and under 160 knots.
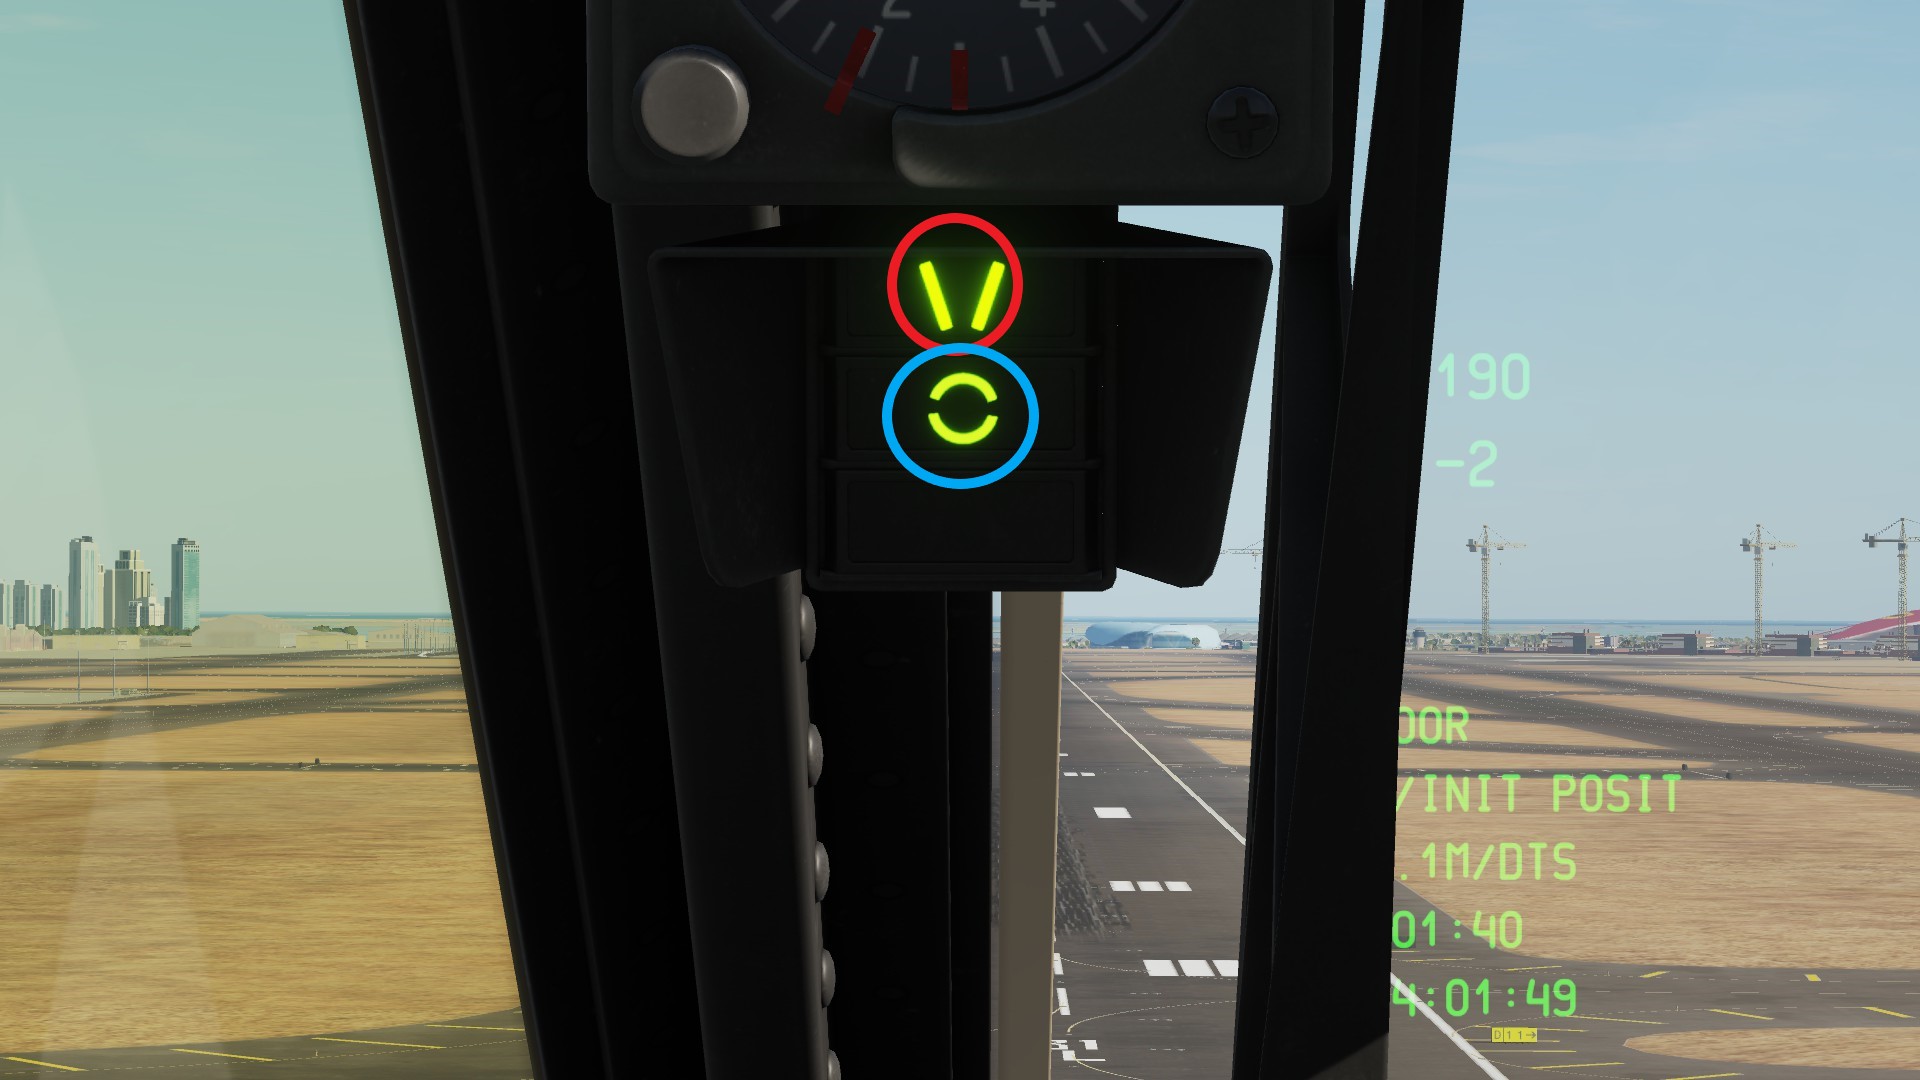
When deploying your gear, you will get new symbology next to your HUD. The small box in the top left will show you one or two of the following symbols. The meaning is as follows.
Red: Too slow, add throttle.
Blue: On speed.
Purple: Too fast, decrease throttle.
If the aircraft shows you two symbols, youre near the edge between them.
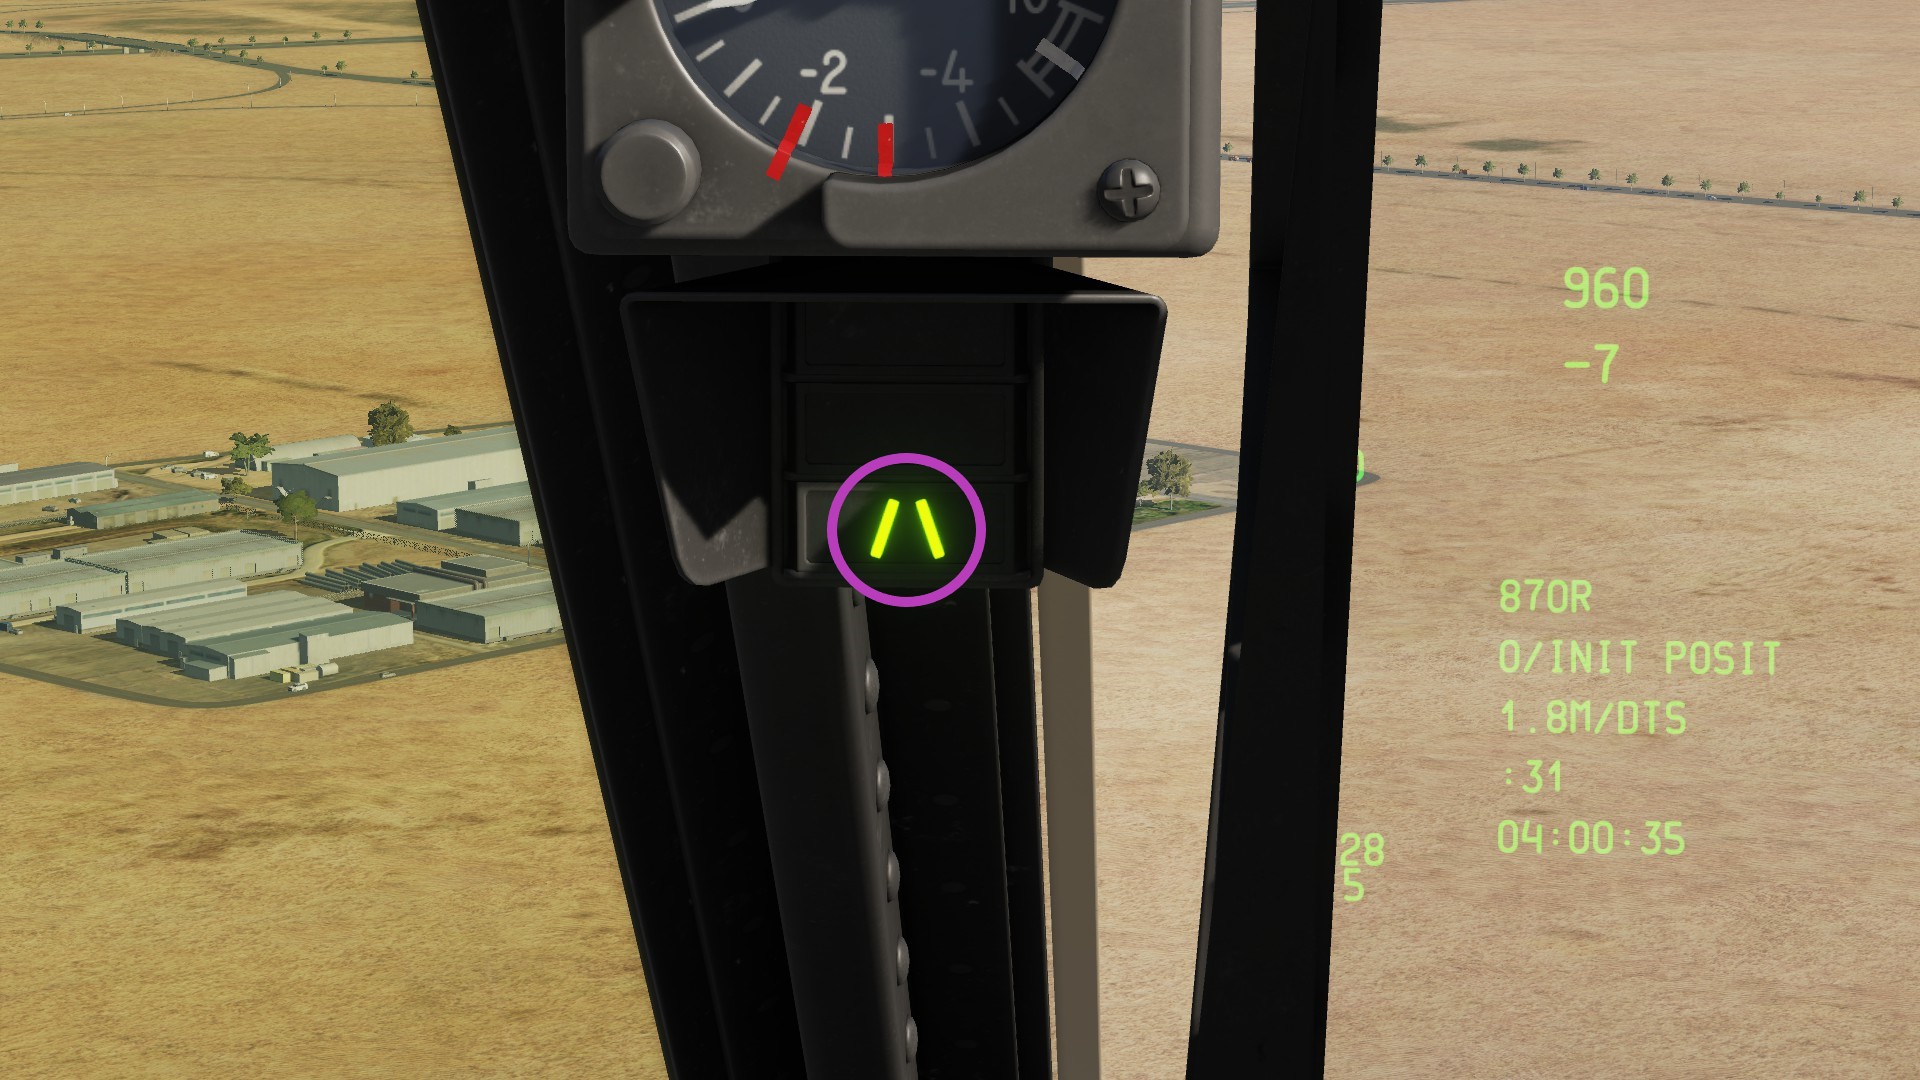
Proceed to fly towards the airfield. A second or two before you touch the ground, pull the throttle back to 0% and pitch up. Set your velocity vector to the end of the runway.
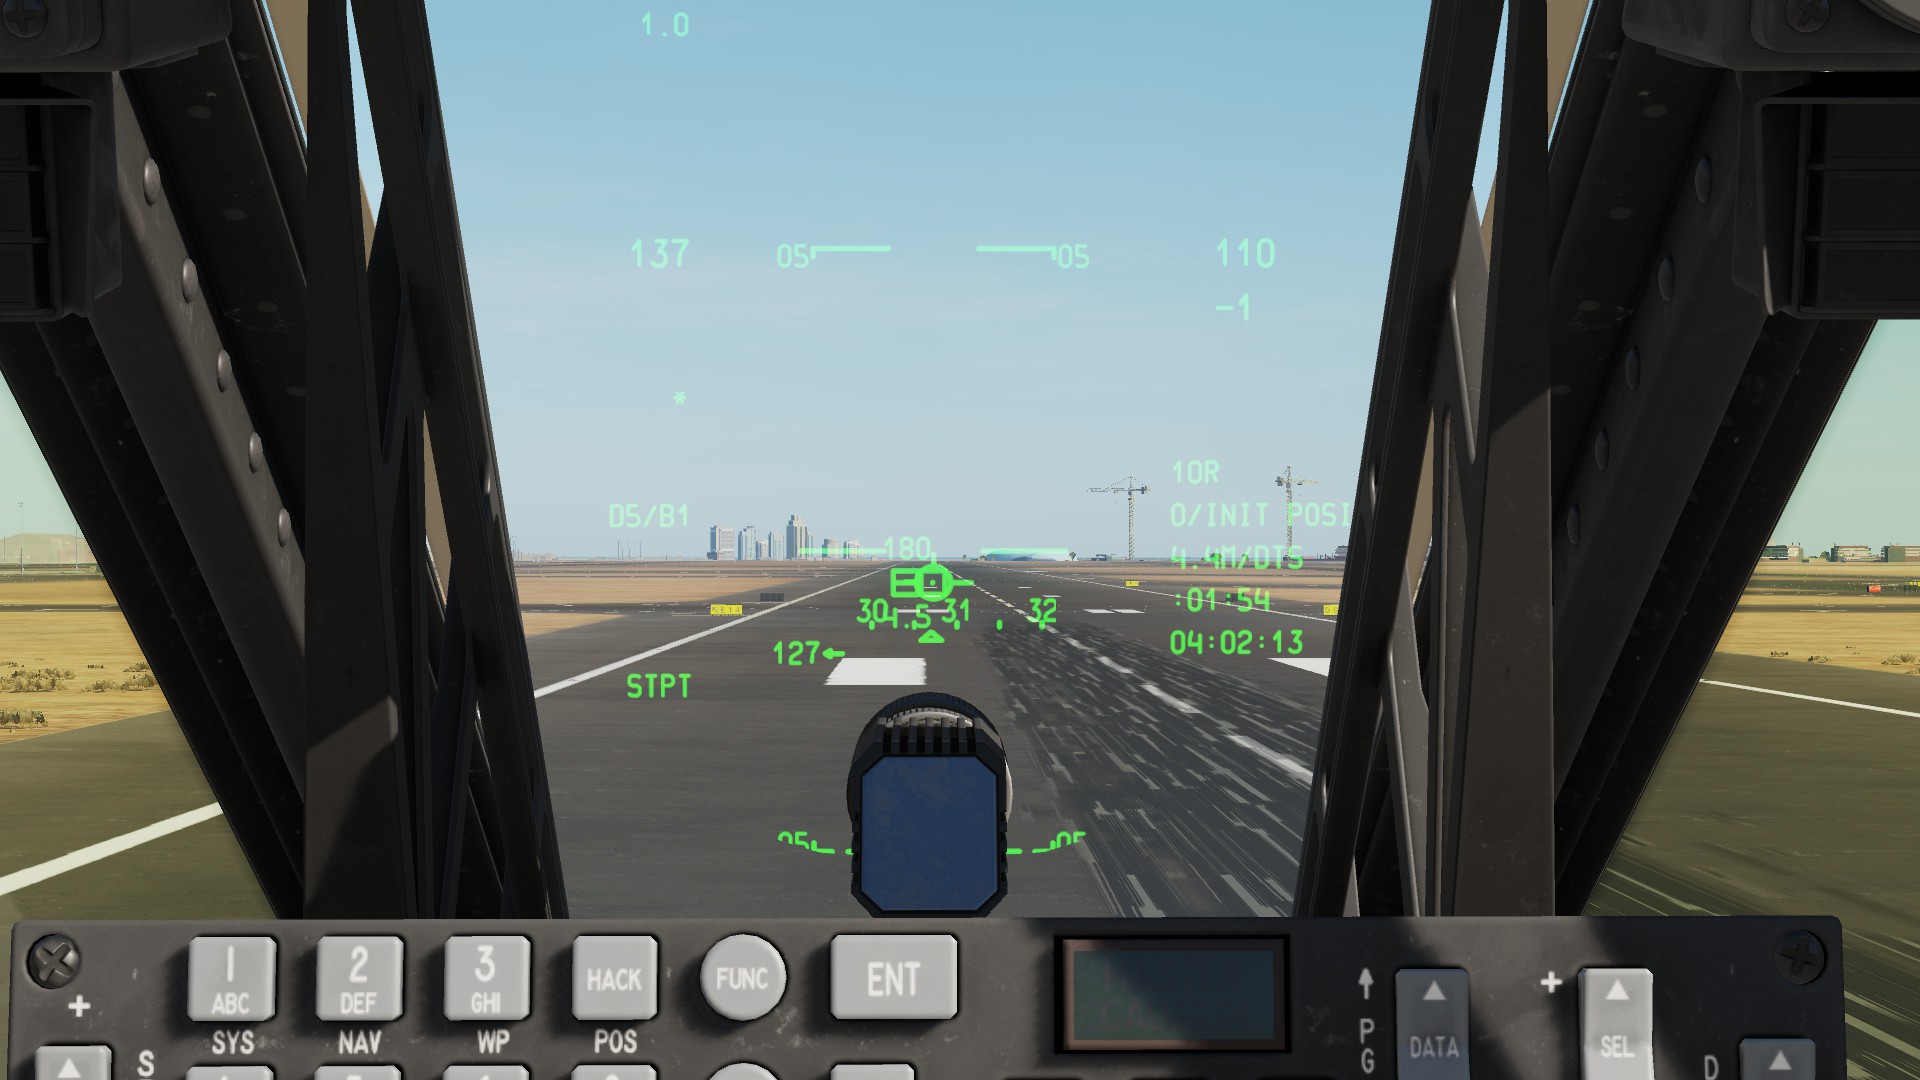
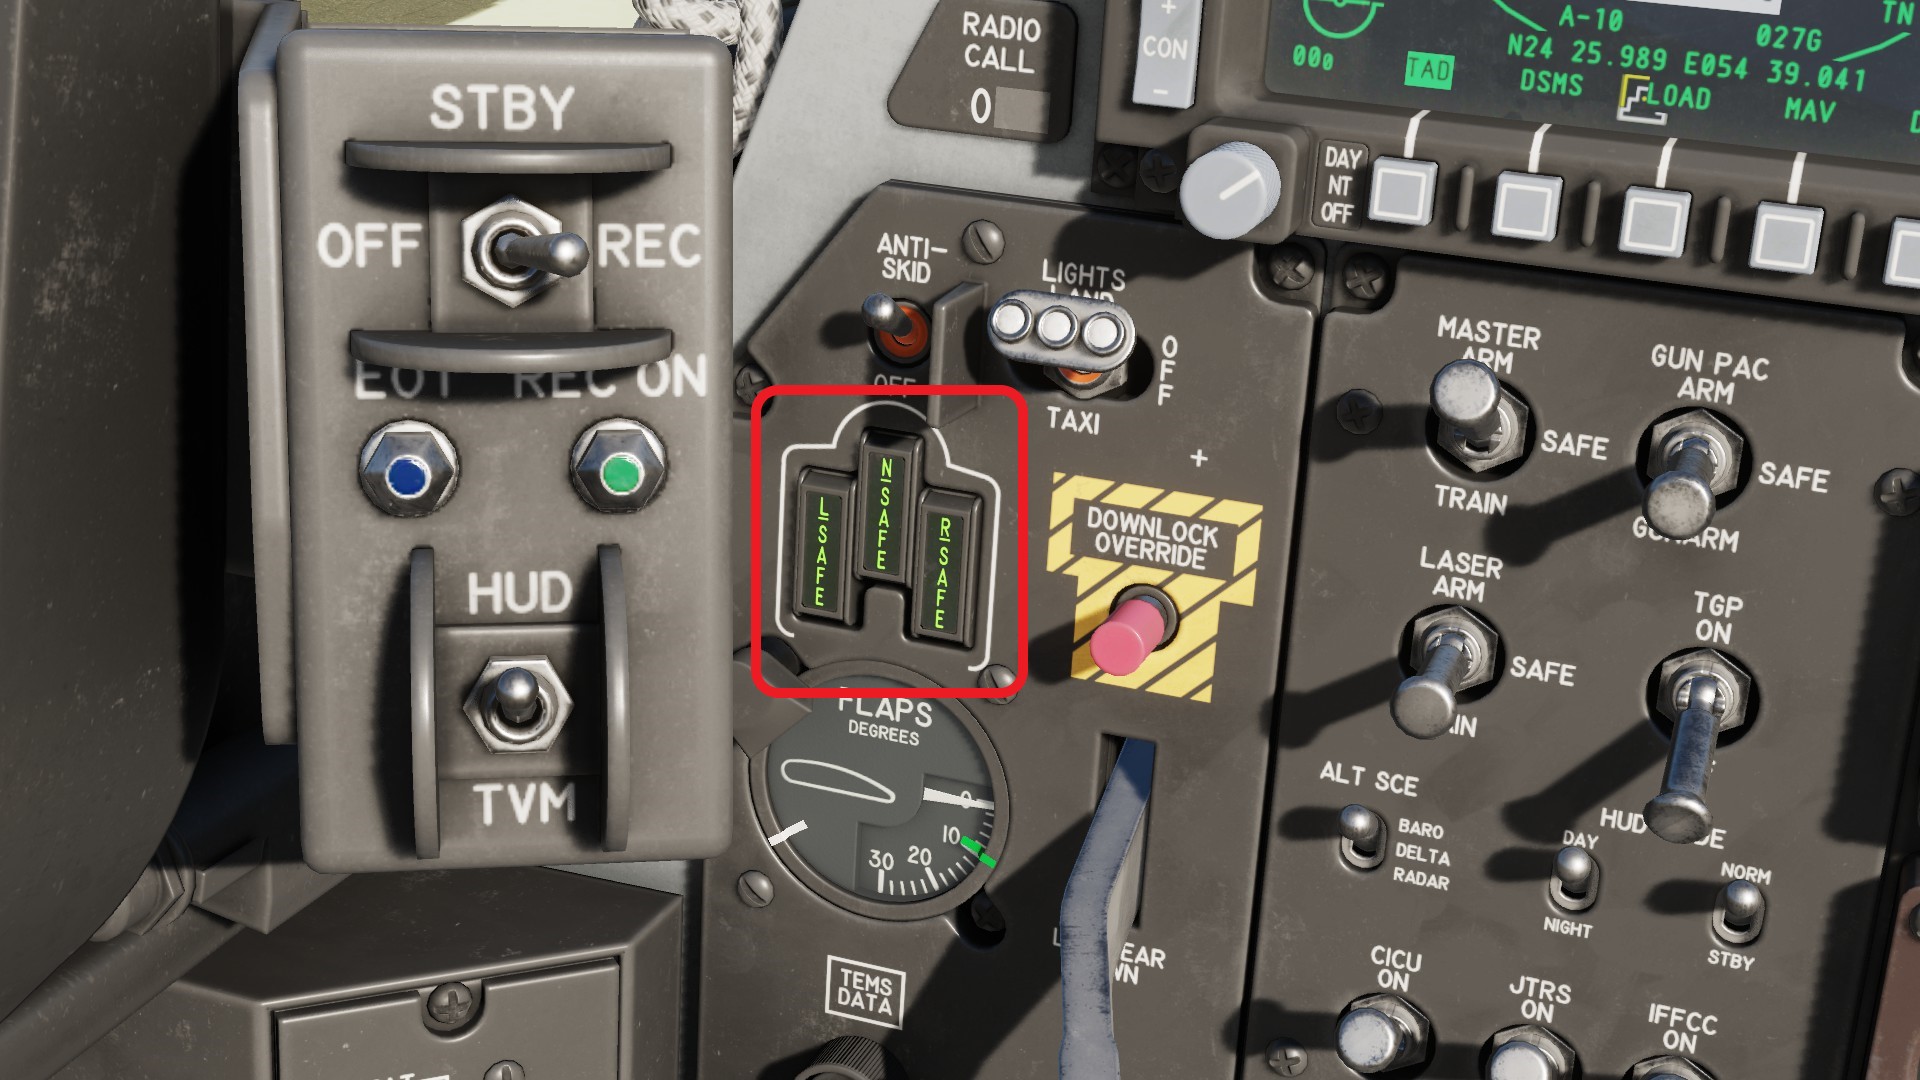
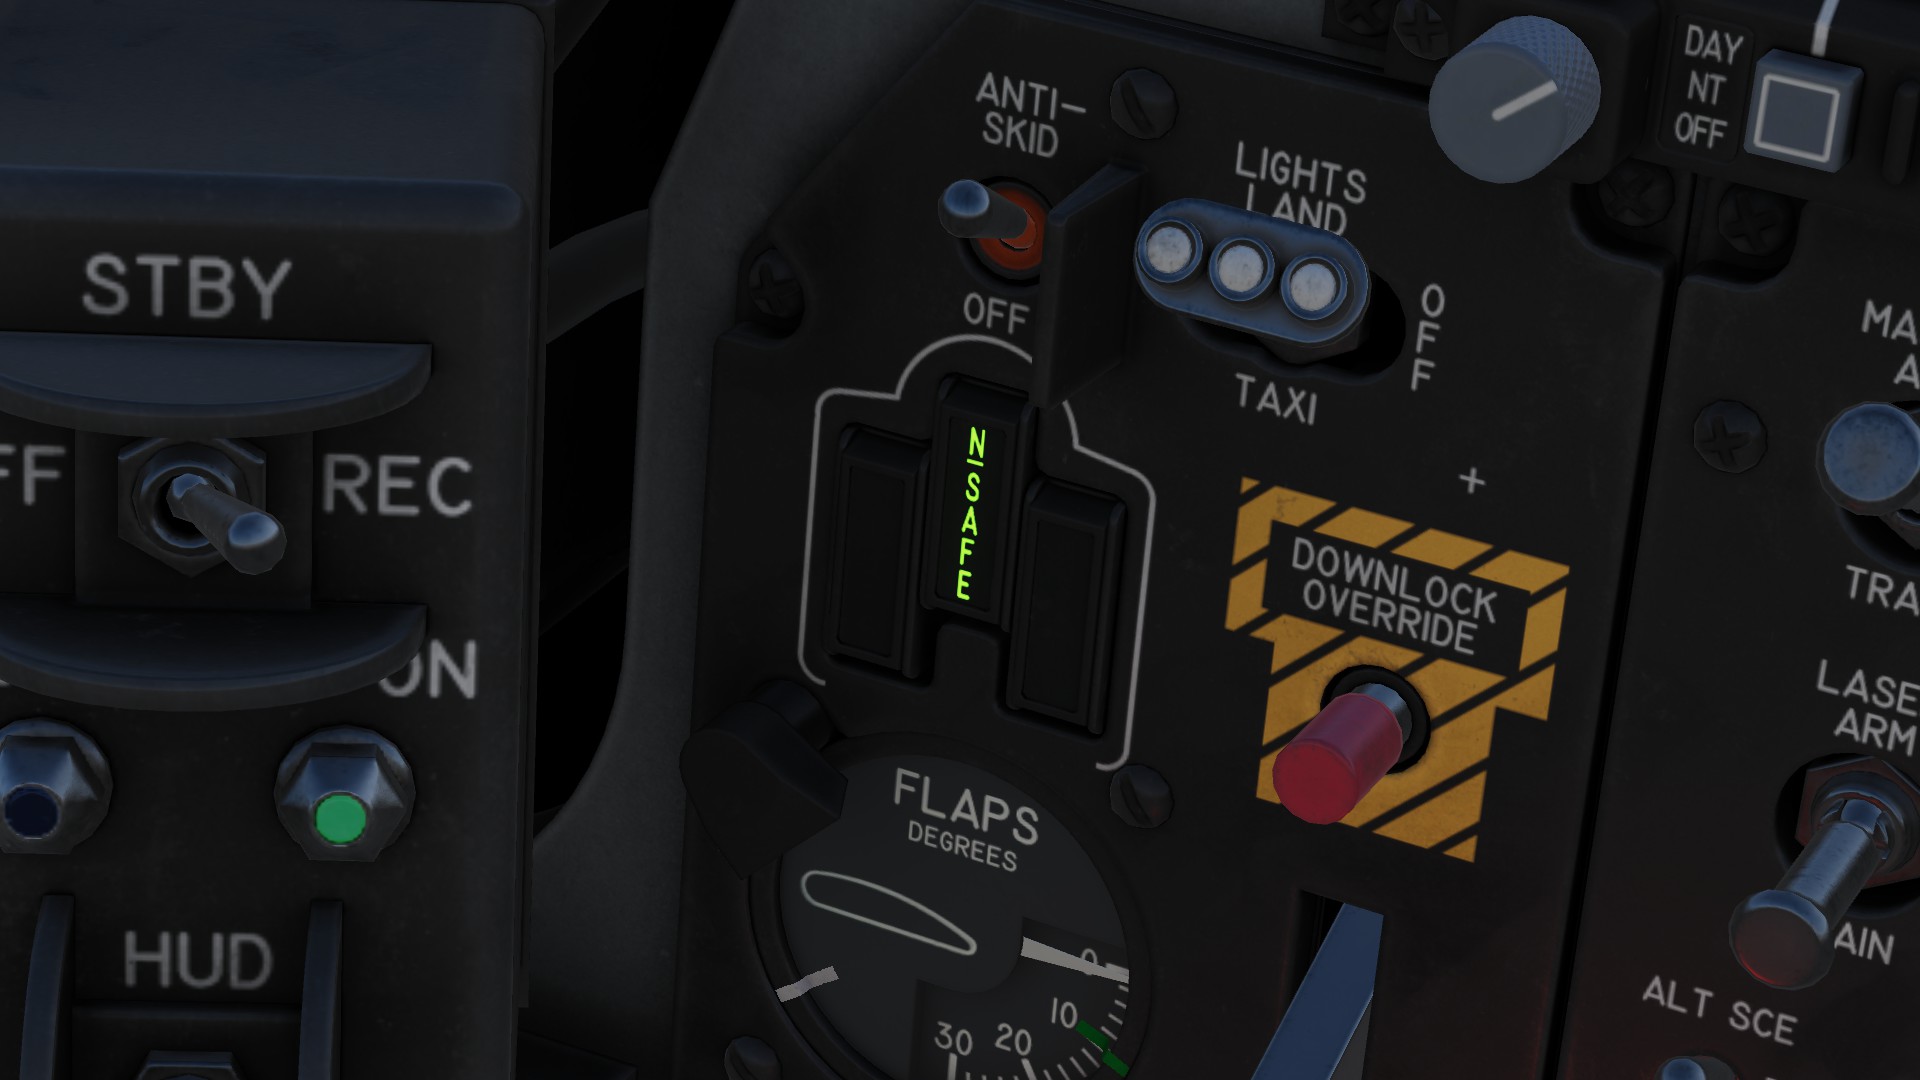
You should glide down to the runway without any problems. If youre unsure if your landing gear got damaged, you can look under your anti-skid button. The panel (red) will show you, if the gear is safe or if and which gear is damaged. The example on the left shows how your gear should look like. The right shows a damaged gear.
Notes and Links
If you want to see anything added to this guide or find mistakes / typos i made, please leave it in the comments.
Learn how to triangulate the position of RWR based threats here.
Officall USAF Flight Manuel[dokumen.tips]
Another guide on the A10c for DCS.[www.mudspike.com]
- How To Setup Controls and Joystick★ 5 (505)39k views1.1k ♥12 minUpdated Aug 18, 2015
- F-15C Eagle Beginners Guide★ 5 (921)29k views1.6k ♥12 minUpdated Sep 13, 2019
- Xbox One Controls for DCS: World★ 5 (359)22k views757 ♥6 minUpdated Sep 12, 2022
- Su-25T : Weapon Specifications List / Other useful information★ 5 (615)18k views1k ♥10 minUpdated Jul 11, 2015
- How To: DCS World Beginner Basics★ 5 (167)13k views389 ♥16 minUpdated Feb 22, 2021
- DCS: A-10C Easy Guide and Basic Concepts★ 5 (296)13k views633 ♥11 minUpdated Sep 4, 2014



- Upgrading to PremiumTeam Fortress 2★ 5 (20k)1441k views11k ♥6 minUpdated May 11, 2022
- No More Room in Hell Official ManualNo More Room in Hell★ 5 (2.8k)569k views2.1k ♥29 minUpdated Apr 22, 2019
- NMRiH Community Hosting GuidesNo More Room in Hell★ 5 (526)351k views653 ♥1 minUpdated Aug 10, 2022
- ULTIMATE GUIDE FOR GAME DEV TYCOONGame Dev Tycoon★ 5 (5.8k)326k views10k ♥4 minUpdated 23 Jan, 2014
- How to 'Git Gud' Soon™MORDHAU★ 5 (2k)318k views3k ♥68 minUpdated Nov 16, 2024
- Лучшие кооперативные игры SteamPAYDAY 2★ 5 (1.5k)315k views2.1k ♥56 minRussianUpdated Apr 27, 2025






This guide was created by its original author on the Steam Community. Are you the author and want it removed? Request removal.