F-14B - Fly In Minutes (with a buddy or AI)
Introduction
One of the best features of the F-14 is to have two people flying in the same aircraft. And while the A.I. is fantastic, I cannot overstate how much fun it is to play CO-OP in the F-14B.
If you are playing single player, then you can switch between the front and back seats with the 1 & 2 keys. When you are in one seat, the AI takes over the other seat. Press the A key followed with CTRL + 1 to 8 to bring up the command wheel and give orders to the AI pilot or RIO.
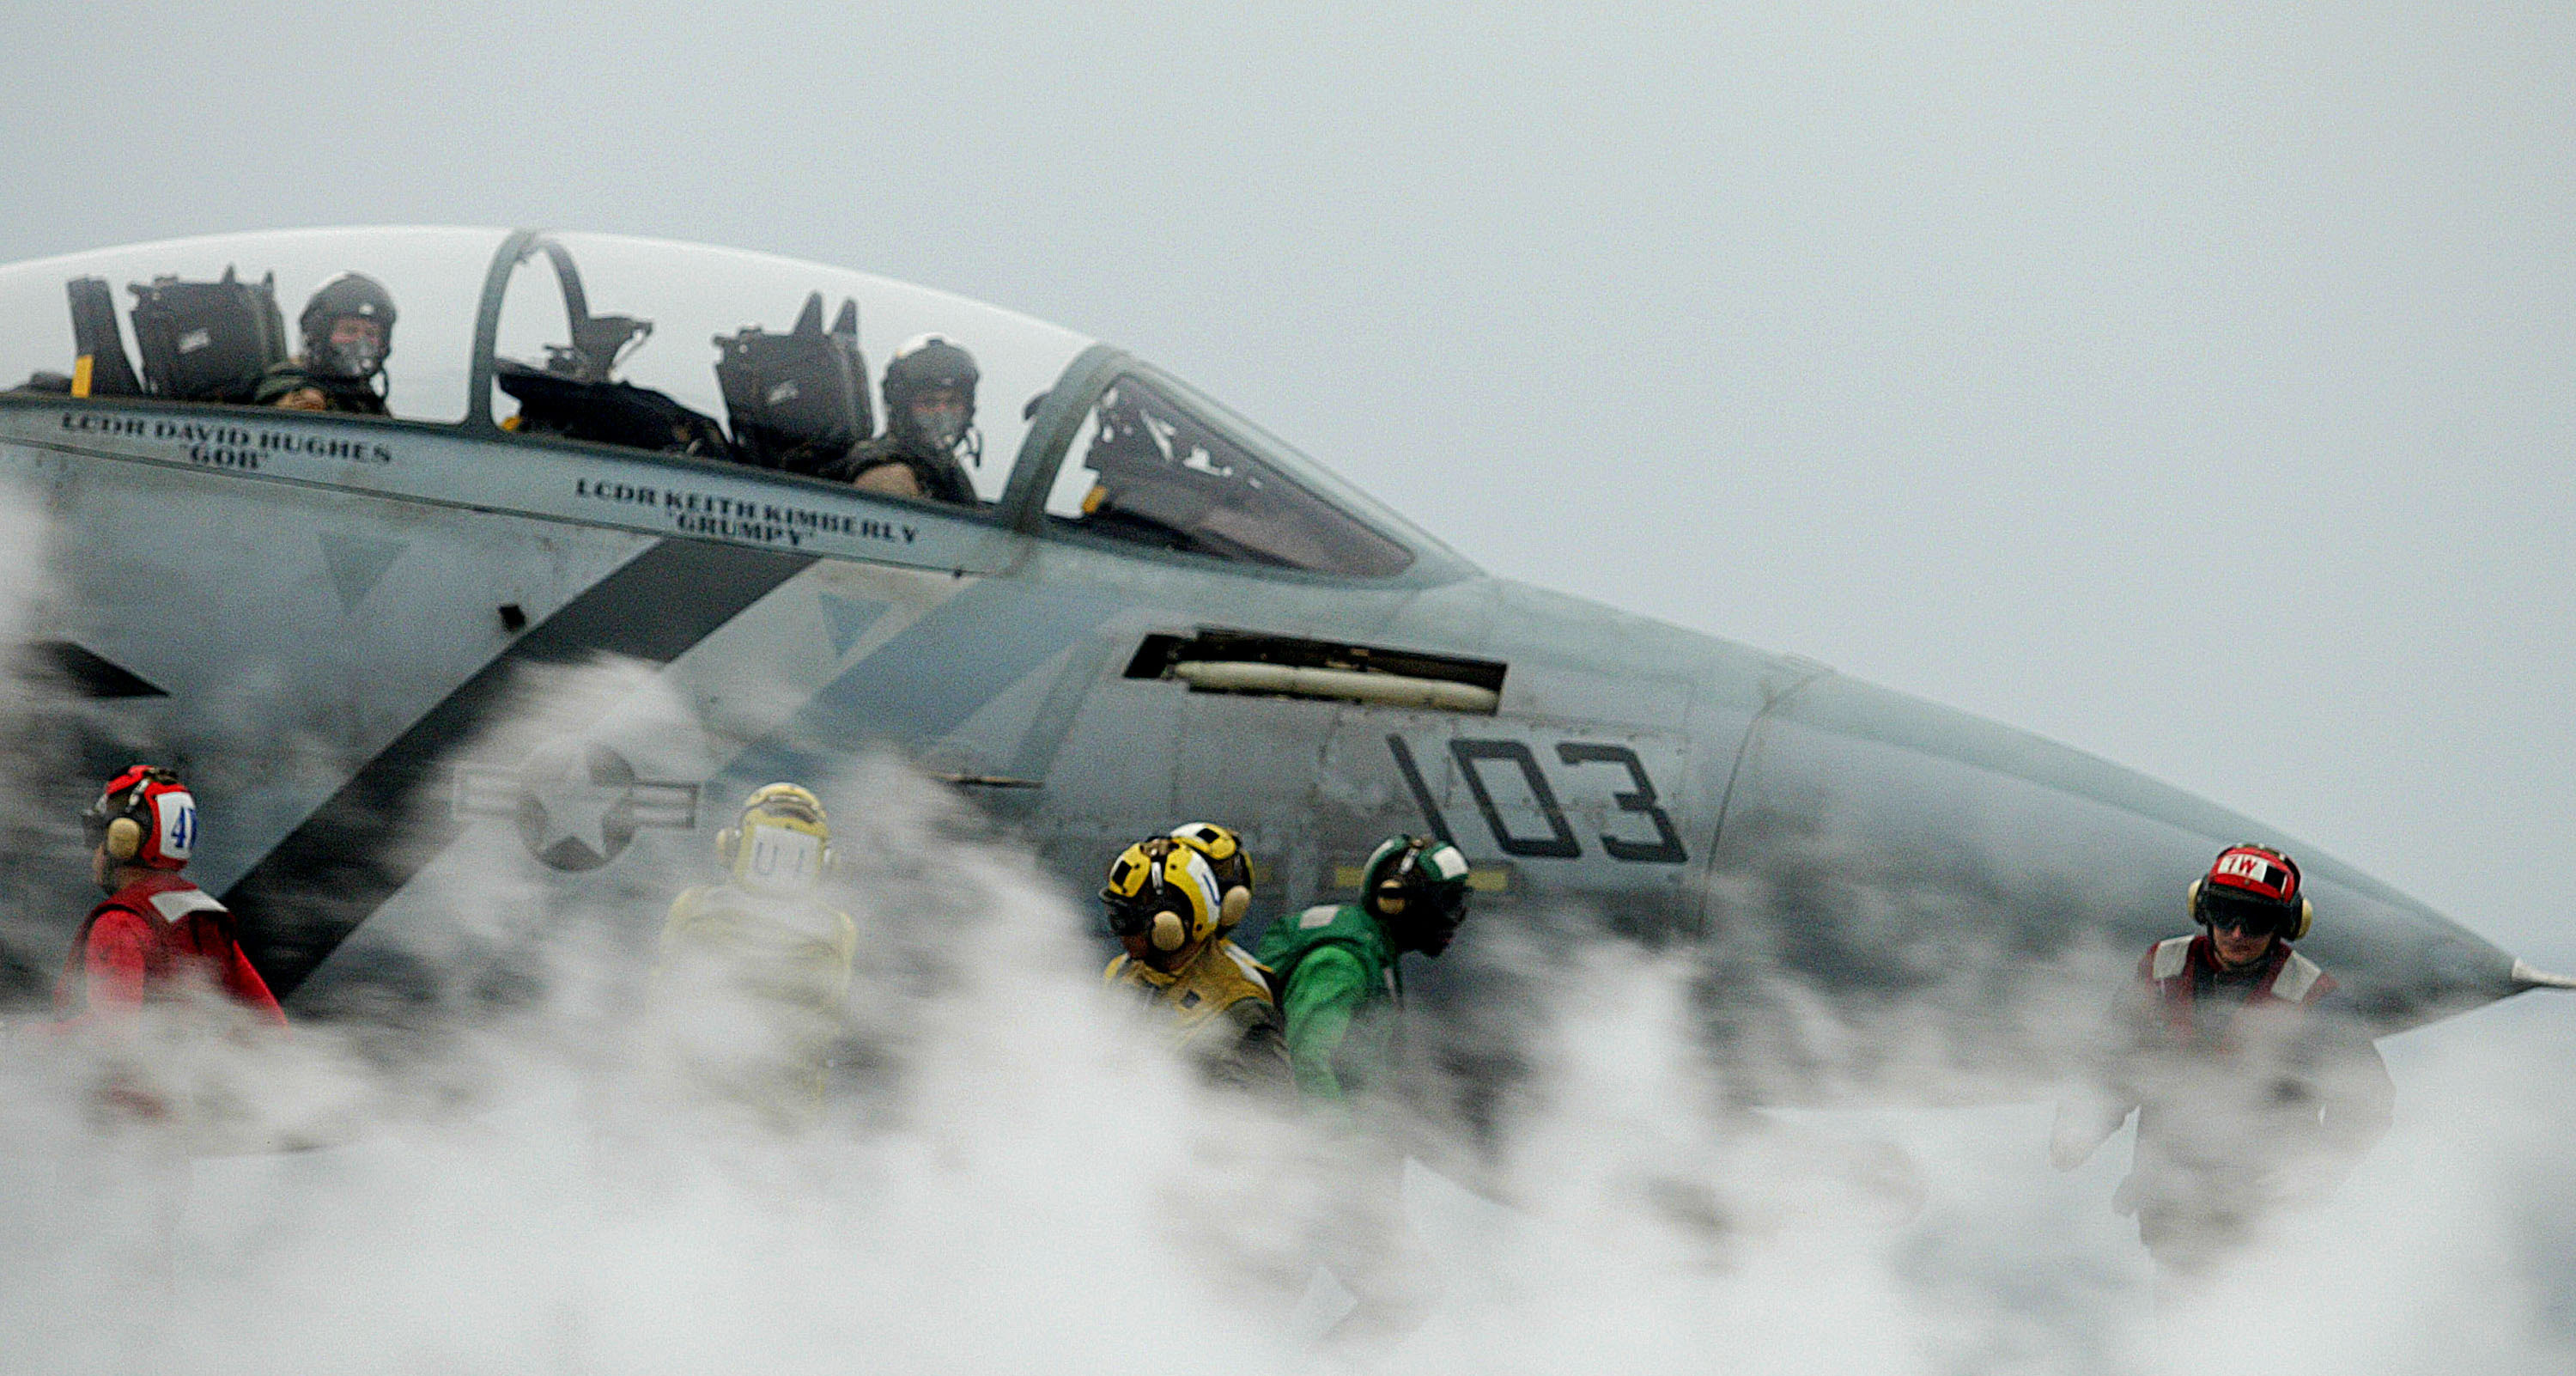
You can do everything in this guide and mission entirely on your own(disable the AI thru the command wheel), with the AI (default), or with a buddy.
As this is a two crew aircraft the guide is dived into Pilot and RIO sections, with steps that should happen more or less at the same time for both players - working together in jolly cooperation! :-)
Hosting your own server is beyond the scope of this guide, but it can be as easy as port forwarding the TCP/UDP of port number 10308 to your computer from your router/modem settings. And then starting a multiplayer game from the DCS main menu. (only the host needs to do this).
There are lots of port forwarding guides on the internet already. You can test if your port forwarding is working by using a site such as CanYouSeeMe.org (your server must be running - this works best if using Windowed Mode in DCS, so that you can see both the browser and DCS at the same time). If you get stuck just go into the community section of DCS World and ask for help.
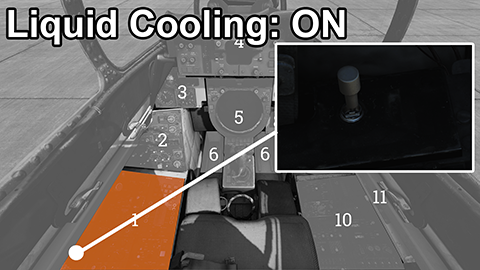
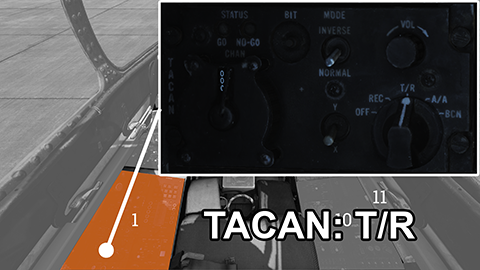
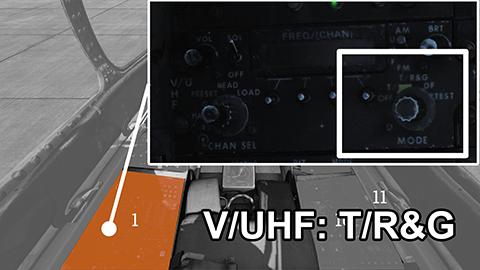
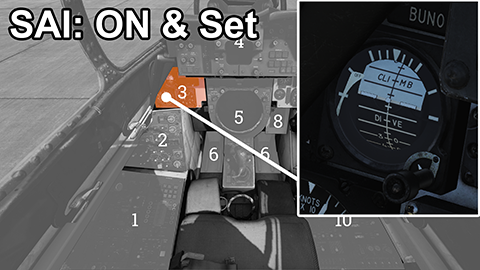
All of the orange cockpit images in this guide correspond with the numbers and sections in the official HeatBlur manual. This way you can look up more detailed information at http://www.heatblur.se/F-14Manual/
The Mission
The mission is simple:
- Start your F-14B
- Fly towards Waypoint #1
- Destroy any targets of opportunity.
- Return to base when you are out of ammo or fuel.
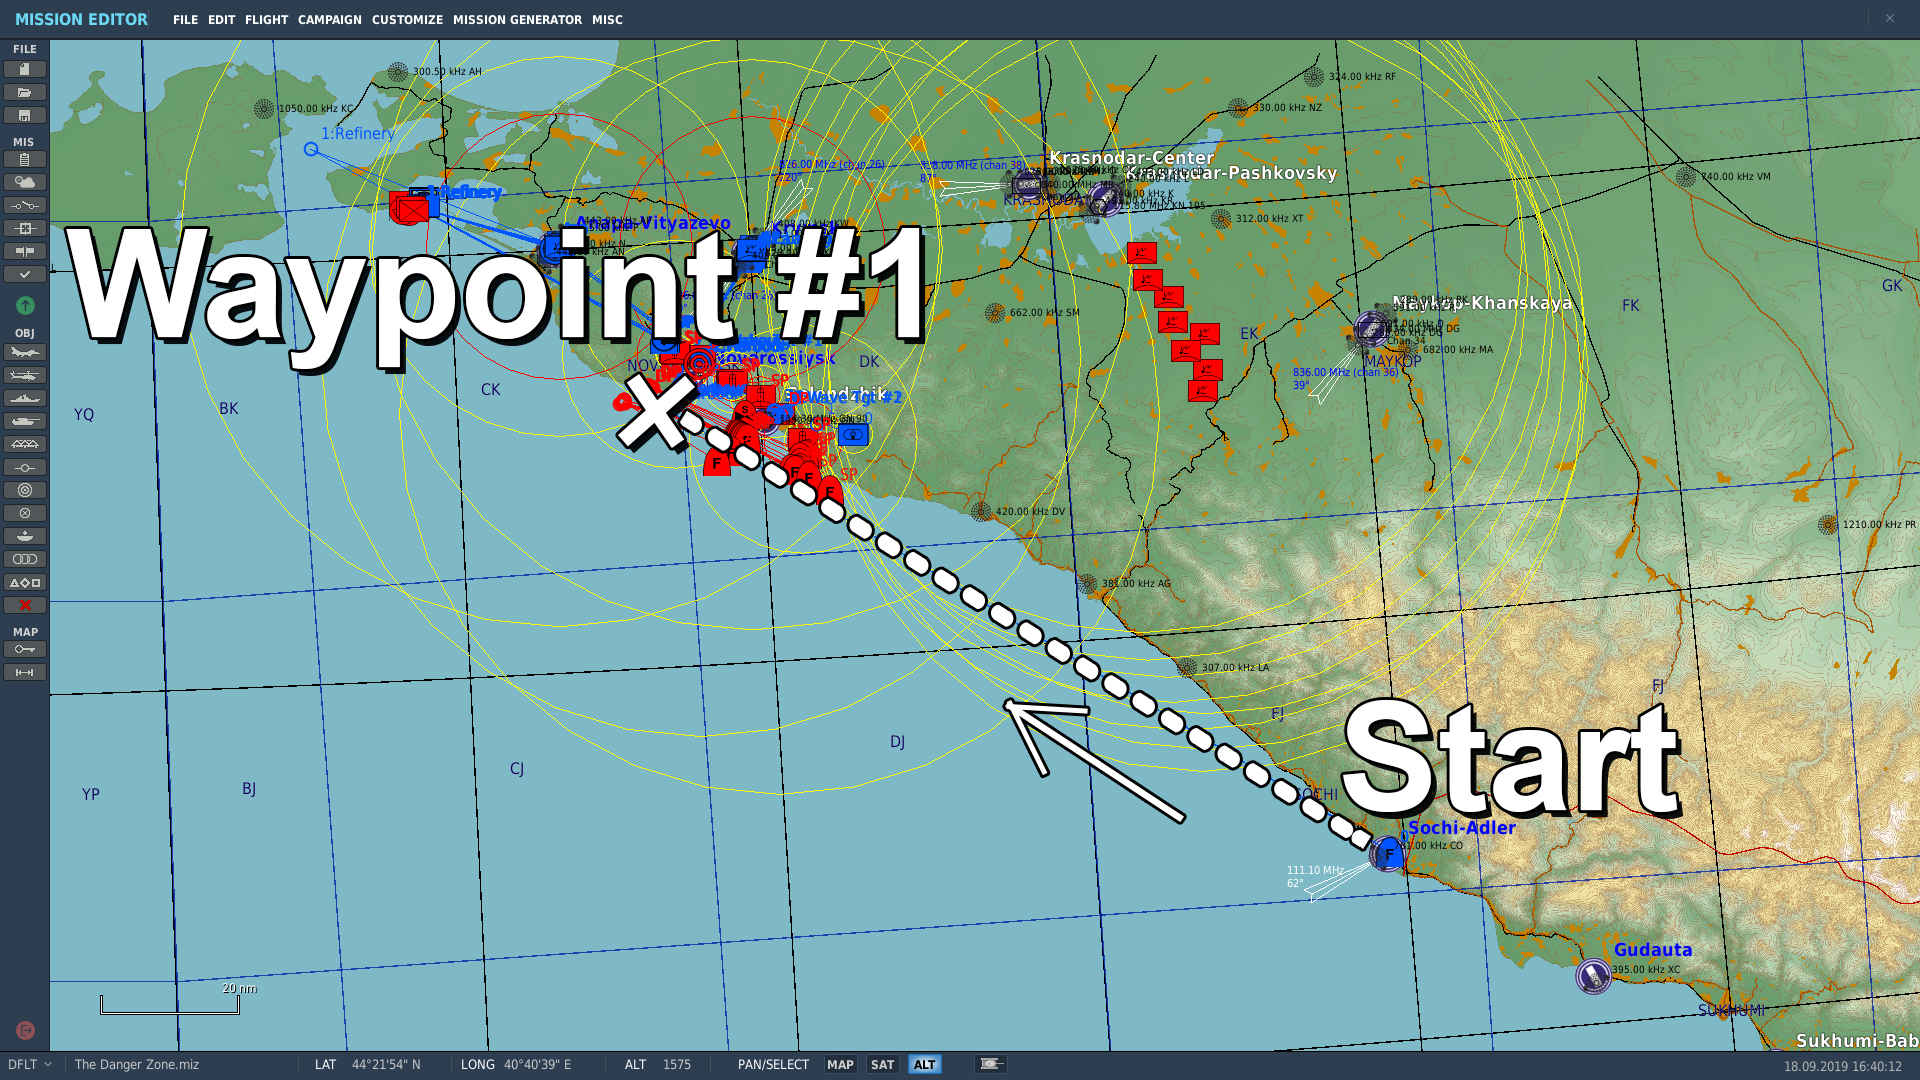
The aircraft in this mission become progressively more challenging. Starting with a simple fuel tanker, to planes armed with only guns, all of the way to a formidable Su-27 armed with all manner of missiles.
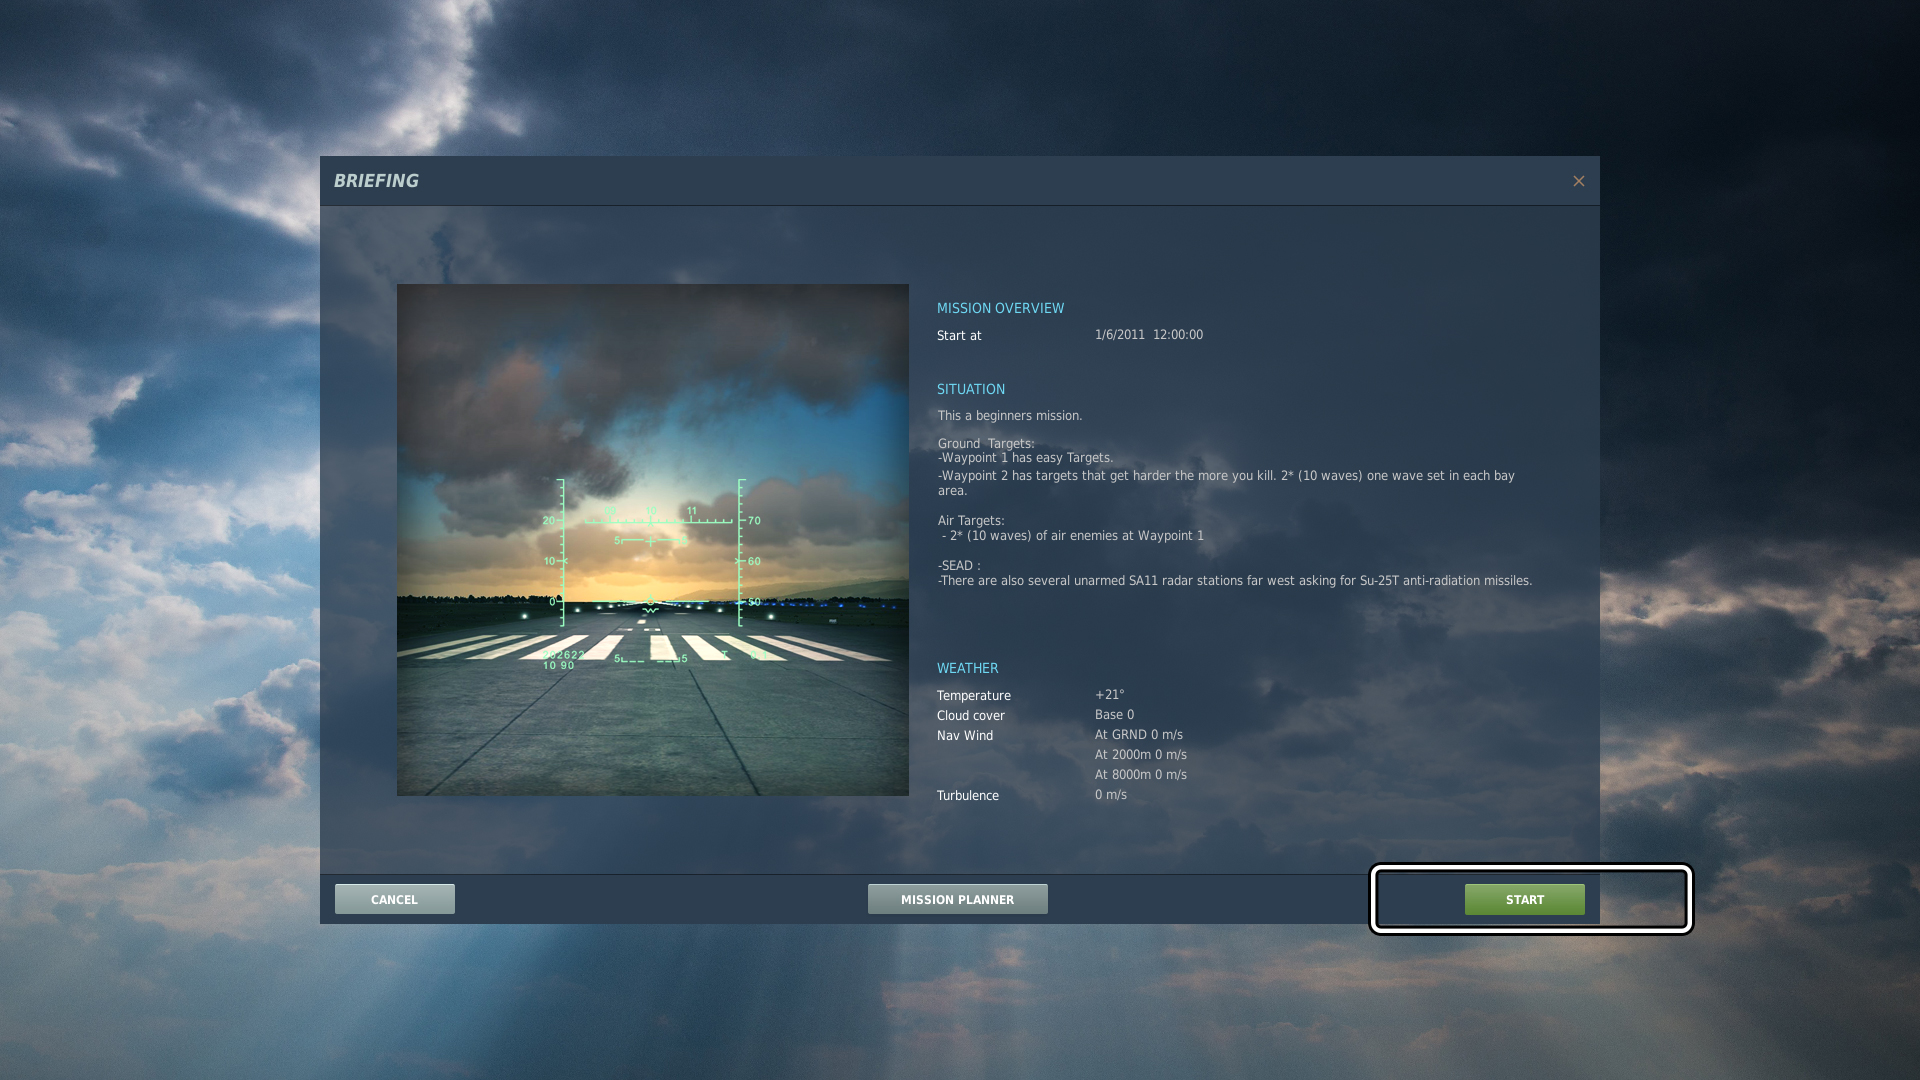
I've prepared a mission which can be played single or multiplayer. Please download this mission, and save it somewhere easy to access, as you'll need to load it up in DCS World.
https://www.dropbox.com/s/i79lfmbm2e72998/The%20Danger%20Zone.miz?dl=0
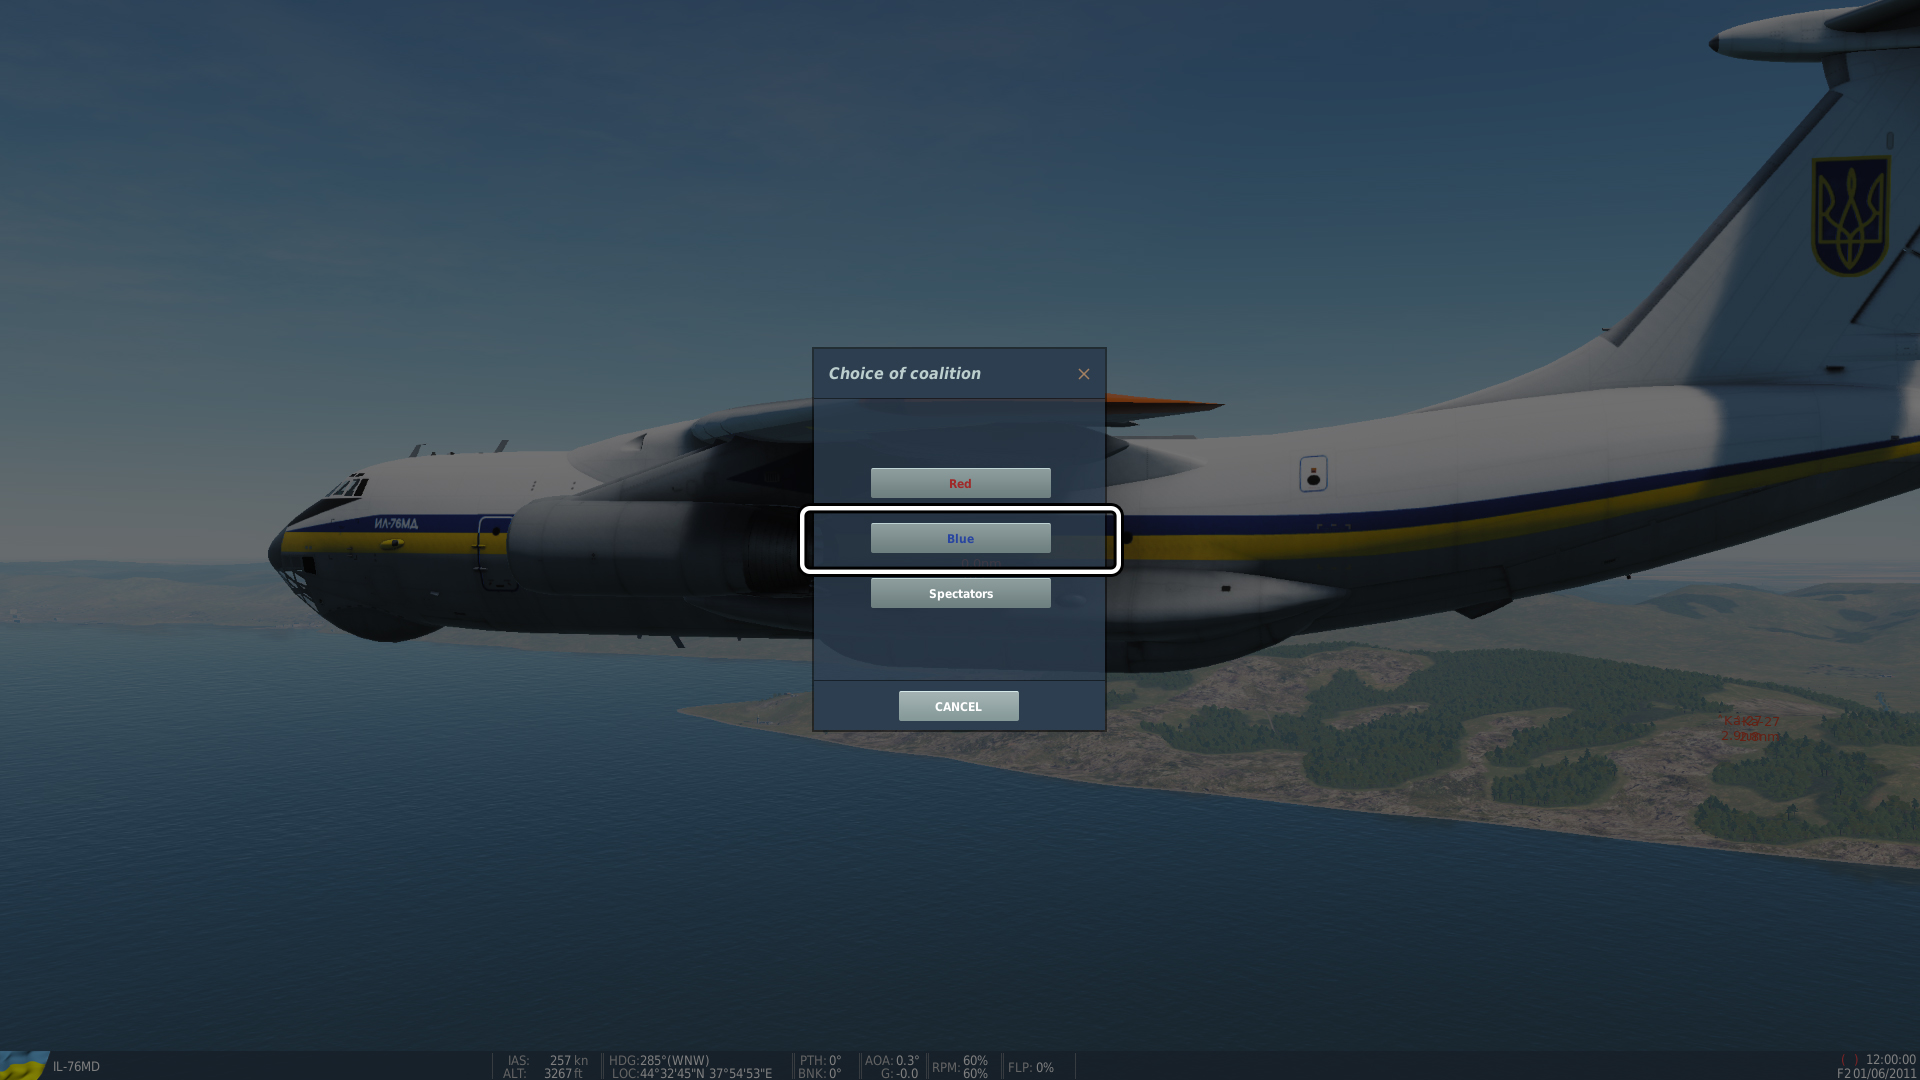
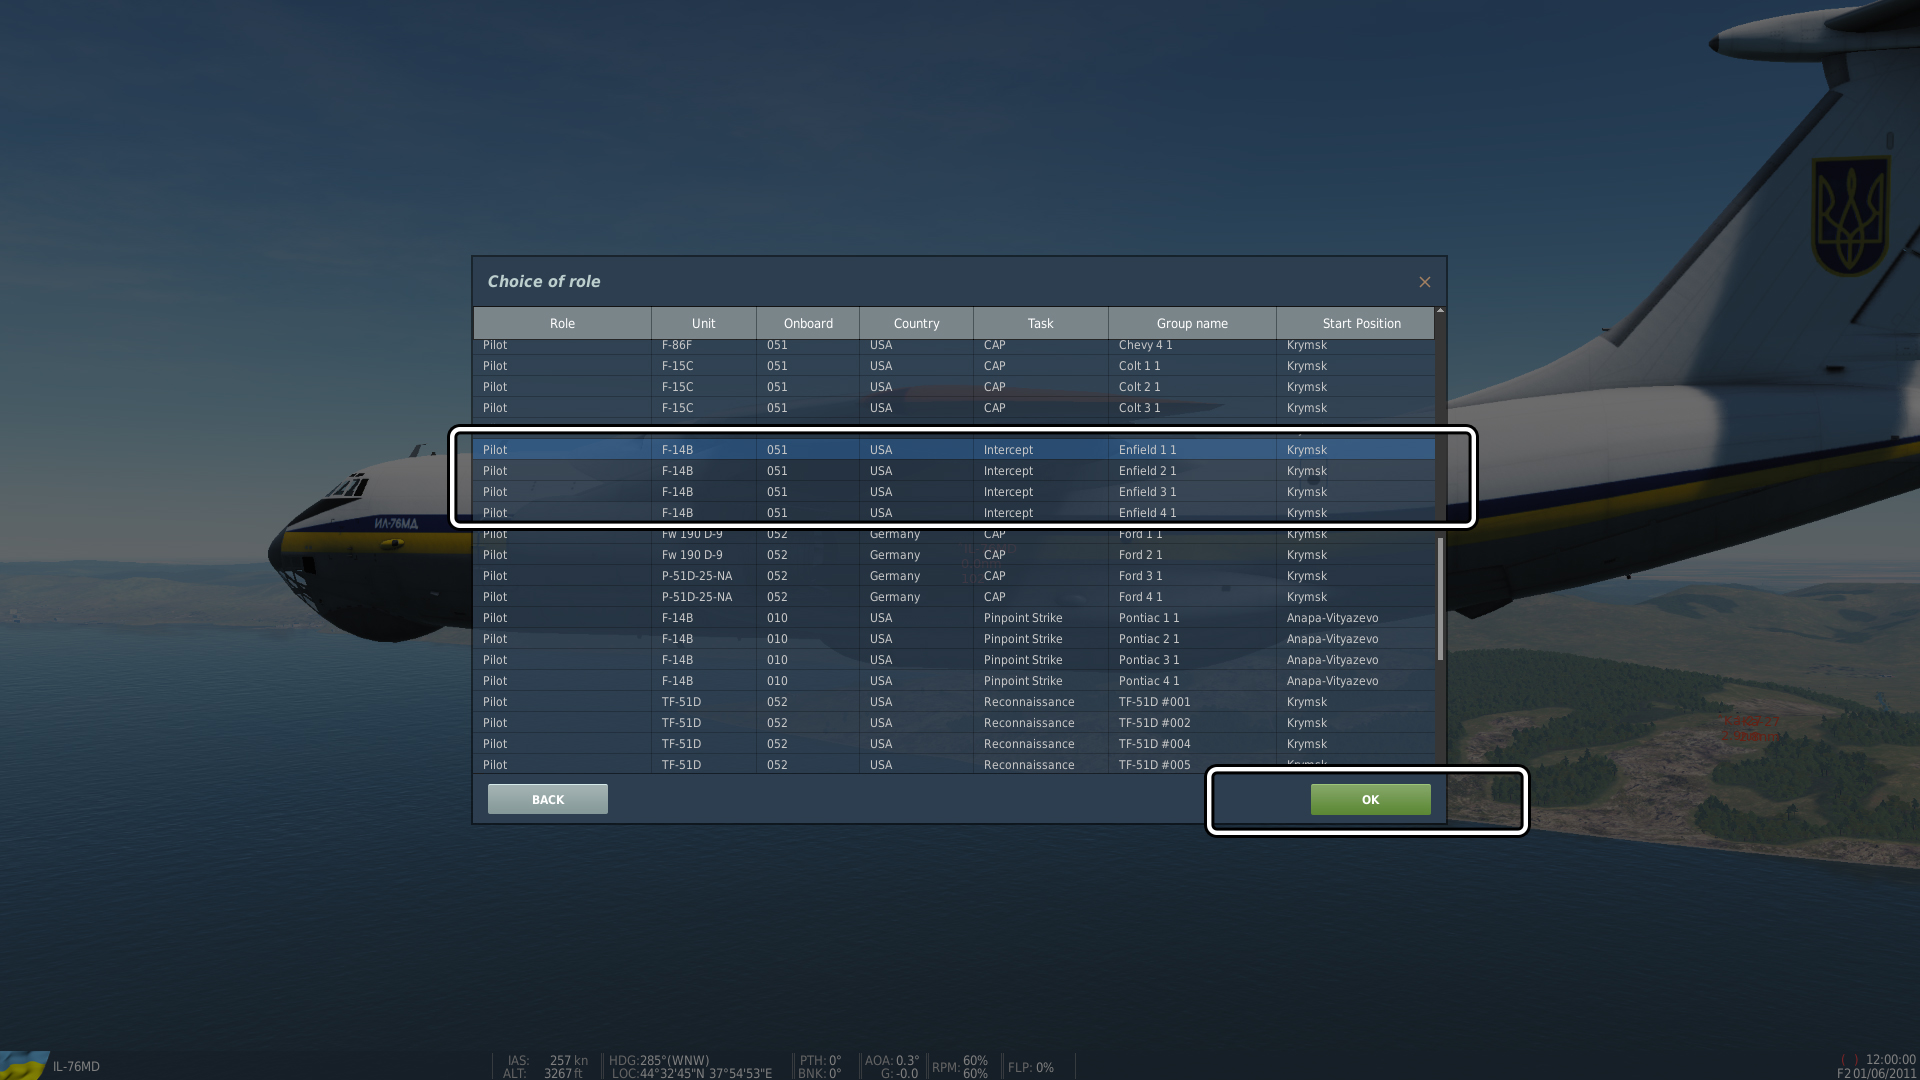
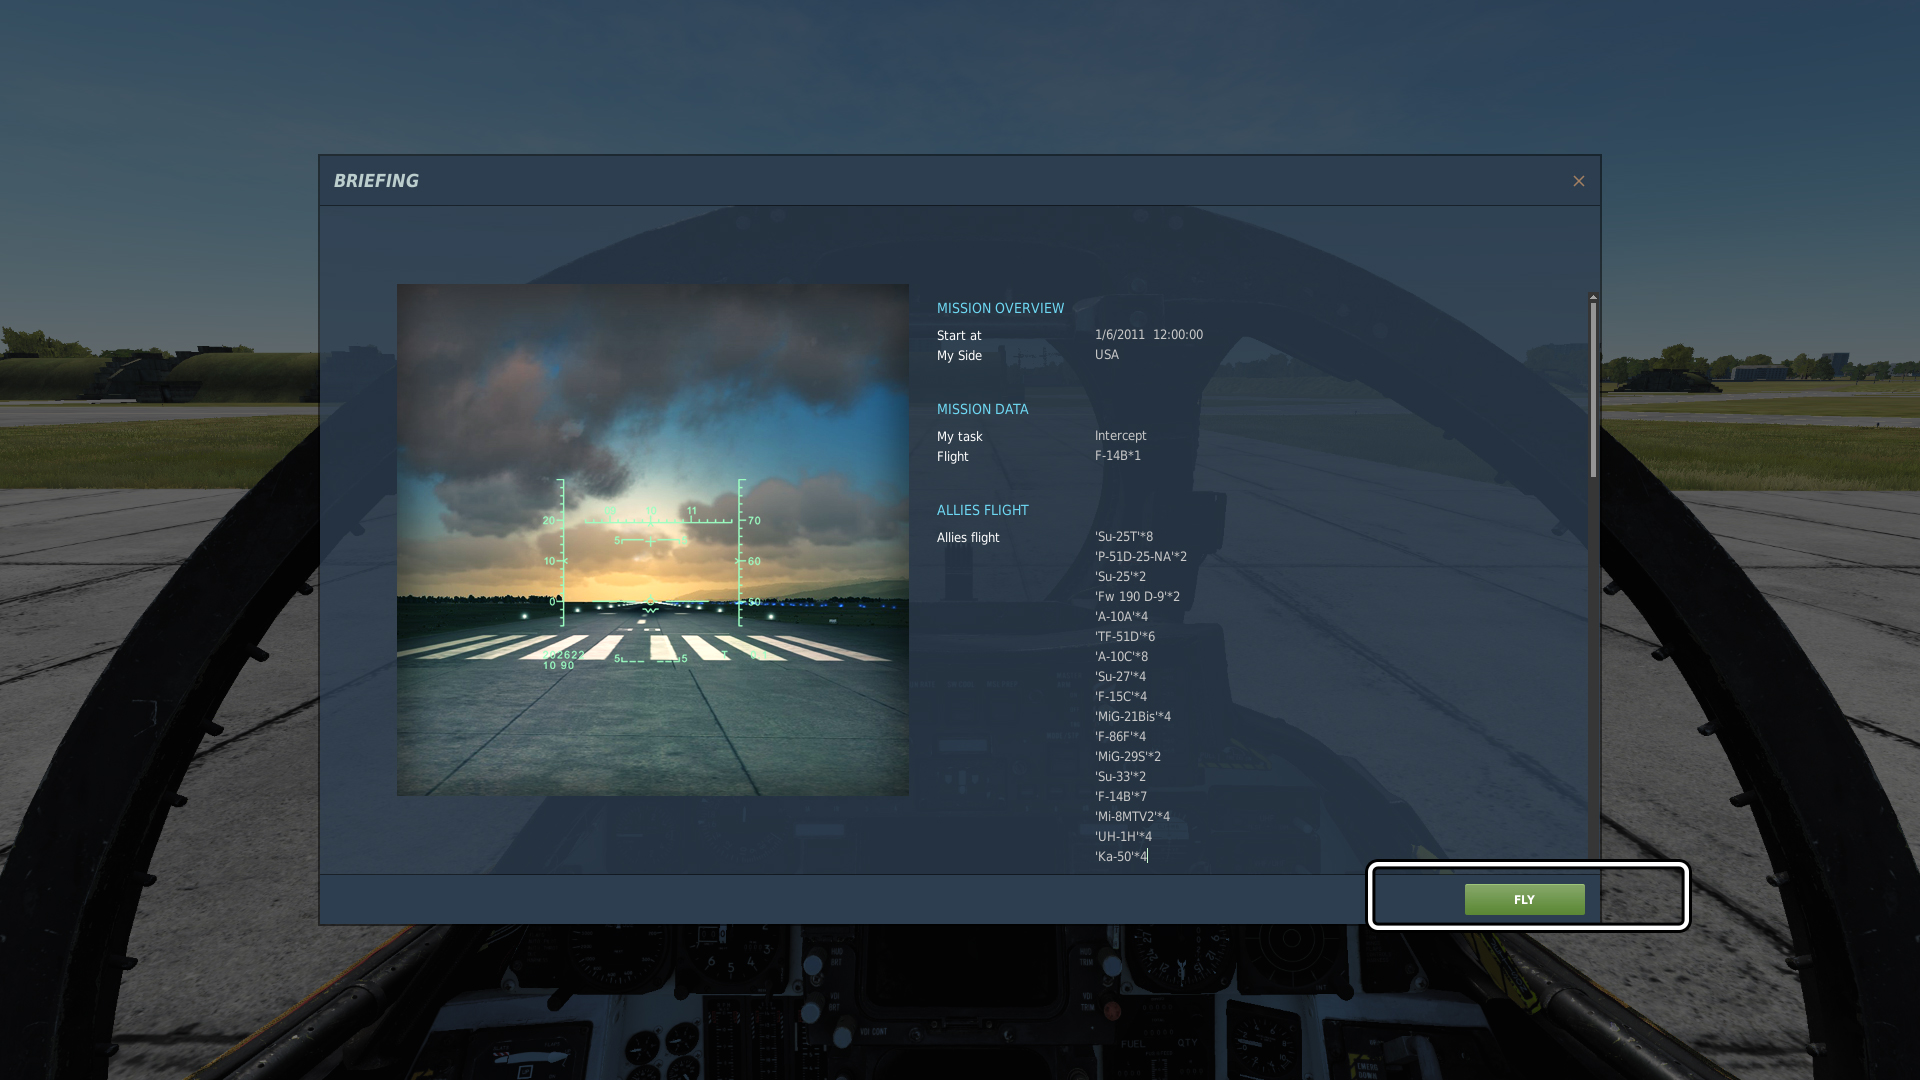
Once the mission loads, select Blue Coalition, and select the any of F-14B Intercept from the list of aircraft.
Feel free to pause the mission anytime (even in multiplayer if you are the host) with PAUSE-BREAK key on your keyboard (above PAGE UP / PAGE DOWN).
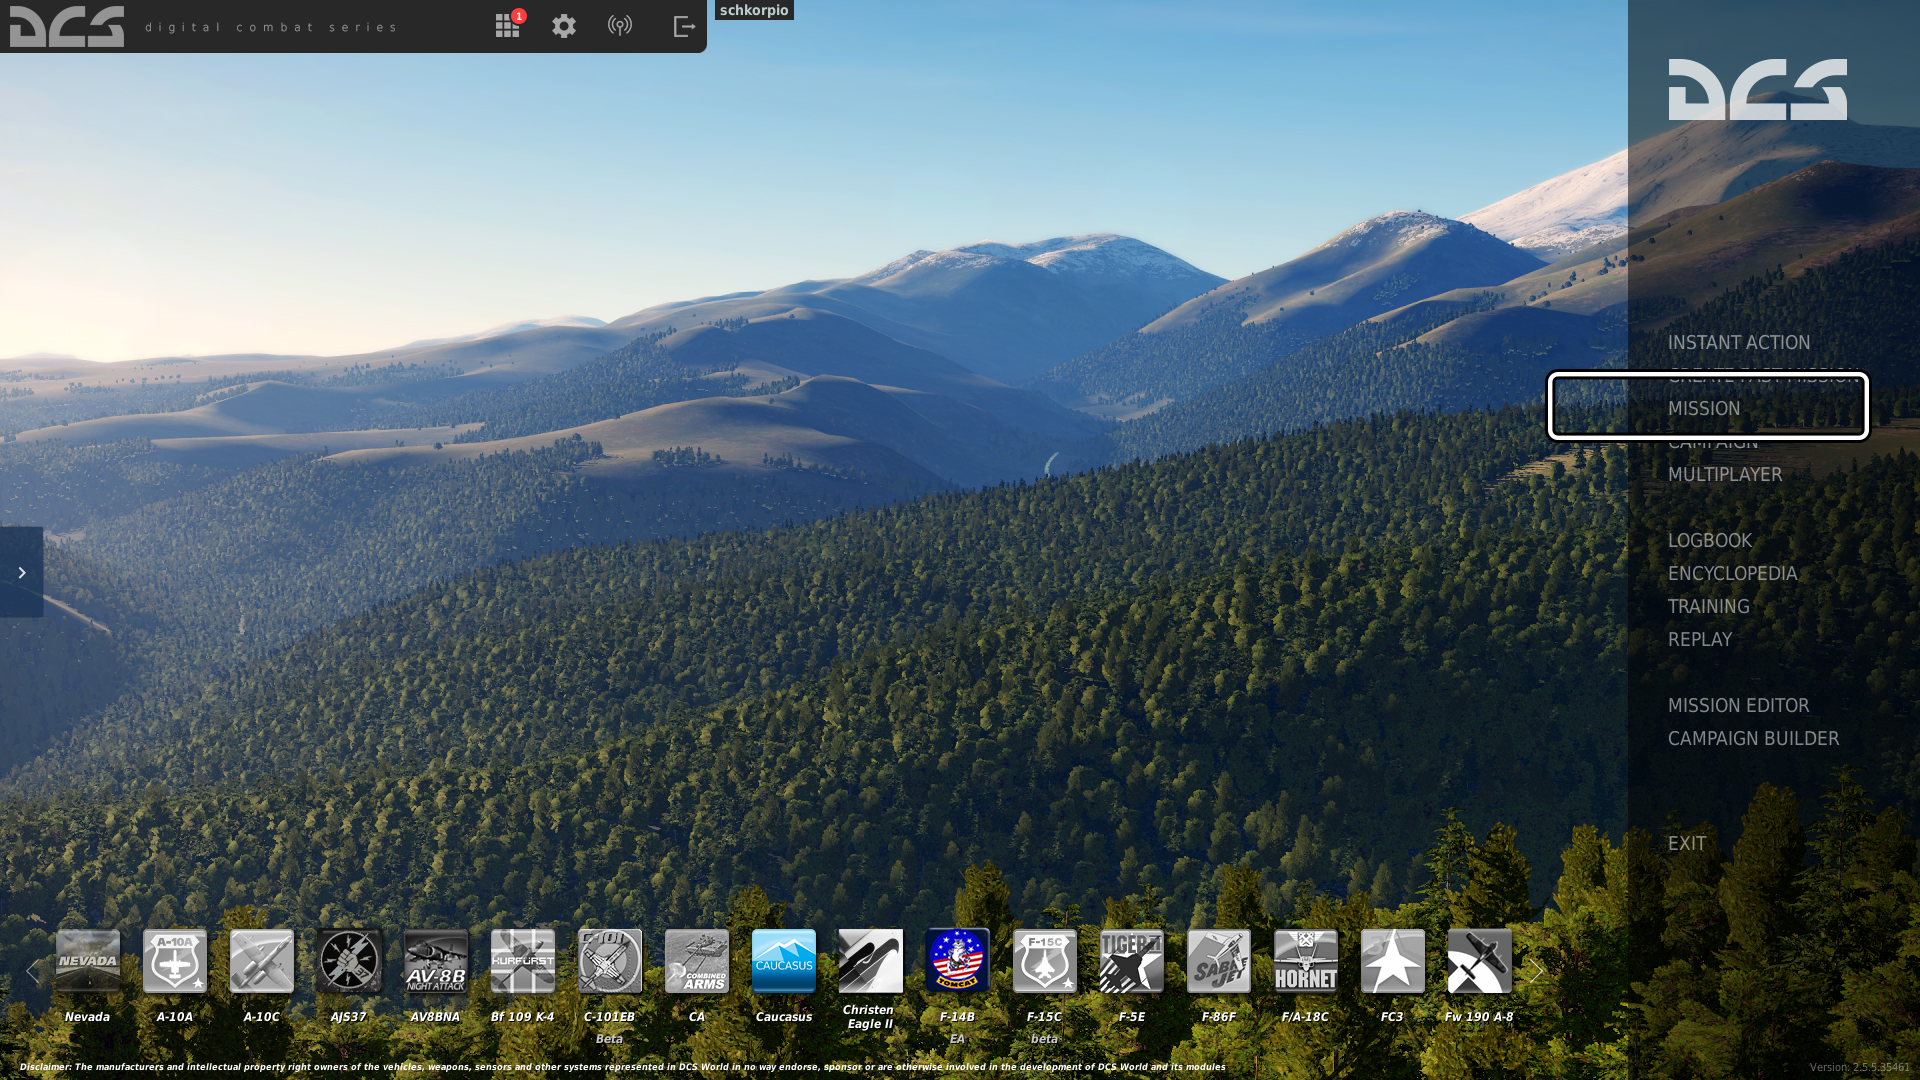 The mission file most likely ended up downloading into C:\Users\ X \Downloads folder. So browse to there thru the DCS menus. Double clicking the .. two dots will send you up one folder.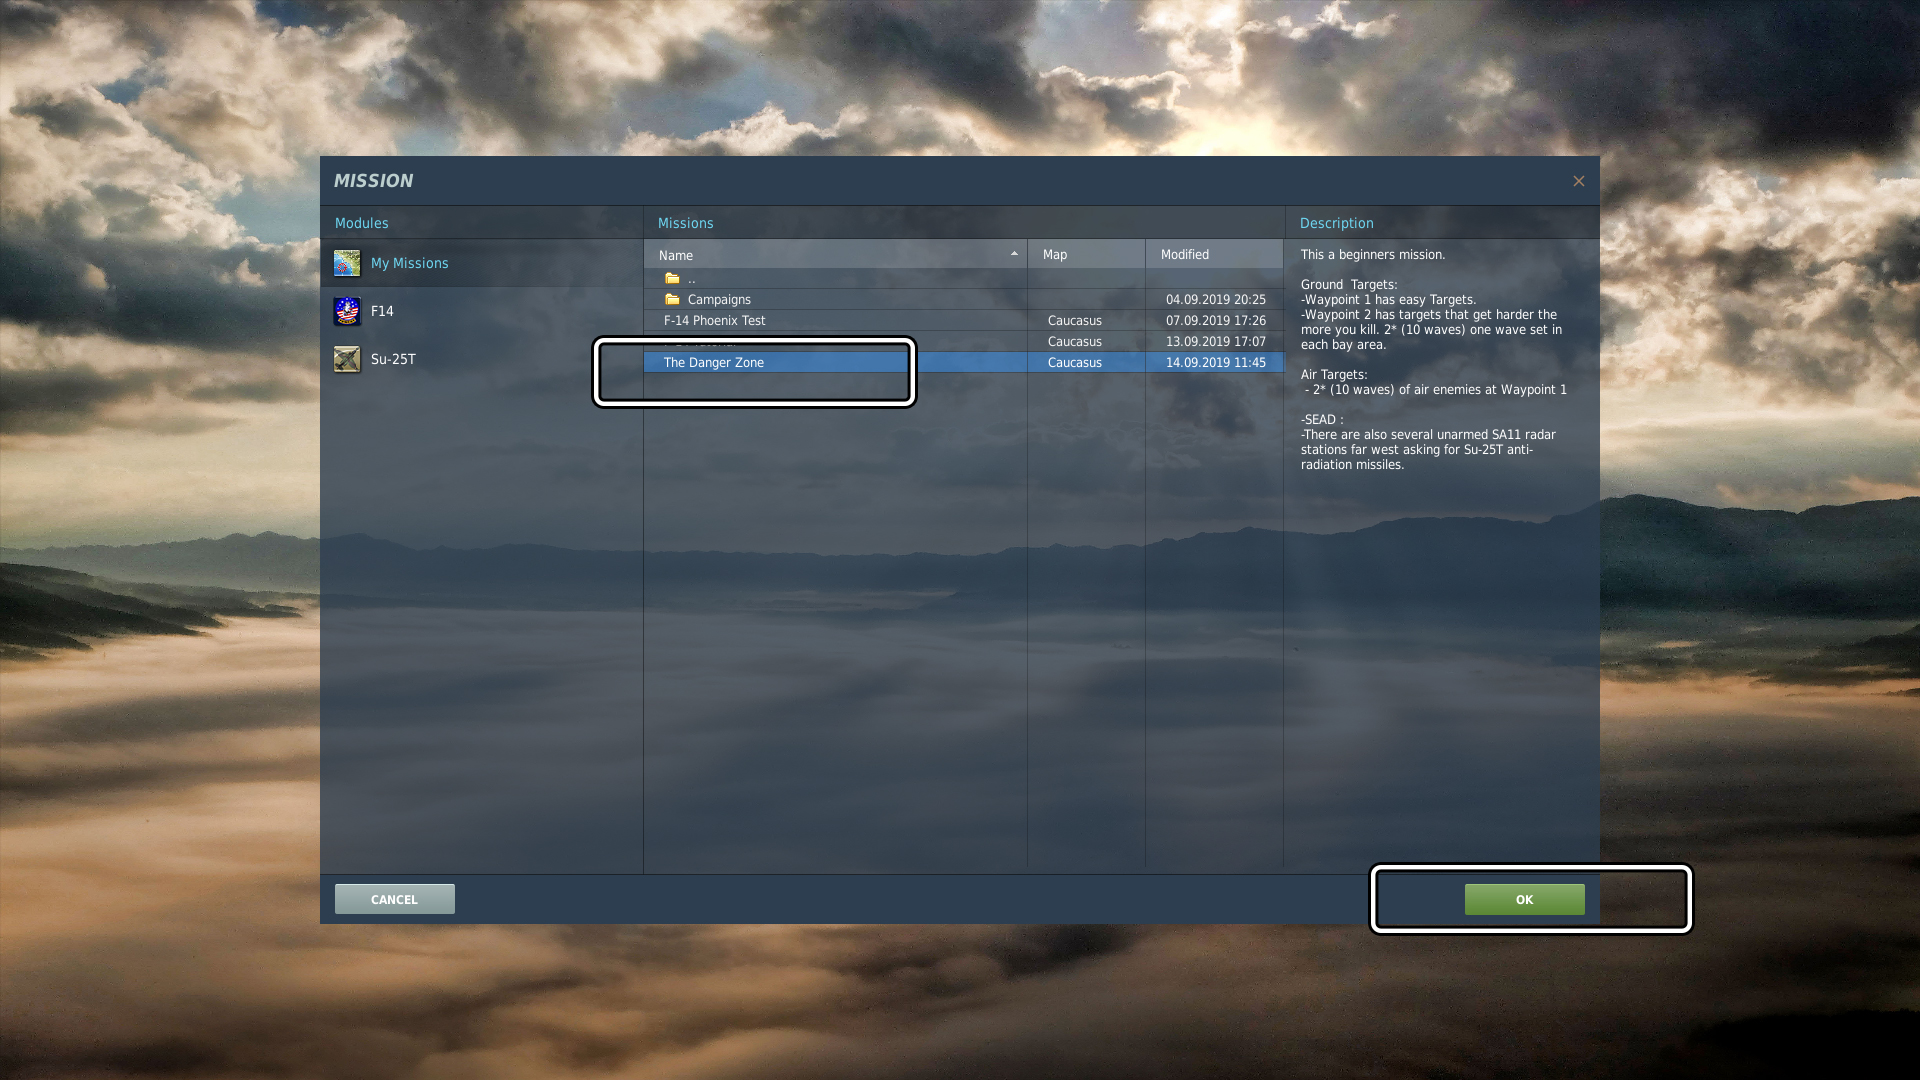
....................-=[ Pilot ]=-....................
Controls Setup (Pilot)
If you have just installed the F-14 module for DCS, then it's important to set up your controls - while you can fly with the keyboard, it's quite tiresome and touchy, so ideally you will have at least 2 analog axes for controlling the roll and pitch of the aircraft with some reasonable accuracy.
(also check out my controls guide here on Steam if you need help setting up controls)
Please go into options now (the cog icon) and set up the following controls:
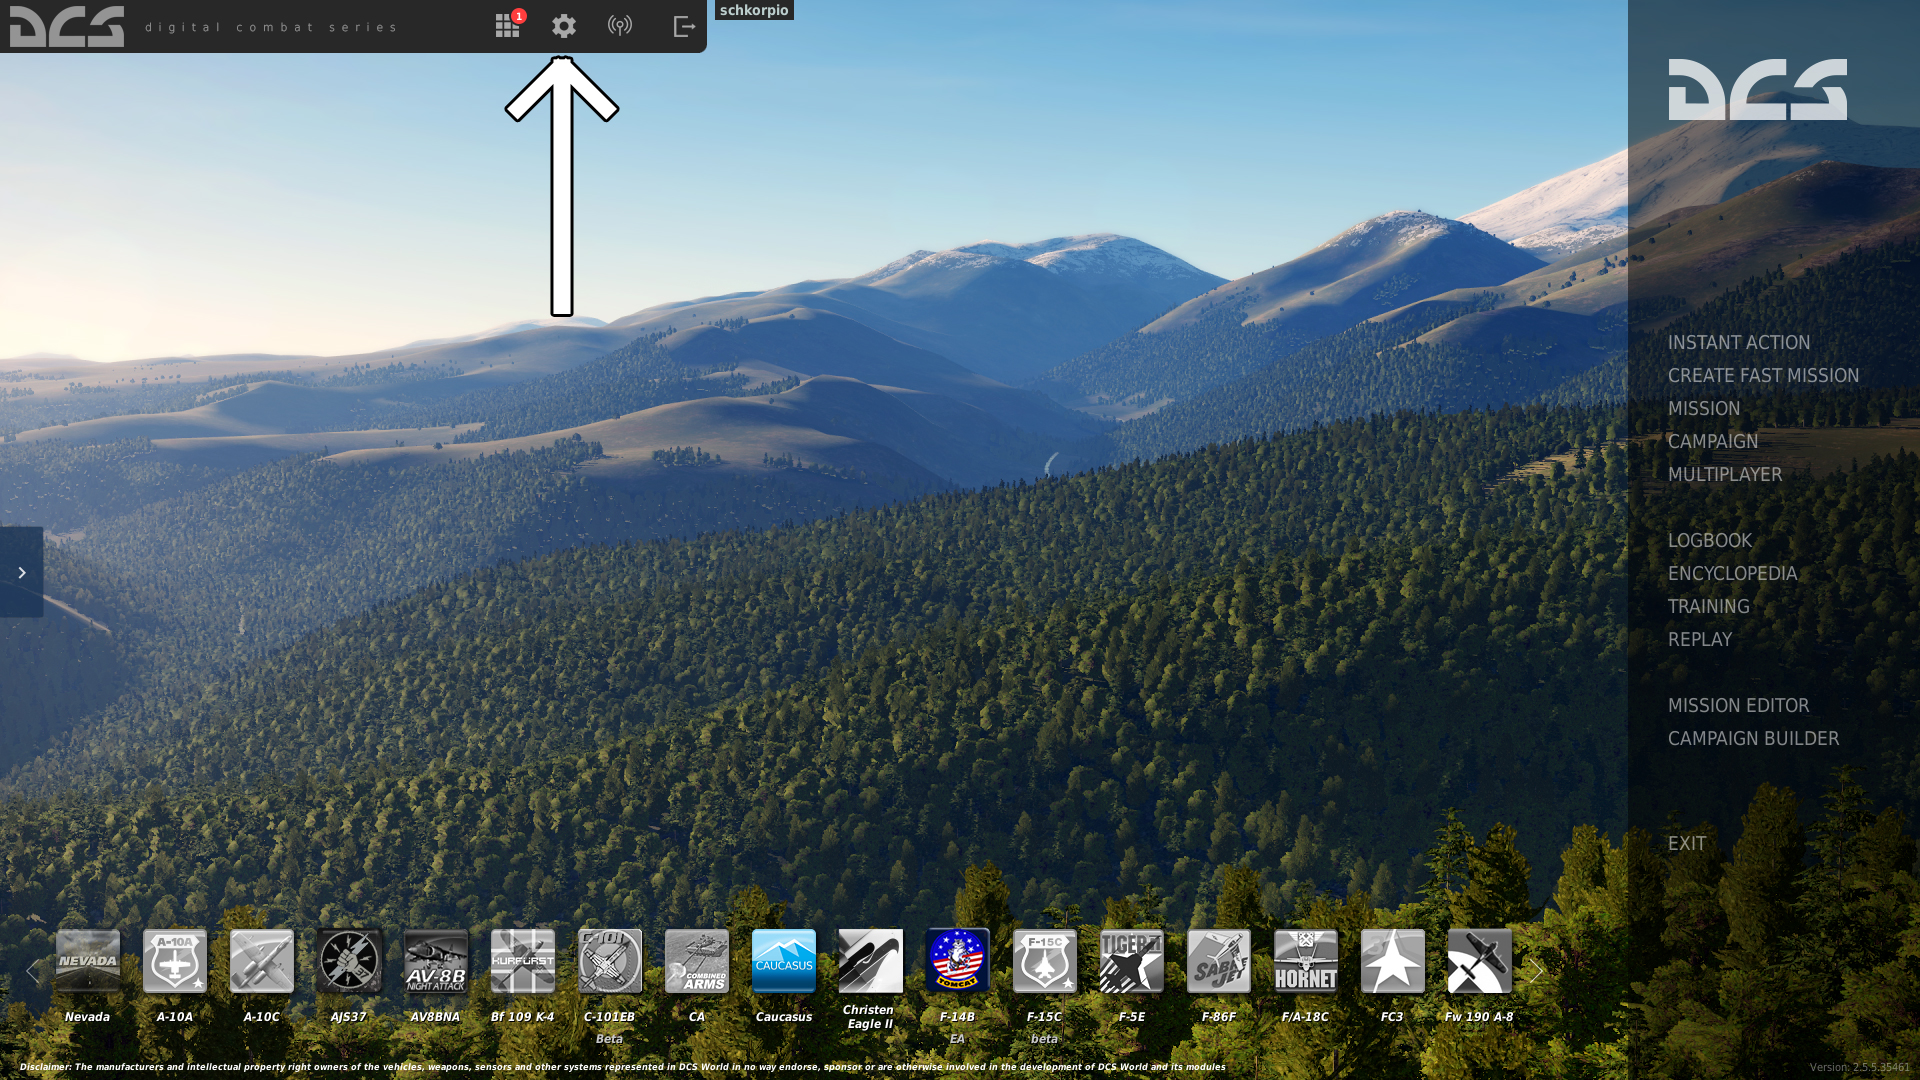
Or open the controls menu from the in-game menu by pressing escape and selecting Adjust Controls
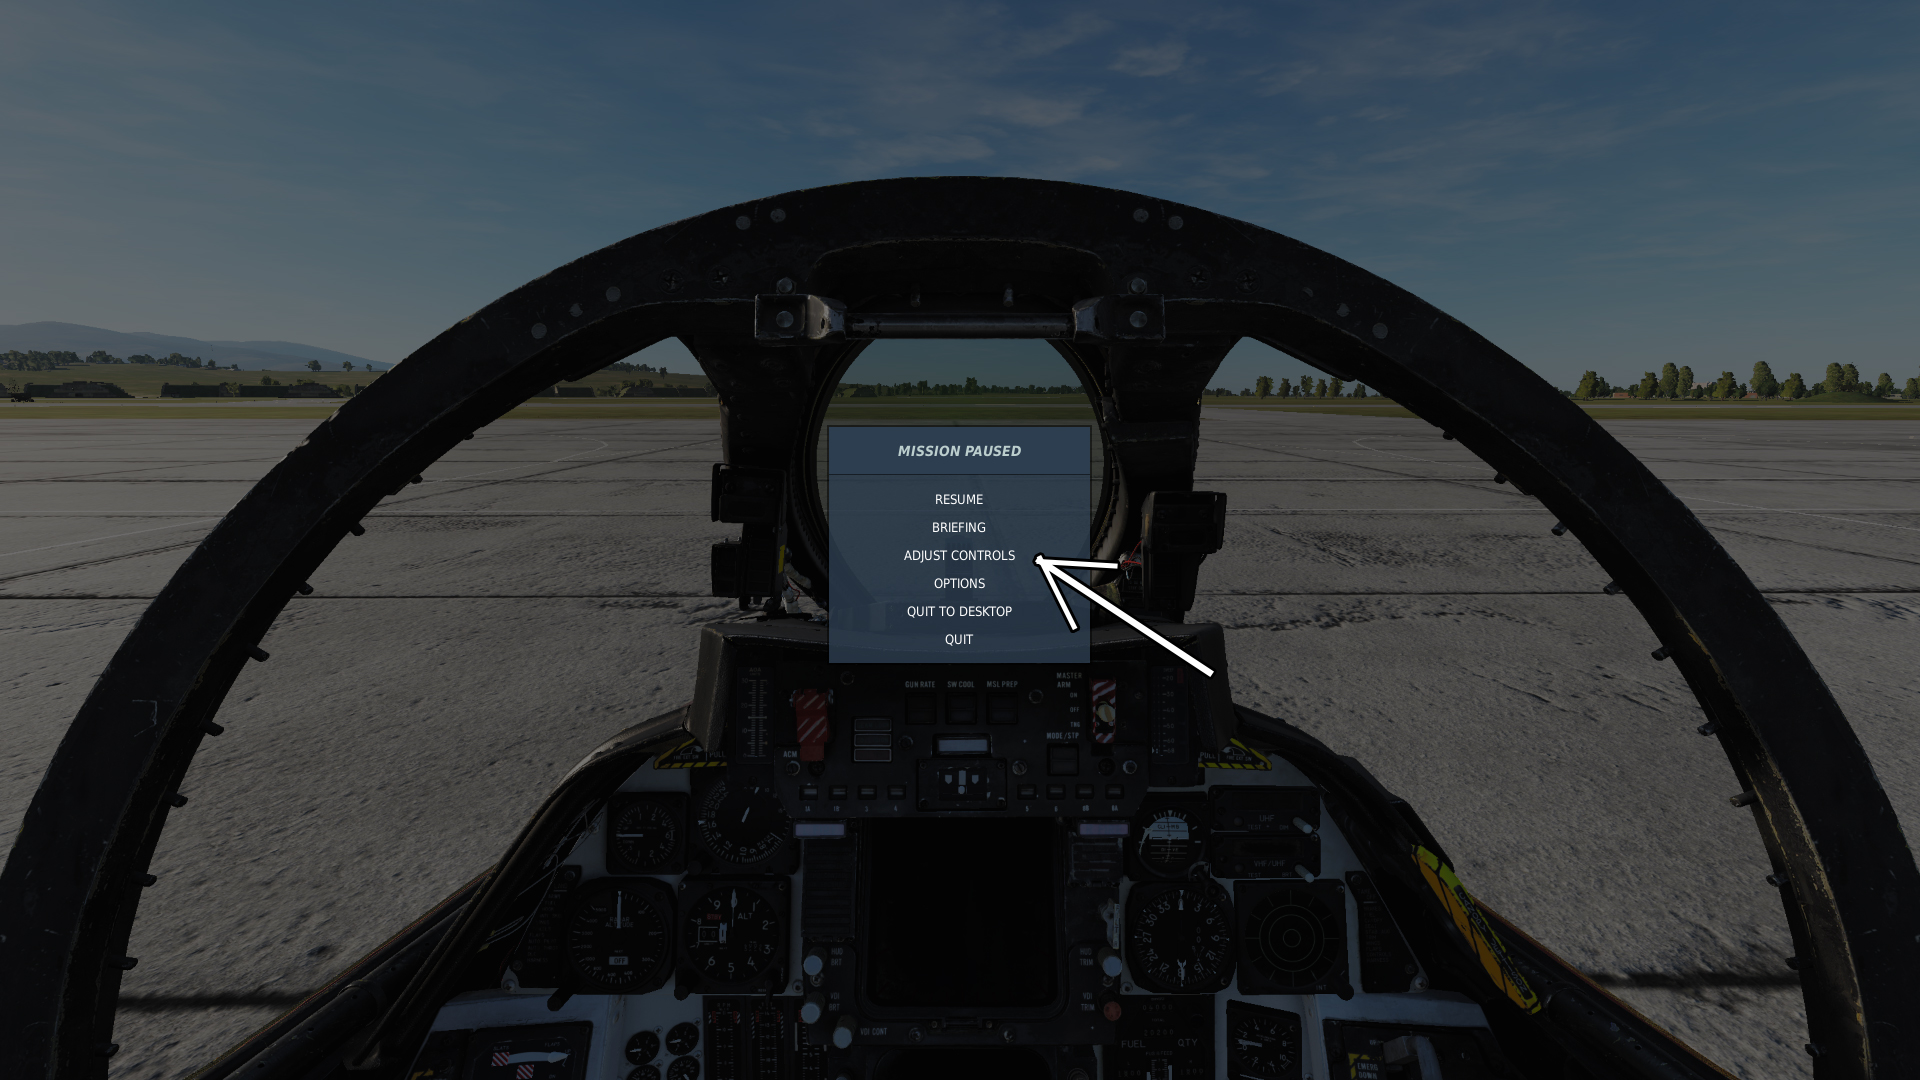
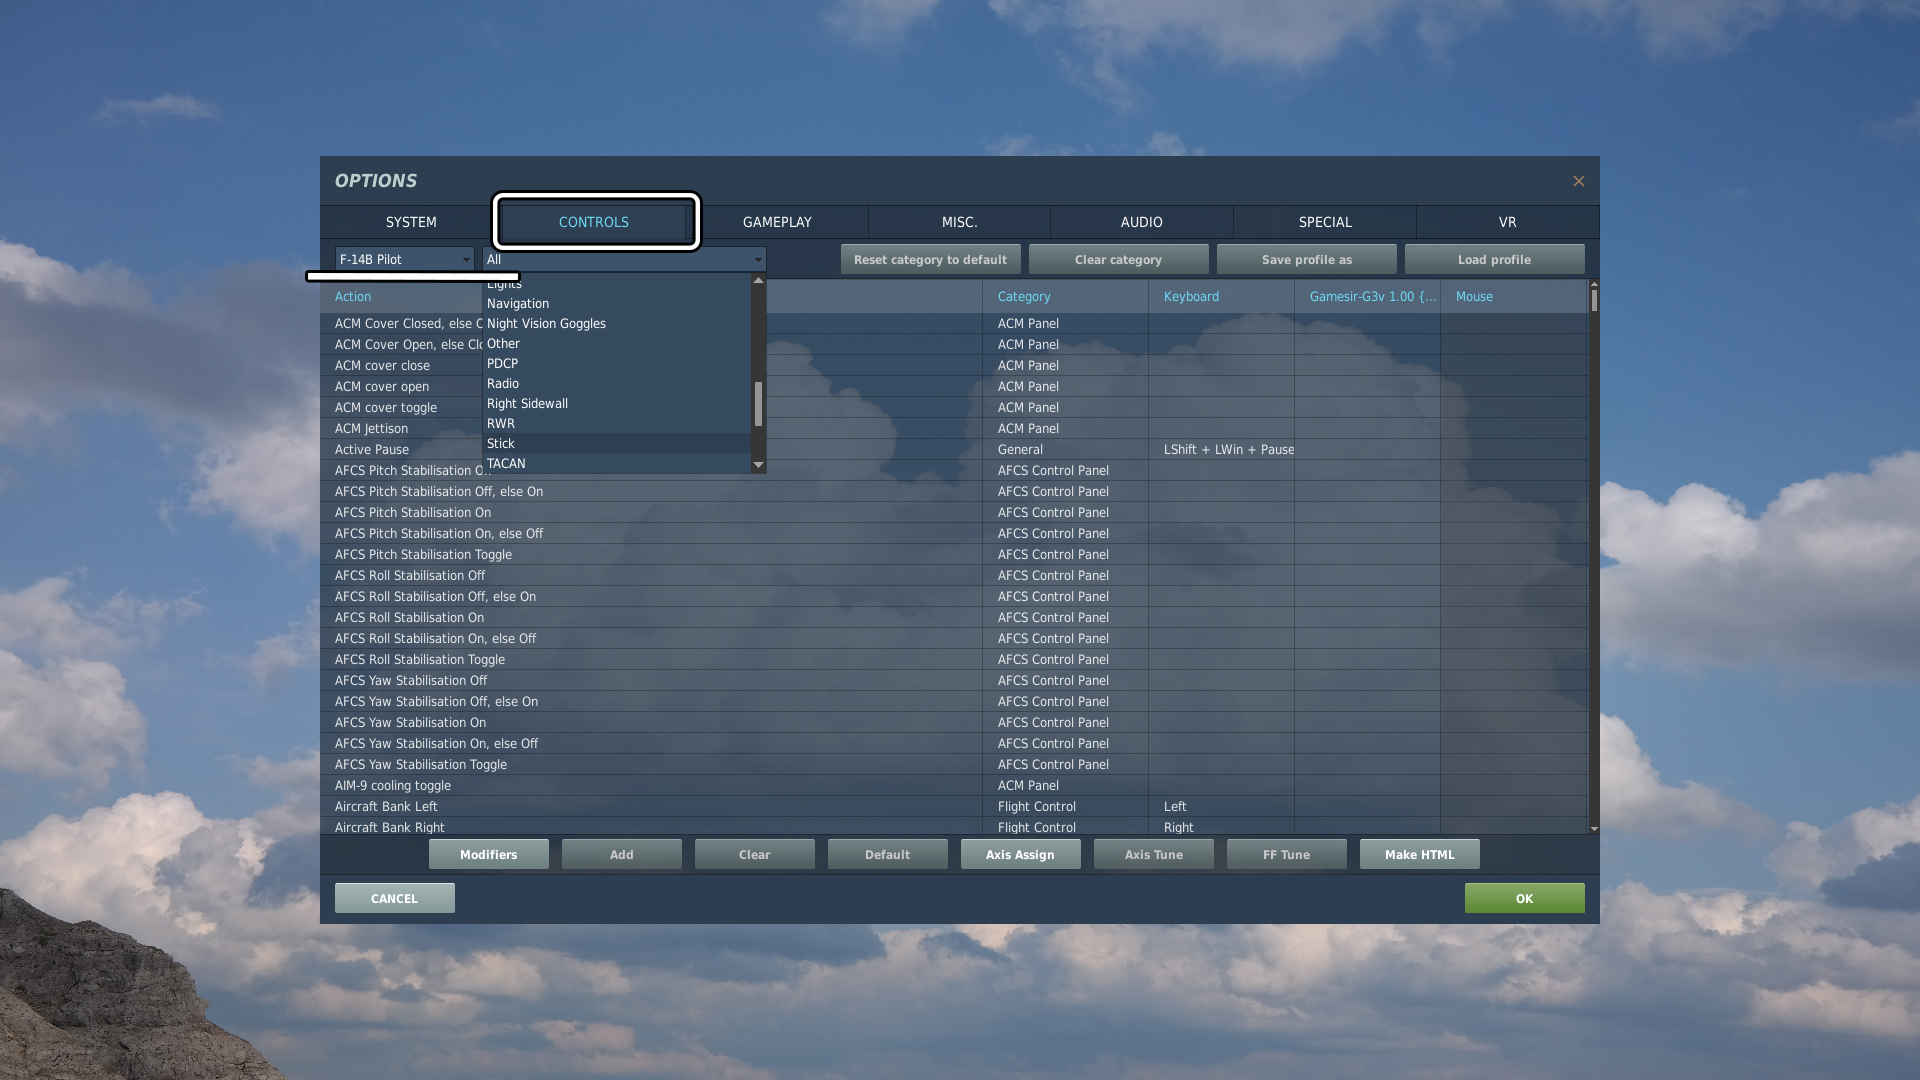
The following set of controls is the minimum you will need to take off, fly and shoot. Some of them are perfectly fine to keep on the keyboard, but many of them will be best within easy reach on a joystick or throttle. If you have enough buttons available on a HOTAS, I find it is best to place the controls onto your HOTAS as they would be in the real F-14B. (check the manual for F-14B HOTAS layout)
Axis Section- Pitch
- Roll
- Rudder
- Throttle Both (or left/right separately if you have a 2 split throttle controller)
Flight Controls Section
- Trim Pitch Down
- Trim Pitch Up
- Trim Roll Left Wing Down
- Trim Roll Right Wing Down
- DLC Thumb Wheel Aft
- DLC Thumb Wheel Forward
- Weapon Selector down
- Weapon Selector up
- Weapon Selector press
- Trigger
- Autopilot Reference / Nose Wheel Steering Toggle
- Wing Sweep AUTO
- PLM button
Start Up Procedure (Pilot)
This is an abbreviated start up procedure, to get you into the air as fast as possible.
For convenience, the screenshots below are available in FHD resolution here https://www.dropbox.com/s/6htyfvsgozotiwh/F14PilotStartUp.zip?dl=0 Put them onto your phone or tablet, and scroll through them without having to ALT+TAB between DCS and this guide.
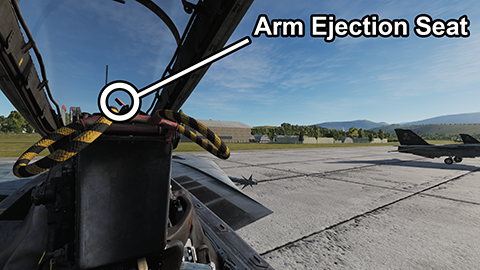
 2. Arm the ejection seat, the RIO should do the same to their seat.
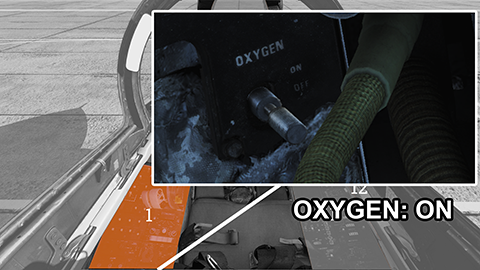
 3. Turn on the oxygen supply to the mask, and remind the RIO to also do this.
 4. Turn on the intercom so that it's possible to communicate with the ground crew and RIO thru all of the noise.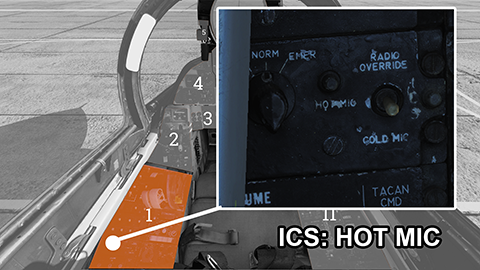
(At this point the RIO will close the cockpit and begin the Inertial Navigation System alignment see RIO start up procedure below)
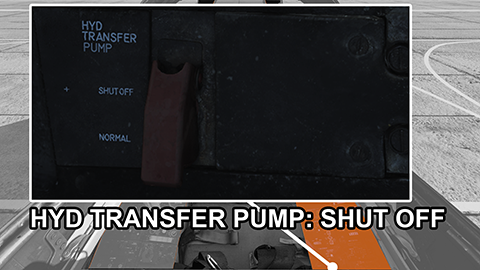
- This switch is a little trick to see, it's hidden behind the seat belt buckle on the right side of your seat, flip the cover open and then adjust the mouse so that you get a green cursor indicating that you are able to click on the switch. (if the cover is closed, then the switch is set to normal, so make sure the cover is open, and then also click the switch).
 6. The Engine Crank is not labelled, but it's to the left of the throttle, it has just an L and R either side of it. Right click to move the switch to the right.
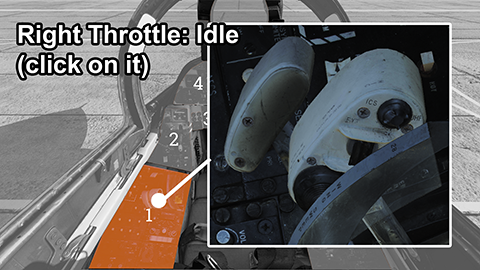
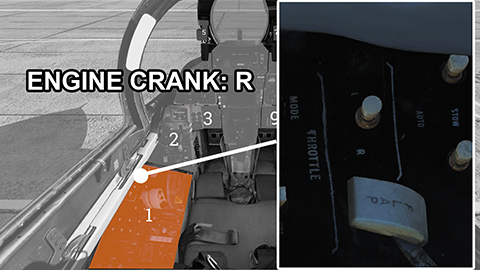 7.Click on the body of the right throttle and it will move from the cut-off position to idle.
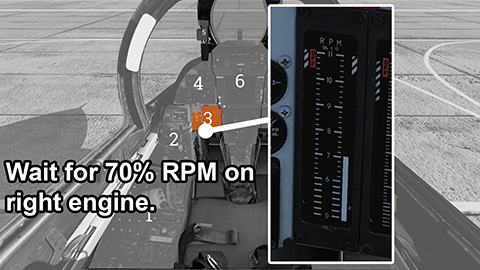
 8. You should be able to hear the engine spool up, but also keep an eye on the RPM gauge, and make sure the engine settles around 70% RPM
 9. Once the right engine has finished spooling, do the same for the left. Set the engine crank to L
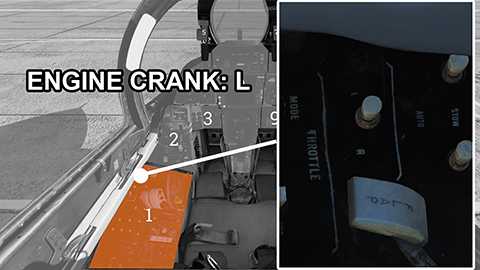 10. Click on the body of the left throttle, to get it out of the cut off position, and if necsesssary push it down to idle.
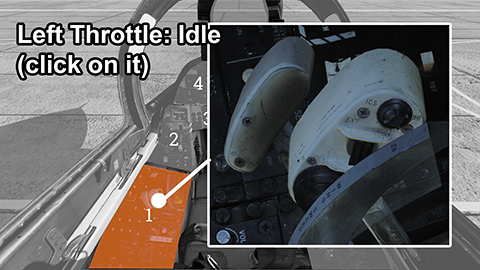 11. Watch the RPM gauge and make sure the engine settles at 70%
 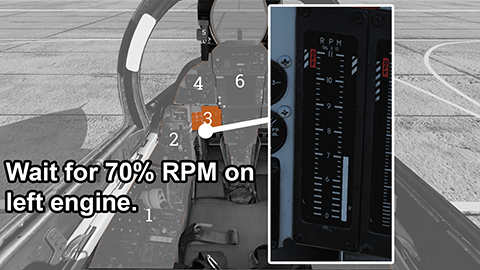 12. Set the Air Source to both engines.
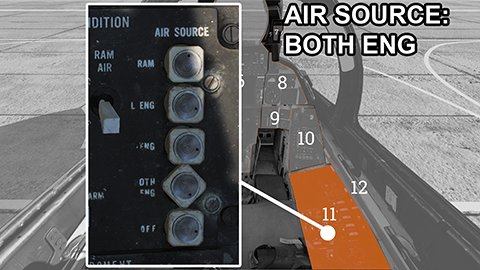 13. Now close the cover on the Hydraulic Transfer Pump, it will automatically set it back to normal
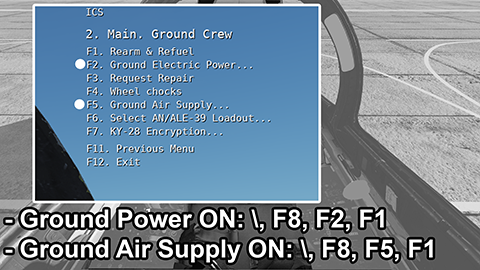
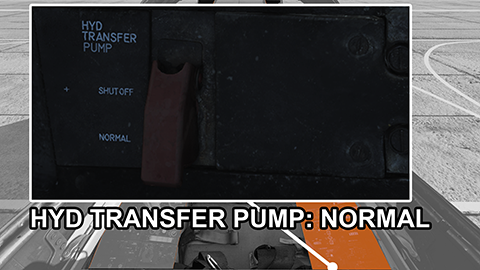 14. Ask the ground crew to disconnect the air supply and external power.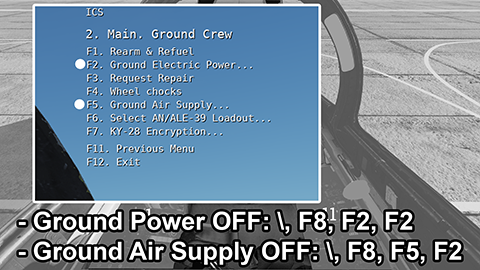
Engine start up is now complete.
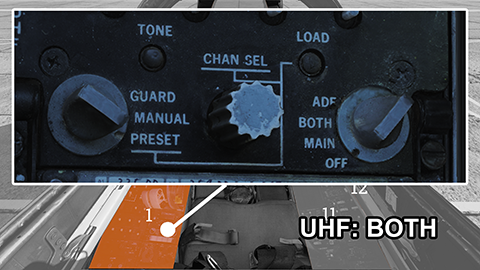
 16. Set UHF video to BOTH
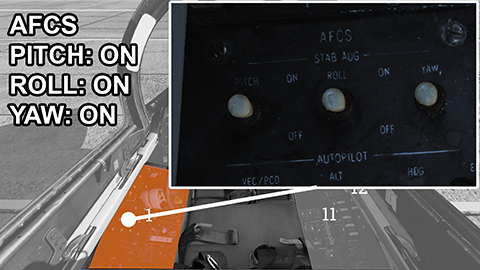
 17. Without Flight Control System, modern planes are nearly impossible to fly, so make sure to turn it on!
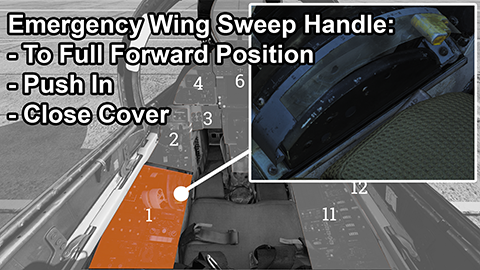
 18. Push the Emergency Wing Sweep Handle into the full forward position, and then click it to lower it into place, and close the cover.
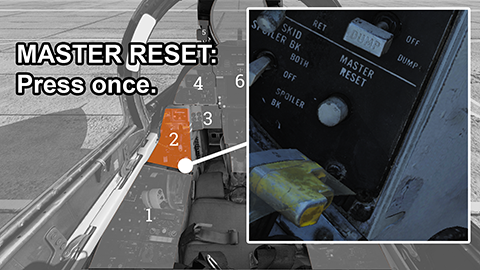
  19. Press the MASTER RESET button.
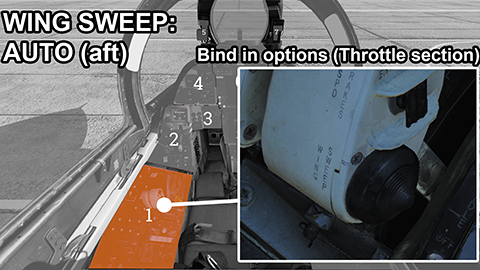
 20. Push the Wing Sweep HAT switch on the throttle into the AUTO position. (Set this up in options under the Throttle Section) Take a look outside and make sure the wings are moving. There is also a small ruler/scale/indicator on just below the HUD (bottom right corner) that shows what angle the wings are currently at. If the wings are not moving, ensure you are in AUTO mode and try pressing MASTER RESET again.
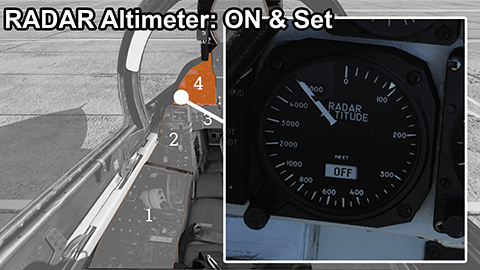
 21. Rotate the knob on the Radar Altimeter to turn it on and to set the low altitude warning alarm(little white triangle).
 22. Turn the the knob on the SAI, to makme the OFF flag disappear and ensure the lines are leveled with the horizon.
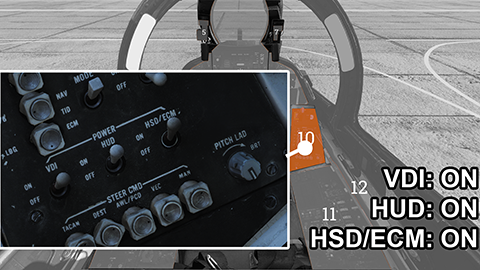
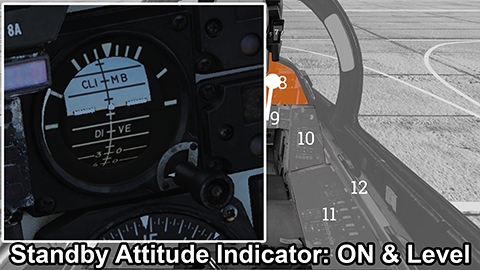 23. Turn on the VDI, HUD, HSD/ECM - this turns on the Heads Up Display and the two monitors underneath the HUD.
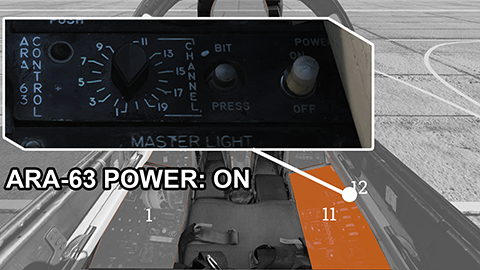
 24. Turn on the Instrument Landing System
 25. At this point we need to wait for the RIO to finish their set up. Once complete the pitch ladder will appear on the HUD.
 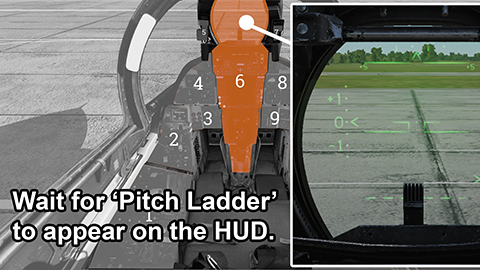 26. Then we can alight the nose indicator with the 0 zero line on the pitch ladder.
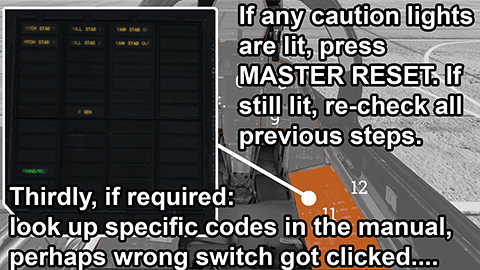
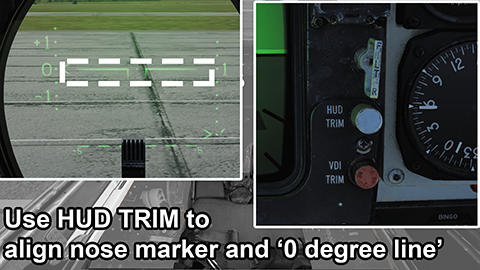 27. Make sure there are no warning lights lite on the Pilots Caution Advisory Panel. If CADC is lit up, press MASTER RESET again (step 19). Any other lights, you will need to look at the F-14B manual on the Heat Blur website to see how to deal with them. There shouldn't be any however since we are in a fresh plane.
 28. If MASTER CAUTION button is flashing, click on it to clear the warning.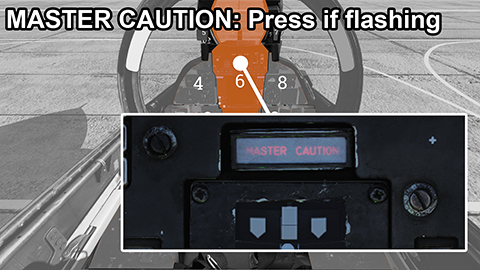
Taxi To the Runway (Pilot)
The Pilot should now:
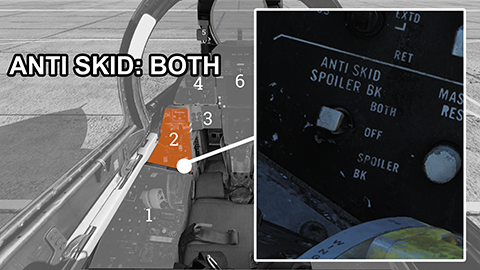
1. Turn on the TAXI lights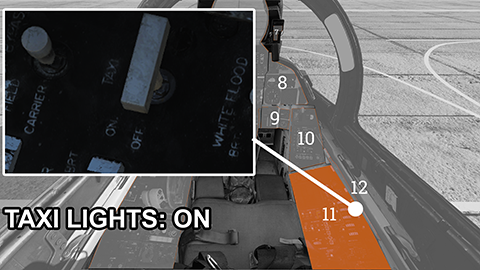 2. Enable Anti-Skid
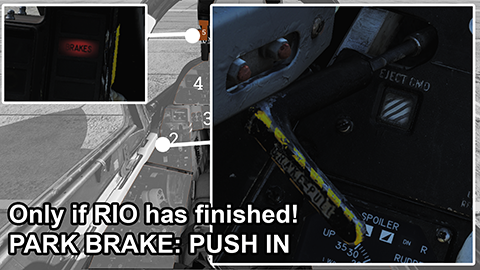
 3. Before you disable the Parking Brake, make sure the RIO has confirmed INS has finished aligning
 4. Enable Nose Wheel Steering (press N on the keyboard by default)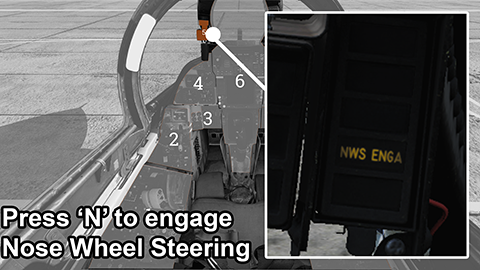
- Now the Pilot should drive the plane to the runway entrance. If you haven't set up your controls, it is Num+ and Num- to use the throttle, W to brake, and Z & X to steer.
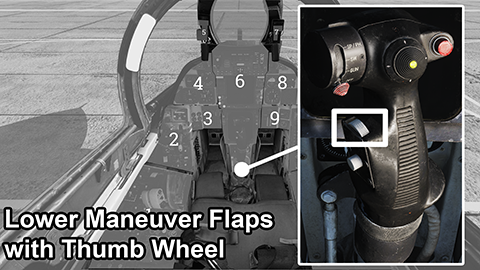
- Ensure the runway is clear, and nobody is landing. (LOOK AROUND)
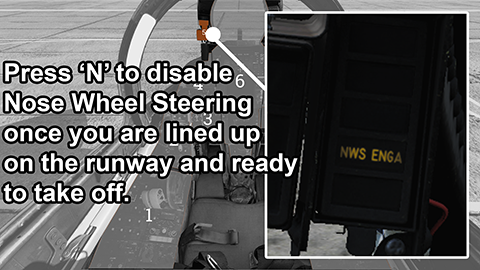
Take Off (Pilot)
Things happen quickly on the runway, so it's worth reading through this once or twice before you hit the gas.
- Extend the throttle to 100% - Or maximum and let the afterburner rip loose, it's not technically accurate, but I won't tell anyone, as long as you are having fun..... :-)
- Keep the aircraft lined up as best as you can with the rudder controls - (Z & X on the keyboard)
- The F-14 will start to lift on it's own once you are going fast enough, but guide the plane up and gently pull back on the stick to keep ascending by keeping the nose at around 5 - 10 degrees (on the HUD).
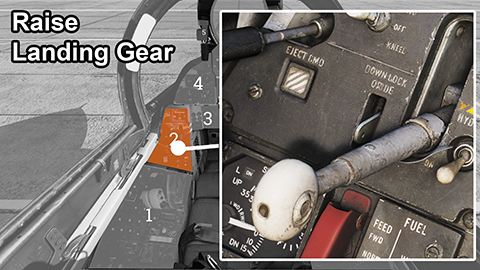 5. Climb to around 10,000 feet. (The small white square in the dial should read 10, as in 10,000 feet)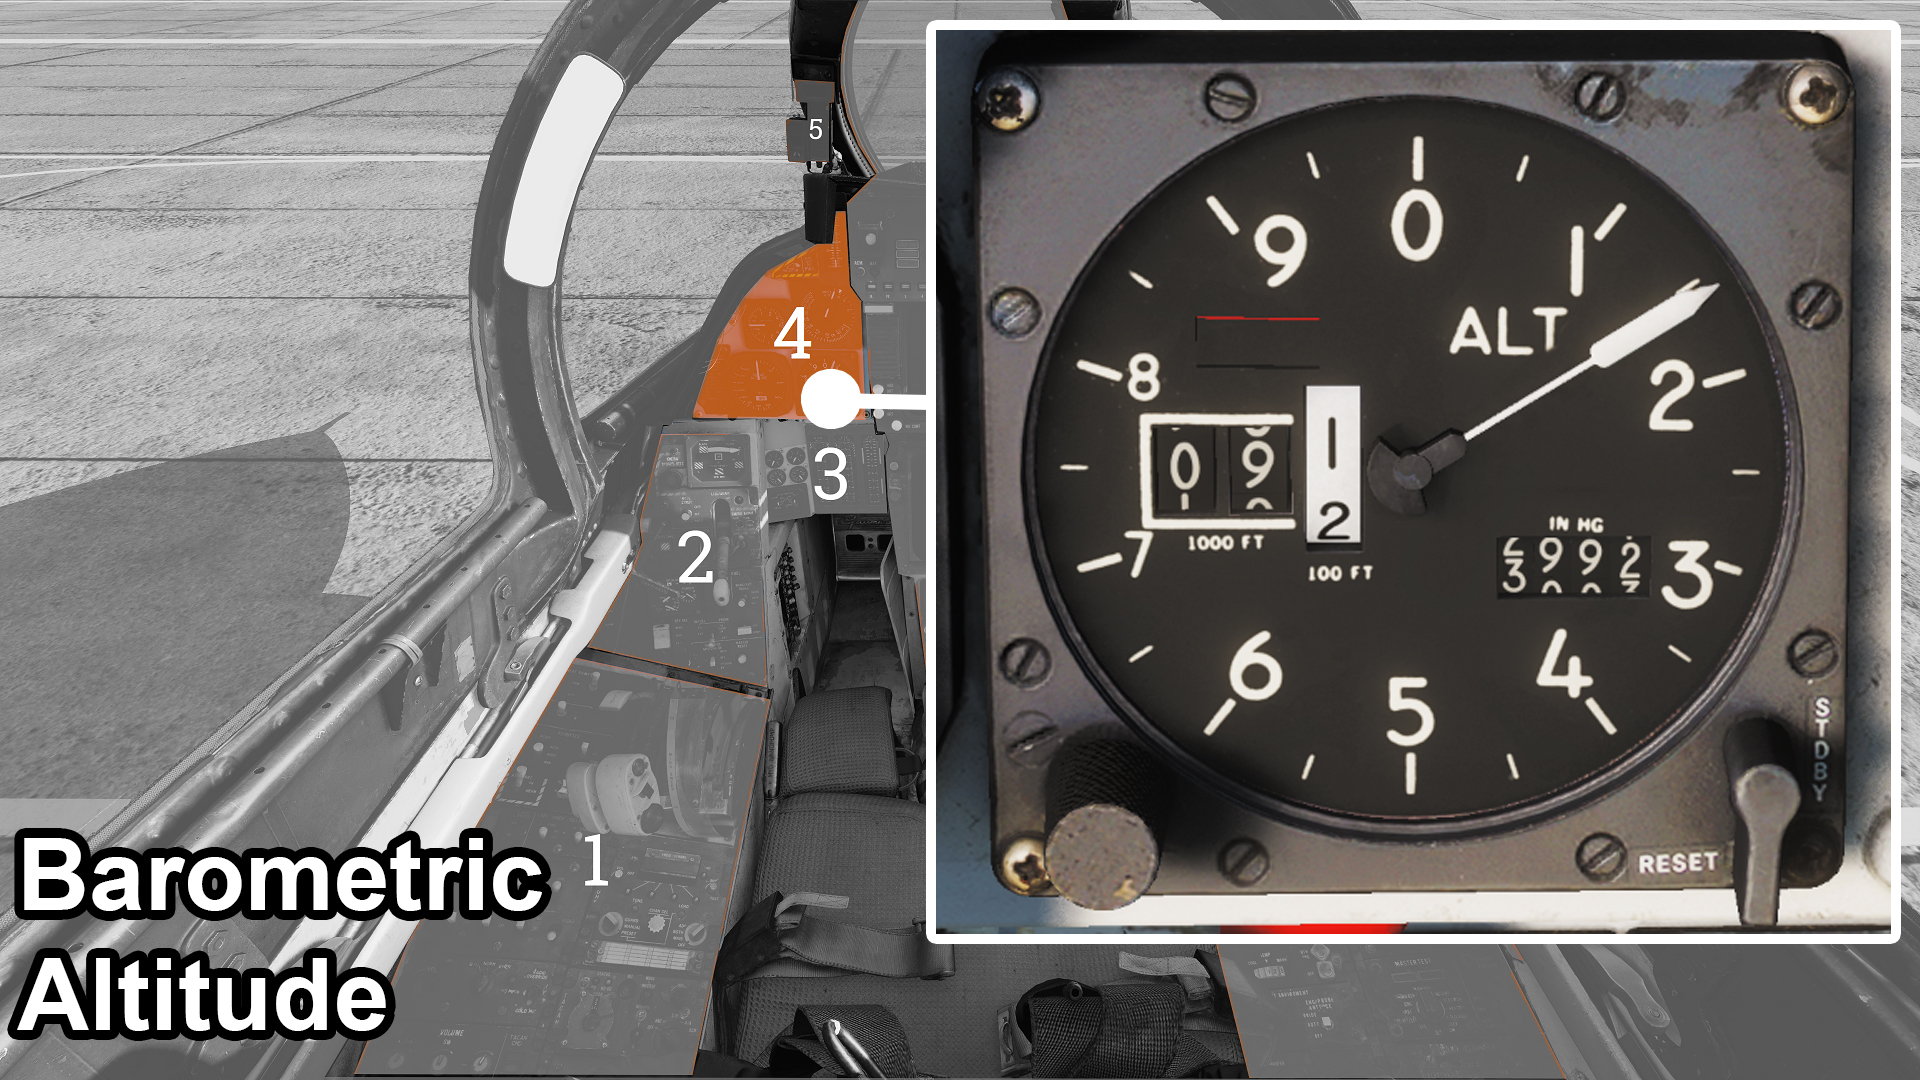
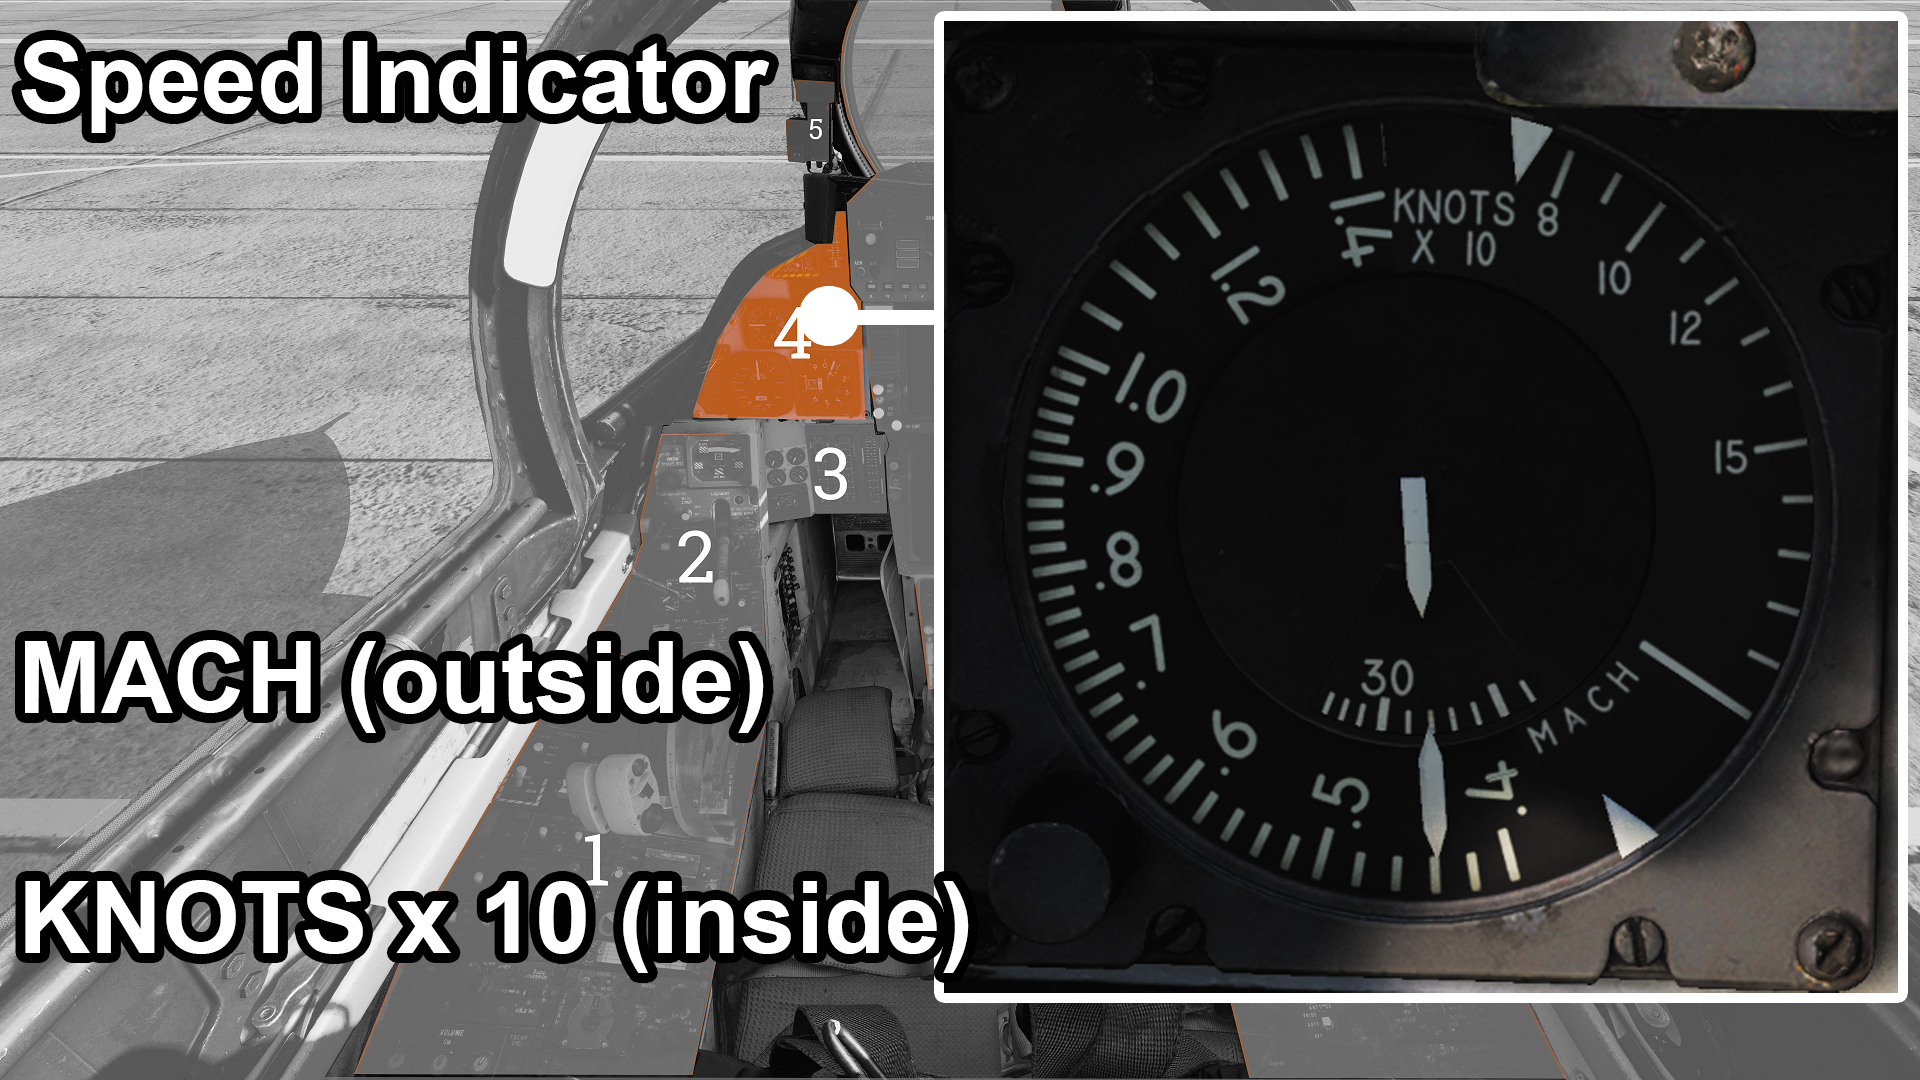
- Turn off the afterburner, otherwise it can guzzle up our fuel before the mission is complete. A throttle RPM between 85% and 95% is perfectly fine, as long as the speed at least 250 knots then we are fine. Ideally keep things between mach .4 and mach 8. when cruising.
Navigation (Pilot)
(The RIO will enter the coordinates for waypoint #1 if playing in multiplayer)
Press backspace to hide the stick in order to see the VDI screen better (the bottom most screen).
Look at the compass in the VDI screen and turn and follow long heading arrow.
If you do not have a waypoint set or the INS alignment failed, or for whatever other reason your navigation, is not working then basically just fly north west - if you keep the sea to your left, and the land to your right, you are going the right way.
Combat (Pilot)
- Missle Prep
- SideWinder Cooling
- Master Arm
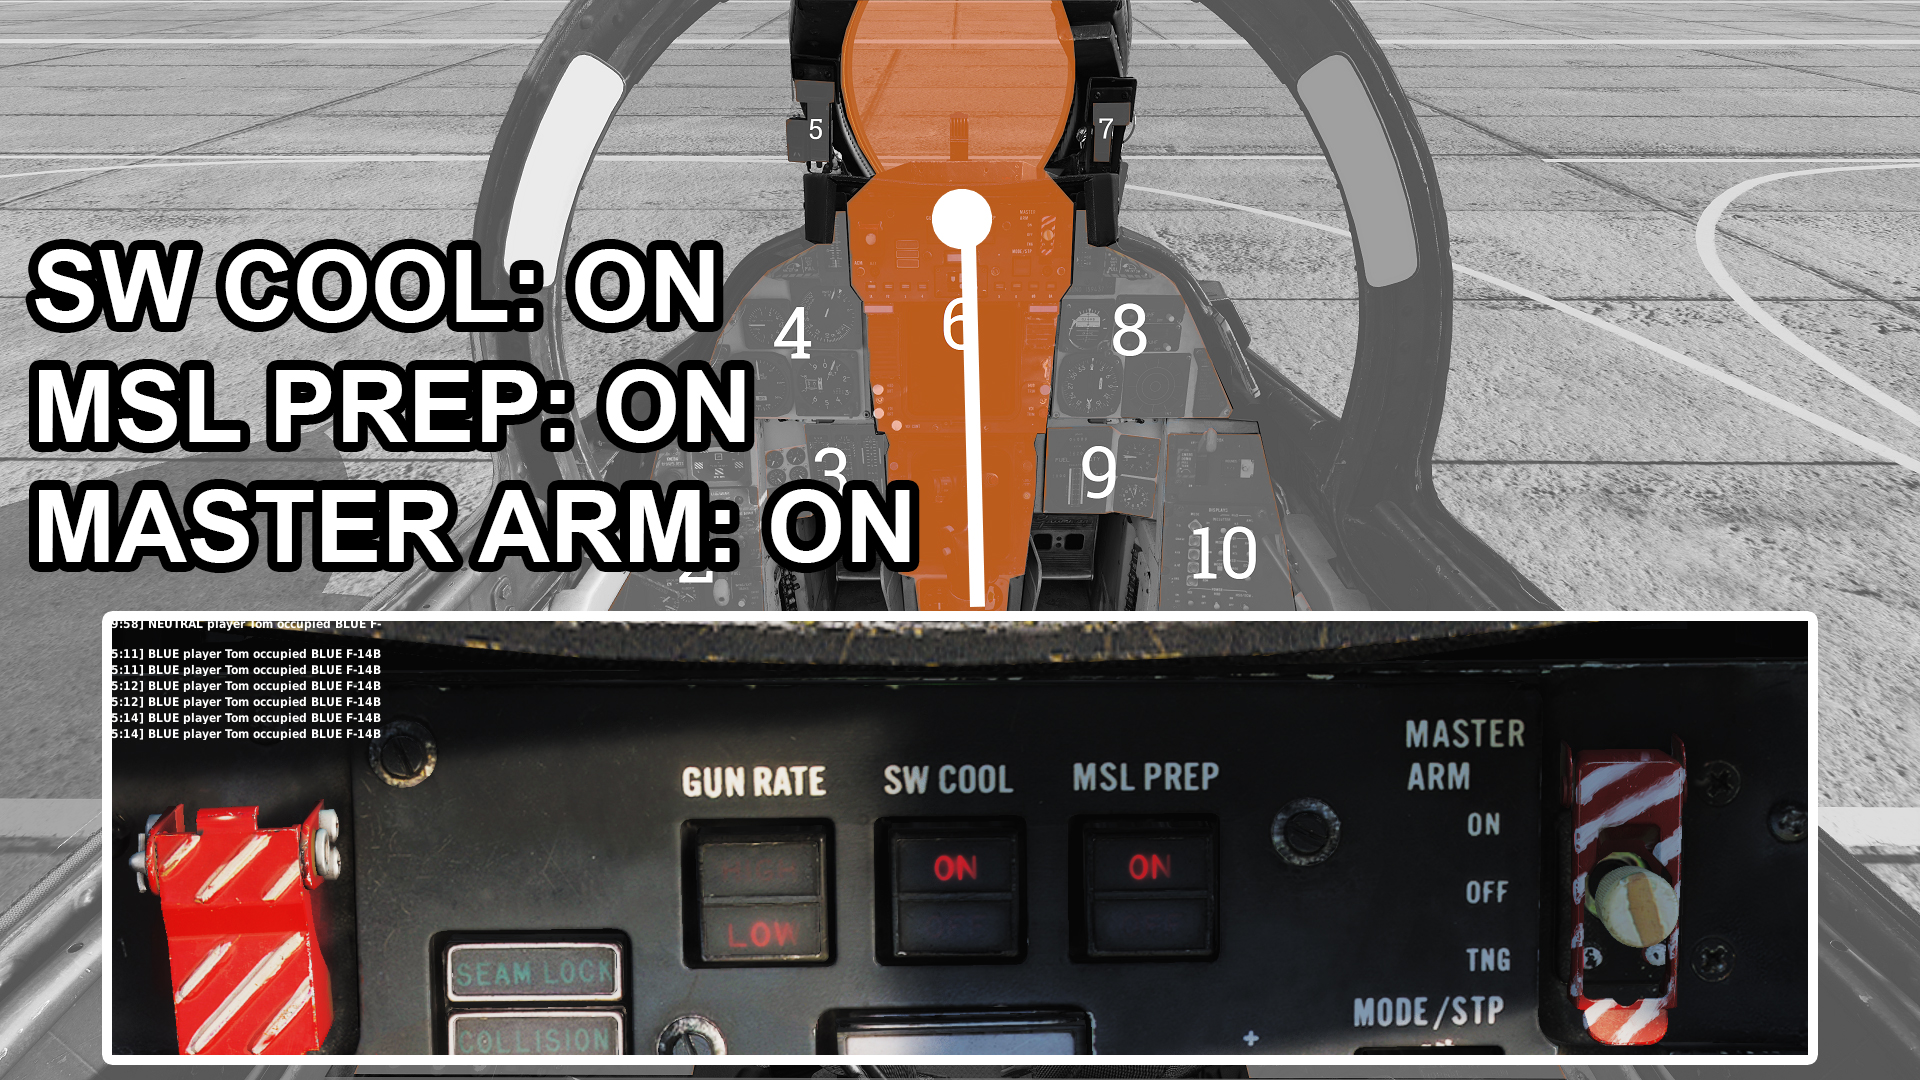
It takes about 2 minutes for the missiles to become ready to fire. So it's important to press these long before getting into an engagement.
2. Set the HUD into Air to Air mode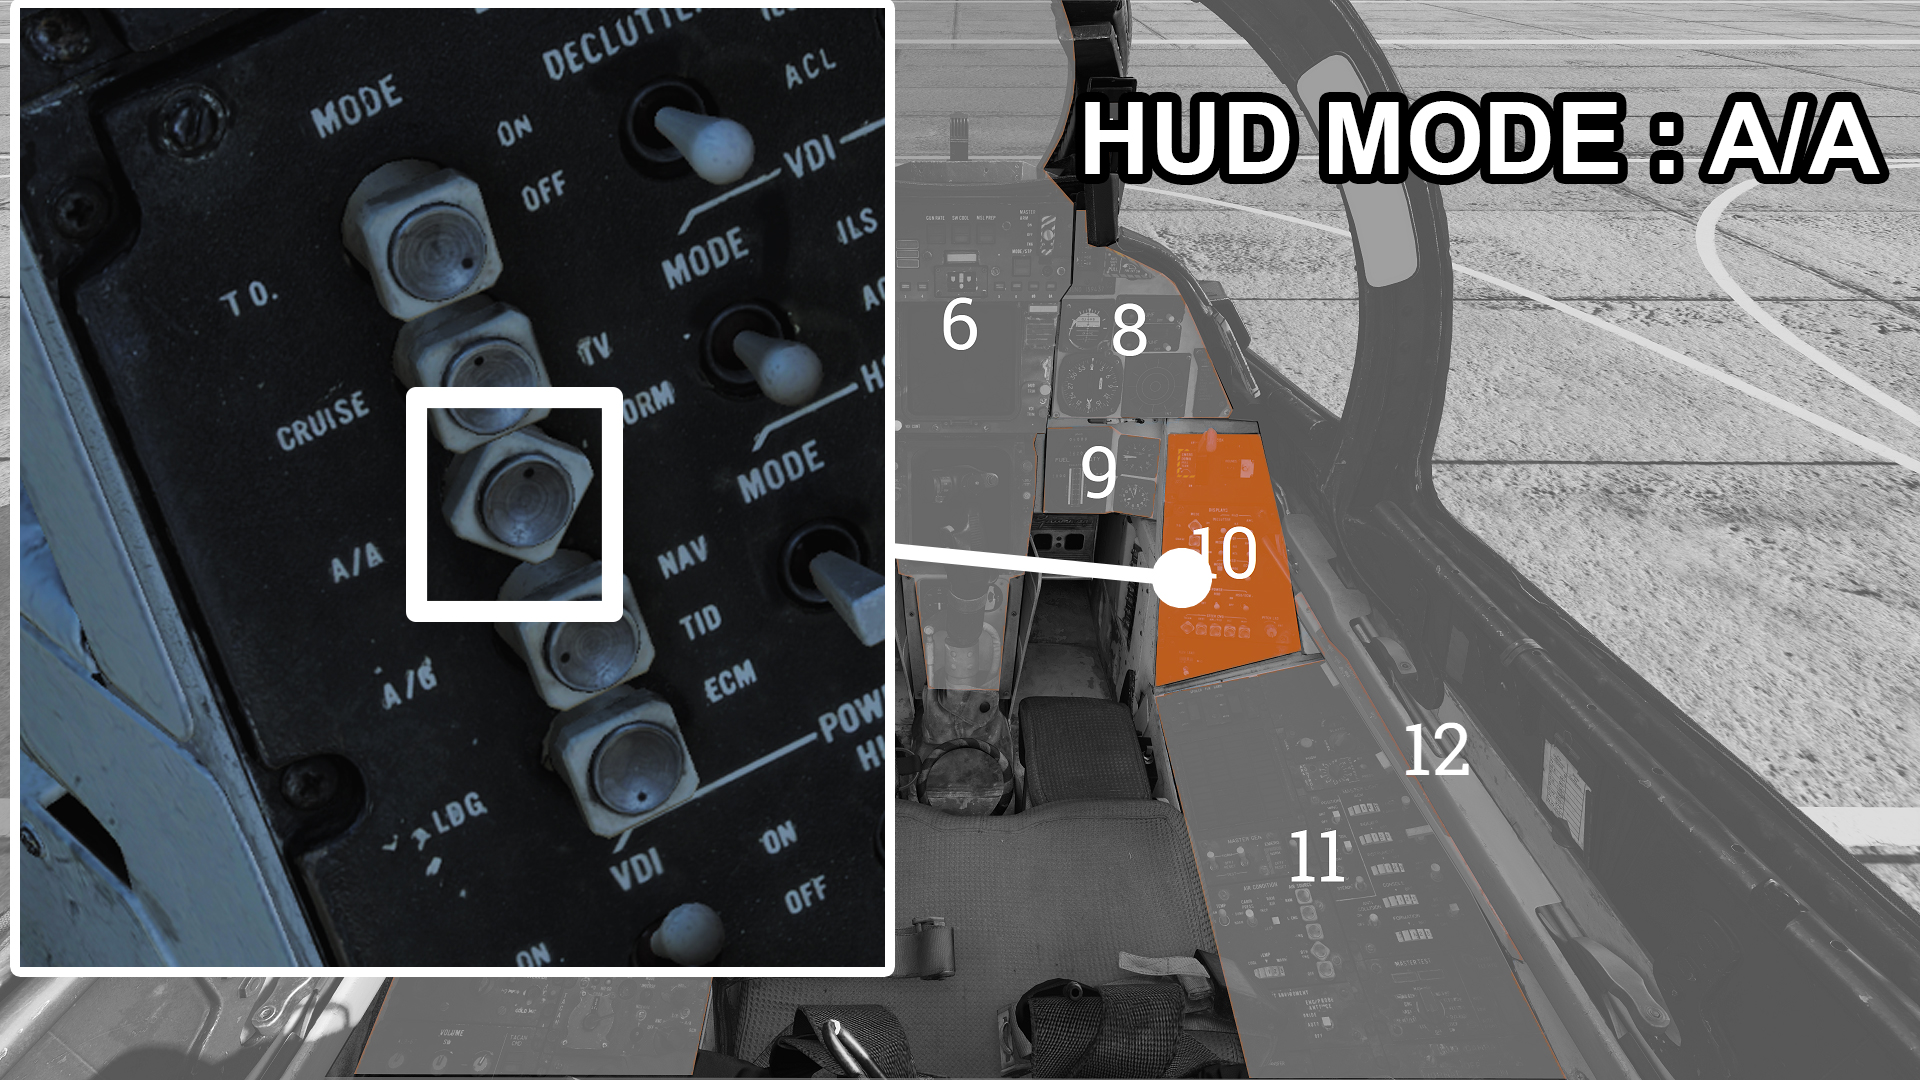
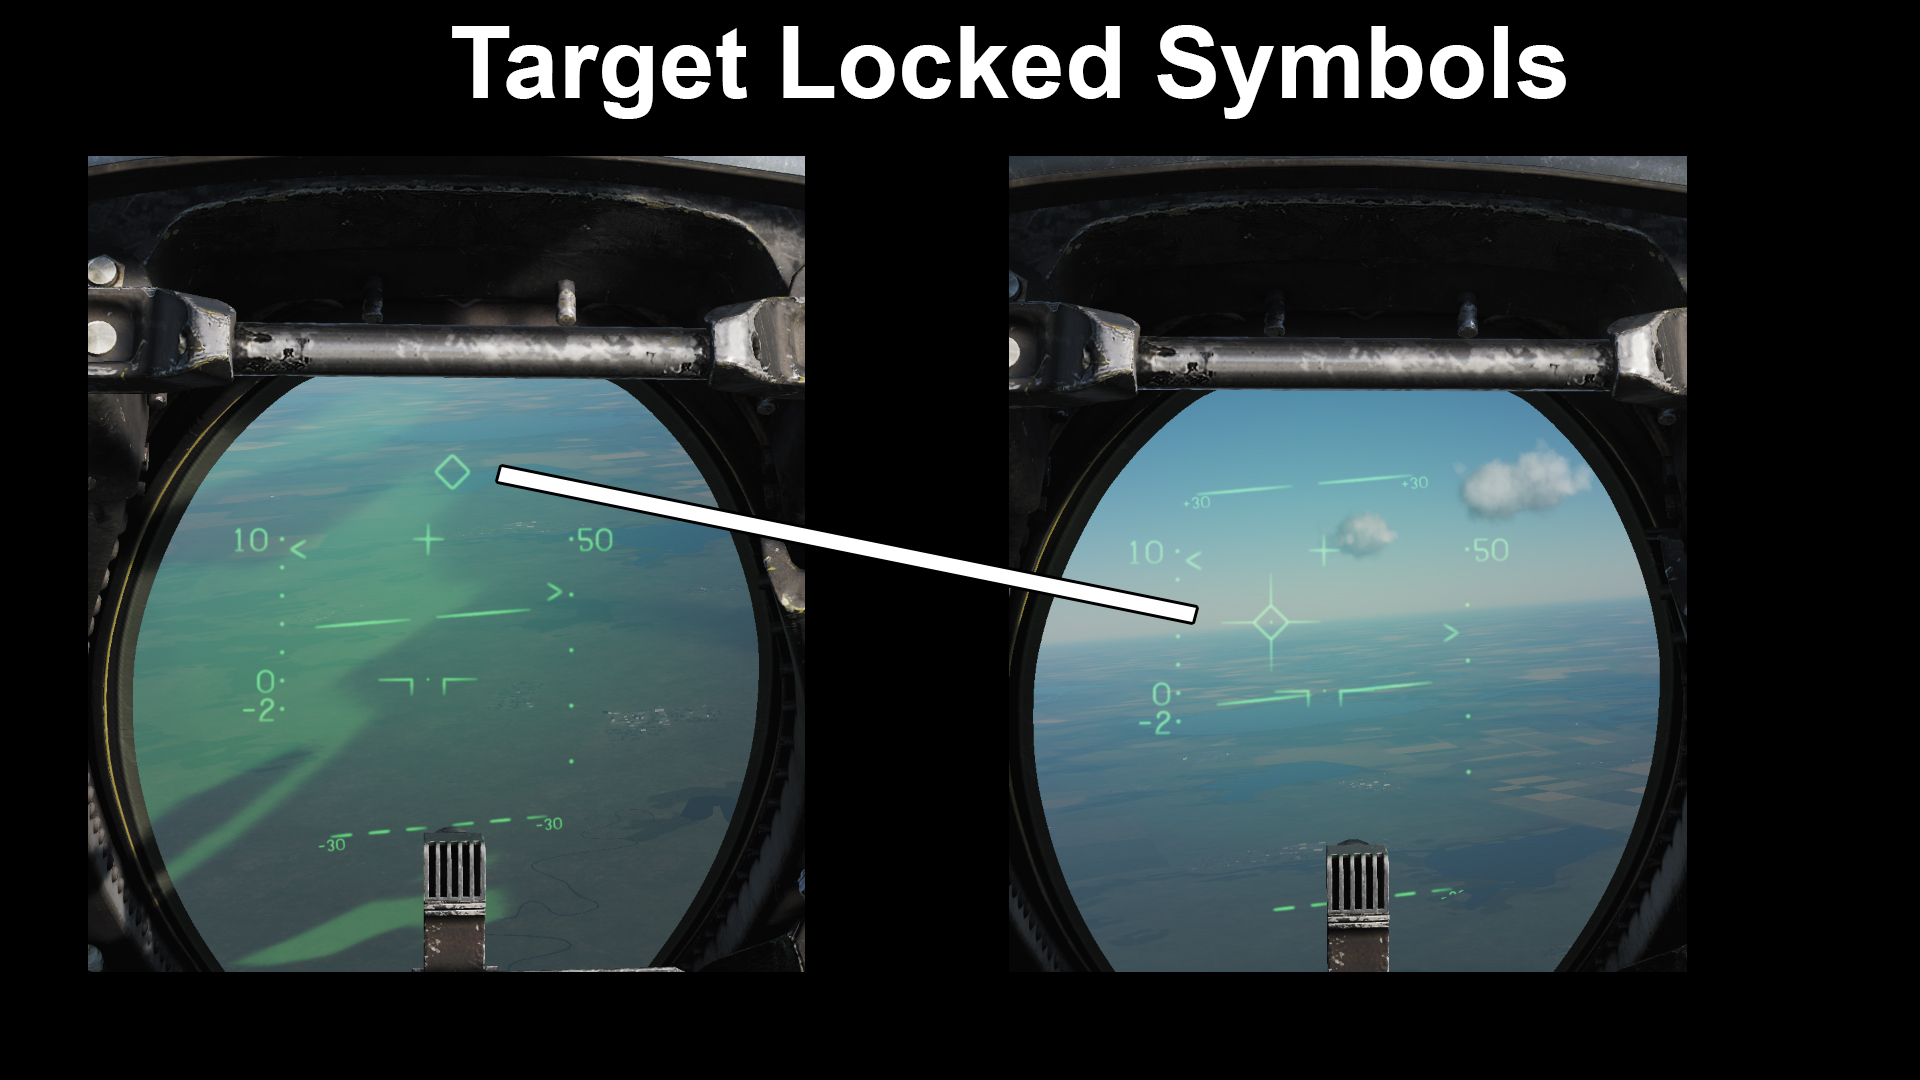
- Once the RIO detects a target they will use the radar to lock the target up. If you see a target yourself within 5nm, then you can use the the PLM button (whatever you have set it to) to lock the target yourself. Just point the small cross on the HUD at your target, and hold the PLM button until a lock is achieved.
When locked, your HUD will have a diamond indicator showing the locked target:
 4. Now that you have a target locked up. Why not shoot it down? Select either the Sparrow missile by moving the weapon selector to the top most position, or select a Phoenix missile by moving to the Sparrow position, and then also press the weapon selector in.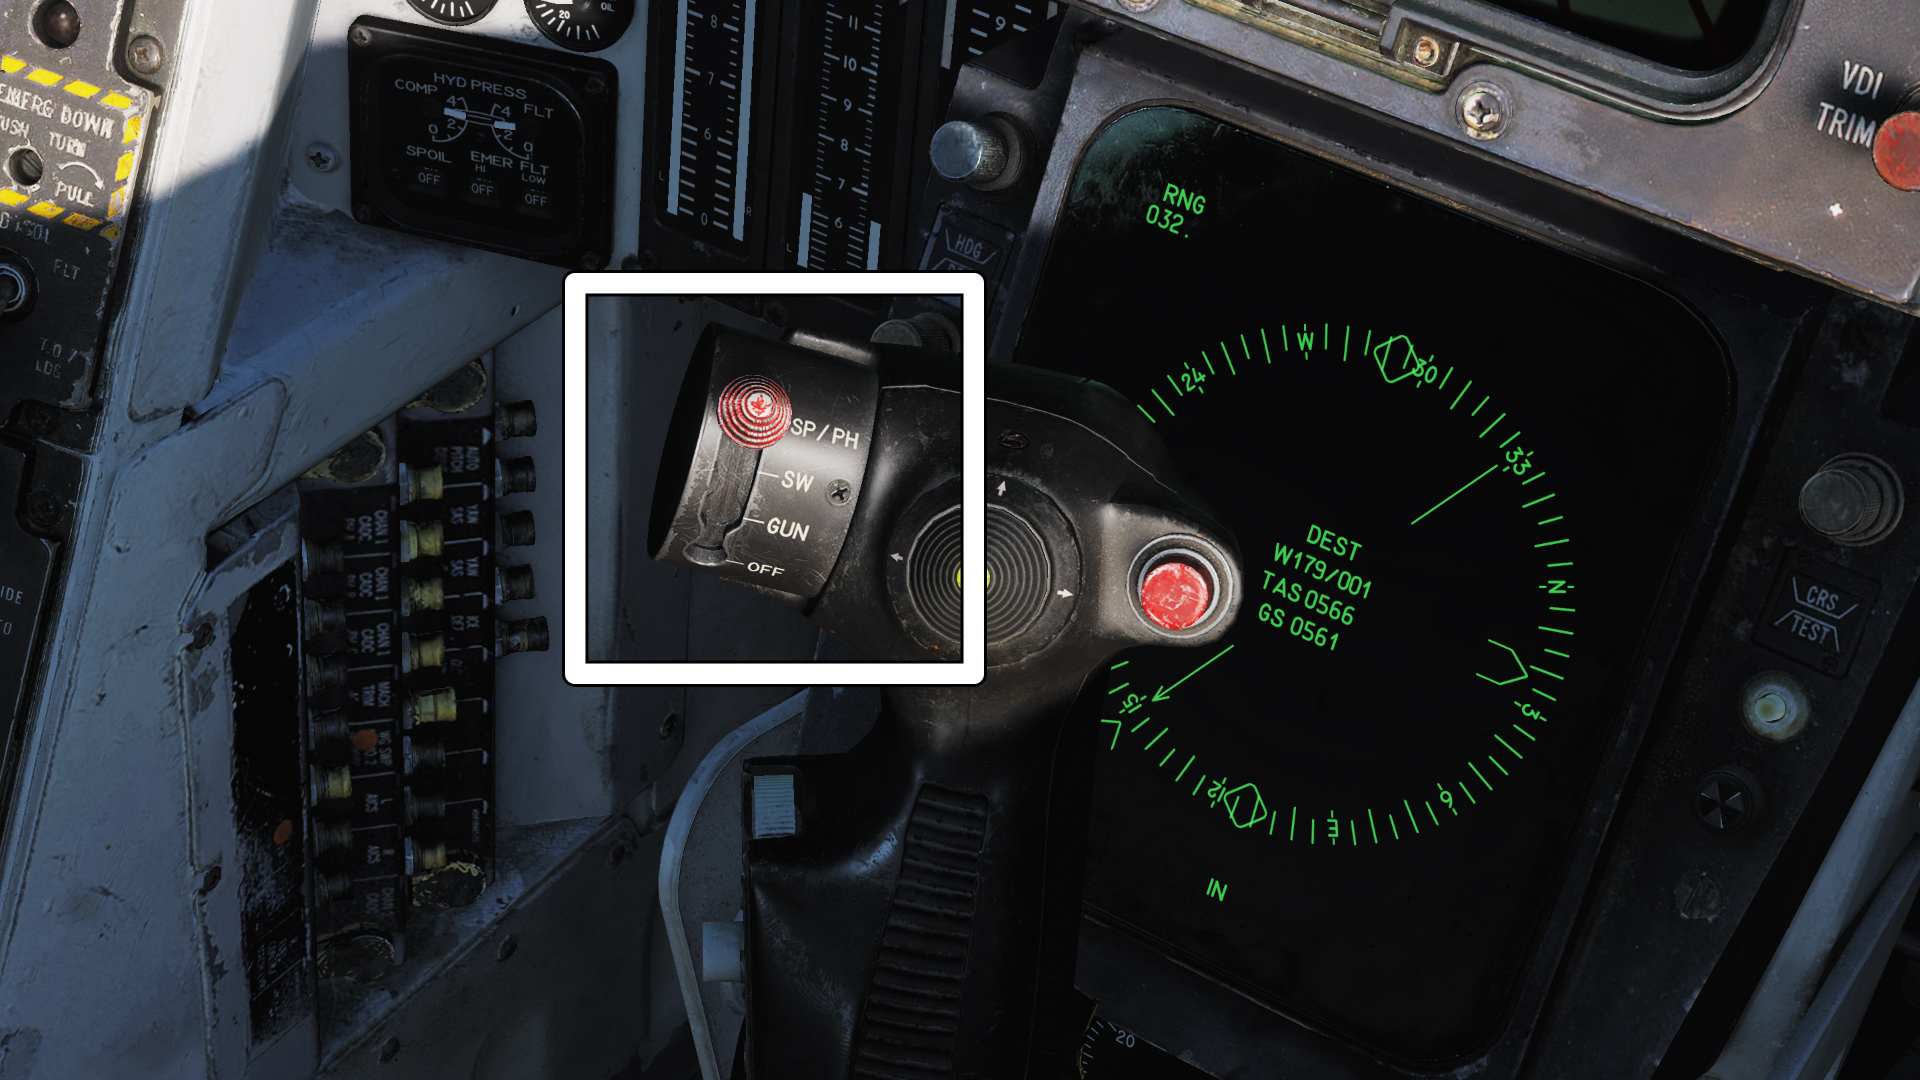
Your HUD will show SP or PH indicating which weapon you have selected and how many missiles you have.
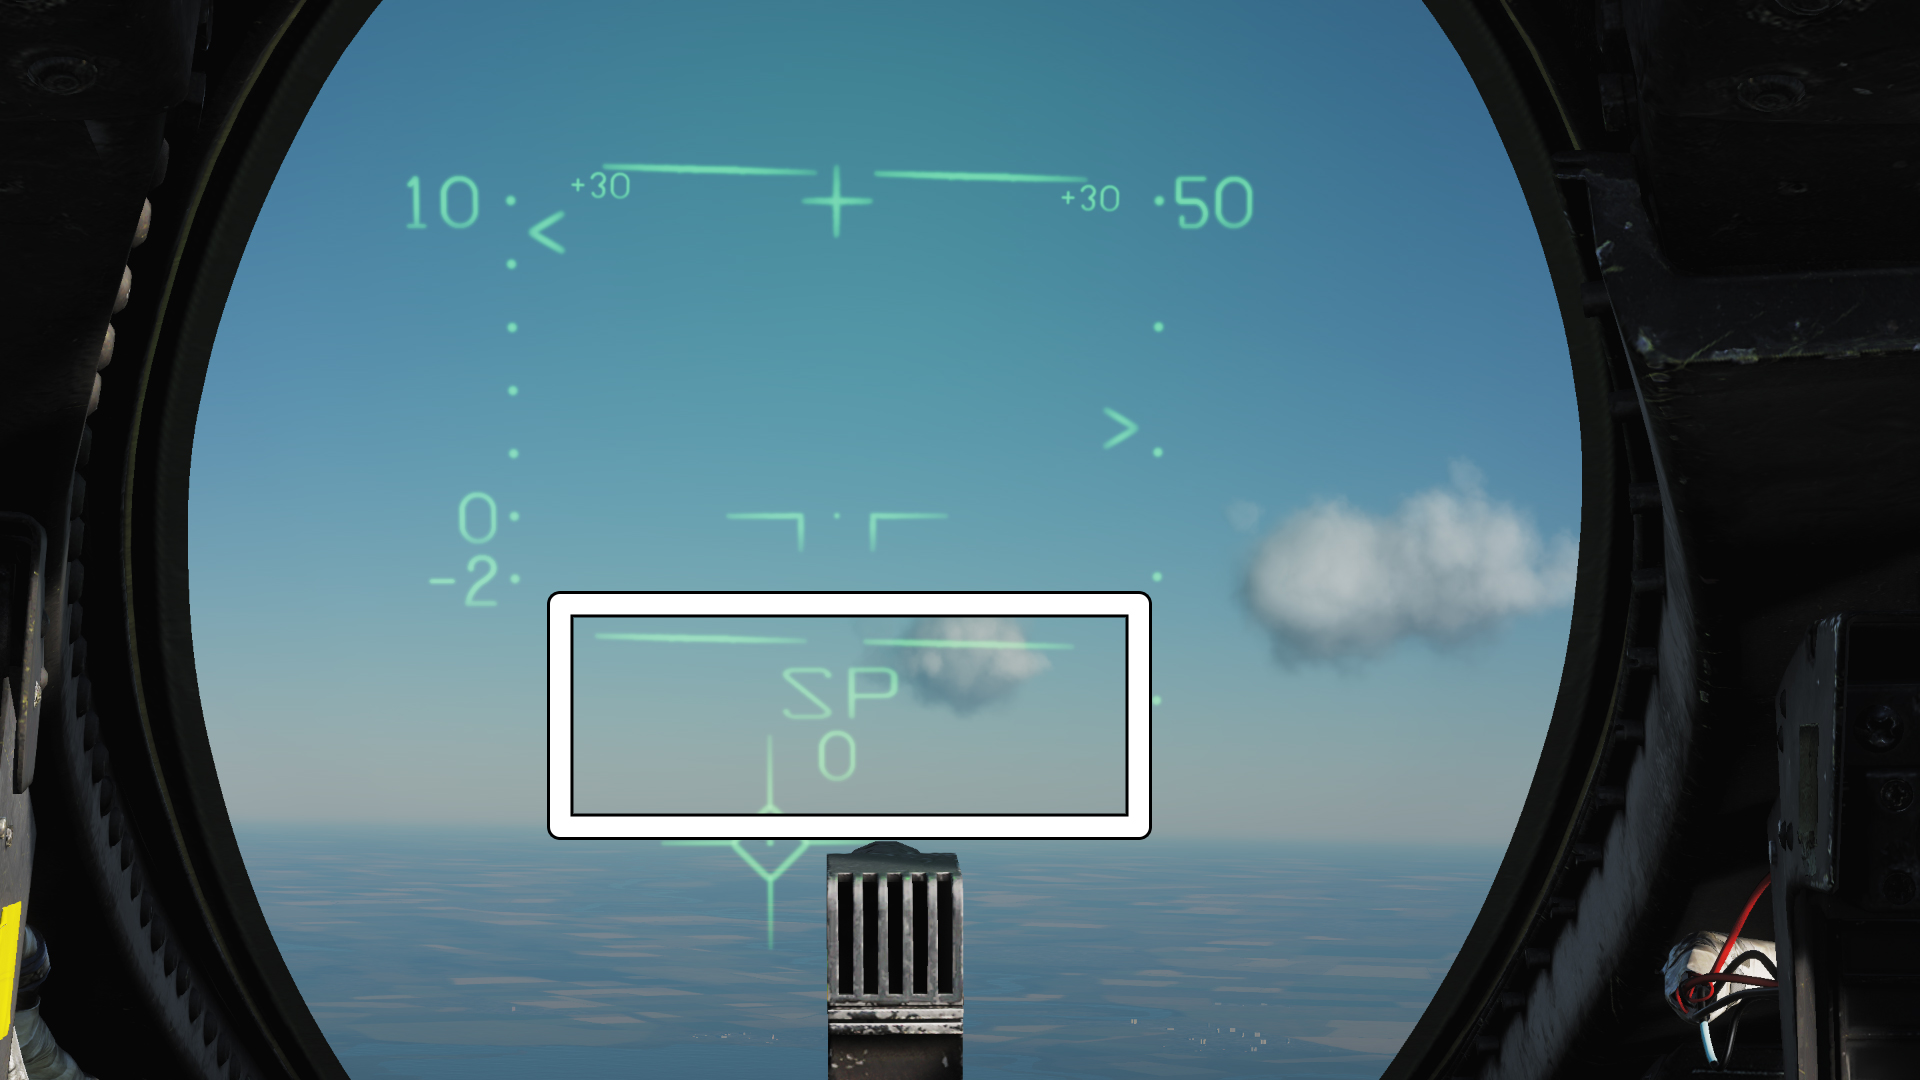
On the right of the HUD is a dotted ladder and a number (50 in the screenshot above) the little > carrot tells us how far away the target is.
Phoenix missiles have a long range reach, around 25 miles can be a successful hit all the way to 60nm if you are high enough and the target is flying toward us. Sparrow missiles can reach about 16nm in a good scenario. For either missile, a 10nm launch range gives them a high probability of hitting the target (unless the target does something very fancy to avoid them). As we have a limited amount of missiles, choose wisely.
- Fox One!
Hold down the Trigger for about 2 seconds, or until you hear the missile fire.
Keep the target within your HUD to ensure the radar can keep a lock until the missile hits.
The RIO will keep you informed of enemy aircraft locations, and fire counter measures if an enemy plane begins to line you up. It will be your job to counter the maneuvers of the enemy planes. The F-14's variable wings, and strong engines, make it great out turning most enemies. One such move is to fly upwards at steep angles. Enemy planes will stall long before you do if they try to follow you. And if they don't follow you, then you are now above them - the advantage is yours in both cases.
However, the weapons used in modern air combat are so deadly, that we don't want to leave winning to acrobatic skill - usually the first shot fired in the fight, is the killing blow. Therefore you should put an emphasis on flying yourself into a position where you can see the enemy before they see you, and fire first.
The F-14 has the advantage at long range too, so make use of the long range of the Phoenix missiles, and shoot from where the enemy is unable to return fire - this way you don't need to put yourself and the aircraft in danger.
While the first few planes you encounter in this mission, can be fairly easily defeated with the guns/cannon or even Sidewinder missiles, as the new and more difficult enemies spawn, it will be more and more important to play tactically.
RCTRL + RSHIFT + TAB to respawn.
In multiplayer, press ESC, select Briefing, and pick a different F-14B Intercept from the list.
Landing (Pilot)
Ask the RIO to set the waypoint to Home Base.
- Once again, follow the arrow on your compass on the VDI (bottom screen).
- When you are within visual range of the runway, drop to about 1000 feet.
- Line up the runway from at least 5nm away, so that you have enough room to descend at a shallow angle, and make to adjustments. This is where the rudder pedals ( Z & X keys)come in handy, keep your plane flat, and adjust the nose with the rudder (instead of rolling sharply with the stick, small stick movements are OK here).
- Lower your landing gear (G key)
- Manage your speed with the throttle to keep it around 250nm or mach .3, and cut the throttle entirely as you are about to touch down.
- Use your wheel brake once you are rolling on the runway (W key) and use the rudders pedals to stay centered on the runway.
- Enable nose wheel steering (N key) and taxi to a parking area.
- Your mission is complete!
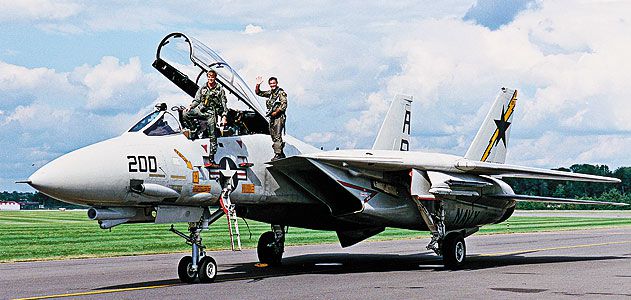
....................-=[ RIO ]=-....................
Controls Setup (RIO)
If you have just installed the F-14 module for DCS, then it's important to set up your controls.
(also check out my controls guide here on Steam if you need help setting up controls)
Please go into options now (the cog icon) and set up the following controls:
Or open the controls menu from the in-game menu by pressing escape and selecting Adjust Controls
Axis Section - HCU left/right
- HCU up/down
- HCU dual stage trigger (axis thresholds)
Everything else can easily be clicked on with the mouse.
Start Up Procedure (RIO)
If you are playing only as the pilot - then the AI RIO will do this all for us. You can simply stay in the front seat, and once you arm your ejection seat, the AI will complete the RIO start up procedure.
This is an abbreviated start up procedure, to get you into the air as fast as possible.
For convenience, the screenshots below are available in FHD resolution here https://www.dropbox.com/s/6zvwuwga6drm77c/F14RIOStartUp.zip?dl=0 Put them onto your phone or tablet, and scroll through them without having to ALT+TAB between DCS and this guide.
As soon as the ground crew connect the ground power, you may begin your start up procedure.
A) Turn on the Oxygen
B) Arm the Ejection Seat
C) Close the Cockpit Canopy LCTRL + C (inform the pilot).
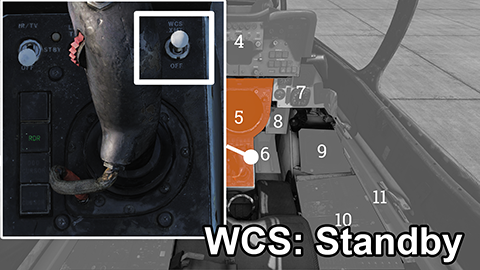 2. Wait for the Tactical Information Display screen to warm up.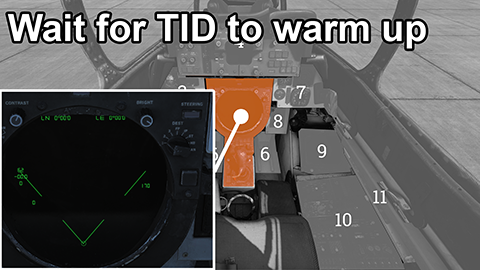
- Now we need to align our Inertial Navigation System (INS) - which is the main way the F-14B keeps track of where we are in the sky, and how to get to our destination. We do this by telling the INS what our current location is.
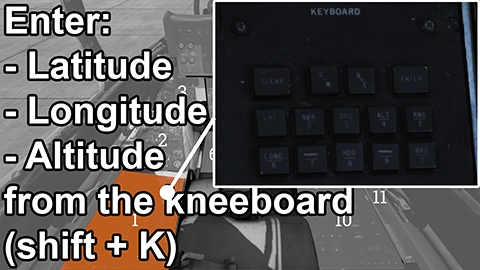
(click to expand)
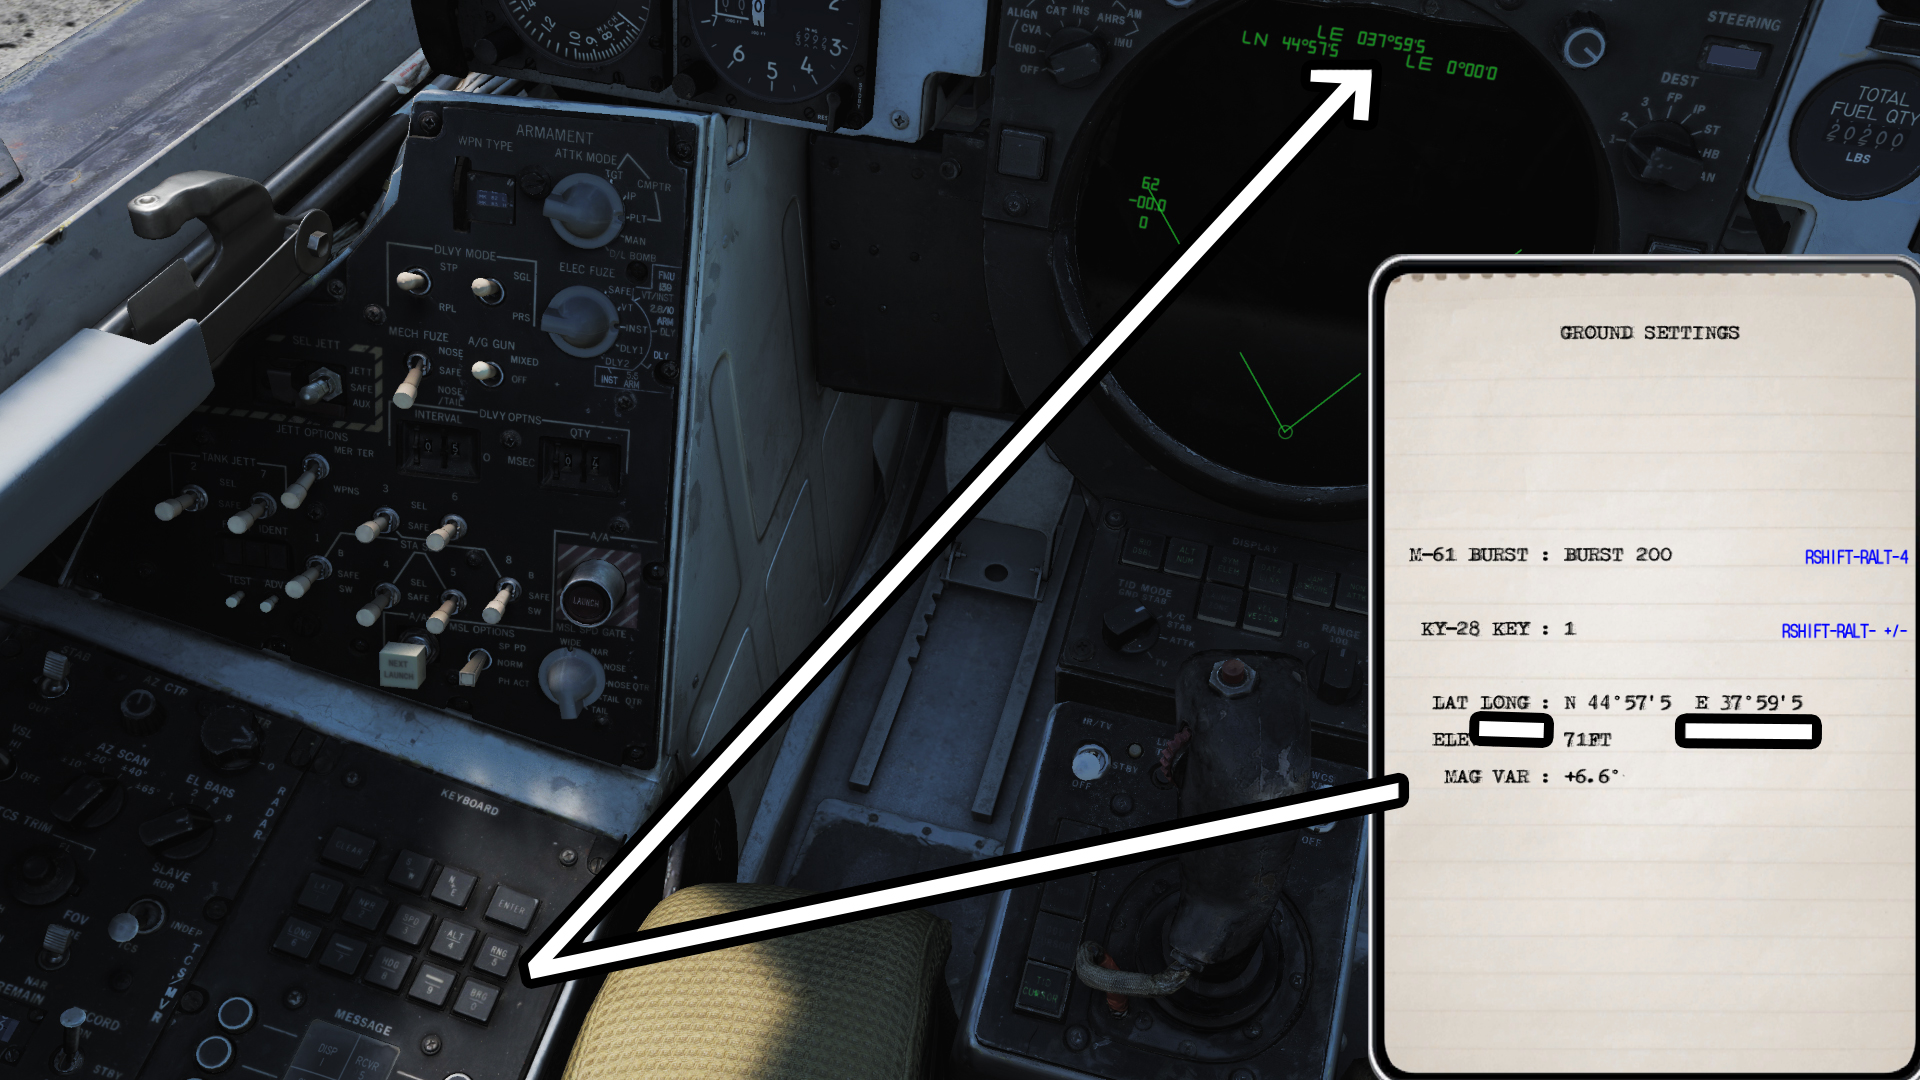
Press RShift + K to open the kneeboard
Then enter the follow key combination:
(you will see the digits appear at the top of the TID as you type them in, press CLEAR if you make a mistake and start again)
- CLEAR
- LAT | 1
- N+E
- 43270(representing N 43°27'0 of latitude - use LAT numbers as written on the kneeboard)
- ENTER
Now repeat the procedure for the Longitude, and Altitude, except press the LONG | 6, and ALT | 4 respectively (instead of LAT | 1 ):
- CLEAR
- LONG | 6
- N+E
- 39570
- ENTER
- CLEAR
- ALT | 4
- N+E
- 104
- ENTER
Press Shift + K to close the kneeboard
4. Set the NAV MODE switch to GND (Ground Alignment)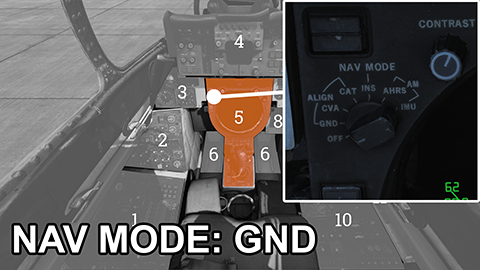 5. The Inertial Navigation System alignment will now begin, and a carrot at the top of the TID will move from left to right, eventually turning into a diamond, and lastly a diamond with a dot in the middle.
This process can take up to 8 minutes, so feel free to continue the rest of the start up procedure during this time.
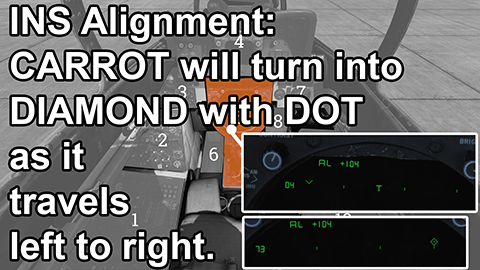 6. This unlabelled switch is the Liquid Cooling, set it to ON.
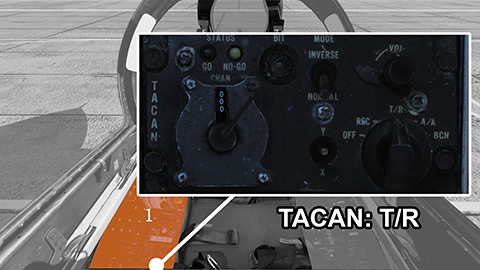
 7. Rotate the TACAN switch to Transmit/Receive
 8. Set the V/UHF dial to Transmit/Receive + Guard
 9. Enable the Standby Attitude Indicator and set the level
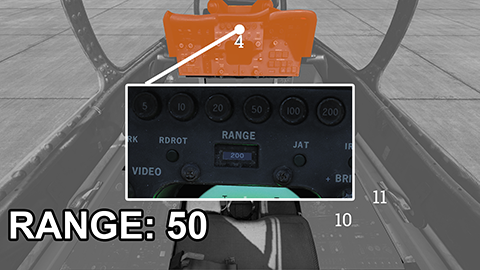
 10. Set the Radar display range to 50 or 100 nm
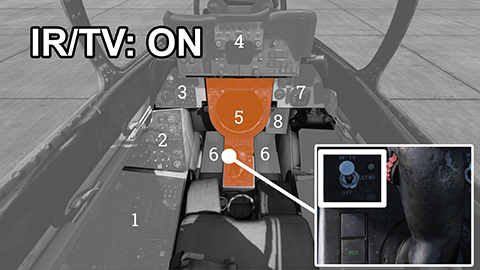
 11. Turn on the IR/TV system.
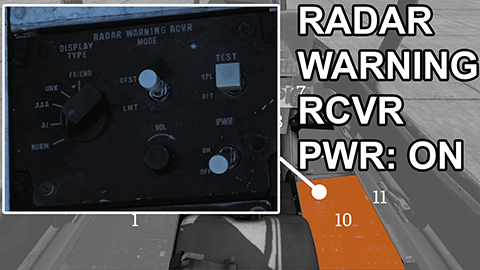
 12. Power up the Radar Warning Receiver
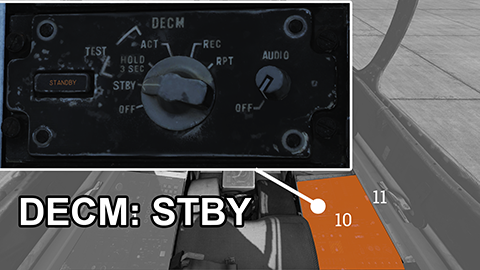
 13. Set Defensive Electronic Counter Measures to Standby
 14. Turn on the DATALINK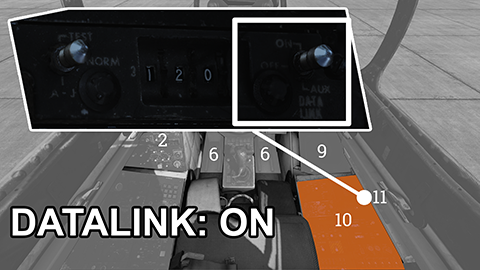
- Here it's critical that you don't left click, or you'll have wait for the INS alignment to happen again.
Only do this if the INS has finished (diamond with dot has moved to the right see step #5). If it is not finished, then we just wait :-)
Once finished, be sure to right click, on the NAV MODE to set it to INS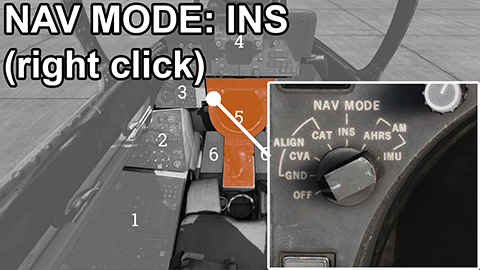
- Inform the Pilot that you have finished your set up.
Taxi to the Runway (RIO)
The RIO should use a combination of F10 to view the map, and external views (F2, F3, F4) to direct the pilot to the nearest entryway to the runway.
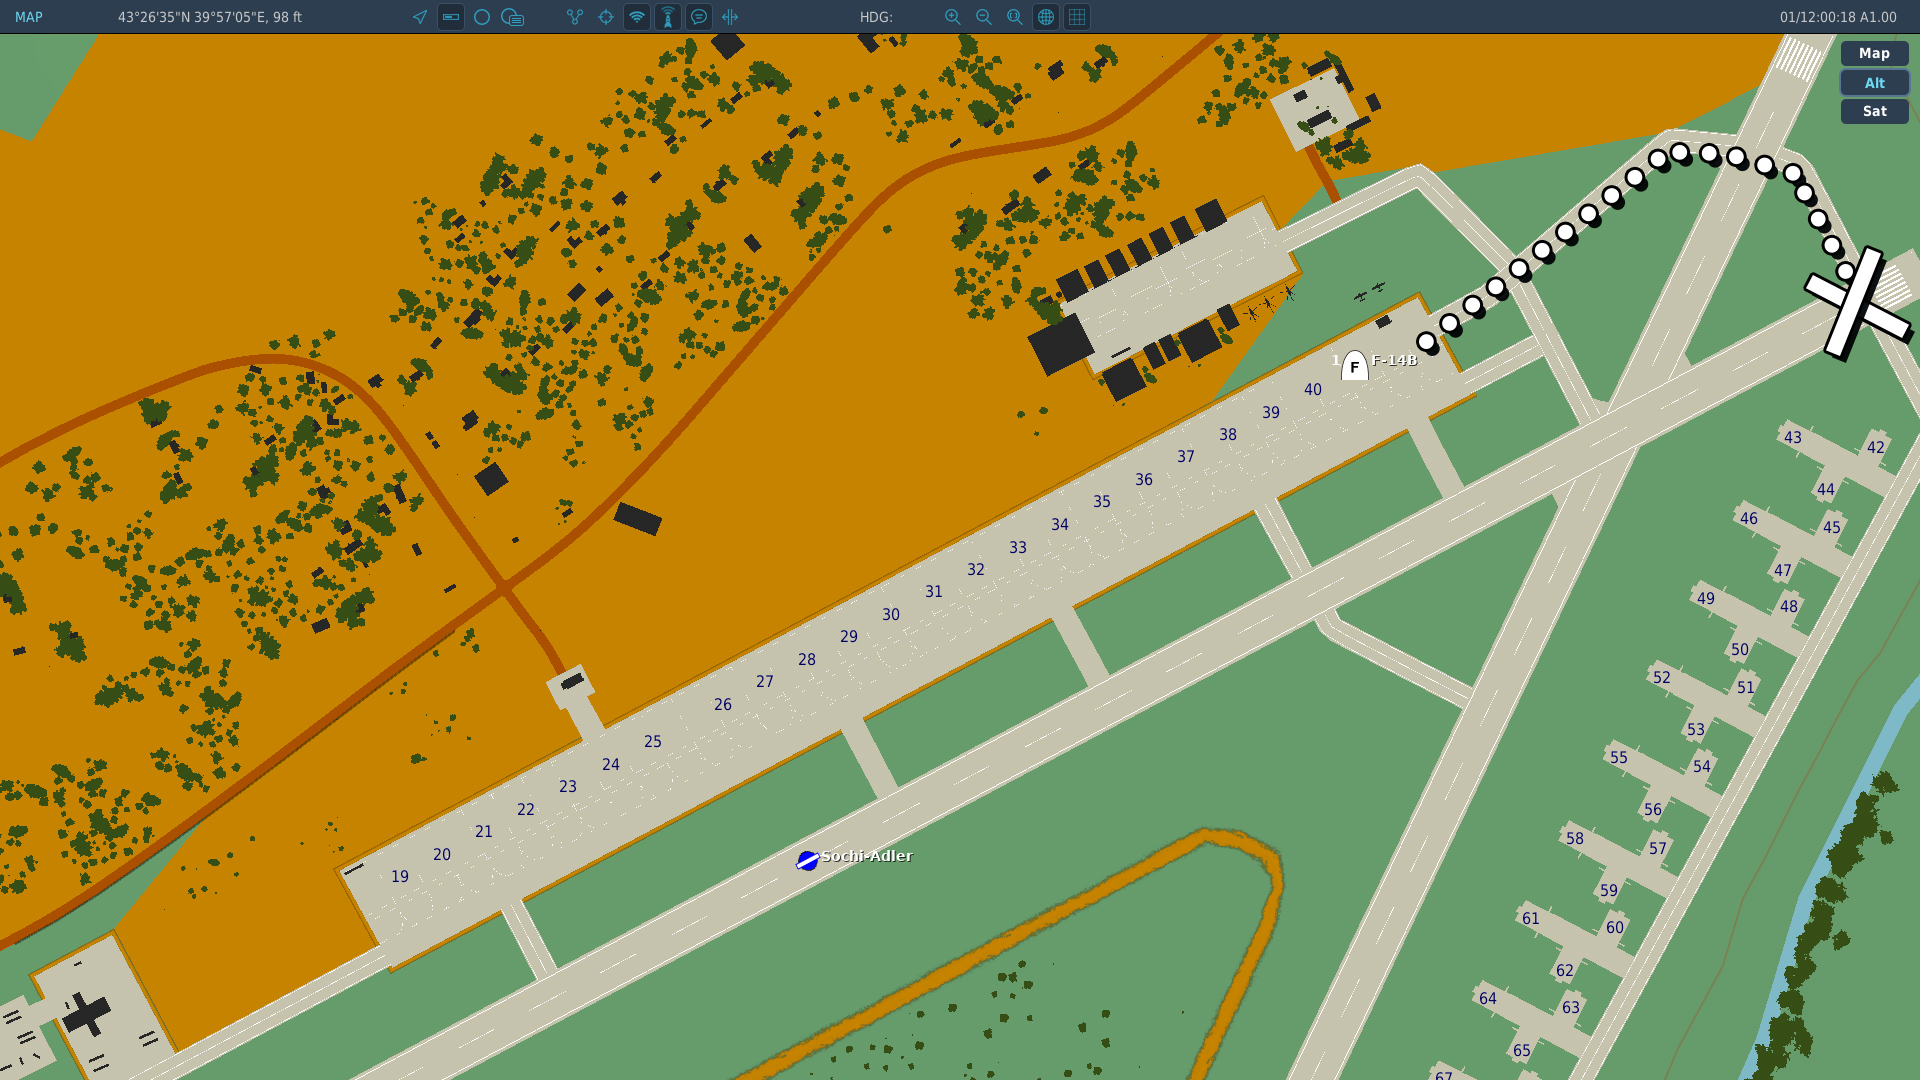
(this is not the standard procedure, but it's the fast way to get you into the air for now)
Before entering the runway ensure the runway is clear, and nobody is landing. (LOOK AROUND)
Take Off (RIO)
Once you have lifted off the ground, inform the pilot, to turn right and follow the coast line.
Navigation (RIO)
We now need to enter in the coordinates for Waypoint #1, so that the pilot knows where to fly to.
Bring up the kneeboard again (RSHIFT + K) and use the square bracket ] to cycle thru to the 3rd or 4th page, titled REFERENCE POINTS notice that we have a line called WP1 followed by the lateral and longitudinal and coordinates.
Again, on the Computer Address Panel we will punch in these coordinates. It's a very similar process to how we entered in the INS alignment coordinates in the first stages of the start-up procedure.
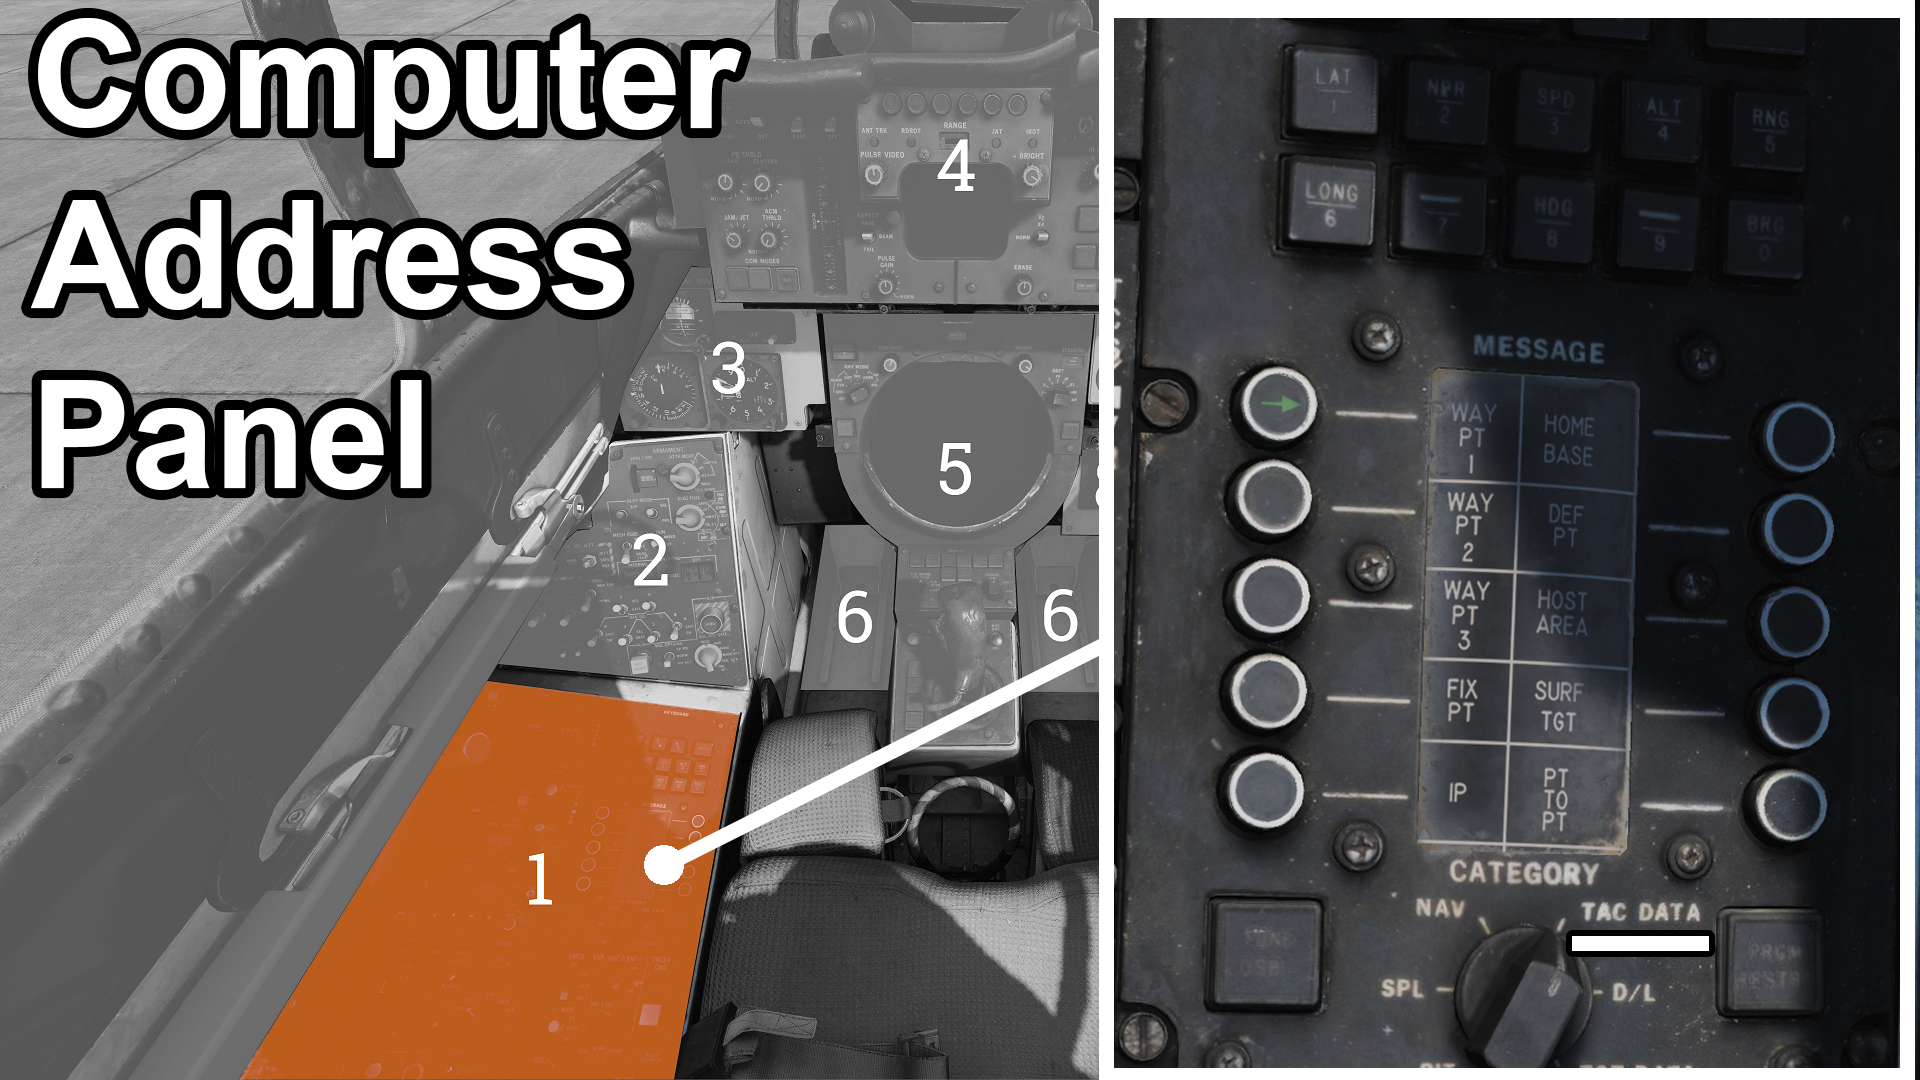
- Turn the CATEGORY dial to TAC DATA
- Click on the button that corresponds to WAY PT 1 in the MESSAGE window, and the green arrow will appear letting us know we have made the selection.
- Use the keyboard keys in this same panel to type in the coordinates. The processes is
- CLEAR
- LAT | 1
- N+E
- 44372
- ENTER
- CLEAR
- LONG | 6
- N+E
- 37403
- ENTER
- CLEAR
- ALT | 4
- N+E
- 10000 (the altitude might be listed as zero on the kneeboard, but let's put in 10,000 feet)
- ENTER
Combat (RIO)
- Let's switch the RADAR from Standby to XMT - short for "transmit" or simply ON.
2. Switch the radar into either of these two modes: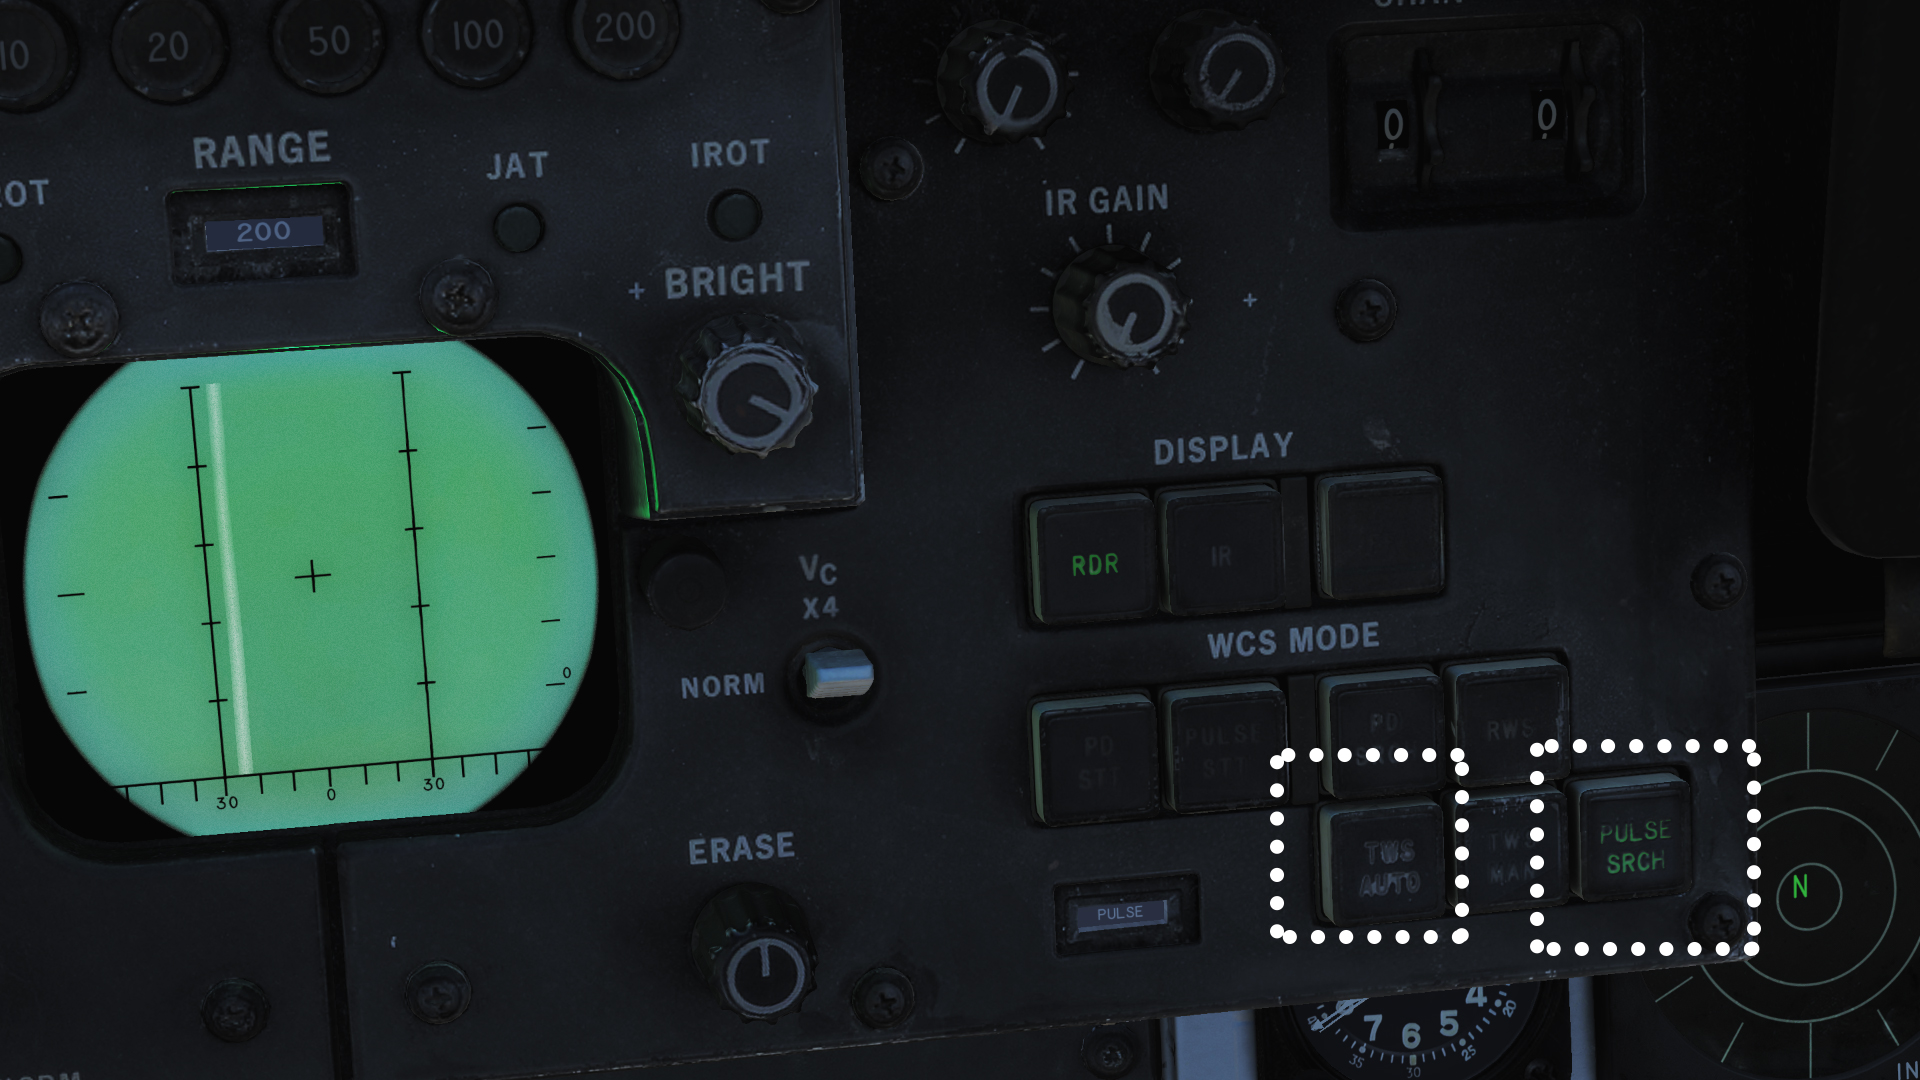
- Pulse Search Mode this mode has a shorter detection range, and can reflect ground clutter, but has the benefit of showing everything detected, as well as showing us the distance to the target.
- Track While Scan AUTO mode TWS has a longer detection range, and filters away most of the unwanted radar reflection noise, but it shows us closure rate, instead of distance to target. It also has trouble detecting targets that match our speed (because it uses a doppler effect, i.e. difference between our speed and theirs, to find targets)
It's good to switch between them every now and then since each one has pro's and con's. 3. Now we can watch the small radar screen for any blips.
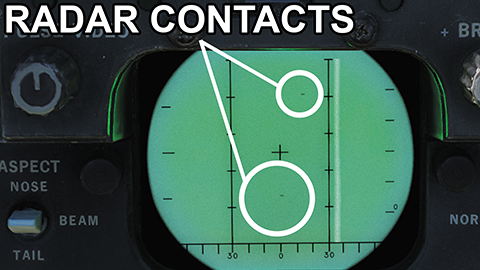
- Using the HCU up/down/left/right, and holding down the HCU Half Action button, we can move a little cursor around the radar screen.
To attempt a lock on, move the cursor on top of where a blip recently showed up, and press the HCU Full Action button. This should lock the target up. However it can sometimes be unseccessful so, wait for the blip to show up again, and try another lock on.
Once we are locked onto something, a few of the green LEDs will light up just above the radar screen. The pilot will also have a diamond indicator on their HUD, so that they know where to fly and shoot. (Pilot must be in Air to Air mode for the diamond to show).
We can look at the TID (the big round screen between our knees) In the top left side, the TID will cycle between the range of our target e.g. RA 50 (short for Range 50nm) and the altidude e.g. ALT 13400. This way we can estimate if we are close enough to fire a successful hit. Coordinate with the pilot.
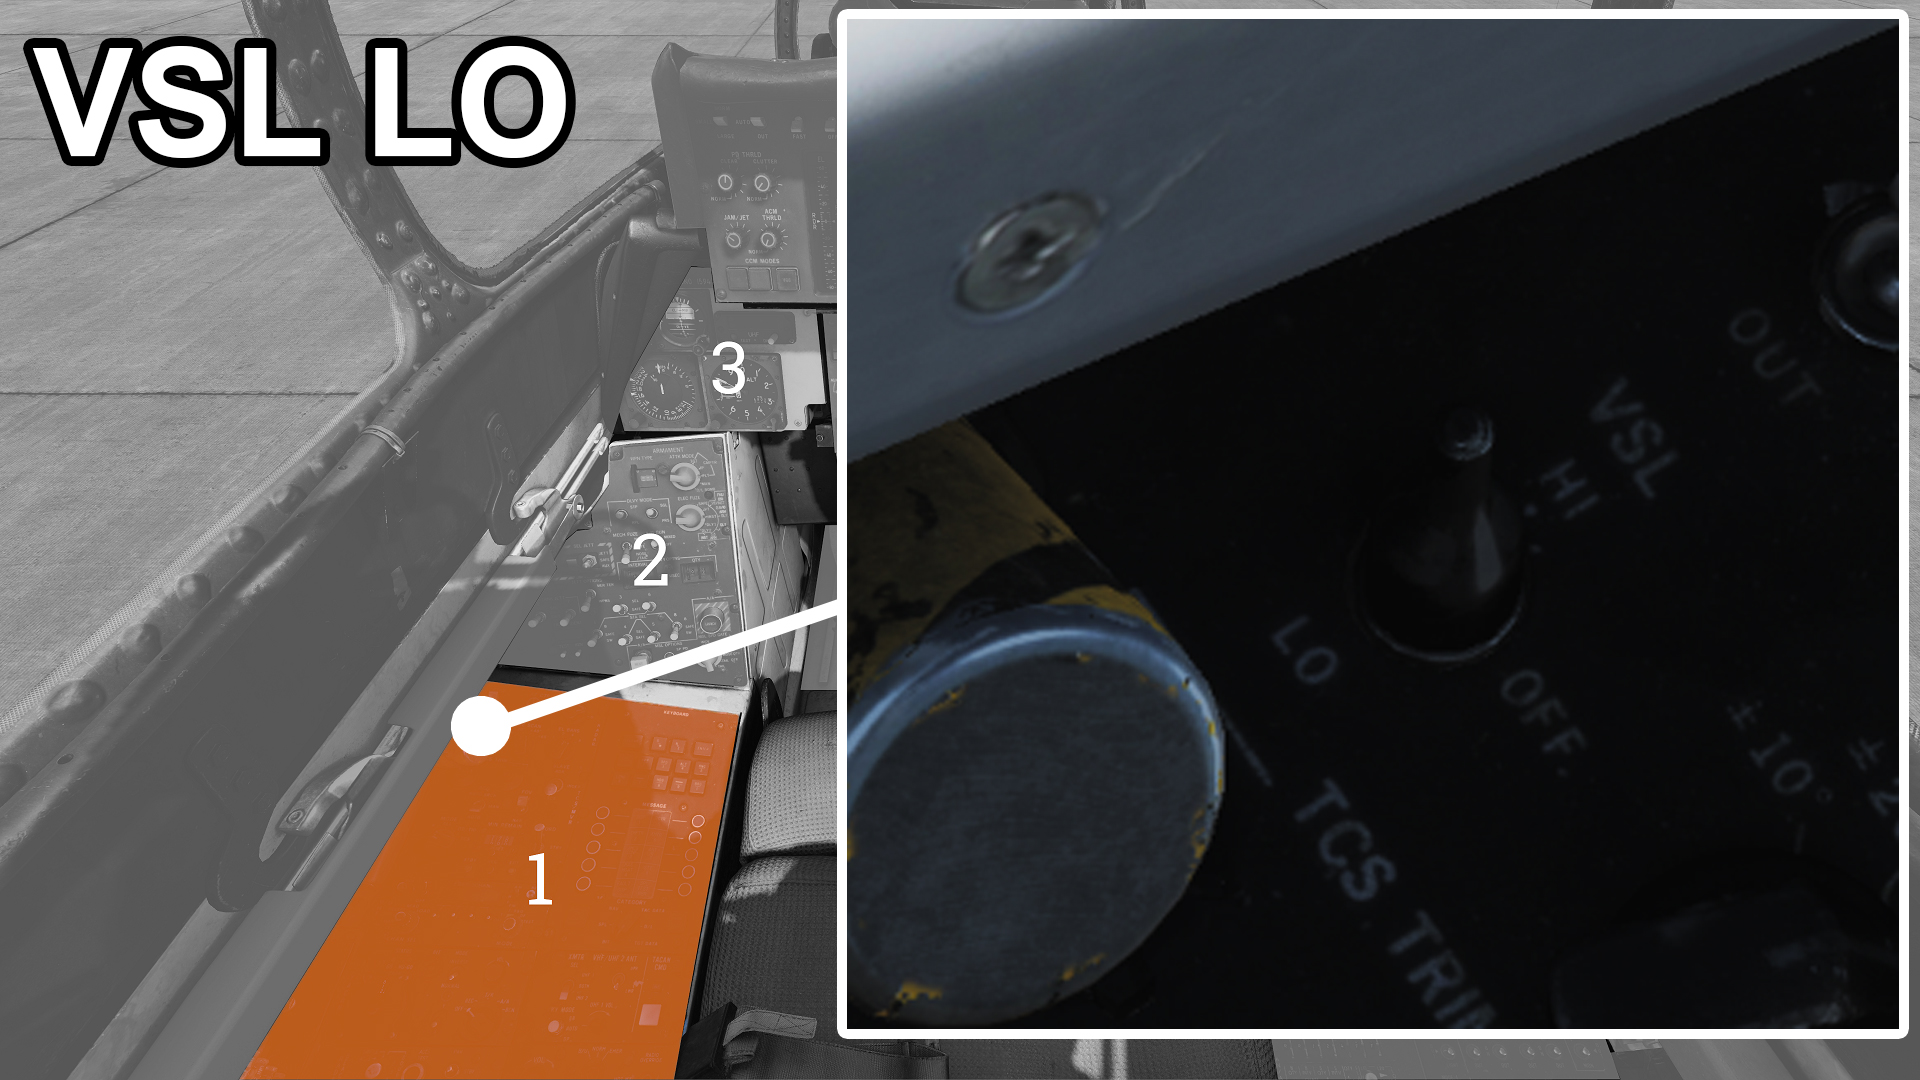
- We can also use the Vertical Scan Lock LO mode if a target gets to 5nm of us (or surprises us). While we hold this switch down, it will attempt to lock on the closest target in front of our F-14. This can be useful for when the pilot has their hands full, and needs to concentrate of some fancy flying - we can do an almost instant lock for a close target for the pilot.
If they shoot a heat-seeking missile, you will have no warning, so if there is a plane on lining up for a shot behind you, press the DEL (delete) key on your keyboard - which pops out 1 flare. Press it at regular intervals e.g. once every second or two to make it harder for them to achieve a lock. If you see a missile launch and hear no alarm, then this is a heat seeking missile coming toward you. Press your flare button rapidly until the missile is avoided (inform the pilot to turn and dive also). You have a limit of only about 40 flares to fire, so it's best to not get into a situation like that at all - long range attack is your best option.
Similarly if you are locked onto or fired at by a radar guided missile, then press the INS (insert) key on your keyboard. This will pop out 1 chaff. Which is similar to a flare, but instead used to confuse radar guided missiles. If you hear the lock on alarm, get ready to press the INS key on your keyboard repeatedly. Once the incoming missile alarm rings, then press that button! You have about 60 chaff cartridges to fire.
As the RIO, you also are able to launch missiles, specifically the long range Phoenix and Sparrow missiles. You must have the radar set to TWS AUTO as show above. If you are either locked onto a target, or if you can see targets on the TID even without a lock, you can press the big red LAUNCH button next your left knee ( on panel #2 ). The button will light up when you are able to launch.
Because the F-14 is able to shoot at such long ranges, it becomes important to identify who our targets are - whether they are enemy or friendly. The F-14 has a built in camera system which allows us to have a peep into the far distance.
Set the TID MODE knob to TV to have a look thru the camera (and back to AC STAB for the situation display)
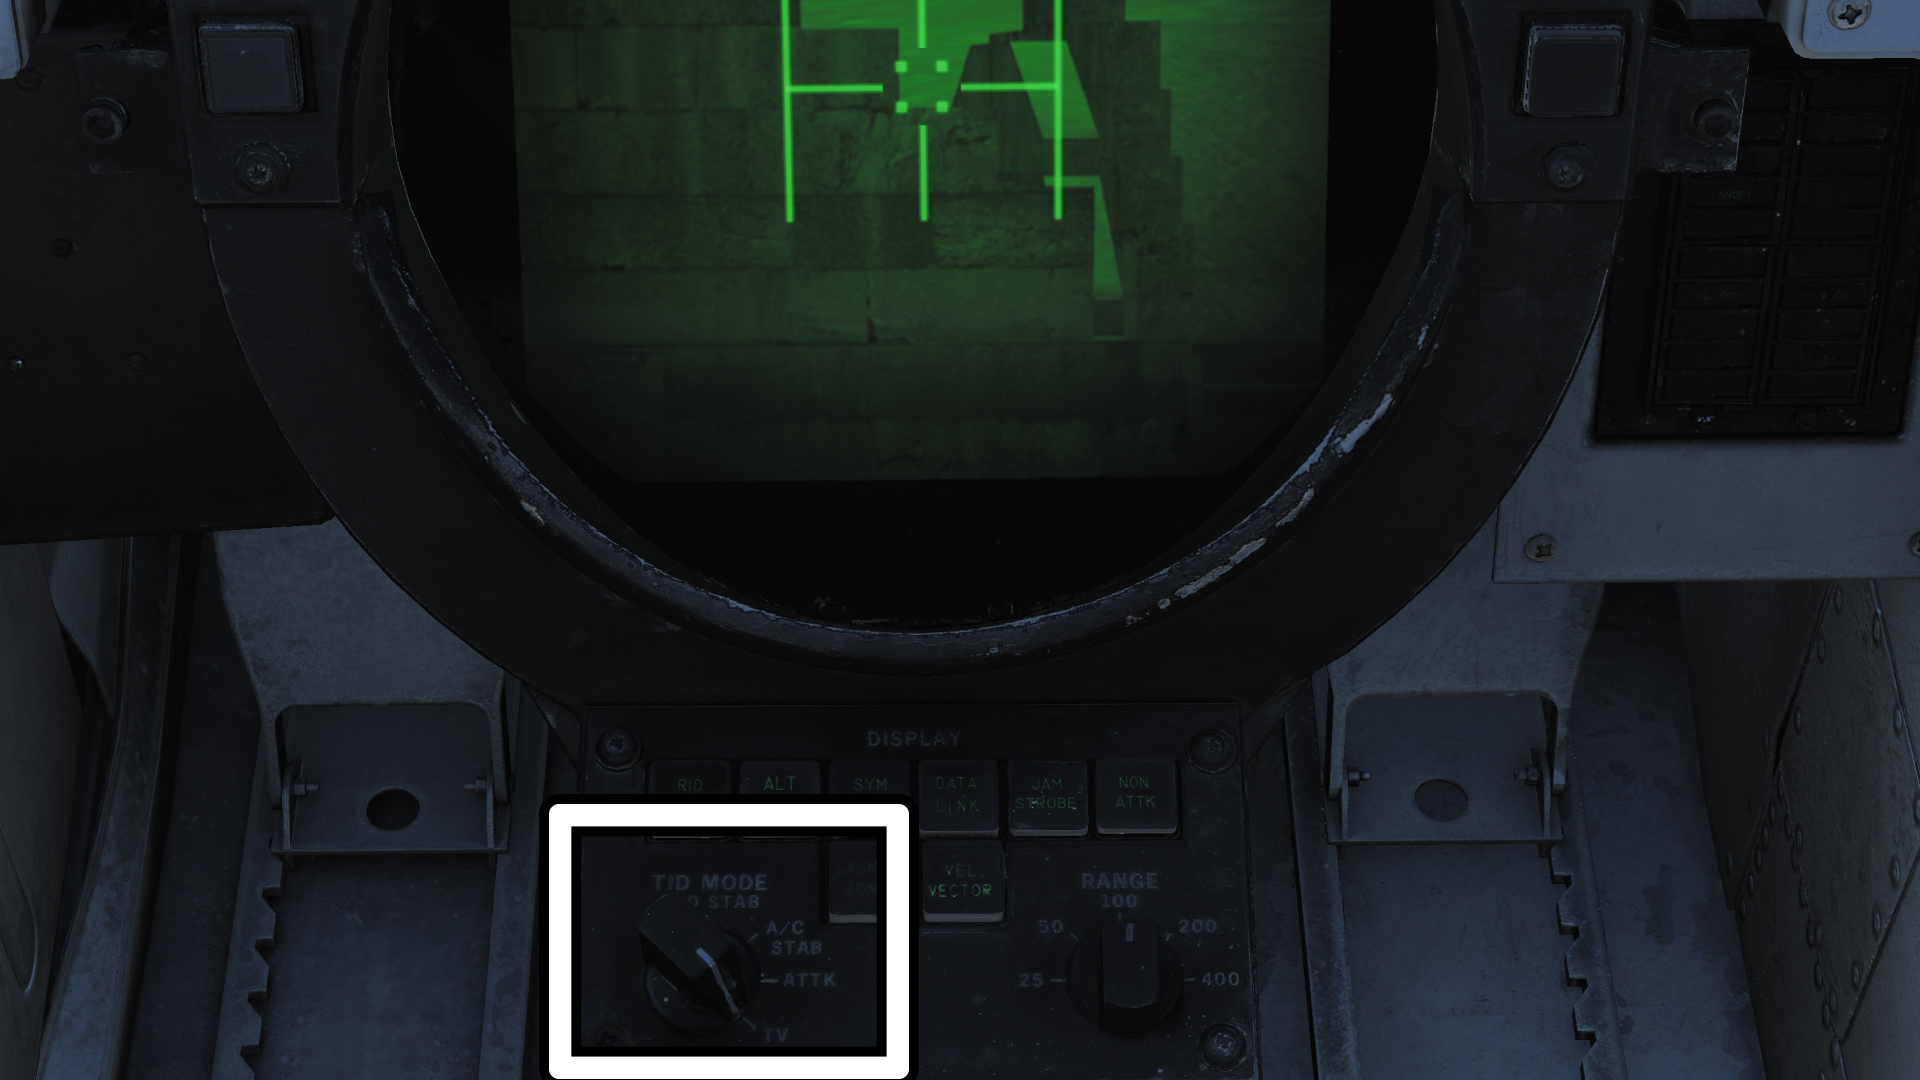
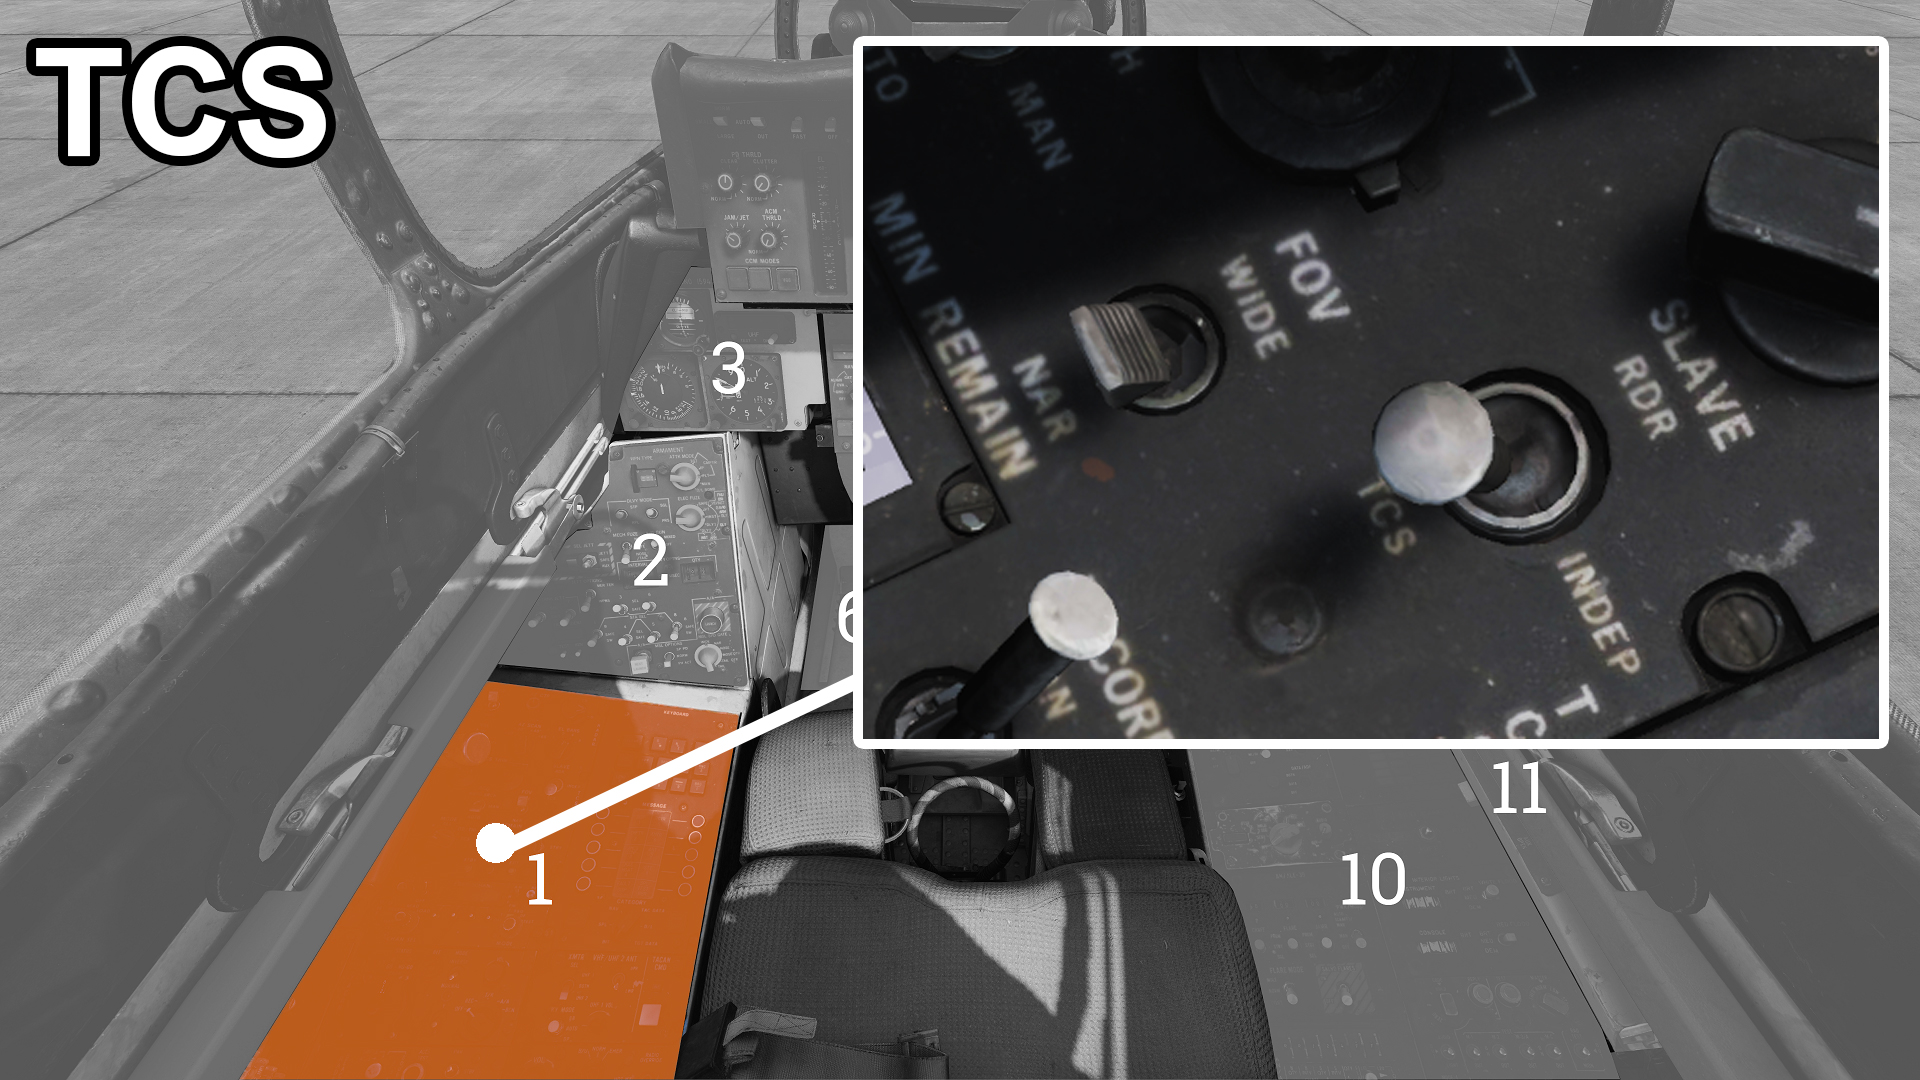
We can set the TV to point at whatever the radar is locked onto, by setting the SLAVE switch to TCS
And we can zoom into a 10x magnification by setting the FOV switch to NAR (narrow).
Landing (RIO)
To find our way home we can must enter in the coordinates for our home base.
Bring up the kneeboard again (RSHIFT + K) and use the square bracket ] to cycle thru to the 3rd or 4th page, titled REFERENCE POINTS notice that we have a line called HB followed by the lateral and longitudinal and coordinates.
Again, on the Computer Address Panel we will punch in these coordinates. It's a very similar process to how we entered in the Waypoint #1 coordinates in the navigation section.
- Turn the CATEGORY dial to TAC DATA
- Click on the button that corresponds to HOME BASE in the MESSAGE window, and the green arrow will appear letting us know we have made the selection.
- Use the keyboard keys in this same panel to type in the coordinates. The processes is
- CLEAR
- LAT | 1
- N+E
- 44577
- ENTER
- CLEAR
- LONG | 6
- N+E
- 37592
- ENTER
- CLEAR
- ALT | 4
- N+E
- 66
- ENTER
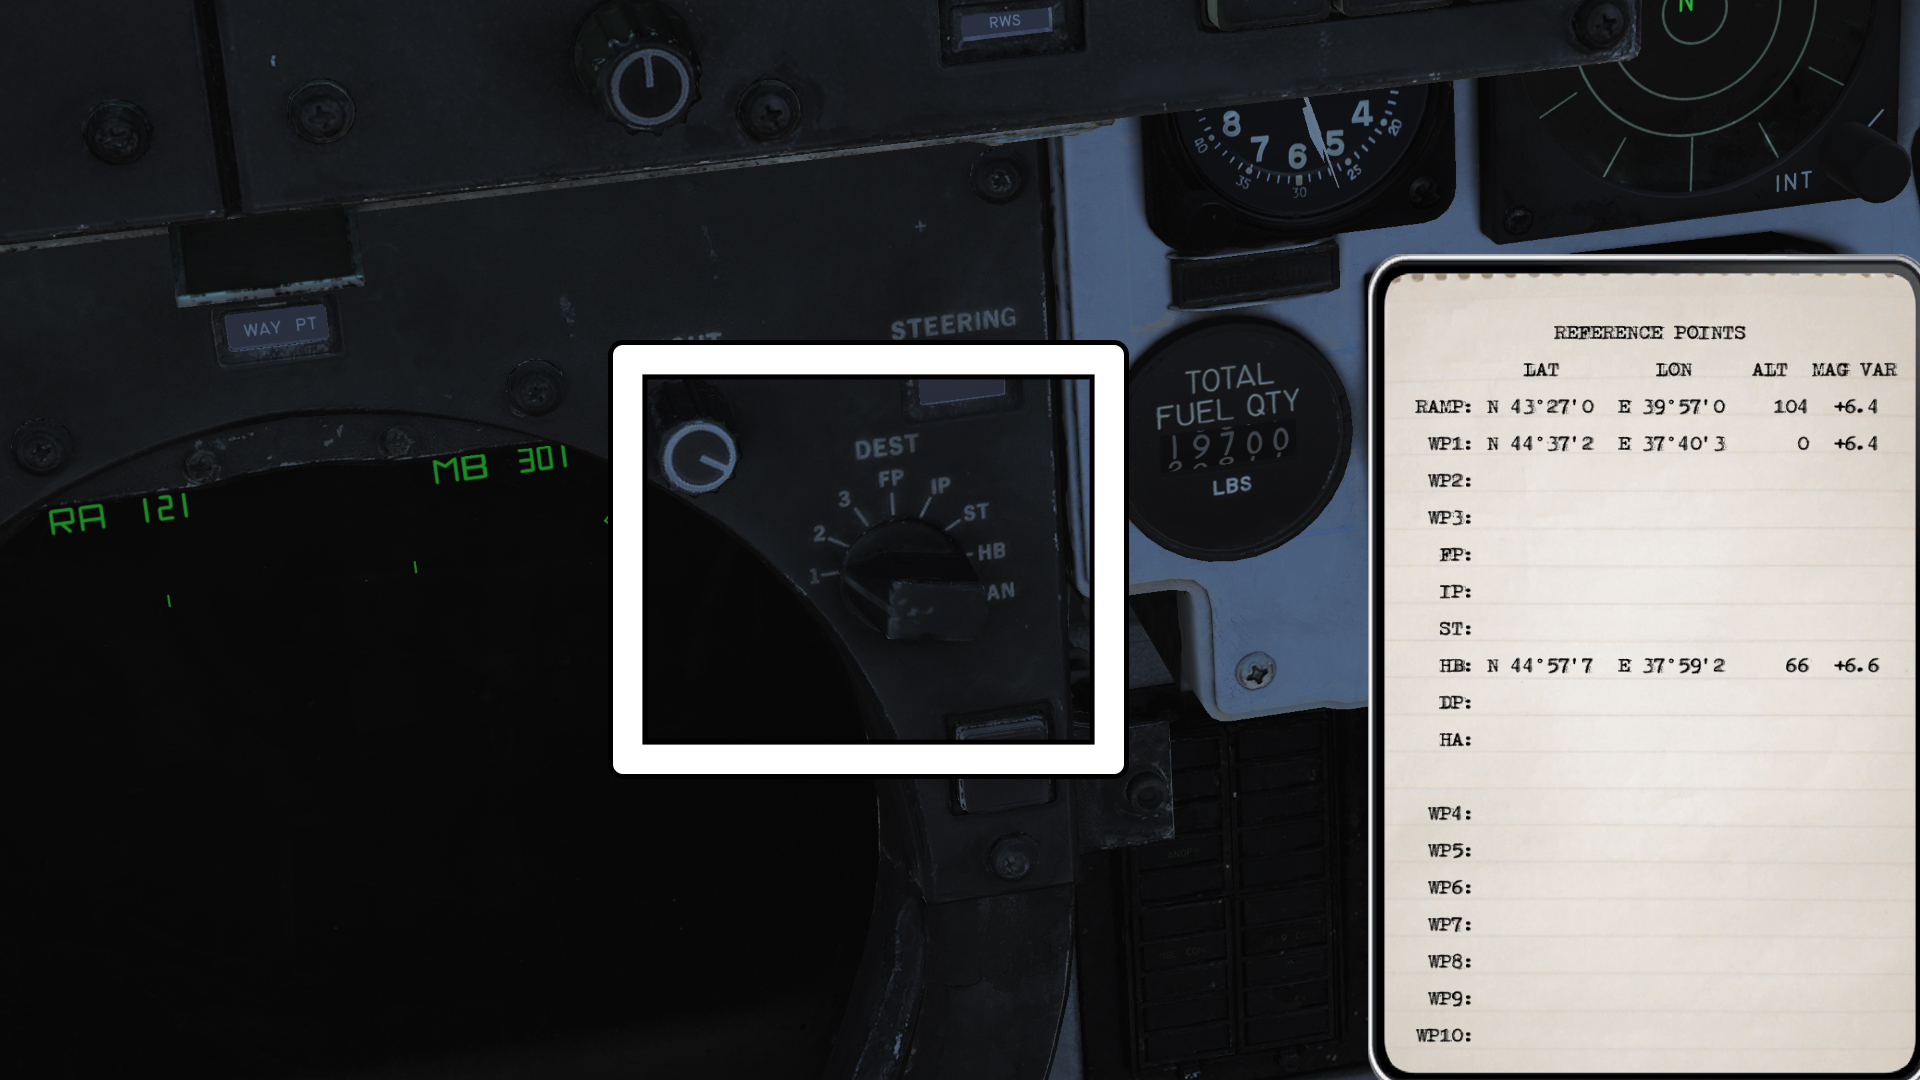
Now we need to set the Destination point to HOME BASE (HB). This will set the long arrow on our compass screen to point to the home base coordinates. The pilot can follow this arrow to find our landing airport.
....................-=Appendix=-....................
Debriefing
How Do I Fly this thing? (Pilot)
By default the arrow keys control your stick.
Moving the stick forwards and backwards controls your pitch (also called attitude), allowing you to fly upwards or downwards. If you keep your nose above the horizon line (either on the HUD or Standby Attitude Indicator) you will fly higher and higher until you put your nose back to level.
Vice-versa, point the nose of the plane downwards, to fly lower.
To turn, roll the plane slightly sideways left or right, and gently pull back on the stick. The further you roll the plane, and the harder you pull on the stick, the tighter the turn. In a fighter jet like the F-14B, it's no issue to turn completely sideways to turn. Something you wouldn't want to do in 737 jet for the sake of the passengers and flight attendants.
Keep your speed above 250knots at all times for a smooth flight. Anything less can put the plane into a stall (it starts falling out of the sky).
Use the Num+ and Num- keys to move your throttles.
You can use rudder pedals during flight for some advanced acrobatics, efficient turns, and accurate gun runs for ground targets. But it's not really necessary at the beginner level, so we'll just use them for taxi, take off, and landings in this guide.
Rudders and nosewheel steering is controlled with Z & X, plus we should use W to apply the wheel brakes when we are taxiing and landing.
The aircraft requires trimming fairly regularly as you change your speed. The more speed you have, the more lift is generated by the wings, so unless you want to hold your joystick forwards for long periods of time to keep the plane level, you will want to add some downwards trim, allowing you to recenter your stick and give your hand a rest. (also allows you to press things on the keyboard without the plane going out of control when letting go of the stick).
Trim Left and Right will be quite handy too, as once a missile is released from one wing, the opposite wing begins to dip. It is a good idea to trim your aircraft back to level flight after you have finished any maneuver, or speed or weight has changed. It seems tedious at first, but it will become second nature after a few hours, and you won't even know you are doing it.
Naturally you want to put your trim controls on a 4 way hat that is very easy to reach. On most fighter and attack planes, the trim is located on on the centre face of the stick so that the pilot's thumb can reach it with ease.
Handy Tip
While you are in the game, and testing your controls, press Right Control + Enter
This will bring up a little graphic specific to each aircraft that will show you where the aircraft's controls currently are, and this makes it very easy to compare your own controls vs what is happening inside the game, if things aren't happening as you expect.
For this to work though, the aircraft usually has to be switched on and in a ready to fly state.
This screen is also handy for seeing if you (or your autopilot) has put some strange trimming effect on your stick. (as well as seeing the trim you apply)
- How To Setup Controls and Joystick★ 5 (505)39k views1.1k ♥12 minUpdated Aug 18, 2015
- F-15C Eagle Beginners Guide★ 5 (921)29k views1.6k ♥12 minUpdated Sep 13, 2019
- Xbox One Controls for DCS: World★ 5 (359)22k views757 ♥6 minUpdated Sep 12, 2022
- Su-25T : Weapon Specifications List / Other useful information★ 5 (615)18k views1k ♥10 minUpdated Jul 11, 2015
- How To: DCS World Beginner Basics★ 5 (167)13k views389 ♥16 minUpdated Feb 22, 2021
- DCS: A-10C Easy Guide and Basic Concepts★ 5 (296)13k views633 ♥11 minUpdated Sep 4, 2014



- Upgrading to PremiumTeam Fortress 2★ 5 (20k)1441k views11k ♥6 minUpdated May 11, 2022
- No More Room in Hell Official ManualNo More Room in Hell★ 5 (2.8k)569k views2.1k ♥29 minUpdated Apr 22, 2019
- NMRiH Community Hosting GuidesNo More Room in Hell★ 5 (526)351k views653 ♥1 minUpdated Aug 10, 2022
- ULTIMATE GUIDE FOR GAME DEV TYCOONGame Dev Tycoon★ 5 (5.8k)326k views10k ♥4 minUpdated 23 Jan, 2014
- How to 'Git Gud' Soon™MORDHAU★ 5 (2k)318k views3k ♥68 minUpdated Nov 16, 2024
- Лучшие кооперативные игры SteamPAYDAY 2★ 5 (1.5k)315k views2.1k ♥56 minRussianUpdated Apr 27, 2025






This guide was created by its original author on the Steam Community. Are you the author and want it removed? Request removal.