Girthy Guide feat. Inspector Gadget
This guide is currently WIP and nowhere near complete - it's also not intended to be read all at once, much like Payday 2's legendarily long guide. The purpose of this guide is to serve as a reference point for in-depth technical information on how the game's mechanics work - if you want information on a particular thing, find the relevant section. ctrl+f is your friend.
Note that this guide is written primarily around Overkill difficulty, but info on lower difficulties is included when applicable. If you're wondering what difficulty something is in reference to and it isn't specified, it's probably Overkill.
If you have any information about anything that this guide is unsure of or currently does not mention, feel free to bring it up!
This is written and worked on as a labour of love by community members who simply want to understand how the game functions; all of the information documented is discovered by a combination of independent testing, calculation, and comparing with datamined game files when applicable.
Everyone listed under "created by" has contributed critical information to this guide - if you want people to thank, it's them!
Edge, Grit, and Rush
 This section is now irrelevant following the release of Skills 2.0.
Skills in Payday 3 are built around 3 primary buffs: Edge, Grit, and Rush. Edge grants a 10% increase to damage dealt, Grit grants a 10% decrease to damage received, and Rush grants a 10% increase to movement speed. The effects of Edge, Grit, and Rush are additive with other sources, meaning the 10% damage granted by Edge combined with the 20% damage from Combat Marking would result in a total 30% damage bonus.
Many skills require an active buff to utilize them, giving them new effects or interacting with them in some way, and certain skills will allow you to gain, refresh, or consume the core buffs. You can only gain a buff from a skill if you don't have it and you can only refresh a buff if it is currently active. All three buffs will last for 20 seconds, however certain skills will consume them to activate their effects, instantly removing it.
Damage Multipliers
This section is now out of date following the release of Skills 2.0. Edge no longer exists and most trees now apply damage bonuses to specific weapon classes instead.
The base damage multiplier is 1.0, increased by 0.1 with Edge; all sources of damage buffs are additive with each other, meaning Edge adds 0.1, Combat Marking adds 0.2, Finisher adds 2.0, and so on. Equipping Precision Shot will overwrite the base damage multiplier with the magnification of your currently equipped scope, meaning a 5x scope paired with Edge will result in a 5.1x damage multiplier.
The highest multiplier you can achieve is 9x (6.0 from Precision Shot, 0.2 from Edge with Pain Asymbolia, 0.1 from Face To Face, 2.0 from Finisher, 0.1 from Coup De Grâce, 0.25 from Duck And Weave, 0.15 with High Grain, and 0.2 from Combat Marking). While high damage multipliers are possible, it's ultimately more worthwhile focusing on just a few skills to reach important breakpoints for your weapons and play style.
The headshot multiplier is applied separately to damage modifiers and stacks multiplicatively with sources of damage. While armor doesn't take increased damage with headshots, armor will be affected by your current damage multiplier.
Damage Reduction
This section is now out of date following the release of Skills 2.0. Grit no longer exists and damage reduction primarily comes from the Juggernaut tree or the minigun overkill weapon.
The base damage reduction is 0, increased by 0.1 with Grit; sources of damage reduction are additive with each other, meaning combining Grit with Threat Assessment will add 0.1 and 0.2 to your damage reduction for a total of 30%.
The damage reduction granted by armor is applied separately to damage reduction granted by skills, thus stacking multiplicatively. For example, the 30% damage reduction granted by Grit and Threat Assessment will multiply with the 25% damage reduction granted by standard armor to reduce incoming damage by 47.5%.
Movement Speed
This section is now out of date following the release of Skills 2.0. Rush no longer exists making the speed caps a non-issue (because you can't increase your speed anymore).
The base movement speed multiplier is 1.0, increased by 0.1 with Rush; movement speed modifiers are additive with each other, meaning Rush will combine with Swift to increase your movement speed while sprinting by 20%.
Movement speed buffs can only increase your movement speed by up to 1.5m/s while sprinting, 0.5m/s while walking, or 0.25m/s while crouched; this means that, while crouching, Rush alone is enough to max out your movement speed.
The multiplier needed to reach max walking speed depends on your weight tier: at weight tier 1 you need the 20% bonus from Rush and Pain Asymbolia but higher weight tiers only need the 10% bonus from Rush. At all weight tiers you need the 20% bonus from Rush and Pain Asymbolia combined with the extra 10% bonus from Swift to max out your movement speed. There are currently no benefits to increasing your movement speed multiplier beyond 30%.
Your weight tier cannot go higher than tier 4—this also means that the mercenary frame is less affected by speed penalties than any other frame, as it starts at tier 3.
Despite the game saying that 1 plate is faster than 2 plates, both actually move at the same speed (tier 1).
- Holding a minigun will add 1 weight tier
- Large money piles, gold, rare minerals, evidence, and zipline bags will add 2 weight tiers
- Cage parts, drill parts, thermite rigs (NRFTW), and meth ingredients will add 3 weight tiers
- Carrying two bags with Power Lifter will add 20 weight tiers, effectively always placing you in the highest tier
Certain bags, classified as "heavy," will prevent you from sprinting while being carried.
An interesting observation is that dyed money adds less to your weight tier than full money bags, meaning that—if you don't have Beast of Burden—allowing the dye packs to go off in No Rest For the Wicked will have a lower penalty on your movement speed.
Player Armor
This section is now out of date following the release of Skills 2.0. The armor passives are different and base armor has been dropped from 75 to 65 - this means effective health needs recalculating, but finding realistic numbers to use for damage reduction will need work due to the variance in DR that's now possible due to the Juggernaut tree.
Armor is broken up into two sections, frames and plates. All frames have a base of 4 downs and a regen time of 0; as you add plates, the regen time increases and the number of downs decreases.
Frames dictate the number of plates you can equip, your weight tier (see Movement Speed), max ammo, and grant a passive bonus. Due to an oversight Mercenary Frame currently has two passives.
-3 trauma on kill
Plates have a base armor of 75 but with differing damage reductions, drastically changing the effective health of each plate. Additionally armor takes trauma damage - the recoverable portion is indicated by flashing red, but 35% of damage taken by resistant plates becomes non-recoverable. This non-recoverable portion is trauma and can only be recovered by using an armor bag, ARK, Soft Assets, or the Mercenary Frame.
Adaptive and impact are unique in that they don't take trauma damage but have their own trade-offs. Adaptive plates can only recover if the plate is not broken, otherwise you will need to use an armor bag or ARK with Clean Slate, while impact plates will always regenerate, even after breaking. This alone makes impact plates one of the strongest plates when coupled with the medtech frame, as having infinite armor on a 3s or 2.4s cooldown negates the need for any other source of armor regen and frees you up to invest in health instead.
Resistant and adaptive will only repair the current plate when an ARK is used, while impact plates all regen at once.
The damage reduction from Grit (and other sources of damage reduction) is applied multiplicatively to the inherent damage reduction that armors have, meaning that the effective total is 206.25 damage per resistant plate with Grit. This amounts to being able to take 2/3 extra shots from most enemies on Overkill. Adaptive and impact increase to 117.86 and 82.5 damage per plate respectively, only allowing 1/2 more shots from most enemies before they break. With impact especially the benefit of Grit is so small that it isn't necessary unless another skill requires it.
Individual plates cannot armor gate, but the final plate can. This means that any excess damage dealt to your last plate will not be applied to health; if you have 10 armor left and take 50 damage, your armor will break and the remaining 40 damage will be ignored. Snipers in this game follow armor gating rules unlike in Payday 2.
Player Health & Adrenaline
This section is now out of date following the release of Skills 2.0. Max health is only 220 and no skills currently affect down count. The only skill that still exists in its original form in this section is Unyielding, though it has been renamed to Scar Tissue and the health you get from it has been increased from 15 to 20/40 [base/aced].
The maximum health without skills is 100, however this can be a little misleading due to critical health; for simplicity, while your true max health remains unchanged, consider the effective maximum health to always be 30 HP higher.
Equipping Fortitude Basic increases your max health from 100 to 150. Unyielding grants an extra 15 health for each down you have:
Each down you take will remove 15 max health, displayed as a red section at the end of your health bar. As you regain downs, either through the use of medic bags or by returning from custody, your maximum health will return. This has been bugged since the Houston Breakout update and your maximum health will only update when picking up a consumable or an overkill weapon.
You will always be revived with 50 HP regardless of your maximum health.
Adrenaline is passively lost at a rate of 1 point every 2 seconds, though this can be slowed or temporarily halted with Walking Tall. Taking damage to your adrenaline will pause degradation for 6 seconds.
Incoming damage is applied to adrenaline before being applied to armor. Adrenaline cannot damage gate—that is to say, any excess damage dealt to adrenaline will always be applied to the next resource in queue (armor or health). Adrenaline will not inherit the damage resistance of your equipped armor, even with an unbroken plate.
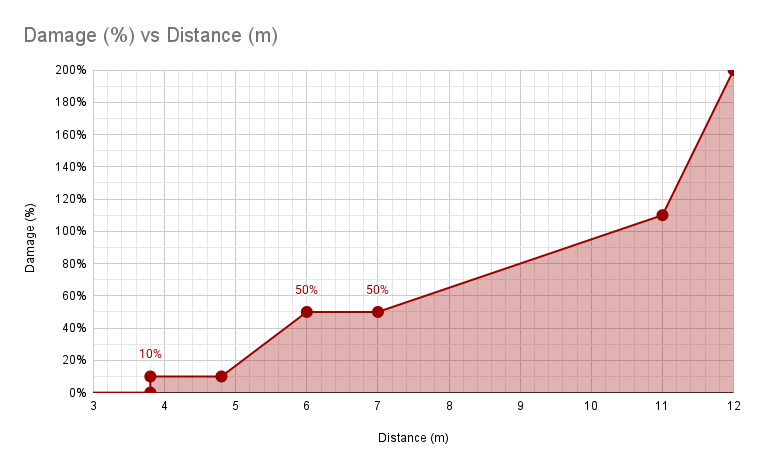 Fall damage ignores damage reduction/armor and always deals full damage. You instantly jump to 10% damage at 3.8m until 4.8m, at which point it begins to ramp up to 50% damage at 6m. At 7m the damage begins to ramp up again to 110% damage at 11m, before drastically ramping up to 200% at 12m.
Fall damage is first applied to Sociopath followed by adrenaline. With full adrenaline you can survive falls up to 12m but beyond 12m is always lethal. Without adrenaline you can survive up to 10m before a fall is guaranteed to be lethal.
The player camera is 1.58m tall when standing and masked up, however pings are up to 0.5m off from the actual distance shown because they are rounded to the closest meter - 2m is anywhere from 1.5m-2.5m and 3m is anywhere from 2.5m-3.5m. If you want to approximate how much fall damage you will take using a ping you must subtract 2m from the ping distance and be as close to directly above the ping as you can get.
Sentries
This was one of the first sections written, is very old, and needs to be moved to a new deployable section. Additionally it needs retesting - if you have any info on sentries that isn't mentioned here, feel free to mention it for when this section is inevitably rewritten. For now check the Engineer skills section for more up-to-date information on how certain sentry mechanics work.
Sentries are somewhat straightforward on the surface but have some nuance to how they work and how the skills interact with each other.
Sentries deal a base 15 damage per shot with an AP of 0.5 and fire in bursts of 14 - this means they deal 210 damage per burst, however due to their low AP value they must break enemy armor to actually kill. Their damage is set in such a way that they cannot kill a single light SWAT before they finish a burst - it will always take one burst and one extra bullet to kill. The AP Turret skill allows them to kill light SWAT in around half a burst instead.
[Wrong but also more complex than this, minimum 6 shots to kill without AP Turret but could be more if it doesn't hit a headshot. With AP Turret it can kill in one shot if it hits the head, but it's inconsistent.]
Against first responders and security guards they will always aim for the head and kill in one shot. Against every other enemy they will aim for the chest [more complex than this; placement position and inaccuracy can lead to headshots]. They have unique tracking for shields where they will try to aim at the shield window and break it before killing the shield through it - this has issues however when the sentry is not directly in front of it, as it can over aim and shoot too high.
Sentry skills describe "heat", but this can be simplified to health. Sentries have 250 base health and every time they shoot they decrease their own HP by 2, meaning they can fire a total of 125 shots before breaking without skills. After a sentry breaks you can pick it up and redeploy it, fully repaired. Picking up a broken sentry takes 2.5 seconds as opposed to the 1 second of an unbroken sentry.
Engineer Basic and Aced simply multiply the sentry base HP by 1.2 and 1.4 respectively. Cooling System is somewhat misleading in its description and may be bugged, as it says that it decreases heat buildup on sentries by 30% from damage. The issue lies in the fact that sentries damage themselves when they shoot, which means this skill decreases the 2 damage sentries deal to themselves to just 1.4. If you're making a build where you want maximum up-time on sentries, Cooling System is absolutely required.
The Cooling System interaction also extends to the Dual Sentries skill which multiplies self-damage by 1.5. Because Cooling System is already multiplying self-damage by 0.7, these two skills end up cancelling each other out and change the self-damage multiplier to just 1.05 - only slightly higher than if you had neither skill.
Throwables
This section is now out of date following the release of Skills 2.0. Throwing knives have been harshly nerfed.
Upon detonation all grenade types will alert everyone within 50m. Without skills you start with 3 grenades (any type) or 2 throwing knives. Throwables do not receive damage bonuses from skills unless the skill states otherwise.
Throwables that kill enemies can trigger skills such as Replenish (which can in turn proc Scrounger, giving you a throwable back). Throwables are not treated as suppressed weapons and do not activate Assassin skills.
With Blade Bouncer each knife impact can lure guards, potentially luring up to 3 guards at once. This could be useful but due to how hard it is to predict the path of Blade Bouncer it can often have undesirable or unexpected results. If a single guard is alerted by multiple bounces of Blade Bouncer they will investigate the sounds in reverse order (last bounce to first bounce).
If you have both Retriever/Blade Bouncer and the knife bounces within range of a guard they will immediately begin calling in a search, even if the knife immediately bounces past the guard. It only needs to pass through his call radius once for this to happen. You can stop the guard calling by picking up the knife, but depending on how the knife bounced it may not be possible to do in time.
Knives deal 150 damage with 1.5 AP - this allows it to one shot most enemies except tasers, naders, bulldozers, and shields. They have a 2x headshot multiplier which allows them to kill tasers and naders.
In loud throwing knives are most effective when paired with low fire rate/low capacity weapons, as you can throw a knife between shots or while reloading to still have a way of dealing damage. With the R900 or Bullkick this can allow you to effectively double your damage output. Knife headshots are effective with low AP weapons as a quick way to kill tasers and naders.
Throwing knives can penetrate and kill one additional target, however this is pretty hard to force to happen as they become stuck in the first person they hit. There is a very brief period of time after a knife kills someone where the damage is still active, and if the corpse passes through another NPC during this time it will deal damage to the second NPC (killing them if they are not a shield or bulldozer). Only one extra target can be killed this way.
With Blade Bouncer you can deal enough damage to body shot tasers and naders. The damage dealt will never be high enough to kill shields (due to their high 2.5 hardness) or dozer visors (even with 2 bounces it lands 100 damage short).
The way the cloud propagates makes it a little inconsistent, and the size can vary slightly - generally smoke clouds are 8m or 9m wide for most of their life and hit max size just before they start dissipating, even with Tactician Aced.
While the in-game description states that enemies must be in the smoke for their accuracy to be reduced, this isn't true. As long as the smoke cloud breaks line of sight between you and the enemy it will multiply their accuracy by 0.3 (70% reduction, multiplicative with other sources of accuracy reduction), making it an absolute life saver in certain situations. The way the penalty is applied means you don't have to think too much about how you're using it, as throwing a smoke at a choke point will make all enemies firing through it less accurate. You can also throw it at an objective to make interacting with it significantly safer, or simply throw a smoke at your feet to make all enemies less likely to hit.
The description also states that enemies move slower in the smoke however the effect is so small as to be unnoticeable. Any NPC entering the smoke cloud can no longer run and is forced to walk, however if an enemy is shooting they will slow to walking pace regardless. As such the slowing effect only works on cops that are currently not targeting a player and are also trying to run somewhere.
If you are within range of the grenade when it detonates it will stun you, triggering Code Blue on any teammates that have it. The stun lasts half as long for you as it does for enemies, though it can arc to you from enemies and, annoyingly, teammates.
Any shields, tasers, or techies hit by the stun will take 200 HP damage, ignoring armor (killing them instantly). Specials killed by the stun will remain in the stun animation until the animation completes, at which point they will fall to the ground normally. When killed this way their bodies are intangible and will not block bullets.
The arcing and special killing attributes of the shock grenade give it distinct differences from the flashbang in usage, as it can theoretically extend further than the flashbang and affect enemies around walls, but you lose the ability to grab human shields - as such the choice is ultimately a matter of play style and build.
The explosion radius of the shock grenade can be extended with both Tactician Aced and Demolitionist Basic for a total 40% increase (2m to 2.8m). This does not apply to the distance the arc can travel, only the initial explosion.
Tools
This section is now out of date following the release of Skills 2.0. Extra Pockets doesn't exist and you can get infinite tools from Bounty Hunter, making tool capacity somewhat irrelevant.
Tools are non-renewable and once placed cannot be picked back up. They can stick to NPCs and most surfaces/objects allowing for some flexibility in how you use them. If a tool is placed on a destructible surface or object it will also be destroyed if the surface or object it is placed on is destroyed.
When aiming at the bottom of a door the microcam snaps to the other side. This allows you to place microcams through closed and locked doors, which can be useful on Gold & Sharke to help quickly find the correct room that contains the red keycard.
You can pick up a microcam at any time.
You can pick up a trip laser at any time.
Infrasonic mines do not proc Tactician Basic and do not benefit from Scramble.
You can pick them back up at any time as long as you do not detonate them.
An active ECM Jammer can freeze the dye pack timer in No Rest for the Wicked, making it easier to defuse the packs.
In First World Bank, an active ECM Jammer allows the six ATMs near the main entrance to be opened without alerting guards. While a single ECM Jammer is enough, the action will still be considered illegal.
With Cam Distortion, ECM Jammers will disable any cameras within 5-meters when placed. This can be used to disable multiple cameras with a single ECM Jammer, especially in heists like Dirty Ice and 99 Boxes.
Signal Scan adds the ability to mark Cameras in stealth, the FBI van, techies, and snipers while active.
You can pick up ECM Jammers as long as they haven't been activated.
If you place the sensor directly on an NPC they will remain permanently marked as they never exit the radius.
Dozers that enter the radius are never unmarked, even if they leave the radius.
Motion sensors can only be picked back up if they haven't marked anyone yet.
Consumables
There are three main types of consumable. All three take 1 second to interact with and will give you a specific resource.
The consumable slot has a limit of 3 consumables (5 with Walking Pharmacy). You can only pick up consumables of one type; picking up other types will be disabled until the slot is empty. Picking up consumables has a cooldown of 0.8 seconds.
Pressing the consumable button will instantly use one of your stored consumables. This cannot happen while down, tased, subdued, or staggered; you can use consumables while interacting, lockpicking, or cracking safes.
Holding the consumable button will hold it in your hand and allow you to throw it like a deployable. It will also prevent you from sprinting, even if you do not currently have any consumables. Holding a consumable this way is treated as holding a different weapon, meaning skills like Gunslinger Basic will give you Edge and Locked and Loaded will allow you to pick up ammo for both your primary and secondary weapons.
Weapon Stats
While critical multipliers behave the same most critical multipliers have ranges distinct from the weapon's damage stat, leading to unpredictable damage at different ranges: The Long Shot skill will make the weapon use its full critical multiplier regardless of distance, often improving the weapon's consistency beyond close ranges.
For a breakdown of weapon damage stats and breakpoints with different attachments and skills check out the Weapon Bench[puppy-girl.github.io]
Each weapon has a unique recoil pattern that offsets your crosshair from its original position, continuing to follow this pattern as long as the trigger is held down before repeating the end of the pattern indefinitely. Following a short delay from not shooting, the crosshair will begin to return to its original position, either resetting the recoil pattern once the camera stops moving or continuing the pattern where it left off if interrupted.
Additionally, most weapons will multiply each point of the viewkick by a certain amount if the weapon is being fired hipfire. For example, the CAR-4's recoil pattern is worsened by 220% while hipfiring: in practice, this will multiply the X and Y coordinates of each point by 2.2.
The position of the crosshair will always be the reference for where your bullet goes when firing.
Gunkick is a vertical and horizontal offset from the crosshair and, after the first shot, is the direction your bullet will fire. While difficult to perceive or control while hipfiring, ADSing will allow you to view and adapt to gunkick as it will affect the direction your sights point towards. A unique gunkick isn't rolled for each shot; instead, gunkick will stack and accumulate over multiple shots until reset.
Each shot you fire will roll an offset for up, down, left, and right between a unique minimum and maximum value for each direction.
These offsets will then be modified by a vertical and a horizontal multiplier, a number that increases by a set amount with each shot fired until it reaches its max—the multiplier increasing with each shot causes gunkick to worsen with prolonged fire, however weapons with more even gunkick can cancel out opposing directions.
Finally, the rolled offsets are added to your current gunkick.
In addition, another stat exists for both vertical and horizontal gunkick: the gunkick threshold. If the weapon kicks too far away from the crosshair and reaches that axis' threshold, the gunkick will forcibly reset and pull the weapon back to the crosshair before beginning the process again. Getting unlucky with gunkick rolls will cause the gunkick to reset faster, preventing the effects of gunkick from having too negative of an impact.
While a weapon's viewkick will be consistent every time you fire, gunkick will randomly offset the weapon from its pattern: this means modifying gunkick will impact the consistency of a weapon's recoil pattern.
Each weapon's spread has a starting value—if your weapon has a starting spread of 0.5, the first shot will randomly deviate from the crosshair by up to 0.5 degrees in any direction. Following each shot, the current spread will increment by a set amount until it reaches its final cap. For example: the CAR-4 starts with a spread of 0.2 degrees, which then gets increased by 0.35 degrees each time you shoot, before reaching a final cap of 3 degrees.
At last, each weapon has a set of spread multipliers for each stance: a stance can modify where a weapon's spread starts, how much it increments, the final cap, and how much the final spread value gets multiplied by. Typically crouching will improve the spread of a weapon whereas moving will worsen it. Most primary weapons in the game have a spread multiplier of 0 while ADS and stationary meaning all shots will be perfectly accurate to where the sights are pointing.
Weapon Mods
A difficulty in comparing mods in Payday 3 is that weapon stat modifiers are not linear.
Each attribute you modify with a weapon mod is additive before finally being translated to a multiplier on that attribute's curve. If you have equipped a horizontal recoil of +20 and an overall recoil of +10, the final modification will use a horizontal recoil of +30 (20 + 10) and a vertical recoil of +10 before finally being transformed into a multiplier of 0.8x and 0.9x respectively. Note from this example that there are diminishing returns as you invest more into the same stat.
Each curve spans a range from -250 to +250 with the most impactful effects within -50 and +50. Modifiers are interpolated linearly between points on the curve: given 10 is 0.9x and 30 is 0.8x, an attribute modifier of 20 will convert to a final multiplier of 0.85x. Positive attribute modifiers will result in positive effects on your stats, meaning equipping attachments with positive spread will result in a lower multiplier on your spread.
The main takeaway when equipping attachments on your weapons is that—if there isn't a specific stat you're aiming to improve—there's more benefits to spreading out the stats you modify rather than investing all of your attachment slots on one.
- Horizontal Recoil will multiply the horizontal position of each point in the recoil pattern.
- Vertical Recoil will multiply the vertical position of each point in the recoil pattern.
- Overall Recoil will be added to both the horizontal and vertical recoil attribute modifiers.
Unlike other recoil stats, the Initial Recoil modifier has a unique effect: the first few shots of the recoil pattern will be multiplied again and whatever the final point gets offset by will be a flat offset applied to the rest of the recoil pattern. For example, if a weapon's first three shots are affected by an initial recoil multiplier of 0.9x, and the final of the three shots offset the horizontal position by 0.1 and the vertical position by 0.2, all other points in the recoil pattern will be adjusted by 0.1 and 0.2 respectively.
The amount of shots affected by the initial recoil modifier differs for each weapon. Notably, the SA A144, Sforza Bison, Bullkick 500, FIK 22 TLR, FSA-12G, Blyspruta MX63, Reinfeld 880, Adelig RG5, Chanit S3, TAS-12 and Garstini Viper have an initial num of 0, being completely unaffected by positive or negative initial recoil modifiers.
- Horizontal Gunkick will multiply the minimum and maximum values for gunkick horizontally.
- Vertical Gunkick will multiply the minimum and maximum values for gunkick vertically.
- Overall Gunkick will be added to both the horizontal and vertical gunkick attribute modifiers.
- Hipfire Spread will multiply the final spread multiplier for all non-ADS stances.
- Targeting Spread will multiply the final spread multiplier for both ADS and ADS while moving.
- Overall Spread will be added to both the hipfire and targeting spread attribute modifiers.
Additionally, shotguns can use an oblong spread radius instead of a circle. Two more attribute modifiers exist for shotgun mods that can multiplicatively affect the size and shape of the spread:
- Horizontal Spread Radius will multiply the spread radius on the X axis
- Vertical Spread Radius will multiply the spread radius on the Y axis
For example, the CAR-4's Ranged Barrel (with a Damage Distance modifier of +10) will increase the optimal damage distance from 3000cm to 3150cm, while equipping the CQC Barrel instead (with a modifier of -5) will decrease its optimal damage distance from 3000cm to 2908cm.
This does not affect critical multiplier distances.
Overskills
As you play a heist you will gradually make progress towards your overskill. For the purpose of this guide we will describe activated overskills as overkill abilities to more easily differentiate between overkill weapons, overskill lines, and activated overskills.
Upgrades apply to any overkill weapon you pick up provided you have the weapon equipped yourself. For example, if you have a level 5 Mamba equipped then any Mamba you pick up will act as a level 5, even if the person who called it in doesn't have it at level 5.
Because Overkill abilities activate instantly on the person that uses them this nuance does not apply to them.
Interceptor can be used during at any time until the first assault starts, at which point it becomes locked.
If environmental hazards are triggered by your explosions, they will still deal damage.
18 seconds after activation the meter begins to drain at a rate of 10% every second and increases by 5% every 12 seconds. After 66 seconds the drain rate hits 20% every second, meaning to sustain it with the second level of the overskill you need to maintain one kill per second. After 2 minutes and 6 seconds the drain rate hits 50% every second, and after 3 minutes and 54 seconds it hits 100% every second.
The damage absorption offered by Sociopath applies to everything, including fall damage.
This can kill civilians.
Abilities replace the weapon drop entirely and last a different amount of time depending on the ability and its current level.
As completing sub objectives is often required for completing main objectives, main objectives will net at least 7.5 progress. Kills made with overskills will not add progress to your overkill meter. If you have a weapon equipped you should be calling it in as soon as possible so you can begin making progress towards the next weapon, as there is no benefit to saving the weapon for later in most cases. By calling in weapons whenever possible you can consistently get at least one weapon drop per assault, two if you are completing lots of objectives/getting a lot of kills.
Enemy Armor & AP
This section is now irrelevant following the release of Skills 2.0. AP has been simplified and works completely differently - enemies still have a "hardness" value (which the game refers to as layers) that can be seen on the health bar. Each layer has a full health bar to itself, and after depleting a layer's health bar it will decrease the number of layers by 1. When the number of layers is less than the AP of your gun (which you still cannot see in-game) your weapon will ignore the rest of the armor the enemy has and deal damage straight to health instead. This basically means enemy armor is just an extension of the health bar, and AP allows you to skip part of their health bar.
Armor penetration (AP), while relatively undocumented in-game, is an incredibly important stat for weapon performance. Every enemy has an armor value that functions similarly to how player armor works - while they have armor no damage can be done to health, and as long as they have 1 point of armor all excess damage is ignored (armor gating). As such, low AP weapons will always take at least 2 shots to kill (one to break armor, one to kill).
AP is important because it allows you to bypass enemy armor; when you deal damage against armor a percentage of the weapon damage will also be applied to HP. The percentage of HP damage applied is based on the enemy's armor hardness vs the armor penetration of your weapon:For future reference, any mention of AP threshold refers to the hardness-1 value that represents the minimum AP needed to penetrate while hardness refers to the maximum AP value for full damage. AP that exceeds hardness does not deal extra damage; AP is capped at 100% penetration.
It's important to note that while armor damage does benefit from damage bonuses such as Edge, headshot multipliers only apply to health damage. It will always take the same number of shots to break enemy armor with low AP weapons, regardless of if you are shooting the head or the body. Headshot multipliers do apply to health damage applied through AP, so headshots are still important for most guns.
You can tell when enemy armor has been broken because of a unique hit sound that is slightly louder and higher pitched.
Assault Mechanics
While this whole guide is a work in progress and may be wrong in places, this section is especially tentative. While some of this has been tested, a lot is still uncertain and how the phases transition/interact with each other isn't entirely figured out. How drama works also needs to be documented.
Assault progress is a core mechanic of how assaults and loud gameplay work. It is a value that goes from 0.0 to 1.0 and is increased by completing objectives. The higher this value, the harder assaults become:
On Overkill the assault progress can update in real time, however on lower difficulties the assault progress only updates between assaults. For example, entering the vault on NRFTW will set assault progress to 1.0 - on Overkill, heavies and dozers will begin spawning instantly. On lower difficulties heavies and dozers will not begin spawning until the next assault begins.
The spawn cap for enemies gradually increases as assault progress increases, but there are a few other factors that also affect it. The base spawn cap is set per heist, with most heists having a base cap of 28. Additionally the cap increases based on the number of players in the heist, with 3/4 players multiplying the cap by 1.25/1.5 respectively.
Smash and Grab works much the same way, but sustain lasts 45/60 seconds on normal and 60/75 seconds above normal.
Assaults are divided into the following phases:
When the alarm goes off the game will enter a unique initial negotiation phase. During initial negotiations hostages do not generate resources but will extend the negotiation timer by 15 seconds upon trading a certain number of civilians. You can only trade hostages when the negotiation timer is below one minute. Each heist has a different threshold for how many hostages need trading to extend the timer. Initial negotiations are immediately ended when you walk through certain areas, complete certain objectives, or create an alert sound (gunshot, explosion, etc).
Once this phase ends anticipation begins.
Once this phase ends build begins.
During the first build of a heist specials and snipers cannot spawn.
Once this phase ends sustain begins.
The length of sustain depends on assault progress and the difficulty you are playing on; on normal this phase will last 90 seconds but will increase to 2 minutes after cloakers begin spawning. On difficulties above normal, this phase will last 2 minutes and will increase to 3 minutes after cloakers begin spawning.
Once this phase ends fade begins.
Once this phase ends regroup begins.
[untested but presumed based on internal values - seems to make sense]
This phase always lasts 15 seconds. Once this phase ends wait begins.
The length of the wait phase depends on assault progress. At the start of the heist this phase lasts 40 seconds. At 0.5 assault progress (after naders start spawning but before cloakers start spawning) this is reduced to 30 seconds, and after dozers/heavies start spawning this phase only lasts 20 seconds.
Once this phase ends anticipation begins.
[more work needs to be put into Regroup and Wait, they're kinda hard to figure out exactly]
Despite the assault being endless there will eventually be a break in enemy spawns if you manage to clear enough enemies, but as the assault is still ongoing you can't trade hostages during this time. Its only purpose is to give you a breather and time to work on objectives.
Common Enemies
This section is now irrelevant following the release of Skills 2.0. All HP and armor values have changed, and they now vary by difficulty.
Enemies follow similar rules to players, having both health and armor (they also support adrenaline, though this is currently unused). Enemy armor has a hardness value that dictates how much damage is allowed to pass through into health. For more information on armor hardness, AP thresholds, and armor penetration, check the dedicated section.
Enemies have an accuracy stat that dictates how likely they are to hit - a value of 0.0 means they will never hit but a value of 1.0 does not mean they will always hit; there is a very small chance that enemies will still miss with 1.0 accuracy, but for simplicity sake you can think of it as being a scale between 0% and 100% accuracy.
Enemy accuracy and damage drop off with distance, so the values given here are not an accurate portrayal of how enemies perform as you start to move away; they are a good baseline for comparisons and are representative of close range encounters.
Enemy accuracy is affected by multiple different attributes, all of which are multiplicative. There is a dedicated accuracy penalty stat that enemies can be affected by, but only Shell Shock uses it; all other sources of accuracy reduction use their own multipliers.Enemy health and armor values do not change with difficulty. The only thing that changes is damage and accuracy. Enemy weapon stats are formatted in the following way:
[Normal/Hard/V. Hard/OVK]
While AR SWAT lack accuracy compared to SMG SWAT, they experience less drop off over distance. This makes them more likely to hit you at range and deal more damage than SMG SWAT as you move further away.
Shotgunners will swap from their shotgun to a pistol when in the presence of hostages, however this can be a little inconsistent. Sometimes they will swap to their pistol when no hostages are nearby, and sometimes they they will pull out a shotgun in the presence of hostages. Their pistol has the same damage and accuracy stats as security guards.
The shield object has a threshold of 2.0 meaning most weapons can't penetrate it; exceptions to this are the base Red Fox, the R900/Bullkick 500 with High Grain active, or sentries with AP Turret. Shooting through the shield deals full damage.
Unlike previous games the shield has a visor that can be shot through, having 250 armor and a 1.5 threshold. Weapons with more than 1.5 AP can shoot straight through the visor and deal full damage directly, while weapons with 1.5 AP or less need to break the visor first which effectively doubles the shots to kill (though it can vary from weapon to weapon; generally the shots to break the visor is the same as the shots to kill the shield).
Standing too close to a shield will cause it to bash. The bash stuns any player it hits and has a cooldown of 3.5 seconds, and can (frustratingly) stun players standing behind the shield.
Shields have a unique pistol that is more powerful than the normal enemy pistol, dealing [6/6/8/20] damage with an accuracy of [0.8/0.9/1.0/1.0]. They can fire up to 8 shots per second for a max DPS of [48/48/64/160], though in practice they do not fire this fast.
Shields are immune to melee stagger.
Upon spotting a player they will begin aiming - after [5/5/2.5/2] seconds have passed they will shoot, dealing [100/100/200/300] damage. They have an accuracy of 1.0 on all difficulties, meaning they can miss and are affected by smokes or other effects that alter enemy accuracy. They can still hit you even if the laser is not directly on you, meaning you are only safe if line of sight is completely broken. They will hit other players if they stand in front of you of when the sniper fires.
Snipers can shoot you through human shields.
If you get too close to a sniper they will swap to a pistol, using the same damage and accuracy stats as security guards.
It takes 30 seconds before a sniper is eligible to respawn.
Special Enemies
This section is now irrelevant following the release of Skills 2.0. All HP and armor values have changed, and they now vary by difficulty.
Only 3 specials can be active on the map at once, and only one of each special can be active at any given time.
Each special's unique attack deals double damage against adrenaline (being tased, standing in gas, being meleed by a dozer/cloaker, being shot by a drone).
Tasers spawn from the beginning of the heist. They have 140 armor with 2.0 hardness (1.0 threshold) and 150 HP. Up to 3 tasers (1 in Smash & Grab) can be alive at once on Overkill before modifiers.
They will try to incapacitate a player with their taser, which can be easily identified as they hold it like a pistol. They can only stun players within 12m and the taser shot has an accuracy of 1.0. Being tased locks up your controls and causes you to take [3/4/6/25] health damage every taser tick.
Shooting their battery will stun everyone within 4m for 6 seconds.
It takes 15 seconds before a taser is eligible to respawn.
Naders can throw a flashbang or gas grenade every 12 seconds. Gas grenades last 10 seconds and deal [5/10/12/30] health damage per second, growing up to 10m horizontally and 8m vertically.
It takes 15 seconds before a nader is eligible to respawn.
Cloakers spawn from special vents on the ceiling and drop down. Vents that they have spawned through will explode from the ceiling, indicating where they are coming from.
After spawning cloakers will begin sneaking around the map to close the gap on a player or hide near areas that players are likely to walk past. Once they get close enough they will begin charging, indicated by their iconic sound. In this state they will only stop charging if they are stunned, killed, or the target becomes unreachable. If another player gets within melee range of a charging cloaker then they will be prioritised instead. Upon reaching their target they will subdue them and begin dealing [2/4/6/15] health damage every second, completely ignoring armor. This damage ignores the critical health damage reduction.
When not charging they can shoot you with an SMG dealing [2/2/4/8] damage with an accuracy of [0.55/0.65/0.75/0.95].
Blinding a cloaker with a flashbang is dangerous as it will cause them to begin flailing, dealing 15 health damage per hit on all difficulties for a total of five hits. This damage ignores the 30 HP damage reduction. Each of the five hits has a different delay. Being hit will stun you for around 1 second, giving you a very brief window to escape after the first hit. If you get hit by the second or third hits you cannot escape until the fourth hit, which you have approximately 0.2 seconds to escape. The most consistent method is to hold sprint and run away from the cloaker, but if you're confident in your aim you can try to kill them.
It takes 45 seconds before a cloaker is eligible to respawn.
After spawning they will move to one of their hiding places (specific to each heist) and set up a refraction shield, where they will begin spawning drones. Techies try to stay within 30m of players and will reposition if they get too far away. Your HUD will distort when you move or look towards the techie, with the effect becoming stronger the closer you are.
Upon being approached the shield will drop and the techie will begin shooting you. This can also happen if you shoot the shield to destroy it, or if you flash the techie.
It takes 5 minutes before a techie is eligible to respawn (5 seconds for drones).
Destroying the visor reveals their face, allowing you to headshot them. The visor cannot be penetrated by any means - it absorbs all damage taken. Dozers are immune to all forms of stun and stagger.
If you get too close to a dozer they will try to kick you, dealing [25/50/75/150] damage with a 3.5 second cooldown. The same damage is also applied if you get hit by a dozer's charge.
In the presence of hostages dozers will try to avoid shooting.
It takes 60 seconds before a dozer is eligible to respawn.
[Flesh this out?]
Stun & Stagger
There are five types of stun and stagger in the game that all work in slightly different ways.
Detonating cameras/drones currently does not trigger Tactician Basic.
If a civilian is tied up and then blinded you cannot command them to follow you until the stun ends.
Needs additional testing for skills 2.0. there's a new condition that makes melee not affect enemies anymore, but I cannot figure out what it is for the life of me.
Heist Modifiers
On Very Hard and Overkill heists gain stealth and loud modifiers. On Very Hard there will be one stealth and one loud modifier, and on Overkill there will be two stealth and two loud modifiers. These modifiers change periodically.
The damage inflicted by this modifier ignores critical health.
Skills: Medic
This section is now irrelevant following the release of Skills 2.0. Code Blue/Combat Medic survived as tier 1 skills, but the rest of the line was removed.
The Medic skill line is based around reviving teammates and improving medic bags.
When combined with Medic Aced and Code Blue this skill can be incredibly powerful. 5 seconds is enough to regen Standard Lining/Adaptive Armor Lining, negating some or all of the damage you take during the revive. Additionally the damage immunity you gain makes you immune to all forms of stun from either dozers or shields, making it an incredibly safe way to double team a dozer if someone goes down to one.
The immunity does not have a buff icon, so you will only know if someone has this skill if you ask or if you pay attention to the damage that you both take after being revived.
As long as you have RUSH, you pick teammates up 30% faster."
With this skill you gain Rush whenever a teammate is incapacitated by any means, including taser mines or the self-stun of shock grenades.
Skills: Ammo Specialist
This section is now irrelevant following the release of Skills 2.0. High Grain is the only skill that survived, though it was nerfed.
The Ammo Specialist skill line is based around picking up ammo and improving ammo bags.
Ammo bags you deploy have 2 additional charges."
The reserve ammo bonus does not apply to starting ammo.
This does not apply to ammo obtained from ammo bags - the ammo must be obtained from an ammo drop.
This effect cannot occur more than once every 2 seconds."
One of the stronger skills, especially if you're using an armor combination with a long regen time. By combining this with Combat Reload for infinite Grit/Edge as well as Replenish to instantly pick up ammo from enemies you kill it enables a playstyle similar to Bullseye from Payday 2, allowing you to recover armor after killing an enemy every 2 seconds.
The effects of High Grain apply to every ammo bag, not just ammo bags placed by the person with the skill. The effect does not refresh, so for optimal usage you want to wait until the 30 seconds have expired before using an ammo bag again. The effect is triggered on everyone even if you do not have the skill - as long as one person in the lobby is running High Grain everyone will receive the buff as soon as someone uses an ammo bag.
The AP increase is +0.2 - this allows the R900/Bullkick to penetrate shields directly.
The stacking +5% damage only applies if multiple people have the skill - if only one person has this skill you only receive +0.2 AP.
The Signature 40/403, Stryk, Duro 5, Reinfeld 880, FSA, Pursuivant, and Tribune receive no benefit from the AP increase.
This won’t trigger the Mag Throw skill of other players."
Despite seeming like a meme skill, Mag Throw is actually quite strong. It gives no benefit to the person using it but it can proc all ammo pick up skills of all nearby players - the only caveat is that it doesn't work if you have Replenish. You must physically pick up an ammo box for the effect to trigger.
With four players running Mag Throw you can gain four times as much ammo from a single ammo box and can proc ammo pick up skills four times per box. As long as you are playing with the team, Mag Throw ends up surpassing Replenish by a huge margin. Even just two people is often enough to make a noticeable impact, greatly improving the ammo economy for anyone who is nearby.
The effect works through walls which can lead to ridiculous passive ammo gain from seemingly nowhere, as some areas that you might not think are close together actually are (especially on heists like No Rest for the Wicked or Touch the Sky).
Skills: Tank
This section is now irrelevant following the release of Skills 2.0. None of these skills survived, though Hardy became the new mercenary frame passive.
The Tank skill line is based around armor and survivability.
After this effect has been applied, you can't gain GRIT until you heal using a Medic Bag or First Aid Kit, or until you're downed."
Last Man Standing (LMS) is a skill that can either be incredibly powerful and save the heist or a skill that doesn't work at all and makes you regret picking it. There is an oversight in how the skill works while down; if you are down and somehow gain Grit (Enforcer Basic, Tank Aced, Cooker) the game will recognise that you have no health upon taking any damage and will consume Grit to activate LMS - this isn't helpful because you are already down, but the bigger issue lies in the reset trigger.
LMS is only reset when you go down, however in this scenario you are already down when it activates - this means it doesn't reset when you get back up so you are unable to gain Grit until you either go down again or heal. Because you can't gain Grit you also can't trigger LMS, meaning the skill can prevent itself from working.
Skills: Engineer
This section is now irrelevant following the release of Skills 2.0. Most of these skills survived in some form but had their stats changed.
The Engineer skill line is based around sentries.
Increases max HP from 250 to 375.
Increases max HP from 375 to 500.
Increases AP from 0.5 to 2.5. This allows them to one shot SWAT on a headshot and shoot through shields.
This skill is highly recommended if you want sentries to get more kills or be more efficient, though it's worth keeping in mind how sentries target - against single targets they will go for body shots until armor breaks at which point they will go for headshots. When up against a group the sentry will go for headshots on every target within its line of sight after it gets its first kill, meaning AP Turret is very effective at clearing crowds as it will enable the turret to one shot every SWAT after the first. This behaviour only resets when it runs out of targets.
This skill has a small oversight, as sentries damage themselves when firing - in essence this skill increases effective health by 43% (500 to 714 with Engineer Aced). This skill is an obvious pick if you want sentries to last as long as possible.
The most important thing to know about this skill is it will kill hostages within 8m.
The damage dealt is comparable to a frag grenade - it deals [300/200/100] damage at [2.5m/4m/8m] with 3.0 AP. This funnily enough puts Detonation sentries as one of the highest damage sources in the game, able to instantly kill any non-dozer enemy within 4m and almost kill any non-dozer enemy within 8m.
It's a valid strategy to take Detonation with Dual Sentries and ignore all other sentry skills to keep their HP low and use them as landmines.
Spin speed is not increased so this may be detrimental in some situations, as it can take a while to spin around fully - this may lead to the sentry continuing to rotate back and forth without shooting if a player repeatedly kills the enemy it tries to target or it loses line of sight, however this also may enable the sentry to keep going for headshots longer before resetting.
Self damage is increased from 2 to 3. This obviously means effective health is decreased by 50% when shooting, but also means that when combined with Cooling System their effective health while shooting is only slightly lower than if you had neither skill (effective health when taking damage from other sources is still increased by 43% like normal).
Sentries cannot target drones this way.
Skills: Fortitude
This section is now irrelevant following the release of Skills 2.0. Most of these skills were axed, but some were kept or modified.
The Fortitude skill line is based around improving adrenaline and increasing survivability from sources of health.
If you have no Adrenaline and you heal to or above maximum health, you gain or refresh GRIT."
This skill increases your max HP to 150, which after accounting for the 30 HP damage reduction is equivalent to 180 HP.
The Grit you gain from this skill does not count to Triage on the heal that applies it - if you have two buffs and then heal to gain Grit, you will only receive the healing you would expect from having two buffs. After gaining Grit from this skill you will get the full healing bonus on subsequent heals.
You start with one extra down, making Standard Lining go from 4 to 5 downs and Heavy Ballistic Lining/Adaptive Armor Lining go from 2 to 3 downs. Your bleedout timer is increased from 30 seconds to 45.
This skill is less effective than using medbags yourself, but is useful if you're building around giving heals to the team or you desperately need health and are away from any source of healing. With Supraphysiological and the base Steady Hands bonus you can gain up to 42% adrenaline from anywhere on the map any time someone uses your medbag without skills. If the person using your medbag has Triage then this can go as high as 69%, and with all teammates running Steady Hands this can go as high as 78% adrenaline. [redo math here]
The heal from Health Siphon resets Last Man Standing.
With 5 downs from Fortitude Aced and Standard Lining you can get up to 225 HP (255 after accounting for critical health). When you go down the end of your health bar will turn red to represent the HP you are missing - you cannot heal above this point until you use a medbag to reset your downs.
Currently this mechanic is bugged; your max HP is only updated when you pick up a consumable (using a consumable that you already have in your inventory or using a consumable from the ground is fine) or an overkill weapon. Medbags will still heal you up to the intended max HP value and excess healing becomes adrenaline as normal, but FAKs and Assassin's Mettle will heal you above the intended max HP to your full max HP. If you update your max HP while below max downs and then use a medbag, your HP will be capped at the lower HP value until you update your max HP again.
The health you heal with medbags is a percentage of your current max health - if you have 5 downs and have been down twice, you will heal for a percentage of 195 instead of 225. If you use a medbag you will heal based on how many downs you have after using the medbag, not before - that is, if you have 0 downs and use a medbag you will heal for a percentage of 165 instead of 150 like you might expect.
FAKs are flat healing and as such receive no benefit from the increased HP - this means Unyielding is worse for gaining adrenaline, because it will take more healing sources to reach that point.
As Unyielding increases your max HP, it also increases your max adrenaline - this means your adrenaline gain from medbags is effectively increased by 10% per down.
The extra adrenaline is applied multiplicatively - with 5 downs this multiplier is 1.5, with 4 downs 1.4, and so on. FAKs heal 25 HP but this is halved for adrenaline to 12.5 (assuming max health) - with 5 downs and Supra this only gets increased to 18.75.
The skill description may be a little confusing, but you gain the extra adrenaline even if you currently do not have adrenaline. The multiplier only applies to the adrenaline you gain; for example if you have 5 downs, 50% HP, and recover 100% health from a medbag (Steady Hands and Triage with two buffs), you will recover 50% of your max health to reach 100% health and then the remaining 50% healing will be multiplied by 1.5 for 75% adrenaline.
If you only have 1 point to spend on either Supra or Unyielding, which one is better depends on how you want to play. Unyielding is better for Assassin's Mettle healing, tanking damage, and medbag healing, while Supra is better for adrenaline gain from flat healing sources (though the increase is very small). You always gain the same amount of adrenaline from medbags with both skills, though Supra will be limited by the 150 adrenaline cap.
If you have any amount of Adrenaline, you can use First Aid Kits to pause its degradation for 15 seconds."
This does not slow degradation to 0% - it increases the timer by 25% per down. With 5 downs this is a max of 125%, slowing adrenaline degradation from 2 seconds per point to 4.5 seconds per point.
This may sound like a big buff but ultimately it's not particularly strong - the Edge bonus is interchangeable with any other 10% damage increase and will have varying effectiveness depending on your weapon. The Rush bonus is nice but not required, check the section on movement speed for more information.
Fortitude Basic ensures that you take 60% less damage for 20 seconds upon gaining adrenaline. This is an effective increase of 189% adrenaline over normal Grit which can make it last considerably longer when combined with the other health increasing skills in the same line.
You gain 40% damage reduction if you have any buff, so any buff will grant a huge increase to your survivability.
If you are planning on playing around adrenaline then this skill will massively extend how long it lasts, otherwise you can ignore it.
Skills: Escapist
This section is now irrelevant following the release of Skills 2.0. None of these skills exist anymore.
The Escapist skill line is based around movement.
When this effect is triggered you cannot be staggered for 2 seconds after activation. If you gain Rush before the 2 seconds is up and get staggered again it will reset the 2 second duration.
While this may seem like a worse version of Solid it can be a decent replacement if you don't want to spend points in the Enforcer line and can gain Rush easily.
If you have Infiltrator Basic (throwing knives) or Assassin Basic (suppressed weapons) and destroy a nader's belt while Rush is active, you will consume Rush to avoid the stun and then immediately regain Rush from the kill. This effectively turns this skill into a simplistic version of Collateral Control, but only for the person using it.
This skill is potentially bugged and negates all bulldozer melee damage - you will not be stunned and you will not take damage [is this still true?].
This is a bit of a sleeper skill in that it doesn't seem particularly useful at first glance and may even seem detrimental to a lot of builds, but there are some builds that Move & Cover is excellent for - primarily Gunslinger builds. You can change weapon to gain Edge then mantle something to convert it into Grit, then change weapon again to regain Edge. In most maps there are countless places to safely do this, giving you a completely free and non-resource dependent way of maintaining Grit.
Only effective on doors with locks that can be picked or shot"
The last line may be a little confusing, but you can use this skill on any swinging lockpickable door even if the door cannot be shot open. Doors opened this way have their handles broken and cannot be closed, and guards that see the door will call a search.
This skill has a potentially major bug depending on how important tools are to your build/playstyle; starting a sprint or slide while too close to a door will make you unable to place tools for the rest of the heist.
Skills: Manipulator
This section is now irrelevant following the release of Skills 2.0. Menacing and hostage count skills were the only survivors.
The Manipulator skill line is based around hostages and improving the effects of trading them.
Once fully surrendered, the SWAT obeys all the rules of a civilian, including any penalties for killing them. You can't have more than one SWAT as a hostage at any time."
You can use this skill to take security guards hostage before first responders arrive. Guards and first responders do not count towards the one SWAT limit, you can take as many guards or first responders hostage as you want.
If everyone is down/in custody and at least one person that isn't in custody has this skill the heist failure will be delayed to 20 seconds. This happens even if there are no civs or enemies that can be dominated alive.
The time reduction is increased by Manipulator Aced and Silver Tongue. The reduced custody time only applies to hostages traded after the initial negotiation ends; any hostages traded during the initial negotiation do not count.
This skill does nothing when the Federal Negotiator modifier is active.
Skills: Mower
This section is now irrelevant following the release of Skills 2.0. Ammo Funnel/Replenish survived, but only for ARs/LMGs.
The Mower skill line is based around ratatat.
This skill adds 20 to your weapon recoil stat which amounts to decreasing recoil by 15% assuming no weapon mods are attached.
Somewhat misleading but the description is technically true - what this skill actually does is causes you to inflict heavy stagger when you would normally inflict light stagger. This has the side effect of causing melee to inflict heavy stagger, but it is still subject to the 5 second melee cooldown and doesn't give melee any extra properties. This skill does not affect the chance of stagger or how it works in any other way.
Despite sounding underwhelming, Sprint Loaded has a lot of versatility. Normally if you are reloading and jump into a slide it will reset the reload, while Sprint Loaded allows you to do this uninterrupted. Additionally you can pull the bolt on the R900 while sprinting, something that you cannot normally do.
Skills: Sharpshooter
This section is now irrelevant following the release of Skills 2.0. Head Hunter and Cutting Shot were the only survivors.
The Sharpshooter skill line is based around ADS with a boost for scoped weapons.
Long Shot means that you always use the highest headshot damage multiplier no matter what distance you are at - with certain weapon types this can be a huge boost to damage at range though other weapon types will see barely any change.
The benefit of Long Shot is heist specific, as some heists have a lot of long angles while others are very compact. Your play style will also affect how useful this skill is, as it only helps when shooting at range.
Because you need to be in ADS to use this skill it has no benefit for hipfire builds.
The damage bonus from this skill is strange in how it is applied, as it effectively overrides your base damage multiplier with the scope zoom multiplier instead. That is to say you will deal 5x damage instead of 1x damage with no other bonuses if using a 5x scope - in practice this means that the actual damage bonus is equal to the zoom minus one (+4x damage).
The default R900 scope is a 5x zoom.
If used with Finisher you will get the 200% damage bonus but not lose Edge and do not need to reload, allowing you to chain Finisher headshots until you miss. This combo is currently bugged and only works properly in solo mode, online you will be forced to reload after your second shot and your Edge icon will disappear, making you unable to see the timer but also giving you all Edge effects until the timer would expire (Edge is not consumed by ADSing with Gunslinger basic in this state).
This adds 20 to your scope speed stat which amounts to a 23.1% increase in ADS speed assuming no weapon mods are attached.
Skills: Enforcer
This section is now irrelevant following the release of Skills 2.0. These skills mostly survived but were made shotgun exclusive.
The Enforcer skill line is based around killing enemies at close range.
This adds 20 to your reload speed stat which amounts to a 13% increase in reload speed assuming no weapon mods are attached. Having both a quick pull mag and Quick Reload only increases reload speed by 18.4%.
Skills: Gunslinger
This section is now irrelevant following the release of Skills 2.0. Quick Draw is the only survivor, though there is a skill similar to From The Hip... that only affects pistols.
The Gunslinger skill line is based around hipfire.
ADSing will end any EDGE you have active"
Pulling out a deployable or consumable counts as changing weapon and will give you Edge.
Spread is decreased by 30%. Some weapons have low base spread to begin with, so this skill will not have much of an effect on how they handle.
The spread reduction is multiplicative.
Another sleeper skill, Heavy Hipfire can synergise with Coup De Grâce but has a (likely unintentional) hidden feature. The heavy stagger applied by this skill also applies on melee, meaning that as long as you have Edge and melee an enemy they will be heavy staggered. This works on specials (and even works on shields, which are normally immune to melee) and can be used to stunlock guards in stealth at the cost of being unable to do anything else.
This adds 2.0 to your damage multiplier, increasing it from 1.1x to 3.1x with no other damage skills. With a few weapons this damage increase allows you to kill SWAT in a single headshot, but it does allow a few weapons to kill SWAT in a single body shot (Bison, Castigo).
The main benefit of Finisher is that it allows you to make builds with compact mags or low capacity weapons that are still effective against dozers, as the damage increase benefits all weapons against dozer visors.
When used with the Red Fox you can kill dozers in a single body shot, which can helpful in a pinch if you only have one bullet left.
Because deployables and consumables are classed as separate weapons you can pull them out and pick up ammo to refill both your primary and secondary weapon magazines simultaneously.
If the magazine is empty and bullets are added to it you do not need to reload unless you were part way through the reload animation already. This allows you to chain Finisher infinitely as you can instantly reload a few bullets in your other weapon on your last shot, swap, and repeat.
This skill adds 30 to your equip speed which amounts to increasing equip speed by 16.7% assuming no weapon mods are attached. This skill does not affect unequip speed.
Skills: Demolitionist
This section is now irrelevant following the release of Skills 2.0. Most of these skills were removed or modified heavily.
The Demolitionist skill line is based around improving explosives.
This applies to the frag grenade, shock grenade, flashbang, and the Mamba [verify?]. This does not affect environmental explosives.
Adds 0.2 to affected enemies accuracy penalty, multiplying their accuracy by 0.8. Does not apply to shock grenades/flashbangs.
Does not apply to shock grenades/flashbangs. You must have Rush when the grenade explodes, otherwise the effect does not trigger. If you gain Rush from Demolitionist Aced it will not activate this skill, but subsequent grenades thrown while Rush is active will.
The health damage dealt by a grenade with this skill is the same as a grenade without this skill, the only difference is that enemy armor is completely stripped.
Skills: Assassin
This section is now irrelevant following the release of Skills 2.0. Killer Kinesthetic/Assassin's Mettle made it through.
The Assassin skill line is based around marking enemies and silent kills.
As long as you have a suppressed weapon this allows you to have infinite Rush.
This does not work if the enemy is already marked - you need to wait for the mark to disappear before it will allow you to refresh Rush, which weirdly enough means this skill is less effective when you have Strategist Basic/Aced.
This can't let you move faster than your current armor speed penalty allows."
Due to an oversight this skill isn't as useful as it necessarily sounds. Refer to the Movement Speed section for more information, but to summarise you only need +10% speed to hit max crouching speed - this skill is basically just a replacement for Rush and nothing else.
The only time the +20% bonus does something is if you crouch and ADS, because ADS lowers your movement speed more than normal.
This skill is not affected by other skills that increase healing. The adrenaline gain from this skill is affected by Supra, allowing you to gain up to 7.5 adrenaline per kill instead of 5. Depending on how you want to use this skill it may be optimal to combine with Supra, Unyielding, or both:
With Unyielding you can benefit more from the increased healing below 75%, as you can heal 30 HP per kill all the way up to 112.5 HP with 5 downs. Unyielding has no effect on adrenaline gain
With Supra by itself you can benefit more from the increased adrenaline gain, as not taking Unyielding means it takes less kills to hit max health and start gaining adrenaline. The increase in adrenaline is pretty small however (+0.5 per down), so this isn't particularly useful.
With both skills you get the benefits of a widened increased healing range and extra adrenaline, but it will take more kills to gain adrenaline due to the top 25% HP being much larger than without Unyielding. If you take this route you will want to maintain armor as much as possible when above 75% HP.
This skill is a great counter to the AP loud modifier as a single kill is enough to recoup your lost health.
If combined with Killer Kinesthetics and a penetrating weapon (R900, Red Fox, SA A144 with Cutting Shot) you can heal by killing the new marked enemy through the first person you shoot. As long as the initial target is marked and the closest enemy is lined up with them you can heal twice from one shot, even if the second enemy is not initially marked.
The mark lasts 5 seconds and is extended by skills that increase mark duration. The throwing knife can only mark shields and dozers because every other enemy instantly dies upon being hit.
Smokes will continue to mark everyone within their max radius while the smoke is active, even if the smoke has not expanded to that location yet and even marking through walls. Even though the smoke might not have any effect within an area, it will still mark anyone within the radius.
Shock grenades will reset the duration on each zap, increasing the effective duration of the marking effect.
Skills: Tactician
This section is now irrelevant following the release of Skills 2.0. Most of these skills were removed.
The Tactician skill line is based around stuns, though it includes some smoke grenade bonuses as well.
The infrasonic mine and Hacker Aced cannot trigger this skill.
On the surface this seems quite simple, but it has a lot of nuance. Shooting enemies can cause them to stagger which will give you Edge, however the game calculates damage after applying Edge.
This means that any weapon which requires Edge to kill in a single headshot can shoot an enemy and, if they stagger, proc Edge - despite the shot being fired without Edge the game will recognise that you now have Edge and include the 10% damage bonus in the damage calculation, turning what wouldn't have been a one shot kill into a one shot kill.
When this happens the hit marker is yellow instead of red, indicating a headshot but no kill. Despite this the enemy will die anyway.
Skills that require Edge (Cutting Shot, Precision Shot, Finisher) will not activate when you gain Edge in this way. If a skill consumes Edge you will gain the 10% bonus damage but the Edge icon will never appear due to being instantly consumed.
On flashbangs this extends their range from an 8m radius to a 9.6m radius - while this is a good improvement the normal range is already very large and covers almost all use cases. If you're making a build based around flashbangs and have an extra point, it wouldn't hurt to put it here (though it likely won't do much).
The effectiveness of Tactician Aced on smoke grenades is hard to quantify due to the inconsistent gradual propagation of smoke grenades. It does increase the final diameter of the smoke from 10m to 12m, however that only results in a 1m increase to the radius which is nearly unnoticeable even if you're looking for it.
The base radius on shock grenades is fairly small, but combining Tactician Aced with Demolitionist Basic increases the radius by 40% (from 2m to 2.8m). This increase does not apply to the arc.
Infrasonic mines do not count towards this skill.
All damage dealt completely ignores armor, dealing full HP damage. This skill is a global effect that benefits the rest of your team, allowing all players to ignore armor of affected enemies.
This does not apply to the infrasonic mine or stagger.
Skills: Strategist
This section is now irrelevant following the release of Skills 2.0. Combat Marking survived as a pistol skill, and Threat Assessment reworked into High Marks.
The Strategist skill line is based around marking enemies.
Enemy accuracy is multiplied by 0.8 when being shot. Multiplicative with other sources of accuracy reduction.
Skills: Infiltrator
This section is now irrelevant following the release of Skills 2.0. The throwing knife skills were removed, though the stealth skills survived.
The Infiltrator skill line is based around speeding up interactions and improving throwing knives.
In combination with Transporter Basic and Bagger you can more optimally bag loot - pick up one piece of loose cash, pick up two bags, drop them both, pick up another piece of loose cash, and repeat.
The Rush on throwing knife kills is also a very effective way of maintaining permanent Rush with throwing knife builds, though it requires you to have throwing knives equipped in the first place.
Very simple, but in stealth this gives a very easy method of gaining Rush for Quick Fingers. Simply walk into a guard's line of sight for a split second and you don't need to waste time picking locks on certain heists (like UTS).
Picking a lock in this way activates Infiltrator Basic, refreshing Rush and allowing you to keep picking locks instantly.
Throwing knives never break on impact with enemies so this only affects misses - it can be a huge help if you're planning on using throwing knives regularly, otherwise you don't necessarily need it. You can restore throwing knives from ammo bags as an alternative.
Throwing knives that exit the playable space are unretrievable, so you probably still want another source of throwing knives anyway (or be careful about where you throw them).
To avoid any confusion, this skill makes you bag loot twice as fast.
As nice as this skill feels to use it is incredibly situational. It's primarily a speedrun skill and may help on certain heists (NRFTW loud, Road Rage) so that you spend less time bagging loot in a dangerous spot.
This skill only applies when bagging loot - when picking up a bag from the ground this skill has no effect.
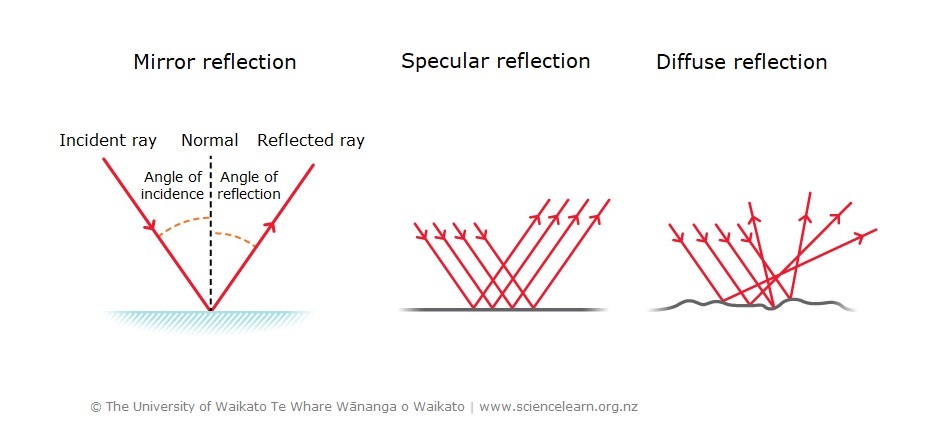 The knife does lose a small amount of distance on each bounce but this loss is marginal, each bounce can travel roughly the same distance as if you were to throw the knife yourself. The knife is also affected by gravity and is very slowly pulled to the ground, but this is often so subtle that it doesn't end up mattering in any significant way (unless you're throwing a knife a very long distance). The main thing to keep in mind is your angle when throwing the knife, as extreme angles are very unpredictable - for more predictable bounces you want to throw the knife as perpendicularly as possible.
Each bounce increases damage by 200%, going from 1x damage to 3x damage and finally 5x damage. While this might sound strong the only real use is for killing tasers and naders, as a single bounce deals enough damage to one shot them. Knives don't have enough AP to do anything against shields or dozers and the 5x bounce damage is not enough to break dozer visors (assuming you're somehow able to make it hit).
The real benefit of the bounce is that it can often turn a missed knife into a hit, as it will rebound and kill someone that you didn't intend; sometimes this can work against you however and the knife will fly away. While Retriever has a slight issue with losing knives, Blade Bouncer can amplify that 10 fold - having another way to recover throwables is highly recommended.
You can also make use of the bounce to hit enemies around corners without ever exposing yourself, but this takes some degree of practice and familiarity with how the bounce works and the map layout to pull off effectively or consistently. Marking enemies can help you.
Ultimately while this skill makes throwing knives a lot more fun you are still giving up the utility of other throwables so it's not particularly useful or practical.
Skills: CQC Specialist
This section is now irrelevant following the release of Skills 2.0. None of these skills survived.
The CQC Specialist skill line is based around improving human shields and takedowns.
You move 5% faster while holding a human shield."
Soft Assets effectively functions like using an ARK when you shove a SWAT, fully recovering the active plate as long as it isn't broken. The Rush requirement is non-existent since CQC Specialist Basic gives you Rush whenever you grab a human shield, making this a free way of recovering armor when combined with throwable skills for infinite flashbangs.
You do not have to wait for the grabbing animation to finish, you can throw the human shield at the same time as you grab them to completely skip the animation and instantly refill your current plate. Rush is only consumed if the plate is damaged.
Clean Slate does not apply to Soft Assets.
Reduces takedown time from 5 seconds to 2 seconds.
You move 5% faster while holding a human shield."
The smoke grenade that is spawned upon shoving a SWAT is treated as your own - it counts as throwing a smoke grenade and receives bonuses from any smoke grenade skills you may have.
Skills: Hacker
This section is now irrelevant following the release of Skills 2.0. The skills related to runtimes made it through, but device detonation did not.
The Hacker skill line is based around accessing cameras and remote stealth interactions.
You gain one Runtime."
You gain one additional Runtime."
While this may not seem like a very useful skill, the overload ability is actually incredibly strong. It functions as an electrical stun affecting all NPCs within a 15m radius that have line of sight. The overload can be performed on cameras and drones, which will permanently destroy them. You cannot overload titan cameras. A runtime must be active on the camera you wish to detonate, but it doesn't need to be your own.
Additionally Hacker Aced can be used alongside Scrambler basic to blow up any hacked drone, with the same effect on target as a detonated camera.
When used in stealth affected civilians will become alerted and run away, triggering the alarm if they escape. Guards will become alerted and call a search.
If the camera is destroyed, you regain your Runtime use. If you apply a new Runtime when you're at max Runtimes, your oldest active one is removed."
Looped cameras turn blue and are represented with a blue circle.
Targets stay marked for 5 seconds after leaving the camera's view and do not count towards your maximum number of marked targets"
In stealth you can combine this with Secure Loop to create a safe area that marks guards, however you can use this skill in loud! On heists that don't have Cerberus Core you can set up Routed Ping on cameras overlooking key areas to mark all enemies that move through the camera's line of sight, allowing you to use skills that require enemies to be marked on normal SWAT. This is especially effective if titan cams are active.
Cameras that have Routed Ping active are represented with a red circle.
The guard is distracted for 5 seconds, after which they will go back to their previous action. If the guard was escorting a player, the guard will go back to patrolling. If the guard was about to detain a player, the guard will go into Search mode instead.
Using this ability has a cooldown of 60 seconds."
Skills: Scrambler
This section is now irrelevant following the release of Skills 2.0. Only KSC and Scrambler Basic survived.
The Scrambler skill line is based around ECMs, cameras, disrupting drones, and countering the techie.
You gain one runtime."
Scrambler Aced provides an easy way of gaining Rush for any skills that require it such as Grifter, Quick Fingers, or other skills within the Scrambler line.
Signal Scan has very niche use cases in helping with finding techies on heists where you are unfamiliar with their hiding spots or quickly locating snipers, but also synergises with the Red Fox as a way of destroying FBI vans by shooting them through walls.
ECM and Trip Laser builds can get a lot of use out of Extra Pockets. Being able to place a second laser or double up on ECMs allows you to play more aggressively with Killer Kinesthetics or make more use of KSC.
"Whenever you destroy a Zapper's battery you replenish one ECM jammer (this effect does not require RUSH)."
Kinetic Short Circuit (KSC) is an interesting skill with one major issue; killing is often easier than stunning, and other skills can do what KSC does more efficiently without resource cost. Despite this it can be used to spray into a crowd as a makeshift shock grenade or used with a shotgun to the same effect.
The free ECMs can also be used to gain more uptime on Signal Scan, if needed.
Cam Distortion effectively acts as another form of Secure Loop on heists without Cerberus Core and is the only way to permanently disable cameras on heists with it.
ECM Jammers and Infrasonic Mines can only be picked up if they haven't been used, while Motion Sensors can only be picked up if they haven't marked anyone. Other gadgets can be picked up at any time.
This is incredibly useful in Killer Kinesthetic Trip Laser builds as it allows you to reposition your lasers based on where enemies are coming from or objective locations.
Heists: No Rest for the Wicked
- The thermite has a base duration of 6 minutes.
- Every thermite bag thrown in causes the timer to decrease twice as fast.
- Each thermite bag lasts between 20 and 30 seconds - this means the thermite can take anywhere from 4:00 to 4:40.
- With the Additional Thermite asset it takes between 3:00 and 4:00. Due to how long it takes for the thermite to drop and how dangerous it can be to get all of them as soon as possible, it's not uncommon for the timer to hit 0 before all the thermite bags finish.
- The sprinklers do not slow down the thermite; it still takes 6 minutes if the sprinklers are turned on the whole time. They simply reset the thermite's state and prevent you from throwing additional thermite bags in.
- When a thermite bag is active the flame will raise and a bassy rumbling sound will play. This rumbling sound immediately cuts out when the thermite effect ends, making it an easy audio cue for throwing in the next bag as soon as possible.
- Throwing in an additional thermite bag while one is still active will trigger the sprinklers, cutting the thermite effect off prematurely.
- While the sprinklers are turned on the thermite runs a check every 10 seconds to determine if it "explodes". This has a 50% chance of succeeding, and whether it succeeds or fails nothing happens.
- Turning off the sprinklers within around a second of them turning on causes the thermite to get stuck in the sprinkler state - any thermite bags thrown in while this bug is active will not speed up the timer and will play the animation of throwing thermite in while the sprinklers are turned on. The only fix for this bug is to let the cops turn the sprinklers on, then turn make sure you wait a couple seconds before turning the sprinklers back off (or you will trigger the bug again).
Heists: Road Rage
- The truck moves at a speed of 1.2m/s for each player standing within the radius (4.8m/s with all 4 players).
- The radius to make the truck move is 6m (12m with the Stronger Signal asset).
Heists: Dirty Ice
- It takes 30 seconds for the cleaning machine to clean one bag.
- Bile takes two minutes to arrive, so you can start the flare when four bags are left. As long as you take the bags out as soon as possible he will arrive when the last bag finishes.
Heists: Rock The Cradle
- Breaking the skylight in stealth will trigger the alarm after a few seconds.
Heists: Cook Off
- The next ingredient will become available 15 to 30 seconds after putting the previous ingredient in. If the power goes off the next ingredient becomes available immediately after turning the power back on.
- It takes 3 seconds for the meth to appear after putting in the last ingredient.
- It takes between 10 to 30 seconds for the meth to become pure.
- It takes between 10 to 20 seconds (40 to 50 with the Longer Purity Window asset) for the meth to burn.
- The smoke above the meth lab indicates the current state of the meth (white smoke for impure, blue smoke for pure, pink for burned).
Heists: Syntax Error
- It takes 25 seconds to decrypt one server.
- Another server cannot be decrypted until you remove the last one that finished.
- The one exception to this is if the combined server is available to be bagged. The machine will start decrypting the next server in queue, but will stop again afterwards.
- The employee that can be found walking around the offices upstairs can be thrown against the computer in the office where you find the door code. He will play an animation leaning against the desk as if he was pressing the button in Dirty Ice, then stop. This can only happen once and does nothing.
Heists: Boys in Blue
- The winch takes 200 seconds to complete.
- The car lift takes 90 seconds to complete.
- Payday 3 Full Achievement Guide★ 5 (298)18k views657 ♥12 minUpdated Sep 1, 2024
- FPS Boost + Stuttering Mitigation + Force HDR★ 4 (158)17k views290 ♥2 minUpdated Oct 8, 2023
- Best MODS List - Improvements and fixes [PAYDAY 3]★ 4 (129)13k views256 ♥4 minUpdated Sep 1, 2024
- How to install MODS [PAYDAY 3]★ 4 (61)9.4k views139 ♥6 minUpdated Sep 1, 2024
- The Lengthy Guide★ 5 (286)7.9k views522 ♥282 minUpdated Oct 2, 2024
- [ОБНОВЛЕНИЕ ПРИОСТАНОВЛЕНО] САМЫЙ ЛУЧШИЙ ЛАУД БИЛД★ 5 (193)7.3k views380 ♥10 minRussianUpdated Oct 27, 2025






- Upgrading to PremiumTeam Fortress 2★ 5 (20k)1441k views11k ♥6 minUpdated May 11, 2022
- No More Room in Hell Official ManualNo More Room in Hell★ 5 (2.8k)569k views2.1k ♥29 minUpdated Apr 22, 2019
- NMRiH Community Hosting GuidesNo More Room in Hell★ 5 (526)351k views653 ♥1 minUpdated Aug 10, 2022
- ULTIMATE GUIDE FOR GAME DEV TYCOONGame Dev Tycoon★ 5 (5.8k)326k views10k ♥4 minUpdated 23 Jan, 2014
- How to 'Git Gud' Soon™MORDHAU★ 5 (2k)318k views3k ♥68 minUpdated Nov 16, 2024
- Лучшие кооперативные игры SteamPAYDAY 2★ 5 (1.5k)315k views2.1k ♥56 minRussianUpdated Apr 27, 2025






This guide was created by its original author on the Steam Community. Are you the author and want it removed? Request removal.