High-Level Strategy for New Players
Introduction
Factorio is an amazing game that offers many paths to victory. It's not always clear what your priorities should be at any given point, which can lead to situations where you're trying to manage a crisis instead of forging ahead. This guide provides some high-level direction. It is not a step-by-step walkthrough.
This assumes a single-player "freeplay" game with default settings and no mods. Priorities will be different in "peaceful" mode, on ribbon worlds, and so on. Selecting peaceful mode isn't a bad idea for a first run, as it allows you to relax and focus on building without worrying about bug attacks, but it reduces the game's intensity.
The game progresses through several phases, determined primarily by available technology. Each phase has its own section. I don't give a lot of specific information on factory design, but there are links to other guides and videos with details in certain areas, and a collection of helpful tips at the end.
Before diving into a freeplay game, you should play through the single-player tutorial missions. Be sure to run through the mini-tutorials (click the mortarboard cap in the top right) as they become available.
If you have the Space Age DLC, everything is essentially the same until you start launching rockets.
Phase 1: Startup
If you played the tutorial missions, you already know how to get started: create drills, create ovens, set up steam power, create a lab, research the basic automation and logistic technologies. Once you've got that going, it's time to start making some long-term plans about what goes where.
 Base layout. The most straightforward layout has resource collection at one end, which feeds into raw-element processing, which outputs to the main bus. If you don't know what a "main bus" is, I recommend KatherineOfSky's guide: https://steamcommunity.com/sharedfiles/filedetails/?id=754378586
If you peeked at the map preview when setting up the game, you should have an idea of where to run your main bus. Steering your bus around obstacles is time consuming and wasteful, so pick a direction where you can travel uninterrupted for a while. (Red underground belts are pretty good for skipping small cliffs, and you'll eventually get Cliff Explosives, but nothing beats a nice empty desert.)
Your resource collection site is initially fed by your nearby deposits of coal, stone, iron, and copper, but will eventually be where trains from far-off sites unload their cargo. Having a single location where all non-liquid raw resources are gathered makes everything simpler.
Furnace lines. One of the later in-game tutorials shows you a very compact iron/copper production site, in which they share a coal feed between two lines. You want to spread out a bit more, because you're going to need to expand. A lot. A simple line for cooking iron/copper/stone looks like this:
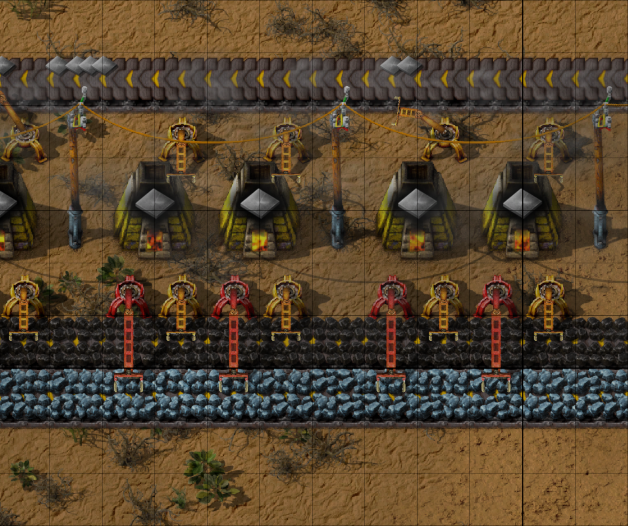
The key thing is to make it 10 squares high. You only need seven, but having one extra row leaves room to twist the line to feed onto both sides of the belt, and a gap of three is enough for substations, beacons, and other stuff later on. The upgraded versions require retooling but fit in the same general space:
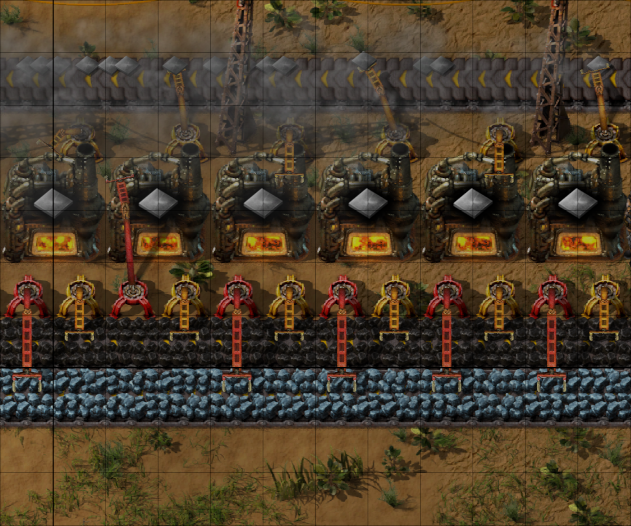
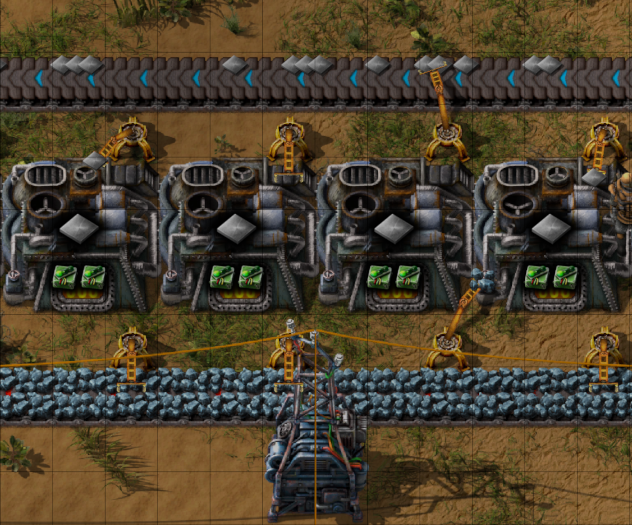
Note Electric Furnaces are 3x3 instead of 2x2, but you can remove the coal line, so they still fit in the 10-space line. (There are MANY ways to create smelter lines; sharing an output belt lets you fill both sides evenly, feeding a split coal/ore line lets you remove one inserter, etc. Start simple. See e.g. this guide for some other ideas.)
Create one line each for iron plates, copper plates, and stone bricks. The early game requires a lot of iron, a reasonable amount of copper, and very little stone unless you're planning to pave the world and put a wall around it. If you want to be tidy, put stone in the middle, copper on top (expand upward), iron at the bottom (expand downward). Once you research steel, you'll add a steel line that feeds from an iron plate output line.
Next question: how long should your line be? Start at one end, and run toward the other for about 8 seconds. Mark that as the other end. So long as you have room to add additional lines you won't paint yourself into a corner. (For reference, you need 24 stone furnaces to generate enough output to saturate one side of a yellow belt. Halve the number for steel/electric furnaces, double it for red belts. Steel takes 5x as long to make as iron, but needs 5 iron plates, so consumes the same amount of input. While we're throwing numbers around, you need 15 electric drills to saturate one side of a yellow belt.)
Bus configuration. What goes on your main bus? You'll want to start with 4 sets of 4 lines:- 4 lines of iron plates
- 4 lines of copper plates
- 4 lines of green circuits
- 1 line of steel
- 1 line of stone and brick, sharing a belt
- 1 line of coal
- 1 line of red circuits (which runs forwards and backwards)
You'll need very few green circuits at first, but eventually you will need a fairly astounding number. An advantage of having green circuit production near the start of the line is that it will get first shot at copper, so you can dump half your copper plate output into the line if you need to. Start with a single circuit assembly line, but leave room for a second.
Phase 2: Automation
The main bus is set up, stuff is flowing. Now what? Factorio is about factory automation, so build some factories.
Initial factories. Creating production lines for red Automation Science Packs and green Logistic Science Packs that feed into labs is essential, but you will make everything about your life easier if you automate production of most basic items. You can whip up some of the parts out of your inventory pretty quickly, but as the game goes on you'll need more and more of them, and want more advanced versions.
In the near term, you will want factories for:- yellow Transport Belts
- yellow Inserters and red Long-Handed Inserters
- red/green science packs
- green Electronic Circuits
- Steel Furnaces
- Electric Mining Drills
- Pipe and Pipe to Ground
- Firearm Magazines (which will eventually feed into Piercing Rounds Magazines)
- Assembling Machine 1
- Medium Electric Poles and Big Electric Poles
- Walls
(You don't have to set these all up at once. You may be in the middle of the next phase before they're all running.)
If you spend a little time setting things up early, you can save time later. For example, consider the very clever "belt array" described on KatherineOfSky's main bus guide (linked earlier):
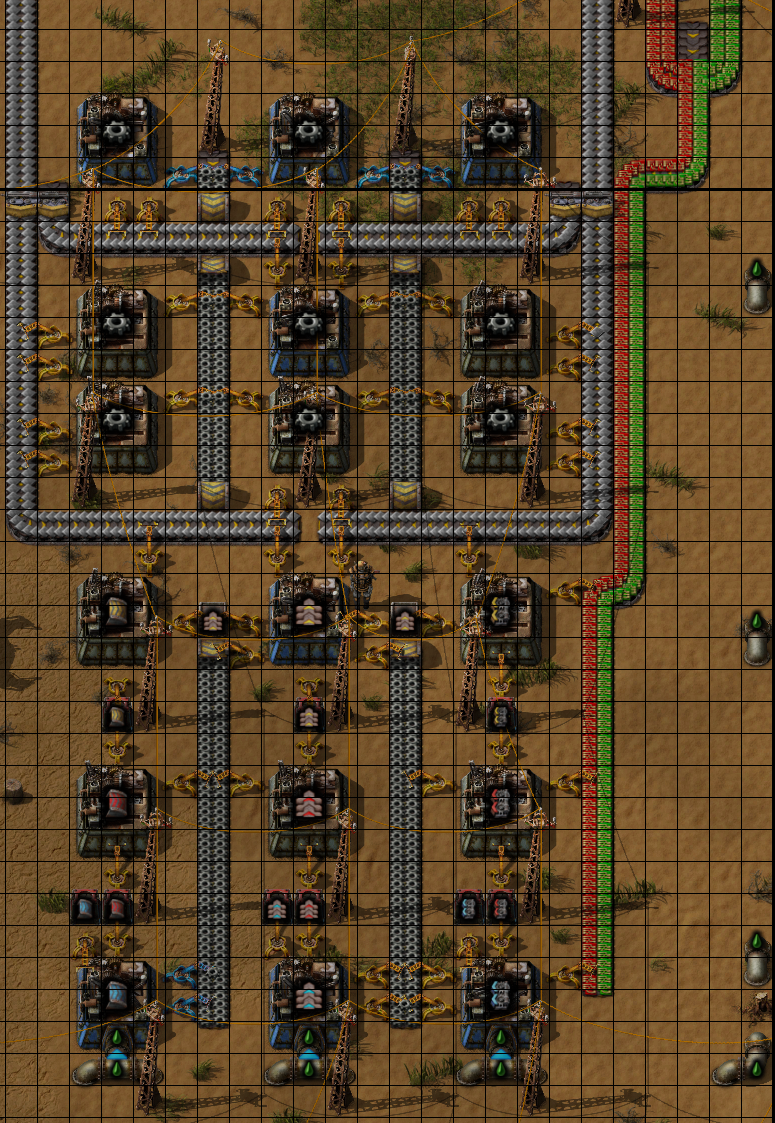
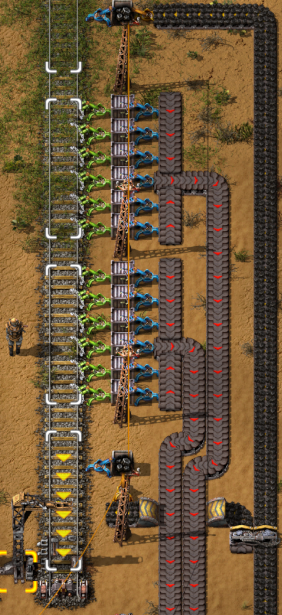
Note how the outputs are sent to boxes that feed the next step. When the box receiving blue components reaches its limit, the box with red parts will fill to capacity; same for the yellow. So you have components in all three colors available. Since you can't build the red/blue parts yet, you don't need to build all the factories right away. Just build a few and leave space for the rest, adding them as your technology level improves. (This is a fragment of a larger design. There are 9 gear factories because, in the full version, there are additional products built with gears past this point.)
You hardly need factories for the yellow components, since (except for mass quantities of belts) you can easily create them from your suit inventory. When you start deploying red "fast" components, though, the creation time and raw material requirements increase. Blue "express" components require liquid lubricant, and can only be built in assemblers. Having it all in one place is convenient.
Inserters are the same: you can create yellow/red from your inventory quickly, but blue Fast Inserters take longer, and Bulk Inserters require a lot of materials.
Bulk Inserters and Express Splitters require red circuits, so planning to have a reverse-direction belt on the main bus isn't a bad idea.
Set up your labs in a line perpendicular to the main bus, with space for a pair of belts on each side. There are 7 different kinds of science packs, none of which become obsolete, so you'll want to feed the labs with half-belts of each.
Landfill and Concrete. Landfill can be very useful on maps with large bodies of water in inconvenient places. Add a factory if you've got water nearby. Concrete dramatically improves your run speed, and can be placed underneath other things. Because concrete requires iron ore, bricks, and water, you'll want to put it near the start of the line.Phase 3: Reinforcement
All the basic stuff is now humming along, which means you're consuming a lot of raw materials and generating a lot of pollution. You need to reinforce your production and your defenses.
Defenses. Check the spread of pollution on the map overlay. It will likely have reached at least one nest by now, so you need to place some turrets. You can initially just drop a turret with some ammo, but that will get overrun in the near future. A simple arrangement is to place 2 or 3 turrets, fed from a box, surrounded by a wall.
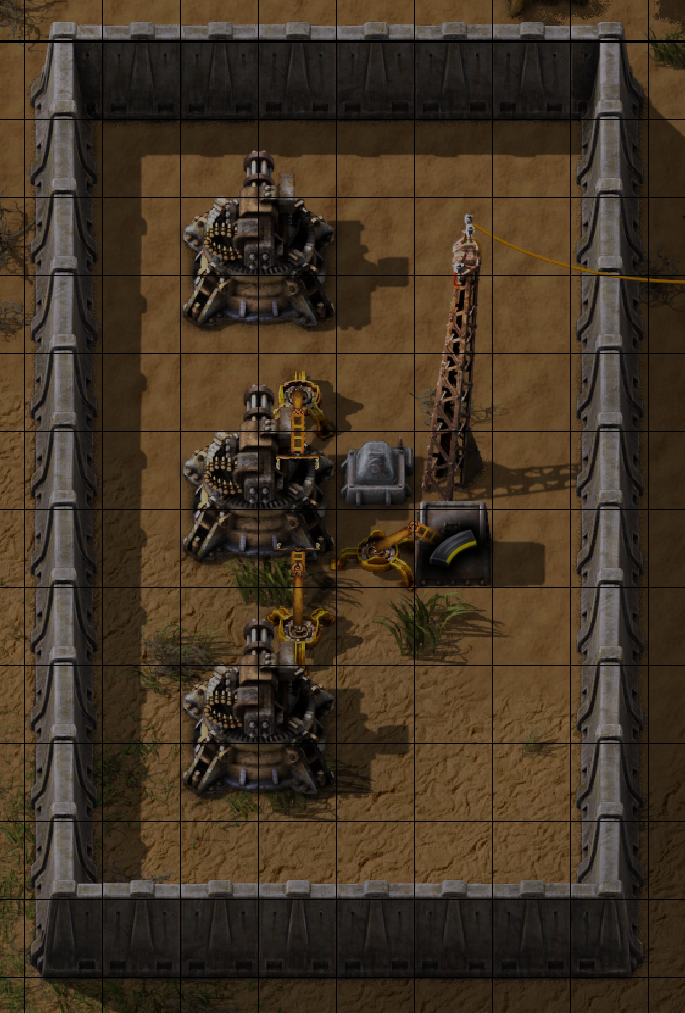
If you want to add a few more guns, add them to the sides and forward ammo between them with inserters. (Tip: when looking at an image, you can tell which way the inserters are facing by looking at the legs, which form a tripod. In the image above, they pull ammo from the box to the center turret, then from the center turret to the other two.)
This is one occasion where long-term planning isn't important. Defenses tend to move around as your base expands, and before too long you'll want to feed your guns from ammo on belts, so just put these up at likely attack routes and move on. (See the "Pest Control" section later on for some notes.) You should already be generating ammunition from a factory, so sticking a couple hundred rounds in each box shouldn't be a problem. You can add a factory for gun turrets, though you won't be needing them in large quantities for a little while.
Increase supply. Once you've bug-proofed your base, upgrade your raw material processing. Replace all Burner Mining Drills with Electric Mining Drills, and Stone Furnaces with Steel Furnaces. The upgraded versions double your output. The new drills require electricity, so check your power consumption, and add more steam engines until power generation is at least twice demand. Make sure coal production exceeds demand, as it's an ingredient in Grenades, which you'll be making next.
Military science. Do the research required for grey Military Science Packs, and add a factory for them. You can share the output of the Piercing ammo line, as grey science is more heavily dependent on grenade production than ammo. It's okay to keep the factory small for now: you don't need to keep up with red/green science if you alternate your research focus between military and non-military subjects. Let the military packs build up while researching something that doesn't require them, then switch. If you design your assembly line to be expandable -- which you should always do -- you can increase production later if it becomes a limiting factor.
Military technology is still useful for "peaceful" games, as a number of suit upgrades are gated behind it, but you won't need nearly as much grey science.
Phase 4: Expansion
You're going to start running out of raw resources from your initial deposits. You need to find new sources of iron, copper, stone, and coal, and you need to find oil (purple dots on the map). And you need to get the resources from where they are to where you are, which is usually easiest to do by train.
You probably have enough iron ore left to let you set up a basic oil refinery before securing a new source of iron. It's safer to secure your iron supply first, but your research opportunities will start to narrow until you can produce plastic. For this guide we'll start with iron, but know that you can do it in either order.
Prepare for trains. Research all train-related technologies: Engine, Logistics 2 (which also gets you red belts), Railway, and Automated Rail Transportation. Add factories to make engines and railroad tracks. You won't need a lot of locomotives, train stops, or railway signals, so you can build those on the fly.
Find iron. The first thing you'll likely run out of is iron ore, which you need a lot of to set up a railroad, so it's important to get your second source working before your first source runs dry. Run power out to the location with big power poles, plunk down a few defenses, and set up a train stop. A simple point-to-point setup with no signals is very easy to do (and is part of the tutorial mission sequence). You will eventually want multiple adjacent stops, one each for iron/copper/stone/coal, and using a pair of one-way tracks that split and merge will make your life easier, especially if you have multiple sources for a single type of ore.
The best video I've found on train signaling is by Soelless Gaming:
(The in-game railroad signaling tutorial in v1.0 is less useful than it could be. Watch the video instead, but note that your rails may not look exactly the same because the minimum curve radius increased in 2.0.)
Hovering the mouse cursor over a resource deposit on the map will tell you the quantity of material available. On your journey to space you should plan to consume 2-3M iron/copper, and a few hundred K of stone and coal. The exact amount will vary, but don't assume a 2M iron deposit will be all you need. Deposits tend to get bigger as you get farther from your base.
Use a small train, with locomotives on each end and 1 or 2 cargo cars in the middle. You won't need longer trains until the deposits get farther away.
Find oil. You probably have enough copper, coal, and stone for the moment, so this is a good time to set up oil production. Research the necessary technologies (Fluid Handling, Oil Processing), and find an oil field. Chances are there's a bug nest nearby, but unless you're worried about getting swarmed while setting up defenses you can ignore it. Just make sure you have your defenses set up before you place any Pumpjacks, which generate pollution.
Unless it's conveniently located next to a water source for steam, you'll want to run power out to the site with big power poles. Place your turrets, then put Pumpjacks on the drill sites, and attach the outputs to a storage tank. What you do next depends on distance and personal preference: you can add a train stop with a fluid car, or just attach a Pump (which is in the Crafting/Logistics tab, different from the Offshore Pump in the Crafting/Production tab) and run a whole bunch of underground pipe.
Underground pipelines are a better option than you might expect. If you place a Pipe to Ground facing away from you and hold the left mouse button down, you can run away from it and the game will automatically place pipe pairs at maximum separation. Bugs don't find them interesting and will run around them. This can be much faster and easier than setting up a railroad stop. (In your pipe factories, increase the stack limits in the output box to 4 so you'll be sure to have enough.)
If you do use a train, a single fluid car will suffice.
Start an oil refinery. There's an excellent video by KatherineOfSky on the subject: The key thing is to place it far enough off your main bus that it won't affect your factory expansion. Make sure you have lots of space: you'll need storage tanks, refineries, heavy oil cracking, light oil cracking, and production of lubricant, sulfur, sulfuric acid, and plastic (which requires coal input). Explosives require coal, sulfur, and water, so you may want to build those in your refinery as well.
Build a "main bus" for fluids that runs parallel to your main bus. Put the factories and chemical plants on the side away from your base, so it won't clash as you add capacity. The fluid bus will carry crude oil, heavy oil, light oil, petroleum gas, water, and possibly lubricant and sulfuric acid. Lubricant is needed for blue belt parts and electric engines, and sulfuric acid is needed for making batteries and blue circuits; these become part of your main bus, which expands to include the two pipelines plus lines for Plastic Bars, Sulfur and (if you didn't leave space for it initially) at least one for red circuits. If you built the Belt Array factories near the start of the line, you can just run a lubricant pipeline directly to it from behind.
For now, you only have the technology to do basic oil processing, which yields Petroleum Gas. Set up some refineries to do that, and tanks to hold the output. Pipe it over to your line and add chemical plants for Plastic Bars and Sulfur, which are key ingredients in future items.
Research Advanced Oil Processing soon. When that completes, set up cracking plants with circuit controls to keep everything balanced.
Find copper, coal, and stone, starting with whichever one will run out first. You're going to need a lot of copper for what comes next, and while you still probably have a fair bit of coal, it's an ingredient in Plastic Bars, which you will be consuming in large quantities. Running out of coal is Very Bad. Secure secondary sources before the next phase. Use a separate unload station for each type of material.
This is one of the first places where red Fast Belts are useful. You'll be moving a lot of ore around, and will eventually want a pair of red belts moving ore from the station to the furnaces.
 Review defenses. If you're taking damage from spitters, add more guns nearby. Eventually they'll come in faster than you can shoot them, but you shouldn't be there yet. Don't get distracted by every ding in the wall. With a decent cluster of turrets surrounded by thick walls, you can lose a chunk of wall and even a couple of guns and still have plenty of time to fix things before you lose something important.
Phase 5: Chemistry
Time to put Advanced Oil Processing technology to use.
Expand refinery. Switch refineries to Advanced Oil Processing, and run pipes to storage tanks for the three products. Add cracking stations, using circuits to balance them (see video linked in previous section). Add a plant for Lubricant near the refineries and pipe it over to the main bus.
Add assemblers. Back on the main bus, add assemblers for Batteries and red Advanced Circuits. You'll need a lot of assemblers for the red circuits, which take 6 seconds to build, so leave plenty of room. Each red requires two green, so you should increase production on green circuits at this time.
You should start producing blue Chemical Science Packs, which require engines, plastic, sulfur, and a whole lot of copper. Feed them onto the other half of the line carrying the military science packs. Like red and green, blue science is required for everything going forward, so make sure your line can expand if it becomes the bottleneck.
Demand for copper will spike. If you built up your supply in the previous phase, you should be able to meet it by adding additional furnaces. Add an Electric Furnace assembler, and use the new furnaces when you start a new line. Electric furnaces have the same yield as steel furnaces, but are larger (3x3 vs. 2x2), so you get fewer per line. However, they don't need coal (which shouldn't matter if you expanded your supply), generate less pollution, and can be boosted with modules. You don't need to rush to replace your existing coal-fired line if you have lots of coal available and aren't fretting about your pollution cloud, but you should transition to the electric version for new lines.
Go solar. Feed your batteries into an assembler for Accumulators, and add a Solar Panel factory. Output to boxes that takes 8 stacks of each -- the solar array described in a later section uses 180 solar panels, 151 accumulators, 16 substations, and a roboport.
Laser turrets. Once you have some accumulator banks, you can start placing laser turrets. These draw huge amounts of power for brief moments, and may not fire during a brown-out, so use them sparingly at first, and pair them with regular turrets so you're not defenseless if the power dims. If you're using isolated clusters of turrets, as opposed to a long line, put the lasers in the corners. They'll fit there because they don't need to have ammo inserted, and are advantageous because their longer range means you can space your clusters farther apart and still have overlapping fields of fire.
Modules. Set up production lines for level 1 productivity, efficiency, and speed modules. Send the output to a box at the end of the line, which will eventually feed into assemblers for level 2. You want to keep some of each level, because the later modules are very expensive to produce, and you specifically need level 1 and 2 modules for certain other products.Phase 6: Robots
Flying robots make everything better.
Build some bots. Research Robotics, Construction Robots, and Logistics Robots. Add factories for Electric Engines, Flying Robot Frames, and the two types of robots. Add a factory for Roboports, which are very expensive, and output them to a box limited to a single stack (10 units). Add a factory for repair kits (4 stacks).
Place Roboports. The logistics network isn't fully functional until you research Logistic System, which you can't do just yet, but you can put Roboports along the perimeter. You don't need to create a linked network just yet. Instead, place them so their green construction zone overlaps your walls and turrets, and put 5-10 construction bots and half a stack of repair kits in each. Now, when the spitters attack your walls or guns, the damage will be repaired automatically.
You can also use robots to build the 48x48 solar panel farms. Build the first farm manually, and create a blueprint. Place a roboport near the next site, throw in a stack of construction robots, then put down a Storage Chest. Add the solar panels, accumulators, substations, and roboport to the chest, then place the blueprint and watch the robots go.
Now we need to build some really expensive stuff.
Purple Production Science. You'll need level 1 production modules for this, as well as electric furnaces and a whole lot of railroad tracks.
Blue circuits. Blue Processing Unit circuits require sulfuric acid, 2 red circuits, and 20 green circuits, each. Producing these in reasonable quantities will require expanding your green circuit line, which will need a surprising amount of copper and iron plates. Increase your raw material and furnace lines to compensate. You will probably need to upgrade all the belts in the iron/copper supply chain to red to keep up. (The "upgrade planner" in the toolbar makes upgrading belts very easy, now that you have construction robots to help.)
You'll need 200 blue circuits when it's time to build a Rocket Silo, and a handful for one-off suit upgrades, so add a siphon chest that pulls into a box limited to 2 stacks.
Yellow Utility Science. This requires a flying robot frame, low-density structures, and a couple of blue circuits.
Merge the purple and yellow science packs onto different sides of a single belt, and ship them all the way back to your labs. Some research requires purple, some requires yellow, and the really advanced stuff requires both. Putting 3x Production Modules and 1x Speed Module into Assembling Machine 3s will speed things along, but watch your power consumption.
Logistic System. Research this once you have some yellow science flowing. This will let you create teal Requester Chests, which make it easy to ship products across your base without belts.
Once you have this, create a bunch of logistic robots, and place linked roboports across your base. All chests that receive products should be red Passive Providers. If an assembler needs input from some other factory, just add a requester chest with a reasonable count, and let the robots move stuff around.
Don't forget that this works for your suit as well: in the logistics tab, add all of the things you want to have on hand (power poles, turrets, ammo, pipes, belts, inserters, walls, etc.) Robots will automatically bring you more items as you place stuff, so you don't have to go chest-hopping to resupply. Robots are initially very slow, but they'll catch up, eventually.
Keep an eye on your power! A roboport can draw over 4MW while recharging a fleet of active robots.
Upgrade your suit. You can build Power Armor, Portable Fusion Reactor, and Exoskeleton. These yield a significant improvement to your quality of life.
Check your oil. The closest oil patch generally isn't very big. It will never stop producing, but it will slow to a trickle. You can improve it by adding speed modules to Pumpjacks and placing beacons, but it's more effective to just find a second source of oil, especially since modules and beacons are made with the oil-based products you're running short on. This supply will likely be distant enough to merit hauling by train to your refinery. If your initial oil was delivered by train you can either merge the tracks (requires a two-track setup for signaling), or just abandon the original source when the new source is ready. If you were using a pipeline, add the new train stop and pump the contents into the same storage tanks.Phase 7 (Classic): Infinity and Beyond
Your focus now is on getting into space. Start by researching Rocket Silo. This requires 1000 red-green-blue-purple-yellow science packs, so it may take a little while. Most of your time in this phase will be spent on upgrading your supply lines to speed things along.
If you plan to continue the game past the initial launch, also research Space Science Pack, which makes Satellite construction available... for a mere 2000 science packs.
Build Rocket Silo. This requires a ton of concrete, electric engines, pipes, steel, and blue circuits. You should have all of these parts sitting around in various chests, so just pick them up, build the silo, and place it near your main bus.
Build parts. The silo builds Rocket Parts, which have three ingredients: Low-Density Structure, Processing Unit, and Rocket Fuel. (This used to require Rocket Control Units, but those were eliminated in v2.0.) You're already building Low-Density Structures, and Rocket Fuel is just light oil processed into Solid Fuel cubes and combined with more light oil. You can set up a chemical factory and assembler near your refinery, and transport the rocket fuel up. (Rocket Fuel can also be used to power trains and vehicles, increasing their acceleration.)
Each rocket part requires 10 of each item, and advances the launch by 1%. You can put up to 4 modules in the silo; since speed isn't a limiting factor, put in 4 production modules.
At 100%, the rocket elevates to launch position, and a slot opens up where you can set the optional payload.
Launch. Open the silo, click the Launch button, and watch the animation.
Congratulations!
Phase 7 (Space Age): End of the Beginning
With the Space Age DLC, your goal is to reach the edge of the solar system, and push toward the Shattered Planet beyond. Before you can do this, you need to visit four additional planets to generate their unique research and products.
After you build a Rocket Silo, you can start launching material into orbit. The material can be used to construct space platforms.
Launch a Space Platform Starter Pack to create a new platform. Once created, you can expand the platform with items built on the ground. Note that all construction in space is done automatically through the "remote view"; there is no need to send yourself into space to do construction there, and no robots are required.
If you select the "automatic requests from space platforms" checkbox in the Rocket Silo, it will act as a big logistic hub, fulfilling requests for the space platforms. If a platform needs something, the planet-side Silo will request it from the network, and once it gets a full rocket-load of the material it will launch a rocket automatically. You will need to send many rockets up, as rocket-loads are generally less than or equal to a single stack, but fortunately launches are relatively inexpensive. This system runs fully automated if all of the materials are available in provider chests.
Sending material back down works similarly. You can drop stuff manually by shift-clicking it into a trash slot on the space platform, which will send it down in a pod that can be collected manually. Or, you can build a Landing Pad on the planet, and use it to request things from space, which are delivered directly. For example, you can build a pad near your labs, and have it request 1000 units of Space Science.
Build a Space Science generation factory on the platform. This first platform will do nothing else, and will remain in Nauvis orbit indefinitely.
There are small chunks of rock floating around in the orbit of each planet. These can be grabbed with Asteroid Collectors, and converted to useful materials with Crushers. You'll need to collect and crush three different kinds of rocks to get what you need for Space Science (ice, carbon, and iron ore), then smelt iron plates and feed the results into assemblers. Store the finished science packs in the hub for transfer to the planet.
There are two basic strategies for asteroid chunk collection: (1) configure each collector to only harvest a single type of chunk, and feed that directly into a crusher; (2) allow collectors to grab anything, and send the output to the various crushers. You can't build storage boxes on platforms, so the central hub is the only storage container (though you can add liquid storage tanks). The first approach is less efficient, but the second approach will likely flood your platform with chunks and gum up the works if you don't mitigate it somehow.
There are two basic strategies for dealing with excess chunk collection: (1) use a circuit network to filter asteroid collection, e.g. disabling collection of a specific type when you have more than 5 chunks in the hub; (2) collect everything, then throw excess materials into space by sending them to an inserter on the edge. Both are viable, but the second requires less familiarity with circuit network programming (see "Tips: Managing Overproduction" for some examples).
Power generation is going to be a factor. For the first few planets, you can rely on solar power, which is amplified in space. It's usually wise to throw a pair of level 2 efficiency modules into the various assemblers and ovens, as that reduces the power draw by 80%. Everything on platforms is automatically connected to power, so you don't need any power poles in space.
Build a second platform, to travel to another planet. This will require some additional things:- Thrusters, to propel your platform. The speed at which you travel depends primarily on the width of the platform (due to a drag effect) and the number of thrusters. The mass of your platform, which is determined simply by how many foundation squares your platform has, has a lesser effect on top speed. Start with two or three thrusters.
- Fuel. This comes in two parts, Thruster Fuel and Thruster Oxidizer. Both are liquids that can be generated from asteroid chunks in space, so you'll need assemblers and chemical plants to process the materials.
- Gun Turrets and Firearm Magazines. Once you leave Nauvis orbit you will start to encounter large asteroids, which can damage or even destroy your platform. You'll want half a dozen guns on the bow (north side) and some on the east and west edges. Basic ammunition is made with iron plates, which you can generate from asteroid chunks, so you'll want an ammo factory onboard as well. Asteroids will appear while in orbit around other planets, so you can't just stock up before heading somewhere new. Asteroids have significant resistance to laser fire, so don't use Laser Turrets. (The in-game Factoriopedia has information on all asteroids, including what you're likely to encounter when traveling between planets.)
Before you can board a rocket to personally get into orbit, you have to empty your inventory. You can only bring your suit and (unloaded) weapons. Load up your best suit of armor with nuclear power and personal roboports, and be sure to stock construction bots in the platform's cargo hold. You can now remote-drive Tanks, so if you leave one with full fuel and ammo, you will be able to prune any biter expansions from afar.
Pick your first planet. You can initially reach Vulcanus, Fulgora, and Gleba. In theory, it's possible to start with nothing on each planet, and build your way back up. (Eventually you'll reach Aquilo, where you MUST come prepared.) In practice, this is tedious and time-consuming, so it's best to arrive with a collection of machinery and some raw materials. If you also bring everything you need to build a Rocket Silo and at least one rocket, you can get back to Nauvis quickly if you suddenly remember that you left the kettle on. Of course, you'll need to add multiple Cargo Bays to make room for all this stuff.
You can configure the set of items you'll want to bring in logistic groups, tailoring them for specific planets. For example: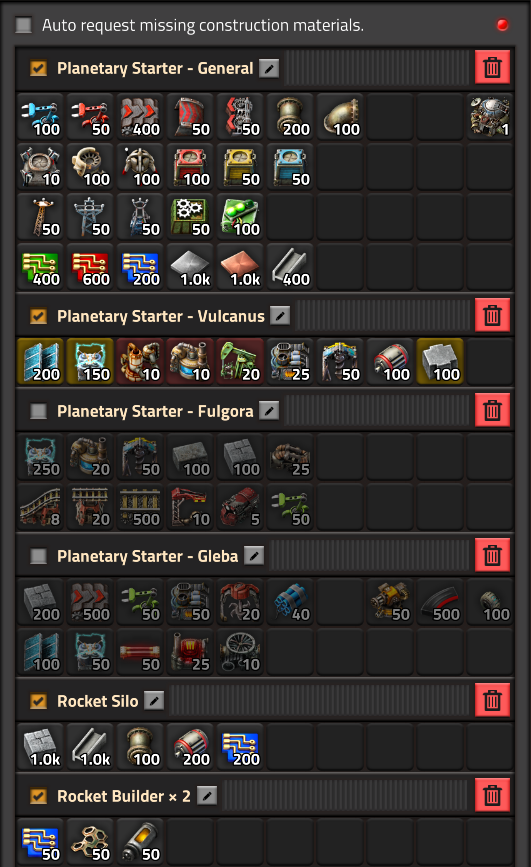
Where to start? Each planet offers unique advancements, such as green Turbo Transport Belts and Recyclers, that can be brought back to Nauvis to improve your base. Each also has unique challenges, e.g. Vulcanus has no oil deposits, so Coal Liquefaction is required, while Fulgora has literal oceans of oil but solar panels barely work. Vulcanus and Fulgora are reasonable places to begin, though Vulcanus is perhaps more straightforward. Gleba is more of a challenge (tips).
If you're not sure what to do next, check the technology tree. If mining or building something planet-specific unlocks a technology, do that, and explore what the new tech provides.
Automate delivery. Once you have your new planetary outpost built up, the goal is to build science packs and ship them to your labs. You may also want to ship machinery, like Foundries, or raw materials like Calcite. You can transfer everything by hand, or set up automated interplanetary deliveries as you would with trains.
The Shattered Planet awaits!
Tips: Stuff You Can Ignore
There are some things you won't have to worry about if your goal is just to launch one rocket. I'm listing this so that you can focus your research efforts on things that matter. If you're playing with the Space Age DLC, you should ignore this section, because everything is useful.
Nuclear power. You just don't need that level of power generation for a single rocket launch. Mining uranium is tricky because it requires sulfuric acid, so you have to haul goods to the site as well as back from it. The power plants and fuel processing are complex operations. It's important for post-game mega-bases, but you can ignore it for now.
Uranium is also used to enhance projectile ammunition. This can be useful post-game, but until then Piercing ammo does plenty of damage if you research some military upgrades.
Flame Turrets. Personal and vehicular Flame Throwers are incredibly useful, but Flame Turrets, while powerful, are a bit awkward to set up because they require a fluid connection to a storage tank with oil. In most cases they're not needed, because Behemoth Biters and Spitters won't make an appearance until well after launch. Unless you're fully coal-powered and burned down all the nearby forests with your flamethrower, in which case they may have evolved quite a bit. (Tip: hover your mouse over a spawner to see the current state of evolution. Behemoths will start to appear at 0.9.)
Artillery. Again, you're not going to be hit that hard by the time you launch, so unless you want to destroy bug nests from a distance, it's not worth the research time. The main value of artillery is automatic elimination of biter expansion bases.
You don't need to build shells for your tank either. Flame anything that wiggles, and drive over the spawners. In v2.0, spawner health increases with evolution. The 15% explosion resist for spawners was removed, shell damage was increased, and personal laser damage was nerfed. The net result is that shells are much more relevant.
Spidertrons. Large 8-legged vehicles with rockets and lasers are awesome, but extremely expensive to research and build.
White Space Science Packs. The only way to get these is by launching a satellite into orbit. If you're just playing to the first launch, there's no need to research them. White science packs are used for the infinitely-repeating technologies, like weapon damage and robot speed.
Level 3 modules. You'll need some level 2 modules if you want to make the Power Armor Mk2, but level 3 modules aren't important at your current scale.
This is not to say that L3 modules aren't useful, just that they aren't essential, and the improvement you get over L2 isn't worth the expense at this point. (800 copper, 360 iron, 260 plastic, 30 blue circuits... each.)
One place where you might want high-level speed modules is if your oil field is tapped out and you want to keep drawing from it. They can also boost production of expensive items like yellow science packs, but bear in mind that a single Assembling Machine 3 with four L3 production and speed modules draws about 1.5MW.
You don't need to build Beacons either. They're handy for Pumpjacks and Mining Drills on small but dense ore patches, but they draw a lot of power, and continue to do so even if the boosted machines aren't operating. Modules in beacons affect multiple machines but their effects are halved, so loading modules directly into machines is often better. Doing both is even better, but the power draw can be pretty extreme.
Post-launch, when you're trying to launch satellites as quickly as possible, you can build a nuclear power plant and throw beacons and modules around to boost production.
Tips: Power Generation
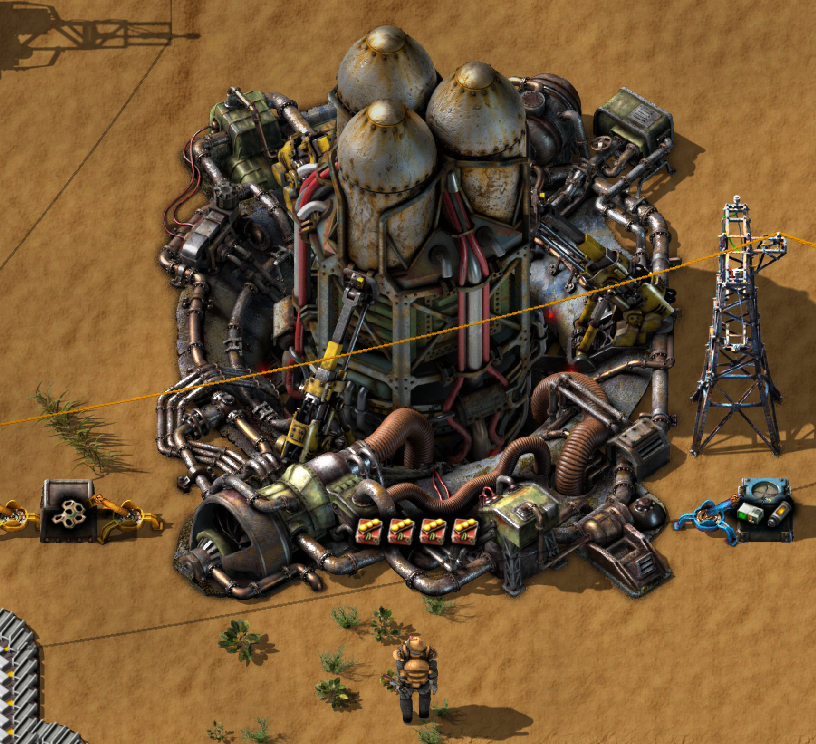
Many guides go into great detail here, explaining the math behind monster solar panel arrays like this one, which can deliver about 7.5MW of power through the day and night without consuming coal or generating pollution:
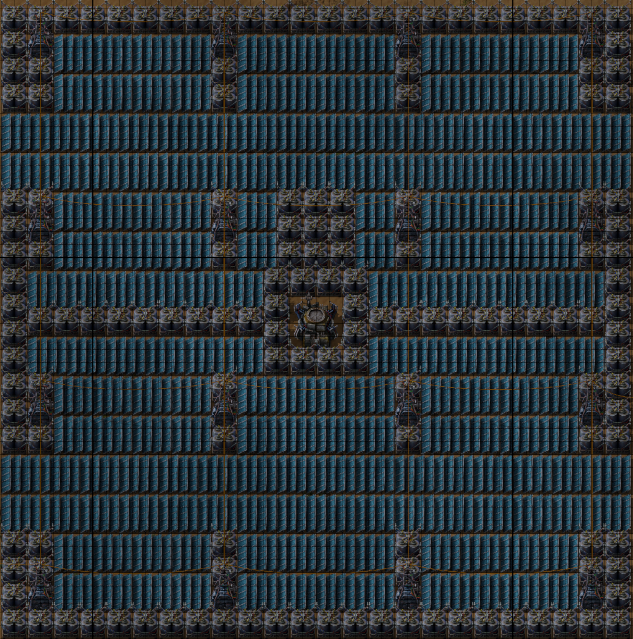
(The optimal ratio of accumulators to solar panels is different on other planets, in a non-intuitive way. See the charts here[forums.factorio.com].)
I just want to point out a couple of things.
Prioritize coal for boilers. If you're relying on boilers for steam power, you want to have a dedicated line from the coal site to the power plant. Normally when you're distributing resources, you create a belt and split it as needed, but each time you do that you're cutting the quantity in half (unless one of the consumers fills up). If the coal supply gets low enough, boilers will start to shut down, and if power levels get low enough you'll experience a "brown out". That causes your electric mining drills to be less productive, which means even less coal is being delivered, so even more boilers shut down.
Lesson: never split the belt that runs from the coal mine to the boilers. If you do, left-click on the splitter and prioritize output on the side that feeds your boilers.
You can add a bit of buffering for insurance. If you put a couple of chests next to the coal line, you can have one inserter pulling coal off the line while another puts it back on. If the belt is full, the boxes fill to capacity. If the belt empties, coal gets pushed back on.
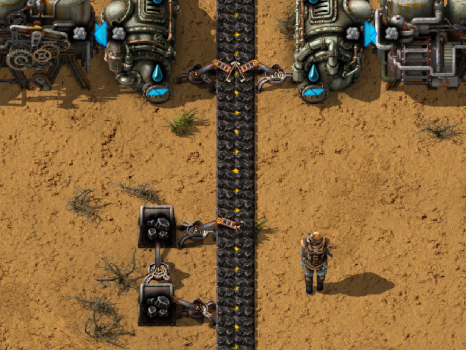
You spend a little extra energy for the inserters, but gain extra time to fix your coal supply if something goes wrong. You always want Burner Inserters on the boilers, but they're not very useful in the buffer because they're too slow to keep a medium-sized boiler farm supplied. It's okay to use powered inserters here because, if you're running out of power due to lack of coal, the boxes are already empty.
Steam backup. You can switch to solar to reduce pollution, but you'll want to keep your steam power around as a night-time backup. Steam power has priority over draining accumulators though, so you need to isolate your steam array behind a switch. The Circuit Network Cookbook[wiki.factorio.com] page explains how to rig it up so steam kicks in when the accumulator level drops below a certain point. If this is happening, it's time to build more solar panels, so I found it useful to add an alarm:
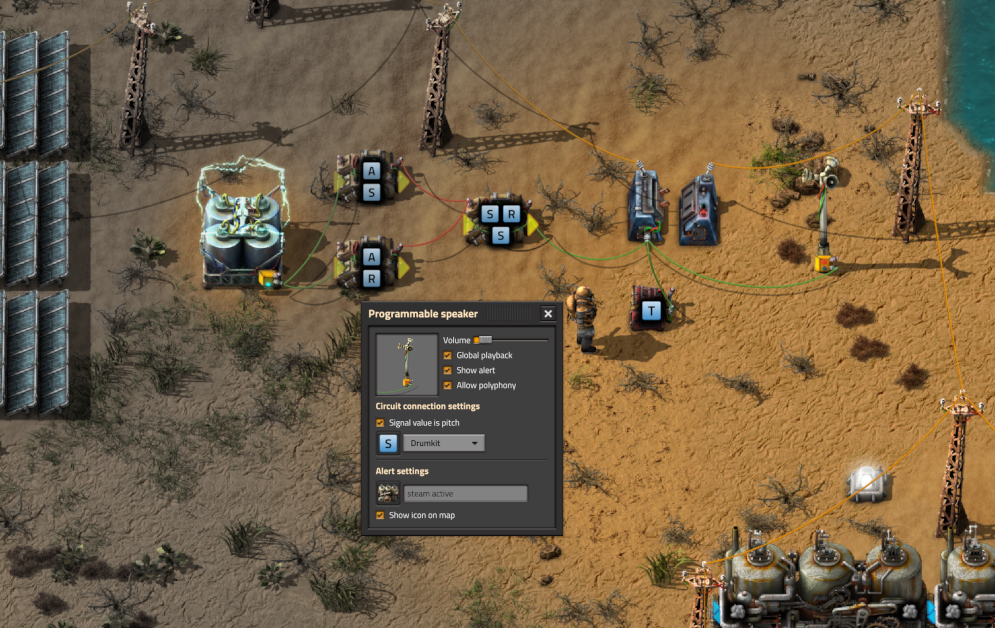
It makes a quiet rumbling noise while flashing a steam engine icon in the alert area. If you want to start smaller, this reasonably-balanced 9x9 block from the factorio wiki[wiki.factorio.com] is a good place to start:
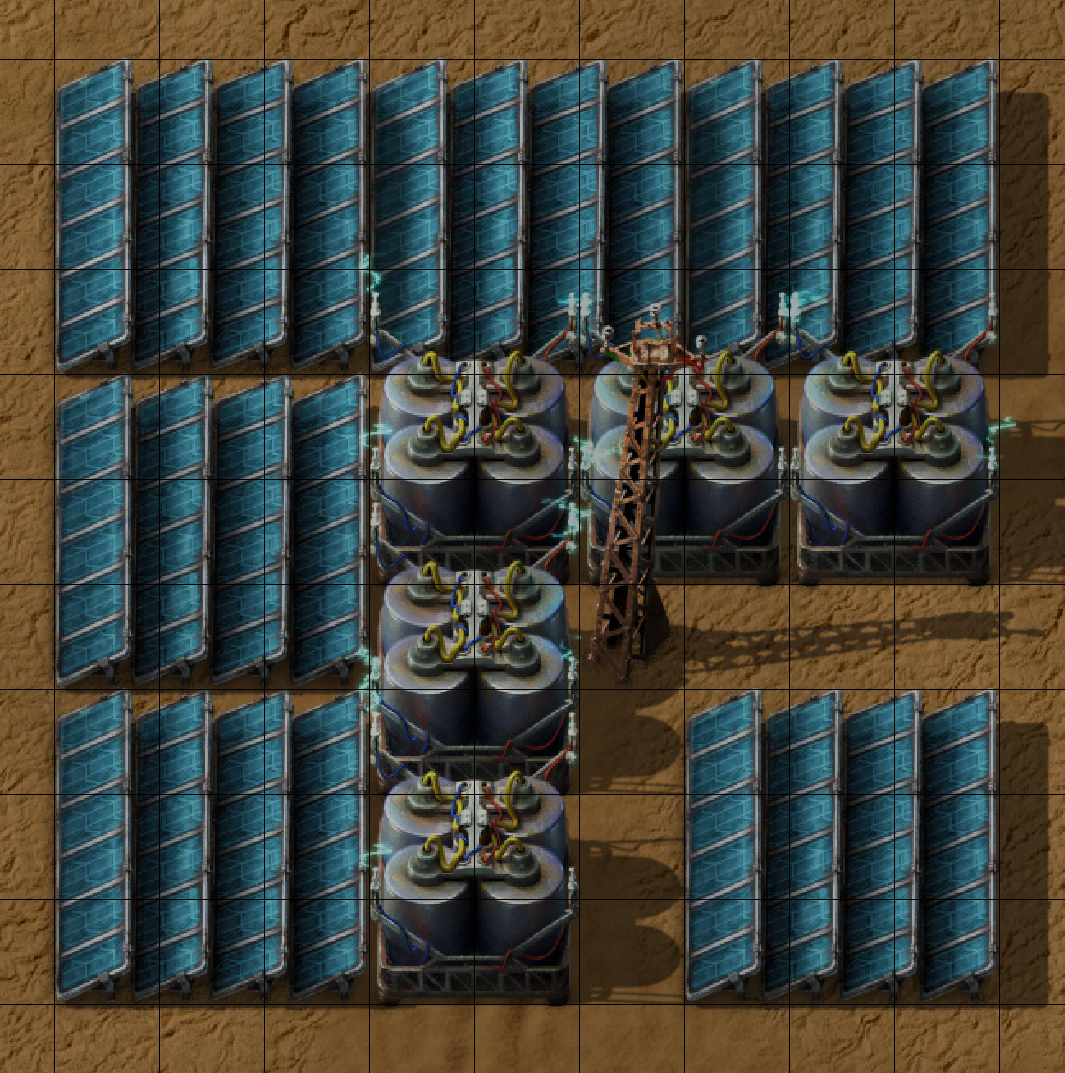
You gain access to solar panels before you have access to batteries. If you want to start using solar early, as a way to reduce pollution and coal consumption during the day, place the panels in the same shape but leave the accumulator spaces empty. Then, when you get batteries, you can just add them to the existing solar farm.
Tips: Managing Overproduction
In Factorio you generally try to over-produce everything. In some cases, such as oil refining, you want to balance production to ensure that your Petroleum Gas output doesn't halt because the Light or Heavy Oil outputs have backed up. In Space Age, generation of unwanted elements is a larger problem, but the game provides new mechanisms to manage them. For example, excess items can be thrown into space or lava, recycled out of existence, or burned for energy.
Managing production is easier with circuits. For example, a simple circuit can be used to disable Heavy Oil Cracking by adding a pump to the input and wiring it to a Heavy Oil storage tank:
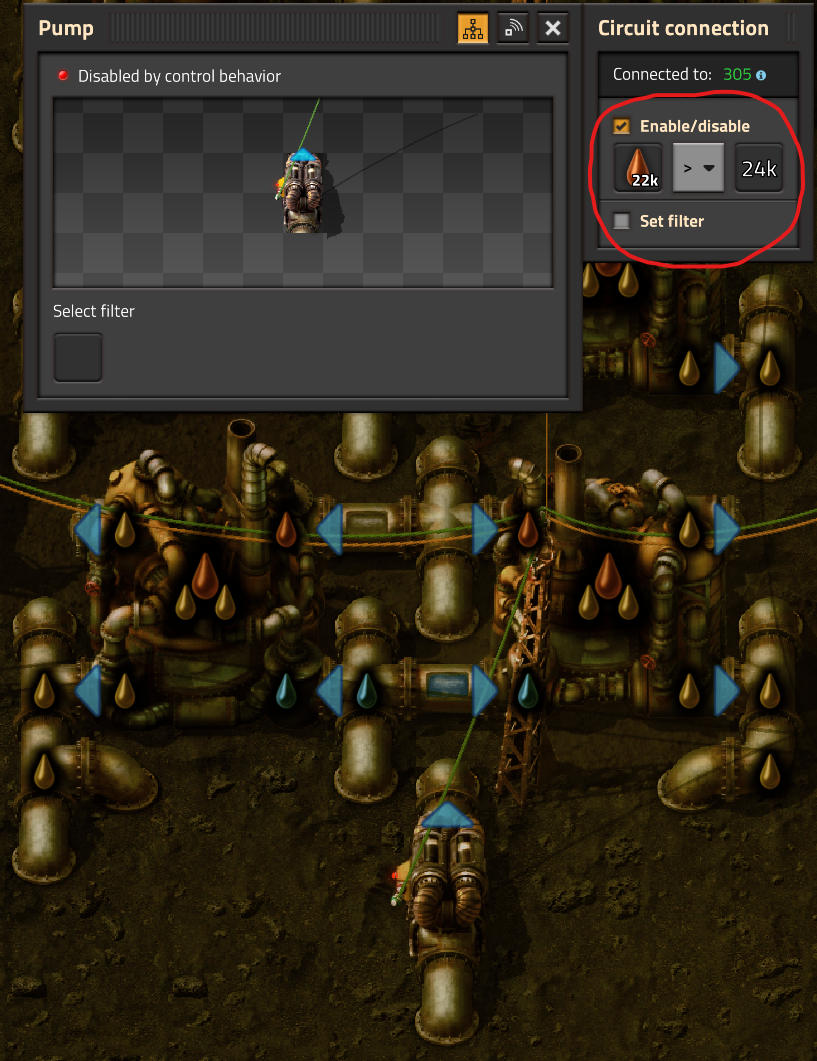
The pump is only enabled when the Heavy Oil tank is nearly full (24K out of 25K), which allows us to keep a stockpile of Heavy Oil, but convert it to Light Oil when it gets full. A similar circuit is used to manage the level of Light Oil.
On space platforms it can be useful to maximize asteroid collection and discard the excess. There are three different kinds of chunks, so if you put them on a mixed belt, or dump them all in the hub, you have to discard them selectively based on how many you have. This can be done with some simple circuits.
The first design uses a trio of inserters to remove excess materials from the hub, and put them on a discard belt.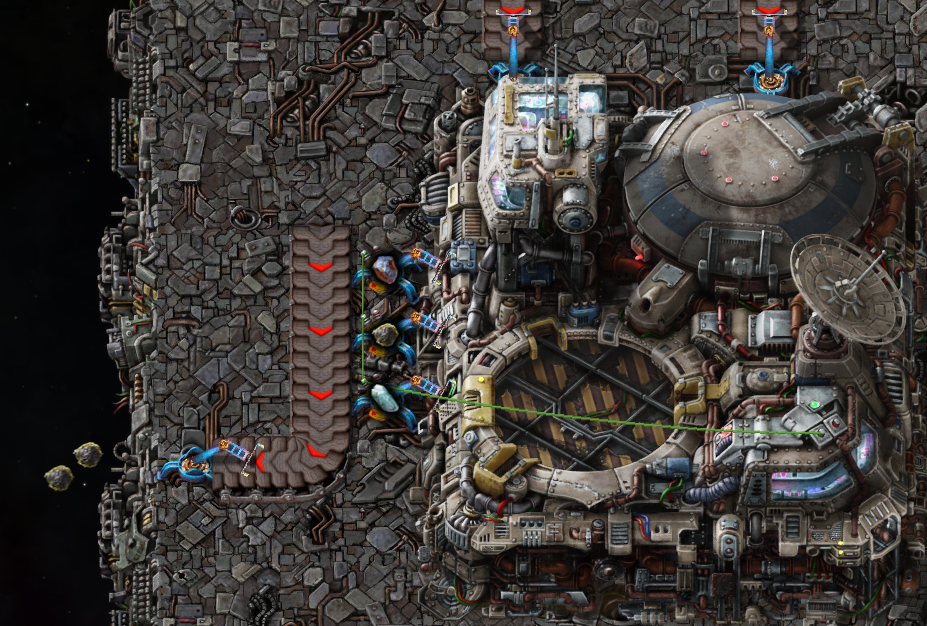
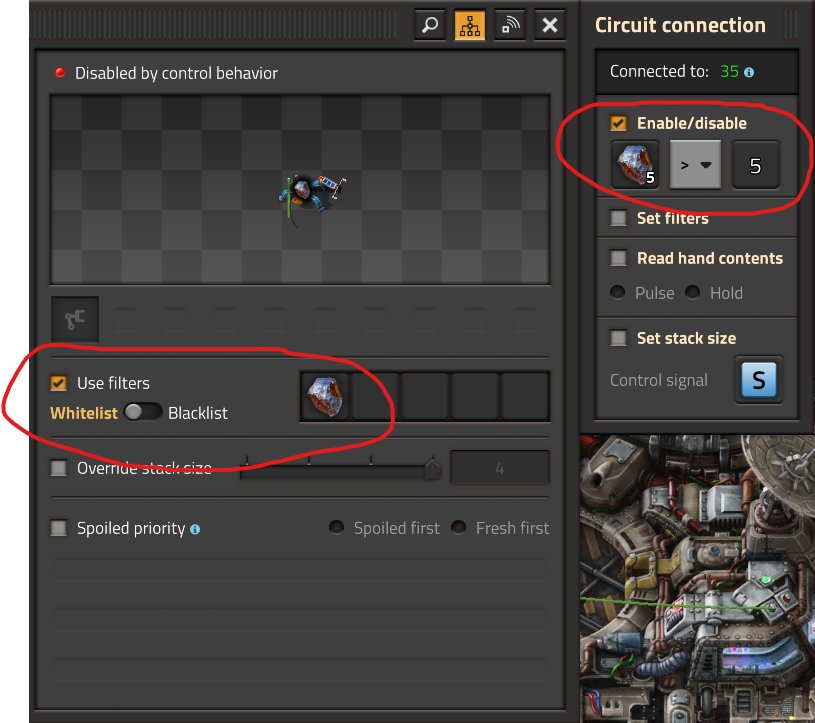
Each inserter is configured with a whitelist filter for one specific asteroid type, then wired to the hub (or daisy-chained to another inserter that is eventually connected to the hub). The hub provides a count of its inventory, so we can configure each inserter's circuitry to enable when more than (say) 5 of the specific type of asteroid are present.
Another way to do the same thing is to use a single inserter that is always enabled, but has a configurable whilelist filter. For this, we use a single inserter connected to a trio of Decider Combinators.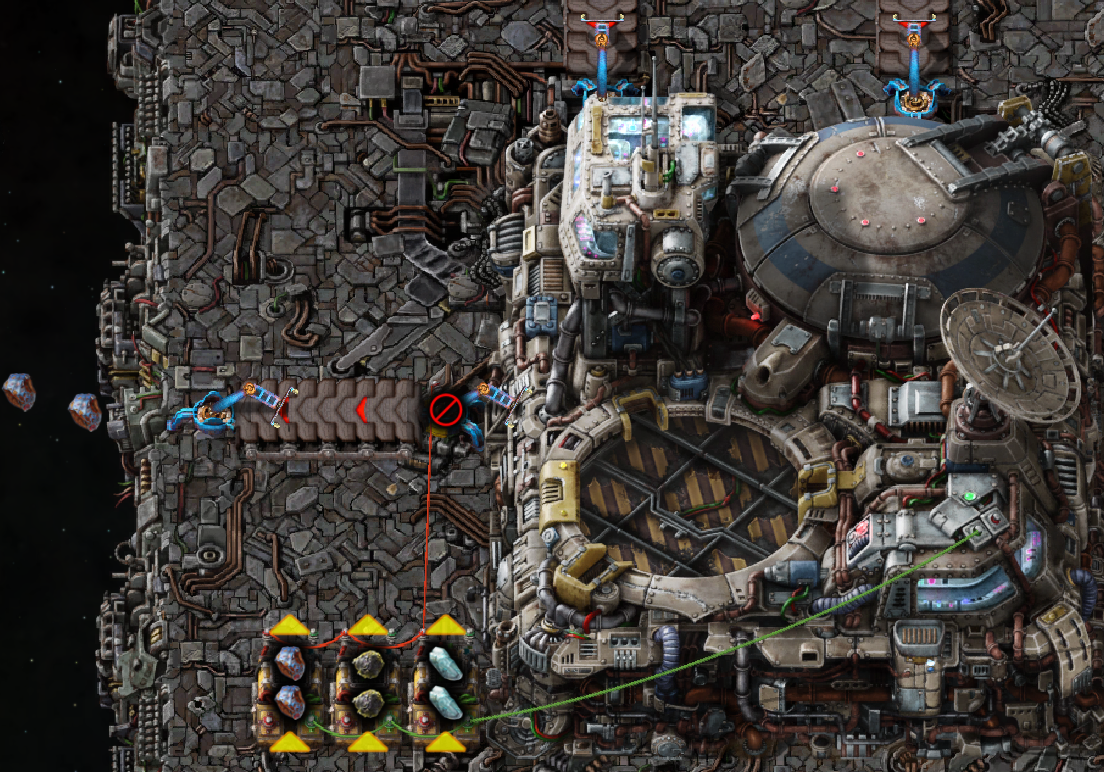
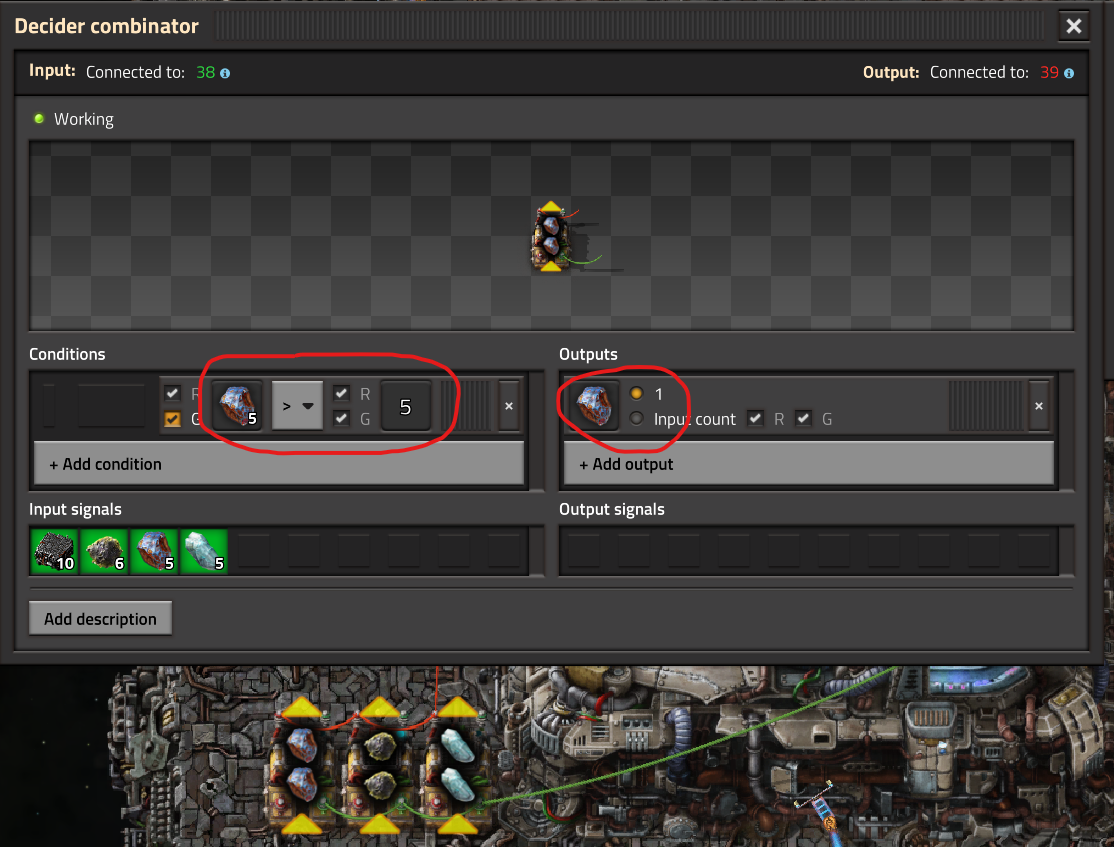
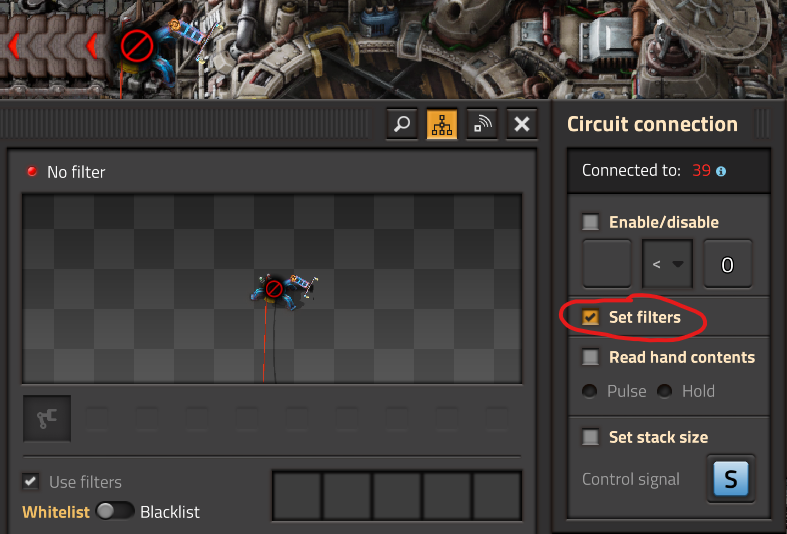
Each combinator reads the hub contents, and decides whether the number of a specific asteroid chunk type is greater than 5. If so, it outputs that chunk type. If not, it outputs nothing. The output is sent to the inserter, which uses "set filters" to put the items seen on the circuit network into its whitelist.
The same circuit design can also be applied to belts. Each square of belt can hold 4 items per side, which can make them a convenient way to store lots of asteroid chunks without using up space in the hub.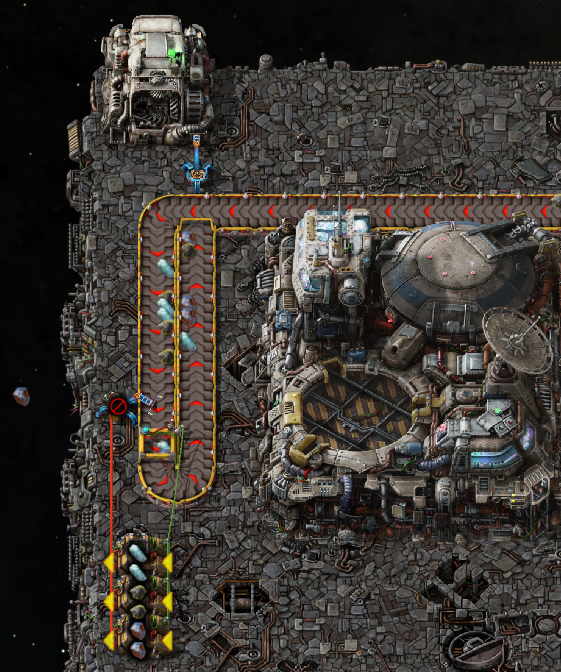
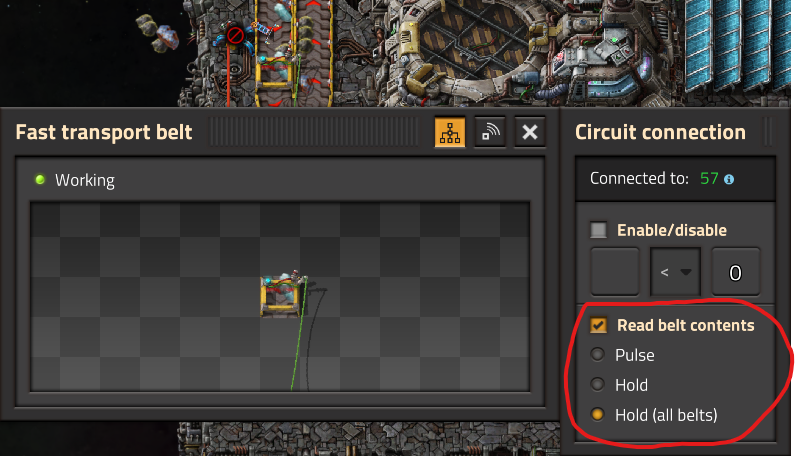
The trick here is to connect a wire between the combinator inputs and any square on the belt, and then configure it to read belt contents with "hold (all belts)". This provides the same output you get from the hub, but for the entire belt string (which gets a special yellow outline). With this arrangement, the asteroid chunks will circulate continuously around your platform.
The example here shows a trivial looped belt. In practice, a single belt string could run past all Collectors and all Crushers, feeding the entire platform. The circuit setup ensures that the belt never gets clogged with a single type of chunk. Belts with multiple different items are known as "sushi belts", because they're reminiscent of sushi restaurants that send food around on small boats.
Tips: Pest Control
There are many different ways to deal with the biters and spitters (collectively, "bugs") that periodically rush your walls. It's important to understand how they work.
Key facts about bugs:- Alien nests convert pollution into bugs. The more pollution you generate, the more bugs you get; but the more bugs you get, the more slowly your pollution border expands.
- Bugs are drawn to things that generate pollution. They don't always attack the nearest source, and don't necessarily move in a straight line.
- In the wild, bugs ignore things that don't generate pollution and aren't substantially in their way. Railroad tracks, belts, single power poles, underground pipelines, and very short sections of wall will be ignored as they rush toward their destination. They will run past parked trains. Once they get where they're going, though, they'll frenzy and start chomping on everything in sight.
- Military structures are a priority target for them. The entire group will immediately pivot and charge when they get close to a turret.
- Biters can hit two squares away, so you should put your guns behind a single wall with a one-square gap, or a double wall.
- Spitters can shoot over walls, but they pause briefly before spitting. If you have enough guns, you can take them out before they shoot.
You can safely run railroads, underground pipelines, and absurdly far-reaching belt networks without fear of them being torn up by bugs. Dense solar panel arrays are at risk if they get in the way. Sometimes bugs in the middle of a large group will get boxed in by their companions and attack small obstacles, including trees and rocks, but this shouldn't happen in open areas.
You don't have to make long double-walled stretches with continuous defenses. It's okay to have open sections so long as you have overlapping fields of fire, which you can see with a map overlay. Sparse clusters of turrets are more effective than widely spread individual guns, because you want as many guns firing simultaneously as possible.
Manage pollution. Less pollution means fewer attacks. The biggest polluters are boilers, mining drills, and coal-fired furnaces. Switching to solar power and electric appliances will help. Modules that reduce energy use also reduce pollution, so slapping some cheap level 1 Efficiency Modules into diggers and pumpjacks will cut pollution and reduce attacks on your mining outposts.
Map zoom. Something I didn't figure out until fairly far into my first game: you can zoom the map in fully wherever you have radar coverage. So when you get a flashing red alert, you can click on it to open the map, then zoom in to see the fight in progress, check the damage, see if your ammo supplies are running low, etc., all without having to investigate in person.
Make sure you have radar coverage across your base, your ore gathering facilities, and at any complicated railroad crossings.
Go easy on the lasers. They cause massive power consumption spikes. Even if you have ample power, a single disconnected power pole could disable an outpost's laser turrets. (Be wary of placing military buildings right next to long-haul power poles, as spitter AoE damage can destroy the poles.) It's prudent to mix projectile weapons in with lasers.
Eyes on the prize. Your goal is to always be at a place where you don't have to worry about every bug scratching at your walls, so you can focus on improving your factory. You can do this in one of two ways: (1) by having enough guns and construction robots to prevent or repair damage; or (2) by wiping out every nest inside the pollution cloud.
Option #2 is perilous and time-consuming until you have a tank with a flame thrower. Once you have that, you can just drive out to a nest in your speedy car, unfold the tank, add fuel and flamethrower ammo, drive through the nest while flaming anything that wiggles, then fold up the tank and move on to the next one. (If the Worms (turrets) are giving you trouble, throw Poison Capsules at them.) Until that point, it's best to focus on static defenses, only attacking nests that are in the way.
Each spawner you destroy increments the "evolution" counter slightly, so when clearing them it's best to focus on nests that are presently or will soon be threats.
Tips: Miscellaneous
A few assorted tips...
Pick your world carefully. When setting up a new game, use the "preview" button at the bottom to get a peek at the world you're about to inhabit. Make sure you have room for a broad path, preferably one that doesn't require you to spend time demolishing a forest right away.
Bring a car when you travel. Remember that you can "fold up" cars, tanks, and locomotives. Pick them up and take them with you when you reach your destination. If you want to travel the rail system freely, keep a locomotive in your inventory, and drop it on the tracks when you need to get somewhere. (But only if you have signals set up, so you don't crash into your ore hauler.)
Accessorize your late-game attire. Modules installed in modular and power armor remain there when you remove it, so you can have a "construction suit" with lots of personal roboports for working around the base, and a "combat suit" with shields and lasers that you wear when clearing alien spawners.
Over-produce iron and copper. Some ore sites have a lot of material in a small area, which is a problem because the mining drills produce ore at a fixed rate regardless of mineral density. Having mines at two sites means you can place twice as many drills and draw twice as much ore, without the overhead associated with modules and beacons.
Module mix. If you're adding production modules to things, bear in mind that adding a speed module may actually improve efficiency more than adding an efficiency module, because the overall energy cost per unit is lower. See e.g. this thread[forums.factorio.com] for some math.
Take your time. Figure it will take at least 40-50 hours to get your first rocket launched. Unless you're going for one of the time-based achievements, there's no rush.
No pets allowed. Biters are adorable and cuddly, but they have violent tempers and can chew through steel and concrete, so they make poor companions.- Factorio: How to Build a Main Bus★ 5 (6k)231k views15k ♥15 minUpdated Aug 31, 2025
- Factorio: Observations, Tips, Tricks, & Efficiency★ 5 (3.2k)111k views7.1k ♥85 minUpdated Aug 4, 2020
- Blueprints for early, mid and lategame (updated)★ 5 (757)83k views2.4k ♥3 minUpdated Sep 3, 2022
- Factorio - Everything To Do With Smelting: Belt & Bot Based★ 5 (629)80k views1.6k ♥16 min
- Factorio Builds★ 5 (1.1k)63k views2.7k ♥5 minUpdated Jun 7, 2021
- Factorio Compact Designs★ 5 (1k)61k views2.9k ♥7 minUpdated Nov 28, 2020


- Upgrading to PremiumTeam Fortress 2★ 5 (20k)1441k views11k ♥6 minUpdated May 11, 2022
- No More Room in Hell Official ManualNo More Room in Hell★ 5 (2.8k)569k views2.1k ♥29 minUpdated Apr 22, 2019
- NMRiH Community Hosting GuidesNo More Room in Hell★ 5 (526)351k views653 ♥1 minUpdated Aug 10, 2022
- ULTIMATE GUIDE FOR GAME DEV TYCOONGame Dev Tycoon★ 5 (5.8k)326k views10k ♥4 minUpdated 23 Jan, 2014
- How to 'Git Gud' Soon™MORDHAU★ 5 (2k)318k views3k ♥68 minUpdated Nov 16, 2024
- Лучшие кооперативные игры SteamPAYDAY 2★ 5 (1.5k)315k views2.1k ♥56 minRussianUpdated Apr 27, 2025






This guide was created by its original author on the Steam Community. Are you the author and want it removed? Request removal.