Launch F/A-18C Hornet
Cold start
There are two ways to perform the Hornet startup procedure. The first and easiest way is Auto Start. After pressing LEFT WIN + HOME, the airplane will start automatically. To terminate the autorun procedure, press the combination LEFT WIN + END.
The Hornet really reveals itself when you use detailed modeled systems, such as when manually launching an aircraft. In this brief tutorial, we'll skip the pre-flight checks and go straight to launching the airplane before it's ready to taxi.
- Set the BATTERY toggle switch to ON and make sure the left and right engine generator toggle switches are set to ON. (RIGHT CONSOLE).
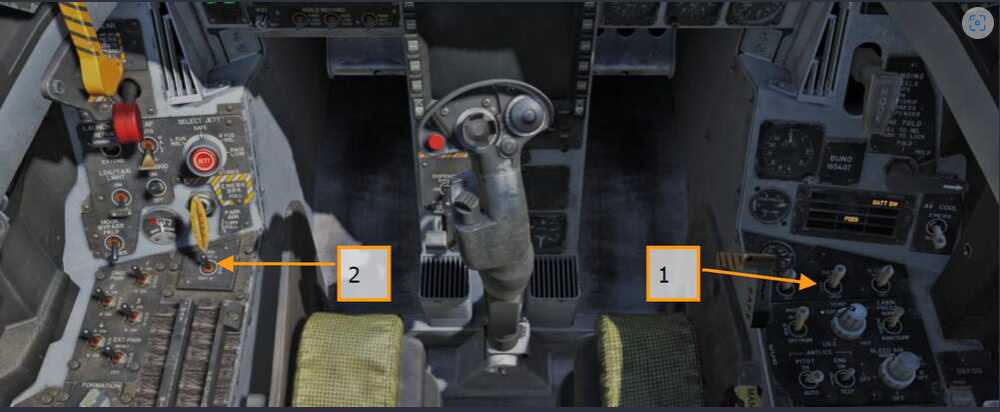 3. Set the APU toggle switch to the ON position and wait for the green APU READY lamp to illuminate. (LEFT CONSOLE)
- Turn the ENG CRANK toggle switch to the R position to start the right engine. (LEFT CONSOLE)
- Move the right hand throttle from OFF to IDLE position when the engine speed reaches 25% or higher (see IFEI). RSHIFT + HOME.
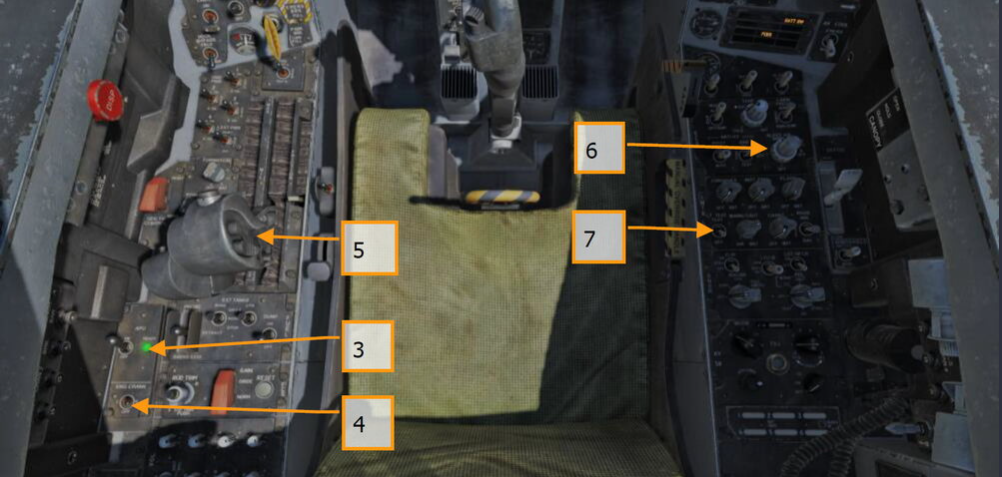 7. Set the LT TEST toggle switch to the TEST position to test the cab light indication. (RIGHT CONSOLE)
8. Turn on both MFDs, the CD and the ILC. On the left MFD, select the FCS screen and on the right MFD, select the BIT page. (INSTRUMENT PANEL)
7. Set the LT TEST toggle switch to the TEST position to test the cab light indication. (RIGHT CONSOLE)
8. Turn on both MFDs, the CD and the ILC. On the left MFD, select the FCS screen and on the right MFD, select the BIT page. (INSTRUMENT PANEL)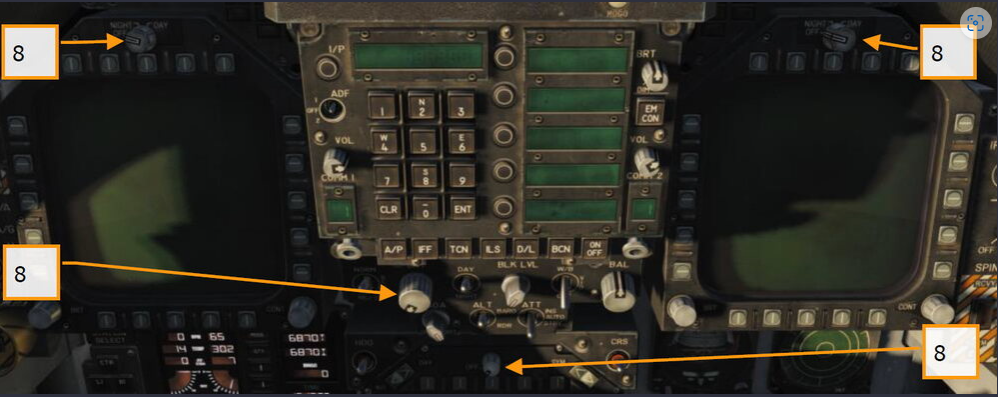 9. Configure COMM 1/COMM 2 radios according to mission requirements.
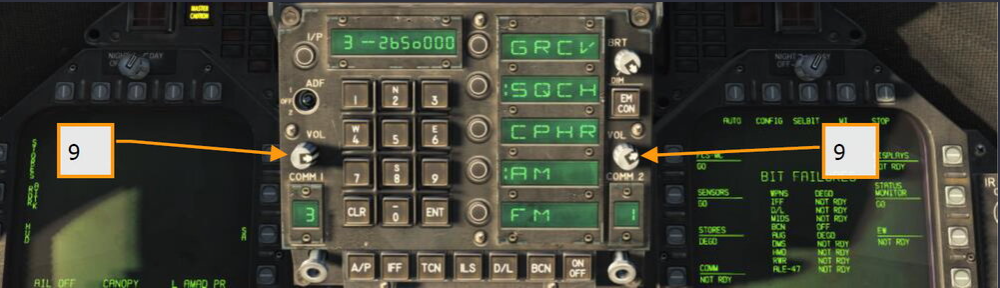 10. After verifying that the right engine has reached 63-70% RPM, temperature is between 190-590 degrees, fuel consumption is 420-900 lb/hr, flap position is 73-84%, and oil pressure is between 45-110 psi, set the ENG CRANK switch to L. (LEFT CONSOLE)
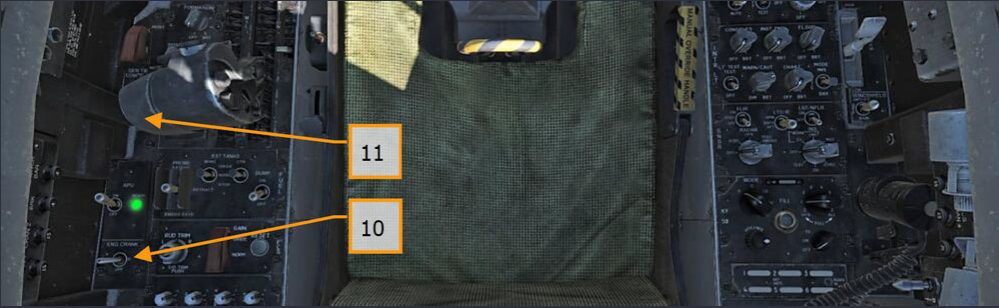 11. Move the left ore from OFF to IDLE when engine RPM is at least 25% by pressing the RIGHT ALT + HOME key combination. (ROADS.)
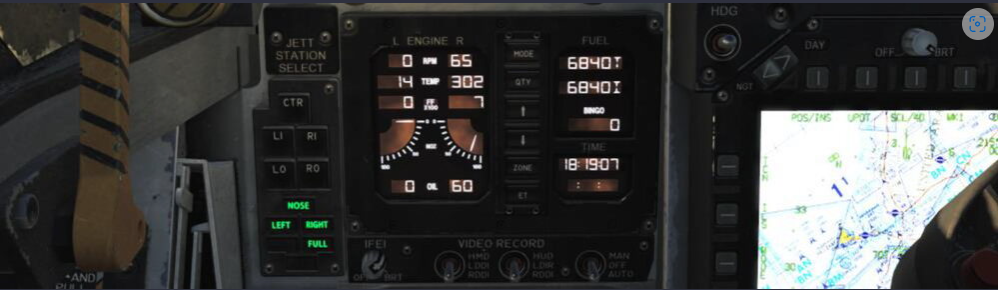 12. After the left engine is above 60% RPM, move the INS rotary switch to the GND (ground) or CV (carrier) position, depending on where the aircraft is located. (RIGHT CONSOLE)
13. Set the RADAR switch to the OPR (Operation) position. (RIGHT CONSOLE)
12. After the left engine is above 60% RPM, move the INS rotary switch to the GND (ground) or CV (carrier) position, depending on where the aircraft is located. (RIGHT CONSOLE)
13. Set the RADAR switch to the OPR (Operation) position. (RIGHT CONSOLE)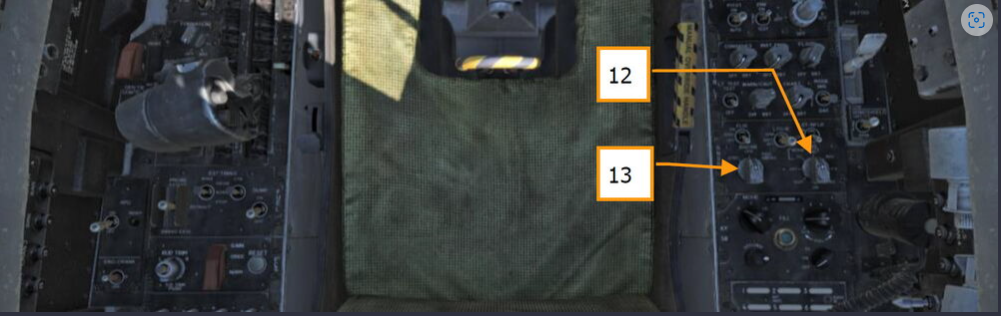 14. Set the OBOGS (oxygen generation system) switch and FLOW oxygen regulator to ON. (LEFT CONSOLE)
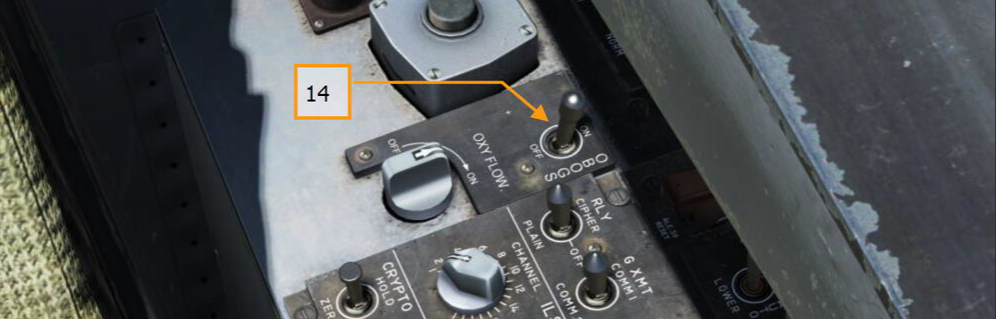 15. Press the FCS RESET button and monitor the FCS page on the left MFD(DDI) (the "X" characters should disappear). (LEFT CONSOLE)
- Set the FLAP toggle switch to the AUTO position. (LEFT VERTICAL PANEL)
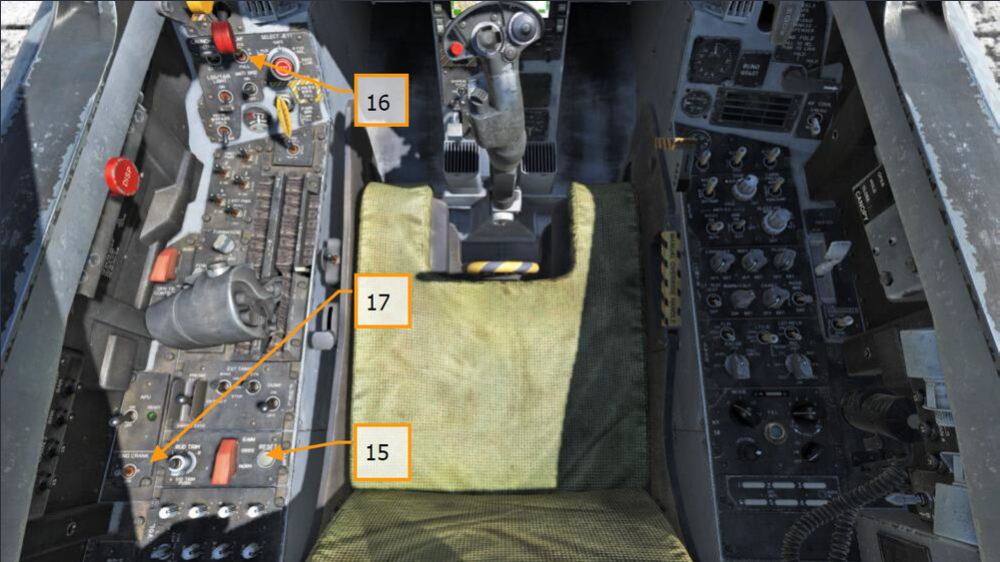 18. Hold the FCS BIT Y toggle switch on the right wall and simultaneously press the FCS function button on the right MFD (BIT / FCS page).
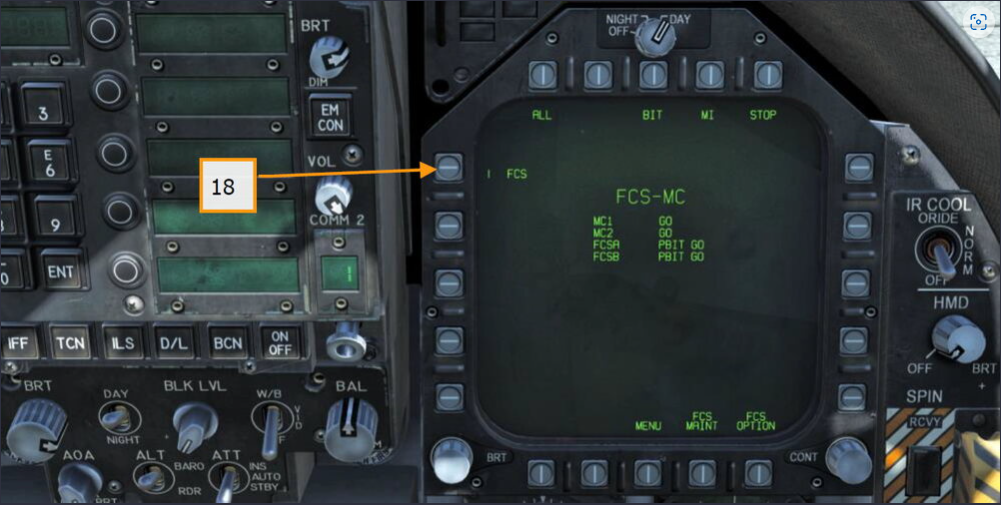 19. Perform the so-called "Four down test". Release the refueling boom, brake flap, throw boom, brake lug, turn on the ATC heater and set the flaps to HALF position. (LEFT CONSOLE, ROADS, LEFT VERTICAL PANEL, RIGHT VERTICAL PANEL, and RIGHT CONSOLE)
20. Left click on the parking brake handle to remove the brake.
19. Perform the so-called "Four down test". Release the refueling boom, brake flap, throw boom, brake lug, turn on the ATC heater and set the flaps to HALF position. (LEFT CONSOLE, ROADS, LEFT VERTICAL PANEL, RIGHT VERTICAL PANEL, and RIGHT CONSOLE)
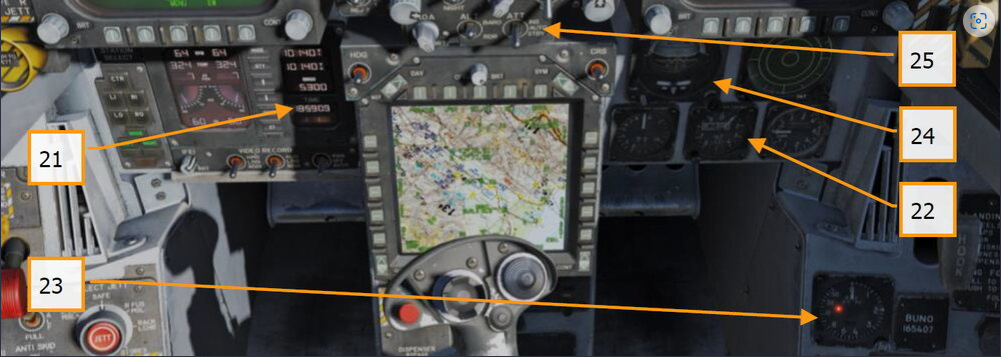
20. Left click on the parking brake handle to remove the brake.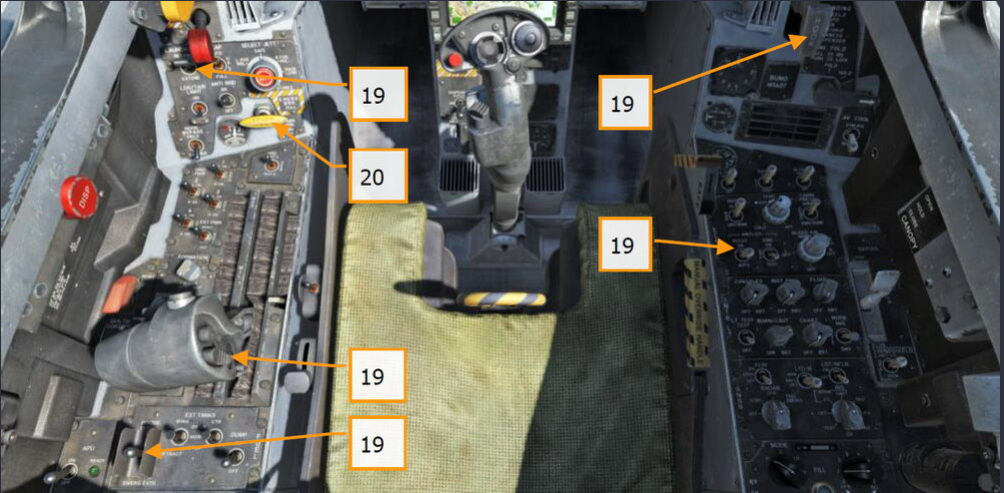 21. Set the value of the minimum remaining fuel (BINGO) required to return to base by pressing the up and down arrows on the PCDTA (IFEI). (LEFT INSTRUMENT PANEL)
- Set the aerodrome exceedance altitude on the backup barometric altimeter. (RIGHT INSTRUMENT PANEL).
- Set the hazardous altitude indicator on the radio altimeter to 200 feet for airfield takeoff or 40 feet for carrier takeoff. (RIGHT VERTICAL PANEL)
- Disarm the standby checkpoint. (RIGHT INSTRUMENT PANEL)
Steering
1. Whether you started the airplane following the above steps or started the mission in an already started airplane, your next step is to taxi to the runway. Slowly move the throttles forward PAGE UP and begin taxiing, using the pedals to make left Z and right X turns. Use the PAGE DOWN key to reduce engine thrust. Holding down the nose wheel control (NWS) key activates the NWS HI mode, allowing you to make smaller radius turns. Use the W key to brake.
- Open the CHKLST page on the left DDI and the FCS page on the right DDI.
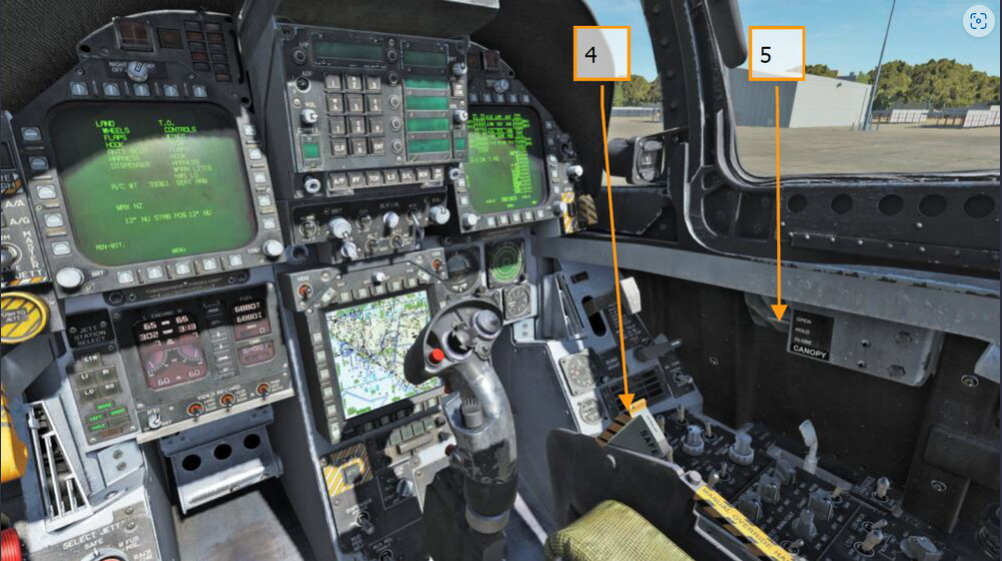 4. Activate the emergency egress system. (RIGHT CONSOLE)
- Close the lantern (if you have not already done so). LCTRL-C
- On the left DDI, open the HUD page. (LEFT DASHBOARD)
Taking off from the airfield
1. Align the aircraft to the center of the runway and drive forward to set the nose wheel in the direction of the runway.
- Open the HUD page on the left DDI.
- Move the throttles forward to the full afterburner position.
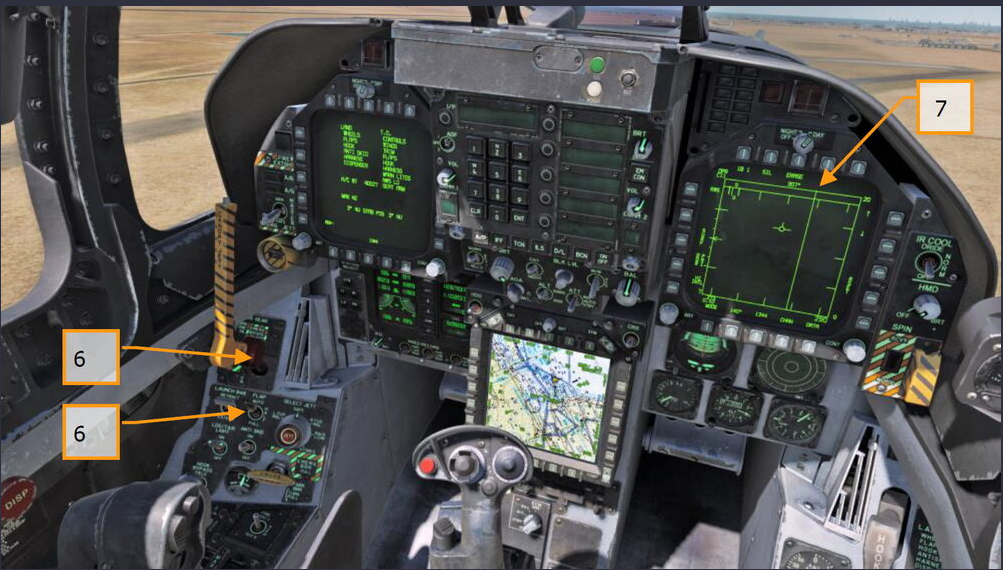 5. At the front landing gear strut breakaway speed, pull the throttle control toward you, setting the pitch angle to 6-8 degrees (W icon above the horizon line on the HUD).
- After achieving a stable climb, retract the landing gear and set the flap control toggle switch to the AUTO position.
- Open the RDR ATTK air-to-air page on the right DDI.
Taxiing on the deck of an aircraft carrier
After completing the launch procedure, your next task is to taxi to the carrier catapult thrower. The main difference between the airfield and carrier launch procedures is the setting of the INS alignment switch to the CVN position (in the case of a carrier launch).
Slowly move the PAGE UP throttles and perform taxiing, using the Z button to turn left and the X button to turn right. Reduce the thrust of the engines using the |PAGE DOWN| button. With the wing consoles folded, briefly press the Nose Wheel Steering (NWS) button to activate the NWS HI S mode, which allows you to increase the nose strut turn angle. Pressing the W button applies the wheel brakes.
On the left MFD, open the Control Chart page (CHKLST), on the right MFD, open the FCS page.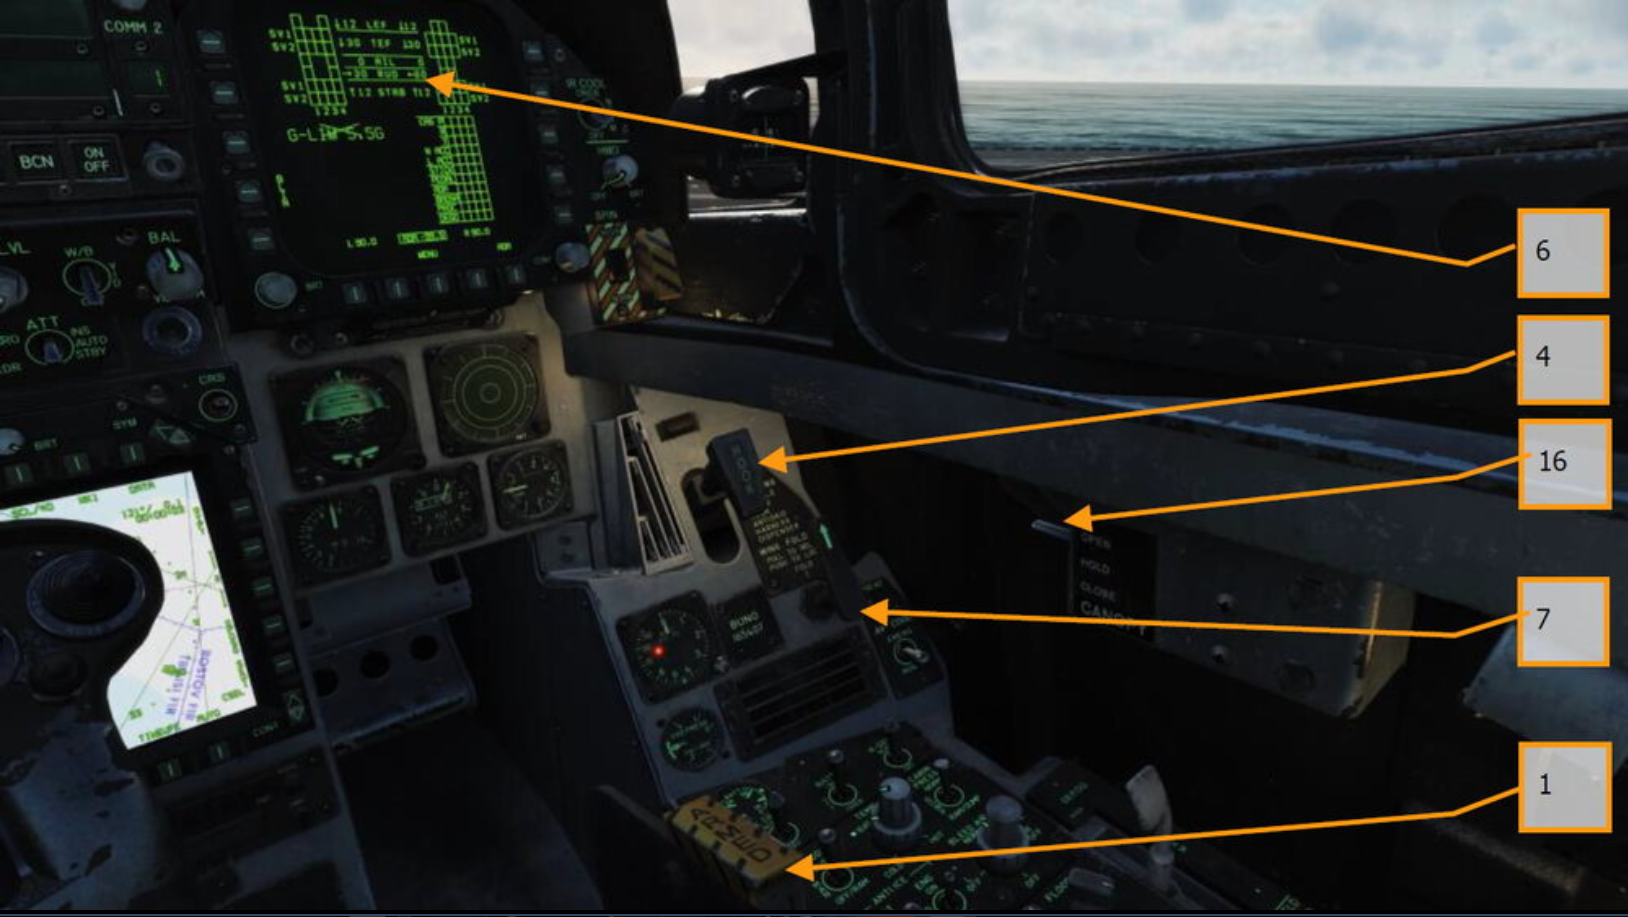 Before taxiing, perform the check according to the check charts:
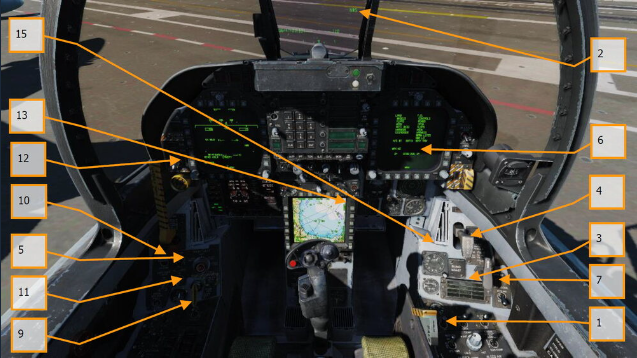 1. Place the emergency ejection mechanism on the cocking lever (RIGHT CONSOLE)
- Check that the NWS front strut control system is ready.
- Verify that no warning lights are illuminated.
- Check that the brake lug is raised.
- Set the mechanization to HALF mode.
- Trim stabilizers according to takeoff weight.
- Verify the position of the wing consoles according to the console control knob.
- Turn on the oxygen supply.
- Verify the brakes are disengaged.
- Verify that the throwing rod is retracted.
- Check that the anti-thrust machine is disengaged.
- Verify that the RMS switch is in the SAFE position.
- Use the central MFD to select navigation point 1.
- Ensure that the jamming stations are turned off.
- Set the hazardous altitude warning on the radio altimeter to 40 feet.
- Close the cockpit lantern if you have not already done so. LCTRL-C.
- Flip the main exterior light control switch to down.
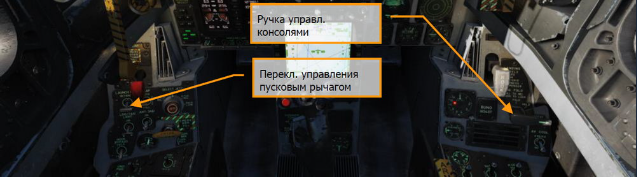 Slowly steer forward behind the throttle shoe and align the nose stand along the catapult guide. When the nose wheel is behind the launch shuttle shoe, lower the throw boom. Then, press the U button to follow the procedure to automatically engage the boom with the hook of the shoe.
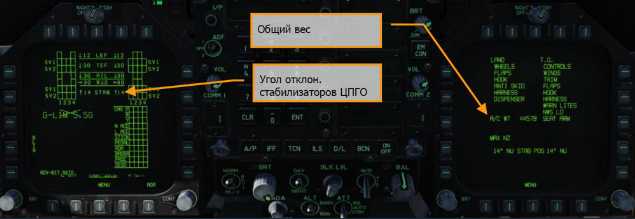
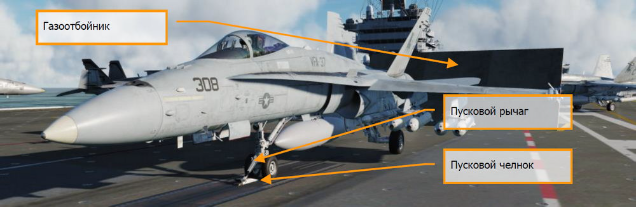 After connecting to the catapult shuttle, trim the CPGO (STAB) with the trimmer nipple to account for the total weight of your airplane. The total weight of the airplane is displayed on the CHKLST page. Using the trimmer nozzle, set the CPGO as follows:
Aircraft weight less than 44,000 pounds = trimmer angle of 16° (takeoff at maximum no-force or afterburner)
After connecting to the catapult shuttle, trim the CPGO (STAB) with the trimmer nipple to account for the total weight of your airplane. The total weight of the airplane is displayed on the CHKLST page. Using the trimmer nozzle, set the CPGO as follows:
Aircraft weight less than 44,000 pounds = trimmer angle of 16° (takeoff at maximum no-force or afterburner)Aircraft weight between 45,000 and 48,000 pounds = trim angle of 17° (takeoff at maximum no-force or afterburner)
Aircraft weight 49,000 lbs. or more = trim angle 19° (takeoff in FORCEAGE mode only)
 [/previewimg]
[b]After trimming (you can observe the trim angles on the FCS and CHKLST page) the stabilizers, you will be ready for the takeoff procedure.[/bAfter trimming (you can observe the trim angles on the FCS and CHKLST page) the stabilizers, you will be ready for the takeoff procedure.
[/previewimg]
[b]After trimming (you can observe the trim angles on the FCS and CHKLST page) the stabilizers, you will be ready for the takeoff procedure.[/bAfter trimming (you can observe the trim angles on the FCS and CHKLST page) the stabilizers, you will be ready for the takeoff procedure.Taking off from an aircraft carrier
Turn the throttle controllers to 100% and remove your hand from the throttle control.
The catapult will launch and the airplane will take off.
After achieving a stable climb, retract the landing gear G and set the flaps to AUTO F.
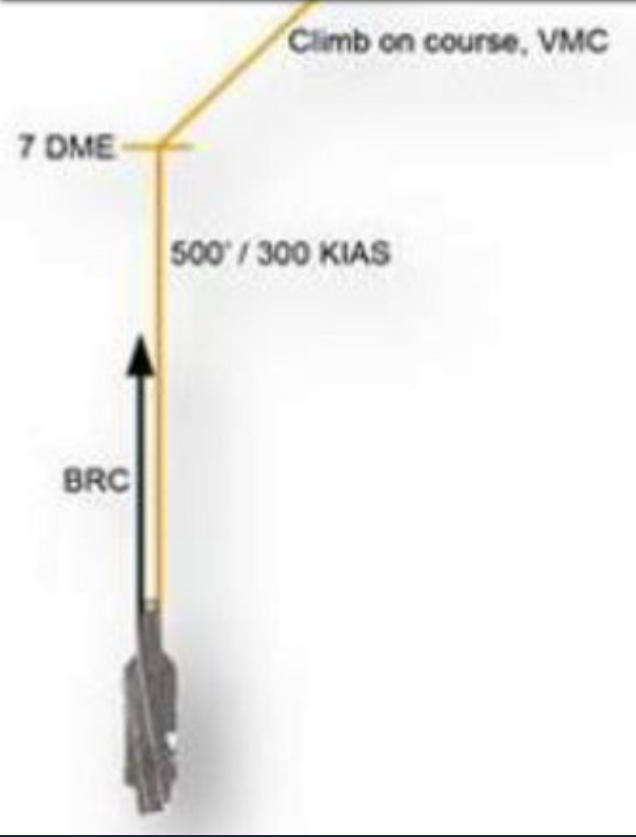
If taking off from catapults #1 or #2 (forward catapults), after takeoff, perform a safety maneuver to the right and depart the aircraft carrier at a heading angle equal to the aircraft carrier's landing course at a range of 7 miles and at an altitude no higher than 500 feet at a speed of 300 knots. If taking off from catapults #3 or #4 (corner deck), the safety maneuver is performed to the left.
 On the right MFD, open the A/A radar page.
Landing on an aircraft carrier in simple weather conditions
Open the radar page on the right MFD (RDR ATTK) and the HUD page on the left MFD.
Enter the NAV navigation mode (by disengaging the A/A or A/G buttons) and set the Master Arm switch (HUD switch) to the SAFE position (LEFT instrument panel). Release the brake lug by pressing the H button and switch the type of altitude displayed on the ILS to RADAR.
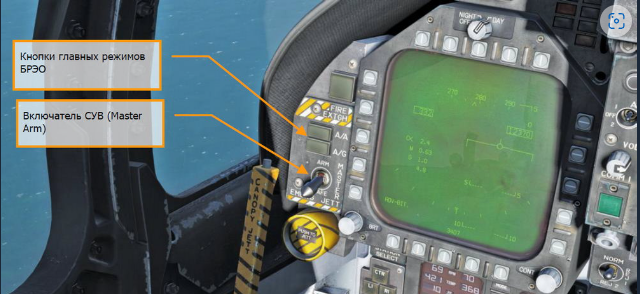 A Case I landing circle approach is made from the holding area (a circular area 5 miles in diameter at an altitude of 1,500 to 5,000 feet above the aircraft carrier) or from a straight line corresponding to the base landing course. In this manual, we will cover a base landing course approach.
Make an approach to the aircraft carrier from aft at 800 feet at a speed of 350 knots. Pass the carrier to starboard at a range sufficient to view the carrier deck and ensure that the landing deck is clear.
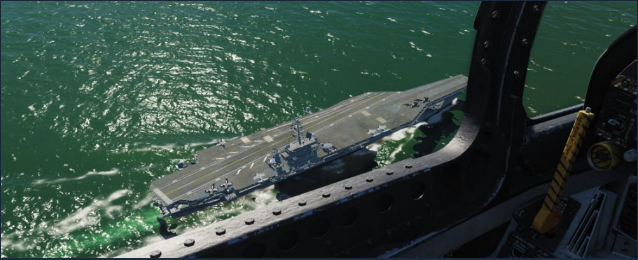 After passing the bow of the aircraft carrier, at a range of no more than 1.5 miles, execute a turn on a course opposite to the landing course (180° to the left).
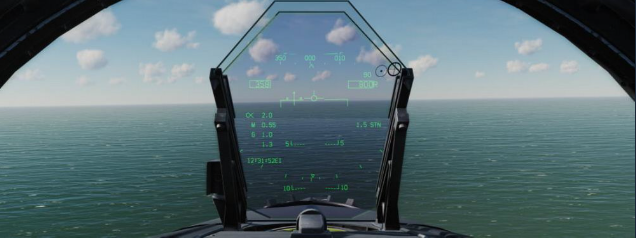 Use the "1% rule" to make turns with a minimum and safe radius. That is, perform the turn with an overload numerically equal to 1% of your speed. For example, 350 knots - overload equals 3.5 G. Complete the turn at 600 feet on a course opposite the base landing course. If your speed when completing the turn is higher than 350 knots, you may release the brake pad for a while until your speed is reduced to 250 knots. At a speed of 250 knots or less, release the landing gear G and set the mechanics to the FULL Left Ctrl + F position.
- How To Setup Controls and Joystick★ 5 (505)39k views1.1k ♥12 minUpdated Aug 18, 2015
- F-15C Eagle Beginners Guide★ 5 (921)29k views1.6k ♥12 minUpdated Sep 13, 2019
- Xbox One Controls for DCS: World★ 5 (359)22k views757 ♥6 minUpdated Sep 12, 2022
- Su-25T : Weapon Specifications List / Other useful information★ 5 (615)18k views1k ♥10 minUpdated Jul 11, 2015
- How To: DCS World Beginner Basics★ 5 (167)13k views389 ♥16 minUpdated Feb 22, 2021
- DCS: A-10C Easy Guide and Basic Concepts★ 5 (296)13k views633 ♥11 minUpdated Sep 4, 2014



- Upgrading to PremiumTeam Fortress 2★ 5 (20k)1441k views11k ♥6 minUpdated May 11, 2022
- No More Room in Hell Official ManualNo More Room in Hell★ 5 (2.8k)569k views2.1k ♥29 minUpdated Apr 22, 2019
- NMRiH Community Hosting GuidesNo More Room in Hell★ 5 (526)351k views653 ♥1 minUpdated Aug 10, 2022
- ULTIMATE GUIDE FOR GAME DEV TYCOONGame Dev Tycoon★ 5 (5.8k)326k views10k ♥4 minUpdated 23 Jan, 2014
- How to 'Git Gud' Soon™MORDHAU★ 5 (2k)318k views3k ♥68 minUpdated Nov 16, 2024
- Лучшие кооперативные игры SteamPAYDAY 2★ 5 (1.5k)315k views2.1k ♥56 minRussianUpdated Apr 27, 2025






This guide was created by its original author on the Steam Community. Are you the author and want it removed? Request removal.