Oblivion Essentials Setup Guide (2026)
☆ Please Read
(The link will be added here when it's done)
This guide was made to help newcomers and veterans setup a stable, bug-free installation of Oblivion in the simplest way possible without altering the vanilla experience of the original game.
- Requirements: Sections or mods are marked with a "☆", are required, do not skip these.
- Questions: Please provide information about the issue and what you've done to try and solve it. (Don't flood the mod authors with comments)
- Help: Check the Guide Notes / F.A.Q Sections at the bottom for extra tips and help.
☆ Requirements & Setup
(Do not skip)
▹ (This guide is made for these, I will not be supporting anything else.)
- Oblivion Game of the Year Edition
Steam Version, for playing, lol.
▹ (Other versions will not be supported by this guide) - A Nexusmods Account[nexusmods.com]
Large modding website and community for many games.
▹ (Account required for downloading mods) - Mod Organizer 2[www.modorganizer.org]
A mod management software, makes organization much easier.
▹ (Other Mod Managers will not be supported by this guide) - BethINI[www.nexusmods.com]
Program for editing game .ini files easily.
▹ (Can be done manually, if you know what you're doing)
- Install Oblivion Game of the Year Edition on Steam (a clean, unmodded install)
- Open the game through Steam at least once, when the main menu loads, you can close it.
- Download and install the latest version of MO2.
(Do not install in Program Files or any location that is UAC protected) - In the top left, click File > Manage Instances > Create New Instance.
- Select Create a Global Instance > Oblivion.
- Choose a location where you'd like all of the mods and downloads to be stored.
- In “Configure Profile Settings” select Automatic Archive Invalidation.
- Next, select a location where you'd like all of the mods to be stored.
(This can be a separate drive if you want, I’d recommend an SSD.) - (Optional) Check the Notes Section to get Steam's Overlay working with MO2.
- Download and Extract the Main File, open BethINI.exe
- Choose Game > Oblivion
- In the Basic Tab, select "BethINI Presets" and "Recommended Tweaks".
- In the Setup Tab, make sure “INI Path” is set to the default location
(Default Location: “C:\Users\USERNAME\Documents\My Games\Oblivion”) - (Optional) You can go through each of the tabs and set your preferences accordingly.
- Once finished, Click Save and Exit.
(Example below)
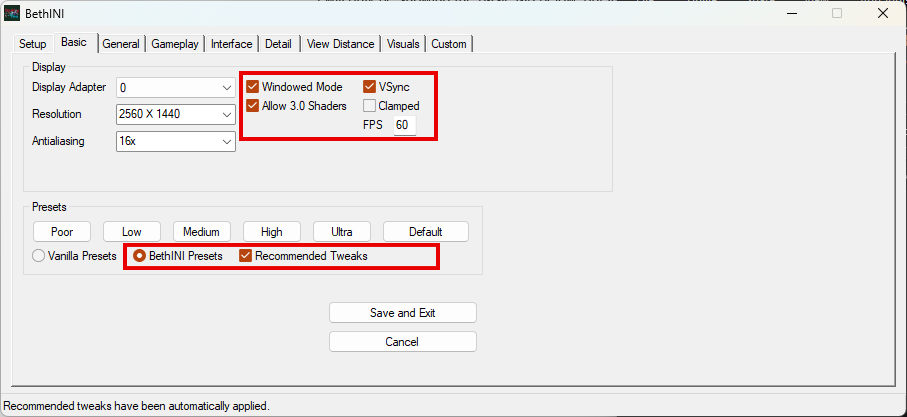
- Enabling Windowed Mode will fix common crashing issues when using Alt+Tab.
- V-Sync is optional, its buggy by default, but we will be using a mod that will fix most of its issues.
- Do not change options you don't understand, please.
☆ Essentials
(Do not skip)
▹ IMPORTANT: Skip this if you are somehow still using a 32-bit system. (See Further Notes)
- Download and extract the latest 4gb_patch.exe to your Oblivion Directory.
- Open the patch and apply it to both Oblivion.exe and OblivionLauncher.exe
(It will create backup files of both, I'd recommend keeping them just in case)
- Download the Main File and install manually.
- Extract Data and obse.dll into your Oblivion Directory.
(Merge files if asked) - (Optional) If you plan to use Construction Set, also extract obse_editor.dll and obse_loader.exe into your Oblivion Directory.
- Download the Main Files for each mod and install with MO2.
(Make sure to get all three)
Unofficial DLC Patches[www.nexusmods.com]
Unofficial Shivering Isles Patch[www.nexusmods.com]
- Download the Main File and install with MO2.
- To edit the .ini file, Right click Oblivion Display Tweaks > Information.
- In INI Files Tab, set the values below in oblivion_display_tweaks.ini
- iMaxFPSTolerance= (Set this value to your maximum FPS + 60)
- bUseD3D9Ex = 1 (Set to “0” if you plan to use ENB)
- bUseFlipExSwapMode = 1 (If you use G-SYNC / FreeSync)
- Download the Main File and install with MO2.
- Download the Main File and install with MO2.
- Download the Main File and install with MO2.
▹ (Alternative to Oblivion's autosave feature, which is known to cause crashes / file corruption)
- Download the Main File and install with MO2.
▹ (Fixes common issue where the dropped item will fall through the ground)
- Download the Main File and install with MO2.
▹ (Makes XP gain relate to the amount of item sold rather than amount of transactions)
- Download the Main File and install with MO2.
▹ (I saw a slight reduction in load time, but if you don't notice a difference, you can omit this mod)
- Download the Main File and install with MO2
▹ (I've never had this issue, so if you don't either you can omit this mod)
- Download the Main File and install with MO2
◌ OPTIONAL (Gameplay)
(Recommendations / Suggestions)
▹ (Total HP is no longer only based solely on Endurance level)
- Download the Main File and install with MO2.
▹ (Makes combat more rewarding and balanced without changing any mechanics.)
- Download the Main File and install with MO2.
(Optional) Can be tweaked via VanillaCombatEnhanced.ini
▹ (Makes magic more balanced and less tedious without changing any mechanics.)
- Download the Main File and install with MO2.
▹ (Effectively increases the annoyingly low maximum charge in vanilla)
- Download the Main File and install with MO2.
(Optional, can be tweaked via More Effective Enchantments.ini)
▹ (Balances loot drops and quest rewards to be more fair)
- Download the Main File and install with MO2.
▹ (Balances creature levels and stats to scale better during progression)
- Download the Main File and install with MO2.
▹ (Balances NPC difficulty with level caps, and alters loot based on difficulty)
- Download the Main File and install with MO2.
▹ (Random container items are no longer "free", taking them will be a crime)
- Download the Main File and install with MO2.
▹ (Locations now need to be discovered before fast travel, personal preference)
- Download the Main File and install with MO2.
◌ OPTIONAL (Quality of Life)
(Recommendations / Suggestions)
▹ That's all, removes the tedious delay between hours.
- Download the Main File and install with MO2.
▹ That's all, less waiting during quests with NPCs.
- Download the Main File and install with MO2.
▹ (Similar to how Skyrim works)
- Download the Main File and install with MO2.
▹ (Similar to how Skyrim works)
- Download the Main File and install with MO2.
▹ Simple tweaks to the vanilla UI proportions, mainly
- Download the Main File and install with MO2.
▹ (No more 1000 keys cluttering up the misc section)
- Download the Main File and install with MO2.
▹ (No more “How many would you like to take/sell” for a stack of two items)
- Download the Main File and install with MO2.
▹ (Can only be used for fast-travel once discovered.)
- Download the Main File and install with MO2.
▹ Example: Quest map marker is still shown, but won't reveal exact specific location of objective.
- Download the Main File and install with MO2.
◌ Guide Notes
▹ (For reference I've provided the load order I am using below)
- In the Right side pane of MO2 , Open the Plugins tab
- From here, you can click and drag each plugin file to reorder them
(Note: Plugin files are loaded from top to bottom)
▹ (If the Steam Overlay doesn't matter to you, this can be skipped)
- In the Top Menu > Configure Executables
- In the Executables List > Oblivion > Configure Libraries
- Click Add Row > Browse > Select GameOverlayRenderer.dll from your Steam Directory
(Usual Location: “C:\Program Files (x86)\Steam”) - Tick the box > OK
(Example below)
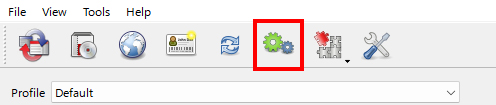
↑ MO2's Top Menu
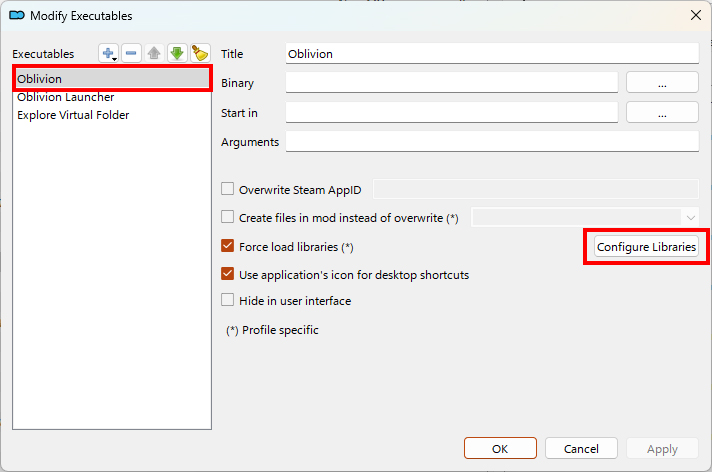
↑ Configure Libraries for Oblivion.exe
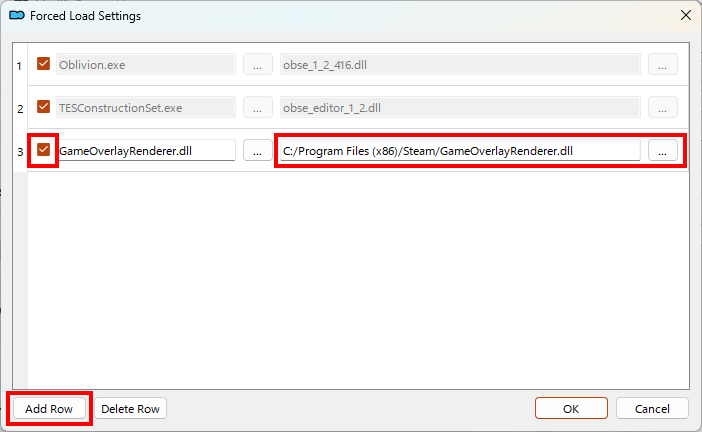
↑ Add entry for GameOverlayRenderer.dll
- Other than the Essential Mods, the list is meant to be semi-modular. So if you don't want some or even any of the Additional Mods, you don't have to use them, they are merely suggestions.
- If you choose to only use the Essential Mods, this list can be used as a good base for adding whatever you want on top. (Be sure to check for compatibility first)
- As for the Additional Mods, I picked these specifically for this guide as they fix some of the common oversights and balance issues in the game.
Overall, they don't change the feeling or function of the vanilla gameplay, they will simply make the experience a bit more balanced and rewarding.
◌ The End

⠀⠀⠀⠀ (I will try to keep the list updated, if anything changes let me know in the comments.)
▹ Where I post mods and such, mostly Fallout 4 related stuff. Steam Profile
▹ My Steam, not really important I guess.
- Keep this guide updated
- Nexusmods / Git page for better organization
- Provide pre-configured .ini files(?)
◌ F.A.Q & Resources
- The Vanilla Experience Load Order[loadorderlibrary.com]
- Information about the 4GB Patch and what it does[en.uesp.net]
- Microsoft Docs on LAA[learn.microsoft.com]
- Troubleshooting for MO2[github.com]
- Running xOBSE with MO2[github.com]
Q: Who is this guide meant for?
Anybody! It’s meant to be as simple as possible, and since it doesn’t touch the game’s major mechanics or features, it would be fine for a newcomer to use as well.
Q: Do I need the 4GB Patch?
Technically no, but there's no reason to not use it for 64bit users.
Oblivion is limited to using ~2GB of memory since its a 32bit application, the patch effectively raises it to ~4GB by making it Large Address Aware (See notes)
Q: Why not make a Nexus Collection or Wabbajack List?
This guide should take no more than 10-15 minutes from start to finish, so it’s hardly necessary. (Plus, it is good to learn the basics of modding yourself)
Q: Does this list overhaul the gameplay or mechanics?
No, it fixes issues and improves performance and stability, mainly for playing on modern hardware.
Q: What about the "Additional" sections?
They are entirely optional, I specifically chose them because they aren’t overhauls, they mainly fix bugs and oversights with gameplay and mechanics, or are just quality of life improvements.
- Essential Mods List★ 5 (1.1k)90k views3k ♥6 minUpdated Jun 7, 2022
- Almost Essential Mods★ 5 (1.2k)84k views2.5k ♥1 minUpdated Jan 16
- 1,200 Hours Played; What you NEED to know in Oblivion.★ 5 (1.2k)65k views2.3k ♥7 minUpdated Apr 25, 2025
- Русификация Oblivion + все DLC★ 5 (1.6k)65k views2.6k ♥1 minRussianUpdated Feb 23, 2025
- Oblivion 2024 Essential Modding Guide★ 5 (457)48k views1.5k ♥42 minUpdated Apr 25, 2025
- Quest Orders★ 5 (664)40k views1.3k ♥1 minUpdated May 26, 2020



- Upgrading to PremiumTeam Fortress 2★ 5 (20k)1441k views11k ♥6 minUpdated May 11, 2022
- No More Room in Hell Official ManualNo More Room in Hell★ 5 (2.8k)569k views2.1k ♥29 minUpdated Apr 22, 2019
- NMRiH Community Hosting GuidesNo More Room in Hell★ 5 (526)351k views653 ♥1 minUpdated Aug 10, 2022
- ULTIMATE GUIDE FOR GAME DEV TYCOONGame Dev Tycoon★ 5 (5.8k)326k views10k ♥4 minUpdated 23 Jan, 2014
- How to 'Git Gud' Soon™MORDHAU★ 5 (2k)318k views3k ♥68 minUpdated Nov 16, 2024
- Лучшие кооперативные игры SteamPAYDAY 2★ 5 (1.5k)315k views2.1k ♥56 minRussianUpdated Apr 27, 2025






This guide was created by its original author on the Steam Community. Are you the author and want it removed? Request removal.