Sleeping Dogs: Definitive Edition Chronological %100 Achievement Guide
Introduction
Hello and thank you for checking out this guide. This is a chronological %100 achievement guide, which means if you start the game while following this guide when you finish the guide you will get %100 of the achievements and perfect the game.
This means this guide will tell you stuff that game generally will hold back until you finish it at least once. So: SPOILERS AHEAD.
I only recommend this guide to the players who want to get their achievements and move on with their lives. If your enjoyment is mostly at discovering things on your own, it is possible that this guide is not for you. I was from the second party for most of my life and never checked guides like these before, but as time passed, I felt like I enjoyed following guides like these more and even started writing them. Things change, all cool.
If you are searching for a specific achievement, you can search this page by clicking on Ctrl + F and writing the achievement name.
If you think there are parts to improve in this guide, please leave a comment so I can look into it. Additions will be made with credits to your profile name.
Also, check the credits at the bottom of this guide as I couldn't have made this guide without their prior contributions.
Achievement Breakdown
By Achievement Type:
- Story Related: 12
- Collectibles: 10
- Special Actions: 9
- Completion: 28
- Offline: 59
- Single Player: 59
- Base Game: 50
- Nightmare in the North Point DLC: 5
- Year of the Snake DLC: 4
We have a total of 59 achievements for Sleeping Dogs: Definitive Edition. This version already includes all of the DLCs so nothing else needs to be purchased. There are no online achievements, no multiplayer/co-op achievements, and no bugged achievements. All achievements are earnable as of the time this guide is posted.
The base game itself holds most of the achievements, but we will need to go to additional story DLCs and finish them as well, to reach %100 completion. DLC data and main game data are not interchangeable, so you won't be able to use the cars you get in the main game at DLCs, but it will be possible to get some additional content from story DLCs to the main game.
We have 12 story-related achievements. If you finish the storylines, you will get these, so in a way they are unmissable. The number also includes the DLC achievements.
Then we have 10 collectible achievements. These achievements are about going to many different places on the map and collecting things or interacting with them. For the main game, I won't be showing these around, but for DLCs, I will leave some remarks as in the DLCs there is no way to detect these collectibles.
Thirdly, we have 9 special action achievements. These will require you to do something specific in-game, sometimes only once, sometimes repeatedly, and sometimes for some time.
The last category is completion. Almost half of the achievements are in this category. This basically tracks your overall progression and gives you achievements as you reach certain milestones. Following this guide, you will get these naturally.
How Will We Do It?
This is an open-world game. You can find things in a different order than in this guide. It is totally normal. Think of this guide as an overly explained checklist. If you get the achievement before where it shows in the guide, congratulations, you can mark it off earlier. If you can't get it when it shows in the guide, that's no problem, you will always have time to re-do things or do them in other ways. This would be especially true for special actions achievements.
If you are following this guide, don't expect it to have all the information you will need in this journey. It will show an approximate line you can follow, that would net you achievement perfection in this game that should be close to optimal. It will try to have the info you will need when you need it but will try not to spoil it as much as it can.
So in a sense, this is not a complete walkthrough. The guide will not have information on how to finish each and every mission. Generally, most of the missions are doable without additional information. But some of the missions would need you to pay attention to some details. You will be able to find those in the guide. Hopefully, we can strike a balance between spoiling the missions and not missing achievements while doing them.
We divide the game into main story missions. They will be having the Chapter names in the guide and you can follow them from the sidebar of this guide. In the main-game and NiNP DLC they show as green icons and in YotS DLC they show as blue icons.
Between the main story missions, we will focus on the side missions, favors, races, jobs, etc. that come in the same district. There are 4 districts in the game and we will generally not go to another district for the sake of side missions. We will do these when we arrive to these places for "official" main story mission reasons.
Generally, we will follow proximity for these side missions, but will also consider where they start and end. Sometimes we will handle business before starting a mission, and sometimes after.
Since this game has a lot of collectibles, we also need to talk about them before starting. Our main strategy toward these items is to collect them whenever you come across them, but don't specifically seek out them. So while you are in a car or running, if you see something glowing, that counts as nearby and you can go get it before you start doing your next thing.
Through the base game side missions, we will unlock a feature that will allow us to see these collectibles on our map and we will finish them in our district-based system. This way we won't need to go over 100+ locations at the end of the game just to get the collectibles. After we open this feature, our general strategy will be similar towards collectibles: Get them if they are near the point of interest we want to go, don't bother if not.
One main consideration while preparing this guide was trying to make it feel as less grindy as possible. This means it tries to prevent doing the same thing over and over for longer than 2-3 times. You can get 50 health shrines after you finish everything, which to me would feel extremely boring, and probably would be a reason why I won't perfect the game. Or we divide this burden throughout the main missions, so when the end times come, we will have very few left where we can finish without much trouble.
This guide also tries to maximize in-game tools for collectibles rather than putting a map for them here. But again, DLCs obviously didn't get that kind of love from devs, so although the guide will explain their locations with text, there will be some maps for those collectibles.
Different from other guides, this guide will have special headings called "Achievement Start". You will see this generally for cumulative and completion achievements. It's to remind you that there is this kind of achievement that you need to pay attention to from that time on. Then afterward, you will see another header called Achievement, which is when we receive it. Not all achievements need this setup, so you won't see it for all.
Together with Achievements, we will also see Stat Awards headings throughout the guide. These will indicate that from that point forward you can start increasing these stats. There are 32 stats that need gold awards, so there will be quite many things to keep in mind. The guide will show some optimal locations for some of these stats.
According to some players, it becomes easier to get some stats if we save scum. I honestly don't have time for that, so if a stat requires that we will discuss it there, but in the guide we don't have any save scumming.
Since you can get achievements at different times, in the appendix, I will give you a list of achievements ordered by their appearance in this guide. If you get them earlier/later, you can still track them from that list. You can add the list in the appendix to your steam notes for this game, and strikethrough the ones you get. Stat Awards will also have another appendix so you can track them by yourself.
There are open-world events in this game. These happen at the same place but don’t happen all the time. You need to drive through there to see them. I added them as I came across to, but you might be seeing them before/after me. They will have a header that starts with "Event" followed by its type. You can search for them at the end if you are missing any.
Mission #1: Vendor Extortion
- Dragon Kick
- Herbal Tea
- Noodle Bowl
- Pork Bun
- Fish Dumpling Skewer
- Roasted Duck
- Ice Cream
- Curry Fish Balls
- Chicken on a Stick
- Spicy Squid ( Harder to come across )
There is an achievement for purchasing all the clothing. This is where we start moving towards that. In the future, any time you extra 10k disposable income, go to a clothing vendor and buy everything you can. This is viable in North Point. Most clothing shops are in North Point.
Legendary Clothes are bit more expensive. You can still get the 10k ones but for the more expensive ones, I would suggest to wait until we get the %40 off from Level 10 Face Level.
The clothing we find from lockboxes doesn’t count.
You shouldn't even bother making this achievement a priority, as it will come naturally during your visit to Hong Kong. The missions will take us to all of these districts.
Since we are already at North Point, it would count as Achievement Start.
While writing this guide, also reading from many different guides, I was under the impression that the better way to handle this problem is to go for Cop experience first, then try to get the triad experience. Doing so forces us to not focus on small increases on triad exp, and at the end of the game, it lets us replay a couple of missions. Also, while trying to get more triad experience and doing some side missions, some of the cop experience goes to waste, as it's already at level 10.
Instead of doing it in this order, one might try to get the triad first and then focus on the cop. Although this is the conclusion I reached after finishing the game, while writing the guide, I focused first on cop exp, so you will see it in that order.
There are clothing pieces that, when created in a set, give 5/10/15 percent extra cop exp, triad exp, or face exp. Make sure you wear triad bonus experience sets before main story missions, otherwise, you might need to replay them at the end of the game. Make sure to check a couple of the next side missions whenever you are close to home in order to maximize your triad/cop experiences.
For face exp, apart from the sets, you can wear chain, watch, glasses, etc. That increases the face exp separately. We will have so many missions after we reach level 10 face, so this is also not a big issue.
You will unlock this through natural progression.
You can vault over cars to hit people.
You can vault over vendors’ stalls to kill them.
F to grapple people. Then, look for the red environment items. Get near them and press F again.
This achievement goes hand in hand with this stat award. Do this enough, and the achievement will pop. I am putting some of the environmental items you can use here, but there are tens of different environmental objects you can use throughout the game, so don't really worry about it. Just keep it in mind until you get it.
- Slider from first Mission
- Garbage Bins
- Telephone Booths
- Fans
- Electric Panels
This should be one of the easiest gold stats we can get. Getting the first gold will also give an achievement.
You will unlock this through natural progression.
You will unlock this through natural progression.
You will unlock this through natural progression.
You will unlock this through natural progression.
You will unlock this through natural progression.
This one depends on how long you will be playing. Later missions in the game have more kills per minute, so you can get it easier later on. But who is to say you won't sit 8 hours in your first session and get this?
You can check the heat level from the right side of the minimap. When you see it as 2 or above, drag the cops along with you. Don't destroy their cars, and don't speed away. Do it like 1-2 mins each time, and you should get this before the end of the game without any issues.
Mission #2: Night Market Chase
Right after this, we get the first opportunity for a favor.
Also, you can start eating/drinking from vendors.
 Complete Night Market Chase.
Story-related, cannot be missed.
While running after Ming, we will see one in Night Market. But if we didn’t get that, there will many around North Point we will open while doing the side missions before our next Main Mission.
There will be a total of 50 Health Shrines in the game. They are red and flashing. Praying at them, when reach milestones, increase the health, so whenever you see them around, make sure to send a prayer or two.
There is one right in front of our house. That would be the first one, probably.
You will start collecting right around here. You will see collectibles glowing, that would help you.
Also, the thugs you see on the map as red, generally have some lockboxes around them.
We will drive a lot of cars. Anytime you drive safely for some time, it starts adding to this stat. Any car you find around should help.
This is not in seconds, you need to drive a total of 30 minutes to get this.
Always drive with cars until we get this. Bikes don’t count.
As long as you try to achieve stat awards for Safe Driver, you will always get close to this one. There are some tricks to get this, but an adequate drive with a mid-level car should get you this.
Bikes don’t count.
Favors will be identified as a yellow "chat" circle with a silhouette of a person in the middle. Some favors will only unlock through story progression. Dates also count as favors. There are 36 in all.
With the favors opening we will start inching towards this achievement.
- Tire Iron - Car Trunks
- Crowbar - Car Trunks
- Knife - Many opponents will use these
- Cleaver - Many opponents will use these
- Briefcase - Can be found on pedestrians
- Handbag - Can be found on pedestrians
- Umbrella - Can be found on pedestrians
- Fish - Some missions have it
- Hand Grinder - Mission Related
- Machete - Mission Related
There are even more types of melee weapons, but these are pretty common ones.
Any melee weapon would do. Should be one of the easier stats.
Story progression will take us through all these acts.
There will be 26 security cameras in HK. Most of them will open with a Drug Bust, but some will need additional trips. A date we will have later on will show all the locations of these security cameras.
This one here is the first one.
 Perform 5 unique environmental kills.
One of the earliest achievements we can get. We should be getting this before the next main story mission.
Helping her will open up Martial Arts for us.
Call Amanda after this. She will want to meet at Victoria Peak for photographing. If it doesn’t show up immediately do some other missions and try calling her again.
There is a Wing Chun cloth at the legendary clothes store for 10k. That’s very helpful.
For the most part, countering is enough. Don’t forget to hold to do some heavy attacks.
There are huge dudes that hold you, try not to get hold by them. If you got hold, press E to get out.
If you can’t get it now, you can always try it later on, when we get more melee training when we bring more statues.
After we finish the Popstar Lead 2, we will start seeing Drug Busts on the Map. These count as open-world events. Along with, shoplifters, hit and runs, and junk in the trunks, there are a total of 28 events. Only drug busts show on the map, the rest shows up when you get close to them. Also, they don’t show up when it’s raining or at night.
After this health shrines appear on your map. Press Q to see collectibles on Map.
Any time you finish a mission, check the map for health shrines from now on. They also show up on your minimap, so you can also get them while wandering around.
Mission #2: Night Market Chase - Cont'd
There are also 2 health shrines in the temple if you want to get them. One on the left side, following the water canal. Others also follow the same canal, this time to the right side.
The first lockbox is where we take sunset photos. There are a couple of thugs protecting it.
 Win a bet on a cockfight.
It should be easy to get. And it is cheap enough to try a couple of times.
Here is definitely not to place to try this as max amount you can bet is 3000. We will get to different locations with higher stakes later on.
 Achieve 1 Gold Stat Award.
We should get this achievement before the start of the next main mission. It could be many things, but defence and martial artist might be more likely.
Achieve 1 Gold Stat Award.
We should get this achievement before the start of the next main mission. It could be many things, but defence and martial artist might be more likely. Achieve Face Level 2.
Beating people gives this, I guess.
Around this time Tran will call you to inform you about car purchases. You can start making your way toward this goal as well. Recent drug busts should give you a sizable sum.
Can buy some simple vehicles, but it’s better to wait until we reach level 10 Face. That gives us 40% off on all vehicles.
There is also a clothing set that adds another 15% to the discount. So, the idea is, we wait until we reach level 10 face, then wear the set, then buy all the vehicles. Until then, we might try to get some cars if we really fancy them. But generally speaking, the game gives you some cars from each class.
Since we will need clothes to get vehicles, we will first buy all the clothing and then buy all the vehicles. Vehicles are far more expensive than cloth.
Mission #3: Stick up and Delivery
Cars we ram count as explosive kills.
SWAT Pack DLC Related. Gives a vehicle. Don’t know if it counts for achievement.
Near Kam Chuk Overpass.
Whatever’s Handy: Police Baton, Cleaver
Mission #4: Mini Bus Racket
 Complete a Case.
We will get this when we finish the last lead.
Complete a Case.
We will get this when we finish the last lead.There will be 4 cases in total. Each case will have multiple leads like the one we just finished. We will get this naturally.
Now that we have Leg Break, we can get moving with this stat award.
Making leg-break turns enemies back to us. You click F again to get this Ninja. Can easily gold this one.
Mission #5: Club Bam Bam
There aren't many chances for fast talk throughout the game, and fast talks generally can only be found at missions. The guide will show you whenever a fast talk is possible.
 Kill someone with a fish.
In the Club Bam Bam, we will get to 2nd floor and start fighting at some point. Grab someone and do environmental on the aquarium. Then, grab the fish and hit people with it until the achievement pops.
If it doesn't pop here, don't worry there will be missions in the future that takes place in a fish market.There will be 8 Karaoke songs overall. We will see them in the guide as we open them.
For this song, there are three options: Shift + Up, Shift + Down, don’t touch. Easy to get more than 90%.
You can get all the dudes upstairs here with Vault Attacks for the FLUID STRIKER stat award.
Progress for Whatever’s Handy: Fish
After this, we should only see a melee training jade statue as not collected at North Point, but luckily, we will get it in the next mission. That is if we are quick.
Health shrines should be at least 15/50 on the collectible view now.
Mission #6: Meet Winston
All the races will be included in the guide. 17 races are the base game races. The races we do due to mission requirements are also included in this number. So the one we have just done is part of this.
17 base game races and 3 Street Racer Pack DLC races make a total of 20 races to win. This also means we will get the gold stat award before this achievement.
Opponents are generally too slow around the corners, so don't worry if you can't catch them on the straights. You can catch them around the corners.
Make sure you slow down for corners as well. Don't NFS hit turn the corners if you want better exit speed.
Also, make sure you are not hitting the random obstacles over the road.
You need to get 30 kills. You can get it and move on with your life. But there is a bit of a problem here: I can't find this mission in Social Hub to replay. This means we need to farm our stats and then move on. If anyone can confirm this issue, that'd be great.
As there is no replay, it would be in our best interest to get as many of these stats as possible before moving on. So, consider dying when you are about to beat the mission.
Generally speaking, it is a hard mission, so you might have a hard time finishing it anyway. And that would help with the stats. Open your stat list, target one of the stats related to melee fighting, and try to get it. Since the enemies practically rain on you, it becomes very easy to increase these stats.
There is one thing to consider: You can’t grapple melee weapon-holding guys. Since you can’t grapple, no limb breaking, thus no bonebreaker and no ninja. It also means no environmentalist, but that's partly because there is not much of an environment to interact with.
Gold Cleaver for the Whatever’s Handy achievement.
Stats to focus:- Fluid Striker: There is a concrete box at directly in front of you on the far side. Since it’s a bit small, it makes it frustrating to perform these. But along with this, you can get disarm as well, and kills too. So overall, trying this would increase multiple stats at once.
- Handyman: Melee Weapon Kills. All come with their weapon. Disarm them and use it against them.
- Disarming: Vault Disarm, adds to this stat. Disarm Tackle, which we learned in the martial arts club, doesn’t count for this stat.
- Defence: Countering. If you still haven’t got this one. Lots of opportunities here.
- Martial Artist: Total Melee Kills.
- Enforcer: Total Enemies Defeated.
- Public Enemy: Most kills in one play session. It doesn’t need to be here, but it eases up. Deaths don’t reset the counter for this stat.
Farm Mission: Mrs. Chu's Revenge
Grappling Stunned Enemies Disarms them. Charge Knee Stun.
Don’t risk it. Make your turns nice and focus on the race.
Gives a Class A bike sting. Makes Class A Bike races far easier.
 Visit Aberdeen, Central, Kennedy Town, and North Point.
This race takes us all over HK. If you didn’t visit these places by yourself till now, you will get this achievement now.
Mission #7: Listening In
We also moved toward the achievement Gadgetman with the bug and the picklock.
Mission #8: Chain of Evidence
You get this when you don't aim and fire from cover.
While we recreate the scene in the main mission, you have unlimited bullets. try to get as many blind fire kills as you can get. But there will be so many opportunities for this stat. You just need to remember doing it.
Also starts with this mission.
Definitely focus on this after you get the lucky shooter. It counts the last 50 shots’ accuracy. If you use the pistols and take your time while shooting, it's not that hard. Aim for the body mass.
Go after Sniper. If you are confident with your aim, you can go for both at the same time.
This should come without much effort. Whenever you see a new gun lying on the ground or dropped by an enemy, grab it and kill someone with it; it can be an enemy or an innocent person.
You can check statistics to see which gun you have used to kill enemies. Statistics > Stats > All Statistics. You have to scroll down a fair bit. This guide will try to warn you anytime a new gun is available in a mission.
Guns you can come across:- 9mm Pistol
- Golden 9mm Pistol
- .45cal Pistol w/ Taclight
- Machine Pistol
- .45cal SMG
- .45cal SMG w/ Taclight
- Pump Shotgun
- Anti-Riot Shotgun
- Anti-Riot Shotgun w/ Taclight
- Assault Rifle
- Assault Rifle w/ Taclight
- Assault Rifle w/ Grenade Launcher
 Complete 10% of all missions, cases, favors, events, jobs, and races.
We should be getting this around this time, if not earlier. I got this in my previous playthrough, so I don’t know the exact timing. If you followed this guide from the beginning, please add a comment so I can move this wherever you got it.
 Achieve 5 Silver Stat Awards.
This one should pop around this time as we have some easy-to-finish stats up until this point.
Mission #9: Payback
You can move towards Lucky Shooter in this level as well. There is a very nice area where you can vault a lot where lots of dudes shoot at you. Get to the cover right next to them and spam bullets.
Sometimes, they will come out of it and run towards you. Let them come close, and then spam. You only need ten kills. You should be very close to getting this, so I will stop reminding you about this stat award.
After you finish it, you can focus on the other three stat awards that we discussed on the mission earlier.
 Successfully perform an action hijack.
Story will teach how to do it. Hold Q, then press Q when arrow turns green.
 Complete Payback.
Story related, cannot be missed.
It’s better to go to left side of the cars to perform this. On a highway, you can jump from car to car and very quickly get that. Give this a little bit of time after the mission and finish it. You can even do it in the North Point city area.
Refrain from doing it with trucks if you’re not right next to them. Otherwise it takes longer to hijack them.
 Change all your clothes in your wardrobe or a clothing store.
By now we should have enough money to completely purchase couple of clothing stores’ inventory. And hopefully, we’ve already done it. If you don’t have this achievement till now, after going to bed and getting up, you need to change these clothing items to get this one:
Change all your clothes in your wardrobe or a clothing store.
By now we should have enough money to completely purchase couple of clothing stores’ inventory. And hopefully, we’ve already done it. If you don’t have this achievement till now, after going to bed and getting up, you need to change these clothing items to get this one:- Torso
- Pants
- Shoes
- Hats
- Glasses
- Chains
- Watches
- Bracelets
After you get your achievement, you can get back to the clothing you like.
After we get out of the house, we will get a call from Roland. He will ask us to hijack Knox trucks. They will have orange shields above them. Perform action hijacks and bring them to drop off location. Do it five times and you will get the achievement.
I hijacked these trucks before his call, right after I learnt about action hijacks, as they look juicy. Nothing happens.
Gives Swat Van.
Gives HKPD Cruiser
HKPD Van
After this last cop job, we should be right next to last of them.
Spy cameras on map collectible view should at least be 9/26 now.
Mission #10: Uncle Po
We are officially going to Central for Business. Now from this mission on, we will have bunch of missions in Central. Make sure you drive to or run to each and get the collectibles on the way. It will reduce the time for cleanup later on.
Also good for Rogue Cop. You don’t lose Cop points for killing them.
 Achieve Face Level 5.
Got this around these missions.
 Achieve 5 Gold Stat Awards.
Should pop around here. It is possible it popped even before here.
 Complete 25% of all missions, cases, favors, events, jobs and races.
Got this around this time.
Gives Swat Tactical Uniform.
 Cruise for 2 minutes straight without damaging your car.
In front of Salzhaus, there is a roundabout. Get a Class B/C car and turn it around for 2 mins. This is one option.
Another option is just using normal roads. Roads in this district are bigger than North Point and have easier access to the Highway. If you get 30 seconds of clean drive somehow, just try to make it up to 2 minutes.
With a Class B car, starting from North Point, where the road goes to be one line in the tunnel, coming to the Central side, if you don’t go too fast, you get this 2 mins before you reach Kennedy Town. Roads are big enough to squeeze.
There are a couple of intersections in this route, but the road is big enough to mitigate the danger.
You don’t need to get this right now. I just had enough of the clean drive counter that I needed to clear my mind about it. Though I gotta note, getting the achievement doesn't remove the counter.
After this point, we will not discuss this achievement.
There are boats on the shore when you go from the jade statue to this drug bust. You can get one and come here with a boat.
Or you can go there directly by car and jump to the sewage output there. You almost don’t swim, it’s very close.
All the people here have Assault Rifle w/ Taclight. If you didn’t get the kills for this weapon, you can try here to get one from the thugs, but if you die, you go back to North Point. Besides, we should already have that from a Cop Job.
I also found anti-riot shotguns and .45cal SMG w/ taclight here, but everyone was dead. So maybe you can get these here as well. I am not pushing more for these at this stage.
We should be able to beat these easily now.
Go for any of the melee stats you are missing. Trying for stats might make you fail this, but stats.
After finishing them, the stat shows as: 17/26
Total of 5 jobs.
We have known Roland for some time now. If you haven’t done it yet, you can call him to get some jobs from him. The job now was in North Point, so we didn’t do it until now, but we are going back to NP.
There will be a total of 20 Tran missions. These missions will give boatloads of money. Each time you bring the car in, make sure there is no scratches on them. Even small dents cut thousands of dollars.
Also, anytime you deliver one car to Tran, call the Tran back so the next target can appear on your map. The guide will take you to these targets when we get close to them.
Mission #11: Bride to Be
3 Fast Talks in the main mission.
Can focus on Melee Stats.
Starting from this event, you might try to go for Public Enemy stat. 200 kills in one session. You will have 40 in this. And the next missions are full of hostiles.
Mission #12: The Wedding
This is the last original game stat that’s being taught to us right with the Distract the Cops favor. Have an object on hand and press Space to throw.
People say sometimes they ricochet and kill you, so have some space between yourself and the targets.
 Pick a lock, plant a bug, trace a phone, crack a safe, and take over a spy camera.
With the phone traced, we should be getting this Achievement.
We get to own first-class A car after this case. High Roller Tuono. I mean, it’s possible you already bought one yourself, but that would require high levels of sacrifice.
Unlike the Clean Driver stat, this one counts the seconds, so you don't need to go around full speed for 30 minutes. 30 seconds is enough.
Mission #13: Mrs. Chu’s Revenge
You can start getting used to the deadeye, throwing knives, and other things in this mission.
It's a very good mission to replay if you are missing gunfire-related stats.
Mission #14: Meet the New Boss
Mission #15: Loose Ends
Mission #16: Final Kill
Fish for Whatever’s Handy. You will fight in the fish market.
 Complete half of the open-world events.
Depending on which unshown events you’ve found, you should get this here or around this time.
Mission #17: Initiation
We will wake up in Aberdeen. Time to finish it up.
Your phone will beg you to call Jackie until the next mission. Don’t call until we put the Aberdeen in order.
Same with Central: Do the missions/races/events we see on the map and collect the collectibles you see on the way. Don’t go out of your way for the collectibles at the moment.
This one counts as Kennedy Town, but it is on our way and very close to Aberdeen.
Don’t forget the lockbox in this place.
There is also a lockbox here.
There is also a pump shotgun here.
 Achieve Face Level 10.
All that weird clothing for face exp paid off. We got this here. Now, we can focus on Cop and Triad levels with our clothing.
Also, now that we are Dai Lo, cars and clothes are 40% cheaper.
Gives a police scanner to your house.
Undercover Police Ghost Car
Gives Tactical Outfit
There is a health shrine here.
Next to the health shrine, there is a shipping container and boxes on top of it. You can go up to hack a security camera.
Also in this same wharf, near the foot of a bridge to the farthest end, there is a lockbox.
It’s better to get these to otherwise, we need to come back here again for that purpose.
The last stats: 21/26.
Fast Talk opportunity.
 Complete 50% of all missions, cases, favors, events, jobs, and races.
One half down, one more to go.
Call Tran after you finish this to get the next job.
 Defeat all 4 Martial Arts Clubs.
Congrats on this one.
 Win 50,000 on a single cockfight.
Close by, there is a Kennedy Docks cockfighting. Go there and bet 50k on any of the fighters. We should have enough money to throw in this one couple of times.
Winning also helps with the gambler stat. In fact, you can increase the odds to 100k to go for that stat.
I lost here twice, then won once, so I lost 50k for this achievement. This brings the gambler stat total to minus 50k, as it also counts the losses.
People suggest save scumming for this one. I don’t know, I think we have enough money to just go for the achievement. The stat award is a different story, though.
Save scumming might be good idea if you are going for Gambler stat award, as it needs you to get 1 million from gambling. Since social hub stats persist through saves, you can just get the gold for the stat and then load back. But I guess whenever you load back, you gotta come back from the house.
That sounds too grindy. Out of 32 stat awards, the only one I didn't properly finish is this one.
The latest stats: 40/50.
Mission #18: Dockyard Heist
Going to Kennedy Town officially this time. But we are not to stay.
Go near workers to get some more fast talks. They are shown as red on the map.
4 fast talks
Don’t forget to use the hand grinder to further your Whatever’s Handy achievement.
 Use 10 different melee weapons to defeat enemies.
I got it right after I used the hand grinder here.
Complete Dockyard Heist.Story related, cannot be missed.
 Achieve 15 Silver Stat Awards.
Should pop around here. I got this in my 1st simple playthrough. don’t exactly know where it would pop according to this guide. If you’ve followed this guide since the beginning, leave a comment so I can put it in the right place.
 Unlock ten Cop Upgrades.
We should get this after this mission. Or around this time.
Now we can focus on the triad exp. We already should be having a couple of clothing sets to increase the triad exp. Go back to house wear them. Try to wear %15 one all the time until we get the triad exp done.
Now that we have finished cop exp tasks, we can focus on this stat.
Mission #19: Intensive Care
Don’t forget to shoot a cop vehicle’s tires when you are driving before the end of the level.
 Shoot out a cop's tires while fleeing in a police chase.
Just need to remember to get one. It is possible you got this earlier than here.
Mission #20: Important Visitor
1 Fast Talk
Finally, after this mission, we will be able to see all the lockboxes on the map. Which means we see all the collectibles on the map. When the time is right and we are nearby, we can just go and collect these lockboxes.
There is a lockbox in the route we ran. You can get it now if you didn’t get it while running.
Unlike health shrines and security cams, we have a lot of lockboxes to collect. That’s why if the number of already collected lockboxes in a district is not high enough, we will not spend time on this until the end game.
What we will do is continue to gather them while going to other missions. This would leave very few lockboxes to the end game and would feel less grindy then. So, like always, if you see them on your minimap while going to missions, get them, but don’t seek out specifically these collectibles for now.
You can also plan your directions to missions by going through these collectibles.
 Achieving 90% and above for all songs at the Karaoke Bars in HK.
With the last song ending and we get our grading, this achievement should pop.
Mission #21: Fast Girls
Now we have an abode over Kennedy Town. This means we will be finishing up the missions here.
Don’t forget to get the collectibles on your way to the missions.
There is a clothing shop here that sells a master negotiator set that gives 15% off for vehicles. Get this one. You can actually clear out this store if you want. It should cost around 600k.
Call Sandra after.
 Use 10 different firearms to defeat enemies.
I got this one with this mission. Here are the guns I’ve used according to game statistics:
- 9mm pistol
- Gold .50cal pistol
- .45cal pistol w/ taclight
- Assault Rifle w/ taclight
- Assault Rifle
- Anti Riot Shotgun w/ Taclight
- Pump Shotgun
- Machine Pistol
- .45cal SMG w/ Taclight
Hijack 5 trucks and collect their cargo.
I was getting trucks whenever I saw them in between missions. This is where I’ve finished this. It is possible you got this before this time. If you didn’t, it’s time to focus on it.
Ends in Aberdeen
Ends in Aberdeen
Don’t forget the lockbox.
 Pray at all of the Health Shrines.
Got it while running between missions.
If you haven’t done it, go back to the house in Kennedy Town to finalize the Drug Busts.
Mission #22: Bad Luck
4 Fast Talks. Go to red icons on the map to talk with people.
Get the lockbox.
 Complete all Street Races.
Aberdeen one is on the east side, near Aberdeen Pier. This one is on the roof. When you try to reach it from the ground, you will come across a fence door with a green dumpster blocking almost half of the fence. That dumpster is climbable. After this info, I think finding the lockbox becomes very easy. (The game will ask us to come to this place at the end of the game, but I didn’t know about that at the time of writing.)
Kennedy Town one is at the docks on top of a container, but doesn’t look like there is a direct way to it. You need to go to the ocean side, there is a road that goes up to containers one level. From there you need to climb up, then jump to the lockboxes side. Then you can find your way up to the lockbox.
 Unlock every lockbox in Kennedy Town and Aberdeen.
We got 30 in total in these two districts.
I only had one left, and that was at Kennedy Beach.
 Hack every Security Camera in the game.
 Achieve 15 Gold Stat Awards.
Approximate location. Don’t know where it actually pops.
Mission #23: Conflicting Loyalties
Mission #24: The Funeral
Very good for wrecker and fire starter.
For derbies, just sit tight and let them come to you. You don’t need to drive. Shoot their tires.
Mission #25: Civil Discord
Make sure you are wearing +%15 triad exp right now.
Stats I forgot till now: Disarms, Deadeye. Check your stats to remember which ones you need working on. Reckless Driver is still not gold, but it's close.
So there is some confusion with this one. If anyone can confirm that right after the case lead 2, we can do the riffraff disposal, that’d be great.
 Complete all cases.
After this last lead, we will get this achievement.
Dim Mak is for countering, not grappling. So, instead of pressing E while countering, press E and F at the same time.
 Purchase all clothing.
I got this after I cleared out the legendary outfit cloth after all the other clothing stores.
Don't forget to change your clothes to whatever is needed after this.
Call Roland After.
Target: 50
You can burn them in the qualifying round as well. This one is environmental damage, but for this island.
This one felt too grindy, so I just left it at 20. You can replay missions to get this.
This is the only other stat I didn’t gold in the game, along with the Gambler. Not hard to get, but it feels extremely grindy. If anyone has a way of doing this without much of a grind, please add it as a comment so I can update it here.
Target: 12
After we finish all the missions on the island, they will show up on our map. But as always, gather as much as you can while doing the missions.
Last one is not on any of your ways while getting to missions. So it is better to get this after the missions.
It’s from where we first arrive to island. Swim to the right side and you will see a small beach. Around this time your minimap should also show you the fire opal statue.
 Achieve 30 Silver Stat Awards.
I got it after I threw a melee weapon on this island. Yeah, I still forget this same stat called Deadeye, even though the gold is like 10 kills.
Call Roland After
 Unlock every lockbox in Central.
When I was doing this last job, I came very close to the peak. Just went in to get the 2 lockboxes. Last Central lockbox shows just under the text of Victoria peak on map, but it’s clearer on minimap.
Mission #26: Buried Alive
Make sure you have triad bonus exp clothing.
Drink your drinks and eat your food before starting.
 Complete all of Roland's Jobs.
Go to bed after this at Central.
Mission #27: The Election
Mission #28: Big Smile Lee
 Complete Big Smile Lee.
After this I was still not able to finish the Triad level 10. So need to replay the level with most points again. To me it was the election. Generally Mrs. Chu’s Revenge is helpful with other stats, but that depends as well. Check stat awards you need, then check from this guide on how to get those, which levels are best. Then replay them until you get the triad exp for level 10.
 Unlock ten Triad Upgrades
After we get this, we can finally put on our master negotiator set, which will give us 15% for all vehicle purchases.
Though, before starting vehicle purchases, you need to make a decision. If you are going for the Gambler stat award, you need some capital. Vehicles will decrease that. So if you want, you can do the save scum thing and get your stat first. I don’t want to get the gambler, as I already have the fire opal one from Zodiac Island.
Costs around 1.5 mil.
Don’t forget the lockbox here.
 Complete all Favors.
Honestly, we could’ve gotten this earlier. I just didn’t know these places were accessible from the beginning.
 Unlock every lockbox in North Point.
The other one should be 0.2-0.3 mil. But probably we bough some cars from this one already.
Missing Events
First, make sure we are actually missing these. To see the stat about it, go to Menu, Statistics > Stats. All Statistics or Completion. There should be an entry for events there. If it’s not showing 28/28, then the last thing you need to do to get the completion is these events.
Events only happen in daytime and when it’s not raining. So if it’s raining or night, go home and sleep.
Check the map below to see which of the events you didn’t get. Search for the name to see if we got this before.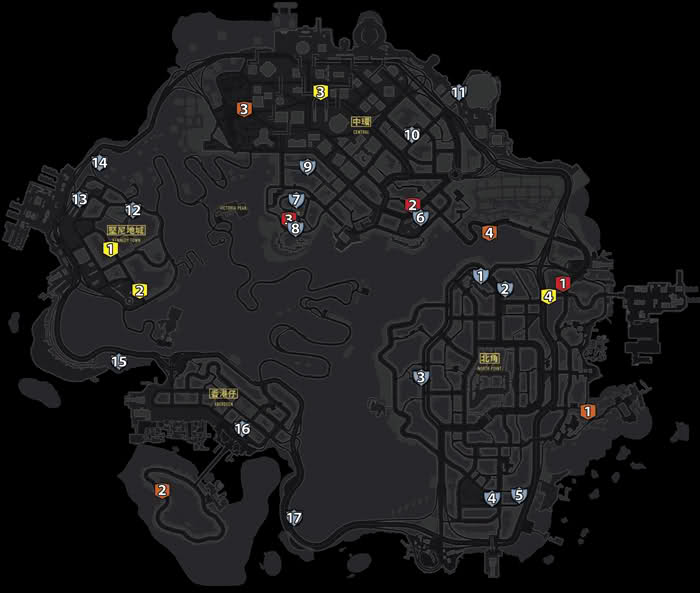 Credits to THN guide.
Blue ones are Drug Busts. We probably already finished them all.
Yellow ones are drunks, loitering, 4. We are missing a couple of these.
Red ones are hit-and-runs, 3. This guide was lucky enough to find these before.
Orange ones are junk in the trunks, 4. Also lucky to have got these.
If you got everything according to this guide, you should be missing one loitering and one junk in the trunk event. Loitering is in the kennedy town and the junk in the trunk is in the Central.
 Complete all of the open-world Events.
 Complete 100% of all missions, cases, favors, events, jobs, and races.
The same event gives us this achievement as well.
 Achieve 30 Gold Stat Awards.
So the 2 stats I didn’t get are Gambler and Smashing Success from the Zodiac Island. I am even in a -74k loss for gambling. And smashing success felt too grindy.
 Purchase all vehicles.
After buying everything, I still had 2 million.
 Try 10 different foods or drinks.
It’s almost unbelievable that this achievement is the last one from the main game. Honestly, I’ve eaten and drunk anything I’ve seen in the game but still didn’t get it, so I checked another guide.
So the tenth food I got is the Squid one, from the Aberdeen promenade. Go to Aberdeen and stay on the HK side, walk through the promenade and try out all the food stalls until you find this last one.
This should be the last of the base game achievements.
Nightmare in North Point DLC
We can open this DLC from the menu. We will still go mission based and I will inform you when it becomes possible to start some new stat awards for this DLC.
Hard part of this DLC achievements lie with the stat awards, so for each mission we will focus on these and check our progress.
We can’t replay the missions with this DLC so it’s important to get the things required, so we don’t waste time after the campaign hunting achievements. Doing so is not that hard, just needs planning.
In each mission, I will try to mention the points where you can maximize your stat gains. This page[www.playstationtrophies.org] also has good information on how to approach this DLC stat awards.
NiNP #1: Big Trouble
Jiang Shi’s are the main enemies for this mission. You need to grapple them to kill them, that brings us to our first stat awards.
- Vampire Hunter: Kill 200 Jiang Shi
- Demon Hunter: Kill 20 Yaoguai.
- Demonic Exorcism: Kill 15 Yaoguai with the Peachwood Sword -
- Hard to Get: Avoid 100 Jiang Shi bites
- Underworld Offering: Find all 10 Hell Shrines
The guide will inform you when a stat first becomes available and when it’s good to grind for those with high numbers.
Before you kill them, hopefully, you will start avoiding them by countering. Each mission you do it 15-20 times and we should have it before we finish the DLC.
There are different kinds of monsters so make sure you avoiding the one we see on the big billboard at the beginning of the first cutscene. These are also the same ones we fight in our first fight.
One trick to fight these guys is just to grapple them while they’re not stunned. They try to bite you any time you do that and stay alive as long as you don't finish them off. So really, you only need one Jiangshi to get this stat. But make sure to keep around 3-4 so you don’t wait much between counters.
So a strategy could be to grapple them, counter when they try to bite, and kill them. And then you can stop doing the first two when you get the stat.
A way to understand if you are getting bitten or getting hit is having a melee weapon on hand. If they try to bite, melee weapons fall down. You will experience that if you try to keep a peachsword around. This comes with a price, though; weapons lose their durability if they fall down in this manner. So it’s a heavy price for peachswords, but not so heavy for others.
They die in one shot if you vault kill them. So you can use a car to insta-kill while grinding for them. We will use that trick somewhere else, which will fit better to grind for this stat.
This one will take the longest time. So any alley you see them, just go and handle them.
NiNP #2: Chinese Magic
The one we get here will be the first one. Not the first time we see it, though. The mission will teach you how to beat them.
After we finish this mission, demons and hell shrines will be available around North Point. We will also be able to check the social hub after this.
Anytime you see peachsword, you get it. It should be giving a Yaoguai to fight with. The first one I got was right in front of the house.
Peachswords can be carried on bikes or cars, so you can travel with them.
Peachswords have durability. So they stop being useful after some use. So leave the weapon to the ground, beat the small ones, maybe use it on the last kill as sometimes after the kill scene changes and you find yourself in some other place.
We can go back to the house to wear the Shaolin Warrior outfit to get extra melee damage. It’s in preset outfits.
There is a Yao Guai in front of the Night Market. Also, a peachsword. But I was carrying the first one. Didn’t want to lose it.
NiNP #3: Smiley Cat’s Army
Energy Sources come into play here. We need to throw Jiangshis into it to stop them from replenishing. These are very good sources for the Vampire Hunter stat.
These Energy sources are our main bread and butter. If you play completely mission-oriented, you can finalize this mission with the initial 4 Jiang Shi. But bring your car around, and just vault back and forth. You will kill them very fast.
Also, make sure you get around 8-10 anti-bite counters. After that, you can close the energy sources.
Gives the Manhattan Melee outfit.
Gives Blast car.
NiNP #4: Clean Out the Rats
Get the peachsword before you finish the mission, otherwise, it disappears.
Gives Drag 979
NiNP #5: Revenge x2
NiNP #6: Ghosts of the Past
There is a peachsword on the ground floor and a yaoguai on the upper floor.
After the cutscene, dispose of the attackers, head to the toilet for the bouncers and take the Peachwood sword with you up to the VIP. Up here, defeat the demon and his followers and as soon as ponytail is down, you will unlock the following:
 Send Dogeyes, Ratface, and Ponytail back to Hell.
I kinda got bored as I had 50 more to reach there, so I finished this one earlier.
Also, we just had 2 hell shrines; 8 more of them will mean 24 additional jiangshis.
 Complete all secondary content.
 NiNP #7: Smiley Cat
We have the last energy sources in this mission. So make sure you finish the vampire hunter before the end of the level.
Energy Source here shows up in the middle. Behind it, there is a gong and an area where Jiangshis spawn. This area is very fit for vault kills. You can use this area to finish the kills.
Get the peachsword before you kill the last Jiangshi. Don’t use it on jiangshi.
There will be more energy sources after that, but since we don’t need them for anything else, you can just close them as quickly as possible and finish the mission.
2 Yaougai’s will spawn here. Use peachsword specifically for them.
 Banish Smiley Cat.
We’ve finished the DLC main missions. These missions didn’t have nearly enough Yao Guais to reach 20 overall kills, or 15 with peachswords. Also, they didn’t bring us close to the rest of the Hell Money Shrines. From the temple, we will go to these places. Both get to shrines and kill the yaoguai.
Here is the map for Peachswords and Hell Shrines. You can finish them yourself. Or follow the guide, and I will take you to some.
Hell Shrines Map: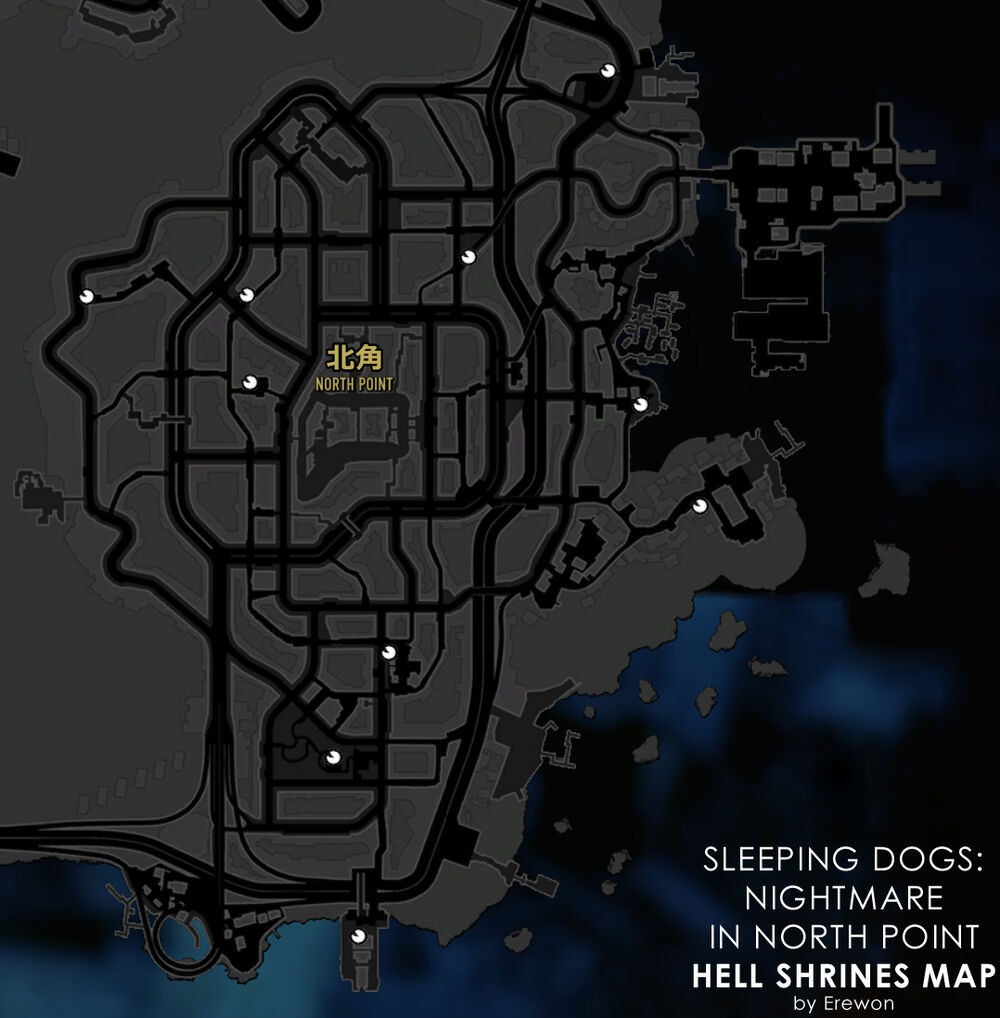 Credits to Wiki
Peachswords Map:
Credits to Wiki
Peachswords Map: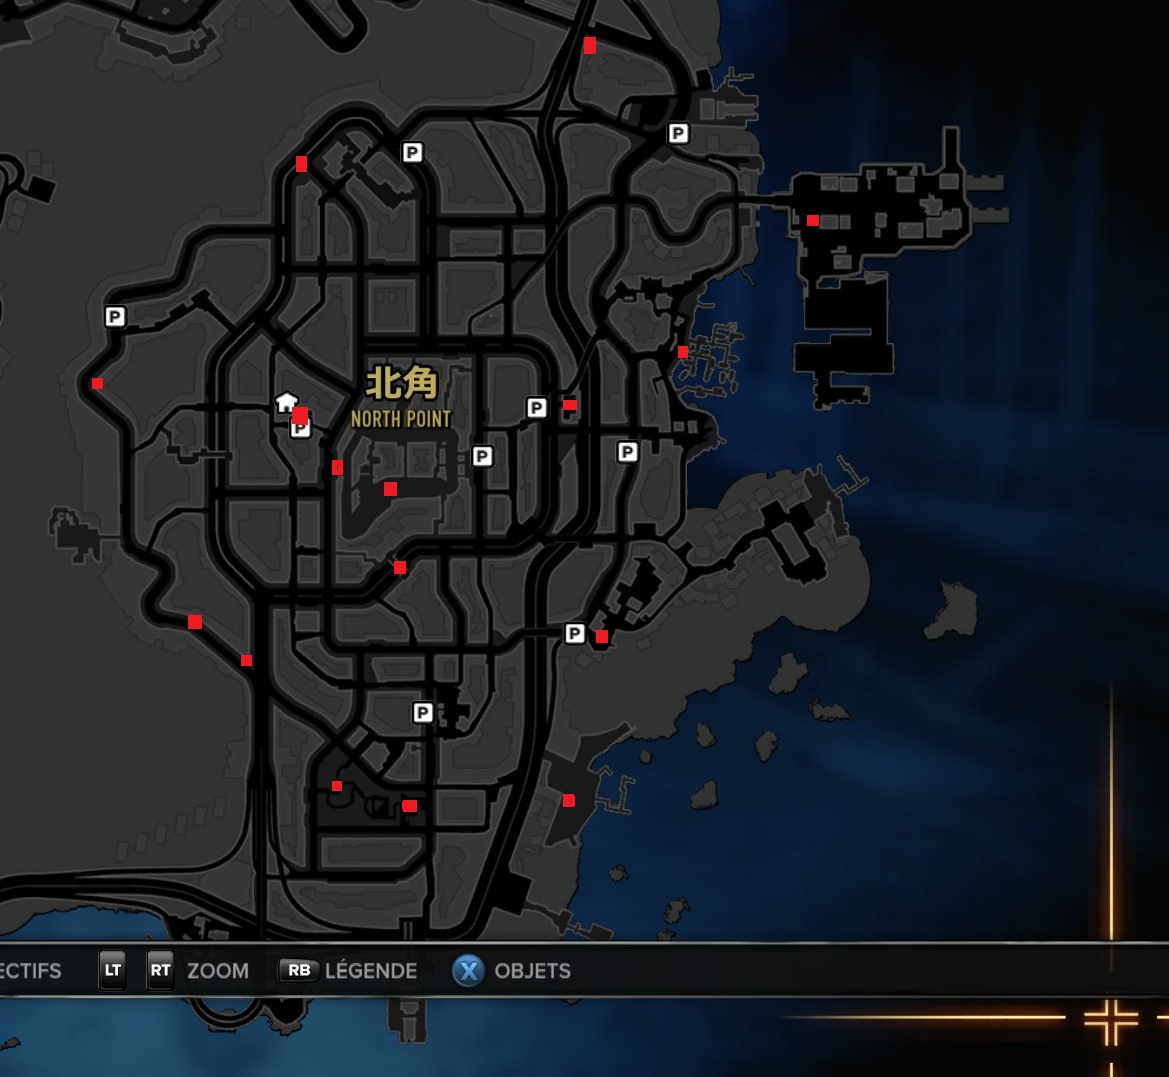 Credits to N'ours
At the next intersection with the alleyway, you will see the hell shrine.
Before reaching the next intersection, we will see another peachsword. Take it and handle the YaoGuai that comes with it.
We continue on the same main road until we find an intersection where the other road leads to Industrial. We turn left to go to Industrial.
This road will go under the highway then continue to join to another big road. The left-hand side should have a minibus terminal. Hell's shrine is in one of the corners of this area, next to the big road.
After this, we will go to Top Glamour for another peachsword. Top Glamour is the big island-like area on the right side of North Point. Turning to the south, where we find the last shrine will put us on that road. Then we need to look at the signs that say top glamor and turn left from the proper place.
Just after you enter Top Glamour, turn right and get the peachsword. You can always look at the minimap for the red icon to locate these peachswords.
You should see a singular red icon that indicates peachsword and Yao Guai. Get these.
After that continue sea-side to the south. You will come to a place where we started the Smiley Cat’s Army mission. There will be a wooden boat on top of a rack seaside. Hell shrine is in front of it.
From where we find the shrine, go towards the city. Keep left. When you reach the place where we were getting cases from the main game, you will see the peachsword.
I got the Demonic Exorcism after this, but I still need Demon Hunter. So we will continue to seek peachswords.
First, we go westward, towards the city. Then, when we come in one line with Yau Ling Court, or when we see a left turn with a sign for Northpoint Park, we turn left. The Auto Lot will be on the left.
You will see on your minimap that some JiangShis are protecting it. Handle them and get the shrine.
When you arrive, you will see some Jiangshis are together. Hell Shrine is next to them.
 Find all the money shrines.
 We got this one with the last shrine. Now I am still needing a couple more Yao Guais. We will go get them.
From in front of the Pier, we will go towards the right side. The second area we can enter should have one more peachsword. This area has some obstacles to prevent people coming in. After you enter, you will see JiangShis. Skip them and turn right. You will see the red icon on your minimap.
From here, chart a route to the temple. There will be a big intersection just before the last leg of the route. A peachsword should be on a small grassy area at a corner.
After you get the Yaoguai, continue toward the temple. You should see another peachsword in a tea shop.
 Achieve 5 Gold Awards.
 Normally, you should have had this achievement a couple yaoguais before. But in case you still didn’t get it still, I will show one last.
In the night market, South side. ( While going to this one, I saw the one at the night market gate again. So there is a possibility these peachswords and their yaoguais are respawning.)
On the bridge that goes through the night market. Possibly the area of first mission. After this, I had 23 Yao Gais, 19 of them defeated with a peachsword.
If you still don’t have this, check the maps for peachswords and find the rest yourself. Hopefully, you will get it after that.
But even after this, if you still don’t have the stats, remember that you can always start a new game for the DLC. Stat awards stats are retained through different games, so if you didn’t get it now, you can get it in the second playthrough. Hopefully.
Year of the Snake DLC
YotS #1: Bomb Squad
Evidence Bag: Just after we beat 4 guys and before we go to investigate the car, there is an evidence bag on the corner of the same place we beat 4 guys.
After we run the car to the ocean, we will get an address to investigate.
Evidence Bag: Before we start investigating, go to the top of the pyramid-shaped containers to get the evidence bag. This is the pyramid in the middle, not at the sides.
 Complete the first mission.
 Finishing the mission gives this achievement.
Evidence Bag: The evidence bag is in the police building. There is a tower at the corner, it’s near to that one.
YotS #2: Illumination
Evidence Bag: Just before starting this mission, if you check the nearby area from map, you will see a building that looks like upside down U. Left side of this building has the next evidence bag. The bag is inside the building on a sofa.
Evidence Bag: Just when you are about to arrive the meeting locations on rooftops, you will have guests coming from left hand side. After dealing with them go to where they came from to find the next bag, on the left side. Get this before chasing the dealer.
YotS #3-5: Bomb Threats
Evidence Bag: After we send the car to the sea, we can continue to the right side of the map to the big circular area. There is a salzhaus store that sell marriage stuff. Backside of it has some thugs that protect an evidence bag. You should be able to see them on minimap.
YotS #6-7
Evidence Bag: When you are searching for the lucky money, you will arrive at a cafeteria area overlooking the stairs. Go to the end of this area to find the bag.
Evidence Bag: Before starting the mission, go to basketball courts and check beneath the hoops.
 Complete all Secondary Content.
 After we finish this mission, we get this achievement.
Evidence Bag: After you handle the cultists, exit from the cemetery side. After you go 2-3 levels up, you will see a small pool and water on the left side. The evidence bag is there on the edge of the pool.
YotS #8-9: SDUs
YotS #10-12: Last Missions
 Defeat the cultists.
 Now, onto the last achievement of Sleeping Dogs: Definitive Edition.
We should have 3 evidence bags remaining. These show on the minimap now. Nothing on the big map, though.
Evidence Bag: This first one is in our home in Central. Lobby area, behind the stairs. It’s possible you got this one before the guide.
Evidence Bag: The Upper left corner of the Business District has a big skyscraper that looks like a diamond on the map. In its lobby, there are many elevators. The bag is in front of one set of these elevators.
Evidence Bag: Last evidence bag is in Aberdeen Pier. It’s the east-most building of Aberdeen. The bag is on the second floor. You will also see it in your minimap.
 Find all Evidence Collectibles.
With this achievement popping, we should be reaching the 100% completion for Sleeping Dogs: Definitive Edition. Thank you for following up the guide up until this point.
Credits
There are so many guides and manuals to credit. The most important one is this:
https://steamcommunity.com/sharedfiles/filedetails/?id=384988940
A very detailed checklist with a way to get each achievement. You can say I reordered it with extra explanations and added personal experience.
Also, the guides on the True Achievements website were very helpful. Link[www.trueachievements.com]
IGN's Sleeping Dogs page is a great work of documentation. They have almost everything about the game in there. Link
Used Steam Hunters to get the actual data on the achievements. Sleeping Dogs page[steamhunters.com]
Wiki has some good documentation information. Link[sleepingdogs.fandom.com]
Official Manual: Link[www.feralinteractive.com]
Appendix 1: Achievement List
- In with the Gang: Complete Night Market Chase.
- Environmentalist: Perform 5 unique environmental kills.
- Tourist: Win a bet on a cockfight
- Strike Gold: Achieve 1 Gold Stat Award
- Minor Face: Achieve Face Level 2
- Take a Bite out of Crime: Complete a Case.
- A Slap in the Face: Kill someone with a fish
- Man Around Town: Visit Aberdeen, Central, Kennedy Town, and North Point.
- Rookie: Complete 10% of all missions, cases, favors, events, jobs, and races.
- Slight Silver: Achieve 5 Silver Stat Awards.
- Stuntman: Successfully perform an action hijack
- That’ll Show ‘Em: Complete Payback
- Fashion Statement: Change all your clothes in your wardrobe or a clothing store
- Gaining Face: Achieve Face Level 5
- Gold Rush: Achieve 5 Gold Stat Awards.
- Officer: Complete 25% of all missions, cases, favors, events, jobs and races.
- Safe Driver: Cruise for 2 minutes straight without damaging your car.
- Gadgetman: Pick a lock, plant a bug, trace a phone, crack a safe, and take over a spy camera.
- Event Driven: Complete half of the open-world events
- Great Face: Achieve Face Level 10
- Detective: Complete 50% of all missions, cases, favors, events, jobs, and races
- Martial Law: Defeat all 4 Martial Arts Clubs.
- Infowlable: Win 50,000 on a single cockfight
- Whatever's Handy: Use 10 different melee weapons to defeat enemies
- A Big Betrayal: Complete Dockyard Heist
- Substantial Silver: Achieve 15 Silver Stat Awards
- Super Cop: Unlock ten Cop Upgrades
- Sharpshooter: Shoot out a cop's tires while fleeing in a police chase
- Karaoke Superstar: Achieving 90% and above for all songs at the Karaoke Bars in HK
- Gun Nut: Use 10 different firearms to defeat enemies
- Kleptomaniac: Hijack 5 trucks and collect their cargo
- Spiritual Healing: Pray at all of the Health Shrines.
- Wei of the Road: Complete all Street Races.
- West End Scavenger: Unlock every lockbox in Kennedy Town and Aberdeen.
- Hong Kong Super Hacker: Hack every Security Camera in the game.
- Golden Touch: Achieve 15 Gold Stat Awards
- Case Closed: Complete all cases
- Fashion Victim: Purchase all clothing
- Solid Silver: Achieve 30 Silver Stat Awards
- Central Scavenger: Unlock every lockbox in Central
- Bounty Hunter: Complete all of Roland's Jobs
- Big Smiles All Around: Complete Big Smile Lee
- Ultimate Warrior: Unlock ten Triad Upgrades
- Mr. Nice Guy: Complete all Favors
- North Point Scavenger: Unlock every lockbox in North Point
- Event Planner: Complete all of the open-world Events.
- Chief Inspector: Complete 100% of all missions, cases, favors, events, jobs, and races
- Pure Gold: Achieve 30 Gold Stat Awards
- Auto Enthusiast: Purchase all vehicles
- Foodie: Try 10 different foods or drinks
- Pet Cemetery: Send Dogeyes, Ratface, and Ponytail back to Hell.
- Ghosts and Stuff: Complete all secondary content.
- I Can Haz Banishment: Banish Smiley Cat
- Hell Money: Find all the money shrines.
- Cursed Gold: Achieve 5 Gold Awards.
- Bomb Squad: Complete the first mission.
- Hong Kong's Finest: Complete all Secondary Content.
- Cult Master: Defeat the cultists.
- Goodie Monster: Find all Evidence Collectibles
Appendix 2: Stat Awards List (Base Game + Zodiac)
- Overall: Total Stat Awards: 50 | 75
- Fluid Striker: Freerunning Attacks (Includes vault attacks and disarms): 25 | 50
- Environmentalist: Environmental Kills: 25 | 50
- Defence: Counters: 50 | 100
- Martial Artist: Melee Kills: 50 | 100
- Mogul: Total Earnings: 1,000,000 | 2,000,000
- Big Spender: Money Spent: 500,000 | 2,000,000
- Completionist: Total Completion Percentage: 60.00% | 100.00%
- Enforcer: Total Enemies Defeated: 100 | 200
- Public Enemy: Most Kills In One Play Session: 100 | 200
- Survivor: Total Time Survived above Heat Level 1: 0:10:00 | 0:20:00
- Explorer: Total Collectables Found: 120 | 175
- Safe Driver: Total Clean Drive Time: 00:15:00 | 00:30:00
- Handyman: Melee Weapons Kills: 25 | 50
- Gambler: Gambling Earnings: 500,000 | 1,000,000
- Fire Starter: Explosive Kills: 10 | 20
- Wrecker: Total Cars Wrecked: 25 | 50
- Bonebreaker: Limbs Broken: 40 | 100
- Ninja: Sneak Kills: 5 | 10
- Fast Talker: Fast Talk Success: 5 | 10
- Racer: Races Won: 10 | 17
- Disarming: Disarms: 25 | 50
- Lucky Shooter: Blind-fire Kills: 5 | 10
- Gunman: Firearm Kills: 50 | 100
- Sniper: Accuracy: 30% | 50%
- Head Hunter: Headshots: 25 | 50
- Hijacker: Action Hijacks Performed: 10 | 20
- Deadeye: Thrown Weapon Kills: 5 | 10
- Reckless Driver: Time Driven At Full Speed In Class A Car: 0:00:15 | 0:00:30
- Rogue Cop: Kill cops under heat: 25 | 50
- Smashing Success: Number of enemies thrown into Zodiac Island combat props: 50
- Statuesque: Number of Fire Opal Statues Collected: 12
Beat Sleeping Dogs: Definitive Edition's achievements?
Flex it — let your friends know you pulled it off.
- 100% Achievement Guide (by THN)★ 5 (2.3k)49k views3.6k ♥22 minUpdated Jan 7, 2021
- Collectibles Maps (100%)★ 5 (945)38k views1.7k ♥1 minUpdated Oct 31, 2017
- [RUS] Гайд по достижениям (Sleeping Dogs: Definitive Edition)★ 5 (2.3k)35k views3.3k ♥12 minRussianUpdated Sep 3, 2024
- How to be a whole man!★ 5 (1.7k)35k views863 ♥3 minUpdated Aug 31, 2015
- Поиск коллекционных предметов в Sleeping Dogs: Definitive Edition★ 5 (594)24k views899 ♥4 minRussianUpdated Dec 10, 2016
- Health Shrines / Spy Cameras / Lockboxes Maps★ 4 (263)24k views314 ♥1 minBulgarianUpdated Jul 9, 2017


- Upgrading to PremiumTeam Fortress 2★ 5 (20k)1441k views11k ♥6 minUpdated May 11, 2022
- No More Room in Hell Official ManualNo More Room in Hell★ 5 (2.8k)569k views2.1k ♥29 minUpdated Apr 22, 2019
- NMRiH Community Hosting GuidesNo More Room in Hell★ 5 (526)351k views653 ♥1 minUpdated Aug 10, 2022
- ULTIMATE GUIDE FOR GAME DEV TYCOONGame Dev Tycoon★ 5 (5.8k)326k views10k ♥4 minUpdated 23 Jan, 2014
- How to 'Git Gud' Soon™MORDHAU★ 5 (2k)318k views3k ♥68 minUpdated Nov 16, 2024
- Лучшие кооперативные игры SteamPAYDAY 2★ 5 (1.5k)315k views2.1k ♥56 minRussianUpdated Apr 27, 2025






This guide was created by its original author on the Steam Community. Are you the author and want it removed? Request removal.