Stardew Valley 100% Achievement Guide
Disclaimer
Also, many images are taken from stardewvalleywiki.com so their work is most definitely appreciated.
Many thanks to the modding community over at ChuckleFish for pushing out a script to extract various files for information.
Note: I do have a web based version of this guide up here.
https://htonyn.github.io/stardew-valley/
Permanent Choices
Standard Farm: Best for Farming
Riverland Farm: Best for Fishing
Forest Farm: Best for Foraging
Hill-top Farm: Best for Mining
Wilderness Farm: Best for Combat
If you're starting this game for the first time, I would highly recommend going with the Standard Farm. It's the most balanced version and probably the easiest to play with.
Prior to this update, if you gained progress in both routes, you would miss both achievements. This has been fixed so that you are guaranteed at least one ending. As such, you can now mix and match completing bundles in the community center as well as purchasing upgrades through the Joja Membership.
Now, these achievements REMAIN mutually exclusive, so it is still impossible to obtain them in a single playthrough without reloading an older save after completing one.
Summary- If you want to do the Joja route, make sure you do not finish the community center with a bundle.
- If you want to do the Local Legend route, make sure you do not buy the last upgrade in the Joja shop.
- If you want both, then back up a save near the end, complete a route, then reload and do a different route.
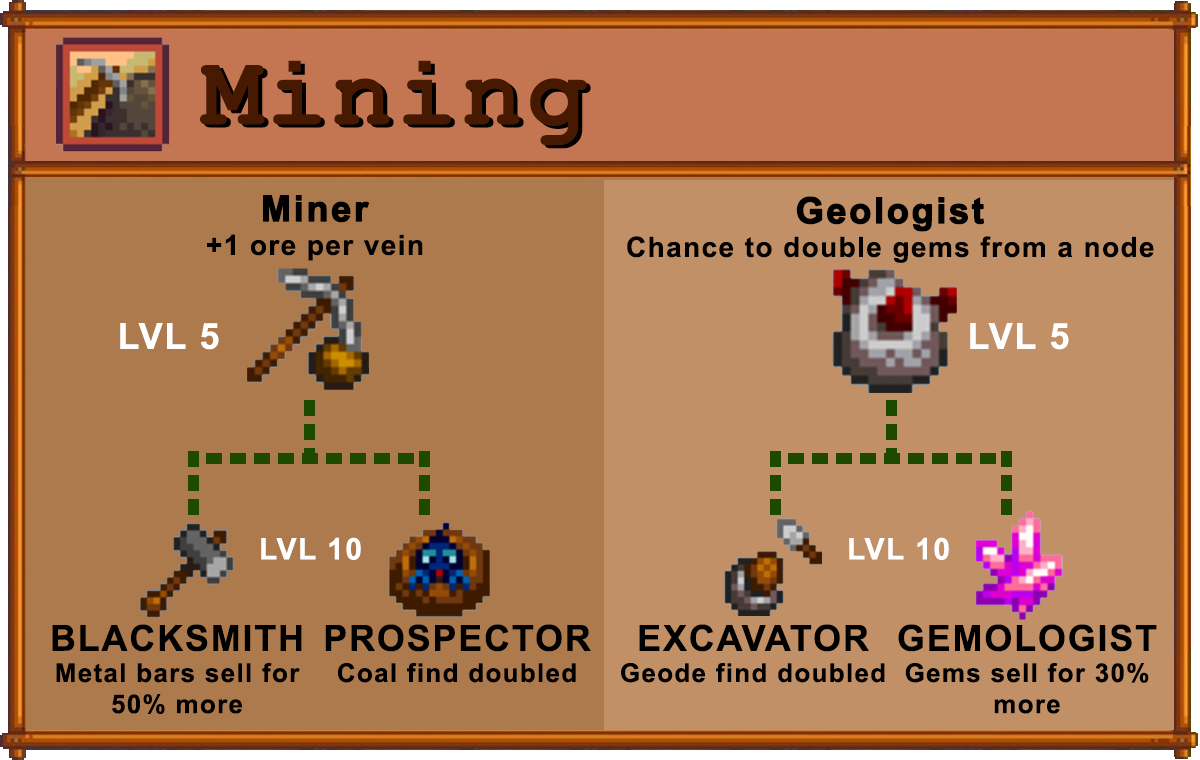
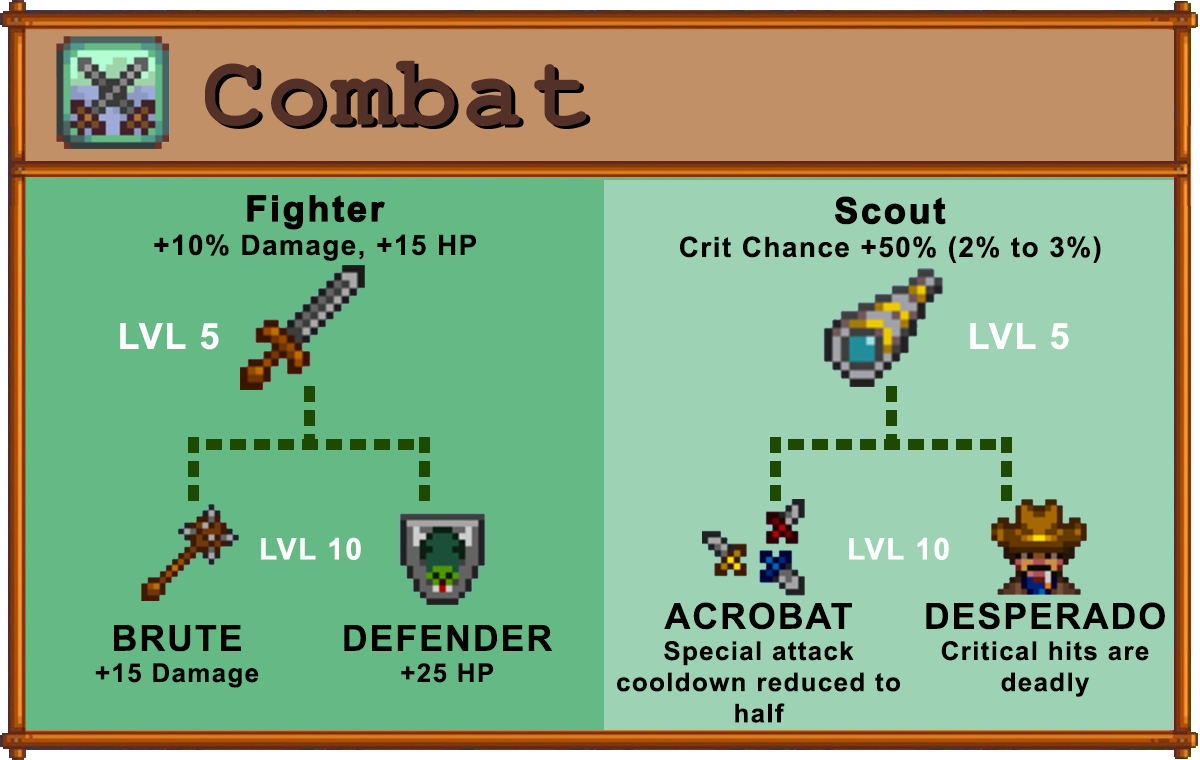
See Master of the Five Ways for more details on skills
My Preference
Farming: Tiller -> Artisan (for Legend achievement)
Foraging: Gatherer -> Tracker (for Complete Collection achievement)
Mining: Geologist -> Excavator (for Complete Collection achievement)
Fishing: Fisher -> Pirate (for Complete Collection achievement)
Combat: Fighter -> Brute (Playstyle)
Mushrooms
Grows all the mushrooms in your cave at random in 6 given mushroom plots
Bats
Fruitbats randomly leave fruits (regardless of season) in the cave.
Which to pick?
If your only goal is to simply complete the Community Center bundles, then I'd pick the fruitbats because planting saps could prove expensive and only grows during specific seasons. But the yields on trees are much better than mushrooms.
If you're going for the perfect setup, I'd pick mushrooms. Fruit trees bare 1 fruit every day as long as you're in season, and you don't have to regrow these trees. Mushrooms on the other hand, are grown primarily in the cave, and the secret woods.
Spring
Summer
Fall
Winter
Magical Construction Questline
This unlocks two new areas that have fishing related to them for the fishing achievement. Other than that, it unlocks new buildings.
Step 1: Complete Joja route or Community Center route.
- You can do either one, but this needs to be done to access this questline. So either you earned the Local Legend achievement, or the Joja Co. Member of the Year achievement.
Step 2: Visit the Railroad area for a Cutscene
- Here you will get a cutscene with the Wizard regarding his Magic Ink. In order to remove the seal to enter, you must have the Dark Talisman.
Step 3: Retrieving the Dark Talisman
- Visit Krobus who resides in the Sewers. In order to access the sewer, you must have turned in enough artifacts to the library.
- Krobus will unlock a new area, Mutant Bug Lair, that contains a chest at the end with the Dark Talisman.
- This new area has waters containing the Slimejack fish.
Step 4: Witch Swamp
- Returning to the Railroad area with the Dark Talisman, you can remove the seal. Enter the cavern and you'll be at the Swamp. Now, you can fish here for the final new fish: Void Salmon
- A goblin will prevent you from passing him. You need a Void Mayonnaise to move him. Void Egg + Mayonnaise Machine.
- Enter the house, the ink on the left table. Return to the Wizard's Tower, the red seal on the ground will teleport you there.
Ginger Island
After you've restored the Community Center, you'll get a letter from Willy to visit the Fish Shop again. This time, enter the back room to see a cutscene with the boat.
- 200 Hardwood
- 5 Iridium Bar
- 5 Battery Pack
https://stardewvalleywiki.com/Ginger_Island
https://stardewvalleywiki.com/Golden_Walnut
- Danger in the Deep for hardmode mines in the Mountains
- Skull Cavern Invasion for hardmode mines in the Skull Caverns
These quests will enable a separate mode for the adventure areas and will also introduce new mining nodes for radioactive ore. These ores do not spawn on floors of multiples of 5.
For the mines, once you've reached Floor 120, there will be a Shrine of Challenge on Floor 120 that you can toggle the dangerous mod.
https://stardewcommunitywiki.com/Perfection
A Big Help - Help Requests
 Gofer
GoferComplete 10 'Help Wanted' requests.
 A Big Help
Complete 40 'Help Wanted' requests.
If you go to Pierre's Shop, there are two things in front of his store.
- A Calendar showing all birthdays of people you know, and festival dates
- Help Request
Each help request is only available on that particular day, and the delivery time only spans 2 days. So you get the current day, and the next day to complete the delivery until it disappears.
Complete 40 of these to get the achievement. As far as I know, there are no counters that you can check naturally to figure out your progress.
Tip: For Clint's copper ores, and Willy's fish requests, it requires you to ACQUIRE new items as opposed to 'giving' them the items. So those items must be obtained after accepting their request. Acquire simply means it needs to be newly introduced to your inventory so dropping it and picking it back up is valid.
Complete Collection - Museum | Minerals
 Treasure Trove
Donate 40 different items to the museum.
 A Complete Collection
Complete the museum collection.
Note: There are more slots in the museum than there are artifacts, so do not worry about that.
There are 53 Minerals, and 42 Artifacts in the game to find. Minerals are either found as nodes in the Mines, Skull Cavern, or at the Quarry.
Artifacts can be obtained through using a hoe on the ground specifically on top of worms. The area you're at will determine what you get. Then the rest are item drops via monsters.
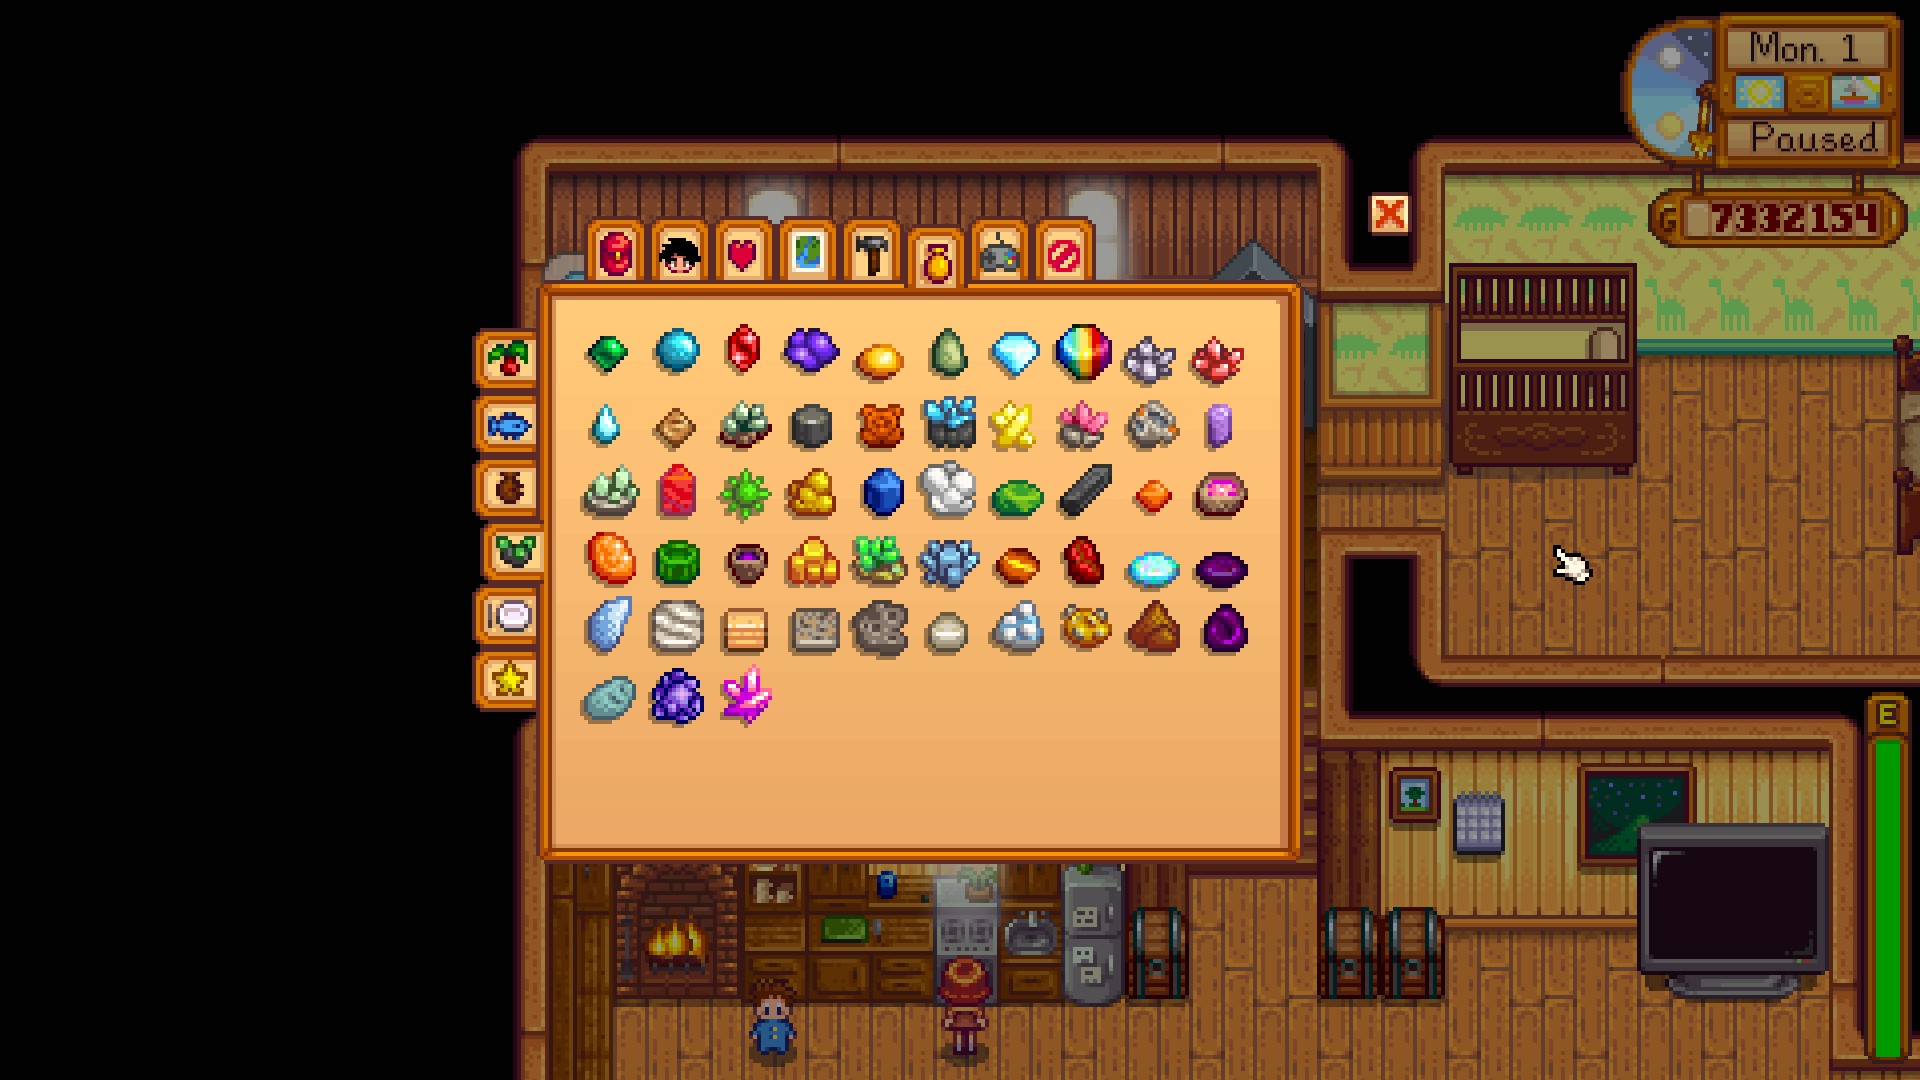


Complete Collection - Museum | Artifacts
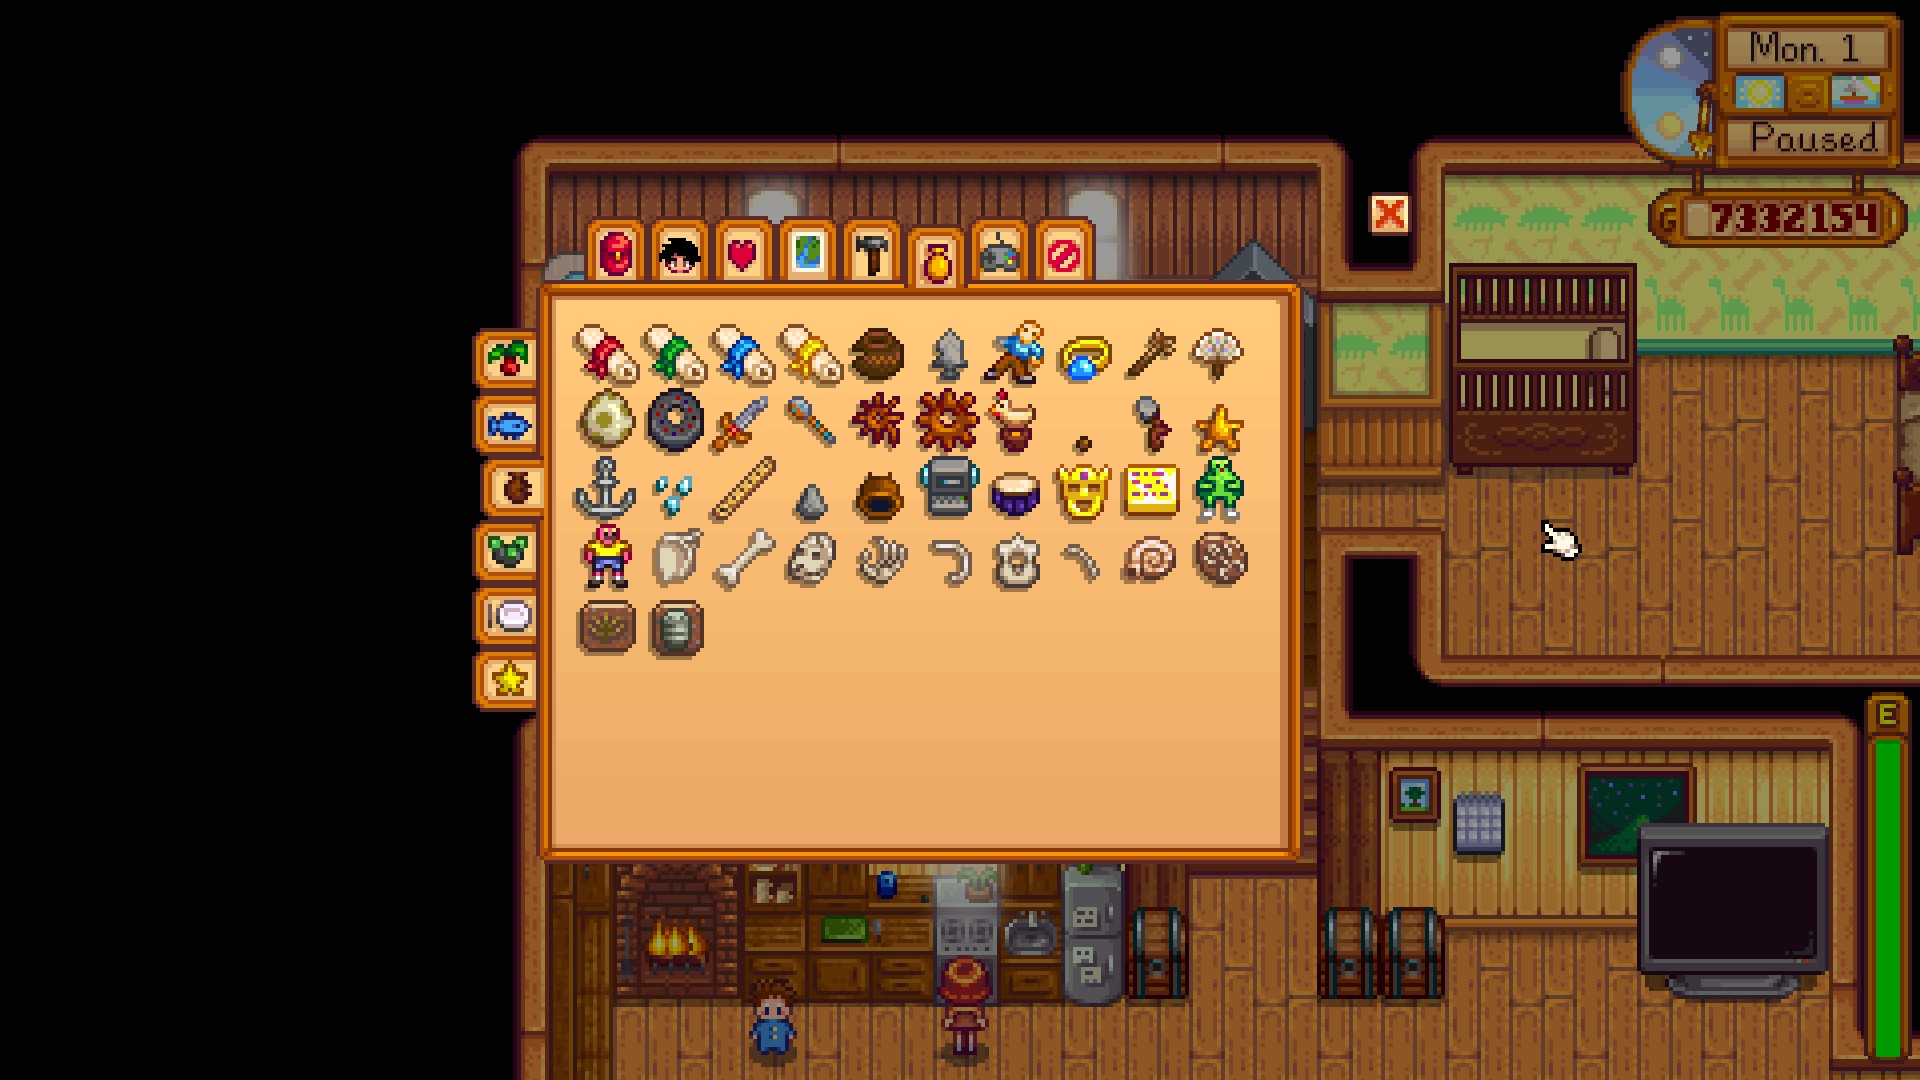
Now, digging for artifacts will most likely result in the most difficult of challenges. This is why in the first section, I highly recommend using the Tracker specialization for Forager. This specialization will throw arrows on the edge of your map that points towards ANYTHING that is forageable. That includes random fruits laying out, or worms on the ground. It's much more efficient to simply clear out all the forageable markers, then move to the next area.
Foraging: Gatherer --> Tracker


Craft Master - Page 1
 D.I.Y.
Craft 15 different items.
 Artisan
Craft 30 different items.
 Craft Master
Craft every item. There are currently 148 different items you can craft. Recipes can be purchased, or earned through leveling up your skills.
- There are 2 Festive Recipe: Jack O' Lantern as the Spirit's Eve Festival and the Tub 'O Flower at the Flower Dance Festival.
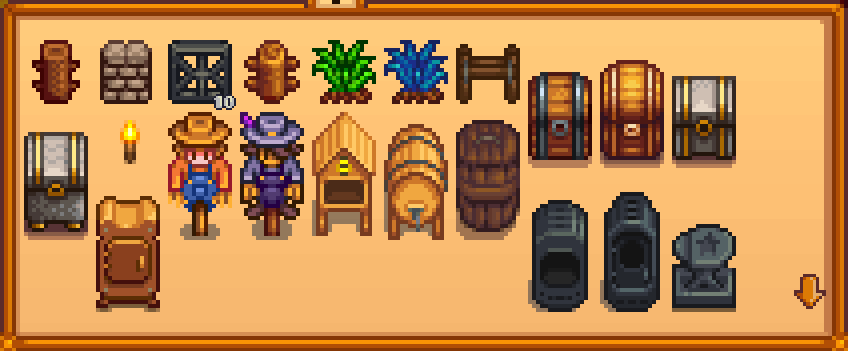


Craft Master - Part 2
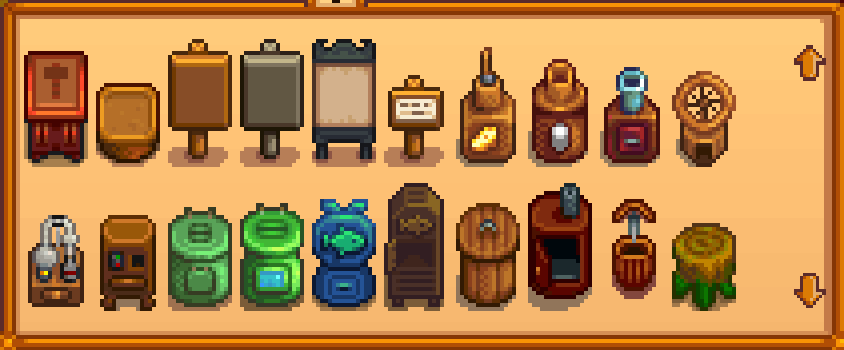


Craft Master - Part 3
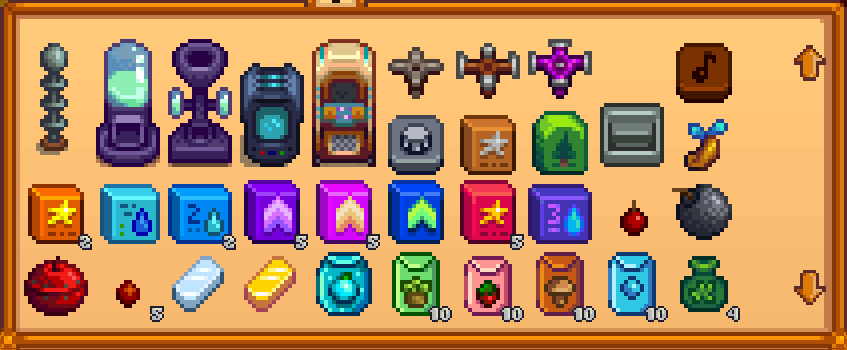


- "Community Cleanup" for Linus
Craft Master - Part 4
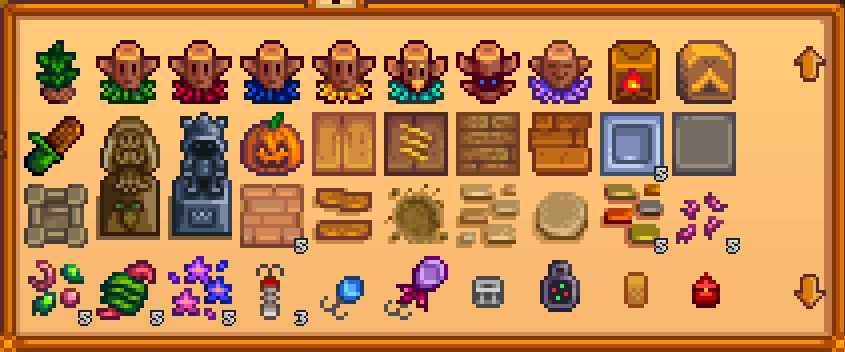


Craft Master - Part 5
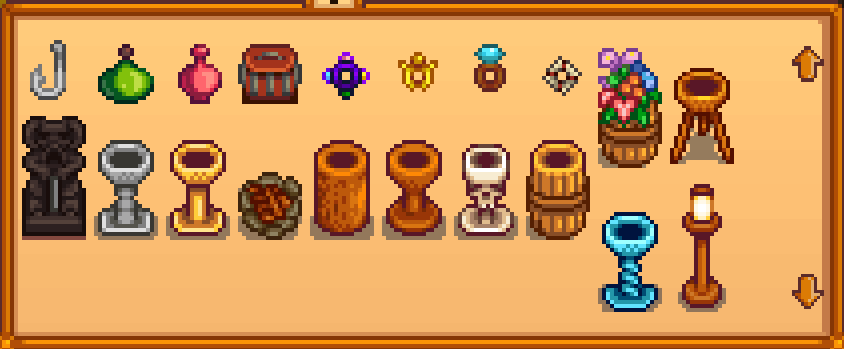
Wedding Ring is only required in MP games.







Craft Master - Part 6
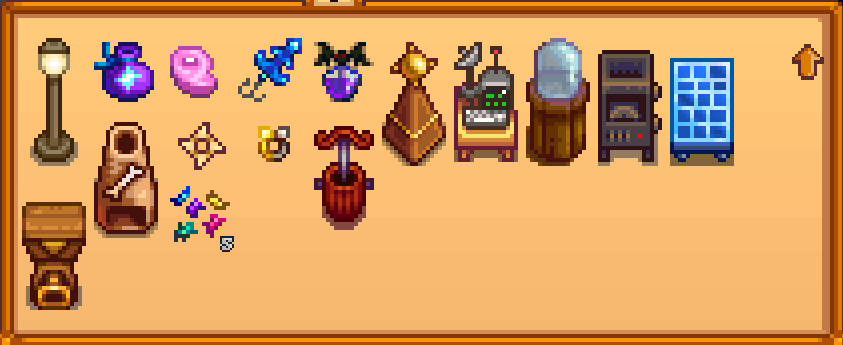


Gourmet Chef - Part 1
If you check the cooking tab, there are two more listed after the Crab Cakes which are actually craft items with a cooking label: Oil of Garlic and Life Elixir. These are not required for the Gourmet Chef achievement, and can't be revealed.
You are allowed to cook regardless of having the recipe, but this achievement REQUIRES it.
- Every Wednesday and Sunday, a cooking show called 'The Queen of Sauces' comes on and you can learn 1 of 32 recipes. On Wednesdays, you will get a random re-run of something that has already been aired. On Sunday, you will get a SPECIFIC recipe depending on the day and year.
- For the majority of the rest, you can get them by increasing your relationship with specific villagers. Most of the requirements are either 3 or 7 hearts to unlock the recipe via mail. The number next to the name will designate how many hearts you need.
- Finally, the Stardrop Saloon, Gus' store, sells a few recipes.
 Cook
CookCook 10 different recipes.
 Sous Chef
Cook 24 different recipes.
 Gourmet Chef
Cook every recipe.
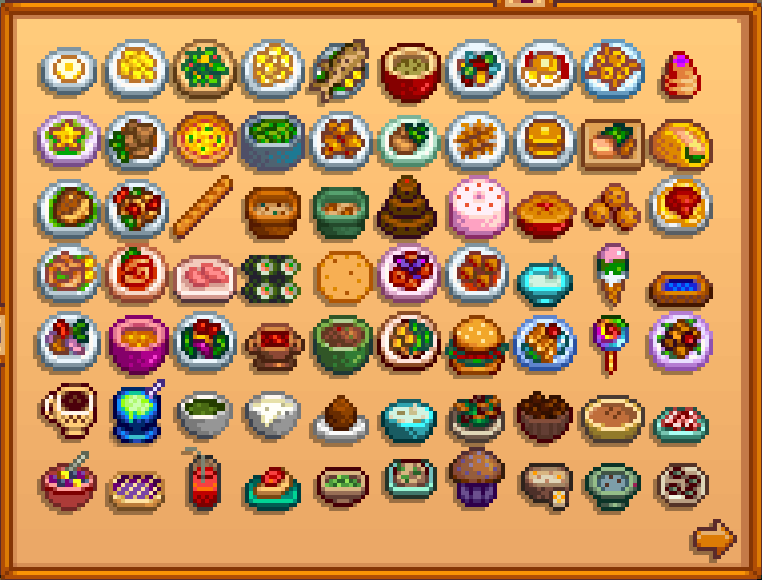
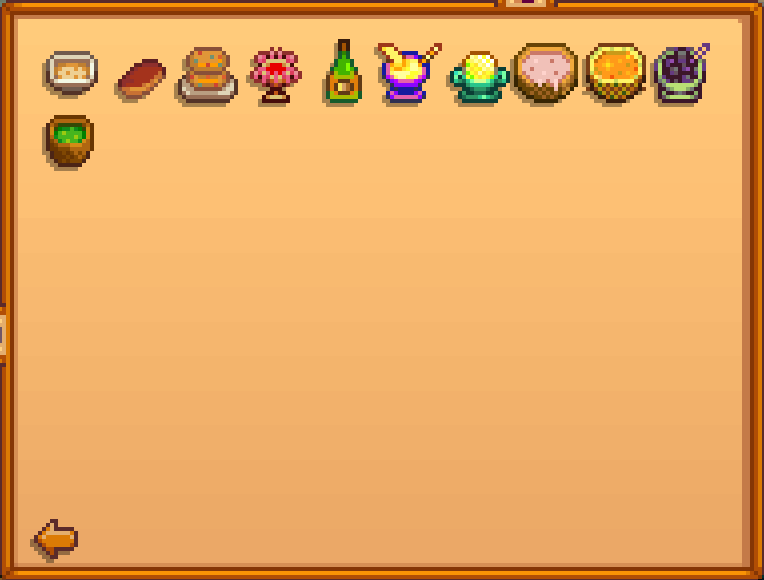
Hot Fix: If you are missing Evelyn's Cookie Recipe, then read the following so you can re-see Evelyn's cutscene and relearn the recipe
Navigate to your save files at: %appdata%/Roaming/StardewValley/Saves/<your_save> then open both files in here. One has the same name as your folder, the other is named SaveGameInfo. Open these using a text editor, notepad works. Now search for 'eventsSeen' using CTRL+F and then go to the right until you find '<int>19</int>'. Delete this in both saves, save and reboot the game.


Gourmet Chef - Part 2


Gourmet Chef - Part 3


Note: If you already cooked all items before finding all recipes, find all the recipes, then cook any item to force a check.
Fector's Challenge - Journey of the Prairie King
 Prairie King
Beat 'Journey Of The Prairie King'.
 Fector's Challenge
Beat 'Journey Of The Prairie King' without dying.
If you visit The Stardrop Saloon, aka the bar, where Gus works, there is an arcade machine to the right. Well two of them. The left one is 'Journey of the Prairie King' and the right one is 'Jumino Kart' which can only be played using the Skull Key.
Anywho, in Journey of the Prairie King, there a total of 12 levels, including 3 boss levels which can be separated into 3 areas as well. To me, all the areas are pretty much the same, with slight differences so there isn't much for use for strategy except for one of the early levels that creates a box in the middle. You can sit inside the box in the corner and then have them come in 1-2 at a time making it really easy to beat.
Mechanics- Each enemy has a specific number of health, so it takes a specific number of hits to kill a specific enemy depending on your bullet damage which can be upgraded
- If you get touched, you die.
- At the top of the screen, there is a bar. This is the amount of time you have to survive to prevent more enemies from spawning.
- Beat each level by clearing out all the enemies after time expires.
- Note: Boss levels will ALWAYS drop a life. Pick this up BEFORE you pick-up the item that the boss dropped.
Upgrades
At the end of every 2nd level, you'll see a guy come onto the map from the top of the map and go to the middle. He will let you buy an upgrade using coins from the game. Upgrades are listed from left to right. Each has 3 tiers.
- Boots: Increases movement speed
- Gun: Increases firing rate
- Ammo Box: Increases bullet damage (2x)
Power-ups
Whenever you kill an enemy, they have a chance to drop a power-up. One power-up can be saved in a slot at the top left and can be activated whenever you wish. If you pick up a power-up while the slot is occupied, that newly acquired power-up will be activated immediately.
- Coin: Comes in 1x or 5x, is a form of currency to purchase upgrades
- Tombstone: Has a yoba sigil on it, turns you into a zombie where touching enemies will now kill them.
- Extra Life: +1 Player Life, looks like the player's head
- Skull Bomb: Clears out the entire map of enemies
- Coffee: Increases movement speed
- Wheel: Shoots a bullet in all 8 directions simultaneously
- Shotgun: Shoots 3 bullets instead of 1 in a cone shape
- Machine Gun: Significantly increases firing rate
- Red Box: Teleports your character to a random part of the map and stops enemies from chasing you
- Star: Coffee + Shotgun + Machine Gun
Tips
- If an item drop is near a spawn, make sure you're shooting at the spawn in case something spawns as you get near it.
- Coins are the most important item-drop. Make sure you get them all.
- In terms of upgrades, the ammo box is by far the best upgrade giving you 2x damage each time you buy it. I would ignore the other two upgrades and make sure to save up enough coins for the damage. Less shots to kill = less enemies on the map to dodge/manage.
- Chaining power-ups is a powerful tactic especially if you're falling behind in the killing ratio. Using firing rate bonuses along with multi shot
- Occasionally, you will see a red fat dragon appear on the map flying in either a horizontal or vertical direction. This dragon will attract the attention of ALL enemies while it's on the map. Take advantage of this.
The rest is up to you. Journey far Prairie King.
Full House - Marriage & Kids
 Full House
Get married and have two kids.
Step 1: Pick a Marriage Candidate
Gender does not matter here. Don't argue with it, freedom of choice is beautiful. All marriage candidates have the (single) tag under their name in the relationship tab.
Step 2: Upgrade Your House
You cannot propose, until you get the first upgrade to your house. So make sure to do that.
Cost: 10,000g
Resources: 450 wood
Step 3: Repair the Bridge at the Beach
In order to do Step 5, you need to do this step. Costs 300 wood to repair.
Step 4: Reach 8-Hearts in Relationship
Once you get a single member to 8 hearts, you must buy a Bouquet from Pierre and then give it to the marriage candidate. Otherwise, you will never cross the 8-heart threshold. This gift will not count against your weekly gifting.
Step 5: Reach 10-Hearts in Relationship
Now that you've got to 10 hearts, you need to wait for a rainy day during a non-winter season. Snow during winter doesn't count as 'rain'. When it's raining, simply go to the beach and cross over to the eastern side and there will be a man there. Buy a Mermaid Pendant off of him for 5,000g.
I'll put a note here to be safe: there have been several bugs regarding mermaid pendants breaking and you can fix it via save file editing. The developer has made a hotfix allowing you to repurchase the mermaid pendant should something go wrong, but if you want to be careful, then back-up a save prior to giving to your future Significant Other (S.O.)
Step 6: Full House
In your post-wedding life, you will need room to have kids and that comes automatically when you get the second and final upgrade to your farmhouse. Hardwood is easily farmed everyday at the secret woods. Head south from your farm, go far west corner. Chop the fallen branch using a Steel Axe (or above), then go left.
Cost: 50,000g
Resources: 150 Hardwood
Step 7: 13/12 Hearts - Stardrop Occurrence
Once you're married, and got your house fully upgraded, all you need now is to increase your relationship to 13/12 hearts. The maximum hearts is 12 on the relationship menu, but in order to have babies you need to reach 13, which is why it's referred to as 13/12. Confusing, yes. From time to time when talking to people, you will see the relationship values next to their portraits. If you see 13/12, then you simply need to wait one day when you sleep.
These prompts occur on different nights and span over a couple of seasons, so if you're waiting for it to happen, don't. Just let it happen, and keep your SO happy. If your relationship is heterosexual, then you'll have a baby naturally. If your relationship is homosexual, then the adoption route is used.
Repeat Step 7 twice for your second child. I believe it's always one girl, and one boy.
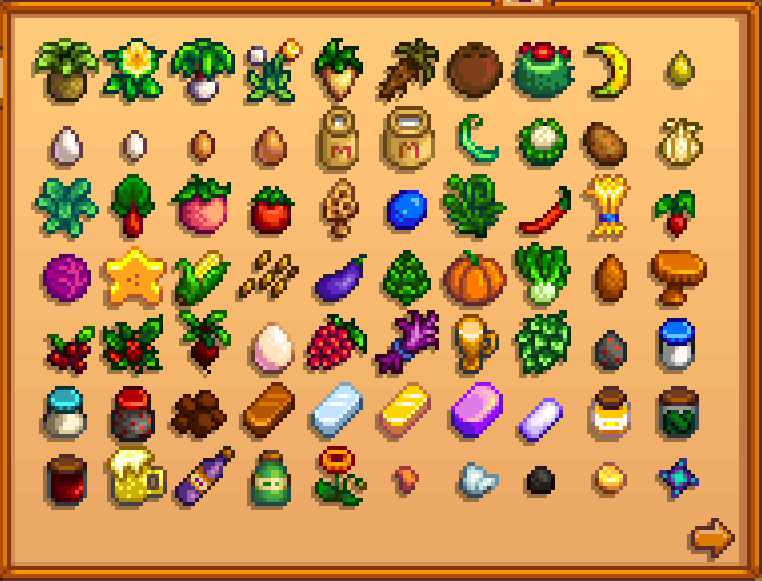
Full Shipment - Page 1 | Part 1
 Full Shipment
Ship every item.
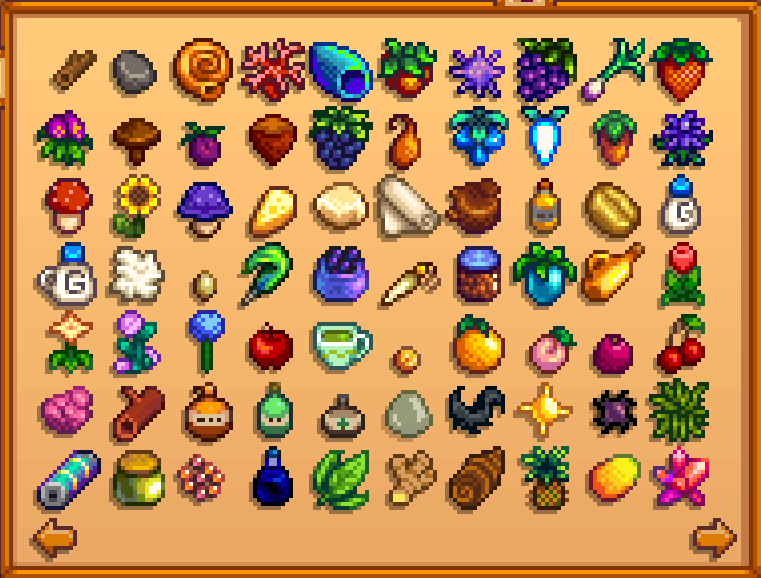
If you check the collections tab, and the very first set of collections, you simply have to ship one of each item that's listed here.


Full Shipment - Page 1 | Part 2


Full Shipment - Page 2 | Part 1


Full Shipment - Page 2 | Part 2


Full Shipment - Page 3
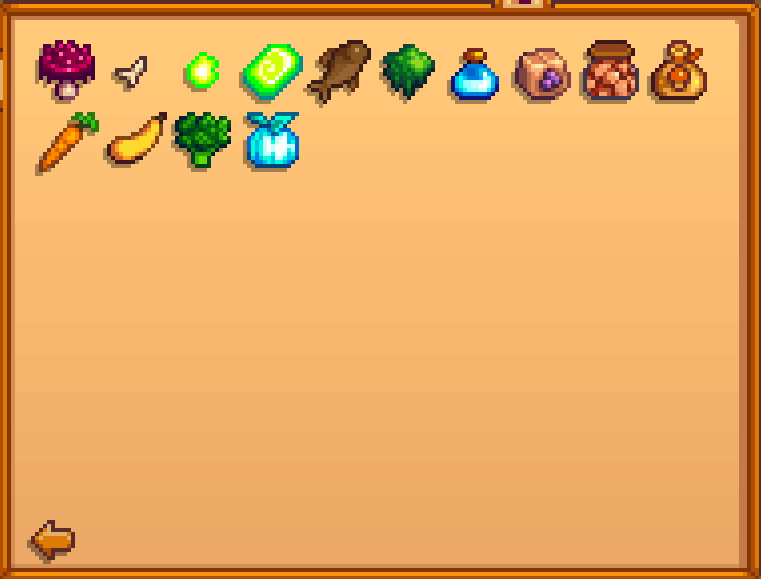


Joja Co. Member Of The Year - Town Development
 Joja Co. Member Of The Year
Become a Joja Co. member and purchase all the community development perks.
To become a Joja Co. Member, head to the Joja Mart and talk to Morris on the right. You can buy a membership for 5,000g. After that, talking to him again will let you view the Joja Development Form shown below.
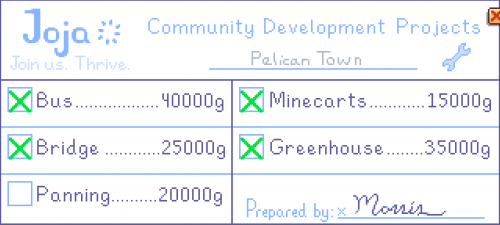
Each entry mirrors a complete task in the Community Center, so in order to buy a development, you cannot finish any of them inside of the Community Center before doing this.
Simply buy each of them for 135,000g total and go to town after they're all built and you'll find a cutscene and the achievement.
Legend - Money Making
 Greenhorn
Earn 15,000g
 Cowpoke
Earn 50,000g
 Homesteader
Earn 250,000g
 Millionaire
Earn 1,000,000g
 Legend
Earn 10,000,000g
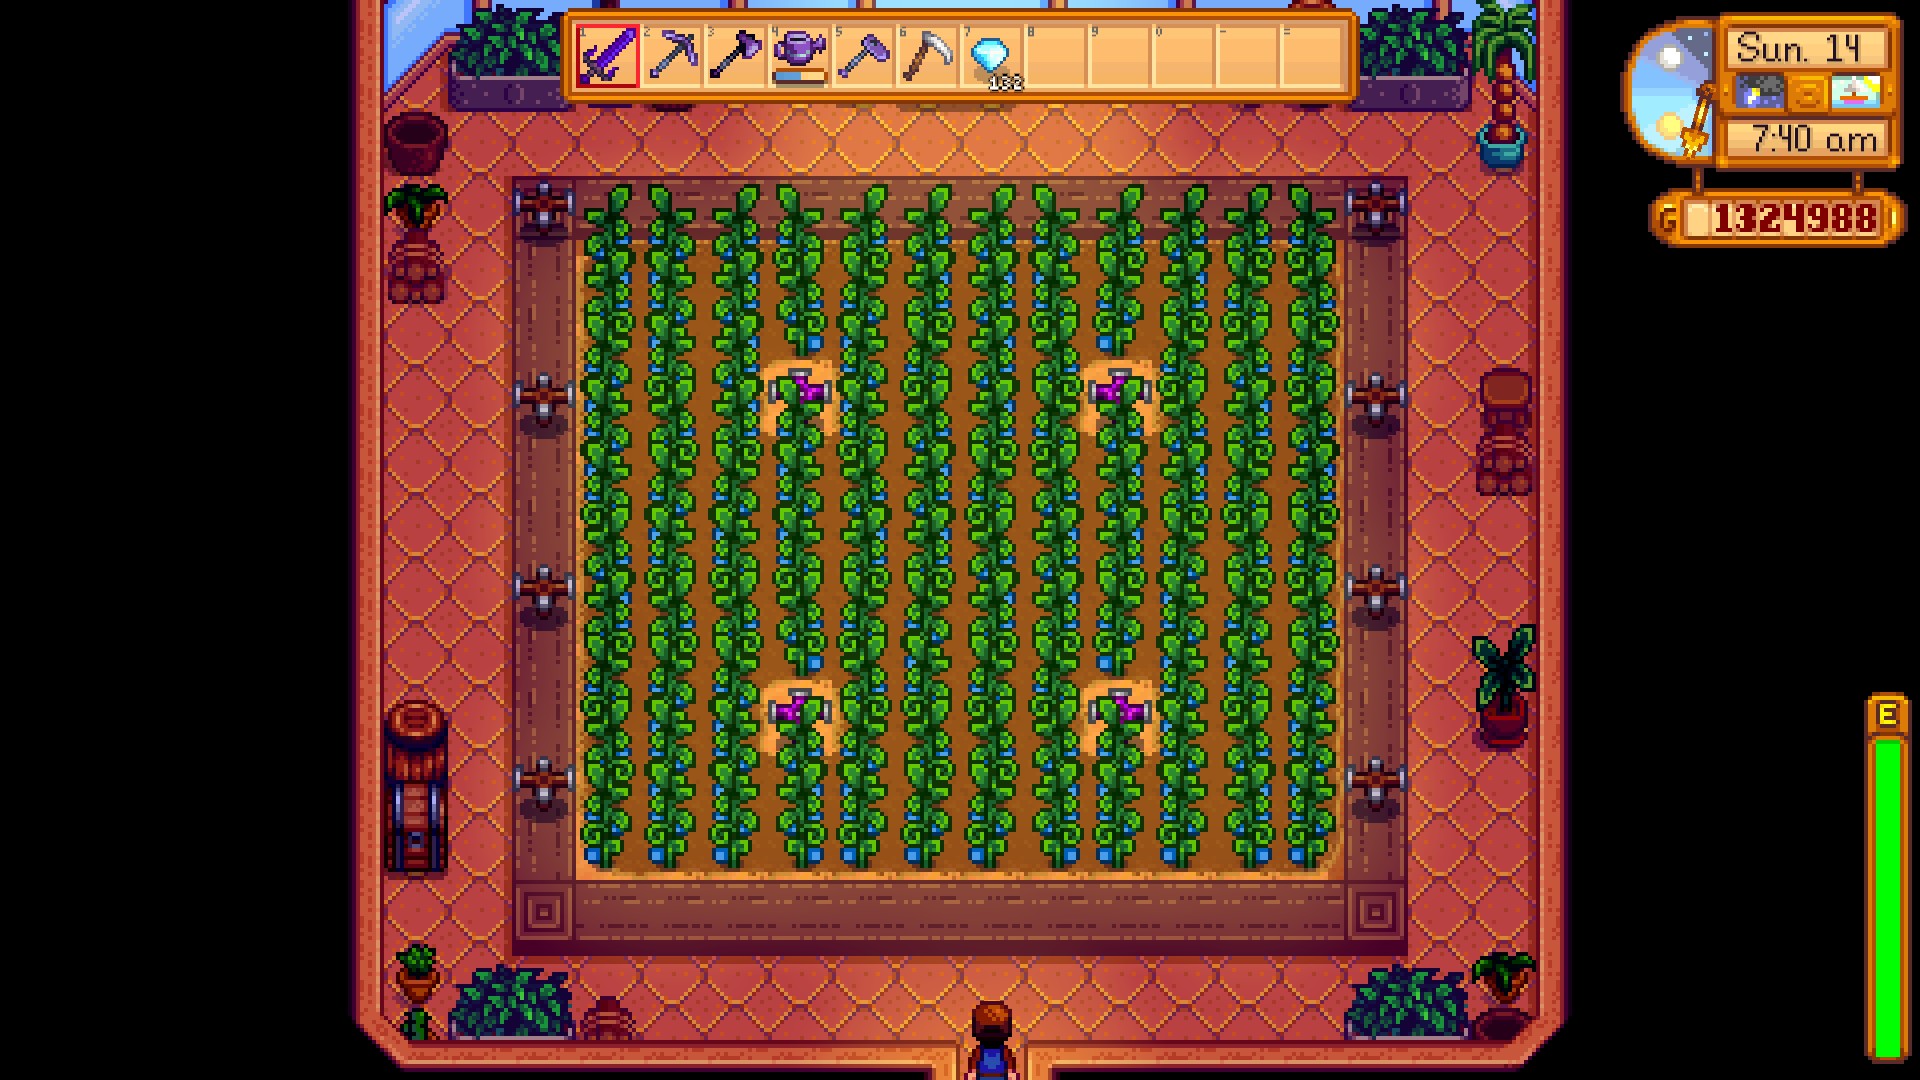
The fastest method I went with was setting up the greenhouse for 116 ancient fruits, and make sure they all produce on the same day no matter what. That way you save a BUNCH of time. Also, probably save this for the last thing to do, because you're about to ruin quite a few things if you're rushing this. Note: Relationship has been updated so anyone with max relationship will no longer lose hearts.
If you cannot find an additional Ancient Seed relic, you may try to use the seed maker and produce one that way.
Money
Next, make sure to have the Artisan perk where artisan goods are worth 50% more. Finally, you'll also need 116 kegs so you can simultaneously transfer the fruit into wine.
Ancient Fruit is the highest valued fruit at 750 gold. Cranberries and blueberries would have to output roughly 5-7 fruits per tile in order to match this base price which won't happen. You could argue, less days, but you'll see why in a bit.
Wine
The base value of wine takes the base value of the fruit, then multiplies it by 3. So at 750 gold, an Ancient Fruit Wine is worth 2,250g each. With the Artisan specialization, that increases from 3x to 4.5x which is 3,375g per wine. Then with 116 wine, you end up with 391,500g per batch. The quality of the fruit is ignored when it comes to wine.
Time
Now for the time saving portion: Ancient fruit initially takes 28 days to grow, then reproduces within 7 days after the first fruit. Then wine takes 6 days to produce. This means every 7th day, you pick up all the fruit in the greenhouse, then pick up all the wine while placing new ancient fruit into the kegs. There's no reason to pick-up the wine when it finishes as you have nothing new to put in.
You can simply sleep for 7 days in a row, then get the new batch, rinse and repeat.
RisksYou will skip a MASSIVE amount of days if you do this which means there will be some issues:
- Relationships no longer decay once they reach 10-hearts.
- Weeds on your farm will grow out of control and may break (R.I.P. Crystalarium)
- Fences will break down
So you can manage those if you want, or not. Completely up to you. There is another thing that works well with this time skip; however. You can watch the TV for Cooking Recipes every Wednesday and Sunday.
Living Large - House Upgrades
 Moving Up
Upgrade your house.
All house upgrades are done by Robin whose upgrades are available at her shop. You MUST bring the materials required to upgrade with you to her shop.
Costs: 10,000g
Material: 450 Wood
Additions: Upgrade creates a bedroom, adds a kitchen to allow you to cook, and a refrigerator that doubles as a chest. Cooking items will use items from the refrigerator automatically.
 Living Large
Upgrade your house to the maximum size.
Costs: 50,000g
Material: 150 Hardwood
Additions: Adds two new rooms: an empty room, and a baby room for any potential future kids. Kitchen is also longer.
Local Legend - Community Center Bundles
 Local Legend
Restore the Pelican Town Community Center.
A quick rundown on how to interpret the following tables. For each bundle, there are a certain number of 'Slots' that you can use. For most of the bundles, the number of items it requests is the same, meaning you need ALL of them. However for others, there are more items available than slots, meaning you can pick the ones you want.
There is a STRONG chance that you will miss this achievement due to conflicting cutscenes attempting to occur on the SAME day. This chance is strong BECAUSE completing the community center will boost the relationships of nearly everyone in town thus making you hit relationship checkpoints that may or may not trigger upon entering town and overwriting the community center cutscene.
Hot Fix: If your game was bugged by having the event appear during a festival, or another cutscene and not having the cutscene appear for the achievement do below. This bug shouldn't happen anymore with a recent update.
Navigate to your save files at: %appdata%/Roaming/StardewValley/Saves/<your_save> then open both files in here. One has the same name as your folder, the other is named SaveGameInfo. Open these using a text editor, notepad works. Now search for 'eventsSeen' using CTRL+F and then go to the right until you find '<int>191393</int>'. Delete this in both saves, save and reboot the game.
Master Angler - Fishing - Part 1
 Fisherman
Catch 10 different fish.
 Mother Catch
Catch 100 fish.
 Ol' Mariner
Catch 24 different fish.
 Master Angler
Catch every fish.
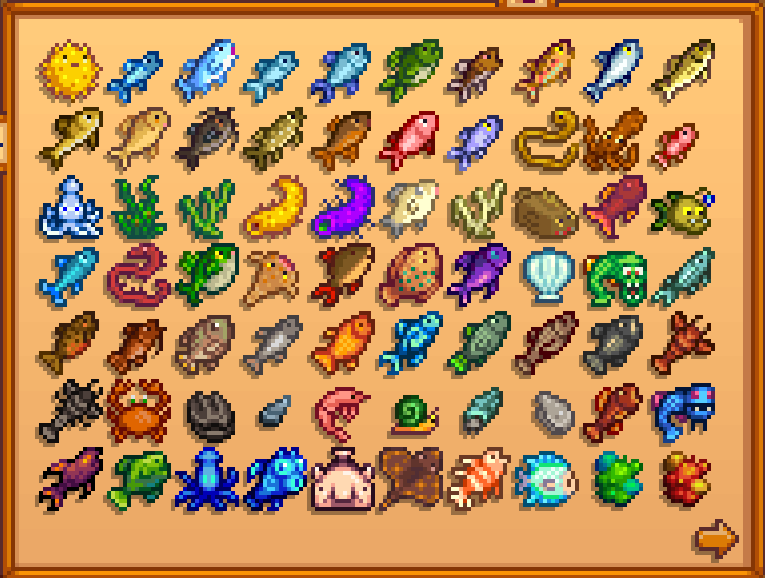
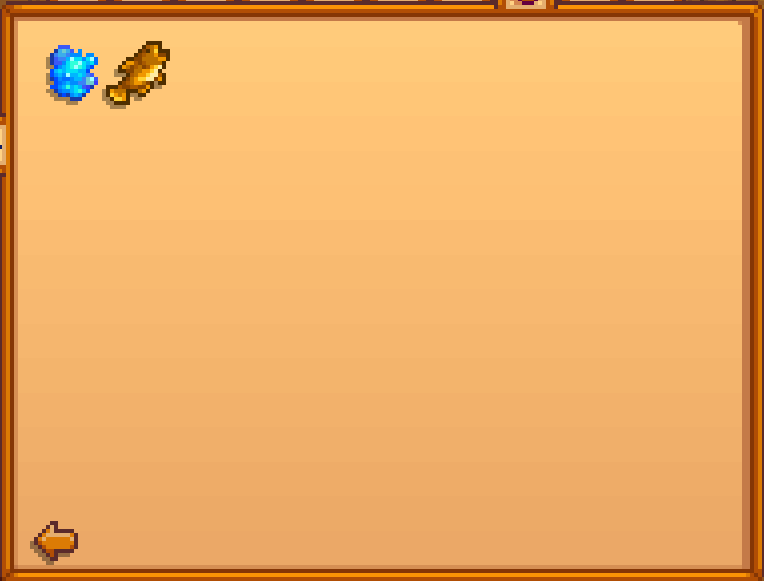
Morning: 6AM-11AM
Afternoon: 12PM-4PM
Morning/Afternoon: 6AM-7PM
Noon/Night: 12PM-2AM
Afternoon/Night: 4PM-2AM
Night: 6PM-2AM


Master Angler - Fishing - Part 2


Goby Location
Master Angler - Fishing - Part 3
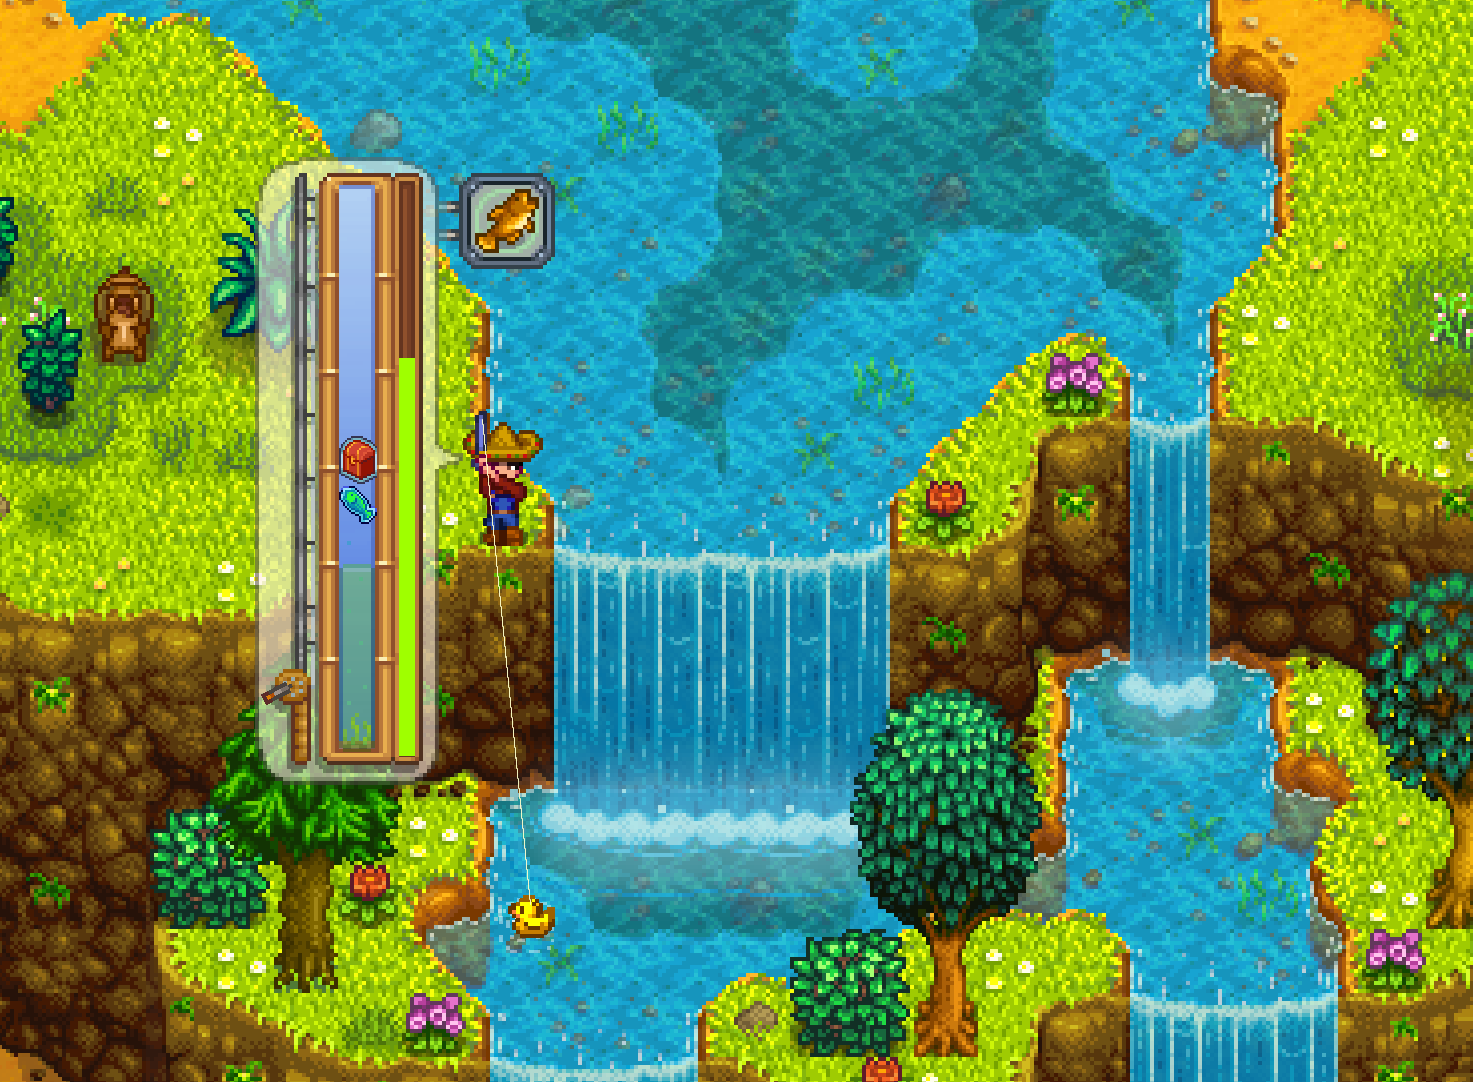
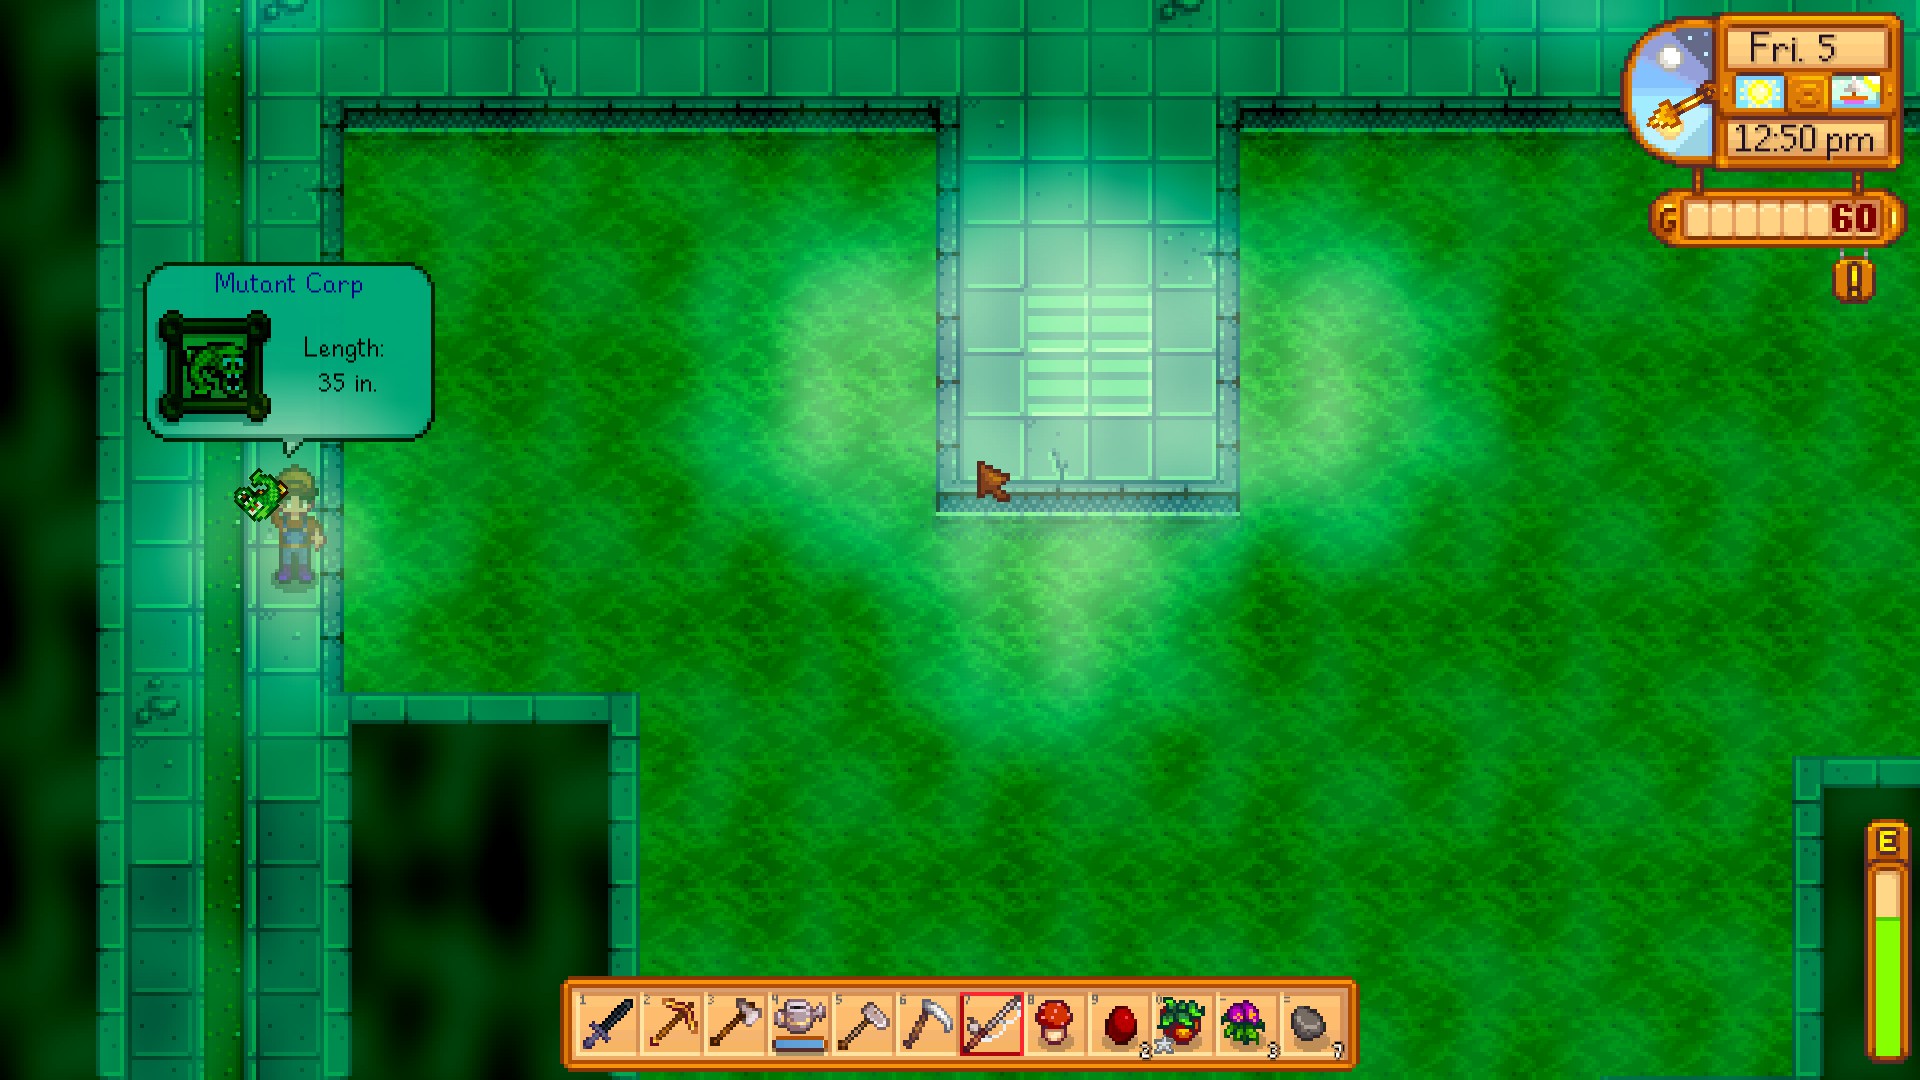 Angler - Using the spot I'm standing on, fish towards the north using max power on an Iridium Rod
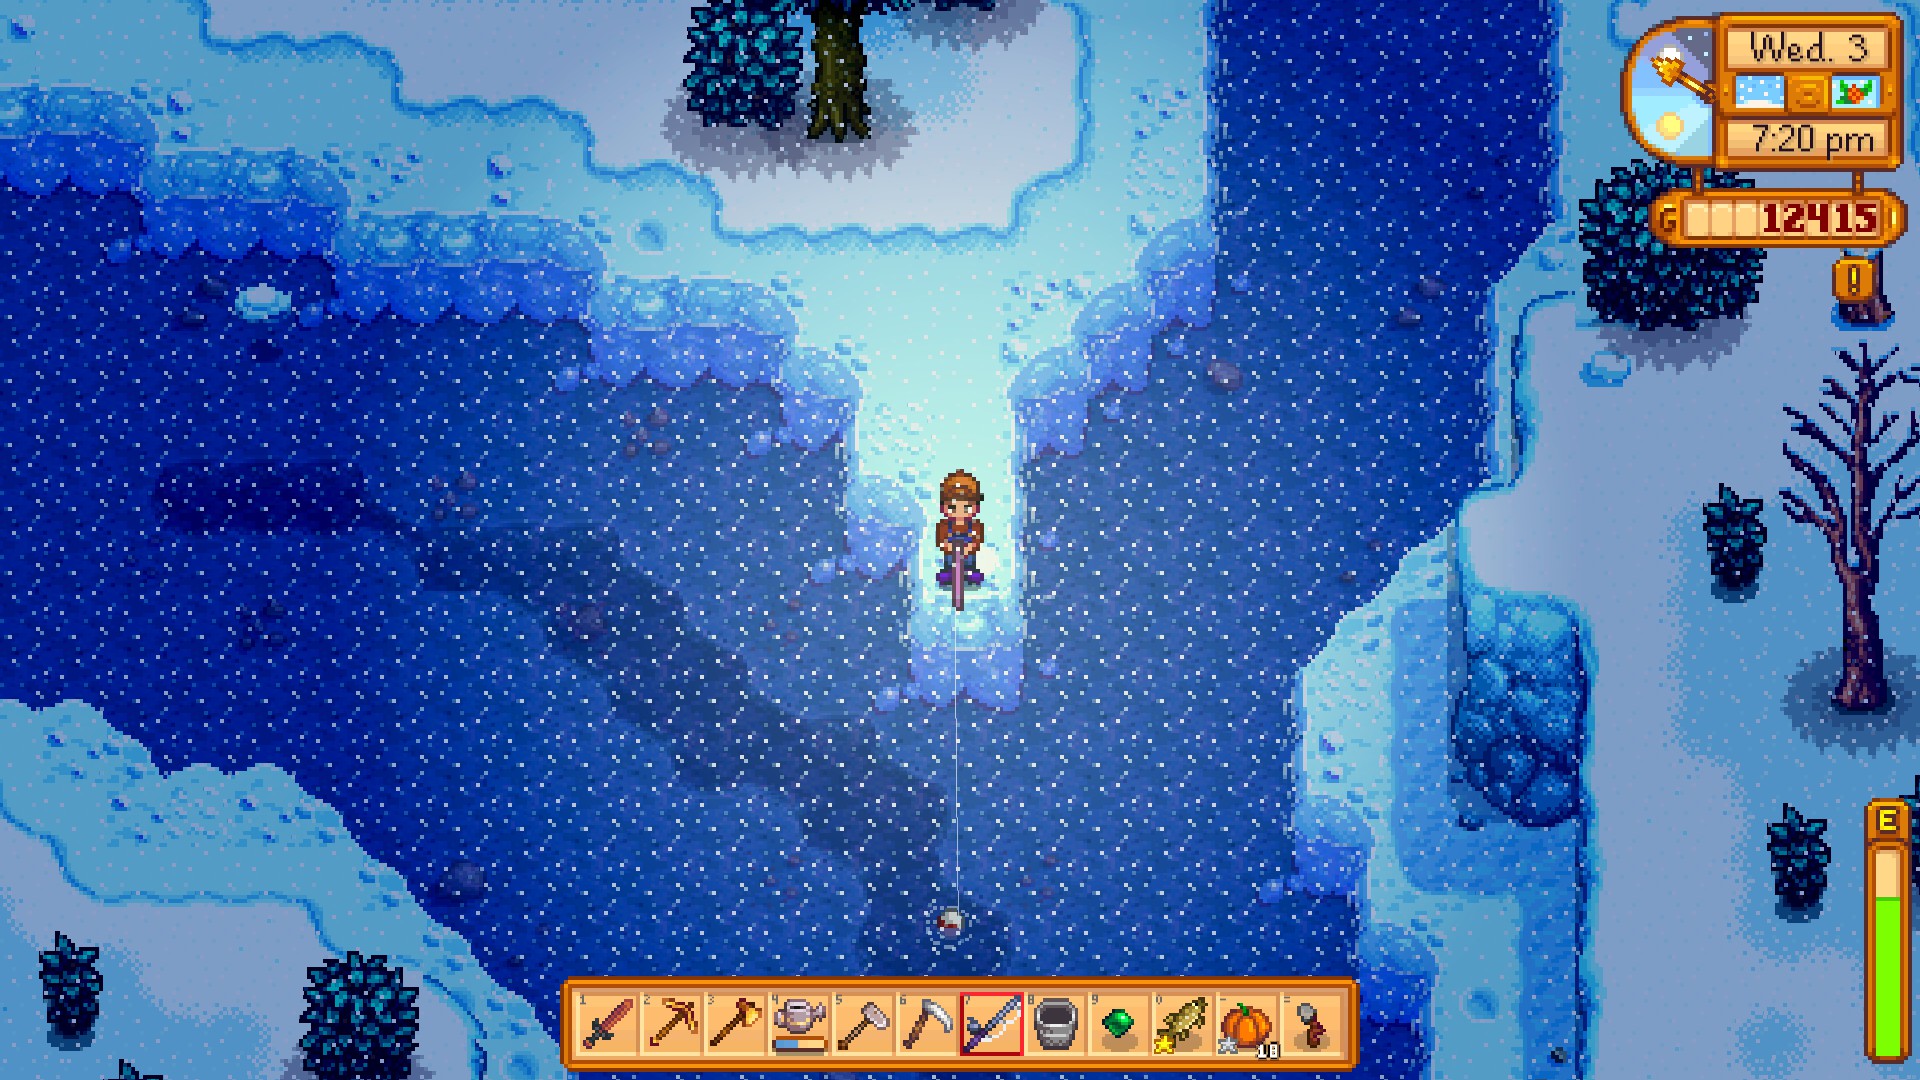
 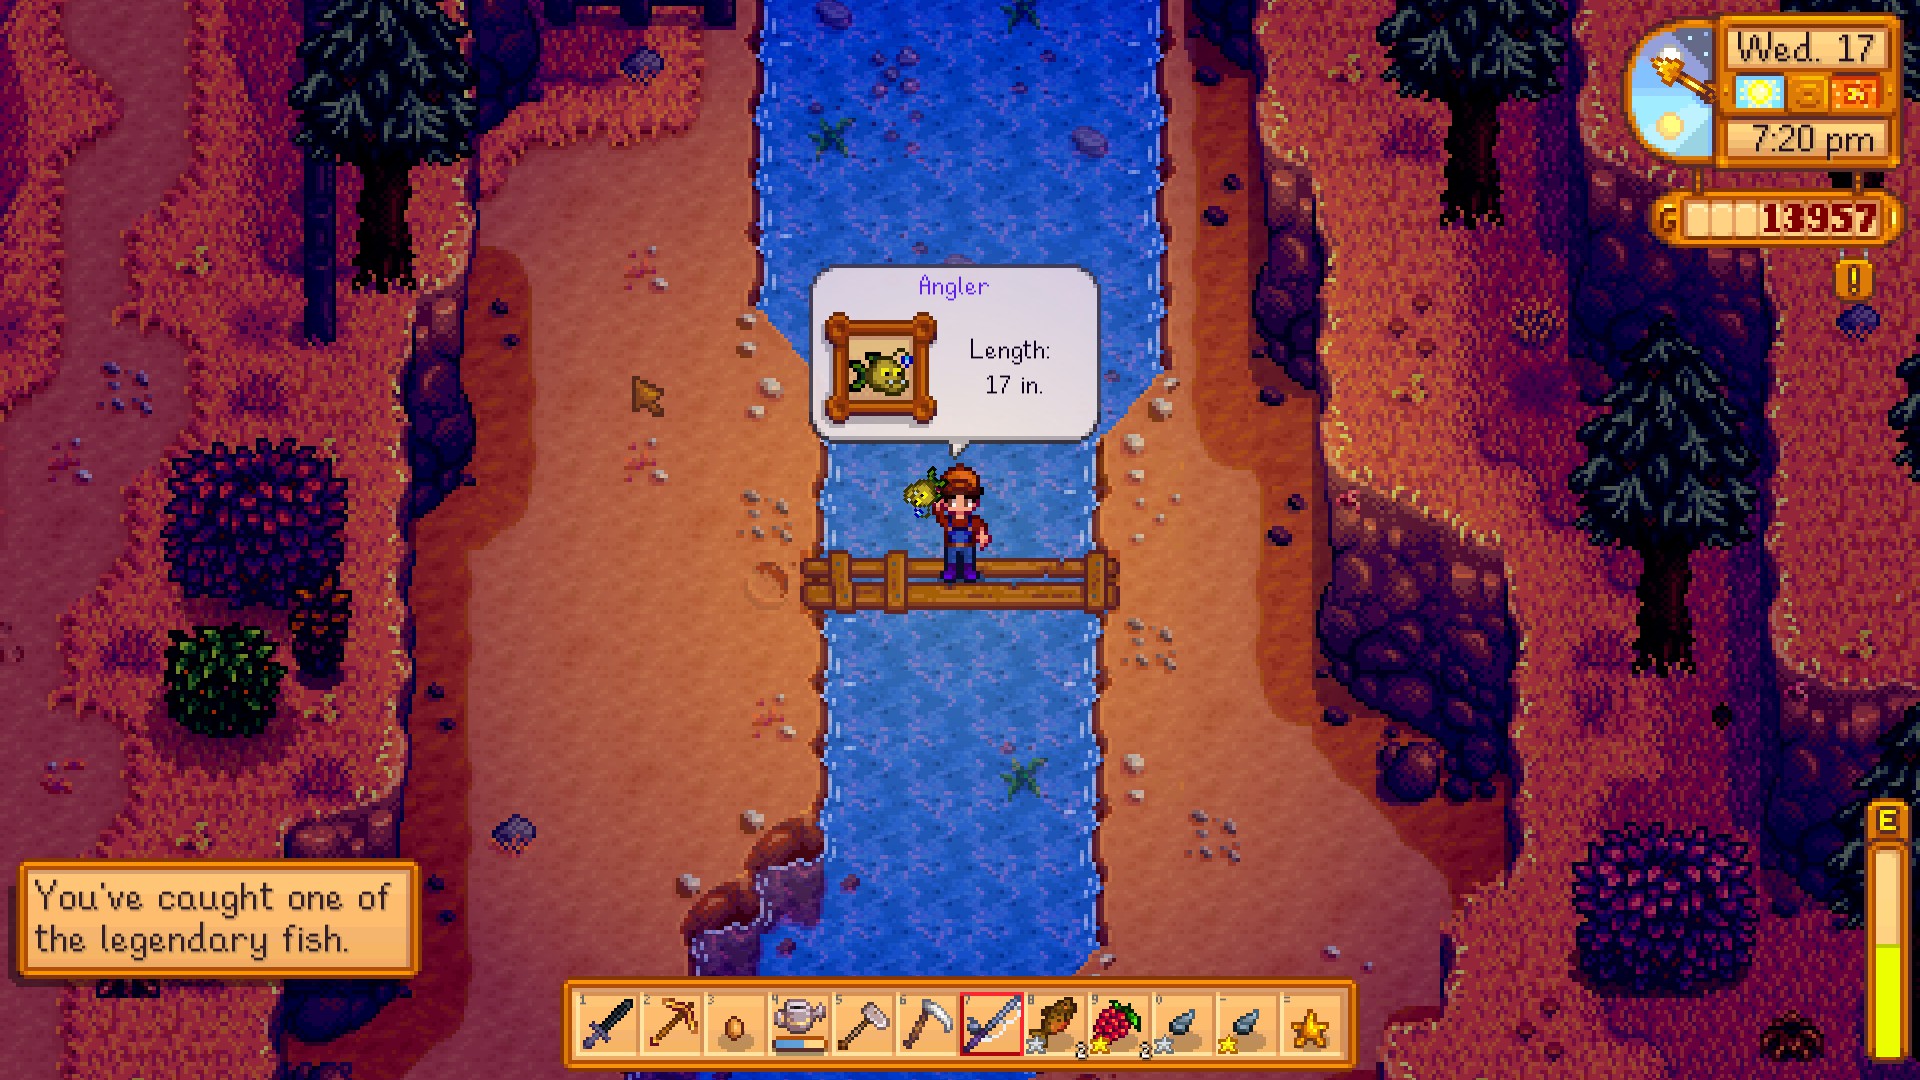 Glacierfish - In Cindersap Forest, go towards the south end and onto the island tip. Cast as far south as possible
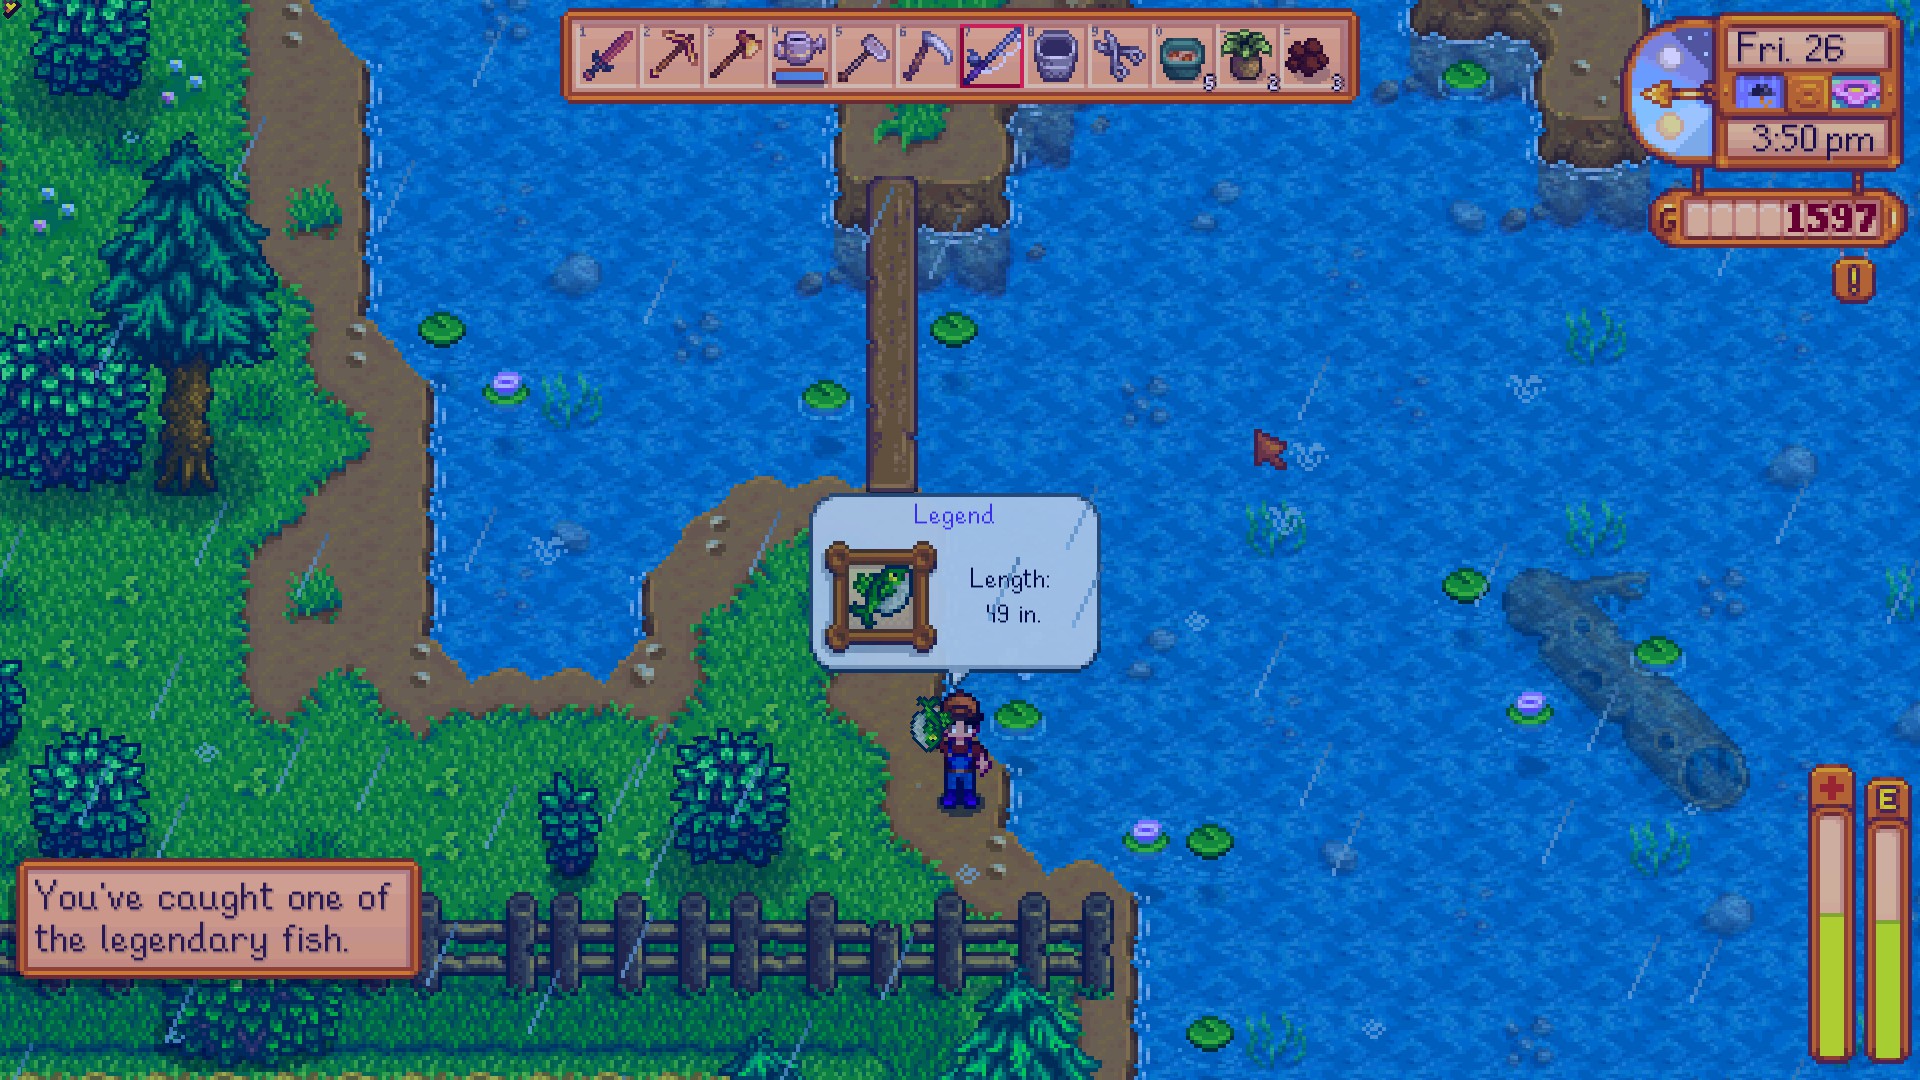
 Legend - Cast as far right as possible. This is the spot where Sebastian smokes at the Lake near the mines.
 Crimsonfish - Technically anywhere on the eastern pier at the beach works.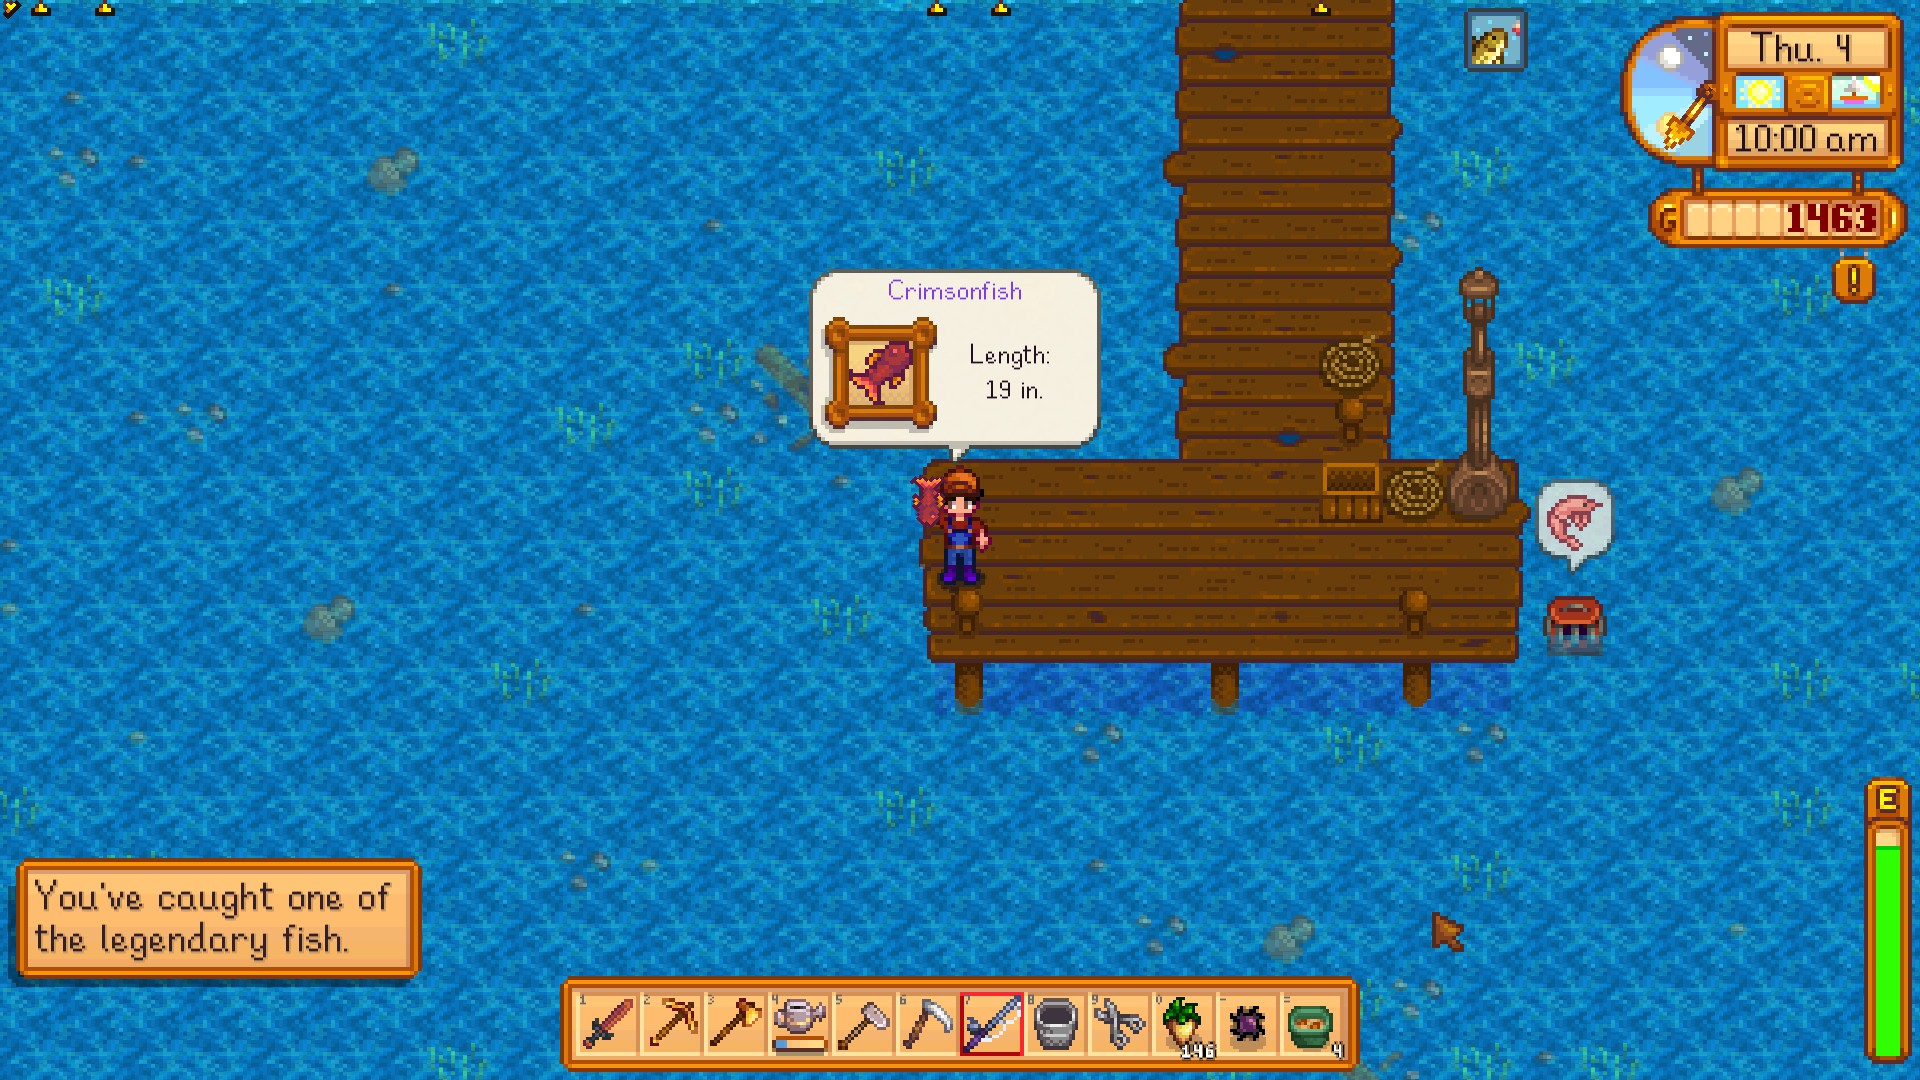
Slimejack and Void Salmon - See Magical Construction Questline Section
Master Of The Five Ways - Skills
 Singular Talent
Reach level 10 in a skill.
 Master Of The Five Ways
Reach level 10 in every skill. Experience is gained upon performing an action related to the skill you're leveling up. Level ups only occur when you go to sleep. It's even possible to earn multiple level-ups for the same skill, especially in farming.
- Farming: Harvesting crops (per crop)
- Foraging: Chopping trees, foraging fruits and wild vegatables
- Fishing: Fishing and Trapping
- Mining: Mining rocks, ores, and gems
- Combat: Eliminating enemies
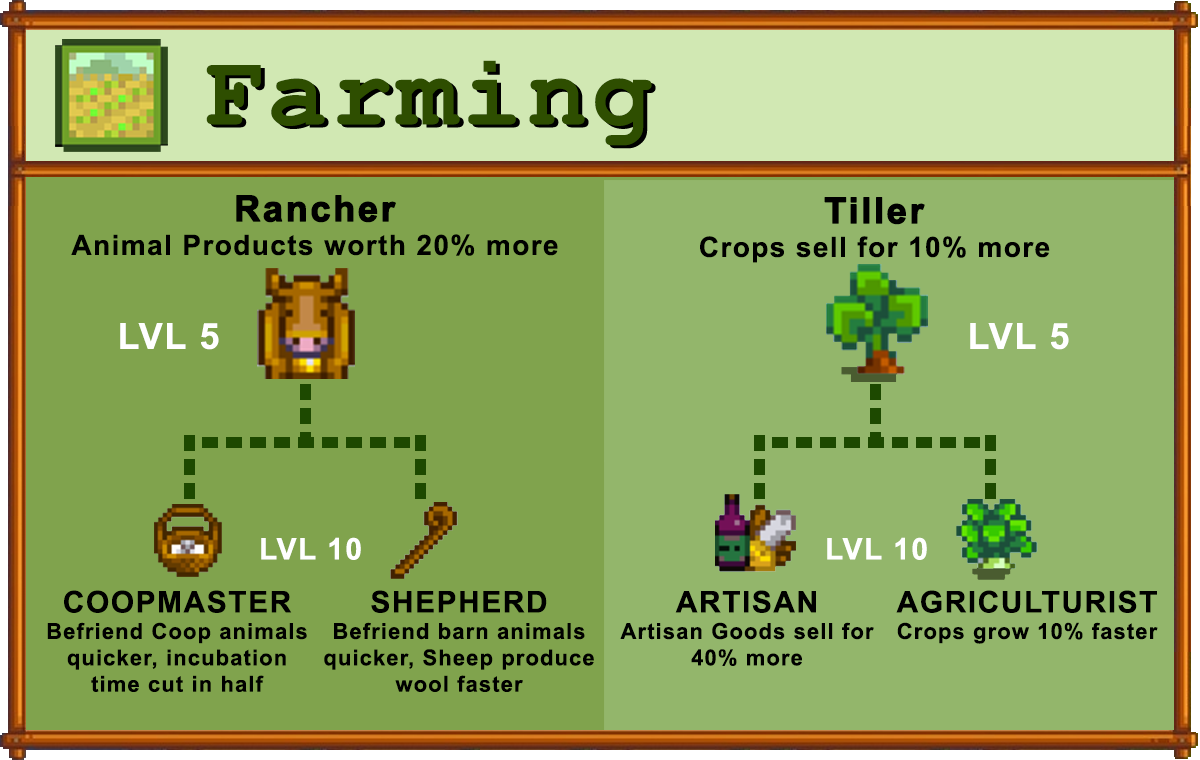
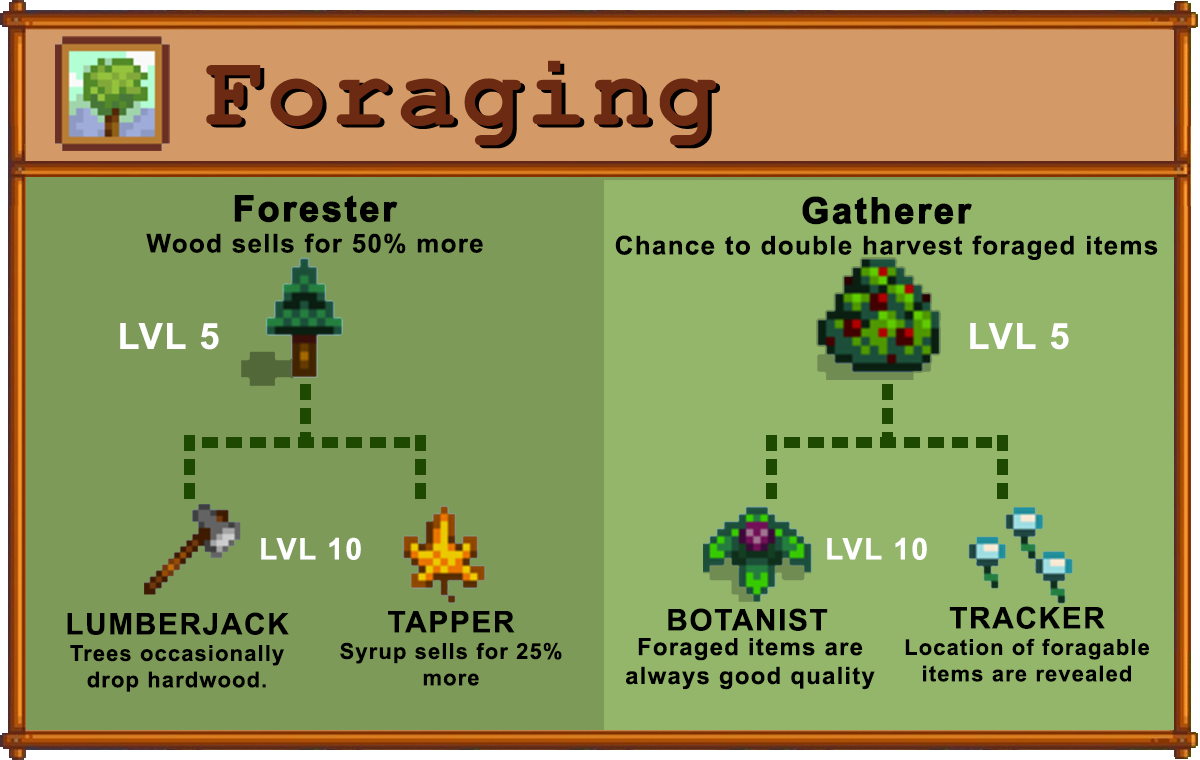
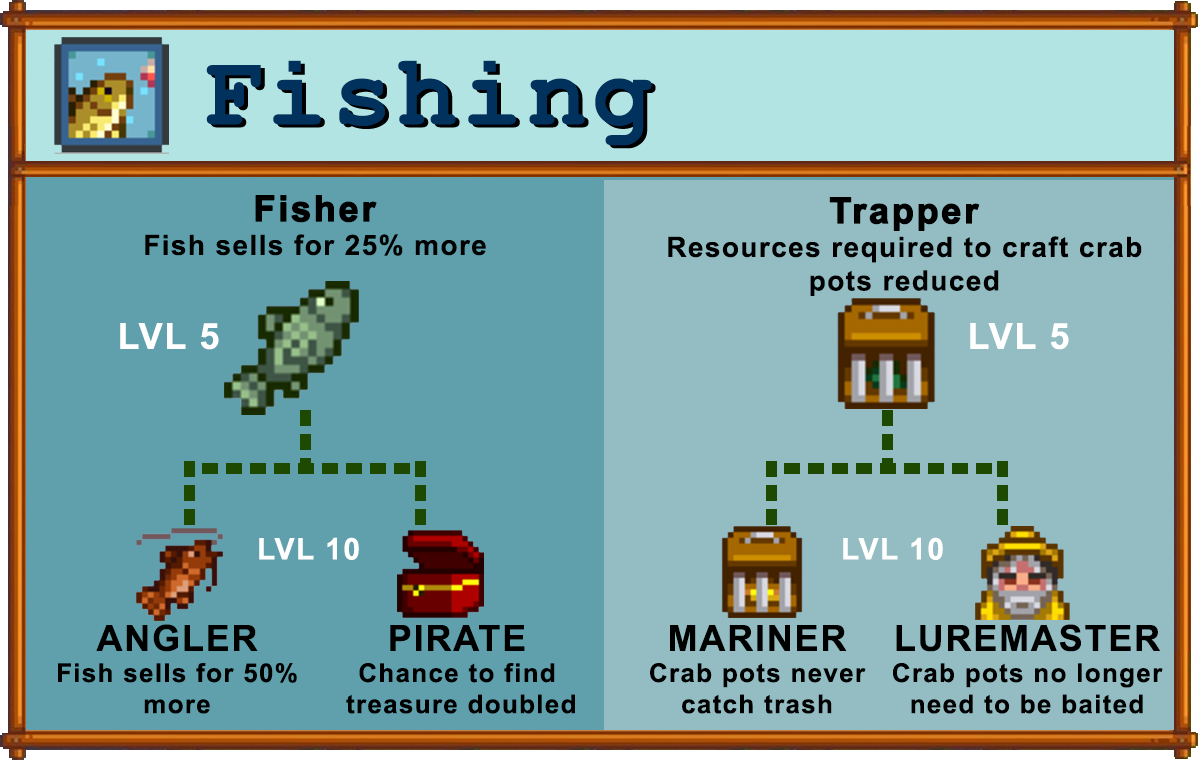
Professions are permanent skill choices available at Level 5 and Level 10. Your level 5 profession WILL affect what skills show up at Level 10. So plan ahead.


Monoculture
 Monoculture
Ship 300 of one crop.
If you're going for this achievement early on in the game, I'd recommend doing this with Blueberries in the Summer, or Cranberries in the Fall as you do not have to replant seeds (like Potatoes) and they yield multiple counts per harvest.
You can do this with any crop, to see which qualify, simply check Polyculture.
Mystery of the Stardrops
 Mystery Of The Stardrops
Find every stardrop.
Polyculture
 Polyculture
Ship 15 of each crop.
Protector Of The Valley - Adventurer's Guild
 Protector Of The Valley
Complete all of the Adventure Guild Monster Slayer goals.
After joining the Adventurer's guild, if you examine the bulletin board one til to the left of the fireplace, you'll find all the goals you need to complete for this achievement. For each goal you complete, Gil to the right will reward you with something.
All enemies can be found inside the mines are various levels.





Lava Crab: Floor 80-119
Iridium Crab: Skull Cavern 26+



The Beloved Farmer - Relationships
 A New Friend
Reach a 5-heart friend level with someone.
 Best Friends
Reach a 10-heart friend level with someone.
 Cliques
Reach a 5-heart friend level with 4 people.
 Networking
Reach a 5-heart friend level with 10 people.
 Popular
Reach a 5-heart friend level with 20 people.
 The Beloved Farmer
Reach a 10-heart friend level with 8 people.
Relationships are associated with hearts. Each person has an event at every multiple of 2 hearts for a total of 5 events.
2 Hearts | 4 Hearts | 6 Hearts | 8 Hearts | 10 Hearts
Now, gifting is the most reliable method of improving your relationship with someone. So, you need to gift items that they either love or like.
- Gifting them on their birthday gives them a big boost.
- Gifting the right items during the Festival of Winter Star gives a big boost.
- Completing help requests and mail quests is a big boost.
Things you should know about relationships:
- Choices you make during these 'events' may have an effect on your relationship
- Single friends cannot pass 8 hearts unless you give them a Bouquet
- For Marriage, see Marriage section.
- Completing the Community Center is a big boost.
Relationship Listing[docs.google.com] - Credit for creating this list goes to Vechh from /r/StardewValley
The Bottom - Mines
 The Bottom
Reach the lowest level of the mines.
There are a total of 120 floors to the mines. This achievement unlocks upon reaching Floor 120.
I won't mention much about enemies, that'll be located in 'Protector of the Valley'. This is more about going through the entire mines.
In the mines, there is a checkpoint every 5th floor of the mines due to access to the elevator. Every 10th level, you get a safe zone, and on all 10th floor except for 30, a chest with an item.
If you die in the mines, then you'll also lose some progress with the elevator.
The objective of each floor is to simply find the ladder. The can be pre-spawned (rarely, but floor 58 generally has the same ladder over to the far right), hidden under a rock, or appear after killing an enemy.
There is also a chance for an infested cave encounter where you will only see enemies, and no rocks, ores, or nodes. A ladder will spawn under the ladder you came from once you defeat all enemies in the cave (one can still spawn from killing an enemy).
Three Tips- You can craft a staircase using 99 stones that lets you place down a staircase. Stone is purchaseable from Robin at 20g each, or simply mine the giant rocks in the mines for 10 stones each. Good to speed run through the mines, or used sparingly if you're running low on time and you want to reach the next checkpoint.
- Using bombs to clear out large amounts of rocks to quickly find the staircase.
- If you're low on energy and have no energy replenishing items, you should aim towards killing enemies first because the sword does not consume energy.
Update 1.1
Depending on when you played Stardew Valley and due to the amount of content that this game has, I found it best to not only update the guide at each section to accommodate for the updates, but as create a section for each update of new things added. Note: These are only things that are related to the achievements.
Crop: Coffee Beans
- Season: Spring
- Acquisition: Traveling Cart (2500g) or Dust Sprite Drop
Fishing: Slimejack
- Season: All
- Acquisition: Mutant Bug Lair (See Magical Construction Questline)
Fishing: Void Salmon
- Season: All
- Acquisition: Witch's Swamp (See Magical Construction Questline)
Craft: Cask
- Acquisition: Build Cellar through House Upgrade (via Robin)
Item: Void Mayonnaise
- Acquisition: Use Void Egg on Mayonnaise Machine
Item: Mead
- Acquisition: Use Honey on Keg
Update 1.3
Update 1.4
- Fish Pond can be purchased at the Carpenter's Shop
- Turnip Head Scarecrow: Purchase from Stardew Valley Fair for 800 Silver Stars
- Witch Scarecrow: Purchase from Spirit's Eve for 5,000g
- Alien Scarecrow: Purchase from Casino for 10,000 Qi Coins
- Snowman Scarecrow: Purchase from Traveling Cart during Fall/Winter for 4,000g
- Lady Scarecrow: Purchase from Flower Dance for 2,500g
- Dwarf Scarecrow: Purchase from the Dwarf for 2,500g
- Raccoon Scarecrow: Donate 20 Artifacts to the Museum
- Mask Scarecrow: Donate 40 Artifacts to the Museum
Update 1.5 - Part 1
- New Areas: Ginger Island, Volcano Dungeon
- Added Special Orders board
Update 1.5 - Part 2
- "Community Cleanup" for Linus
Update 1.6 - New Achievements
 Well-Read
Read every book.
The bookseller visits just above where Joja Mart is/was twice a season.
Overall, you only need to read 19 books, not all of them.
 Two Thumbs Up
See a movie.
After completing the Community Center in the bundle route and not the Joja route, there will be an thunderstorm event when you sleep. If you visit the Joja Mart that's run down, you will find the Missing Bundle. Complete the Missing Bundle, and the next day the juminos will work on Joja Mart and turning it into a Movie Theatre overnight. Pay 1000g at the entrance for a ticket, and enter for the achievement.
 Blue Ribbon
Get 1st place in the Stardew Valley Fair competition.
The Stardew Valley Fair occurs on the 16th of Fall every year. I won't go far into the best ways to do these, but you'll want to get 1st in the Grange for the achievement.
General strategy is to include items of different categories (at least 6 different categories) as well as higher quality for more points. The categories are: animal products, artisan goods, cooking, fishing, foraging, fruits, minerals, and vegetables.
 An Unforgettable Soup
Delight the Governor.
The Luau occurs on the 11th of Summer every year. As part of the event, you can place one item into the potluck soup. For this achievement, you'll want the best possible soup which can be obtained by placing specific items. Some of the easier ones to provide are gold tier goat milk, large milk, melon, or yams.
 Good Neighbors
Help your forest neighbors grow their family.
You'll need an overnight event for heavy winds causing a large tree to fall just south of your farm. Leftover is a stump and you can restore this stump to build a house here that will be inhabited by some critters.
This questline will alternate between fulfilling the requests and waiting until the next quest and will take several days in between requests. After the 8th quest, you'll finish this achievement.
 A Distant Shore
Reach Ginger Island.
In order to access Ginger Island, you will need to either restore the Community Center through bundles or fill out the Joja Community Form. Once there, you'll get a letter to go visit Willy in the Fish Shop.
After repairing the boat, you can take a ride to Ginger Island.
 Infinite Power
Obtain the most powerful weapon.
You'll need a Galaxy weapon which can be unlocked by obtaining the Galaxy Sword by offering a Prismatic Shard to the Three Pillars int he desert. You can either use that Galaxy Sword or buy Galaxy weapons from the Adventurer's Guild.
Next, you'll need to obtain 100 golden walnuts on Ginger Island to access Qi's Walnut Room and obtain Qi Gems to buy 3 Galaxy Souls. Then head to the top of the Volcano with 60 Cinder Shards to the Forge. Upgrade the Galaxy weapon 3 times to create an Infinity Weapon.
 Danger In The Deep
Reach the bottom of the 'dangerous' mines.
This will require you to obtain 100 golden walnuts on Ginger Island and then access Qi's Walnut Room on the west side of the island (the purple door). inside is Qi with a quest board on the left. Every Monday, the quests will rotate and you're specifically looking for the Danger in the Deep quest.
Once you have this quest, then the mines will be converted to the dangerous mines with the elevator reset. From there, make your way down to the 120th floor again within the quest duration time.
Update 1.6 - Collections
For the jellies, you can increase your luck for better drop rate. Jelly is not a fish, it catches like items such as driftwood, newspaper and glasses. Goby Location:
Update 1.6 - Perfection
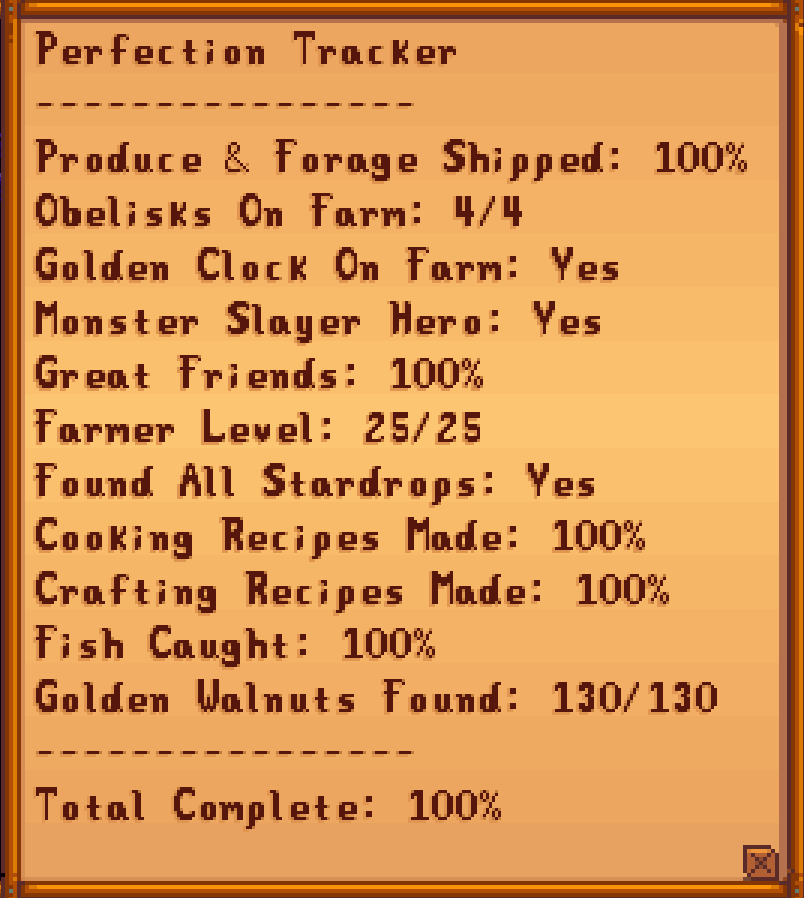
 Perfection
Reach the summit.
Once you unlock Qi's Walnut Room, the board on the right is a perfection tracker, so you'll want to hit 100% on that list.
Overall, would recommend this tool to see how your save is doing and what you're missing. You don't need to do everything in the checklist, just the perfection listed ones and this corresponds to the perfection list given by Qi's Board: https://mouseypounds.github.io/stardew-checkup/#sec_Skills
 Requirements
You can confirm your state in game or through the checklist provided. Once you're done, you'll be able to access the Summit just north of the Train Station after sleeping.
FAQ
QWhere is Robin's Lost Axe?
AForest, directly south of Leah's House across the river. Follow the cliff on the right.
QWhere are the Mayor's Shorts?
AMarnie's Bedroom; will need 2 hearts to enter her room.
QWhere is Linus' berry basket?
AGo to the Bus Stop, head to the left using the road to find his berry basket on the next map. (Lower level of the Backwoods)
QWhy did my crops die?
ACrops are a season thing, so when a season dies, all crops that cannot survive in the new season will wither away. Realistic or not, that is the mechanics of the game.
QAn earthquake happened. What is it?
AFirst off, the earthquake did not kill your crops. Secondly, it unlocks a new area. Check the area just north of the Carpenter's Shop (Robin/Demetrius/Maru/Sebastian).
QWhat does the train do?
AFrom time to time, a train may drop resources while it passes through Pelican Town.
QWhat is the Witch Event?
AThis requires a Chicken Coop, not sure what size, but it always occurred on my Deluxe Coop. A witch will visit overnight while you sleep giving you a cutscene. This will GUARANTEE a Void Egg in your coop that you can hatch and harvest more void eggs. Other than the Full Shipment achievement, no real advantages here.
QI was sleeping and an explosion happened overnight. What is it?
AThis is a meteorite hitting your farm. Search around for a round purple meteorite that yields Iridium Ore. Requires a Gold Pickaxe to mine. Does not disappear if you don't mine it. It also has specific spawning points, so if a building is occupying a meteor spot, the meteor will not fall there.
Changelog
- Full Shipment - Fully Updated + Fixed Broken Steam Images
- Master Angler - Fully Updated
- Craft Master - Fully Updated + Fixed Broken Steam Images
- Gourmet Chef - Fully Updated
- Updating for 1.6
- Updated 1.6 section for new changes
- Making changes for 1.5
- Removed ingredient list section, too much to keep up with and serves little purpose
- Created distinction sections for 1.3 and 1.4 as well
- Updated Master Angler achievement
- Updated Gourmet Chef achievement
- Updated Full Shipment achievement
- Updated Craft Master achievement
- This update is primarily for: Update 1.1
- Skill: Rancher 10% to 20%
- Skill: Artisan 50% to 40%
- Skill: Blacksmith 25% to 50%
- Added Slimejack and Void Salmon to Fishing
- Added Spring Section
- Added Summer Section
- Added Fall Section
- Added Winter Section
- Updated Full Shipment: Void Mayonnaise, Coffee Bean, Mead
- Updated Craft Master: Cask
Beat Stardew Valley's 100% run?
Flex it — let your friends know you pulled it off.
- Good Sprinkler Layouts★ 5 (3.4k)166k views6.1k ♥1 minBulgarianUpdated Mar 16, 2016
- Professions: What to Pick? [v2.1]★ 5 (2.2k)157k views4.8k ♥21 minUpdated Mar 16, 2016
- First Year Walkthrough, Part 1 (Spring, Year 1)★ 5 (765)57k views2.4k ♥53 minUpdated Jan 31, 2022
- Моды для версии 1.6.15 [Обновлено 07.05.2025]★ 5 (991)56k views2.1k ♥23 minRussianUpdated May 17, 2025
- Шпаргалка★ 5 (2.9k)48k views6.2k ♥64 minRussianUpdated Feb 20, 2022
- 一篇指南,星露谷尽在掌握!(极速更新!)★ 5 (1.3k)31k views3.4k ♥13 minSimplified ChineseUpdated Oct 21, 2025






- Upgrading to PremiumTeam Fortress 2★ 5 (20k)1441k views11k ♥6 minUpdated May 11, 2022
- No More Room in Hell Official ManualNo More Room in Hell★ 5 (2.8k)569k views2.1k ♥29 minUpdated Apr 22, 2019
- NMRiH Community Hosting GuidesNo More Room in Hell★ 5 (526)351k views653 ♥1 minUpdated Aug 10, 2022
- ULTIMATE GUIDE FOR GAME DEV TYCOONGame Dev Tycoon★ 5 (5.8k)326k views10k ♥4 minUpdated 23 Jan, 2014
- How to 'Git Gud' Soon™MORDHAU★ 5 (2k)318k views3k ♥68 minUpdated Nov 16, 2024
- Лучшие кооперативные игры SteamPAYDAY 2★ 5 (1.5k)315k views2.1k ♥56 minRussianUpdated Apr 27, 2025






This guide was created by its original author on the Steam Community. Are you the author and want it removed? Request removal.