The Binding of Isaac for beginners (v2.0)
Intro
 [/previewimg]
This guide is for all players new and old, whether you're new to the game and want to learn the basics and get some tips or you're getting pretty good but just can't quite make to the end of the game no matter how hard you seem to try. This guide will be pretty subjective; I will probably not be giving specific details such as numerical data on item stats unless it's basic information amount the item - for example, I will tell you that 'The Pact' will give you two soul hearts, extra damage and a tears upgrade but not the numerical details on those stat increases - let's keep it simple!
I'll be updating this guide as much as I can so if you find it helpful don't forget to favourite it!

The Basics #1 - Controls, stats and consumable items

- Move around with the standard WASD format and shoot with your arrow keys
- Prefer a controller? I use an XBOX 360 controller by using Joy2Key[joytokey.net]! Try it out! My guide on using Joy2Key can be found here
- I can't stress enough that having the Isaac wiki[bindingofisaac.wikia.com] open while you're playing to research item specifics is essential to becoming good at this game. Find a new item? Search it on the wiki and find out exactly what it does and when it's best to use it!
- Familiarize yourself with how Isaac shoots whilst moving - you will notice, for example, when moving right and shooting up, Isaac's tears will shoot at a 45 degree angle - in some situations using this technique can save you from taking a lot of damage, especially if you can run in and out from the cover of a rock!
- Your basic stats are:
HP - your current health / maximum health
Damage - the amount of damage you deal to enemies per hit
Tears - this is your rate of fire i.e. how fast a tear fires after the previous one
Range - how far your tears go across the room
Speed - how fast you move - Your hidden stats are:
Shot speed - the rate at which tears travel once you have fired them
Luck - the likelihood of an item appearing when you finish a room - only Luck Up and Luck Down pills affect this stat. Due to a bug, having low/negative luck increases your chance at finding items/chests. Having positive luck increases your chance of shooting teeth instead of tears when you have the item 'Tough Love'. Positive luck also increases the chances of a payout from gambling.
Special stat - this stat is complex and worth researching on the wiki once you're an experienced player.


[/tr]

[/tr]

[/tr]

[/tr]

Tarot cards have different effects depending on the type of card you pick up. There are a variety of Tarot Cards with effects ranging from temporary invincibility to instant teleportation to a boss room/item room/secret room/shop. Remember to keep the wiki open[bindingofisaac.wikia.com] so you can learn what each card does as you find it!
[/tr]

- 2 of Spades - Doubles your keys. If you have 0, you will get 2 keys.
- 2 of Clubs - Doubles your bombs. If you have 0, you will get 2 bombs.
- 2 of Diamonds - Doubles your money. If you have 0, you will get 2 pennies.
- 2 of Hearts - Doubles your hearts. If you have full health, this is useless. Best used when you are at 50% health.
- The Joker - instantly teleports you to a Devil Room or Angel Room. Best used after defeating a boss and the Devil/Angel room fails to appear.

[/tr]
The Basics #2 - Gambling, Blood Donation and Beggars
 The Shell Game
This guy, found only in the Arcade, will take 1 cent from you and in return you will have a 1 in 3 chance of receiving bombs, keys or more money from him. There is also a chance that he will drop 'Skatole', causing him to disappear forever. Picking up Skatole will stop most fly enemies from being able to damage you. Ones that can still damage you will be slowed down by Skatole.
 Blood Donation Machines
Blood Donation Machines will take half a red heart (or soul heart if you only have just one half of a red heart left) in exchange for money. Blood Machines have a 1 in 15 chance of exploding and producing a Blood Bag or IV Bag upon doing so. Please see the 'My Advice' section for details on using the Blood Machine effectively. Floors after 'The Depths 2' will take a full heart.


Slot Machines / Fortune Tellers
These accept money in order for a chance to get an item. Slot Machines drop keys, bombs, pills, money and Pretty Flies and can also explode into a dollar bill giving you 99 cents. Fortune Tellers can drop spirit hearts, tarot/playing cards and trinkets and can explode into the 'Crystal Ball' item. Consult the wiki[bindingofisaac.wikia.com] for details on Pretty Flies and the Crystal Ball.
 Beggar / Judgement
This guy can be found randomly on any floor or be summoned by using a Judgement tarot card. He will take one cent from you each time you bump into him and has a chance of giving you a pick-up in return (a key, bomb, heart, etc.). However, he also has the chance of giving you a special item, such as a Compass, Map, Nun's Habit, HP upgrade, etc. Upon giving you a special item, he will disappear. I find that Judgement pays out with a special item more often than not so if you have some cash to spare, throw it his way. It's a good idea to remain at 15 cents at the minimum if you have yet to see what the Shop of that floor has in store, though!
Blowing up Judgement increases the chance of a Devil Room appearing after a boss fight
Using a Judgement card to spawn a Judgement in a Devil/Curse/Angel room will lead to him paying out with an item from that pool
 Devil Beggar / Demon Judgement
This guy also appears randomly or can be spawned from a Judgement card. However, this Judgement wants health instead of money. He will not drop any normal pick-ups except tarot/playing cards. However, he will drop an item at some point - the Devil Beggar will drop an item from the same pool as Devil/Curse/Angel rooms. You may find more often than not this guy makes you feel like a total idiot when you give him 6 of your 8 red hearts and he just sits there and gives you nothing. It's up to you if you want to play him, just make sure you don't go overboard if there's no quick means of refilling your lost health. A Nun's Habit + Yum Heart/Book of Revelations combo makes this guy a no-brainer play.
And finally: if you have no use for any of these guys/machines, blow them up with a bomb. They should all pay out with a pick-up item or two! However, Demon Judgement is the exception - he only pays you back with some enemy spiders - but it will increase your Devil Room chance by 35%!
Room types
(you are tearing me apart, Lisa!)
 [/td]
[/td]
 [/previewimg]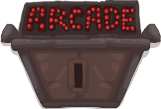

Some points about the curse room:
 Red Chests have a chance of dropping:
- any 4 of the Dead Cat/Guppy items (see Advice section for more on Guppy)
- teleporting you to a Devil or Angel Room
- spawning two enemy spiders
- spawning two troll bombs or a super troll bomb that will chase you until it explodes
- giving you three attack fly allies
- pills
- soul hearts If you're flying by any means, you will not take damage on the way into the room

 [/td]
[/td]
The Devil Room can sometimes instead be a fight with the boss Krampus
The Devil Room cannot spawn on the first floor (basement/cellar) unless it is an XL floor


Picking up a book during a playthrough gives a 25% chance of a library appearing on other floors for the remainder of the playthrough.
Secret Rooms

Secret rooms are, as you would guess, secret. They don't appear on the map until they are A) found or B) revealed to you by certain items.
Going into secret rooms will typically grant you money (usually 3 cents, 6 cents, or 9 cents; though you may get more if nickels/dimes are part of that make-up). They may also contain Slot Machines, Fortune Teller Machines, specific items or the miniboss Greed/Super Greed.
Secret rooms are found by placing bombs in the middle of the wall in a room adjacent to the secret room itself. Once the bomb explodes, a hole will be revealed and a mysterious tune will play. But what's the trick to finding the secret room?
Secrets rooms tend to be adjacent to at least 3 rooms - sometimes it's 4, sometimes it's 2 - but it's usually 3. On the picture below I have circled possible locations for the secret room
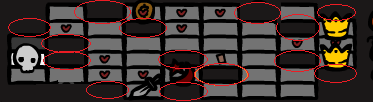
My advice is to wait until you have cleared out most or all of the floor, and then look for those horseshoe shaped gaps around rooms on the map. One of these will be your secret room! Some of the best items in the game can be found in those rooms (as well as a lot of money!) so be sure to check for them!
Super Secret Rooms have different rewards to the normal Secret Room. They can contain trinkets, fortune teller machines, tarot cards, eternal hearts or several red hearts! The secret room will most likely be adjacent to only one other room on the map.
Here is a map I have marked with X's showing likely locations for the super secret room:
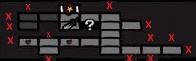
Note: if you leave a secret room and then leave the adjacent room, you will have to use another bomb to enter the secret room again.
 The Treasure Map (purchasable from shops or a chance drop from a Judgement Beggar). Will only reveal normal secret rooms.
 The X-Ray Goggles - when you walk into a room wearing these, the secret room hole will already be there and you can walk through it as much as you wish. Will open secret and super secret rooms.
 Spelunker Hat - will reveal the locations of secret rooms when you walk into the adjacent room, but you will need to bomb your way into it each time to get in there. Will reveal both types of secret room.
'The World' tarot card - reveals the whole map to you, including the normal secret room
Spelunker Hat - will reveal the locations of secret rooms when you walk into the adjacent room, but you will need to bomb your way into it each time to get in there. Will reveal both types of secret room.
'The World' tarot card - reveals the whole map to you, including the normal secret room
 The Crystal Ball - reveals the map including the normal secret room and also gives you either a soul heart or tarot card
Tips & Tricks #1
 Play as Cain
Cain, in my opinion is the first character you should unlock and play with in order to progress through the 'Complete game X times' achievements (which unlock more items) as he has a higher chance of success with gambling and cannot get negative pill effects.
Once you are more comfortable with your Isaac skill, Judas is great practice for high damage/low HP playthroughs.
 Tinted Rocks
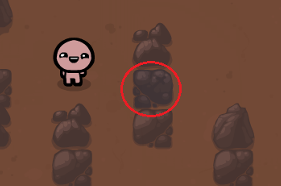
Now and then you will catch in the corner of your eye a rock that is tinted blue. Use your bombs on them! Blowing them up can give you soul hearts, keys, bombs and even a damage upgrade in the form of the 'Small Rock'!
Tinted Rocks
Now and then you will catch in the corner of your eye a rock that is tinted blue. Use your bombs on them! Blowing them up can give you soul hearts, keys, bombs and even a damage upgrade in the form of the 'Small Rock'!  Blood Donation Machine
As said before, this has a 1 in 15 chance of exploding into one of two items: the Blood Bag or the IV Bag. The IV Bag will act a portable donation machine, taking hearts for money. The Blood Bag is an HP and speed upgrade combined (and also refills 5 HP if you've taken some damage before you picked it up). If you find an arcade/blood donation machine on a floor, be mindful of any red hearts on the floor. Stay on the floor longer than you would normally in order to play this machine, that extra HP will make a lot of difference, especially if you're taking deals with the devil.
 The Nun's Habit
The Nun's Habit is an amazing item found in the Shop. When hit, you will recharge 3 bars of your 6-bar active item. With the right items, this allows you to become pretty much unstoppable. The 'Yum Heart', which heals one red heart per-use, will recharge to full every time you take 2 hits (i.e. one heart), so every time you lose a heart, you can immediately get it back. If you come across this combination abuse it for infinite plays on the Blood Donation Machine until it pays out with a Blood Bag or IV Bag.
Notes:- After the IV bag has been picked up once all future machines will pay out with a Blood Bag.
- Maggie already starts with the Yum Heart. Obtaining the Nun's Habit as Maggie is great as the Blood Bag will provide her with even more heart containers and the extra speed Maggie desperately needs as she starts with the lowest speed of any character.
- You can do the same thing as above using the Book of Revelations or The Nail but instead you will gain soul hearts rather than red hearts - this is useful in the early game to stack up on soul hearts for the late game.
+
The Bloody Penny is a trinket that appears quite late on in the game (by defeating The Cathedral with Samson), so you'll probably be quite the Isaac player by that point! But just so you know, the bloody penny will give you a chance to get red hearts every time you pick up a penny. The Blood Bank gives out pennies for hearts. See the cycle? You lose health, it gives you money, the money gives you health. Abuse this like you would abuse the Habit to get as much as you can out of the Blood Machines for the max amount of HP upgrades possible!
Deals with the devil
Deals with the devil look pretty risky. You're losing a lot of health for some items and it may not seem like a good trade. Early/new players tend to think that the best thing to stack up on is HP for the maximum chance at winning. It's not. The best thing to stack up on by far is damage. My general rule while I play is that if taking a deal with the devil will leave me with at least 2 red heart containers while giving me extra damage, I will definitely take it. Damage makes all the difference. The following items are my favourite devil room items:
The Pact - gives you more damage and increases your rate of fire while also giving you 2 soul hearts
Brimstone - this also gives you infinite range via a charged laser attack that also pierces through enemies and rocks. Possibly one of the best items in the game.
The Mark - gives you damage, speed and a soul heart.
Common Cold - gives your shots a chance to poison enemies
Spirit of the Night - while it doesn't give you damage, it gives you the ability to fly and gives you spectral tears, meaning you can now shoot through rocks/obstacles. This is an amazing defensive item and I'd recommend taking it any time it shows up.
Blue Baby + Book of Shadows/Polaroid + Devil Room
Blue Baby/??? has the unique ability to steal items from the Devil Room under certain circumstances. Blue Baby is not able under any circumstances to get red hearts and must subsist solely on soul hearts - getting any HP upgrade will only give you a soul heart. This means that if Blue Baby has a shield he is able to take items from Devil Rooms without losing any soul hearts. This can be accomplished by either using the Book of Shadows while in the Devil Room or hurting yourself with a bomb in a Devil Room whilst in possession of The Polaroid
Although I say Blue Baby has the unique ability to do this it is possible to do this with other characters by either giving up all your red hearts while retaining soul hearts (Devil Room) or using Guppy's Paw so that your character is only subsisting on soul hearts as Blue Baby does.
Becoming Guppy It is possible to turn into Isaac's cat Guppy with the acquisition of specific items in the game. Guppy has the ability to fly and can spawn flies that attack enemies whenever you successfully hit an enemy. You must have at least once picked up any 3 of these 4 items during one playthrough:
Guppy's Head - Spawns flies around you that attack enemies. Recharges every room.Guppy's Paw - each usage turns one red heart permanently into three soul hearts.Guppy's Tail - increases the chance of golden chests appearing throughout your playthrough.Dead Cat - removes all of your red hearts except for one and allows you to die 9 times. Each time you die you will only respawn with one red heart container.


Tips & Tricks #2

The D6 has the ability to reroll any special item, passive or active, into another item from the same pool (i.e. Devil Room items will reroll into another random Devil Room item, Shop item into another Shop item etc.). This can be used to increase your chances of getting certain items that you want/need to complete your run or goal.
What you should reroll if you don't like what you see:- Item rooms
- Shop items
- Secret room items
- Boss room items
- Boss Trap / Mob Trap room items
- Items that drop from Judgement or Demon Judgement
- Devil Room items
- Angel Room items
- Curse Room items
- Items that drop from golden or red chests
- Books in the library
Picking up active items that you see throughout your run will take them out of the pool, preventing them from appearing again later in the game. This also works in the case of D6 rerolls. If you pick up, say, Anarchist's Cookbook, it will not appear again throughout that run. This mechanic can be used to gain an advantage e.g. in the library.


Some items in the game are from a separate pool all by themselves and they won't reroll into another item (with two exceptions). Those items are:

 [/previewimg]


Tips & Tricks #3
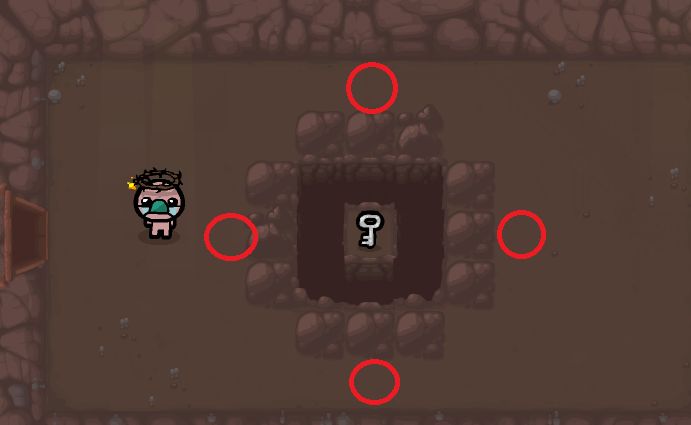 Bridge the gap!
If you see a situation like the picture above and you can't fly (or you don't have the magnet!) you can still get to that item! If there is a rock parallel to the 'island' that the item is on, you can place a bomb behind the rock to blow the rock into the gap in order to bridge it. The rock must been blown in the direction of the gap however or it will not work!
Fight the same boss twice for another item!
If you have the tarot card 'Wheel of Fortune', you can use it after defeating a boss (whilst still in the boss room) and play it there. If it eventually spawns an enemy fly, leave the room and go back in without killing the fly. The game will register the boss fight as if you escaped and you will fight it again! You will then be able to get another item from defeating the boss again if you wish.

 Miniboss Rooms and Shop Rooms
After Caves 2 and beyond, there is a chance that Greed or Super Greed will be in the Shop rather than purchasable items. However, if you fight Greed in a secret room or you fight any other miniboss (any of the 7 Sins) on the floor, Greed will defintely not be in the Shop.
 The Mr Mega Glitch
If you place a bomb and exit + re-enter the room before it explodes, it will have an increased blast radius similar to that of a Mr Mega or Mr Boom explosion. This allows you to blow up more rocks or find the secret room whilst also blowing up tinted rocks, bridging gaps or making gaps to collect trapped items.
Judgement item pool
Spawn a Judgement via a tarot card in a Curse, Angel or Devil room to have him pay out with an item from those pools!
Killing any Judgement or Shell Game will increase the chance of a Devil Room appearance by 35%
 [/previewimg]Bad Trip's can be amazing
The pill 'Bad Trip' will turn into a Full Health pill when you are down to just one heart. If you're playing as ???/Blue Baby you must be down to half a soul heart instead; using it at one heart will kill you.
 Brimsnapping
This is another bug like the Mr Mega Glitch but it makes you insanely overpowered. When firing Brimstone, repeatedly pressing the direction you're firing in after the initial shot will cause multiple bursts of brimstone to fire out and deal multiples of damage - for example, if you fire brimstone to the left and then press the left arrow key three times as fast as you can, you will deal four times the amount of damage.
Tips & Tricks #4

- Teleport Remote
- Telepills
- Stars Tarot Card
- Hermit Tarot Card
- Moon Tarot Card
- The Fool Tarot Card

If you have enough soul hearts for a soul heart deal with devil, using the Teleport Remote as you run into the item can get you the item for free if you time it right.
Things to avoid

Extra: Shot speed upgrades explained
One of the hidden stats, 'shot speed', increases how fast your tears travel across a room. This may seem like an advantage at first but in fact it can be a huge disadvantage. This is because shot speed also increases the amount of knockback an enemy suffers when they are hit. This can make them extremely unpredictable and make them run at you in ways that they wouldn't without the shot speed upgrades. I would recommend avoiding the following items for that reason:
 Magic 8-ball - Increases shot speed by 16% and gives you a random tarot card. This item displays the 'tears up!' message upon pickup but has no actual effect on rate of fire, only shot speed. Avoid it unless you badly need a tarot card.
 Toothpicks - increases shot speed by 16%. Despite it turning your tears red (which usually indicates a damage increase), it has no effect whatsoever on your damage. Not worth picking up.
 Cat O' Nine Tails - increases shot speed by 23% - this item is the worst of all. It slows items like Brimstone and Technology 2 and also makes Lump of Coal much less effective. Avoid this item completely. If it appears after defeating a boss, just leave it.
 Stem Cells - increases shot speed by 16% but also gives you one HP-up and heals 1 and a half hearts.
 Speed Ball - this item is worth picking up if you are playing as Maggie and you've yet to pick up a speed upgrade. Increases shot speed by 20%.
 A Lump of Coal - Rewarded to you for beating Krampus in a Devil Room, A Lump of Coal increases the damage of your tears for every second they are on screen before they hit an enemy. Shot speeds therefore make the A Lump of Coal less effective.
A Lump of Coal will increase the damage of Brimstone, Technology (1 and 2) by +2.
Extra: No damage / 'X Boy' Achievement tips


 Complete X Floor without taking any damage
These achievements are the hardest to get in my opinion and are down to both luck of the draw on items and the skill of using those items. The achievement will unlock when, having taken absolutely no damage, you defeat the boss (or second boss of an XL floor) of the second floor of each series (Basement 2, Caves 2, etc.) - you do not need to go down to the next floor to obtain it.
My advice is to focus on these achievements solely during the runs that you try to get them. Don't be concerned about winning the run as a whole. With such a route, you can go all out on aggressive devil deals and get the maximum damage possible (since hey, you don't need HP since you're aiming not to get hit at all, right?). The combination that I used to get these achievements were:
Brimstone - Brimstone gives you high damage which pierces through enemies and obstacles with infinite range.
 Lord of the Pit - LOTP gives you the ability to fly as well as a speed upgrade, allowing you to very effectively dodge enemies and bosses. Great when combined with Brimstone.
Book of Shadows - gives you about 10 seconds of invincibility when used - great for rooms where damage is nearly unavoidable or if you get yourself trapped in a tight spot!
Lord of the Pit - LOTP gives you the ability to fly as well as a speed upgrade, allowing you to very effectively dodge enemies and bosses. Great when combined with Brimstone.
Book of Shadows - gives you about 10 seconds of invincibility when used - great for rooms where damage is nearly unavoidable or if you get yourself trapped in a tight spot!
 Mom's Bra - freezes enemies temporarily, giving you a good shot at taking them out
 Mom's Pad - enemies will back away from you for 5 seconds - great for rooms where you get rushed by flies or a tonne of ground enemies
 Necronomicon - deals massive damage to all enemies in a room - great for rooms with lots of flies
 Unicorn Horn - makes you invincible and do damage to enemies you run into for about 5 seconds
 Gamekid - same as the Unicorn Horn and Mom's Pad (though also heals you if you've lost hp)
 The Battery - recharges one bar of your space bar item every 15 seconds in a room with enemies (up to 3 charges)
 9 Volt - makes your space bar item charge faster.
If you get any combination of these items just do your best to use them effectively and get those achievements!
You can take damage on the floor sets below/after the one you're trying to get. If you are looking to get 'Dark Boy' (no damage on the Depths 1 and 2) then get high damage/flying devil items if they come up BEFORE the Depths (Basement 1 and 2, Caves 1 and 2). Do not take devil deals on the first floor of the set you're trying to get the achievement with. If you're trying to get Dark Boy and take a devil deal on Depths 1, it will count as damage.
Extra: How to unlock the other characters


Extra: What to do if achievements aren't showing up
If you're having trouble with your achievements showing up, try the following:
Open up your Isaac folder under SteamApps\common\The Binding Of Isaac (usually in C:\Program Files\Steam)
It should look like this:

Next, delete the file called FlashAchievements
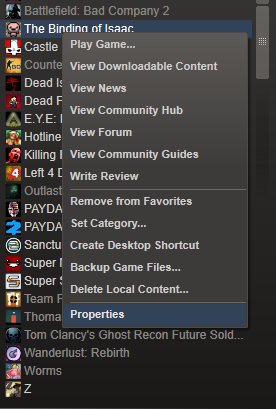
Now go to your SteamLibrary, right click on Isaac and go to Properties
Locate the 'Local Files' tab and click Verify integrity of game cache
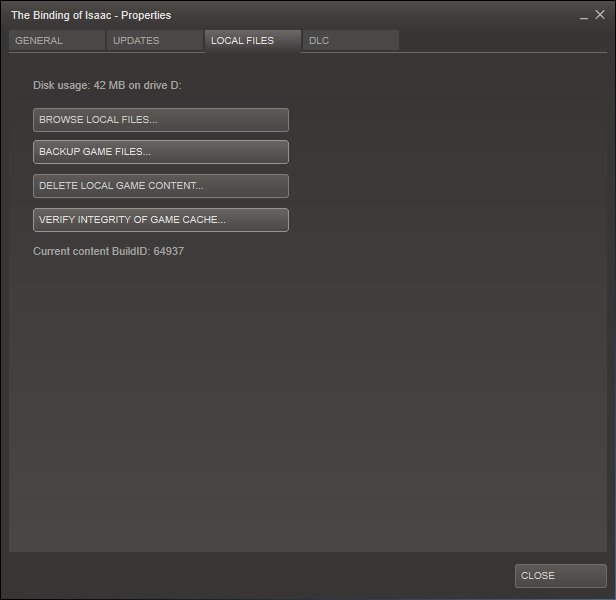
The game will then verify the FlashAchievements file and re-download it.
Open up Isaac and your achievements should pop up!
Extra: How to use an XBOX controller
- Achievement Guide for The Binding of Isaac★ 5 (1k)39k views1.5k ♥9 minUpdated Sep 29, 2018
- Making Bad Items Useful★ 5 (720)37k views549 ♥17 minUpdated Dec 5, 2015
- The Bindening™: A Comprehensive Guide to Everything Isaac★ 5 (2.1k)32k views2.8k ♥155 minUpdated Jul 4, 2015
- Unlocking Broken Achievements [Windows/Mac]★ 5 (565)31k views506 ♥6 minUpdated Mar 12, 2021
- Comprehensive Guide To The Binding Of Isaac★ 5 (980)29k views1.3k ♥75 minUpdated Aug 19, 2015
- «The Binding of Isaac»: руководство по достижениям★ 5 (1.2k)25k views1.4k ♥11 minRussianUpdated Sep 26, 2014




- Upgrading to PremiumTeam Fortress 2★ 5 (20k)1441k views11k ♥6 minUpdated May 11, 2022
- No More Room in Hell Official ManualNo More Room in Hell★ 5 (2.8k)569k views2.1k ♥29 minUpdated Apr 22, 2019
- NMRiH Community Hosting GuidesNo More Room in Hell★ 5 (526)351k views653 ♥1 minUpdated Aug 10, 2022
- ULTIMATE GUIDE FOR GAME DEV TYCOONGame Dev Tycoon★ 5 (5.8k)326k views10k ♥4 minUpdated 23 Jan, 2014
- How to 'Git Gud' Soon™MORDHAU★ 5 (2k)318k views3k ♥68 minUpdated Nov 16, 2024
- Лучшие кооперативные игры SteamPAYDAY 2★ 5 (1.5k)315k views2.1k ♥56 minRussianUpdated Apr 27, 2025






This guide was created by its original author on the Steam Community. Are you the author and want it removed? Request removal.