Witcher 2 Walkthrough/Guide
Introduction
Gameplay Tips
- Quen and Yrden are extremely helpful for survivability. Make sure to use them on difficult fights.
- Backstab enemies. It makes a huge difference, especially if you get the Assassin perk in the prologue.
- Red Haze bombs and Dancing Star bombs are extremely helpful against groups of enemies. They're almost required for certain fights.
- Kayran and Draug Trophies have hidden damage bonuses.
- Some enemies including ghosts will dodge heavy attacks.
- Use the medallion (Z key) everywhere. It highlights corpses, containers, plants, breakable walls, barrels, and loot.
- The wolf icon on the top left will glow when you are near a Place of Power. Use the medallion on these to get a buff.
- Snare traps can be found all over Chapter 1 and can be reused an unlimited number of times. There's a couple fights these are useful, so make sure to pick them up after disarming them.
Impregnation is an alchemy skill that greatly increases the effects of mutagens (around double). It only gives a bonus to mutagens that are equipped after leveling it. This means that you should get Impregnation 2 before equipping any Mutagens.
Respecing deletes your mutagens unless you reacquire the skills that had them. Impregnation bonuses are kept even after respecing. This means that you don't need Impregnation after respecing.
Build before respec (optional build for min-maxing mutagens, level Alchemy last)
Build after respec (endgame build, ignore the build above if you don't want to respec)
Survivability is far more important than damage in this game. Position, Riposte and Footwork are all required skills for survivability. Enhanced Quen is useful because it knocks back enemies.
Prologue
- It is cursed. (*)
This results in him offering you the talisman and surviving the battle. - It is magic but you don't know what it does.
This results in him surviving the battle. - It will help him.
This results in him dying in battle.
Experienced: 10% bonus experience
Earned by destroying 10 training dummies. Note that there are only 5 dummies here. You can destroy the rest in Chapter 1 or later.
Sapper: 50% chance to avoid trap/bomb damage
Earned by interrupting Geralt 5 times while disarming a trap.
Pyromaniac: 20% increased chance to incinerateOnce you reach Foltest he will give you a spyglass. Aim the spyglass at the two men on the wall for the achievement. See this image for help. Then follow Foltest until you reach the top of a siege tower.
Earned by walking into a campfire 5 times.
 Eagle Eye
Hit Count Etchverry using the ballista.
Eagle Eye
Hit Count Etchverry using the ballista.Assassin: 25% bonus damage when attacking from behindNow climb back up to the ramparts and follow Foltest until you reach Aryan La Valette. You are given 3 dialogue choices.
Earned by approaching the dead Assassin's Creed look-alike by the haystack near the ballista.
- Drop your weapon, fool. (*)
This spares Aryans life. - Let's settle this between us. (*)
This results in a duel with Aryan. - As you wish.
You must kill Aryan and his men.
Strong Back: +50 inventory capacity
Earned by saving Aryan and freeing him near the end of the Prologue.
Executioner: 1% chance to instantly kill enemies
Earned by killing Aryan along with 2 other important characters at the end of Chapter 2.
Conjuror: +3 sign damage
Earned by successfully using Axii during conversations.
Axii Sign Hex: increases Axii success chance during conversations (3 levels)
Earned by successfully using Axii during conversations.
Intimidate: increases intimidation success chance (3 levels)
Earned by successfully using intimidate during conversations.
Persuasion: increases persuasion success chance (3 levels)
Earned by successfully using persuasion during conversations.
 Intimidator
Intimidate someone.
Intimidator
Intimidate someone.- Head left past the prisoners until you reach Aryan or Louisa.
- Head straight through the locked door and fall down the trap door. This path is harder because you must fight the hangman.
Strong Back: +50 inventory capacityAfter leaving the dungeon you will be approached by Newboy if he survived who will help you by leading some guards away. If he did not survive his corpse can be found near the docks. You can kill him or loot his corpse for a talisman that starts Melitele's Heart[witcher.fandom.com].
Earned by saving Aryan.
 The Fugitive
Finish the Prologue.
The Fugitive
Finish the Prologue.Chapter 1
Cover: 10% damage reduction
Earned by staying inside Triss' bubble until you reach Flotsam. Can also be earned later.
Make your way into town until you see your friends at the gallows. This starts By the Gods - Stringing Up Sods[witcher.fandom.com]. Approach the gallows in the center of town and stop your friends from being hung. Eventually Bernard Loredo[witcher.fandom.com] will free them.
NOTE: Make sure to buy a Diagram: Diamond Armor Reinforcements[witcher.fandom.com] from Sendler in Lobinden during this Chapter. It's arguably the best armor enhancement in the game and it can only obtained from him.
Experienced: 10% bonus experience
Earned by destroying 10 training dummies.
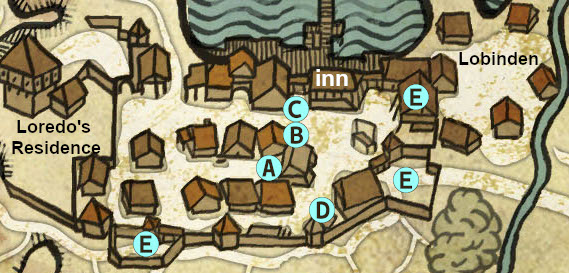
- Bribe her. (50 orens)
You can then loot the Ballista Mechanism Fragment after she distracts the guard.
Speak to Roche and follow him down the stairs. A man will then approach you and inform you of a Kayran trap component Iron Frame[witcher.fandom.com]) which you can only obtain during this quest. Roche will then distract the closest guard. You will need to sneak by and knock out the other guards. Use your medallion to detect buckets, especially around corners. Touching a bucket will draw the guards attention and cause you to miss out on two achievements. Search for the Kayran trap part (ironframe) and listen to the conversation in the window before returning to Roche.
Cover: 10% damage reduction
Earned by knocking out the first two guards.
 Man of the Shadows
Sneak through Loredo's garden undetected and find the component of the kayran trap.
Man of the Shadows
Sneak through Loredo's garden undetected and find the component of the kayran trap.Note: You can speak to Keith on the docks in order to level up a dialogue attribute.
Haggling: 20% discount from shop
Earned by successfully using Axii on a merchant and doubling the reward for killing the Kayran.
Once you leave town Triss will lead you to Cedric in Lobinden. Cedric will tell you to search the shipwreck to the north to learn more about the Kayran. Make sure to buy the Diagram: Kayran trap[witcher.fandom.com] from Cedric before meeting Triss. After fighting some drowners near the shipwreck you can analyze the ooze nearby. Triss will tell you the Kayran is venomous and recommends that you craft a Mongoose potion[witcher.fandom.com] to protect yourself. Investigate the wreck to start Mystic River[witcher.fandom.com] before leaving.
Strong Stomach: 10% reduced chance of being poisoned
Earned by drinking the Mongoose potion.
 Great Potion!
Brew the Mongoose potion.
Great Potion!
Brew the Mongoose potion. Taster
Drink a potion.
Taster
Drink a potion.Speak to Síle in at the inn to travel to the Kayran. Drink the Mongoose potion before heading down to the shore.
 Artful Dodger
Cut off a tentacle using the kayran trap.
Artful Dodger
Cut off a tentacle using the kayran trap. Oh My God! You Killed The Kayran! You Bastards!
Kill the kayran.
Oh My God! You Killed The Kayran! You Bastards!
Kill the kayran. Backbone
Craft a suit of armor from elements of the kayran's carapace.
Backbone
Craft a suit of armor from elements of the kayran's carapace.Strategy: Always keep Quen up during this fight. Place the Kayran trap or cast Yrden on the sides of the arena. Then bait the tentacles to attack the traps before chopping them. After 3 tentacles are destroyed you will have a quicktime event. Finally you need to ascend the rubble on the left side before a cutscene plays.
Chapter 1
- Go alone
If you need help finding the garden you can speak to Cedric. Once you reach the garden you can take the rose. - Go with Triss (*)
Going with Triss will gives you the option to romance her or gain an attribute. Once you reach the garden you can take the rose. Your choice in giving it to Triss does not matter. Soon some bandits will show up and will be provoked into attacking. After the fight the floor will collapse and you can choose to romance Triss in the bath house or reject her to gain an attribute.
Resistance to Magic: 20% more resistances to magic
Earned by rejecting Triss in the Elven Bath and casting Aard to open the way out during The Rose of Remembrance.
Speak to Vernon Roche after the quest completes and then Zoltan in the inn. Zoltan will then escort you into the forest to meet some Scoia'tael. After speaking with them you must head deeper in the forest. You will be forced to fight an Arach before being confronted by Iorveth. WARNING! Do not disrespect or threaten him or you will be killed and miss out on the Arach loot. Tell him about the elven prisoner on the barge and Letho. Do not follow Iorveth immediately or you will miss out on the loot.
Loot the Sword of Kaer Morhen[witcher.fandom.com] and prepare for the fight with Letho. Activate the places of power in the forest and use potions/oils before approaching Ioveth at the garden. Iorveth will agree to act as a hostage and let you take him to Letho. At the end of the conversation you will have a timed decision.
Note: This decision ultimately does not matter. Your allegiance can be chosen later.- Help Iorveth
Give your sword to Iorveth. This results in a riot among the non-humans in the city and the Scoia'tael will become friendly. - Help Vernon Roche
Punch Iorveth so that he can be taken prisoner by Vernon Roche and Bernard Loredo. This results in a holiday in Flotsam.
After some cutscenes you will fight Letho.
Strategy: The fight ends soon after Letho reaches half health. Keep Quen up as much as possible and keep your distance. Letho is invulnerable while he has his own Quen up. Cast Yrden and bait him into it to stun him. Then walk behind him and backstab him for maximum damage.
- At a Crossroads: Vernon Roche[witcher.fandom.com]
- At a Crossroads: Scoia'tael[witcher.fandom.com]
- Follow Roche's plan
Wait until night and then climb the ladder in the non-human district to enter the garden. - Enter using the secret passage
Enter the secret entrance to Loredo's residence in a cave near the west side of town. This is the same cave entered during the Malena side quest. (400 bonus XP)
You can kill the guards or sneak around, but you get more experience for killing them. You can optionally climb the ladder near the residence to speak with Helena. You can also optionally kill Arnolt Malliger in the garden. Inside the residence you will find Bernard's mother whom you must kill. Next you must find a key on the third floor. On the second floor you can interact with a mailbox if you have the Mystic River[witcher.fandom.com] quest. The third floor has sleeping guards and the key. After retrieving the key head upstairs and kill Loredo. After the battle you must protect Ves and Moril. Kill the guards in the stairs and head towards the courtyard until a cutscene plays.
 To Aedirn!
Complete Chapter 1.
To Aedirn!
Complete Chapter 1.Chapter 1 - Side Quests
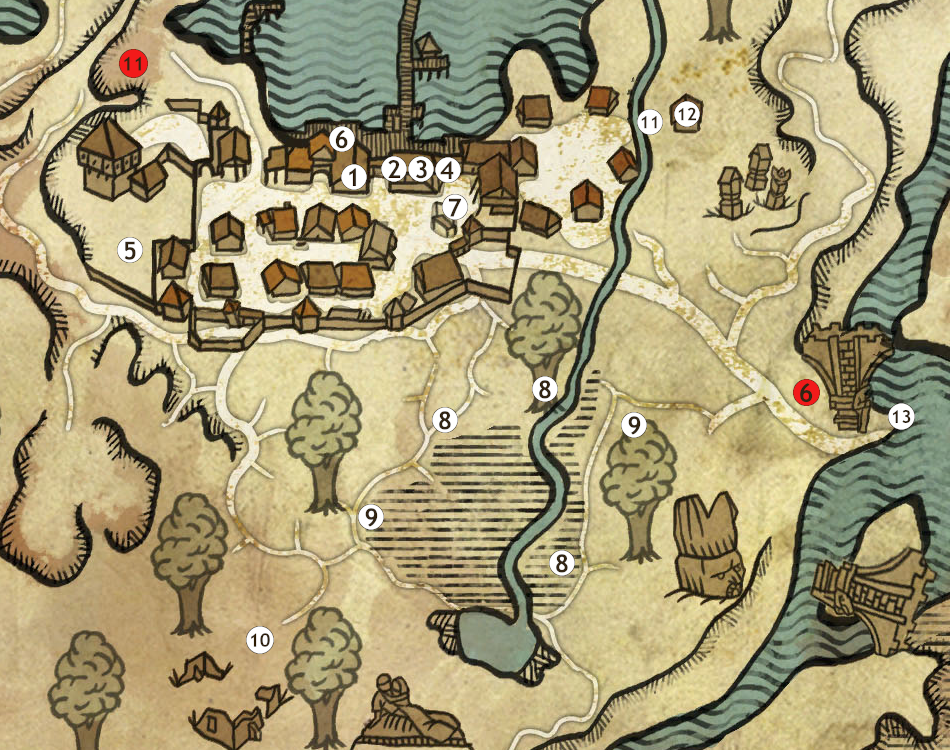
1. Witcher's Silver sword diagram (10-17 damage)
Found in a chest near the start of this chapter.
2. Silver Plated Sword (8-16 damage) (304 orens)
Purchased from Berthold Candeleria the dwarf merchant.
3. Robust Witcher's Silver Sword (12-18 damage) (267 orens)
Purchased from a mysterious merchant.
4. Robust Witcher's Silver Sword diagram (12-18 damage)
Found during Indecent Proposal.
5. Sword of Kaer Morhen (15-24 damage, 1% instant kill)
Found north of Iorveth's hideout. This is only obtainable later on during the main quest.
Thrower: +5 throwing knife damageAfter the contest some locals will anger Roche and you will have to calm him down. Next you must compete in arm wrestling against two soldiers. If you win then you will obtain a Sword of Creyden (10-13 damage). After the party you will wake up naked on the docks with a tattoo. A local will approach you and tell you to talk to Margot in the brothel. Margot will tell you to speak with Ves to obtain your belongings. You can then speak with Triss, Philippa, or Síle to remove the tattoo.
Defeat Ves in a knife throwing contest.
 Gambler
Win an arm wrestling match, a dice poker game and a fist fight.
Gambler
Win an arm wrestling match, a dice poker game and a fist fight.
Gambler
Win an arm wrestling match, a dice poker game and a fist fight.
Gambler
Win an arm wrestling match, a dice poker game and a fist fight.
Gambler
Win an arm wrestling match, a dice poker game and a fist fight.
Gambler
Win an arm wrestling match, a dice poker game and a fist fight.
 Pest Control
Finish all quests involving the destruction of monster nests. Pest Control
Finish all quests involving the destruction of monster nests.
Pest Control
Finish all quests involving the destruction of monster nests. Pest Control
Finish all quests involving the destruction of monster nests.Chapter 1 - Side Quests
- Help the ghost.
Convince Gridley and Rupert to enter the ruins. This results in both of them being killed. You can then loot Gridley's corpse for a silver sword diagram.
Giving the ghost hearts and eyes of nekkers or pigs causes it to attack you. You can then decide to leave the two explorers alone or hand them over to Loredo's mother.
 Librarian
Find all 4 pages of the asylum's history.
Librarian
Find all 4 pages of the asylum's history.This results in Malena being hung. (325 XP)
2. Lie to the guards or let her speak.
You can then follow her and are promptly betrayed. She will then flee to the ruins to the south. Find her and decide what to do with her. (125 XP)
Show Anezka[witcher.fandom.com] in Lobinden the talisman and she will offer to buy it. You can accept 50 orens or haggle it up to 200 orens. If you persuade her into telling you why she wants it she says she can restore its power and keep it for yourself. This requires 4 ingredients:
• Troll Tongue - received as a reward from beating Sendler at dice or looted during Troll Trouble[witcher.fandom.com] by killing the troll
• Essence of Death - looted from wraiths during In the Claws of Madness[witcher.fandom.com].
• Endrega embryo - looted from Endregas or Endrega cocoons.
• Arachas eyes - looted from Arachas during The Assassin of Kings[witcher.fandom.com] if you choose not follow Iorveth immediately.
Note you can help the troll for a reward before killing him. Return to Louis Merse in Flotsam for your reward.
The troll explains that he will not go back to work unless his mate is avenged. Optionally speak to Síle and Zoltan in Flotsam to learn who killed the troll. Next you need to beat Sendler in a game of dice and he will give you the troll trophy and tell you to talk to a man in the inn during the night. The man will tell you that Dmitri killed the troll and he can be found at the graveyard in Lobinden. After killing Dmitri you can speak to the troll and convince him to rebuild the bridge. If you won the she-troll head from Sendler you can give it to the troll for the Hunter's armor diagram, however this will prevent you from obtaining Melitele's Heart unless you kill him. Next return to Chorab for a reward. You will have to persuade him to give the full amount.
 Friend Of Trolls
Help all 3 talking trolls in the game and spare their lives.
Friend Of Trolls
Help all 3 talking trolls in the game and spare their lives. Summer Solstice
Bow before the Summer Shrine.
Summer Solstice
Bow before the Summer Shrine.Summer's Crown: 10% chance to incinerate enemies that hit you while Quen is active
Earned by visiting the Summer Shrine found in the lower right corner of the map. (PC only)
Loot the captain's key from a skeleton in the shipwreck on the beach to the north of Flotsam. Open a chest in the wreck and loot the journal. Place this journal in the mailbox in Louis Merse's home near the gallows. This quest will continue in Chapter 2 and 3. Completing the quest chain allows you to craft some of the best armor in the game.
Chapter 2 - Roche
 Tourist
Tour the camp with Zyvik.
Tourist
Tour the camp with Zyvik.Speak with the king in his tent. Then speak with Dethmold and Zyvik to receive some quests. Then explore the camp and complete some side quests. Consider buying the Oathbreaker's body armor diagram from Lasota if you are playing on Dark Mode difficulty.
Toxic Blood: 30% chance of poisoning enemies that damage you while a potion is active.
Obtained after being poisoned 12 times. Use rotfiends or take off your armor and throw Devil's Puffballs at a wall.
He will ask for the money from the soldiers. You have 2 choices:
- Give him 400 orens.
This ends the quest and he will immediately tell you about Sabrina Glevissig.
He will ask you to perform a ritual. Read the 2 notes in his house before leaving. Head to the nearby forest to the east with Endregas and wait until 20:00 before interacting with the altar. Make sure to loot the Arbitrator steel sword (28-33 damage) in the nearby puddle. Geralt will drink the mixture and have a hallucination before waking up. Pick up the notes on top of the hill before jumping down. Return to the Visionary and tell him about the hen and mushrooms. He will tell you that the Relic peddler has the spear that pierced Sabrina's heart. Return to the peddler and ask about the spear. He will tell you that he lost the spear while gambling and that Iorveth has it in Vergen.
You have 2 choices:
1. Kill him.
2. Convince him that you are a former member of the Dun Banner. (*)
He will ask you a series of questions to prove you are a member. Correctly answering the questions rewards you with the Sword of the Dun Banner. Incorrectly answering a question results in the wraith attacking you. If you possess a beaver cap or the Dun Banner cloak then he will allow one incorrect response.
Select the following answers:
- "I served in the Banner".
- "You got it wrong."
- "Menno Coehoorn."
- "Coehoorn is dead."
- "Vandergrift and Seltkirk."
- "I was lead out by a priest."
Return to Vergen and speak to Skalen. Beat him at dice and you will obtain The Spear of Destiny[witcher.fandom.com]. You can also play him two more times to win Princess Xenthia's Sword (31-35 steel sword) and a Dun Banner cloak.
Chapter 2 - Roche
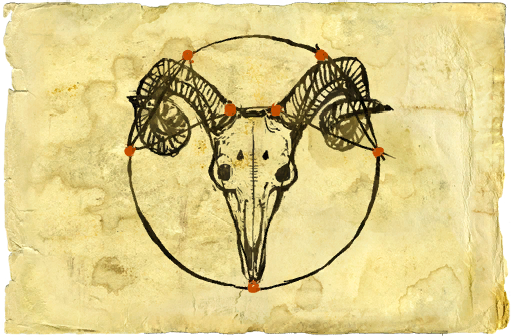
- Petrified bread
- Black candles
- Goat skull
- Scorched tree
- Raven corpse
- Sour milk in stone bowl
- Pixie ring
Exorcist: +10% damage against spectres and wraithsReturn to the camp and speak to Henselt in his tent at midnight. Then defeat the assassins that show up to kill him.
Remove the curse from the king.
Swordsman: +4 sword damage
Defend King Henselt from the two assassins.
 Necromancer
Relive all of Auckes's memories in Dethmold's vision.
Necromancer
Relive all of Auckes's memories in Dethmold's vision.David: 10% increased damage dealt to opponents much bigger than GeraltTalk to the dying assassin to have a flashback which starts the quest Returning Memories[witcher.fandom.com]. Return to Dethmold and he will give you the medallion which completes Faith Symbolized[witcher.fandom.com]. Speak to him again to begin lifting the curse from the land.
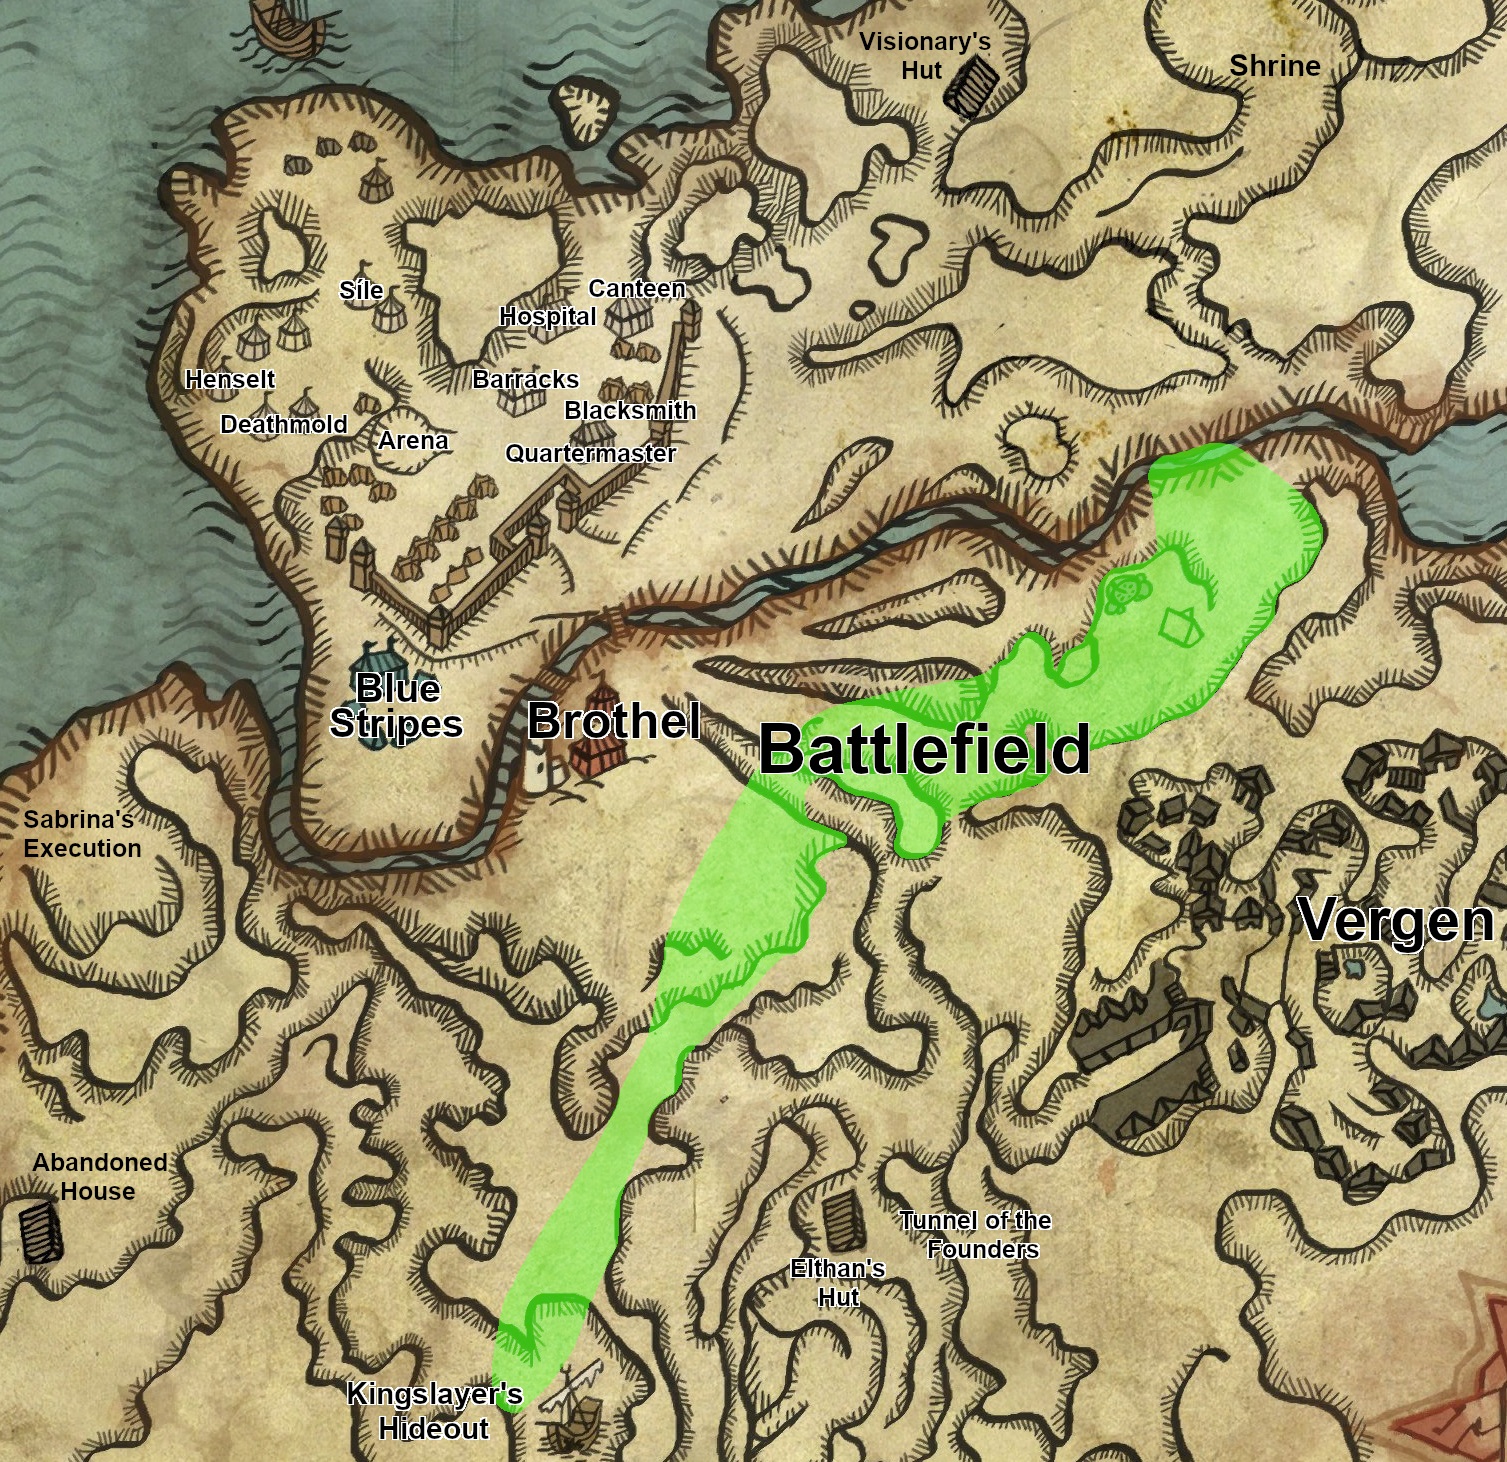
Kill the golem in the kingslayer's hideout.
Note: This battle is one of the most difficult parts of the game.
Strategy:- Defeat 3 wraiths and a Draugir. Wait a couple seconds or your allies will catch fire. Kill the wraiths first. Be patient and wait until you have an opening to attack.
- Hide behind each barricade until after the arrows land before moving forward.
- Defeat the soldiers and prioritize the weaker enemies first. Wait and heal after the first 3 are dead. Try to fight the remaining enemies one at a time.
- Use Quen and Yrden against the weaker Draugir until the larger Drag shows up. Keep Quen up and roll dodge when you are charges at you. Then backstab him until he blocks.
- Run down the hill and exit the battlefield.
 Fat Man
Kill the draug.Friend Of Trolls
Help all 3 talking trolls in the game and spare their lives.
Fat Man
Kill the draug.Friend Of Trolls
Help all 3 talking trolls in the game and spare their lives.Executioner: +1% chance to instantly kill enemiesExit the tunnels and speak to Zoltan who asks you to help Iorveth. Enter the door on the left and climb the stairs until Roche becomes separated from you. You have 2 choices:
Earned by killing Aryan La Valette, Adam Pangratt, and Henselt.
1. Save Iorveth.
Iorveth is located on the bottom right of the map. Saving him rewards you with Naevde Seidhe[witcher.fandom.com] silver sword (30-34 damage).
2. Head directly to Philippa and Síle. Kill the golem blocking the path before entering Philippa's room. Be prepared for a difficult battle unless you have Red Haze bombs. Yrden will also be very helpful in this fight. Cast Quen before entering the door and watch Síle escape through a portal. Then Henselt and 4 soldiers will enter the room and attack you. Red Haze bombs, Snare traps, and Riposte are highly recommended for this fight. After the battle Roche will demand that you let him kill Henselt.
 Reasons of State
Stop Roche from killing Henselt.
Reasons of State
Stop Roche from killing Henselt.Executioner: +1% chance to instantly kill enemiesRoche and you will then travel to Loche Muinne in search of Letho.
Earned by killing Aryan La Valette, Adam Pangratt, and Henselt.
 Alea Iacta Est
Complete Chapter 2.
Alea Iacta Est
Complete Chapter 2.Chapter 2 - Side Quests (Roche)
You have 3 choices:
1. He's a prisoner. (*)
The guard will let you enter.
2. He has important information.
The guard will refuse you without a bribe.
3. Bribe the guard (30 orens).
 Gladiator
Defeat all opponents in the Kaedweni arena.
Gladiator
Defeat all opponents in the Kaedweni arena. Heartbreaker
Seduce Ves. Pest Control
Finish all quests involving the destruction of monster nests.
Heartbreaker
Seduce Ves. Pest Control
Finish all quests involving the destruction of monster nests.1. Kill the wraiths (50 XP). This ends the quest.
2. Help Mavrick at the camp.
Before talking to Mavrick you should investigate the wraith's story. Head to the graves behind the house and examine Malget's grave. Then use Aard on the barrels next to the house to uncover a trap door. Light the candles in the basement according to Malget's grave (V◇Λ) and loot the notes to start From a Bygone Era[witcher.fandom.com]. WARNING! The wraiths will not appear if you complete From a Bygone Era before speaking to them.
Return to the camp and speak with Mavrick. You have 2 choices:1. Accuse him of murdering his sisters.
He will run away and be murdered by the wraiths. If you return to them they will summon a Demon which drops a Mahakaman sihil[witcher.fandom.com] steel sword schematic (29-35 damage).
2. Ask him to help defeat the wraiths. (600 XP).
Make sure to use quick attacks against the wraiths. If Mavrick dies then the result is the same as accusing him of murder.
You have 2 options:
- Give the notes to Deathmold. (200 orens)
Enter a hut to the southwest of Vergen near a quarry and speak to Elthon inside. You need to gather a total of 80 feathers for this quest and will be rewarded up to 500 orens. He will initially ask you for 12 feathers, then 60, and then 8 more. Persuading him to give you more money will actually earn you a little less money. Return to his hut after giving him all of the feathers to obtain a Elthon's trophy[witcher.fandom.com].
Chapter 3 - Roche
 Winter Solstice
Bow before the Winter Shrine.
Winter Solstice
Bow before the Winter Shrine.Winter's Shroud: 20% chance of freezing opponents with AardTalk to the guards and they will let you enter the city. Then travel to the center of town and talk to Roche. Follow him to talk with King Radovid. Then follow Roche back to the inn and talk to Brigida Papebrock. She will ask you to help her escape the city. If you decline to help her then she will temporarily wait for you at the front gate. Her questline can be skipped.
Earned by visiting the Winter Shrine near Loc Muinne.
Keep going until you reach the dead smuggler. Then speak to Brigida until the mage attacks with more soldiers. After the battle Brigida will give you a document that implicates Kimbolt. Visit Kimbolt in Loc Muinne and discuss the document. He will tell you that it's a forgery and the scribe outside can prove it. The scribe can be found drunk in his bed, so you are on your own. Read the scribes notes which state "light, quench, sh*t, rinse." His bookshelf has 5 Scribe's Notes that you can use for practice. The quest will fail if you incorrectly analyze the document.
Solution:
- Add burnt lime
- Add water
- Add cormorant guano
- Heat and capture the vapors with cold water.
Return to Kimbolt and admit that the document was a forgery. Kimbolt will then ask you to investigate Count Maravel which starts The Messenger[witcher.fandom.com]. After leaving the room you will be asked to speak with Count Maravel. Accepting Maravel's request starts Pacta Sunt Servanda[witcher.fandom.com] You can optionally complete both of these quests.
1. Accuse Maravel of treason.
Rewards you with 500 XP, 100 orens, and a Ceremonial Ellandrian steel sword (48-55 damage).
2. Accuse Kimbolt of treason.
Rewards you with 500 XP, 200 orens, an Encrusted Nilfgaardian Lawgiver steel sword (50-55 damage)
3. Accuse both of them of treason.
Rewards you with 750 XP and a Medal of Distinguished Service to Termia[witcher.fandom.com] trophy.
Speak to Roche near the sewers in the center of Loc Muinne and help him free Anais from Dethmold. When you start the mission you will be forced to use Axii on the guards. Failing the ability adds a few more enemies to the battle. Keep heading forward through large groups of soldiers until you are attacked by a mage. Killing the mage can be a bit tricky. Casting Yrden while on top of him might work. After the battle you can head into Dethmold's quarters to watch Roche kill Dethmold. Roche will then mention that you should take Anais to Radovid.
You have 2 choices:1. Agree to give Anais to Radovid as promised.
Radovid's soldiers will escort you out of the camp.
2. Take Anais to John Natalis.
Radovid's soldiers will attack you when you leave Dethmold's chambers.
 Kingmaker
Help Roche rescue Anais.
Kingmaker
Help Roche rescue Anais.Forgotten Vran[witcher.fandom.com] steel sword. Then return to the sewer exit.
1. Fix the broken portal.
 Sensitive Guy
Save Síle from dying in the unstable portal.
Sensitive Guy
Save Síle from dying in the unstable portal. Witch Hunter
Leave Síle to die in the unstable portal.
Witch Hunter
Leave Síle to die in the unstable portal.The dragon will then break through and attack you. After defeating the dragon you will be given a choice to spare or kill it.
 Being Witcher George
Kill the dragon.
Being Witcher George
Kill the dragon. Dragonheart
Spare the dragon.
Dragonheart
Spare the dragon. Once Ain't Enough
Reach the Epilogue of the game.
Once Ain't Enough
Reach the Epilogue of the game. Old Friends
Spare Letho.
Old Friends
Spare Letho. Avenger
Kill Letho.
Avenger
Kill Letho. To Be Continued...
Finish the game.
To Be Continued...
Finish the game.Chapter 3 - Side Quests (Roche)
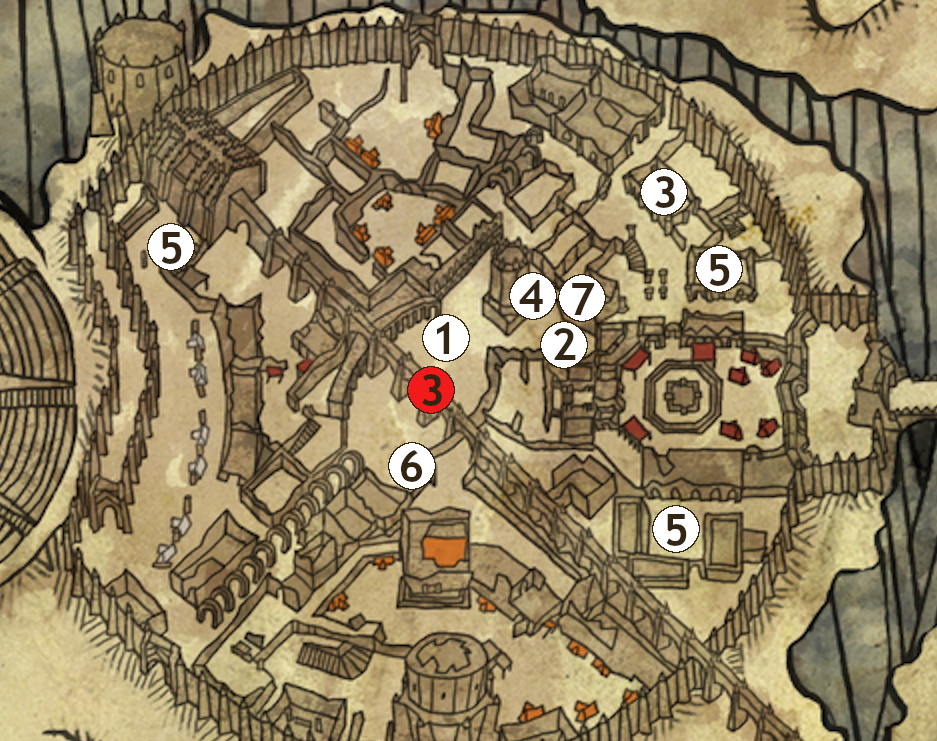
He will offer you one of 4 rewards:
- 250 orens
- Magic Wrap armor enhancement diagram
- Fire Rune and Earth Rune
Runes:Return to Bras of Ban Ard after clearing all 3 nests to complete the quest.Animal
Death
Sky
Time
Pest Control
Finish all quests involving the destruction of monster nests.Bring the document to Bras of Ben Ard near the inn. He will decypher the document and ask for some ingredients.
- Warrior Nekker Blood
- Queen Endrega's Pheromones
- Bullvore Brain
You can obtain the Queen Endrega's pheromones in Chapter 1 or during the Lilies and Vipers questline. Return these ingredients to Bras and he will give you a Caerme steel sword diagram.[witcher.fandom.com] This sword isn't as good as some other options.
Enter the sewers from a door near the Mighty Numa. Speak to the wisp in front of the door that asks "Nigb't?". Then talk to Bras of Ban Ard near the inn about Malget's notes. He will tell you to say the words between "Nanna Kanpa" and "Nanna Zi" and then say the words after "Nanna Zi" in reverse order. Answering the wisp incorrectly causes you to take some damage. Answering correctly opens a portal.
Malget's Notes: "Nanna Kanpa Zi Uddu-ya Ia Ia Gat Exa Nanna Zi Uddu-Zi Gat Kanpa Nibbit"
Solution:
Zi + Uddu-ya + Ia Ia + Gat + Exa + Nibbit + Kanpa + Gat + Uddu-zi
After entering the portal you will need to solve a Lights Out type puzzle. The fastest solution is to light the first braizer on the left and the second braizer on the right. You should also be able to solve it by randomly lighting unlit braizers. After completing the puzzle you can speak with The Operator. WARNING! Be prepared to respec before talking to him. You can leave and come back later if you are not ready.
1. You are not ready.
He will teleports you out and you will be unable to return.
2. Operate the machine by yourself.
This causes him to fight you and prevents you from respecing. He casts spells, teleports around, and summons gargoyles. You can hide behind a pillar to heal during the fight. He drops the Operator's staff[witcher.fandom.com] (40-60 damage) which has a high chance to light enemies on fire.
3. Yeah. Go ahead and use the machine.
This resets your skills. You should be able to obtain all of these achievements by respecing and reloading.
 Mutant!
Enhance 5 abilities using mutagens.
Mutant!
Enhance 5 abilities using mutagens. Swordmaster
Acquire the Combat Acument ability.
Swordmaster
Acquire the Combat Acument ability. Master Alchemist
Acquire the Mutant ability.
Master Alchemist
Acquire the Mutant ability. Master Of Magic
Acquire the Sense Of Magic ability.
Master Of Magic
Acquire the Sense Of Magic ability.Iorveth (incomplete)
Anatomy Lesson: +10% Damage against Humans
Examine the body in the catacombs during With Flickering Heart.
Birdman: +10% damage against Harpies
Complete The Harpy Contract quest.
Child of the Night: +2 vitality regeneration at night
Sneak through the camp undetected during Where is Triss Merigold?
 Spellbreaker
Help Iorveth find the dagger needed to free Saskia from the spell.
Spellbreaker
Help Iorveth find the dagger needed to free Saskia from the spell.Achievements
This list includes all achievements that were not included in the rest of the guide.


I missed this achievement by 1000 XP and I only missed the Hung Over quest.
I'm not sure if it's obtainable on the Roche path without grinding Gargoyles and Harpies.
Finish the game on Insane difficulty.
Best Equipment


Amethyst armor enhancements[witcher.fandom.com]
Diamond armor reinforcements[witcher.fandom.com]
Diamond armor reinforcements[witcher.fandom.com]


Fire Runes[witcher.fandom.com]
Ysgith Runes[witcher.fandom.com]
Diamond armor reinforcements[witcher.fandom.com]
Vran armor enhancements[witcher.fandom.com]
Magic wraps[witcher.fandom.com]
- How to get all of Geral'ts secret passive abilities★ 5 (1.6k)53k views3.5k ♥6 minUpdated Mar 17, 2021
- Получаем достижения★ 5 (3.6k)48k views4.2k ♥7 minRussianUpdated Apr 24, 2017
- Моды на The Witcher 2: Assassins of Kings Enhanced Edition★ 5 (563)32k views1.2k ♥5 minRussianUpdated Mar 15, 2020
- The Witcher 2: Assassins of Kings на 100%★ 5 (1.1k)29k views2.6k ♥7 minRussianUpdated Sep 2, 2021
- The Witcher 2 Insane Difficulty Walkthrough★ 5 (634)27k views1k ♥22 minUpdated Apr 20, 2017
- Особые умения Геральта★ 5 (1.3k)27k views1.9k ♥5 minRussianUpdated Mar 9, 2014






- Upgrading to PremiumTeam Fortress 2★ 5 (20k)1441k views11k ♥6 minUpdated May 11, 2022
- No More Room in Hell Official ManualNo More Room in Hell★ 5 (2.8k)569k views2.1k ♥29 minUpdated Apr 22, 2019
- NMRiH Community Hosting GuidesNo More Room in Hell★ 5 (526)351k views653 ♥1 minUpdated Aug 10, 2022
- ULTIMATE GUIDE FOR GAME DEV TYCOONGame Dev Tycoon★ 5 (5.8k)326k views10k ♥4 minUpdated 23 Jan, 2014
- How to 'Git Gud' Soon™MORDHAU★ 5 (2k)318k views3k ♥68 minUpdated Nov 16, 2024
- Лучшие кооперативные игры SteamPAYDAY 2★ 5 (1.5k)315k views2.1k ♥56 minRussianUpdated Apr 27, 2025






This guide was created by its original author on the Steam Community. Are you the author and want it removed? Request removal.