Zap Zap! - Laura SFV Guide
Introduction
 Name: Laura Matsuda
Birthdate: Unknown
Birthplace: Brazil
Height: 5'9" (175 cm)
Weight: 159 lbs (72 kg)
Eye color: Brown
Hair color: Black
Fighting Style: Matsuda Jiu-Jitsu
Likes: Her younger brother (Sean Matsuda), meat dishes, fighting
First Appearance: Street Fighter 5
Brazilian Jiu-Jitsu is a style that has never been represented in Street Fighter, so we definitely made sure it was included in Street Fighter V. Since Brazilian Jiu-Jitsu is known for being methodical, we had to make sure that Laura felt methodical too so we emphasized mind games and reads. To do this, we gave her movement options that allow her to get in and out quickly. We also gave her the Bolt Charge attack, which leaves her next to the opponent. When she’s in close, the mind games truly begin.
—Peter Rosas, Associate Producer
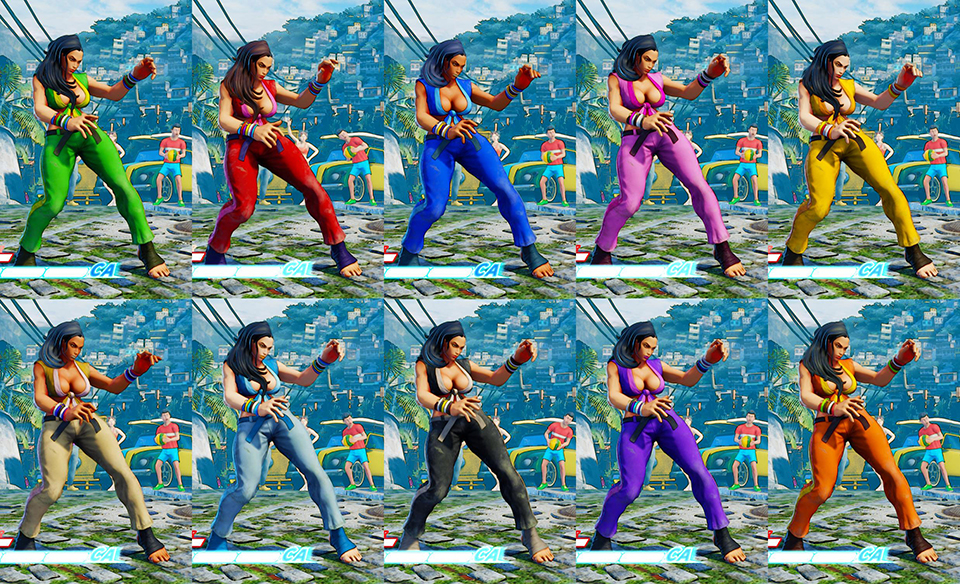
Overview

- She hits like a truck, with even the simplest openings dealing more than 100 points of damage.
- For a grappler, she has an incredibly mobile ground game with her Linear Movement V-Skills that greatly enhance her footsies game.
- A few of her tick-into-command-throw blockstrings have tight windows of escape, putting the enemy in sticky coin-flip situations.
- Many of her knockdowns are from hit-throws or throws, limiting her opponent’s recovery options to quick-rising in place or staying floored.
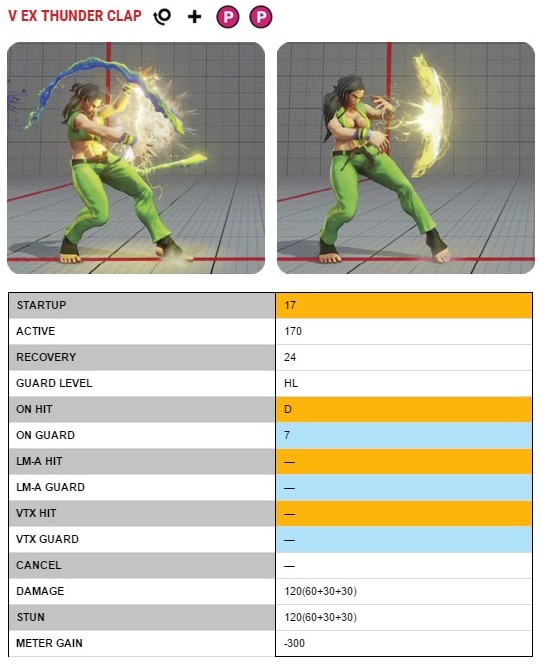
- Thunder Clap would be an invaluable tool for conventional characters, but it’s an even better one for a grappler like Laura.
- Laura is limited in her combos; she only has a handful of hit-check combos and no practical anti-air Crush Counter ones.
- She’s primarily footsie-based, so she can be difficult to play for Street Fighter novices.
- She doesn’t have a conventional low hit-check combo like most characters, so her offense can be difficult to implement against knowledgeable players.
Laura is a ground-based, mobile grappler with a chargeable projectile attack. Her strengths lie in her ability to weave in and out of mid and close range, threatening with her powerful Sunset Wheel command throw. She’s reliant on having good Street Fighter fundamentals, so she can be reasonably hard to master. Her combos, however, aren’t too mechanically intensive.
Your objective is to play a solid mid-range game until you find an opening to score a throw-type knockdown, or to use an LP Bolt Charge combo to get in. Achieve this by:
- Getting into mid range as early as possible, holding your ground and pressuring your opponent into the corner
- Using Thunder Clap as a catalyst for the enemy to make bad decisions, and to clear a path through their defense
- Fishing with standing
into Linear Movement – Esquiva, weaving out of range with strong mid-range attacks
- Whiff-punishing attacks with crouching
LP Bolt Charge or crouching
Data
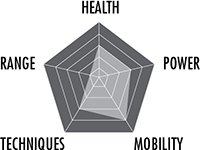 CHARACTER ATTRIBUTES
Attacks
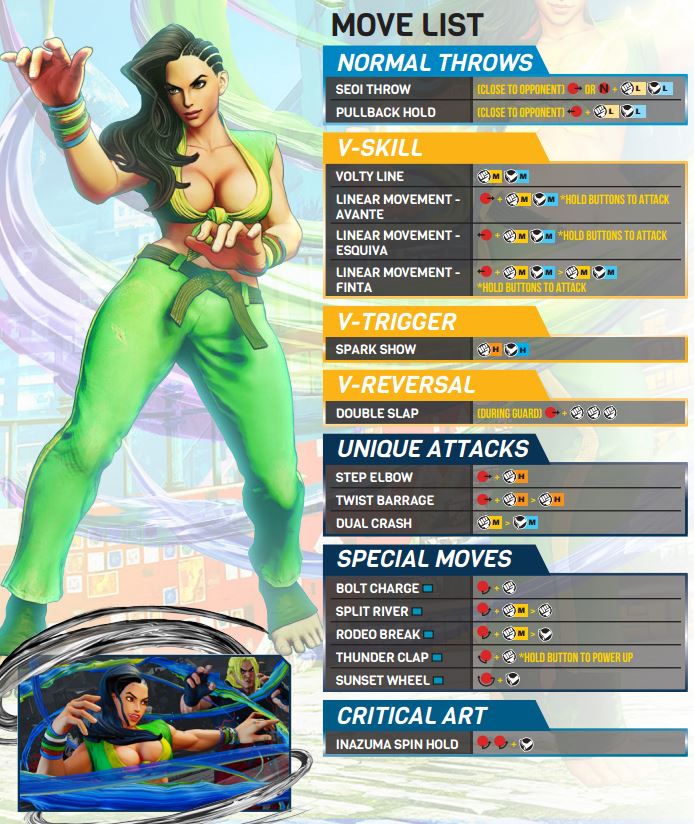
Being effective with Laura requires you to really get into the mind of the opponent once you get into close range. This means that you'll have to keep pressuring as they retreat, anti-air them when they try to jump, command grab them if they block, and block if you feel they're itching to attack back. Once you're aware of your opponent's options, and can properly guess what they'll do next, you'll be surprised at how fast the wins will come.
—Peter Rosas, Associate Producer
V-System Pt. 1
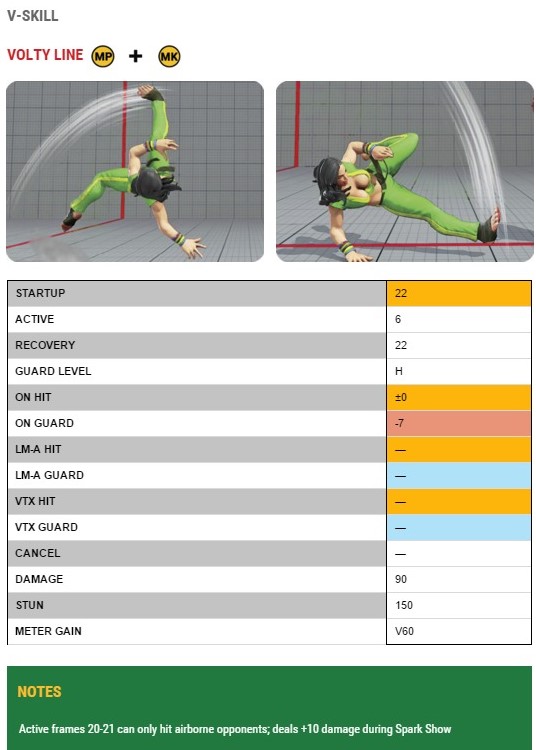 Volty Line: Volty Line is one of Laura’s three V-Skills, and it is executed with an input of

 . It’s an overhead wheel kick that reaches just short of half-screen distance. Any attacks that are special-cancelable are also V-Skill-cancelable (with standing being an exception, since it’s V-Skill-cancelable but not special-cancelable). This applies to all three V-Skills. While that’s a powerful trait to possess, especially as a grappler, using Volty Line in this way is usually not advised. It’s -7 on block and easily punishable by medium-strength combos, even at max distance. Furthermore, Laura doesn’t have a blockstring sequence with successive low attacks, so astute opponents will most likely block high after blocking your first low attack, nullifying this strategy entirely.
Volty Line is best used standalone, where you can force the enemy to react appropriately under your footsie pressure. Like Rashid’s Beak Assault overhead, Volty Line starts up at 23 frames, so it’s not too difficult to block if you’re looking for it. But, in conjunction with your crouching
. It’s an overhead wheel kick that reaches just short of half-screen distance. Any attacks that are special-cancelable are also V-Skill-cancelable (with standing being an exception, since it’s V-Skill-cancelable but not special-cancelable). This applies to all three V-Skills. While that’s a powerful trait to possess, especially as a grappler, using Volty Line in this way is usually not advised. It’s -7 on block and easily punishable by medium-strength combos, even at max distance. Furthermore, Laura doesn’t have a blockstring sequence with successive low attacks, so astute opponents will most likely block high after blocking your first low attack, nullifying this strategy entirely.
Volty Line is best used standalone, where you can force the enemy to react appropriately under your footsie pressure. Like Rashid’s Beak Assault overhead, Volty Line starts up at 23 frames, so it’s not too difficult to block if you’re looking for it. But, in conjunction with your crouching 
 poke sequence, you can sneak it in if you’ve conditioned the enemy into blocking low at mid range. It also builds valuable V-Gauge on contact and deals more damage than a traditional overhead (90 versus 60).
There are two active frames prior to the overhead active frame that won’t connect with grounded opponents. These frames knock down airborne foes and are meant to stop opponents from jumping out of range. This trait is often more valuable than the overhead trait, since players may be inclined to jump away from Laura’s frightening mid-range and close-range offense.
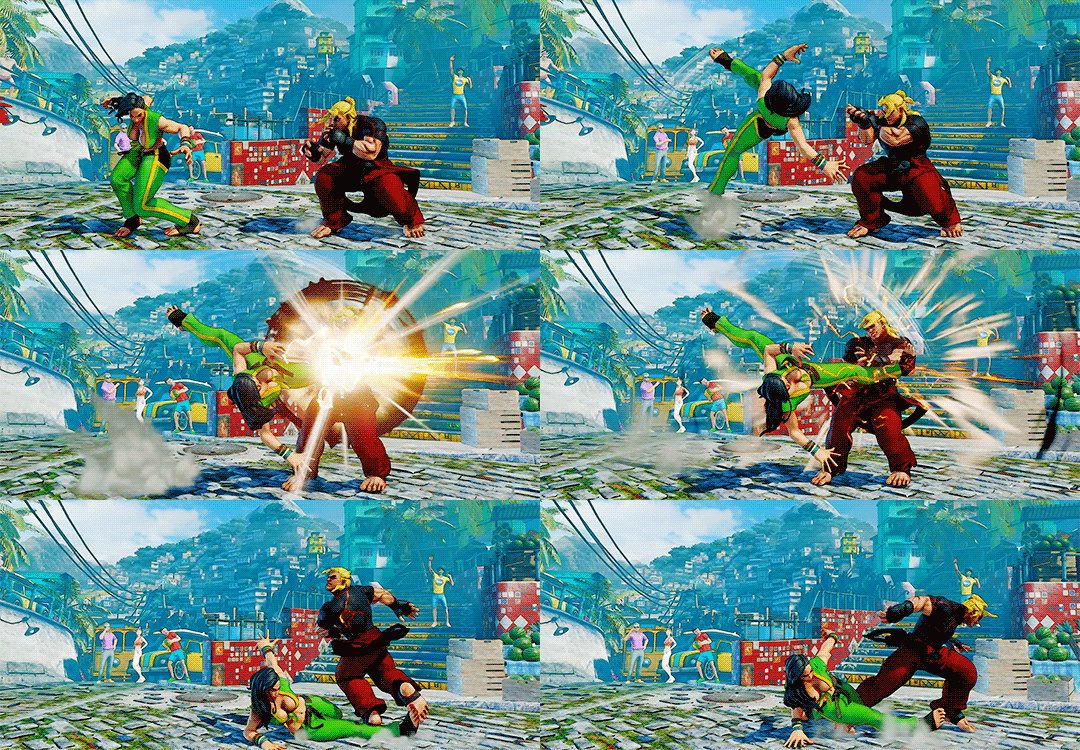 Additionally, Volty Line causes a Crush Counter when it counter-hits.This effect makes Volty Line an invaluable backdash deterrent when applying your close-range pressure. Players are much more likely to backdash away from a grappler like Laura, especially considering she doesn’t have conventional low hit-check combos. If you can make the appropriate read, you can hunt down your opponent’s backdash with Volty Line, earning a Crush Counter juggle. See Combo 20 for more details.
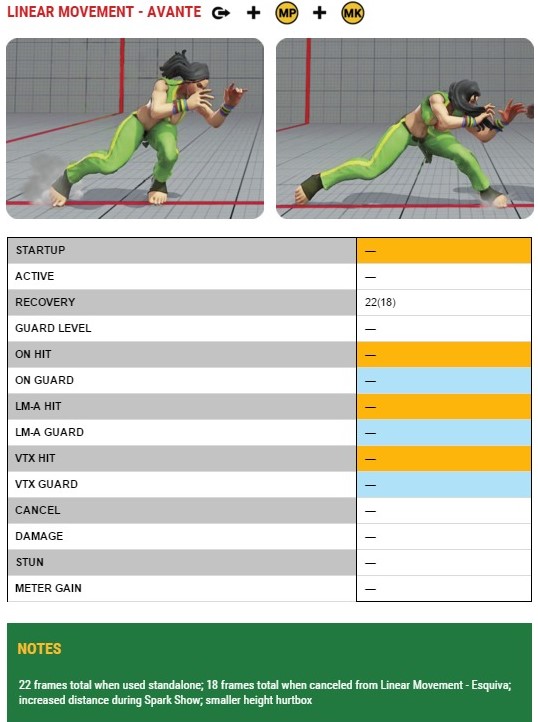 Linear Movement - Avante: With an input of
  , Laura performs a crouch-dash toward the enemy. Linear Movement – Avante (or “forward” in English) is a command dash that can be canceled from any of her special-cancelable ground attacks. The main difference between this dash and her normal dash is that her hurtbox height is decreased during Linear Movement – Avante, but at the cost of five additional recovery frames (22 total frames compared to her normal dash at 17). When canceled into from Linear Movement – Esquiva, Linear Movement - Avante clocks in at 18 frames total, a reduction of four frames.
Linear Movement – Avante is an important asset in Laura’s offense-based gameplay, considering she can cancel her attacks with it to get into close range easily. However, you’re usually at a punishable disadvantage when using it this way. The best advantage you can get from canceling a blocked normal attack is standing or crouching , at -2. V-Skill-canceling standing isn’t too useful since standing MP has an extremely limited range, and you’re at +3 on guard without the V-Skill cancel anyway. The next best sequences are standing , which is -5 on guard, and crouching , at -2 on guard. The standing HP variant is punishable, but it’s practical because of how much range standing covers, allowing Laura to get into point-blank range from outside of close range. It’s not a sequence you want to use often because experienced players will punish you on reaction, but if you can keep your opponent in a state of hesitation, you’ll be able to get away with it occasionally. Otherwise, you can use crouching to get Laura into close range easily and safely (for the most part).
For instance, if you’re using standing canceled into a safer special like LP Bolt Charge, Linear Movement – Esquiva, or EX Thunder Clap (or even normal Thunder Clap from range), you can sneak in a Linear Movement – Avante cancel intermittently because your opponent is probably worried about one of your other follow-ups.
, Laura performs a crouch-dash toward the enemy. Linear Movement – Avante (or “forward” in English) is a command dash that can be canceled from any of her special-cancelable ground attacks. The main difference between this dash and her normal dash is that her hurtbox height is decreased during Linear Movement – Avante, but at the cost of five additional recovery frames (22 total frames compared to her normal dash at 17). When canceled into from Linear Movement – Esquiva, Linear Movement - Avante clocks in at 18 frames total, a reduction of four frames.
Linear Movement – Avante is an important asset in Laura’s offense-based gameplay, considering she can cancel her attacks with it to get into close range easily. However, you’re usually at a punishable disadvantage when using it this way. The best advantage you can get from canceling a blocked normal attack is standing or crouching , at -2. V-Skill-canceling standing isn’t too useful since standing MP has an extremely limited range, and you’re at +3 on guard without the V-Skill cancel anyway. The next best sequences are standing , which is -5 on guard, and crouching , at -2 on guard. The standing HP variant is punishable, but it’s practical because of how much range standing covers, allowing Laura to get into point-blank range from outside of close range. It’s not a sequence you want to use often because experienced players will punish you on reaction, but if you can keep your opponent in a state of hesitation, you’ll be able to get away with it occasionally. Otherwise, you can use crouching to get Laura into close range easily and safely (for the most part).
For instance, if you’re using standing canceled into a safer special like LP Bolt Charge, Linear Movement – Esquiva, or EX Thunder Clap (or even normal Thunder Clap from range), you can sneak in a Linear Movement – Avante cancel intermittently because your opponent is probably worried about one of your other follow-ups.
With its crouching properties, you can use Linear Movement – Avante to get under certain attacks, including F.A.N.G.’s Nishikyu, Dhalsim’s Yoga Fire, and even some jumping attacks that would hit Laura’s head if she were standing or dashing normally. This is especially important against those two zoning characters since the parabolic arc on their projectiles can be an annoyance for a ground-based grappler like Laura. Linear Movement – Avante lets Laura crouch-dash under those projectiles when timed properly, advancing her closer to mount a mid-range
V- System Pt. 2
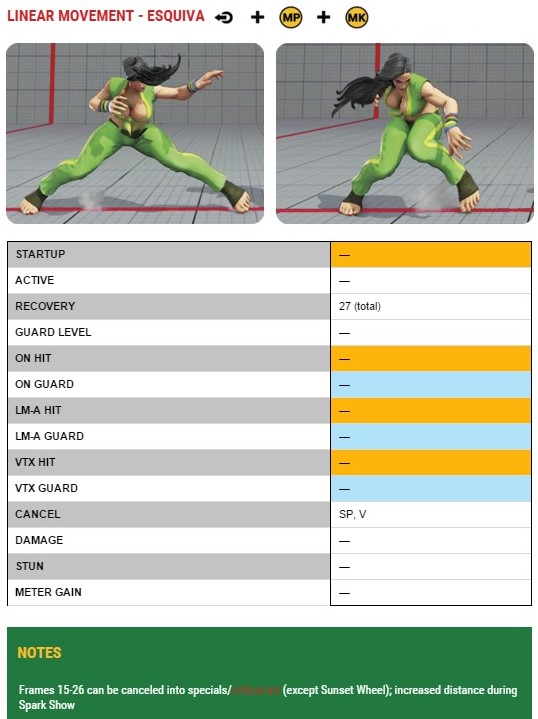 Linear Movement - Esquiva: Linear Movement – Esquiva (or “elusive” in English) is performed with an input of
  and is the backdash variant to Linear Movement – Avante. It’s six frames longer than Laura’s normal backdash, but it has several unique properties that make it much more versatile. It can be canceled into from any special-cancelable attack, like Linear Movement – Avante, and then can even be canceled into other moves. Frames 15 through 26 of Linear Movement – Esquiva can be canceled into a special attack (except Sunset Wheel), or any of her other V-Skills. Essentially, you can skip the last 12 frames of this move with another one. You can use this trait creatively, especially with Linear Movement – Avante, LP/MP/EX Bolt Charge, and Thunder Clap.
For example, if you knock down an opponent and then get into close range, you can use a sequence of standing to bait out a throw-tech or whiffed attack. Laura will dodge it and then get back into close range for a surprise frame trap, throw, or command throw mix-up.
Another great use of this kind of V-Skill cancel into special cancel is in fishing for counter-hit standing On a counter-hit confirm, you can cancel the recovery of Linear Movement – Esquiva with MP or EX Bolt Charge, as seen in Combo 16.
and is the backdash variant to Linear Movement – Avante. It’s six frames longer than Laura’s normal backdash, but it has several unique properties that make it much more versatile. It can be canceled into from any special-cancelable attack, like Linear Movement – Avante, and then can even be canceled into other moves. Frames 15 through 26 of Linear Movement – Esquiva can be canceled into a special attack (except Sunset Wheel), or any of her other V-Skills. Essentially, you can skip the last 12 frames of this move with another one. You can use this trait creatively, especially with Linear Movement – Avante, LP/MP/EX Bolt Charge, and Thunder Clap.
For example, if you knock down an opponent and then get into close range, you can use a sequence of standing to bait out a throw-tech or whiffed attack. Laura will dodge it and then get back into close range for a surprise frame trap, throw, or command throw mix-up.
Another great use of this kind of V-Skill cancel into special cancel is in fishing for counter-hit standing On a counter-hit confirm, you can cancel the recovery of Linear Movement – Esquiva with MP or EX Bolt Charge, as seen in Combo 16.
As the “elusive” name implies, you can use these techniques to weave out of and back into close range, keeping the enemy on their toes guessing what you’ll do next. Both Linear Movement - Avante and Esquiva are essential to Laura’s gameplay. Her walk speed is slower than average, so these ground mobility options make up for it.
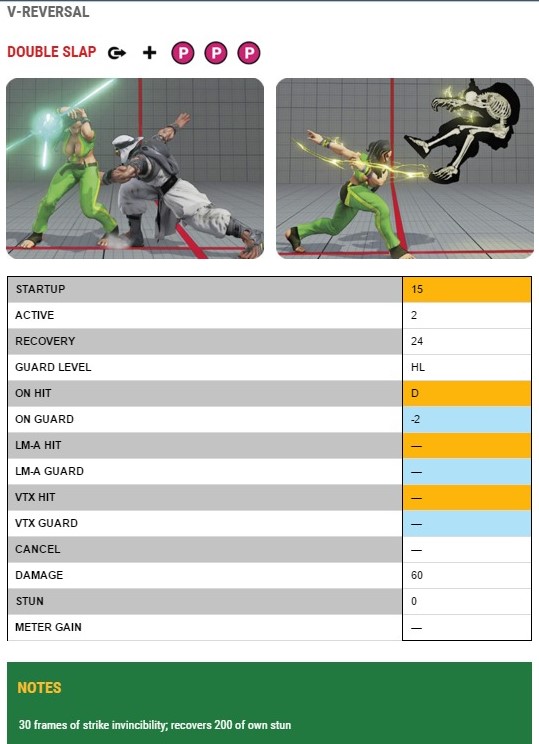 Double Slap: After guarding an attack, Laura spins around with a double-handed slap to her opponent’s chest, knocking them down on hit. Laura’s V-Reversal is better than most others in terms of knockdown advantage. After a successful hit followed by a dash-in, you’re at +9 against quick-recovery and +14 against back quick-recovery—plenty of time to set up your next attack. At this point, you can basically go for any kind of frame trap, meaty, or command throw attempt.
However, since Laura’s V-Trigger is the three-bar variety, using Double Slap will usually sacrifice your powerful Spark Show V-Trigger power-up for the round. If you don’t gain extra V-Gauge from Crush Counters or Volty Line, you’ll have to sustain about 75 percent stamina damage to gain three bars of V-Gauge, so double-check your gauge before committing to using Double Slap to fend off aggressors. The upside is that if you do use a bar of V-Gauge for Double Slap, and you aren’t depending on Spark Show as a win condition, you can use Double Slap (with its incredible knockdown advantage) at least two more times in the round. It can easily swing the tempo back in your favor; as an in-your-face grappler, this can be vital.
If Double Slap is blocked, you’re left at -2 frame disadvantage, which is usually safe.
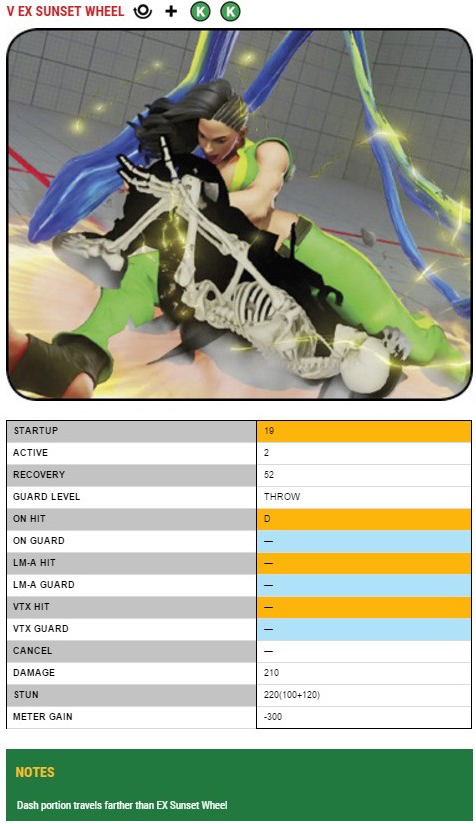
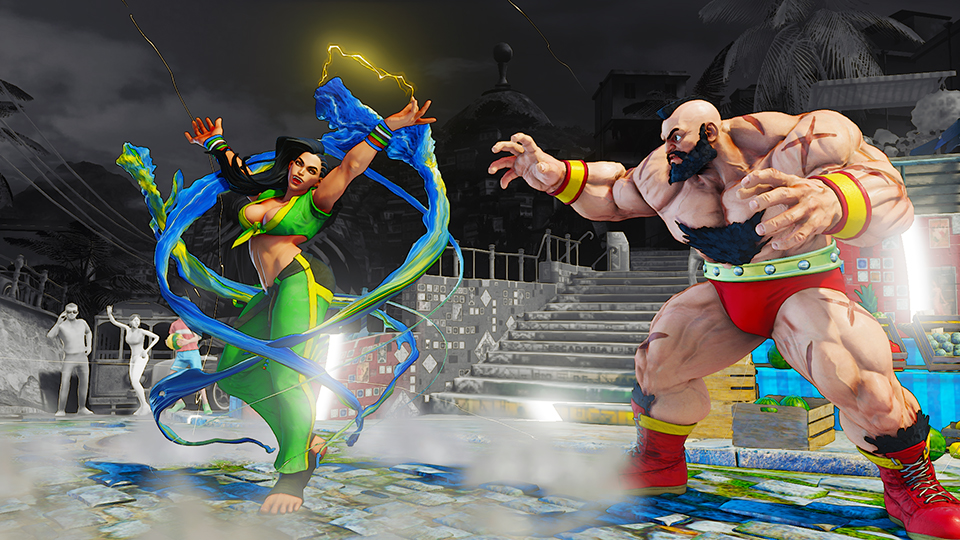
Spark Show: As its name implies, Laura’s Spark Show V-Trigger empowers her with the element of lightning. For roughly 13 seconds, Laura gains new properties on several of her moves, including more damage and stun to all of her special moves, as well as her Critical Art. Distance traveled is increased for both Linear Movement – Avante and Linear Movement - Esquiva. Thunder Clap lv.1 is automatically upgraded to Thunder Clap lv.2, and the required charge time for Thunder Clap lv.3 is reduced. EX Thunder Clap also gains an extra hit. Finally, EX Sunset Wheel gains extended dash range. These buffs are game-changing, especially the ones involving Thunder Clap.
Having a full V-Gauge allows for more extensive combos, letting you utilize V-Trigger cancels from Laura’s normal moves. Your mid-range pokes become more of a threat, as seen in several of the combos listed in the Combos section. Additionally, you can create some hard-to-escape 50/50 situations if you can force your opponent to block one of your high-advantage sequences of poke V-Trigger (see the Step Elbow/Twist Barrage description for an example setup).
Unlike other V-Trigger power-ups, none of Laura’s special moves consumes Spark Show gauge on use. During its duration, you’re free to use as many buffed Thunder Claps as you please.
Strategy - Long Range
Because she’s a grappler, you’ll always want Laura to be either in the opponent’s face with the threat of her command throw or at around footsie range, intimidating the enemy with her Linear Movement mobility options. However, Laura is no slouch when it comes to long-range play. With a serviceable projectile that handily deflects other projectiles from long range, she’s difficult to chip at effectively. Thunder Clap also forces other close-combat fighters to engage with Laura since they can’t sit back idly allowing her to build meter and dominate the stage with it. You aren’t going to be chipping out your opponents from full screen with Laura’s Thunder Clap, but it gives you a tool to help you do what you want to do, and that’s to get her closer.
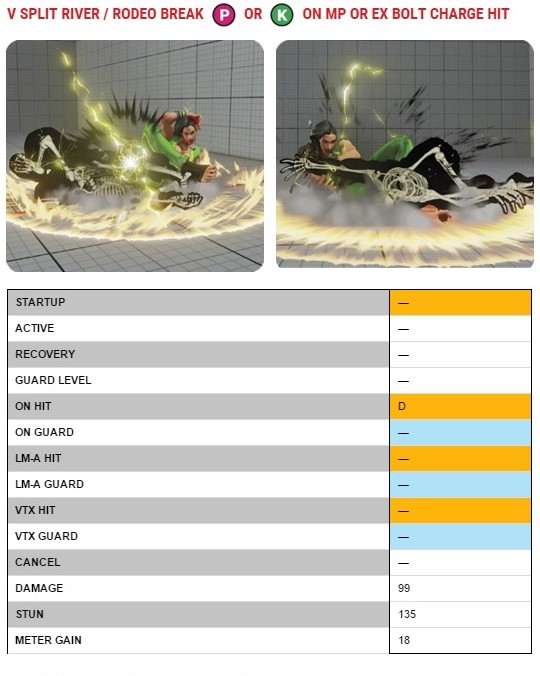
Against zoning characters with projectiles (like Ken, Nash, and Ryu), you have a couple of tools to help Laura fight back without losing ground. You can trade with your own Thunder Clap projectile, or you can blow through single-hit ones with EX Bolt Charge. EX Bolt Charge can be done on reaction and a little anticipation, depending on how far Laura is from the enemy. Successfully connecting with it and canceling it into Split River/Rodeo Break scores you a knockdown. If you want to get Laura into close range afterward, you can immediately follow it with a dash-in, leaving her at ±0 (assuming the enemy quick-rises).
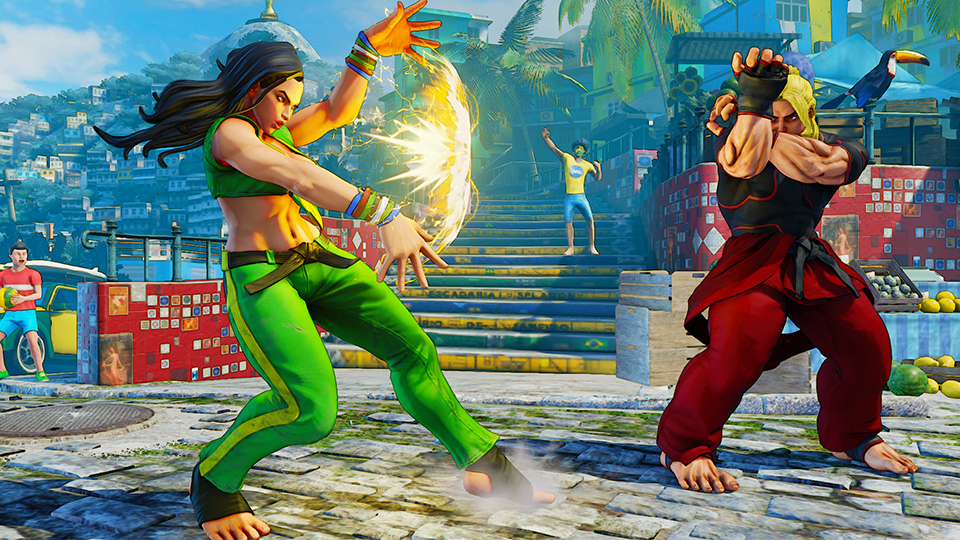
With a full EX Gauge, you can use Inazuma Spin Hold the same way, except Laura’s punish range is less relative to using EX Bolt Charge. Her Critical Art is invincible for the first four frames and travels far forward quickly, easily getting past projectiles for the throw.
At closer distances (around mid to long range), projectiles may be difficult to deal with without EX Gauge because of how slow Thunder Clap starts up (19 frames versus Ryu’s 13 with HP Hadoken). So, in a fireball fight, Laura will eventually lose ground or get hit out of the Thunder Clap animation, since she won’t be able to keep up with the barrage. Laura doesn’t have meterless moves to get around a good zoning game, nor does she have great aerial tools to deal with them. Therefore, when you find yourself in these scenarios, you’ll need to be patient and resort to blocking or neutral jumping. These options are perfectly acceptable, especially since you have plenty of stamina to play with.
If you can pin down your opponent’s projectile patterns, you can make an educated guess jump-in using jumping (her farthest-reaching jump attack), linked into Combo 4. Alternatively, if your guess-jump read is incorrect and Laura is far enough, you can omit the jumping extension, making it less likely for her to get punished. However, this depends heavily on the range that Laura jumped from, as well as her foe’s anti-air capabilities.
For instance, Chun-Li may have a much easier time in deflecting Laura’s jump-in with her standing  than characters like Ken or Nash.
The two other zoning characters Laura may have trouble dealing with are Dhalsim and F.A.N.G. These two have parabolic projectiles but are limited in horizontal ground control compared with a zoning-based character like Nash (Dhalsim has a few using standing and EX Yoga Fire). Fortunately, Laura’s Linear Movement – Avante, with its crouching hurtbox and forward movement, makes for excellent mobility in getting under Yoga Fire and Nishikyu. It does have additional recovery frames over Laura’s normal dash, so if the enemy baits it out, they’ll have an easier time punishing her. You only need to get into close range a few times against these low-stamina, projectile-chucking fighters, so sacrificing some stamina trying to get in is generally okay.
than characters like Ken or Nash.
The two other zoning characters Laura may have trouble dealing with are Dhalsim and F.A.N.G. These two have parabolic projectiles but are limited in horizontal ground control compared with a zoning-based character like Nash (Dhalsim has a few using standing and EX Yoga Fire). Fortunately, Laura’s Linear Movement – Avante, with its crouching hurtbox and forward movement, makes for excellent mobility in getting under Yoga Fire and Nishikyu. It does have additional recovery frames over Laura’s normal dash, so if the enemy baits it out, they’ll have an easier time punishing her. You only need to get into close range a few times against these low-stamina, projectile-chucking fighters, so sacrificing some stamina trying to get in is generally okay.
Against other grapplers or melee-based characters, there usually won’t be much of a long-range game because you’ll both want to immediately engage mid-stage, with an emphasis on keeping ground or pushing each other to the corner. Remember that you do have a leg up against them in terms of having an actual projectile, so make good use of Thunder Clap (and even charged Thunder Clap if there’s a lull or point of hesitation in the action) to force out mistakes or to take ground control.
Strategy - Mid Range Pt. 1
, crouching , Thunder Clap, and (occasionally) your Volty Line overhead. If you want to go for a more aggressive approach, you should focus on getting in with your normal dash, Linear Movement – Avante, Step Elbow, and LP Bolt Charge.
Against most characters, Laura will normally be on offense, pressuring her opponent into the corner. To accomplish this at mid range, you need to be vigilant in your aggression. Everything you do from this range should instill fear so that Laura can eventually corner the target, especially if they’re taking a passive approach.
While standing is active for three frames and has a relatively long-reaching hitbox, its hurtbox extends farther, leaving it vulnerable if it misses. However, since it’s a heavy attack with the highest priority, it doesn’t often lose to opposing medium and light attacks, as long as you’re spacing it correctly. Unless you score a counter-hit with it (or cancel it with Spark Show for a combo), you don’t get much from connecting with it, aside from its heavy-attack damage (80). It’s meant as a relatively safe footsie deterrent because you aren’t committing to advancing into close range. It’s particularly strong against hop kick attacks (such as Rashid’s and Chun-Li’s ), as long as you’re proactive with it; stick it out if you’re expecting this kind of attack from your enemy. When it counter-hits against a grounded foe (depending on Laura’s distance), you can proceed into one of the variants listed under Combo 17. Furthermore, it can be canceled into Inazuma Spin Hold, so you can use a sequence of standing  for a devastating whiff-punish combo. As an option select, you can use this sequence just outside of your standing attack range so that if the opponent attacks or walks into your standing , you’ll cancel into your Critical Art. Otherwise, you’ll simply miss your attack with your EX Gauge unused.
Another reserved approach you can take is to use MP/HP Thunder Clap. The startup is slow, but if you sense the enemy’s reluctance in engaging in a footsies battle with Laura, it’s imperative that you throw out a long-lasting threat in order to force the action. Once Laura has recovered from releasing Thunder Clap, you can go for an aggressive dash-in with either a normal dash or Linear Movement – Avante. You can opt to charge up to Thunder Clap lv.2 or Thunder Clap lv.3 if your opponent shows absolutely no signs of aggression. Each additional level travels much farther and adds an extra hit to the projectile, causing more chip damage and frame advantage. Note that if Laura is hit while the projectile is out, the projectile will dissipate. For instance, if the foe is within crouching range and they hit Laura directly after she releases her Thunder Clap, you won’t get a trade—the projectile simply disappears. But if she manages to get her Thunder Clap out, it’s essentially a large tempo advantage in your favor. The opponent must deal with the projectile, and for the most part, they can’t simply jump over at Laura since you have ample time to punish them with HP Bolt Charge. An often overlooked advantage of setting out a slow-traveling projectile in front of the opponent is that it puts them into a “proximity guard” while it’s out—while there’s a threat active within a certain range, they can no longer walk backward because it’s replaced by a standing guard animation. You can use this to your advantage as the aggressor, keeping them in place while Laura trails her projectile.
At closer ranges, crouching will be Laura’s main low-hitting mid-range attack. It has average reach, but it can be canceled with LP Bolt Charge for a two-hit blockstring that’s relatively safe when guarded (at -2). This puts Laura at close range but sacrifices a bit of advantage, so be prepared to defend against a retaliatory light attack. As a whiff-punish, you can substitute LP Bolt Charge with EX Bolt Charge Split River/Rodeo Break for a knockdown (see Combo 2), or you can still go with LP Bolt Charge for a non-knockdown, +2 advantage combo. If using the latter sequence, you can go for an immediate Sunset Wheel (which version to use depends on the distance you connected LP Bolt Charge from). If ending with EX Bolt Charge into Split River/Rodeo Break, you get a knockdown (where the opponent can’t back recover). You can capitalize on this with a forward dash (Laura’s left at ±0, so you can go for a three-frame jab or throw setup). You can go for a hit-and-run style crouching sequence by canceling it into Linear Movement – Esquiva, as well. This puts Laura outside of mid range, and you can then cancel the recovery of your with HP Thunder Clap, seamlessly flowing back into an aggressive approach.
for a devastating whiff-punish combo. As an option select, you can use this sequence just outside of your standing attack range so that if the opponent attacks or walks into your standing , you’ll cancel into your Critical Art. Otherwise, you’ll simply miss your attack with your EX Gauge unused.
Another reserved approach you can take is to use MP/HP Thunder Clap. The startup is slow, but if you sense the enemy’s reluctance in engaging in a footsies battle with Laura, it’s imperative that you throw out a long-lasting threat in order to force the action. Once Laura has recovered from releasing Thunder Clap, you can go for an aggressive dash-in with either a normal dash or Linear Movement – Avante. You can opt to charge up to Thunder Clap lv.2 or Thunder Clap lv.3 if your opponent shows absolutely no signs of aggression. Each additional level travels much farther and adds an extra hit to the projectile, causing more chip damage and frame advantage. Note that if Laura is hit while the projectile is out, the projectile will dissipate. For instance, if the foe is within crouching range and they hit Laura directly after she releases her Thunder Clap, you won’t get a trade—the projectile simply disappears. But if she manages to get her Thunder Clap out, it’s essentially a large tempo advantage in your favor. The opponent must deal with the projectile, and for the most part, they can’t simply jump over at Laura since you have ample time to punish them with HP Bolt Charge. An often overlooked advantage of setting out a slow-traveling projectile in front of the opponent is that it puts them into a “proximity guard” while it’s out—while there’s a threat active within a certain range, they can no longer walk backward because it’s replaced by a standing guard animation. You can use this to your advantage as the aggressor, keeping them in place while Laura trails her projectile.
At closer ranges, crouching will be Laura’s main low-hitting mid-range attack. It has average reach, but it can be canceled with LP Bolt Charge for a two-hit blockstring that’s relatively safe when guarded (at -2). This puts Laura at close range but sacrifices a bit of advantage, so be prepared to defend against a retaliatory light attack. As a whiff-punish, you can substitute LP Bolt Charge with EX Bolt Charge Split River/Rodeo Break for a knockdown (see Combo 2), or you can still go with LP Bolt Charge for a non-knockdown, +2 advantage combo. If using the latter sequence, you can go for an immediate Sunset Wheel (which version to use depends on the distance you connected LP Bolt Charge from). If ending with EX Bolt Charge into Split River/Rodeo Break, you get a knockdown (where the opponent can’t back recover). You can capitalize on this with a forward dash (Laura’s left at ±0, so you can go for a three-frame jab or throw setup). You can go for a hit-and-run style crouching sequence by canceling it into Linear Movement – Esquiva, as well. This puts Laura outside of mid range, and you can then cancel the recovery of your with HP Thunder Clap, seamlessly flowing back into an aggressive approach.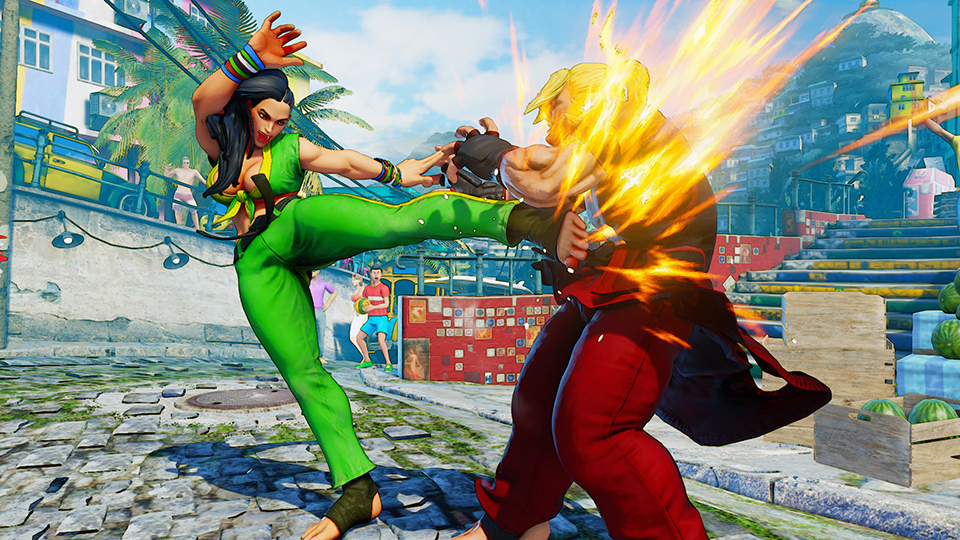
Strategy - Mid Range Pt. 2
If you’ve conditioned your opponent into guarding low at mid range, you can try for a semi-risky Volty Line V-Skill overhead. Unlike most overhead attacks, Laura’s V-Skill deals a large amount of damage (90, versus the usual 60 for an overhead). Additionally, you gain valuable V-Gauge on block and hit. The downside is that if it’s blocked, it’s easily punishable (at -7) with either a medium or heavy-strength combo. Distancing Laura helps make it less punishable, but most characters will still be in range for at least a medium-attack punish. Although Volty Line starts up a bit slowly and is blockable on reaction, its best property is that it has an “anti-jump” property. There are two active frames prior to the overhead active frame that can hit opponents out of the air (however, these frames do not hit grounded characters). Essentially, Volty Line doubles as an overhead and as a high-damage punish for opponents trying to jump out of range from Laura (which many players are tempted to do against a grappler like her).
Another aggressive approach is to simply dash in with your normal dash or Linear Movement – Avante. If you sense hesitation in your opponent’s footsie game, don’t be afraid to just go in with either of these, especially considering the high amount of health Laura has. You can afford to take these risks—compounded with the comeback potential of her V-Trigger, these lines of play can often be more rewarding than harmful. For example, if you’ve been bullying with standing and crouching , you might give pause to the enemy, affording you time to dash in for a quick three-frame standing frame trap into in-your-face grapple pressure.
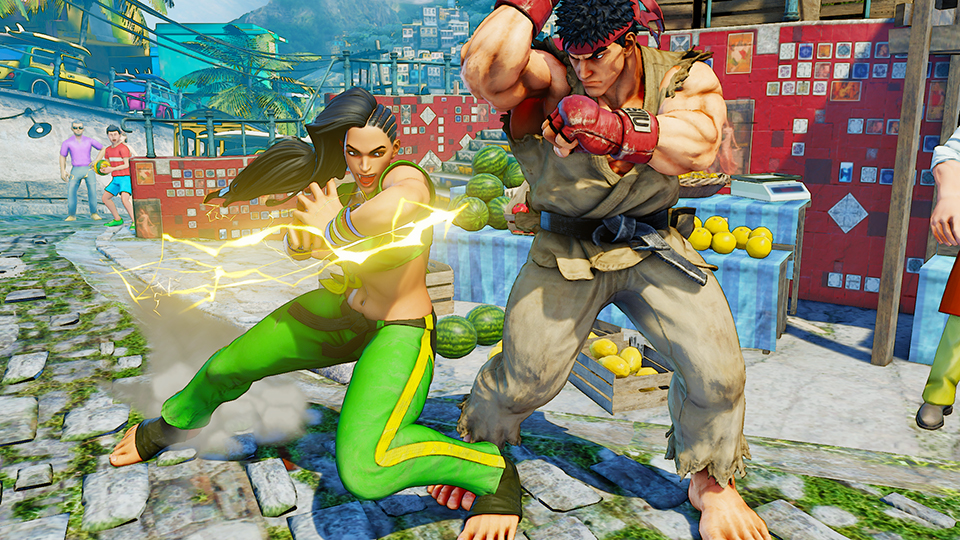 If you want to take Laura’s offense airborne, she has two exceptional jumping attacks that both have cross-up properties: jumping
  and jumping . Which to use depends on what type of setup you want to pursue after your jump-in. Jumping puts the opponent in much less blockstun, which threatens a quick follow-up throw, while jumping allows for a stronger combo on hit. See Combo 12 and Combo 13 for sample combos stemming from these attacks. Additionally, jumping can be made very ambiguous with its five active frames. Depending on Laura’s spacing and the timing of your input during her forward jump, you can create an extremely hard-to-block situation for the opponent. The spacing for this is just barely outside of backdash range from the enemy. You can practice this by getting flush with the opponent, backdashing once, and just ever so slightly walking back. Then, forward jump and change up your timing of the input; the later you input it, the more likely you are to cross the enemy up. If you hit it earlier, then Laura will land with a frontal kick to her opponent’s face. If you can master the spacing of this in the heat of a match, you can easily score moderate damage along with a knockdown to keep up your offensive momentum, especially if you set it up with an unrecoverable Crush Counter crouching As with most jump-ins, though, it’s vulnerable to certain anti-air attacks (especially anti-cross-up ones that strike vertically).
Strategy - Close Range Pt. 1
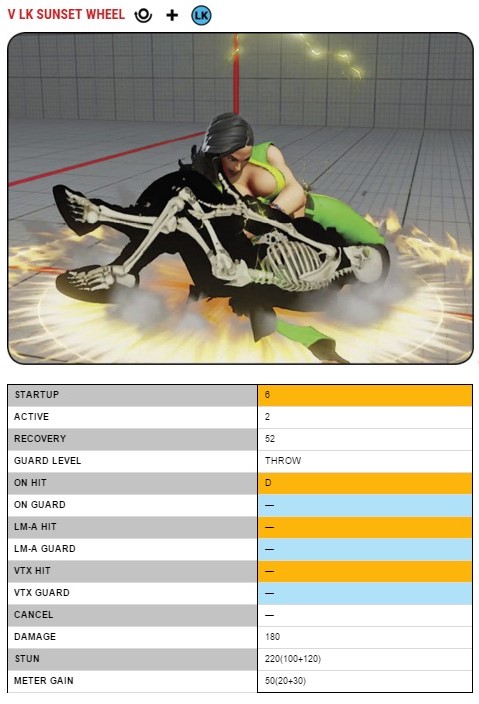
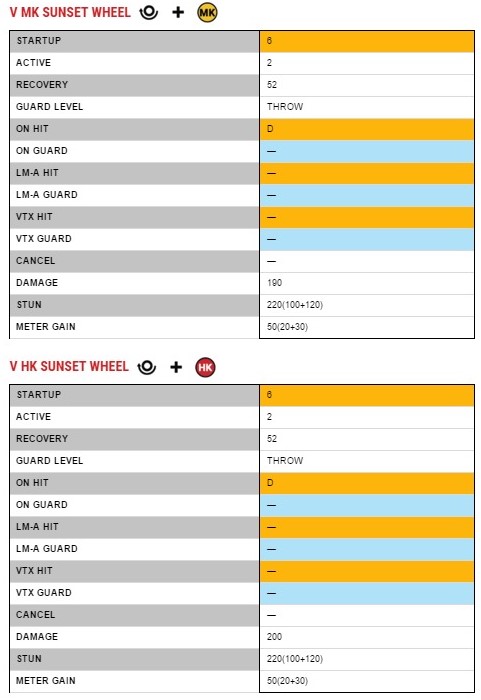
Close range is where Laura truly shines. It’s where most of your damage will come from, with the obvious threat of her Sunset Wheel, high-advantage back throw, and three-frame standing jabs. Laura’s only deficiency at close range is that she doesn’t have access to a conventional low-hit check (aside from using full EX Gauge, as seen in Combo 1), but her throw threats make up for this shortcoming.
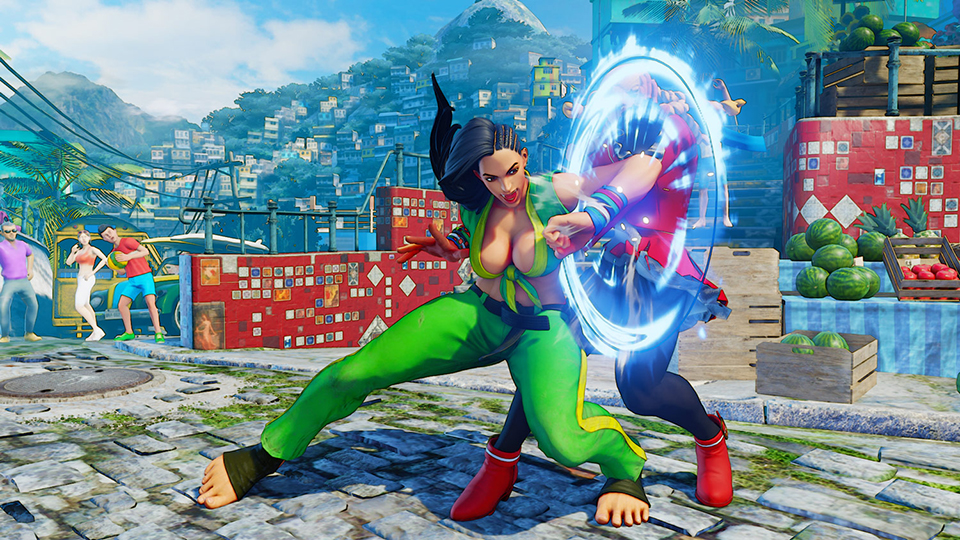 One of the most common ways Laura will get into close range is from a normal dash or Linear Movement - Avante (standalone or canceled from an attack, like standing ). In these cases, you’ll most likely want to follow up with a fast light attack. Dash in with standing or standing and go for a hit-check using Combo 3, or for a counter-hit frame-trap, Combo 15. Alternatively, you can stop after the first standing / and go for a buffered Sunset Wheel. This type of 50/50 is the basis of your close-range play, so get used to making good reads and gauging your opponent’s defensive habits appropriately. For a counter-hit strategy, you can use a two-step counter-hit-check combo using a standing buffered into crouching sequence, leading into a knockdown combo. See Combo 15 for details and tips.
If you’re transitioning into close range from a blocked jumping or attack, you can use your high blockstun advantage to go for a command throw setup. Time your Sunset Wheel so that it will grab the enemy as soon as they leave guardstun, or lock them down even more with standing , which you can then buffer into Sunset Wheel if they’re still blocking. This strategy is extremely frightening for your opponent to deal with because it leaves only a three-frame window to escape. You’ll beat out three-frame jabs if timed correctly (since throws have priority over strikes in hitbox “trading” situations).
However, watch out for the primary counter-strategies to your command throws. You might not want to go for them too often since they leave Laura completely vulnerable if the enemy scouts them out and preemptively neutral jumps or backdashes away from her. Sometimes, the best command throws are the ones never used. This gives you a leg up with your frame trap pressure because of the higher possibility of connecting with strikes when your opponent is trying to jump out of Laura’s attacks, scoring you combos where you otherwise wouldn’t earn them. If you can make a hard read on a backdash, you can go for a Crush Counter standing or standing . Off of a low, spinning Crush Counter from these, you can either juggle with standing or standing canceled into Linear Movement – Avante for an air recovery frame trap or throw setup. This sequence is particularly effective since standing is only -2 on block, so it’s safe to go for in most cases; its reward is a two-hit heavy-attack combo leading into a setup.
Against neutral jumps, instead of using a high-recovery Sunset Wheel, you can opt for a fast-recovering normal throw instead. Normal throws are particularly attractive to use as a grappler because a player’s natural instincts against grappler-type characters are to get off the ground instead of inputting a throw tech. For example, if you go for a sequence like dash-in standing into a follow-up normal throw, your opponent may see the standing as a precursor to Sunset Wheel, instigating a neutral jump in hopes of punishing Laura with a full jump-in combo. However, Laura will recover much faster—with good reactions, you can anti-air their neutral jump with HP Bolt Charge or standing
.
If you’ve conditioned your enemy into staying grounded and playing a standard close-range neutral game, you can start using your other effective up-close attacks, including standing , standing , and standing .
Standing is an advancing heavy attack that’s cancelable into specials. It’s one of Laura’s primary attacks from just outside of point-blank range. It’s only -2 on block, so you don’t even have to special-cancel it to make it safe. A sample pressure sequence you can use is standing , standing , then a buffered standing for a frame trap. With its heavy-attack priority, you’ll beat out medium-strength normal attacks while catching jumps and backdashes. You can cancel it into Linear Movement – Avante to get back into point-blank range (although at a punishable -5), or cancel it into Linear Movement – Esquiva for a Crush Counter hit-check (see Combo 16). Alternatively, you can cancel it into EX Thunder Clap for frame advantage and a combo on counter-hit and non-counter-hit. (See the Combos section for more details).
When you’re going for a standing Crush Counter check and your opponent blocks, you can cancel the recovery of your Linear Movement – Esquiva with HP Thunder Clap. This is a remarkable follow-up that lets you get Laura back into close range, keeping up your tempo. However, if the opponent makes a good read, they can hold
One of the most common ways Laura will get into close range is from a normal dash or Linear Movement - Avante (standalone or canceled from an attack, like standing ). In these cases, you’ll most likely want to follow up with a fast light attack. Dash in with standing or standing and go for a hit-check using Combo 3, or for a counter-hit frame-trap, Combo 15. Alternatively, you can stop after the first standing / and go for a buffered Sunset Wheel. This type of 50/50 is the basis of your close-range play, so get used to making good reads and gauging your opponent’s defensive habits appropriately. For a counter-hit strategy, you can use a two-step counter-hit-check combo using a standing buffered into crouching sequence, leading into a knockdown combo. See Combo 15 for details and tips.
If you’re transitioning into close range from a blocked jumping or attack, you can use your high blockstun advantage to go for a command throw setup. Time your Sunset Wheel so that it will grab the enemy as soon as they leave guardstun, or lock them down even more with standing , which you can then buffer into Sunset Wheel if they’re still blocking. This strategy is extremely frightening for your opponent to deal with because it leaves only a three-frame window to escape. You’ll beat out three-frame jabs if timed correctly (since throws have priority over strikes in hitbox “trading” situations).
However, watch out for the primary counter-strategies to your command throws. You might not want to go for them too often since they leave Laura completely vulnerable if the enemy scouts them out and preemptively neutral jumps or backdashes away from her. Sometimes, the best command throws are the ones never used. This gives you a leg up with your frame trap pressure because of the higher possibility of connecting with strikes when your opponent is trying to jump out of Laura’s attacks, scoring you combos where you otherwise wouldn’t earn them. If you can make a hard read on a backdash, you can go for a Crush Counter standing or standing . Off of a low, spinning Crush Counter from these, you can either juggle with standing or standing canceled into Linear Movement – Avante for an air recovery frame trap or throw setup. This sequence is particularly effective since standing is only -2 on block, so it’s safe to go for in most cases; its reward is a two-hit heavy-attack combo leading into a setup.
Against neutral jumps, instead of using a high-recovery Sunset Wheel, you can opt for a fast-recovering normal throw instead. Normal throws are particularly attractive to use as a grappler because a player’s natural instincts against grappler-type characters are to get off the ground instead of inputting a throw tech. For example, if you go for a sequence like dash-in standing into a follow-up normal throw, your opponent may see the standing as a precursor to Sunset Wheel, instigating a neutral jump in hopes of punishing Laura with a full jump-in combo. However, Laura will recover much faster—with good reactions, you can anti-air their neutral jump with HP Bolt Charge or standing
.
If you’ve conditioned your enemy into staying grounded and playing a standard close-range neutral game, you can start using your other effective up-close attacks, including standing , standing , and standing .
Standing is an advancing heavy attack that’s cancelable into specials. It’s one of Laura’s primary attacks from just outside of point-blank range. It’s only -2 on block, so you don’t even have to special-cancel it to make it safe. A sample pressure sequence you can use is standing , standing , then a buffered standing for a frame trap. With its heavy-attack priority, you’ll beat out medium-strength normal attacks while catching jumps and backdashes. You can cancel it into Linear Movement – Avante to get back into point-blank range (although at a punishable -5), or cancel it into Linear Movement – Esquiva for a Crush Counter hit-check (see Combo 16). Alternatively, you can cancel it into EX Thunder Clap for frame advantage and a combo on counter-hit and non-counter-hit. (See the Combos section for more details).
When you’re going for a standing Crush Counter check and your opponent blocks, you can cancel the recovery of your Linear Movement – Esquiva with HP Thunder Clap. This is a remarkable follow-up that lets you get Laura back into close range, keeping up your tempo. However, if the opponent makes a good read, they can hold  after blocking your standing for a punish on your Thunder Clap. It’s a hard guess they have to make, but it’s still one you should consider.
Strategy - Close Range Pt. 2
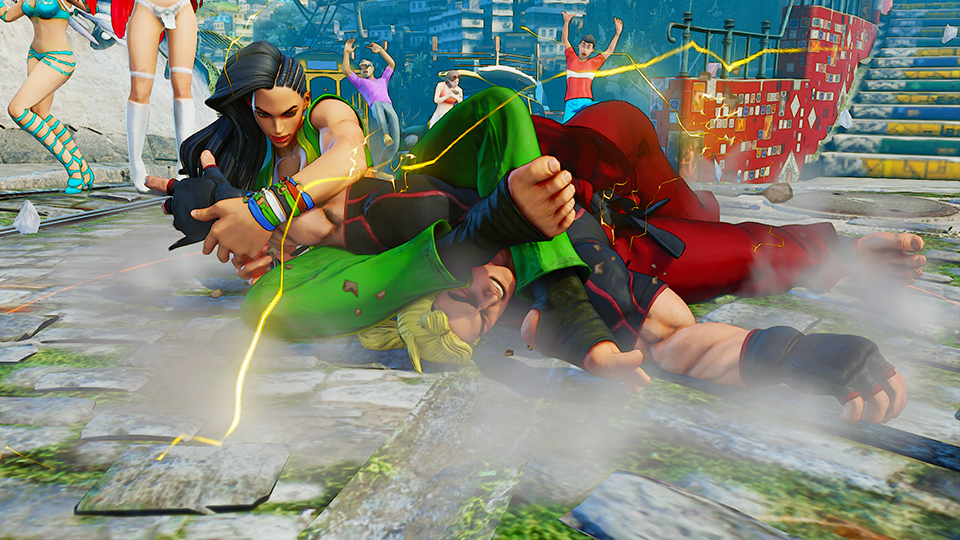
If you’re looking for a faster close-range attack from standing
range but don’t want to commit to eight frames of startup, you can use standing . It’s similar in properties but starts up two frames faster (at six, versus standing HP’s eight). It can only be V-Skill-canceled, but it’s only -1 on block. It boasts an impressive midsection hitbox and gets Laura closer to the opponent, as well. It can be very difficult for foes to deal with even if it doesn’t lead into any major damage. Otherwise, you can use crouching special-canceled into LP Bolt Charge or Linear Movement – Avante or Esquiva. On block, Crouching puts you at -3 advantage, which is less than ideal but can be useful to get Laura into close range immediately against unsuspecting opponents. You can then follow up with a three-frame standing frame trap (if you aren’t interrupted).
Even though Laura doesn’t enjoy the many hit-check combos that other characters have, she can open up more opportunities through counter-hits. For a more damaging close-range counter-hit frame trap, you can use standing at point-blank range (especially if you’re coming from a high-advantage situation, such as a knockdown or a blocked jumping or ). On block, it’s +3, so you can continue your tempo-based aggression with your other attacks, like standing and standing . You can’t link from standing on a normal hit (standing and standing are just short of range), but on counter-hit, you can link into crouching , as seen in Combo 18.
The most important aspect of Laura’s close-range offense is her advantage off of her knockdowns and hits. You’ll want to know the numbers for all of Laura’s knockdown sequences, particularly her throws and hit-throws. These attacks prevent the enemy from back recovery, forcing them into a predictable quick-recovery (or to stay grounded, which is abysmal for them since it gives you meaty, ambiguous cross-up jumping opportunities).
The following advantage values all assume that the opponent is performing a quick-rise while Laura is following up with a dash-in:- Off of a combo into MP/EX Bolt Charge
- Off of Sunset Wheel, you’re left at -4. So, if you connect with a command throw, it’s best not to follow up with a dash-in. Instead, walk into close range and start your up-close offense over again. Or, you can throw out a Thunder Clap to force chip damage or an ill-timed jump.
- Off of an anti-air HP Bolt Charge (or a combo leading into it), you’re at -4. As with the Sunset Wheel follow-up, you’ll want to omit the forward dash against wary opponents and play it safe with a transition into a mid-range or close-range game.
- Off of a back throw into a dash-in, you’re at +2, which is the ideal advantage for a meaty Sunset Wheel. Your enemy has an extremely small window to get out of this setup. While it’s usually better to use forward throws to carry your foe into a corner, you’ll have to assess whether the corner is more important than this much knockdown advantage. A good setup is to back throw, forward dash, and then go for a mix-up between a standing
- Off of an LP Bolt Charge hit, you’re at +2, with both characters grounded. Sometimes this is better than a knockdown because it forces your opponent to think quickly on their feet. One of the best follow-ups to LP Bolt Charge hit is a standing
Defensively, Laura lacks an invincible special attack, but she does have a three-frame standing
to quickly deflect slower moves and throws if you can make the correct reads. EX Bolt Charge has a point of armor, but it doesn’t activate until the third frame, so it’s unreliable if Laura’s under duress. Her main anti-air is HP Bolt Charge, but against cross-up attempts, you’ll find yourself missing the opponent and getting punished. Against these types of jump-ins, you can resort to a quick three-frame backward-jumping , or you can be more elusive and dash under your foe with Linear Movement – Avante, which can be sort of a crouch-dash. These require quick reactions and preparation, though, so be mindful of the opponent’s distance when they jump.Spark Show
Under the effects of Spark Show, your strategy will largely remain the same. You’ll deal more damage across the board, with the bonuses of having enhanced mobility and better zoning capabilities.
The most notable changes for the neutral game include increased dash distance with both Linear Movement V-Skills and the transformation of Thunder Clap lv.1 to Thunder Clap lv.2, which decreases the charge time of Thunder Clap lv.3 to that of what Thunder Clap lv.2 is pre-Spark Show. Furthermore, V EX Thunder Clap deals more damage and knocks opponents higher up on hit.
These buffs empower your mid-range and long-range gameplay substantially. You can use Thunder Clap lv.2 on a whim, allowing for an easier advance into close range, especially considering the increased distance of your Linear Movement dashes.
For just about 13 seconds, your enemy will have to respect Laura from farther than usual thanks to her augmented moves. Since she can dash into close range from half-screen distance, you can apply all of your close-range strategies much more easily during Spark Show, while dealing even more damage and stun when successful. If you’re in the lead, you can opt to zone the enemy out and apply projectile pressure with Laura’s leveled-up Thunder Claps.
Pre-activation, when you’re sitting on a full V-Gauge, don’t be afraid to use Spark Show as a free momentum-starter off of Laura’s mid-range attacks. If you see a chance from footsie range, you can go for a Step Elbow Twist Barrage Spark Show sequence for a powerful tempo-based play, followed by a throw or frame trap setup. Otherwise, you can use standing to hit-confirm into Spark Show with Combo 11. With an aggression-based character like Laura, you want to take these chances as often as possible because of the amount of pressure and duress you put on your enemy.
Visual Guide/ TL;DR
Combos Pt. 1
Crouching
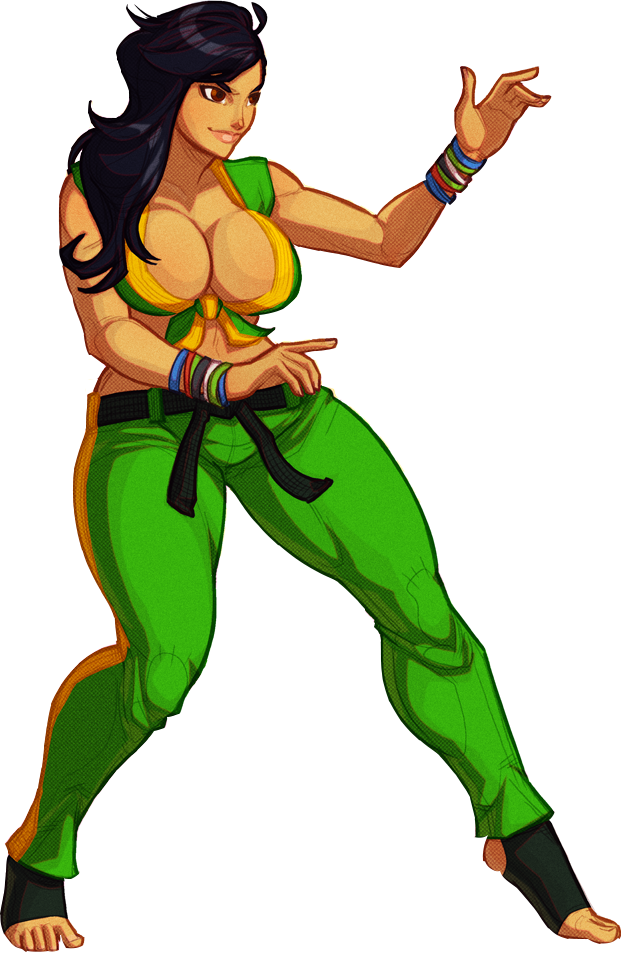
Crouching - 310 damage, 133 stun (requires full EX Gauge) Laura doesn’t have much in the way of low-check combos, but if you have a loaded EX Gauge, you can deal around 300 points of damage—a decent amount, considering how scary it is to sit there guarding against a grappler.
COMBO 2
Crouching
, then cancel into either:
 /
/ - 185 damage, 265 stun (requires one stock of EX Gauge)
- 104 damage, 190 stun (no knockdown)
A generally useful poke combo initiated with crouching
Standing
 standing ) or (standing standing )
 - 105 damage, 213 stun (no knockdown)
, you earn around 100 points of damage with this combo. If they block the first standing , you can go into HK Sunset Wheel (from point-blank range; use LK or MK from farther away).
Occasionally, you may want to use a three-frame starter of standing linked into another standing for this combo (useful for faster frame traps or as a three-frame punish). Standing provides more frame advantage on block, so the version to use depends on if you want to follow up with Sunset Wheel or a throw.
COMBO 4Crouching
/ - 186 damage, 265 stun
is one of a few moves that combo into MP Bolt Charge. Only use this if the hit is guaranteed since MP Bolt Charge is -7 on block, leaving Laura vulnerable. It’s also a good follow-up for a ranged, forward-jumping or hit-confirm.
COMBO 5 crouching standing , then cancel into either:
- 173 damage, 309 stun (no knockdown)
/ - 234 damage, 364 stun (requires one stock of EX Gauge)
When spending meter to end with EX Bolt Charge, end with either Split River or Rodeo Break, depending on your desired position. See the Bolt Charge description for more details.
Combos Pt. 2
 COMBO 6A , crouching , then cancel with:

- 197 damage, 315 stun (requires full V-Gauge)
- 197 damage, 315 stun (requires full V-Gauge and one stock of EX gauge)
- 197 damage, 315 stun (requires full V-Gauge)
COMBO 6B
- 254 damage, 370 stun
, you can go for a Thunder Clap frame trap setup, with a possible combo if your opponent tries to attack into the floating projectile. Alternatively, you can dash under for a cross-up mix-up opportunity with a frame trap, Combo 3, or HK Sunset Wheel.
Without V-Gauge, you can simply cancel Twist Barrage into HP Bolt Charge for an EX Gauge-building combo.
COMBO 7Standing
, then juggle with:
Standing , then cancel into one of the following mix-up options:- 225 damage, 351 stun (requires one stock of EX Gauge, causes air recovery into one of the below follow-ups)
or or
These Thunder Clap setups are designed simply to keep your opponent in blockstun for more pressure. Keep in mind that some characters can hit Laura with a quick low attack during her Thunder Clap animation, which causes the projectile to dissipate. If you scout your opponent on this type of reaction, you can opt to go for a meaty setup with Linear Movement – Avante instead (below).
It’s possible to dash under the falling opponent for an ambiguous left/right mix-up. The cross-up only works against the following characters: R. Mika, Ryu, Ken, Cammy, Vega, Karin, Nash, M. Bison, Dhalsim, and F.A.N.G.
A meaty overhead mix-up. It’s -5 on block, so use caution and assess whether you can take the risk since it’s punishable by all light attacks.
Crouching- 233 damage, 351 stun (causes knockdown)
- 281 damage, 391 stun (requires cornered opponent)
A simple combo utilizing the versatility of EX Thunder Clap. On block, Laura’s at +3 frame advantage. On hit, it gives you multiple follow-ups. Since standing
forces the opponent into an air recovery, you have a plethora of mix-ups to choose from. LP and MP Thunder Clap will place a slow-moving projectile between Laura and the enemy, while HP Thunder Clap forces the opponent to block some chip damage, which then leads into more potential pressure.
Otherwise, you can just sweep the opponent into a knockdown state, followed by a dash for frame trap pressure against their wakeup.
The HP Bolt Charge finisher works only if the target is cornered. It will work mid-stage if you have Spark Show activated, thanks to the improved EX Thunder Clap properties.
Combos Pt. 3
Standing
standing - 165 damage, 293 stun
non-counter-hit. If you opt to use standing without Linear Movement – Esquiva, you can link into standing . The advantage of using standing HP on its own this way is that you’re rewarded with more damage in case of a counter-hit, while at the same time remaining relatively safe. If you cancel into Linear Movement – Esquiva and your standing counter-hits, you only get a possible MP/EX Bolt Charge follow-up, as seen in Combo 16 (the variant that includes ).
 COMBO 9
Standing
standing , - 332 damage, 492 stun (requires one stock of EX Gauge)
Standing
, then link into either:
Standing - 402 damage, 312 stun (requires full V-Gauge and EX Gauge)
/ - 259 damage, 430 stun (requires full V-Gauge)
canceled into your V-Trigger, you can link into another standing for even more damage.
COMBO 11Standing
, then link into:
- 368 damage, 150 stun (requires full V-Gauge and EX Gauge)
/ - 259 damage, 430 stun (requires full V-Gauge)
- 152 damage, 270 stun (requires full V-Gauge)
can link into either her Critical Art or crouching from max range. Standing is one of her best attacks, and off of a standard hit, you can score around 370 points of damage (with a full EX Gauge) while transitioning into Spark Show. Otherwise, you can link into a standing combo.Combos Pt. 4

Forward jump cross-up
/ , standing standing , then cancel into either:
- 153 damage, 289 stun
/ - 214 damage, 344 stun (requires one stock of EX Gauge)
with crouching and chain into standing , but the standing variant is preferred in most cases because it pushes the opponent back less on block (which allows for easier command throw follow-ups in case your cross-up doesn’t connect).
COMBO 13Forward jumping cross-up
, standing , into one of her many juggle options listed under combo 7- Damage varies, see Combo 7
is -2 and generally safe on block, so this two-level hit-check isn’t too dangerous to throw out off of a cross-up jumping attack. You can confirm whether the opponent guarded your jumping after you input standing , so you should be able to confirm into on hit. On a block-confirm, you can cancel standing into to distance Laura from having to defend against light attacks (or, you can cancel into EX Thunder Clap regardless for +3 advantage).
COMBO 14Forward jump
, crouching , then cancel into either:
- 457 damage, 333 stun (requires full EX Gauge)
standing , - 389 damage, 587 stun (requires one stock of EX Gauge)
Combos Pt. 5
Counter-hit standing
crouching / - 201 damage, 319 stun
into crouching , making sure to keep an eye on the “Counter” system message. When you see it, go ahead and cancel crouching into . Crouching is +1 on block, so it’s an excellent move in terms of tempo advantage.
COMBO 16Counter-hit standing
, then either:
Continue with combo 7- 296 damage, 492 stun (see Combo 7 for details)
, / - 222 damage, 345 stun
Linear Movement – Esquiva because you can cancel the tailing recovery frames of this special backdash into MP Bolt Charge on a Crush Counter confirm.
COMBO 17Counter-hit standing
, then follow up with:
- 402 damage, 180 stun (requires full EX Gauge)
/ - 231 damage, 345 stun (requires one stock of EX gauge)
standing - 321 damage, 555 stun (requires full V-Gauge)
- 150 damage, 270 stun (no knockdown)
is a slow poke, but it’s one of Laura’s best mid-range attacks because it extends a large distance and is active for three frames. On a max-range counter-hit, you can link into either LP or EX Bolt Charge. At closer distances, you can link standing into an even beefier combo as your opponent is staggered.Combos Pt. 6
Counter-hit standing
crouching , then cancel into:
- 412 damage, 258 stun (requires full EX Gauge)
standing , - 344 damage, 512 stun (requires full V-Gauge and one stock of EX Gauge)
/ - 237 damage, 355 stun
is an excellent meaty attack for certain situations you set up yourself (such as off of the forced air recovery follow-up in Combo 7 or from a back throw into dash sequence). On a counter-hit confirm, you can link into crouching , which then combos into a couple of high-damage finishers.
COMBO 19Counter-hit
standing or crouching , then cancel into either:
- 436 damage, 282 stun (requires full EX Gauge)
/ - 261 damage, 379 stun
. Laura’s +6 on counter-hit, allowing for a link into standing or crouching .
This is a rather advanced combo because it takes a great amount of foresight, reaction, and anticipation to see a counter-hit off of Step Elbow. Input , then actively look for the “Counter” system message. When confirmed, follow up with standing or crouching .
COMBO 20Counter-hit
, then juggle into:
- 162 damage, 270 stun
- 189 damage, 315 stun
- 243 damage, 360 stun
for a moderate-damage combo. The most realistic scenario of a counter-hit Volty Line is if you hit the opponent’s backdash as they try to escape Laura’s throws. In the corner, you can juggle with HP Bolt Charge for even more damage.
Anti-air
, then juggle with either:
- 141 damage, 195 stun
- 114 damage, 150 stun
Credits

**This guide is a collection of information gathered from multiple sources found online. All credit goes to their respective owners.**
Prima Games
Street Fighter
Samuraiblack
SatsuiNoHado
Omar-Dogan
DandonFuga
Meno Jazz
GLHFtv
Capcom Fighters
- How to Remove Pieces of Clothing from Certain Costumes★ 5 (793)42k views1k ♥4 minUpdated 25 Oct, 2017
- SFV common problems and solutions★ 5 (447)35k views599 ♥69 minUpdated 31 Dec, 2020
- Costumes with a Secret Variant★ 5 (835)21k views1.1k ♥8 minUpdated 8 Nov, 2024
- JURI★ 5 (392)13k views600 ♥45 minUpdated 10 Aug, 2019
- Lock on! - Cammy SFV Guide★ 5 (587)12k views837 ♥34 minUpdated 26 Sep, 2018
- Street Fighter V Achievement Guide★ 5 (231)9.1k views300 ♥11 minUpdated 7 Mar, 2016





- Upgrading to PremiumTeam Fortress 2★ 5 (20k)1441k views11k ♥6 minUpdated May 11, 2022
- No More Room in Hell Official ManualNo More Room in Hell★ 5 (2.8k)569k views2.1k ♥29 minUpdated Apr 22, 2019
- NMRiH Community Hosting GuidesNo More Room in Hell★ 5 (526)351k views653 ♥1 minUpdated Aug 10, 2022
- ULTIMATE GUIDE FOR GAME DEV TYCOONGame Dev Tycoon★ 5 (5.8k)326k views10k ♥4 minUpdated 23 Jan, 2014
- How to 'Git Gud' Soon™MORDHAU★ 5 (2k)318k views3k ♥68 minUpdated Nov 16, 2024
- Лучшие кооперативные игры SteamPAYDAY 2★ 5 (1.5k)315k views2.1k ♥56 minRussianUpdated Apr 27, 2025






This guide was created by its original author on the Steam Community. Are you the author and want it removed? Request removal.