Custom Portraits Guide
Introduction
 Hello and welcome to my very first Steam community guide!
Baldur's Gate provides a very nice collection of portrait artwork that you may select for your player character, but many of them are also used by one of several NPCs found in the game. That leaves very few unique faces to represent your player character.
Fortunately, Baldur's Gate does support importing customized graphics for you to use as a player character portrait, so you can find a favorite picture of your choice to represent your inner hero or villain. Both the original Baldur's Gate and the Enhanced Edition will do this.
This guide will focus on the Enhanced Edition v2.0, but the techniques described here-in can be applied to the classic Baldur's Gate, as well.
Quick Summary (for advanced users)
For anyone who knows how to use photo editing software, this summary is everything you need to know. The remaining guide is for players who do not know how to use photo editing software.
If you do not understand this section, it's OK. Just skip this part and go to the next section.
- In your "My Documents" folder, you should find a "Baldur's Gate - Enhanced Edition" Folder. Inside that, create another folder called "Portraits". This is where your custom portrait files will be stored.
- Steamdeck: Your portraits folder is located at "~/.local/share/Baldur's Gate - Enhanced Edition/portraits/"
- Each custom portrait must be a 24-bit Windows BMP file, and file names must not exceed eight characters. If the filename is too long, the portrait does not appear in the game.
- Stock portraits are 210x330px, but the game will accept custom portraits up to 1024px.
- Custom portraits should be cropped to a 7:11 pixel ratio (roughly 0.64:1). At this ratio, the largest acceptable custom portrait is 652x1024px.
- Custom portraits are added to the end of the portaits list. They are accessible by selecting to the left.
Setup
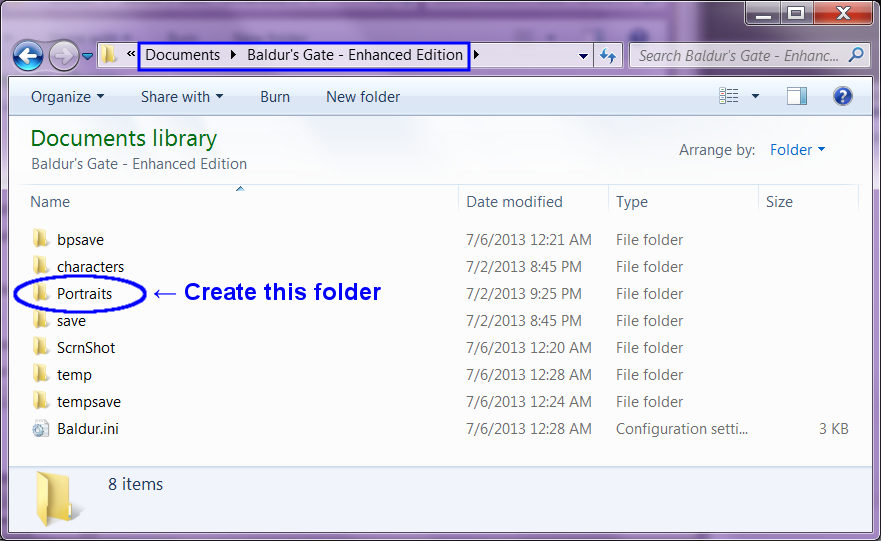
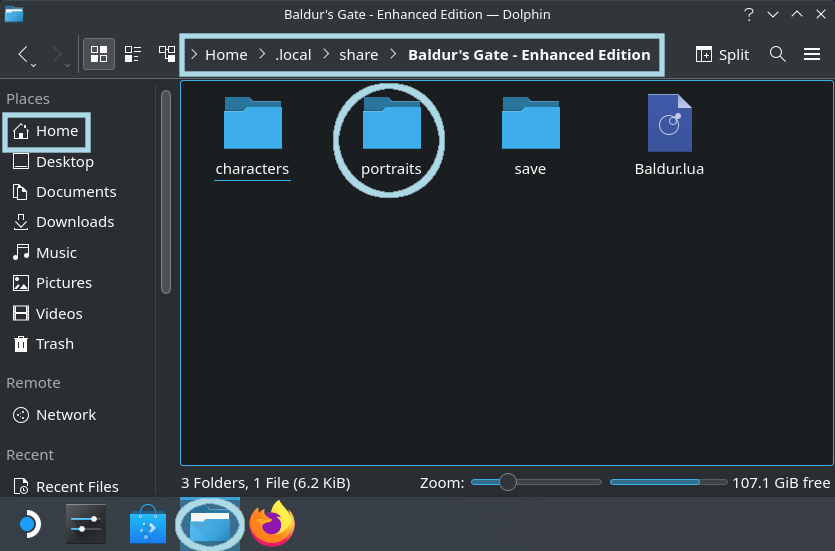
I've provided screenshots of The GIMP v2.8.14 on Windows 7 to serve as a visual aid. The GIMP is an excellent free and open source photo editing application that I like to think of as, "the poor man's alternative to Photoshop." It's free, so go grab it if you don't already have some photo editing software.
On the screenshots, important details will be circled or squared-off in BLUE, just as seen above.
You could also create your portraits on a different computer and transfer the files to your Steamdeck.
Creating a Custom Portrait
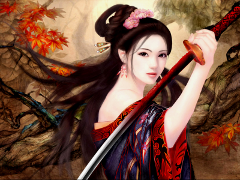 This image is used for strictly illustrative purposes. Original artist unknown.
For this guide, I want to create someone a bit more exotic — an onna-bugeisha[en.wikipedia.org] (female samurai) type of character. Baldur's Gate: Enhanced Edition includes a few common Japanese medeival weapons and a specialized fighter kit called the kensai (sword saint). So far so good, except there is no appropriate portrait image in the game.
If you do not have any photo editing software by now, STOP and go grab The GIMP[www.gimp.org].
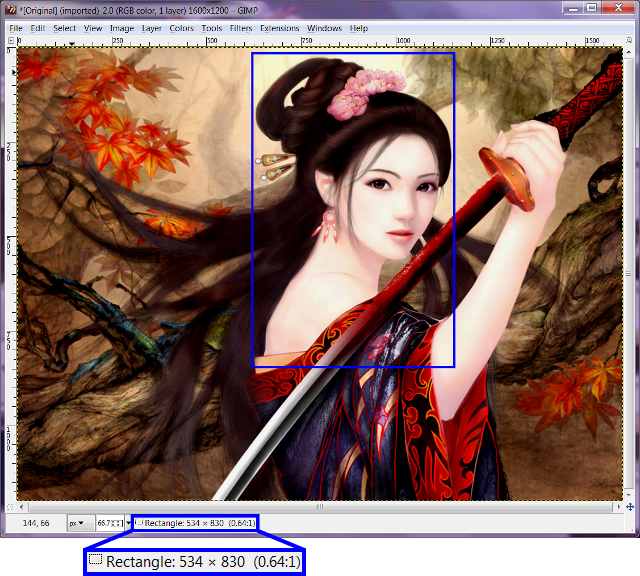
This picture is a beautiful work, but it is a bit large at 1600x1200px. It needs to be smaller and at a different pixel ratio. There is also a lot of extraneous detail that can be removed.
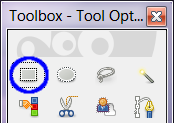 Using a "rectangle selection tool" (very upper-left corner of The GIMP toolbox), use the mouse to draw a box that will be the custom portrait area. This is done by click and dragging the mouse over the image. To help get the box dimensions about correct, your editing software should give you some information about the box you are drawing. For now, do not worry about the pixel size of the selection area so long as it is drawn to a ratio of 0.64:1.
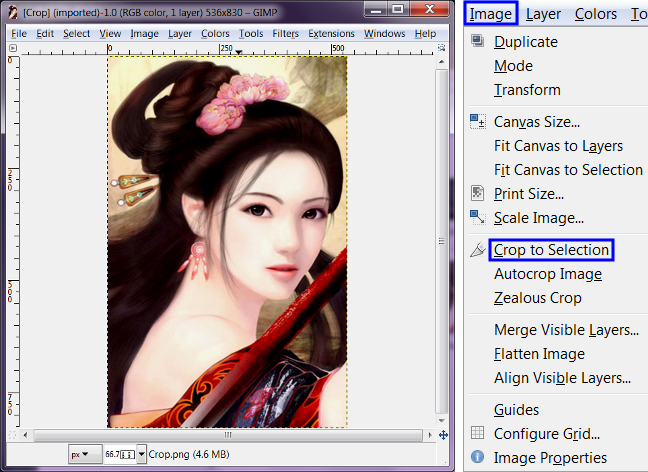
From the menustrip up top, select Image→Scale Image.
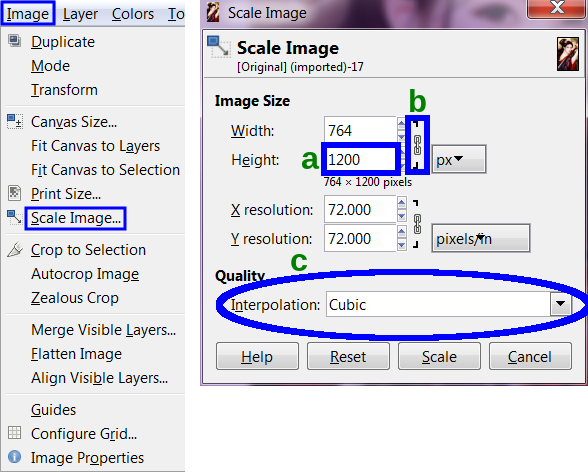
Looking at the screenshot above/right...
(a) Change the "height" value to 1024px (or smaller). Although not strictly necessary, if you want to be consistent with the stock portraits, set the height value to 330px.
(b) As long as the chain-symbol is "connected", the width field will automatically change to maintain the correct ratio. If you set the height to 330px, don't panic if the width doesn't equal exactly 210px. It will be very close, and that will be good enough.
(c) Finally, make sure the Quality is set to "Cubic".
Go ahead and click the "Scale" button.
Using a Custom Portrait
To "install" your nice new custom portrait, copy it into the Portraits folder mentioned earlier.
During character creation, the second part has you choosing your character's appearance. As custom portraits are appended to the end of the portraits list, you can quickly access them by selecting to the left
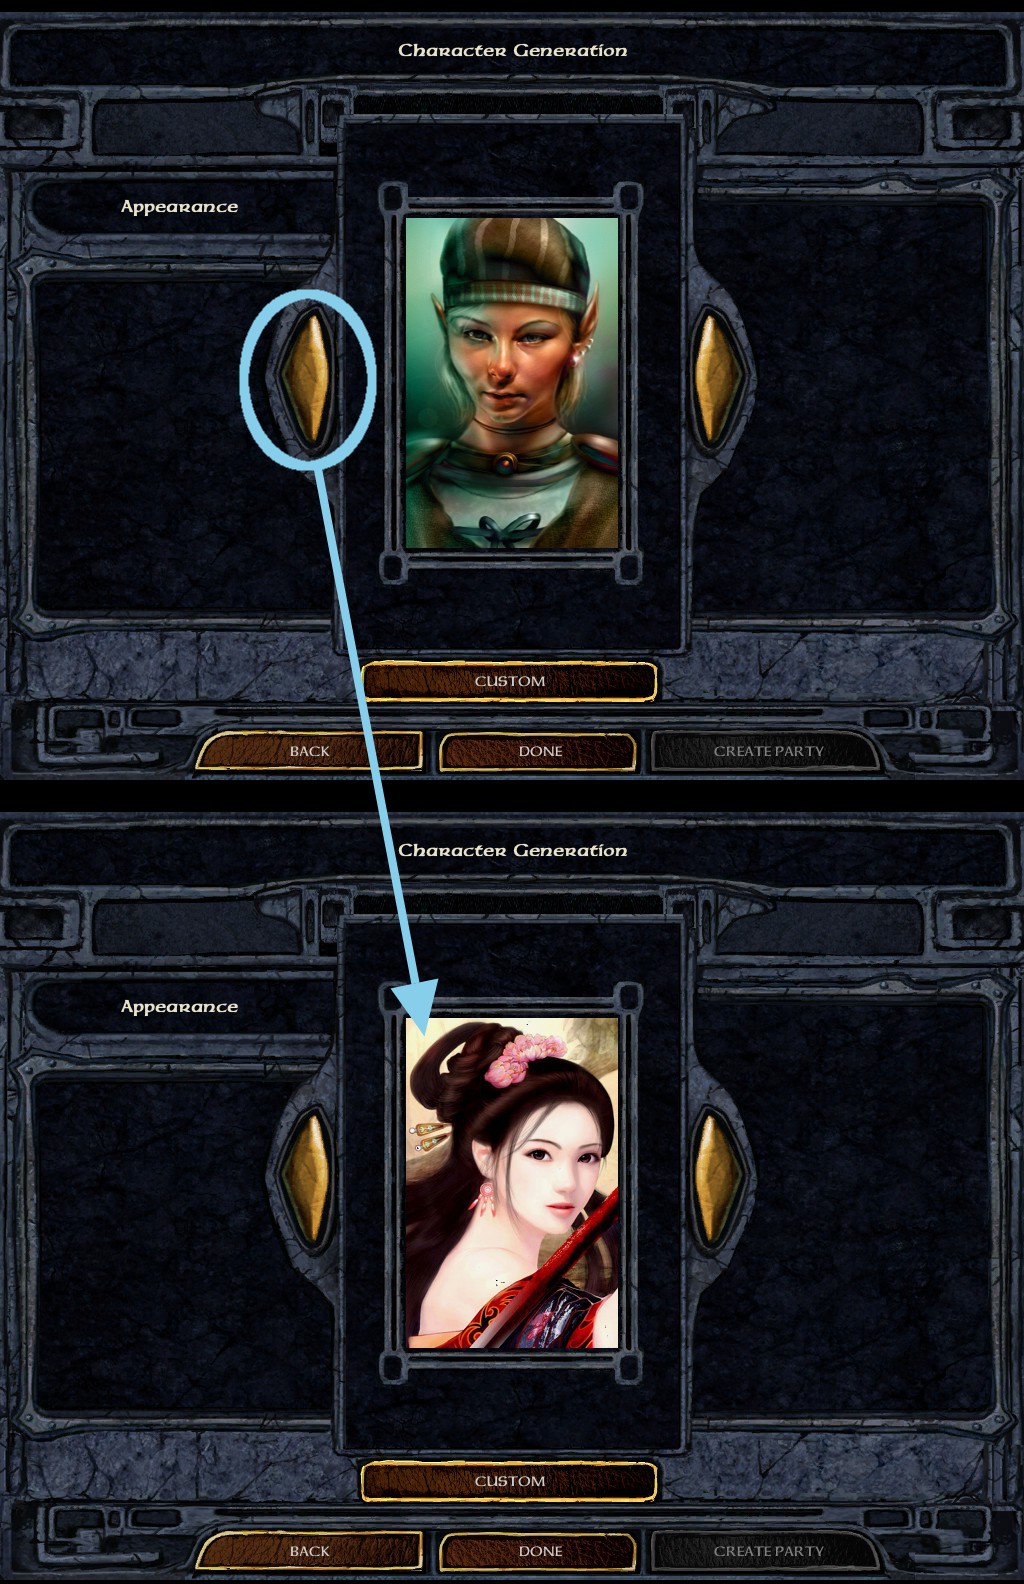
After picking your custom portrait, continue generating your character. As for the onna bugeisha[en.wikipedia.org] character I was building...
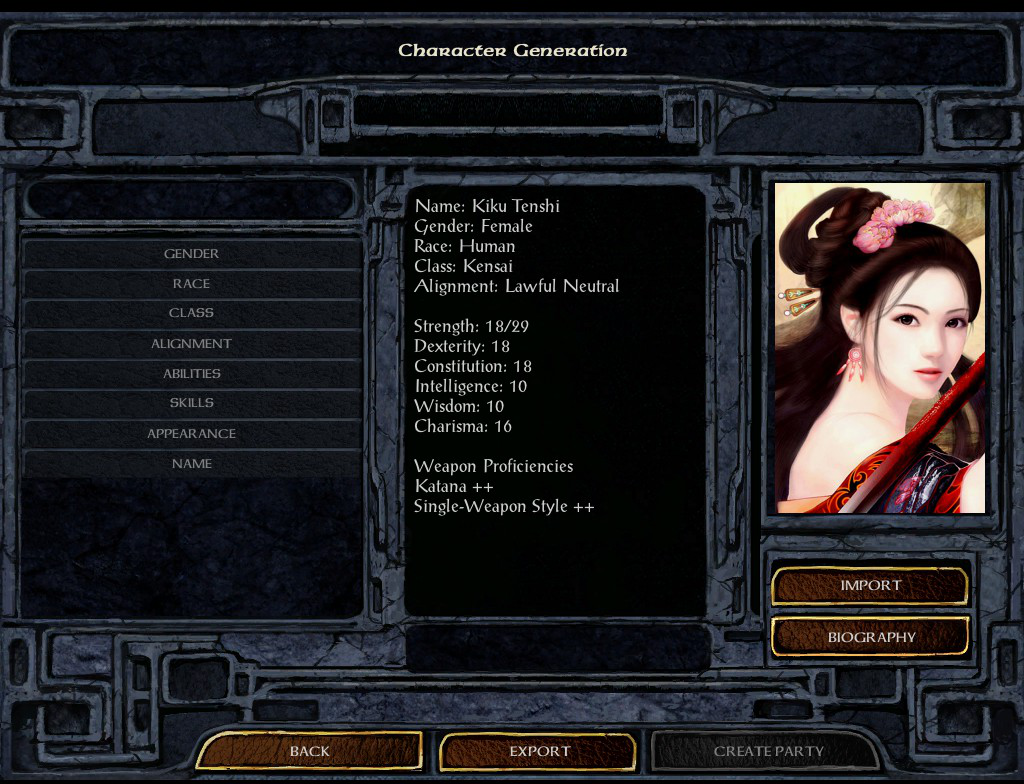
Kiku Tenshi is 90 attribute points of beautiful; exotic; and deadly, and more than capable of delivering samurai-style justice to Baldur's Gate!
Old Custom Portrait Packs
Older packages of custom portraits for Baldur's Gate Enhanced Edition may have different size images of the same portrait, possibly denoted by an 'L' (large), 'M' (medium), or 'S' (small) as the last character of the filename. Assuming that these images were properly cropped to begin with, keep the largest version available and remove the other(s).
It is advantageous to only install those portraits you intend to use. Should you install a hundred portraits, that's a hundred portraits you may have to click through to find the one you want. Blargh.
Therefore, you should first preview and select the portraits you want to use, from outside of Baldur's Gate Enhanced Edition. Then install only those portraits you want. Any photo viewing software will allow you to preview custom portraits.
Classic Baldur's Gate
- The portraits folder goes into where the game was installed, not your "My Documents" folder.
- You will need to create two crops for each portrait: a "large" version and a "small" version.
- The file names cannot exceed 8 characters and must have an 'L' or 'S' at the end.
- Large portraits are 24-bit Windows BMP files at 110x170px, and small portraits are 8-bit Windows BMP files at 38x60px. The pixel ratio remains very close to (but not excactly)
0.64 to 1. Note that there are different color depths for large and small versions.
- Baldur's Gate: Enhanced Edition Ultimate Guide★ 5 (1.3k)57k views3.3k ♥19 minUpdated Oct 15, 2016
- NPC Guide for BGEE (and SoD)★ 5 (561)29k views1k ♥169 minUpdated Dec 24, 2021
- Baldur's Gate Mechanics for Non-D&D Players★ 5 (620)25k views1k ♥15 minUpdated Apr 25, 2021
- Locations of all tomes to permanent increase stats★ 5 (332)18k views672 ♥2 minUpdated Jan 8, 2016
- Baldur's Gate: EE - Achievement Guide. Excl Siege of Dragonspear★ 5 (561)17k views885 ♥14 minUpdated Dec 16, 2019
- Baldur's Gate: Enhanced Edition - Achievements Guide★ 5 (458)17k views1k ♥14 minUpdated Jun 17, 2024




- Upgrading to PremiumTeam Fortress 2★ 5 (20k)1441k views11k ♥6 minUpdated May 11, 2022
- No More Room in Hell Official ManualNo More Room in Hell★ 5 (2.8k)569k views2.1k ♥29 minUpdated Apr 22, 2019
- NMRiH Community Hosting GuidesNo More Room in Hell★ 5 (526)351k views653 ♥1 minUpdated Aug 10, 2022
- ULTIMATE GUIDE FOR GAME DEV TYCOONGame Dev Tycoon★ 5 (5.8k)326k views10k ♥4 minUpdated 23 Jan, 2014
- How to 'Git Gud' Soon™MORDHAU★ 5 (2k)318k views3k ♥68 minUpdated Nov 16, 2024
- Лучшие кооперативные игры SteamPAYDAY 2★ 5 (1.5k)315k views2.1k ♥56 minRussianUpdated Apr 27, 2025






This guide was created by its original author on the Steam Community. Are you the author and want it removed? Request removal.