Editor: A comprehensive guide
Introduction
So, you want to create some maps for Monaco? Great! Making maps for Monaco is a lot of fun and actually quite easy to do. But I must warn you, it will devour you and you won't let go easily after you've started. Are you ready to experience something even more addicting than Monaco itself? Good! Lets go then!
A handy tip that you might not know of: You can use ctrl-F to search in most things in steam, including this guide. So if you are searching for something specific in this guide, use ctrl-F.
Nguyen AKA AndyN has created a short video series as well. They are not as comprehensive as this guide, but you might find them useful as well: http://www.youtube.com/channel/UCFi00DV1ppgrD58KIHoajeg/videos
Controls and Layers... AKA some boring stuff
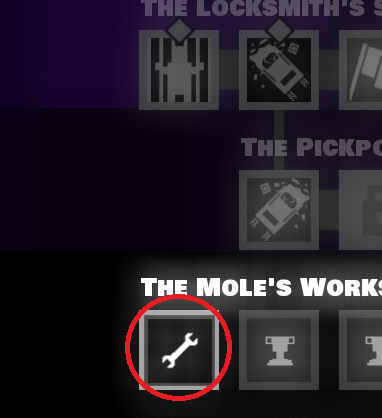
Now you need to enter a name for your map. If you don't feel creative, don't worry, you can change it later.
After creating your map you see a big black screen of nothing. This is your map and it's of course empty. So what do we see right now? We see a menu with items and a big grid with nothing on it right now. Those are the two main things in the editor, you have the grid where you're working on and the menu's to select items from to place on the grid.
- arrow keys/left stick to move around the grid.
- wasd/right stick to choose items from the menu. Note that up and down moves in the different folders of items and left and right between the different tiles in that folder.
- space/A to place a tile
- backspace/B to remove a tile in your current layer
- F/Y to fill an area. This means all items (or none) in your current layer will be filled.
- R/X to rotate a tile
- Q and E/up and down on d-pad to move quickly between layers
- Page up and down/left and right bumper to select a different floor. Note that there are 8 floors and you start at the lowest floor.
- C and V/Left and right trigger to Copy and paste a selection. You select by holding C/Left trigger and move the cursor on the grid. If you have placed items, you'll see them highlighted. Paste by using V/right trigger. Note that you can only paste a selection once, you have to copy it again if you want to paste it multiple times. Press C/Right trigger again to remove your selection from the clipboard.
- "/" / Left and right stick press to undo and redo (the controller can do multiple undo's and redo's)
- Tab/left d-pad to use the eyedropper. This handy little tool selects the tile you're hovering over. If you press it multiple times it will go through all the layers.
- Shift/right d-pad to zoom in and out. Note that there are only 2 levels of zoom.
- Architecture: This layer contains floors and walls. Visibility-wise they are on the bottom. Note that this layer also contains rugs, which are bigger than 1 square and lay on top of other floor tiles surrounding it.
- Furniture: This contains all kinds of furniture, such as tables, chairs and shelves. But also some fences, sculptures, rocks and more. Often a character can't walk through furniture, but it can see over it. It is placed on top of floors, but below items.
- Items: This is the fun stuff. Here you have everything ranging from guards, characters, lasers, bushes and much much more. Everything you interact with is in this layer and most of the decor items are here as well (but you can often walk over them, which is often not the case with furniture).
- Meta: This is a special layer for invisible stuff. This means some lighting, AI controls, electronic wiring and some extra coin control.
We will discuss a lot of the different items in the layers later.
OMG! Your very first map!
So lets start building your first map! At the moment we don't need all those things in the menu, we just want to create some basic things. And we want to create them fast!
So start by selecting the left Alabaster from the Wall folder in the Architecture layer. This is your basic wall. You cannot see through it or walk through it. This also means that it doesn't really matter what type of wall you choose. It's just a tiny bit of visual things that might make you choose a different wall.
Now create some crazy building with your wall. You can create rooms, halls or anything else you like. Remember that later you want to be able to enter your rooms, this will require 1 empty spot. We will later place a door there. On a side note: if you use a metal wall, it will be unbreakable.
Now select some kind of floor from the Architecture layer. It doesn't really matter what you pick (as long as it's not a wall or the Erase tile). Next thing to do is fill your map with floors. You can have different floors for different rooms to make it more pretty, but otherwise it doesn't really matter. What's important is that if you leave a spot empty, you cannot walk over it (nor can a guard). It won't be part of the map. Also note that rugs are very big and should be added later. You can fill floors quickly by using the fill tool (F/Y). You should first surround the floor you want to fill before filling it.
Next up, we want to place some characters. Go to the Item layer and select some characters from the SpawnAvatar folder. The characters that you place will be the characters that can be selected at the beginning of your map. If you want your map to be multiplayer, you need at least 4 characters.
Now for some loot! Go to the Pickups in the Items layer and go wild! Everything in there can be looted and that's what your thieves want. You can also place some backpacks with items for your characters to pick up. There is an item called RandomLoot, that is just a coin that you place at a specific point. We will talk about random placed loot later.
Of course we also want some guards. Go to the Spawn folder in the Item layer and place some guards. You can also place civilians, birds and more. The things you've just placed won't move yet. They will stand still, which is fine for birds and maybe some guards, but you want them to move. Go to the Meta layer and in the AI folder select the PatrolRandom (4 arrows). Place them on top of the guards and civilians you want to move. This will make them start moving randomly around your map. Note that civilians that stand still have a coin beneath them, but when they're moving they do not. We will talk about more advanced AI behaviour later.
Lastly we want to add doors an escape vehicle. Doors can be found in the Doors folder of the Item layer. There are several kinds of doors, you can stick with the ArchedDoor and LockedDoor to place an open or closed door respectively. An escape vehicle is the last thing you need. Go to Vehicle in the Item layer and place at least one.
Ofcourse you want to make your map more pretty, so go search the folders for all kinds of items. One thing you must not do is place civilians or guards on top of chairs! Otherwise you can't really go wrong, so place a bunch of cool stuff in your map.
That's it! Your first map! Quickly go save it by pressing escape/start and select Save Mission. After that you can exit the editor and go play your map. It should appear next to the editor icon. To edit your map later, move the cursor on the map and press E/right trigger. Now go play it!
Lazors (and other electronics)
Most of the electronics you need are in the Electronics folder in the Item layer. For now pick any Blink laser and place it somewhere on your map. Now pick the Alarm in the same folder and place them somewhere on your map. You probably want it on a wall, close to the base of the laser. Now there are two possibilities. You've either placed the alarm already directly adjacent to the laser. Hooray! You've already made your first trap! The other possibility is that the laser isn't directly adjacent to your alarm. In that case, we need to connect it. Go to the Electronics folder, but this time in the Meta layer. You'll see two items there, select the trap wiring. Now put as many trap wiring tiles between your alarm and laser as needed to connect them. See the image below for some examples.
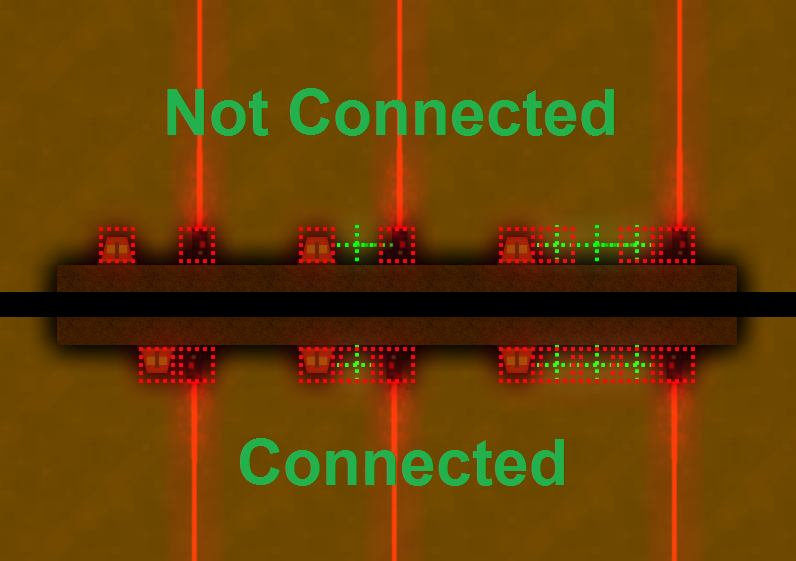
Some things to mention about the trap wiring is that you more or less create blocks of alarms. So if you select your trap wiring and see all the red squares, you can see what is connected to what. Every collection of red squares that is adjacent to each other is connected and will behave as such. So if one of the lasers in that block goes off, all alarms and all guns in that block will go off. Also every other laser, pressure plate and other detectors will go off for a short time (just as the laser you've just hit). With this system you can create very complex systems, but keep in mind that you can't cross other blocks, as there is only 1 type of trap wiring. You'll have to create a route around it.
- Blink lasers 1-4: these are your basic lasers that turn off from time to time. You have 4 different ones, each one has as different blinking pattern.
- Stationary laser: This is your basic non-blinking laser
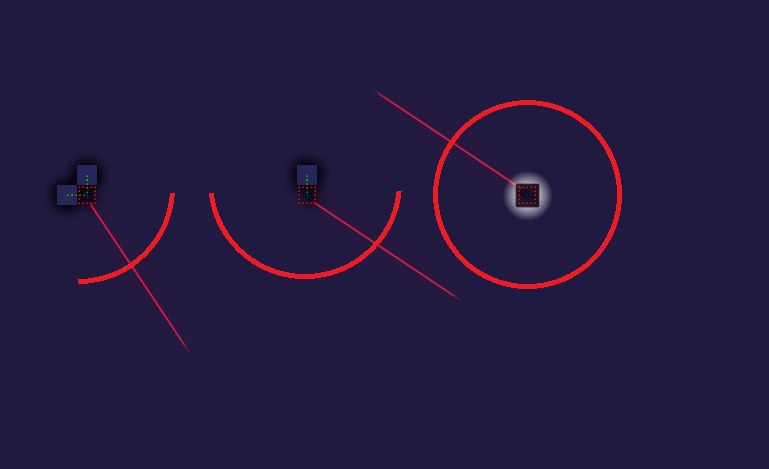
- Security camera (Counter-clockwise): This is your basic moving laser. You have two different flavors. The normal one moves clockwise and the other counter-clockwise. These lasers are a bit smart. They move different if they are placed next to walls. If you place them next to two walls, they will only move in 90 degrees. If you place them next to 1 wall, they will move 180 degrees. If placed next to no walls, they move 360 degrees. You can change the rotating patterns of the lasers by rotating them (R/X) or by choosing another clock-rotation.
- Search laser: This is the closing in laser/camera thingy. You have to look close where the front of the laser is pointing to. Rotate the laser until it faces the right way. It will have a 90 degree wide spread (so 45 degrees on both sides).
Other detection modules
- Pressure plate: This is your basic red square you can't walk over or you're screwed thingy.
- Metal detector: This is basically the same as a pressure plate, but it looks more fancy and is bigger.
- Scan door: This is the door with the hand on it. Note that it is in Electronics section, though it also could be considered a door.
Security measure modules
- Alarm: The alarm is that annoying thing that attracts guards. It will attract 1 guard per alarm that goes off, so you could attract a lot of guards if you want, but I personally think it's best to use 1 per block in most cases.
- Turrets: These come in 3 different flavors, with the 3 different types of weapons available in the game. You can attach a lot of shotguns to each other to kill someone as soon as he hits a laser. Or you can use an alarm and a tranq to give some shameful dying by a guard hitting you.
- Security door: This security measure is actually under the Door folder of the Item layer. It is the double lock door.
- Car alarm: This tile should be placed on a car to make a car alarm go off as soon as someone wants to enter it. I often place it on the door from where you can't get in the car.
Other Electronic things
- ATM: This is in the Pickups folder of the Item layer. It is your safe with a hand on it. You should connect it to security measure tiles. (often just an alarm)
- Hidden wiring: This is in the Meta tab (next to trap wiring) and it's useful for connecting other electronics than traps. For example lights and computers. Normally viruses can only move over walls and trap wiring, but you also want them to be able to reach lights to turn them off and computers.
- Computers: This is a computer where you can create viruses from. Make sure to connect it to a wall with hidden wiring, otherwise your virus can't get away from your computer.
- Electrical box: This is the item you need to shutdown the power. It doesn't matter where it's placed, it doesn't need to be connected. Do note that it will create a wave of failing electricity starting from the place of the Electrical box.
- Spotlight: This is just a light that will follow the player around. So the player is a bit easier to detect for guards.
- Telephone: The telephone will sometimes ring and attract a guard or civ. Make sure to connect it with hidden wiring, otherwise your viruses can't shut it down.
- Wiring: These behave the same as trap wiring, except that they are in the item layer and they are visible. This way you can show the player how the traps are connected.
Stairway to heav... the eighth floor
Lets talk about different floors. In list of controls for the editor we've already discussed how to change floors in Monaco. Page up and down/left and right bumper. You can have up to 8 floors in Monaco and the first floor that you'll see is the lowest floor. So when you plan your map, make sure you start placing items on the right floor.
One of the cool things in the editor is that you can see what's beneath you if you haven't placed a Architecture tile there. It also means you can't move there, but instead of being completely black as seen in the beginning, it will now show the first floor beneath your current floor that does have some items.
Note that you have stairs of only 1 tile and stairs of 9 tiles. I advise to use the stairs with 9 tiles, since they are often more visible to the player. Only use the stairs of 1 tile if you lack space to place a bigger one, but even then, try to create more space such that it is clear for the player where your stairs are.
Stupid guards and less stupid guards
Next up is the AI. So far we've seen two types of AI behaviour: Standing still and walking randomly. We can do a lot more and all that can found in the AI folder of the Meta layer.
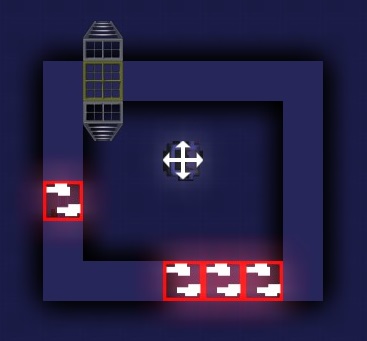 The PatrolRandom tile is one of the most useful AI behaviours, especially if you combine it with the PatrolBlocker! The PatrolRandom makes guards patrol randomly, but they avoid walls and most other impassable objects (except for jewelry cases that aren't placed on a table for example). A guard (or civ) will also see the PatrolBlocker as a wall. This means you can keep guards inside their own room for example. Note that when a guard is alerted, it will pass through the PatrolBlocker (and also vents and secret passages).
The Search tile is almost the same as the PatrolRandom, but now the guard will run. Just like you see in the hotel levels.
The PatrolSpawner and SearchSpawner are the same as the normal ones, but now the guards will keep spawning. This can be used if you create survival levels, where more and more guards will appear and eventually kill you. Note that C4 can blow up these spawn points.
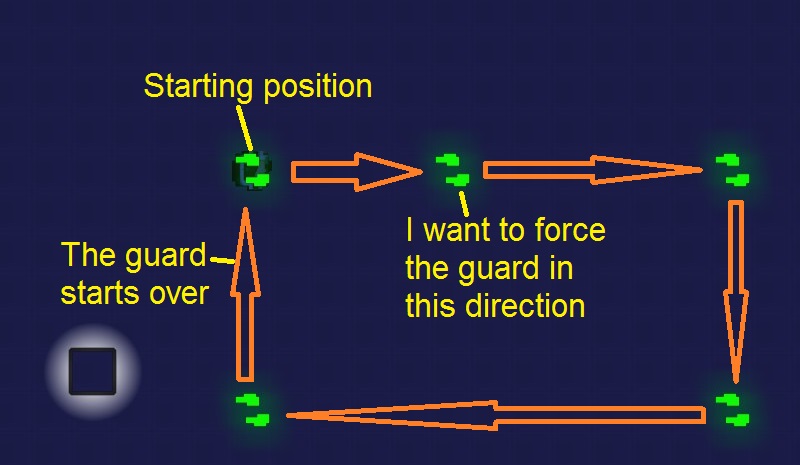 Note that you can let multiple guards (or civs) walk the same route, as long as you place a PatrolWaypoint of the same color on them. You might need to do some puzzling with the place of the waypoints if you want very specific routes, but so far I've always been able to create more or less what I want.
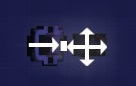 The Follow tile can be used to make npc's follow each other. Place two npc's next to each other and place the Follow tile on top of the npc that should follow the other. Make sure that the arrow points to the npc that it should follow. Also make sure that the npc it should follow actually moves, otherwise following is pretty useless. You can make long lines of npc's following each other, you can let guards follow dogs to lead them to the smell of the player. I've even seen someone create two npc's following each other to simulate that they "were doing it". A lot is possible, be creative!
Making your map prettier (lighting, sounds and in-game texts)
So now you've created an awesome map, it has amazing lazer puzzles, guards patrolling every inch of your map and a ♥♥♥♥♥♥♥♥ of loot. What's next? Well, your map will probably feel very unfinished for a player at the moment. That's because it's ugly! Yeah, i said it! Your map is ugly! But don't worry, making your map very pretty is easy and a lot of fun!
The dimmed lights can be used to set atmosphere. They are not affected by walls and just create a small amount of (colored) light. You can experiment with these a lot as they aren't as obvious as LOS lights and they can sometimes create very dynamic and visibly pleasing levels. Note that there is a tiny version of the white dimmed light.
The Line Of Sight Lights or LOS Lights are affected by walls, which can create very nice patterns. If you want to create a "normal" light in the ceiling, you can just use the white (or sometimes yellow) light. Using colored LOS Lights is easily noticed by the player, so be careful with them.
There are also a few special lighting tiles in the Ambient Lighting folder. The CrystalLight, WaterLight and PulseRedLight are pulsing lights in a certain color. The two dance floor tiles are used for creating flashy dance floors. If you place a few in a row, you will create a running light. The difference between the two dance floors is that the left one looks a bit smoother than the right one.
There is also a second folder with (even more) lighting: in the Item Layer in the Lights folder. These are all visible lights, like street lights, candles, neon sign boards and more. Just look through them and you'll find a lot of cool things. I will mention two special ones briefly: BigWhiteLight is a chandelier that actually hangs from the ceiling, characters will walk beneath it. The LightProjecter can be used for a small cinema or for people giving a presentation.
When you're creating a map with multiple floors, you sometimes want to add lighting later, but your lower floors are incredibly dark, since there is no lighting yet. There is a solution for that: You can turn off lighting in the settings. You can also toggle this feature by pressing L on your keyboard (Nothing for controller users here). If you turn of the lighting, everything will appear as if there are a lot of lights shining on them. So everything should be visible. Note that if you do this, lasers won't show! So creating traps is hard and you probably want to enable lighting for that. Also you can use M to toggle the meta layer to always on or normal mode, which might come in handy from time to time (you can also see the meta layer if you have any folder in the meta layer selected).
All kinds of useful things
So we're almost done, we've covered a lot of the stuff in the editor and right now you can make some pretty awesome maps already. But there are just a few more things that are handy to know but didn't really fit in any of the previous sections. So we'll conclude this guide with all kinds of useful things that are handy to know.
Folders and changing the dialogue
Whenever you create a map, you should never (and when I say never I mean NEVER) create a map with the same name as you did before. This will create major problems and it could mean your previous map will be gone and steam workshop hates you (this might be fixed in the future). When you create a map, you give it a name that is used to create a file with that name. But also your mission will have that name. You can change that in the menu, which doesn't change your file name, but only changes the mission name. Also if you duplicate your mission, you will create a new steam workshop ID for your new map. Which basically means steam workshop will consider it a different workshop item. However, duplicating does allow you to choose a new file name.
In the previous section we've discussed where your files are located. After closing down Monaco, open up the .xml file in your favorite text editor. You can use notepad, but please don't use word. I prefer Notepad++, which you can download for free. Now for the people familiar with xml, you'll probably already understand how most of it works. For those who don't: It's not that hard.
First go to the text that says "0|Ready?|Waiting on you, Chief!" This is where you can edit the text. Simply edit the text and your created your first line. You can also add more lines if you want. Just add a new line with <string>your text here</string>. As long as these are inside the <DialogueText>all your text lines</DialogueText>, you should be fine.
Each line is formatted as follows:
number|name|text
The number should be 0 or 1 and it determines where the dialogue appears on screen. 0 is on top, 1 is on the bottom of the screen. Normally 0 is used for narration and overview text, while 1 is used for characters talking. The name can be names like Pickpocket or Lookout and the game will automatically recognize these and give them the right color (you should use a capital). If you pick anything else it will be a grey box, which is the color if you use "Ready?" for example. The text is just what you want to write.
Something very important: NEVER use more than 255 characters in your whole string (so including the number and "|"). If you do, you will create a corrupt file as soon as you save your map. If you have done this, it can be fixed, leave a message in the comment section and I can help you.
When you're done, save the file and open up Monaco again. Now go to your map and open it in the editor. Now save your map and exit the editor. If you open your map again, you should see the dialogue! If your dialogue is correct, you can open your map in the editor again and upload it to steam workshop.
Some troubleshooting: If your game crashes at the startup screen, you've probably made a mistake while editing your .xml file. Check if every line begins with <string> and ends with </string> (note the /). If that doesn't fix the problem, try your backup. Also it might work if you just delete your xml file. Every time you edit your map, it will be generated again. This also holds if you want to edit a map you've already created: Just open it in the editor, save it, and there should be a .xml file. If you want to create special characters, make sure you set the encoding of your file to ANSI (not UTF-8). This can easily be done using notepad++ for example.
The file we need is the .lvl file. Get it from a friend of your backup folder and copy it to your Monaco custom map folder. Next create a new map in Monaco and give it a name that you like (not the same one as the .lvl file) and save it. Exit Monaco. If you go back to your custo map folder, you find your newly created map. Delete the .lvl file and rename the file from your friend or backup to the file you've just deleted. If you now open Monaco again, it will think that the newly created map is your imported map! Note that if you use this method for backups a new steam workshop item is created, so you can't update the previous one!
Be careful with this, always make backups, because I'm not responsible for your data loss!
Super awesome mega pro tricks
This section is dedicated to all kinds of handy tips and tricks. Several of these are used by Nguyen or AndyN, the designer of the original Monaco campaign. Read it, you might learn some neat tricks.
- Don't spawn characters on the corners of the map and also don't place stairs on the corners of the map, otherwise the UI might block the view.
- Try to make staircases face the same direction. So if you run in one staircase and go to the next floor, you don't run out of it by accident.
- Rotate to prevent patterns. Especially if you create a lot of connected foliage, you can rotate it randomly and it won't look like an artificial pattern anymore.
- Movement blockers cast a shadow, this includes furniture. So always make sure that there is enough light around, otherwise the player cannot see this and will walk more against furniture.
- Place a fence on camera's! Yes, you heard that right. If you think that your camera's are floating in the air, you can try placing a fence on them. Check the original campaign of Monaco, it's used all the time.
- Making fires must be done using two type of tiles, you need the ones from the Decor-debris folder in the Item layer for the damage and you need the one from the Particles folder in the Meta layer to generate the flames.
- Some items might be considered furniture, this is how that works: You can't move over furniture, otherwise it's an item. If something that blocks movement makes sound, emits light or anything like that, it's considered an item.
- There are 3 different types of walls. You have normal walls, metal walls and rock walls. A metal wall can't be destroyed, not by explosions or the mole. The rock wall does not contain any electronics. This means that viruses don't travel through it and if a player moves to far away from his viruses, they will die. The other difference in walls are just esthetic: You see the walls in the sideview. Also if you blow them up, the tile that is left (and you can walk over) is in the same style as the wall. Lastly, a secret passage on a wall will be in the style of the wall if the secret passage is used.
Design and more subjective stuff
This section is about how to design maps. It will be quite subjective since there is no definitive way of creating maps. By looking at several maps of the original campaign and playing several custom maps I noticed several things that make the original campaign good and most custom maps not as good. Note that this section is more about how to recreate the feel of the original campaign, some players like a more stealthy approach. In my opinion monaco consists of two parts: stealth and making the best of screwing up. Which makes Monaco different than other stealth games. If you want to create stealthy levels, this advice might not help you, if you want to create levels similar to the original campaign, read on.
Something related to this is a mistake a level designer makes for the start of a level. Often a player can't start playing because the security to get in the building is too tight. Think as it in this way: A player has been waiting to get a lobby full of 4 people and he finally can get to play Monaco... but he is stuck at the beginning... what a bummer. Scan doors can be the cause of this as well as guards that start walking to the start of a level. It's easy to avoid, just make sure that players can dive in Monaco as soon as the level starts, it will give them way more fun.
- Use random loot. I see a lot of maps that don't do this, but it adds replayability and it is used a lot in the original campaign.
- Be careful with gendarme (shotgun guards), they are very punishing and should be avoided as much as possible. Only a few (3) levels in the original campaign use them and both hotel levels are critized because of them. So just be very careful if you use them.
- Use secret passages for secret passages. I've seen a lot of people use them for non-secret passages and sometimes this can add to the story. But if you do, make sure it's clear for the player where they are and also don't place multiple passages in a row, it looks and feels ugly.
- Take your time, think your map through. The original campaign took a year of full time development. That's an average of 2 weeks of time for each level. Just take your time and don't rush things. Rome wasn't built in a day.
This section is still a work in progress and will be expanded in the future.
Conclusion
So that's it! You should have learned a lot of things now and should be able to use the editor in a professional way. All levels in the original campaign are made in this editor and now you know how to use it! So now you can make something amazing! Of course you're not there yet, you need to make a lot of maps before you really understand how to create maps. You want to create certain flows to your map to create the true Monaco experience. But now you know all the technical stuff to start practicing and maybe someday you will create the best custom map ever!
I might add more stuff to this guide later, so be sure to check it again later! I might have missed some things or maybe I'll add more handy tips for all kinds of stuff.
If you think something is missing from this guide, please comment! I'll be happy to make this guide even better! If the guide helped you, please vote it up! The Monaco community is small, so any vote is appreciated :)
I'd like to thank Nguyen (AndyN) for the spellcheck and several tips and both UB3RSOUL and cpi for helping me understand the dialogue editing.
Thanks for reading!
- Character cheat sheet★ 5 (498)27k views378 ♥3 minUpdated Aug 8, 2021
- Achievements Guide in Monaco: What's Yours is Mine!★ 5 (224)9.5k views243 ♥6 minUpdated Apr 8, 2020
- Monaco 日本人用ガイド★ 5 (534)8.4k views710 ♥2 minJapaneseUpdated Sep 6, 2014
- "Play It Again Sam" Achievement Guide★ 4 (39)4.6k views25 ♥2 minUpdated Dec 25, 2023
- Strategy behind each pickup★ 4 (76)4.3k views71 ♥8 minUpdated Feb 1, 2015
- Основы, или как не попасть в ситуацию "Бежим, я спалился!"★ 4 (140)3.8k views84 ♥6 minRussianUpdated Nov 12, 2014


- Upgrading to PremiumTeam Fortress 2★ 5 (20k)1441k views11k ♥6 minUpdated May 11, 2022
- No More Room in Hell Official ManualNo More Room in Hell★ 5 (2.8k)569k views2.1k ♥29 minUpdated Apr 22, 2019
- NMRiH Community Hosting GuidesNo More Room in Hell★ 5 (526)351k views653 ♥1 minUpdated Aug 10, 2022
- ULTIMATE GUIDE FOR GAME DEV TYCOONGame Dev Tycoon★ 5 (5.8k)326k views10k ♥4 minUpdated 23 Jan, 2014
- How to 'Git Gud' Soon™MORDHAU★ 5 (2k)318k views3k ♥68 minUpdated Nov 16, 2024
- Лучшие кооперативные игры SteamPAYDAY 2★ 5 (1.5k)315k views2.1k ♥56 minRussianUpdated Apr 27, 2025






This guide was created by its original author on the Steam Community. Are you the author and want it removed? Request removal.