Fixing GTA IV with 4 Mods (2026 Guide)
Introduction
GTA IV’s PC port is already 15 years old, and for most of that time, this version of the game has admittedly, been a disaster.
Missing and broken graphical effects, poor performance and a confusing number of versions, all with their own individual pros and cons, often make playing GTA IV on PC seem like more hassle than it’s worth.
Thankfully, that is no longer the case. In the last few years, significant progress has been made by the modding community to fix GTA IV on PC. Modding has been made easier than ever, downgrading isn’t really necessary anymore and you can have the best version of GTA IV on any platform, by simply installing 4 excellent mods, and all it takes is a few minutes, so let’s get to it!
This guide is also available in video form if you'd prefer to follow that instead.
Help & Support

FusionFix
So, let’s start with our first mod, Fusion Fix. This is going to be the most important mod we’ll install, as it fixes a huge number of issues, adds a lot of quality of life features and adds a Modloader called “Fusion OverLoader” to the game.
I’ll quickly highlight some of the fixes this mod provides.

However, it also enables or disables the game’s depth of field effect. Except on the PC version of GTA IV, the depth of field effect is broken, and instead blurs the entire screen, instead of just blurring objects in the distance.

Fusion Fix separates motion blur and depth of field in the game’s menu. So, you can now enable and disable depth of field, and motion blur separately, if you only want one or the other.

FusionFix also fixes the depth of field effect. Like I said, previously it blurred the entire screen, and it didn’t scale with resolution, so the intensity was only right at 720p. Now the effect scales correctly, and it only blurs objects in the distance like it was meant to.


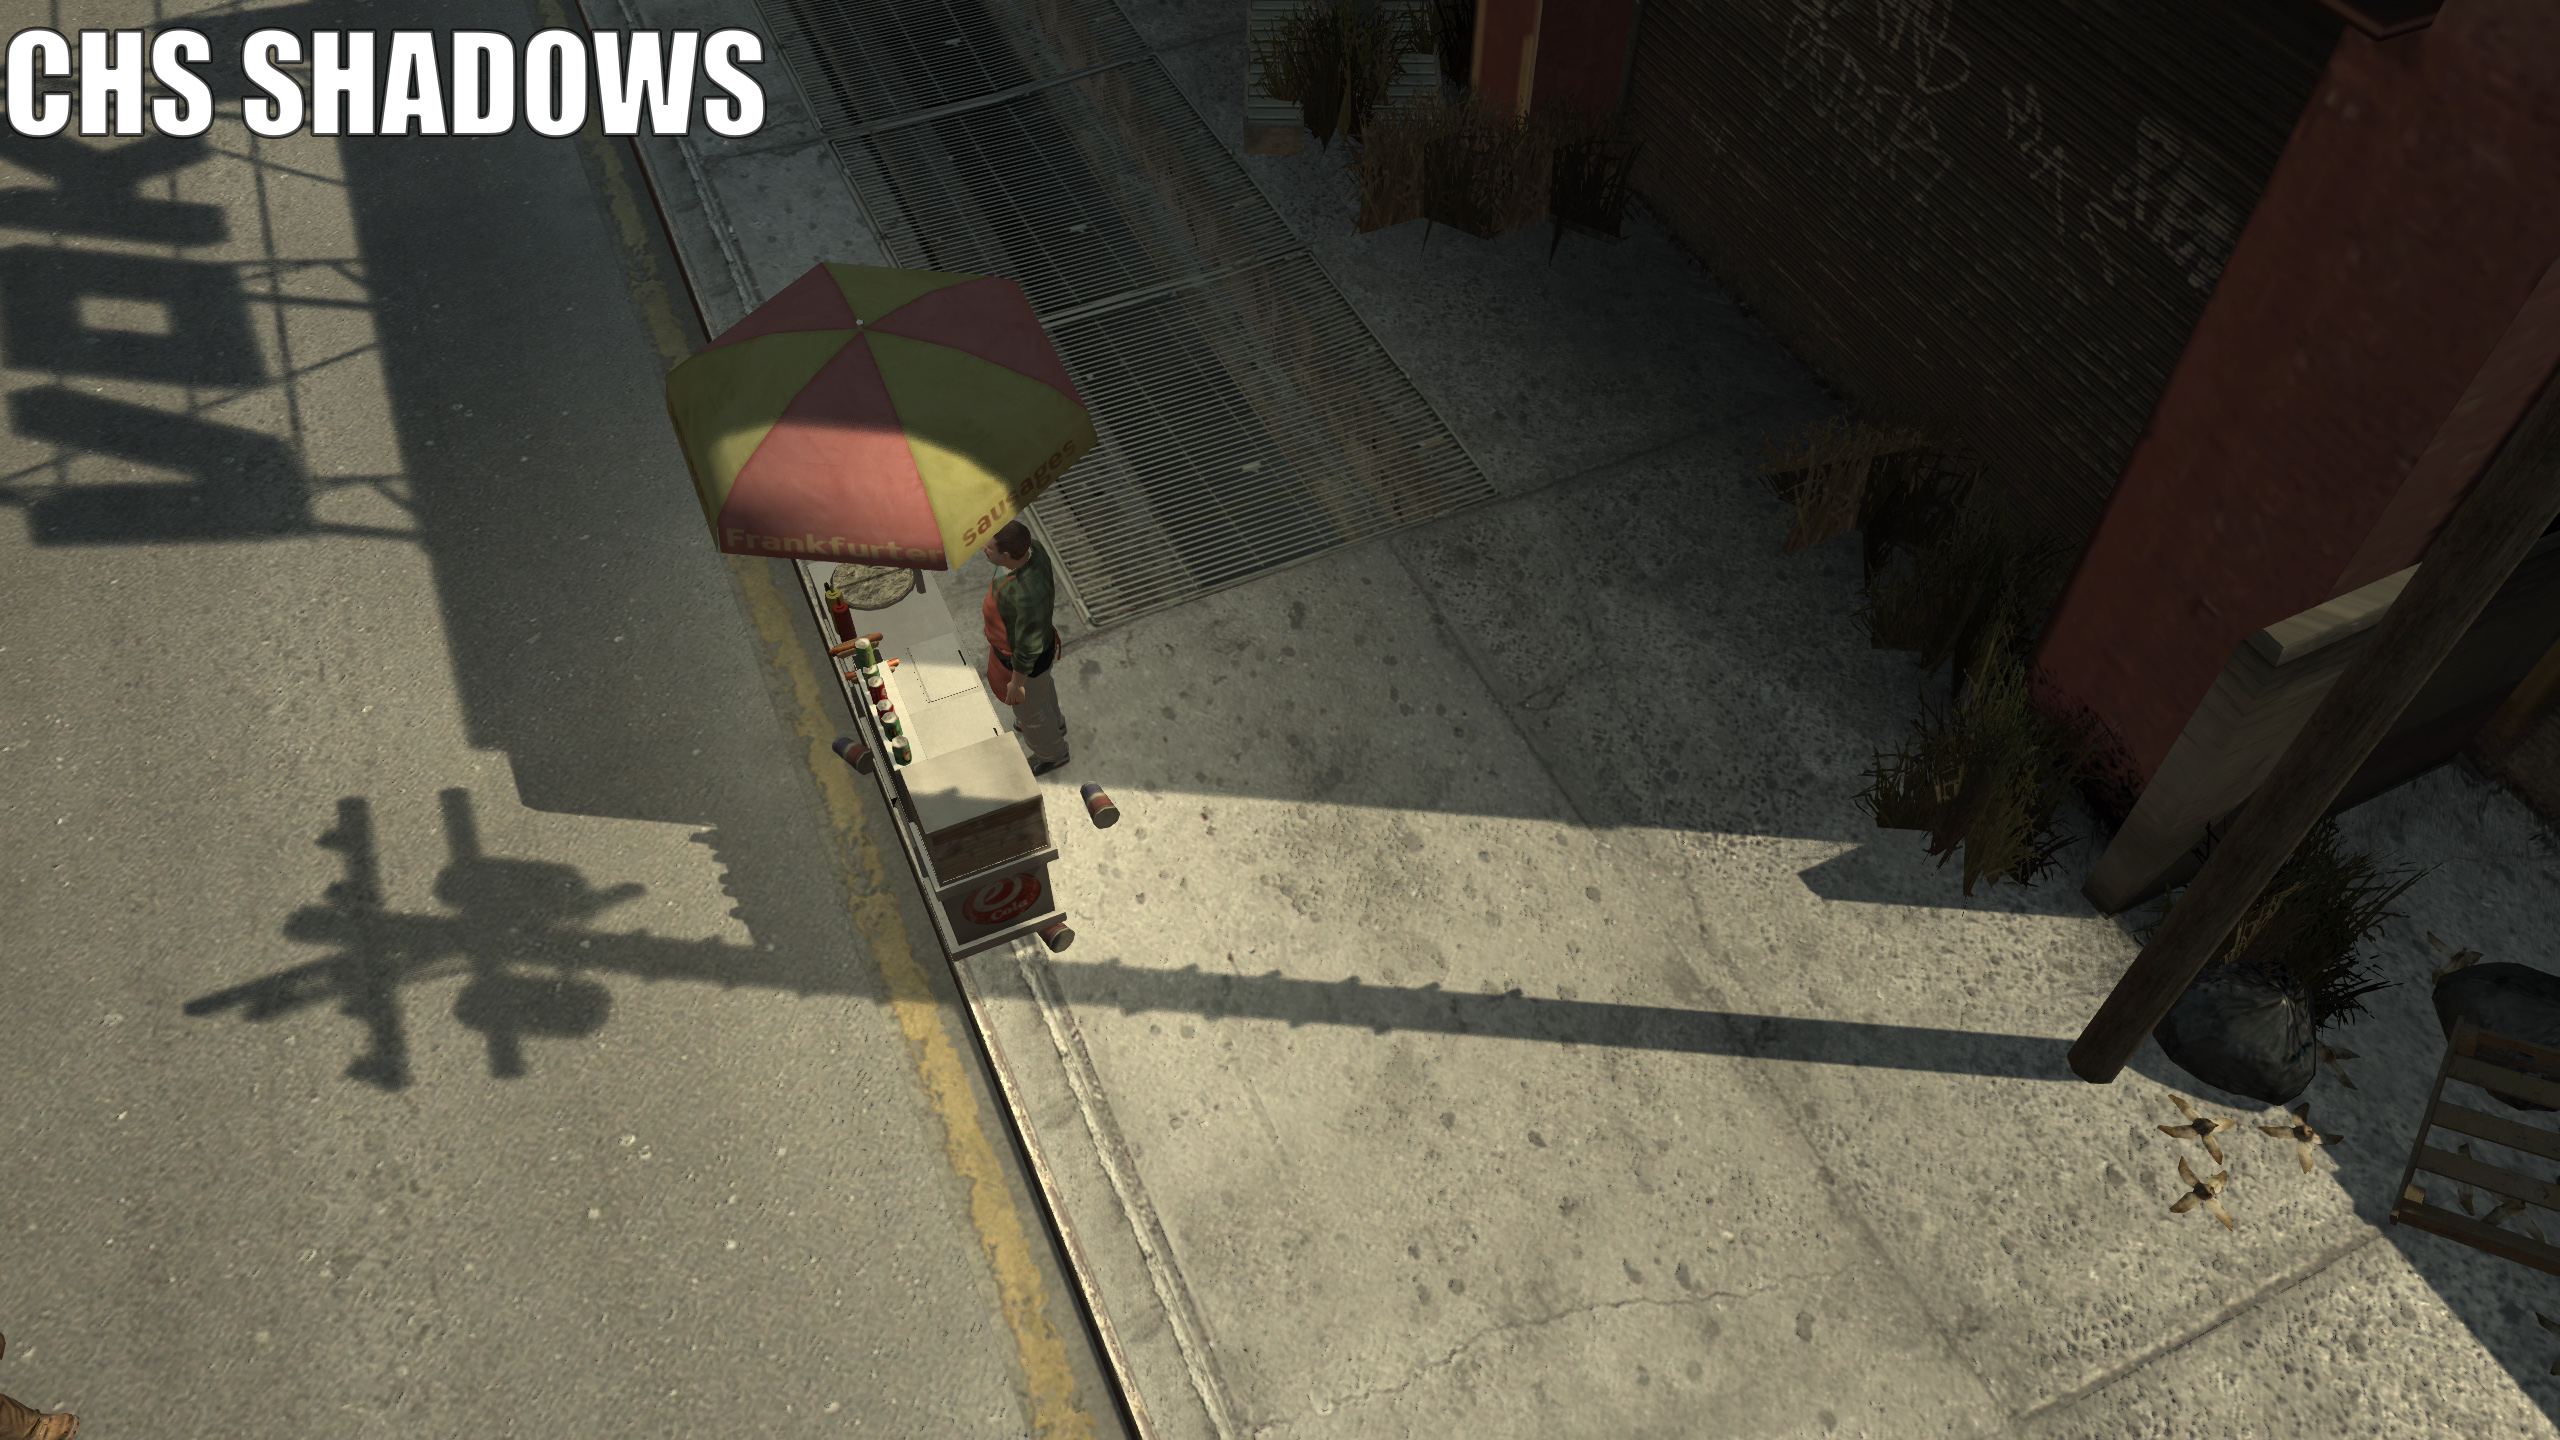
You can see this here, where the shadow at the start of this pole is sharper as it’s closer to the object casting the shadow, but the top of the shadow is softer as it’s further away from the object.
You can also see how the shadow of the hot dog stand is sharp in contrast to the soft shadow next to it. With this option, you get a nice mix of sharp and soft shadows, in situations where they’re most appropriate.
The example below is with PCSS, which has since been removed from the mod, but works in a similar way to CHS.
The mod adds so much more that I really can’t even cover in this guide, but if you are interested in learning more about what this mod does, I’d recommend reading through the mod’s GitHub page[github.com].
- Click the download button on the FusionFix GTAForums thread[gtaforums.com], this should open the releases page with all versions of the mod on GitHub.
- Download the latest "GTAIV.EFLC.FusionFix.zip" from the GitHub page.
- Open the mod archive you just downloaded, and copy all of the files from the archive, into your GTA IV folder, where GTAIV.exe is located.
If you're not sure how to find your game folder, you can find it by right clicking on GTA IV in your Steam library, going to "Manage" and then clicking "Browse Local Files". The "GTAIV" folder is where GTAIV.exe is located.
And that’s it, the mod is installed.
“dinput8.dll” is Ultimate ASI Loader, and it’s used to load the FusionFix ASI plugin in the “plugins” folder, which provides some engine fixes and is also what allows Fusion OverLoader to work.
Fusion OverLoader uses the “update” folder to load your mods, and this is where most of FusionFix is installed, and this is where our next mods will be installed too.
Console Visuals
Our next mod to install is Console Visuals.
The PC version of GTA IV changed a good few of the games assets when compared to the console versions, things like certain clothing options, animations and other things were different between the two versions.
The mod Console Visuals aims to restore all of that content from the consoles. Now most of the changes are completely subjective, they’re just small things like the way Niko might hold a specific weapon, or the size of the games help boxes.


On PC, a lot of the vegetation was changed. This includes a new grass model, which is actually worse because in a lot of areas it appears under the ground instead.
Just look at this comparison here, the grass on PC is mostly under the ground compared to the console grass.

The team behind Console Visuals managed to extract those textures and got them into GTA IV with some corrections made to them.

Anyway, let's install console vegetation from Console Visuals!
- Click the download button on the Console Visuals GTAForums thread[gtaforums.com], this should open the latest version of the mod on GitHub.
- Download "Console.Vegetation.zip" from the GitHub page.
- Open the archive you just downloaded, then copy the "update" folder from the archive, into your GTA IV folder, where GTAIV.exe is located.
Once again, if you're not sure how to find your game folder, you can find it by right clicking on GTA IV in your Steam library, going to "Manage" and then clicking "Browse Local Files". The "GTAIV" folder is where GTAIV.exe is located.
And that’s it, the vegetation from Console Visuals is installed! If you do want to install other parts of Console Visuals, the installation will be the exact same as the vegetation installation, so just download the parts you want and then follow step 3.
Various Fixes
The penultimate mod we’re going to install, is Various Fixes. This mod fixes a huge, huge number of issues with the GTA IV map and other assets.
It’s hard to even cover what this mod fixes, as the list of fixes is VERY big...

But this mod is definitely worth installing as it fixes plenty of texture issues, prop placement issues and other problems and inconsistencies in GTA IV.
Let’s install the mod.
- Click the GitHub button on the Various Fixes GTAForums thread[gtaforums.com], this should open the releases page with all versions of the mod on GitHub.
- Download "Installation.through.Fusion.Overloader.2.0.2.rar" from the GitHub page.
The version number at the end will change when the mod gets updated.
- Open the archive you just downloaded, open the "Installation through Fusion Overloader" folder in the archive and then copy the "update" folder from the archive, into your GTA IV folder, where GTAIV.exe is located.
And yet again, if you're not sure how to find your game folder, you can find it by right clicking on GTA IV in your Steam library, going to "Manage" and then clicking "Browse Local Files". The "GTAIV" folder is where GTAIV.exe is located.
And that’s it, Various Fixes is now installed in Fusion OverLoader.
Radio Restoration
Like all of the other old GTA titles, GTA IV has had music removed due to licenses expiring.
The radio station Vladivostok, lost all of its original songs except one when licensing expired in 2018, so Rockstar added a whole new soundtrack to the station instead, other radio stations also lost some songs too.
The best mod to restore cut music from the Complete Edition of GTA IV, is the Radio Restoration mod, so we're going to use that in this guide.
- Download the tool from the bottom of this page[downgraders.rockstarvision.com].
- Open the archive you just downloaded, and then copy "IVCERadioRestoration.exe" anywhere you'd like.
- Run the tool and follow the steps in the installer.
You've now restored the cut music in GTA IV!
Outro
And that's it! You now have the BEST version of GTA IV on ANY platform.
Again, if you found this guide helpful, consider supporting me on Patreon[patreon.com], your support means a lot!
Enjoy your definitive GTA IV experience!

- How to make GTA IV: The Complete Edition perfectly playable in 2026★ 5 (2.7k)106k views5.2k ♥11 minUpdated May 2
- Grand Theft Auto IV: CE - The Improved Classic★ 5 (1.4k)53k views3k ♥4 minUpdated May 4
- Optimization, Performance and Improvements★ 5 (1.3k)52k views2.7k ♥9 minBulgarianUpdated Apr 18
- GTA IV: The Complete Edition Achievement Guide [2024]★ 5 (1.7k)32k views3.3k ♥15 minUpdated Jul 2, 2024
- GTA 4 COMPLETE EDITION: THE DEFINITIVE MOD GUIDE★ 5 (692)31k views1.3k ♥13 minUpdated Mar 11, 2024
- GTA 4 100% достижений★ 5 (1.4k)28k views3.5k ♥24 minRussianUpdated Sep 2, 2025


- Upgrading to PremiumTeam Fortress 2★ 5 (20k)1441k views11k ♥6 minUpdated May 11, 2022
- No More Room in Hell Official ManualNo More Room in Hell★ 5 (2.8k)569k views2.1k ♥29 minUpdated Apr 22, 2019
- NMRiH Community Hosting GuidesNo More Room in Hell★ 5 (526)351k views653 ♥1 minUpdated Aug 10, 2022
- ULTIMATE GUIDE FOR GAME DEV TYCOONGame Dev Tycoon★ 5 (5.8k)326k views10k ♥4 minUpdated 23 Jan, 2014
- How to 'Git Gud' Soon™MORDHAU★ 5 (2k)318k views3k ♥68 minUpdated Nov 16, 2024
- Лучшие кооперативные игры SteamPAYDAY 2★ 5 (1.5k)315k views2.1k ♥56 minRussianUpdated Apr 27, 2025






This guide was created by its original author on the Steam Community. Are you the author and want it removed? Request removal.