How to make GTA IV: The Complete Edition perfectly playable in 2026
Introduction
- Fusion Fix
- Radio Restoration [currently unavailable]
- Modifying "stream.ini"
- DXVK translation layer [legacy / only for Fusion Fix < v4.0]
- Using DSR/VSR Super Resolution [optional]
- In-game settings recommendations
I have tried to make these instructions as clear as possible. If you have any suggestions on how I could further improve my guide, feel free to leave a comment.
Fusion Fix
The Fusion Fix is an essential fix for many problems players of the vanilla version of GTA IV are facing. It offers a plethora of fixes as well as additions that greatly enhance your GTA IV experience. Above that, all options are neatly integrated in the in-game menus in the most recent versions of the Fusion Fix (no .ini file adjustments necessary anymore).
I would like to point out some of my personal favorites:- lighting now works correctly (i.e. neon lights in Hove Beach, Rotterdam Tower at night)
- custom anti-aliasing, motion blur, and bloom effects
- fixed Z-fighting, tone mapping, water reflections, and shadows
- field of view can be freely adjusted
- screen filters can be adjusted or disabled (Default, Off, IV, TLAD, TBoGT)
- console gamma mode can be enabled for less washed-out colors
- extended controller support, including full Steam Deck compatibility
This is just a small selection and Fusion Fix offers many more improvements and options. I highly recommend checking out the new official website at https://fusionfix.io/iv, which clearly showcases all features and changes with side-by-side comparisons.
Click on "Download: GTAIV.EFLC.FusionFix.zip" and wait for the download to start.
- unzip "GTAIV.EFLC.FusionFix.zip"
- copy all files into your GTA IV root directory
(\steamapps\common\Grand Theft Auto IV\GTAIV)
⚠️ Limiting GTA IV’s FPS to 60 or below is critical for avoiding game-breaking bugs!
Without this limit, you may experience zoomed-in cutscenes, physics glitches (especially during mini-games or while riding a motorcycle), and other unpredictable issues. I personally use Rivatuner Statistics Server (bundled with MSI Afterburner) to cap FPS, but standalone RTSS or other tools like NVIDIA Control Panel’s frame limiter are also effective.
Do not skip this step - it ensures a smoother and bug-free experience!
Radio Restoration
As you may know, Rockstar Games removed about 50 radio tracks from the game after re-releasing it as The Complete Edition. In this step, we will restore those lost songs.
⚠️ As of June 2025, the Radio Restoration mod previously hosted on NexusMods has been taken down and is no longer available.
While there are other radio downgrade/restoration mods circulating online, I have not been able to test them personally and cannot verify their quality or safety. For that reason, I won’t link to any other sources directly. Please proceed with caution if you choose to explore alternatives, and always scan downloaded files for potential risks.
Select "FILES" and download the latest version of "Radio Restoration" by clicking on "MANUAL DOWNLOAD".
Note that you must have a NexusMods account and be logged in to download the file.
- unpack "Radio Restorer.rar"
- copy the "update" folder into your GTA IV main directory
(\steamapps\common\Grand Theft Auto IV\GTAIV)
Modifying "stream.ini"
This file changes how much RAM GTA IV is allowed to use. Increasing this value will reduce texture issues for many people. If you change the value to "409600", GTA IV will be able to use up to 4GB of RAM (which, to my knowledge, is the maximum it can use since it is a 32-bit program).
You don't need to download anything here, as the "stream.ini" file is already inside your GTA IV "pc" directory (\steamapps\common\Grand Theft Auto IV\GTAIV\pc).
Your stream.ini should now look like this:
DXVK translation layer [legacy]
⚠️ Note: This section is only relevant if you are using an older version of Fusion Fix (<v4.0). Since v4.0, DXVK is bundled and does not require separate setup.
Explaining how DXVK works is a bit difficult, but I will try my best anyway:
GTA IV runs on DirectX 9, but DXVK is a translation layer that allows GTA IV to run in Vulkan instead, which can dramatically improve performance. Vulkan is an API similar to DirectX or OpenGL (actually Vulkan is a successor to OpenGL).
This step is a bit more difficult than the others, so I consider it advanced and only recommend it to people who know what they are doing. Also, make sure your graphics card supports Vulkan. Any GPU released in the last 10 years should, but since GTA IV is already 15 years old, I cannot simply assume that you have such a card.

For example, my GTA IV graphics menu shows "Resource Usage 1259 / 16376 MB", so I use 16376 for the availablevidmem command.
https://github.com/doitsujin/dxvk/releases On this page, you will see the latest version of DXVK. Scroll down past the list of improvements and download the ".tar.gz" file without the "steamrt-sniper" suffix.
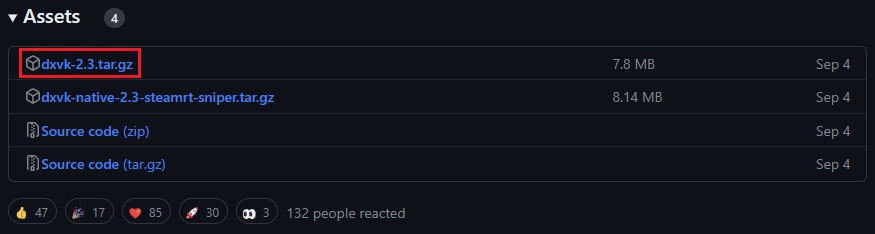 For example, at the time of writing this guide, DXVK's latest version is 2.3 so you would need to download "dxvk-2.3.tar.gz".
https://github.com/doitsujin/dxvk/blob/master/dxvk.conf This page may look confusing to some because the download button is not immediately obvious. You can either press the three little dots at the top right of the screen and select "download", or use the little download icon below (also on the right, just above the first line of code).
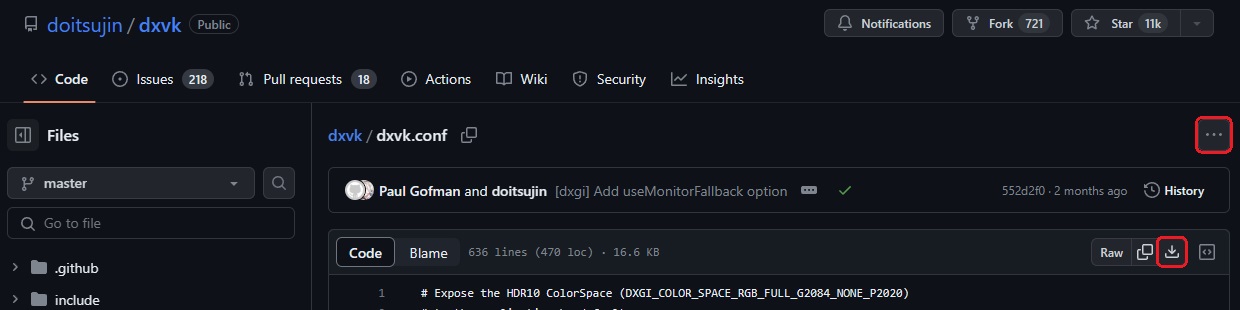 Each download button should download a file named "dxvk.conf".
- unpack "dxvk-2.3.tar.gz" or whatever version you downloaded (depending on which file archiver you use, you may need to unpack the file in two steps like "dxvk-2.3.tar.gz" → "dxvk-2.3.tar" → "dxvk-2.3")
- open the "x32" folder (even if you have a 64-bit version of Windows as GTA IV is a 32-bit program)
- copy "d3d9.dll" into your GTA IV root directory
(\steamapps\common\Grand Theft Auto IV\GTAIV)
- copy "dxvk.conf" into your GTA IV root directory
(\steamapps\common\Grand Theft Auto IV\GTAIV) - open "dxvk.conf" with Notepad or any other text editing program
- press Ctrl+F and search for "d3d9.forceAspectRatio" (without quotation marks)
- remove the number sign (#) at the beginning of the line (otherwise it is interpreted as a comment)
- add your display's aspect ratio inside the quotation marks (typical desktop monitor resolutions such as 1920x1080, 2560x1440, and 3840x2160 have a 16:9 aspect ratio)
- save the file
 Make sure to remove the "#"at the beginning of the line and to add your display's aspect ratio.
Using DSR/VSR Super Resolution [optional]
To improve GTA IV’s visuals and reduce jagged edges, you can use Nvidia’s Dynamic Super Resolution (DSR) or AMD’s Virtual Super Resolution (VSR). These features allow your GPU to render the game at a higher resolution (e.g. 4K for a 1080p monitor or 5K for a 1440p monitor) and then downsample it to your screen’s native resolution. This process significantly improves image clarity by eliminating aliasing.
- Open the Nvidia Control Panel
- Navigate to "Manage 3D Settings" → "DSR - Factors"
- Check the 4.00x option for 4x upscaling
- Set "DSR - Smoothness" to 0%
- Click "Apply" and select a higher resolution in-game
- Open AMD Radeon Software
- Go to "Display" → "Virtual Super Resolution"
- Enable it and select a higher resolution in-game
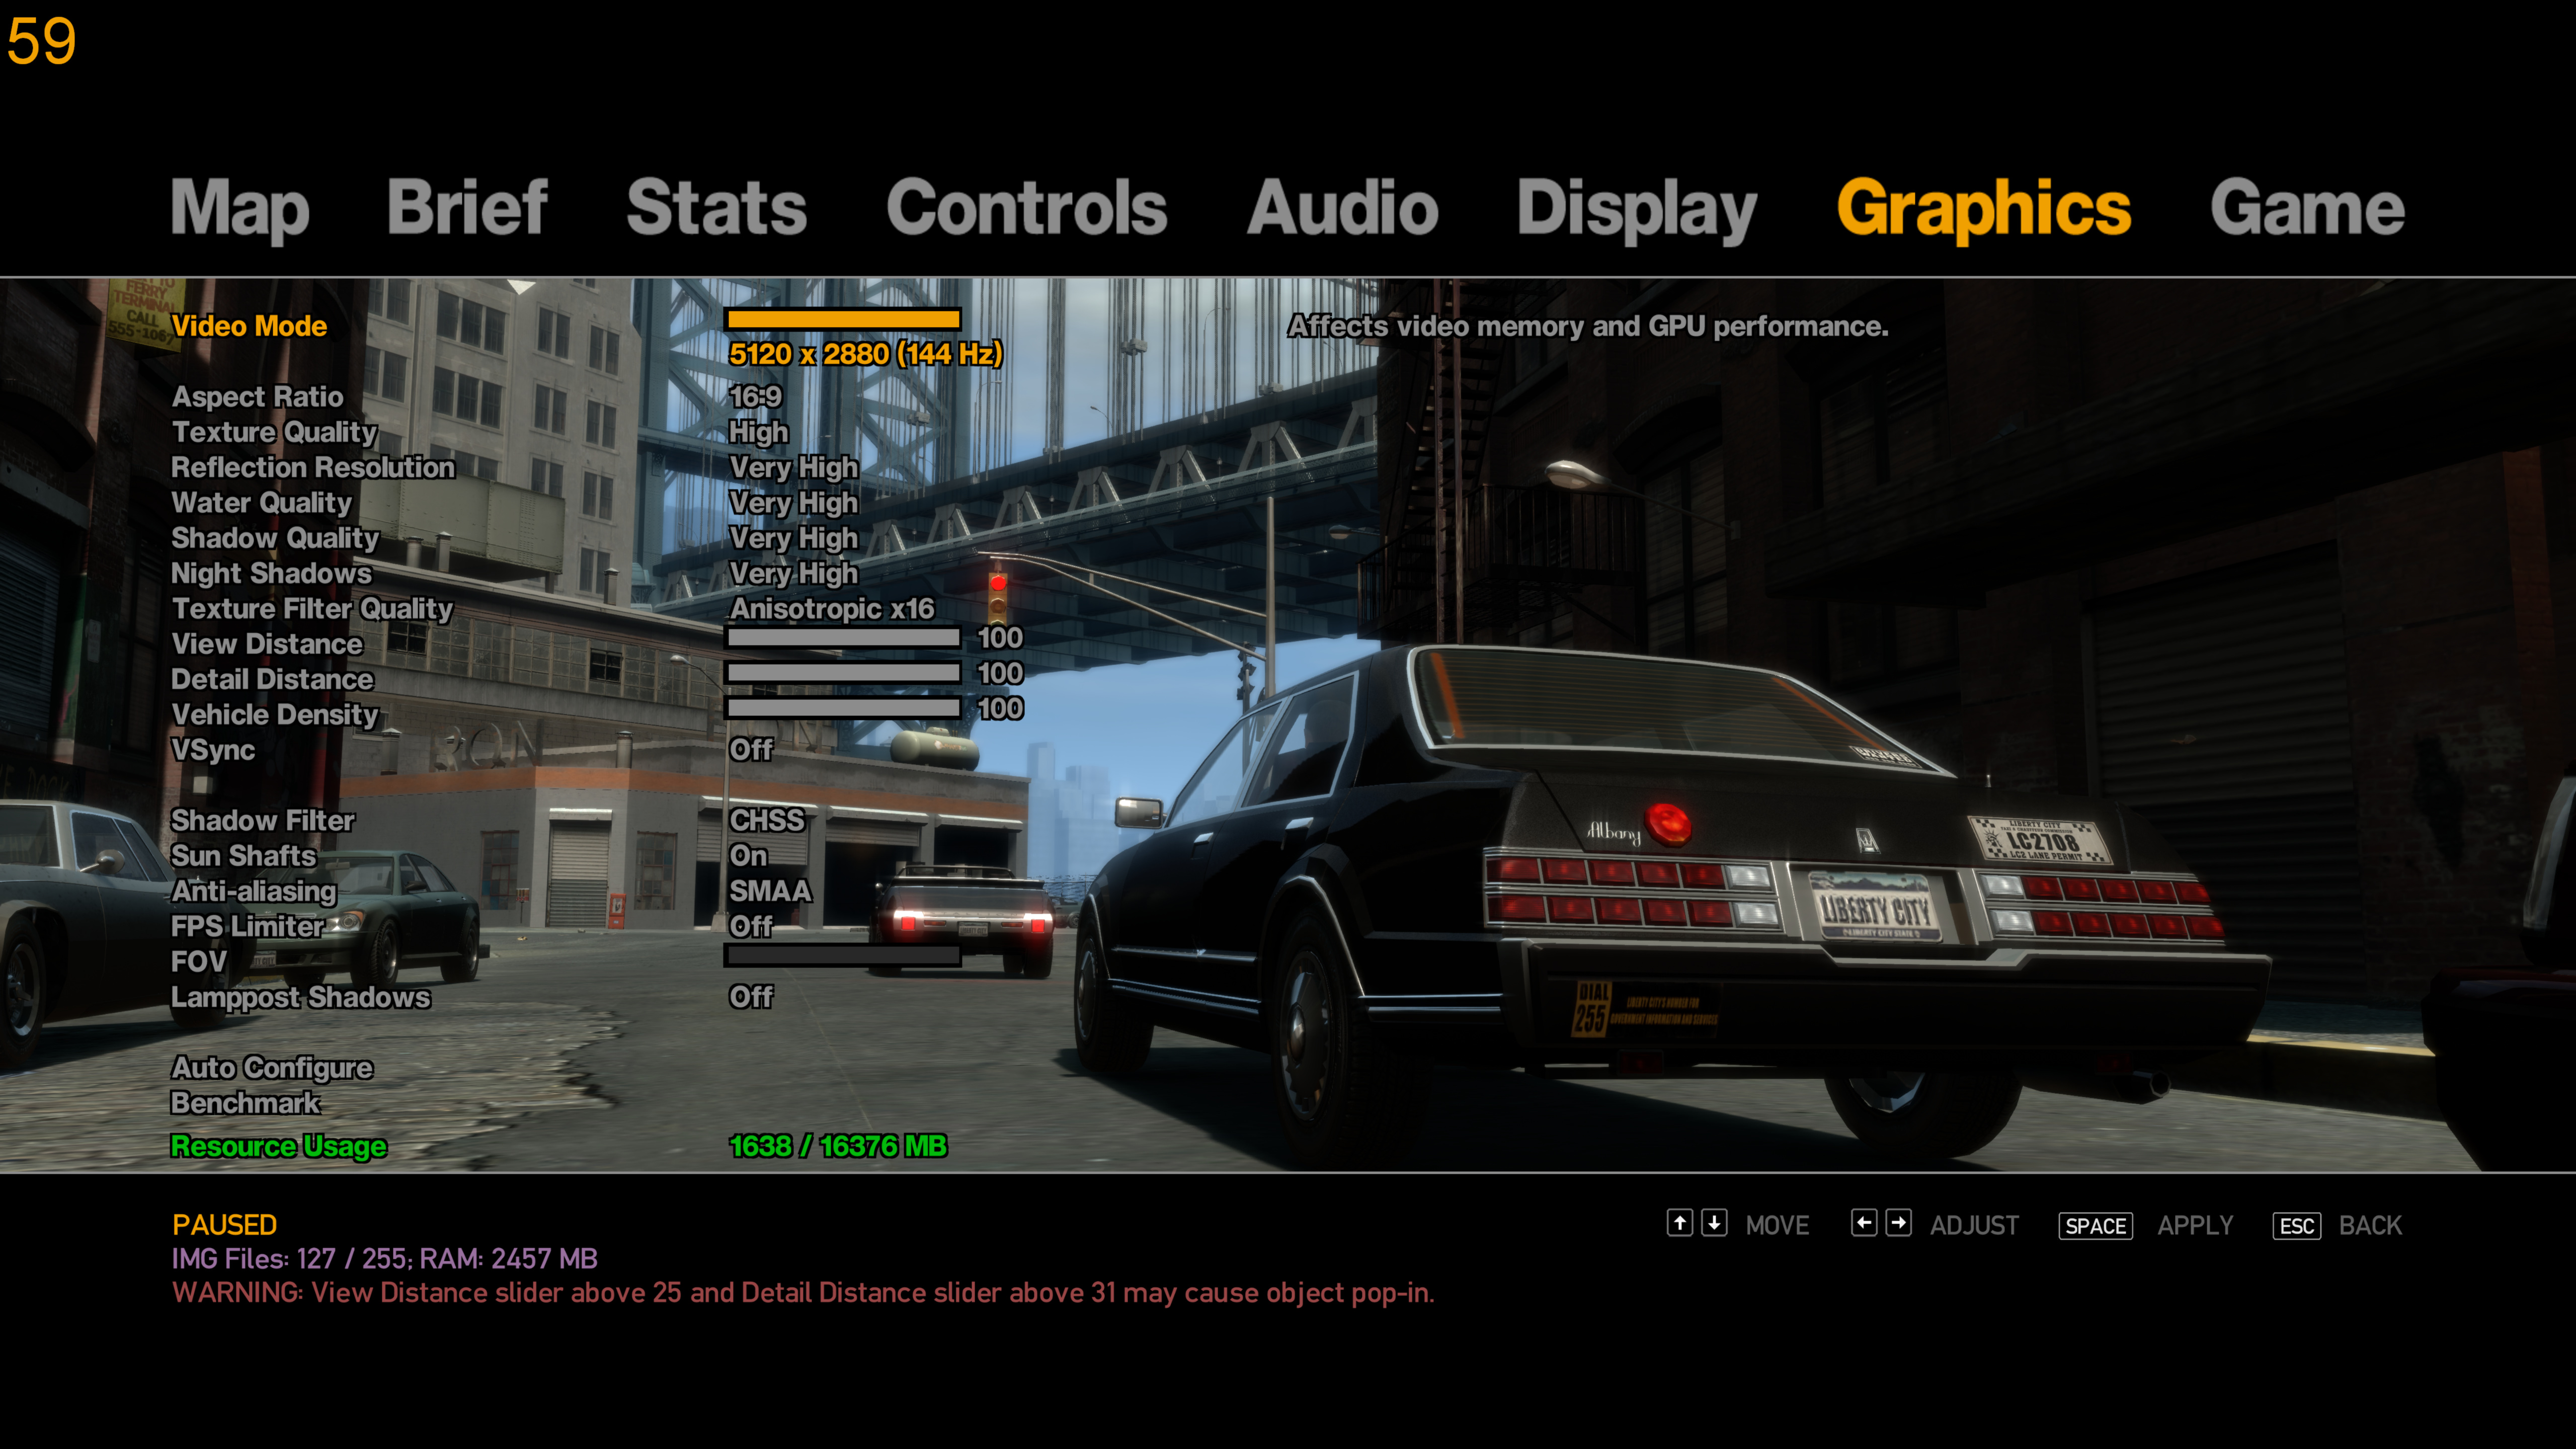 As you can see, I’m able to select a 5K resolution (5120 × 2880) in GTA IV’s settings menu after enabling DSR, even though I only have a 1440p monitor (2560 × 1440).
- Higher resolutions will impact performance siginficantly, especially if your GPU already struggles with GTA IV on your monitor's native resolution.
- Ideally, you should always go for 4x upscaling because it perfectly matches the width and height ratios, meaning each pixel is sampled four times. Lower scaling factors may cause some blurriness.
- For best results, pair DSR/VSR with Fusion Fix’s SMAA anti-aliasing for even smoother edges.
- If your Nvidia GPU supports it, consider using 2.25x DLDSR instead of 4x DSR. It offers similar image quality with significantly better performance.
In-Game Settings Recommendations
As you may know, GTA IV is notorious for having poor performance even on high-end hardware. While the Fusion Fix and DXVK improve performance quite drastically, you can boost GTA IV's performance even further by tweaking some in-game settings. You can also use these settings if you have decided not to use DXVK and need the extra performance to maintain consistent frame rates.
Congratulations, you did it!
Congratulations, you should now have a perfectly playable version of GTA IV with no severe stuttering, zoomed-in cutscenes, lighting bugs, or other issues. You should also be able to use console gamma and other graphical effects that were previously unachievable.
Additionally, your radio stations are now complete again and all cut songs are restored.
If you have problems with any of the steps in this guide, feel free to leave a comment. I will try to help you.
Otherwise, please like this guide and add it to your favorites if you found it helpful, thanks!
Screenshot Gallery - GTA IV in 5K
https://www.flickr.com/photos/spoggi99/albums/72177720323725268/
I continuously update the album with new screenshots from my playthrough.
- Grand Theft Auto IV: CE - The Improved Classic★ 5 (1.4k)53k views3k ♥4 minUpdated May 4
- Optimization, Performance and Improvements★ 5 (1.3k)52k views2.7k ♥9 minBulgarianUpdated Apr 18
- Fixing GTA IV with 4 Mods (2026 Guide)★ 5 (677)44k views1.4k ♥8 minUpdated Feb 2
- GTA IV: The Complete Edition Achievement Guide [2024]★ 5 (1.7k)32k views3.3k ♥15 minUpdated Jul 2, 2024
- GTA 4 COMPLETE EDITION: THE DEFINITIVE MOD GUIDE★ 5 (692)31k views1.3k ♥13 minUpdated Mar 11, 2024
- GTA 4 100% достижений★ 5 (1.4k)28k views3.5k ♥24 minRussianUpdated Sep 2, 2025


- Upgrading to PremiumTeam Fortress 2★ 5 (20k)1441k views11k ♥6 minUpdated May 11, 2022
- No More Room in Hell Official ManualNo More Room in Hell★ 5 (2.8k)569k views2.1k ♥29 minUpdated Apr 22, 2019
- NMRiH Community Hosting GuidesNo More Room in Hell★ 5 (526)351k views653 ♥1 minUpdated Aug 10, 2022
- ULTIMATE GUIDE FOR GAME DEV TYCOONGame Dev Tycoon★ 5 (5.8k)326k views10k ♥4 minUpdated 23 Jan, 2014
- How to 'Git Gud' Soon™MORDHAU★ 5 (2k)318k views3k ♥68 minUpdated Nov 16, 2024
- Лучшие кооперативные игры SteamPAYDAY 2★ 5 (1.5k)315k views2.1k ♥56 minRussianUpdated Apr 27, 2025






This guide was created by its original author on the Steam Community. Are you the author and want it removed? Request removal.