The Fundamentals of SFM: For Beginners
Welcome to Source Filmmaker!
This guide is tailored for novices who are just getting acquainted with SFM, including its tools, environments, and editing workflow. Specifically, it's for users who have recently installed SFM from the Steam Store for the very first time. Think of this as a crash course: it covers what each button or mode does and how to perform specific tasks.
This is your one-stop shop for all your SFM beginner learning needs. From loading characters into a scene, to exporting your final piece!
Throughout the guide, you'll be shown how to perform various actions through the use of hotkeys, but If you ever get stuck or forget a hotkey, don't worry! There's a list of them right at your fingertips within the ribbon bar Help > Keyboard Shortcuts. Alternatively you can use this four-key combination for easier accessibility: Ctrl + Alt + Shift + E.
Getting Started
First and foremost, we need a session. So, let's fire up SFM and get started!
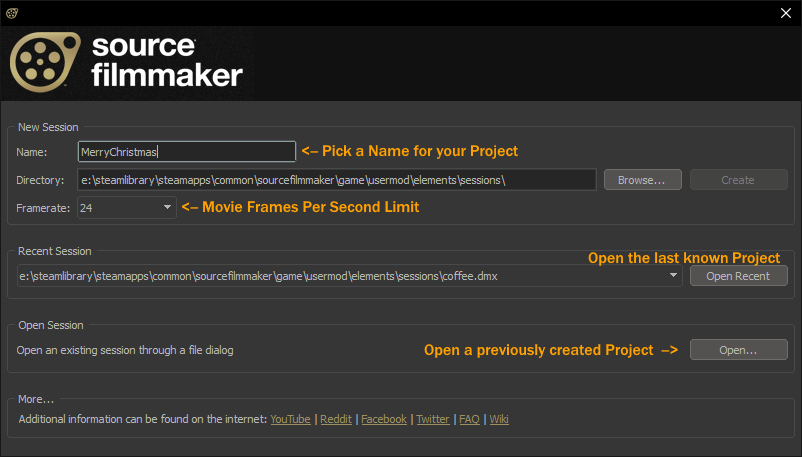 Once SFM is loaded, you'll see this window. Sessions are your project files and are saved only on your PC. It's wise to select a custom file destination for a backup in case you ever need to do a Windows reinstall or change computers and don't want to risk losing your sessions. We've all been there. It's also best to avoid using special characters in your session file names, such as:
 Unless you are animating, you don't need to worry about the session frame rate, and it's possible to adjust this later if desired.
Once you've done all that, hit 'Create' to make your first session!
Loading a Map
You can either select one from the Steam Workshop or pick from the assortment already installed in SFM. For demonstration purposes, let's load a map that is already available upon installation of the program, the Stage map.
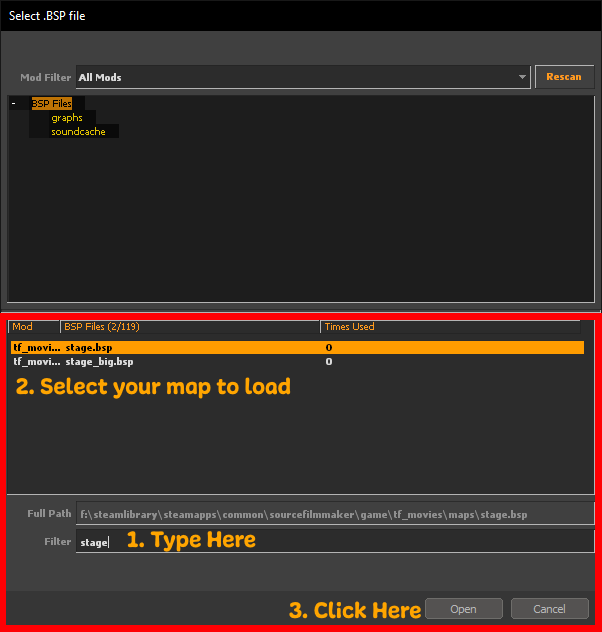 Right-click on the Viewport (show example) and choose Load Map... from the bottom of the menu. This will bring up another window. Then type "stage" in the filter box at the bottom of the window and choose the first highlighted option. Click "Open".
Keep in mind that loading may take a while, depending on your PC's hardware capabilities and more complex maps will require extra load times and system resources. If the program seemingly freezes while loading a map, this is normal and only temporary.
Model Loading & Animation Set Editor
The Animation Set Editor is located on the left side of the program by default. Here, you'll find all your session assets, like characters, props, lights, including the controls to adjust their settings in the form of sliders. Right-clicking anywhere within the blank space brings up a menu to select what you want spawned into your scene (or alternatively, you can also use the cross icon at the top of the window to bring up the same menu).
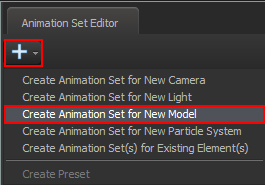 Right now, there's nothing in this window, so let's spawn a model!
Right click anywhere within the blank space, Select "Create Animation Set for New Model," and a new window appears.
Alternatively, you can also click on the cross icon, and the same drop-down menu will appear.
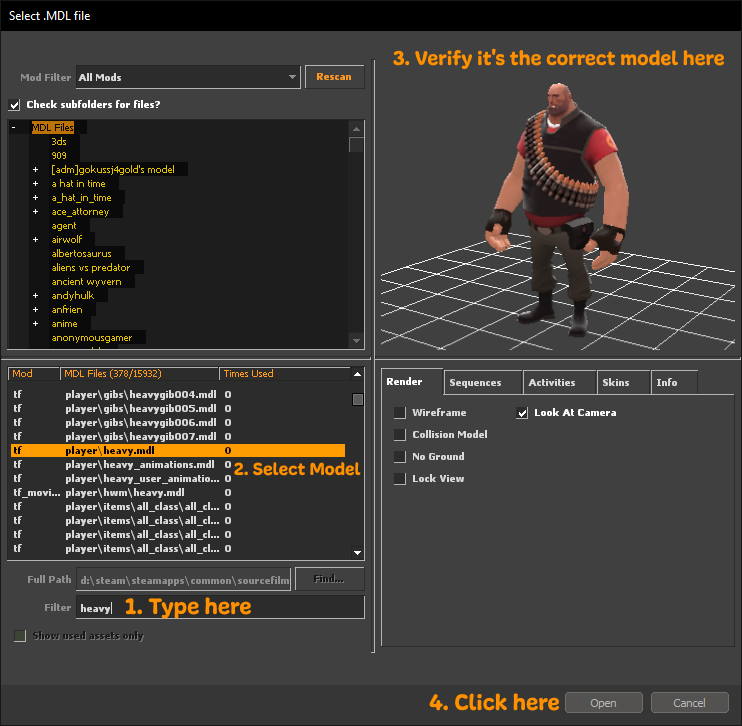 This window houses all your models, ready to be loaded into your scene. As you subscribe to more workshop submissions, this list will grow. Let's begin by loading TF2's Heavy. Type "Heavy" in the search-bar and scroll until you find "player/heavy.mdl." Then, click "Open" at the bottom right corner to load him into the scene.
If everything was done correctly, you should now see your model successfully loaded! Search Tip
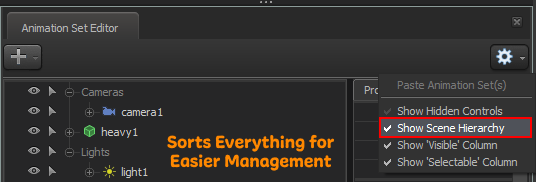 Renaming dags allows you to further organise your assets, but note that hierarchy must be enabled first. Simply right-click on a group dag and select Rename Dag.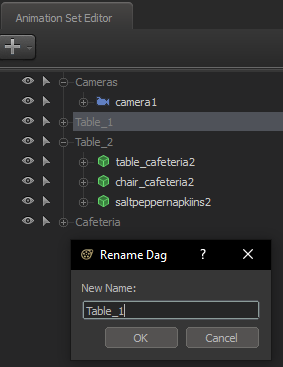
The Timeline
This is where the magic happens. Camera shots, posing, animation, sounds, overlays- you do it all right here.
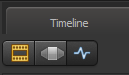 Located on the left side of the Timeline are these 3 buttons. They can be used to access different Timeline modes and allow control for different editing purposes. By default, you are in Clip Editor mode when starting a new project or loading into an existing one. But hold on, what do any of these mean?
- Clip Editor
This lets you preview your scene by rendering it out using the samples set in the Progressive Refinement settings window. This mode is also useful for splicing clips, and adding sound to your session. You cannot, however, manipulate camera settings or change scene elements while in this mode.
Hotkey = F2 - Motion Editor
This mode allows manipulation of scene elements and changing camera settings. You can move bones, spawn models, lights, and particles, and move and manipulate them however you wish.
Hotkey = F3 - Graph Editor
Specifically for animation. Allows movement between keyframes via changing an entity/bone position's coordinates. The Graph Editor will be explained further in the guide.
Hotkey = F4
Also, tapping Tab can quickly switch back and forwards from the last mode you were in, to the one you're currently in now. Tip
The Viewport
The viewport is your primary display. Whatever settings you make will be shown in this space.
W, S, A, D = Allows you to move forward, back, left or right.
Z, X = Pans you up/down.
R = Modifier key that allows rolling the camera side to side, as you move the mouse left or right.
Mouse Wheel = Zoom in/out.
Ctrl, Shift = Slows down or speeds up the camera movement.
Alt + Left Mouse = Orbits around wherever the viewport is facing.
Alt + Middle Mouse = Pans the viewport.
Alt + Right Mouse = Dolly in/out.
This video by Valve is a good visual demonstrator for showing off viewport navigation. Go to 2:08:
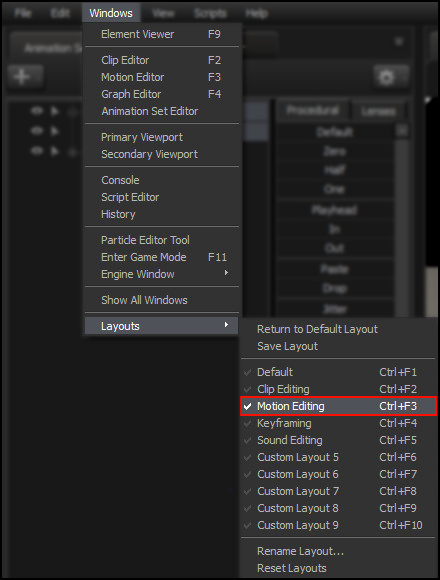 It is possible to have two Viewports visible at the same time with a Camera1 and WorkCamera. This is useful for previewing your project in real time as you're editing it, instead of manually switching camera modes from a single viewport.
Go to: Windows on the ribbon bar > Layouts > Motion Editing. You can also enter this layout by holding down Ctrl+F3.
Lower end PCs beware!How to use Cameras
By default, every new session created will have the button below the bottom right part of the Viewport labelled as <No Camera>. It is essential to have cameras in your project, so let's go over what's what:
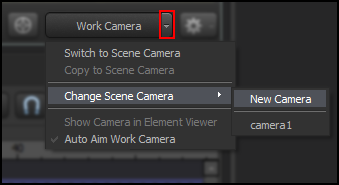 Right beside this button is a small arrow, as shown in the picture; click it to open a drop-down menu. Select Change Scene Camera and then select New Camera in the sub-menu. The button will now say Camera1.
Alternatively, you can also create cameras instantly via the Hotkey = C.
Now you would think that by doing this, the newly created camera would have shown up within the Animation Set Editor by now, except it hasn't. For each newly created camera, you must manually create its Animation Set. Navigate back to the button, now labelled Camera1, and once again click on the small arrow to bring up the drop-down menu. Click on Select Animation Set and this will now make it show up in the Animation Set Editor as a blue camera icon. This is where you can freely adjust its settings, which we'll discuss in a bit.
- WorkCamera
This camera mode comes with every new session, and can simply be selected by clicking on the Camera button, clicking it again will return you to the previous camera that was in use. In WorkCamera, you can fly around the map and adjust your scene elements freely. - Camera1
This is the camera from which your scene will be rendered. Creating a new scene camera will spawn it from the WorkCamera's position. You can have as many scene cameras in the project as you would like, but only one can be active at a time. You cannot edit its settings or move it while in Clip Editor mode.
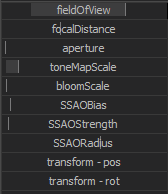 Now, turn your eyes to the newly created camera in the Animation Set Editor, represented by a blue camera icon. Click on it and a list of settings will appear in the bottom right. These are represented as sliders you click and hold, then drag either left or right to adjust that settings parameters. Let's start with the top option: fieldOfView (FoV).
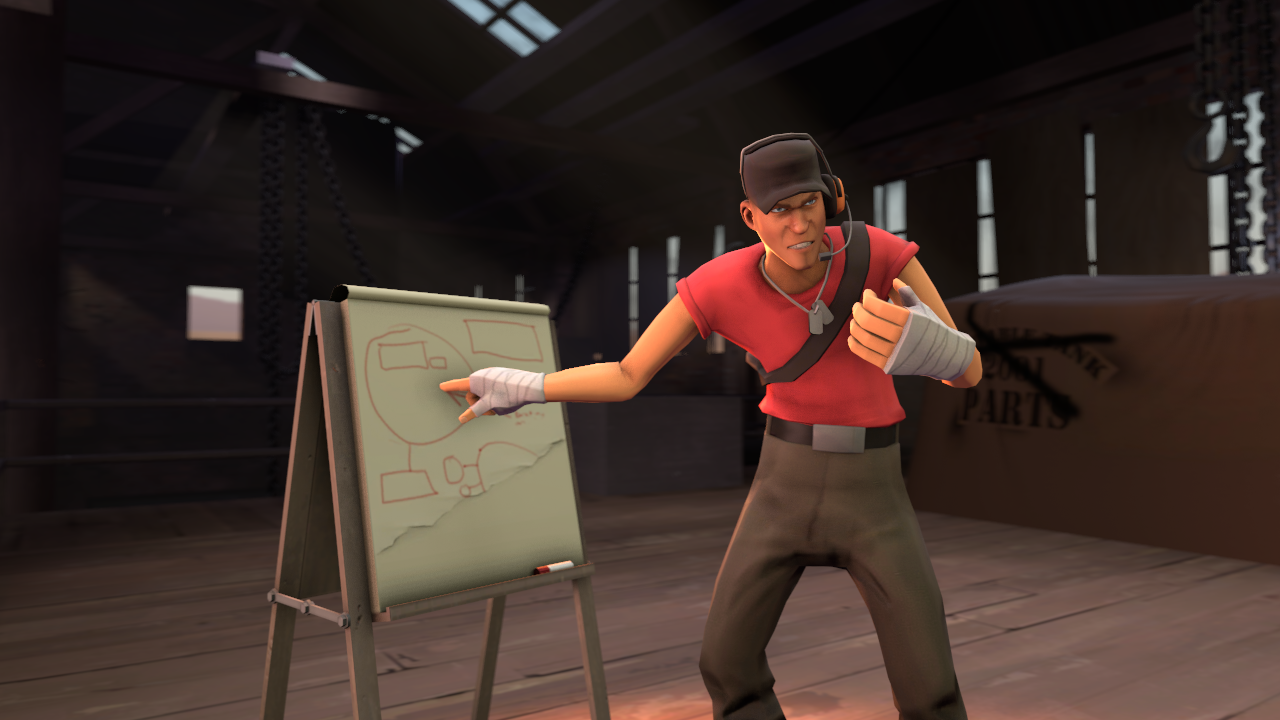
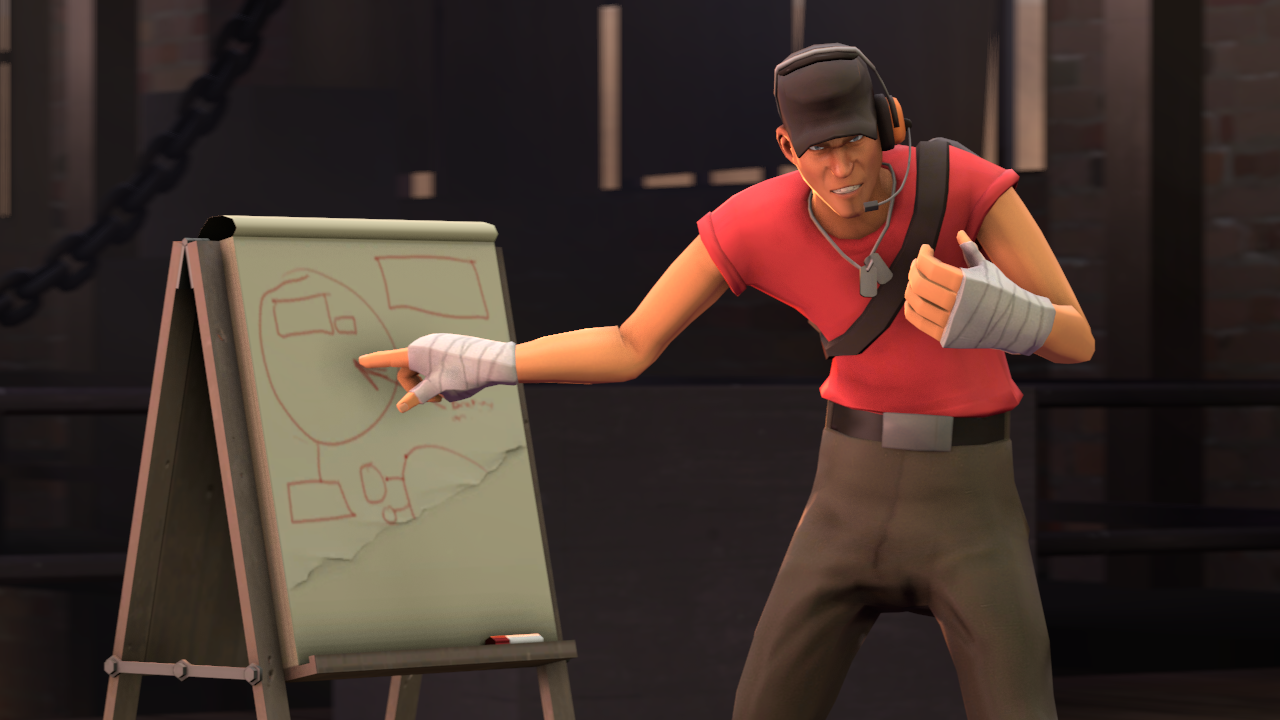
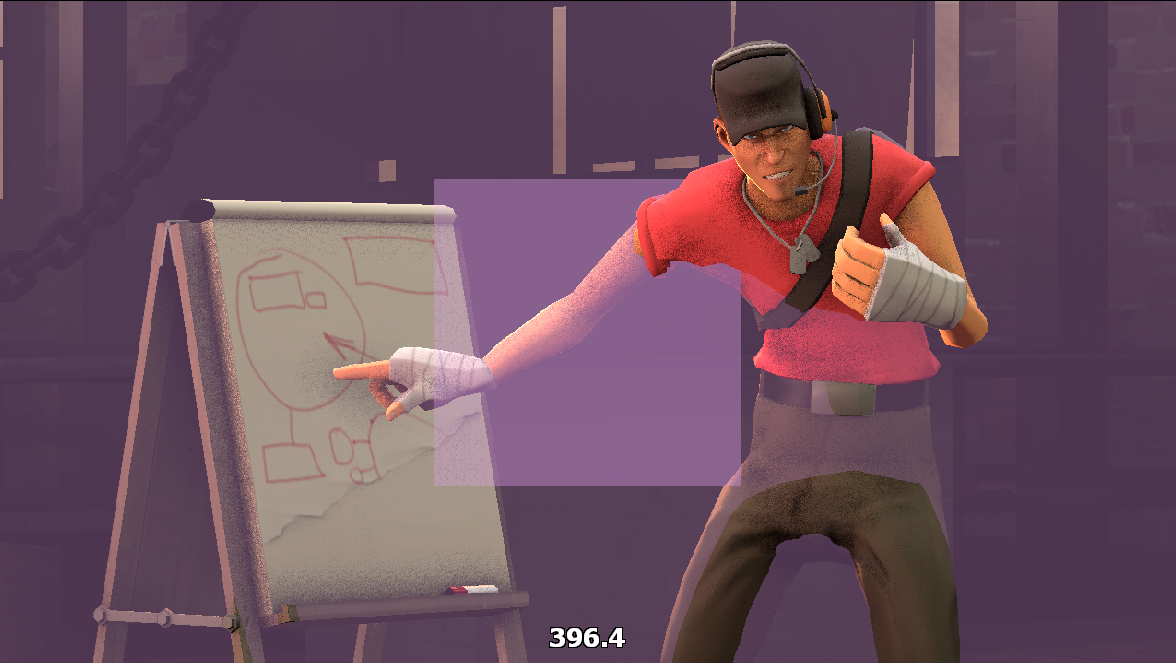
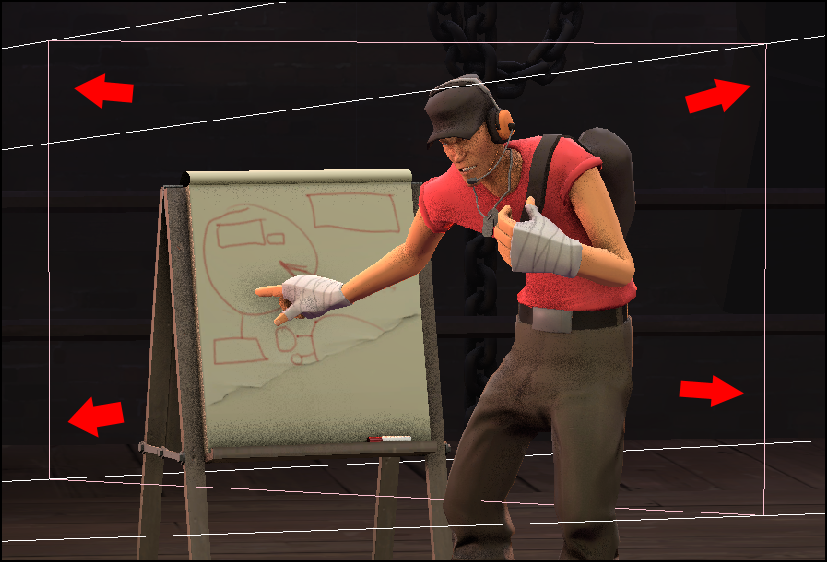
But what if the slider can't reach the object you want in focus?
Most sliders have a minimum and maximum value range that can be manually adjusted. First, right click on the slider itself and from the drop down menu, click on Remap Slider Range and a new window will pop up.
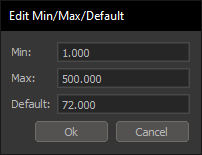 The only box you may need to change here is Max: as this controls how far the slider is allowed to go. Setting this to a higher value will allow the focal plane to reach out further.
You need to use the focalDistance slider to have any effect here. If you have nothing in focus, adjusting this setting won't be useful.
Example:
https://steamcommunity.com/sharedfiles/filedetails/?id=2540740431
The main focal point here is in the background. When Aperture is applied, Link (In the foreground) is blurred to give a sense of depth, giving the illusion of greater distance between him and Sheik (in the background).
- SSAOBias
- SSAOStrength
- SSAORadius
For a beginner, we would recommend only adjusting the Strength and Radius sliders very minimally. Too much can denature your scene and should be seldom used.
Move Objects & Characters
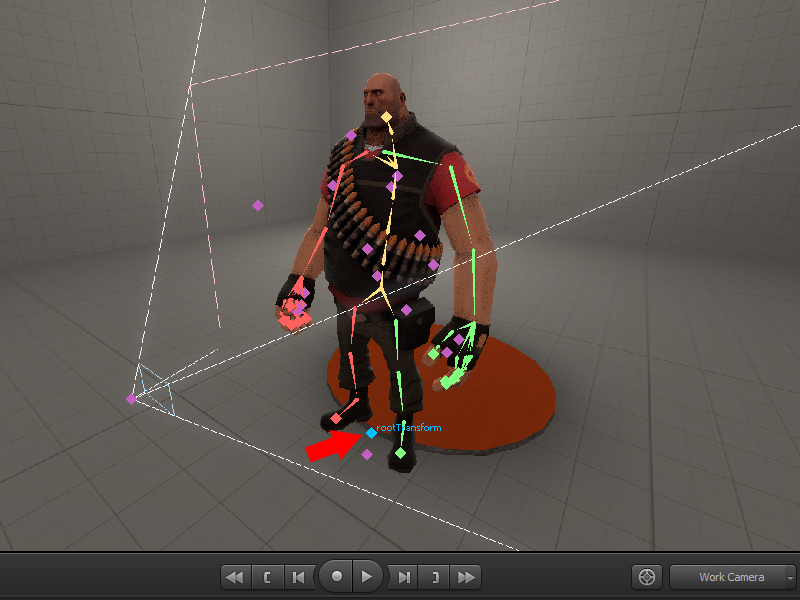 While In Motion Editor mode, and with the Transform tool selected (hotkey W), move your cursor over the viewport and then hold down CTRL.
You'll see your model's bone structure. Down the bottom should be a bone labeled rootTransform. Click it!
To speed up this process, in case you want to move the entire model at once, clicking its name in the Animation Set Editor does the same job.
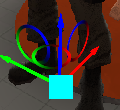 Your XYZ axis icon should now appear, and you can freely move your character by left click holding one of the coloured arrows. Combined axis are represented by the coloured circles, so moving horizontally without changing the model's height is done through dragging by the red-green circle. Dragging by the cyan square will move the model relative to your active camera's perspective, and holding shift while dragging the cyan square will snap the bone to the surface of the surface you dragged your mouse in front of - handy for bringing a character in contact with the ground.
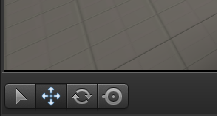 But why stop there? Lookie here, there are more buttons to mess around with in the bottom left corner of your viewport!
 - The select tool is for selecting things. It's a thing.
Hotkey = Q - The move tool is for moving the selected entity or bone along the XYZ axis.
Hotkey = W - The rotate tool brings up a different control interface, allowing you to rotate your selection on specific axis. The cyan axis is a view-dependent combination of the three axis. Dragging imbetween the axis will allow combined axis rotation up to the edges of the circle.
Hotkey = E - The screen tool's function is the same as the rotate button, but you're no longer bound by the edges of the circle, and you can drag it by the knob to the side to change the orbit point of the model, if you need to.
Hotkey = R
Just as a reminder, you can not do any of this in Clip Editor mode. You must be in either the Motion Editor or Graph Editor mode to make any changes to the scene. Refer to Using the Viewport & Timeline if you forgot how to change between the different modes.
Posing your Character
There are two ways to pose your character. Let's look at both and see which you might prefer.
Once more for clarity: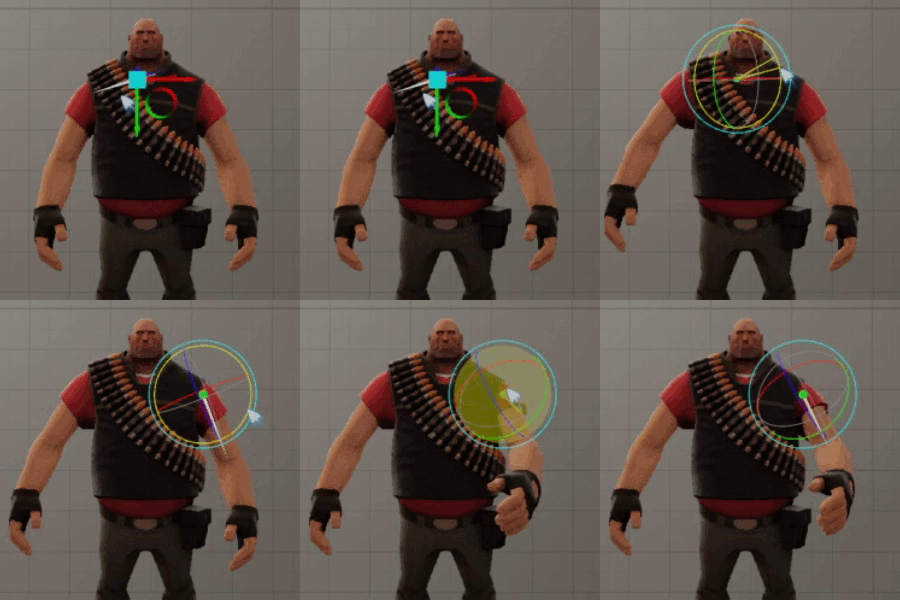 While having a bone selected, click the rotate button on the bottom left corner of the viewport or Press E. You can individually rotate a bone on each axis by clicking and dragging on the lines, or rotate in a combination of all axis by clicking and dragging within the circle as it glows yellow. It's advisable to rotate, instead of move (translate) bones, lest it results in distortion - if you made a mistake, you can always undo with CTRL + Z.
This method takes longer to pose, especially for users unfamiliar with the workflow; however, it can potentially reap great benefits as it allows complete control over your character's posing, regardless of physical limitations like joints.
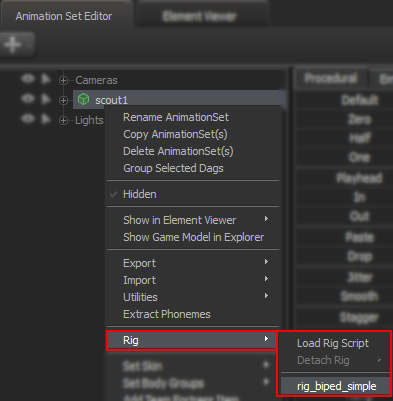 A potentially much faster way to pose. Before you can use rigs, you need to right click your character in the Animation Set Editor and then navigate down to Rig.
In this sub-menu, you'll find the options to either apply or disable a Rig-Biped to your model. As you use SFM, you're likely to increase your library of available rigs to use, and some of them won't even necessarily be for posing humans, but for now, use rig_biped_simple.
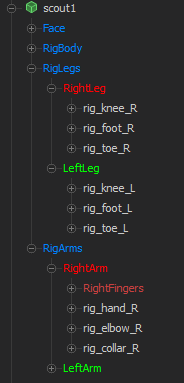
After applying this, you'll see in the Animation Set Editor that the bone structure has changed. Now when you move the feet and hands, the joints connected will now follow along and update as you move them. As a demonstration, when I move the hand, the elbow moves as well.
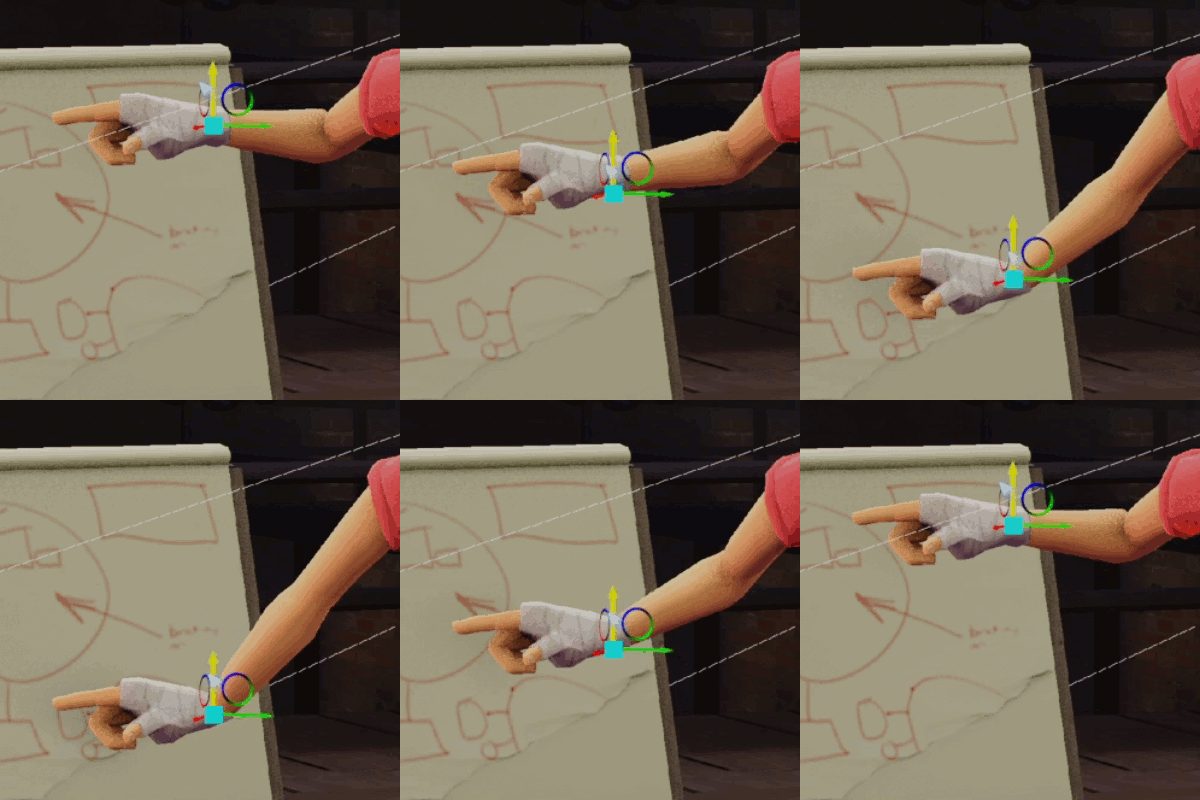
Great, now you know how to move your character's bones... Now start posing!
 Jigglebones are physics-active bones which wiggle, twist and bounce around freely, depending on how your character (or object) moves during animation. These give a more lifelike appearance to the entity in question, and are usually found in clothes or hair.
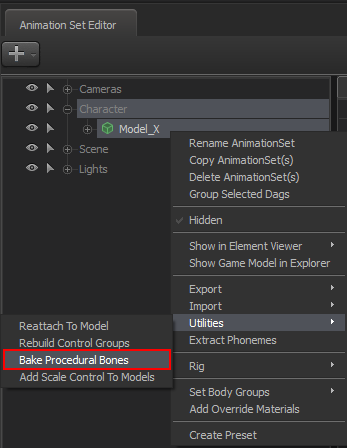
A jigglebone will not make itself known straight away as these can be hidden by default, even when you go to hold down Control with the mouse over the viewport. To gain access to these, right click the character/object from the Animation Set Editor and navigate to Utilities -> Bake Procedural Bones. Now when you hold down Control there should be a lot more bones to pick from!
Be mindful that, in doing so, you remove the jigglebone's... jiggle properties, meaning it won't move on its own. Among other things, this puts extra work load for manual animation, and should preferably be used for extra control when making an artwork.
Posing Eyes & Facial Expression
You might have a cool looking pose that already tells a story, but a matching facial expression really seals the deal and fleshes out the character. So how do you go about doing this?
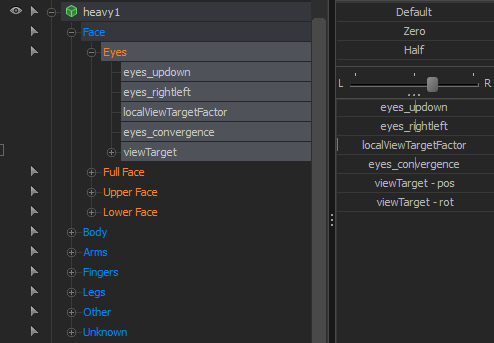 Well, if you go over to your Animation Set Editor window, you'll want to click on the little plus icon next to Heavy1 or whatever character you have loaded. This expands the hierarchy of bones and controls within the model. We want to open the option labelled Face, as it contains the controls we need.
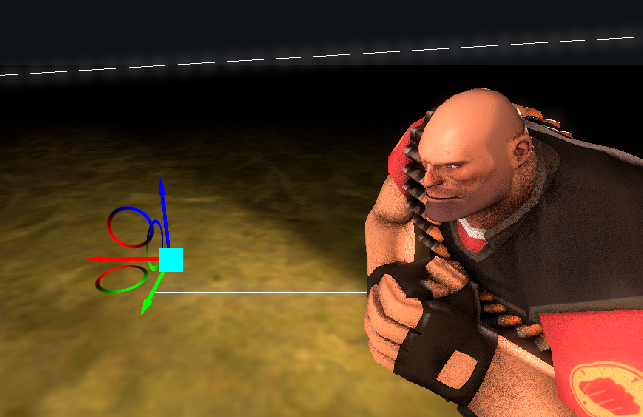 It's common to start out using the sliders for this, but using the ViewTarget is even better. This is a separate bone you can find and select by holding down CTRL, and you can move it to have your character's eyes look into its direction, even taking into account distance (so you can make them derpy and cross-eyed if you so wish). The actual eye sliders are still useful for fine tuning the eyes, if deemed necessary.
Note:
It's common to start out using the sliders for this, but using the ViewTarget is even better. This is a separate bone you can find and select by holding down CTRL, and you can move it to have your character's eyes look into its direction, even taking into account distance (so you can make them derpy and cross-eyed if you so wish). The actual eye sliders are still useful for fine tuning the eyes, if deemed necessary.
Note: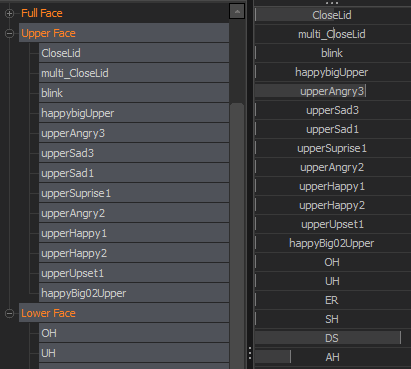 Now we can look at what kind of Facial Expressions he will have. Heavy has pre-made flexes ready for us to use, so all it takes is to move the slider of that preset and see how much impact that has on his face. It should be noted, it's easier to see changes while you are close to the face with the Work Camera to get a proper view of whats going on. You can change his facial flex expressions via Full Face, Upper Face and Lower Face.
 Here are my settings. Can't find the settings?
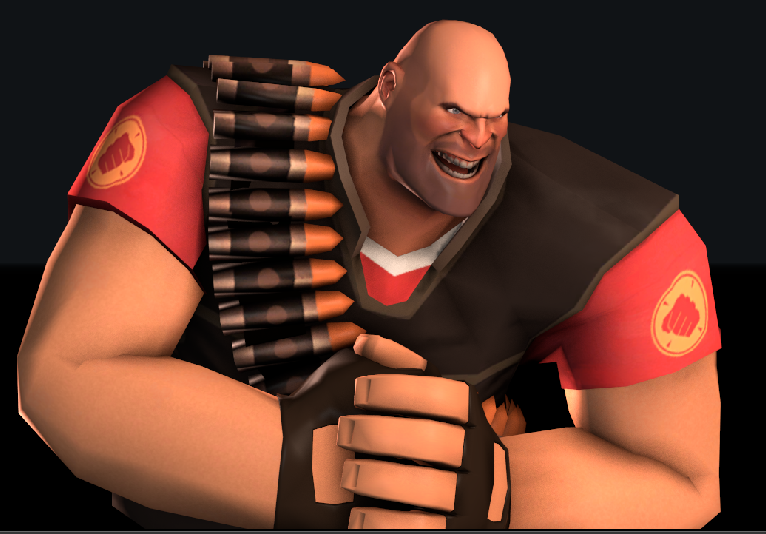 There we go! Having an actual facial expression makes a huge difference. With Heavy, the look on his face matches the rest of his body - he looks like he is ready and eager to administer a can of whoop-butt to a hapless victim.
Changing Bodygroups and Skins
Hold up, how did that guy get a blue soldier in his SFM? Why does that character have a different kind of clothing item and how did he get it? If the creator had uploaded the character with multiple visual options, SFM allows you to change to different skins and turn certain bodygroups on or off, usually for characters who have multiple cosmetic elements.
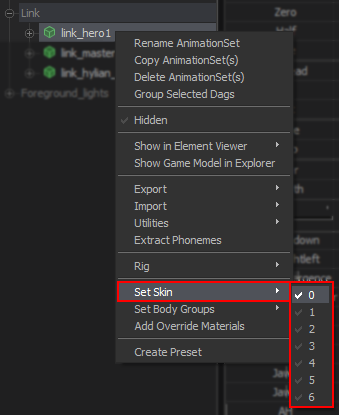 This is used for when you want your character to have a different colour scheme.
To access this option, right click the character you would like to change in the Animation Set Editor, navigate down to Set Skins and you should see multiple options. These are the different colour options, with 0 being the default look. Some characters have a lot of options, others do not. Skydomes (large dome props with a sky texture painted on them) particularly take advantage of this to show many different sky textures packed into a single loaded model.
Note that changing the skin of a character does not change the skin of any item you had loaded separately into the scene: here, Link's Sword and Shield look like they don't belong. You can right click those items (again, via the Animation Set Editor) and change their skins individually through the same method.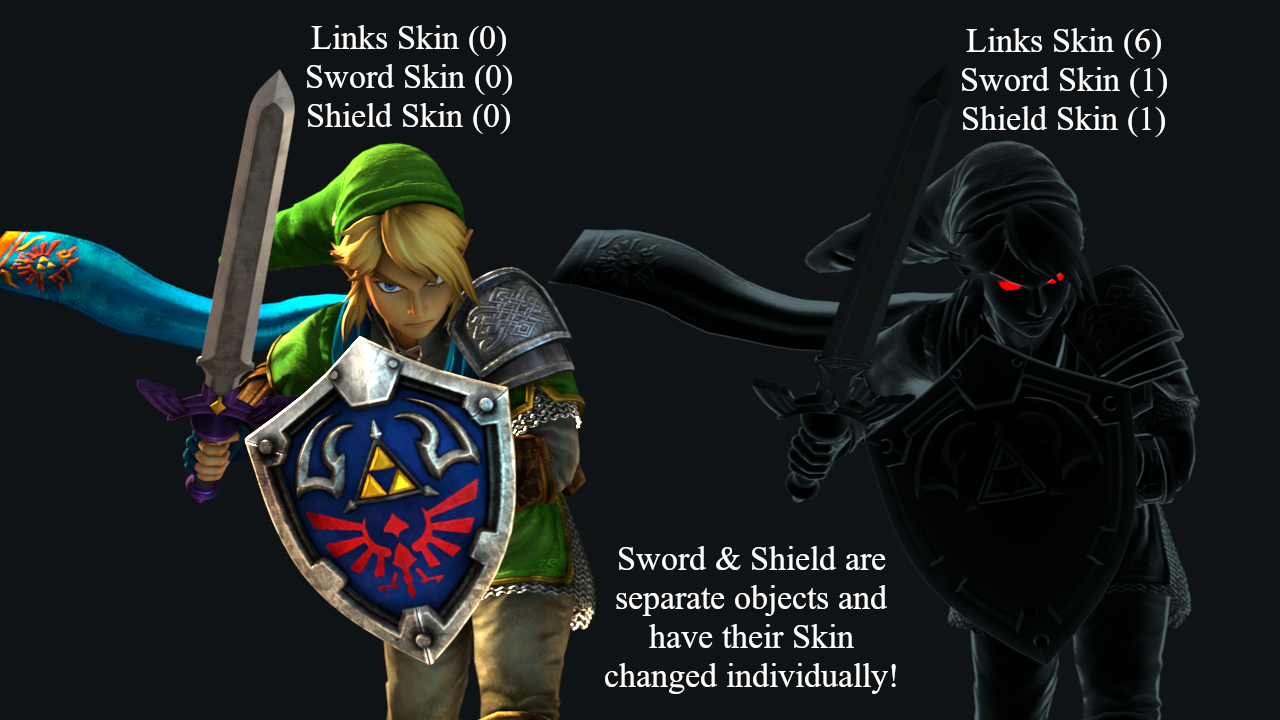
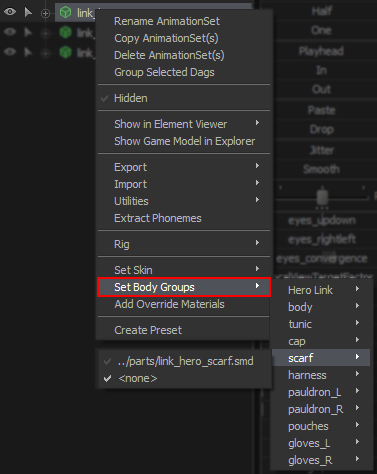 This is used for turning various components of the model on/off.
If you were observant before, you may have noticed that, under Set Skins, there is the option: Set Body Groups. Not every model has this option so it's not always guaranteed that this will be present. Here, the Hyrule Warriors Link model is being used as an example. You can tell by looking at him, compared to the left, that his clothing items have been disabled via the Body Group Menu. If you want the items back then go back into the menu and choose the appropriately named options to have them appear again.
This is used for turning various components of the model on/off.
If you were observant before, you may have noticed that, under Set Skins, there is the option: Set Body Groups. Not every model has this option so it's not always guaranteed that this will be present. Here, the Hyrule Warriors Link model is being used as an example. You can tell by looking at him, compared to the left, that his clothing items have been disabled via the Body Group Menu. If you want the items back then go back into the menu and choose the appropriately named options to have them appear again.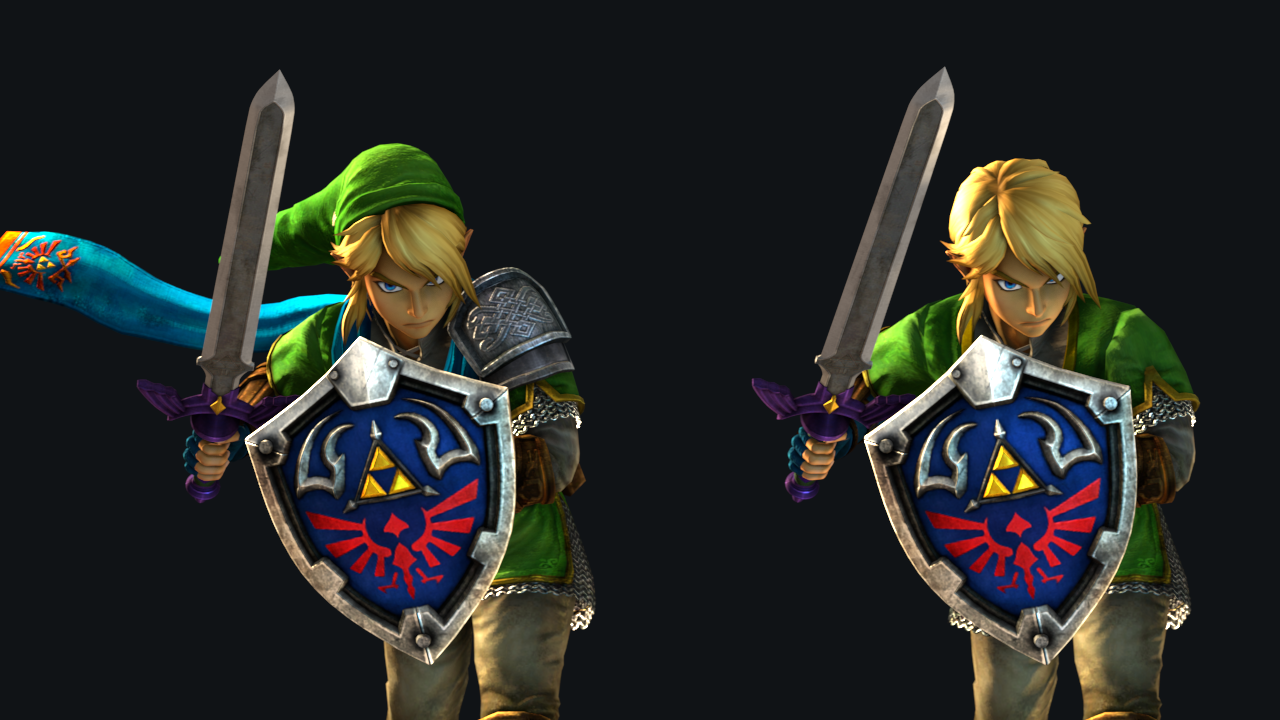
Not every character has the ability to change skins or bodygroups, but for those that do allow for that little bit of extra customisation, this gives you the option to have some visual variance here and there. Go and experiment with the TF2 characters!
Scale Controls
Changing the scale of an object is handy for altering their perspective, or simply to make items that appear too large or too small when first spawned in, more usable. This is moderately more tricky for animations: different scales and positions may only look good from one camera angle, but not from others.
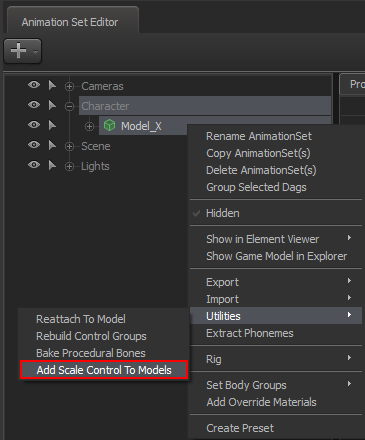 Scaling also, more importantly, allows you to change the size of a model's bones. This might include resizing the hands of a character, or subtly adjusting the size of the head. You shouldn't feel restricted just because a character's body part is getting in the way, though excess can also detract from the final product.
To access Scaling for an object, right click the model or bone in the Animation Set Editor, and select Utilities -> Add Scale Control for Models. Once you have done so, a new controller will appear for that object within its slider controls: rootTransfrom_Scale. Sliding left will make the object smaller, right is larger. You can even right click the slider and edit the Max value, allowing you to make really disproportionate eldrich creations.
But I wanted to resize a part of the character, not the whole thing!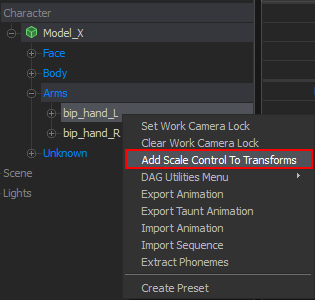 The process is largely the same as scaling the whole model. Either click on the bone in the Viewport or locate it manually within Animation Set Editor. After you have found the exact bone, right click it in Animation Set Editor and look for Add Scale Control To Transforms, which will generate a new controller specific to that bone. Click it once and the Scaling slider should appear: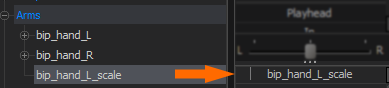
Zero Locking
In animation, characters hold objects in their hands or equivalent appendages without dropping them mid-motion, unless they desire or are forced by circumstances. This is achieved via Object locking: a model can be locked to a different bone, and the movement of the parent bone will allow the locked object to move simultaneously with it.
First, have your character set up within your scene. Spawn the object you want them to hold onto. The tedious part is manually dragging the object to wherever you want it locked; let's say, they're holding it in their hand. Once you're happy with the object's placement, we can move on.
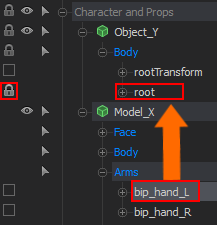 Next, look towards the Animation Set Editor. Locate your character's hand bone. Next, open your objects bone tree. Every object has bones, even if it's just a single rootTransform.
Drag the hand bone over to the root bone of that object. If you were successful, a lock icon will appear next to the locked object. Wherever you move the hand, it should now follow along with it.
The order in which you do this does matter! If you drag the object onto the hand, for instance, moving the hand won't affect the object, but moving the object will drag the hand with it.
To do this, you'll need to have the weapon/cosmetic in question already locked to the character model. See above for how to do just that! Next, divert your attention to the Procedural tab within the same window as the Animation Set Editor. You'll see a setting that says "Zero." Everything else around it is irrelevant for now. Refer to the picture below if you get lost:
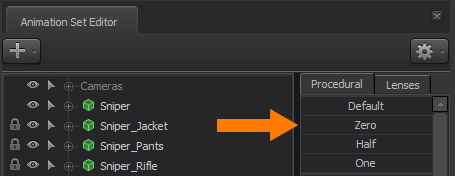
Despite the lack of no indicated slider, you can still left click hold and drag this like any other slider setting. Once your object has been locked, you need to highlight it within the Animation Set and then drag the Zero slider as far to the right as possible. If done correctly, your cosmetic or weapon should have homed in on the character's position and will stay in place as you animate/pose them.
Note: Zero Locking can not be undone except with Ctrl+Z
Light Settings
To use lights effectively, it's best to load a map that is marked as a dark map. The stage map is not one of these, because we can actually see things in it. Right click the viewport and select Unload Map. Don't panic, your stuff is still there, it just needs a new map to become visible again. Right click again and select Load Map... It's the same process outlined in Creating Session & Loading a Map, only this time you are searching for black_void, and not stage.
Once it loads, you'll see that it's quite dark. If a map called black_void weren't a black void, I'd ask for my money back as well. This is a map that is nearly* entirely black, allowing you to apply lights as you desire.
Why do such a thing in the first place?
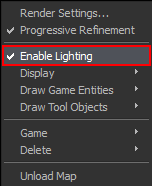 Can't see what's happening?
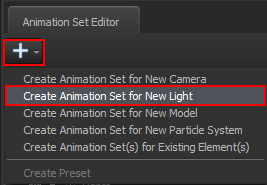 We can't really see much at the moment, so let's spawn a light here by right clicking the Animation Set Editor and selecting Create Animation Set for New Light, or clicking the cross and spawning one - it's the same process as to how we spawned a Model and a Camera into our scene. Only difference here is we don't get a pop-up window for a Light.
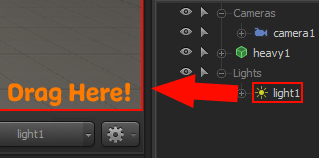 Psst, extra spicy hot tip for you: drag the newly created light from your Animation Set Editor straight onto the viewport. Now you can control the light with the W, A, S, D keys, just like it were a camera! Use this to easily position lights, instead of having to rely on the Move and Rotate tools.
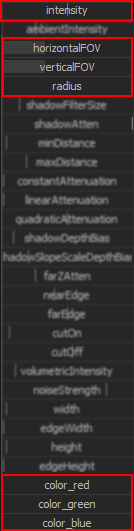 Intensity
This slider controls the brightness of your light. If your character looks too bright, slide this to the left. Too dark? Go right. Also, try bringing your light further back if the slider isn't doing much. It does matter how close a light source is to an object, funny enough! The closer it is, the brighter things become.
HorizontalFOV/VerticalFOV
You may think that adjusting these sliders will make the light more oval, but you'd be wrong. In practice, the light takes the FOV value of the highest of these sliders; if verticalFOV is higher than horizontalFOV, horizontalFOV is largely ignored. The only time they're not is when controlling the light through the viewport, so my advice is to set them to roughly the same value.
Same deal as for cameras, otherwise: drag to the right to widen the light's FOV. You can also hold left click on the viewport and scroll up or down to change both FOV sliders at the same time. Experiment with wider light FOV than you may think is needed.
Radius
Default light properties in SFM lead to sharp shadows, regardless of distance, which is not believable. In real life, on a sunny day for example, shadows from low hanging objects are sharp, while shadows from tall tree leaves are softer and fuzzier. Radius applies a more realistic softening of the light, to simulate a higher surface area of the light casting object; in other words, it means that shadows farther from where they get cast are softer.
Colours
Ah, the RGB sliders. These are the most fun, but also a little confusing if you're not familiar with mixing them to get a desired colour. How can you go from a pure white light to a red light?
You don't touch the red slider; you instead reduce the green and blue sliders. To make orange, you bring red and green close to each other, and reduce blue. So on and so forth.
My advice is to keep at least one colour slider maxed out, and work with the remainder. If the light is too bright or too dim, refer to Intensity. Don't make the RGB sliders do the work of Intensity, this will complicate your workflow.
Game Mode Recording
Source Filmmaker is not just a film making program, it is also partly a game. The program is a unique hybrid of 3D animation and a barebones TF2 version, unlike everything else available at the time of writing. The Game Mode takes you into the Game world portion of the software, having controls and movement like in TF2.
To enter the game world (or exit it), simply press F11.
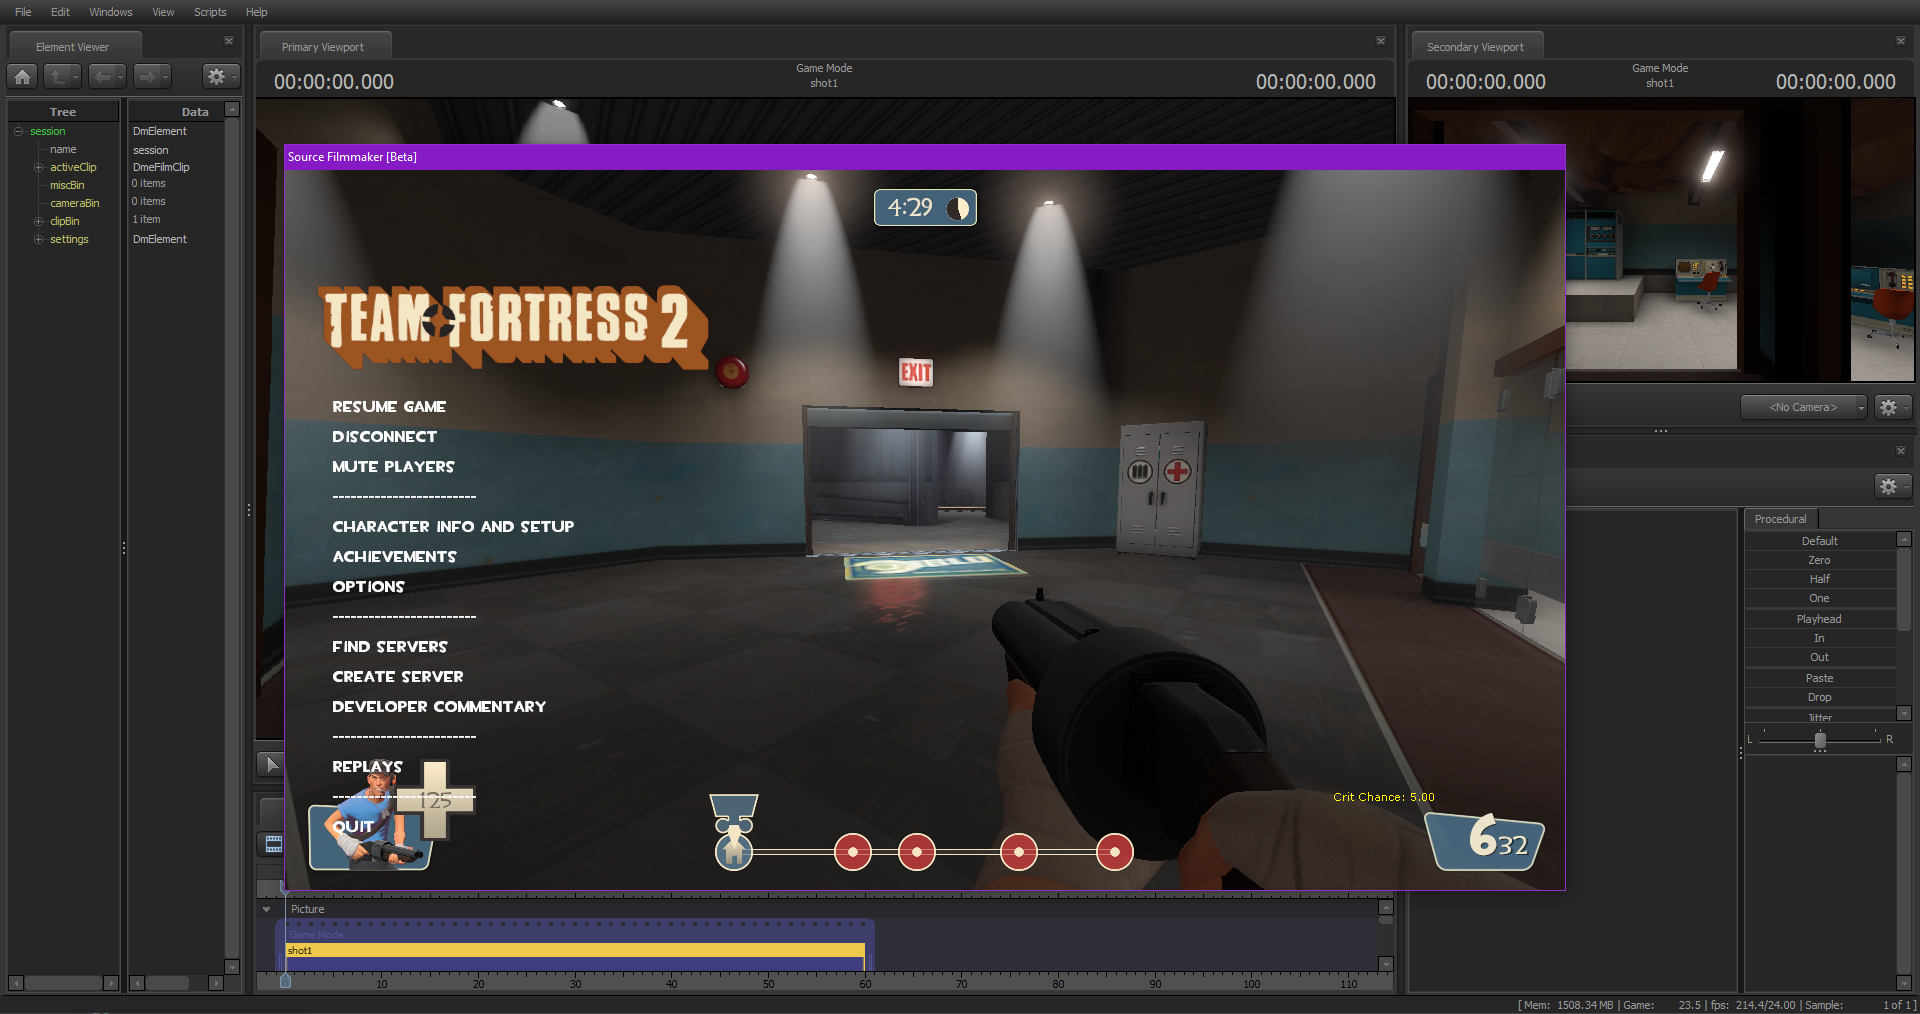
Congratulations, you're in! You can shoot, run, bonk or do anything that you can otherwise do in early TF2. If you want a different map to run around in, you have to exit the game world and load a new .BSP file from the viewport. But what do you do from here?
Game Mode is intended to record actions and movement of one or multiple characters at once, in order to create believable TF2 "gameplay" with advanced camera, light, particle etc. systems from within SFM.
Keep note:
Switching views with Alt + Tab does not give you mouse control in Movie Mode, you're still technically in Game Mode and thus need to exit via F11 to properly regain control of Movie Mode.
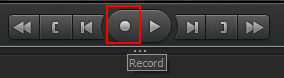 To get properly set up, position your character in Game mode, then exit back to movie mode. With your camera set up, hit the record button.
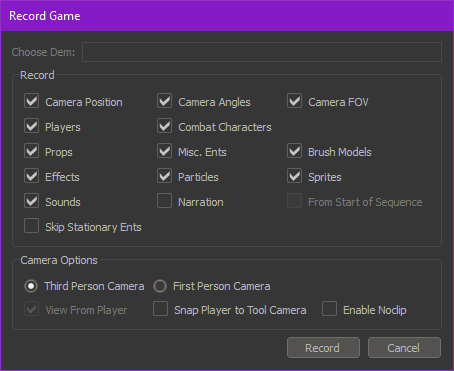 In the filter settings, select the things you don't want to capture because once you make a recording. This captures EVERYTHING happening on screen and can be an issue when SFM's memory usage starts getting full.
Four beeps will start after confirming and you'll be in Game Mode. On the final beep, you are free to move about however you wish within the shot. Once done, press Esc to finish the recording and you'll automatically return back to Movie mode.
You can now edit the recording however you wish, though do note that once you are done recording, any characters or entities that were used in Game mode can not be adjusted in Movie mode.
If you had already set up a camera in Movie mode, you can go back to it through the camera options menu, here: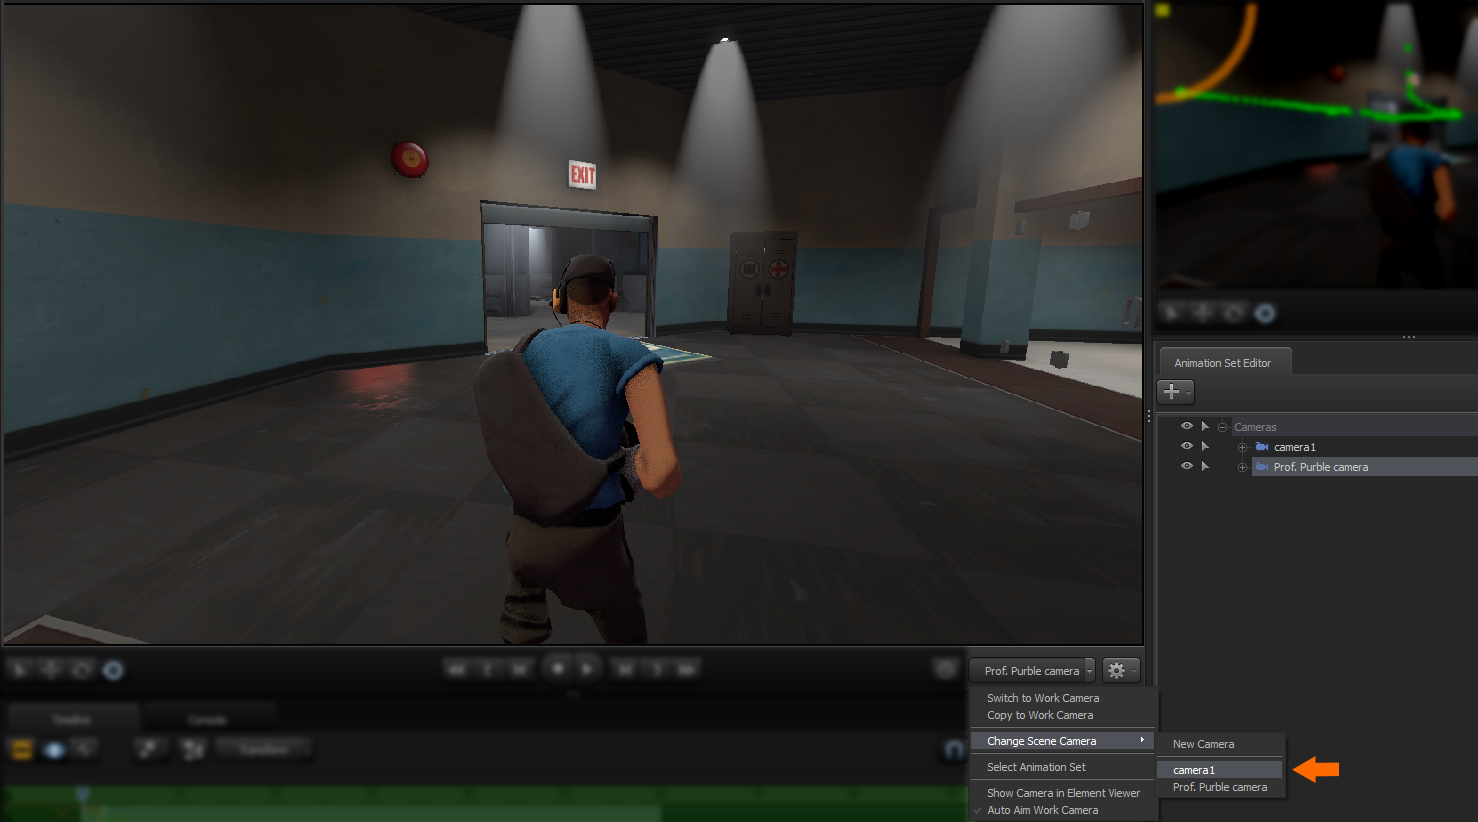
You're done! To preview the animation, simply hit the play button!
For further reading:
https://developer.valvesoftware.com/wiki/SFM/Movie_mode_and_game_mode
https://developer.valvesoftware.com/wiki/SFM/Recording_gameplay
Export Settings
Phew, almost there. Here we'll find out how to export at various quality settings, resolutions, sample rates, and how to get rid of this stupid ugly grain on everything.
To access the Export menus, go to the Ribbon Bar at the top: File > Export.
Clipboard Export
This is not a normal exporting function. This just takes a snapshot of your Primary Viewport's contents at this moment in time. Would be useful for sharing work in progress pictures...
if not for the Windows Snipping tool. (it's on mostly every Windows device by default: Win + Shift + S)
Image Export
You may think this is what you should select to export still pictures. As a matter of fact, the image quality will be overall very poor with this option. Avoid.
Poster Export
This seems like a better alternative than Image Export, and it is - better quality exports, and you can set your custom resolution. However, exporting takes absolute ages (regardless of system performance... believe me, I've tried), the resulting file will be massive for no good reason, some visual effects can bug out, and there's a chance of the end result being corrupted anyway. Exercise caution.
Because from the Movie Export window, you can change the dropdown from Movie to Image Sequence, and then export the desired single frame.
Ah yes, this is the stuff. It's the most advanced way to export, but it's the most rewarding. It doesn't take long, it has the maximum image quality, it allows you to export in more file types, and can go up to 4K UHD resolution (3840 x 2160) with launch commands.
Recommended settings for single frame exports, except for resolution:
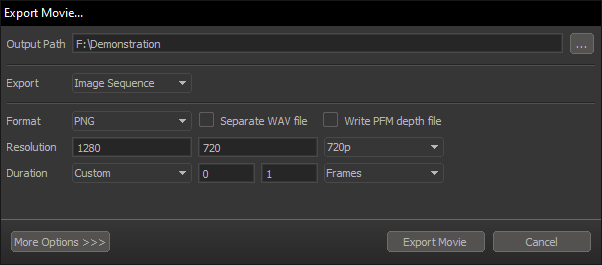
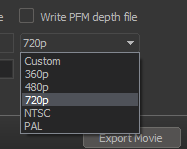 Notice how options past 720p are not available for you, yet. That is because, by default, SFM's maximum export resolution is 720p, which is coincidentally the viewport's resolution. To enable higher resolutions, you need to use Launch Commands.
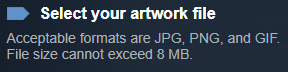 Keep in mind, resolutions past 4K do not work for Movie Exports and must be rendered as a Poster, buuuut I really don't recommend doing so. Even without the rather small 4MB file size limit for the Steam Community, 16K posters don't come out great. On top of that, the file size of the final output will be ridiculously massive, so good luck posting it on Steam...
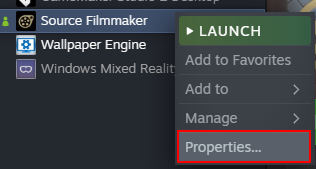 To use these, you will first need to exit SFM (so make sure to Save), navigate to the program in your Steam Library, right click and select Properties. A new window should pop up with a box at the bottom labelled, 'Launch Options'. Copy and paste only one of these commands into the box and exit the window. They will automatically be saved and applied on the next launch of the program.
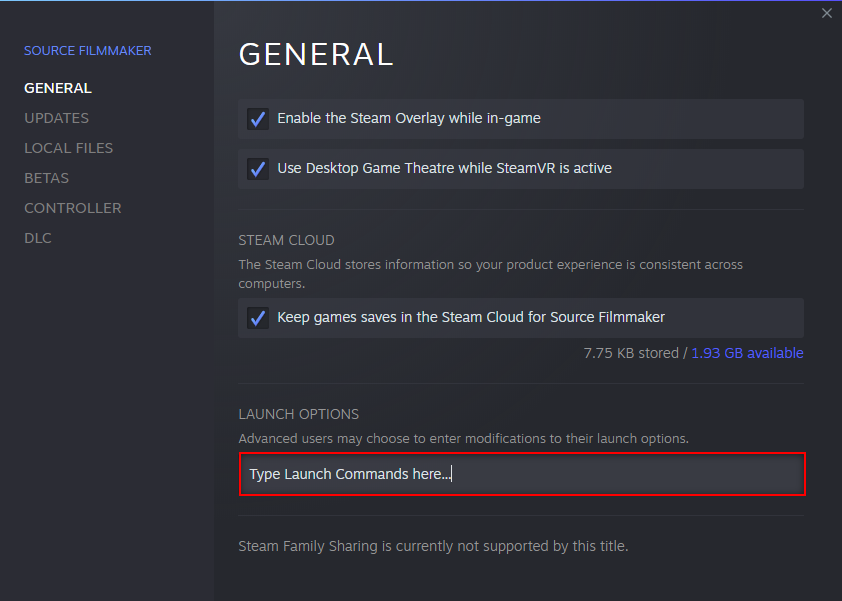
You can now re-launch SFM, navigate back to Export > Movie and the option to render up to that resolution should now be available! However, you generally only want these on when you are ready to render the finished project. You do not want them on, especially the 4K resolution option, when still editing your project, as this will have a significant impact on performance and will cause SFM to run at low framerates.
To disable them, go back to Properties and delete the commands. Restart SFM.
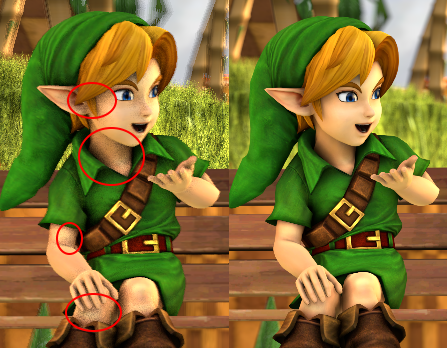 To the Left, Link has a severe case of it, but on the right, he's perfectly clean. This grain is Ambient Occlusion on low sample rates, and the culprit is the Depth of Field Sampling.
To get rid of this, there is this nifty menu called Progressive Refinement, which can be accessed by right clicking the Viewport. It should be the top option from the drop down menu.
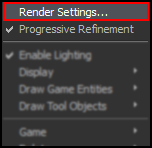 You want to click on Render Settings to access this menu. Don't click on the second option, as this toggles the use of your settings on/off.
Here, you can change your sampling rate to override the default. Depth of Field is the main one you want to adjust, but if you have a moving object moving within your scene, you may want to also adjust Motion Blur sampling to be increased as well. All of these changes can only be seen while in the Clip Editor, and only while your Viewport is set to a scene camera.
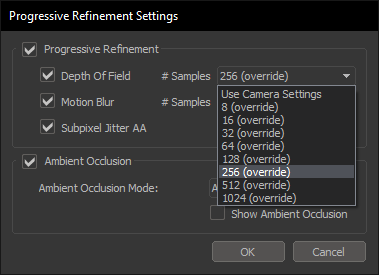 8 - 16 Samples
Unless your computer is really struggling at running SFM, you don't need to use these at all. 8 samples are the default from the Use Camera Settings option, and 16 is barely an improvement.
32 - 128 Samples
Good for previewing your scene while in the Clip Editor mode, but still has a lot of grain.
256 Samples
A fair compromise for exporting an animation without waiting too much. Grain is low enough that animation isn't too negatively affected - picture exports still deserve better.
512 Samples
Decent for single frame exports that are not animations. Grain is much less visible in most conditions.
1024 Samples
Takes the longest rendering time but grants the best yields: almost zero grain.
But what about Use Camera Settings?

'nuff said.
I recommend leaving Ambient Occlusion enabled, so don't untick the option for now.
Make sure to fully preview your scene before exporting: check the counter at the bottom right corner. While SFM is constructing the preview, the counter increases, and the image itself may shift and shimmer. It is complete when it shows as "1 of 64" (or 8, 16, 32, 128, etc...) and both it and the image remain static.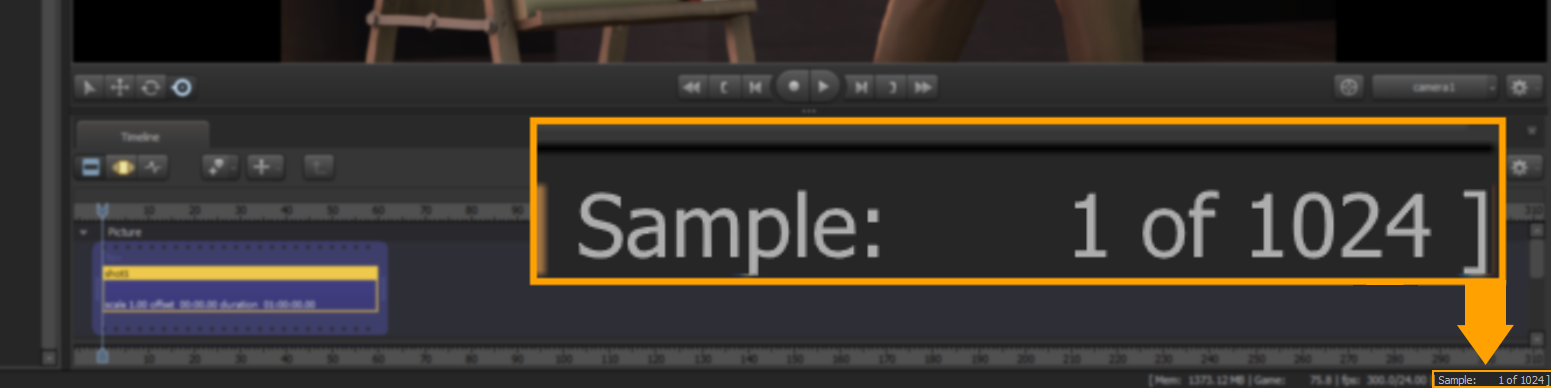
If you did as follows, you hopefully now should be rid of the pesky grain curse! Remember to do this for every time you want to render because whether you like it or not, you will be critiqued for it! So try to get used to it... If there is still some grain, either you didn't quite follow the instructions correctly or you need to make adjustments to your Camera's SSAO Settings, which are not covered in this guide...
How to Export a Movie
So you're finally done crafting your masterpiece, you are ready to hit export and show it off to the world to see! But wait, before you do so, make sure you give your work the best treatment it deserves while exporting.
In the Export window, you're going to select Image Sequence. The other options take way too much time to render, look like a washed out soap opera when finished, and have absurd file sizes. Furthermore, one option requires you to install QuickTime, which is deprecated and poses a security hazard.
Image Sequence allows you to render the film frame by frame at high quality with your preferred image format. This method renders a lot faster and there is a much lower chance of corruption, as you're rendering multiple images instead of a single larger file. Make sure you set a folder destination for all the exported images and not your desktop, unless you're fine with clogging it up... (we've all been there).
When you're done, hit Export Movie. This will take a while, but take my word for it, it's a lot faster than the other options. Make sure the option for Separate WAV file is enabled if you want audio to also be exported. Once done, we shall move on to the next exciting step!
Now I know some of you might feel like you probably won't be able to progress beyond this point because "Blender, aaaaaaaaaa!! Nothing makes sense in this program!" which is why I have taken the liberty of taking as many screen shots as possible to help guide you through the process. Shall we begin?
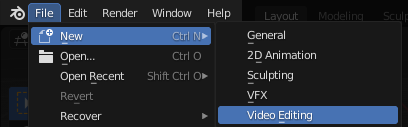
- If you haven't already, go and download Blender. It's free! Start the program and you'll be greeted with this splash screen. Click on the Video Editing option.
Alternatively, you can access Video Editing via the top ribbon bar.
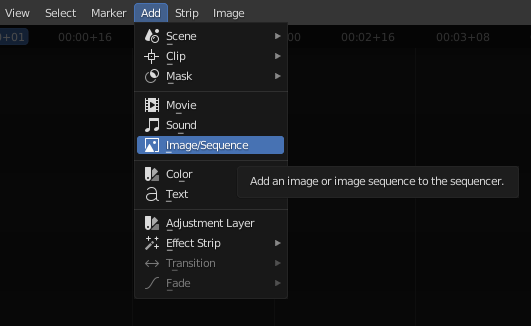
- Once you're in Video Editing mode, go down to the Timeline options and click Add -> Image Sequence. Navigate to your image sequence export location, Ctrl + A to select all the images and then Import. You may want to also add the Sound file as well from the same drop down menu if your export came with a .WAV file.
- Make sure your render settings are set to the correct frame rate and resolution, as well as the total amount of Frames. If you forgot how many frames there was in your render, the image sequence in your timeline will have a number at the very end of its name showing the amount of frames loaded.
If unsure, every SFM export comes with a .txt telling how many images were exported.
- Over to the far right, change the Output File Format to FFmpeg Video. You may also want to set a destination folder where you want the final MP4 export to go.
- Change the Encoding "Container" to MPEG-4.
- Adjust your Video codec settings. This usually falls down to personal preference, but here is what I like to set it as. You can change it up however you wish.
- If you have Audio loaded, go down to the Audio tab and pick out the audio codec.
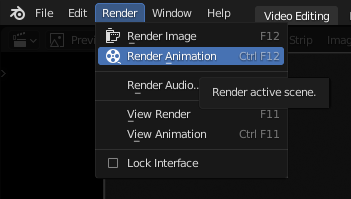
- With that out of the way, go to the top ribbon bar and select Render -> Render Animation.
Now you can do this with all your future animations and not have to worry about absurd file sizes. And the best part about it is that you don't need a $300 video editing program to do this. (But it's still nice to have, let's be honest.)
Customising UI Layout
The Default UI layout is what appears upon starting up Source Filmmaker either for the first time, or is how it was left from the last time you used the program. There are multiple layout styles to choose from, and you can customize them to your liking.
Up in the ribbon bar, select Windows -> Layouts and you'll see some options to pick from.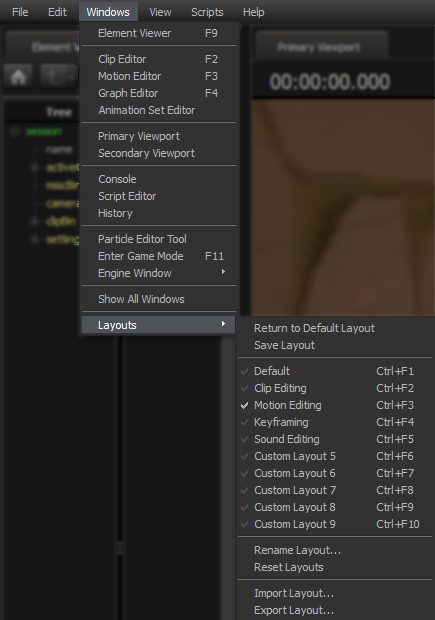
Return to Default Layout resets you to the Default Layout.
Save Layout enables you to save the current layout.
Next section is a list of pre-made layouts and slots for custom layouts that all serve their own purpose.
Rename Layout allows you to rename the current layout you are currently using.
Reset Layouts deletes all the current custom layouts and resets them back to how they were from the beginning.
Import Layout lets you load .INI files and sets SFM to use the Custom Layout from that file.
Export Layout saves your current layout as a .INI file you can store for backup.
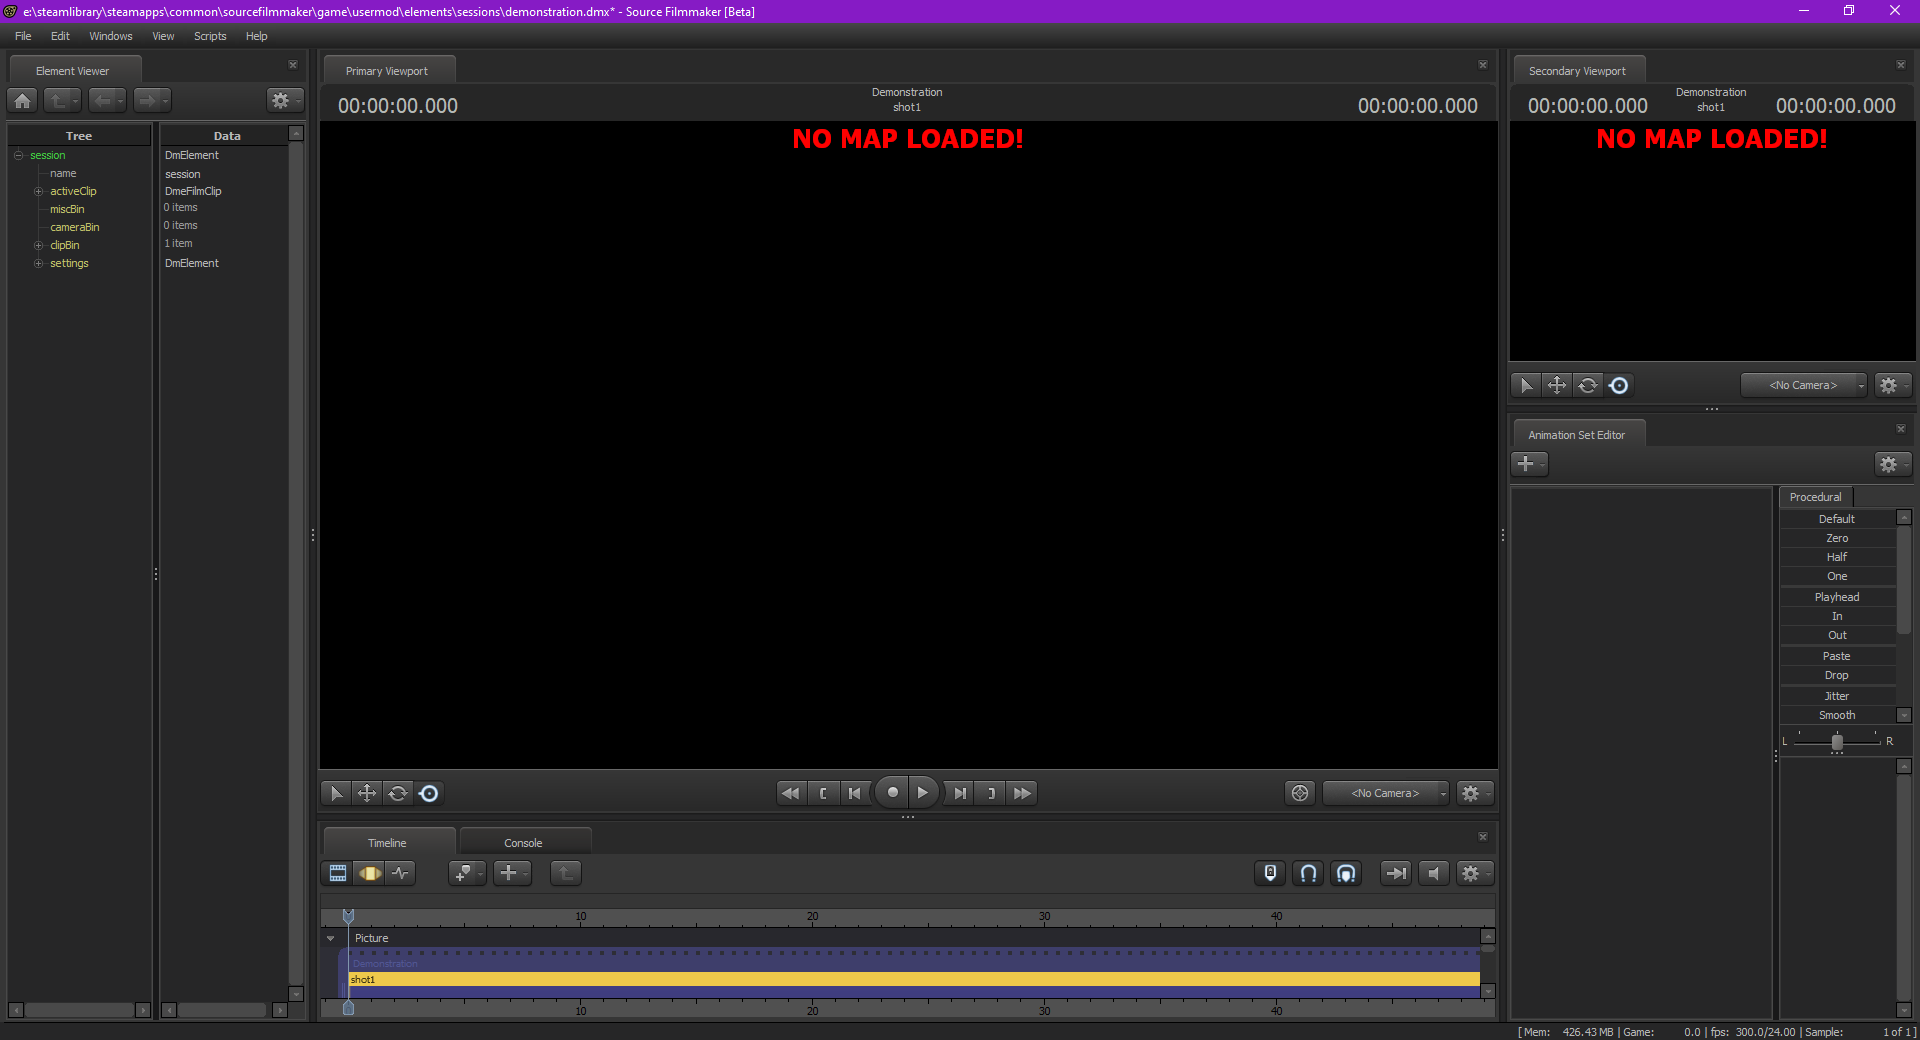
My preference revolves around suiting my needs as an artist. I use the Element Viewer almost as often as the Animation Set and wanted both windows open simultaneously. There is a second Viewport window in the top right hand corner, although it's set up in a way that still keeps the main viewport a priority. I have also moved the Console tab down to sit next door to the Timeline Tab for easier access.
What do tabs look like and where are they?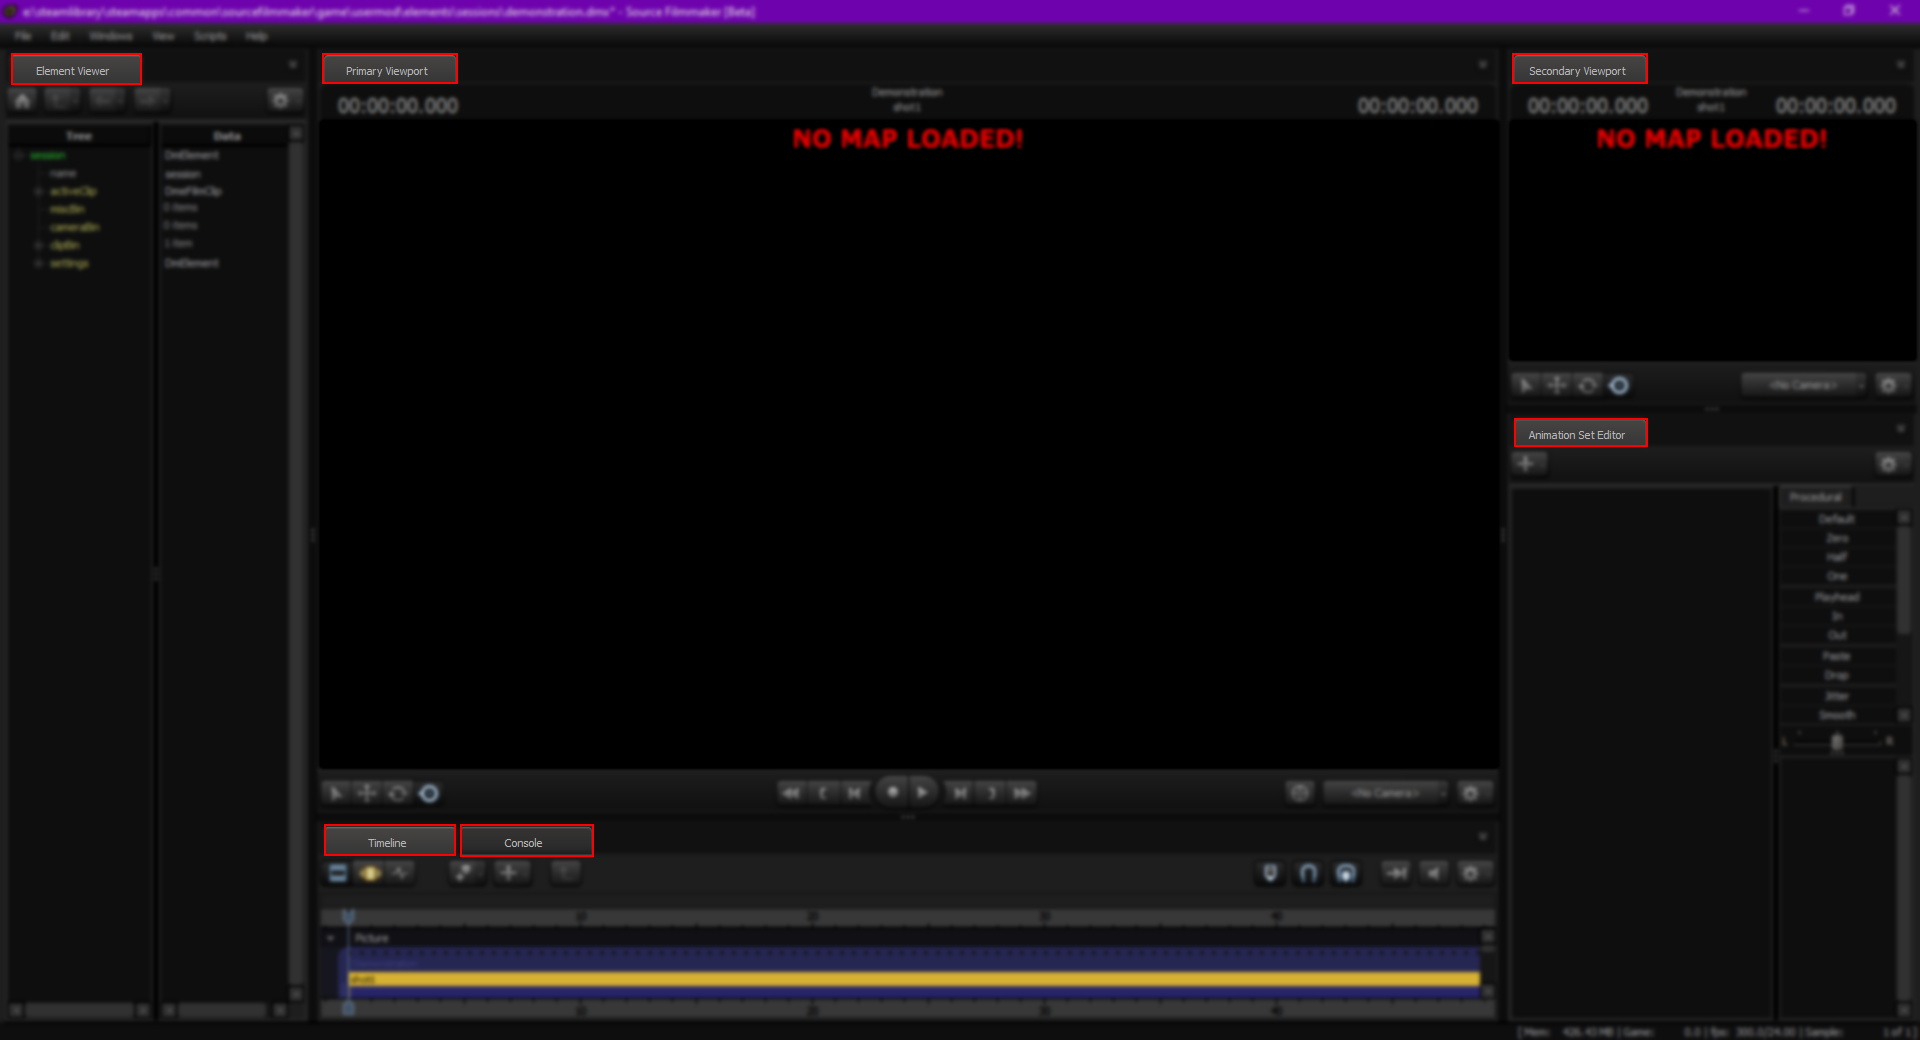
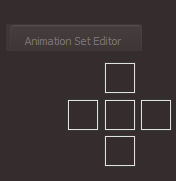 To move a tab, left click and hold onto that tab. When you drag it away, you'll be given squares that look like this around every section of SFM. Drag and drop the tab on one of these squares to snap the tab to that location. Let's say we want to move the Animation Set Editor to the right side of the Viewport window: drag over to that window and simply plop it over the right square.
Also, if you release the left mouse button without dropping over any squares, that tab will become its own window. If this wasn't desired, don't worry - you can easily snap it back to where it was. Simply drag and drop it onto one of the available squares on the main window.
But wait, I lost a tab. How do I get it back?
From the ribbon bar, select Windows and click on any of the options that are missing currently from your layout. This will open it as a separate window which you can then clip into the main window through the same process as before: drag and drop into the white squares.
If you somehow messed things up so much that you can't figure out where anything is, go to the ribbon bar and click Windows -> Layouts -> Return to Default Layout.
Feel free to experiment and make an SFM layout you're comfortable with. Once you're satisfied, try and save an .INI file of it, then load it up. If it showed up exactly as how you saved it, then it was successful!
How to Install Non-Workshop Assets
- The uploader decided to keep his/her workshop upload set to private, so only they can use it.
- The model is not available on the SFM Workshop.
In the case of the 2nd option, this means that you can visit other websites to download models for SFM without the Workshop being your only option. As long as the model has been converted to work with Source, it'll work. This is super handy for those who wish to share and contribute their work, but uploading to the Workshop might prove to be a bit difficult, either due to size restrictions, or because certain... features of the model are not appropriate for Steam.
First, download your model from wherever. It'll probably come in a Zipped folder. Inside, you'll see two folders labelled "Models" and "Materials" that you need to extract. Our preference is for 7-Zip[www.7-zip.org] but anything that opens .rar and .zip files and extracts them will work.
Access your game folder here:- maps
- materials
- models
- particles
- sound
Next, open the SDK and check off your new folder:
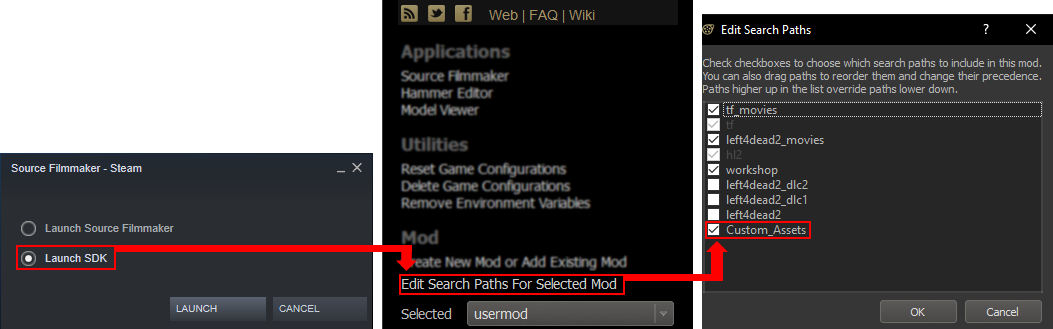
Get your "model" and "materials" folders of the model you wish to add and place them inside that new folder! Do not place them in any of the created sub-folders as your model will sort itself out.
Congrats, you can now use the model(s) inside SFM! You might need to restart if the program is already running, and make sure you save a backup because if you reinstall SFM, they will be deleted as well.
Bonus Tips and Tricks
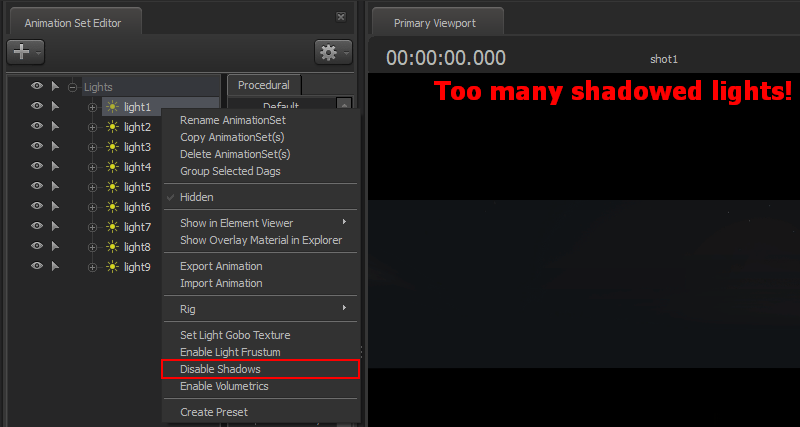 SFM by default only allows up to eight lights with dynamic shadows to exist in the scene. You can right click and select Disable shadows for a selected light, and you can then continue placing lights at the expense of losing out on shadows.
Great news, there is now a way to bypass the hard limit on 8 Shadowed lights! Refer to the guide below for a detailed explanation.
https://steamcommunity.com/sharedfiles/filedetails/?id=2788015755
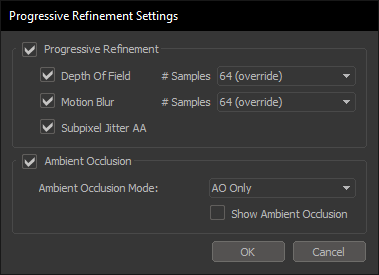 This little window right here may save you a lot of headaches if you have a slow computer.
If you've previously set your Depth of Field sample rate to a high amount, changing it down to 64 or less will allow you to render previews faster. Remember to set this back to a much higher, or even maximum amount, before rendering.
This little window right here may save you a lot of headaches if you have a slow computer.
If you've previously set your Depth of Field sample rate to a high amount, changing it down to 64 or less will allow you to render previews faster. Remember to set this back to a much higher, or even maximum amount, before rendering.If you're using a fairly large amount of lights with shadows enabled, disabling shadows on the lights that don't see a significant benefit can bring you back some frames per second as well.
Ambient Occlusion can also be disabled if your PC is having significant difficulties running the program.
Credits Addendum
It quickly became very apparent that SFM just isn't beginner friendly at all, and a good chunk of existing guides have some form of assumption that you understand at least the basics. I created this guide to help remedy that problem, and act similarly to Valve's official SFM tutorials, not as a replacement to those, (they are still useful!).
~ Prof. Purble
- YouTube
Many users offer advice, and can provide useful resources with a visual tutorial. Valve even released their own tutorial series, which remains useful to this day! - The Steam Forums
A great deal of users who use the program can be found here and are willing to help! There is even a Pinned discussion thread to get you started on the more advanced stuff. - Steam Guides
Go to "Top Rated All Time" and have a look at the first couple of pages. This guide also has helpful Guides posted throughout for their relevant sections, showcasing a variety of community-made tutorials that I personally recommend to any newcomers. - Social Platforms
Places such as Reddit and Discord for example. While there is no Official SFM Discord server, there are many community gatherings; namely the r/SFM server gets brought up quite a lot. A lot of high profile artists are gathered there, who are more than willing to lend you a hand!
Cusuno
Sharper
Noah TG
Marco Skoll
Pte Jack
Hunter in the Green Vest
EmperorFaiz
Source Filmmaker is developed and owned by Valve.
Helpful Guides Spotlight!
Here are some additional guides that I found especially useful. Some of them are a little less known, and I wanted to give them some time in the spotlight. Thank you to all those who shared their valuable knowledge with the SFM community!
This one goes in depth to explain more things you can do in SFM! A lot of things are in fact not covered in this guide.
https://steamcommunity.com/sharedfiles/filedetails/?id=2115357116
Cool secrets just waiting to be uncovered.
https://steamcommunity.com/sharedfiles/filedetails/?id=1716880745
A proper tutorial on creating cell-shaded artworks or just cartoony looks in general.
https://steamcommunity.com/sharedfiles/filedetails/?id=2116664621
An excellent place to visit if you need help creating animated images such as GIFs!
https://steamcommunity.com/sharedfiles/filedetails/?id=158186863
Particles are complex and may seem overwhelming to new users. This is how you can change some basic settings within them and make them more versatile.
https://steamcommunity.com/sharedfiles/filedetails/?id=1729828393
Perhaps you're using an older or newer variant of Blender and want to understand more on how to export videos from image sequences?
https://steamcommunity.com/sharedfiles/filedetails/?id=375229570
There are, like, five hundred and a half light settings to alter in SFM. What do they do? Check out this guide for some explanation, theories and practical use.
https://steamcommunity.com/sharedfiles/filedetails/?id=881610592
Excellent lecture on how to properly deliver critique to other works.
https://steamcommunity.com/sharedfiles/filedetails/?id=1661268459
Another useful guide for applying certain material properties and altering them.
https://steamcommunity.com/sharedfiles/filedetails/?id=1683500927
3D skyboxes are a neat concept, and so is this guide.
https://steamcommunity.com/sharedfiles/filedetails/?id=645553481
Helpful Guides Spotlight! Part 2
How to give your poster some lovely high dynamic range!
https://steamcommunity.com/sharedfiles/filedetails/?id=938272940
The Graph Editor, and how to love it even more.
https://steamcommunity.com/sharedfiles/filedetails/?id=461083885
A useful guide outlining the principles of posing, emphasis on using rigs and finger posing.
https://steamcommunity.com/sharedfiles/filedetails/?id=2422092254
How to achieve better bloom results using Photopea!
https://steamcommunity.com/sharedfiles/filedetails/?id=2165584940
A way to bypass the hard limit on 8 Shadowed lights using Hex editing!
https://steamcommunity.com/sharedfiles/filedetails/?id=2788015755
written by me, this guide hosts an archives worth of dedication into solving some of SFM's most common to somewhat less-common issues that you'll probably encounter more than a few times.
https://steamcommunity.com/sharedfiles/filedetails/?id=2131043208
Update's Log History
- The idea for "The Fundamentals of SFM" and its development started here.
- Guide Published by Prof. Purble.
1st, December, 2019 - V.1.0.1
- Added more pictures.
- Switched Sections around to prioritise learning about the Viewport.
18th, December, 2019 - V.1.1.0
- Added new Section: Export Settings.
- More pictures were added/replaced.
- Extended Section: Camera Composition.
2nd, January, 2020 - V.1.2.0
- Clarified part in "Export Settings" under "Removing that grain!" to help/fix the issue.
- Updated picture in Section "Using the Viewport".
- Included more pictures for "Creating a Camera" for better clarification.
- Added new part "Export as an Image" in the "Export Settings" Section.
- Updated images for creating a model and light, demonstrating how to use the "Add" button.
- Changed the branding image.
- Completely removed Section: Planning your Scene.
- Completely removed Section: Posing Strategies.
- Removed Section: Camera Composition. Some of its contents migrated to "An Introduction to Camera Settings."
- Removed Section: Lighting Techniques. Some of its contents migrated to "An Introduction to Lights."
- Guide was set to Private temporarily.
1st, May, 2020 - V.2.1.0
- Included more Pictures in "Export Settings".
2nd, May, 2020 - V.2.1.1
- Added new Section: Changing Bodygroups and Skins.
15th, June, 2020 - V.2.1.2
- Section "Troubleshooting Source FilmMaker" taken down to give its own dedicated guide.
16th, June, 2020 - V.2.2.0
- Introduction rewritten.
19th, June, 2020 - V.2.3.0
- Some pictures inexplicably went missing. (Situation has been resolved.)
- Added the "Troubleshooting Source FilmMaker" guide.
- Sample count part in "Export Settings" rewritten.
- Added new Section: Object & Zero Locking.
- Updated the branding image.
- Temporarily changed the branding image to celebrate the guides 1 year anniversary.
- Migrated contents from the scrapped "vol. 2" guide over into this guide.
- Added new Section: Baking Jiggle Bones.
- Added new Section: Game Mode.
- Added new Section: Customising UI layout.
- Added new Section: How to Export a Movie.
- Added new Section: Helpful Guides Spotlight!
- Added new Section: Disclaimer!
- Added new Section: The Past, Future and Now.
- More pictures were added/replaced.
21st, February, 2021 - V.3.1.0
- All Sections given a revision and edited for better read flow.
End of 2021 - V.3.2.0
- Added new section: Helpful Guides Spotlight! Part 2.
16th, November, 2022 - V.3.2.1
- Added new section: Update's Log History.
21st, November, 2022 - V.3.3.0
- Updated images to Steams newer Properties UI in Section: How to Install Non-Workshop Assets.
- Updated images to Blender 3.3 in Section: How to Export a Movie.
- General clean up of unused images and if all are in working order. No problems found.
- Included the "How to increase the shadowed light limit" guide in Section: Extra Tips.
27th, November, 2022 - V.3.4.0
- Updated title for "Extra Tips", to "Bonus Tips and Tricks" and numbered it.
- Moved the "Troubleshooting guide" into "Helpful Guides Spotlight! Part 2".
- Moved "Disclaimer!" down to sit next to "The Past, Future and Now".
7th, February, 2023 - V.3.5.0
- Adjusted the guides section numbering.
2nd, July, 2023 - V.3.5.1
- Updated the guide's description to reflect on a slightly more accurate number of images present within the guide. (There are 77 images in total throughout this guide as of current.)
5th, July, 2023 - V.3.5.2
- Fixed a formatting issue that made all the text unintentionally bold in "loading a map".
9th, December, 2023 - V.3.5.3
- Example artwork used for Aperture in Section "An Introduction to Camera Settings" changed.
16th, December, 2023 - V.3.6.0
- Multiple adjustments and rewrites across all sections.
22nd, June, 2024 - V.3.6.1
- Restored all images that inexplicably went missing.
- Changing Textures Using Material Overrides★ 5 (1.4k)41k views2.7k ♥5 minUpdated Jul 26, 2014
- Manually Updating TF2 Content★ 5 (1.3k)35k views1.9k ♥2 minUpdated Nov 26, 2025
- Ваш первый постер★ 5 (1.1k)22k views2k ♥5 minRussianUpdated Oct 22, 2024
- Getting Gmod Workshop stuff too SFM★ 5 (510)15k views1.3k ♥1 minBulgarianUpdated Aug 4, 2015
- Animation Guide★ 5 (704)14k views1.9k ♥6 minUpdated Apr 9, 2023
- Улучшение качества постера в SFM★ 5 (973)14k views2.1k ♥12 minRussianUpdated Jan 17, 2020





- Upgrading to PremiumTeam Fortress 2★ 5 (20k)1441k views11k ♥6 minUpdated May 11, 2022
- No More Room in Hell Official ManualNo More Room in Hell★ 5 (2.8k)569k views2.1k ♥29 minUpdated Apr 22, 2019
- NMRiH Community Hosting GuidesNo More Room in Hell★ 5 (526)351k views653 ♥1 minUpdated Aug 10, 2022
- ULTIMATE GUIDE FOR GAME DEV TYCOONGame Dev Tycoon★ 5 (5.8k)326k views10k ♥4 minUpdated 23 Jan, 2014
- How to 'Git Gud' Soon™MORDHAU★ 5 (2k)318k views3k ♥68 minUpdated Nov 16, 2024
- Лучшие кооперативные игры SteamPAYDAY 2★ 5 (1.5k)315k views2.1k ♥56 minRussianUpdated Apr 27, 2025






This guide was created by its original author on the Steam Community. Are you the author and want it removed? Request removal.