'Within Time' Achievement Guide - The easy way to complete the Hunter campaign
Introduction
(I'm aware that this is an excessive amount of text to read. If you like, you can refer to the TL;DR's I've added at the end of each section, or skip the reading altogether and just watch the video walkthrough)
So, you’ve just completed the Survivor/Monk campaign and you’re ready to take big boy Hunter out for a spin. The world is more hostile, the enemies are more dangerous, and you’re still a fragile little cupcake with an extra spear on your back. You make a go of it and struggle with the limited cycles you have and karma requirements to pass gates. Maybe you even make it to Moon or Pebbles and complete your mission but the campaign doesn’t end. All of a sudden you’re at Cycle 0, you’re fighting for your life and the run is over.
You scratch your head at how this is even possible and you decide to look online, but everywhere you look there’s an intimidating long explanation that involves visiting Pebbles, Moon + 3 echoes which is just too much for you to reliably do in a limited time frame.
Maybe you’re like me and you want all the achievements, or maybe you just want to complete the Hunter campaign but you want an easier gameplan to follow that doesn’t take you all around the world.
In any case, I have a simple method. All you need to ascend and beat the game is to be at the maximum karma level and then travel to The Depths and dive into the void sea. This can be done by visiting 4 echoes. This means you DO NOT NEED to visit Pebbles or Moon and you can completely ditch your rescue mission. You can save the robot woman some other time but for now, you just want to earn the achievement the easiest way possible.
This guide will serve as a step by step walkthrough of the entire journey, divided into segments. I will include an overwhelming amount of detail in each section for those of you who need/want it and I will also have a shorter TL;DR portion at the end of each section. Additionally, each segment comes with visual aids and a video walkthrough so you can feel free to completely skip all this noise and just watch those if you like.
In my initial struggle to overcome the Hunter campaign, I was confused as to why I couldn’t find anyone online who did it this way as I believed it to be quite clearly the simplest. My method turns this stressful campaign into stress-free trial and error. It will still be difficult because Rain World is a difficult game but I believe if you follow this guide it will be substantially easier than any method elsewhere.
TL;DR Hunter campaign is hard and stressful. This guide will make it much easier by almost completely removing the need to worry about karma or cycles and completely skipping the main Hunter quest. A conscious effort has been made to create a guide that is accessible to all skill levels so a lot of detail is included. Some details may be excessive, so feel free to take as much or as little from this guide as you need. Alternatively, If you just want to see the actual video guide, then skip forward and watch those. Cheers!
Essential Tools and Concepts
These are the main tools and game mechanics we will be using throughout the run to simplify our journey as much as possible. Feel free to skip these if you already know about them.
Cycle length You may or may not have noticed that cycles are not all equal in length. You can know roughly how long or short the cycle you’re in will be based on the white pips surrounding your current karma symbol (in the bottom left corner when you view the map). The more pips, the longer the cycle. This is somewhat random but can be controlled to some extent. If you are just waking up in your shelter or have just starved into a new cycle, pay attention to the cycle length in the bottom left corner. It can sometimes be beneficial to quit out of your save and load in again to get a longer cycle length. As long as you do this in the first 30 seconds of the cycle, you will not be penalized.
TL;DR check your cycle length at the start of the cycle and quit and reload the save before 30 seconds if it is too short for the upcoming journey.
Vulture Masks A vulture mask is easily the most useful tool we will use during the run. Wearing a vulture mask will scare most breeds of lizards, and since lizards are the most common predator by far, this makes travelling through the world far easier. Lizards will also turn away from you while attempting to flee, making it very easy to hunt them for food. However, they are only afraid of you for a limited time (17.5 seconds for a Vulture mask and 30 seconds for a King Vulture mask, starting as soon as the lizard sees you) so it’s best not to linger.
This unfortunately means that we will need to kill or demask a vulture at some point during the run, which can be quite intimidating for the uninitiated. Fear not! For I have a very simple and easy to execute strategy which I will explain and show during the detailed walkthrough. It is possible to forego the vulture mask but I would highly advise against that as it completely trivializes one of the harder areas of the game. Even though you wear it on your face, it takes up a hand slot which can be annoying, but is a small price to pay for the utility it provides.
TL;DR Vulture masks turn the game into easy mode and I have an easy strategy on how to get one in the detailed walkthrough below.
Vulture GrubsTL;DR Vulture grubs are bait for Vultures. We will be collecting one very early in the guide and using it to trap a Vulture in a later segment.
Echoes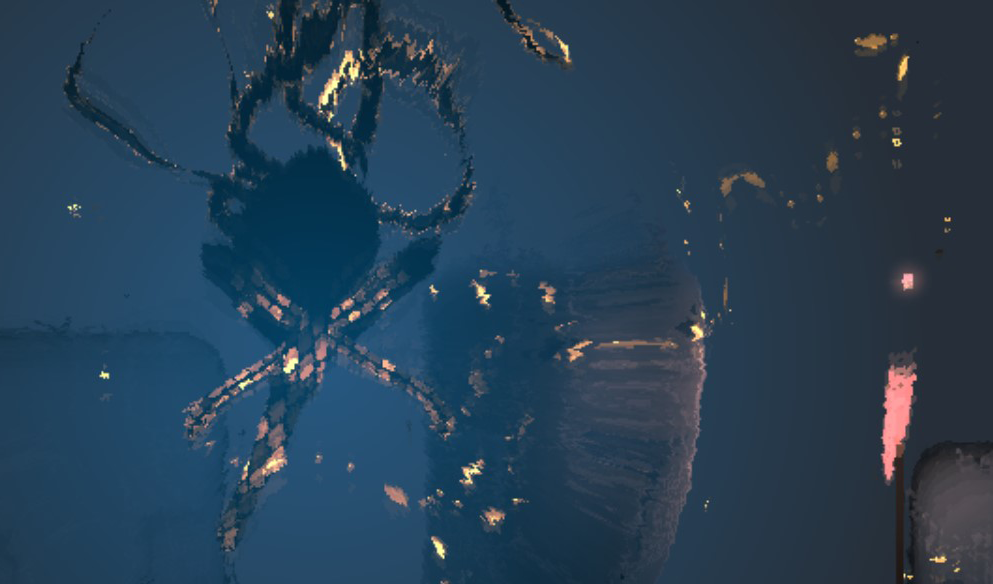 Echoes are cosmic entities that appear in the game in set locations and under a specific set of circumstances. Meeting them gives you some lore and gives a boost to your maximum karma and then you wake up in the last shelter you hibernated at as if that cycle had never happened. If you visit an echo during a starvation cycle, then the game will reset you to the cycle before you starved.
Since Five Pebbles doesn’t instantly boost your karma to the maximum level like he does for Monk/Survivor, this is the method we will be using to reach the maximum karma level in the game which will enable us to ascend and complete the run. Hunter is unique in that he does not need to discover their location beforehand to visit them, they will always be in their spots as long as he has the requisite karma level. An active echo will also create a zone in the surrounding rooms where creature spawns do not occur and any creature that stumbles into this area will fall asleep. This can be used to our advantage to make travelling through that area safer. There will be times when we make use of this mechanic by skipping the echo and travelling past it and then visiting the echo on our way back as we are backtracking.
TL;DR Visiting echoes boosts your maximum karma and we will be visiting 4 of them to reach the highest maximum karma and ascend to finish the game. 2 of the 4 will have a karma requirement so maintaining high karma is important but by using the starvation mechanic we will effectively never lose karma.
Starvation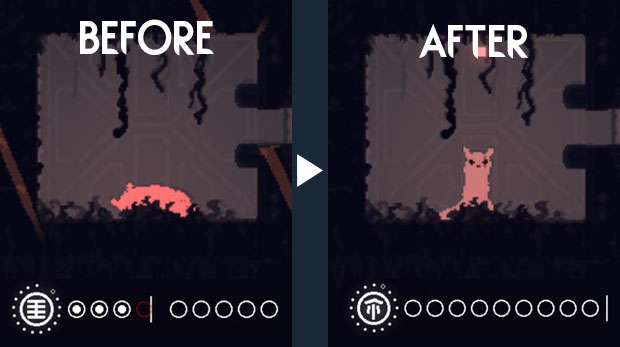 Whenever you enter a shelter with less than the required food for hibernation, you have the option to hold down to force hibernate as long as you have at least one food pip. This will increase your karma by one and take you to the next cycle as if you had hibernated normally but will not save your game and will put you in a starved state for the next cycle. A starved state means that you are slower, weaker, and will require a whopping 9 food pips to hibernate successfully. You will also collapse from fatigue if you don’t pace yourself properly. You can not hibernate for two cycles consecutively. Dying on a starvation cycle will take you all the way back to the last successful hibernation cycle.
So why are we subjecting ourselves to such torment in an already brutally hard game? Well, because it completely bypasses the main challenge of Hunter’s campaign, which is the limited cycles. Starving increases karma by 1 as if you had hibernated normally and dying decreases karma by one and takes you back to before you starved, which means you can just starve again to increase karma by one… and so on. Utilizing the starvation mechanic means that you will never be below the karma requirement for gates or echo visitation and it means we can die as many times as we want while trying to progress with little to no consequence on the overall run.
TL;DR Hold down in a shelter to hibernate with less food than required (at least 1 pip). The karma lost by death can be negated with the karma gained from starving, which means you effectively never lose karma while trying to make it to the next checkpoint.
Shelter Failures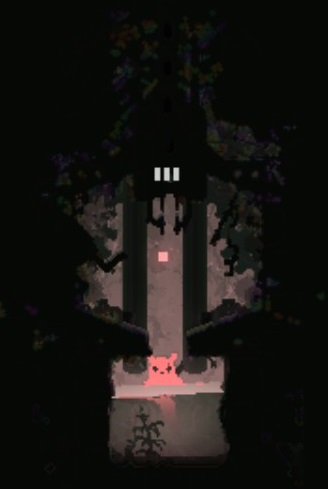 A shelter failure is a very rare random event that can occur in some slugcat campaigns in which the slugcat will wake up in a shelter to find it flooded. The cycle will begin with heavy pulsating rainfall for the first couple of minutes and the slugcat will be forced to hibernate elsewhere for that cycle. This can be very troublesome as it will disallow starving for that cycle, which can make things much more difficult for us, especially in the early segments of the run. The best we can do without the use of mods is to improvise.
TL;DR There is a chance for shelters to flood and force you out of them which will prevent starving for that cycle. It is a VERY rare occurrence and you will just have to adapt if it happens. Welcome to Rain World!
Valuable Resources
The following are valuable assets on your journey and very useful tools for players of all skill levels. Refer to them as needed.
The Rain World Wiki:-
https://rainworld.miraheze.org/wiki/Rain_World_Wiki
Rain World Interactive Map:-
https://henpemaz.github.io/Rain-World-Interactive-Map/
Controllable Rain Deer mod by Maxi Mol:-
https://steamcommunity.com/sharedfiles/filedetails/?id=3010517336
Overview
We start in farm arrays where we will quickly dump the green neuron fly and pearl and head east and then up into Sky Islands. We visit the echo in Sky Islands and then proceed to Chimney Canopy and across to The Wall, while using the echo’s presence to keep us safe without visiting them. Before Entering The Wall, we will kill a Vulture and take his mask (this is easy if you use the method in the walkthrough). We then ascend the wall to visit the Echo at the top and we will be taken all the way back to the bottom. Climbing the wall is normally a nightmare but the vulture mask makes it a cake walk.
NOTE: Since we’ll be at the top of the wall, It is possible to deviate from my plan by visiting Pebbles who bumps up your karma like an echo would and gives you 5 extra cycles but this is not at all necessary as everything we need is comfortably on our way back and we will need to backtrack either way.
We then retrace our steps back to Farm Arrays while visiting the Chimney echo on our way back. We make it all the way back to our starting point where it’s a short Rain Deer ride west to the Subterranean gate where we will meet our 4th and final echo.
At that point, the run is basically a guaranteed success. You should easily be in Subterranean with around 7 cycles remaining if you followed the guide. Having 4 cycles or higher means you can rest at literally every shelter on your way to The Depths with not a worry in the world. Dying has no consequence as you do not need your karma level to be high anymore so you could theoretically be at Cycle 1 and still make it all the way to the end of the game if you skip all the shelters.
This might sound daunting even as I explain it, but I have divided the journey into smaller more digestible trips with visual aids, text descriptions and a captioned video guide for each segment of the journey.
TL;DR We completely skip Hunter's quest and visit 4 echoes (Sky Islands, The Wall, Chimney Canopy, & Subterranean) to reach max karma and ascend. I’ve divided the entire journey into smaller segments with a specific guide + video for each segment. See below.
Segment #1 (Start > Sky Islands Echo)
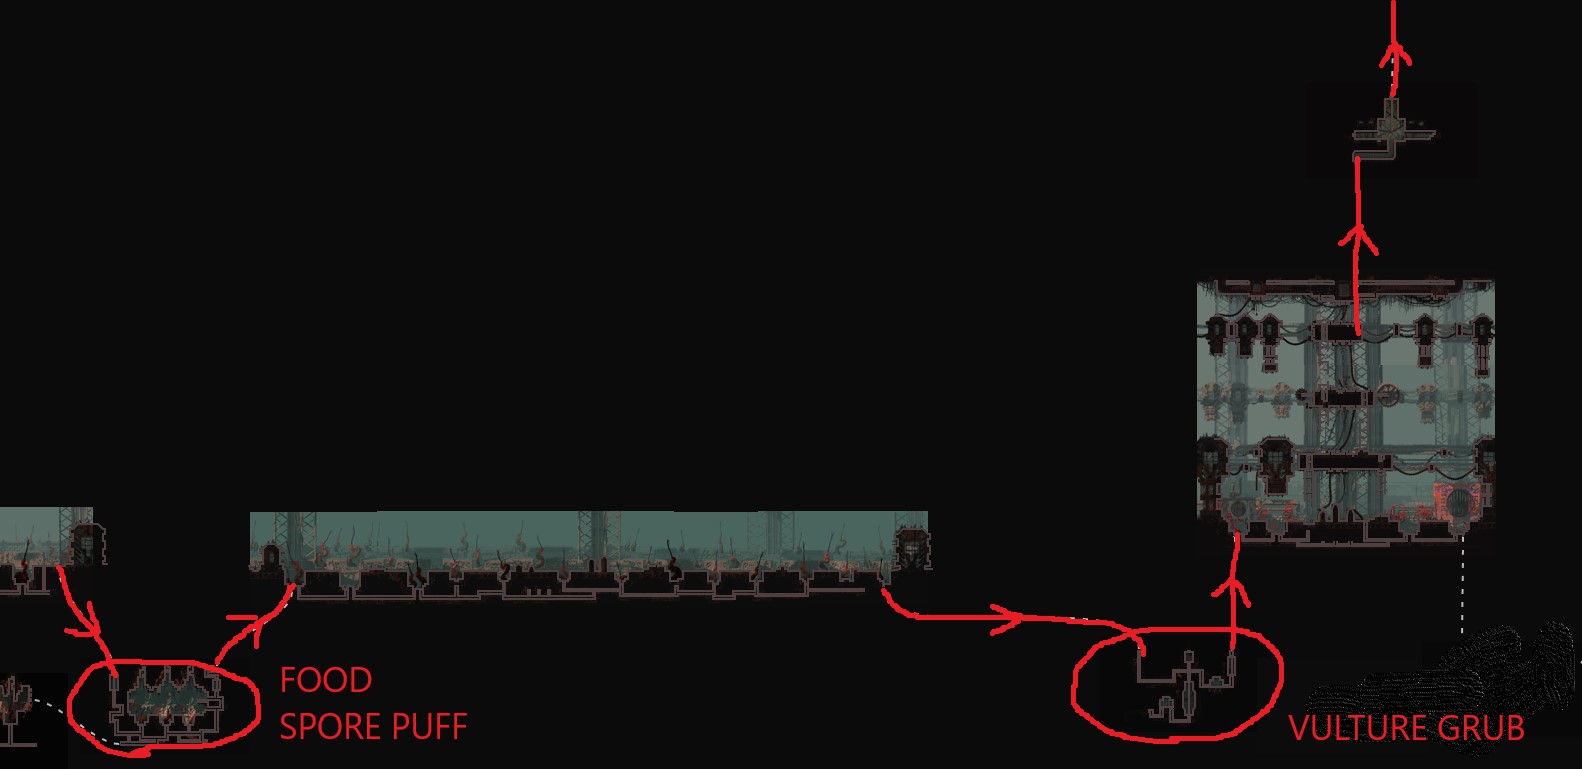 As soon as we begin, we will want to immediately dump the green neuron and pearl as we will not be needing them. The very next room is filled with baby centipedes, eat 2 of them to fill your food pips and grab the sneaky spore puff hidden in the center of the room behind the foreground; it can come in handy if we need to insta-kill a centipede.
Continue heading east, towards the Sky Islands gate, try to stay above the tunnels in the next couple of screens as centipedes and lizards travel through pipes faster than you.
IMPORTANT NOTE: There is a tight claustrophobic room you will come across that will contain two Vulture Grubs. One of them will be dead with the other one alive and flopping around. You will need to grab the one that's alive and swallow it to store it in your stomach. This can be done by holding the eat button. It is CRUCIAL that we take this Vulture Grub and that he remains alive. He will save us a lot of trouble down the road.
Continue east and you will find a room with broken ladders. Begin climbing to exit the room upwards toward the karma gate. On the upward path to the karma gate, expect to find multiple adult centipedes of varying sizes. If you were able to hang on to that spore puff from earlier, it can be a life-saver here. The spore puff will act as a poison gas bomb to any arthropod creatures (i.e. Centipedes, Spiders, Dropwigs). Use the spore puff to get rid of any centipedes that you can not sneak past and continue towards the gate.
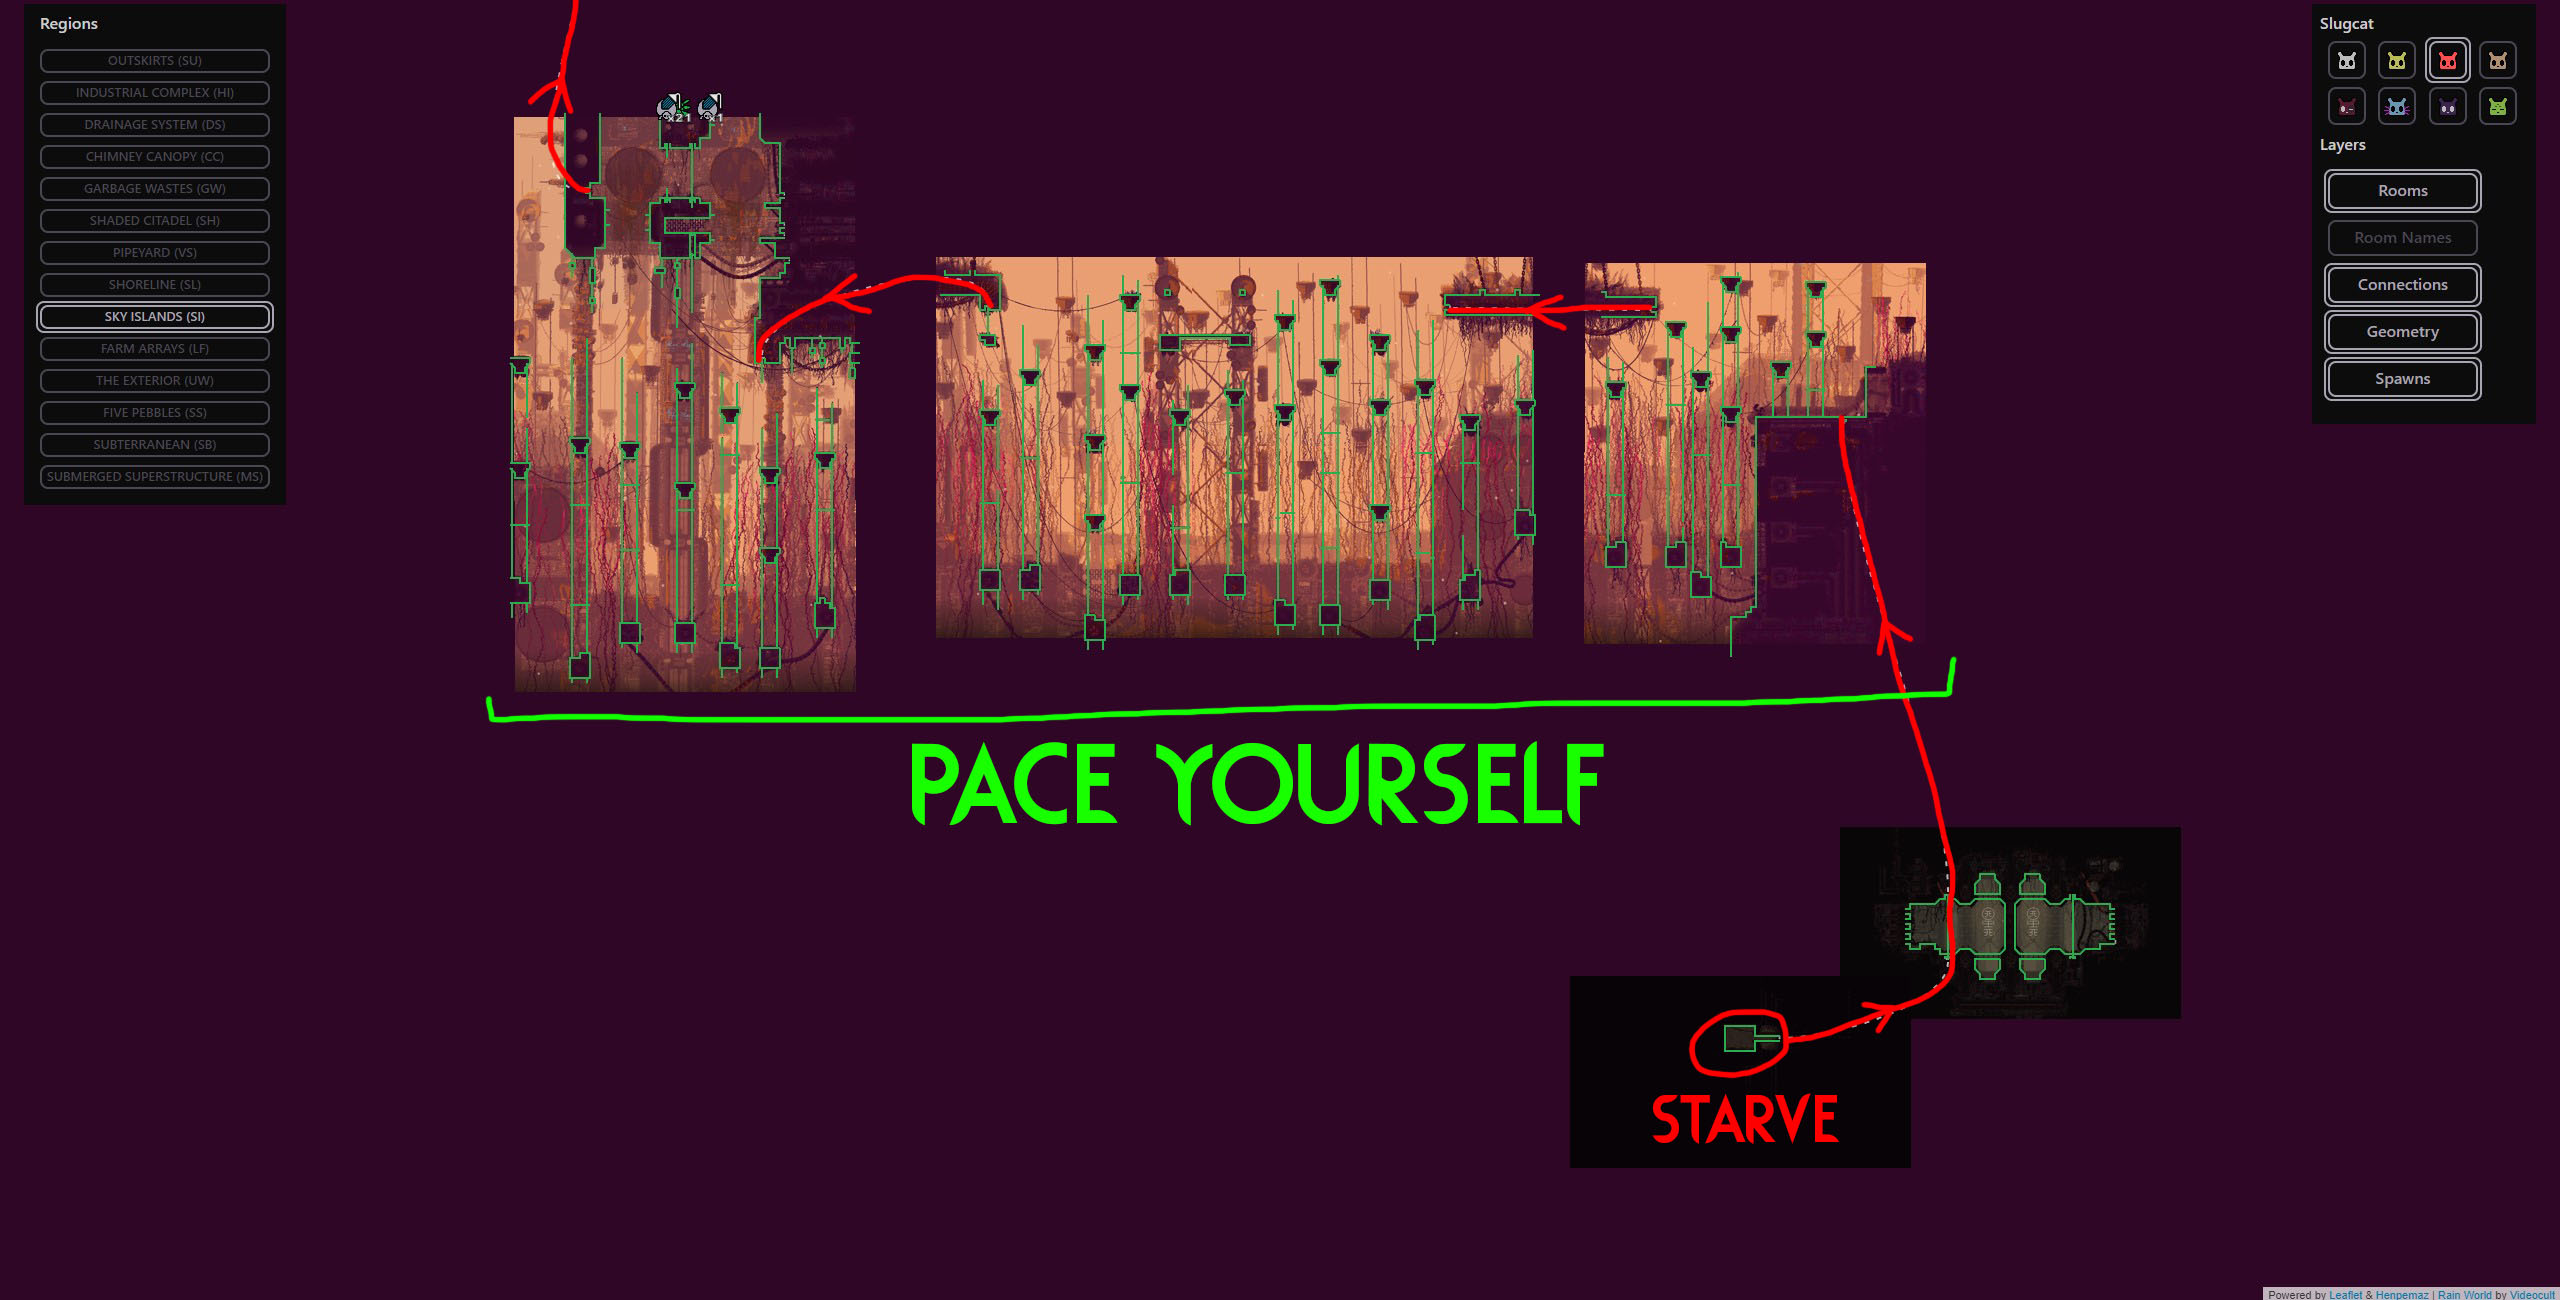 As soon as you pass the karma gate, hibernate in the shelter right next to it. You have 9 food pips and hibernation will drain 6. Hold down as soon as you wake up to use the remaining 3 pips to force hibernate. This will boost you to karma level 5 which is what we need to activate the upcoming echo.
NOTE: You are now in a starved state. This means that you are slower, weaker, and will collapse from fatigue after excessive jumping/climbing. It also means you will need to fill all 9 food pips to hibernate. The advantage, however, is that you have nothing to lose if you die. Since starvation does not save the game, you will be reset to before you starved upon death. Your karma will decrease to 4 and you will wake up with 3 food pips. This means that all you need to do is just starve again to boost yourself back to karma 5. You can repeat this indefinitely with no consequence to the overall run. Using the starvation mechanic in this way will nullify the need to preserve karma and remove all the stress of trying to survive. PRO TIP: These effects will be removed as soon as you fill your food pips.
Continue upwards out of the karma gate and head towards the next shelter on the map. This will involve a lot of climbing and jumping in the first few screens. You will need to be careful, as if you do not pace yourself properly, you can collapse and fall to your death. Take short breaks after every few jumps to catch your breath. It is uncommon, but you could be attacked in the first few screens by a vulture. Unfortunately, due to the nature of these first few screens, this is almost a guaranteed death, as unless you’re able to leave the room, it is very difficult to evade the vulture. If he gets you, simply restart, starve, and give it another go. Dying on a starvation cycle does not really matter at all.
A few rooms into Sky Islands, you will begin to notice a grayscale effect on the screen. This is the effect of the nearby echo. Echoes will prevent creatures in the surrounding areas from spawning, and any creature that stumbles into the echo zone will fall asleep. We will use this as our strategy to hunt for easy food so we can hibernate as close to the echo as possible.
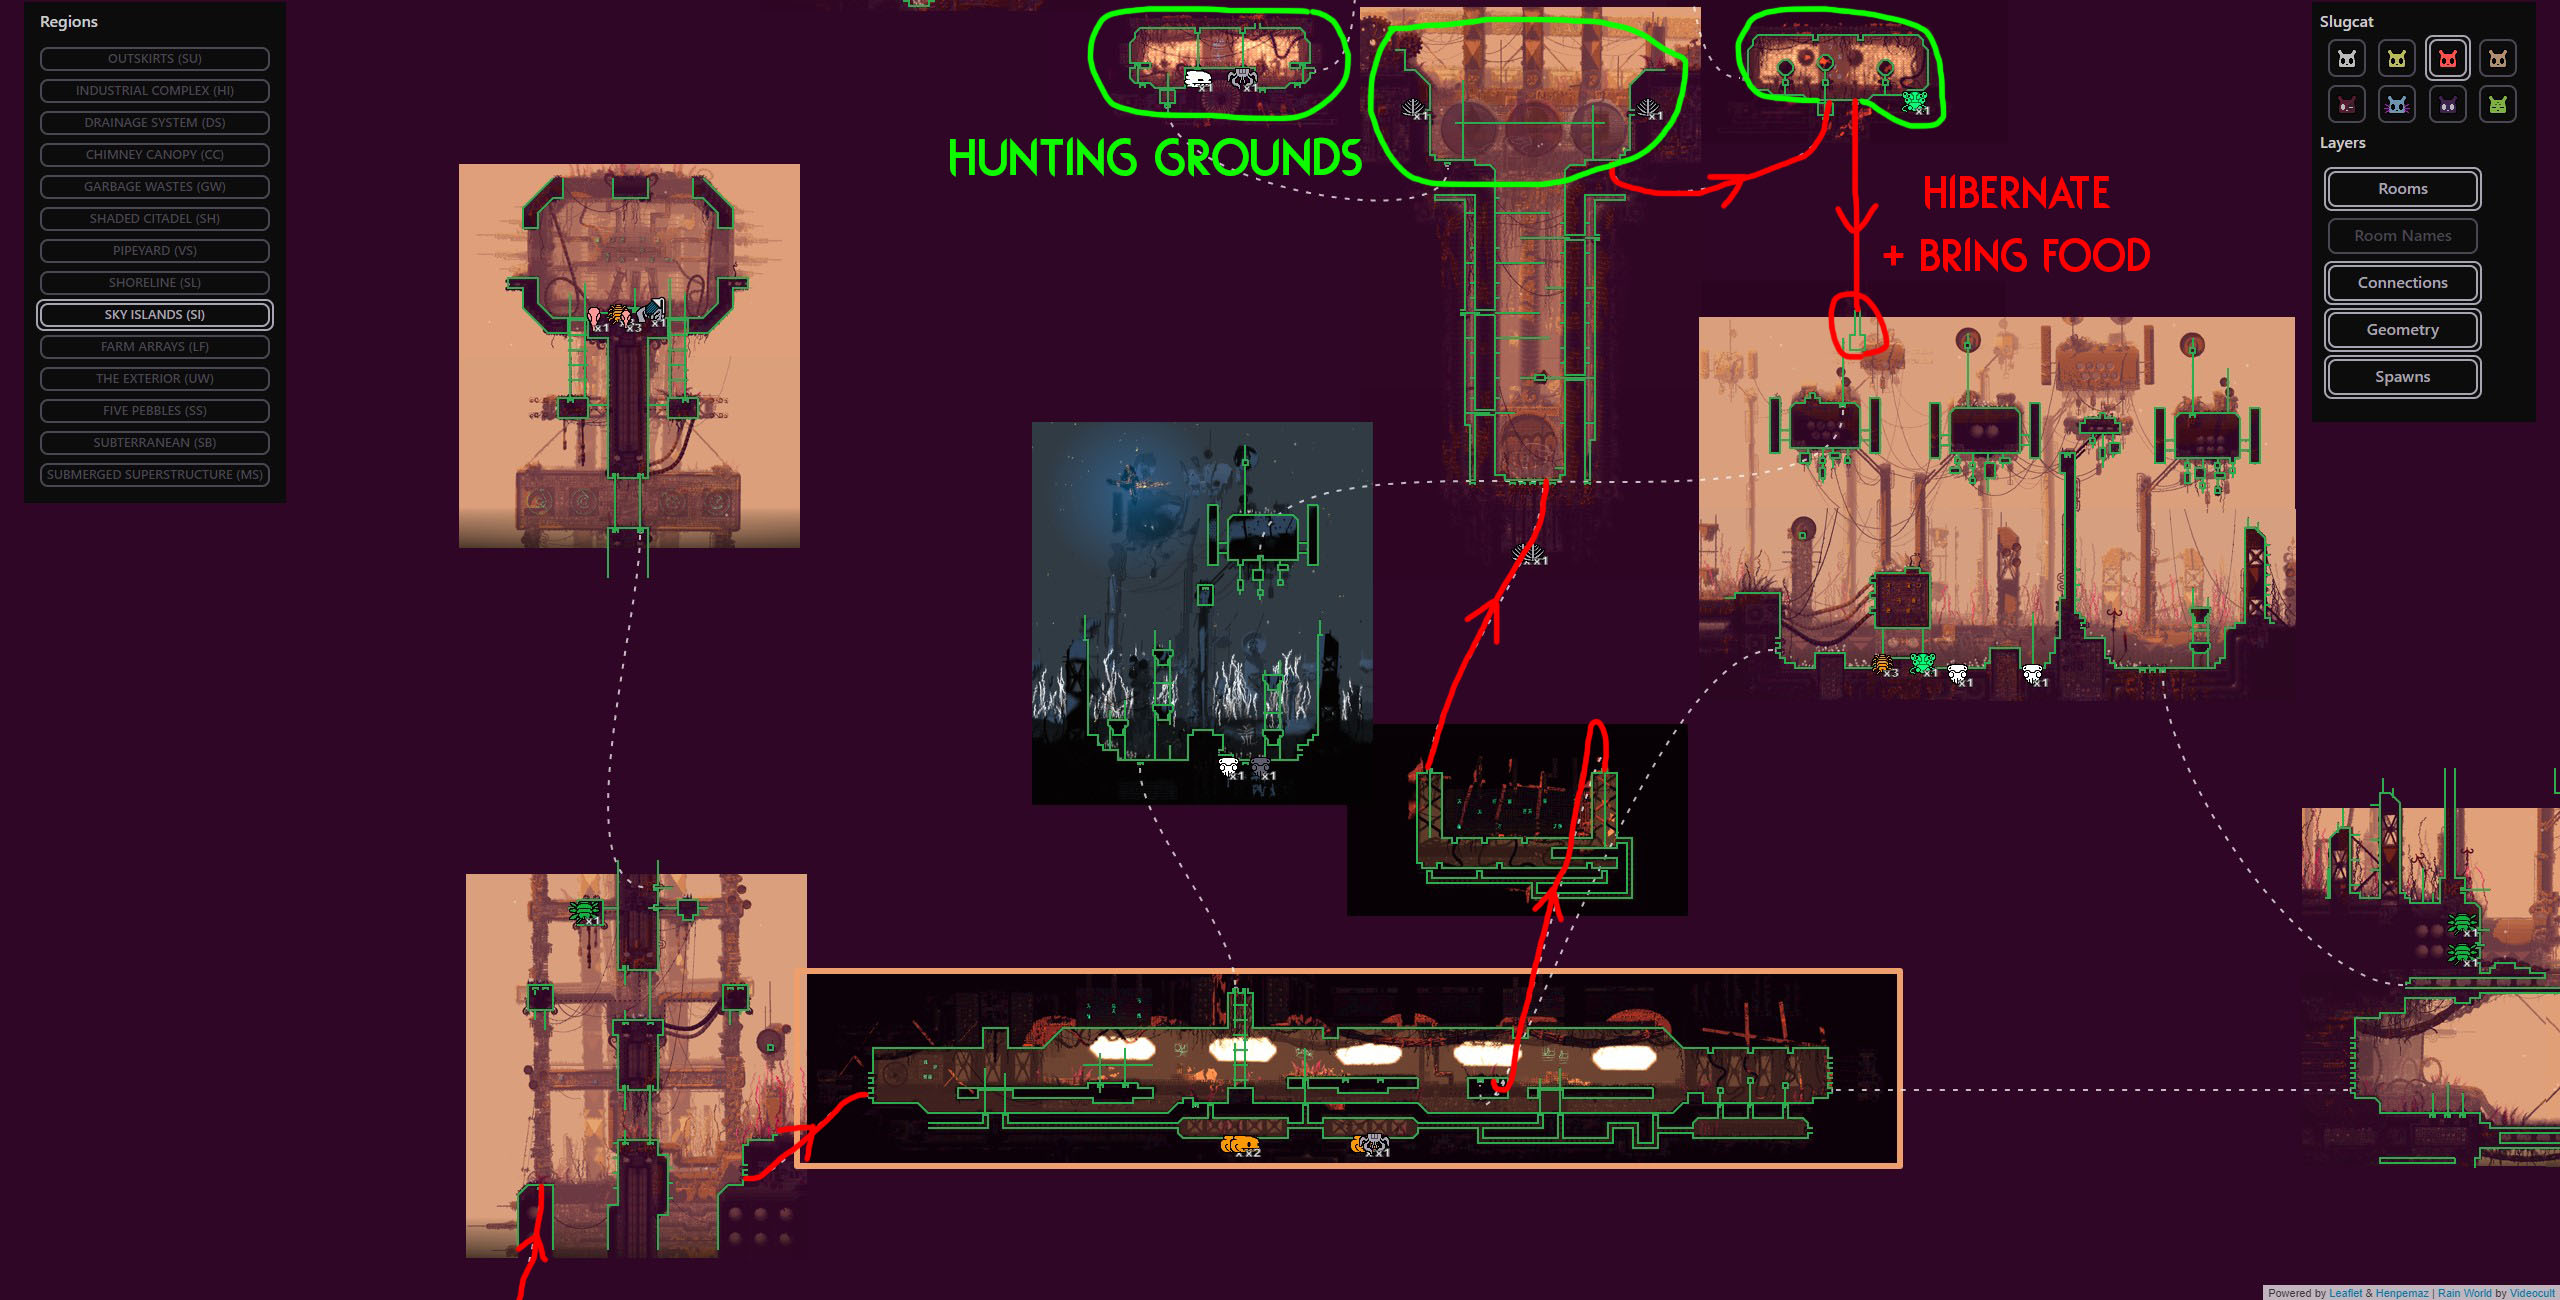 After making it through the echo zone and the infamous yellow lizard tunnel (empty now thanks to the echo), we will proceed towards the shelter. One screen away from the shelter is where the echo’s influence ends. We will use this as our hunting ground. Try to hunt in the adjacent rooms, and retreat to this room if you are pursued. Anything that stumbles into this room will flop to the floor unconscious making them an easy kill and an easy meal. There are multiple eggbugs in this area and they are optimal as a source of food, as they provide 7 food pips (6 for the eggs and 1 for the corpse). After you fill your belly, try your best to bring some food with you to the shelter. 1 eggbug egg is all you need. Hibernate with your breakfast and get ready to visit the echo.
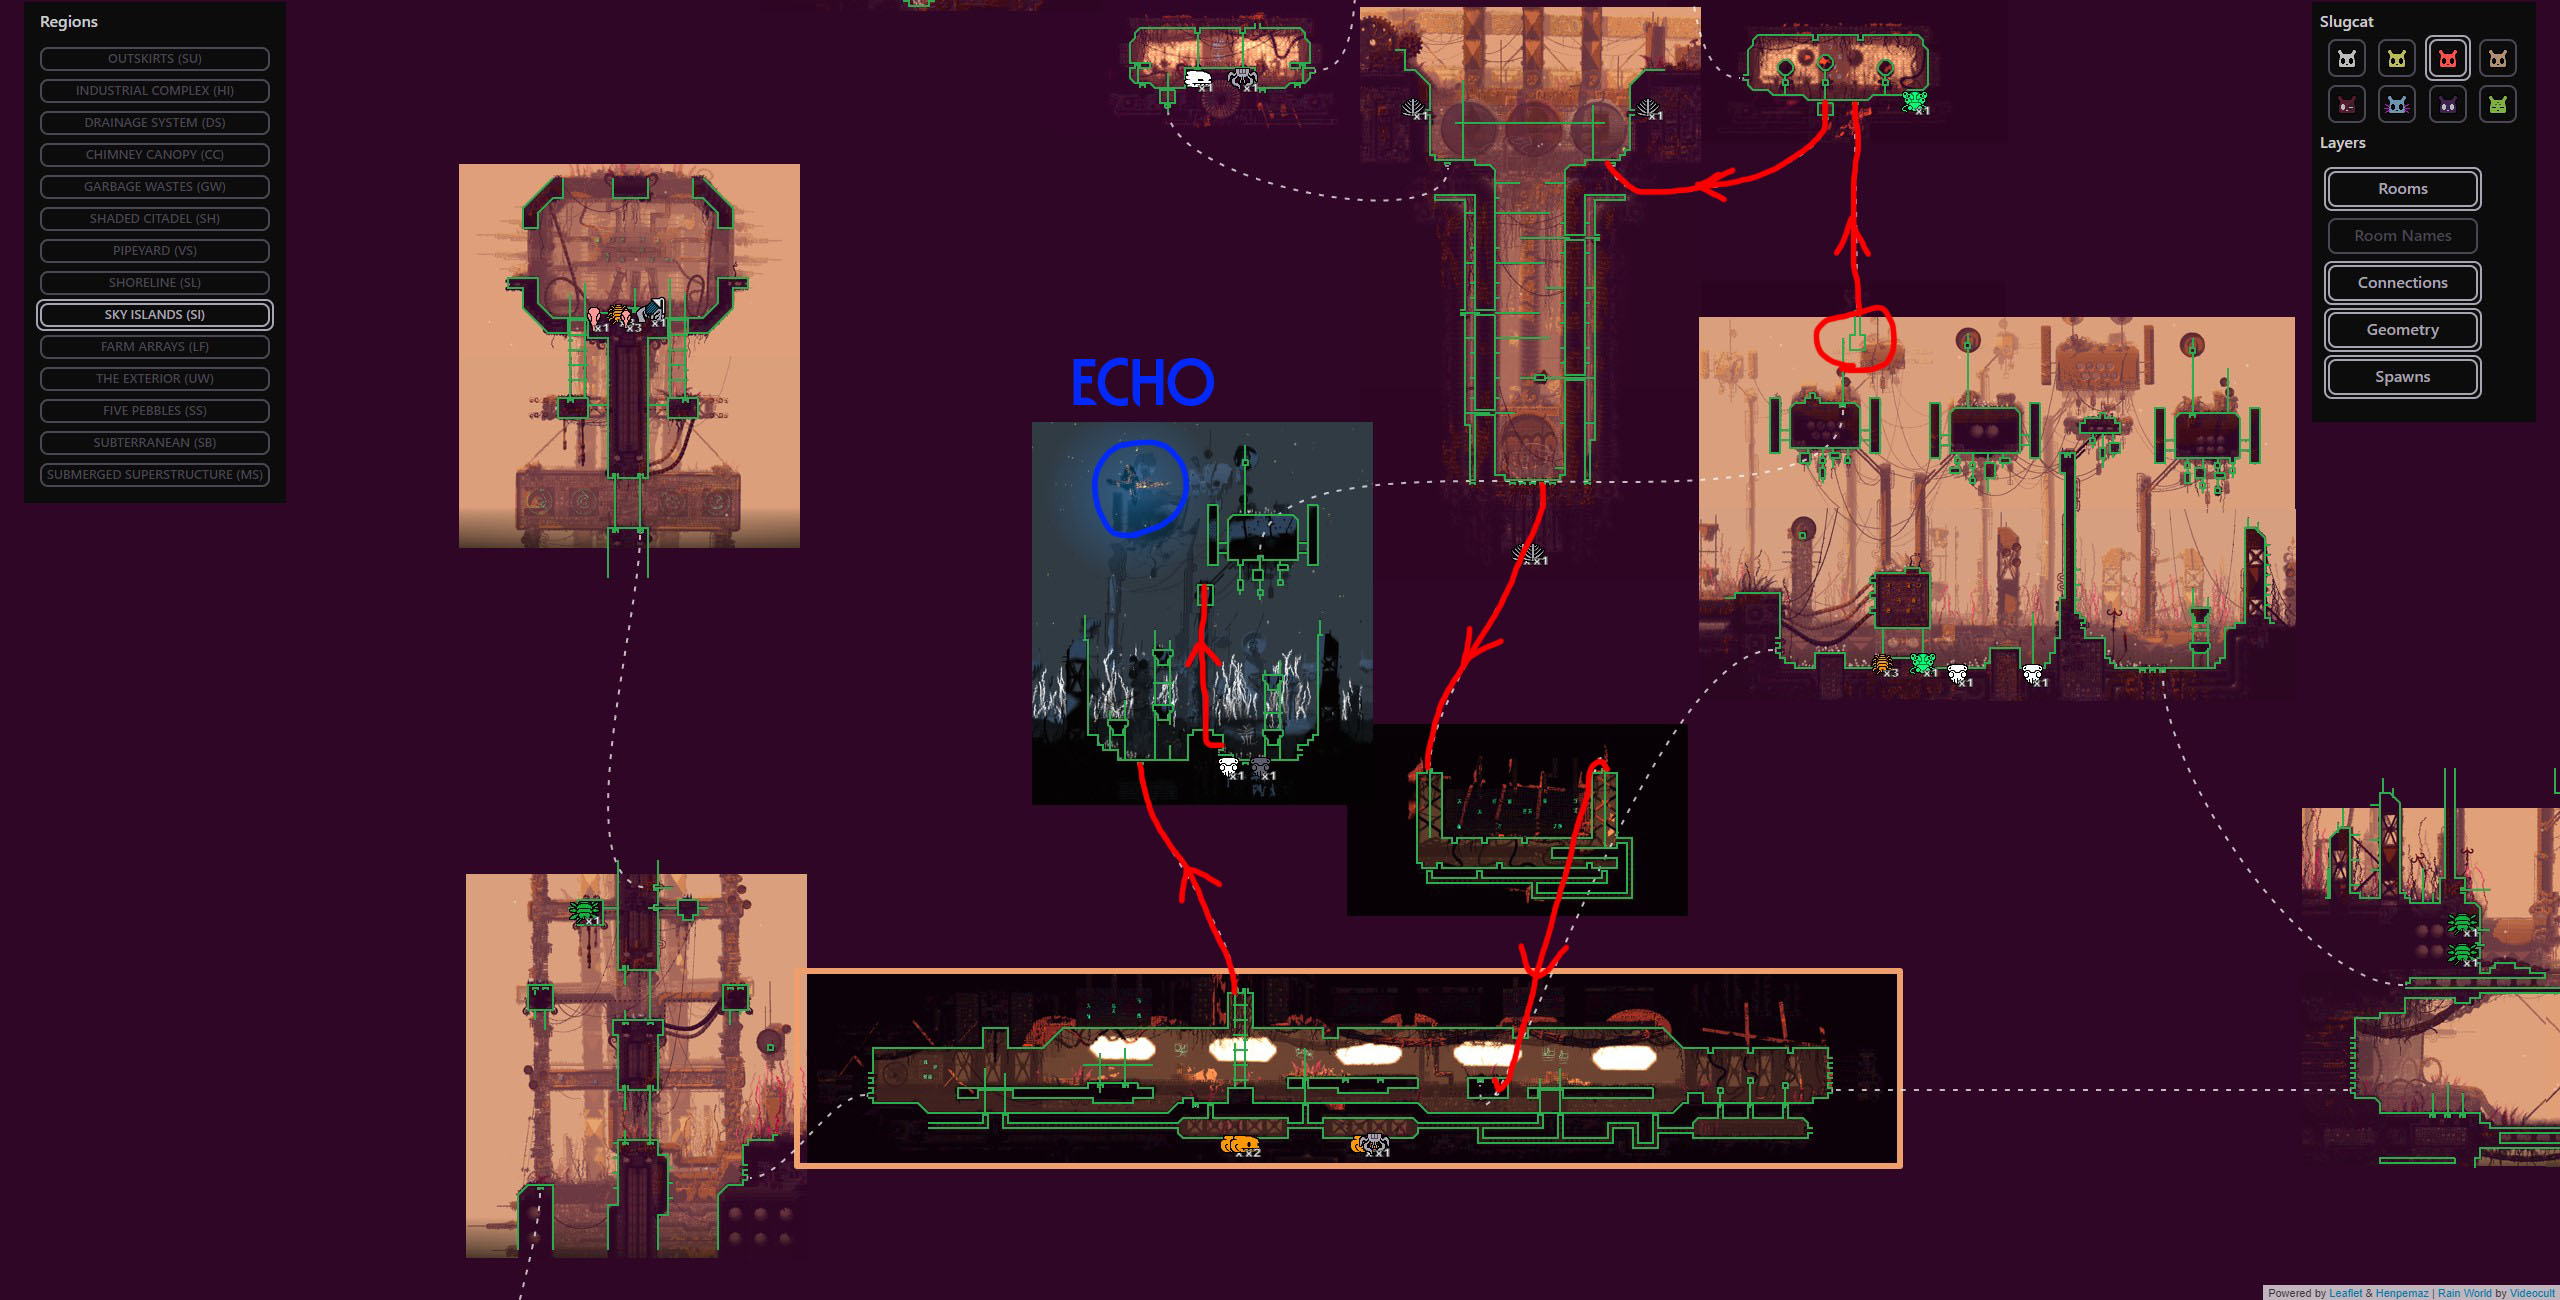 Wake up and begin making your way to the echo. Generally, you should make it a habit of always starving if it’s possible but for this cycle it might not be necessary as the next few rooms should be safe while the echo is active. Just be careful in the screen immediately outside the shelter as it is a Scavenger hotspot.
Make your way back down towards the yellow lizard tunnel and climb the ladder towards the echo. As soon as you enter his room he will begin speaking to you, you can leave as soon as the subtitles begin to skip his monologue if you aren’t interested.
After our echo visit, we will be reset to before we starved at karma 7. This means you will wake up along with your breakfast as if the starvation cycle never happened.
Segment #1 Video Walkthrough (with text commentary):
Congratulations that’s 1 echo down and 3 to go. This first section and the next one are by far the hardest part of the whole run.
Segment #2 (Sky Islands > Chimney Canopy)
This is by far the most dreadful part of the whole run because a lot can go wrong, but thanks to the meal you brought with you to the shelter, it just becomes a matter of stress-free trial and error.
Eat your food and force hibernate to starve. We will need to fill our food pips first and foremost before continuing the journey. However, now you do not have the echo’s influence protecting you so the surrounding area can be quite treacherous.
SHELTER FAILURE WARNING:
I've had a shelter failure happen to me here once before and heard reports of the same happening to others on their Hunter runs. It is a very rare and unfortunate occurrence and I have no good advice for it, so just try to improvise as best you can. This is one of the few segments where a shelter failure can be a real nightmare but luckily it is still very early in the run and you may just be inclined to restart if all else fails.
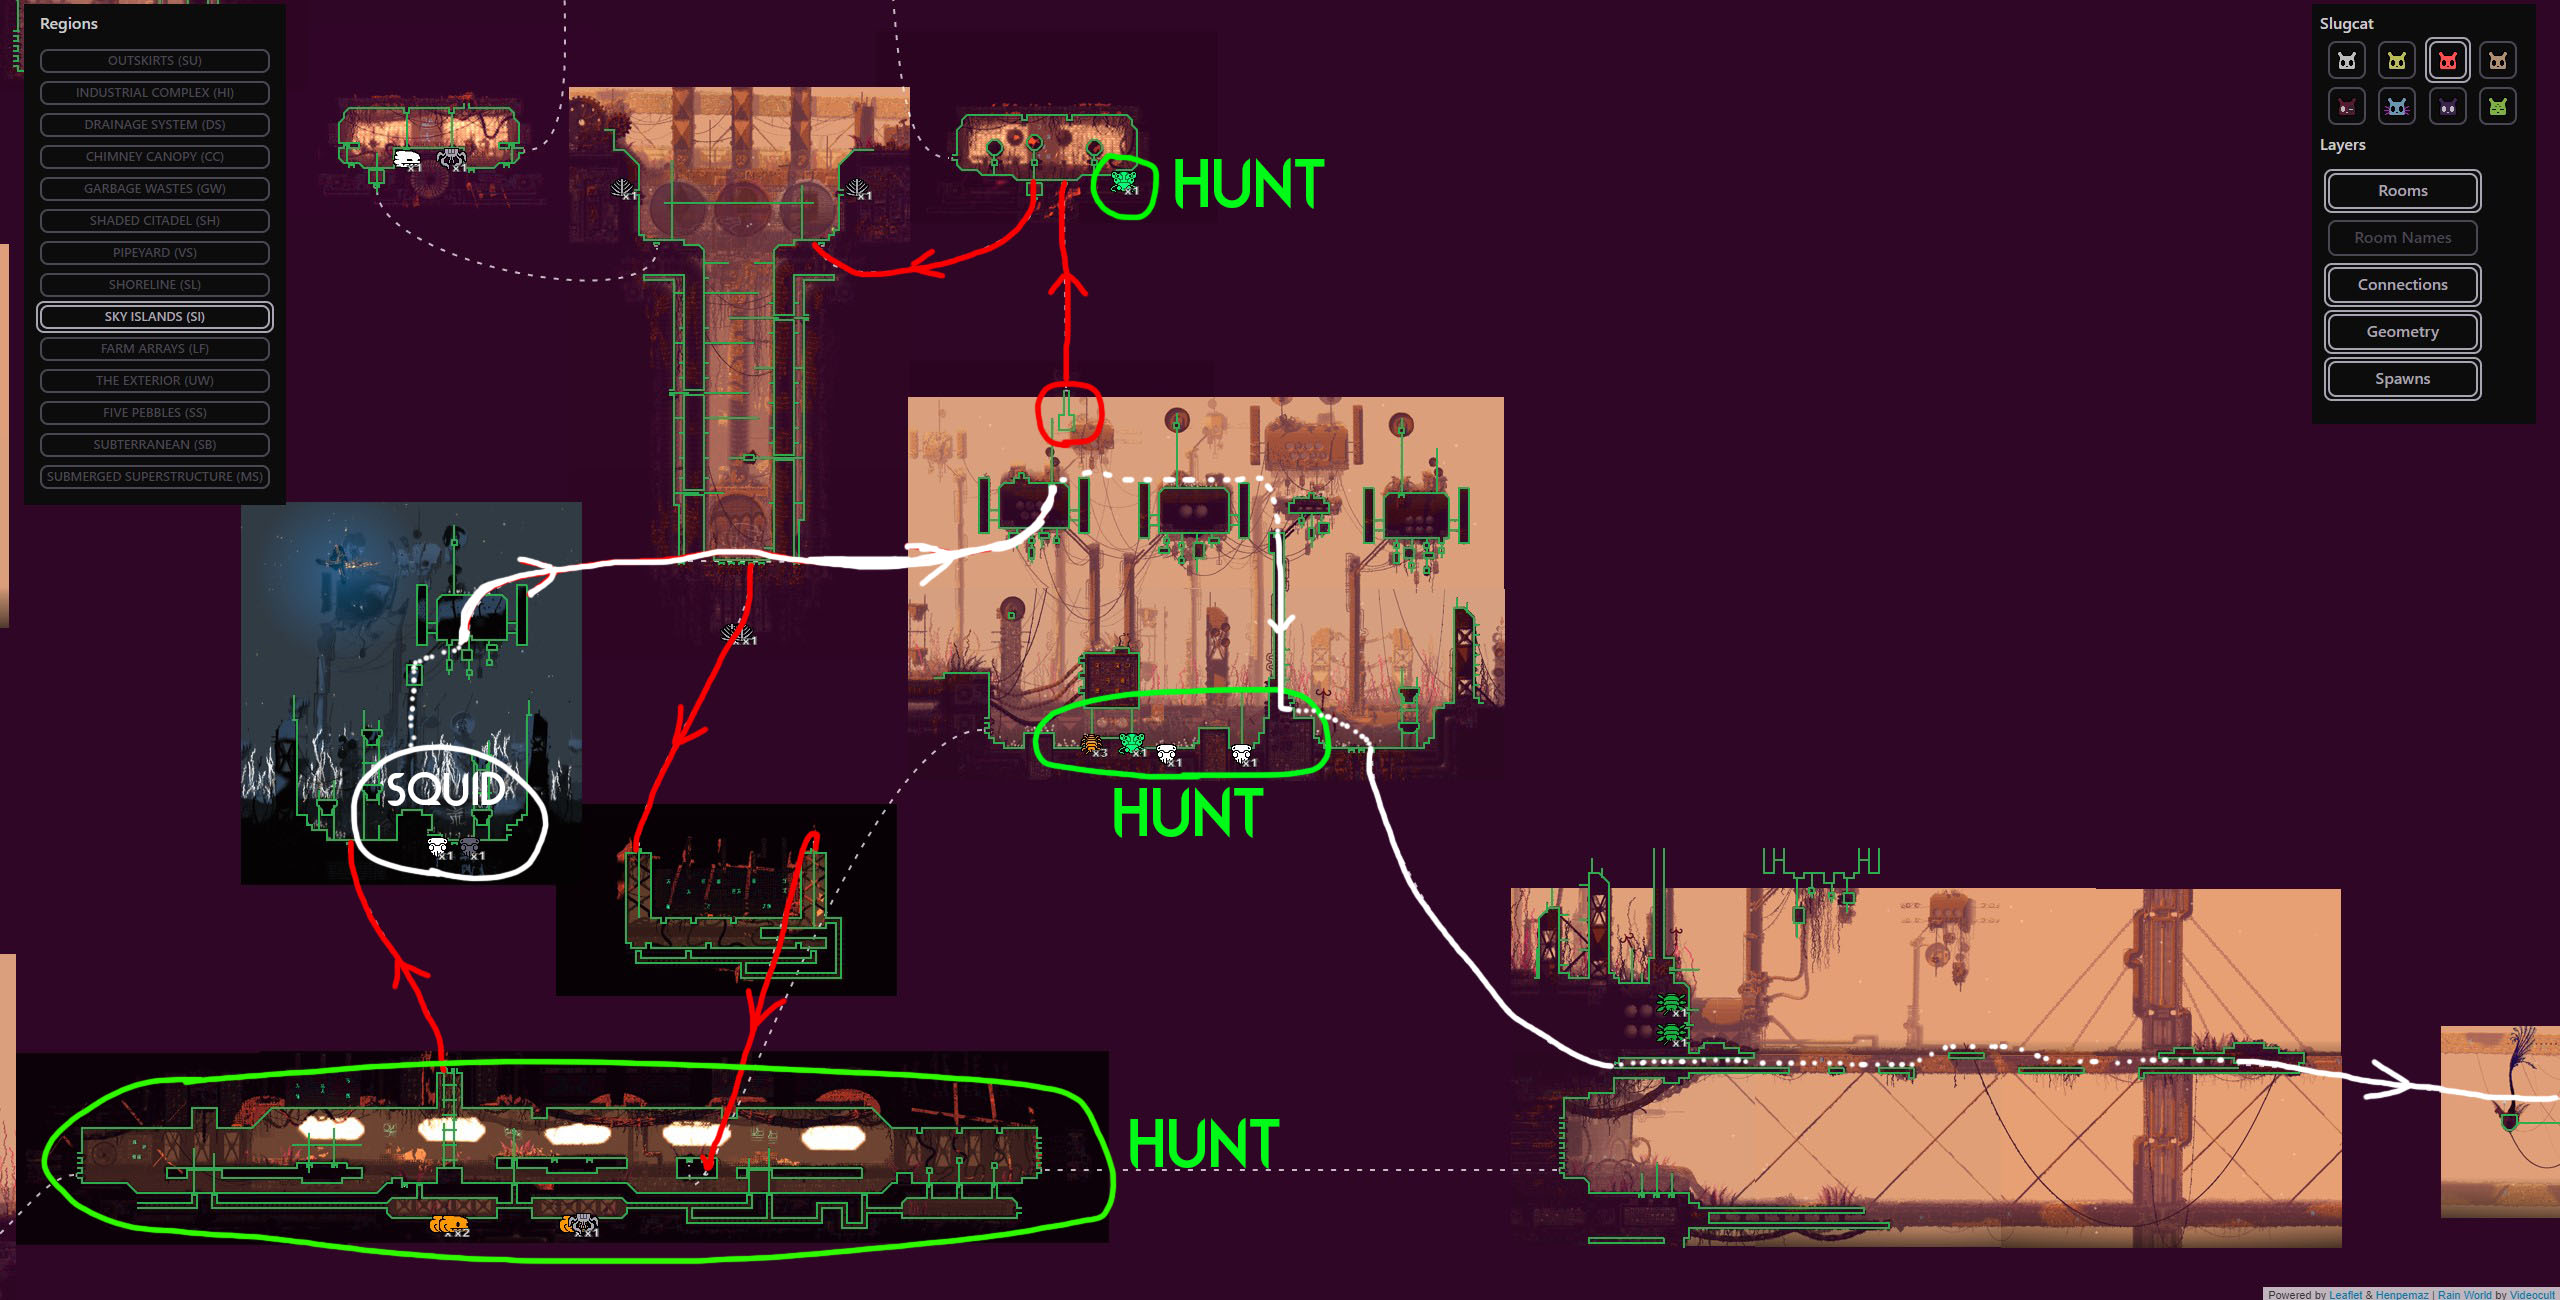 There is an eggbug that spawns in the same room as the shelter. Catch him, eat all his eggs and the corpse and that’s 7 out of 9 pips filled.
 Head towards the echo’s room again. The infamous yellow lizard tunnel is an absolute ♥♥♥♥ show. A gang of yellow lizards, a dropwig or two, and centiwings all in one room. Be patient in this room if you haven’t been spotted yet. The dropwig, lizards and centiwings will very commonly kill each other and you may be able to eat the corpses. Get whatever food you’re missing from this room and move on towards the echo room (Refer to the video walkthrough for more tips on how to hunt in this area).
In the echo room, you will most likely find 1 or 2 squidcadas. We will need one of them and they aren’t very easy to catch if they refuse to cooperate. A black one is good, a white one is better as white squidcadas are larger and can jump higher. Grab whatever you can and begin your journey to the Chimney Canopy karma gate.
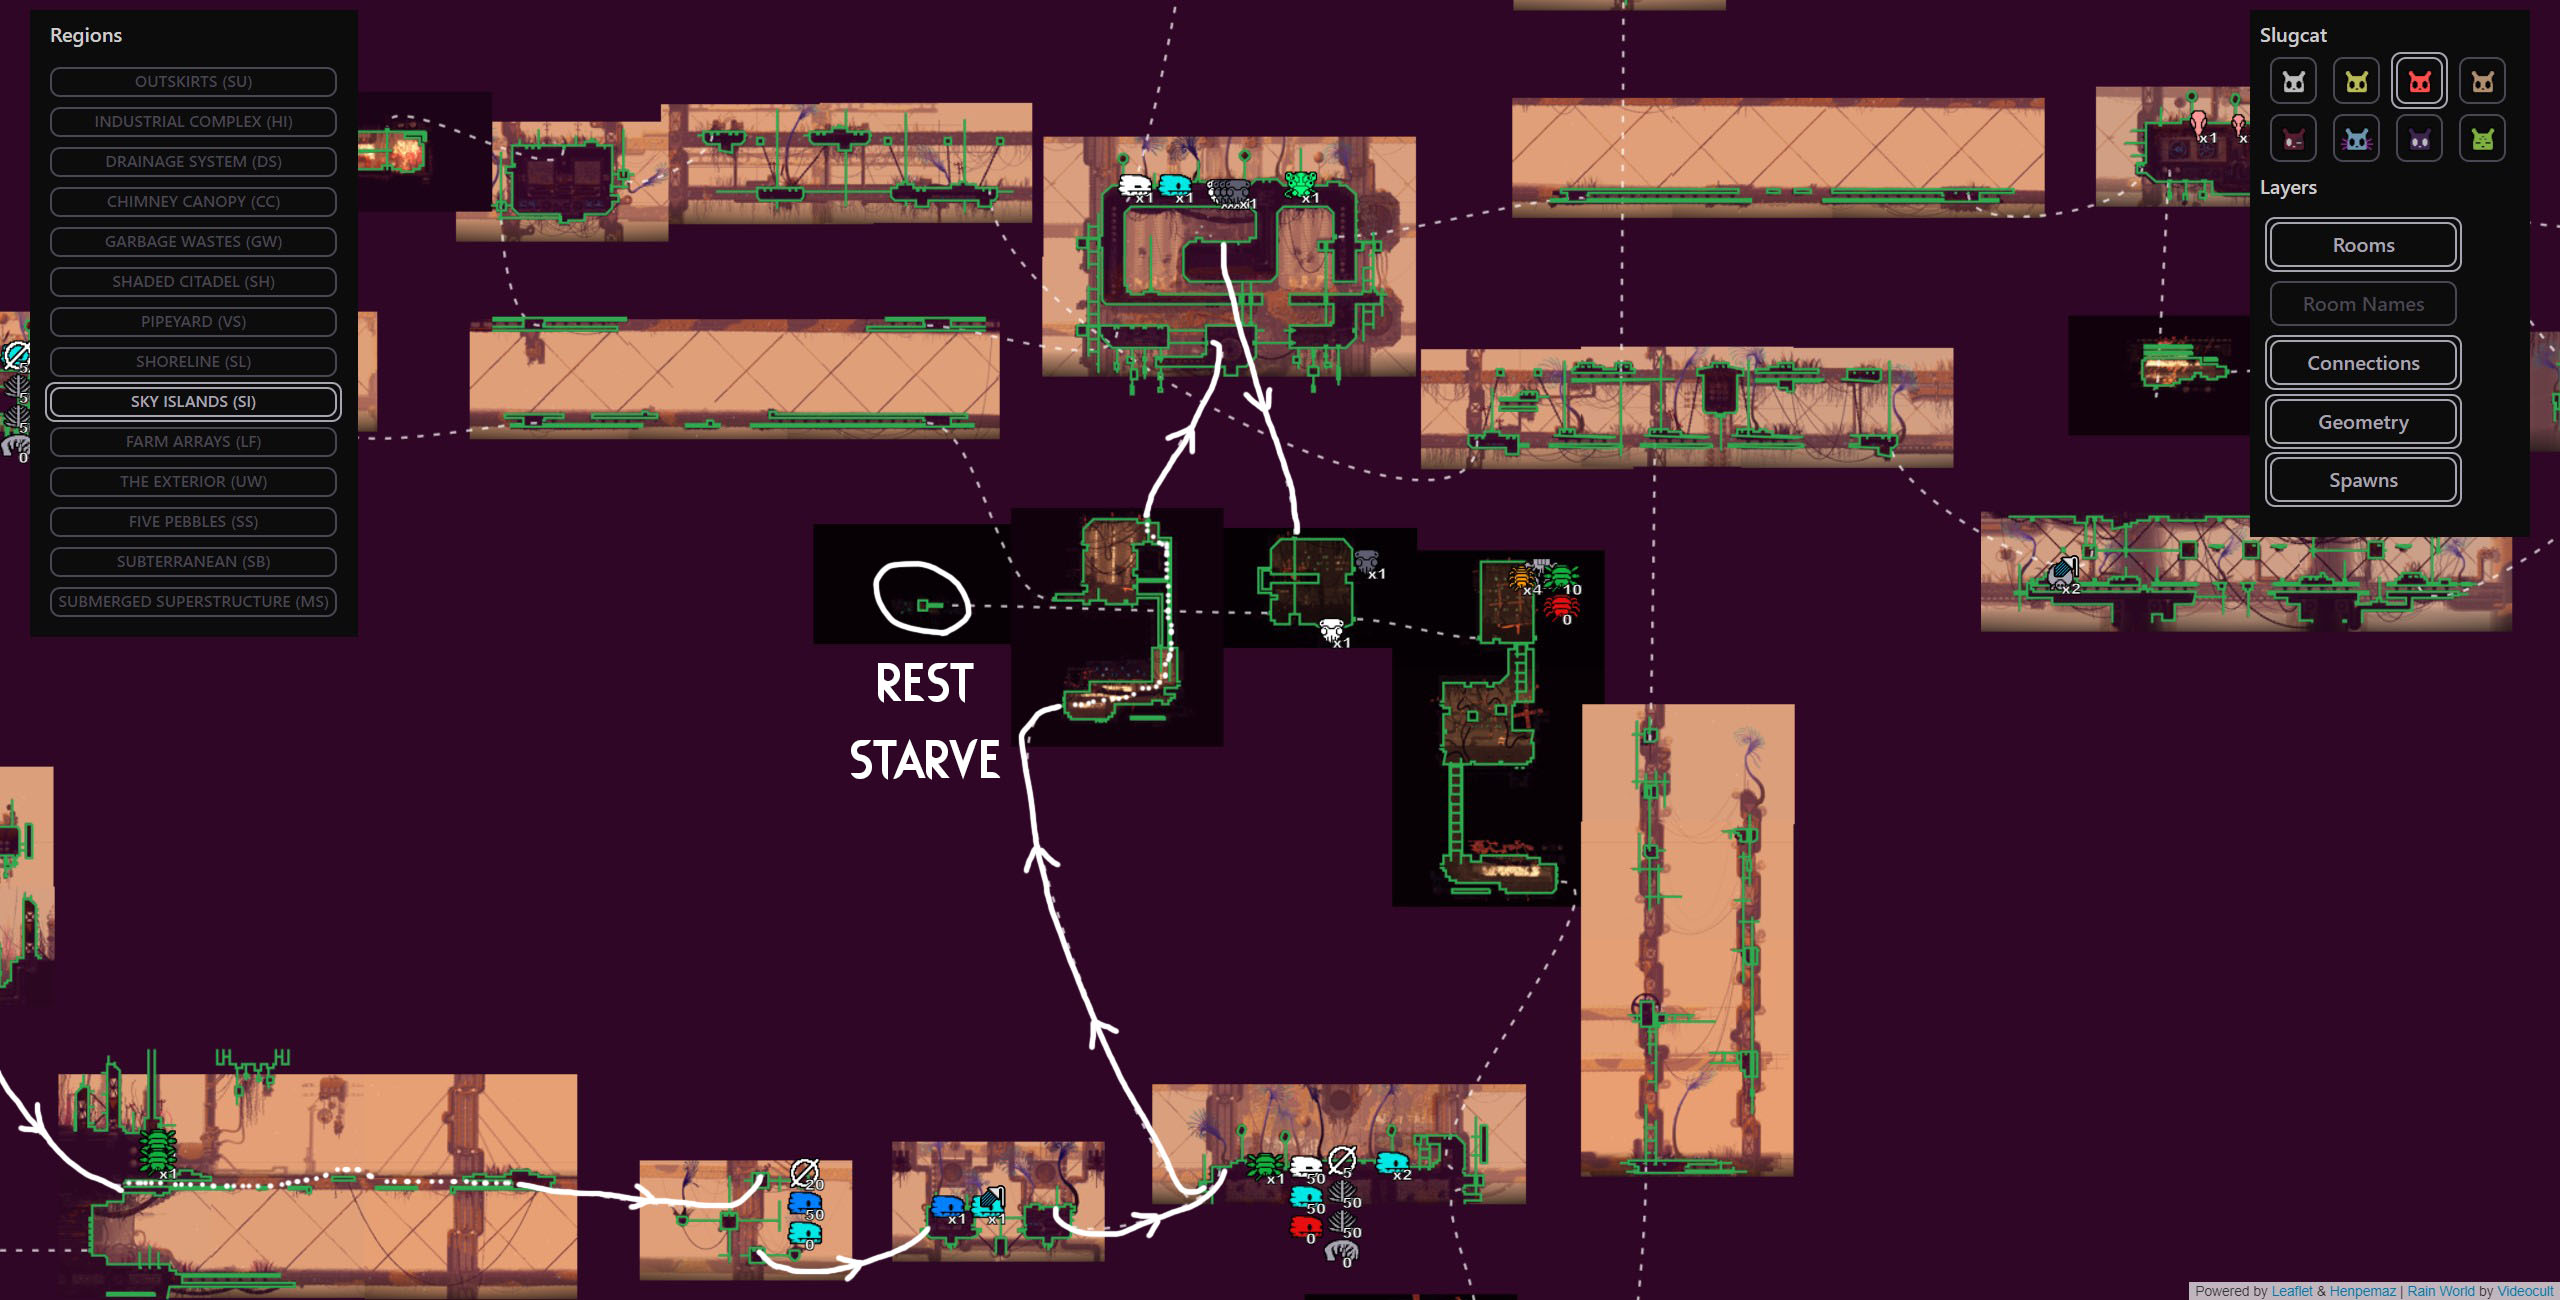 This trip will involve a lot of tight squidcada platforming. Thanks to the starvation mechanic, you don’t lose anything meaningful by dying here, but it is still annoying to restart and hunt for food all over again. Refer to the map or the video guide for directions and hang onto that squidcada as best you can all the way to the next shelter. Beware of cyan lizards, they are your worst enemy and are very hard to evade.
This is a rough trip and can feel quite unfair because of the random nature of the game. Stay calm and cool and keep trying until you make it. Die > Starve > Try again as many times as you need as the karma lost on death is regained by starving so all you’re effectively losing here is a bit of your time.
Once you reach the shelter, make sure you enter with your squid buddy and a spear on your back. Hibernate > Wake up > Kill/Eat the Squid > Starve. The hard part is now behind us.
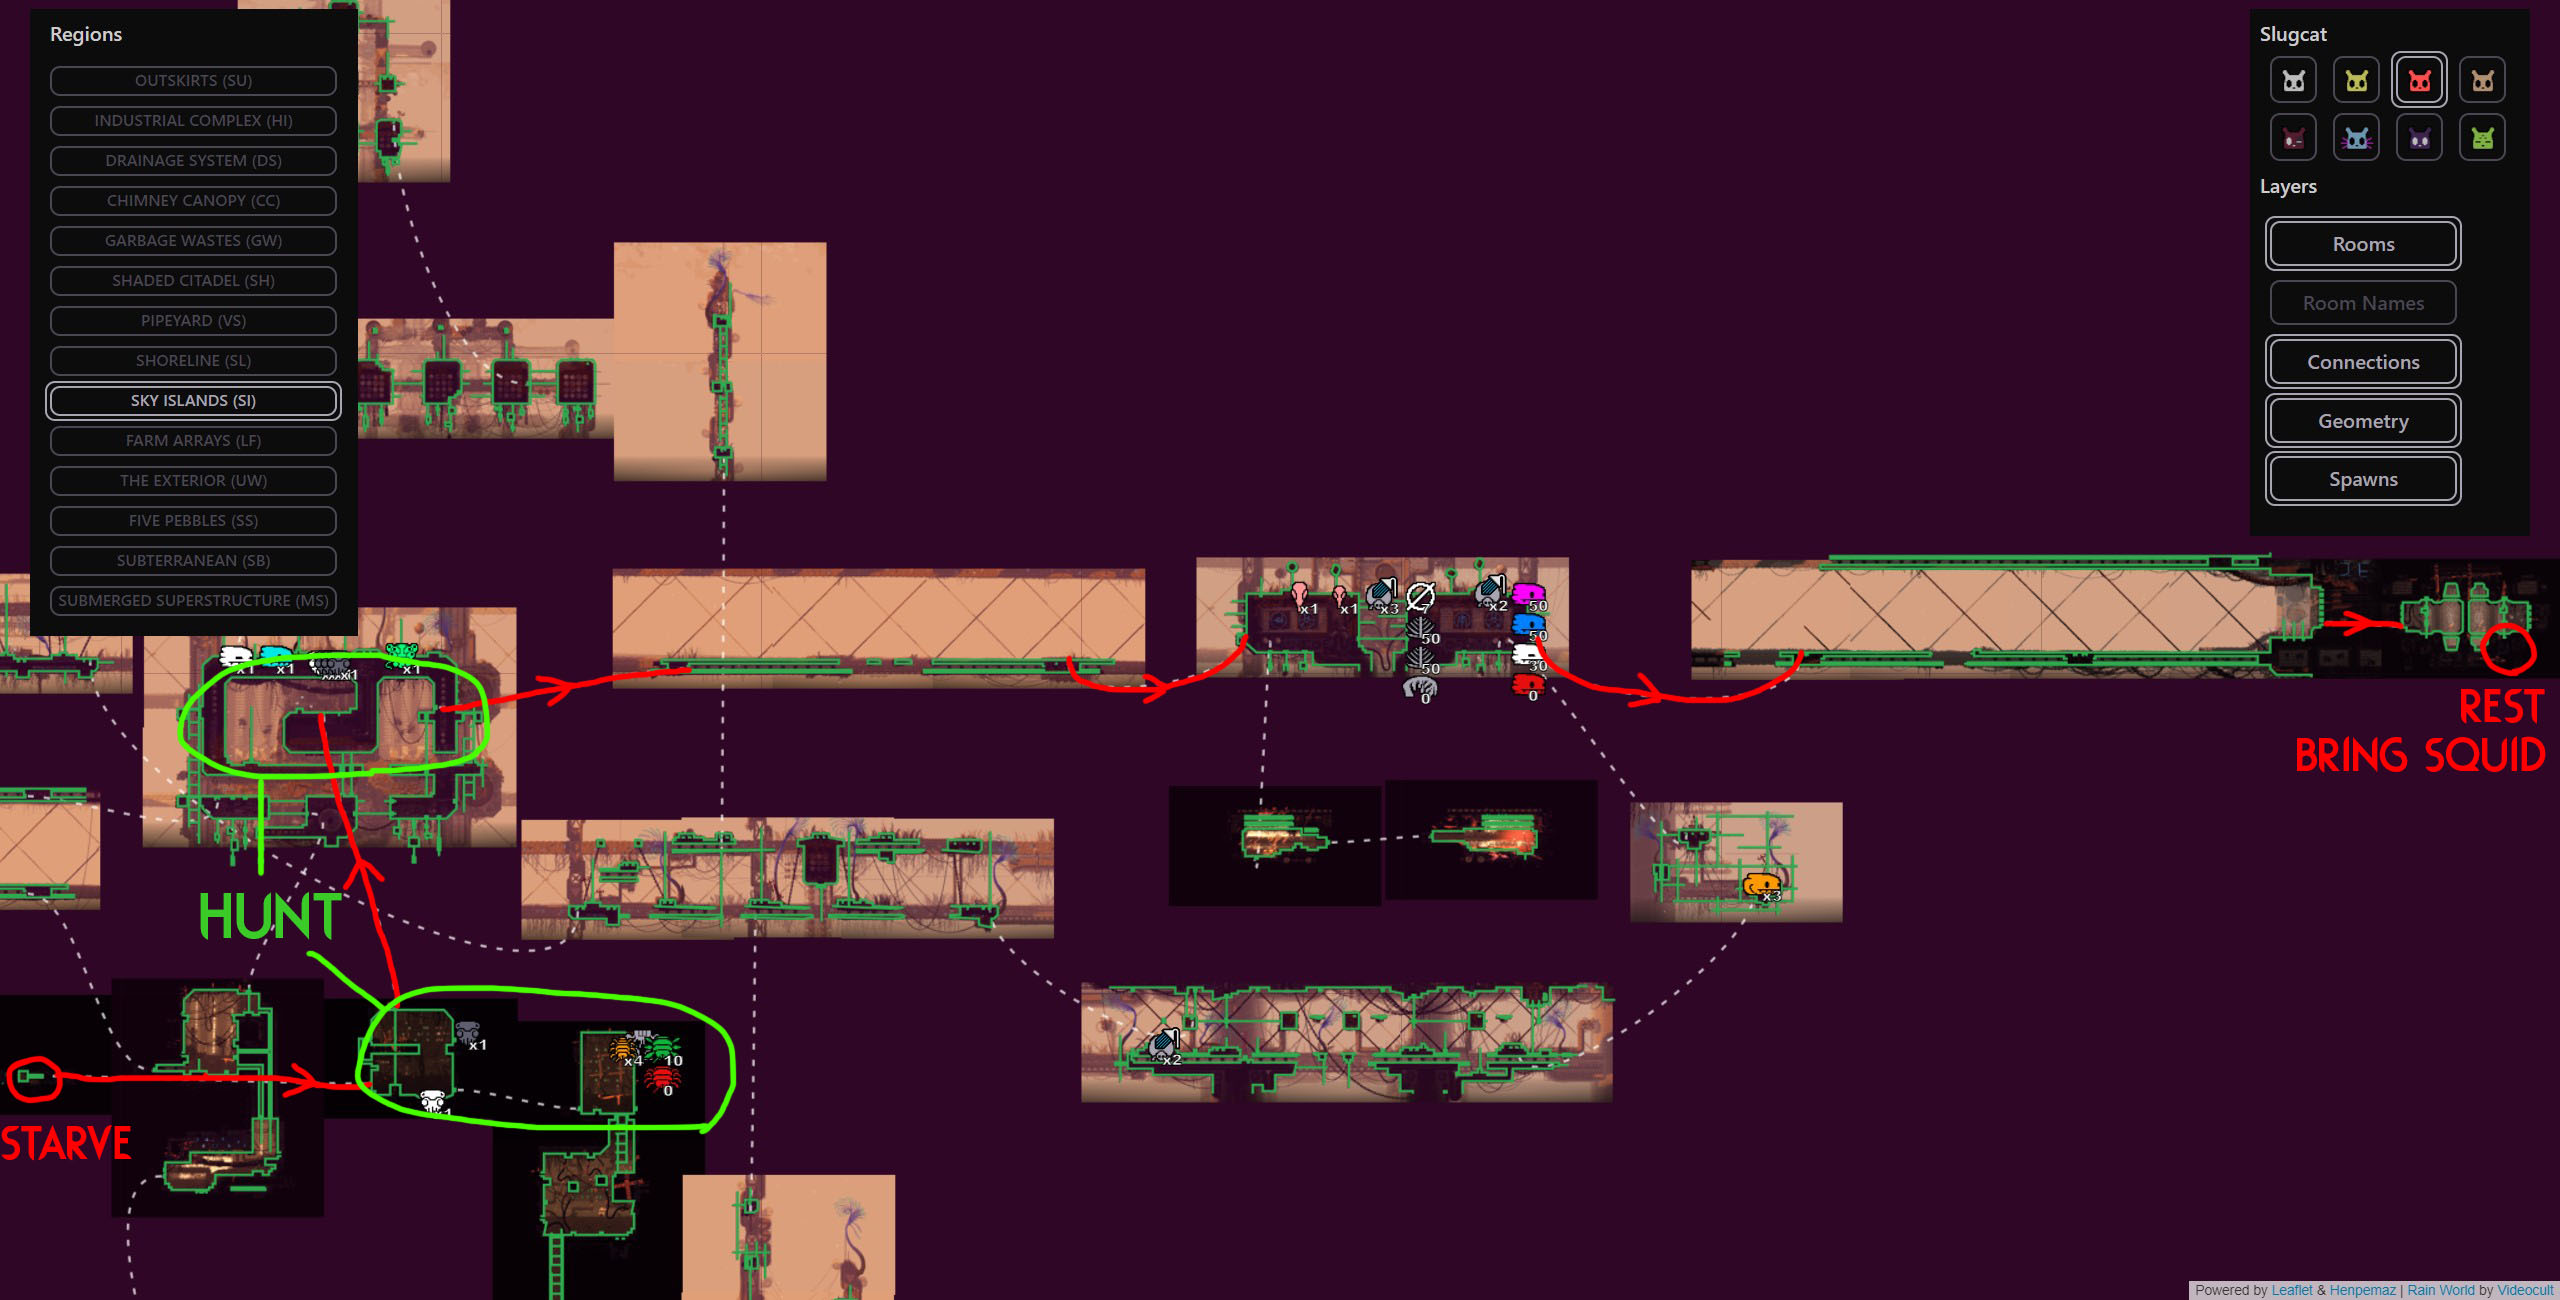 As you wake up you will need another 9 food pips, but luckily you’re in squidcada heaven. You can hunt squidcadas and eat baby centiwings near the shelter and in the adjacent screens relatively safely. Once you are full, grab a new squidcada and continue to the east towards the Chimney Canopy karma gate.
The trip from this shelter to the Chimney gate is a fairly safe and peaceful one so I don’t really have much advice for it. Refer to the map/video for directions.
As soon as you make it past the karma gate into Chimney Canopy with your squidcada buddy, take him with you into the shelter and hibernate.
Segment #2 Video Walkthrough (with text commentary):
Congratulations, That's by far the hardest segment of the whole run and it's now behind you.
Segment #3 (Chimney Canopy > The Wall)
We wake up with our squidcada buddy at the shelter next to the Chimney Canopy gate, feel free to use him as food at this point. If you’ve been properly using the starvation mechanic to keep your karma intact, you should be at maximum karma. You need karma level 6 or 7 for the Chimney echo to be active.
NOTE: Whenever you are at maximum karma, you can afford to take the risk of NOT starving. Since you’re already at max karma, starving does not increase your karma and is therefore pointless. Make one non-starved attempt. If you fail, that will decrease your karma by 1 and then you will have to starve to proceed safely beyond that. This cycle is relatively safe, and a good time to give ONE non-starved attempt if you wake up at maximum karma.
Now it is crucial that you are at the correct karma level for this cycle as we need the echo in this area to be active. We will finally be using that Vulture Grub that we collected back in Farm Arrays near the start. Now tossing a live Vulture Grub on the ground will cause it to send a signal laser to the sky. In rooms with an open sky, this will summon a Vulture. Now as I have mentioned before, any creature that enters a zone with an active echo will immediately fall asleep. This means that we can use the Vulture Grub to summon a Vulture (or preferably a King Vulture) and they will plummet from the sky unconscious, at which point we can just spear it to death, eat it and take its' mask for free. Eating it will provide 9 food pips and a simple spear to the face after it dies will drop the mask.
The mask causes most Lizard type enemies to flee in terror from us temporarily, which will make the upcoming segments much much easier.
IMPORTANT NOTE: This guide did not used to include this easy Vulture Grub strategy and instead had a detailed strategy on how to bait a Vulture into the roofed bridge near the Wall karma gate and ambush it there where it cannot fly away. I have since removed the detailed text explanation on Vulture combat and shortened this segment. However, you can still find the "NO VULTURE GRUB" video for this segment below just in case you forgot or were unable to bring one with you.
Segment #3 Video Walkthrough (with text commentary):
NO VULTURE GRUB STRATEGY:
Once you have your mask and have had your victory meal, proceed past The Wall karma gate and rest at the shelter just outside of it.
Congratulations, the mask you got will come in handy moving forward
Segment #4 (The Wall Echo)
Now, you may have thought I was crazy in the overview when I said that we will be climbing the wall and visiting The Wall echo as it is quite the daunting task on paper. The Wall is filled to the brim with cyan lizards and white lizards and is one of the most dangerous areas in the game due to this reason coupled with the limited space to evade them.
Now what if I told you, that we’re skipping the shelter up the wall and climbing the whole thing in one cycle? Wait! Wait! Don’t leave yet, I can explain!
Yes, The Wall is a dangerous area, but I have multiple reasons to bring you here during your Hunter run.
- Thanks to our brand new Vulture mask, 90% of all the Wall’s inhabitants are now afraid of us. This makes the climb far easier.
- The Wall echo is one of only 2 echoes in the game that do not have a karma requirement. This means that you do not need to starve or worry about dying or karma at all, the echo will always be there.
- You can die as many times as you need to and you can just restart and try again with no consequences to the overall run and visiting the echo at the top will give you the karma boost, max out your karma, and then you will wake up all the way at the bottom ready to leave as if the cycle never happened.
IMPORTANT NOTE: If you hung onto the green neuron from the beginning, it is possible to deviate from my plan here and visit pebbles from the top of the wall. He will boost your karma like an echo would and give you 5 additional cycles. This is completely unnecessary but it’s an option nonetheless. If anything, this can serve as practice if you ever plan on doing an All Objectives Hunter run.
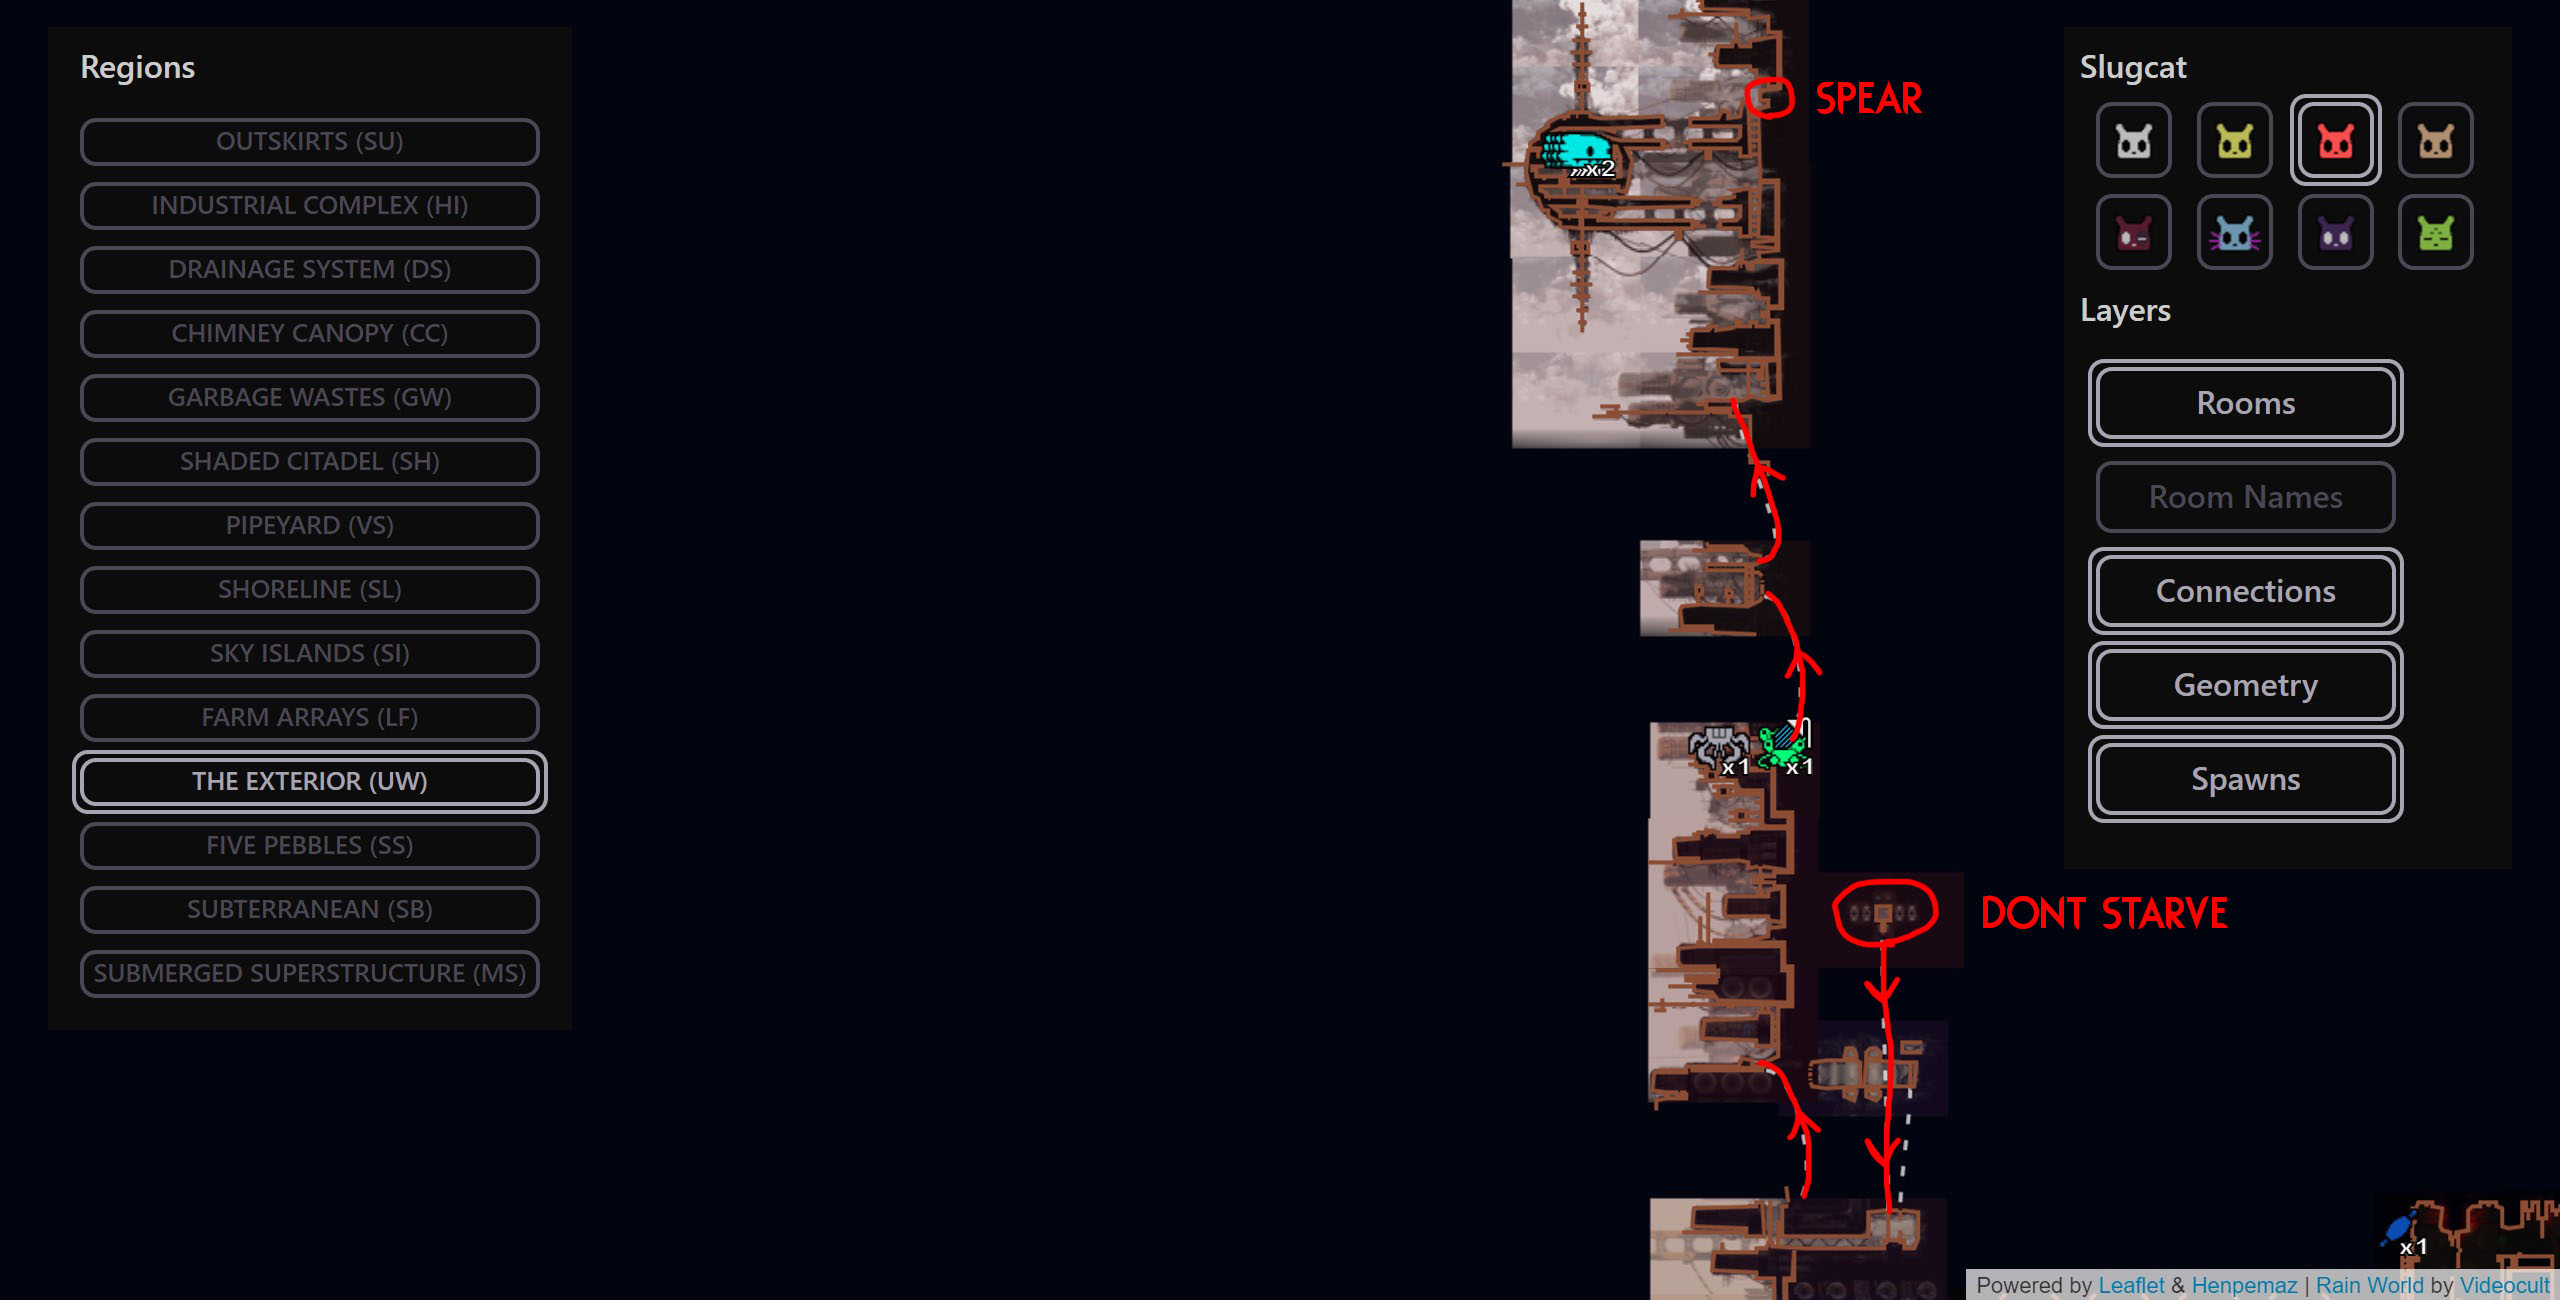 Now, we wake up and begin our ascent to meet the echo. There is no need to starve and no need to worry about food at all. There is also no reason to fear death or karma loss as this echo has no karma requirement. Keep your Vulture mask on and enjoy the climb as the wall is, in my opinion, one of the most scenic areas in the game. The path up is linear for the most part, so it’s hard to get lost.
Keep an eye out for a dropwig in the first few screens, as there is one that resides here and can usually be easily avoided. If you cannot avoid it for whatever reason, run past it and when it drops onto the ground, stun it with rubbish then spear it. 1 spear is usually enough to kill a dropwig.
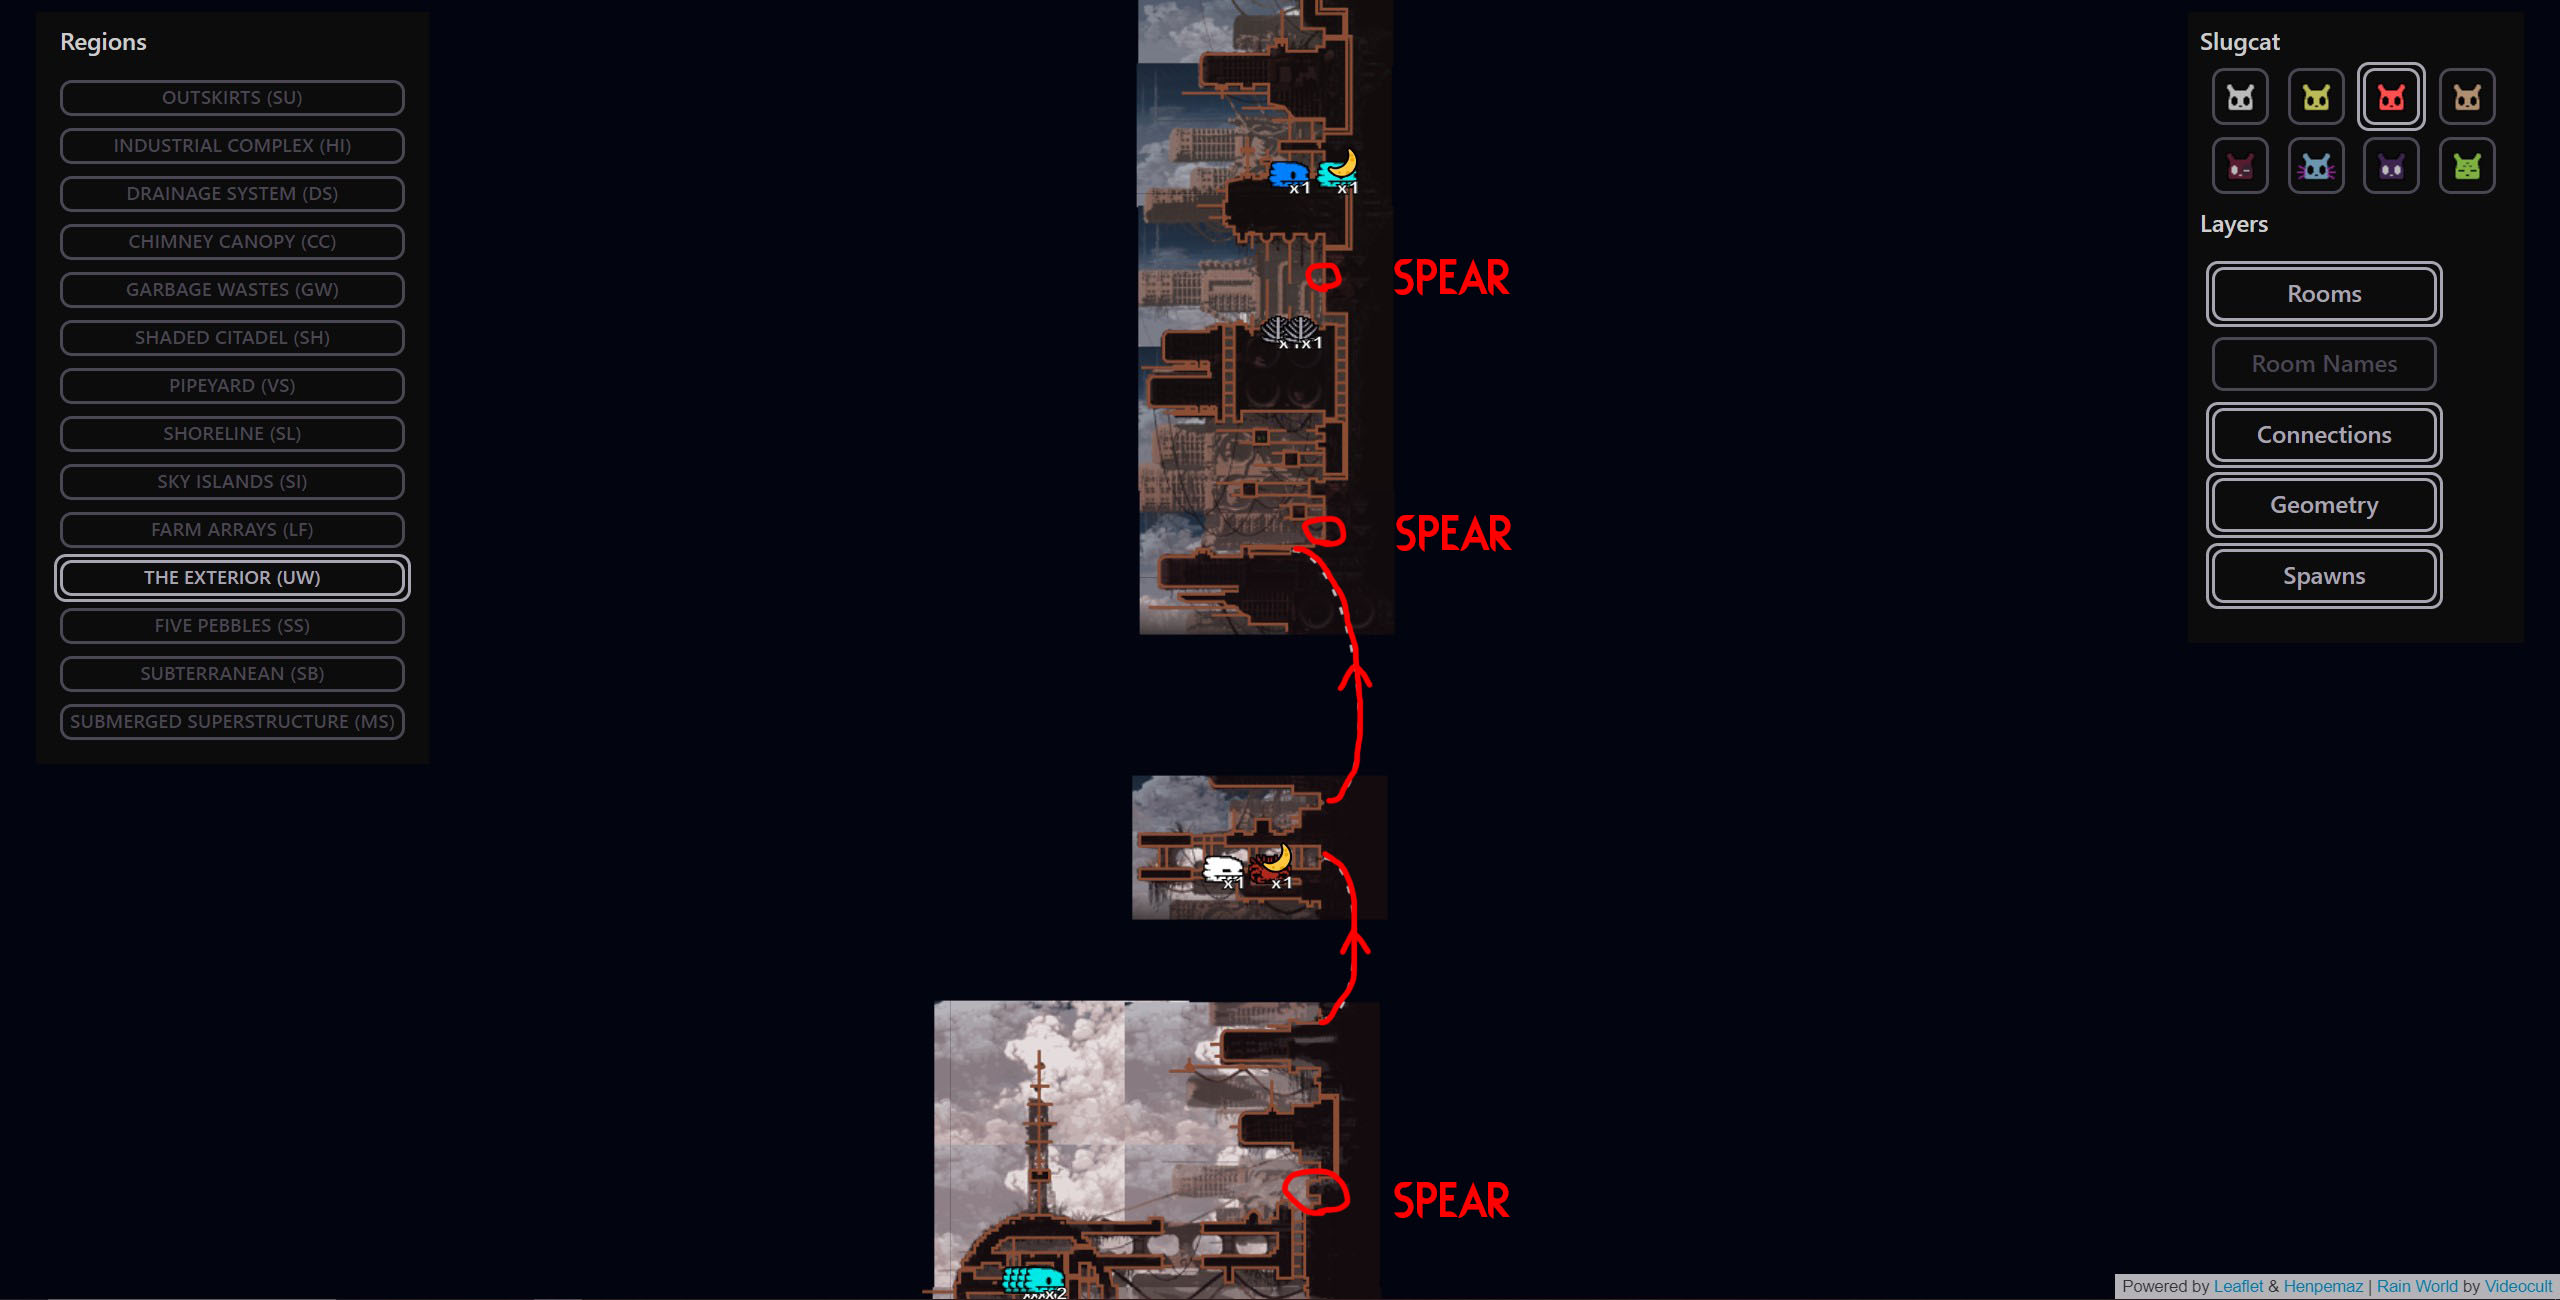 A few screens ahead you will begin to encounter the Cyan Lizards, they will flee from you due to your Vulture mask. BE VERY CAREFUL as they usually flee in the same direction you are headed, which means they will still be in your path when the Vulture mask effect wears off. For this reason, it is wise to kill them whenever possible while they still fear you. They will expose their backs to you as they flee which makes them easy targets. Try to avoid or kill them whenever possible or try to get in their way before they are able to flee upwards, which will prompt them to flee downwards and out of your way instead.
Keep spears handy to keep yourself safe and also to help with climbing. There are multiple points on your way up where a spear will be necessary to continue. (Refer to the video)
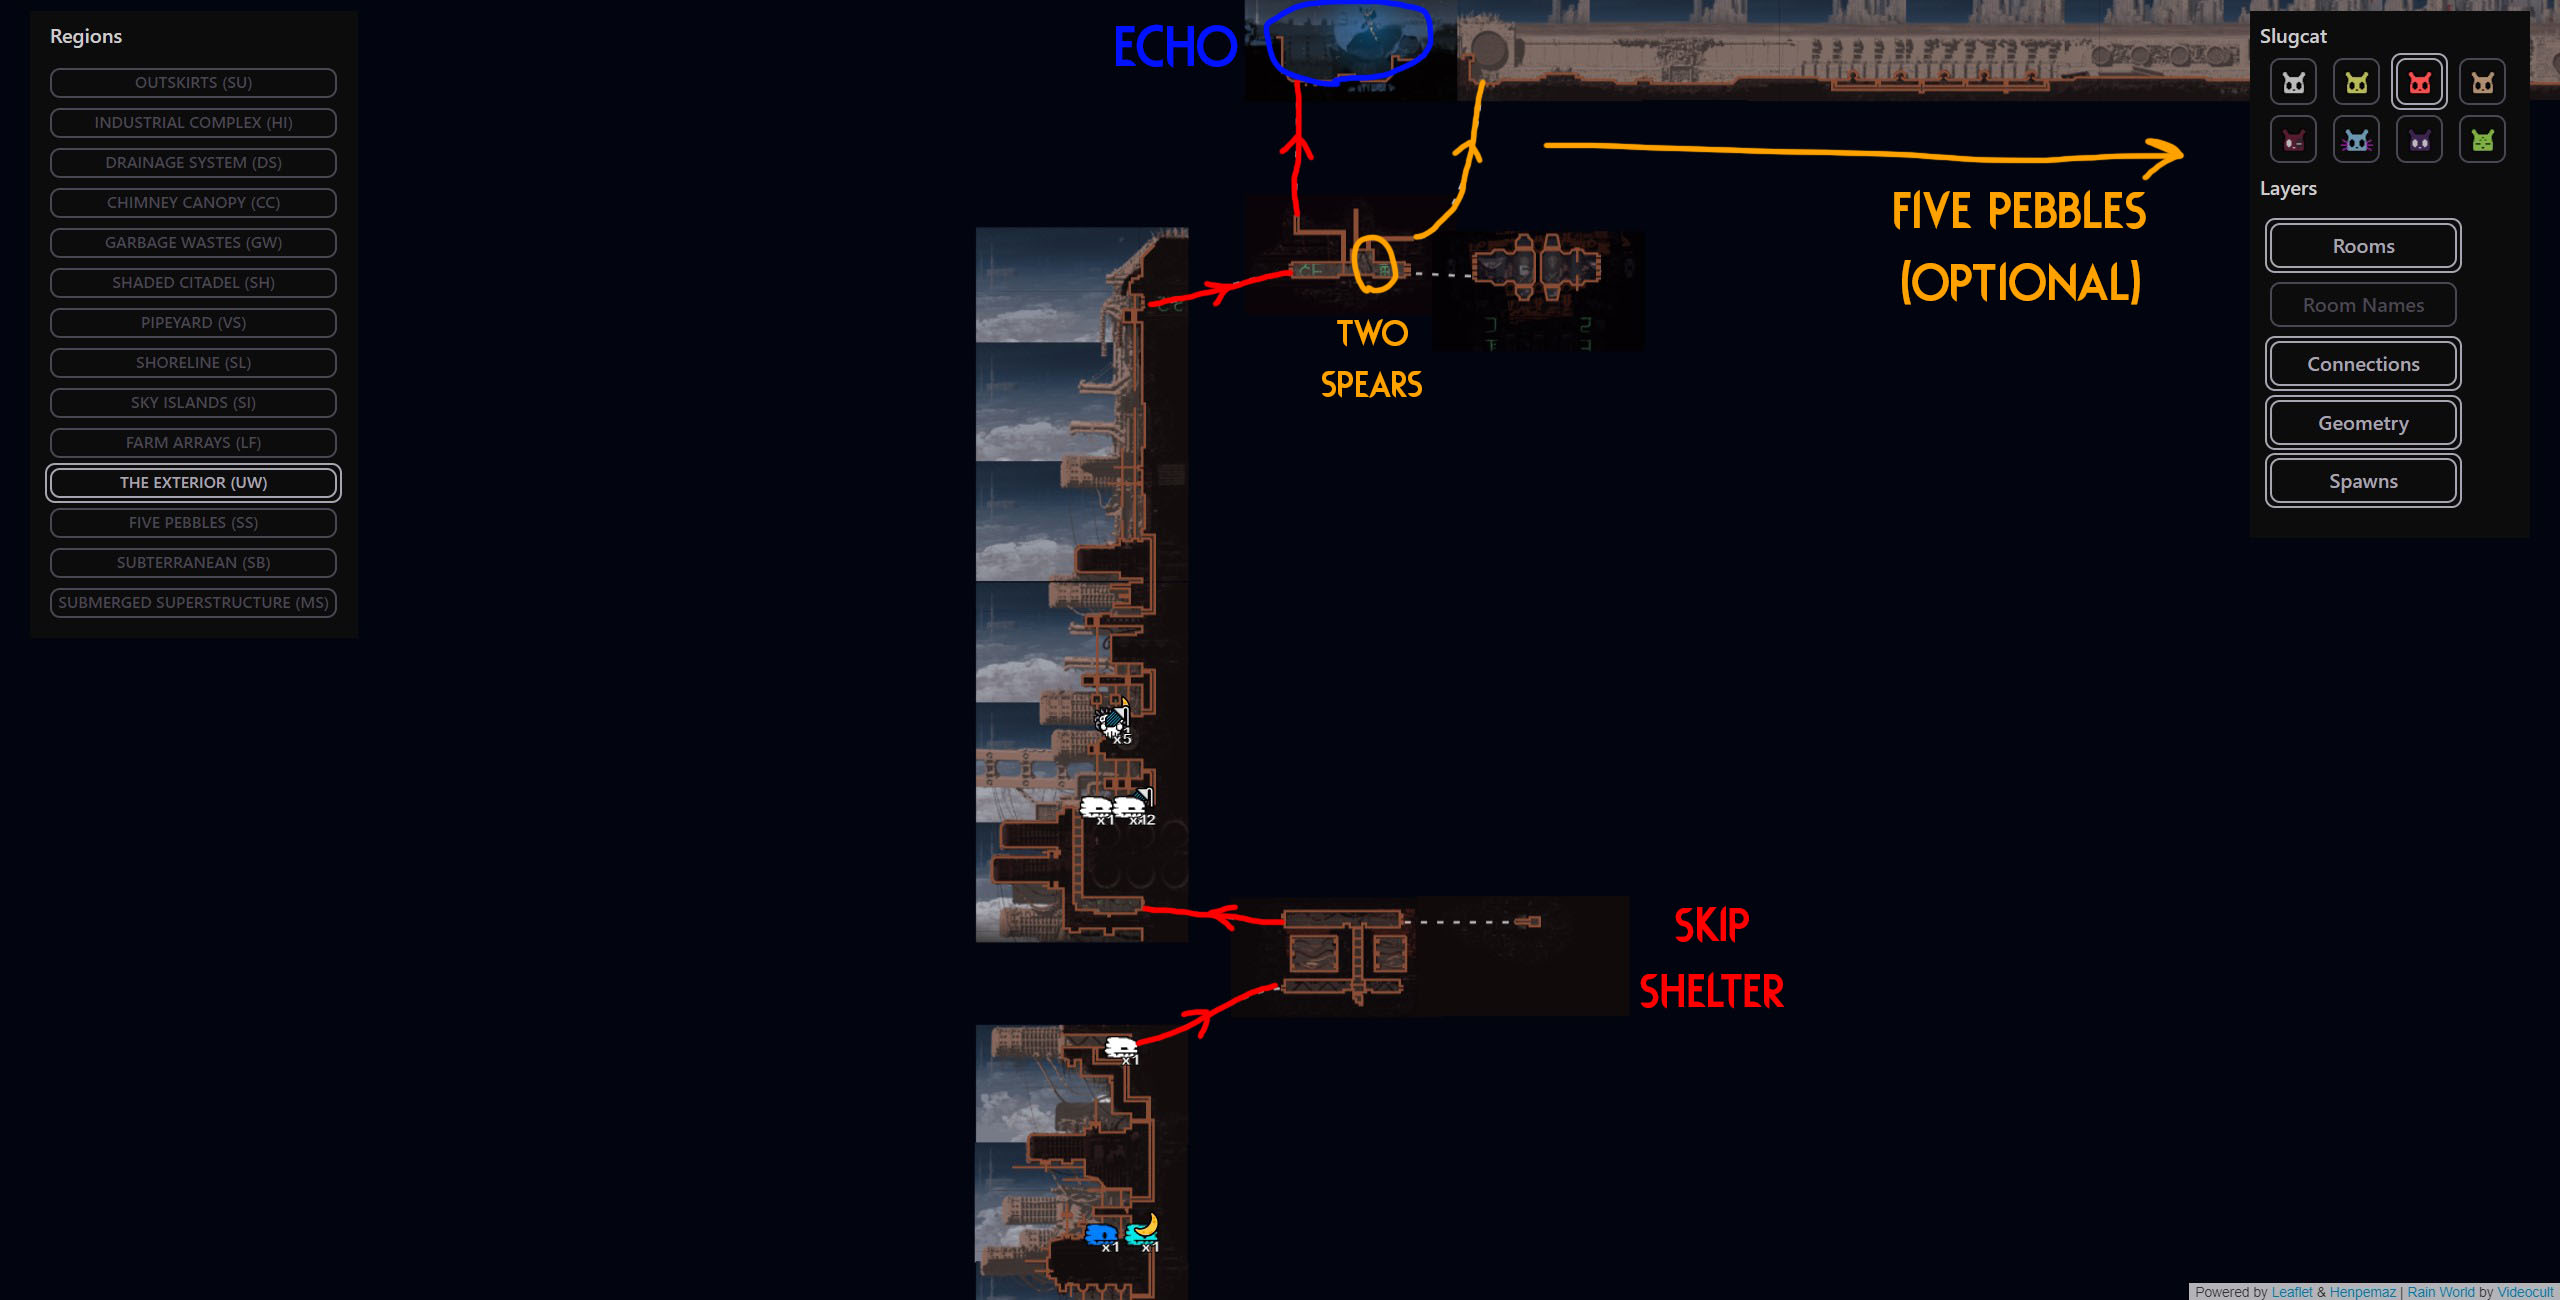 A bit further up, you will run into 4 White Lizards. They chill in multiple different screens and will flee from you when they see you but keep your eyes open all the same. The same ideas apply to them, try to prevent them from fleeing upwards so you don’t run into them after they figure out you’re not a vulture. Kill them if you need to.
Past the White Lizards you will find a shelter. Skip it.
The remainder of the climb is quite peaceful. Enjoy it.
Once you reach the top, take a moment to take in the view then enter the next room and take the exit at the top left. This is the Wall Echo.
Meeting him will increase your maximum karma, boost your karma level to the new maximum, and then teleport you all the way back to the bottom of The Wall where you will wake up as if this cycle never happened. This is fantastic because we are leaving the wall back towards Chimney Canopy and this just saves us a bunch of time and effort by not needing to go back down.
Segment #4 Video Walkthrough (with text commentary):
Congratulations, that’s 2 echoes down and 2 to go.
Segment #5 (Chimney Canopy Echo)
Now, this next trip should be exceedingly easy, but there is one thing that could go wrong and cause complications. If, for any reason, you fail the upcoming journey more than once, then you will have to hunt down the lone dropwig at The Wall and use that to starve through the following journey to keep your karma intact. Hopefully, it won’t come to that, but it’s an option just in case you need it.
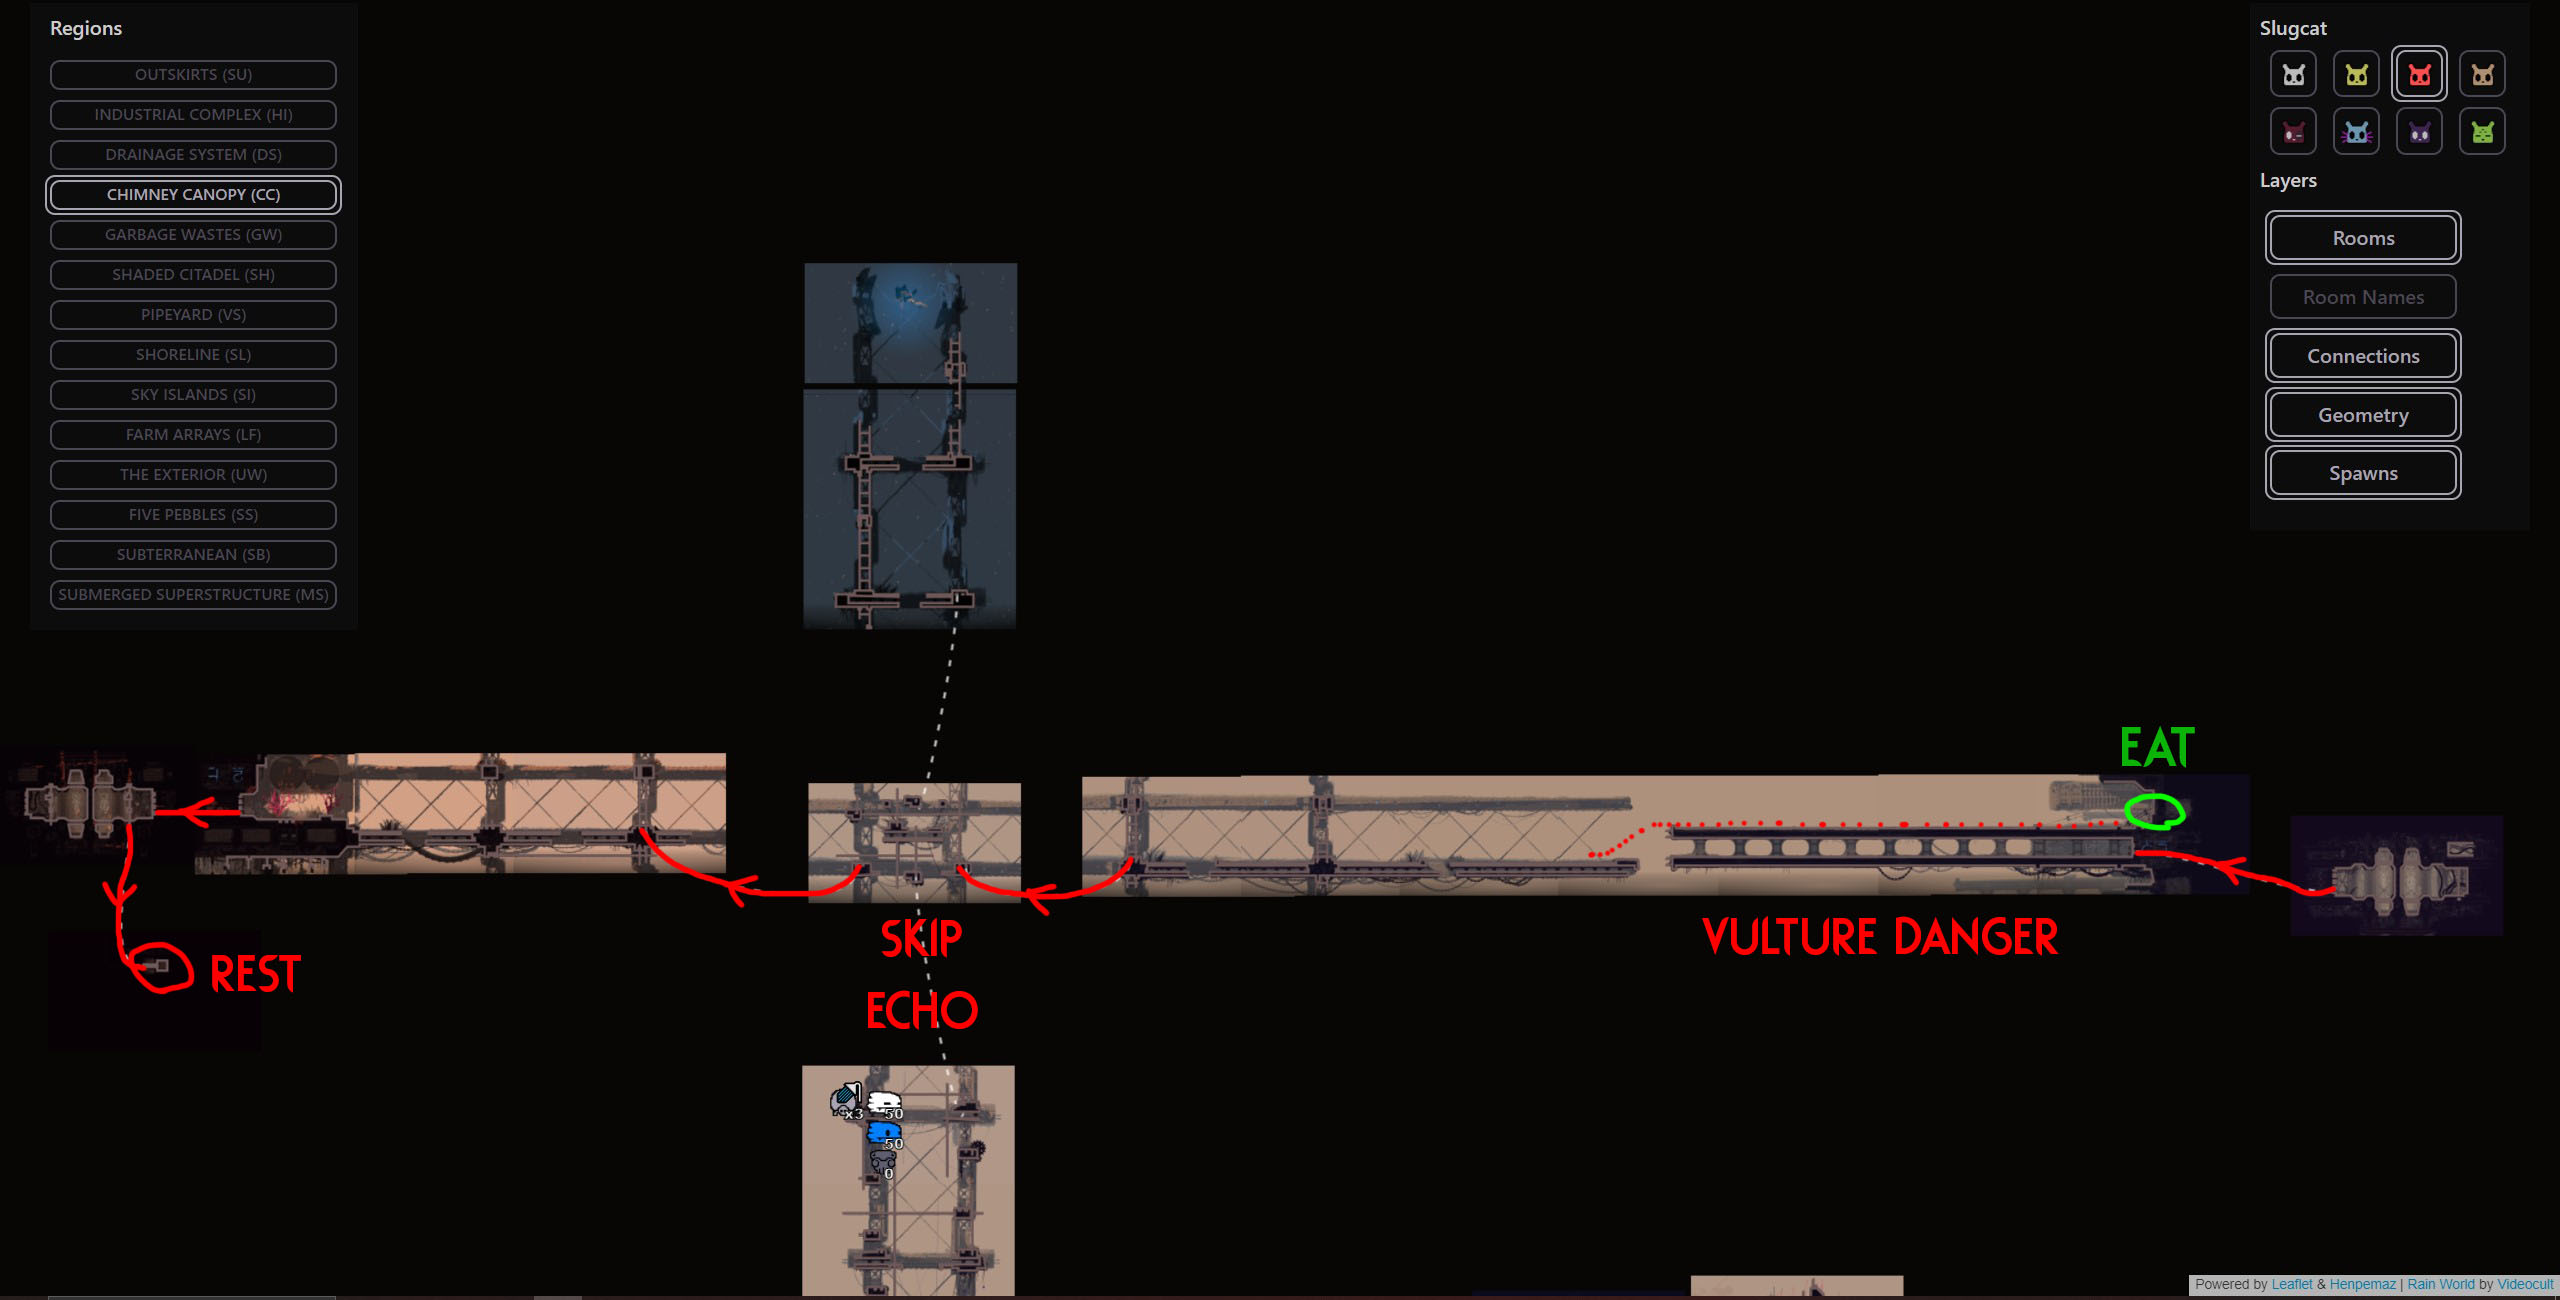 We exit the shelter, and go through the karma gate to Chimney Canopy. We climb atop the roofed bridge and fill our belly with the popcorn plant found above. We then travel west back through the echo zone to our old shelter at the Sky Islands karma gate. We need to stay on top of the roofed bridge while we travel west as the jump across the gap is very hard to make from below. This is a problem because this means that for a couple of screens, you will be a sitting duck on a wide open and flat surface exposed to the sky. If a Vulture (especially a King Vulture) decides to attack you during this time, there isn’t really much you can do other than fighting it head-on. Ideally, you will be able to make it past without being attacked or you will be still relatively close to the karma gate and just hide under the roof and wait it out for a bit. Keep an eye out for laser sights from King Vultures and immediately retreat if you see them. If you’re able to make it to the end of the roofed bridge and make the jump, you should be relatively safe to continue to the Sky Islands gate.
If you get caught by a Vulture/King Vulture out in the open and retreat is not an option then you might still stand a chance in a head-on fight. If you have multiple spears, you can employ all of the same Vulture fighting tactics as before, and if the Vulture retreats then that’s perfect.
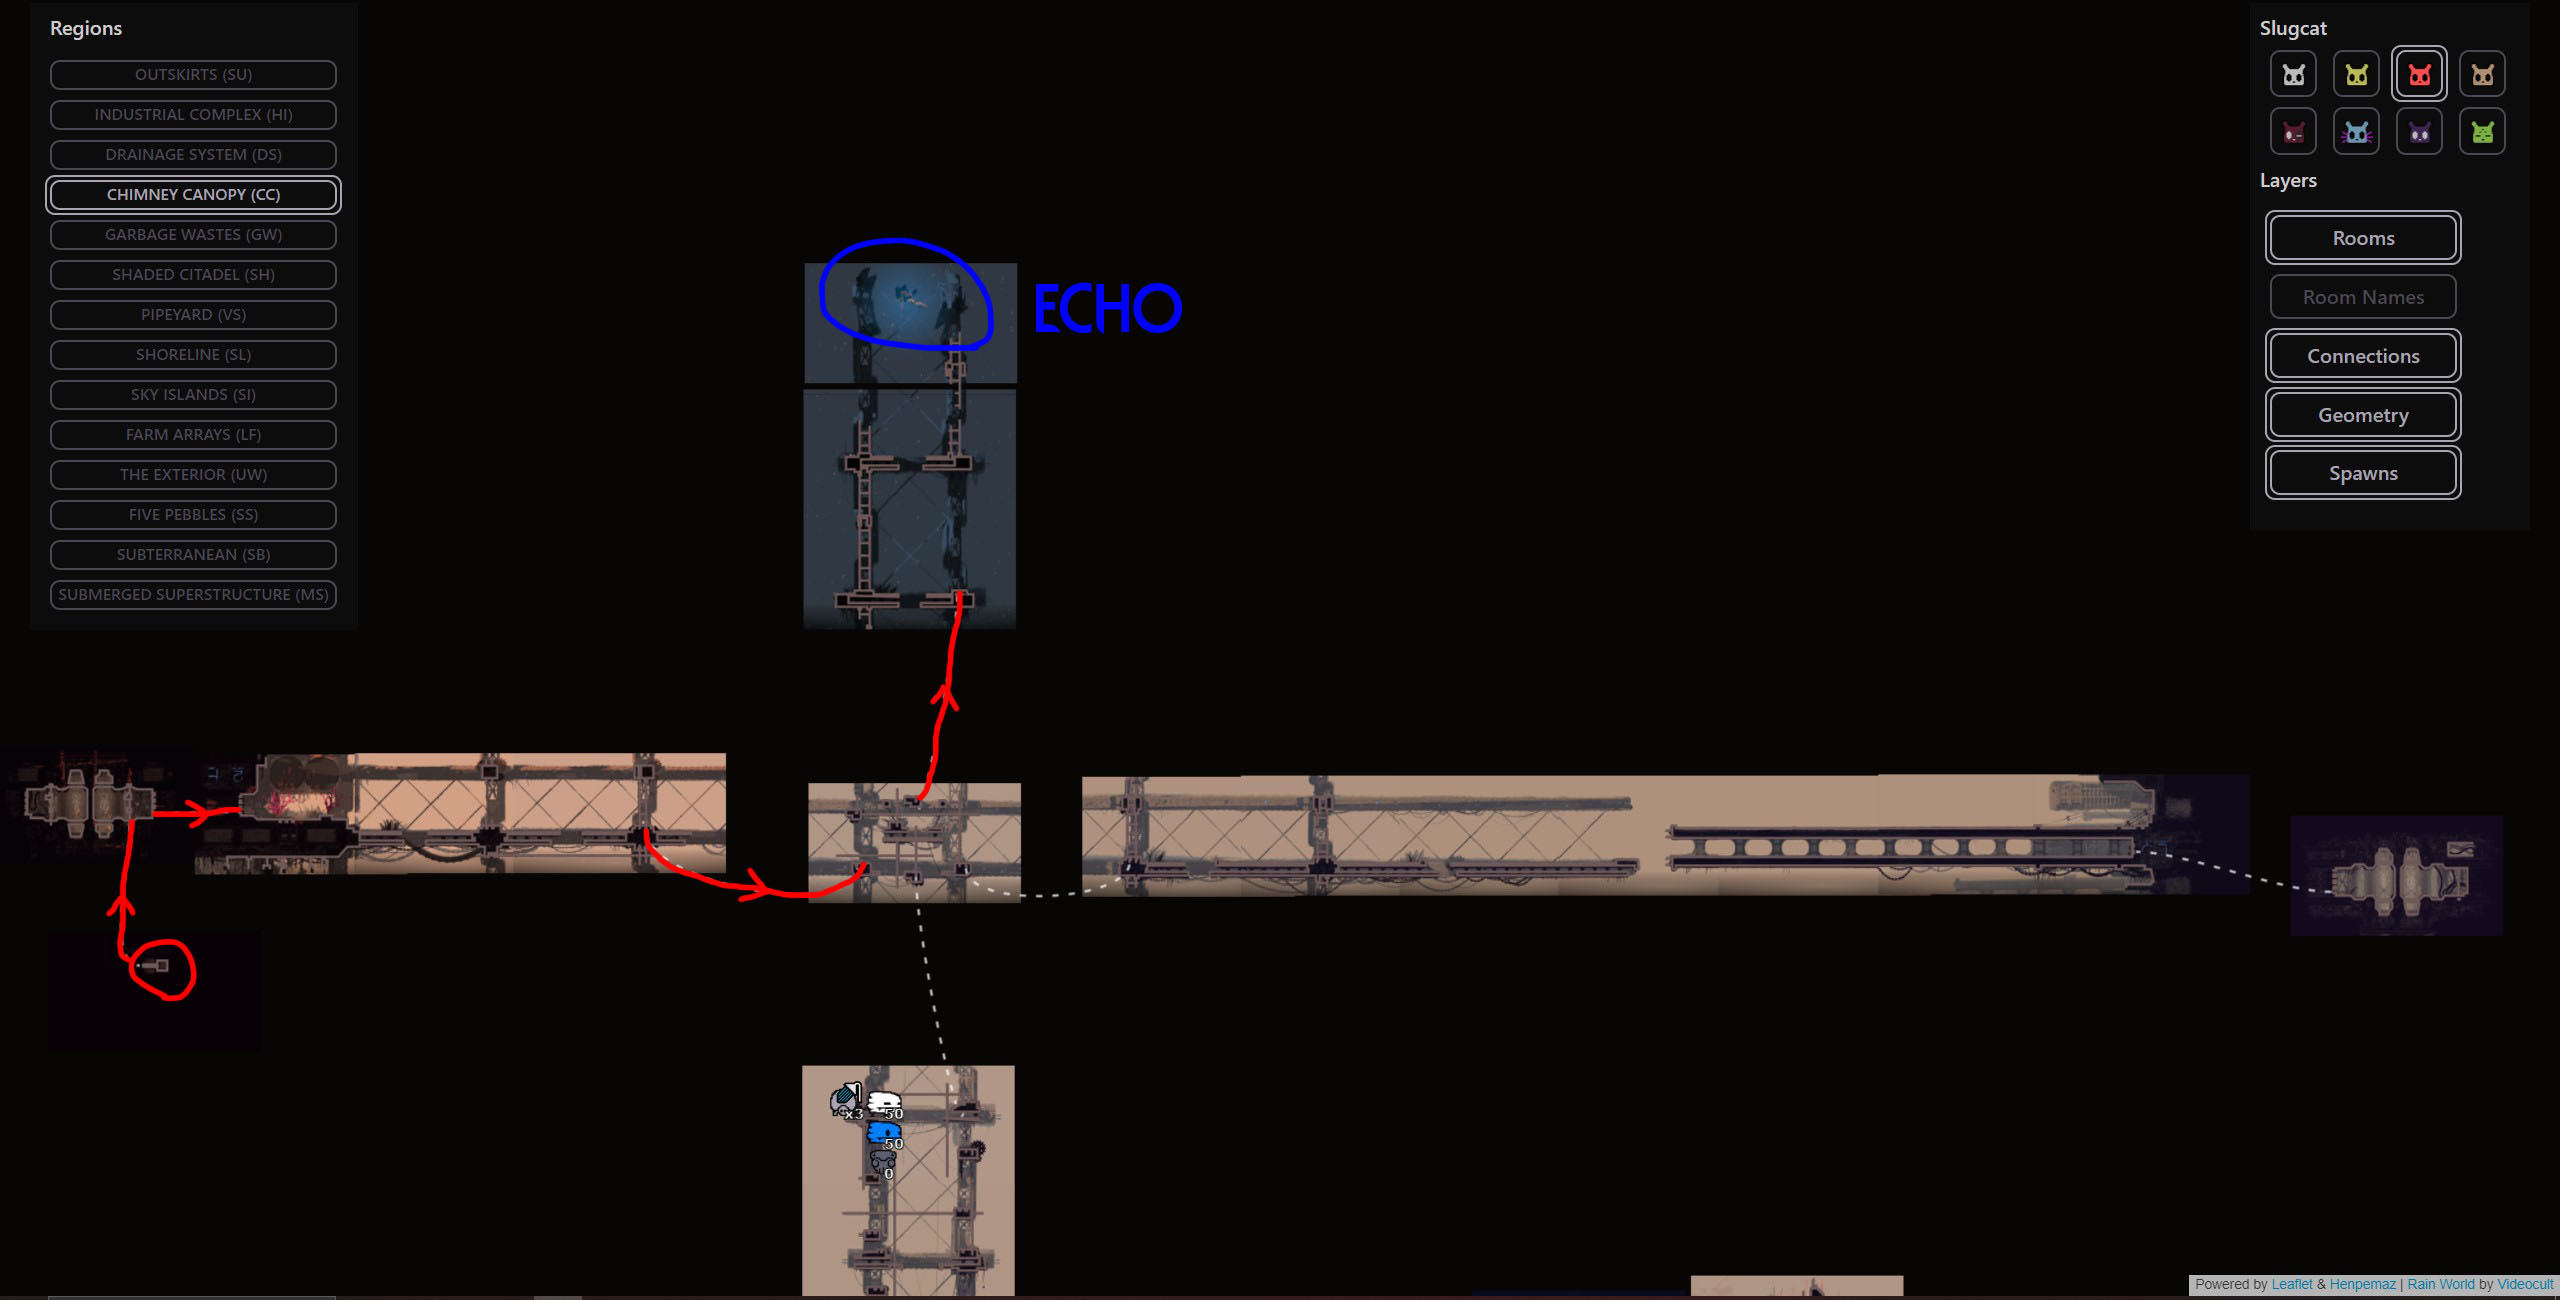 Once we make it to the Sky Islands gate, we rest at the shelter. We will wake up with no need to starve as we will simply go back a few screens to climb up through the echo zone and finally visit the Chimney Canopy echo. His influence has kept us safe for two of our trips and now his visit will boost our max karma and teleport us back to the shelter at the Sky Islands gate. The little trip from the shelter to the echo is almost completely safe, just pay attention not to fail any jumps. Throw an item mid-jump to give yourself some extra jump distance and guarantee that you don’t fall short.
Segment #5 Video Walkthrough (with text commentary):
Congratulations, that’s 3 echoes down and only one remains. We have a lot of distance to cover in our next segment as we will be backtracking all the way to where our journey began in Farm Arrays. It’s a familiar path to us now + we have our Vulture mask so there’s nothing to fear.
Segment #6 (Sky Islands > Farm Arrays)
Cycle length is very important for the coming segments. Be sure to quit and reload if you get a short cycle. Furthermore, we will not have starvation as a crutch this time and will have to complete at least the first portion of this segment fair and square. Our advantage here is that our path is familiar to us as we have been here before.
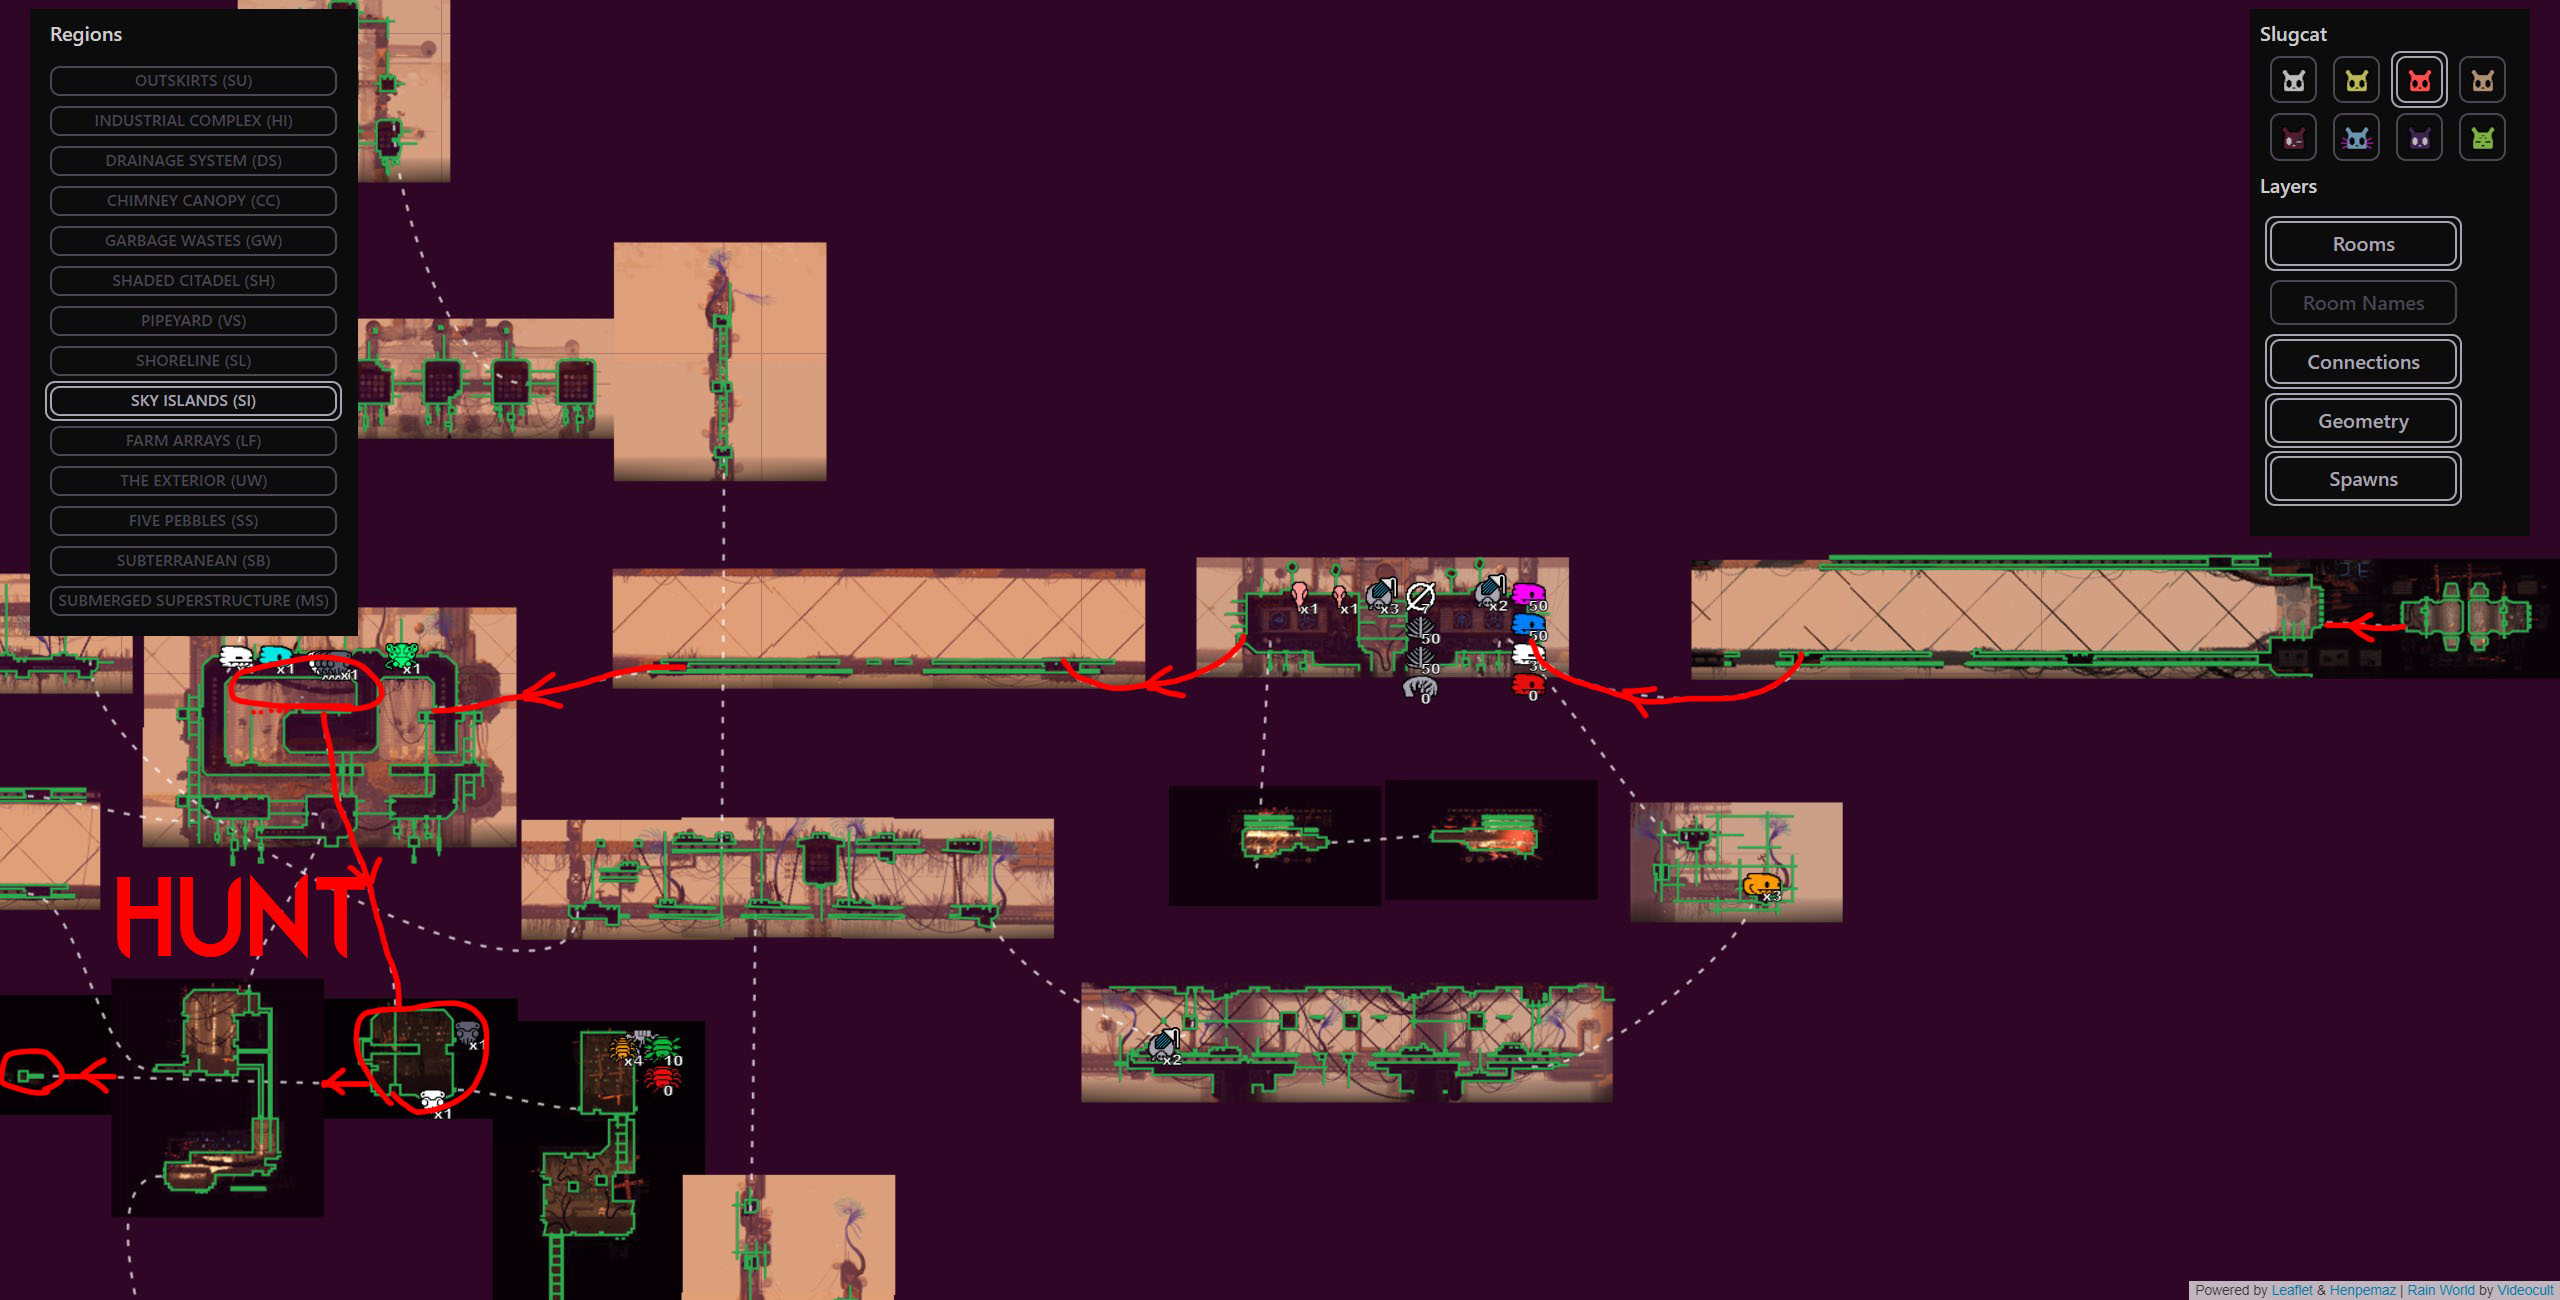 We pass the Karma gate into Sky Islands and head west. You may encounter a lone pink lizard in the first few screens, hunt him for an easy 6 food pips. As you continue to head west, you will eventually reach Squidcada heaven where we hibernated a few cycles ago.
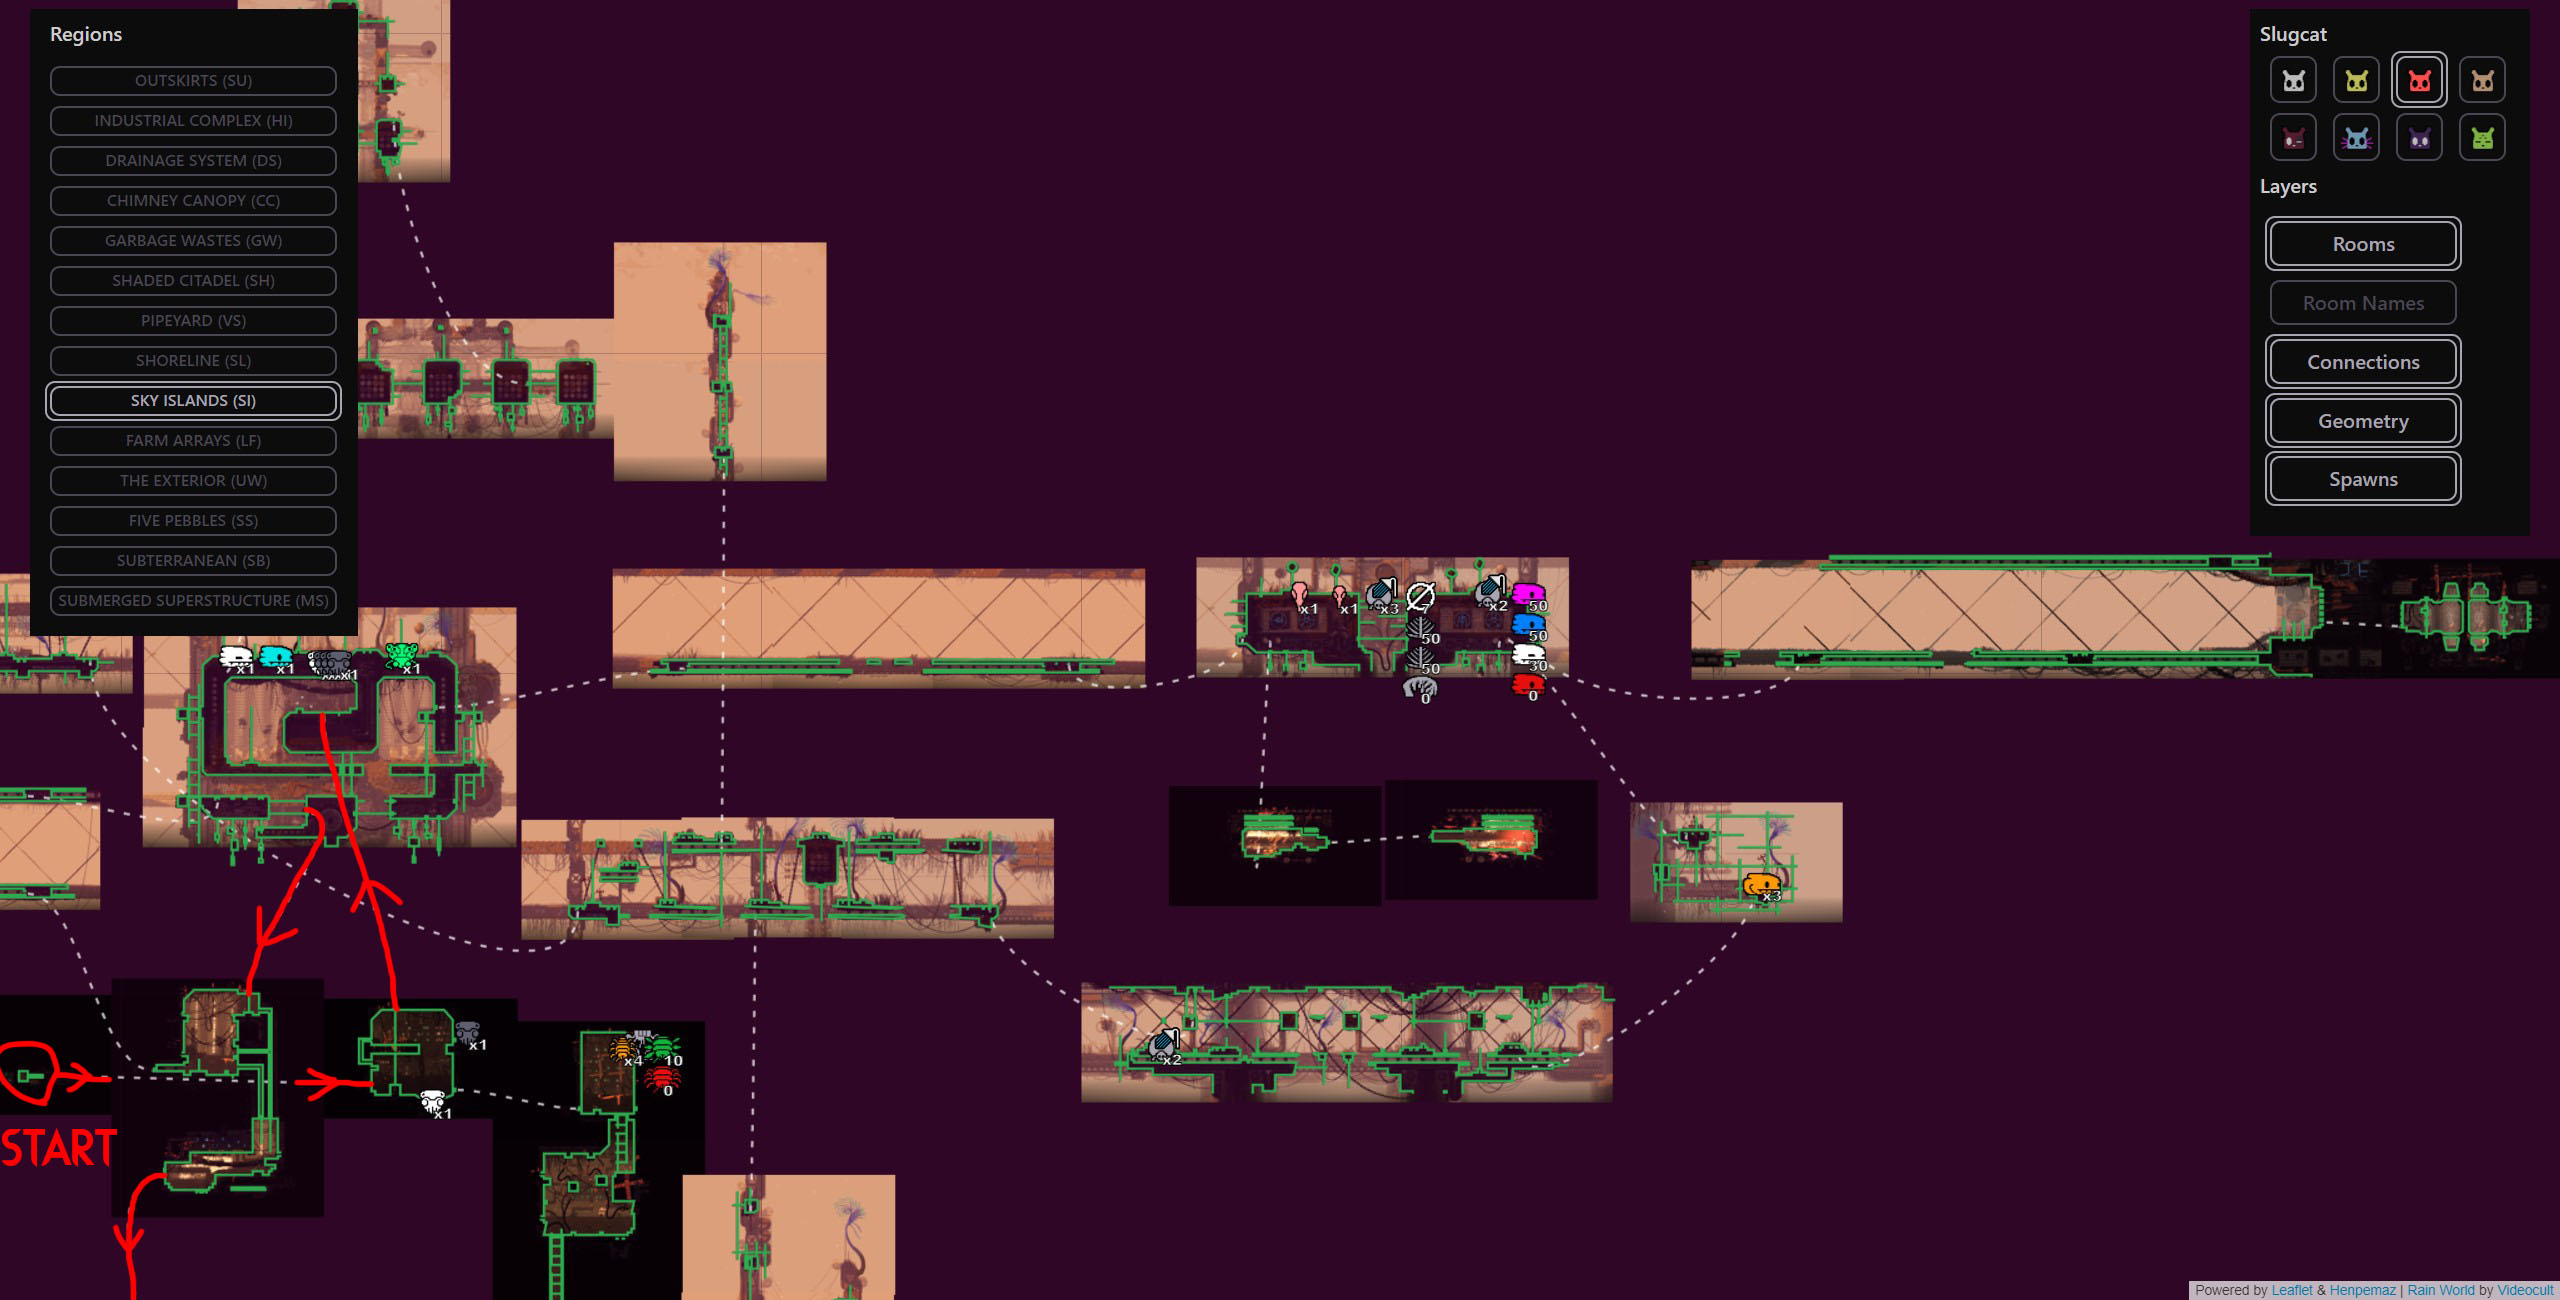 We hibernate at the shelter and then use our remaining 3 food pips to starve. We hunt squidcadas and baby centiwings for easy food in the first 2 screens. After we are set for food, grab a squidcada, then enter the access tunnel under “squidcada heaven” and retrace our steps from before all the way to the yellow lizard tunnel. This will involve tight squid platforming just like before but you ought to be a squidcada pro by now.
IMPORTANT NOTE: you will need to drop your Vulture mask to use a squidcada. You have probably grown attached to it by now as it has made our journey much easier, but unfortunately there is no other way. I believe it’s possible to use a squidcada and hang onto the mask via some bug but I have no idea how to do that. Feel free to look that up.
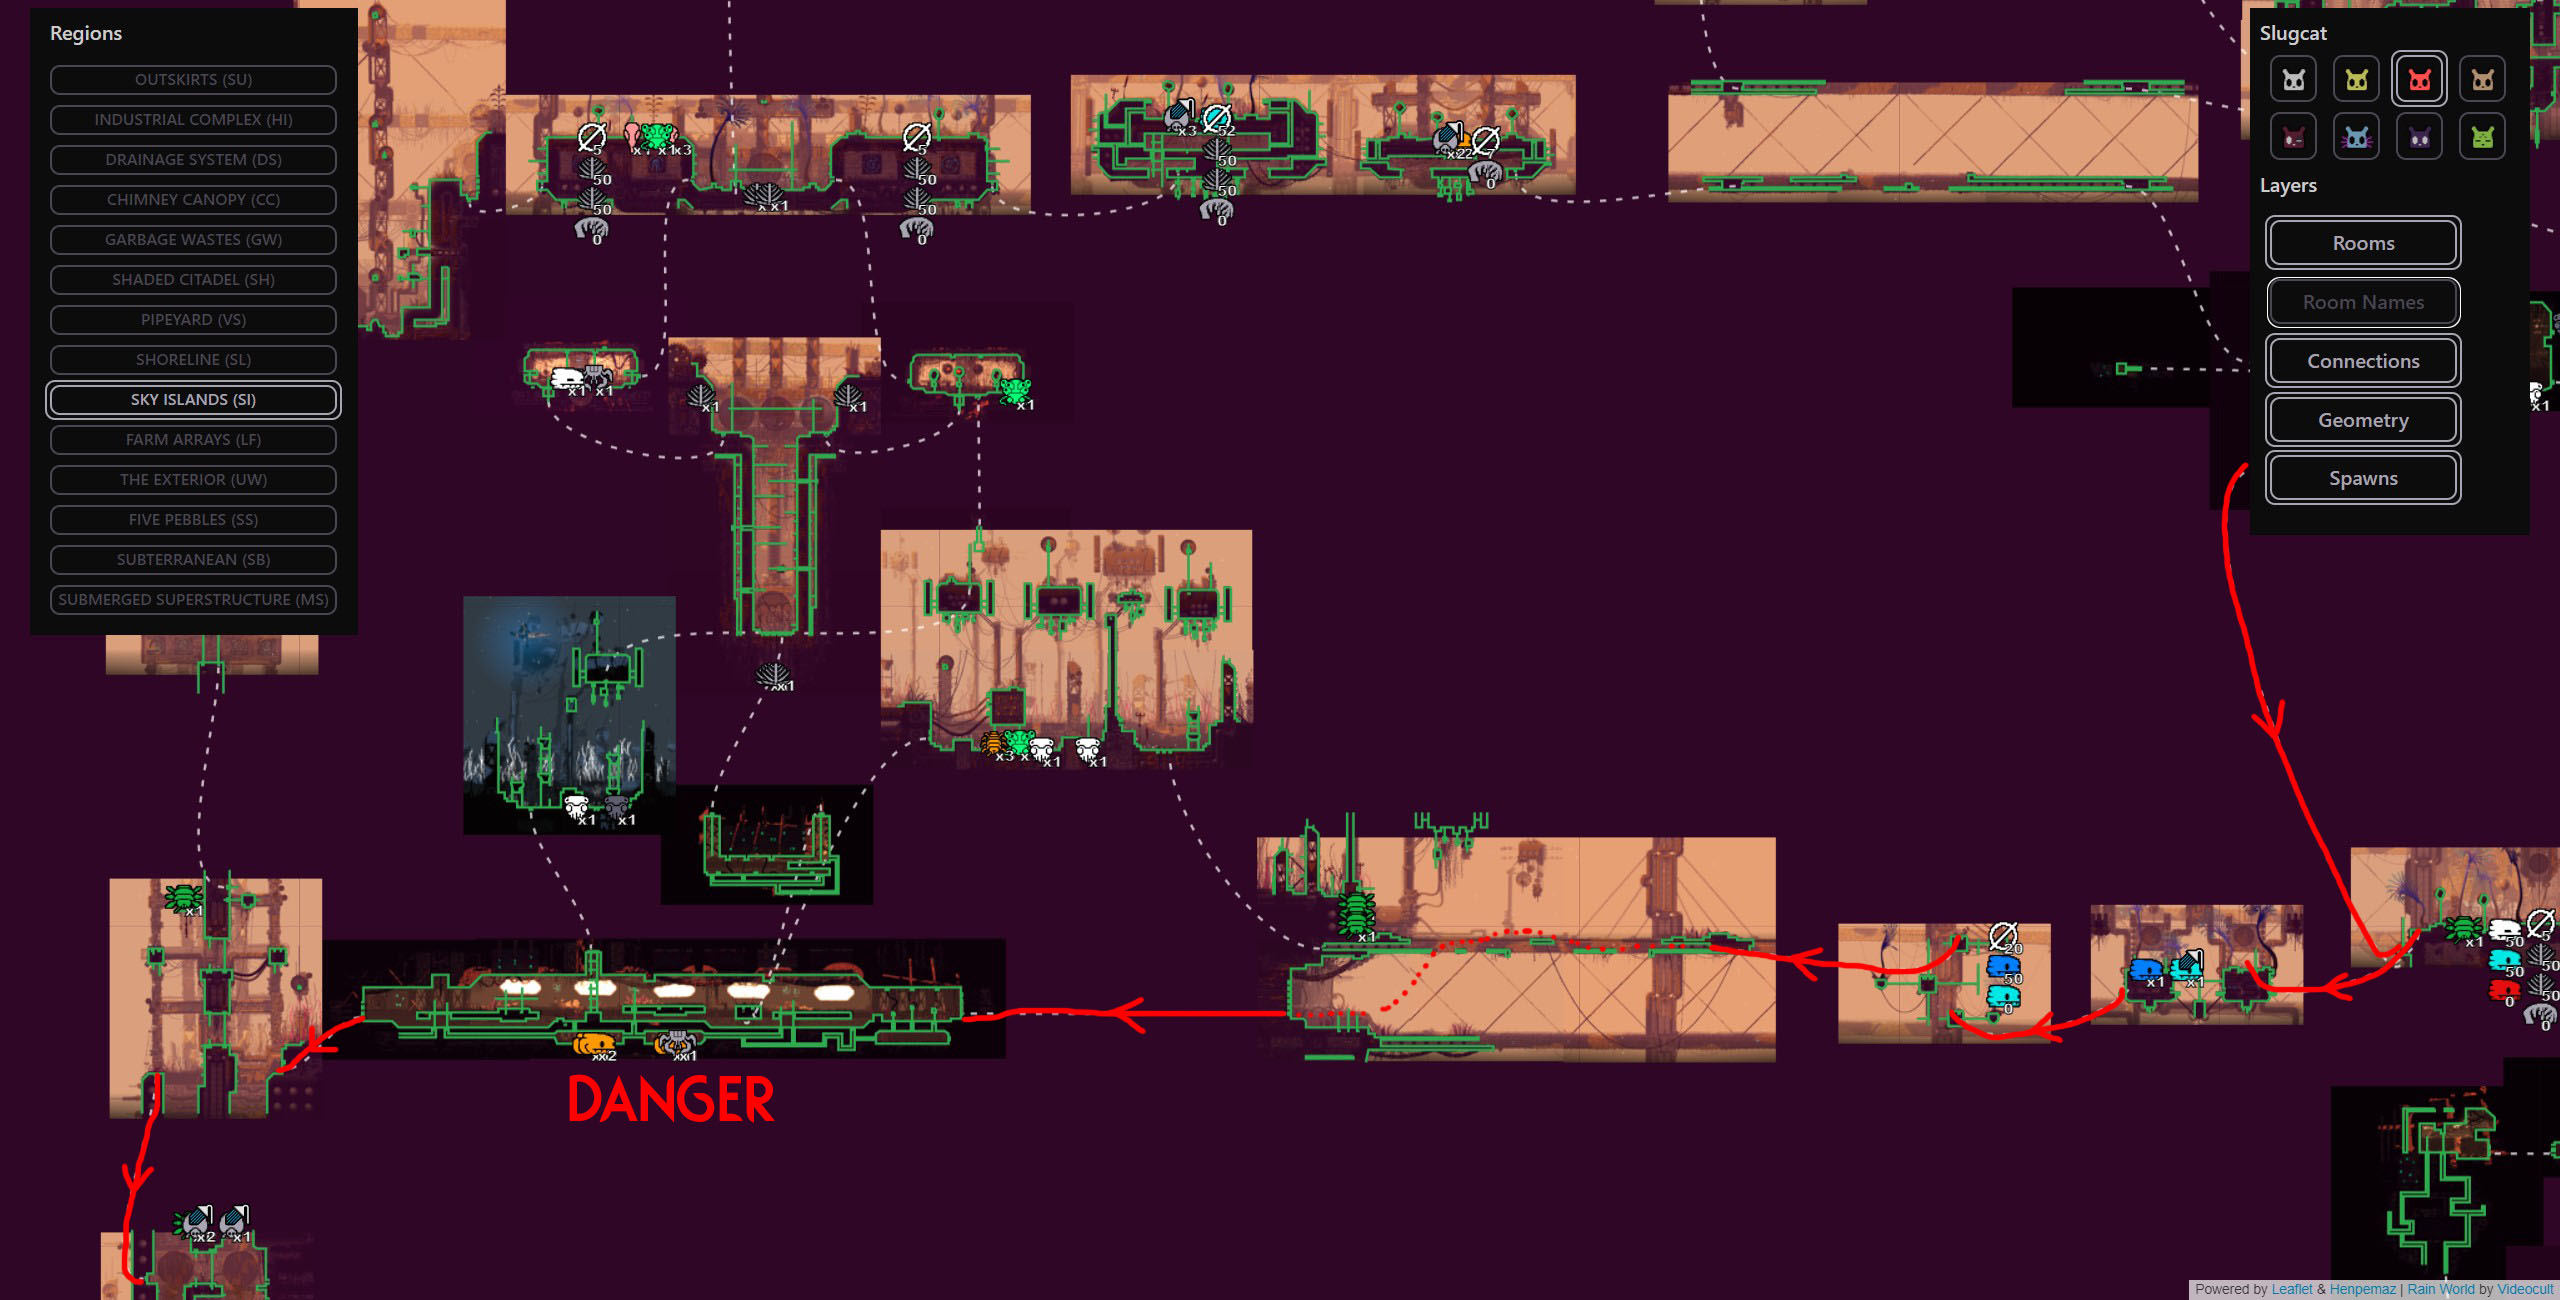
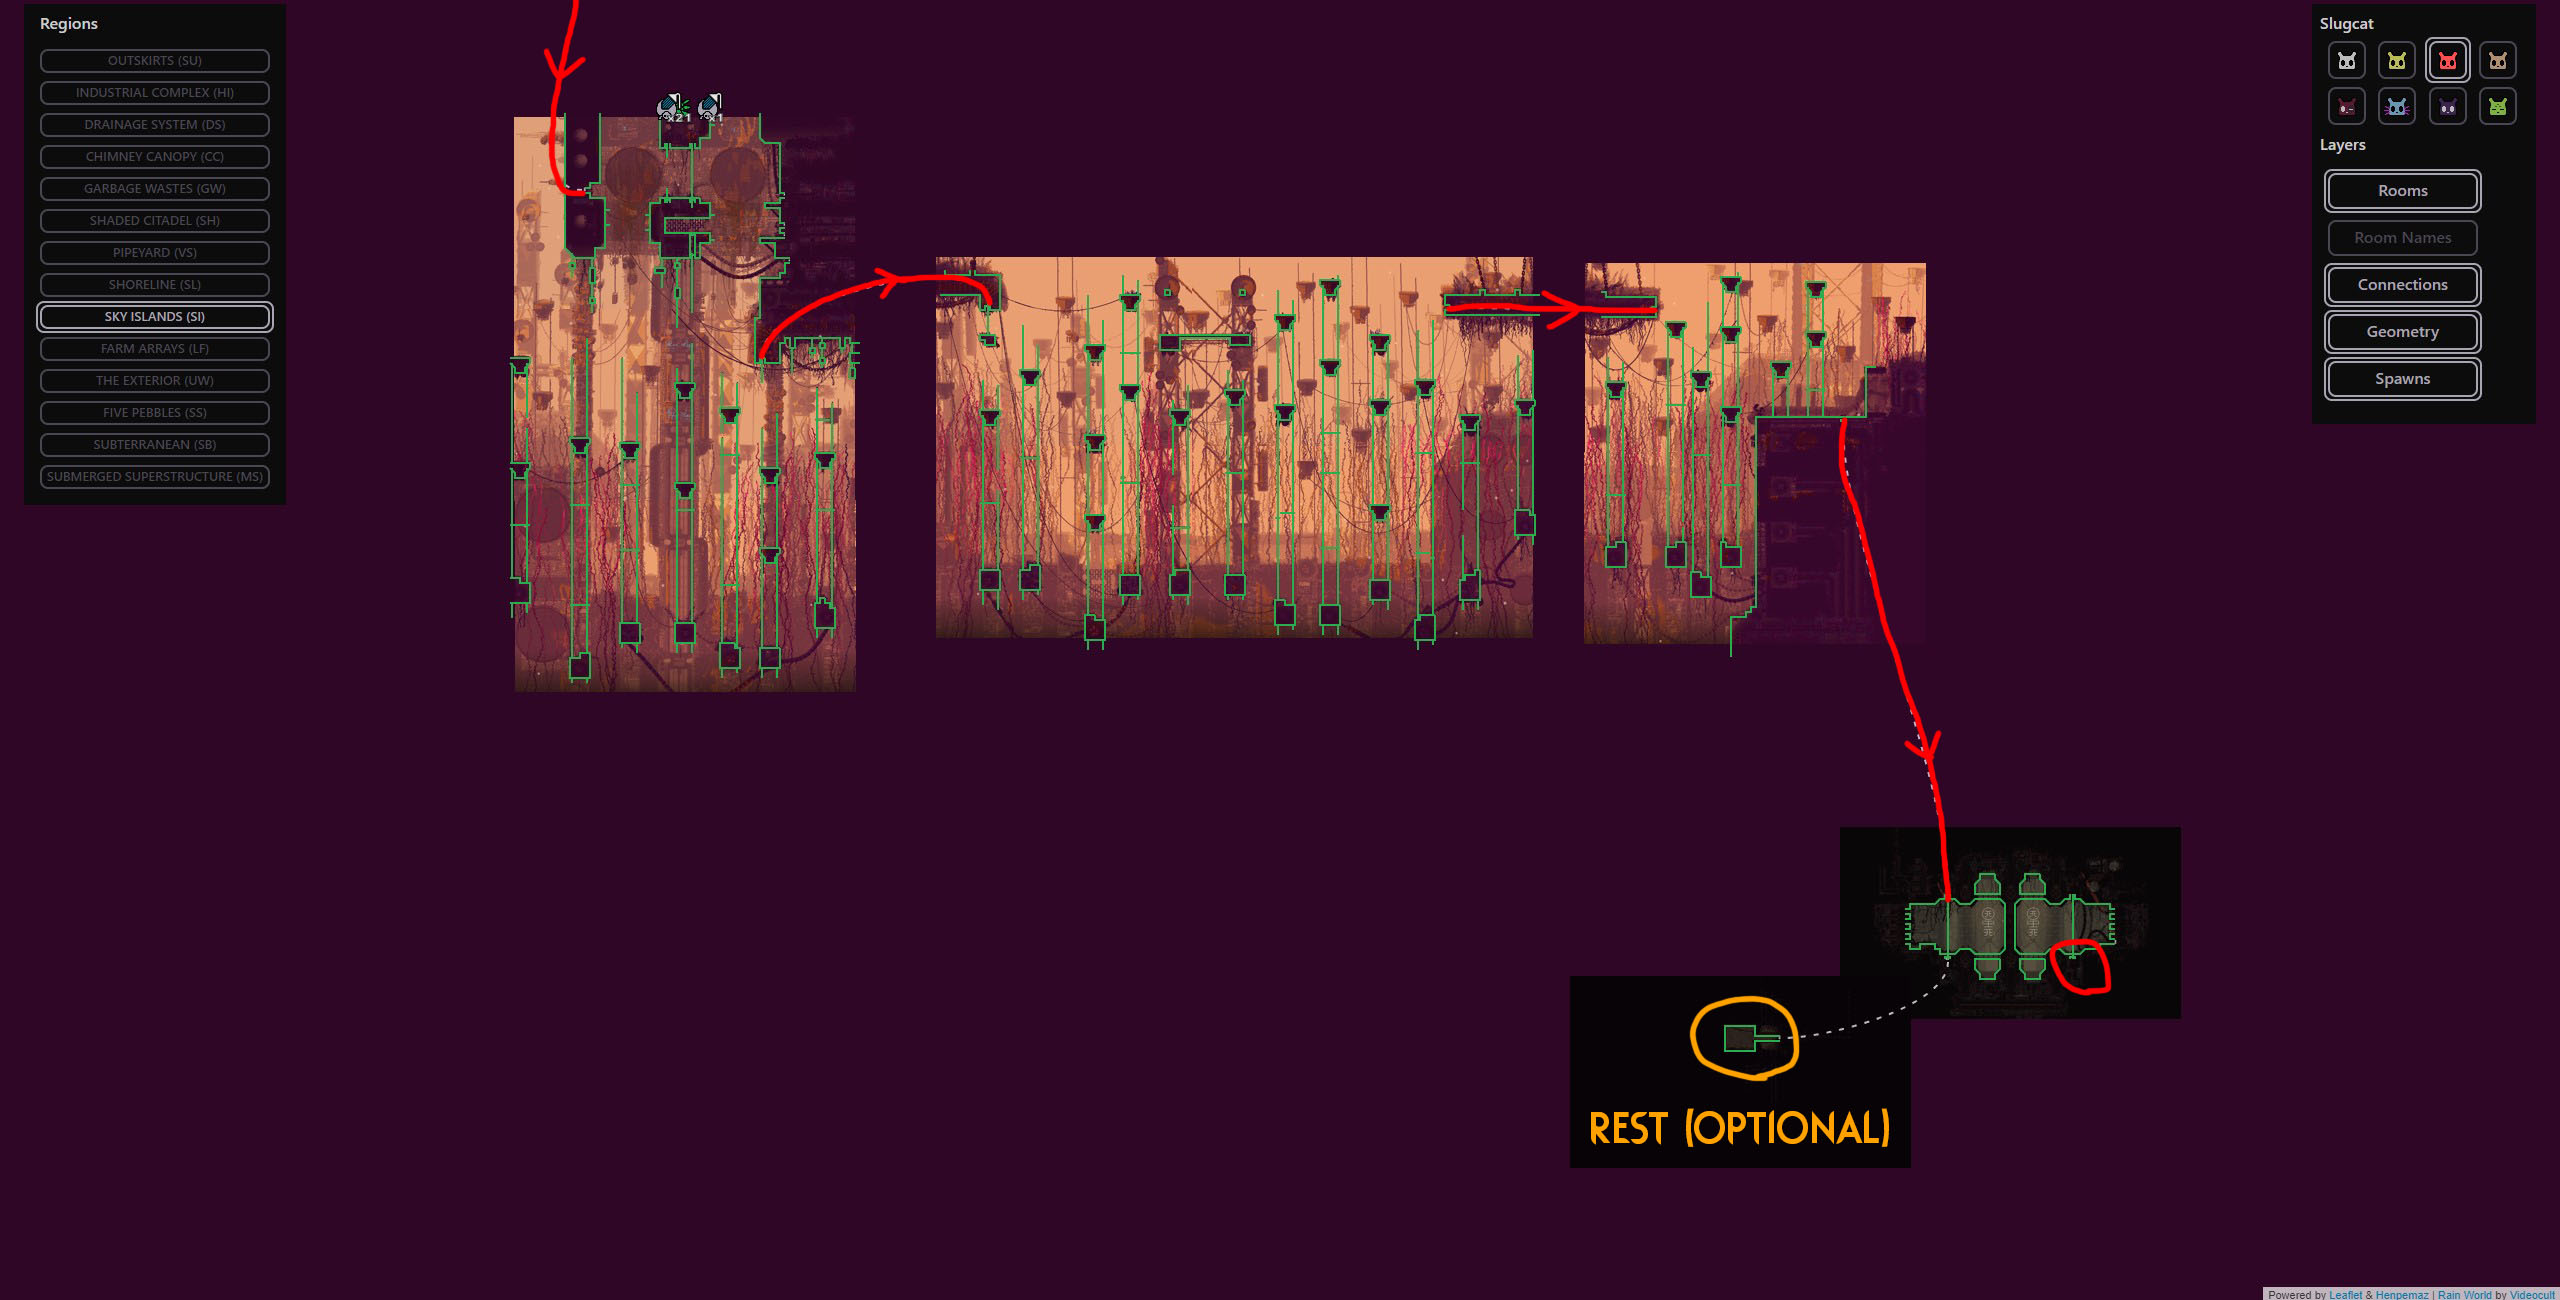 Getting through the yellow lizard tunnel should be easy with your squid buddy as the yellow lizards should be easy to evade, but be sure to watch out for the resident dropwig in this area.
We exit the yellow lizard tunnel to the west and continue downward to the Farm Arrays gate. The squidcada should make all the platforming a breeze. Watch out for Vultures in the last couple of Sky Islands rooms but don’t worry too much as they are easy to outrun with the squidcada.
Hopefully you were able to get a decent cycle length because we plan on skipping the shelter at the karma gate and going straight through to Farm Arrays.
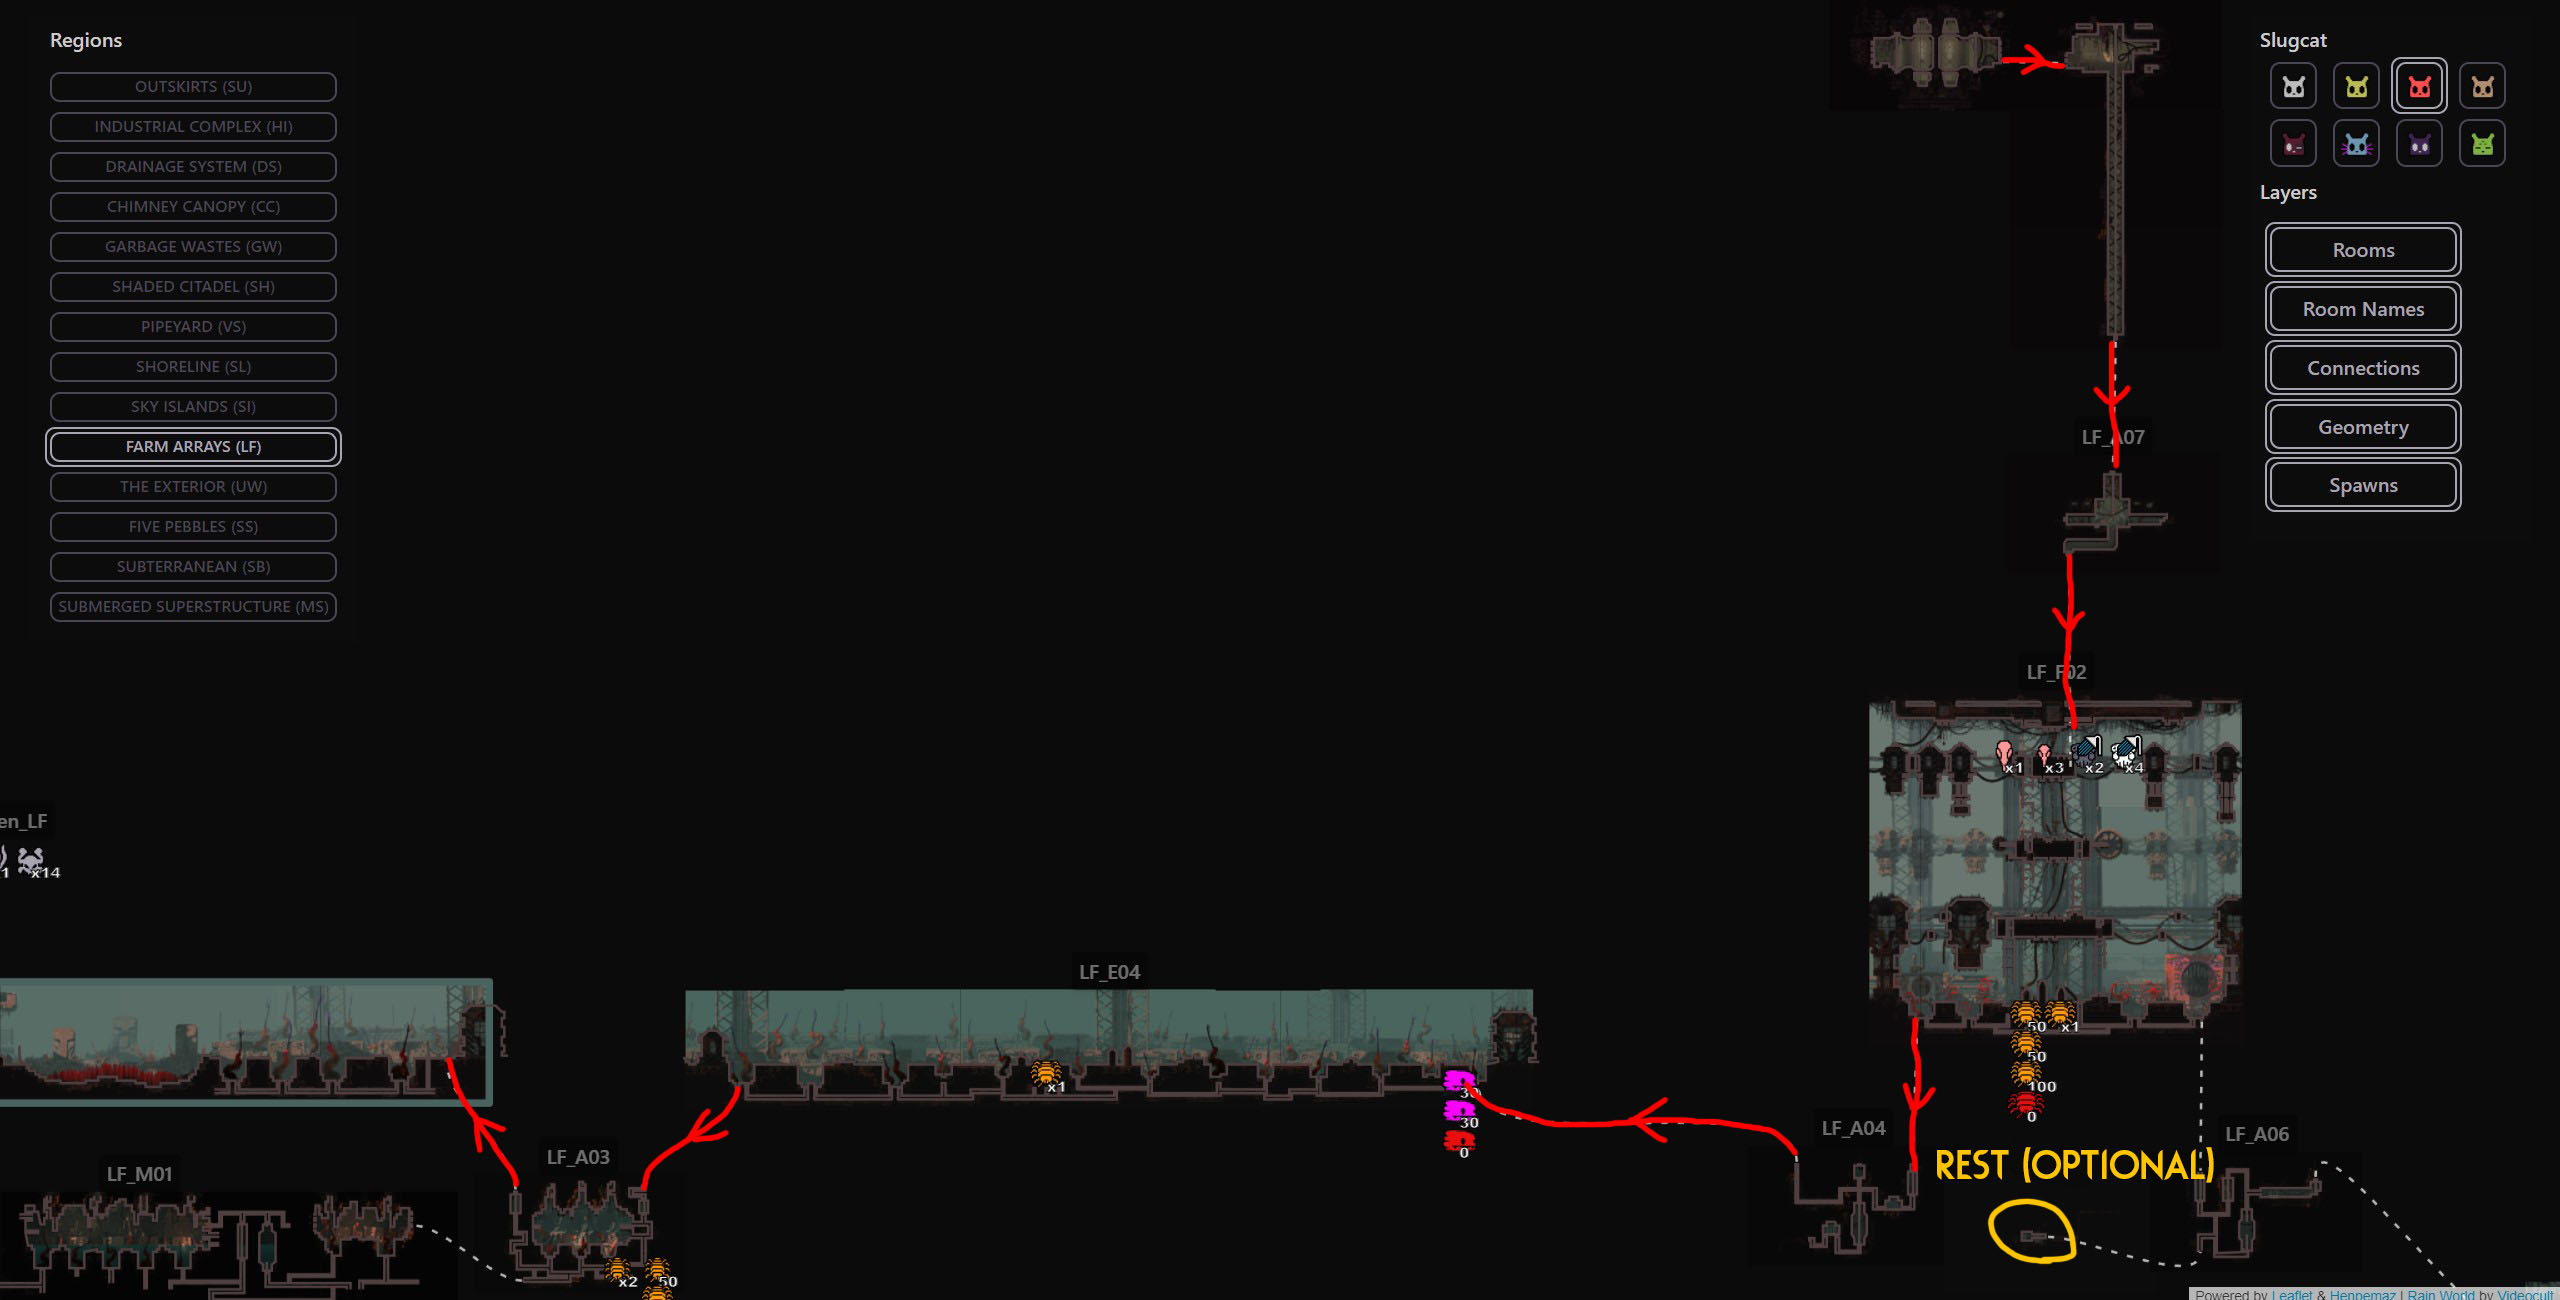 The first few screens as we descend into Farm Arrays can be sketchy because of the Centipedes that like to hang out here. You should be able to juke them with your squid buddy or just rush past them. If you get grabbed, quickly release the squid, equip your spear and spear the centipede for it to release you. This can be tricky to do and hopefully it will not come to that.
After you enter the first big room, you should be okay. You can choose to exit this room to the bottom right for a nearby shelter or exit to the bottom left and continue west to where our journey began.
We will be travelling back to the beginning screen regardless. Be sure to grab spore puffs on your way. We will need 2 and you can swallow one to store it.
We exit the big room with all the broken ladders heading west. If you’ve managed to hang on to your squid buddy until now, they will make travelling through the next few screens very easy.
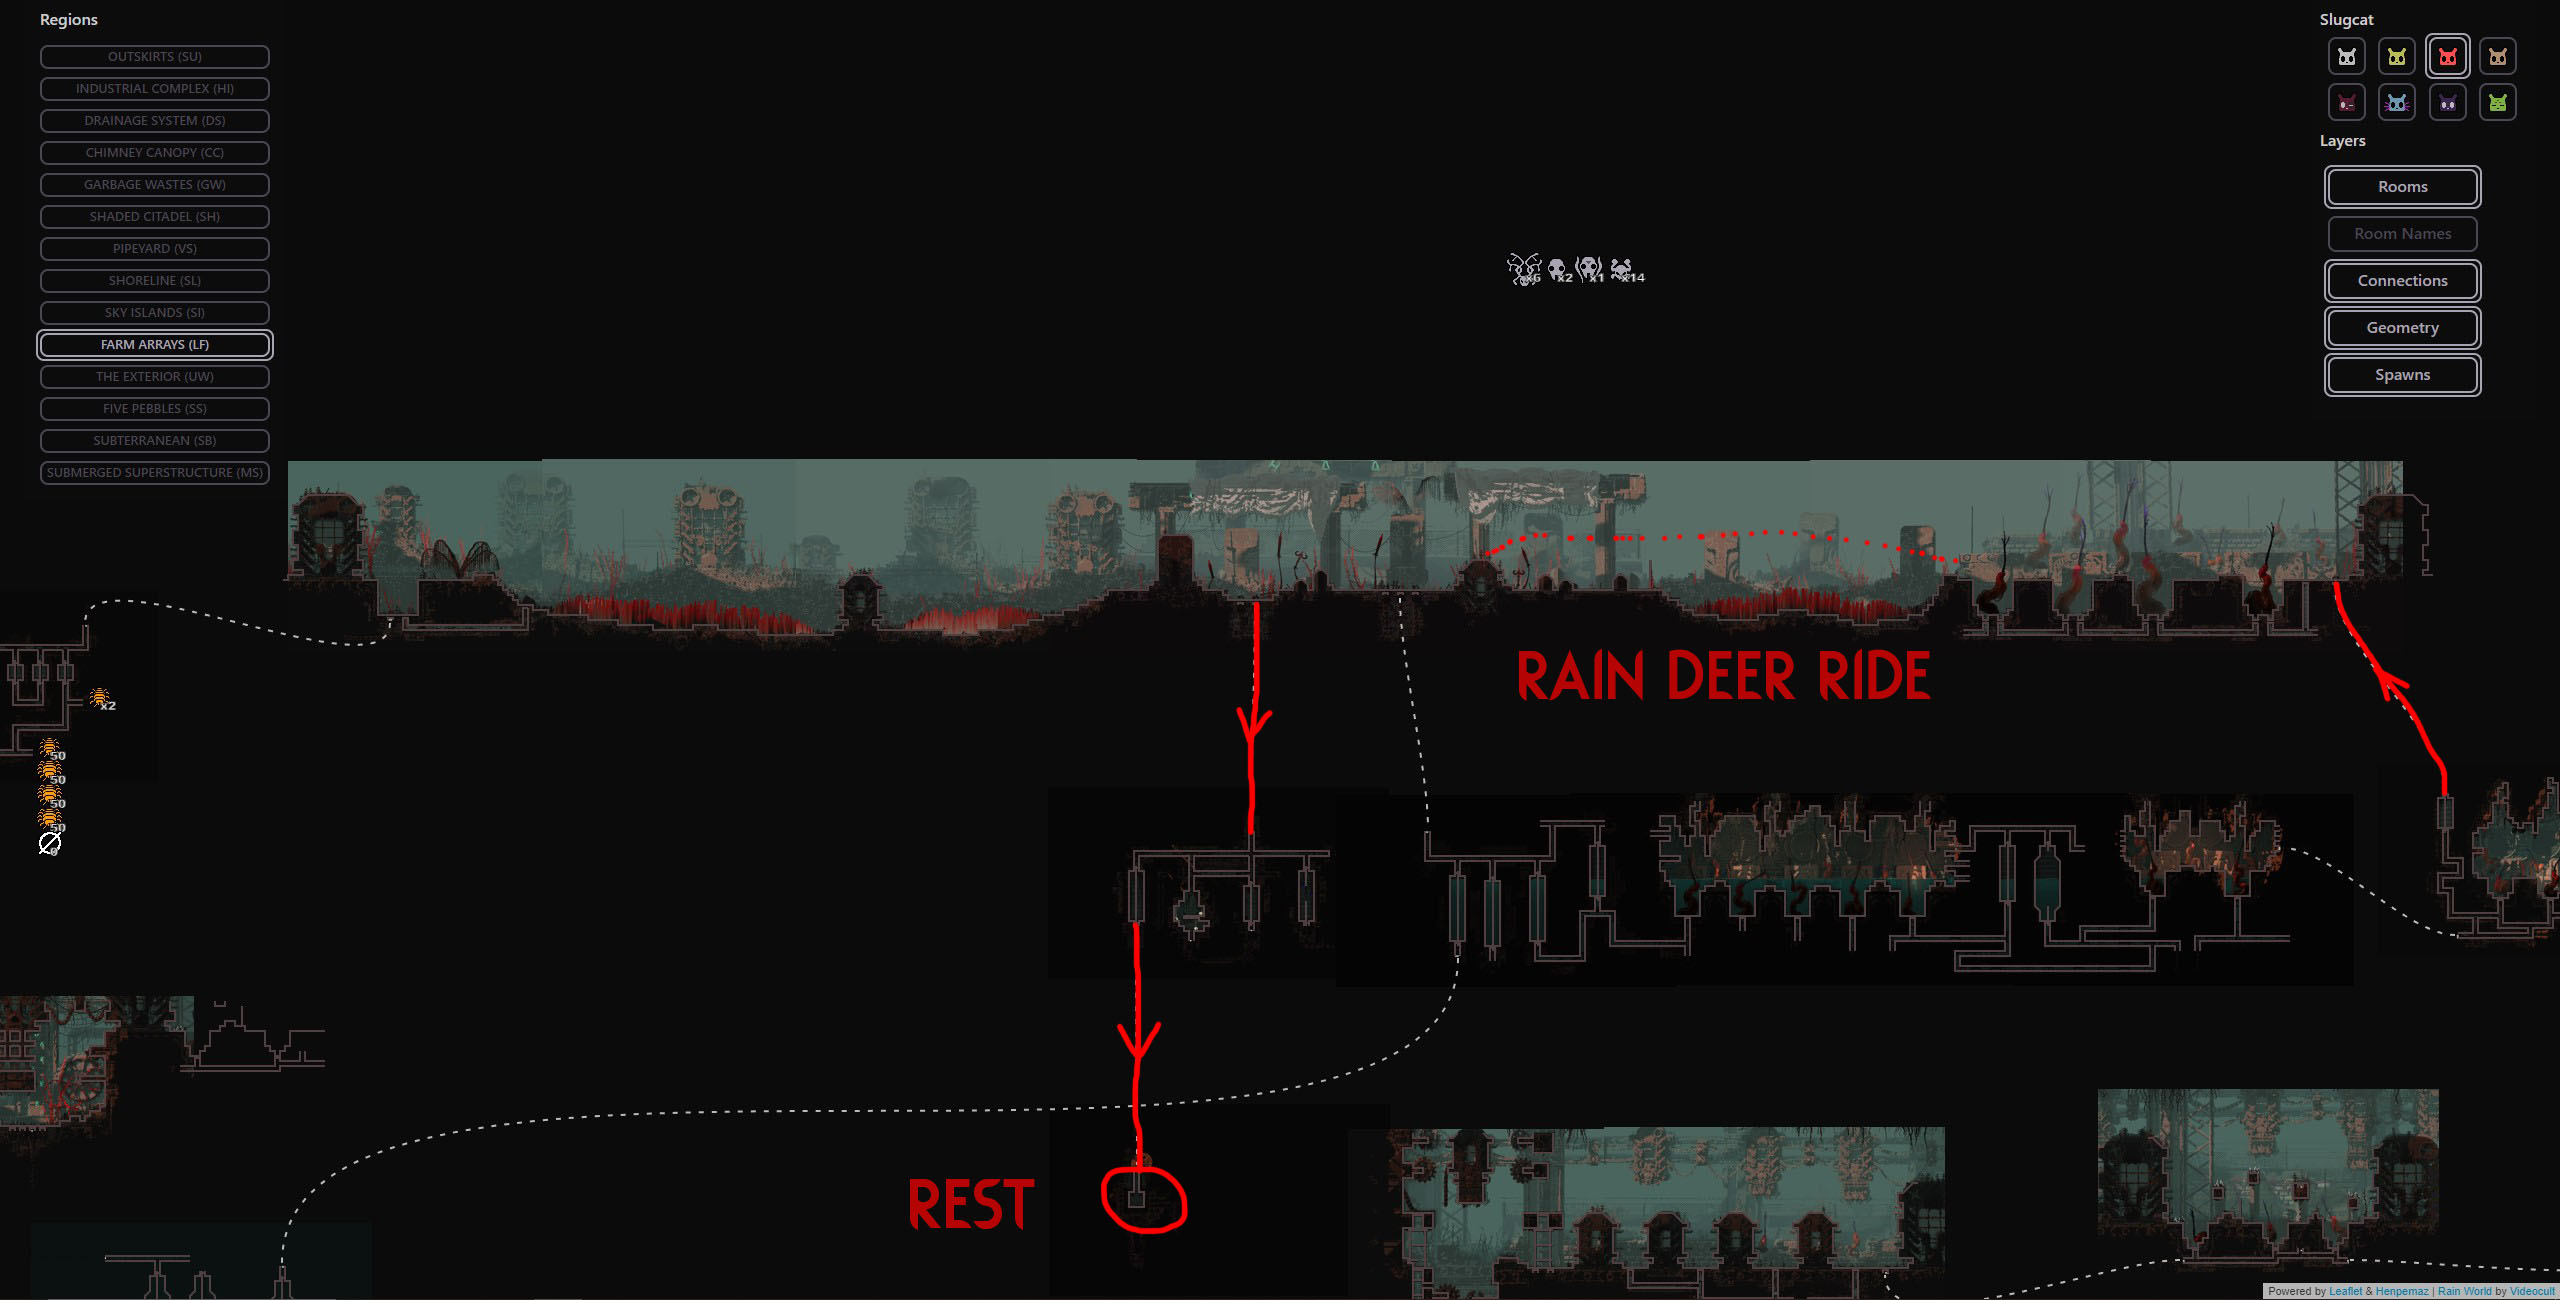 You will eventually reach the same room with from the beginning with all the baby centipedes and the hidden spore puff. Exit to the top left and make sure you have at least 2 spore puffs with you. This is also a good location to kill and eat our squid buddy as he has served his purpose.
NOTE ABOUT RAIN DEER: I find Rain Deer to be among the most annoying creatures to deal with in the entire game because of how buggy and unreliable they can be. I opted not to include the Farm Arrays echo as that path involved a lot more Rain Deer usage and Scavenger tolls. I highly recommend subscribing to and activating the Controllable Rain Deer mod (linked above in 'Valuable Resources' section) to make using them simpler and more enjoyable but from this point forward all my explanations will assume that you are playing without the mod.
We are now back here where our journey began and will need to take a short Rain Deer ride to the west to reach the shelter. Hopefully you’ve been picking up easy food along the way and are ready to hibernate.
Throw the first spore puff against any vertical surface and make sure to avoid throwing it in tight spaces or corners. This will cause a Rain Deer to come investigate.
When the Rain Deer arrives, place your other spore puff on the ground as bait. When the Rain Deer bows their head to eat the spore puff, jump and grab onto their antlers. The Rain Deer may hang out around the spot you threw the first puff for a while but will eventually get up and leave (we hope). If the Rain Deer starts walking to the east, you can spam directional inputs to wiggle around on their antlers which will prompt them to stop and then hold left to kindly ask the dumbass to go west.
Once you make it past the first patch of red worm grass, you’ll find an unmarked exit in the center. Take the exit and it will lead you down to the shelter where we will be hibernating.
Segment #6 Video Walkthrough (with text commentary):
Congratulations!
That was a tough segment and we’re almost at the end of our journey.
Segment #7 (Farm Arrays > Subterranean Echo)
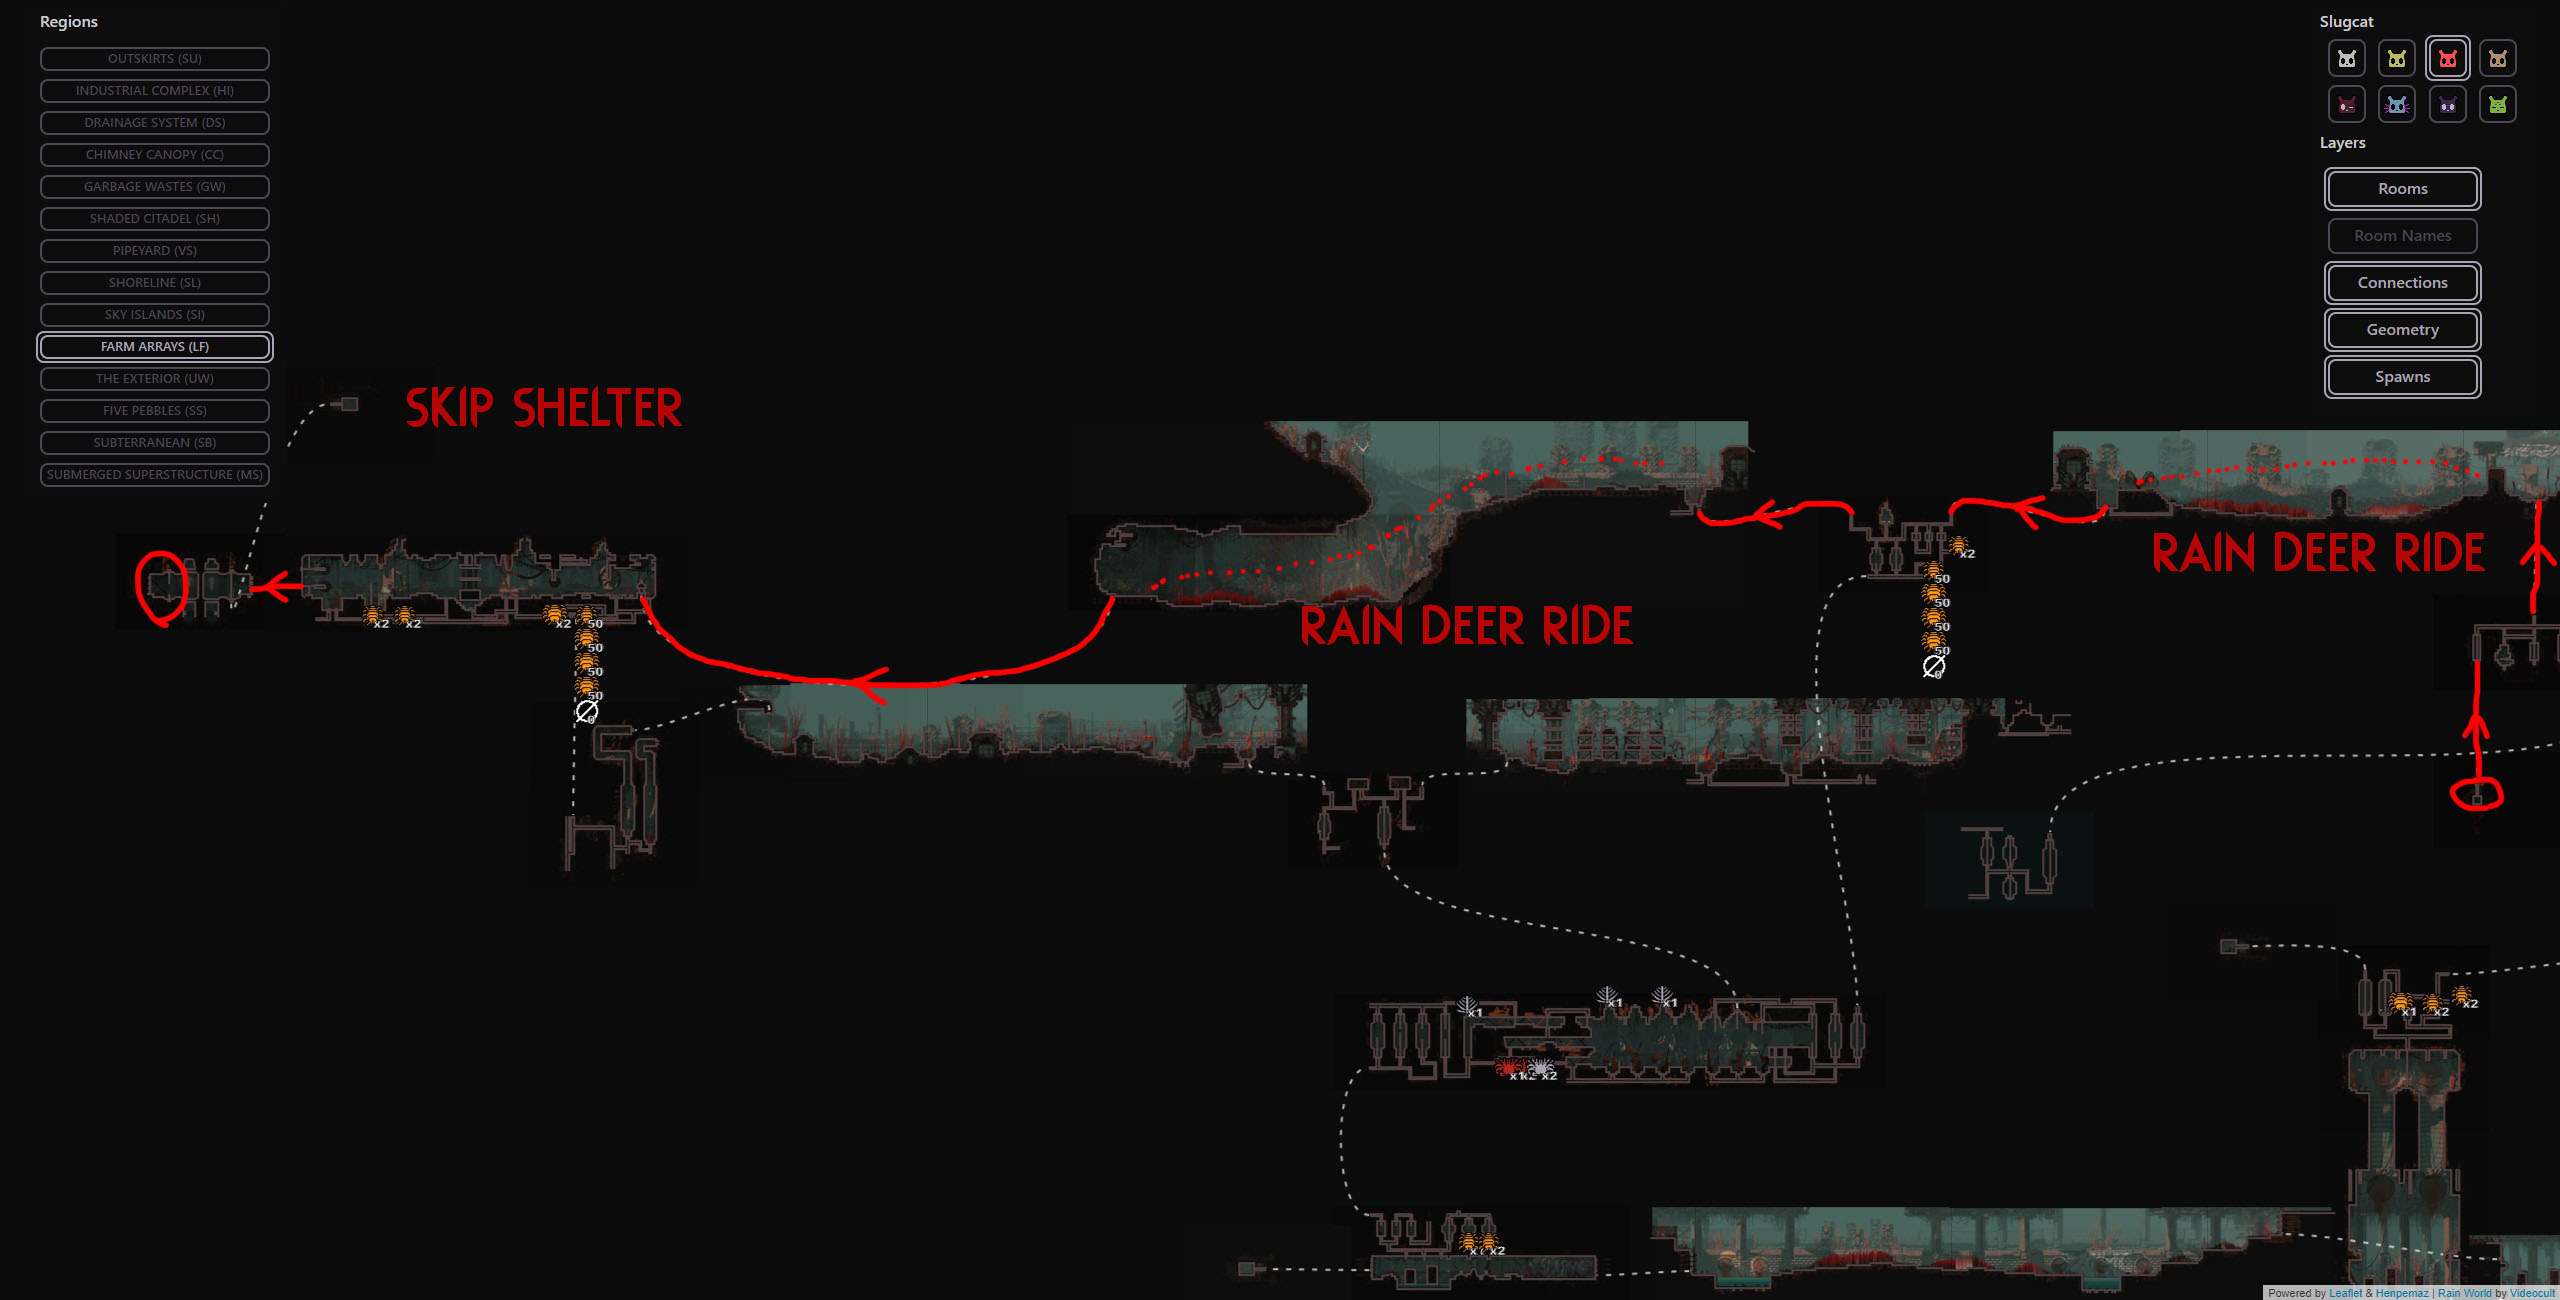 Make haste out of the shelter and check that the coast is clear of scavengers topside. Scavengers like to congregate in this area and they can be annoying to deal with. If it has been less than 30 seconds into this cycle, you are able to quit out and reload to avoid them.
Luckily, it is only 2 short Rain Deer trips west to the Subterranean gate. Be sure to have at least 2 spore puffs with you whenever possible.
Once you are above ground, you will notice a short pillar to the left. I recommend using spears to climb over and be on the west side of it. This is so that scavengers cannot annoy you while you wait for your ride.
Throw a spore puff at the western side of the small pillar to bait the surrounding Rain Deer to this location. You want to throw it a little high up on the wall. This is because Rain Deer sometimes bug out when you throw the spore puff into a corner or a tight space.
After a short ride to the west, you will reach a room exit heading downward, take it and restock on spore puffs in the next room. I highly recommend swallowing an emergency spore puff and grabbing 2 more. We then exit this room to the top left.
Use 2 of the spore puffs the same as earlier to take another short Rain Deer ride to the west. Be sure to throw the first puff at a vertical surface as far from the ground as possible. As you arrive at the end of the short tunnel with the weird graffiti, you will want to disembark the Rain Deer and continue into the next room to the west.
Centipedes and Scavengers are common in this area. Avoid the Scavs if possible, and use the emergency spore puff on any larger centipede in your way. Get some easy food if you have the time, stock up on spore puffs and ONE SPEAR and then continue west into the Subterranean karma gate.
This will be the final karma gate of our journey. Victory awaits.
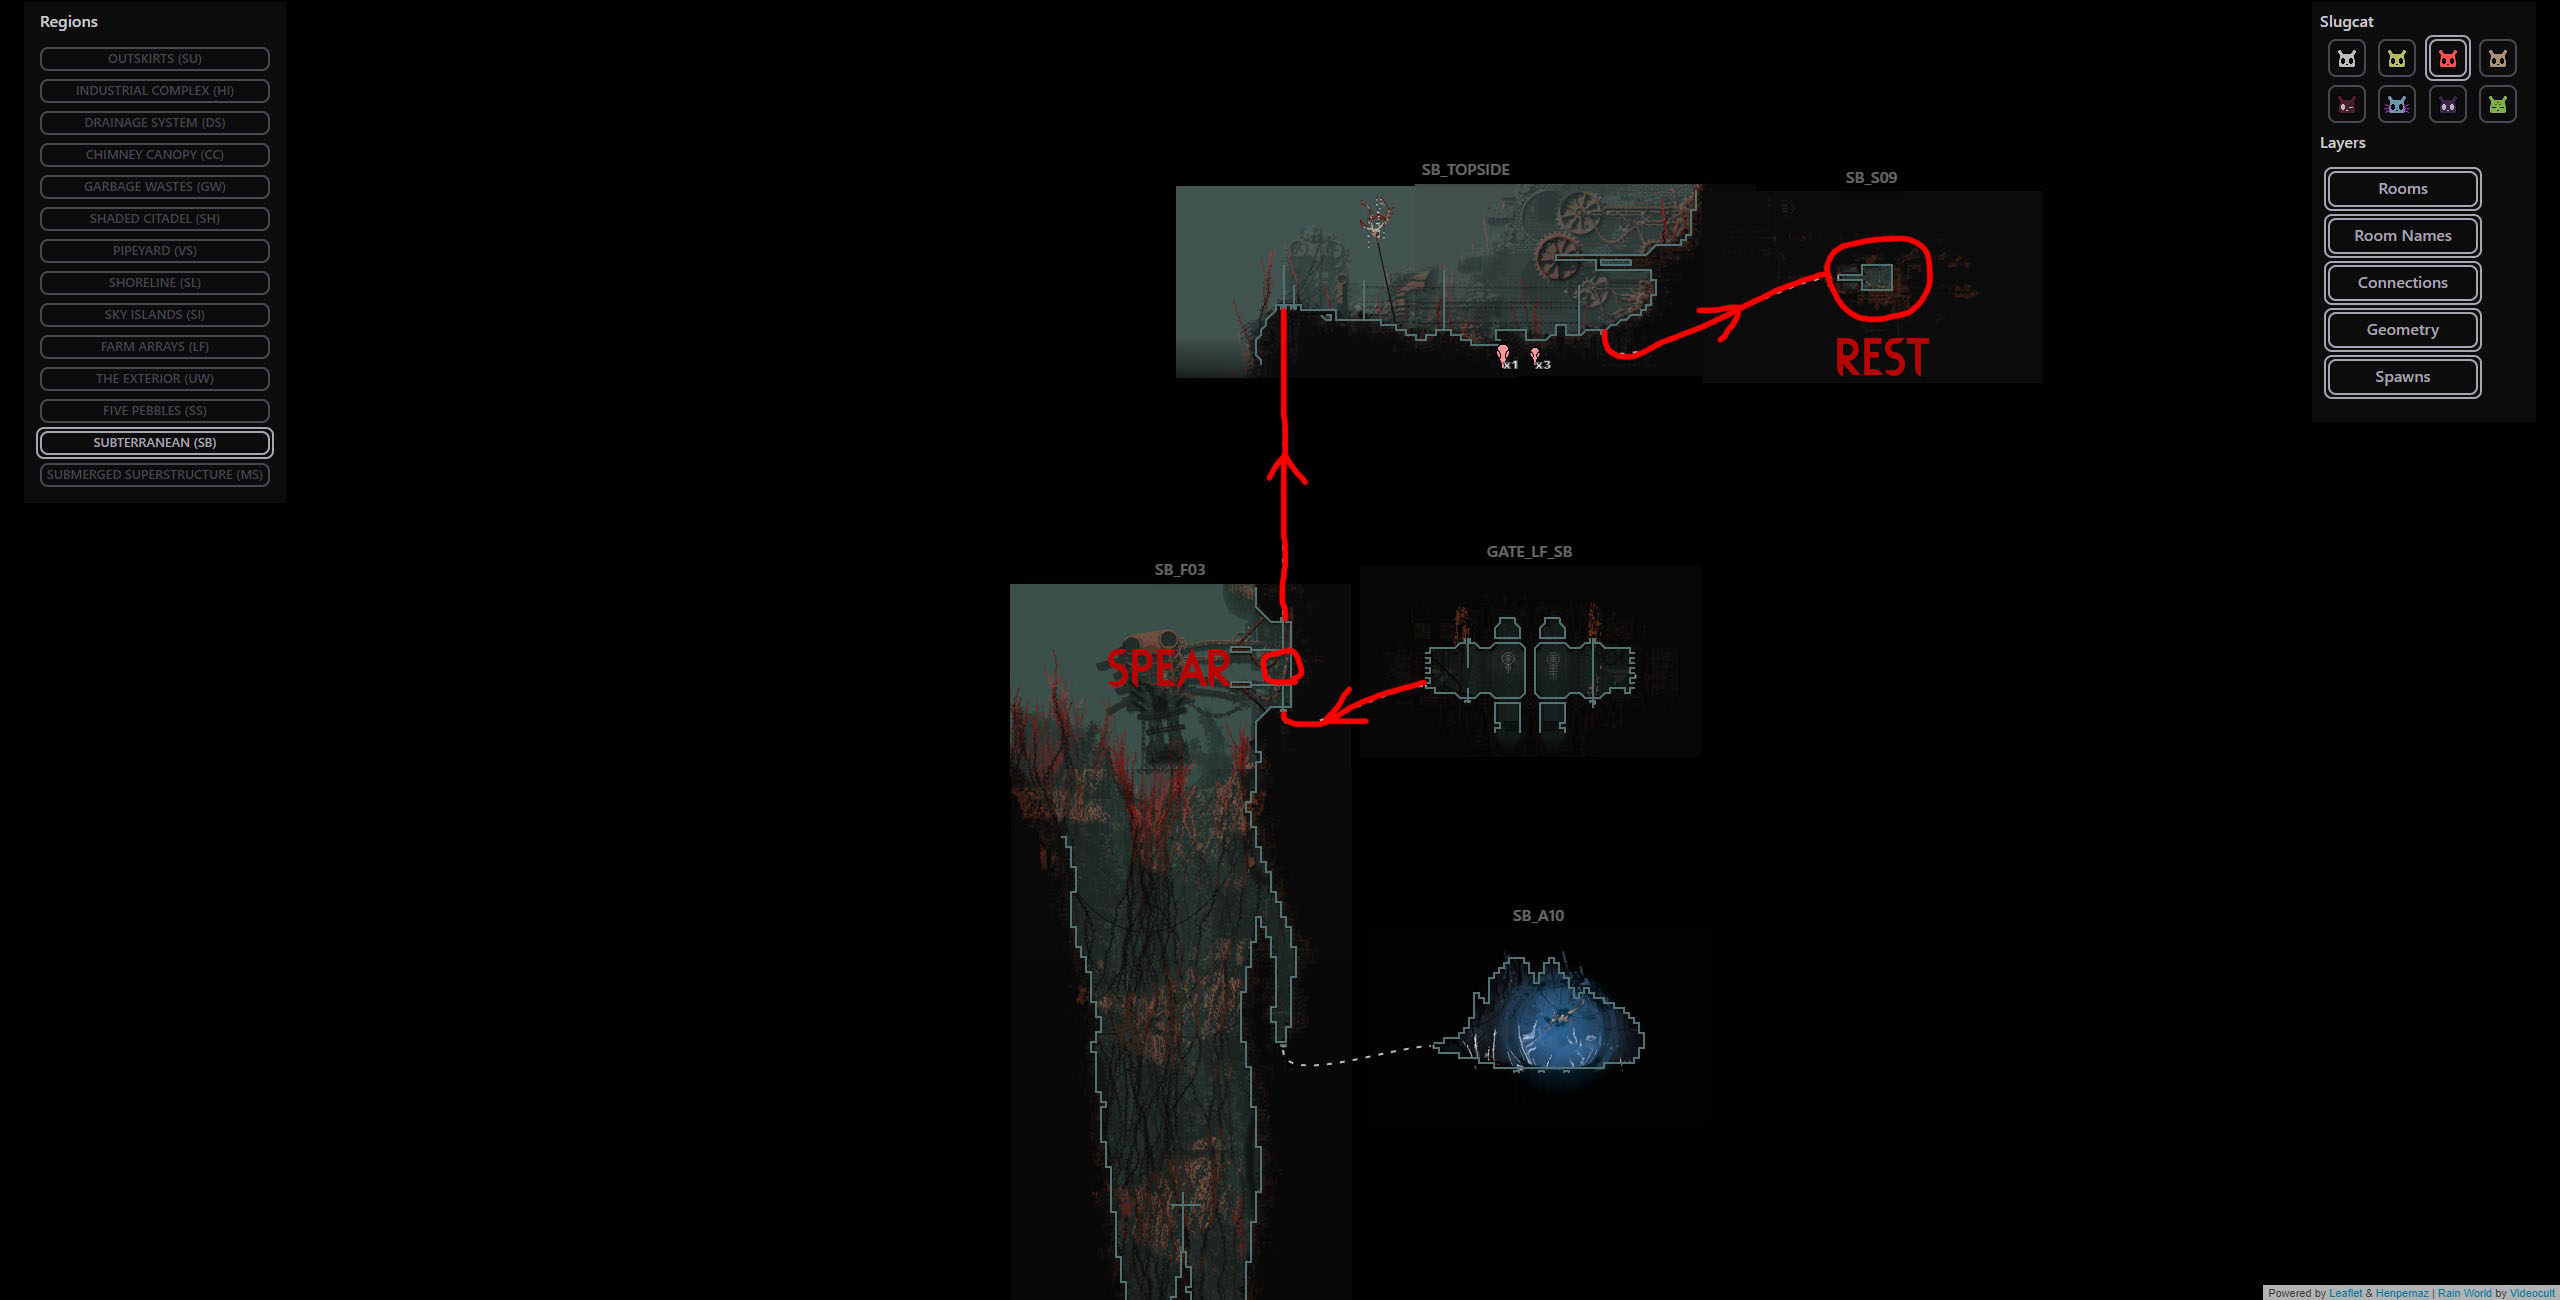 Once you’re past the gate, use the spear to climb up and into the room above. If you don’t have enough food to hibernate yet, use one of the two available popcorn plants here. Make sure not to stand in the worm grass for too long. Once your belly is full, rest at the shelter.
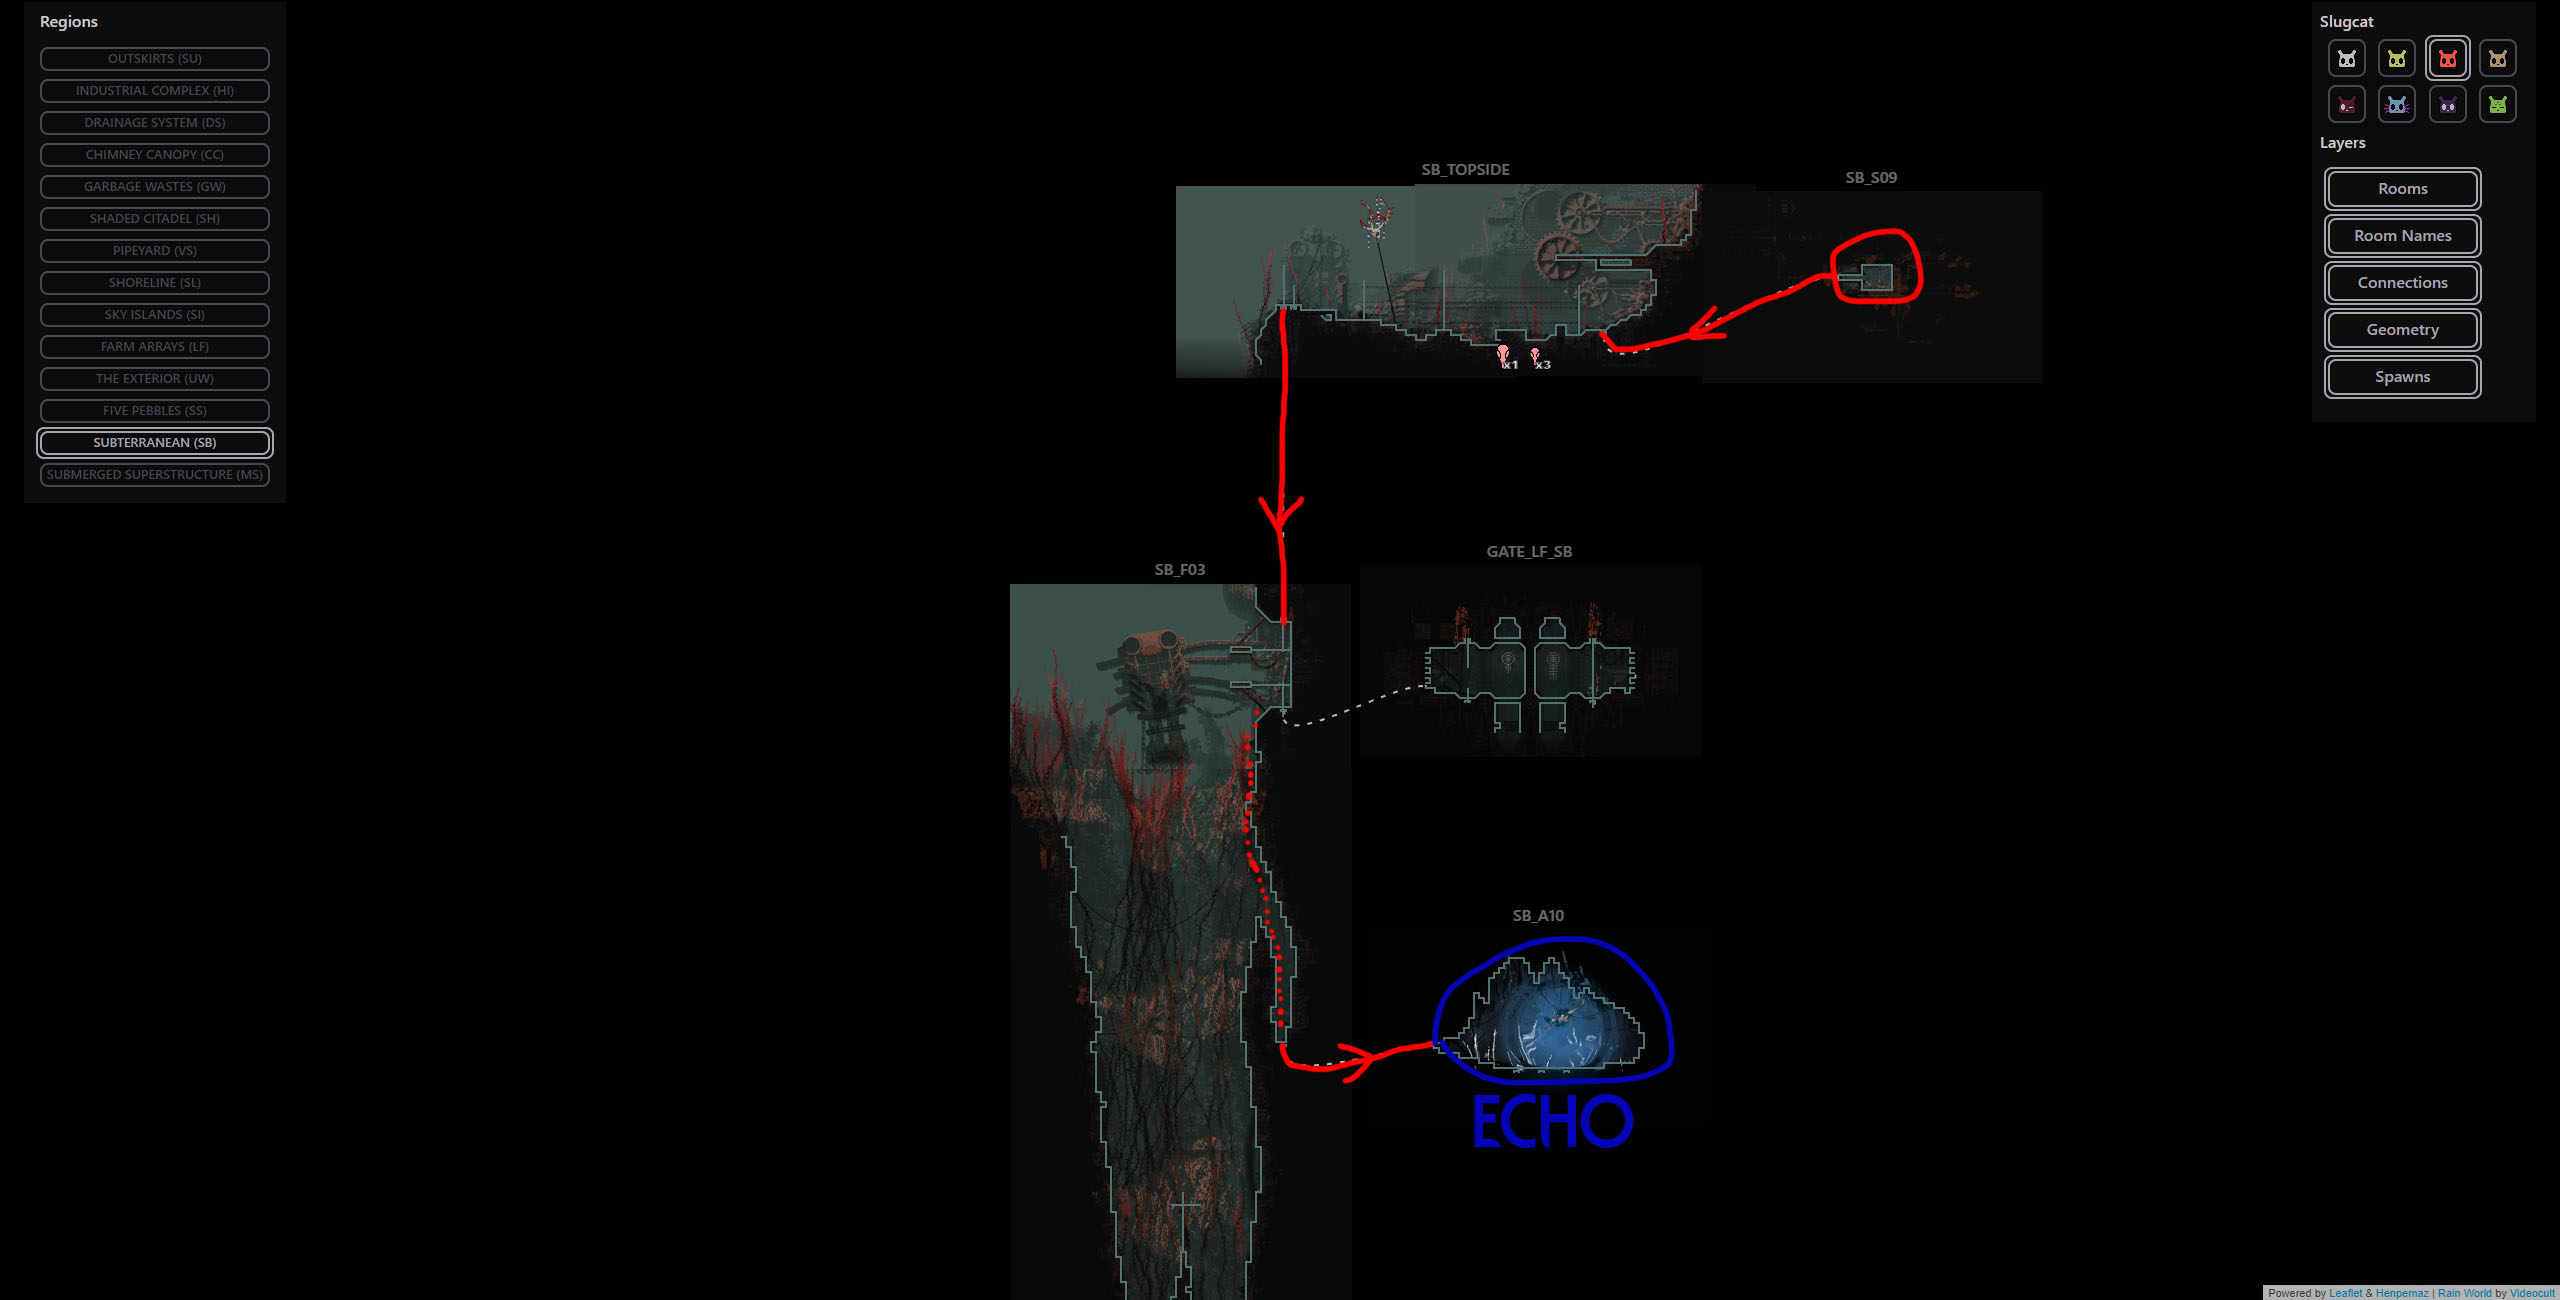 Wake up and head back down and descend down past the karma gate. Make sure to hug the right wall as you fall down this massive hole and you will reach an exit to the right side. Take the exit into the room on the right and you will be met with the final echo. They have no karma requirement and they will finally boost us to the maximum karma, enabling us to ascend.
You will be teleported back to the shelter. That’s 4/4 echoes and we’re ready to ascend. Moreover, we are in the final region of the run and no longer need to starve or worry about karma.
Segment #7 Video Walkthrough (with text commentary):
The run is essentially over and the final segment is just a victory lap. Congratulations.
Segment #8 (Subterranean > End)
At this point, if you’ve adhered to the guide, you should be in Subterranean after 4 echo visits with 3 or more cycles remaining. This basically means the run is a guaranteed success, and moreover it means you can rest at every single shelter between here and the Depths without a care in the world. Death and karma loss mean nothing as we will no longer need to pass karma gates or visit echoes.
Now don’t get me wrong, this won’t be easy, as Subterranean is an absolute hellscape filled with dangerous creatures, pitch black darkness, and unfriendly labyrinthine rooms. However, none of this matters because we can die as many times as we want. In fact, as long as you’re safely in Subterranean even if you only have ONE cycle remaining, you could make it all the way to the end of the game in a single cycle. Depths is unaffected by rainfall and has no hostile creatures so all we need to do is reach it.
For these reasons, I will simply refer you to the final video below for a detailed walkthrough from the final karma gate to the end of the game if you need it.
Segment #8 Video Walkthrough (with text commentary):
Conclusion/Closing Remarks
Congratulations on the completion of this grueling and treacherous journey.
Only 2.6% of players have the ‘Within Time’ Achievement at the time of this guide’s creation and now you’re one of them :)
Hunter’s campaign is one of my favorites. I love his story, I think his limited cycles are an interesting and exciting challenge, and I think his spawns are still fair compared to other slugcats such as Spearmaster or Artificer.
On my quest to collect all the achievements for this game, ‘Within Time’ was the first real obstacle I was met with. I didn’t know what the cycle countdown meant, nor did I realize how much more challenging the spawns would be. I theorized that skipping the main quest and reaching max karma via echo visits should just allow you to ascend and complete the campaign, but whenever I searched for suggested routes, everyone kept insisting I should visit moon or pebbles or both. I found no affirmation that my echo method would work but I decided to go for it anyway. It worked and I decided then and there that I would make a guide to try and simplify the journey for others.
Hopefully this guide was helpful and you learned a thing or two. I went into excessive detail at times but I really love this game and I think it has a great community, so when I decided to make a guide, I wanted to give 110% effort.
If you enjoyed this journey and you’re up for an even bigger challenge, try going for a Hunter All Objectives run. This is a run where Hunter completes his main quest and then ascends afterwards. A link to my own segmented All Objectives run can be found below (no commentary).
Hunter (All Objectives) Segmented Playthrough (no commentary):
TL;DR
Thank you for using the guide :)
Beat Rain World's achievements?
Flex it — let your friends know you pulled it off.
- Storyline Region Routes★ 5 (592)31k views1.4k ♥2 minUpdated 20 Jun, 2017
- Dress My Slugcat: Custom Slugcat Tutorial - Basics, Setup, Workarounds (WIP!)★ 5 (335)21k views932 ♥29 minUpdated 8 Jun
- 100% Steam Achievement Guide★ 5 (887)20k views1.9k ♥37 minUpdated 17 Dec, 2025
- Detailed Region Maps★ 5 (803)19k views1.7k ♥1 minUpdated 10 Mar, 2023
- General and Advanced Movement Guide★ 5 (572)17k views1.3k ♥15 minUpdated 5 Mar, 2021
- All Slugcats Guide★ 5 (682)15k views916 ♥9 minUpdated 30 Oct, 2025




- Upgrading to PremiumTeam Fortress 2★ 5 (20k)1441k views11k ♥6 minUpdated May 11, 2022
- No More Room in Hell Official ManualNo More Room in Hell★ 5 (2.8k)569k views2.1k ♥29 minUpdated Apr 22, 2019
- NMRiH Community Hosting GuidesNo More Room in Hell★ 5 (526)351k views653 ♥1 minUpdated Aug 10, 2022
- ULTIMATE GUIDE FOR GAME DEV TYCOONGame Dev Tycoon★ 5 (5.8k)326k views10k ♥4 minUpdated 23 Jan, 2014
- How to 'Git Gud' Soon™MORDHAU★ 5 (2k)318k views3k ♥68 minUpdated Nov 16, 2024
- Лучшие кооперативные игры SteamPAYDAY 2★ 5 (1.5k)315k views2.1k ♥56 minRussianUpdated Apr 27, 2025






This guide was created by its original author on the Steam Community. Are you the author and want it removed? Request removal.