Black Ops III Zombies Mapping Guide (by n0x)
1.0 Introduction
Not all steps are required in order to be able to have a playable map, if all you want is to create a playable map without having to edit anything (without using the map editor) then all the steps you need to follow are:
- 1.1 Requirements
- 2.0 Creating the project
- 9.0 Compiling/ building the map
- 9.1 Loading the map into BO3 from the Mod Tools
- 9.2 Playing the map
This will allow you to play the standard map that comes with the map editor.
1.1 Requirements
- Call of Duty: Black Ops III
- Call of Duty: Black Ops III Zombies DLC
- Call of Duty: Black Ops III Mod Tools
- Go to your library and click on the button above the search bar.
- In the list, tick the box called "Software"
- Search for Call of Duty: Black Ops III Mod Tools in the list and download it.
1.2 Resources
There are certain websites which can be used as a resource for information to help you with mapping, crazy enough, Generative AI isn't that bad to use either when you don't know how to do something but it isn't always helpful.
Black Ops 3 Source Code Explorer Documentation[bo3explorer.zeroy.com] This website is incredibly useful for finding scripts and other files to add to your map that would otherwise need to be manually extracted.
Devraw[www.devraw.net] This website contains assets, models, textures, tools and guides on many things related to Bo3 map editing.
2.0 Creating the project
Step 1:
Open the Call of Duty: Black Ops III Mod Tools. A terminal window will open and then a window named "Black Ops III Mod Tools Launcher" will open, the terminal window can be closed when Black Ops III Mod Tools Launcher is opened.
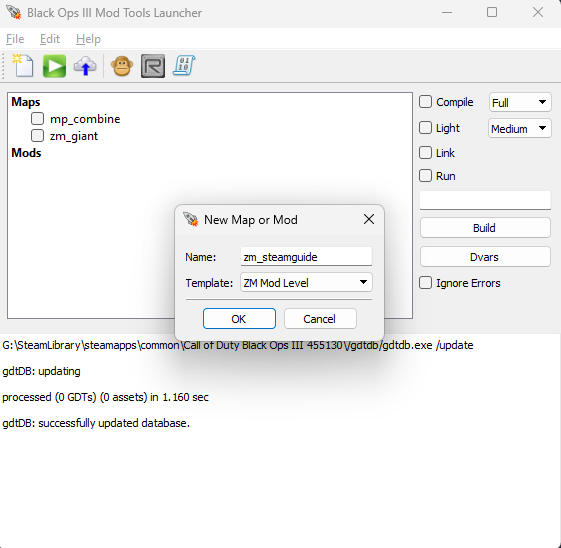
There will already be two maps, they can be edited and used but for the sake of this guide a new map will be made. Click on the "New" button in the top toolbar, give it a name (make sure it starts with "zm_") and from the dropdown list choose "ZM Mod Level", then press "OK"
For this guide i will use the mapname "zm_steamguide".
Step 3:
After pressing "OK" a window will pop up showing the files it has created, the map should now also show up in the map list. The map already comes with some basic features, a player spawn point, zombie spawners, a box and jug. The map is now ready to be edited, or played.
Tip: to find out where your map files are stored, right click on the map and press "Open Map Folder"
3.0 Opening the level editor Radiant
Radiant is the map editor that is used to make levels for Call of Duty: Black Ops III: Zombies. It features an asset browser, texture browser, grid views and 3d views of the current level you're working on.
To open radiant follow these steps:
Step 1:
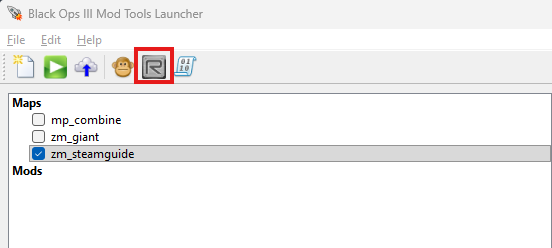
Open Call of Duty: Black Ops III Mod Tools and select your map from the list.
In the top of the screen, press the button with the large "R" labelled "Level Editor"
Step 3:
Radiant should now open with your selected map loaded.
If you've just made a new map, it should already have a few items in it such as a few walls, some perk machines, a power switch, zombie spawners and a info_payer_start entity.
3.1 Navigating around (views)
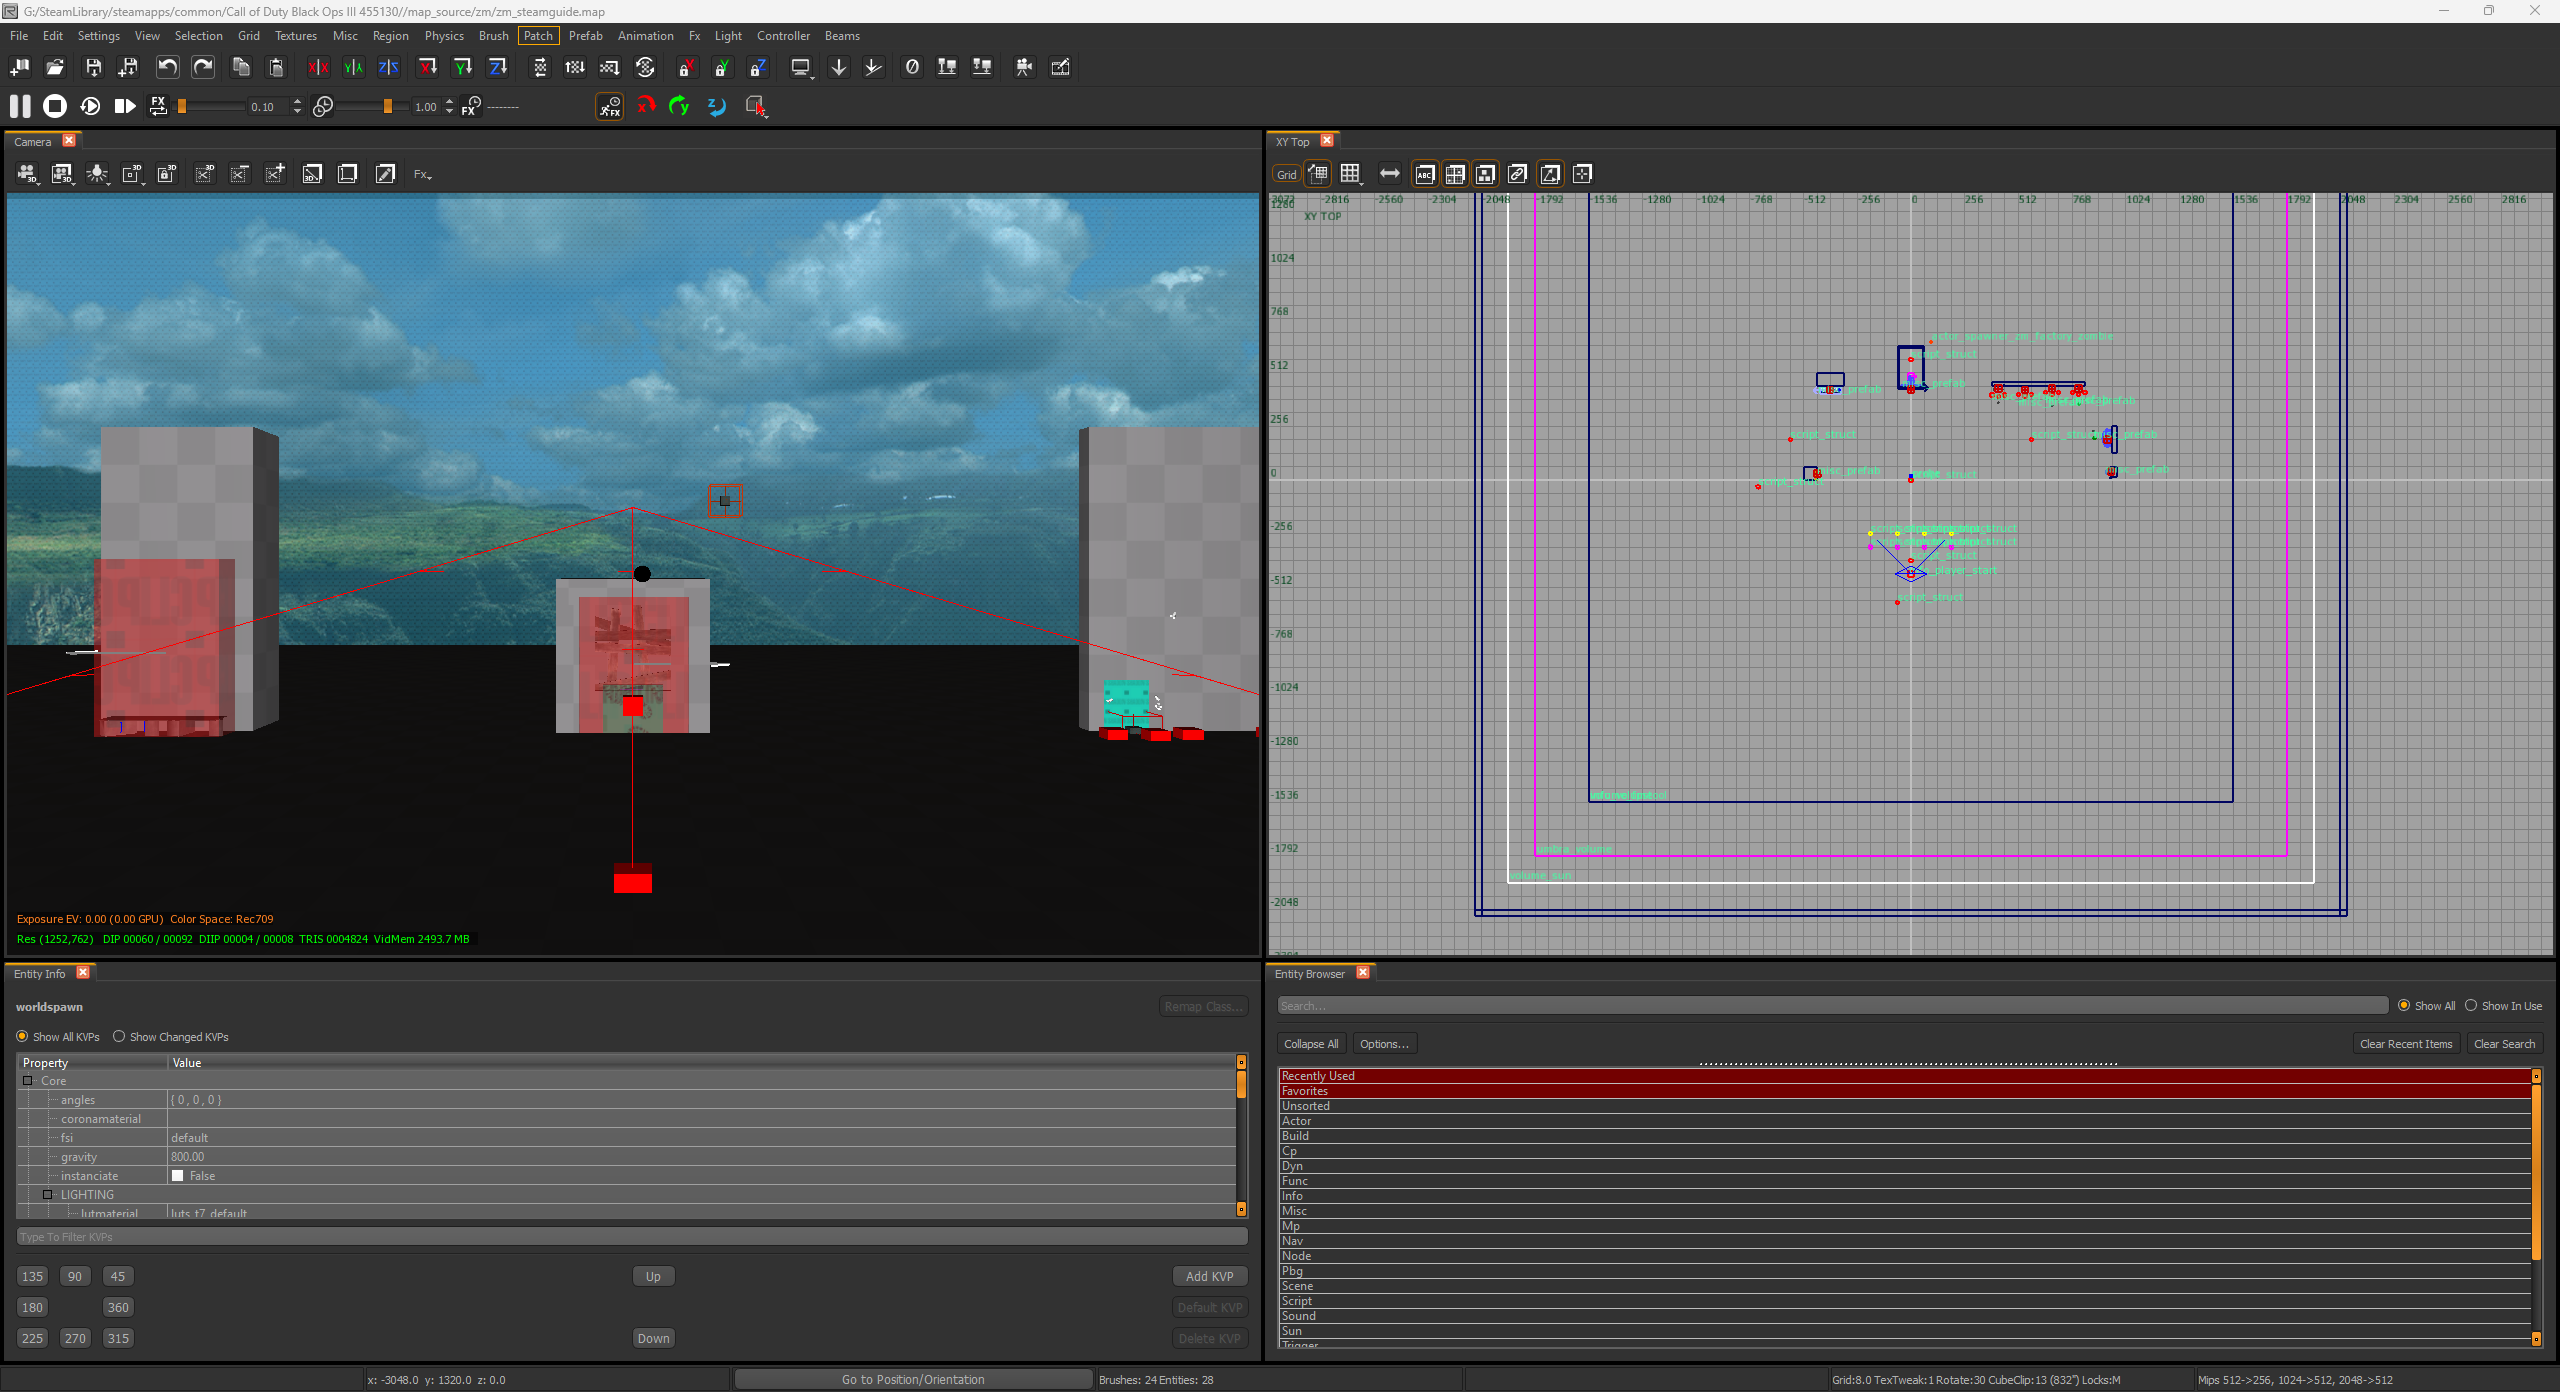
Top right:
This is the 2D top down view, useful for moving brushes and entity into their place.
Top left:
This is the 3D view, by holding right mouse button into this view you can look around, by scrolling you can move forwards and backwards.
Bottom:
In the bottom are the Entity info and Entity browser windows, these are used when placing and or configuring entities.
I recommend adding another 2D side view to make it easier to position brushes and entities, to do this go to View > New View Window > New XZ View
4.0 Making a brush
A "brush" is the name for everything that is not an entity or object, when talking about a brush you are talking about walls, floors, windows, water and for example a skybox. To make a brush, follow these steps:
Step 1:
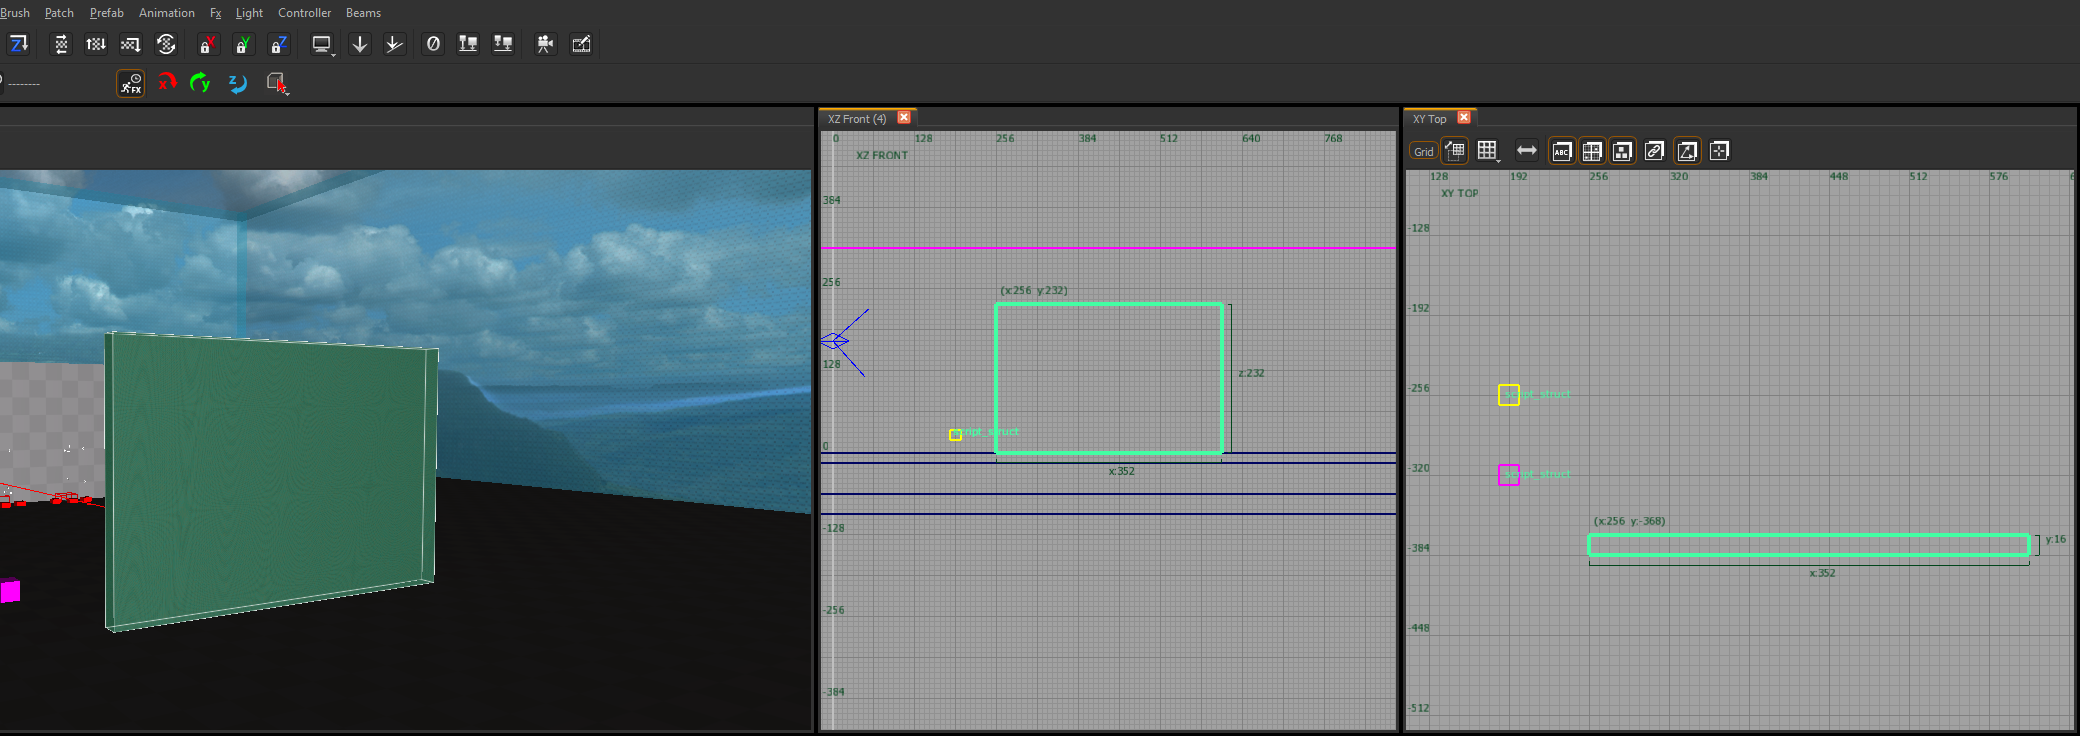
Move your mouse to any of the 2D views and drag the shape you wish to make.
Use different 2D views to control length, height and width. The brush should appear blue.
Step 3:
Once you are happy with the shape, press ESC to create the brush (in this case a wall)
The brush will not be placed but it's invisible, a texture will need to be given to it for it to appear in the world as described in 3.2.1
4.1 Giving a brush a texture
After a brush is created it might not have a default texture and may appear invisible or see through in game, to apply a texture to a brush follow these steps:
Step 1:
Select your brush by using Shift + Right Click in the 3D view on the brush.
Step 2:
Press T to open the texture browser (bottom of the screen)
Step 3:
To show all textures, make sure to select "All" instead of "All in use" in the top of the texture browser window.
Select the texture you wish to give to your brush and double click to apply it to your brush.
Now when you compile your map and load it into the game, your brush should be there.
4.2 Reshaping a brush
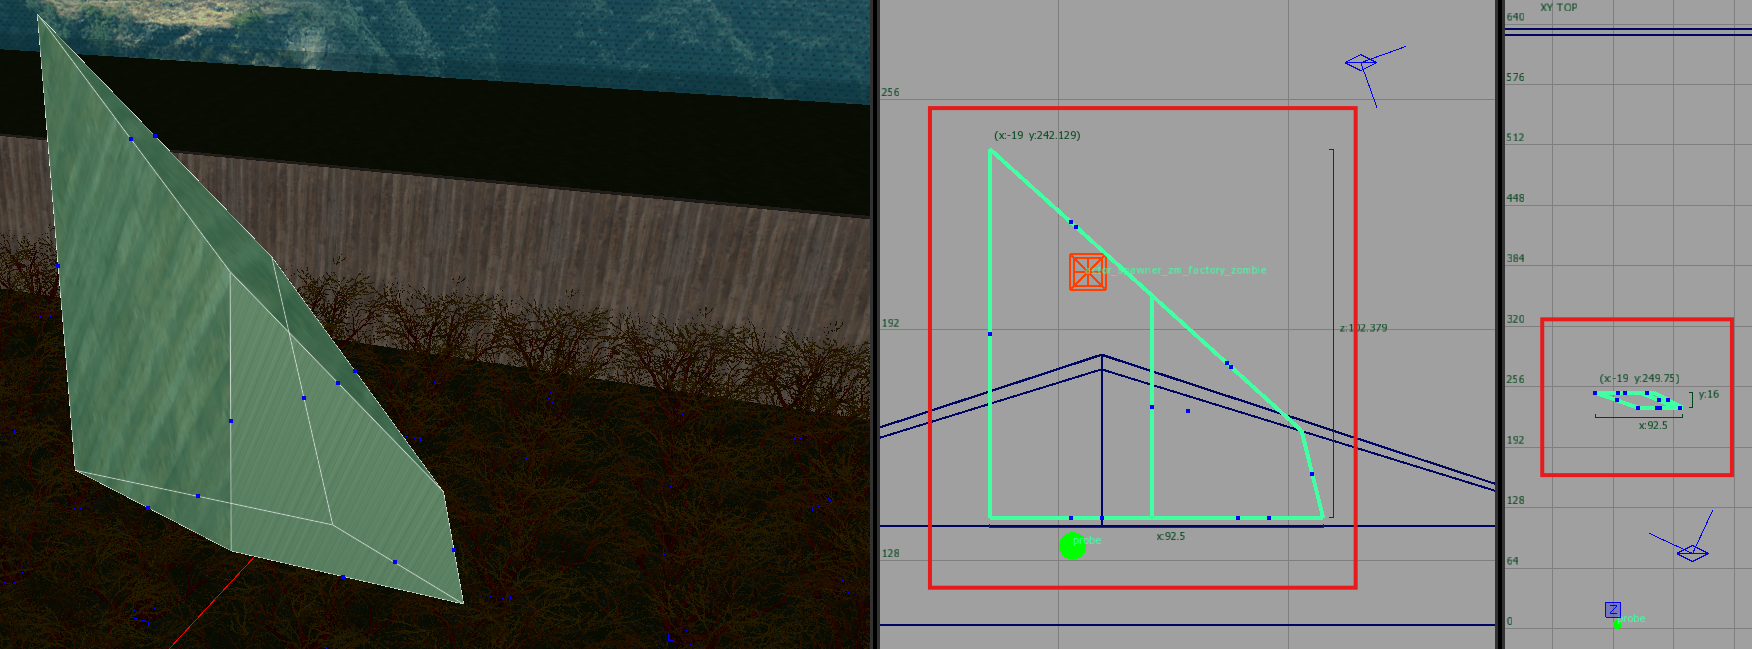
Changing the shape of a brush can be useful for making roofs, slopes or other slanted shapes.
Step 1:
Create a brush in your 2D view and make sure you can see it in your 3D view.
Step 2:
Select your brush by pressing Shift + Left click on it and then open the shape properties by pressing E
Step 3:
Blue squares should appear at the ends of the brush which can be dragged around to create the shape you want to make, use the 2D view to make them line up with other meshes.
4.3 Making an archway
In the section i will go over what needs to be done in order to create an archway, in this example i will create a tunnel.
Note: click on the images to enlarge them!
It will look like this in game: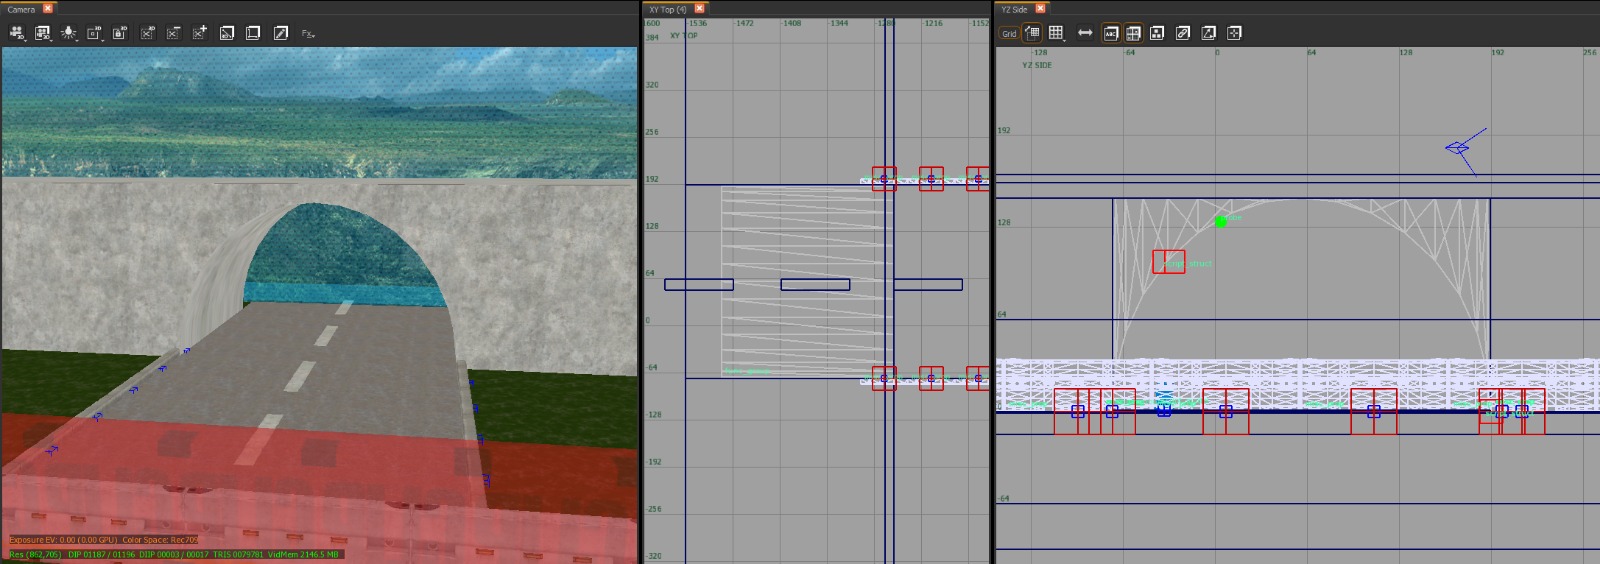 Step 1:
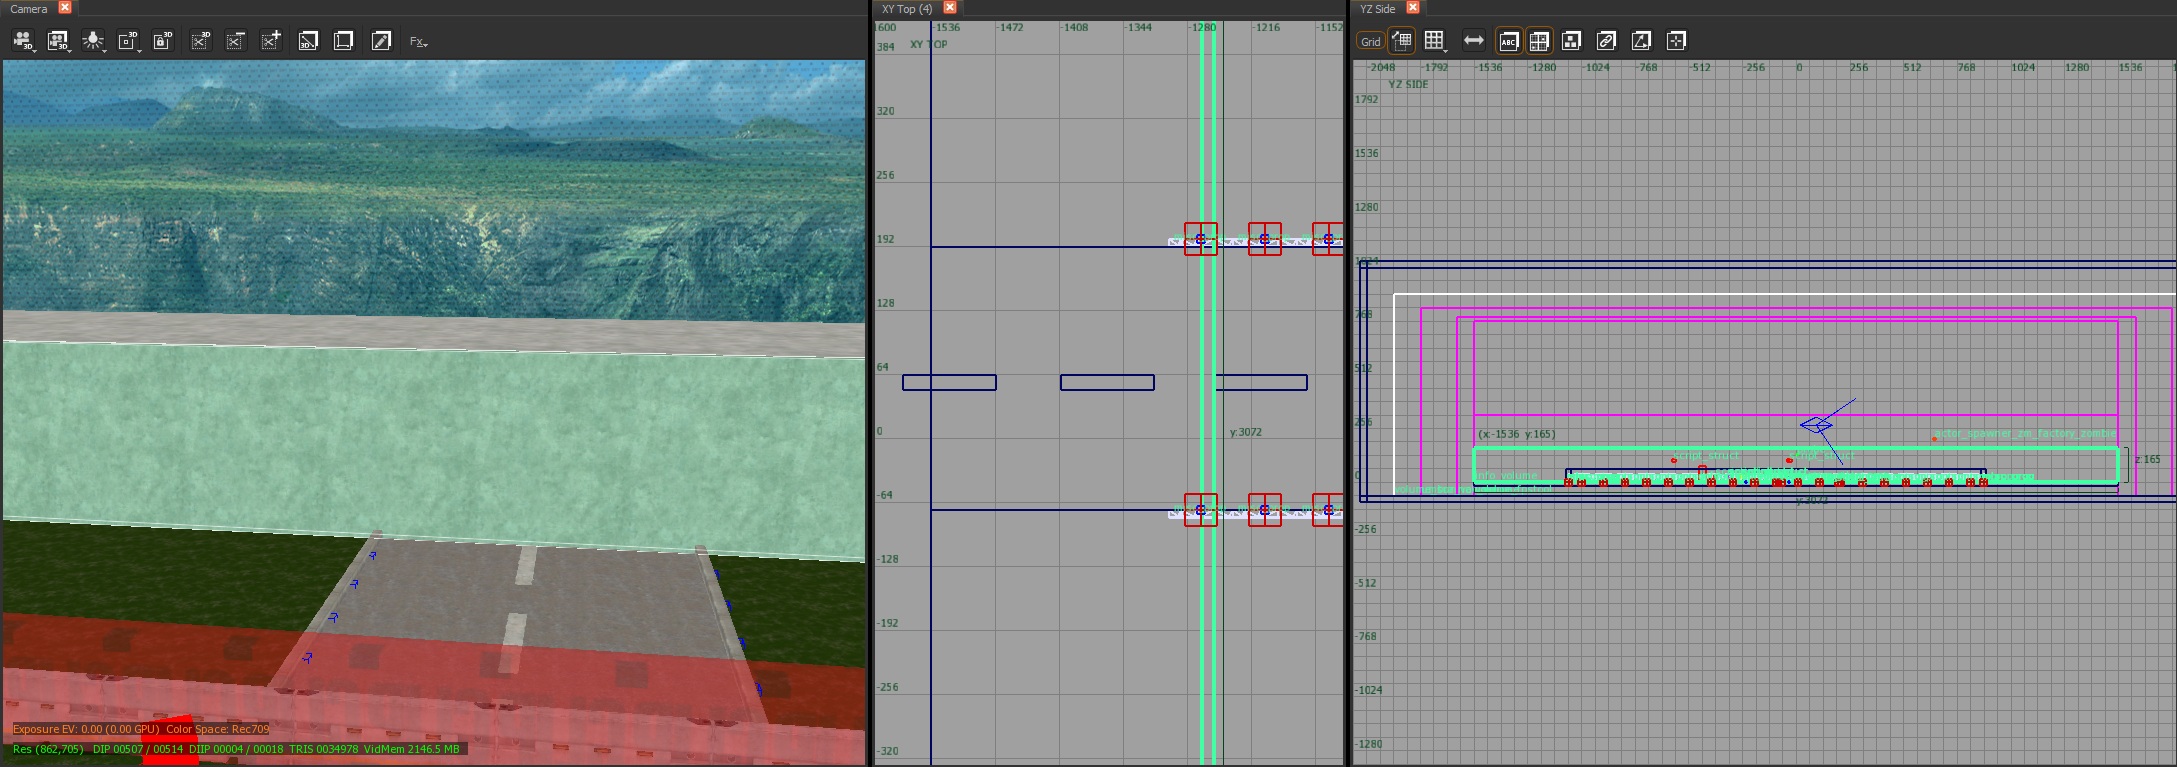
Create a brush that will be the wall as shown left and right of the archway, make sure it's the full height of the tunnel:
Step 2:
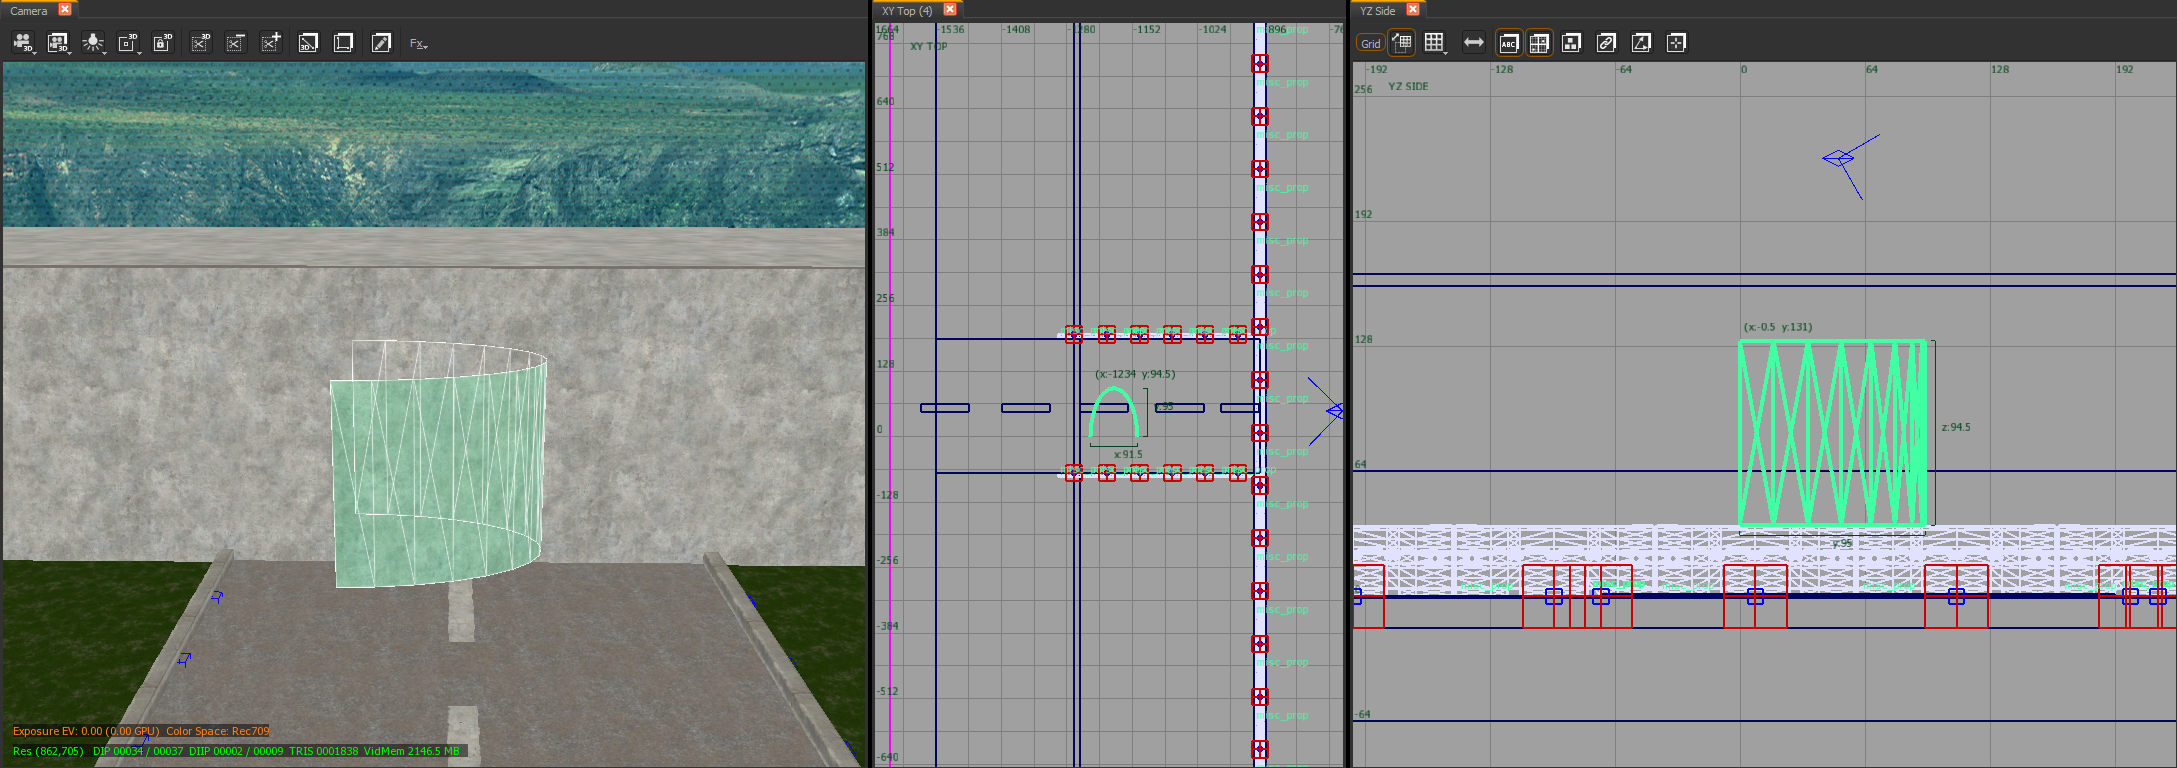
Create a new brush in front of the area where you want the tunnel to be, then select the brush and go to Patch > Primitives > Cylinder After your brush turned into a cylinder, select it and go to Patch > Primitives > End cap to turn your cylinder into a archway:
Step 3:
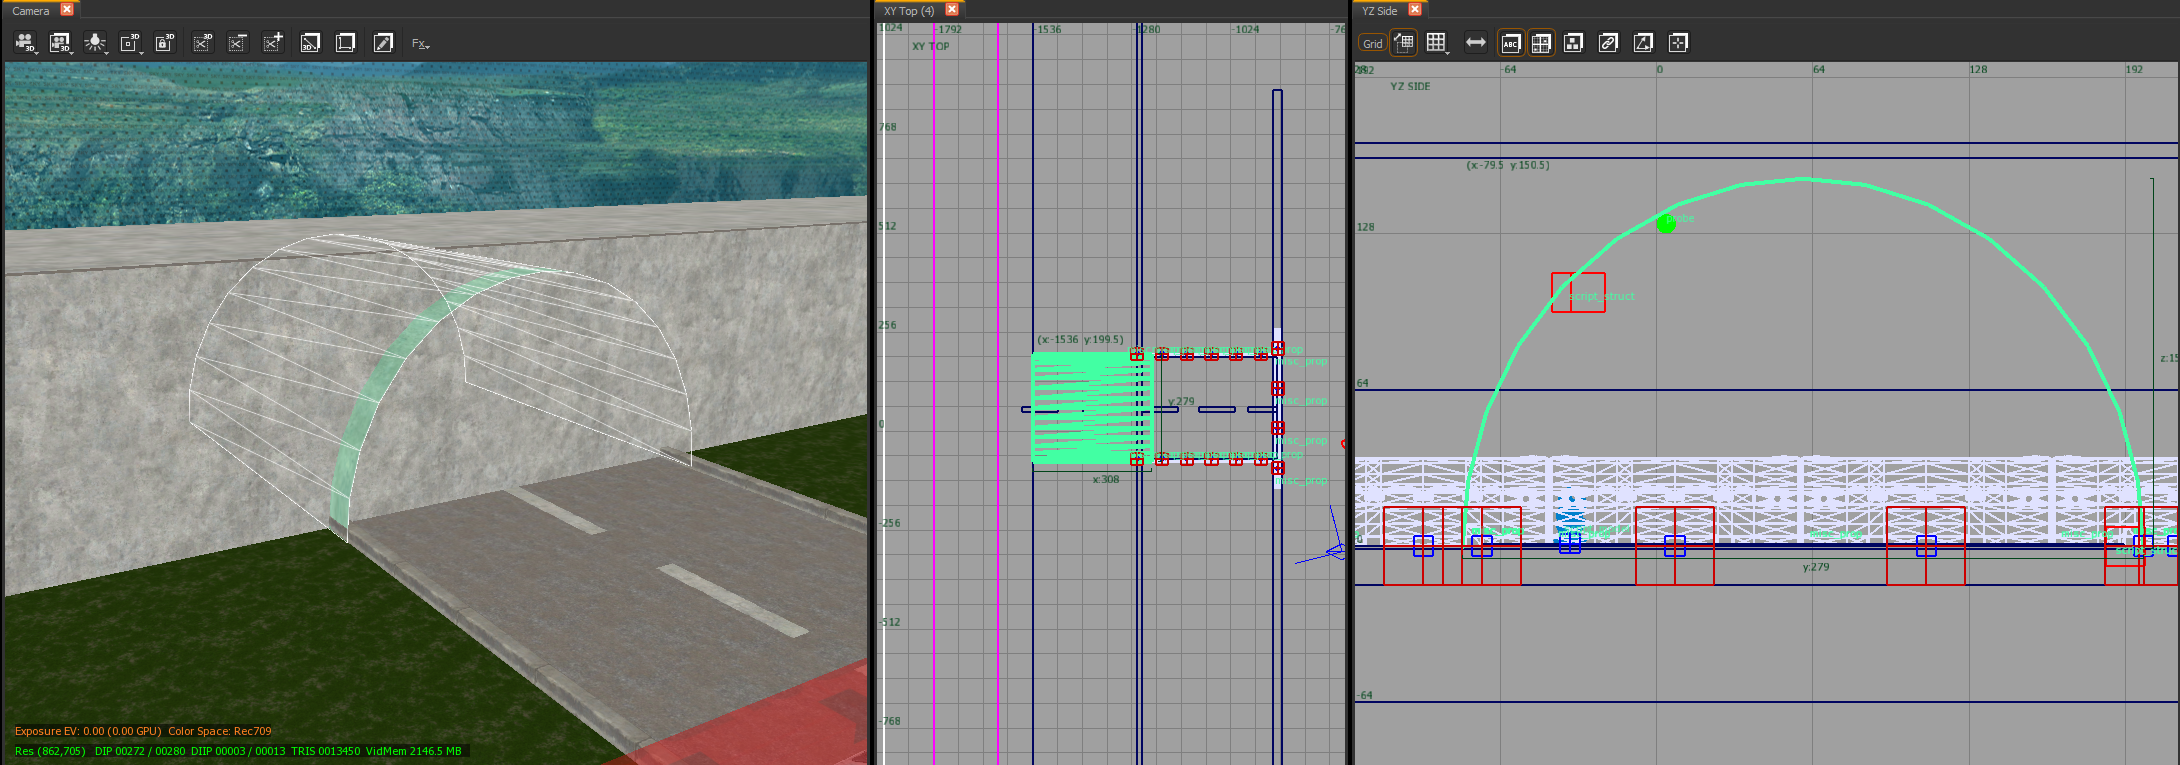
Reposition your archway in a way that it covers the entire area where it will be in the end, in my case that means it covers the width of the road and the depth of the tunnel. You may need to rotate your arch, do this by going to Selection > Rotate > and choosing one of the options to rotate your arch into the right position.
Step 4:
Now select both the arch and the brush you're wishing to make the arch into and press Alt + H to isolate the two brushes from all the other items in your map, you should now only see the two brushes in your view. Make sure your archway brush is flush with the brush as shown in the image.
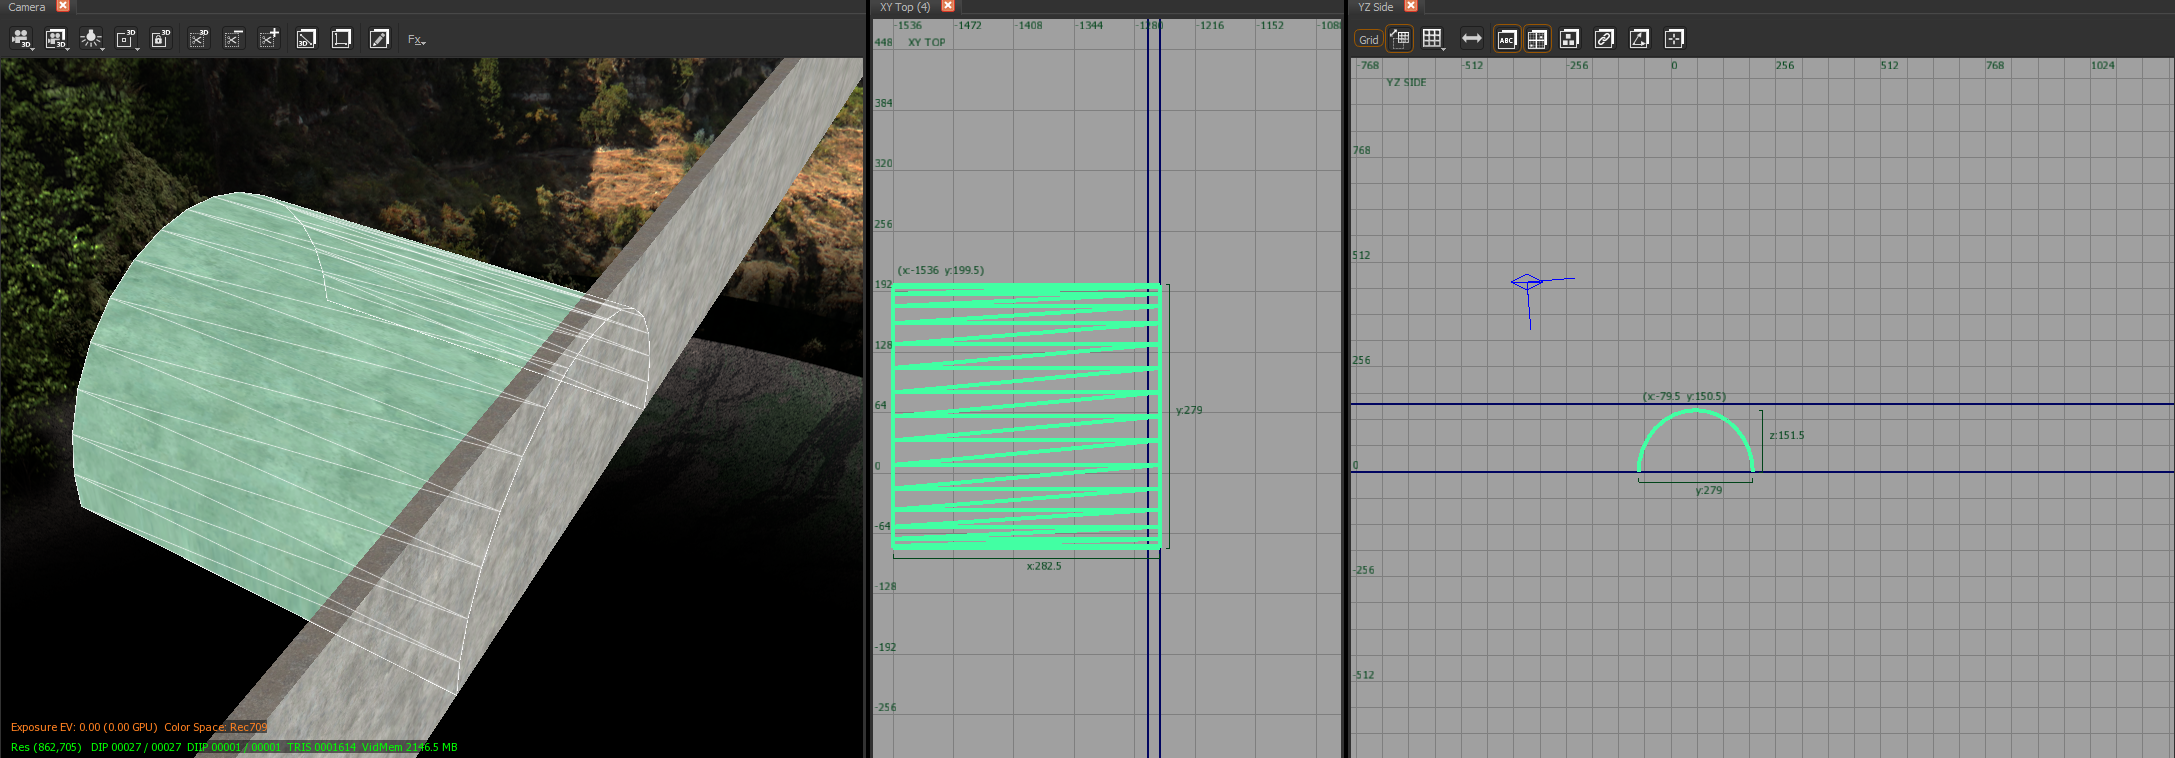
Step 5:
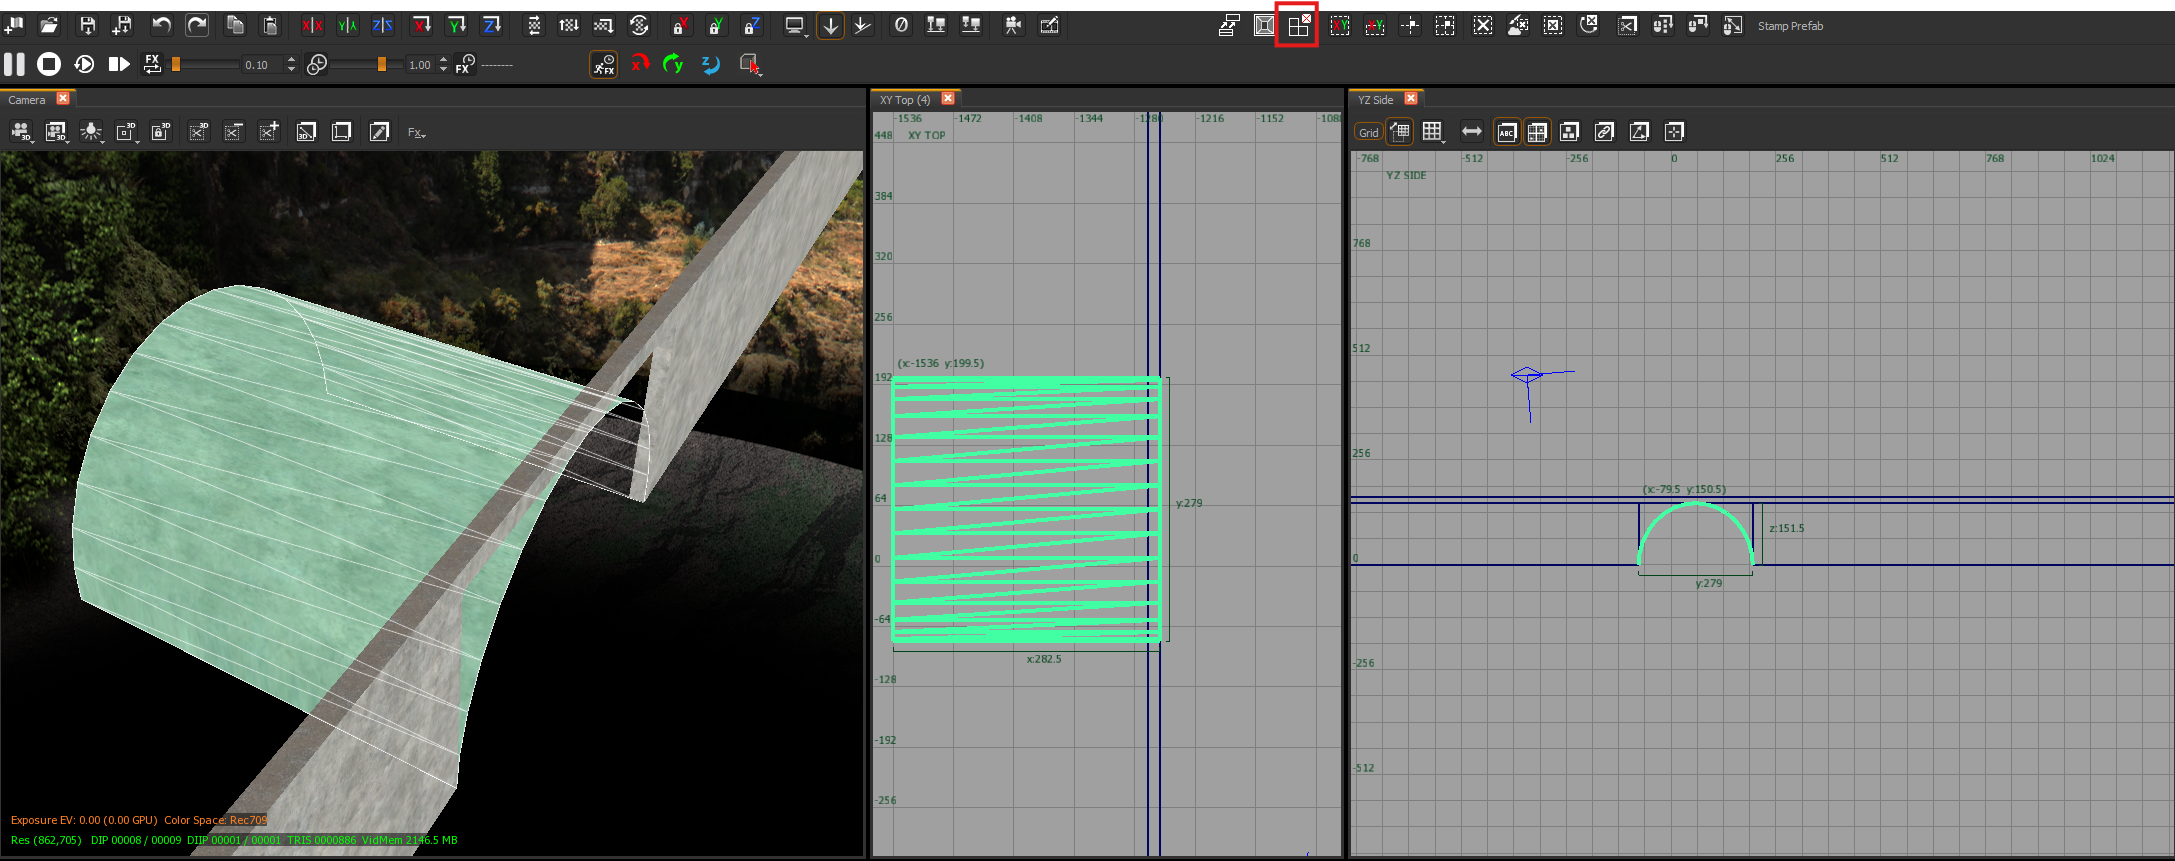
Now select only the archway and press the subtract button in the top tool bar in the editor, this should subtract a square shape around your archway in the wall brush. In the image there is a red square around the subtract button:
Step 6:
With the archway now selected go to Patch > Cap and in the cap dialog choose "Inverted Endcap". This should fill in the empty areas between the archway and the brush.
You may now need to invert the textures to make them show on the inside instead of the outside, do this by pressing Ctrl + I
Your arch should look like this: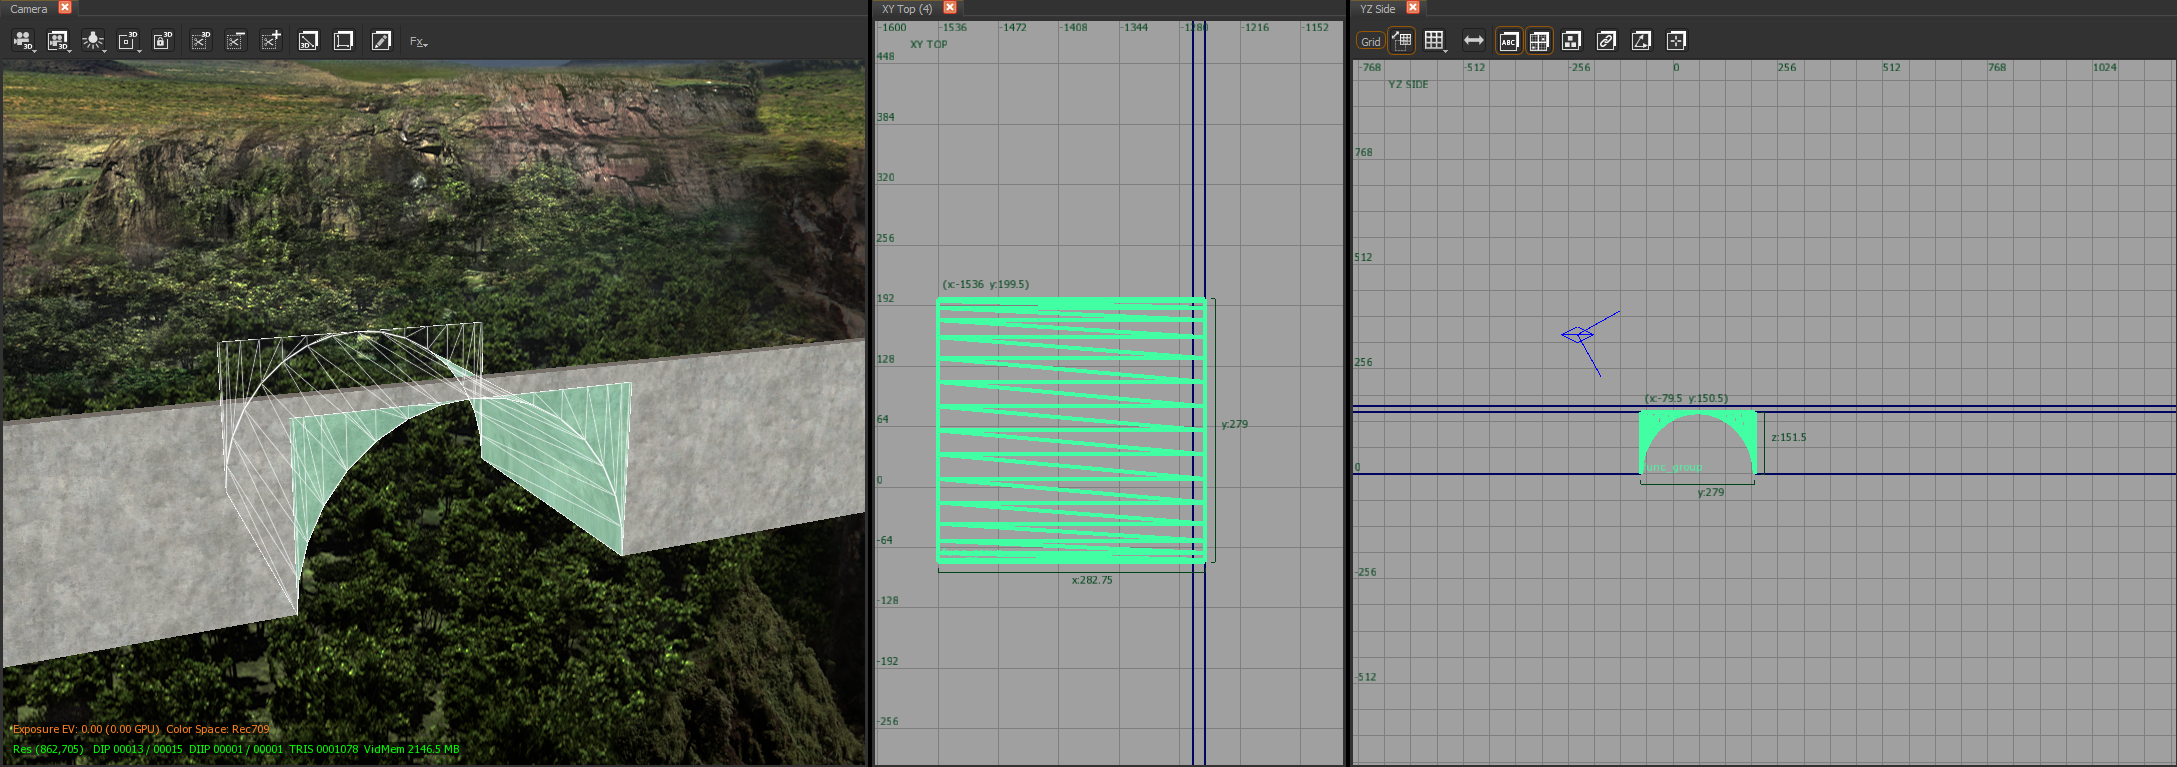
Step 7:
To go back to the rest of your map, press Shift + H, with the final result being:
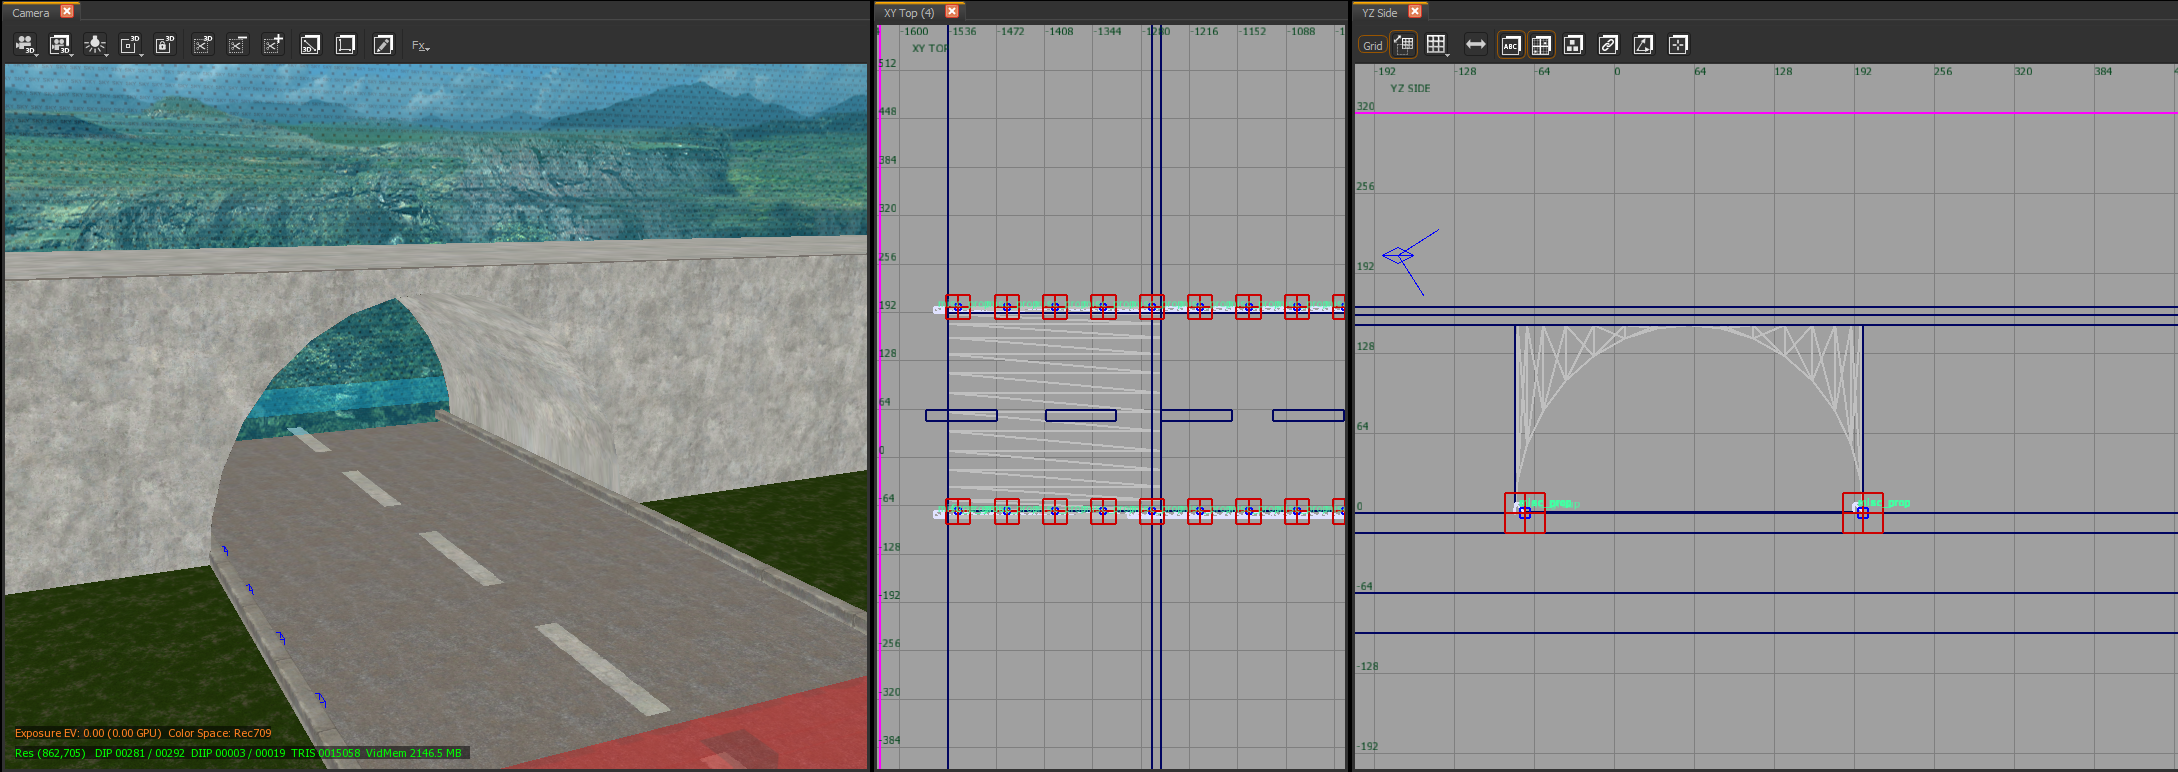
5.0 Prefabs
These can be placed in the map with relative ease as they are drag and drop prefabs, meaning you need to place them in your world and position them to use them and they often don't require a lot of extra work.
5.1 Wallbuy prefab
Wallbuys are very simple to add to your map and come in prefabs, this means all you need to do is place the prefab in your map and that's it.
Step 1:
With Radiant open, go to View > Toggle > Prefab Pane to open the prefab menu.
On the right side of the screen, the prefab window will open. In the prefab pane go to zm > zm_core to see a list of placable wallbuys and other prefabs.
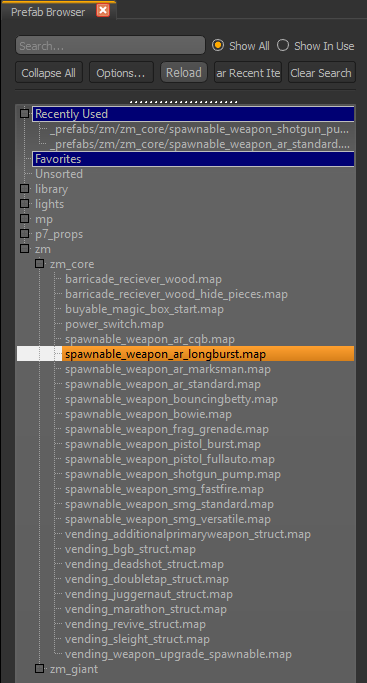
Step 3:
Choose which wallbuy you want to place in your map, and simply drag it to either your 2D or 3D view to place it.
Make sure it starts with "spawnable_weapon_"!
Step 4:Once placed, it should create an entire prefab containing brushes and script_struct bocks (the red squares)
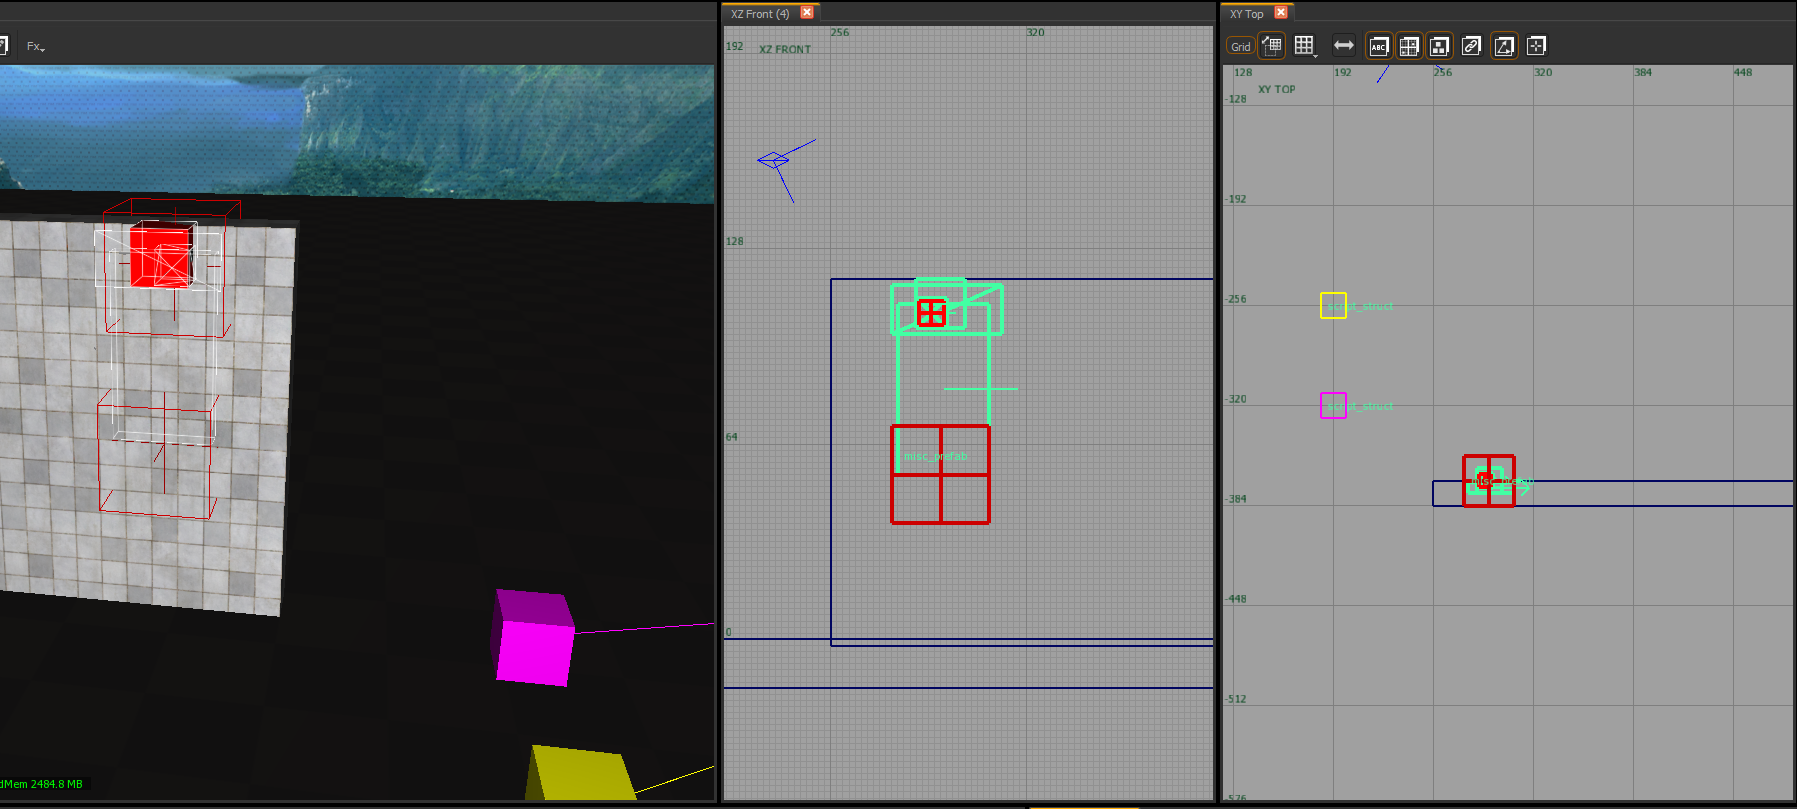
Step 5:
To be able to actually use it, we will need to change it's position in a way that the player can reach it and that the gun is visible on the wall.
To turn the entire prefab 90°, select the prefab by using Shift + Right Click and once selected press Shift + D, with your prefab selected you can also move it around in your 3D and 2D view.
Step 6:Move your prefab around until the gun is visible and it will look something like this:
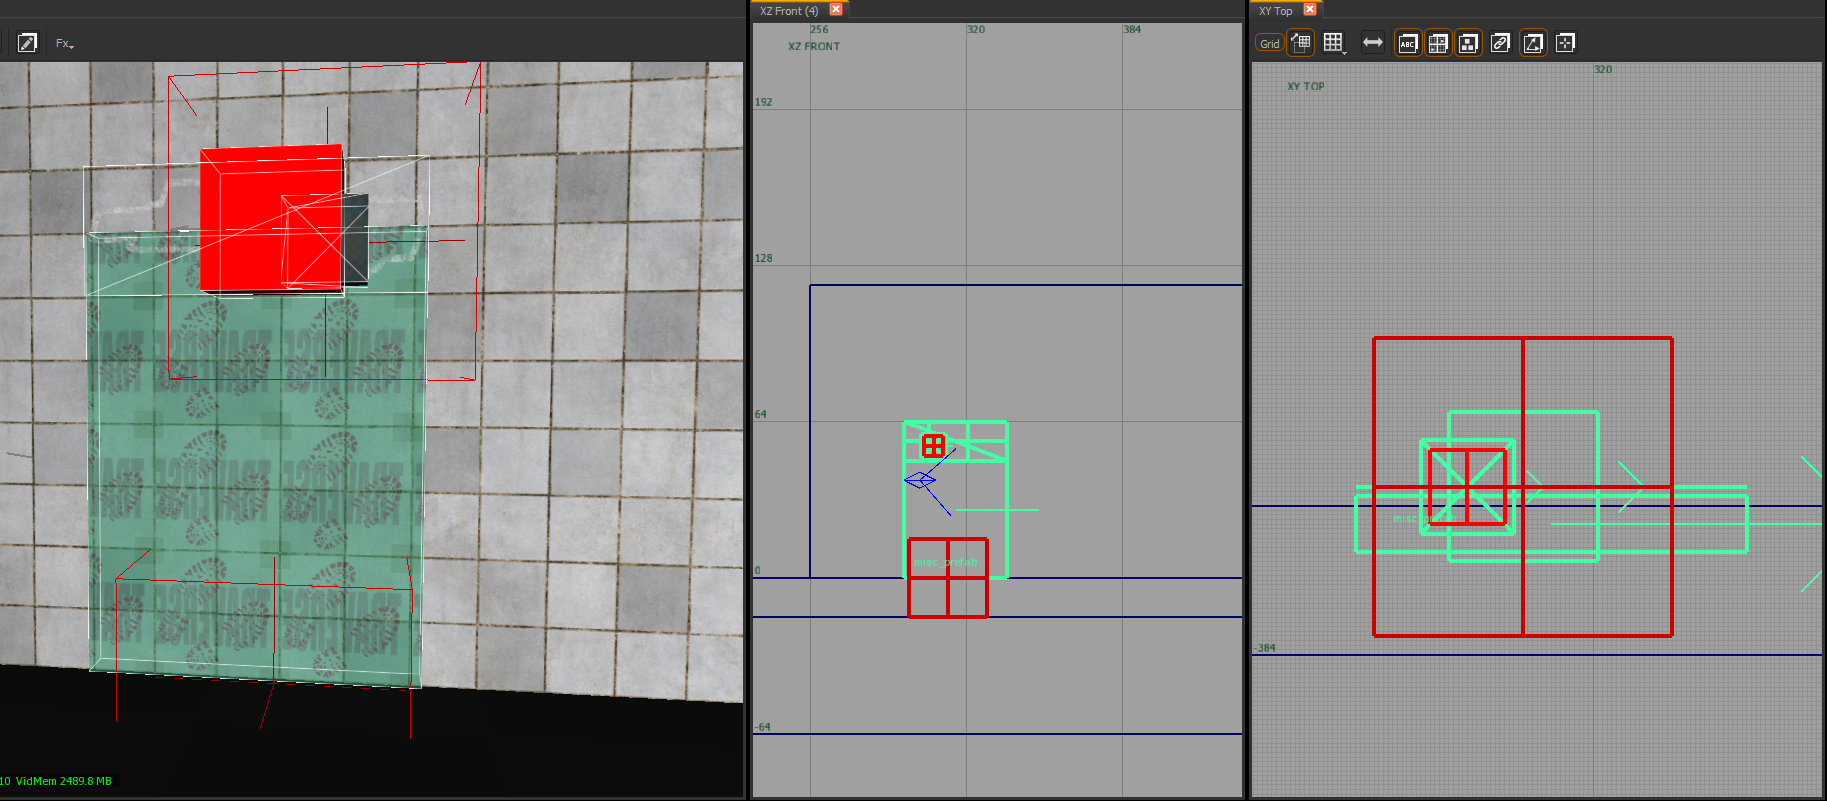
As we can see in the 3D view, the gun is visible. Also in the XY view we can see that the brushes (the green line and rectangle) are slightly away from the wall, this makes it easier for the player to reach the wallbuy and makes it float a small distance away from the wall.
The final result will look like this: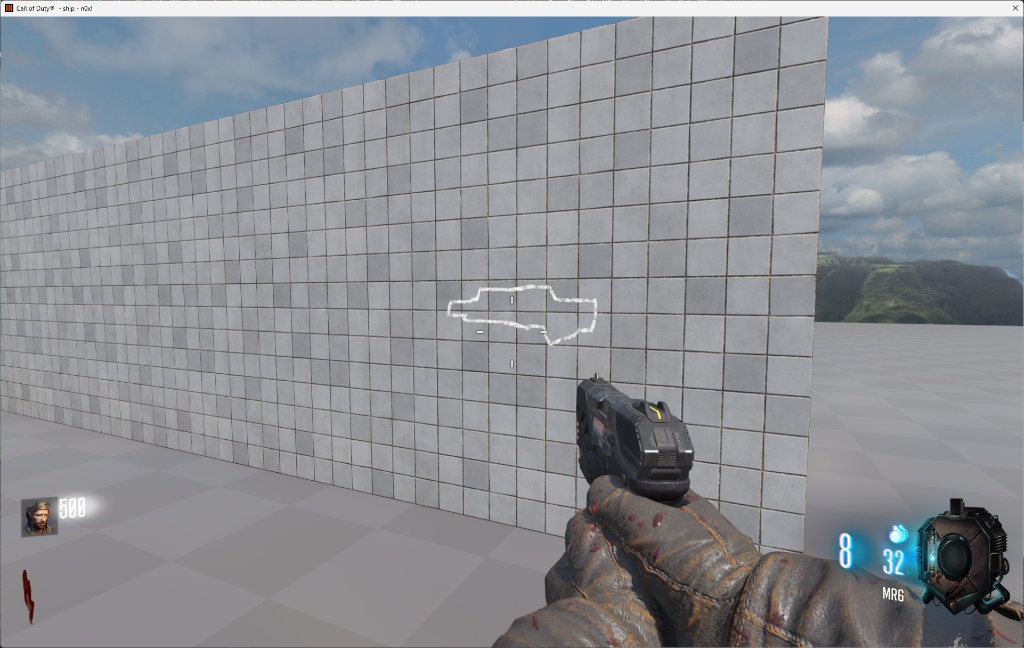
It seems as if the weapon is "on the wall" even though it floats away from it by a few pixels.
5.2 Mystery box prefab
To add the mystery box to the map we first must make a new prefab, then load that prefab in the map editor and add it to the map.
By default (in my experience) there is no buyable mystery box prefab, hence why we will create our own.
Step 1:Open the prefab folder in your Mod Tools installation, for me this is:
Make a new folder called "mystery_box_locations"
Step 3:
In this folder, make a new file called "magic_box_start.map" Make sure the file extension is .map and not .txt !
Open the file in a text editor and paste the following code:
Step 5:
Restart the map editor to load the new prefab.
Step 6:
Back in the map editor, open the prefab menu by going to View > Toggle > Prefab pane
Step 7:
In the prefab pane, go to zm > mystery_box_locations and drag the "magic_box_start.map" into the map.
Now after compiling the map, moving it into the game folder and loading it up in game, the mystery box should appear and be fully functional.
6.0 Powerups
6.1 Adding a disabled power ups (free perk powerup)
The file should look something like this by default:
We can see that #using scripts\zm\_zm_powerup_free_perk; is already imported, this way the game knows what it is and how to use it but it still won't spawn. To make it spawn you can add a function that waits until a zombie dies, and then a function that rolls a random chance for it to spawn:
Also make sure to call the first function in your main():
Now the free_perk powerup will have a 5 in 100 chance of spawning, which is similar to the other perks. This frequency can be changed to make it spawn more often or less often by editing:
Also, to change it's spawn position (for example higher in the air or lower to the ground) you can edit:
Changing the last number (15) will adjust how far off the ground it spawns.
7.0 Entities
An entity can also be something the player cannot see, such as a zombie spawner or a timer.
7.1 Creating a zombie spawner using script_struct
Zombie spawners are quite easy and are based on a script_struct entity connected to the info_volume. To make a zombie spawner follow these steps:
Step 1:
In Radiant go to View > Toggle > Entity Browser or simply click B on your keyboard
Step 2:
In the entity browser, use the search bar to find script_struct and place it somewhere in your map, keep in mind that if you place it floating in the air, the zombies might spawn in the air.
Step 3:
Shift + Left click on the script_struct you've placed and look in the Entity Info window, if you don't see this window, find it under View > Toggle > Entity Pane or press N
Step 4:
In the script_struct entity info window, there will be a key called "targetname" which is currently empty, to this key we will need to add the value of your info_volume's target (this is a box that should be surrounding the area you're working in right now)
If you do not know what your info_volume's target name is, check the other zombie spawners in that area!
Step 5:
After changing the targetname value to your info_volume's target, a red line should appear which will go from the spawner to your info_volume
No we need to add two KVPs, KVPs can be added using the "Add KVP" button in the entity info window. We will make one with the key "script_noteworthy" and the value "riser_location" and the second with the key "script_string" and the value "find_flesh"
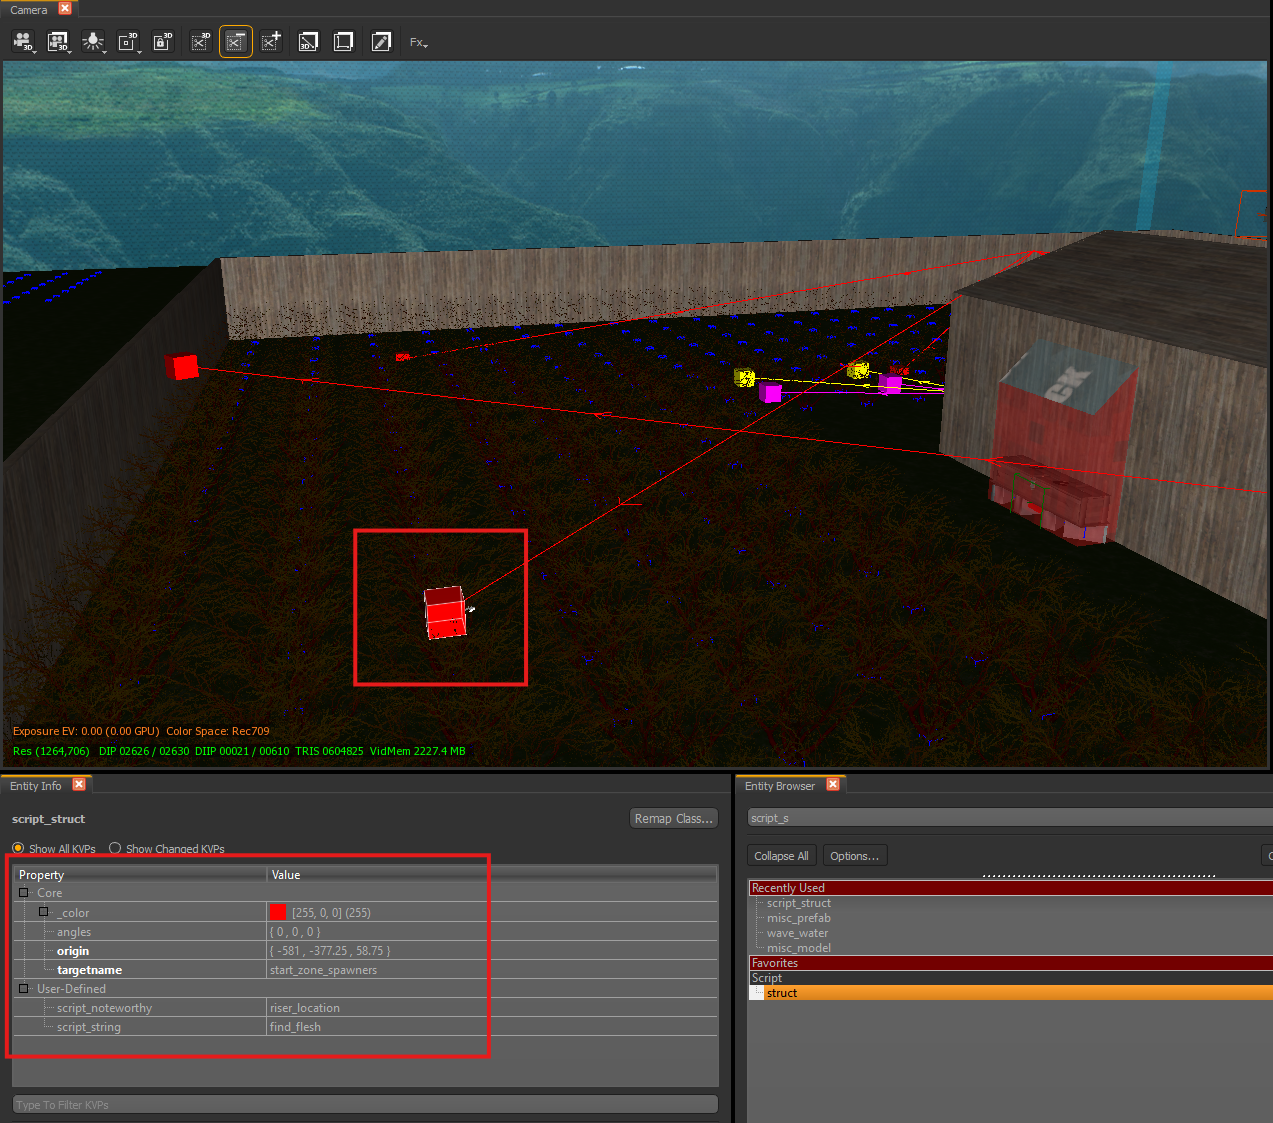
In the image you can see i have selected the script_struct and changed the keys and values as described in the entity info window, you can see that my info_volume's target is called "start_zone_spawners"
8.0 Miscellaneous
8.1 Disabling the dog round
During testing, i came across several dog rounds that didn't actually spawn any dogs, rather than figuring out why i figured out how to disable it. To disable it in your map follow these steps:
Step 1:Open your GSC file in any text editor, for me it is located in:
Find your main function which should look something like this:
Within this main function, add the following line:
Make sure it is added before the "zm_usermap::main();" line as shown in the example! Step 4:
Repeat the same steps for the CSC file which is in the same directory as the GSC file:
Again, make sure it is added before the "zm_usermap::main();" line
Step 5:
Now compile your map and play it until round 6 to make sure they no longer spawn.
9.0 Compiling/ building the map
Please following these steps VERY CAREFULLY! otherwise the map will not work.
Step 1:
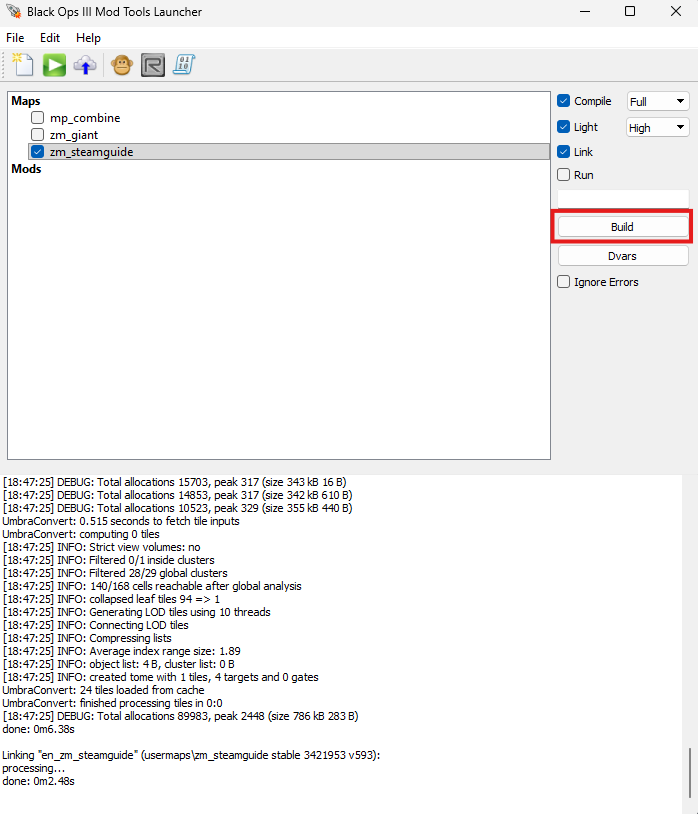
In the Black Ops III Mod Tools Launcher, select the map you wish to compile and select the compiling options, for the guide i will select all options with "Compile" on "Full" and "Light" on "Full".
To compile the map, press the build button.
 Step 2:
After pressing the button the map should start compiling/ building. Read the console to see the process of the compiler, when it is done compiling it should look something like this:
For me personally, selecting the option "Run" in the compiler does not work, to run the actual map it will need to be moved into the games folder as described in 9.1
9.1 Loading the map into BO3 from the Mod Tools
To load the map into the game for playtesting it will need to be moved to the game's folder.
Note! this has to be done every time after you've made changes to your map and compiled it!
For me my game is installed at:Make a new folder in your base game directory named "usermaps"
Move the map folder from your Call of Duty: Black Ops III Mod Tools to the newly created usermaps folder:
To actually play the map a "usermap.info" file will need to be created inside your map folder:
9.1.1 Scripting step 9.1
Instead of manually deleting and moving the files around every time a simple Powershell script can also be used, this means all you need to do is run the script and then load up the map after compiling to see the changes you've made.
Step 1:
Create a new files in any directory and call it script.ps1, make sure the extension is ".ps1" and not ".txt" for example.
In this file paste the following code:
- Check if the map folder exists in your game and if not, make one
- Delete existing map files from your game (except usermap.info
- Move new files from your Mod tools into the game
- Log the entire process into a mover.log file
- Close itself
Step 3:
Change the variables in the top of the code to match the following:
Dir A: Your game map folder
Dir B: Your Mod Tools map folder
Step 4:
To actually execute the script you may need to change the execution policy on your PC, please google how to do this.
After changing these settings, right click on the script.ps1 file and press "Run with PowerShell"
9.1.2 Starting the game with the map automatically
If you're repeatedly opening the map after compiling to see the changes you've made it might be annoying having to sit through the loading screen, selecting zombies > solo game > and your map.
An easy solution for this is adding some launch options to your game to skip all of that and load up your map.
Step 1:
Open your steam library and find your game, right click on it and open properties.
Under general, set the launch options to the following parameters:
Make sure to change the "zm_steamguide" to your own map name!
Step 3:
Now you can start your game and it will load your map right up skipping all the intro parts and menus.
You can also add this to your script from section 9.1.1, just ask an AI to edit your script to make it launch the game after it has finished moving the files (or write it yourself, of course)
9.2 Playing the map
This is probably the easiest part.
If you've followed all steps so far, you should be able to just load up the game, go to zombies and select your map from the map list.
A mod does not need to be loaded to load your map.
10.0 Publishing to the Steam Workshop
After your map is finally done it can be published to the workshop for others to play.
Step 1:
Open Call of Duty: Black Ops III Mod Tools and select your map.
Step 2:
Press the "Publish" button in the toolbar to open the publishing window. Give your workshop item a title, a description and choose a category (probably "Map"), optionally you can also add a thumbnail.
Step 3:
After it has finished uploading to the workshop a pop up will appear asking if you want to open the workshop page and see your item.
By default your item is hidden, but you can publish it whenever you like.
11.0 Debugging your map
11.1 Client field mismatch debugging
In this scenario i was working on some maps and for some reason all of them would compile fine but throw a client field mismatch error when loaded up. To figure out the actual problem i enabled logging and used the log files to find the error.
Step 1:
With your game open, go to Zombies > Solo Game > and select your map from the list
Step 2:
After getting the client field mismatch error, in the menu open the console by pressing the tilda key "~".
In the console type the following command and press enter:
Step 4:
With developer mode on, load up your map again and wait for it to place you back in the main menu with the client field mismatch error. Step 5:
a log file should be located at in your mods/usermaps folder, which for me is:
Step 6:
Scrolling through this file may give some clues as to why we're getting the error, for example:
12.0 F.A.Q
Yes, without this the new map or changed map can't be loaded by the game.
- All Around Enhancement Mod Description And Info★ 5 (597)211k views1.2k ♥34 minUpdated Aug 10, 2023
- Black Ops 3: Console Commands★ 5 (1.1k)123k views2.4k ♥7 minUpdated Feb 13, 2020
- Origins Ultimate Guide★ 5 (562)72k views1.7k ♥17 minUpdated Jun 24, 2017
- [2.0]All Around Enhancement Mod Description And Info★ 5 (186)71k views602 ♥38 minUpdated May 16
- Guide for Shadows of Evil [2020 updated]★ 5 (1.4k)67k views4.5k ♥24 minUpdated Mar 22, 2024
- Guide for Der Eisendrache [2020 updated]★ 5 (1.3k)65k views4.6k ♥30 minUpdated Feb 22, 2024






- Upgrading to PremiumTeam Fortress 2★ 5 (20k)1441k views11k ♥6 minUpdated May 11, 2022
- No More Room in Hell Official ManualNo More Room in Hell★ 5 (2.8k)569k views2.1k ♥29 minUpdated Apr 22, 2019
- NMRiH Community Hosting GuidesNo More Room in Hell★ 5 (526)351k views653 ♥1 minUpdated Aug 10, 2022
- ULTIMATE GUIDE FOR GAME DEV TYCOONGame Dev Tycoon★ 5 (5.8k)326k views10k ♥4 minUpdated 23 Jan, 2014
- How to 'Git Gud' Soon™MORDHAU★ 5 (2k)318k views3k ♥68 minUpdated Nov 16, 2024
- Лучшие кооперативные игры SteamPAYDAY 2★ 5 (1.5k)315k views2.1k ♥56 minRussianUpdated Apr 27, 2025






This guide was created by its original author on the Steam Community. Are you the author and want it removed? Request removal.