[Custom Raid Music Mod] How to make custom raid music packs
0. Preparation. Installing the Scrap Mechanic Mod Tool and preparing the workspace.
Like every good dish, we need to prepare our workspace. Making a music pack for my mod is relatively simple, it really amounts to frankenstein-ing your own from an already existing one.
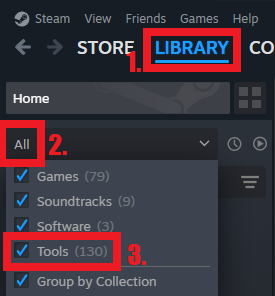
Next, use the search bar to look up and install "Scrap Mechanic Mod Tool", like you would any other game. It should have an icon of a low quality green bearing.

(picture this but tiny and low quality)
Now that you've done that, we will no longer need Steam up until the very end, when we upload the mod.
Ideally the song should be laid out in a way where it is possible to jump from any point in the loop-able part to the ending.
Keep presice timestamps for where the loop starts and ends, we will need them later!
The audio should be in the ".ogg" file format. While yes, other formats do work, through rigorous testing and experince I urge you to use OGG. Other formats are either too compressed to the point where it will cause the end users really long load times (example: MP3) or are too uncompressed, causing file size bloat (example: WAV).
Your files also should be appropriately named. I name them "[ABBREVIATON OF WHERE THE SONG IS FROM]_[SONG NAME].ogg".
Then take the numbers after the dot and place them after the dot of the seconds you calculated previously.
0.1 A list of what you will need.
- A text editor (Winodws notepad works too)
- Access to the internet
- Image editor
- The main Custom Raid Music mod
- Any music pack for it
- Scrap Mechanic Mod Tool
- Any audio/video editing software
0.2 Installing the Scrap Mechanic Mod Tool.
First, we need to enable tools, here is how to do it:Next, use the search bar to look up and install "Scrap Mechanic Mod Tool", like you would any other game. It should have an icon of a low quality green bearing.
(picture this but tiny and low quality)
Now that you've done that, we will no longer need Steam up until the very end, when we upload the mod.
0.3 Prepping your music.
Your music must follow this structure to work in a pack:INTRO
LOOP-ABLE PART
ENDING
Keep presice timestamps for where the loop starts and ends, we will need them later!
The audio should be in the ".ogg" file format. While yes, other formats do work, through rigorous testing and experince I urge you to use OGG. Other formats are either too compressed to the point where it will cause the end users really long load times (example: MP3) or are too uncompressed, causing file size bloat (example: WAV).
Your files also should be appropriately named. I name them "[ABBREVIATON OF WHERE THE SONG IS FROM]_[SONG NAME].ogg".
0.4 Math?!
Yes. Sorry, not sorry, you have to do math. Remember those precise timestamps for the loop part of your music from 7 sentences ago? We need them now. The mod measures length of tracks, and by extension points at which to loop in seconds, so convert your timestamps into seconds. Here is a handy formula:(MINUTES * 60) + SECONDS
Now that you did this, you need to deal with time measurements that are less than a second. If you were using a software that shows real time, like Audacity, you will end up with milliseconds, if you used a video editor, like DaVinci Resolve, chances are you ended up with frames. Both work the same so it does not really matter. You need to convert them to fractions of a second. To do this, use this handy formula:LESS THAN A SECOND LEFTOVERS / AMOUNT OF YOUR MEASURE IN 1 SECOND
To understand this, simply use logic. If you have milliseconds, remember that there is 1000 milliseconds in 1 second, so your equation would look like this: "LEFTOVER MS / 1000", and if you have frames, and you exported your music in 60 FPS it will look like this: "LEFTOVER FRAMES / 60".Then take the numbers after the dot and place them after the dot of the seconds you calculated previously.
TIMESTAMP IN SECONDS.LEFTOVER FRACTION
Now write those new timestamps down somewhere, we will get back to them when we will be editing the files.
1. Putting the pieces together. Making the pack's file structure.
Now that we are done with preliminaries, we can begin making the actual pack. Let's begin by creating a file structure for the pack.
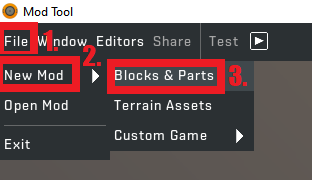
Name it how you want it to be called, note that if you want to use any special characters, like a / or ?, you can not do it here, as it has to be a name for a folder Windows can allow. Usually my packs follow the naming scheme of "[SOURCE HERE] Raid Music Pack". I recommend you name it the same to help make them more search-friendly on the workshop.
Congratulations! You just created your very own mod.
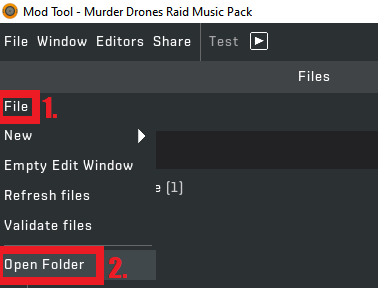
Now delete everything, except "description.json".
We will now need to grab another pack to serve as a base, I recommend this one
https://steamcommunity.com/sharedfiles/filedetails/?id=3497222935
as it is the simplest of them all and you can easily mold it into what you need. To get to it, simply right-click on the steam shortcut on your desktop, press "open file location" and from there navigate to "\steamapps\workshop\content\387990\3497222935".
Copy everything inside except the aforementioned "description.json" and paste it into your pack's folder.
Clear out all previous music.
Take the music files you had prepared and put them into there.
1.1 Making the base file structure.
Start the mod tool. If you have the "Open Mod" window - close it. Navigate to the button to create a new blocks & parts mod.Name it how you want it to be called, note that if you want to use any special characters, like a / or ?, you can not do it here, as it has to be a name for a folder Windows can allow. Usually my packs follow the naming scheme of "[SOURCE HERE] Raid Music Pack". I recommend you name it the same to help make them more search-friendly on the workshop.
Congratulations! You just created your very own mod.
1.2 Copying over the base mod.
Let's continue by pressing the secondary "File" button and opening the pack in a file explorer. Close the mod tool.Now delete everything, except "description.json".
We will now need to grab another pack to serve as a base, I recommend this one
https://steamcommunity.com/sharedfiles/filedetails/?id=3497222935
as it is the simplest of them all and you can easily mold it into what you need. To get to it, simply right-click on the steam shortcut on your desktop, press "open file location" and from there navigate to "\steamapps\workshop\content\387990\3497222935".
Copy everything inside except the aforementioned "description.json" and paste it into your pack's folder.
1.3 Inserting your own music.
Go to "[YOUR PACK'S FOLDER]\Effects\Audio".Clear out all previous music.
Take the music files you had prepared and put them into there.
2. Making the pack part of the pack. Editing all the files so they actually work.
Let's continue by modifying the files for the mod to actually work.
Start by creating "sm_cae_config.json" in the folder of your pack.
Next open it in a text editor and fill it out according to this:
First find the "name" field and put what you want your pack to show up as in-game.
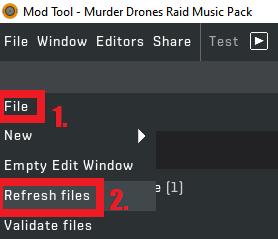
Use the secondary "File" button to refresh the content.
Use the "File" menu on the toolset window to save the changes.
"pack_thumbnail.png" is the small square image that shows up in the pop-up in-game when the music is about to play.
And "preview.jpg" is what will show up in the mod list in the main menu and on the Steam Workshop page.
2.1 Registering your music.
To function, your music must be registered in the database. To do so there 2 ways.
- Use my Python script[drive.google.com] that will generate everything for you. However, it requires that you have Python installed on your PC.
To generate using my Python script, simply download it, put it in the folder of your pack and run it. "sm_cae_config.json" should appear near it afterwards.
Start by creating "sm_cae_config.json" in the folder of your pack.
Next open it in a text editor and fill it out according to this:
{
"soundList": {
"Some-Song1": {
"path": "$CONTENT_DATA/Effects/Audio/Some_Song1.ogg",
"is3D": false
},
"Some-Song2": {
"path": "$CONTENT_DATA/Effects/Audio/Some_Song2.ogg",
"is3D": false
}
}
}
Next, go to "Effects\Database\EffectSets" and open "music.effectset" in a text editor. Fill it out according to this:{
"[Some - Song1" : {
"effectList" : [
{
"audio" : [ "Some-Song1" ],
"parameters" : [ "CAE_Volume", "CAE_Position" ],
"type" : "audio"
}
],
"parameterList" : {
"CAE_Position" : 0.0,
"CAE_Volume" : 0.10
}
},
"Some - Song2" : {
"effectList" : [
{
"audio" : [ "Some-Song2" ],
"parameters" : [ "CAE_Volume", "CAE_Position" ],
"type" : "audio"
}
],
"parameterList" : {
"CAE_Position" : 0.0,
"CAE_Volume" : 0.10
}
}
}
Now that the music is registered. It's time to make the code recognize it.2.2 Coding.
Go back to your pack's folder and go to "\Scripts" and open "hook.lua" in a text editor. The only thing we care about is the big pile of data in the middle.First find the "name" field and put what you want your pack to show up as in-game.
name = "My Cool Pack",
Next find the "color" field and change the color to what you want the vinyl graphic to show up as in-game. Simply look up "hex color picker" on Google and it will give you a color picker in the browser, just copy the HEX code from it and put it into the quotes.color = sm.color.new("#fcba03"),
Simple stuff is over. Get to adding songs! And also pull up those timestamps we converted earlier! Here is the structure of how to add songs:songs = {
[modUuid.."Some - Song1"] = {
name = "Song name that will show up in-game",
composer = "Composer Name",
origin = "Origin of the song (IP name, game name or nothing)",
loop start timestamp,
loop end timestamp
}
[modUuid.."Some - Song2"] = { name = "The Epic Battle for BEANS", composer = "DJ Rizz", origin = "Gwimbly's Adventure 2", loopStart = 4.41, loopEnd = 166 }
}
Note that the name that goes "[modUuid..HERE]" must be the same one as in "music.effectset".2.2 Making sure you don't blow up the game.
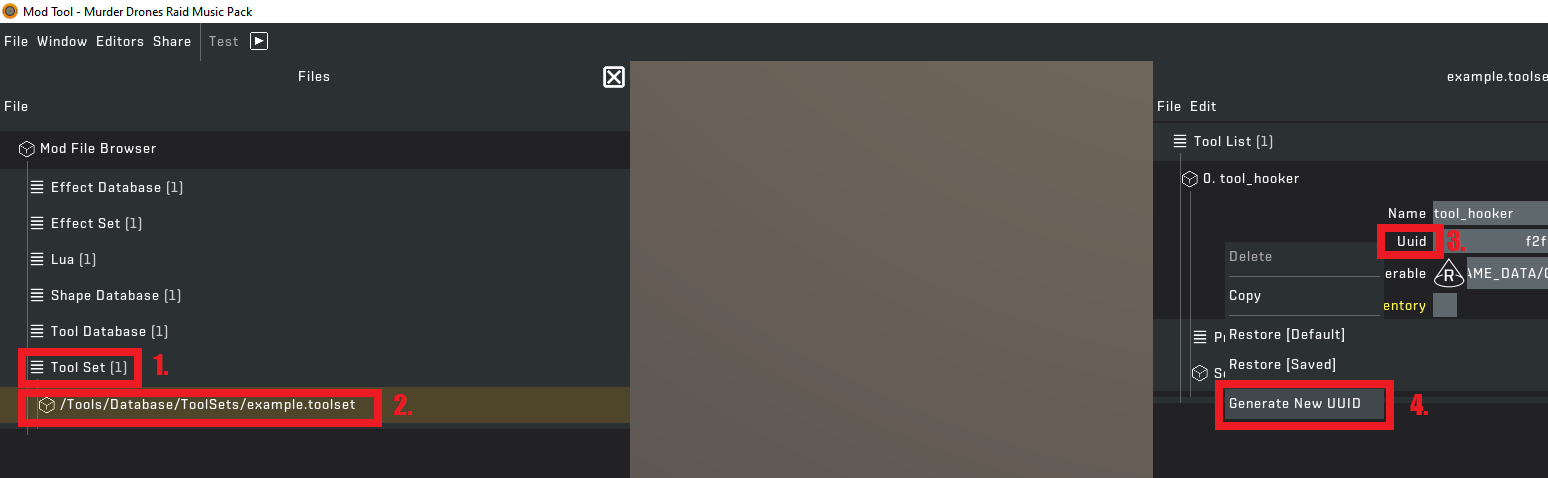
Go to into the mod tool.Use the secondary "File" button to refresh the content.
- Tool set
- example.toolset
- uuid
- Right-click the uuid label
- Generate New UUID
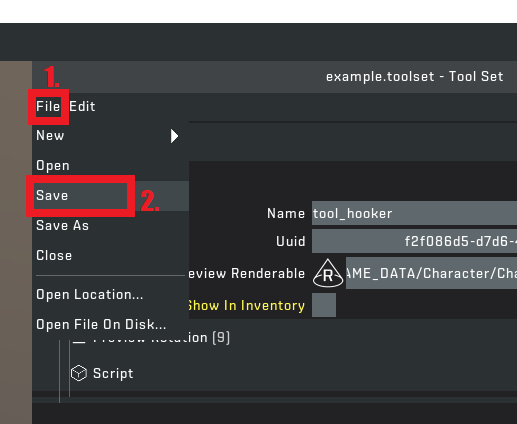
Use the "File" menu on the toolset window to save the changes.
Important note!
Sometimes everything can be correct, but the audio just won't play. In this case you may be experiencing FMOD being trash. To fix this, go to a website, like https://convertio.co/ and convert your audio in the same format it already is and that fixes it.All it does is literally flip ONE single bit in the header of the file, what is this madness?!2.3 Pretty-fying.
It is time to make the thumbnails! Go to the pack's folder one last time, and make "pack_thumbnail.png" and "preview.jpg" look the way you want to. I suggest packs having a uniform look, so here are all necessary resources[drive.google.com] you could need."pack_thumbnail.png" is the small square image that shows up in the pop-up in-game when the music is about to play.
And "preview.jpg" is what will show up in the mod list in the main menu and on the Steam Workshop page.
This is a good time to test your mod locally (singleplayer) in-game and see if everything works and the music is cut properly!
3. Publishing. Uploading to Steam Workhop & page formatting.
Now that you have succefully made and tested your music pack, it is time to publish it!
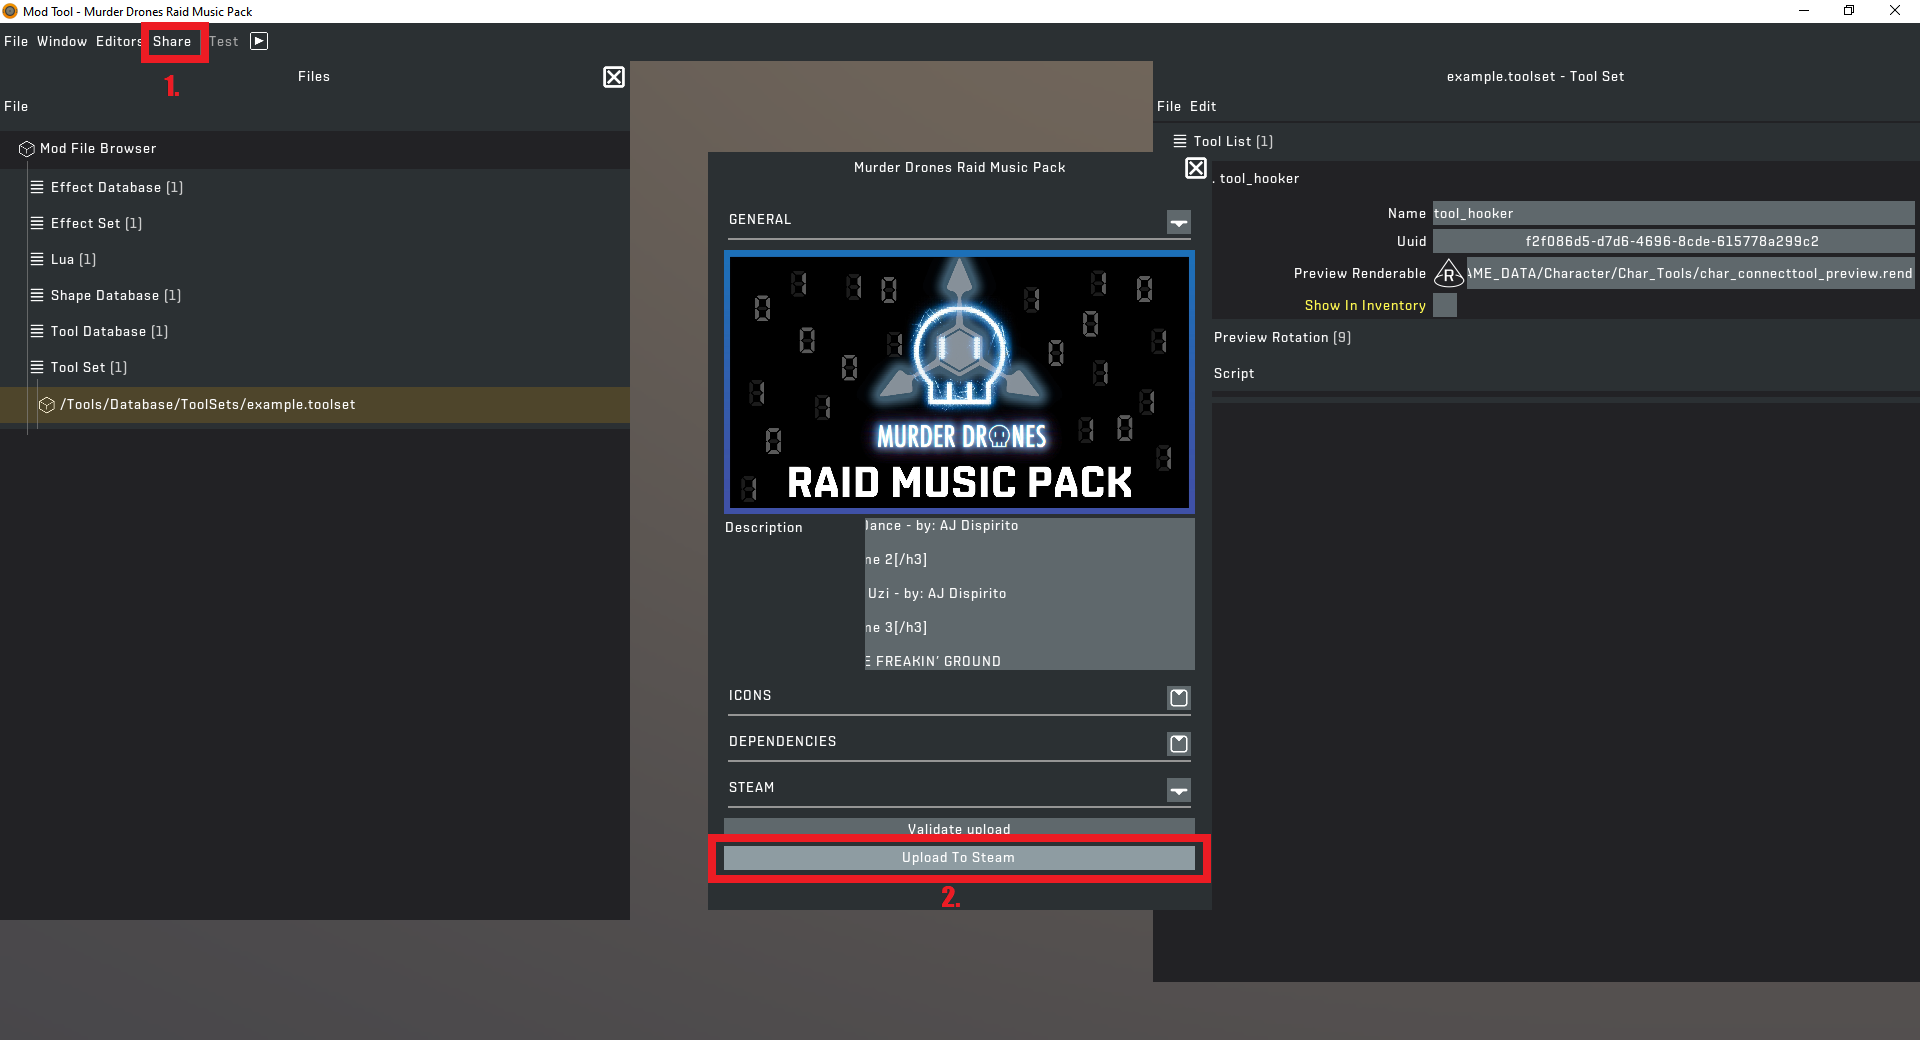 The rest of the process is automatic.
Once the newly generated Steam page for your pack opens, close the mod tool.
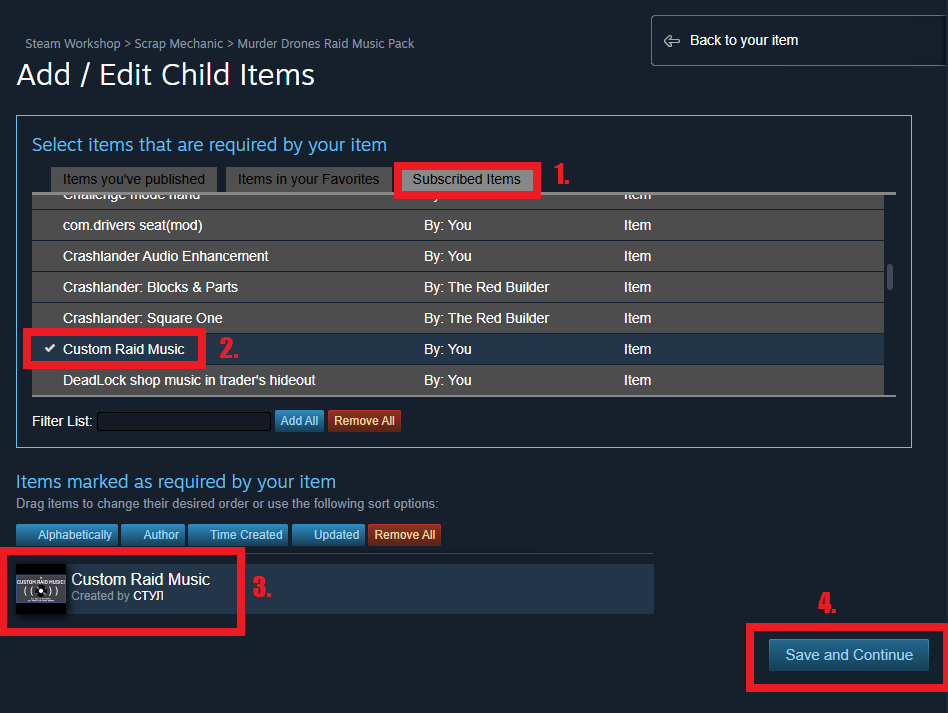
 Selecting the "Subscribed items" tab, locating the mod, pressing the + button, and pressing "Save and continue".
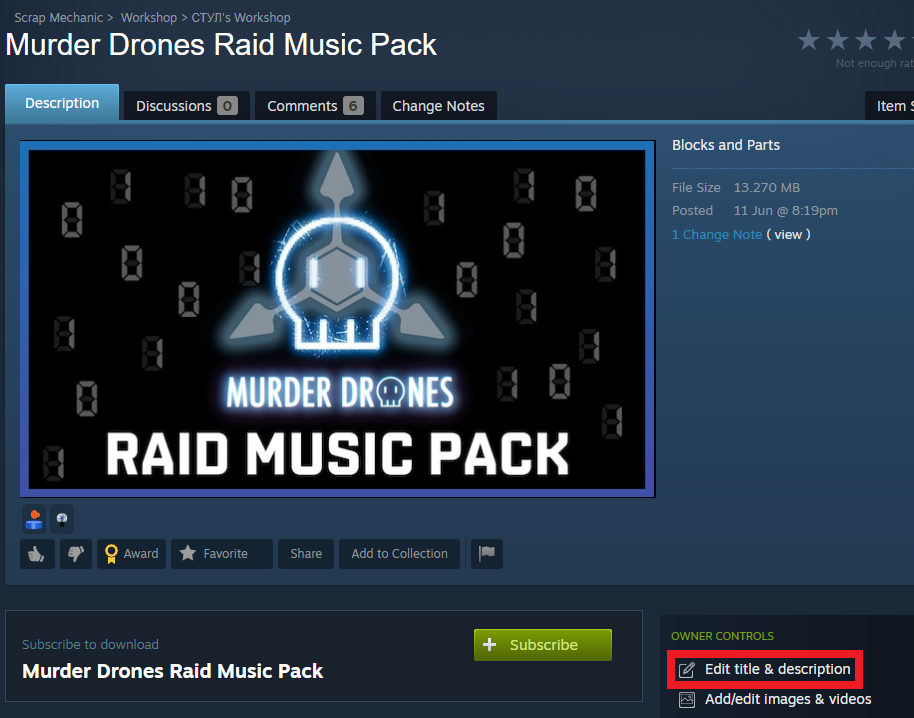
Use this button to start editing the description.
Here is my template[drive.google.com] that I use for all packs that you can copy-paste and edit to your needs.
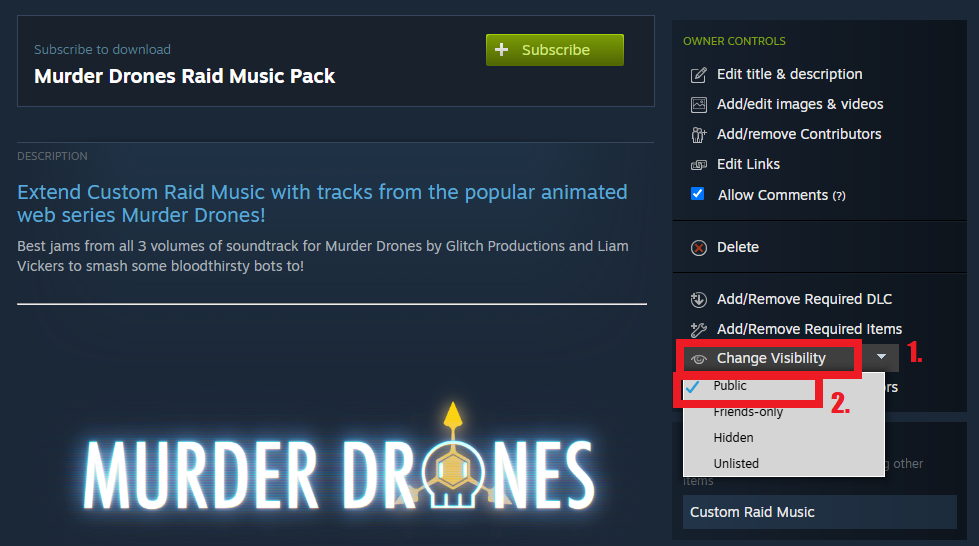
After saving the description return to the store page and make the mod public!
3.1 Uploading.
To upload a pack, press the "Share" button, then "Upload To Steam" button.The rest of the process is automatic.Once the newly generated Steam page for your pack opens, close the mod tool.
3.2 Adding the dependency.
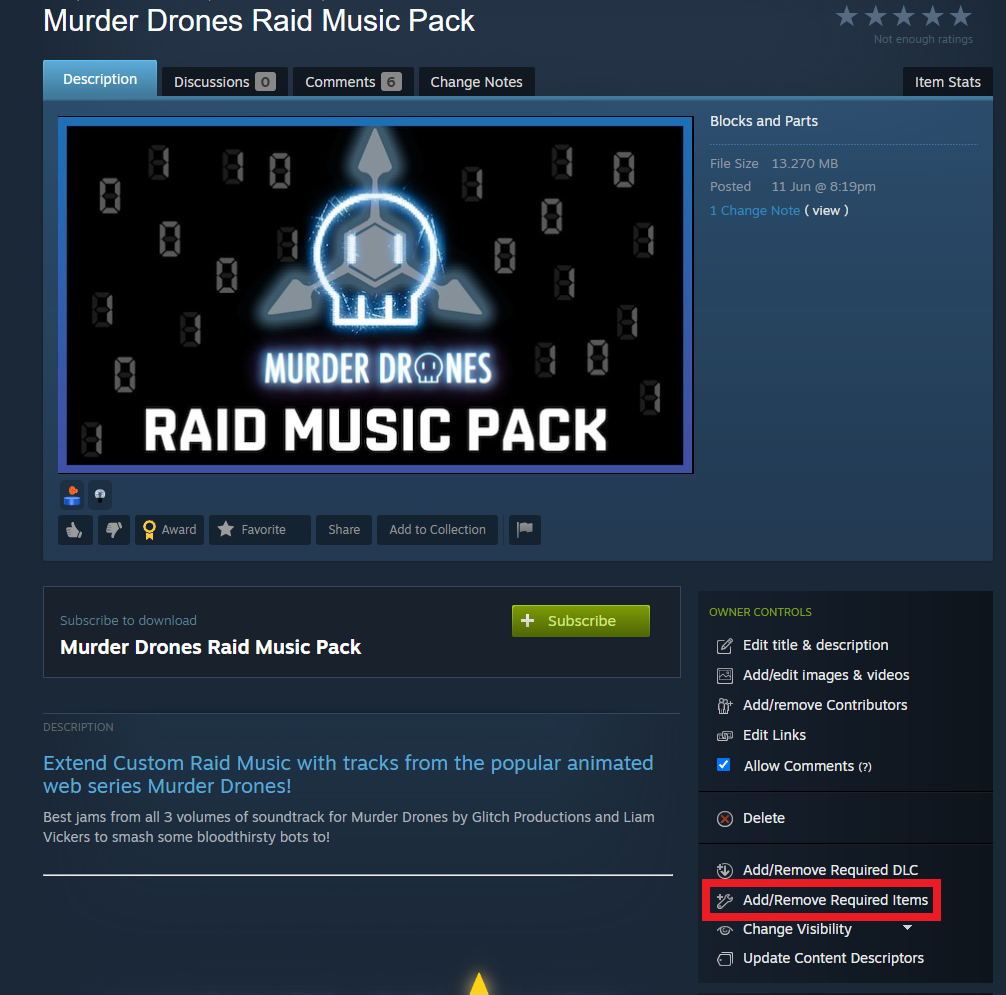
Add the main Custom Raid Music mod as a dependency. By pressing "Add/remove required items".Selecting the "Subscribed items" tab, locating the mod, pressing the + button, and pressing "Save and continue".3.3 Describing.
And now onto the final step, the description.Use this button to start editing the description.
Here is my template[drive.google.com] that I use for all packs that you can copy-paste and edit to your needs.
After saving the description return to the store page and make the mod public!
PROFIT!
Congratulations!
You just made a custom raid music pack!
Stand proud as you enjoy the music YOU want with your friends and yada-yada-yada.
Now go grab those free Steam award points.
You just made a custom raid music pack!
Stand proud as you enjoy the music YOU want with your friends and yada-yada-yada.
Now go grab those free Steam award points.
More Scrap Mechanic guides
- How raids actually work (Version 0.5.1)★ 5 (550)19k views867 ♥3 minUpdated 7 Apr, 2021
- Как пройти выживание?★ 5 (448)18k views700 ♥25 minRussianUpdated 12 Aug, 2020
- Все команды для скрап механик★ 5 (259)15k views475 ♥1 minRussianUpdated 1 Dec, 2023
- Robots and weapons concept proposal★ 5 (421)10k views182 ♥3 minUpdated 1 Apr, 2022
- How Does Fuel Consumption Work? Which Engine Is the Most Efficient?★ 5 (182)10k views152 ♥3 minUpdated 16 Oct, 2020
- Русификатор для Scrap Mechanic by Pro100DarkTV (v2.5)★ 5 (317)9.9k views516 ♥1 minRussianUpdated 19 Jun, 2021


🔥 Popular guides
- Upgrading to PremiumTeam Fortress 2★ 5 (20k)1441k views11k ♥6 minUpdated May 11, 2022
- No More Room in Hell Official ManualNo More Room in Hell★ 5 (2.8k)569k views2.1k ♥29 minUpdated Apr 22, 2019
- NMRiH Community Hosting GuidesNo More Room in Hell★ 5 (526)351k views653 ♥1 minUpdated Aug 10, 2022
- ULTIMATE GUIDE FOR GAME DEV TYCOONGame Dev Tycoon★ 5 (5.8k)326k views10k ♥4 minUpdated 23 Jan, 2014
- How to 'Git Gud' Soon™MORDHAU★ 5 (2k)318k views3k ♥68 minUpdated Nov 16, 2024
- Лучшие кооперативные игры SteamPAYDAY 2★ 5 (1.5k)315k views2.1k ♥56 minRussianUpdated Apr 27, 2025






This guide was created by its original author on the Steam Community. Are you the author and want it removed? Request removal.