Pax Romana Aeternum - The "Flawless Victory, Fatality!" Guide
Introduction
Pax Romana Aeternum is considered by many as the "most difficult Civ5 achievement".

Win the game as Eastern or Western Rome on Deity and have all your original cities under your control in the Fall of Rome scenario.
You play as Honorius or Theodora, representing Western and Eastern Rome respectively, during the not-so-glorious period of the barbarians invasions. Rome is being threatened by the Celts, Franks, Goths, Vandals, Huns and Sassanids. Your economy is crumbling, your borders are too large to defend and your people are turning against you. If you didn't get the hint, the name of the scenario is Fall of Rome. You are supposed to succumb and the AI does a great job on that front on Deity.
You'll start with pretty much no troops, facing a large Barbarian army attacking from multiple fronts right on turn 1. Your happiness starts negative as well as your gold income - in few turns you'll run out of gold and the little units you have will start disbanding. Social policies play against you i.e. make you weaker and there is no way to avoid them. Yet, the achievement wants you to win while retaining control over all of your cities after 70 turns.
All guides I have found so far for this achievement agree on one thing: this is really tough. Even the seasoned players from CivFanatic forums report losing 3 to 6 cities during the initial Barbarian assault. Some spend most of the remaining turns trying to regain those cities, fix the economy and train troops to defend against for the final assault of the Barbarians (which supposedly happens around turn 60).
Finally, there is the "winning the scenario" part. Both Rome Civilizations have to have togehter more points (more on that later) than any other Barbarian. However, the Sassanids are very good at pulling points out of their poo-poo-holes and even those players who beat the scenario reported a very tight win, with few points margin.
 But this is not going to be our case. We will humiliate the AI. By playing with a very mean version of Theodora (observe the lasereyes) we will
- halt the Barbarian invasion without losing a single city or unit (apart from Scouts)
- "solve" the happiness problem
- obliterate the Sassanids - they can't win if they're dead
- bury the Goths seven feet under
- take over Atilla's Court and eliminate the Huns
- stop the Frank invasion on Western Rome and recover some cities
- plug the Alboran sea and trap the Vandals' ships
- ...not much with the Celts... really, but we could!
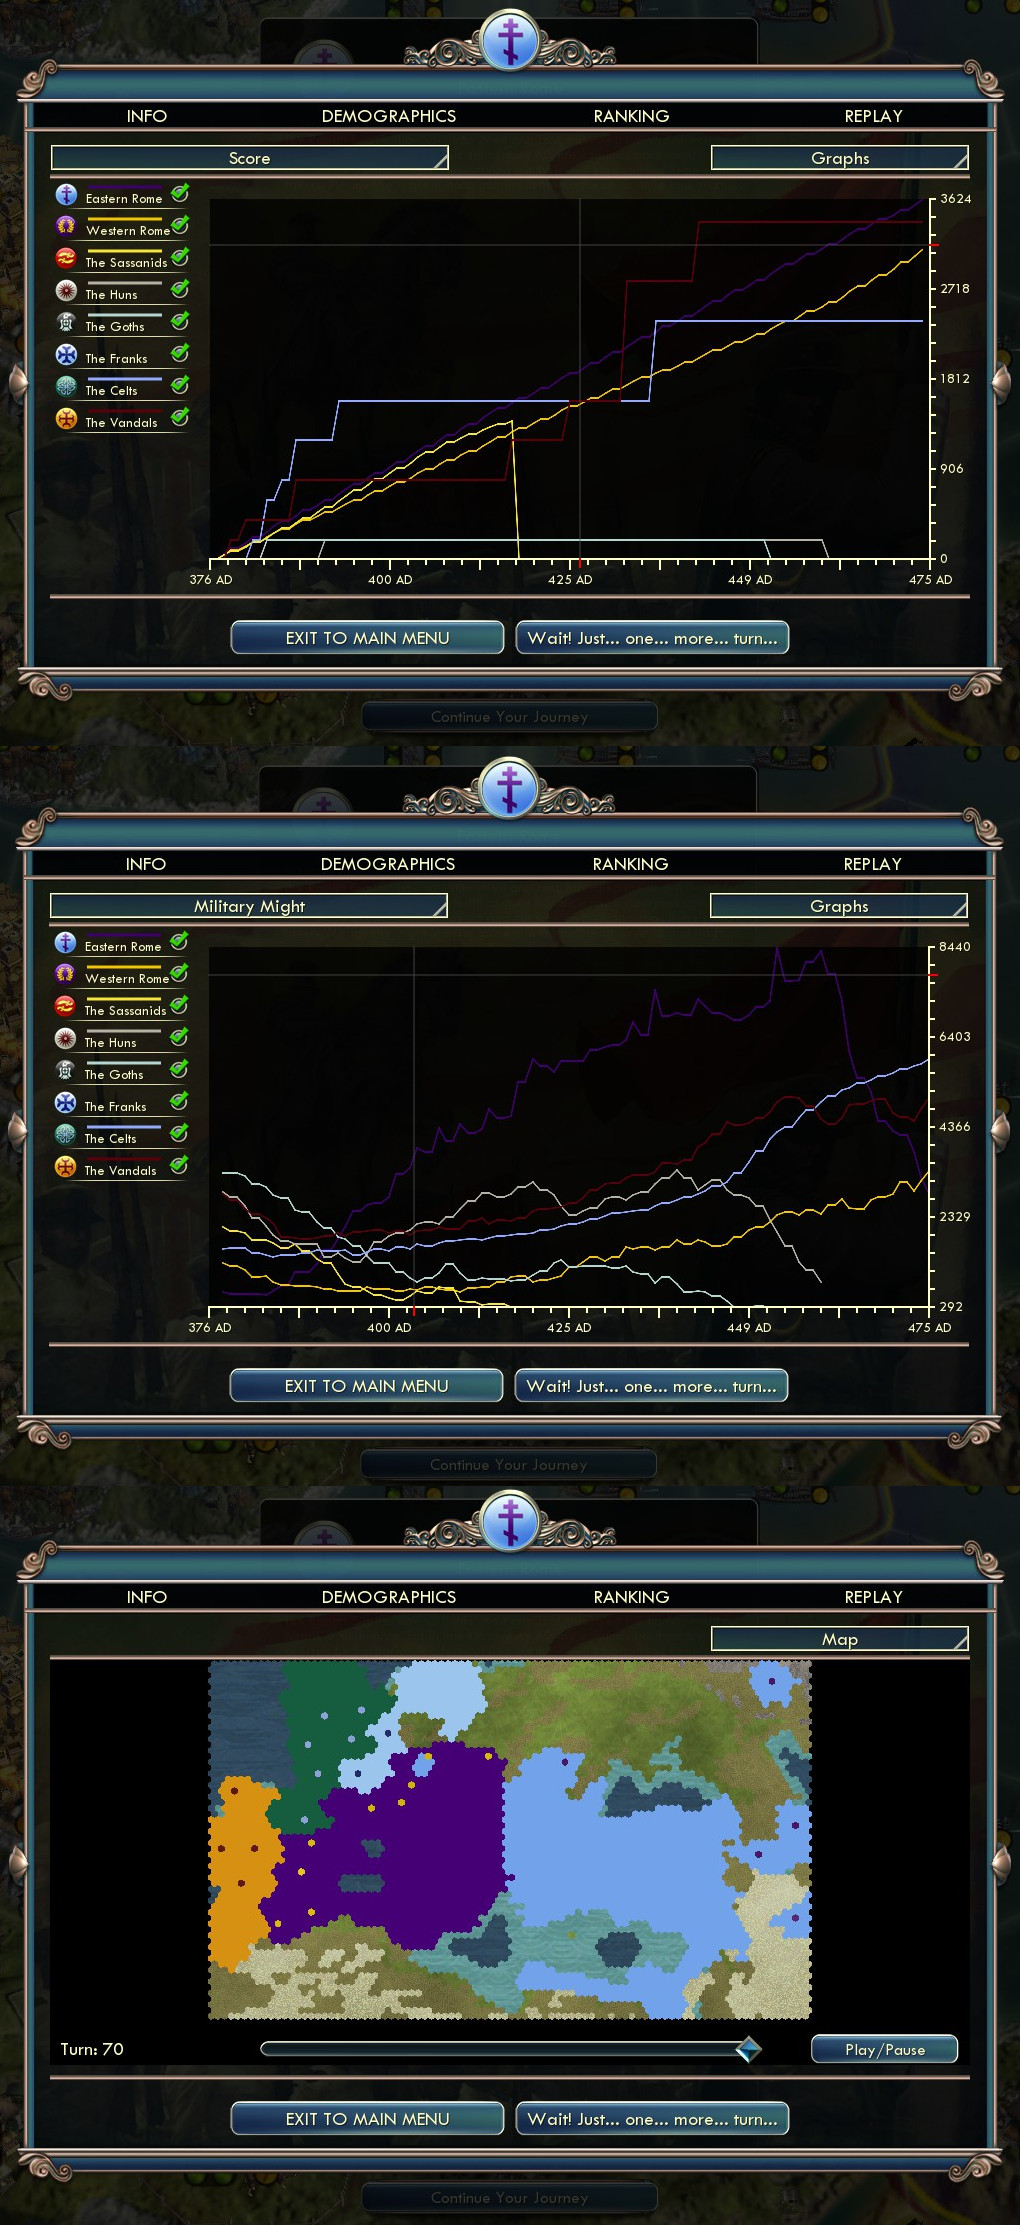
- get enough points to win the scenario. Alone more than 3624 against 3400 from the Franks
This WILL NOT BE EASY, but it will be VERY REWARDING. Be ready for a very tough first 11 Turns followed by madness and bloodshed.
The initial save game can be downloaded from
provided by Kalle in his website (if redirecting doesn't work, ctrl+c and ctrl+v the url).
The game is only deterministic if you do exactly the same I did and in exactly the same order, including every single attack; so, yes, your game will vary, potentially even branch to a completely different endgame. Perhaps a better one!
"Fall of Rome" Mechanics
The scenario is all about conquering and keeping the Imperial Cities, i.e. all cities originally from the Roman or Sassanid empires, in order to gather VP (Victory Points). Technology and Diplomacy are disabled, but culture points play a very important role both for Barbarians and for the Roman Empire (not so much for the Sassanids).
A very detailed description of this scenario with its units and rules can be found in
https://civilization.fandom.com/wiki/Fall_of_Rome_(Civ5)
but I will give a tl;dr version here.
Furthermore, you'll likely need a map for this. No need to reinvent the wheel: mah bruv Kalle has already made an awesomely detailed map for this scenario, including historical details about each leader!
https://steamcommunity.com/sharedfiles/filedetails/?id=2230506916
Give him a thumbs up too! I'll be using crops of his map throughout this guide, but make sure to check the full map as well.
 Deity is very different from other difficulties. The AI "cheats" and in fact, quite a lot! A very detailed description can be found here:
https://www.civfanatics.com/civ5/info/difficulties/ In summary, these are the things you have to know:
- hapiness, maintenance and even production is irrelevant for the AI
- AI receives units out of thin air (sometimes 3 or 4) at the beginning of some turns
- units start with 30 EXP
- double EXP from combat
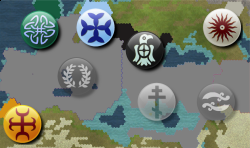 Barbarians get VP and Culture Points for capturing Imperial Cities depending on the size of the city (usually 200VP on Deity). Barbarians also fight between themselves, meaning that they may (and will) capture the same Imperial City from each other, e.g. Franks take Tiel from Honorius (+200VP), Celts take Tiel from the Franks (+200VP), Franks take it again from the Celts (+200VP) and so on.
The Barbarians also have two particularly OP Social policies, which they may get quite early in the game, since they get so much culture from kicking Honorius' butt:
- Willy Veterans - military units gain 100% more experience from combat
- Destiny's Army - +50% combat strength for military Units which have another military Unit in an adjacent tile
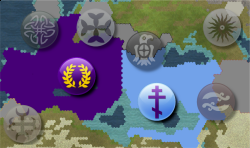 That would be you!
You get VPs from keeping Imperial Cities. The larger the cities, the more points you get. There is no benefit in keeping or capturing Barbarian cities, other than the satisfaction of seeing the look on their faces.
You're restricted in a lot of things in this scenario. The first strange restriction is that you cannot sell buildings. Some of your cities start with a Wall and all your cities start with a Monument built. This gives you culture, but just like in modern western society, culture plays backwards and only corrodes our civilization.
- Barbarian Conscription: -10% combat strength
- Rise of Serfdom: cities with walls suffer -2 production
- Usurper General: +1 culture for each barracks and a rebel army appears
- Popular Ennui: -1 happiness from luxury resource
- Con Debasement: +10% unit maintenance
- Dark Age: -20 happiness
Whenever you get enough culture points, the game forces to pick a policy. Since you cannot demolish Monuments, you'll get at least 4 social policies. Having Walls and/or Barracks might be detrimental. To make matters worse, losing any city also gives you culture points (usually 20). Yes, even losing barbarian cities will give you culture points!
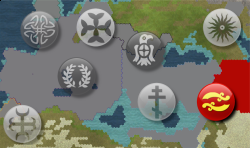 They are also an Empire, but have a serie of advantages over the Roman Empire. The first one is that they aren't surrounded by Barbarians and their only foe are the Huns. Second is that their empire is not collapsing i.e. their social policies are actually beneficial. Third, they make points for having Imperial Cities, but they make 2x more points than the Romans.
This is where they get problematic: on Deity, the AI cities grow senselessly without any apparent reason; if you don't bug them, the Sassanids could have 3 or 4 cities with 20 citizens each, pumping up lots of VPs per Turn! Most players in the CivFanatics reported that their main foe were the Sassanids and their insane point-making machinery.
Overall Strategy
Some notation: Production = P, Food = F, Happiness = H, Unhappiness = -H. So when I write +3P or -2H you'll know what I'm talking about.
https://steamcommunity.com/sharedfiles/filedetails/?id=2136936176
I had to min/max every single combat for 7 Turns in order to not lose a single city/unit (more details later). We're trying to achieve greatness here. If you're shy for save/reloading, I don't think you can follow this guide at all. We need to attack the Barbarians very fast, because they grow very strong very quickly and wasting time with reconquering/retraining units will jeopardize everything.
 Capitalism 101: embrace the debt. You can sure go positive on gold but only if you abandon your hopes of raising a horde to chew the barbarians.
But maybe you're not convinced yet. I did you a favour and built a Market (even Bank and Mint, whenever possible) in all of my cities, set to Gold Focus and put them all to produce Wealth just to prove the point (see screenshot). If you would delete ALL ROADS (which you cannot do), on Turn 61 you'd still have -13 GTP. On Turn 69 I almost turned the tables, but that's because I lost ~30% of my Army in the last 8 turns. Nevertheless, getting positive GTP only on the last turn is unconditionally not useful.
Capitalism 101: embrace the debt. You can sure go positive on gold but only if you abandon your hopes of raising a horde to chew the barbarians.
But maybe you're not convinced yet. I did you a favour and built a Market (even Bank and Mint, whenever possible) in all of my cities, set to Gold Focus and put them all to produce Wealth just to prove the point (see screenshot). If you would delete ALL ROADS (which you cannot do), on Turn 61 you'd still have -13 GTP. On Turn 69 I almost turned the tables, but that's because I lost ~30% of my Army in the last 8 turns. Nevertheless, getting positive GTP only on the last turn is unconditionally not useful.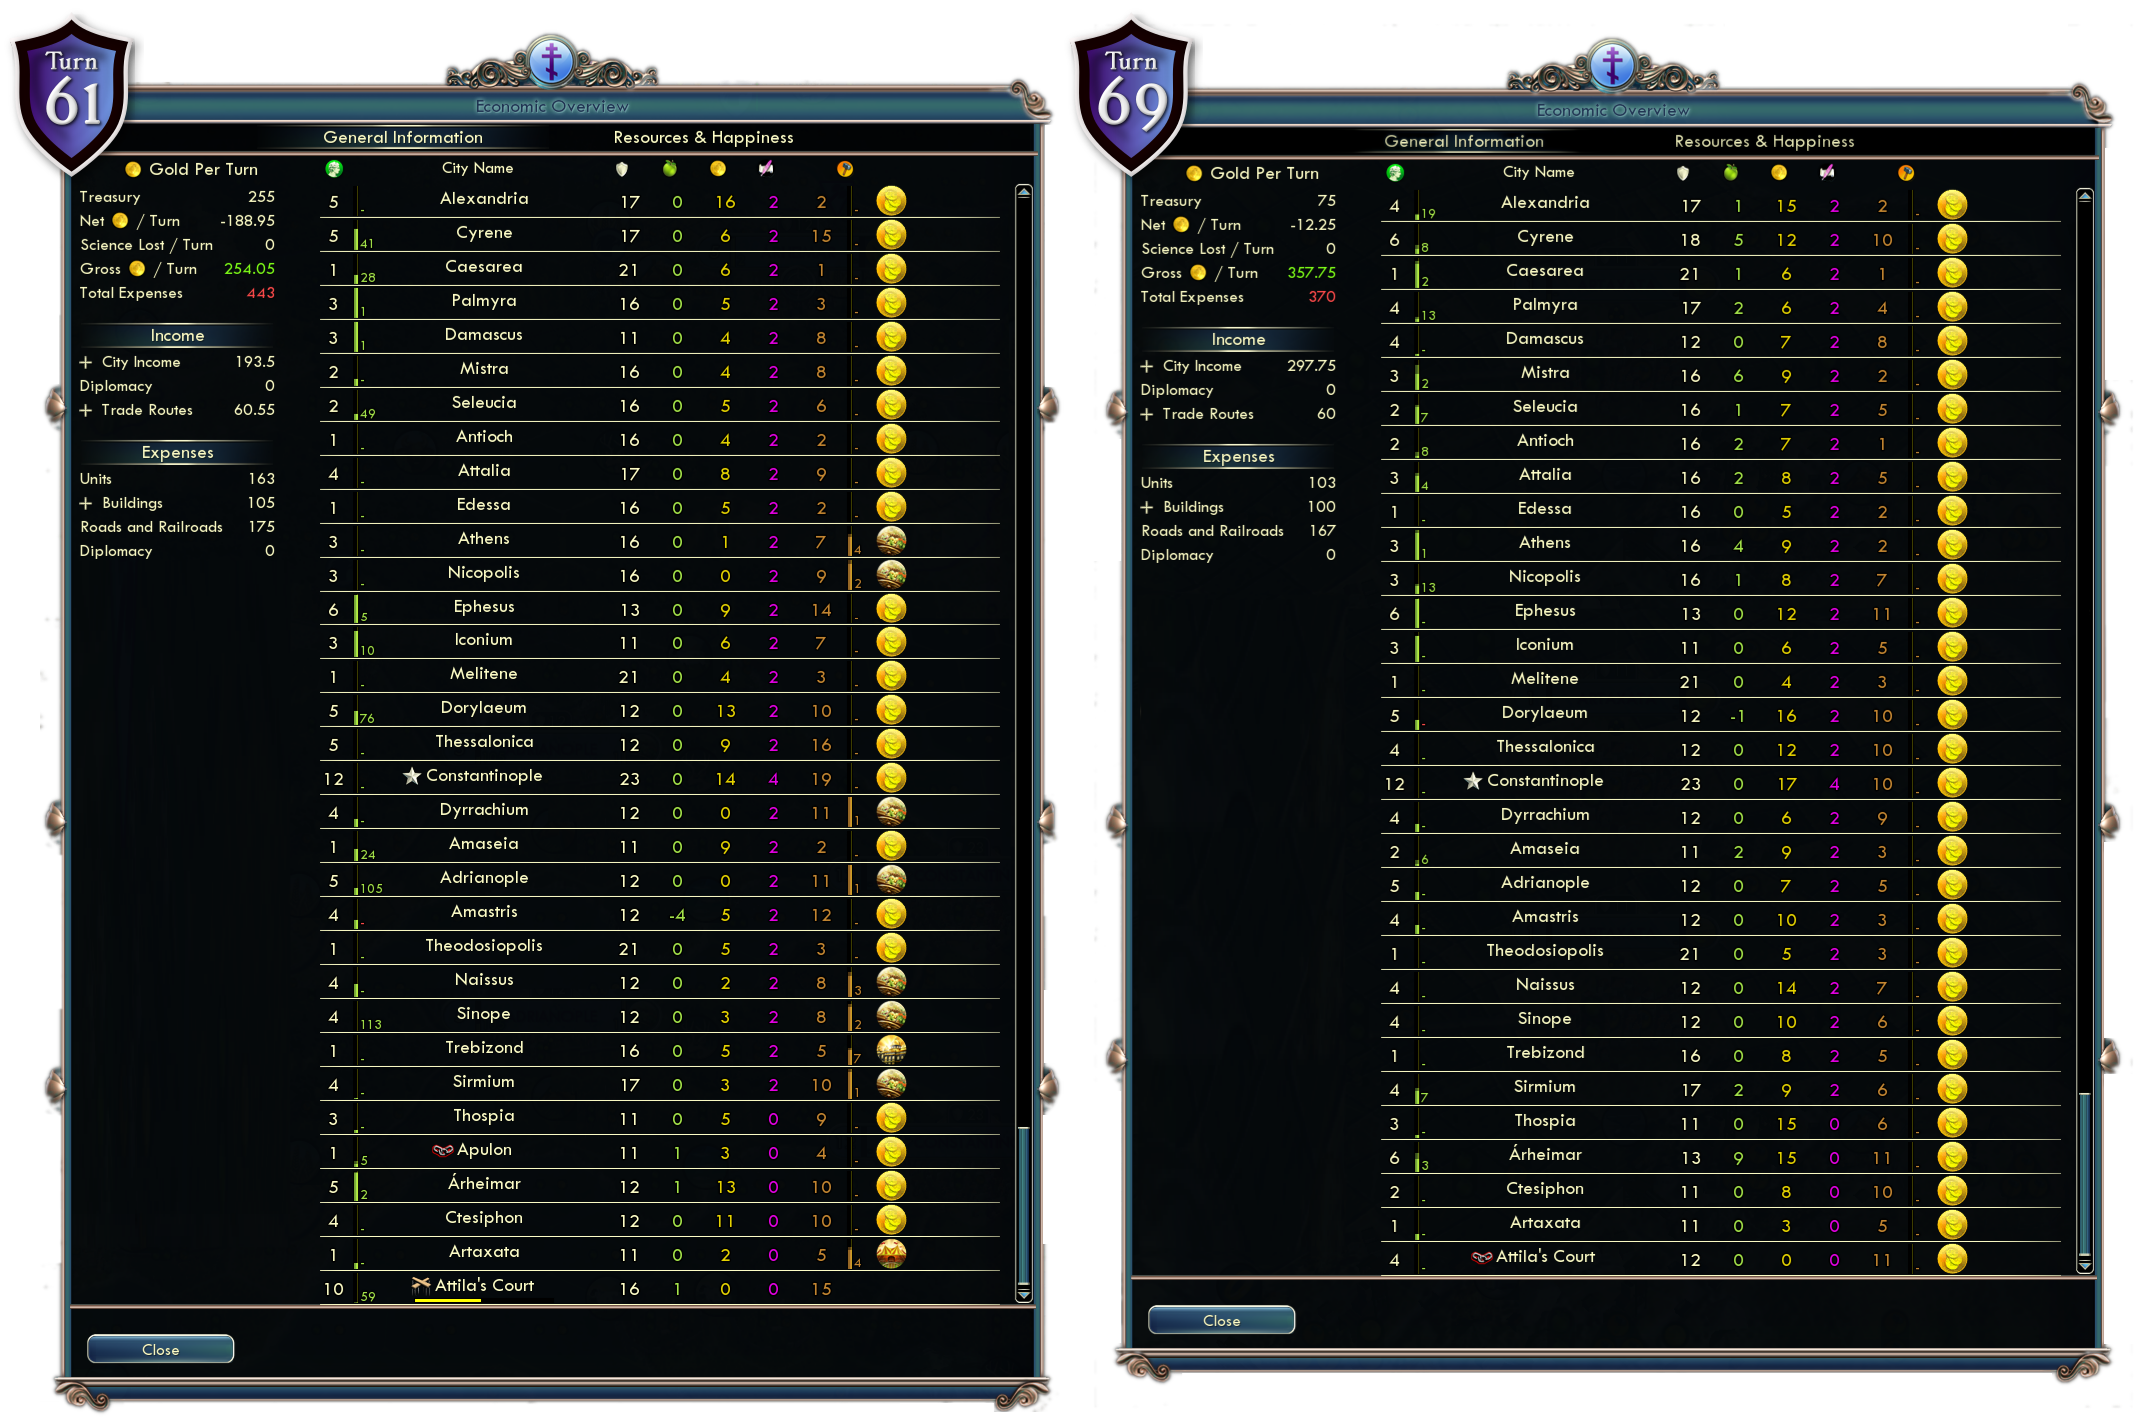
Summarising: do not waste your time with the economy. You will have to cope with units disbanding randomly wimps. This won't be that much of a deal breaker - it will not happen every turn and even when it does, it usually happens to scouts or units which are low on health anyway. If you lose a key unit, reload, tap the RNG sequence and try again.
 Max Production Focus and make sure to micromanage it; you can easily get a +3P in a city by doing it manually. Also, sometimes you'll prefer 2F over 1P: check the micromanagement section.
Also, Avoid Growth. We will want some cities to grow, but you gotta chose them carefully; we will also starve some cities but more on that later.
 A start -4H doesn't sound that bad. However, look at it this way: some cities have really good improvements around which could surely use some new citizen. If your Happiness is negative, they won't grow. Second, we will be razing, puppetting and annexing several cities. That'd bring us to -10H or below and that causes mass disbanding and -33% combat which is a no-no in this scenario.
Circuses and Stone Work (in Thessalonica) won't cut it. We will solve the Happiness Problem with a very carefully planned Mass Starvation Plan Communist Anthem plays in the background.
 Eastern cities build units and only units. Western cities will build units to hold the first wave, then invest in some infrastructure... then MORE UNITS!
Forget walls. They won't get ready in time for the first wave. Thereafter, the Barbarians will be too busy dying to ever consider of attacking you again. Barracks will be essential on the western Cities, as well as Alexandria and Cyrene. "When" you should build them... is still not very clear to me.
Forget Markets and Harbors. Some few cities deserve a Stable, but really, few. Granaries can be far more useful to boost production - and they get ready much faster too (see Infrastructure section). Tiles improvement will make your best source of production boost - tree chopping at first, building Mines and Pastures later. Legions will warm up by build Forts (see "First Wave" section).
 You'll have to deal with 4 policies:
- Turn 5 - Neglected Infrastructure: Gold from city connections reduced by 50%
- Turn 12 - Coin Debasement: +10% Unit Maintenance Cost
- Turn 25 - Rise of Serfdom: -2P on cities with walls
- Turn 47 - Barbarian Conscription: -10% Combat strength
 Don't dream about getting March Promotion, ain't nobody got time for that. Cover is objectivelly more important for Melee units. Get one or two medics around but try to get Accuracy and Barrage with your ranged units.
At the beginning of the game you'll have to sacrifice some promotions for Rapid Heal and later you'll use it to troll the AI with Spearmen.
 Probably the reason why you're here: FIRE AND FURY! We will eliminate the Sassanids mostly for the sake of preventing them from winning. It feels tempting to keep their cities, as that gives you more points, but you won't have enough happiness to maintain it. I suggest you to raze the city to 1 citizen and then stop it. Once you're about to get a new city, finish razing the one with 1 citizen.
We will eliminate the Goths because we are evil. The cities from the Goths are not supposed to give you any point (but I never tested). It is very optional to finish off the Huns, since they are so faraway, but it is SO VERY SATISFYING. At least try, will you?
Just for the sake of comparing, those were my conquests (all cities razed, except where noted):- Turn 17: Amida [Sassanids]
- Turn 19: Tyras [Goths]
- Turn 21: Thospia [Sassanids]. Kept for iron, horses, circus and etc.
- Turn 23: Nisibis [Sassanids] and Olbia [Goths]
- Turn 26: Singara [Sassanids]
- Turn 29: Arheimar [Goths]. Kept (Capital)
- Turn 30: Anium and Ctesiphon [Sassanids - eliminated]. Kept (Capital)
- Turn 40: Artaxata [Huns, former Sassanids]
- Turn 42: Turda [Goths]
- Turn 54: Apulon [Goths - Eliminated]
- Turn 60: Atila's Court [Huns - Eliminated]
- Turn 66: Tiel [Franks]
 Your partner, Western Rome, kinda seems to be enjoying the beating, giving buckets of points to the barbarians.
This stage of the game will differ DRAMATICALLY, but 3 fronts are more or less constant:
Your partner, Western Rome, kinda seems to be enjoying the beating, giving buckets of points to the barbarians.
This stage of the game will differ DRAMATICALLY, but 3 fronts are more or less constant:- Rome/Ravenna: by turn 30 he will have lost Rome to the Franks. You have to jump in before the Franks arrive in Ravenna in other to help him defend the region. This is really crucial. If they take this region, Western Rome will be even more useless.
- Carthagena: at around turn 57, the Vandals come to take it. It is easy to retake, but it is better to deny them dem sweet 200 points.
- Carnuntum: the Goths will be pressing them there. You'll attack Apulon through here, so this city must be defended or reconquered.
For the sake of comparison these were my re-conquests:
- Turn 44: Carnutum [Goths], Massilia, Milan [Franks]
- Turn 48: Genua [Franks]
- Turn 56: Iol Caesarea [Vandals]
- Turn 61: Casta Regina [Franks] and Tarraco [Vandals]
- Turn 62: Carthago Nova [Vandals]
- Turn 64: Rusadir [Vandals]
Micromanagement
We're planning to take Amida and Tyras on Turn 17 and 19... that's a pretty tight schedule. You'll have to start marching on turn 13~14, which means you'll have time to squeeze 1~3 units per city. Although you have 27 cities, some of them are very far and won't contribute. The only way you can pull that off is by micromanaging your resources very tightly in a very, very, very tedious process.
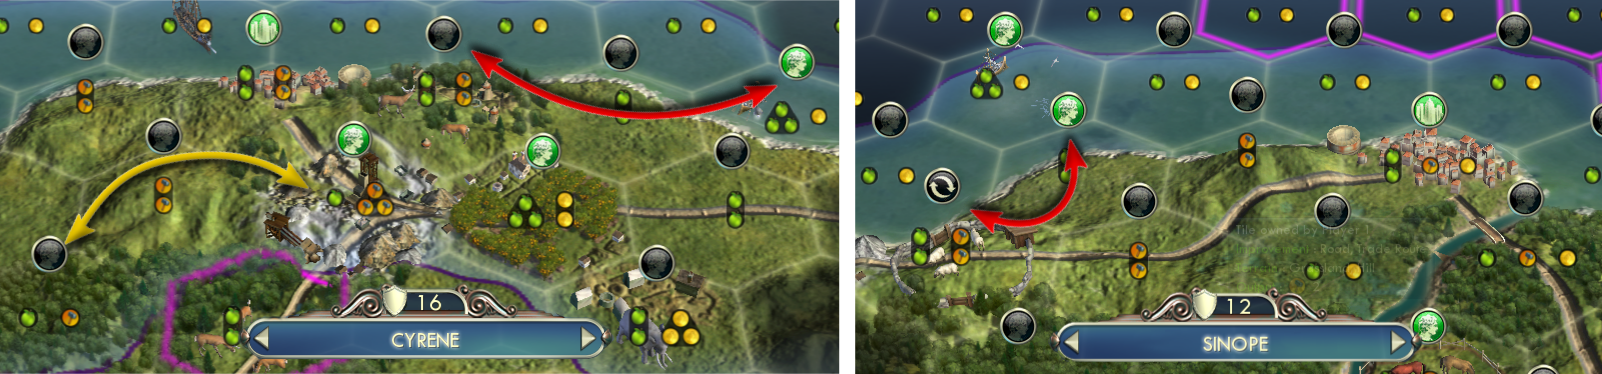
The sheeps in Sinope are initially assigned to Amastris, but Sinope needs it more - so go ahead and grab it for Sinope. About the yellow arrow in Cyrene: swap it while you have negative happiness. Once your happiness is positive, swap it back to Oranges (next section).
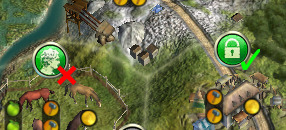
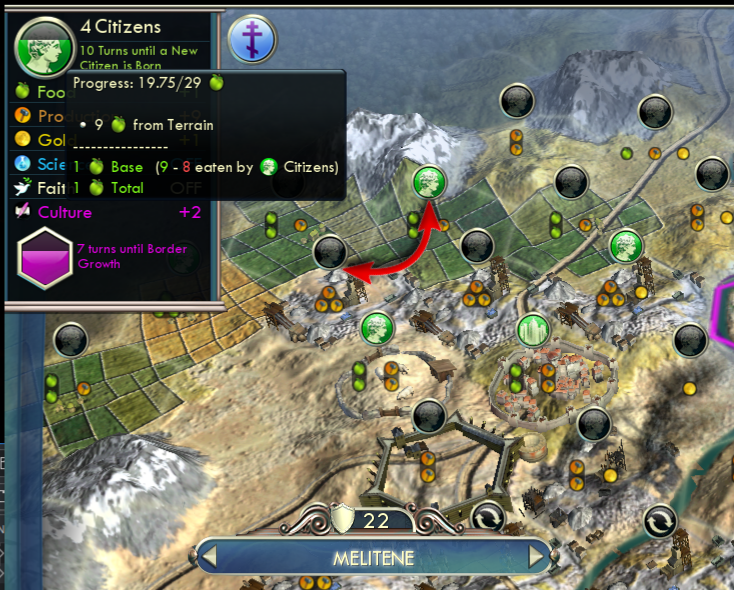 As long as your civilization is Happy, Food = Production. Surplus Food goes to the Food Bank (only 1/4 if your civilization is unhappy); once this bank is full, the city grows i.e. gain a new citizen. What people tend to neglect is that you can also starve a city for a few turns to boost its production instead.
In the image (Turn 36) Melitene had 19F in the Food Bank, with +1F per turn. Instead of waiting for it to grow, you can swap the Farm for the Mine (red arrow). Your net change is -2F, +2P making Melitene starve at -1F per turn. Since you had 19F in the Food Bank, you can maintain this production boost for 19 Turns without losing a citizen - a very sweet deal!
General idea: if you have Food in the Food Bank, use it while your Civilization is Unhappy (e.g. while you are razing some barbarian city) otherwise let it gather whatever nets more.
Happiness & Population Control
 If your empire's happiness drop to -10, you'll get a serious punishment:
- all surplus food is discarded
- production penalty
- -33% combat strength
A prime example is Antioch; the citizens highlighted in red are useless. They produce 2F and consume 2F. The only thing they do is decrease the Happiness of your empire. The citizens highlighted in yellow are only producing Gold, which for the purpose of this scenario, is as good as nothing. You can reassign them to Sheeps from the south, Wheat from east, deer from North but still 4 citizens will be useless.
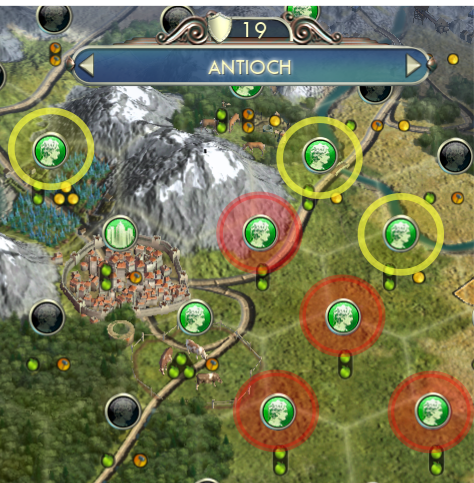
I'll suggest you to starve only eastern cities; the westerns will need the extra citizens. These are some good candidates:
- Antioch: -4 citizens
- Alexandria: -3 citizens
- Caesarea: -1 citizen
- Attalia - you can take the Wheat from Seleucia (and Seleucia gets the Fish instead).
- Ephesus - we will build a Granary here later and that useless citizen will go to a mine.
- Dyrrachium - DEFINITELY do not starve this city. We will sorely need it to pump new units to defend Rome. Instead, we will build a granary here and even allow it to grow mid-game.
- -3H for having a new city
- -1.44H per citizen in it
- -2H for occupying it
- -3H for having a new city
- -1.05H per citizen in it
Even with the puppet cities, keep them like so just until rebellion time is over: then annex, build courthouse and chop down trees asap while starving the city at the same time.
Starting on turn 18, I started starving cities such as Palmyra, Caesarea, Damascus, Antioch, Edessa, Melitene, Theodosiopolis and Trebizond. This was needed to make room for new conquests AND to grow some cities on the west. Think of it as a citizen relocation.
If that helps, imagine that those citizens used to do something horrible, like putting pineapples on pizza.
Infrastructure
By now you already know that we will focus on Production, Avoid Growth, stock up Surplus Food while your empire is happy and carefully starve for Production boost. You can still boost the production of some cities further by building Stables and Granary, as well as Tile Improvements.
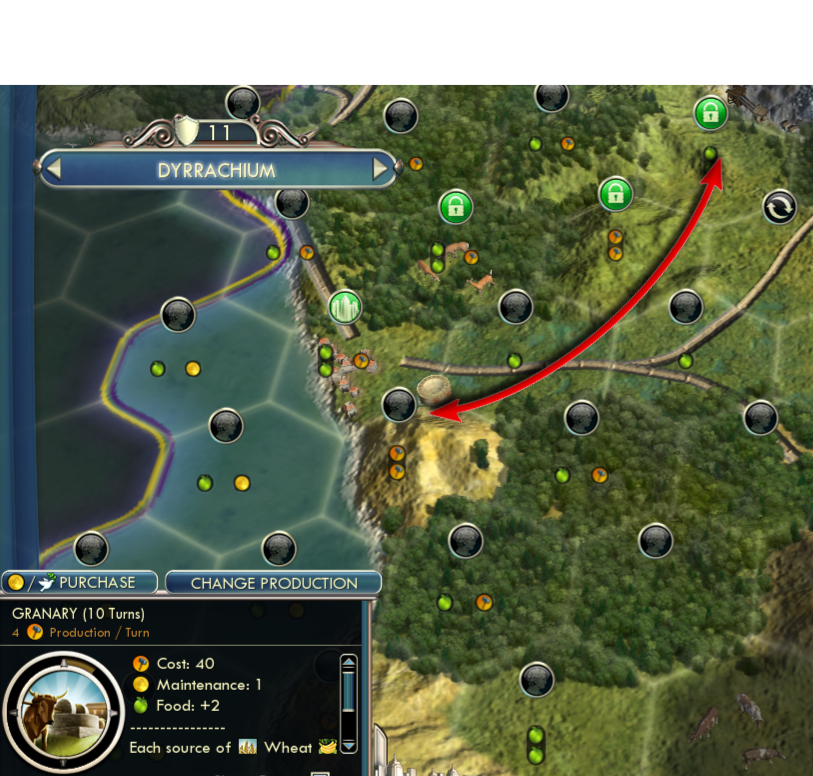 There is a simple formula:
- T = current Turn
- R = how many Turns till it finishes building it
- C = how much Production it costs to build a building; 67 for Stables, 40 for Granaries
- B = how much more Production you will get after the building is done
For most cities you'll find a gain of 40~60 production from buildings. This is usually not worthy. By investing in the building, you'll be trading 1 early game unit for 1 late game unit. In the first turns, the units are much more relevant/powerful: later you'll have a -10% Combat Strength, the Barbarians will have a +50% Combat Strength.
I found it worthy to build a Stable and/or Granary in the following cities:- Amastris (Stable; 3~4 Sheeps = +3~4P)
- Cyrene (Granary; 2 Deers). Grow this city and build barracks too, it will pump dromons to attack the Vandals
- Dyrrachium (Granary; 1 Deer). Grow this city too, but no Barracks; pump Spearmen for Rapid Healing + Fortification
- Dorylaeum (Granary; Deer, 2 Wheat )
- Ephesus (Granary; 1 Deers, 1 Wheat, this nets +6P!!!)
- Thessalonica (Stone Works and Stable; 2 Cattle, 1 Sheep)
- Sinope (Water Mill)
It is questionable if Adrianople could benefit from a Stable or Granary. If you get it to grow 2 citizens, they would be very handy (there are enough Hills around, which could turn into Mines for +3P) but perhaps it would take too long. Same goes to Sirmium, but Naissus is a lost cause.
- Constantinople
- Cyrene (dromons only)
- Dorylaeum
- Nicopolis
- Ephesus
- Thessalonica
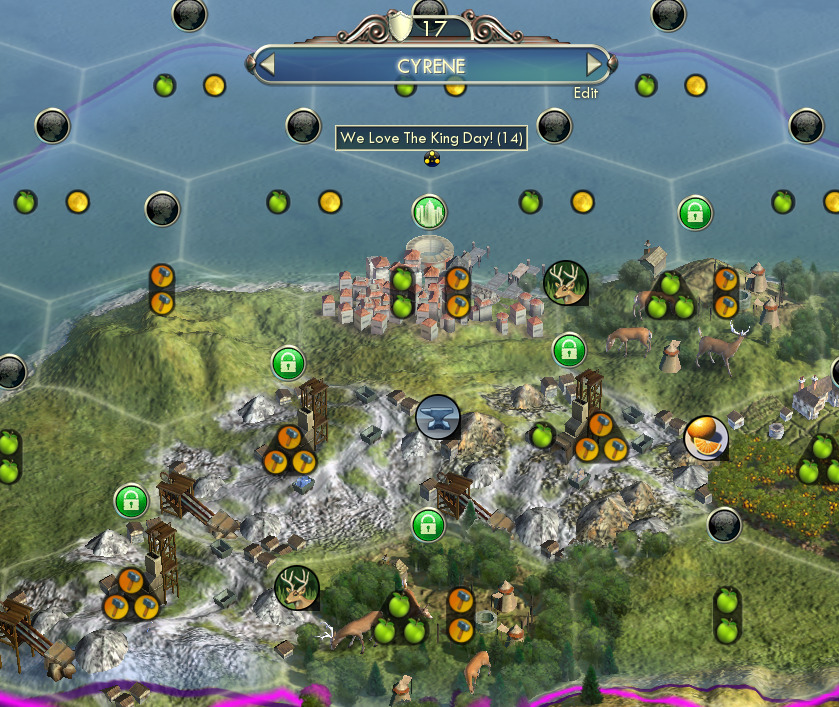 The usual: production focus, chop down trees, etc. You will have to hurry up and build a pasture in Thessalonica and Amastris, so that they can start building Stables quickly. I also trained a Worker on Cyrene and one in Iconium after the first wave.
Be ready to repair broken roads and improvements. The Goths will pillage some stuff on North (specially the Truffles) and then Vandals will pillage the Whales in Mistra.
This can actually play in your favour: your citizens may start asking for one of those two resources and once you restore them you'll get a "We Love The King" event which will last the whole game!
First (and only) Wave
You will have to min/max the random modifiers (from my RNG Mastering Guide), but the good news is that this is the only part where this is ***mandatory***. Once the first wave is done, you can play like a normal human being again.
- don't lose your troops (except scouts) - reload if needed
- flanking and terrain bonuses are essential; forts will also give a +10% in a 2 Tiles radius so we will build some
- low-health enemies will also cause less damage when they attack your cities. If killing a weak unit opens the path for a new full health one, ]don't
- do your best to prevent enemies from rapid-healing
- avoid killing enemies with melee units, to avoid breaking formation; use ranged attacks instead
- once the AI is attacking a city with yellow HP, they will focus desperately on taking it down, often ignoring your units. Place your units cleverly and make the AI walk around them to simply reach the city
- the AI tends to attack cities only once catapults and archers have line of sight - stall THESE units!
- movement is reduced when the unit moves in a tile adjacent to an enemy's - use Scouts to distract and slow the enemy's progression
- Spearmen are specially powerful on East, since the Huns and the Sassanids are based on mounted units
- the AI seems to avoid Forts (even unfinished). Use it in your favour!
- save/reload, save/reload, save/reload, (...) save/reload and then save/reload.
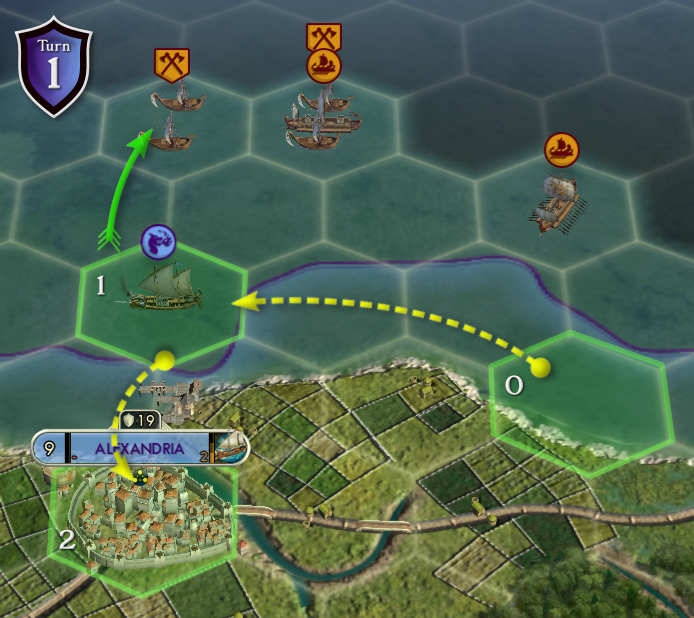 The funniest thing about defending Seleucia is that you will never have to. You can fool the Vandals into attacking Alexandria instead; Alexandria has more defence (19 vs 17), the lands are flatter (thus you hurt the Axemen more with your city's attack) and has only 1 tile to the sea (meaning that only 1 Trireme can attack per turn). Furthermore, some Triremes get confused, disperse and attack Caesarea and Seleucia alone.
You can lure them to Alexandria by moving your Dromon towards Caesarea. The next turn move it back to Alexandria (?!?!) and attack an embarked Axeman. The next turn all triremes will be upon your Dromon, but it will survive - hide in Alexandria and let the ranged combat begin. It will be REALLY a piece of cake. This strategy worked 100% of my playthroughts.
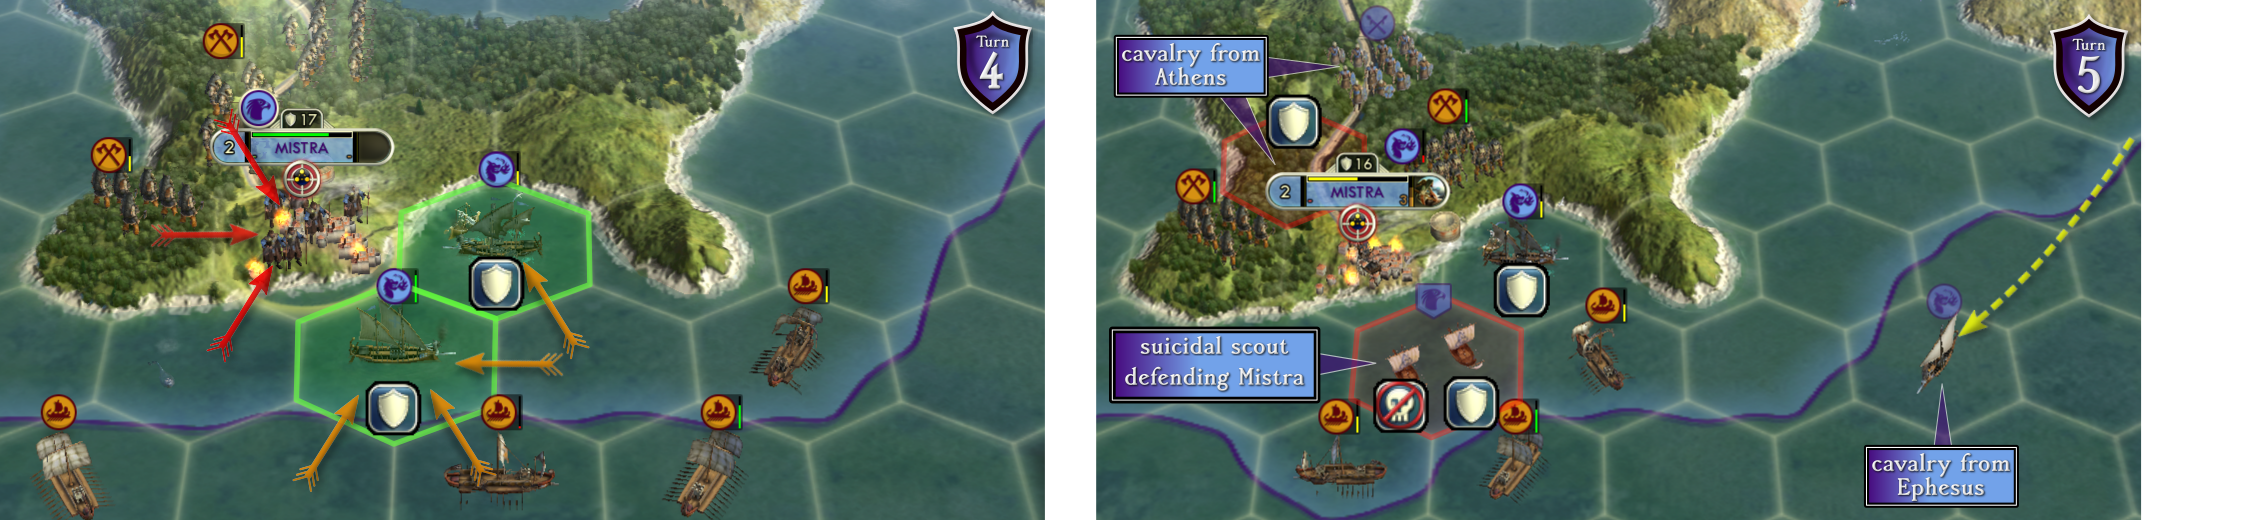
- Dromon from Constantinople (Turn 3)
- Scout in Mistra (Turn 4)
- Dromon from Ephesus (Turn 6)
- Spearman from Athens (Turn 6, chop some trees to speed it up!)
- Turn 0: for all that is sacred, hide your Dromon inside of Mistra. The Vandals will not move towards Mistra this turn if you do that.
- Turn 1,2,3: pray a lot
- Turn 4: use the Dromon from Constantinople to block one of the sea tiles. You might have to rapid heal at least one of the Dromons.
- Turn 5: use the Scout to block one of the sea tiles (see screenshot)
 Play your cards right and none of those will ever get attacked - Hint#7-9.
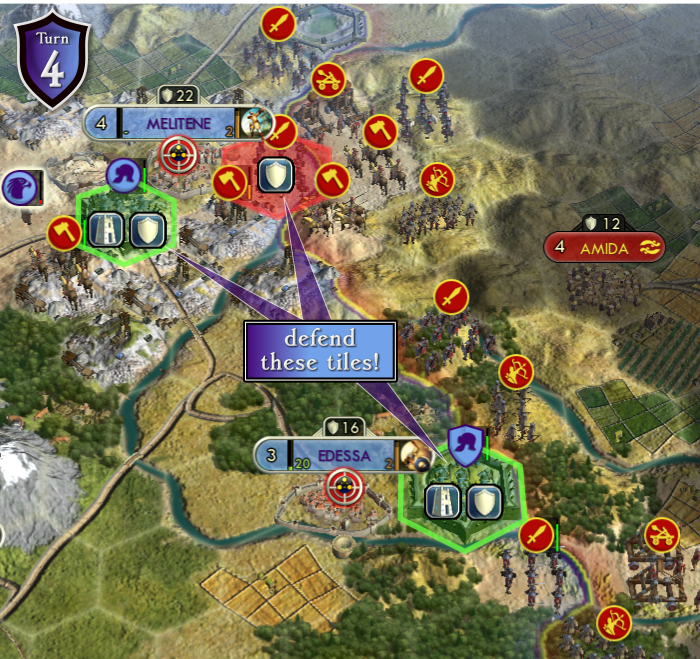
- Edessa: fortify the Legion on East tile and follow Hint#5 to the letter
- Melitene: train a swordsman in Antioch on Turn 0. Build a fort on the southwestern tile with your Legion (I had to interrupt on Turn 4). On Turn 4 a Swordsman will be ready in Antioch; bring it up to Melitene. The eastern tile (highlighted in red) is crucial. The Sassanids will try to fortify a Swordsman there, but DO NOT ALLOW THAT. In my run, they had a Swordsman there on Turn 4, but I lured him out on Turn 5. On Turn 5 you should get a Great General - fiddle with the RNG until it pops in the Antioch or Melitene. Mine arrived in Melitene on Turn 6 and then the Sassanids went nuts and spread - towards Theodosiopolis, Edessa and so on. They won't stand a chance anymore.
- Theodosiopolis: the Sassanids were so confused that they only started attacking this city on Turn 7 (see screenshot). However, they are coming mostly from Melitene, allowing you to strike them from both sides. They won't stand a chance anymore.
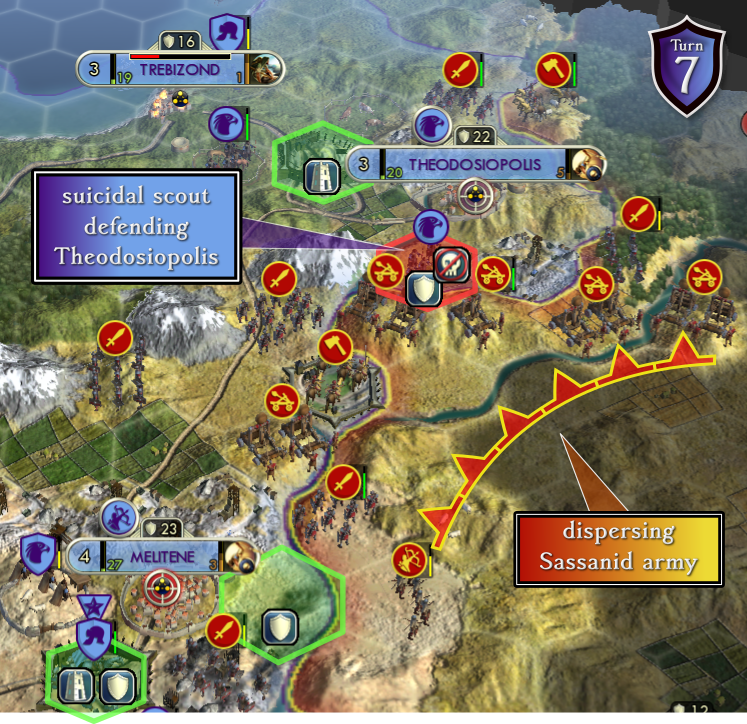
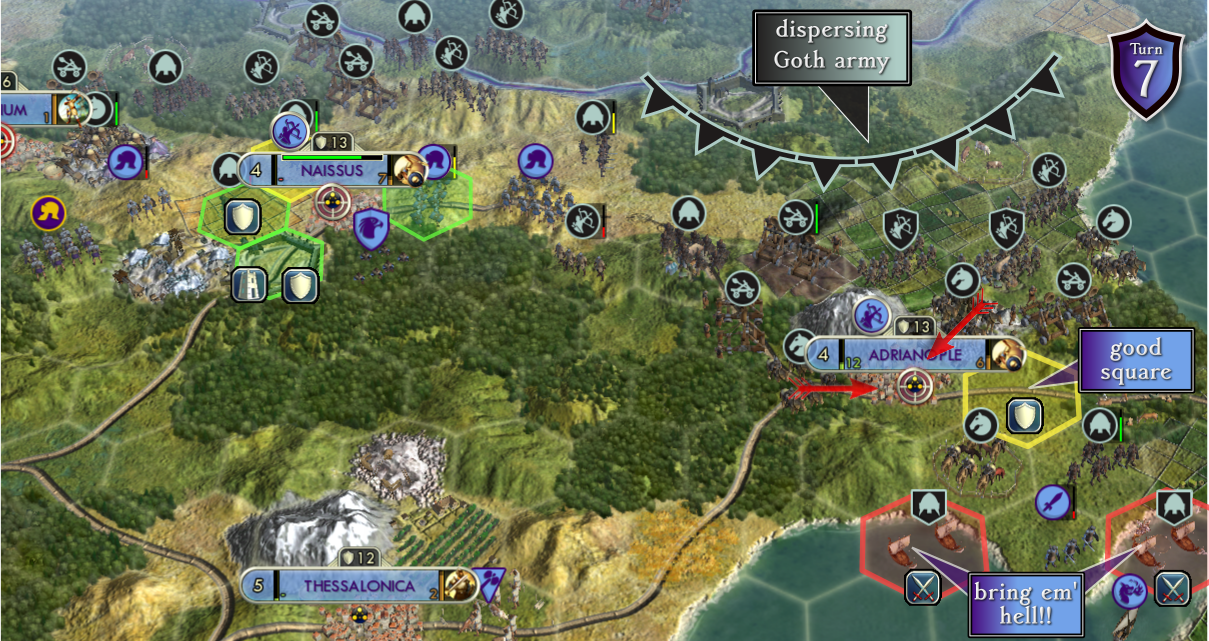
Most of the confusion takes place around Naissus: it is very hilly and your archers won't get line of sight either. Divert the Goths towards Adrianople instead: It is protected by mountains and hills and you can have Dromons Northeast and Southwest. They will only reach Adrianople on Turn 7 (very reassuring, see screenshot). There is a surprisingly good (but flat) hex East of Adrianople.
On Turn 0, bring the Legion from Constantinople to Naissus and Fortify it on West. The other two Legions will build forts on Southwest of Naissus and Sirmium respectively. On Turn 5 the forts are done; move the Legion from Sirmium towards Naissus and now you have 3 Legions protecting it.
Form a "wedge" pushing them Eastwards. Have the West, Southwest and East tiles tightly protected (see screenshot). Depending on your luck, they might leave archers and catapults unprotected in the process - well, chew them up ;)
Starting on Turn 7, the fun begins. Alternate between attacking the flank of the Goths from Naissus and Adrianople to confuse them. On Turn 10 you should have quite enough units to finish the Goths.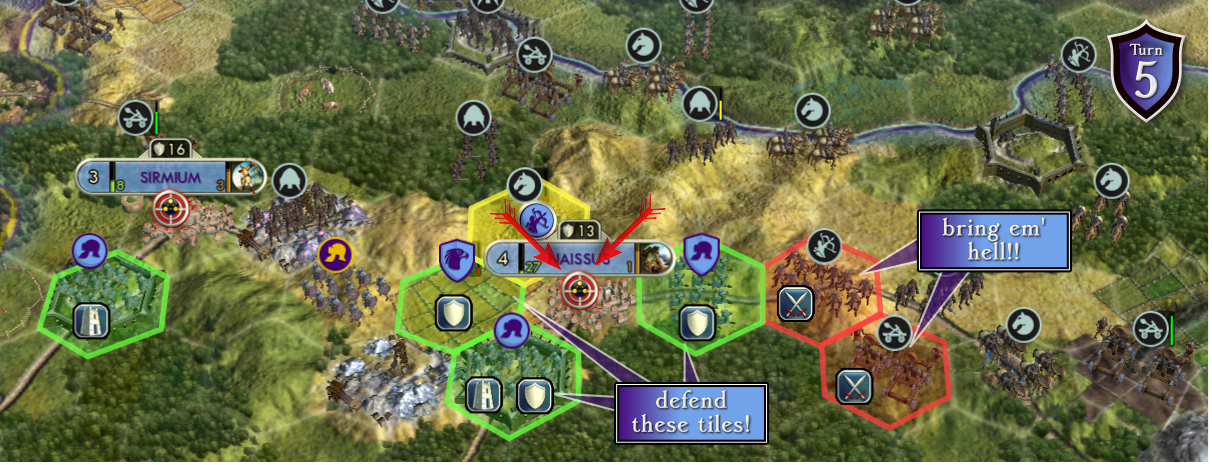
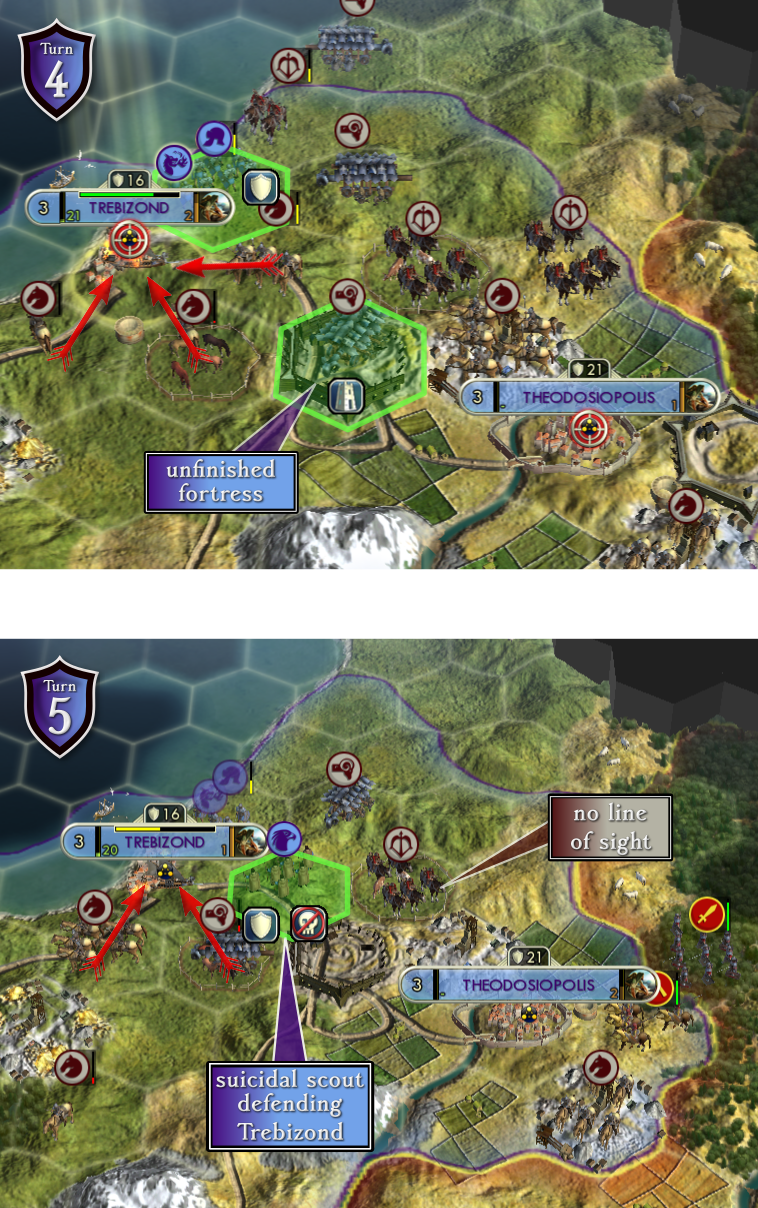 This city is not as fragile as Mistra, but it is the hardest to defend. It can be attacked from pretty much any angle (the Huns use even EMBARKED Horsemen sometimes!) and the Battery Rams are super OP. You ***MUST*** send a Dromon from Constantinople to Trebizond, but it will only arrive on Turn 4. Four hellish, punishing, fun turns!
No strategy can save you here, just luck and exploiting AI's retardness. Their horses are fast, so Hint#3 is specially relevant. As always, Hints#6-9 are crucial. Curiously, the best tile for your Legion is the plain Northeast of Trebizond. The Huns do not attack him there, so your Legion can wipe weak units every now and then. Hint#4 is invaluable here.
Starting on Turn 4 you'll be able to breath - look at the very comforting screenshot. On Turn 5 you should get a Scout from Theodosiopolis, which will complete the defence. Use it to block another tile - they will strangely not attack the Scout. Trebizond will be defended from Turn 6 onwards. This strategy worked about 50% of the time.
Sassanids - Conquest, Bloodlust & Flames!
If you managed to reach this part of the guide, congratulations. You're already better off than any other player who followed any other guide!
 Eliminating the Sassanids is practical, because they are cheaters and can jeopardize your efforts by stealing your well-deserved victory. But hey, we're not here to just "win", we're here to pee on the AI to show dominance.
Though the worst has passed, it is very important to constantly keep pumping out new units (the barbarians will do the same). I could also afford to heal some units (e.g. promoted ones) some turns.
Since our games will be very different at this point, I will just roughly show "how I did it" and then you try to "do something like that".
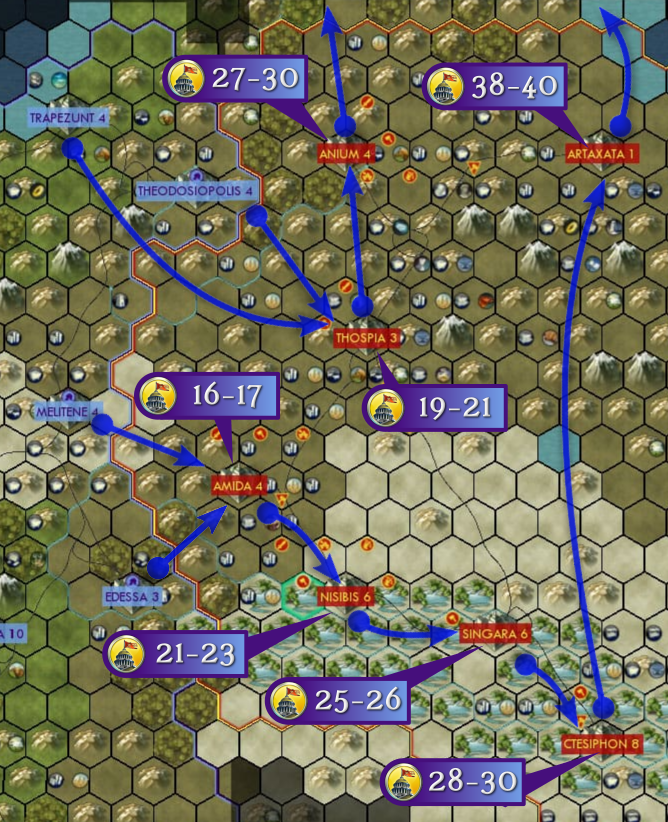 On Turn 12~13, the Sassanids should start dispersing. In all of my games, they dispersed from Edessa and Melitene towards Theodosiopolis. Follow their heels! Refrain from wasting turns attacking their units, you have a better target - Amida. After Amida falls, the Sassanids will throw everything at retaking it in a most chaotic way. That's what we want.
Anium might look tempting as the next target, but the Huns should be attacking them there soon™. The Sassanids will also be fighting the Huns in Artaxata, leaving the southeast of the Sassanid's territory particularly vulnerable - you HAVE to profit from the confusion.
Send all of the troops from Amida (and all new troops from Melitene and Edessa) southeast. Set some to siege Nisibis, but let some pass to siege Singara asap; repeat for Ctesiphon. At the same time, send all troops from Trebizond and Theodosiopolis to attack Thospia - a delicious city containing iron and horses. After Thospia falls, march north, take Anium and keep marching north: Set the course to Atilla's Court! After Ctesiphon has fallen, march those troops north as well, passing through (and conquering) Artaxata. Embark those units and send them north as well, via sea.
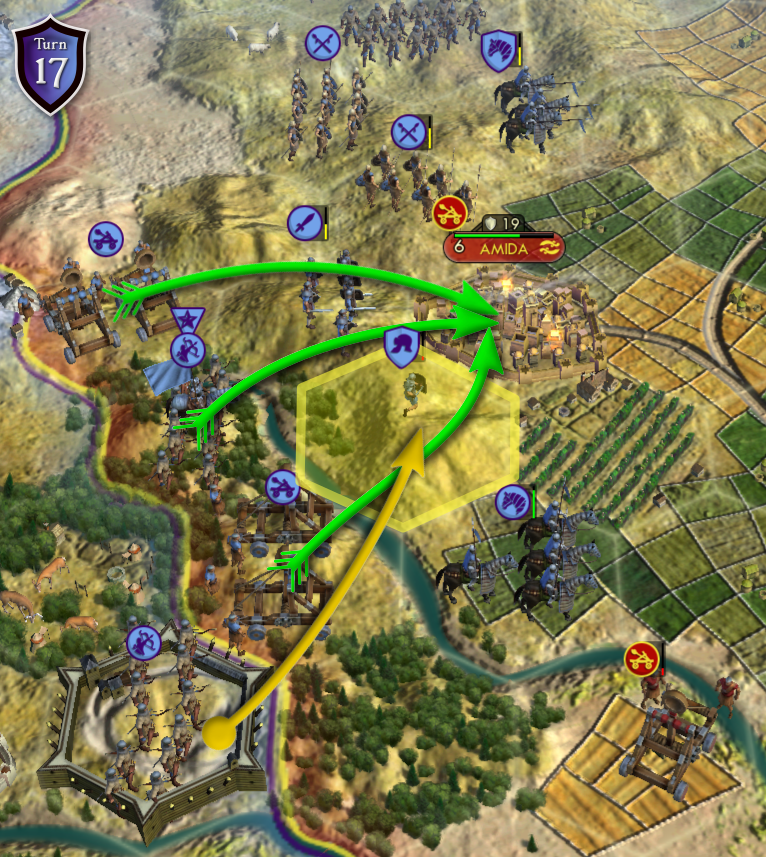 The siege started with just a handful of troops. The half-dead Legion (yellow hex) was guarding the fort East of Edessa; he got heavily attacked... and thus heavily promoted! I gave him Cover I and Cover II and the AI wasted their ranged attacks on attempting to take him out (in vain). This is CRUCIAL, since otherwise, they'd target the Catapults (thus reducing their damage throughput). The Cataphract southeast is guarding the square which will be used by the Catapult (yellow square). Also, remember the Great General that I told you to bring to Melitene? Yes <3
Few units had line of sight to the city (green arrows). Taking Amida in just 2 turns with that little power will only happen if you min/max the RNG again; otherwise, 3 turns will be needed.
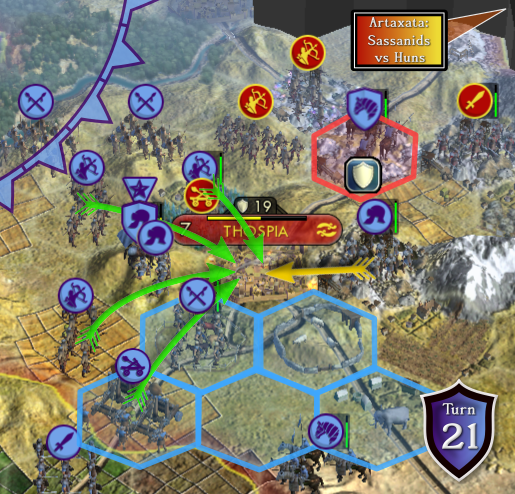 A tactically better front to attack is southwest (cyan hexes) but your troops are coming from northwest and it is not worthy to spend 3~4 turns just to get a minor vantage point.
The Cataphract on northeast seems to be in danger, but ACKCHYUALLY there is mayhem going in Artaxata between Sassanids and Huns. The Sassanids will try to send some troops from there to defend Thospia. The Cataphract is just standing in the way in the middle of the road and slowing them down à la Black Knight 'Tis but a scratch!
This is one of the few non-capital cities which I captured and kept; it provides happiness from Circus, Colosseum, has strategic resources, has high production... no ragrets.
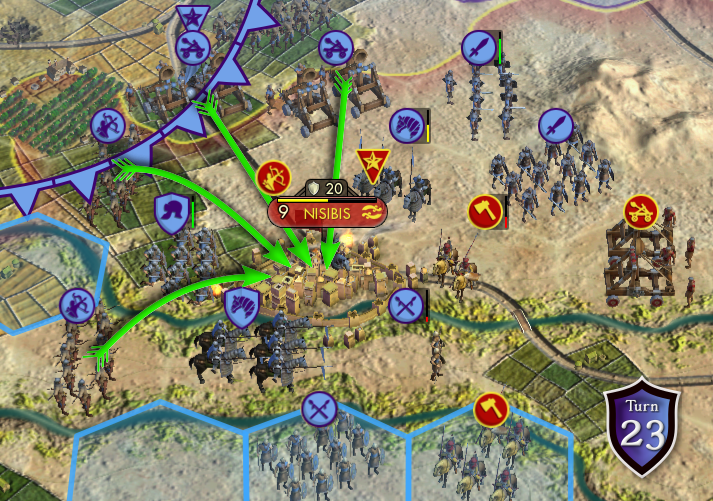 This city is pretty easy to take. It is surrounded by plains and your troops get even protected by its rivers! The cyan-coloured hexes show other good positions for archers and Catapults (the troops are coming from northwest though).
Took me 3 turns to take it because the second catapult took a while to arrive, but if you plan properly you may take in just 2.
While you're laying siege, pass some of the troops southeast through. The Sassanids will send some troops from Singara/Ctesiphon to defend Nisibis. You want to intercept them before they have the chance to disturb your siege. Furthermore, you want to march further southeast, towards Singara and Ctesiphon anyway.
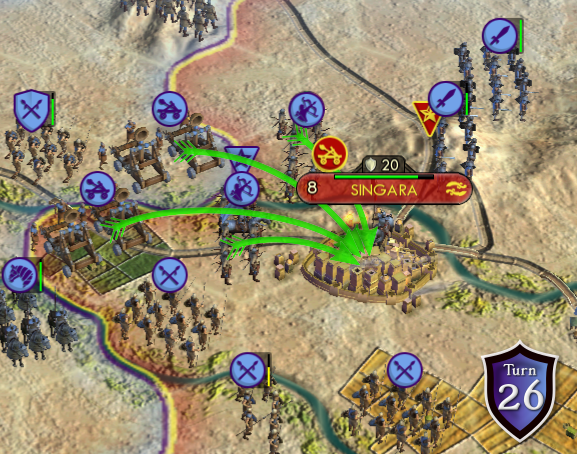 There should be some Sassanid troops around after taking Nisibis, and you'll need to finish them off before attacking Singara, but otherwise it is straightforward. It is also unprotected and this time around I had enough ranged power (most of which was meant for Ctesiphon, actually).
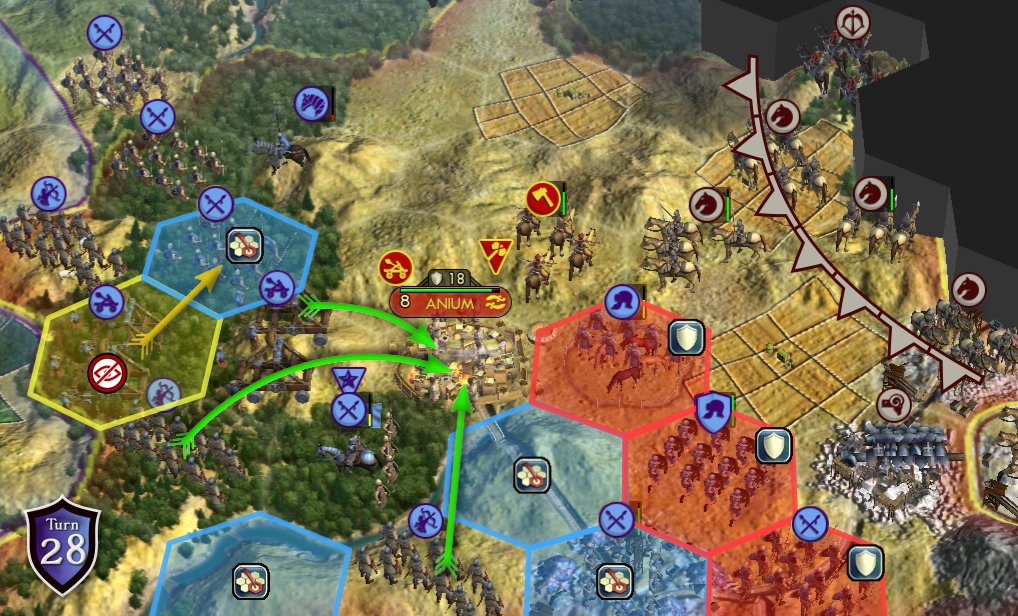 I actually tried to start marching towards Anium on turn 23, but this city is rather well defended; it is hilly, has rivers, forests and they even had some modest defence. Much worse is the HORDE of Huns, coming from east on Turn 28. In some previous game I let the Huns take Anium first, to then take it from them. That usually happens on turn 35~36, and I didn't want to wait until then.
It is also tricky to find position for your Catapults and archers. Green arrows in the image show which units have range. The Catapult in the yellow hex has no sight, and moved to the adjacent cyan hex. The remaining cyan hexes are also good candidates for Catapults and archers.
Be sure to make a wall of Legion/Spearmen preventing the Huns from attacking from the east!
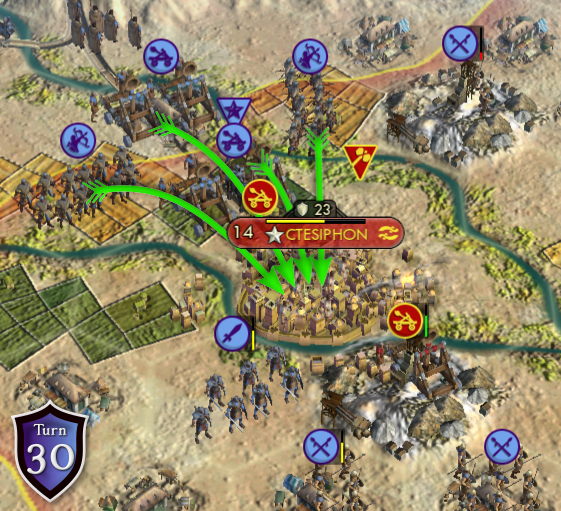 Once I started really marching towards the Sassanids' capital I felt a little bit guilty - I had a horde, they barely had any defending troop. I kept only enough troops to take Ctesiphon and marched the rest north, to take Artaxata.
With that, the Sassanids are likely done for. Their "last" city is Artaxata, but the Huns usually take it pretty early on.
Artaxata is attacked by the troops coming from Ctesiphon. They should arrive by turn 35-ish, but positioning is tricky, since Artaxata is hidden behind mountains.
I will tell you to raze this city as well, but at turn 40 I had so much happiness that I could afford to keep it... and so I did.
Now, notice also the size of the army marching north! #ProudDad#MyBaby#TheyGrowSoFast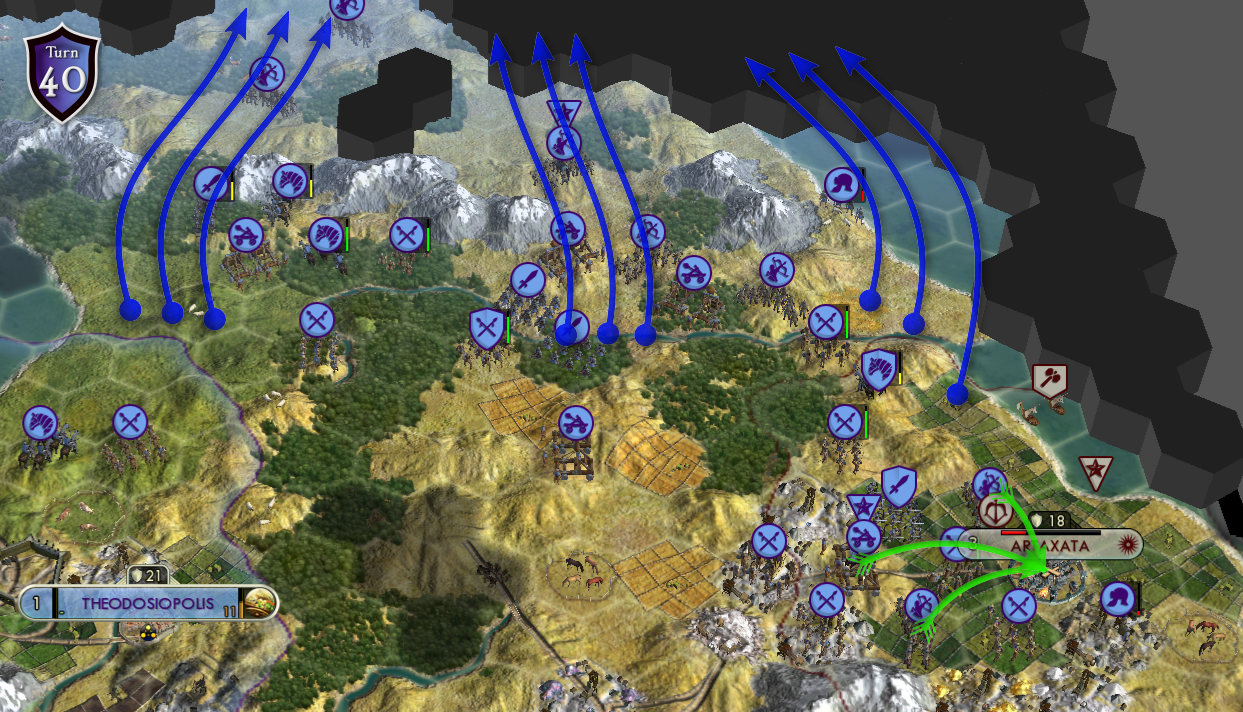
Goths - Conquest, Bloodlust & Flames!
If you've reached this part of the guide, WOW! You already got a helluva bragging right!
 But why, oh Lord,
I asked unto thee,
For if the birds take flight
To better, warmer skies
Why must I, poor that I am
Within the dark, cold
Confinement of my walls linger?!
Oh poor me!
No, I shan't!
My grave I shall seek
Amongst the Goths,
Who dance to weird techno stuff
And paint their nails black!
Taking the Goths is a pressing matter. First, because you want to use these troops to help Honorius and stop the Franks. Second, as previously mentioned, the AI get units out of thin air and incredibly beefy social policies; if you don't take care of them now, you're in for a wild ride.
Without further ado, ladies and gent's, how to bitchslap the goths so hard that they never wake up again!
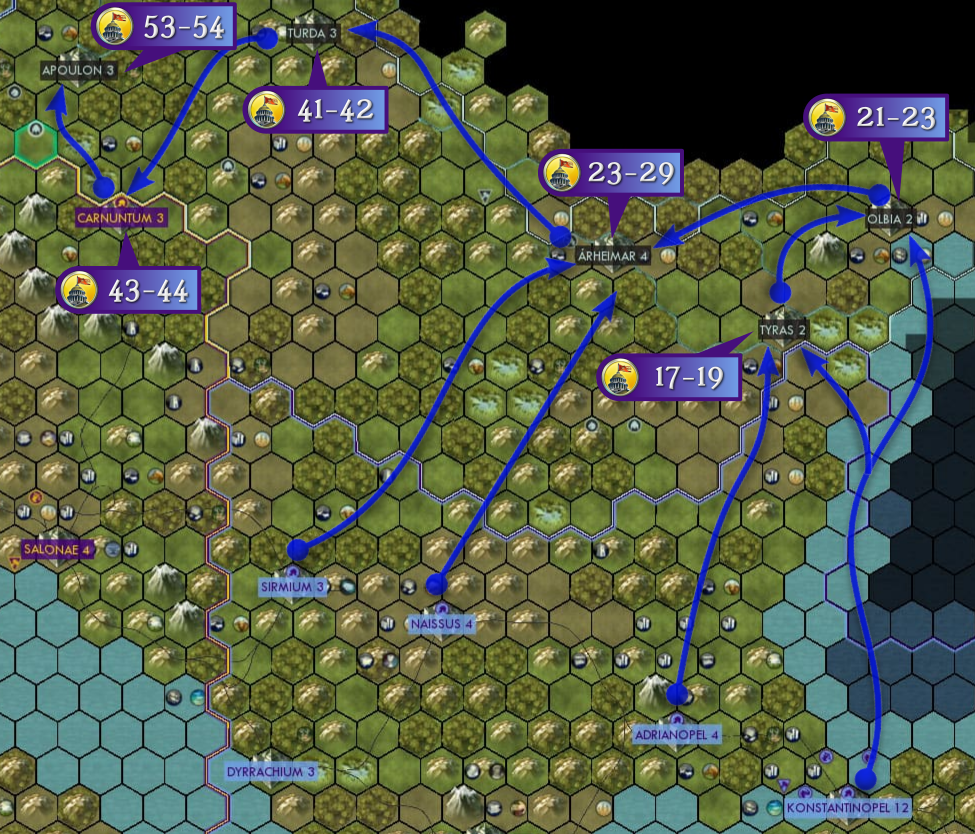 Your first target is quite far up - Tyras. Start marching with Alexandria's troops early on, as soon as this city is out of danger (Turn 14 for me). Naissus should still be under attack, but you should have enough troops to defend it easily, and a constant flow of new units coming from Thessalonica, Dyrrachium and Sirmium.
New units from Amastris, Dorylaeum and Constantinople should be sent up there by sea. Be careful to not let your units vulnerable to eventual ranged attacks while embarked, since they take extra damage. Bring dromons too: they will help (a lot) with Olbia.
Once you start attacking Tyras, the Goths from Naissus will try to retreat to Arheimar... this time, chase them! If the force from Naissus joins the force from Arheimar you'll be in trouble. Luckily, the AI is not that smart and ends up dispersing, fortifying units in weird places and stopping to pick berries. Don't be surprised if you find yourself in some guerrilla warfare in the forests south of Arheimar. Too many forests, too many hills, too many marshes - there is a reason why I only took Arheimar on turn 29! In fact, the troops that took Olbia had to help taking Arheimar too.
Carnutum is optional; the Goths don't always take it, but you have no control over that. I *think* that sometimes they clash with the Franks northwest of Apulon and then leave Carnutum alone. In that case - lucky you. If not, you'll have to clear Honorius' mess and retake Carnutum for him, for the sake of attacking Apulon safely.
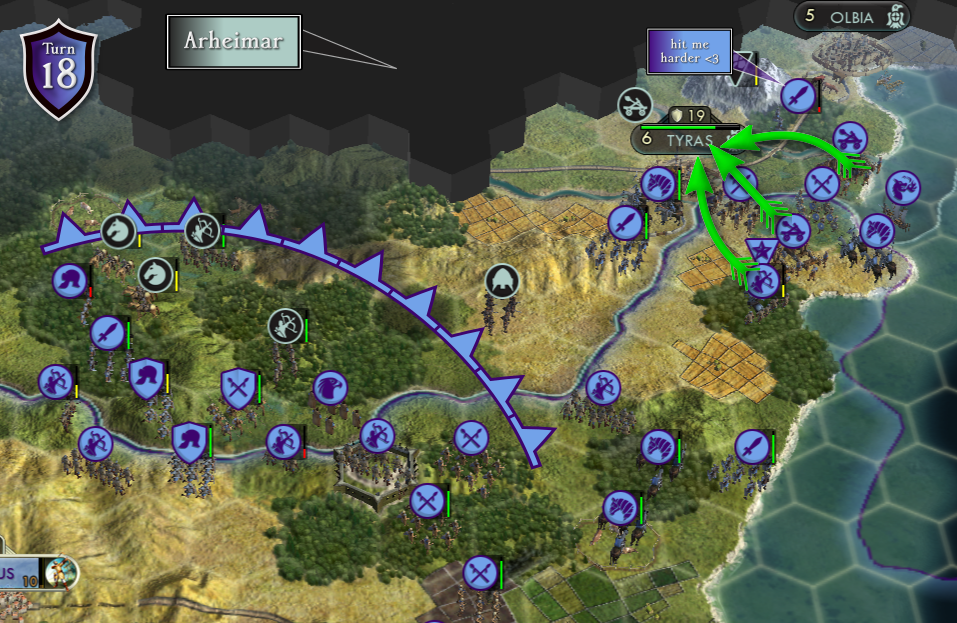 The river passing through is annoying, but otherwise the city should be unprotected. The Goths have troops coming from the west (Arheimar, their capital) but they come slowly thanks to those forests. I used two Catapults and one injuried Archer to take Tyras. While you're placing your troops, be mindful that the next target is Olbia. The injuried swordsman in the screenshot is purposely gathering exp because I'm helplessly greedy and OP. The cataphract was tasked with taking the city.
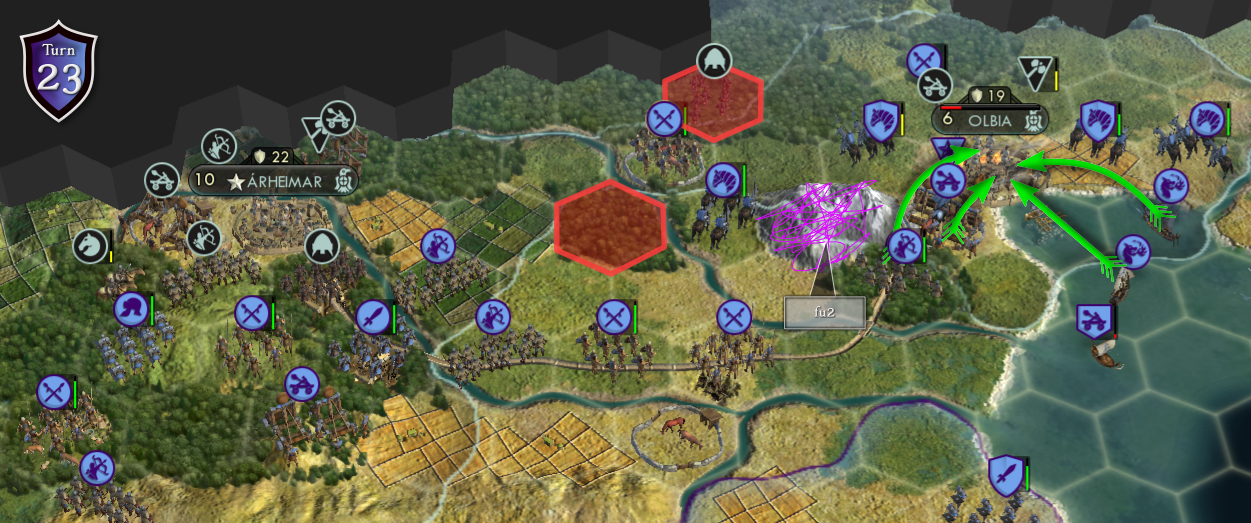 I had a lot of personal problems with that mountain, which I gently marked on the screenshot. Most troops have to go around from the left to reach the city because of this blessed, beautiful mountain. The process is worsened by the fact that the red hexes will be often guarded by a fortified Gadraught. Even if you simply ignore it, it slows down your units. Maybe this will not happen in your game, but just to be sure, bring the Dromons - otherwise the siege of Olbia might take longer than it should.
Also, notice that I had already started attacking Arheimar, a deed which takes a loooong time.
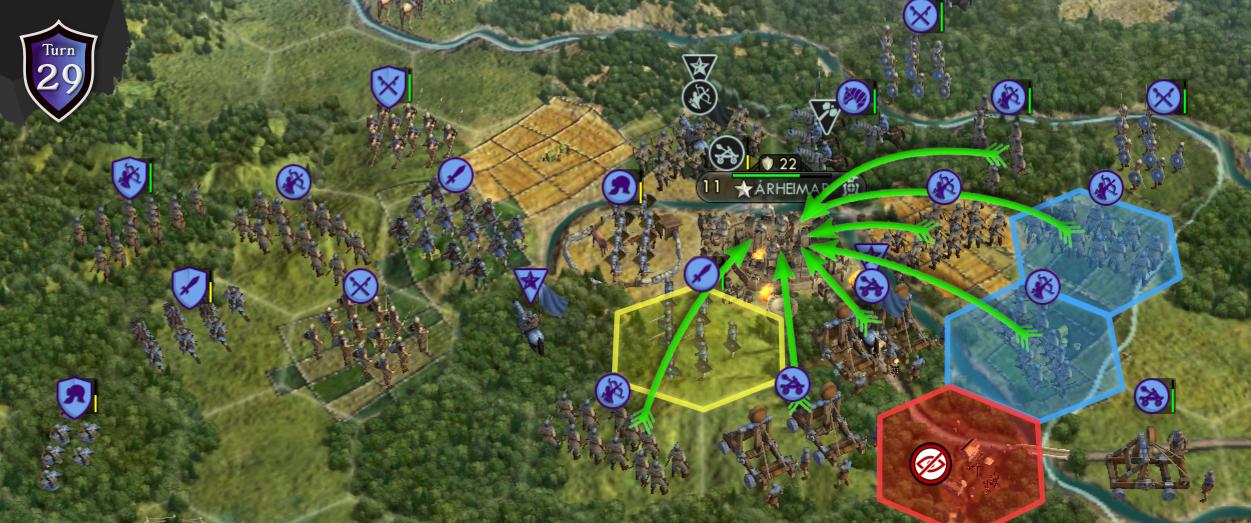 As expected, the capital is heavily defended. It is difficult to get access to the good squares with sight to the city. There is one key square that the Goths will try to defend, marked as a yellow hex - try to control it. Alsoo, do yourself a favour and place your Catapults in the blue hexes instead (since they are more accessible from Tyras), and attack with the two Archers from south.
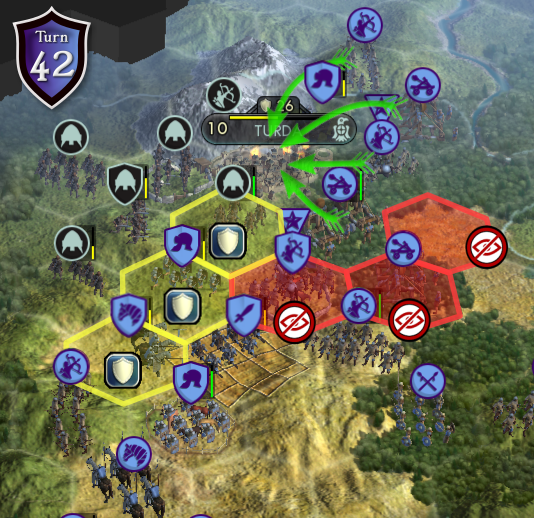 It took me 13 turns to capture another Goth city, but not for lack of trying: around turn 30 the Goths get new units out of thin air in Apulon and get a new social policy. Plus, Turda is freaking Minas Tirith, it is glued to a bloody mountain with cleverly placed hills and forests.
Be patient and think twice before sacrificing soldiers: you'll need them for Apulon and Carnutum and you might not have time to bring new soldiers from your other cities. With enough perseverance you might clean the terrain and get a nice formation like in the screenshot.
The highlighted Archers in red hexes have no sight. The Catapult to southeast is in a sort of dangerous spot, but my wall of melee (yellow hexes) should protect it. In this formation, the Gadraughts are better left ignored. After capturing Minas Tirith Turda, the Goths will have less combat bonuses & they will suicide trying to take Turda back. Fortify a few melee units around and let them try!
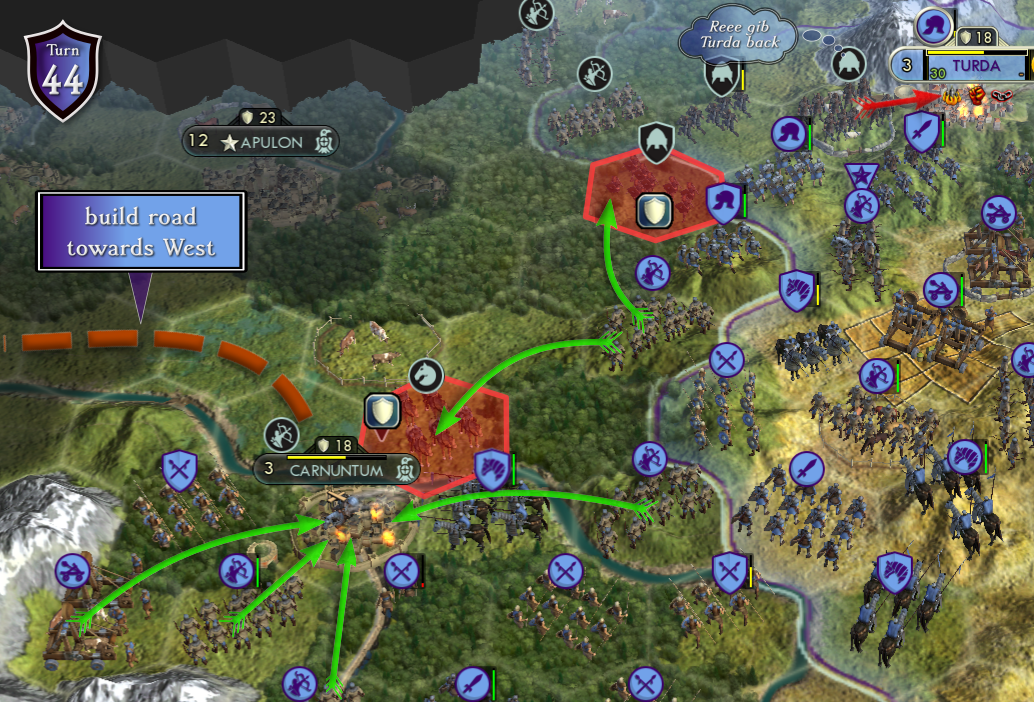 I am providing a larger screenshot for this one to clarify the gravity of the situation. The Goths guard the red hexes to prevent your army from passing through to Apulon. You kinda have to retake Carnutum before marching to Apulon. You can harass the Goths which are still around Turda, but focus on healing hurt units while Turda is not yet fully razed.
Make sure to bring a worker up to Carnutum and start building a road to Apulon and then west; the land is full of marshes and rivers and you'll need a mean to cross them easily and bring your army to retake Casta Regina later on.
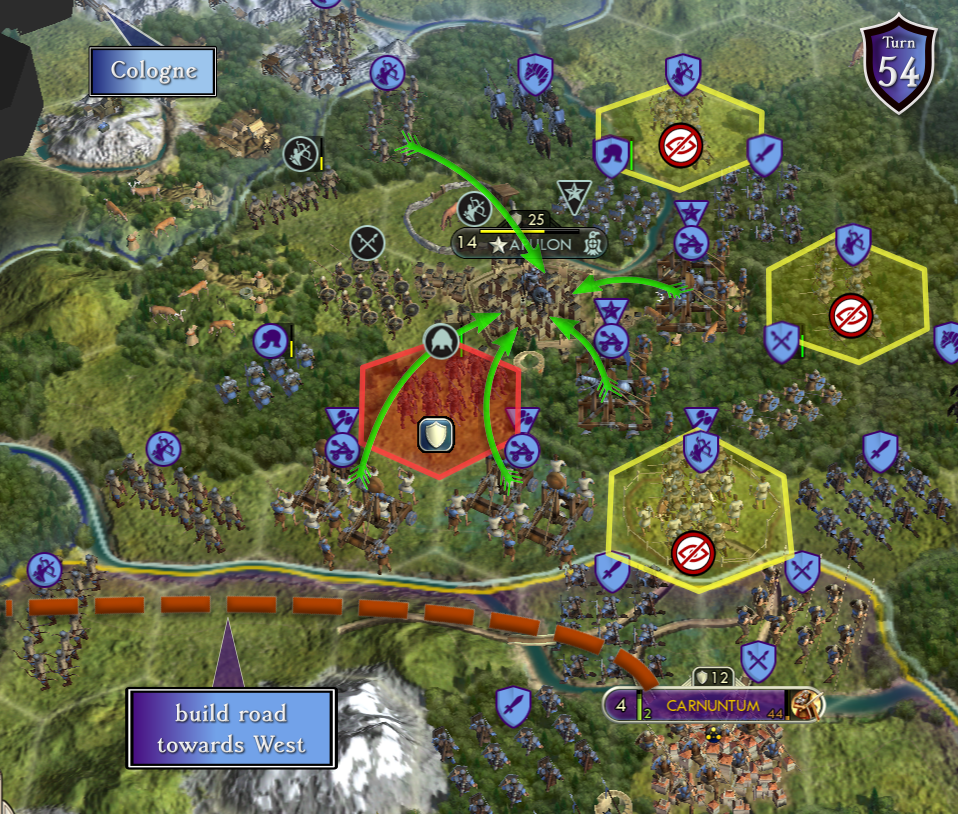 The longer you take to attack this city, the worse it looks. At Turn 50 the barbarians take so little damage and cause so much devastation, you might feel like flipping all tables of the world.
As usual, ignore defending troops as much as you can: once Apulon falls, they will just *poof*. It will also take a while to move your troops to position because of the rivers, forests and marshes. You can only attack the city from the East by standing directly adjacent to it. There are some plains from southwest, but the red hex will almost always be guarded, slowing down your progress considerably. Also, the city itself is VERY strong, so bring in *some* siege machines.
Don't go too far northwest. Cologne is right there and you don't want to provoke the Franks yet.
The next step is to sit back and relax. Look at the world you crafted, pop open a beer. Be proud of your accomplishments. You've achieved greatness.
Huns - Conquest, Bloodlust & Flames!

- because you're a sicko
- because you can
- because I did it and you're jelly
- because you want to sell the units from the eastern front to gain some gold & reduce your expenses
- because if you don't, they will attack Trebizond/Theodosiopolis on Turn 50~55
There isn't much to talk about with me, you have a lot to explain to your therapist, since the Huns have only Atilla's Court left.
Let's just steal their last toy from them!
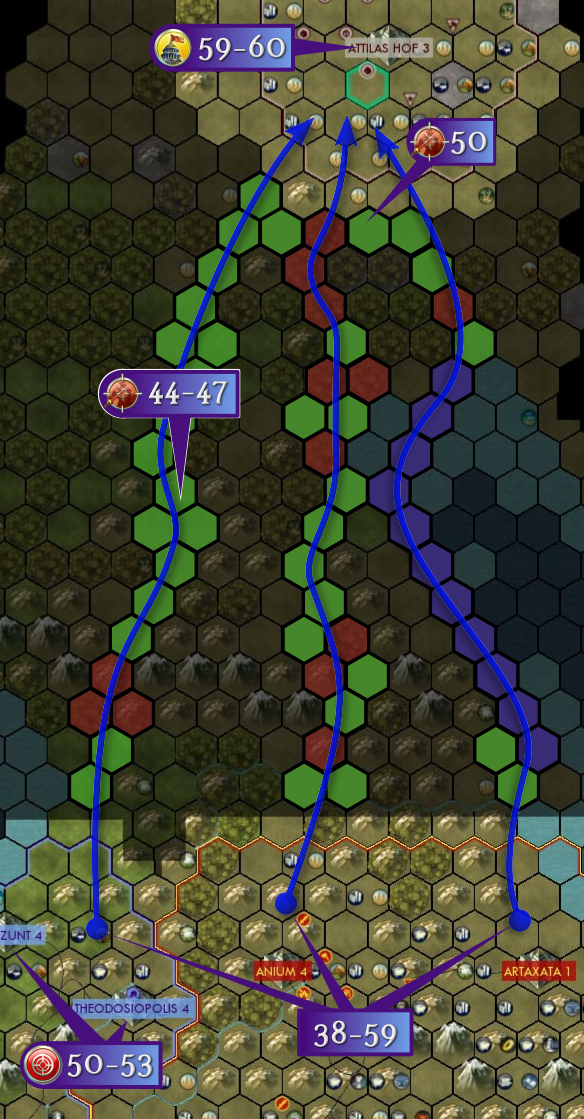 As I explained during the Conquests of the Sassanids, you want to march north asap. Atila's Court is pretty faraway and the path is like a Netflix Serie's protagonist anything but straight. Conquering the Huns is 70% marching north and 30% itching to not attack their troops along the path.
In the map, green hexes show the "good" ones for movement, red hexes shows the "bad" ones. Purple hexes show the water tiles.
 BY FAR THE BEST PATH IS THE RIGHTMOST. It is, however, too narrow and you will need to send troops from other paths too.
The leftmost path is in principle far better than the middle path. That's so true, that the Huns uses it to send troops to Trebizond and Theodosiopolis. You will encounter their troops mostly on the leftmost path. Avoid attacking them; they will ignore your troops and once they reach your cities, they'll be well defended. The middle path is only useful because the other two will be jammed.
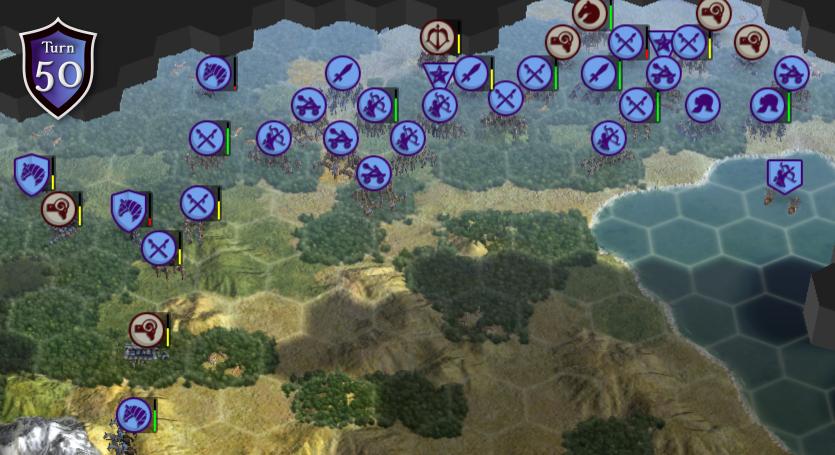 You might meet the Huns again on Turn 50, but this time few blocks south of Atila's Court. The AI simply ignored my horde and marched their troops south. Once again: let them pass!
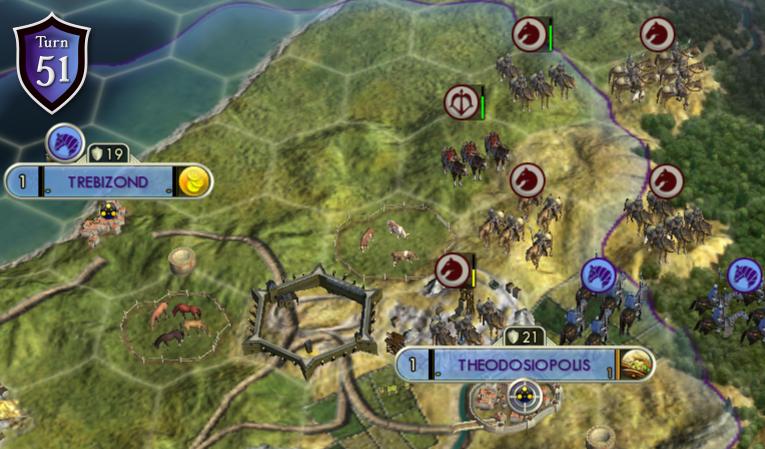 The Huns should reach these cities at around turn 50. Even with little troops you can defend the position. The worst that can happen is that they may pillage some tile improvements. Since eastern cities are not relevant anymore, you can just ignore them.
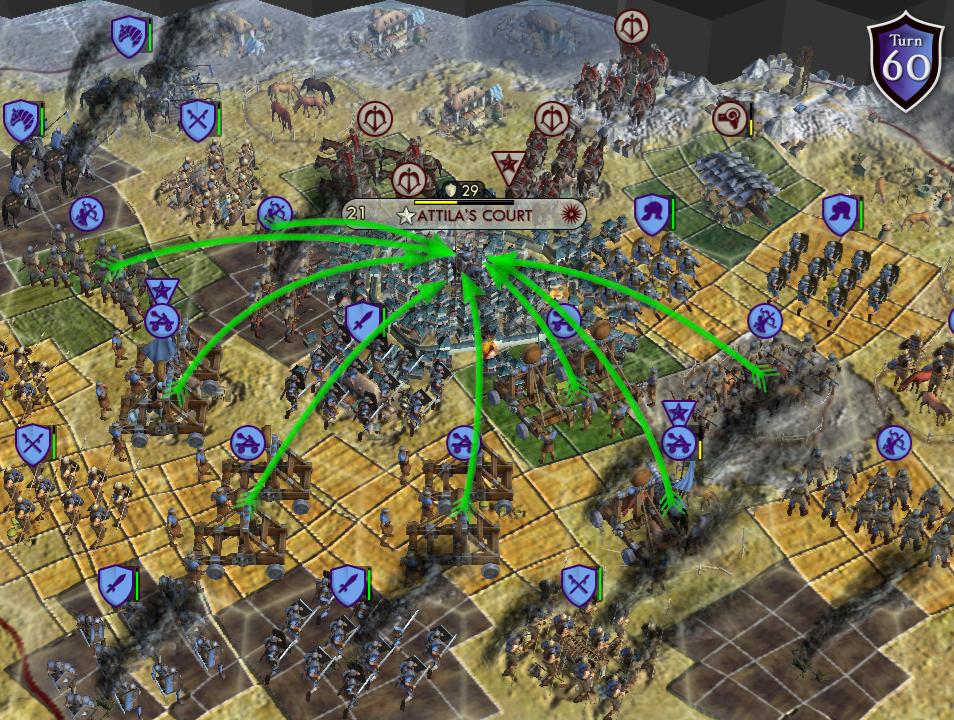 It may look like I overdid it and that I have too many troops up there. That is just because I overdid it and I had too many troops up there.
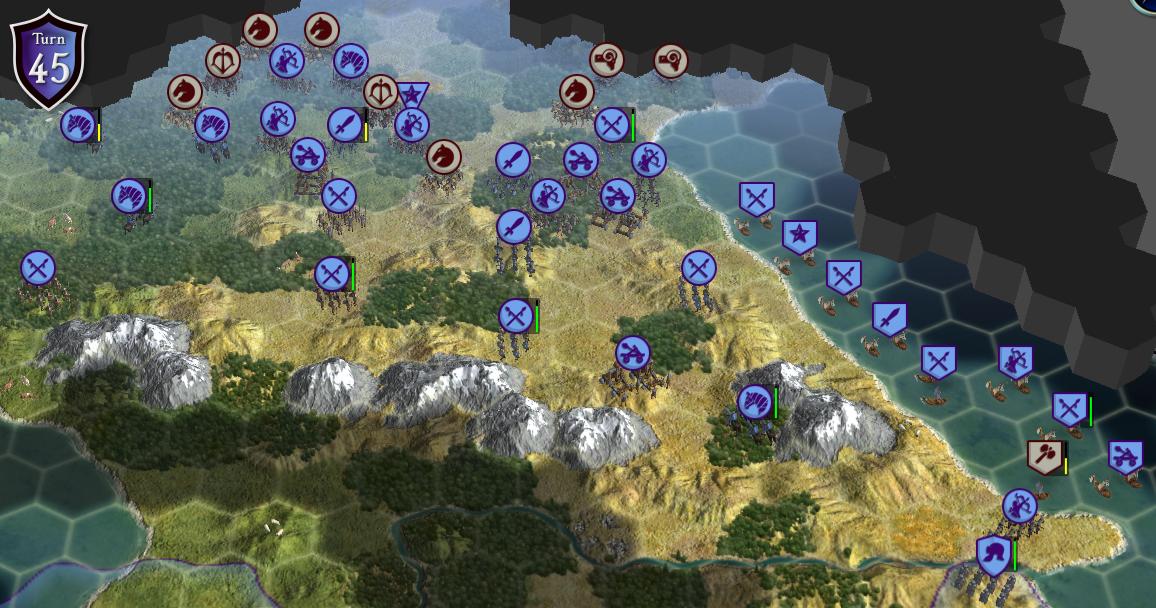
This is thanks to the fact that the Huns ignored my army on turns 44-47 and on turn 50. That might not be the case for you. Furthermore, if realise you don't have enough troops once you reach Atila's Court, it will be far too late to send more up. Better safe than sorry!
There is another worry: happiness. Atila's Court was a huge city with 21 citizens; taking it will hit you with a massive -13H. You have to be prepared to accommodate this. I also took it on turn 60, meaning that I never had the time to build courthouse or starve it.
With the Huns eliminated, you can send those eastern troops to their well deserved retirement. You did it, you crazy SOB, you did it...
Franks - Defending Your Honor(ius)
Okay, now we need to put back the "serious business hat". Unlike Nero, our objective here is not only to watch the world burn, but to win the scenario while the world burns. We can't do that if the Franks, Vandals or Celts get enough points to win.
In most of my games the Vandals and Franks could easily hit 4600 points if left unchecked. We need to check them. With a pointy stick >=)

These are the cities that are usually taken by the Franks:
- Lungdunum (also Celts too, too far)
- Trier (also Celts too, too far)
- Casta Regina
- Milan
- Genua
- Massilia
- Narbo (we'll prevent that)
- Ravenna (we'll prevent that)
- Rome (we'll prevent that)
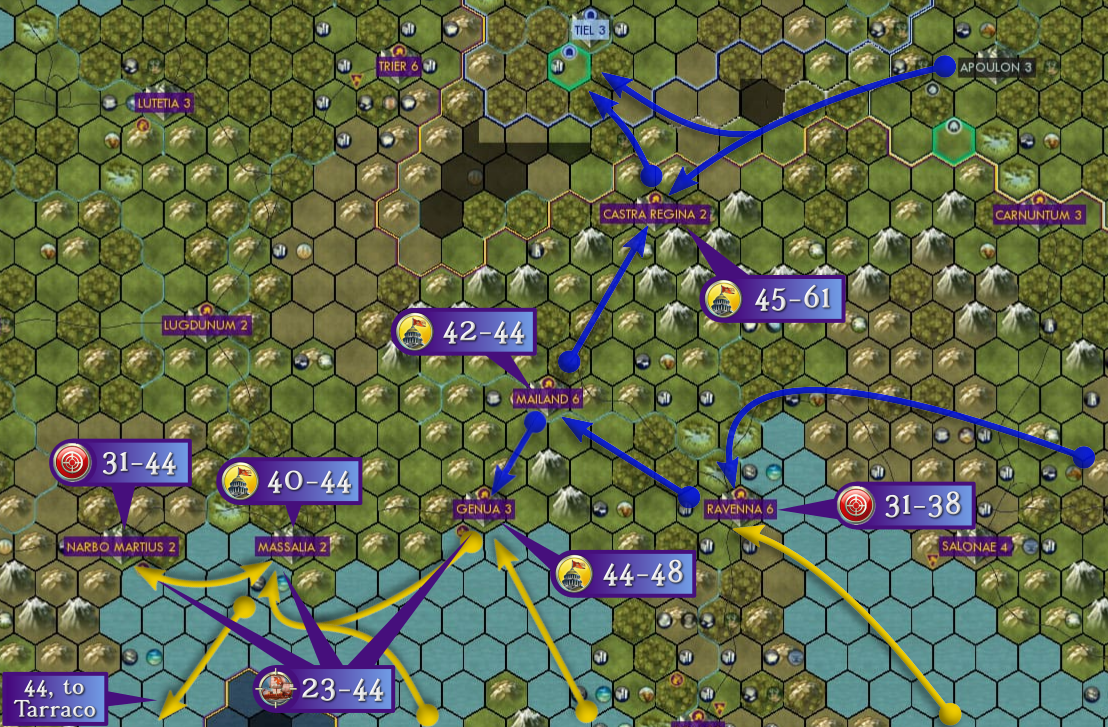 You cannot afford to send troops West from Turn 0 because of the menace of the Goths. Furthermore, your western cities are very meh. As explained earlier, I invested in the infrastrucutre of Dyrrachium, Thessalonica (Cataphracts) and Nicopolis (via sea). Mid-game, there was a non-stopping flow of units from these 3 cities going West.
Nevertheless, this part of the game is really though. The Barbarians take little damage and come en masse. It is not even funny how much more powerful they can be. You have to proceed with care, since those western units are hard/impossible to replace.
- Genua: Turn 23 to 29
- Massilia: Turn 29 to 31
- Narbo: Turn 31 to 44
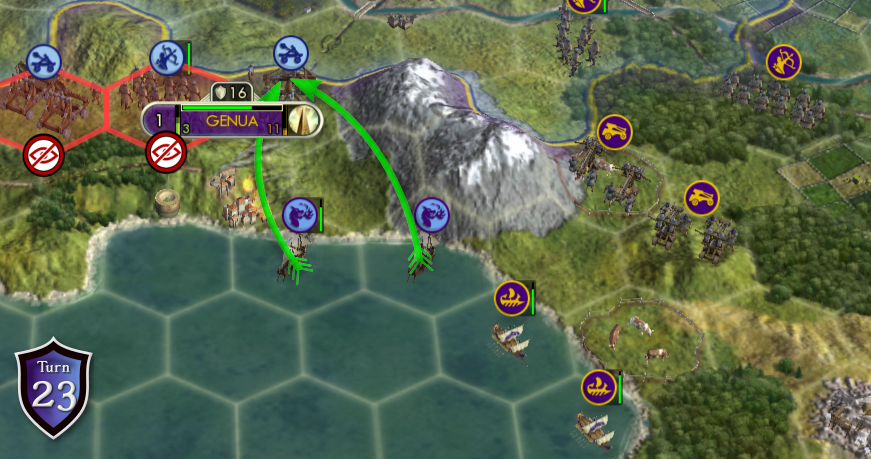 With 2 Dromons I managed to pester the Franks for 6 turns, even though there is only one vulnerable hex (see screenshot). DO NOT RETAKE GENUA YET (see Genua section below)!
After taking Genua, the Franks will start marching towards Massilia: repeat the formula there! I only delayed them for 2 Turns (oof). Narbo could be defended more properly and it never fell. Be mindful of where you're placing your Dromons, several tiles do not have a very good line of sight because of hills.
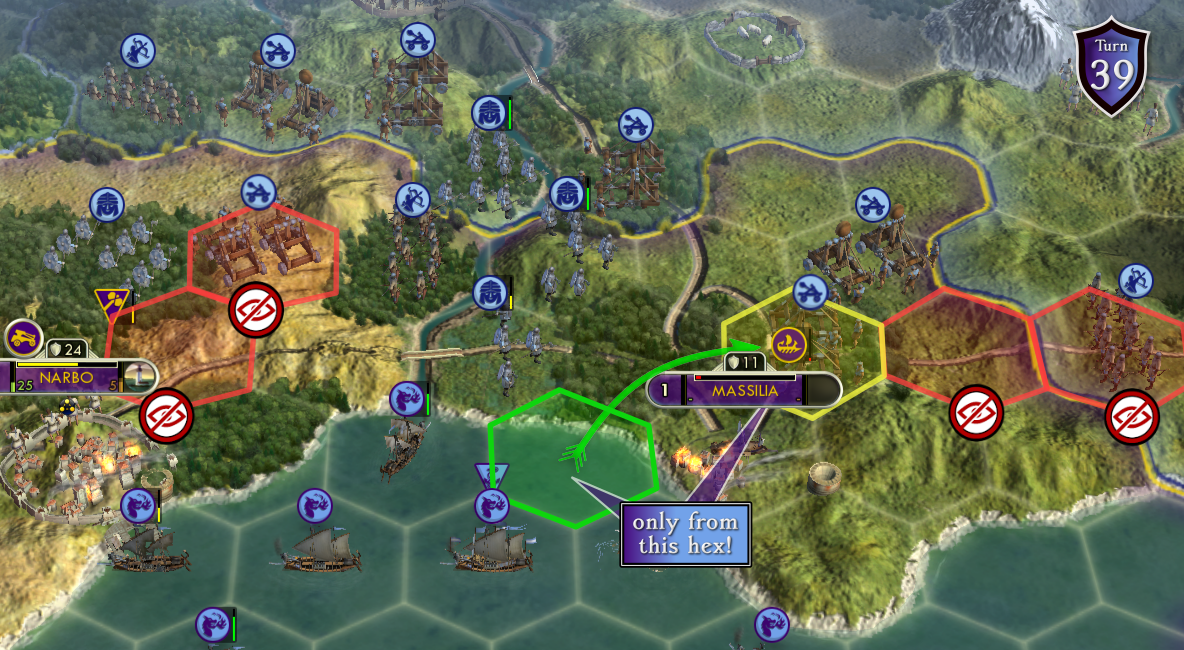
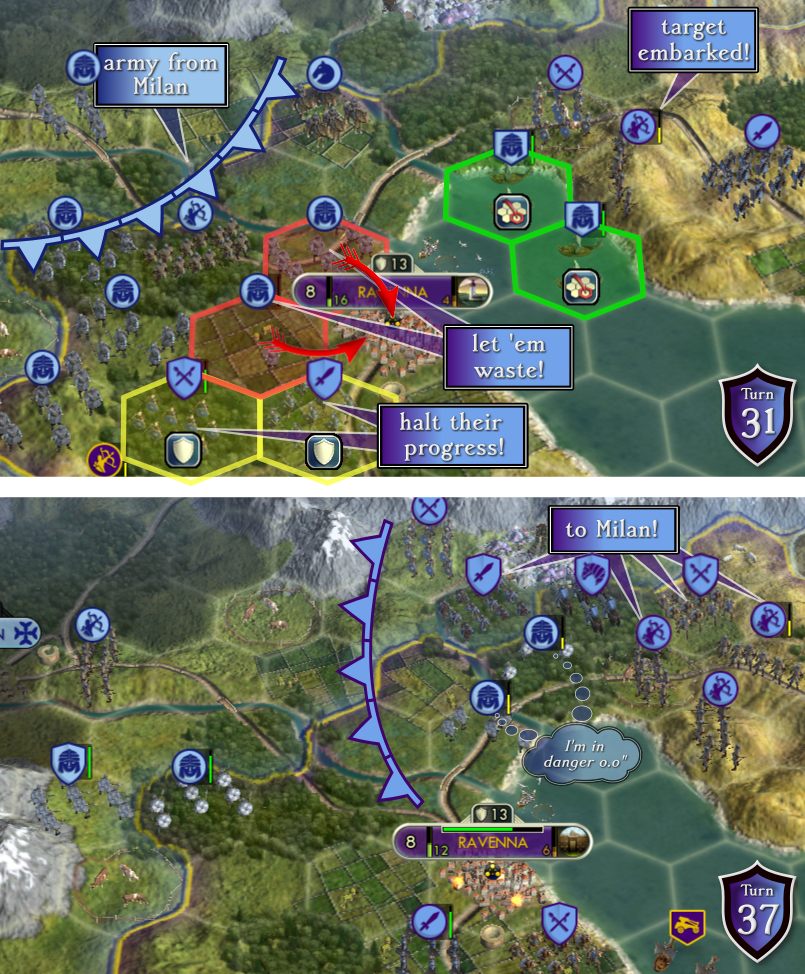 The defence of Ravenna marks the turning point in the war against the Franks.
- if the Franks take this city, they will very quickly attack Sirmium, Nicopolis and your western front will be in danger.
- the AI will fumble several times and leave vulnerable embarked units in the Adriatic Sea
You must march early on to this city and fortify your units around. I never found a good spot to place my units, but be creative. Let your archers have sight to the Adriatic Sea to targed embarked units. Give the Franks one, at most 2 hexes to attack Ravenna: we want them to waste their troops here before we can reclaim Milan, Genua and Casta Regina. Be prepared to close the hexes if Ravenna threatens to fall.
On Turn 38 Ravenna was pretty much already safe and the Franks would be soon tasting the byzantine steel in Milan!
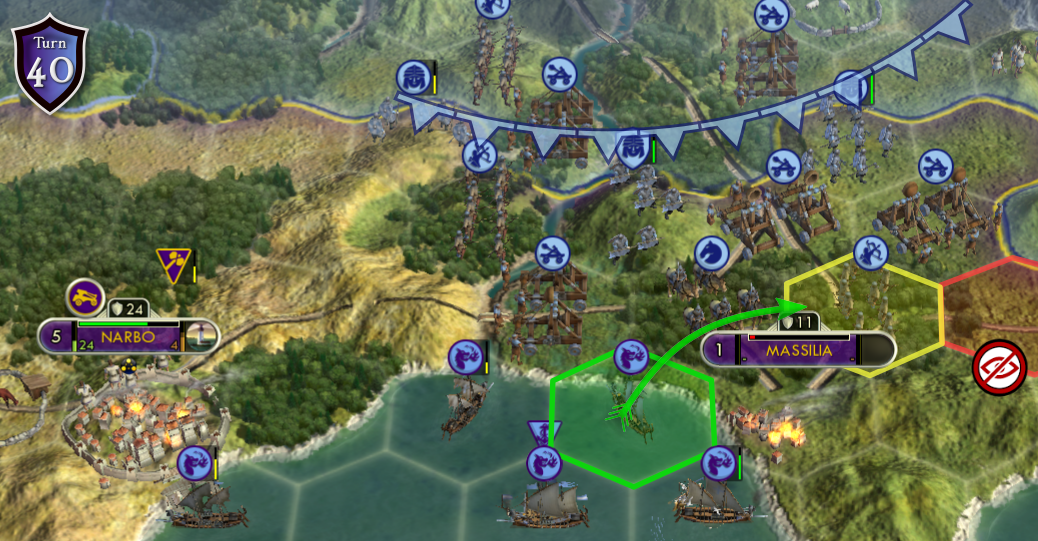
On Turn 39 Honorius retakes Massilia (dumbass) and the Franks take it again on Turn 40. Nevertheless, this fluke helped me defend Narbo, since the Franks split their forces to take Massilia again. On Turn 42 I started attacking Milan, causing the Franks to spread their defences: with that, I reclaimed Massilia and defended Narbo.
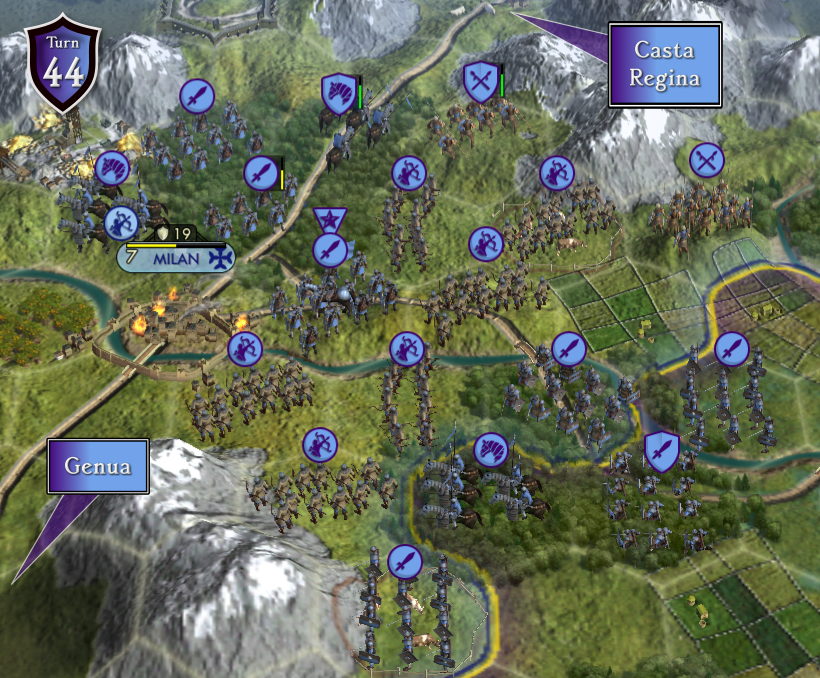 Taking Milan is strangely satisfying. It kinda splits the Franks troops. They will try to send troops down from Casta Regina, but it is very narrow and you can clog it easily. After taking it, you can attack Genua safely from the sea. The Franks will send units from Lungdunum and Massilia, but it will take a while. No special strategy is needed if you have a horde.
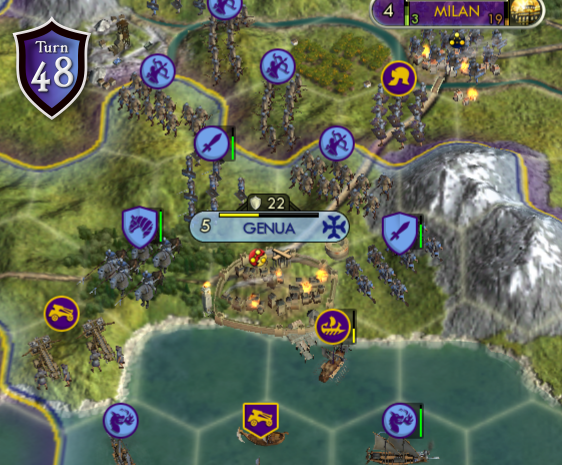 Rescuing Genua is rather easy: making sure that the Franks will not retake it is far more complicated. Remember: they get points for CONQUERING cities, not for keeping them! With proper planning you can have enough troops by sea on Turn 35, but the Franks will have a large force around.
After you retake Milan and Massilia (Turn 44), the Franks will be fighting in too many fronts and will start spreading. That's the perfect moment for retaking Genua. I rescued it on Turn 48 with the troops from Milan.
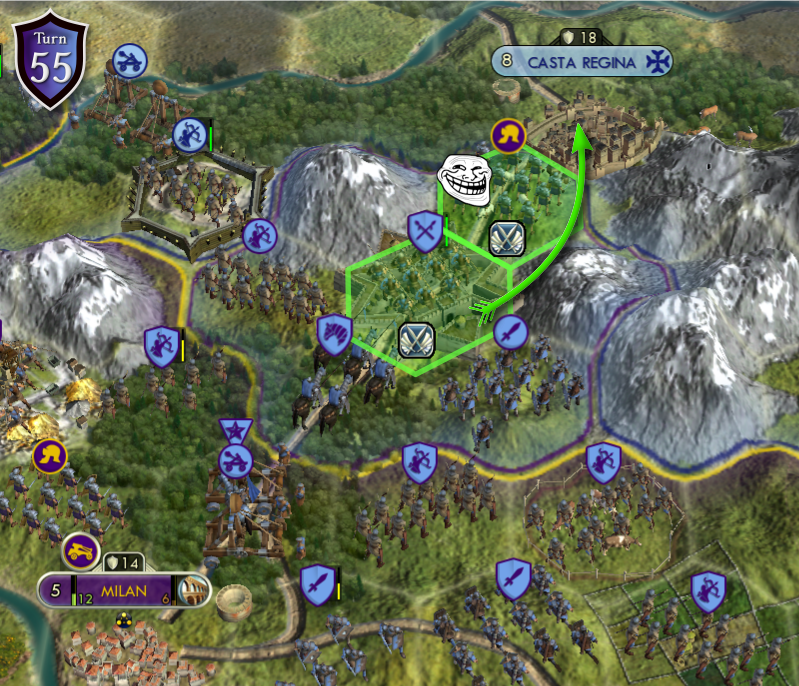 If Turda was Minas Tirith, Casta Regina is Moria. There is a single hex from which to attack from the South and a single hex for ranged units. The Franks will also go berserk after you retake Genua and will heavily defend the area.
Another option is to wait for your troops from Apulon to come and help reclaim Casta Regina, but that may be a long wait. The best option I found so far is to troll the AI and build 2 citadels on the only 2 squares they give us. The Franks will leave the adjacent hexes, allowing you to attack Casta Regina without a problem. It can be done, in principle, on Turn 52-ish.
Why didn't I do that? First, because I did not have two Great Generals ready (duh). Second, because Honorius is a bloody troll and parked a Legion on the second hex for several turns. After some patience, the trick was used. The following image is mostly for bragging.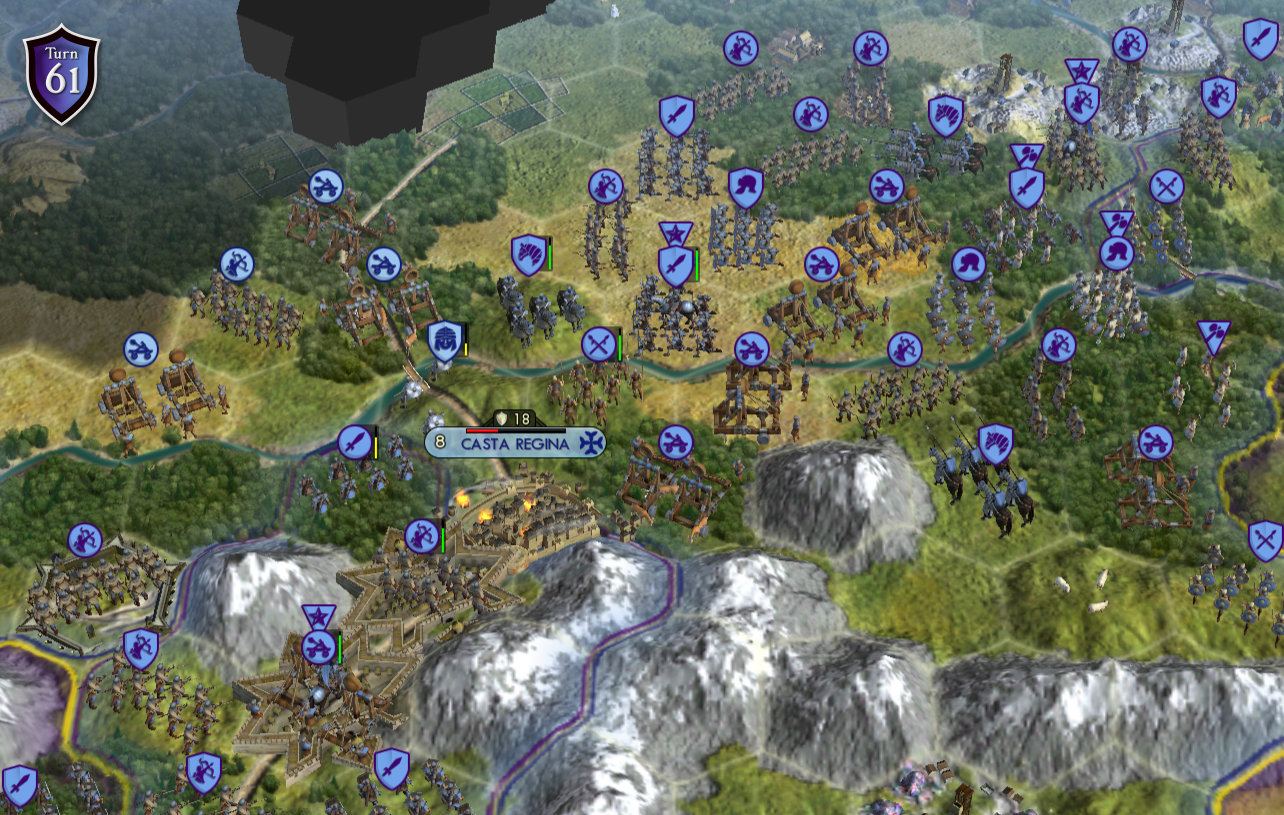
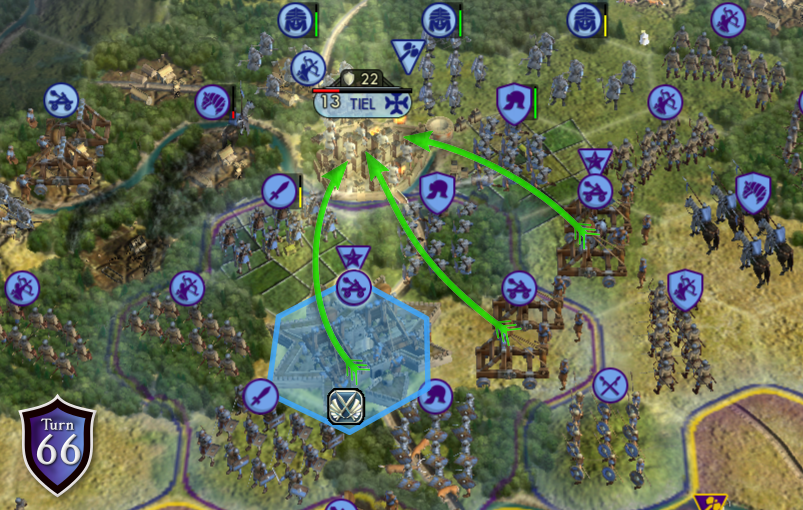 Why would we attack Tiel, you ask? For the Glory of Rome of course! Plus, it is on the way to a juicier goal, which is Trier.
I built a Citadel on the highlighted hex, but I think it was not really necessary. In my case, I even let Tiel fall on Turn 67 to then re-take it. Tiel is not an imperial city, so it won't give the Franks any point. Plus, their units wasted the turn taking it, which is exactly what I wanted, so meh.
In the end, it is a nice finishing touch to raze Tiel while marching West.
Vandals - Defending Your Honor(ius)
 Your naval cities, specially Cyrene and Ephesus, were preparing for this during the whole game: mass producing Dromons to sail West and halt the Vandals' invasion! That is a fitting theme to conclude our epic saga!
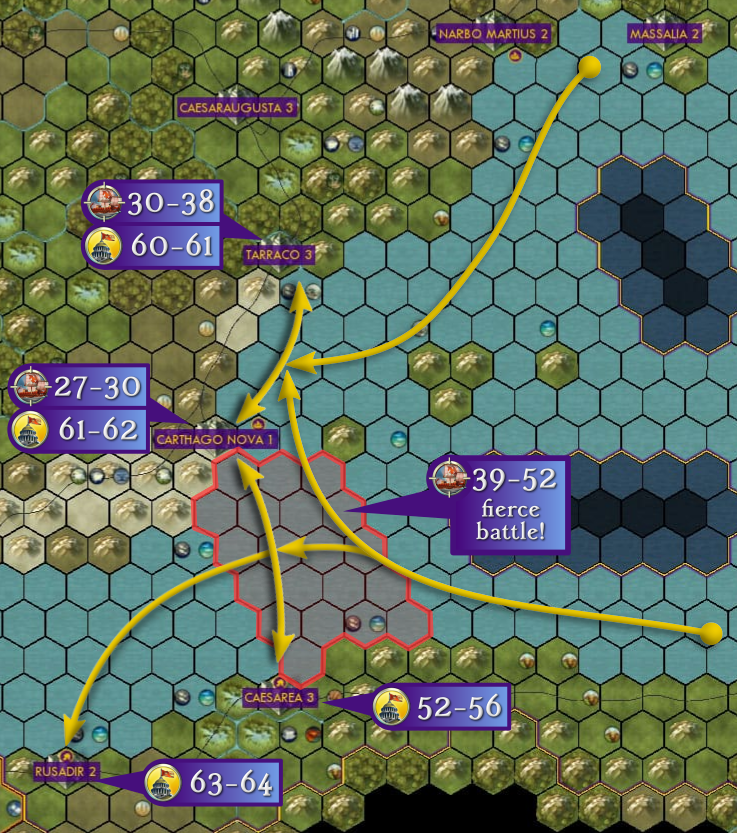 These are the cities that the Vandals usually take:
- Gades (too far)
- Olisipo (too far)
- Emerita Augusta (too far)
- Brigantium (too far)
- Rusadir
- Carthago Nova
- Iol Caesarea
- Tarraco
- Carthage (we'll prevent that)
- Syracuse (we'll prevent that)
This is a general advice but let me stress this again here: DO NOT LOSE ANY UNIT. SAVE AND RELOAD. Any units fighting this far west is faaaaaaar too precious. They cannot be replaced, they took 30 bloody turns to get there. DO. NOT. LOSE. UNITS.
These units will arrive west during late game, meaning that they will face toughened barbarians, and will have to deal with barbarian units popping out of thin air in Caput Vada on Turn 40. Be patient!
Don't feel bad if you need to defend these cities. I had to in my first playthrought. Just try to speed up and see how well you do!
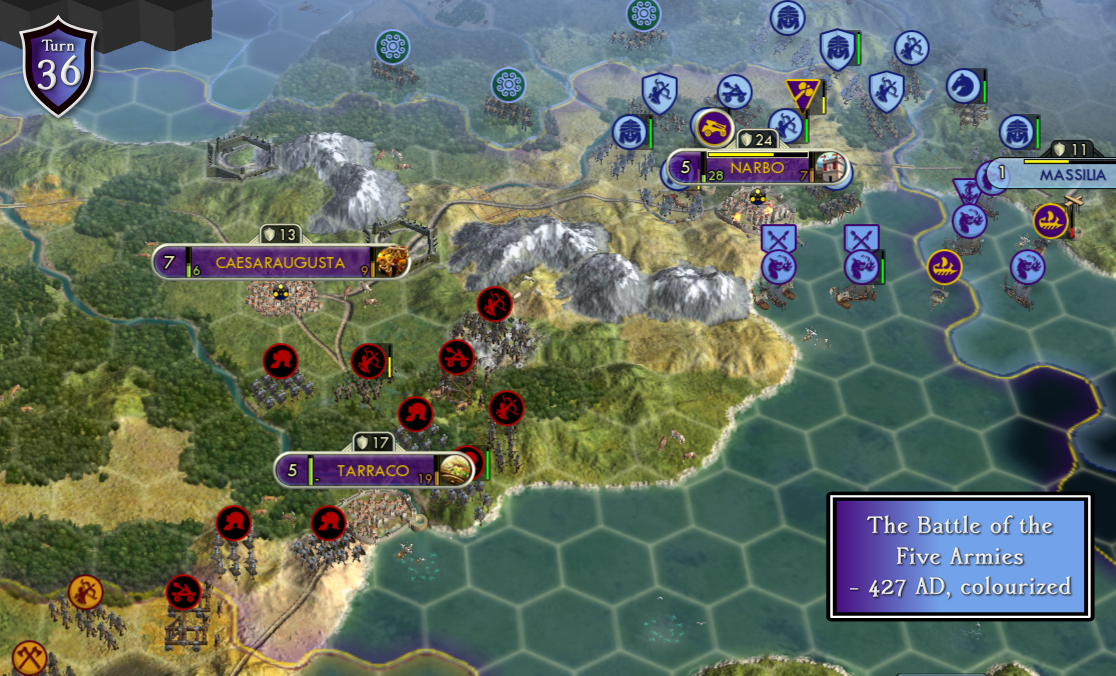 The Vandals attack Carthago Nova first. I arrived (late) on Turn 27 and could only stall them until Turn 30. Move the Dromons to Tarraco and help defend there now. On Turn 36, Honorius had a little rebellious incident there.
I abandonned Tarraco on Turn 38 and went to attack Iol Caesarea instead, a questionable decision (Tarraco fell on Turn 42).
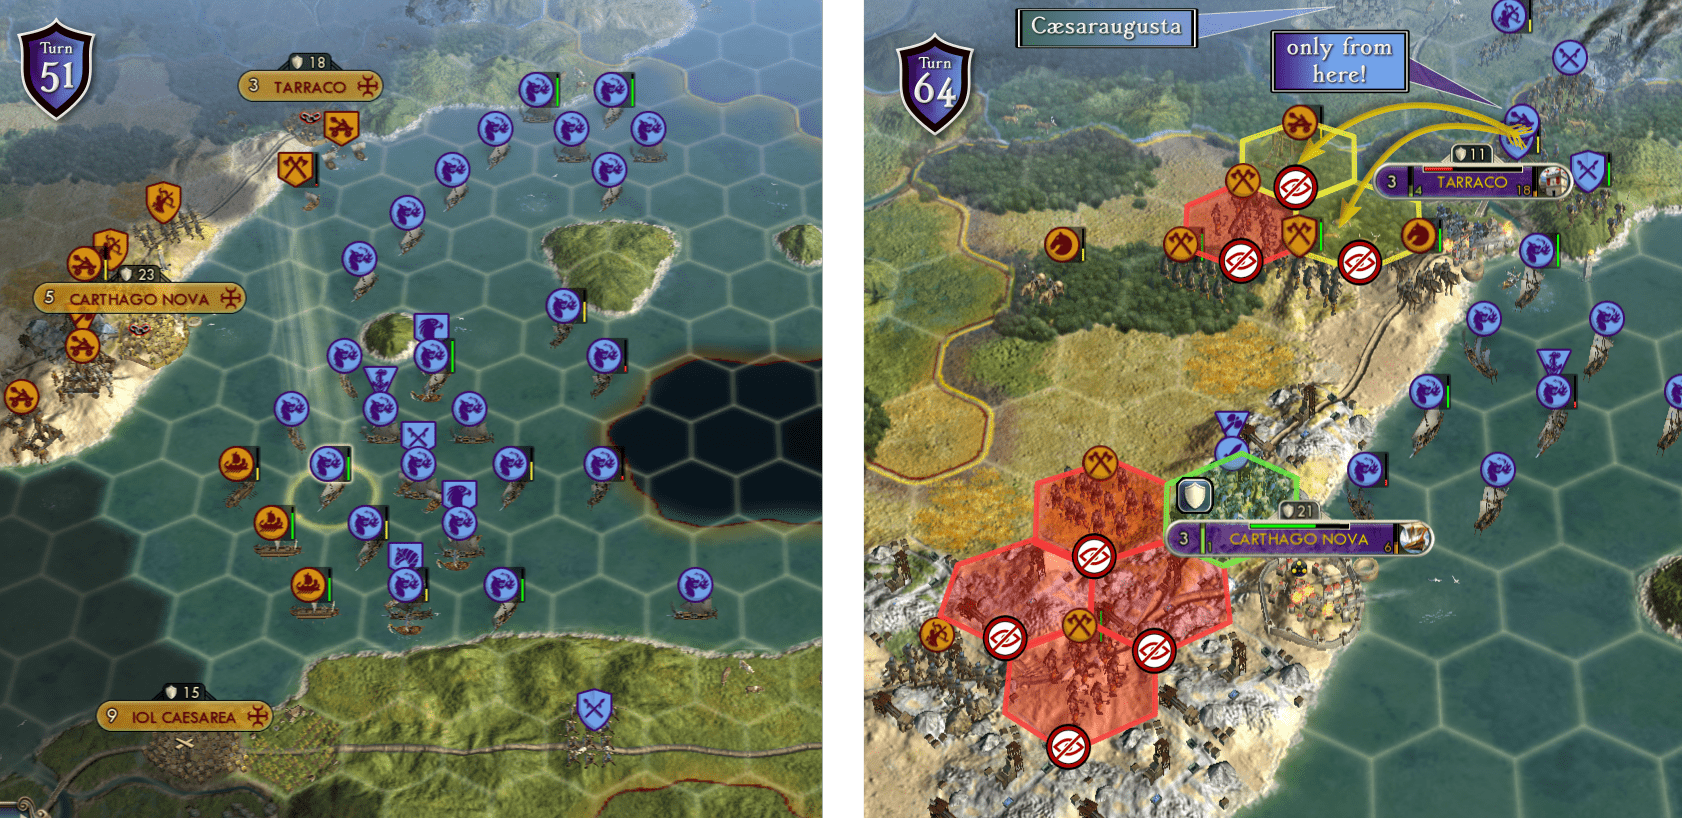 On Turn 51-ish I already had enough land units to help with the reconquering of Tarraco, Iol Caesarea (next section) and Carthago Nova. On Turn 61 Tarraco was reconquered. This causes the Vandals to move in force to retake it.
At this point, I went all in (even because the game was about to end anyway) and took Carthago Nova on Turn 62. The Vandals split their forces, but be ready to help defend these cities - Honorius wouldn't defend the cities properly alone! You can use the Dromons to bombard the attackers, but several tiles are behind hills (look the screenshots). Fortify some unit north to Carthago Nova to help with the defence.
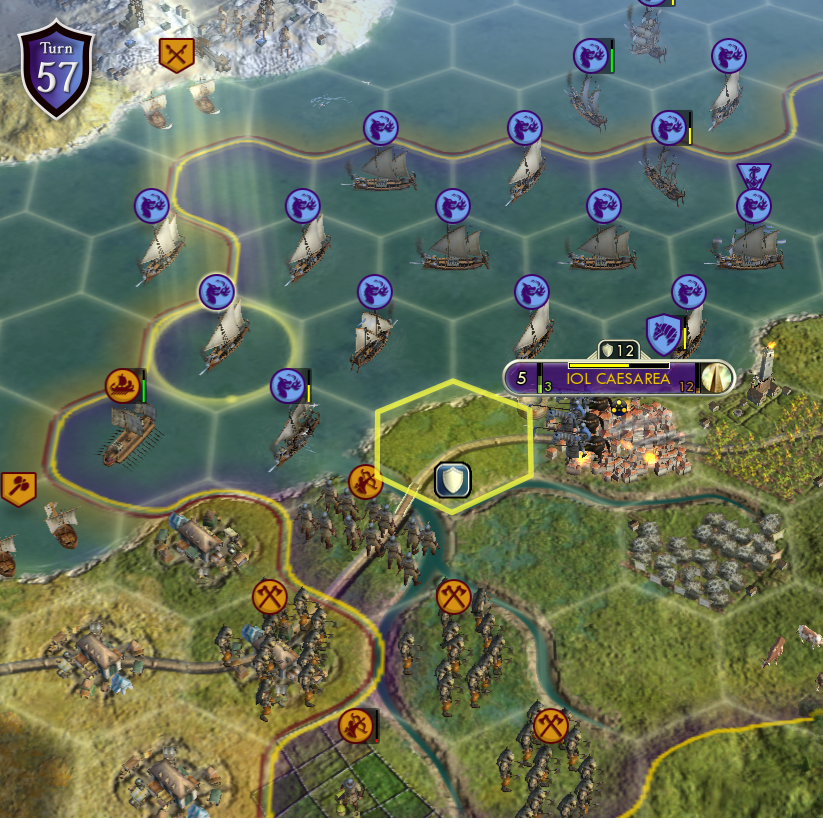 I arrived on Turn 39, but had to fall back. This was much tougher than I initially imagined, probably because the Vandals got units out of thin air in Kaput Vada on Turn 40. I pressed them but on Turn 46 I had to fall back.
Take your time wiping the Vandal's Trireme and gathering XP. Several of my Dromons got the Range promotion in the process, which is priceless. At Turn 52 I had a huge fleet, with which I could easily take Iol Caesarea, Carthago Nova, Tarraco and Rusadir.
However, notice that defending Iol Caesarea is not that trivial (see the screenshot). The Vandals invest rather heavily on retaking it and you probably do not have many land units to defend. Fority some unit on the marked hex (it is actually protected by the rivers) and bombard them with your Dromons, otherwise Iol Caesarea will fall again.
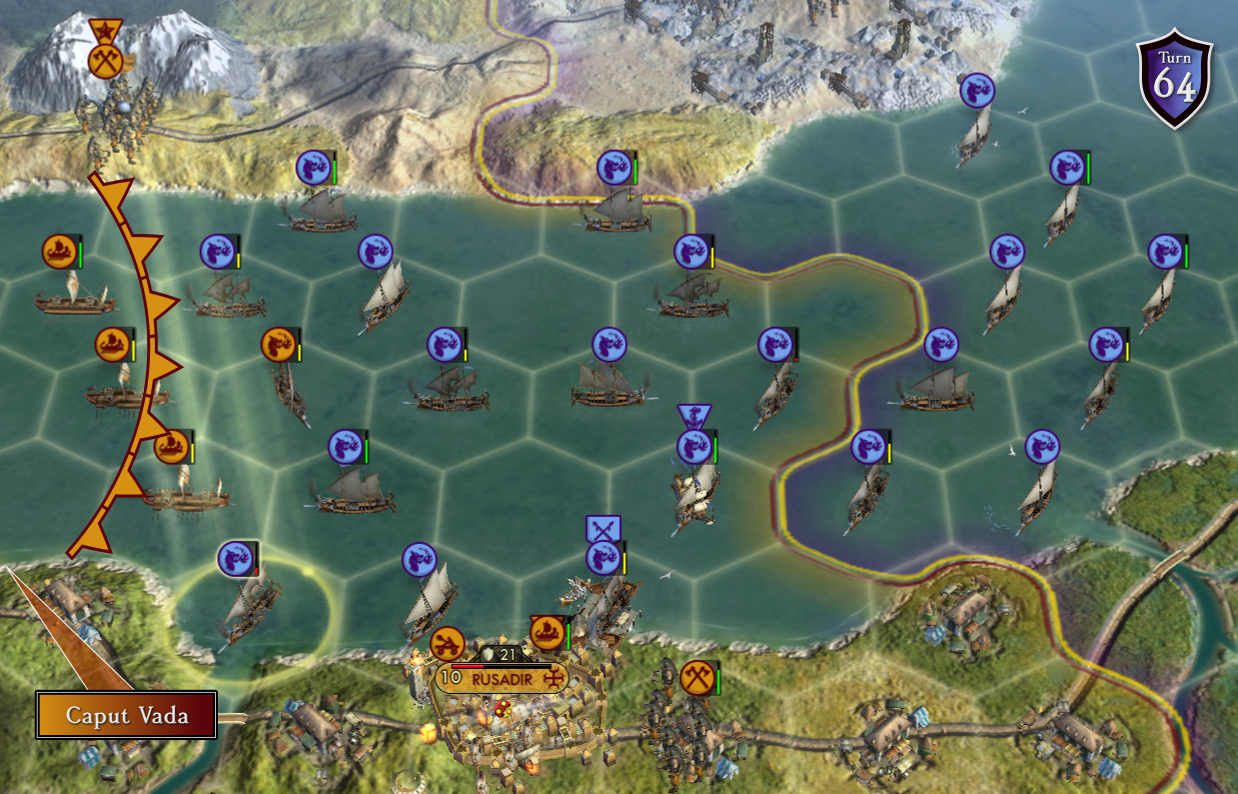 Rusadir is relatively easy to take, but this late in the game, the Vandals will continuously pump Triremes from Caput Vada (few hexes to the West). I had to destroy 2~3 Triremes per turn and I was quite happy that I had so many Dromons to keep the attack going.
The "stop it, it is already dead!!!" Section

So, here are the cities which should fall if you plan properly.
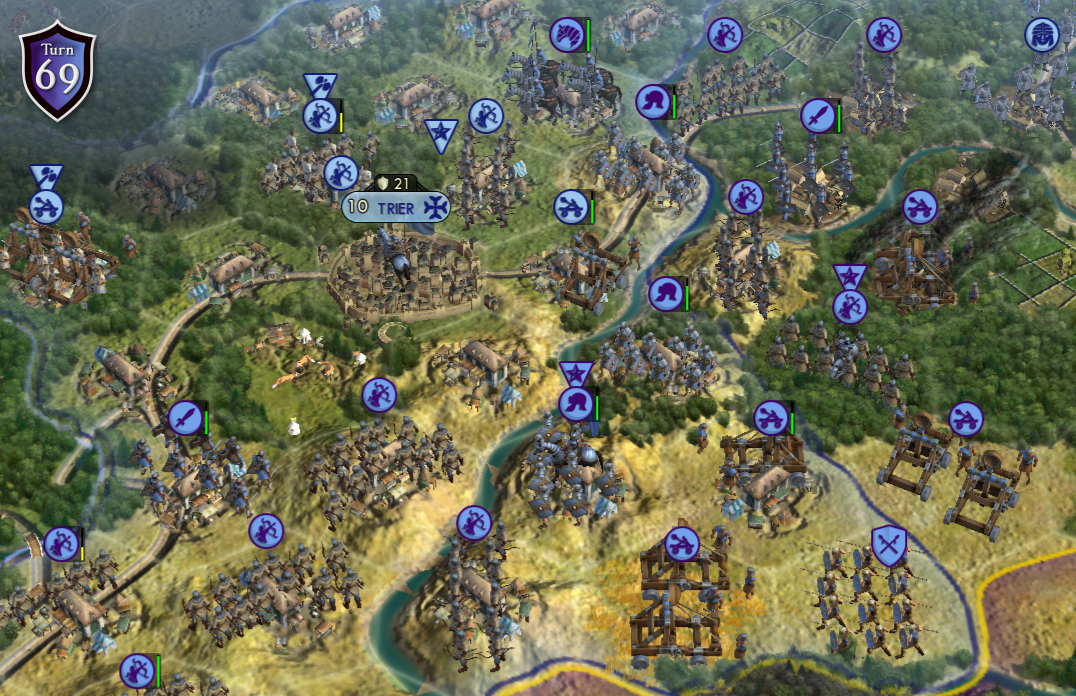 I only managed to start the assault on Turn 65, shortly before the fall of Tiel; however, if you manage to start it earlier, Trier can probably be reconquered: in this screenshot, only weak ranged units are left in their defences.
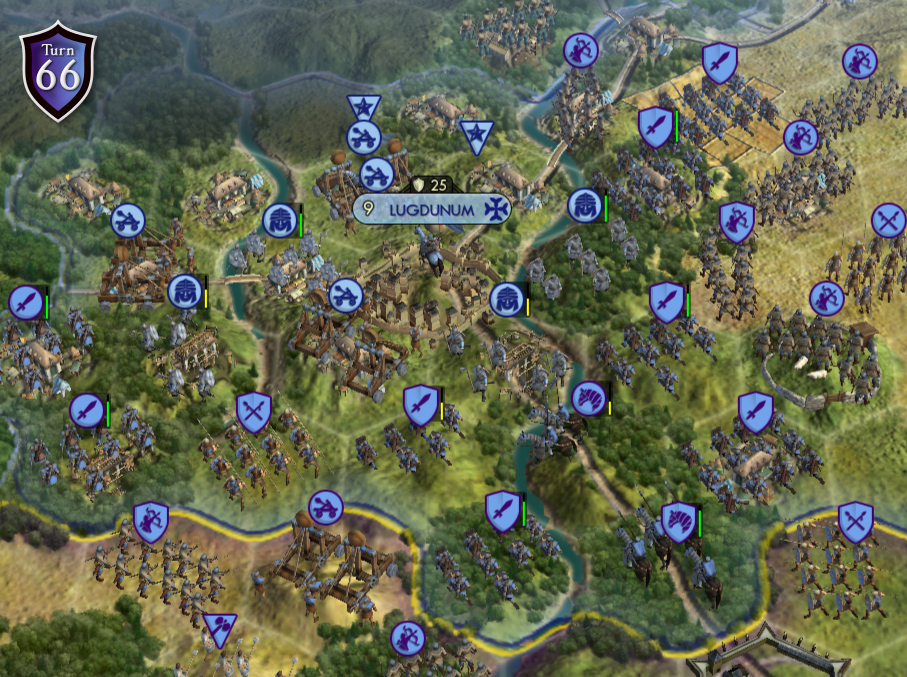 I am still scratching my head concerning this city. The Franks had a neverending supply of Seaxmen here. I am not sure how to take this city, other than starting a reckless attack on Turn 50 or so, after reconquering Massilia.
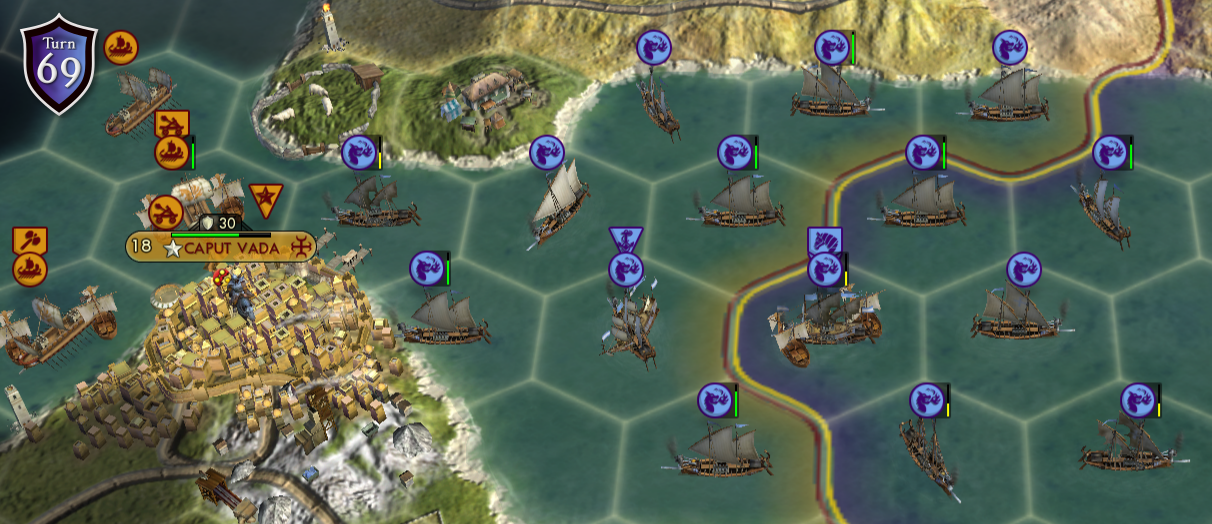 This city was a hair away from falling and, in retrospect, I should have attacked it asap to prevent those neverending Triremes from spawning...
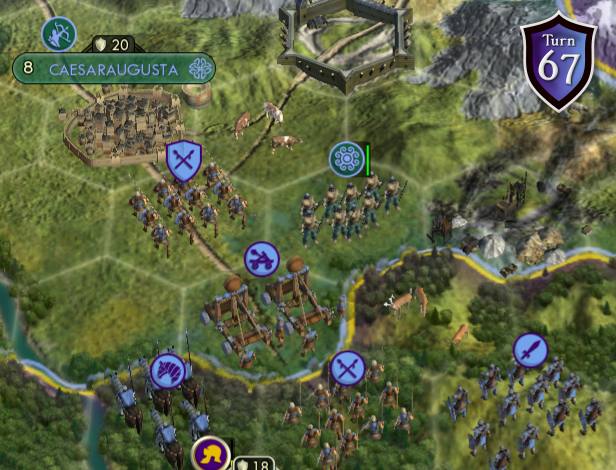 This city was largely unprotected and would probably fall if I had sent the defences from Narbo to attack it. Just try it and let me know if it works!
End Credits
It took me forever to complete this guide, because every time I finished this scenario, I noticed that "I could to a little bit better and take city X at least Y turns earlier". However, I am now truly satisfied with the results and I definitely will not try to play again and attack Cologne from Apulon to disperse the Franks, nor will I aggressively press on Rusadir and Caput Vada on Turn 40 to lower the defences in Tarraco and Carthago Nova and shun the Vandals.
Lots of things can be improved and now with this guide written, I can see a couple of mistakes I've made. For instance, I have prematurely starved several cities, reducing the number of citizens and thus VPs per turn; in fact, you can surely get more VPs.
You see further mistakes I've made? Well, do it better than I did, and then write a comment below ;P
- Real Populations★ 5 (1.2k)79k views1.2k ♥2 minBulgarianUpdated Aug 31, 2017
- Civ-specific tricks, secrets and clarifications (BNW)★ 5 (1k)53k views2.2k ♥96 minUpdated Jun 30, 2019
- Zigzagzigal's Civ Summaries (BNW)★ 5 (1.5k)49k views3.9k ♥134 minUpdated Jun 30, 2019
- Who to Trust and Who to Avoid in Civ V★ 5 (570)41k views802 ♥12 minUpdated Jul 8, 2016
- How to win the Korea Scenario as Korea on Deity in 16 turns★ 5 (532)41k views828 ♥15 minUpdated Apr 1, 2016
- Drunk Civ★ 5 (1.1k)39k views1.2k ♥2 minUpdated 17 Jan, 2020




- Upgrading to PremiumTeam Fortress 2★ 5 (20k)1441k views11k ♥6 minUpdated May 11, 2022
- No More Room in Hell Official ManualNo More Room in Hell★ 5 (2.8k)569k views2.1k ♥29 minUpdated Apr 22, 2019
- NMRiH Community Hosting GuidesNo More Room in Hell★ 5 (526)351k views653 ♥1 minUpdated Aug 10, 2022
- ULTIMATE GUIDE FOR GAME DEV TYCOONGame Dev Tycoon★ 5 (5.8k)326k views10k ♥4 minUpdated 23 Jan, 2014
- How to 'Git Gud' Soon™MORDHAU★ 5 (2k)318k views3k ♥68 minUpdated Nov 16, 2024
- Лучшие кооперативные игры SteamPAYDAY 2★ 5 (1.5k)315k views2.1k ♥56 minRussianUpdated Apr 27, 2025






This guide was created by its original author on the Steam Community. Are you the author and want it removed? Request removal.